Showing 2022 items matching "station building"
-
 Ballarat Tramway Museum
Slide - 35mm slide/s - set of 13, Peter Moses, 1974
Set of 13 colour slides, 7 on Kodak cardboard mounts and 6 on Agfa colour plastic mounts. .1 - Bendigo Trust, Birney trams 28 and 30 at Central Deborah Mine terminus. No. 30 has a 3BO Roof advertisement. .2 - ditto .3 - ditto with the Central Deborah mine and buildings in the background. .4 - No. 30 inbound in High St. with Sacred Heart Cathedral in the background (spire under construction) .5 - Nos. 30 and 28 crossing at Charing Cross with the Fountain Plaza building and the fountain in the background. .6 - No. 28 north bound in Pall Mall, after leaving Charing Cross with the Shamrock Hotel in the background. .7 - Photo showing track and centre poles in View St. looking west - no overhead. Has AMOCO service station near McKenzie St. .8 - No. 28 taken from cab of No. 30, in McCrae St, at end of double track. .9 - No. 28 turning from McCrae St. into Nolan St. .10 - No. 28 in Nolan St. with Lake Weeroona rowing sheds in the background. .11 - No. 19 in now Tramway Ave (then Arnold St.) running into depot .12 - No. 19 outside Bendigo depot .13 - ditto Slides taken by Peter Moses, during the winter of 1974 (no leaves on the trees).On the rear of all the slides "P. Moses" in black ink. .1 - "1974 Bendigo Central Deborah Mine" in blue ink and in red ink “16”. .2 - "1974 Bendigo two Birney cars / Central Deborah Mine" in blue ink and in red ink “18”. .3 - "1974 Bendigo trams at Central Deborah Mine" in blue ink and in red ink “17”. .4 - "1974 Bendigo High St / tram near Sacred Hearth Cathedral" in blue ink and in red ink “15”. .5 - "1974 Bendigo two Birney cars / Charing Cross" in blue ink and in red ink “20”. .6 - "1974 Bendigo No. 28 Pall Mall" in blue ink and in red ink “8”. .7 - "1974 Bendigo / Old Tramline View St." in black ink and in red ink “5”. .8 - "1974 Bendigo, McRae St. (Pall Mall)" and in red ink "9". .9 - "1974 Bendigo, Lake Weeroona, / tram " and in red ink "10". .10 - "1974 Bendigo, Lake Weeroona" and in red ink “11”. .11 - "1974 Bendigo / Outside depot" and in red ink “24”. .12 - "1974 Bendigo / Outside depot" and in red ink “25”. .13 - "1974 Bendigo / Depot" and in red ink “26”.tramways, trams, bendigo, central deborah, bendigo trust, sacred hearth cathedral, north bendigo, depot, tram 19, tram 28, tram 30 -
 Ballarat Tramway Museum
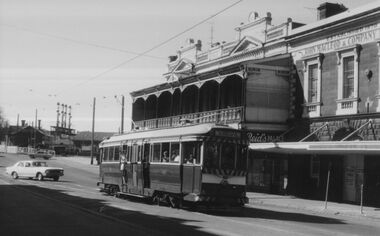
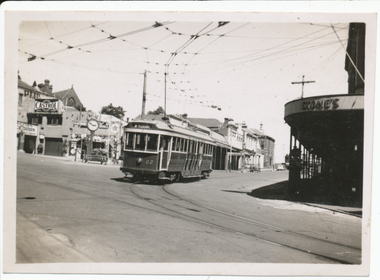
Photograph - Black & White Photograph/s, The Courier Ballarat, 5/09/1971 12:00:00 AM
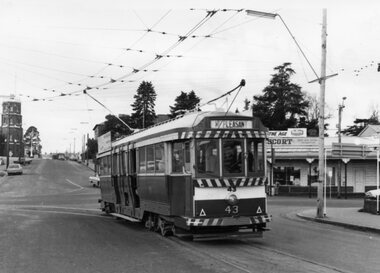
Yields information about the tramcars and the street scenes at particular locations an dhow the tramway fitted with its streetscape at the time and important buildings. Also shows how the overhead was structured.Black and White copy photograph of a newspaper photograph taken by The Courier - published Monday, 6/9/1971, titled "Tram makes farewell trip" - photo of No. 43, near dusk on Mt. Pleasant route turning from Main St into Barkly St, with Ballarat fire station in background. - photo taken Sunday Sept. 5, 1971. Has a Milk bar on the right hand side of the photograph advertising Escort cigarettes, The Age and Peters Ice Cream. Good image of the overhead structure arrangements. See Reg Items 2907 for the actual newspaper cuttings. Collected by Alan Bradley from the Ballarat Courier early 1980's. See Excel file "Record of Ballarat Courier Photos SEC era" (Archive Documents) for source of details.On rear stamped "Copyright, The Ballarat Courier Proprietary Limited.", "100Y" in black ink and "92 AR Rpt" in felt pen.tramways, trams, mt pleasant, barkly st, fire station, tram 43 -
 Ballarat Tramway Museum
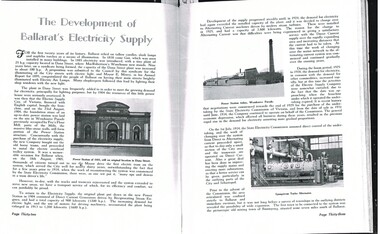
Document - Photocopy, M. Sayers, "The Development of Ballarat's Electricity Supply", 2000?
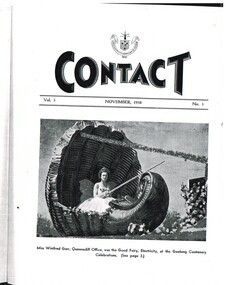
2971.1 - Photocopy of the cover of the State Electricity Commission of Victoria Magazine, Contact, Vol 3, No. 3, Nov 1938 . Features Miss Winifred Gurr of the Queenscliff office, as the Good Fairy, Electricity at the Geelong Centenary Celebrations. Has the SEC logo or motif on the top of the cover. 2971.2 - Photocopy of an article in the State Electricity Commission of Victoria Magazine, Contact, Vol 3, No. 3, Nov. 1938 titled "The Development of Ballarat's Electricity Supply". One A3 sheet and one A4 sheet. The article details the SEC's part in the celebration of Geelong's Centenary Celebrations in October 1938. Opened by Mayor, Alderman C. N. Brown. Details the lighting needs for the celebrations, 400kW, the large motor traffic who came to see them, damage due to Gales, public buildings illuminated and the procession. Includes details of the decorated trams - 1500 paper floors and 400 lamps. Has photos of Moorabool St, a decorated Pengelly tram and Power Station. On page 4 is a letter from an American visitor, Dorothy Bradner congratulating the tramways. Record revised 3/4/2019 to add digital images with those from Andrew Cook CD. Images added of pages 22 and 37 Page 22 - image 12 - titled "The Provincial Big Three" - photos of the Managers of the Ballarat, Geelong and Bendigo Regions - Mr. T. A. Farr, Mr. H.N. Hornabrook and T.H. McNaught. Page 37 - image 11 - Staff movements of General Interest - records the retirement of W. White Tramways Inspector Geelong, and appointments - W. J. McKinnon appointed as Tramway Inspector and Mr. C. S. Ball, appointed Senior Traffic Inspector. Each item had a thin strip of paper attached by staple to the top left hand corner, giving the Vol. No. details. trams, tramways, sec, geelong, geelong centenary, power station, decorated trams, letters -
 Ballarat Tramway Museum
Slide - 35mm slide/s, Eldon Hogan, early 1960's
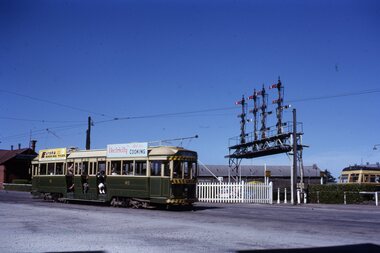
35mm Kodachrome cardboard mount slide of Ballarat No. 40 southbound in Lydiard St North, crossing the railway level crossing. In the background is Kennedy Murray General Carters building, the main signal gantry and a Walker Rail car - 280HP?. No. 40 has roof advertisements for Eureka Roofing Tiles and "Electricity Best for Cooking". Photo taken early 1960's. Photo from the Eldon Hogan collection. See email with worksheet from R.Gilbert date 29/12/2000 and Fares Please!, May 1995. In ink on the top of the slide "Bogie car at Ballarat Station"tramways, trams, railway station, lydiard st north, signals, tram 40 -
 Ballarat Tramway Museum
Photograph - Colour Print/s - set of 30, Carolyn Dean, 2004
Set of 30 colour prints, taken by C. Dean from 30/10/2004 to 2/1/2005 of the rebuilding of the sub-station and initial tramway operations. .1 - Interior view of substation after transformer removed - 30/10/2004 .2 - ditto .3 - ditto .4 - ditto .5 - G.Wood, A. Reither working on the re-building of the walls. .6 - Temporary door .7 - Sign on No. 39 - "There are no trams running today". .8 - COTMA Storage shed frame at Bungaree - 2/12/2004 .9 - 38 outside shed, pending delivery of the transformer - 17/12/2004 .10 - 38 and 1 ditto .11 - ditto .12 - The box arrives - with forklift and G. Wood .13 - unpacked .14 - ditto - with P.Mong .15 - ditto .16 - ditto .17 - P.Mong checking delivery .18 - moving into position - G.Wood and P.Mong .19 - ditto .20 - ditto with Pallet mover. .21 - In position .22 - ditto .23 - No. 40 being repainted .24 - 38 and 1 outside the shed .25 - framing the new walls .26 - ditto .27 - new device frame .28 - The BTM big band - re-opening day - 26/12/2004 .29 - ditto - Sam Boon .30 - No. 26 and that road traffic - cars! - Wendouree Parade - 2/1/2005Each photo has on rear in ink "date", "number" and "Photo by Carolyn Dean"btm depot, substation, wendouree parade, tram 38, tram 1 -
 Ballarat Tramway Museum
Slide - 35mm slide/s - set of 8, Carolyn Dean, 24/09/1970 12:00:00 AM
Set of photographs of operations, near the central area, in particular Charing Cross.Set of 13 Kodak slides, white cardboard of Bendigo trams. Taken 24.9.1970 by Carolyn Dean. .1 - "1" - No. 5 enroute to Eaglehawk passing former poppet head. .2 - "2" - Possibly No. 4 enroute to Eaglehawk - side on view (same ads shown on .4) .3 - "3" - View looking down onto Charing Cross from North East corner with single truck and Bogie car arriving. Has Ezywalkin, Maples and the Beehive buildings in the background. .4 - "7" - No 4, with destination of Eaglehawk, Mitchell St, near end of double track, with Shell Service station alongside. .5 - "8" - Alexandria Fountain, Charing Cross, with bogie tram behind. Has the Ezywalkin and The Beehive buildings in the view as well. .6 - "9" - No. 6 arriving at Charing Cross. Has the Ezywalkin and The Beehive buildings in the view as well. .7 - "10" - Bogie tram and single trucker at Charing Cross. Has the Ezywalkin and The Beehive buildings in the view as well. .8 - "11" - No. 7 departing ditto. Has the Ezywalkin and The Beehive buildings in the view as well. .Each slide has in corner a number in pencil and the first one the date of "24-9-70".tramways, trams, bendigo, charing cross, mitchell st, eaglehawk, tram 5, tram 4, tram 6, tram 7 -
 Ballarat Tramway Museum
Photograph - Black & White Photograph/s, early 1950's?
... . Shows both railway station buildings and traffic. tramways trams ...Yields information through a photograph of Flinders St in of the nature of traffic in the 1950's. Shows both railway station buildings and traffic. Black and white photograph of a scene in Flinders St Melbourne, during the 1950's, showing Flinders St and Princes Bridge Railway Station. Shows W2's in Flinders St and Swanston St, a few motor vehicles, but many people. Photographer unknown.tramways, trams, flinders st station, mmtb, princes bridge station -
 Ballarat Tramway Museum
Photograph - Black & White Photograph/s, David Clark, 17/02/1971 12:00:00 AM
Yields information about the Ballarat's tramcars in the months before closure and the appearance then of Stones Corner.Black and white photograph of Ballarat No. 21 in Victoria St, looking back to Stones Corner building. Photo by David Clark 17/2/1971. Tram has just left Bridge St. Stones Corner building in the background, and Viscount Ambassador Caravans to the left of the tram having replaced the Caltex Service Station on this location. Tram has the destination of Victoria St.On the rear in ink "Tram No. 21 in Victoria St, near Bridge St, looking to Sturt St. 17/2/71. Ballarat Tramways, Photo 30, Taken by David Clark", with David's address stamp "4 Adeney Ave Kew 3101" with "Melbourne" underneath.tramways, trams, victoria st, stones corner, bridge st, tram 21 -
 Ballarat Tramway Museum
Photograph - Black & White Photograph/s, Late 1940's
... , The National Mutual building and a service station. A commercial... the appearance of Malop Street Geelong and its buildings and vehicles ...Yields information about the appearance of Malop Street Geelong and its buildings and vehicles.Black and white photograph of Malop Street Geelong Has The title "Malop Street Geelong" in the bottom left hand corner and "V.22" in the bottom right hand corner. Shows the tram track, one bus, other vehicles, Elders or Dalgety's Wool Store, The National Mutual building and a service station. A commercial produced photograph - printer/publisher unknown.tramways, trams, geelong, malop st -
 Ballarat Tramway Museum
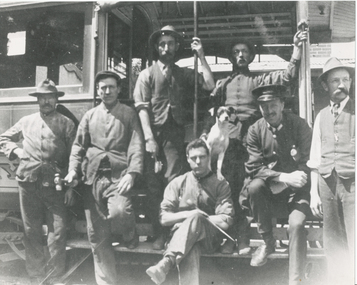
Photograph - Black & White Photograph/s, c1915?
... with the ESCo tram and power station staff, c1920? Published detail ...Has a strong association with the ESCo tram and power station staff, c1920? Published detail provides some names of the men photographed. Shows the style of clothing, the equipment used and details of the power station office building.Black and White copy photograph of some of the ESCo tram depot staff and one uniformed crew member, alongside an ESCo tram. Shows the details of the interior of the tram ceiling. See page 50 of The Golden City and its Tramways and for the photo itself. Gives some names of the people in the photograph. From the photo caption in the book: Extreme left is Bill Morgan, Harry Foy, Sy Barker, Robert Haines.tramways, trams, esco, staff, depot, cross bench tram -
 Ballarat Tramway Museum
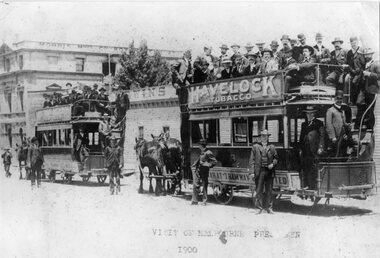
Photograph - Black & White Photograph/s - set of 2, 1900
Yields information about the nature of a visit to Ballarat by Melbourne pressmen and the buildings in the background at the time. Also shows the dress of the visitors at the time. Various sources - ex photo held by the Ballarat Historical Society. Also shows the condition of the trams at the time.Black and white print of a photograph of two crowded horse trams in Lydiard St North. Ballarat, titled "Visit of Melbourne Pressmen 1900". Has Morris Manufacturing Company building in the background. Both horse trams, No.9 nearest to camera, have "Havelock" Tobacco roof advertisements. Behind the trams is Irwin's Provincial Hotel, when it was a timber structure. Print made from a copy negative held in the Ballarat Historical Society collection???? 2nd copy added 8/11/2005 from BTM collection of photos in mess room. 2785.1 - as above, but photographed from an album - shows the full length of horse tram No. 9 and has number TR4 in bottom right hand corner. 2785.2 - as above but cropped on sides - cropped out rear of horse tram 9. 2785.1 & .2 added 12/7/2009, ex William F Scott. See Email from Max Harris 12/8/042785.1 - top on rear in ink - "Ballarat Visit of Press men , 1900 Sydney Harvey photo". 2785.2 - in ink on rear "18a)", "Visit from Melbourne Press 1900, opposite Ballarat Railway Station". In bottom right hand corner "Sydney Harvey" and "William F Scott" address label.tramways, trams, horse trams, melbourne pressmen, ballarat, tram 9 -
 Ballarat Tramway Museum
Document - Photocopy, M. Sayers, "The Development of Ballarat's Electricity Supply", 2000?
... photos of the Dana St. building, Ballarat A power station.... building, Ballarat A power station, Ljungstrom Turbo Alternator ...Photocopy of an article in the State Electricity Commission of Victoria Magazine, Contact, Vol 3, No. 2, Aug 1938 titled "The Development of Ballarat's Electricity Supply". Two A3 sheets. The item with six photographs details the history of the development of Ballarat's Power Supply. Details development of the initial power supply in Dana St, the take over by ESCo, DC power initially, expansion, introduction of AC in 1925 to Ballarat, the takeover by the SEC in 1934, changeover from DC to AC, expansion to outlying areas, Buninyong, Creswick etc. Gives description of installed plan, boilers, storerooms and the stores systems. Has photos of the Dana St. building, Ballarat A power station, Ljungstrom Turbo Alternator and three of the stores area. Record revised 3/4/2019 to add digital images with those from Andrew Cook CD. Each item had a thin strip of paper attached by staple to the top left hand corner, giving the Vol. No. details.On rear of 2nd A3 sheet in blue ink details of contact with the BTM by M. Sayers prior to sending the material.trams, tramways, sec, power supply, power station, ballarat a power station, esco -
 Ballarat Tramway Museum
Slide - 35mm slide/s, Travis Jeffrey, late 1960's or early 1970's
Agfa plastic mount (blue base, white cover) with a photo of Bendigo No. 19 in Pall Mall, nearing Charing Cross. Tram has the destination of Golden Square Photo taken late 1960's early 1970's. Photo has the Beehive, the Shamrock Hotel in the background. Radio station 3BO can be seen on the Beehive building. No. 19 has two SEC roof advertisements. Note the point bar on the pole on the right hand side of the photograph."BES 35" in penciltramways, trams, bendigo, pall mall, beehive building, tram 19 -
 Ballarat Tramway Museum
Photograph - Digital image Set of 20, 9/12/1972 12:00:00 AM
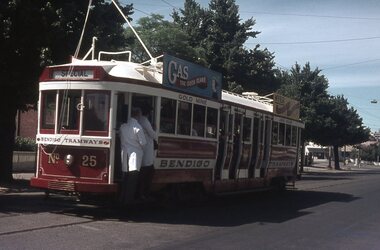
Set of 21 digital images of Bendigo Tramways, at the re-opening of the Bendigo tramways by the Bendigo Trust on 9/12/1972by Stuart Lodington. All trams in the first Bendigo Trust colours. .1 - No. 25 with Gas and Myer roof advertisements .2 - No. 30 with 3BO roof advert and a BP service station in the background. .3 - SEC single trucker at the Mine with a large "Tram Tours" sign on the front of the tram .4 - ditto .5 - No. 19 with a large group of passengers, Bendigo Motor Co and Sandhurst roof advertisements .6 - No. 30 in McCrae St .7 - view of opening march with band .8 - No. 19 in opening parade .9 - Opening Parade in High St with cathedral in the background .10 - No. 30 in Nolan St crossing bridge .11 - ditto .12 - No. 25 at the mine .13 - No. 30 leaving the mine .14 - No. 30 ditto with BCTV roof advert. .15 - Charing Cross with cenotaph, The Beehive building and Ezywalkin shoes and Coca Cola adverts .16 - No. 19 southbound in High St with City Centre Motel building in the background. .17 - No. 30 returning from North Bendigo .18 - No 25 in High St after leaving Gold Mine .19 - No. 30 at the Mine .20 - No. 30 in Nolan St .21 - No. 30 with 3BO roof advert and a BP service station in the background.trams, tramways, bendigo, north bendigo, charing cross, bendigo trust, central deborah, tram 25, tram 30, tram 19 -
 Ballarat Tramway Museum
Photograph - Digital image, c1971
Yields information about Ballarat streetscape and its trams in the closing days of the SEC tramway system.Digital image from a black and white print of tram 40 southbound in Lydiard St North to Sebastopol with Reid's Palace and John Macleod and Company buildings in the background. Railway station signal gantry in the view. Photo by Marc Dahlstrom c1971.On rear is the Marc Dahlstrom stamp.trams, tramways, lydiard st nth, tram 40 -
 Ballarat Tramway Museum
Photograph - Digital image, c1971
... . Has the Reid's Palace building and the railway station... Palace building and the railway station and signal gantry ...Yields information about Ballarat streetscape and its trams in the closing days of the SEC tramway system.Digital image from a black and white print of tram 11 outbound in Lydiard St North, crossing the railway level crossing. Has the Reid's Palace building and the railway station and signal gantry in the background. The tram has a "Bliss Bombs" (Make Bliss not Love) roof advertisement and a Twin Lakes sign. Photo by Marc Dahlstrom c1971. On rear is the Marc Dahlstrom stamp.trams, tramways, lydiard st, railway station, level crossings, tram 11 -
 Ballarat Tramway Museum
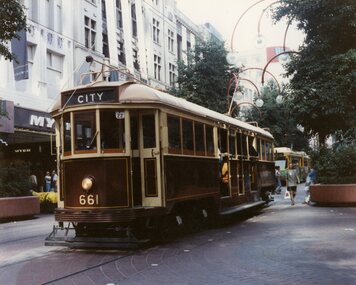
Photograph - Black & White Photograph/s - set of 3, William. F. Scott, 1989
Yields information about the appearance of Geelong's trams and the railway station area and the conversion to a one-man tram.Set of three colour photographs of BTPS owned W3 661 operating in Bourke St Melbourne. Presumed taken at the same time as the front cover of the annual report, 1988-1989 - 29/4/1989. Has Myer building in the background. .2 - ditto - crossing an articulated tram. .3 - westbound in Bourke Street with the Priceline Centrepoint building in the background and Medicare office. Printed on Kodak paper.In pencil on the rear "William F Scott".trams, tramways, btps, bourke st, yapper tours, tram 661 -
 Ballarat Tramway Museum
Photograph - Black & White Photograph/s, The Courier Ballarat, 30/10/1964 12:00:00 AM
Yields information about the appearance of the Ballarat Railway Station, c1905/06 and ESCo trams soon after opening of the tramway.Black and White Photograph of Les Edwards polishing No. 18 decorated for the Centenary of Sebastopol, 1964 in the depot yard. The Courier Ballarat photograph. Has the depot buildings in the background including the Bundy Clock. Tram has the destination of Sebastopol. Note the damage showing through the Apron. Alan Bradley advised 22/7 - The caption on the "Courier" of 31/10/1964 was: "Les Edwards puts the final polish on a tram which the SEC has decorated to mark the Sebastopol centenary. Gold, blue and white, the tram is decorated with 100 electric light globes and flags".On rear on one edge "Ballarat Courier - Alan Bradley"trams, tramways, sebastopol, centenary, depot, tram 18 -
 Ballarat Tramway Museum
Photograph - Black and White photograph/s - mounted, John Phillips, c1971
Yields information about trams used, services and buildings in Lydiard St North near the railway station c1971.Black and White photograph mounted on heavy cardboard backing. Photo of Ballarat No. 12 with destination of Grey St Sebastopol, with tram behind it, showing "Special" and another two single truckers behind No. 12 in Lydiard St North, just before the Railway level crossing. In the background are Victoria House, Moodys' Provincial Hotel and Ludbrook House. Has parts of old support tape on rear. Note image scanned in two runs through a scanner, resulting in the shading in the image file.trams, tramways, lydiard st, railway crossing, provincial hotel, tram 12, tram 21 -
 Ballarat Tramway Museum
Photograph - Black and White photograph/s - mounted, c1914
Yields information about trams used, services and buildings in Sturt St near Lyon St in the ESCo era c1914.Black and White photograph mounted on heavy cardboard backing. Photo of Ballarat ESCo trams east bound in Sturt St. Photo taken from the Ballarat City Fire Station tower, looking East to Mount Warrenheip. Has St Andrews Kirk and St Patricks church and Harry Davies & Co. Drapers buildings. Some early motor vehicles - c1914? From a Railway Photograph? Has marks from old support tape on rear. Note image scanned in two runs through a scanner, resulting in the shading in the image file.trams, tramways, sturt st, town hall, grenville st, esco -
 Ballarat Tramway Museum
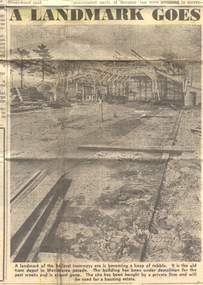
Newspaper, The Courier Ballarat, "A Landmark Goes", "City's oil strike", 8/08/1972 12:00:00 AM
Yields information about the progress of the demolition of the old tram depot in Wendouree Parade and an incident in Lydiard St north after the closure of the tramway in that street.Newspaper clipping from The Courier, Ballarat, Tues 8 August 1972 - pages 1 and 2 Page 1 - has a story about an oil spill in Lydiard St North near the railway station and featured a photograph showing the tram tracks. Page 2 - has a photograph and short update story about the demolition of the old SEC tram depot and the future use of the land. Only the rear portion of the building remains.depot, sec depot, demolition, lydiard st north -
 Ballarat Tramway Museum
Photograph - Digital image Set of 10, Tony Smith, 1971
Yields information about Ballarat Tramways and trams prior to the closure of the tramway system.Set of 10 digital images of Ballarat trams prior to closure, scanned from original slides by Tony Smith, 1971 prior to closure of the system. .1 - 13 at the Parker St loop, Sturt St west waiting for another tram to arrive - Mercedes Benz car pull out around the stationary tramcar. .2 - 13 and another single trucker at the City terminus, north side of Sturt St. Note the conductor in the distance with a point bar about to hop onto the tram turning into Lydiard St North. Has the Post Office in the background. .3 - 26 arriving at the City stop, with the Mechanics Institute and Cooks Provide Hotel in the background. Tram has destination of Gardens via Drummond St North. .4 - 33 and 12 in Lydiard St Nth at Sturt St. 33 (Lydiard St Nth), 12 (Sebastopol). Has the post office and other buildings in the background .5 - 12 and 26 at city stop, south side with Town Hall and Myers in the background. 12 has destination of Sebastopol. .6 - 12 at intersection of Drummond St and Sturt St with Mobil petrol station in background and ad for Marshall batteries. Has the tram stop sign on the left hand side. Tram has destination of Sebastopol and a Twin Lakes sign. .7 - 30 northbound in Drummond St south at Sturt St about to turn into Sturt St. Has destination of Lydiard St Nth. Has the Southern Cross hotel in the background. .8 - 31 turning from Drummond St North into Sturt St, en route to Victoria St with the Shell service station in the background. Hospital Corner. Tram has roof advertisements for Johnnie Walker whisky. .9 - 30 and 31 (from above photos) in Sturt St. .10 - Tony Smith standing on the doorstep of 26 at Mt Pleasant terminus. Has the store in the background with The Sun and Robur tea adverts. trams, tramways, parker st loop, sturt st west, sturt st, conductors, drummond st, hospital corner, mt pleasant, tram 13, tram 26, tram 12, tram 30, tram 33 -
 Ballarat Tramway Museum
Photograph - Digital image Set of 9, Tony Smith, 19/09/1971 12:00:00 AM
... Murray Pty Ltd General Carriers building at the station yard... Murray Pty Ltd General Carriers building at the station yard ...Yields information about Ballarat Tramways and trams prior to the closure of the tramway system.Set of 9 digital images of Ballarat trams prior to closure, scanned from original slides by Tony Smith, 1971 prior to closure of the system. This set of slides appears to be the last day of operations - 19/9/1971 .1 - 40 south bound in Lydiard St Nth, at the Gregory St Loop. .2 - 40 after passing through the loop .3 - 42, north bound in Lydiard St. North at Macarthur St. .4 - 42 southbound at the Railway station level crossing with the Kennedy Murray Pty Ltd General Carriers building at the station yard in the background. .5 - 42 southbound in Lydiard St North after crossing the railway - taken from the signal box (B) with Reids Palace in the background and the Provincial Hotel. .6 - 35 northbound after passing through the level crossing. .7 - bogie tram crossing the tracks with Ballarat Railway Station in the background. .8 - bogie tram entering the double track section in Lydiard St with Reids Palace in the background. Note the new bus stop bay. .9 - 35 and another bogie in Sturt St, with the Town Hall, Golden Star Chinese Cafe and Georges Fish & Chip shop in the background.trams, tramways, lydiard st nth, gregory st, level crossings, ballarat railway station, sturt st, closure, tram 40, tram 42, tram 35 -
 Ballarat Tramway Museum
Photograph - Black & White Photograph/s, 14/03/1954 12:00:00 AM
Yields information about the appearance of SEC trams in the mid 1950'ss at the Railway level crossing and the streetscape.Black and white photograph of Ballarat tram No. 14 crossing the railway level crossing in Lydiard St Nth - 14-3-1954. Tram has the destination of Sebastopol. In the background is Ballarat Goods Shed, the signal gantry and the Kennedy & Co. General Carriers building.On rear in ink "ARHS Photo, Ballarat, 14-3-1954"trams, tramways, level crossings, lydiard st north, railway station, tram 14 -
 Ballarat Tramway Museum
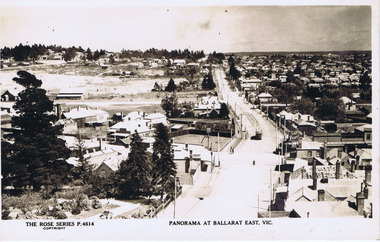
Photograph - Digital image, Rose Stereograph Co, "Panorama at Ballarat East Vic", c1914
Photo looks west from the Ballarat Fire Station (East) tower, and has a good view looking along Barkly St. Shows the crossing loop between Eastwood and Main St with one tram in the view. Wal has dated the photo as 1914 in his album notes. See item 8243 for an actual postcard. Yields information the buildings, buildings and scene looking west from the Fire Station tower along Barkly St. East BallaratDigital image of a postcard from an album compiled by Wal Jack, loaned to the Museum. The Rose Series Postcard No. P 4614. For rear of postcard - see second image.trams, tramways, esco, ballarat east, barkly st -
 Ballarat Tramway Museum
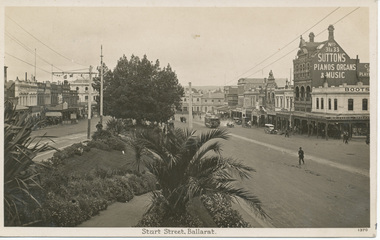
Photograph - Digital image, Tramway Museum Society of Victoria (TMSV), c1930
Yields information the appearance of Sturt St from Lydiard St looking east, with a number of vehicles and building sin the background.Digital image from the Wal Jack Ballarat Album of a postcard looking south east from the intersection of Sturt and Lydiard St with Suttons store and Boots in the background - c1930 with a number of motor cars in the street scene. Post card has title "Sturt St Ballarat" and number "1370". Manufacture of postcard not shown. For rear of postcard - see image i2.On rear of photograph in pencil "Ballarat Railway Station 27-12-32" and "3d" in the stamp box.trams, tramways, sturt st, esco -
 Ballarat Tramway Museum
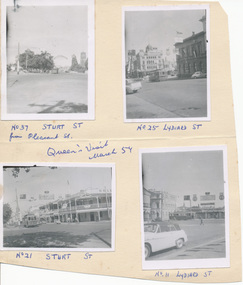
Photograph - Digital image, Wal Jack, Mar. 1954
Yields information on the decorations and tramcars and street scenes at the time of the Queens visit to Ballarat.Digital image from the Wal Jack Ballarat Album of a series of four small black and white photographs taken during the Queen Elizabeth II visit to Ballarat, March 1954. Captions under each photograph in ink. 1 - No. 37 at Pleasant St, looking east along Sturt St. - see Neg 993 2 - No. 25 at Lydiard St with the National Mutual Building in the background - see Neg 991. 3 - No. 21 - Sturt St at Dawson St with Golden City Hotel in the background - see Neg 992 4 - No. 17 Lydiard St taken from the railway station car park - see also Reg Item 5300 for a better photograph and Wal's notes on rear which says No. 17, not 11 - see Neg 994 All photographs include some of the decorations for the Royal Visit. Photographer - not stated, but sheet in Wal's handwriting. May not be Wal Jack based on the negative size, smaller than 120 which Wal used at the time. See image i2 for rear of photograph. See image i3 for hi res scan of print. See image i4 for hi res scan of negative N993 See image i5 for hi res scan of negative N994 See image i6 for hi res scan of negative N995 See image i7 for hi res scan of negative N996 On rear of the Manila sheet which has been cut from another sheet are "No. 11 Victoria St terminus 25-6-57".trams, tramways, royal visit, lydiard st, pleasant st, sturt st, tram 37, tram 25, tram 21, tram 17 -
 Ballarat Tramway Museum
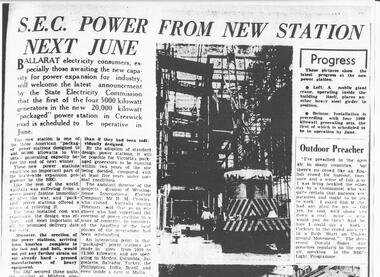
Photograph - digital Images
... and replace the A Power station and the building of it. Trams tramways ...Yields information about the construction of Ballarat B Power station that was used to augment and replace the A Power station and the building of it.Digital Image of an article about the construction of Ballarat B Power station in The Courier, 14/3/1953, from a photocopy of the article obtained by Alan Bradley. Gives details of the power station, the builder (Westinghouse International Electric Company) and the Mildura and Geelong package power stations. Has two photographs of the station under construction. See Alan's email of 21/12/2011 in the worksheet file.trams, tramways, ballarat b power station, power supply, geelong, westinghouse -
 Ballarat Tramway Museum
Photograph - Digital image, Wal Jack, 29/12/1945 12:00:00 AM
Yields information about the early use of Ballarat's first bogie tram after it had been re-numbered and Stones Corner.Digital image from the Wal Jack Ballarat Album of No. 22 turning from Bridge St into Main St 29-12-1945. Has the Castrol / Caltex service station with clock in the background and Stones Corner building. Tram proceeding to Mt Pleasant. See image i2 for rear of photograph. See image i3 for hi res scan of print. See image i4 for hi res scan of negativeIn ink on rear " SEC Ballarat Tramways bogie. 22, turning out of Bridge St into Main St, Ballarat East Post Office in background in Main St. 29-12-45" with number "T547" within Wal Jack photo stamp.trams, tramways, bridge st, stones corner, main st, bogie trams, tram 22 -
 Ballarat Tramway Museum
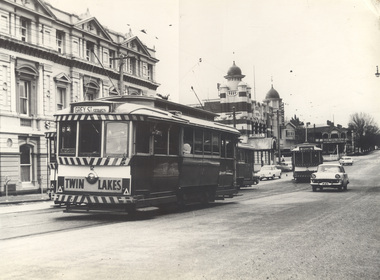
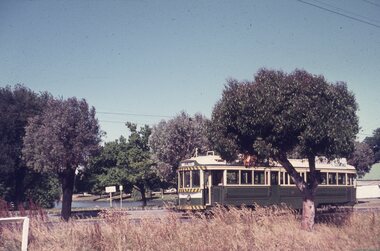
Slide - 35mm slide/s - set of 11, Eldon Hogan, mid 1960's to early 1970's
Set of 11 Agfa Plastic mounted slides - from the Eldon Hogan collection - possibly on an ARE Bendigo tours - mid 1960's (black destination rolls) and late 1960's or early 1970's. Scanned on the Canon scanner at the depot 15/12/1971 at the time of the installation of the scanner. .1 - No 18 with Lake Weeroona in the background - possibly at the same time as the tour with No. 18, though showing destination of Charing Cross. .2 - ditto .3 - No. 25 and two following trams on a special tour, note the white disc - Quarry Hill line? .4 - No. 29 on the Eaglehawk line at the Mt. Korong Road and the Calder Highway, with the Ampol Service station in the background. .5 - No. 29 passing Lake Weeroona with Destination of Nth Bendigo - has a Briquettes Roof Advertisement., .6 - No. 26 ditto - with two SEC Roof Advertisements. .7 - No. 24 leaving Charing Cross for Golden Square with The Beehive building, Ezywalkin, Coca Cola and the Fountain Shopping Centre in the background. .8 - No. 29 and a bogie tram at the Golden Square terminus with Golden Square Hotel and Victoria Bitter fence in the background. No. 29 has a SEC Briquettes roof advertisement. .9 - No. 29, with the Cathedral in background. Tram has a SEC Briquettes roof advertisement and destination of Golden Square. .10 - side view of a bogie tram on the Eaglehawk line? Tram has a Electric cooking roof advertisement. Photo has been over exposed. .11 - Single trucker, Violet St with the Central Deborah mine head in the background. Tram has two SEC Electric Cooking roof advertisements. tramways, trams, bendigo, lake weeroona, eaglehawk, golden square, charing cross, central deborah, tram 18, tram 25, tram 29, tram 24