Showing 27279 items
matching m-r-j-moreton
-
 Melbourne Legacy
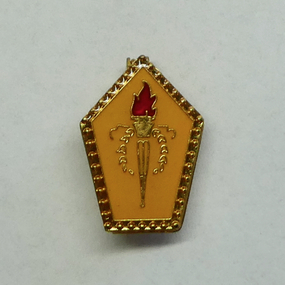
Badge, Legacy Appeal Badge - $5
An example of badges issued by Legacy for fundraising during the Legacy Appeal and Badge Week. The donation value was $5. The date is not known. The badge of Legacy is the Torch and Wreath of Laurel. The Torch signifies the undying flame of service and sacrifice of those who gave their lives for their country. The Wreath of Laurel is the symbol of our remembrance of them. Example of Legacy badges that were sold up to raise money for Legacy's work. Legacy Appeal badge with the Legacy torch, it is gold with orange enamel around a torch with red enamel in the flame. It is an elongated pentagon shape.On the reverse 'A J Parkes / $5'.legacy appeal, fundraising, badge week -
 Melbourne Legacy
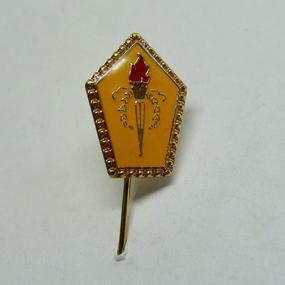
Badge, Legacy Appeal Badge - $5
An example of badges issued by Legacy for fundraising during the Legacy Appeal and Badge Week. The donation value was $5. The date is not known. It is the same style as a $5 badge but has a stick pin rather than a clasp. The badge of Legacy is the Torch and Wreath of Laurel. The Torch signifies the undying flame of service and sacrifice of those who gave their lives for their country. The Wreath of Laurel is the symbol of our remembrance of them. Example of Legacy badges that were sold up to raise money for Legacy's work. Legacy Appeal pin with the Legacy torch, it is gold with orange enamel around a torch with red enamel in the flame. It is an elongated pentagon shape on a stick pin.On the reverse 'A J Parkes / $5'.legacy appeal, fundraising, badge week -
 Melbourne Legacy
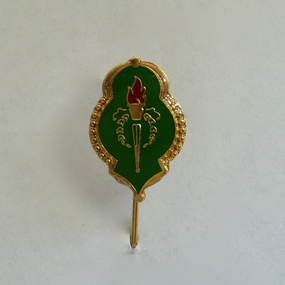
Badge, Legacy Appeal Badge - $20
An example of badges issued by Legacy for fundraising during the Legacy Appeal and Badge Week. The donation value was $20. The date is not known. The badge of Legacy is the Torch and Wreath of Laurel. The Torch signifies the undying flame of service and sacrifice of those who gave their lives for their country. The Wreath of Laurel is the symbol of our remembrance of them. Example of Legacy badges that were sold up to raise money for Legacy's work. Legacy Appeal pin with the Legacy torch, it is gold with green enamel around a torch with red enamel in the flame. It is a decorative oval shape.On the reverse 'A J Parkes / $20'.legacy appeal, fundraising, badge week -
 Melbourne Legacy
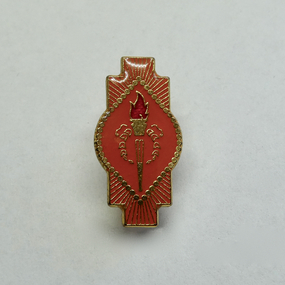
Badge, Legacy Appeal Badge - $25
An example of badges issued by Legacy for fundraising during the Legacy Appeal and Badge Week. The donation value was $25. The date is not known. There are two of these in the collection. The badge of Legacy is the Torch and Wreath of Laurel. The Torch signifies the undying flame of service and sacrifice of those who gave their lives for their country. The Wreath of Laurel is the symbol of our remembrance of them. Example of Legacy badges that were sold up to raise money for Legacy's work. Legacy Appeal badge with the Legacy torch, it is gold with orange enamel around a torch with red enamel in the flame. On the reverse 'A J Parkes / $25'.legacy appeal, fundraising, badge week -
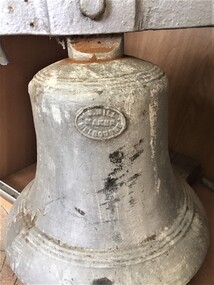 Pyrenees Shire Council
J. Mill, Lexton School Bell, 1878
When Lexton School closed in 2001 the bell was brought to the Community Centre. Commissioned for 12 pounds in 1878significant to the Pyrenees Shire and Lexton communitycast gun metal bell Maker J. Mill Melbourne -
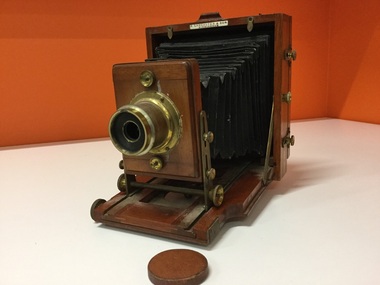 Arapiles Historical Society
Instrument - Instagraph camera, J. Lancaster & Sons, c. 1893
Most likely used by Horace Woolmer of Natimuk, to photograph life and events in the town between late 19th and early 20th centuries.Mahogany wood case and brass construction with cloth below, half plate instagraph camera.J Lancaster & Sons, Birminghamnatimuk, arapiles, camera, instagraph, photography, horace woolmer -
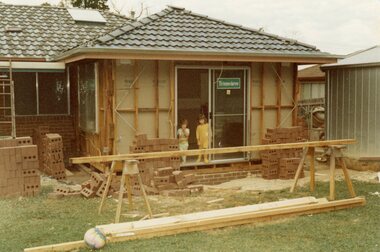 Ringwood and District Historical Society
Photograph, Adding a room onto the Mitchell house at 168 Oban Road, North Ringwood in February 1979
Near the corner of Cormistom Road and Florence Avenue onto Oban Road. The house is still there today (2024).Taken by Roy J Mitchell -
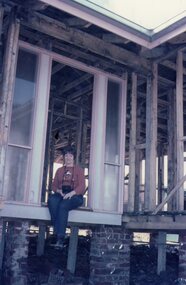
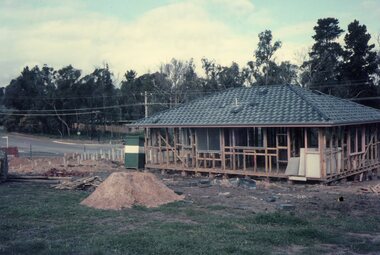 Ringwood and District Historical Society
Photograph, Building the Mitchell house at 168 Oban Road, North Ringwood circa 1973
Rear view of the house, partially completed. On the left is the corner of Cormistom Road and Florence Avenue onto Oban Road. The house is still there today (2024).Taken by Roy J Mitchell -
 Ringwood and District Historical Society
Photograph, Marian Mitchell at the Mitchell house at 168 Oban Road, North Ringwood circa 1973
The house is partially completed. The house is still there today (2024).Taken by Roy J Mitchell -
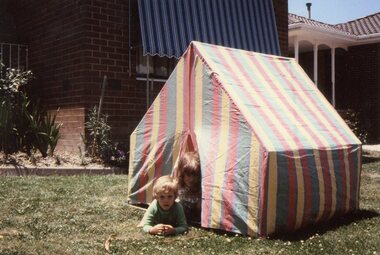 Ringwood and District Historical Society
Photograph, Children on front lawn of the Mitchell house at 168 Oban Road, North Ringwood circa 1983
The house is still there today (2024).Taken by Roy J Mitchell -
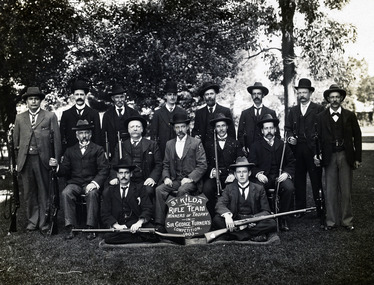 St Kilda Historical Society
Photograph, St Kilda Rifle Team, winners of trophy in Sir George Turner's competition 1903
Photograph taken in garden of Ripponlea, home of Mr B Nathan in summer of 1914 (donated by M Vivian)Black and white photograph, very good condition.Original mounted, framed photograph. A Rowley, G Darling, G M Mitton, H Greenwell, H M Knox. H Bunn, H McQuade, J E LeGriffon, J H O Myers, J King, J Vivian, Sep. Wilson, V Kelly, W H Mills, W J Bayley -
 University of Melbourne, Burnley Campus Archives
Newspaper - Newspaper cutting, The Sun News-Pictorial, 15, 1936
Photograph from the Sun News-Pictorial June 5th, 1936 p.24. (M. Younger.)Melon Masacre at Burnley. Getting the pip is a common occurrence these days at Burnley Horticulture College while melons are being cut for jam. These students who have just begun the new term, are (from left): Misses A. Armstrong, J. Wakeford, M. Atkins, J. Bacon and M. Younger.sun news-pictorial, burnley horticulture college, a. armstrong, j. wakeford, m. atkins, j. bacon, mabs younger, female students -
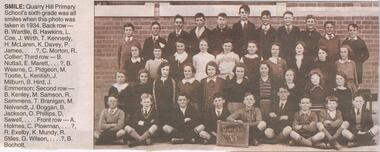 Bendigo Historical Society Inc.
Newspaper - JENNY FOLEY COLLECTION: SMILE
Bendigo Advertiser "The way we were" from Wednesday, November 17, 2004. Smile: Quarry Hill Primary School's sixth grade was all smile when this photo was taken in 1934. Back row: B. Wardie, B. Hawkins, L. Coe, J. Wirth, T. Kennedy, H. McLaren, K. Davey, P. James, Unknown, C. Morton, R. Collier. Third row: B. Nuttall, E. Marett, Unknown, B. Wearne, C. Pidgeon, M. Tootle, L. Kentish, J. Milburn, B. Hird, J. Emmerson. Second row: B. Kenley, M. Samson, R. Semmens, T. Branigan, M. Neivandt, J. Boggan, B. Jackson, D. Phillips, D. Sewell, Unknown. Front row: A. Holmes, C. Plowman, Unknown, R. Exelby, K. Mundy, R. Stiles, G. Wilson, Unknown, B. Bocholt.newspaper, bendigo advertiser, the way we were -
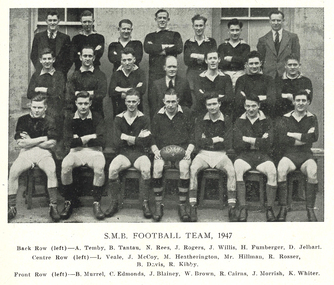 Federation University Historical Collection
Photograph - Football Team, Ballarat School of Mines Football Team, 1947
This team included Bob Davis who became a great with Geelong in the Victorian Football League. In 1949 Bob Davis was captain of the School team.Black and white image of the Ballarat School of Mines Football Team. Ballarat School of Mines Football Team, 1947. Federation University Historical Collection Back row (left) A. Temby, B. Tantau. N. Rees, J. Rogers, J. Willis, Hans Fumberger, Dave Jelbart Centre row (left) L. Veale, J.McCoy, M. Heatherington, Mr Hillman, R. Rosser, Bob Davis, R. Kibby Front row (left) B. Murrel, C. Edmonds, J. Blainey, W. Brown. R. Cairns J. Morrish, K. Whiterballarat school of mines football team, b. tantau. n. rees, j. rogers, j. willis, hans fumberger, dave jelbart, j.mccoy, m. heatherington, mr hillman, r. rosser, bob davis, r. kibby, c. edmonds, j. blainey, w. brown. r. cairns j. morrish, k. whiter, a. temby, l. veale, b. murrel, football, afl, vfl, australian rules football -
 Ballarat Tramway Museum
Photograph - Digital image, W. J. Llewelyn, c1954
Set of two colour digital images taken by W. J. Llewelyn of the Johns Valves Ballarat factory on the south side of Norman St Ballarat under construction c1954. .1 - looking from the SEC Power Station B towards Wendouree - note the narrow Norman St. .2 - looking back towards the City of Ballarat, with the Railway Workshops and the Showgrounds in the distance. See https://bih.federation.edu.au/index.php/M._B._John_Ltd. accessed 12-6-2017 Photo taken at the same time as btm6855i.trams, tramways, secv, manufacturing, norman st, creswick road, industry -
 Phillip Island and District Historical Society Inc.
Photograph, 1960's
Donated by N. M. & J. D. Archibald. April, 1973Colour Photograph. Chicory Kiln. Cowes. Mr. E. C. Wood, Settlement Road, East. Built of mud 18" thick about 1880 by J. Jenner. Oldest Kiln in operation as at 1973. Chicory Kiln Albumlocal history, photography, photographs, agriculture buildings, historic, chicory kiln, cowes, phillip island, e c wood, j jenner, n & j archibald -
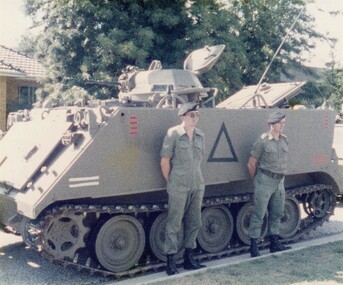 8th/13th Victorian Mounted Rifles Regimental Collection
Photograph
‘A’ Squadron 8th/13th Victorian Mounted Rifles took part in Bicentennial Parade at Wodonga 2 January 1988. Parade included Light Horse Heritage Troop, Historical Vehicle Club and current armoured vehicles.Colour photograph of 2 soldiers standing beside M 113 Armoured Personnel Carrier. Soldiers are Corporal H. Burvill and Lieutenant R. J. Marshall of 8/13 Victorian Mounted Rifles. -
 City of Moorabbin Historical Society (Operating the Box Cottage Museum)
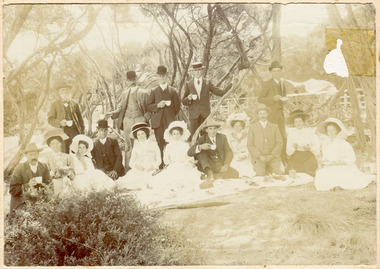
Photograph, The Cheltenham Market Gardner's Picnic, The Gardner's Picnic pre 1914-18 War, pre 1914-18
The photograph is pre 1914-18. It is showing Cheltenham Market Gardeners having a picnic. The Market Gardeners gave Moorabbin it's first industry, which was to prove the most durable and resilient. The ladies and gentlemen are dressed in very fine clothes. All of the men are wearing suits with waistcoats and white shirts with neck ties. One man has a Boater hat , 4 have Bowler hats and 5 have Stetson hats. 5 men are standing and 4 men are kneeling or sitting with the ladies. The ladies are seated on the ground around a table runner on which items of food are seen. Most of the ladies are wearing white dresses, one lady has a dark coloured skirt with a white frilly blouse, and all have large wide brimmed fashionably decorated hats . They all seem to be dressed in their best clothes.The photograph depicts a group of men and women, 16 altogether, having a picnic pre World War 1 1914-1918 . They are surrounded by trees and bushes outside.Front of mount : R. McGeehan Photograph, Beechworth. Back of Mount Address Balaclava / C Whitehead / Gardeners Picnic / Pre World War 11914-18, moorabbin. picnic, market gardeners, early settlers, pioneers, moorabbin shire, cheltenham, fashion, dressmaking, bowler hats, boater hats, stetson hats, bonnets, chapeau, menswear, neckties, beechworth mcgeehan r, photographs, -
 Rutherglen Historical Society
Certificate - Prize Certificate Rutherglen Agricultural Society, 1921 (Exact)
All three certificates won by J G Scott. 32.3 Certificate for Bouquet of Wild Flowers, Beige.Prize certificate for Rutherglen Agricultural Society 1921, printed in black on beige card, with decorative printed edging, Certificate won by Scott, J G. for Bouquet of Wild Flowers.On front of card: "1921 / Rutherglen Agricultural Society / Thirty Eighth Annual Exhibition / Wednesday, October 19th, 1921 / Certificate / Section 25, Class 29 / For Bouquet of Wild Flowers / M J. Scott / H.J. Furze, Secretary / T. Drenen, Printer, Rutherglen"rutherglen show, rutherglen agricultural society, flower show, j g scott -
 Flagstaff Hill Maritime Museum and Village
Bowl, J & G Meakin
Large white ironstone china bowl. Made by J & G Meakin. Hanley England. 15' in diameter.flagstaff hill, warrnambool, shipwrecked-coast, flagstaff-hill, flagstaff-hill-maritime-museum, maritime-museum, shipwreck-coast, flagstaff-hill-maritime-village, china bowl, bowl -
 Flagstaff Hill Maritime Museum and Village
Domestic object - Bowl, J & G Meakin, Late 19th or early 20th Century
The Process of Making Pottery Decorating, Firing, Glazing, Making, Technical There is a rhythm and flow to clay. It can’t be done all at once! Even the making process! It can take weeks to get everything done, especially if you can only work on your pottery once a week! Even though we have three hour classes, it’s often just not enough time! Here is an overview of some of the processes so you have a bit more grasp on some of the technical stuff! Step One – Design There are SO many ideas out there for making stuff in clay! From delicate porcelain jewellery, through to heavy sculptural work and everything in between. Deciding your direction is sometimes not that easy – when you first start, try everything, you will naturally gravitate to the style that you enjoy! The options and variations are endless and can get a wee bit overwhelming too! Check in with me before you start to ensure your ideas will work, what order you might do things, how you could achieve the look you are seeking and any other technical data required! Step Two – Making Clay is thixotropic. This means that as you work with it, the clay first gets sloppier and wetter, before is begins to dry in the atmosphere. For most things, you simply can’t do all parts of the project at once. An example of work order might look like: Get last weeks work out from the shelves Prepare clay for today’s work – roll your clay, prepare balls for throwing, make the first stage of a pinch pot) Clean up last week’s work and put it on the shelf for bisque firing Check that you have any glazing to do – and do enough of it that you will have time to finish your main project Do the next step of your next project – there might be a further step that can’t be complete immediately, in that case, wrap your work well and put onto the shelves. Letting your work rest for a while can really help keep your work clean and professional looking. Many things require bagging under plastic to keep it ready for work the next week – put your name on the outside of the bag so you can find your work easily. We have stickers and markers. Consider how you want to decorate your work – coloured slip can be applied at a fairly wet stage (remembering that it will make your work even wetter!). Trying to apply slip to dry clay won’t work! If you want to do sgraffito – you will need to keep the work leather hard (a state of dryness where you can still work the clay with a little effort and a little water and care). Step Three – Drying Most of the time your work can go into the rack uncovered to let it dry out for the following week. If you want to continue forming or shaping you will need to double bag your work – put your work on a suitable sized bat and put the bat in a bag so the base of the bag is under the bat, then put another bag over the top of the work and tuck the top of the bag under the bat. If you want to trim (or turn) your thrown work the following week, it should also be double bagged. If your work is large, delicate, or of uneven thicknesses, you should lightly cover your work for drying. When considering the drying process, bare in mind the weather, humidity and wind! The hotter and dryer, the faster things dry and work can dry unevenly in the shelves – this can lead to cracking – another time to lightly cover your work for drying. Step Four – Trimming and Cleaning Up Your work is dry! It is called greenware now and it is at it’s most fragile! Handle everything with two hands. I often refer to soft hands – keep everything gentle and with your fingers spread as much as possible. Try to not pick up things like plates too much, and always with both hands! Before your work can be bisque fired it should be “cleaned up”. You work won’t go into the kiln if it has sharp edges – when glazed, sharp edges turn into razor blades! Use a piece of fly wire to rub the work all over – this will scratch a little so be light handed. Use a knife or metal kidney to scrape any areas that require a bit more dynamic treatment than the fly wire offers! Finally, a very light wipe over with a slightly damp sponge can help soften and soothe all of your edges and dags! Trimming thrown work: If you are planning to trim (or turn) your thrown work (and you should be), make sure you bag it well – your work should be leather hard to almost dry for easiest trimming. Use this step to finish the work completely – use a metal kidney to polish the surface, or a slightly damp sponge to give a freshly thrown look. Wipe the sponge around the rim after trimming, and check the inside of the pot for dags! Trimming slip cast work: Usually I will trim the rims of your work on the wheel the following day to make that stage easier, however you will still need to check your work for lumps and bumps. Last but not least – check that your name is still clearly on the bottom of your work. Step Five – Bisque Firing When the work is completely dry it can go into the bisque kiln. The bisque kiln is fired to 1000°C. This process burns off the water in the clay as well as some of the chemically bound water. The structure of the clay is not altered that much at this temperature. Inside the bisque kiln, the work is stacked a little, small bowl inside a larger bowl and onto a heavy plate. Smaller items like decorations or drink coasters might get stacked several high. Consideration is paid to the weight of the stack and shape of the work. A bisque kiln can fire about one and a half times the amount of work that the glaze kiln can fire. The firing takes about 10 hours to complete the cycle and about two days to cool down. Once it has been emptied the work is placed in the glaze room ready for you to decorate! Step Six – Glazing Decorating your work with colour can be a lot of fun – and time consuming! There are three main options for surface treatment at this stage: Oxide Washes Underglazes Glazes Washes and underglazes do not “glaze” the work – It will still need a layer of glaze to fully seal the clay (washes don’t need glaze on surfaces not designed for food or liquid as they can gloss up a little on their own). Underglazes are stable colourants that turn out pretty much how they look in the jar. They can be mixed with each other to form other colours and can be used like water colours to paint onto your work. Mostly they should have a clear glaze on top to seal them. Oxides are a different species – the pink oxide (cobalt) wash turns out bright blue for instance. They don’t always need a glaze on top, and some glazes can change the colour of the wash! The glazes need no other “glaze” on top! Be careful of unknown glaze interactions – you can put any combination of glaze in a bowl or on a plate, but only a single glaze on the outside of any vertical surface! Glazes are a chemical reaction under heat. We don’t know the exact chemicals in the Mayco glazes we use. I can guess by the way they interact with each other, however, on the whole, you need to test every idea you have, and not run the test on a vertical surface! Simply put, glaze is a layer of glass like substance that bonds with the clay underneath. Clay is made of silica, alumina and water. Glaze is made of mostly silica. Silica has a melting point of 1700°C and we fire to 1240°C. The silica requires a “flux” to help it melt at the lower temperature. Fluxes can be all sorts of chemicals – a common one is calcium – calcium has a melting point of 2500°C, however, together they both melt at a much lower temperature! Colourants are metal oxides like cobalt (blue), chrome (green through black), copper (green, blue, even red!), manganese (black, purple and pink) iron (red brown), etc. Different chemicals in the glaze can have dramatic effects. for example, barium carbonate (which we don’t use) turns manganese bright pink! Other elements can turn manganese dioxide brown, blue, purple and reddish brown. Manganese dioxide is a flux in and of itself as well. So, glazes that get their black and purple colours, often interact with other glazes and RUN! Our mirror black is a good example – it mixes really well with many glazes because it fluxes them – causes them to melt faster. It will also bring out many beautiful colours in the glazes because it’s black colouring most definitely comes from manganese dioxide! Glaze chemistry is a whole subject on it’s own! We use commercial Mayco glazes on purpose – for their huge range of colour possibilities, stability, cool interactions, artistic freedom with the ability to easily brush the glazes on and ease of use. We currently have almost 50 glazes on hand! A major project is to test the interactions of all glazes with each other. That is 2,500 test tiles!!!! I’m going to make the wall behind the wheels the feature wall of pretty colours! Step Seven – Glaze (Gloss or sometimes called “Glost”) Firing Most of the time this is the final stage of making your creation (but not always!) The glaze kiln goes to 1240°C. This is called cone 6, or midrange. It is the low end of stoneware temperatures. Stoneware clays and glazes are typically fired at cone 8 – 10, that is 1260 – 1290°C. The energy requirement to go from 1240°C to 1280°C is almost a 30% more! Our clay is formulated to vitrify (mature, turn “glass-like”) at 1240°, as are our glazes. A glaze kiln take around 12 hours to reach temperature and two to three days to cool down. Sometimes a third firing process is required – this is for decoration that is added to work after the glaze firing. For example – adding precious metals and lustres. this firing temperature is usually around 600 – 800°C depending upon the techniques being used. There are many students interested in gold and silver trims – we will be doing this third type of firing soon! After firing your work will be in the student finished work shelves. Remember to pay for it before you head out the door! There is a small extra charge for using porcelain clay (it’s more than twice the price of regular clay), and for any third firing process! Once your work has been fired it can not turn back into clay for millennia – so don’t fire it if you don’t like it! Put it in the bucket for recycling. https://firebirdstudios.com.au/the-process-of-making-pottery/This bowl was made by renowned pottery company J & G Meakin of England. The firm was established in the mid-1800's. The bowl is an example of kitchenware used in the 19th century and still in use today.Bowl; white ceramic, round and tapering inwards towards base. Made by J and G Meakin England.On base, 'Ironstone China Reg SOL 391413' with symbolflagstaff hill, flagstaff hill maritime museum and village, warrnambool, maritime museum, maritime village, great ocean road, shipwreck coast, mixing bowl, food preparation, j & g meakin, pottery, stoke-on-trent, kitchen equipment, ceramic -
 University of Melbourne, Burnley Campus Archives
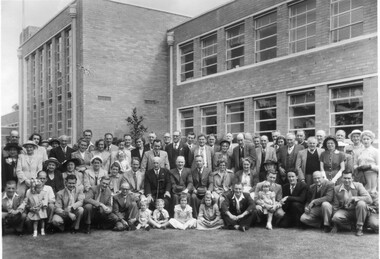
Photograph - Black and white print, Fred M. Day Press & Commercial Photographer, Poultry Field Day 1954, 1954
Note by T.H. Kneen 8 April 1992, "Included in photo: Chief Veterinary Officer of D of A Mr. Talbot seated with walking stick. Second from his left Bill Macauley, Curator Egg-Laying Competition. On his right T.H.K. and kneeling third from right Bill Stanhope Poultry Expert D of A."Black and white photograph. Large group of men, women and children outside the Administration Building. N.U.P.B.A. Field Day (National Union of Poultry Breeders). Also see B91.430.On reverse, "Poultry Field Day 1954 27.2.54." and, "Fred M. Day Press & Commercial Photographer 10 Ailsa Grove Ivanhoe Phone JX 1944."administration building, poultry, chief veterinary officer, bill macauley, curator, egg-laying competition, bill stanhope, poultry expert, mr talbot, field day, main building, public day -
 Clunes Museum
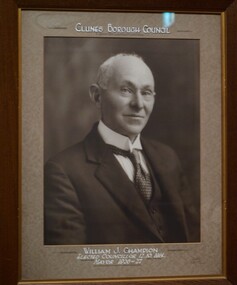
Photograph, HORNSBY STUDIOS, BALLARAT, C1926
IT IS ON PERMANENT LOAN FROM HEPBURN SHIRE COUNCIL.CR. W. J. CHAMPION WAS ELECTED COUNCILLOR TO CLUNES BOROUGH COUNCIL IN 1914 AND WAS MAYOR 1926-27. THE PHOTOGRAPH ORIGINALLY HUNG IN THE CLUNES TOWN HALL DURING HIS TERM AS MAYOR.PHOTOGRAPH OF CR. WILLIAM J. CHAMPION - FRAMED.CLUNES BOROUGH COUNCIL WILLIAM J. CHAMPION. ELECTED COUNCILLOR 12.10.1914. MAYOR 1926-27. HORNBY STUDIOS BALLARATlocal history, photography, photographs, councillors & officers -
 Bendigo Military Museum
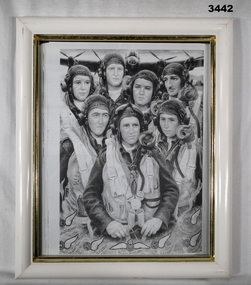
Drawing - DRAWING WW2, FRAMED, Possibly post WW2
Names of airmen are: “CHAMPKIN D G, CARROLL M W, LYNCH T J, JARMAN E G D, HARRIS H R, JACKSON J G NEAL R L”Black / white drawing of a Lancaster air crew. Each is wearing his flying gear, each has a last name drawn on front of helmet. An Avro Lancaster Bomber is at the top part of drawing. Winged badges bearing pilot's full names are at bottom part of drawing. Frame is simple wood design, painted white with a small amount of gold trim.illustrations-pen&ink, military history - air force, airforce, lancaster -
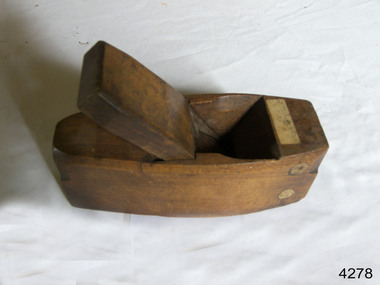 Flagstaff Hill Maritime Museum and Village
Tool - Smoothing Plane, Mid to Late 19th Century
A smoothing plane is typically used after the work piece has been flattened and trued by the other bench planes, such as the jack, fore, and joiner planes. Smoothing planes can also be used to remove marks left by woodworking machinery. When used effectively alongside other bench planes, the smoothing plane should only need a handful of passes removing shavings as fine as 0.002 inches (0.051 mm) or less. The work piece is then ready to be finished, or can be further refined with a card scraper or sandpaper. The smoothing plane is usually held with both hands, and used in a similar manner to the other bench planes. Though designed for smoothing, a smoothing plane can be used as an 'all-round' bench tool and for rougher work depending on how it is set up. Being smaller than other bench planes, the smoothing plane is better able to work on smaller work pieces and around obstructions. Since the 1700s wooden smoothing planes have predominantly been 'coffin shaped' wider in the middle and slightly rounded making them more maneuverable. It has also been claimed that the coffin design exposes more end grain, enabling the plane to better adjust to changes in humidity. John Moseley & Son: Records indicate that before 1834, the firm is listed at number 16 New Street, London and according to an 1862 advertisement the shop had been established in New Street since 1730, The Sun insurance records from the time show that John Moseley was the possessor of a horse mill in the yard of his premises, which means that some kind of manufacturing was taking place, as the mill would have provided power to run a saw or perhaps a grinding wheel so the probability is that he did not just sell tools, he made them as well. John Moseley died in 1828 and his will he names his four sons: John, Thomas, William and Richard. To complicate matters he also had brothers with the same first names; brothers Richard (of Piccadilly) and William (of Peckham Rye) are named as two of the executors. Brother Thomas is not mentioned in this will, but became a minister and was one of the executors of brother Richard’s estate when he died in 1856. From John’s will, we also learn that, although the shop was in New Street, he resided in Lympstone, Devon. The family must have had a house in that county for quite some time as both sons Richard and William are baptised in Devon, although John and Thomas were baptised in London. In the 1841 and 1851 census records, we just find William in New Street, but in 1861 both William and Richard are listed there as toolmakers. That Richard was staying overnight at New Street was probably just accidental as in 1851 and 1871, we find him with his wife Jane and children in Clapham and Lambeth respectively. In 1851 Richard is listed as “assistant clerk cutlery warehouse” and in 1871 as “retired plane maker and cutler”. Although the actual place of work is not stated, one may assume he worked in the family business. 1862 is a year full of changes for the firm. In that year, William had a new property built at 27 Bedford Street. In the catalogue for the 1862 International Exhibition, 54 Broad Street (later 54-55 Broad Street) is listed for the first time, which may very well coincide with the split of the business into a retail and a wholesale branch. Around the same time, they must have moved from New Street to 17 & 18 King Street because their manufacturing premises had been pulled down to form the New Street from Cranbourne Street to King Street. In January 1865, William died and Richard continued the business. In 1867, the partnership he had with his son Walker and Thomas Elis Hooker, is dissolved. Richard continued tool making at King Street and Bedford Street. Richard retired somewhere between 1867 and 1871, but the business continued. The business is taken over by W M Marples & Sons and tools continued to be made in London until 1904 when manufacturing relocated to Sheffield. A vintage tool made by a well documented company, this item was made commercially for firms and individuals that worked in wood and needed a tool that could produce a smooth finish to timber. The tool was used when timber items needed to have a smooth finish these types of planes were used in conjunction with profiled planes that provided a decorative finish. A significant tool from the mid to late 19th century that today is quite rare and sought after by collectors. It gives us a snapshot of how furniture and other decorative finishes were created on timber by the use of hand tools. Tools that were themselves hand made shows the craftsmanship used during this time not only to make a tool such as the subject item but also the craftsmanship needed to produce a decorative finish that was needed to be made for any timber item. Smoothing Plane coffin design Maker J Moseley & Son London & 2 1/4"flagstaff hill, warrnambool, shipwrecked-coast, flagstaff-hill, flagstaff-hill-maritime-museum, maritime-museum, shipwreck-coast, flagstaff-hill-maritime-village, plane moulding, moulding plane, plane, j heath, moseley -
 Stawell Historical Society Inc
Photograph, Presbyterian Girls’ Association 1920s
Presbyterian Girls’ Association. This photograph belonged to M. Robson, Seaby Street before being donated to the society. The group of ladies belong to the Presbyterian Girls Association. J. Ure (Mrs. David Phillips) Miss M. Williams (Sister of Ross) E. Robson (Mrs. H.J. Powe) L. Bearup (Father Manager Gas Works) E. Bigmore. Edna Gray (Sister Mrs. McMullin) Miss Freda Mahnke (Dau of Gustan) Mrs. Widmer (Rev Phillip Widmer, Presby.) E. Francis, M. Gray. Black & White Photograph of a group of ladies. One row standing and one row sitting. Dressed in white blouses and dark skirts, one has a dark top one has a check skirt.Presbyterian Girls. Acc. Back row J. URE, M. Williams, E. Robson, L. Bearup, E. Bigmore. Front row, E. Gray, F. Mahnke. Mrs. Widmer, E. Francis, M. Gray Jean Ure - Mrs. Dave Phillips Elsie Robson - Mrs. Harry Rowestawell portrait religion -
 Ballarat Tramway Museum
Badge - BTPS Tram 38, R. E. V Gomm, mid 2000's
Demonstrates a sales item that the museum has produced over many years.Metal lapel badge - image of Ballarat tram No. 38, with a BTM "Tram rides" sign - stamped metal badge with a clip on rear, nickel plated finish, with hand painted green, yellow and cream paint infilling the detail. Made by R. E. V Gomm the BTM, mid 2000's. 2nd copy added 6-2-2023tramways, trams, badges, lapel badge, btm, bogie trams -
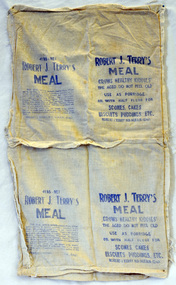 Orbost & District Historical Society
pillow case, c. 1930 - 1950
Presumed to have been made by the family of Mrs. Jean Snow who donated this item. This is a classic example of the tradition of "making do" , of creating new uses for older items or bits of scrap. A pillow case made from four porridge bags which have been opened out and stitched together. The name of the porridge manufacturer is evident on the pillow case, Robert J Terry.Robert J Terry N D M B A N (Eng)pillow- case making-do depression-creativity -
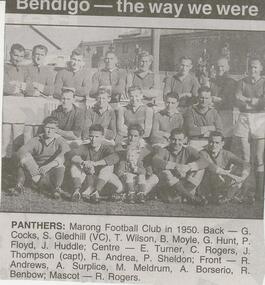 Bendigo Historical Society Inc.
Newspaper - JENNY FOLEY COLLECTION: PANTHERS
Bendigo Advertiser '' The way we were'' from Wednesday, February 25, 2004. Panthers: Marong football club in 1950. Back: G. Cocks, S. Gledhill (VC), T. Wilson, B. Moyle, G. Hunt, P. Floyd, J. Huddle. Centre: E. Turner, C. Rogers, J. Thompson (Capt.), R. Andrea, P. Sheldon. Front: R. Andrews, A. Surplice, M. Meldrun, A. Borserio, R. Benbow. Mascot: R. Rogers. The clip is in a folder.newspaper, bendigo advertiser, the way we were -
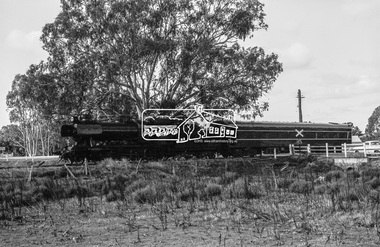 Eltham District Historical Society Inc
Photograph, Steam locomotive J-521 with the Royal Train on the Wharf Spur line during a visit to Echuca by the new Governor of Victoria, His Excellency Sir Rohan Delacombe, c.May 1963
In this picture The Royal Train is passing through a railway crossing along the Wharf Spur line. The train has been shortened comprising steam locomotive J-521 and tender to which is attached the State car. The State car is in the design of the Spirit of Progress. George Coop advised that the occasion is the visit of the Governor of Victoria, Sir Rohan Delacombe to Echuca in 1963. Delacombe had replaced Sir Dallas Brooks in May 1963 who had departed for England on the liner Iberia,11 April 1963 (1963 'SIR DALLAS ON WAY TO U.K.', The Canberra Times (ACT : 1926 - 1995), 9 April, p. 9. , viewed 27 Jan 2020, http://nla.gov.au/nla.news-article104249252) George believes the Governor was doing a considerable formal train ride around the State and Echuca was on the schedule. The ‘platform’ was a special creation for such purposes, located on the wharf spur line that ran behind the Echuca Civic Centre. The large notice board commemorates the Queen’s visit on March 5th, 1954 for which the platform was initially built. From time to time it would get spruced up with pot plants, fresh paint and repaired hand rails for formal functions. George attended the Civic Reception held for the Governor. A picture of His Excellency Sir Rohan Delacombe, Governor of Victoria, and Lady Delacombe about to entrain at Spencer Street for a visit to western Victoria is available on page 4 of VICTORIAN RAILWAYS REPORT OF THE VICTORIAN RAILWAYS COMMISSIONERS FOR THE YEAR ENDED 30th JUNE, 1963. (http://www.victorianrailways.net/vr%20history/annual_reports/vrar1963.pdf) More information about the Victorian Railways Royal Train https://en.wikipedia.org/wiki/Victorian_Railways_Royal_Train State Car No. 5 https://www.pjv101.net/cd/pages/c160v06.htm Digital TIFF file Scan of 35mm Ilford FP3 black and white negative transparencyechuca, george coop collection, governor of victoria, j-521, railway crossing, royal train, sir rohan delacombe, state car no. 5, victorian railways, wharf spur line