Showing 213 items
matching eaglehawk road
-
 Ballarat Tramway Museum
Slide - 35mm slide/s - set of 24, Noel Simons, 20/05/1971 12:00:00 AM
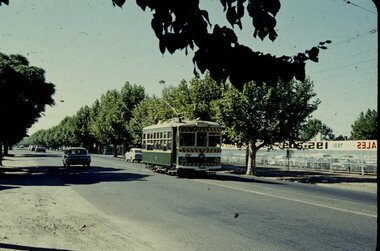
Set of 24 transparencies taken on 20/5/1971 on Kodak mounts. 1195.1 - Bendigo 19 arriving at Charing Cross en route to North Bendigo with Fountain Plaza and the City Family Hotel in the background. No. 19 has two roof ads for the SEC. -'Electricity better for cooking' and 'Everything's under control in my all electric kitchen' 1195.2 - as above, but standing at the Charing cross stop, with the Beehive Stores and other buildings along the east side of Pall Mall in the background. 1195.3 - No 21 ex Golden Square crossing View St. trackwork in front of No. 25 waiting to depart for Quarry Hill. No.21 has two roof ads (as for No.19 in 1195.1) and No.25 has one SEC roof ad and another. Ezywalkin sign in the background, and Fountain Plaza. 1195.4 - as for 1195.3, but after 21 has arrived and 25 left for Quarry Hill. Has Ezywalkin store and the Beehive store in the background. 1195.5 - No. 5 at the Eaglehawk terminus. Photo taken with a cannon in foreground looking along High St. Eaglehawk. Has shops on the west side of High St. in the background. 1195.6 - No. 5 at the Eaglehawk terminus, close up of the rear of the tram - note tow bar arrangement. Has destination of Quarry Hill. 1195.7-Nos.25 and 5 crossing at the Thorpe St. Loop, California Gully. No. 25 bound for Eaglehawk (has SEC Briquette and electric cooking roof ads) and 5 en route for Quarry Hill with a SEC and Cinzano roof ad. 1195.8 - as for 1195.7, but after trams have passed each other. Has Borough Auto Service building in the background. 1195.9 - No. 5 in Mt Korong Road, towards Bamard Street, photo taken after tram has passed photographer. 1195.10 - No. 30 at the Golden Square terminus with the Milk Bar on the right hand side of the photograph. 1195.11 - No. 30 inbound at Fire Station Loop, High St. Golden Square. Has old fire station in the background. Passengers are boarding the tramcar. 1195.12 - No. 30 in High St, bound for North Bendigo between Vine and Wattle Streets. 1195.13 - No. 5 bound for Eaglehawk waits at Iron Bark Gully Loop, at Hayes St. 1195.14 - No. 5 and No. 2 crossing at Iron Bark Gully Loop. 1195.15 - No. 5 bound for Eaglehawk leaving the Manchester Loop, Long gully. 1195.16 - No. 5 passing William Street, Long Gully en route to Eaglehawk. 1195.17 - No. 5 just before the California Gully Crossing Loop. 1195.18 - Nos. 5 and 26 crossing at California Gully crossing Loop. No. 5 heading to Eaglehawk, 26, Quarry Hill. 1195.19 - No. 5 in High St. Eaglehawk with Bob Moyle's Victoria Hotel and the TAB in the background. 1195.20 - No. 5 in High St. Eaglehawk approaching the terminus. Photo taken after the tram has passed the photographer. Has Foodland store and J. Best Fruit supply in the background, along with Eaglehawk Town Hall. 1195.21 - No. 5 at the Eaglehawk terminus, photo taken along seldom used track along High St. 1195.22 - as for 1195.22 - but at the very end of the track. 1195.23 - No. 5 en route for Quarry Hill climbs High St. Eaglehawk with the Victoria Hotel and Eaglehawk Town Hall in the background. 1195.24 - No. 5 and 25 crossing at Jobs Gully Loop. Note 25 has a black on white destination roll, while No. 5 has a white on black destination roll. Information written on in black ink and date stamped on purple ink. 1195.1 - "No. 19 arrives at Charing Cross Bendigo from Golden Square" 1195.2 - "No. 19 about to leave Charing Cross for North Bendigo" 1195.3 - "No. 25 awaiting departure for Quarry Hill, watches No. 21 arrive at Charring Cross from Golden Square" 1195.4 - "No. 21 on North Bendigo service and No. 25 on Quarry Hill run await departure at Charing Cross" 1195.5 - "No. 5 at Eaglehawk terminus" 1195.6 - "No. 5 at Eaglehawk terminus" 1195.7 - "Nos. 5 and 25 crossing at Thorpe St. Loop, California". 1195.8 - "Nos. 25 and 5 crossing Thorpe St. Loop, California Gully". 1195.9 - "No. 5 descending Mt Korong Rd. towards Bamard St." 1195.10 - "Birney car No. 30 at Golden Square terminus" 1195.11 - "Birney car No. 30 in High Street near Thistle Street (Fire Station Loop)" 1195.12 - "No. 30 in High St. between vine and Wattle Streets" 1195.13 - "No. 25 at Hayes Street Loop Iron Bark". 1195.14 - "Nos. 2 and 5 crossing at Hayes Street Loop Iron Bark" 1195.15 - "No. 5 at Manchester Loop opposite Havilah Road, Long Gully" 1195.16 - "No. 5 passing William Street, Long Gully". 1195.17 - "No. 5 at California Gully" 1195,18 - "Nos. 26 and 5 at Thorpe St. Loop, California Gully". 1195.19 - "No. 5 in High St. Eaglehawk". 1195.20 - "No. 5 approaching Eaglehawk terminus" 1195.21 - "No. 5 at Eaglehawk terminus" 1195.22 - "No. 5 at Eaglehawk terminus" 1195.23 - "No. 5 in High St. Eaglehawk" tramways, trams, bendigo, charing cross, eaglehawk, california gully, golden square, iron bark gully, jobs gully, tram 2, tram 5, tram 19, tram 21, tram 25, tram 26, tram 30 -
 Ballarat Tramway Museum
Slide - 35mm slide/s - set of 20, Noel Simons, 21/05/1971 12:00:00 AM
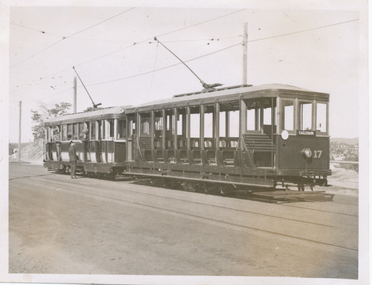
Set of 20 transparencies taken on 21/5/1971 on Kodak mounts. 1197.1 - Bendigo No. 5 en route to Eaglehawk at Creeth St Long Gully. Tram has a SEC roof ad and Cinzano roof ad. 1197.2 - No 5 approaching Needle Loop between Long Gully and California Gully. On left hand side is the City of Bendigo sign, indicating city boundary. 1197.3 - As for 1197.2 but actually entering loop. Photo taken after tram has passed photographer. 1197.4 - No. 26 bound for Eaglehawk descending the railway bridge near Eaglehawk, at Jobs Gully. 1197.5 - as for 1197.4, but after crossing bridge, now ascending a hill. Photo taken after tram has passed photographer. 1197.6 - No. 26 climbing High St. hill Eaglehawk, nearing end of Double track, bound for Quarry Hill. Shows centre of the road poles. 1197.7 - As for 1197.6, with tram entering single track section. Photo taken after tram has passed photographer. Has a BP service station in the background. 1197.8 - No. 26 (bound for Quarry Hill) crossing No. 17 (Eaglehawk) at Job's Gully Loop. 1197.9 - No. 17 climbing railway bridge at Job's Gully, en route to Eaglehawk. Photo taken after tram has passed photographer. 1197.10 - No.26 bound for Quarry Hill, leaving Long Gully Loop? Has the Creeth St. church in l197.l in the far background. Photo taken after tram has passed photographer. 1197.11 - Tramway Point work at the northern end of Long Gully Loop. 1197.12 - No. 17 en route for Quarry Hill turning into View St. from Bamard St. Tram has SEC roof ads "Everything fine in my all electric Kitchen' and 'Electric Cooking is Matchless'. 1197.13 - as for 1197.12, but tram has turned into View St and about to enter the double line track. Photo taken after tram has passed photographer. 1197.14 - No. 21 enters Nolan St after turning from MacRae St. en route to Bendigo. Note sign on its own post noting tram turns "Beware Tram Turns" and stop sign on adjacent pole "Trams stop on Request". No. 21 has two SEC roof ads. 1197.15 - No. 21 in Nolan St. after turning from Bridge St. (White Hills Road). Note signal light for Bridge St. loop on pole corner of street. Photo taken after tram has passed photographer. 1197.16 - No. 2 bound for Eaglehawk at unknown location. 1197.17 - Tram stop sign on a pole "CARS STOP BY REQUEST" 1197.18 - No. 5 in Carpenter St.? en route to Quarry Hill. 1197.19 - No. 28 has just arrive at Golden Square terminus, passengers are disembarking and the trolley pole is being turned. Golden Square Hotel in the background. 1197.20 - No. 28 at Golden Square terminus. Has a "Nothing beats Briquettes for hear roof ad. Information written on in black ink and date stamped on purple ink. 1197.1 - "No. 5 at Creeth St. Long Gully" 1197.2 - "No. 5 approaching Needle Loop between Long Gully and California Gully" 1197.3 - "No. 5 at Needle Loop between Long Gully and California Gully" 1197.4 - "No. 26 crossing railway bridge at Job's Gully near Eaglehawk" 1197.5 - "No. 26 just after crossing railway bridge at Job's Gully near Eaglehawk/ 1197.6 - "No. 26 in High St. Eaglehawk" 1197.7 - "No. 26 at end of double track in High St. Eaglehawk" 1197.8 - "Nos. 26 and 17 crossing at Job's Gully Loop" 1197.9 - "No. 17 crossing railway bridge at Job's Gully near Eaglehawk". 1197.10 - "No. 26 at Long Gully" 1197.11 - 'Northern end of points at Long Gully Loop". 1197.12 - "No. 17 turning into View St. from Bamard St. Bendigo". 1197.13 -'No. 17 at beginning of double track in View St. after leaving Bamard St. Bendigo. 1197.14 - "No. 21 enters Nolan St. from MacRae St. Bendigo." 1197.15 - "No. 21 in Nolan St. Bendigo just after leaving White Hills Road." 1197.16 - "No. 2" 1197.18 - "No. 5" 1197.19 - "Birney car No. 28 at Golden Square Terminus" 1197.20 "Birney car No. 28 at Golden Square Terminus" tramways, trams, bendigo, long gully, railway bridge, jobs gully, trackwork, nolan st, quarry hill, tram stops, golden square, tram 2, tram 5, tram 17, tram 21, tram 26, tram 28 -
 Ballarat Tramway Museum
Slide - 35mm slide/s - set of 32, Noel Simons, 25/02/1971 12:00:00 AM
Set of 31 transparencies taken on 25/2/1972 on Kodak mounts. 1201.1 - Bendigo No. 26 in Bond St. just after leaving Long Gully en route for Quarry Hill. Has Norris Supermarket in background. Has two SEC roof ads. 1201.2 - No. 26 climbing View St. from Charing Cross en route to Eaglehawk. Has ANZ bank and AMOCO service station in background. 1201.3 - as for 1201.3, but after tram has passed photographer. Has buildings west of Mackenzie St. in photograph. 1201.4 - Tram stop and centre of the road pole with two "CARS STOP BY REQUEST" signs mounted on pole at the corner of Mackenzie St. 1201.5 - same position as for 1201.3, but with No. 5 descending the street. 1201.6 - same position as for 1201.2, but with No. 5 descending the street. Photo taken after tram has passed photographer. 1201.7 - No. 7 in Nolan St. from across the park at Lake Weeroona. 1201.8 - No. 7 entering McCrae St from Nolan St. - distant view. Note "TRAM "sign on left hand side under tree and overhead in McCrae St. from former track that once was in this street. 1201.9 - No. 7 in High St. with Cathedral in background. Tram en route to North Bendigo. Note scaffolding around Cathedral main spire area. 1201.10 - No. 7 crossing Bendigo Creek bridge in High St. near Golden Square. Has a Caltex Service station in the background. 1201.11 - No. 7 at Golden Square terminus with Sunburst Fruit Juices and a Peters Ice cream delivery vans alongside. 1201.12 - as for 1201.11 but photo taken from behind tram, with the end of the rails in the photograph. 1201.13 - No. 7 and 21 in Pall Mall at Charing Cross with No. 5 in the background. Taken some distance away from the location. 1201.14 - No. 7 at Golden Square terminus, taken a short distance from the tram terminus. Shows Milk Bar on right hand side and the hotel on the left hand side. Taken from the south side of the roadway. 1201.15 - as from 1201.14 but taken from the north side of the roadway. 1201.16 - No 5 waiting at California Gully loop. Distant photo showing surrounds 1201.17 - No. 5 en route for Quarry Hill crossing No. 26 at California Gully. 1201.18 - No. 26 at Eaglehawk terminus with Eaglehawk Town Hall and Post Office in background. 1201.19 - No. 21 arriving at Charing Cross en route to North Bendigo. Has Alexandra Fountain in the background, ANZ bank RACV building, and other buildings on the north side of Pall Mall or Nolan St. 1201.20 - No. 26 en route for Quarry Hill at Charing Cross, with crew standing by front door. Has Colonial Mutual life building, Armstrong Tyre Service (Firestone) and a sign for Cohns Drinks in the background. 1201.21 - as for 1201.20 but with No. 5 en route to Eaglehawk now in photograph. 1201.22 - No. 26 at Quarry Hill terminus. 1201.23 - No. 26 at Quarry Hill terminus, view of front portion of tram only from a gate at the Bendigo cemetery. 1201.24 - Track at the end of the Quarry Hill line showing the point blades of the former "Y" terminus and the overhead for this. 1201.25 - No. 2 at the Quarry Hill terminus, looking along the former Trackwork. 1201.26 - as for 1201.25 1201.27 - number not used. 1201.28 - Golden Square terminus from some distance from the actual terminus, showing the Warning sign "TRAM" for motorists from the south. No. 7 at the terminus. 1201.29 - No. 7 passing through the Golden Square shopping centre. Numerous cars and pedestrians. Tram en route for North Bendigo. 1201.30 - No. 7 in High St. Golden Square, en route for North Bendigo. Photo taken after tram has passed photographer. 1201.31 - No. 7 in High St. just past Wattle St. with the Cathedral in the background. Tram has two SEC roof ads good side on photo, 'Everything's fine in my all electric kitchen' and 'Electrical cooking - clean, quick, economical'. 1201.32 - No. 7 in High St. nearing Wattle St. Has Cathedral in the background. Photo taken after tram has passed photographer.Information written on in black ink and date stamped on purple ink. 1201.1 - "No. 26 in Bond St just after leaving Long Gully" 1201.2 - "No. 26 climbing View St. from Charing Cross" 1201.3 - "No. 26 ascending View St. from Charing Cross (At Mackenzie St.)" 1201.4 - "View St. & Mackenzie St." 1201.5 - "No. 5 in View St. near Mackenzie St." 1201.6 - "No. 5 in View St. nearing Charing Cross." 1201.7 - "No. 7 in Nolan St. seen from Lake Weeroona Park." 1201.8 - "No. 7 entering McRae St. from Nolan St. Note "TRAM" warning sign on left. 1201.9 - "No. 7 in High St. passing Short St." 1201.10 - "No. 7 crossing Bendigo Creek bridge in High St. near Golden Square." 1201.11 - "No. 7 at Golden Square terminus" 1201.12 - "No. 7 at Golden Square terminus" 1201.13 - "No 7, 21 and 5 at Charing Cross" 1201.14 - "No. 7 at Golden Square terminus" 1201.15 - "No. 7 at Golden Square terminus" 1201.16 - "No 5 waiting at California Gully loop." 1201.17 - "Nos. 5 and 26 crossing at California Gully loop" 1201.18 - "No. 26 at Eaglehawk terminus" 1201.19 - "No. 21 arriving at Charing Cross from Golden Square" 1201.20 - "No. 26 at Charing Cross" 1201.21 - "Nos. 5 and 26 at Charing Cross." 1201.22 - "No. 26 at Quarry Hill terminus" 1201.23 - "No. 26 at Quarry Hill terminus seen through the gates of the Bendigo Cemetery." 1201.24 - "Quarry Hill terminus showing remains for former double track layout abandoned before 1964." 1201.25 - "No. 2 at Quarry Hill terminus" 1201.26 - "No. 2 at Quarry Hill terminus" 1201.28 - "The Southern approach to Golden Square with No. 7 standing at the terminus, "TRAM" warning sign on the left. 1201.29 - "No. 7 passing through Golden Square Shopping Centre" 1201.30 - "No. 7 in High St. Golden Square" 1201.31 - "No. 7 in High St. passing Wattle St." 1201.32 - "No. 7 in High St. nearing Wattle St."tramways, trams, bendigo, bond st., view st., nolan st., high st., eaglehawk, california gully, charing cross, quarry hill, trackwork, tram 2, tram 5, tram 7, tram 21, tram 26 -
 Ballarat Tramway Museum
Slide - 35mm slide/s - set of 19, Noel Simons, 26/02/1972 12:00:00 AM
Set of 18 transparencies taken on 26/2/1972 on Kodak mounts. 1203.1 - Bendigo 5 at Eaglehawk terminus - with new traffic works. 1203.2 - No. 5 climbing the High St. hill Eaglehawk with the buildings on the east side in the photo. 1203.3 - No 2 descending the road over rail bridge at Job's Gully, heading for Quarry Hill. 1203.4 - as for 1202.3, but more side on. Tram has two SEC roof ads. 1203.5 - as for 1202.4 1203.6 - No. 26 entering Garden Gully Loop, Mt. Korong Road, Ironbark. Tram en route to Eaglehawk. Water column on right hand side of photograph. 1203.7 - No. 2 on the Eaglehawk route, Iron Bark area?, bound for Quarry Hill. 1203.8 - as for 1202.7, but photo taken after tram has past photographer. 1203.9 - No. 5 at Eaglehawk terminus, night photo. Tram has arrived at terminus, showing Quarry Hill, pole turned, but the tram lights have yet to be turned around. 1203.10 - as for 1202.9, but lights have been turned around. 1203.11 - No. 26 climbing the View St. Hill near the Commodore Hotel. Has Campbells Electrical Services building in the background. Photo taken after the tram has passed the photographer. 1203.12 - No. 7 end on photograph, at Golden Square, destination showing Golden Square - night photo. 1203.13 - number not used. 1203.14 - as for 1202.12, but partially side on, has a passenger looking out the tram. 1203.15 - as for 1202.12, but with hotel in the background. 1203.16 - No. 26 and 2 at Charing Cross, night photo. Tram 26 en route to Quarry Hill, 2 to Eaglehawk. 1203.17 - Interior photo of No. 26, at night. 1203.18 - No. 26 at the Quarry Hill terminus as night. 1203.19 - as for 1202.18, but central portion of the tramcar.Information written on in blue ink and date stamped on purple ink. 1203.1 - "No. 5 at Eaglehawk terminus" 1203.1 - "No. 5 in High St. Eaglehawk" 1203.3 - "No. 2" 1203.4 - "No. 2" 1203.5 - "No. 2" 1203.6 - "No. 26 at Garden Gully Loop Mt Korong Rd., Ironbark" 1203.7 - "No. 2" 1203.8 - "No. 2" 1203.9 - "No. 5 at Eaglehawk terminus" 1203.10 - "No. 5 at Eaglehawk terminus" 1203.11 - "No. 26 in View St. Near the Commodore Motel" 1203.12 - "No. 7 at Golden Square Terminus" 1203.14 - "No. 7 at Golden Square Terminus" 1203.15 - "No. 7 at Golden Square Terminus" 1203.16 - "Nos. 26 and 2 at Charing Cross" 1203.17 - "Interior of No. 26" 1203.18 - "No. 26 at the Quarry Hill terminus" 1203.19 - "No. 26 at the Quarry Hill terminus "tramways, trams, bendigo, eaglehawk, bridges, iron bark gully, night photo, quarry hill, golden square, tram 2, tram 5, tram 7, tram 26 -
 Ballarat Tramway Museum
Slide - 35mm slide/s - set of 25, Noel Simons, 26/02/1972 12:00:00 AM
Set of 25 transparencies taken on 26/2/1972 on Kodak mounts. 1204.1 - Bendigo No. 5 - just arrived at Manchester Loop near Havilah Road, Long Gully. Photo taken after tram has passed photographer. 1204.2 - No. 26 in Backhaus St. Long Gully passing William St, en route to Quarry Hill. Photo taken after tram has passed photographer. 1204.3 - No. 5 climbing the High St. Hill Eaglehawk, heading for Quarry Hill with the buildings on the West side of High St. in the background, including the Eaglehawk Town Hall. 1204.4 - as for 1204.3, but tram close up. 1204.5 - as for 1204.3, but after tram has passed photographer. 1204.6 - No. 5 at intersection of Mt Korong Road Ironbark and Calder Highway, with the AMPOL service 'station in the background. Photo taken after tram has passed photographer. 1204.7 - No. 26 en route to Quarry Hill shortly after leaving Needle Loop, passing William St., Long Gully. 1204.8 - No. 5 at California Gully Loop, picking up a passenger, with the shops at Long Gully in the background. Photo taken after tram has passed photographer. 1204.9 - No. 5 in Long Gully, en route to Quarry Hill. Photo taken after tram has passed photographer. 1204.10 - No. 2 at Eaglehawk terminus with the Eaglehawk Town Hall and Post Office in the background. Tram has two SEC roof ads. 1204.11 - No. 2 at Eaglehawk terminus, close up. 1204.12 - as for 1204.11, but through the park gates. 1204.13 - as for 1204.11, but with tram stop shelters in the foreground and buildings on the West side of High St in the background. 1204.14 - No. 2 in Mt. Korong Rd, midway between California Gully Loop and Needle Loop. Photo taken after tram has passed photographer. 1204.15 - No. 5 in Long Gully, en route to Quarry Hill. 1204.16 - as for 1204.15, but with trams departed loop. Has an ESSO service station in the background. 1204.17 - No. 26 leaves Charing Cross up View St.. Photo taken after tram has passed photographer. Has Armstrong Tyre Service, Cohns Drinks ad on a building and the T&G building in the background. Also Firestone ads on the tyre service building. 1204.18 - No. 5 waits at Charing Cross with the Alexandra Fountain in the background. Tram has two SEC roof ads, 'Everything s fine in my all electric kitchen' and 'Electricity Best for Cooking'. Has RACV, Colonial Mutual Life buildings in the background and the planting areas around Charing Cross gardens in the foreground. 1204.19 - No. 21 en route to North Bendigo arrives at Charing Cross, with passengers waiting to board. No. 5 in the background. In the background is the Fountain Gate Plaza building and the City Family Hotel. 1204.20 - as for 1204.19, but with No. 7 en route to Golden Square. 1204.21 - as for 1204.19, but closer up. 1204.22 - as for 1204.18 1204.23 - No. 25 in Nolan St. near the crossing of Bendigo Creek, running a special tram tour. 1204.24 - No. 25 on a special charter, in Weeroona Ave. at Cnr of Caledonia St. passing the Gas works. 1204.25 - Nos. 25 (showing Golden Square), 7 and 26 at Charing Cross. Has fountain in the background.Information written on in blue ink and date stamped on purple ink. 1204.1 - "No. 5 at Manchester Loop, near Havilah Rd. Long Gully." 1204.2 - "No. 26 in Backhaus St. Long Gully passing William St." 1204.3 - "No. 5 in High St. Eaglehawk." 1204.4 - "No. 5 in High St. Eaglehawk." 1204.5 - "No. 5 in High St. Eaglehawk." 1204.6 - "No. 5 in Mt. Korong Rd., Ironbark, passing Calder Highway Junctn." 1204.7 - "No. 26 shortly after leaving Needle Loop, passing William St., Long Gully. No. 5 cresting hill in distance." 1204.8 - "No. 5 at California Gully Loop." 1204.9 - "No. 5 in Long Gully" 1204.10 - "No. 2 at Eaglehawk terminus." 1204.11 - "No. 2 at Eaglehawk terminus." 1204.12 - "No. 2 at Eaglehawk terminus." 1204.13 - "No. 2 at Eaglehawk terminus." 1204.14 - "No. 2 in Mt. Korong Rd, midway between California Gully Loop and Needle Loop. 1204.15 - "Nos. 2 and 26 crossing at Long Gully." 1204.16 - "No. 26 leaves Long Gully loop for Eaglehawk as No. 2 pulls out of the far end towards Bendigo" 1204.17 - "No. 26 beginning the climb up View St. from Charing Cross." 1204.18 - "No. 5 at Charing Cross." 1204.19 - "No 21 arrives at Charing Cross from Golden Square while No. 5 awaits departure time for Eaglehawk." 1204.20 - "Nos. 7, 21, and 2 (behind which is No. 5) at Charing Cross." 1204.21 - "Nos. 7, 21, and 2 at Charing Cross." 1204.22 - "No. 5 at Charing Cross." 1204.23 - "No. 25 in Nolan St. near Bendigo creek crossing" 1204.24 - "No. 25 in Weeroona Ave. at cnr of Caledonia St." 1204.25 - "Nos. 25, 7, 26 and 2 (behind 26) at Charing Cross."tramways, trams, bendigo, eaglehawk, long gully, california gully, charing cross, north bendigo, tram 2, tram 5, tram 7, tram 21, tram 25, tram 26 -
 Ballarat Tramway Museum
Slide - 35mm slide/s - set of 4, Noel Simons, Apr. 1972
Set of 4 transparencies - copy slides - possibly ARE film strip dated March 1972. 1209.2 and 1209.4 on Kodak Readymount mounts. 1209.1 - Bendigo 5, 6 and 28 on a special tram service in bound to the City on a tour in Caledonia St. about to enter Lucan St, or White Hills Road or Weeroona Ave. (mis match in names in various maps). Gas works in the background. No. 5 has a white disk on the rear of the tram. 1209.2 - Nos 2 and 26 at Charing Cross with the Fountain Plaza in the background. Both trams have the destination of Quarry Hill, though 26 is on the Eaglehawk bound track. 1209.3 - No. 19 at the Golden Square terminus, with the conductor or driver swinging the pole and Billy Rodda's Golden Square hotel in the background. 1209.4 - No. 7 at Fire Station loop, en route to North Bendigo, picking up a passenger with a pram. Part of a set of 20 slides made by the Association of Railway Enthusiast Provincial Tramways film strip. Reference Item 2560 details the ARE Film Strip and provide references to other slides.Information written on in blue ink and date stamped on purple ink. 1209.1 - "Nos 5, 6 and 28 in Caledonia St. about to enter Weeroona Ave." 1209.2 - "Nos 2 and 26 at Charing Cross." 1209.3 - "Swinging the pole on No. 19 at Golden Square Terminus." 1209.4 - "No. 7 inward bound from Golden Square stops at Fire Station Loop."tramways, trams, bendigo, charing cross, golden square, gas works, special trams, tram 2, tram 5, tram 6, tram 7, tram 19, tram 28 -
 Ballarat Tramway Museum
Slide - 35mm slide/s, Wal Jack, 12/04/1959 12:00:00 AM
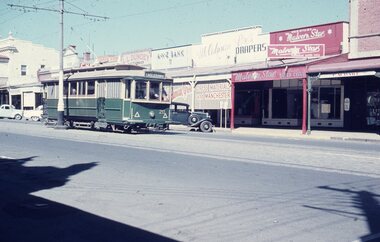
Bendigo, SEC No. 20 with Eaglehawk destination, travelling west along Mitchell St, 12-4-1959. Tram has small white reflective triangles placed on front panels, , blinds drawn, centre of the road poles visible, and some parked cars. Has various shops in view, eg ANZ bank, Malvern Star bicycles, Holdmans? Bros. drapers'Bendigo, No. 20, Mitchell St, 12-4-59, W.Jack Photo'tramways, trams, bendigo, tram 20 -
 Ballarat Tramway Museum
Newspaper, The Walkabout Magazine, "The Road to Bendigo", Oct. 1974
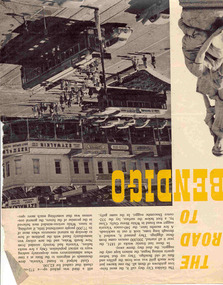
Yields information about the final day of the Bendigo tramways and some of the tramcars used.Three double sided sheets from "The Walkabout" magazine, October 1964, titled "The Road to Bendigo". Five printed pages featuring photographs of Bendigo, its buildings, its history stories, gold mining days and other information, including three illustrations containing trams. .1 - Charing Cross with bogies and single trucker - taken early 1960's. Photo by A. Doney. Features the intersection, with Ezywalkin store. Note the "Jeffrey's bread" roof advertisement on the single trucker. .2 - Bogie tram on the Eaglehawk route prior to any nearby housing development - reclaimed mining land - has Castrol roof advertisement - photo by Claver P Carroll. .3 - No. 6 outside The Beehive stores - 3BO - photo by Claver P Carroll. bendigo, eaglehawk, charing cross -
 Ballarat Tramway Museum
Slide - 35mm slide/s, Graham Evans, Apr. 1972
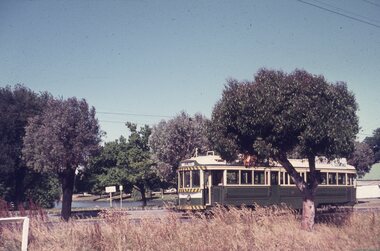
White cardboard mount, 35mm slide, from the Association of Railway Enthusiast's film strip titled "Provincial Tramway Film Strip" of a Bogie car at Long Gully Loop, in the far distance, with a Hotel and the ESSO service station in between. Has Fosters Lager and Carlton signs on hotel. Note sign on the closet pole - "No standing between Notices". The film strip notes (Reg. Item 2560), provided the following caption details: "Meandering roadway and centre road track were a feature of the long "EAGLEHAWK" line. Here an inbound car negotiates the Long Gully Loop. - April '72 (Graham Evans)" See image btm2593p.tif for high level scan of image. Stamped on base of slide "11803" and written in ink on top edge "Eaglehawk line"tramways, trams, are, film strip, long gully, eaglehawk -
 Ballarat Tramway Museum
Photograph - Black & White Photograph/s, Wal Jack, Easter Saturday, 1941
Black and White print contained within the Wal Jack Bendigo and Geelong Album, see Reg Item 5003 for more details. No. 17 and No. 22 at Mt Korong Road loop - Garden Gully Loop. Photo taken Easter Saturday, 1941. Negative No. T191. No. 17 has the destination of "Eaglehawk" and is carrying a white disk at the front of the tram. i1 - scan of print in the album i2 - rear of image i3 - scan of negative at 3200dpi added 6/6/2020. On rear in ink "T191 State Electricity Commission Bendigo tramways / No. 17 summer car and "No. 22 Ex MMTB G Class standing at Passing Loop in Mt Korong Road, Easter Saturday 1941." In bottom right hand corner "W. Jack Photo".trams, tramways, bendigo, mt korong road, garden gully loop, tram 17, tram 22 -
 Ballarat Tramway Museum
Slide - 35mm slide/s - set of 10, Campbell Duncan, Jan. 1971
Set of 10 Ferraniacolor slides - cardboard mounts taken on either 10/1/71 or 16/1/71. .1 - Birney No. 30, Golden Square line, inbound near Cathedral with car yard in background. .2 - ditto, with Cathedral gardens in background. .3 - single trucker, with two SEC roof adverts, entering Nolan St enroute to North Bendigo. Shows the driver sitting in a side on shot. A 4 square store in the background, with a fading advert for "Peeled Tomatoes". .4 - No. 6 turning from Nolan St into McCrae St with 4 square store in background. .5 - No. 26 at Quarry Hill with cemetery in background. .6 - No. 6 at the North Bendigo Terminus .7 - No. 26 outbound to Eaglehawk on the Railway Overbridge, Mt Korong Road. .8 - No. 17 (inbound to City and Quarry Hill) and another bogie crossing at a loop on the Eaglehawk line. Both trams have SEC roof adverts. The driver of the outbound car is boarding the tram. Based on .9, it is No. 3 at Long Gully. .9 - No. 3 waiting at Long Gully Loop . .10 - No. 26 at Quarry Hill terminus, with destination of Eaglehawk.In ink on slide: .1 - "1/2 mile out on Golden Square line - 10/1/71 (Sun)." .2 - "1/2 mile out on Golden Square line - 10/1/71" .3 - "Has just rounded curve near lake Weeroona on North Bendigo line - 10/1/71 (Sun)." .4 - "16/1/71" .5 - " 10/1/71 (Sun)." .6 - "North Bendigo terminus, 16/1/71 (Sat)" .7 - "10/1/71 (Sun) c 3pm" .8 - "Cross Eaglehawk line - 10/1/71 (Sun)." .9 - "Jackson St Loop on E'Hk line awaiting up - 10/1/71 " .10 - "Quarry Hill terminus Bendigo - - 10/1/71"tramways, trams, bendigo, golden square, high st, nolan st, north bendigo, quarry hill, long gully, railway bridge, tram 30, tram 6, tram 26, tram 17, tram 3 -
 Ballarat Tramway Museum
Slide - 35mm slide/s - set of 2, Eldon Hogan?, late 1950's
Set of two Agfacolor cardboard mounted slides - have handwritten captions and two numbers - no date, pre dash canopy stripes and additional lights, late 1950's? Scanned on the Canon scanner at the depot 15/12/1971 at the time of the installation of the scanner. .1 - Bendigo 13, outbound in Pall Mall with the Shamrock Hotel in the background. .2 - Bendigo 2, in bound from Eaglehawk in a very rural situation, unsealed road sides, with the Destination of Quarry Hill..1 - "Tram No. 13 in Pall Mall Bendigo / 24)" in red ink. .2 - "Tram No. 2 approaching Bendigo / 25)" in red ink.tramways, trams, bendigo, eaglehawk, pall mall, tram 13, tram 2 -
 Ballarat Tramway Museum
Slide - 35mm slide/s - set of 11, Eldon Hogan, mid 1960's to early 1970's
Set of 11 Agfa Plastic mounted slides - from the Eldon Hogan collection - possibly on an ARE Bendigo tours - mid 1960's (black destination rolls) and late 1960's or early 1970's. Scanned on the Canon scanner at the depot 15/12/1971 at the time of the installation of the scanner. .1 - No 18 with Lake Weeroona in the background - possibly at the same time as the tour with No. 18, though showing destination of Charing Cross. .2 - ditto .3 - No. 25 and two following trams on a special tour, note the white disc - Quarry Hill line? .4 - No. 29 on the Eaglehawk line at the Mt. Korong Road and the Calder Highway, with the Ampol Service station in the background. .5 - No. 29 passing Lake Weeroona with Destination of Nth Bendigo - has a Briquettes Roof Advertisement., .6 - No. 26 ditto - with two SEC Roof Advertisements. .7 - No. 24 leaving Charing Cross for Golden Square with The Beehive building, Ezywalkin, Coca Cola and the Fountain Shopping Centre in the background. .8 - No. 29 and a bogie tram at the Golden Square terminus with Golden Square Hotel and Victoria Bitter fence in the background. No. 29 has a SEC Briquettes roof advertisement. .9 - No. 29, with the Cathedral in background. Tram has a SEC Briquettes roof advertisement and destination of Golden Square. .10 - side view of a bogie tram on the Eaglehawk line? Tram has a Electric cooking roof advertisement. Photo has been over exposed. .11 - Single trucker, Violet St with the Central Deborah mine head in the background. Tram has two SEC Electric Cooking roof advertisements. tramways, trams, bendigo, lake weeroona, eaglehawk, golden square, charing cross, central deborah, tram 18, tram 25, tram 29, tram 24 -
 Bendigo Historical Society Inc.
Slide - Back to Marong Celebrations, c1960-1963
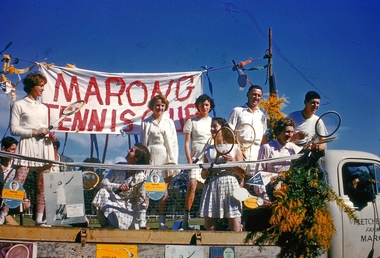
Marong was first incorporated as a road district on 27 August 1861, and became a shire on 23 December 1864. On 1 October 1915, the Borough of Raywood, which was gazetted on 17 January 1865 on 23.31 square kilometres (9.00 sq mi) of land 28 kilometres (17 mi) north of Bendigo,[2] was united with Marong. On 1 October 1990, the Shire of Marong became a rural city, under the Local Government Act 1989. On 7 April 1994, the Rural City of Marong was abolished, and along with the City of Bendigo, the Borough of Eaglehawk and the Shires of Huntly and Strathfieldsaye, was merged into the newly created City of Greater BendigoTwelve slides taken for the Back to Marong celebration about 1960-63 possibly at the Marong Recreation (Football) ground. Slides include a float with members of the marong tennis club, a family group, a float depicting old school days, horse and carts, ladies and men dressed in period costumes and Miss 'Golden North'.history, bendigo, back to marong, city of greater bendigo, rural city of marong, marong tennis club, carl tracey collection -
 Bendigo Historical Society Inc.
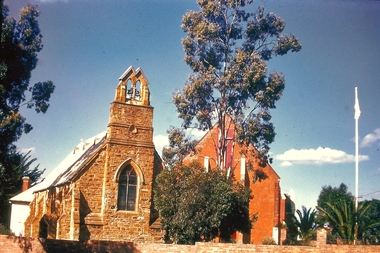
Slide - Peter Ellis Collection, Church of England Eaglehawk, Whipstick, Bendigo Creche and Garden Statues, Sandhurst Road Bendigo, 1970-1990
Peter Ellis Collection, 15 Slides Church of England Eaglehawk, Whipstick, Bendigo Creche and Garden Statues, Sandhurst Road Bendigohistory, bendigo, peter ellis collection, whipstick bendigo, bendigo state forests, whipstick, church of england eaglehawk, conservatory gardens bendigo, sandhurst road bendigo, bendigo creche and day nursery -
 Bendigo Historical Society Inc.
Slide - Images by Arthur Pulfer, 1957-1970
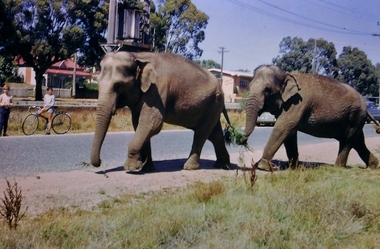
ROSEVIEW 407 High Street, Golden Square Bendigo "Roseview" was designed by Godfrey Eathorne and constructed in 1939. It is one of the few Streamline Moderne houses in the Central Goldfields region, and was one of the earliest constructed in the Bendigo region. It is an outstanding example of this style of housing. It resembles an ocean liner, and reflects the emphasis on the streamlining of methods of transportation. It utilizes both flat and curved surfaces and has little external ornamentation. The use of materials such as rounded glass windows and metal window and door frames reflects an innovative approach to construction consistent with the style. "Roseview" was constructed on a large scale, with large and spacious rooms. It reflects the prominent social status and wealth of the original owner, together with the desire for a building in 'the latest' style which was sure to attract attention and prominence in the region. It has been maintained largely in original condition. CARALULUP HOTEL 'The Sun' dated January 17, 1941 on the back. It states that 'The licence of Caralulup Hotel, near Talbot, has been surrendered, thus severing an 80 year association with the district' State Library of Victoria TOLMER GOLD ESCORT ROUTE The gold rush in New South Wales and Victoria left few able miners in South Australia. Bad economic conditions saw more than 15,000 men leave the Kapunda and Burra mines by the end of 1851. Alexander Tolmer, Commissioner of Police in 1852 proposed that the gold won by South Australians should be brought back to South Australia under an escort consisting of only a few men. In March a Gold Escort was on its way back to Adelaide with almost 6,000 ounces of gold for the vaults of the Treasury Building. After this successful trip Tolmer led two other escorts before handing over his duties. A total of eighteen gold escorts were made, the last one during November and December 1853 when Inspector Wyndham was in charge. You’ll find Gold Escort Route Monuments between Meningie, Coonalpyn and Tintinara.Many images from by Arthur Pulfer copied to slides. Twenty Slides of Bendigo: Bullen's Circus Bendigo February 1966 "Roseview", Pethard's Home at 407 High Street, Golden Square, Bendigo. 25th March 1957. House is possibly on the Midland Highway Epsom, Bendigo - 8 April 1955 Kangaroo Flat Bus Lines mini bus The Big Tree Sedgwick Road March 1972 The old Golden Gully Hotel Diamond Hill Road, Bendigo The old Lockup Eaglehawk Bendigo September 1967 Market Gardens - possibly North Bendigo North Deborah Mine photo taken from Breen Street 1958 Laying the track to get the engine into the park, looking down Mitchell Street Bendigo Engine R766 in the Victorian Railways Institute Park Railway Place Bendigo On the Methodist Church Steps Arnold street Bendigo Miner's Hut at Moliagul Basket Lunch - White Hills Botanical Gardens - St johns 100 year celebrations White Hills Swimming Pool February 1970 White Hills Botanical Gardens Bendigo Bendigo Show Parade 1958 The Arrival of the Cobb and Co Coach in Bendigo September 1963 history, bendigo, james lerk collection, golden square high school, dragon loong, white hill botanical gardens, 407 high street bendigo, r766 engine, bullens circus, caralulup, moligual, bendigo show, tolmer's gold route, kangaroo flat bus lines, eaglehawk lockup, arnold street methodist church, elephants -
 Bendigo Historical Society Inc.
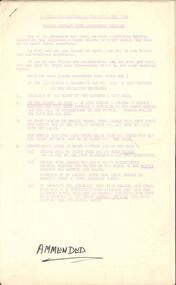
Document - PETER ELLIS COLLECTION: A GUIDE FOR DRIVERS ON THE WHIPSTICK TOUR
A Guide for Drivers on the Whipstick Tour. First page gives assembly area, driving in convoy and negotiating water or boggy patches across the road. Amended written at the end of the page. Directions with mileage and items of interest for the tour on Sunday September 9th (no year). A Whipstick Map 1971 showing State Forest, Crown Lands, Uncleared Mallee - Private (shown in different colours) Water Reserve and Roads. Noted are Flora and Fauna - Plants, Birds & Mammals, and areas of State Forest and Southern State Forest with Mallee Scrub area noted. Also State Forest & Crown Lands Total Area and a map scale. The Bendigo Whipstick mentions area, suggestions of where the name Whipstick came from, shrubs and flowers with their flowering times, descriptions of some of them and some information on the Mallee Fowl. The Eucalyptus Oil Industry paragraph mentions the beginnings of the industry. Mentioned are the different uses of oils (perfumery, industrial and medicinal) and the different species of eucalypt used for each and various products. Also notes on the growing, harvesting and refining of eucalyptus. P Ellis at the end of the page. The next two and a half pages mentions reserves, and at the end acknowledgements. Includes a spare copy of 'The Bendigo Whipstick' by P Ellis.bendigo, history, early bendigo, peter ellis collection, a guide for drivers on the whipstick tour, the whipstick 1971 map, shire of marong, shire of east loddon, shire of huntly, borough of eaglehawk, city of bendigo, shire of strathfieldsaye, the bendigo whipstick, eucalyptus oil industry, eaglehawk town hall, lightning hill lookout, eaglehawk rifle range, new moon mines, blue jacket reservoir, maggetti's wine hall, camp hotel (ex), skylark dam, eucalyptus oil production, eucalyptus factory, whipstick eucalyptus farm, ruedin's eucalyptus factory, dutch bowls, governor philip, sir joseph banks, john white, baron von mueller, joseph bosisto, commonwealth government, perfumery oils, industrial oils, medicinal oils, p ellis, dr frith, csiro wildlife division, harley webster, forests commission, vincent serventy, victorian national parks association, bendigo field naturalists club -
 Bendigo Historical Society Inc.
Slide - DIGGERS & MINING: THE DIGGINGS - THE DIGGERS
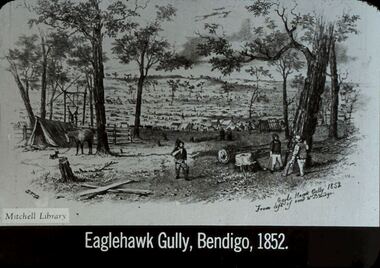
Diggers & Mining: The Digging - The Diggers. Slide depicts : Eaglehawk Gully Bendigo, 1852., 1852. Shows tents almost as far as the eye can see, miners, small girl, not many trees at the foot of a hill. On Slide: STG Eagle Hawk Gully 1852 from left of road to Bendigo. Mitchell Library. Markings: 19 994.LIF:6. Used as a teaching aid.hanimounteducation, tertiary, goldfields -
 Bendigo Historical Society Inc.
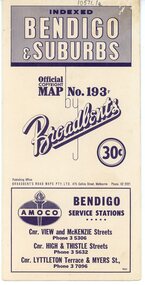
Map - Three Road Maps of Bendigo, 1962
George Robert Broadbent (1863-1947), cyclist and map publisher, was born on 3 November 1863 at Ashby near Geelong, Victoria, son of George Adam Broadbent, Lancashire-born draper, and his wife Elizabeth, née Ruffhead. When the family moved to North Melbourne Broadbent attended the Errol Street school, followed his father's trade, and became an early cycling and cycle-racing enthusiast. At various times Broadbent held most Victorian and Australian road records, and two of his performances on solid tyres—203 miles (327 km) in 24 hours on a penny farthing, and 100 miles (161 km) in 6 hours 20 minutes on a 'safety' bicycle—were never bettered. He established records for all distances between 130 and 220 miles (209 and 354 km), and for all times between 8 and 12 hours, at the Exhibition Grounds track in May 1894, and road records for 50 and 100 miles (80 and 161 km) in October 1896. The Australian Cyclist acknowledged him 'the finest road rider that Australia has ever produced'. A foundation councillor of the League of Victorian Wheelmen in October 1893, Broadbent contested the first Warrnambool-Melbourne race in 1895, and was active in the Good Roads Movement. Next year he issued a road map of Victoria, 'prepared … after some sixteen years riding and touring in all parts of the Colony', which indicated general topography, distances, and roads classified as 'good', 'fair' or 'ridden with difficulty'. It was to become Victoria's standard map, and the basis of a continuous publishing programme by Broadbent's Official Road Guides Co.Three Road Maps of Bendigo, Bendigo and Suburbs, Bendigo and Eaglehawk. Two fold out maps printed in colour and produced by Broadbent's Road Maps Pty. Ltd. 475 Collins Street Melbourne. One map printed by Bolton's Bendigo.history, bolton's, bendio broadbent maps -
 Bendigo Historical Society Inc.
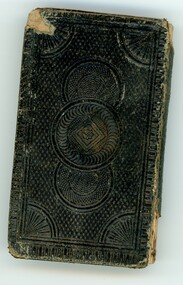
Book - HOSKING AND HUNKIN COLLECTION: BIBLE, 1800s
HOSKING AND HUNKIN COLLECTION: Small Bible inside envelope. On Binder: New Testament Inside front cover: This Book Belongs to Ellen Nancarrow November 8th 1857 Redruth Coomb Inside second page: This is a present given to Emily Hoskong by her Aunt Helen a a token of Love November 1860. Bible Details: The New Testament of our Lord and Saviour Jesus Christ translated out of the original Greek and with the former translations diligently compared and revised, by his Majestiy's special Command appointed to be read in Churches. Oxford prineted at the Univerity Press for the British and Froreign Bible Society, instituted in London in the year 1804; and sold to Subscribers at the Society house Earl Street, Blackfriers, London. Diamond's 48's 1856. Cum Privilegio Note inside BibleBible given to Emily Hosking (m. Emmanuel Hunkin) from her aunt Ellen (Nancarrow) Redruth Coomb. 8 Nov 1860 prior to sailing to Victoria. Nancarrow = Valley of the Stags. On front of envelope: Her New Testament a precious possesion. Bible given to Emily Hosking (b. 12-2-1854 d. 22-5-1905) by her mother's sister Ellen Nancarrow (b 17 Mar 1827 husband Wm Hosking m. 1853 Rev. John Cornwall Wm. D. 10 July 1914) in 1860 8th Nov before leaving for Australia. Liven and mined at Eaglehawk, Vic. Then Rushworth area (farming) Emblen Hosking nee Nanacarrow RedruthCoomb Cornwall b. 6/3/1831 d. 20/5/1895 Gobarup. Rear of envelope: Yellow and black stickers (Women with flowers and Man with Scythe, and St. Piran's) written on 'Cornish Patron Saint's day - 5th March. Address Label: Ms Betty Night, 29 Gilbertson Street Essendon Vic 3040 Separate page of Notes: A note in the front of Hymn Book Emily Hosking born 12/2/1854 married 1873 her book. A reward - The Bible Christian Sabbath School, Sailors Gully June 29th 1868. Hyms - Bible Christian 2nd edition 1890. Bible Christian Book Room 26 Paxxxx Road E.C. Mrs E. Hunkin Eaglehawk B.C. Church January 21st (18) 94 Husband Emmanuel Huskin born 21/1/1852 - collection of hymns Wesley hymns Emmanuel Hunkin. 2. A collection of hymns Emmanuel Hunkin, Eaglehawk Bendigo.book -
 Bendigo Historical Society Inc.
Document - LYDIA CHANCELLOR COLLECTION: BENDIGO METHODIST CHURCHES PLAN 1905 AND CHURCH OFFICIALS, 1905
LYDIA CHANCELLOR COLLECTION: Bendigo Methodist Churches Plan 1905 and church officials Quarterly Pastoral Visitation of Classes Circuit plan for Forest St, Golden square, Eaglehawk West, Eaglehawk East, California Hill, California Gully, Long Gully, McKenzie St, Galvin St, Rowan St, Arnold St, Iron Bark, Buckly St, Specimen Hill, Quarry Hill, Bridge St, Retreat Road, Kangaroo Flat, Lockwood, East Shelbourne, White Hills, Epsom, Huntly, Bagshot, fosterville, Strathfieldsaye, Axe Creek, sheepwash, Nerring, Leichardt, Leichardt East, Marong, Golden Fleece, Golden Gully, Dowling St Mission, Benevolent Asylum, Hospital Income and Expenditure List of stewards Notices Pastorates Evangelistic Bandsbendigo, history, schooling -
 Ballarat Tramway Museum
Slide - 35mm slide/s, early 1960's
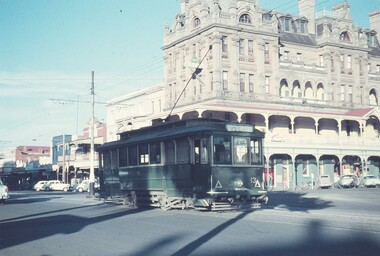
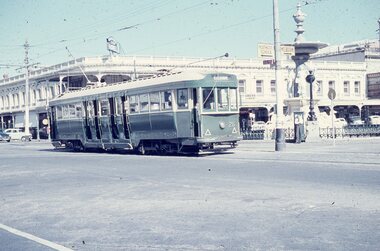
Bendigo Charing Cross, looking east towards railway station, with SEC No. 7 about to depart for Eaglehawk. A Birney tram in background heading for Quarry Hill. Photo shows 'Ezywalkin' and 'Fountain Plaza' buildings, has large white with black lettering road signs on left. On centre pole in front of tram is smaller road direction signs (yellow with black letters) for Echuca, Heathcote and Melbourne. Tram has dash canopy lights, early 1960's.niltramways, trams, bendigo, charing cross, quarry hill, eaglehawk, tram 7 -
 Ballarat Tramway Museum
Slide - 35mm slide/s, Wal Jack, 12/04/1959 12:00:00 AM
Bendigo bogie No. 26 at Fountain, Charing Cross, on 12-4-1959. Tram has been fitted with small reflective triangles. Has Eaglehawk destination. In background is the now demolished City Club Hotel. Tram is the wrong line for Eaglehawk, will have to go through cross over in front. On pole in front of tram is old style road signs for Echuca, Heathcote and Melbourne. Also on pole is 'ALL CARS STOP HERE' sign'Bendigo No. 26 at Fountain 12-4-59, W.Jack photo' in blue inktramways, trams, bendigo, charing cross, tram 26 -
 Surrey Hills Historical Society Collection
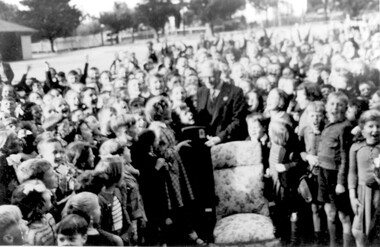
Photograph - Retirement of Mr John Clough as Head Teacher of Surrey Hills Primary School, 1948
John Spencer Clough was the Head Teacher at Surrey Hills during the Depression and the Second World War years. He had a long history in the education department. He was born in Eaglehawk in 1889; married Lily Carpenter in 1915 and died in Camberwell in 1952. He served in France during the First World War. He enlisted in 1915 (SERN 5671) aged 26; occupation school teacher. Electoral rolls place him at the following places as a school teacher: 1912 - Sea View, Warragul 1913 - Leongatha 1914, 1915, 1916 - Carpendeit 1919 - Portland 1922 - Scarsdale 1925, 1926 - Werribee 1928 - Echuca 1931 - Ballarat 1935 - living Wattle Valley Road, Camberwell. At Surrey Hills he was succeeded by Mr Lewis Wheeler. The girl presenting Mr Clough with his retirement gift was Margaret Haines who made the presentation on behalf of the students. A B&W photo of an elderly gentleman surrounded by children. He is wearing a suit and tie and a girl is presenting him with what looks to be a radio. There is a chair with floral covering central to the photo and the gentleman is standing behind it. The background is consistent with a school playground.Number in pencil on the rear - SH1150surrey hills state school, surrey hills primary school, margaret haines, margaret dowsett, john clough, john spencer clough, education, schools -
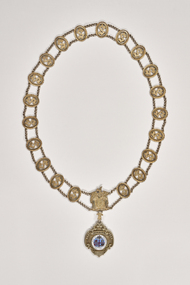 City of Greater Bendigo - Civic Collection
Ceremonial object - Shire of Strathfieldsaye Chain with President medallion, unknown
Strathfieldsaye was first incorporated as a road district on 20 August 1861, and became a shire on 17 September 1866.Strathfieldsaye Council was suspended on 20 July 1993, with a commissioner appointed, after allegations of the council being divided and unworkable.On 7 April 1994, the Shire of Strathfieldsaye was abolished, and, along with the City of Bendigo, the Borough of Eaglehawk, the Rural City of Marong and the Shire of Huntly, was merged into the newly created City of Greater Bendigo. (source Wikipedia). Strathfieldsaye was divided into three wards, each of which elected three councillors; Axedale Ward, Mandurang Ward, Strathfieldsaye Ward. The Shire of Sthrathfieldsaye President's chain was manufactured by P. Blashki and Sons in Stirling silver with a 22ct gold plated finish. Consisting of 20 links, the centre piece depicts the Australian Coat of Arms and drop features an enameled Shire of Strathfieldsaye coat of arms. President / Shire of Strathfieldsaye / Victoria / 1866 / Dieu et mon droit / PROGRESS / 1866city of greater bendigo ceremonial item, shire of strathfieldsaye, president of strathfieldsaye shire -
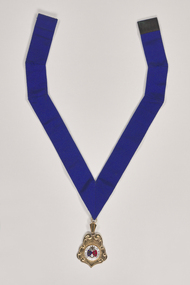 City of Greater Bendigo - Civic Collection
Ceremonial object - Rural City of Marong Medal, Blashki & Sons
The first local government authority for Marong was the Marong Road District (an early form of single-purpose local government), which was proclaimed on 19 August 1860. Its boundary was altered twice in 1862 and on 12 December 1864 it was re designated as a shire. It absorbed Raywood Borough in 1915, and was proclaimed a Rural City in 1990. On 2 December 1994, with the creation of Greater Bendigo City Council, it was abolished by being amalgamated with Bendigo City, Eaglehawk Borough, Huntly Shire, part of McIvor Shire, part of Metcalfe Shire and Strathfieldsaye Shire to form Greater Bendigo City.Rural City of Marong Stirling silver drop, plated in 22 ct gold with enamel centre piece. Medallion hangs from a royal blue neck ribbon. front; RURAL CITY OF MARONG / verso; FORMED AS / MARONG DISTRICT ROADS BOARD / 27th AUGUST 1861 / PROCLAIMED SHIRE OF MARONG / 23rd DECEMBER 1864 / PROCLAIMED RURAL CITY OF MARONG / 1st OCTOBER 1990shire of marong, city of greater bendigo ceremonial item -
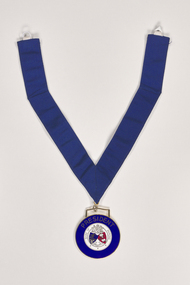 City of Greater Bendigo - Civic Collection
Ceremonial object - Shire of Marong President Medallion, P Blashki & Sons
The first local government authority for Marong was the Marong Road District (an early form of single-purpose local government), which was proclaimed on 19 August 1860. Its boundary was altered twice in 1862 and on 12 December 1864 it was re designated as a shire. It absorbed Raywood Borough in 1915, and was proclaimed a Rural City in 1990. On 2 December 1994, with the creation of Greater Bendigo City Council, it was abolished by being amalgamated with Bendigo City, Eaglehawk Borough, Huntly Shire, part of McIvor Shire, part of Metcalfe Shire and Strathfieldsaye Shire to form Greater Bendigo City.Manufactured by Blashki and Son this circular medal hangs from a royal blue gosgrain ribbon. The medallion has a gold edging with blue enamel outer band. Centre depicts Australia coat of arms and the Shire of Marong coat of arms.PRESIDENT / SHIRE OF MARONG / DIEU ET MON DROIT / INDUSTRIAshire of marong, marong presidents medal, city of greater bendigo ceremonial item -
 City of Greater Bendigo - Civic Collection
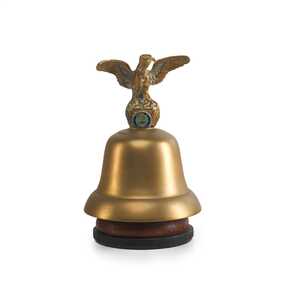
Ceremonial object - Eaglehawk Bell, unknown
The Borough of Eaglehawk was a local government area which covered the northwestern suburbs of the regional city of Bendigo and covered an area of 14.54 square kilometres (5.6 sq mi). Eaglehawk was first incorporated as a borough on 29 July 1862. It had nine councillors, who represented the entire borough. Councillors met at the Town Hall (incorporating the Star Cinema) at the intersection of Sailors Gully Road and Loddon Valley Highway, Eaglehawk. The Town hall has always been the centre of the Borough's activities and was built in 1901 on the site of an earlier town hall which had stood on the location since 1865. The Victorian Heritage Database notes: "The present building replaced this earlier building and was opened on 14 August 1901. The architects were the Melbourne firm of Wilkinson and Permewan. As a much larger and more sumptuous building of brick and stone featuring a central clock tower, the new hall reflected prevailing architectural fashion and was a remarkable investment for a town consisting predominantly of poor mining families. The condition of the town hall is substantially as built. The design is almost identical to the Castlemaine Town Hall." On 7 April 1994, the Borough of Eaglehawk was abolished, and along with the City of Bendigo, the Rural City of Marong and the Shires of Huntly and Strathfieldsaye, was merged into the newly created City of Greater Bendigo.Brass bell with eaglehawk topper / handle on timber stand. The lower front section of the topper has the Borough of Eaglehawk seal attached. No hallmarks or makers stamps visible.borough of eaglehawk, star cinema -
 City of Greater Bendigo - Civic Collection
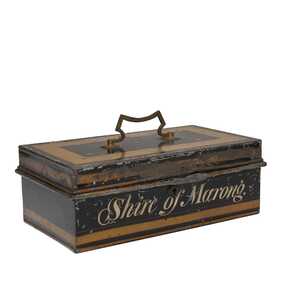
Functional object, Shire of Marong, Unknown
The first local government authority for Marong was the Marong Road District (an early form of single-purpose local government), which was proclaimed on 19 August 1860. Its boundary was altered twice in 1862 and on 12 December 1864 it was re designated as a shire. It absorbed Raywood Borough in 1915, and was proclaimed a Rural City in 1990. On 2 December 1994, with the creation of Greater Bendigo City Council, it was abolished by being amalgamated with Bendigo City, Eaglehawk Borough, Huntly Shire, part of McIvor Shire, part of Metcalfe Shire and Strathfieldsaye Shire to form Greater Bendigo City.Painted metal tin with handle on top. Currently locked closed.Shire of Marongshire of marong -
 City of Greater Bendigo - Civic Collection
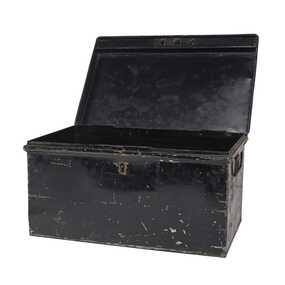
Functional object - Metal Box, Unknown
The first local government authority for Marong was the Marong Road District (an early form of single-purpose local government), which was proclaimed on 19 August 1860. Its boundary was altered twice in 1862 and on 12 December 1864 it was re designated as a Shire. It absorbed Raywood Borough in 1915, and was proclaimed a Rural City in 1990. On 2 December 1994, with the creation of Greater Bendigo City Council, it was abolished by being amalgamated with Bendigo City, Eaglehawk Borough, Huntly Shire, part of McIvor Shire, part of Metcalfe Shire and Strathfieldsaye Shire to form the City of Greater Bendigo. This metal box contained a roll of admission tickets and was possibly used for holding cash at the swimming pool or other municipal facility. Lockable painted metal box. Shire of Marongshire of marong