Showing 264 items
matching temperature
-
 The Beechworth Burke Museum
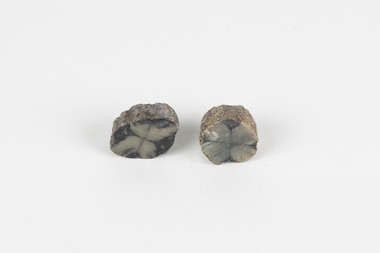
Geological specimen - Garnet crystals in galena, Unknown
Majority of Galena in Australia is found in hydrothermal deposits emplaced around 1680 million years ago which have been heavily metamorphosed. Galena is the natural mineral form of lead sulfaide. It occurs generally as fine to large crystals due to syntectonic remobilization at low temperatures and moves to a suitable location. The colour is a shining lead and silvery gray with high specific gravity between 7.2 and 7.6 gms/cm3 and contains 86.6 lead sulfaide in its purest form. Its cyrstal system is cubic with perfect cleavages, and contract penetration and lamellar twinning. This particular specimen is from the Broken Hill mine, it is one of the largest lead mines located in Western New South Wales and still has ore reserves amounting to 20.9 million tonnes of ore grading of 7.4% lead, 9.4% zinc, and 61.5 million oz of Silver. Throughout its history, it has produced over 200 million tonnes of ore throughout its 127 years of mining history dating back to 1885. Galena mineral ore found in Australia is considered rare, as it is only currently found in the Broken Hill Mine of Western New South Wales. It represents heritage value through the systematic collecting of the geological surveyers in Victoria and Australia during the early to late 19th Century. The fact that it is only found in one mining area of Australia, shows that this specimen is rare for examples of Australian Galena. This mineral specimen is one part to a larger collection, aquistion, and distribution of Garnet in Galena around Australia and parts of the world and donated to the Burke Museum between 1860-1880. While this specimen was not found by the Victorian Geological Survey, it shows the historical need for mapping geological areas around the Gold Rush region to further identify areas of precious metal and gem aquisition. Additionally, collecting these specimens was an important part of mapping the scientific make up of the earth's surface. Many were sent to institutions for further contribution to research and scientific knowledge of the specimens. A solid coin-sized lead and zinc sulphaide and zinc silicate ore mineral in shades of black and red with shiny black points. GARNET CRYSTALS in / GALENA (lead sulphide), / SPALERITE (zinc sulphide), / WILLEMITE (zinc silicate) ore. / Locality: Broken Hill, NSWburke museum, #beechworth, indigo shire, beechworth museum, geological, geological specimen, mineral, galena, galena quartz, broken hill mine, broken hill, nsw -
 The Beechworth Burke Museum
Geological specimen - Chiastolite
It is made up of andalusite. Andalusite is a rock-forming mineral, sometimes found in granite or schist. It is often used to make glass, ceramic products, chemicals, and heat-resistant bricks as it can withstand high temperatures without changing. The chiastolite contains particles of graphite, which arranges in geometric patterns. When crystal growth occurs in the rock, the granite particles concentrate at crystal interfaces and can result in cross shapes. These ‘cross stones’ have been valued and used for their spiritual or religious meaning and used as charms, gems, or amulets. Chiastolite was first discovered in 1754, seen in a description in a published book by a palaeontologist, Franciscan priest, and Spanish author, Jose Torrubia. Deposits have been found in Australia, France, the USA, Chile, Canada, Spain, Brazil, Sri Lanka, and Russia. Deposits have been found in Western Australia and South Australia. This particular specimen was found in Bimbowrie, South Australia. Other chiastolite specimens have been found in Bimbowrie, along with jasper, quartz, and aventurine in the form of rolled pebbles or schist. This chiastolite specimen is socially and historically significant. It is a very rare sort of andalusite mineral. It is from one of only two locations where it is regularly found in Australia. The carbon cross has made it an important religious symbol in the past. Its ability to withstand high temperatures has made it a common ingredient in heat-resistant bricks and ceramics today. This specimen is part of a larger collection of geological and mineral specimens collected from around Australia (and some parts of the world) and donated to the Burke Museum between 1868-1880. A large percentage of these specimens were collected in Victoria as part of the Geological Survey of Victoria that begun in 1852 (in response to the Gold Rush) to study and map the geology of Victoria. Collecting geological specimens was an important part of mapping and understanding the scientific makeup of the earth. Many of these specimens were sent to research and collecting organisations across Australia, including the Burke Museum, to educate and encourage further study.A metamorphic mineral consisting of andalusite, with a cross shaped graphite pattern in colours of grey, brown and yellowburke museum, beechworth, geological, geological specimen, andalusite, chiastolite, geometric, cross stone, spiritual, religious, australia, south australia, bimbowrie, quartz, jasper, aventurine, schist -
 Kiewa Valley Historical Society
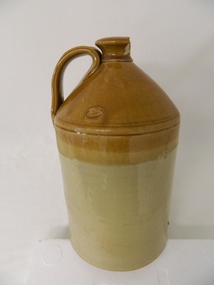
Jar/ Demi John Stone Ware, Circa 1860
This kiln glazed container for liquid's, was the type used in the 1700's to mid 1900's to contain fluids mainly for human consumption which needed to retain liquid that could be affected by sunlight and or required to be maintained at a cooler temperatures. Ginger beer and other "brews" for human consumption were the prime target. The ability to refill these vessels were of the utmost importance to the consumer. Over time these containers were reduced in size and produced for "special" liquids e.g. alcoholic Port. This Demi John stone ware was manufactured in Tamworth (England) and imported into Australia during a period when the majority of "quality" domestic items were sourced from "the Mother Country" and the ties between the still "colonial" outpost were very strong. This bondage remained longer in rural communities than in the cities. The "multi-culturalism of the post World War II era resulted in the lessening of the earlier ties. The growing of nationalism, the Aussie evolution, was brought about by the increased social and business/commercial interactions between Australia and the United States of America, post World War II.This container(jug) is very significant to the Kiewa Valley, a rural region that required these type of liquid storage vessels, especially in the late 1800's to the mid 1900's. These were times when household refrigeration, if available, would be from the "block ice" coolers or "cool" storage nooks and crannies within farmhouse locations.This large "stone ware" glazed Demi John, alias Carboy has a capacity of over 20 litres. It has a conical smooth lipped neck top with a wide, flat(three to four finger) carry and poring handle. The top third portion of the jug is caramel in colour and the bottom a darker cream. It has a manufacturer's seal stamped into the surface before glazing. This item would have been corked and then sealed (air tight) with wax.manufacturer's seal "GEORGE SKEY WILNECOTE TAMWORTH"household liquid jar container, 1800's food storage, kiln fired glazed pottery -
 Federation University Historical Collection
Book, Records of Meterological Data for Ballarat 1892-1897, 1892 - 1897
A summary of meteorological data appears in the Ballarat School of Mines Annual Report for 1887 (P.35, 50). The last such summary appears in the Ballarat School of Mines Calendar 1901-2 (p58), which contains the data for the year 1900. No references have been found re names and job duties/positions of data collectors. The data was recorded by J. Matsen and A. Kiedahl.A charcoal grey hard covered, 120 page ledger, with brown leather spine and corners. The ledger has 31 special column heading, with the observed data added by hand. The column headings are: (AM) Date, Barometer, Ther. of Bar., Wet Bulb., Dry Bulb, Maxim., Minim, Rainfall, Wind, Remarks and State of Weather (PM) Date, Barometer, Ther. of Bar., Wet Bulb., Dry Bulb, Maxim., Minim, Rainfall, Wind, Remarks and State of Weather.Gold lettering on spine "Meteorological Observations: and on a glued on leather patch "School of Mines Ballarat" also in gold lettering. Written on inside front page: "Elevation of barometer 1420ft above Sea Level. To reduce barometric readings to Sea Level When Thermometer stands at 40 add 1.606 (to barometer) 45 " 1.590 50 " 1.574 55 " 1.559 60 " 1.543 65 " 1.528 70 " 1.528 80 " 1.499 85 " 1.471 90 " 1.457 95 " 1.444 100 " 1.431 Lightly hand written in pencil on the next page: "J. Matsen Feb 1891 to Feb 1894 - 3 years A. Kildahl Feb 1894 - " A circle has been place around the hottest temperature for the month. ballarat school of mines, smb, meteorology, j. matsen, a. kiedahl, kiedahl, matsen, rain, weather, meteorological data -
 University of Melbourne, School of Chemistry
Discharge Tubes
(Sir) David Orme Masson was Professor of Chemistry at the University of Melbourne from 1886 to1923. As well as being a distinguished teacher and researcher, he contributed significantly to Australian scientific and public life, being instrumental in the establishment and governance of many important bodies including the CSIRO. Masson supported Antarctic research for 25 years, beginning with Douglas Mawson's expedition of 1911. Born in England and receiving an MA, BSc and DSc from the University of Edinburgh, he was a gifted, elegant and disciplined lecturer and a researcher of substance. His research work included the theory of solutions, from which emerged the term 'critical solution temperature'; the periodic classification of the elements; and the velocity of migration of ions in solutions. Much of his research was done in collaboration with talented students such as David Rivett and his own son Irvine Masson. Masson was knighted in 1923. He is commemorated by the Masson Theatre and Masson Road at the University of Melbourne; a mountain range and island in Antarctica; a portrait painting by William McInnes in the foyer of the School of Chemistry; the Masson lectureship from the Australian National Research Council; and the Masson memorial scholarship from the Royal Australian Chemical Institute.Set of rare gases in a box coming from Irvine Masson to his father. -
 University of Melbourne, School of Chemistry
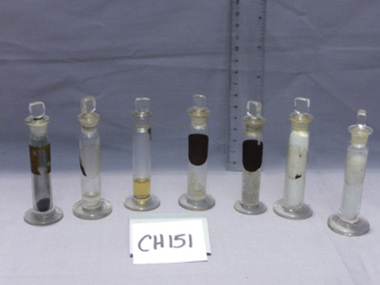
Methyl Sulphides
(Sir) David Orme Masson was Professor of Chemistry at the University of Melbourne from 1886 to1923. As well as being a distinguished teacher and researcher, he contributed significantly to Australian scientific and public life, being instrumental in the establishment and governance of many important bodies including the CSIRO. Masson supported Antarctic research for 25 years, beginning with Douglas Mawson?s expedition of 1911. Born in England and receiving an MA, BSc and DSc from the University of Edinburgh, he was a gifted, elegant and disciplined lecturer and a researcher of substance. His research work included the theory of solutions, from which emerged the term ?critical solution temperature?; the periodic classification of the elements; and the velocity of migration of ions in solutions. Much of his research was done in collaboration with talented students such as David Rivett and his own son Irvine Masson. Masson was knighted in 1923. He is commemorated by the Masson Theatre and Masson Road at the University of Melbourne; a mountain range and island in Antarctica; a portrait painting by William McInnes in the foyer of the School of Chemistry; the Masson lectureship from the Australian National Research Council; and the Masson memorial scholarship from the Royal Australian Chemical Institute.8 samples in bottles of the type used in Masson's work on methyl,etc,sulphides, See152 -
 Department of Energy, Environment and Climate Action
Timber moisture meter adapted for forest fuels
Representative samples of fuel such as bark, leaves, twigs etc were minced and the moisture measured The availability of fuel to burn depends largely on its moisture content. When it exceeds 20-25% not much will burn, whereas 12-15% is generally ideal for fuel reduction burning, but if the moisture content drops as low as 7-10% virtually everything will ignite, and fire behaviour becomes extreme. During the afternoon of the Ash Wednesday bushfires on 16 February 1983 fuel moisture contents were recorded at Stawell as low as 2.7%. Fine fuels like leaves and bark can rapidly absorb moisture after a shower of rain, or from the air when the Relative Humidity (RH) is high, and the temperature is low. Conversely, they can also dry out very quickly. So even though the overall fuel quantity in the forest doesn’t change, the fine fuel availability can increase rapidly from zero after rain to many tonnes per hectare as the fuel dries out. This can happen over a few hours on hot and windy days. Heavy fuels like logs on the ground take longer to dry out. Adaption of a timber moisture meter made by the FCV radio lab to measure fuelforests commission victoria (fcv), bushfire, forest measurement -
 University of Melbourne, School of Chemistry
Container
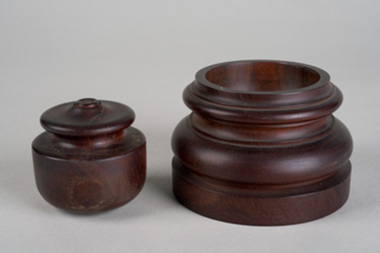
Large dark wooden one fits the dish ordered by D.O.Masson shortly after arrival in Melbourne. (Sir) David Orme Masson was Professor of Chemistry at the University of Melbourne from 1886 to1923. As well as being a distinguished teacher and researcher, he contributed significantly to Australian scientific and public life, being instrumental in the establishment and governance of many important bodies including the CSIRO. Masson supported Antarctic research for 25 years, beginning with Douglas Mawson?s expedition of 1911. Born in England and receiving an MA, BSc and DSc from the University of Edinburgh, he was a gifted, elegant and disciplined lecturer and a researcher of substance. His research work included the theory of solutions, from which emerged the term ?critical solution temperature?; the periodic classification of the elements; and the velocity of migration of ions in solutions. Much of his research was done in collaboration with talented students such as David Rivett and his own son Irvine Masson. Masson was knighted in 1923. He is commemorated by the Masson Theatre and Masson Road at the University of Melbourne; a mountain range and island in Antarctica; a portrait painting by William McInnes in the foyer of the School of Chemistry; the Masson lectureship from the Australian National Research Council; and the Masson memorial scholarship from the Royal Australian Chemical Institute.Wooden containers (formers) -
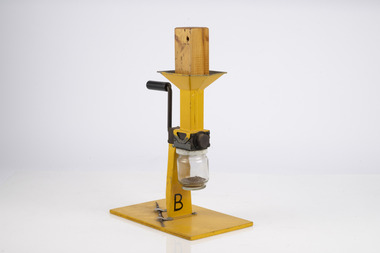 Department of Energy, Environment and Climate Action
Fuel Mincer
Used to mince fuel samples to measure moisture content Representative samples of fuel such as bark, leaves, twigs etc were minced and the moisture measured The availability of fuel to burn depends largely on its moisture content. When it exceeds 20-25% not much will burn, whereas 12-15% is generally ideal for fuel reduction burning, but if the moisture content drops as low as 7-10% virtually everything will ignite, and fire behaviour becomes extreme. During the afternoon of the Ash Wednesday bushfires on 16 February 1983 fuel moisture contents were recorded at Stawell as low as 2.7%. Fine fuels like leaves and bark can rapidly absorb moisture after a shower of rain, or from the air when the Relative Humidity (RH) is high, and the temperature is low. Conversely, they can also dry out very quickly. So even though the overall fuel quantity in the forest doesn’t change, the fine fuel availability can increase rapidly from zero after rain to many tonnes per hectare as the fuel dries out. This can happen over a few hours on hot and windy days. Heavy fuels like logs on the ground take longer to dry out. Fuel mincer Made at Altona as an alternative design to the commercial Spong Mincer With wooden plug to push fuel into the mincer and glass jar to collect sampleforests commission victoria (fcv), bushfire, forest measurement -
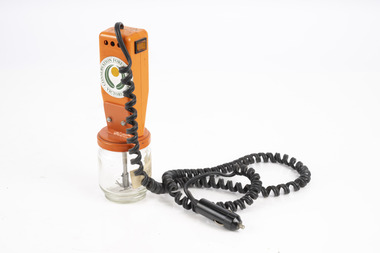 Department of Energy, Environment and Climate Action
Electric Fuel Mincer
Used to mince fuel samples to measure moisture content Representative samples of fuel such as bark, leaves, twigs etc were minced and the moisture measured The availability of fuel to burn depends largely on its moisture content. When it exceeds 20-25% not much will burn, whereas 12-15% is generally ideal for fuel reduction burning, but if the moisture content drops as low as 7-10% virtually everything will ignite, and fire behaviour becomes extreme. During the afternoon of the Ash Wednesday bushfires on 16 February 1983 fuel moisture contents were recorded at Stawell as low as 2.7%. Fine fuels like leaves and bark can rapidly absorb moisture after a shower of rain, or from the air when the Relative Humidity (RH) is high, and the temperature is low. Conversely, they can also dry out very quickly. So even though the overall fuel quantity in the forest doesn’t change, the fine fuel availability can increase rapidly from zero after rain to many tonnes per hectare as the fuel dries out. This can happen over a few hours on hot and windy days. Heavy fuels like logs on the ground take longer to dry out. Battery operated Fuel mincer. Plugs into 12 volt car cigarette lighter socket Adaption using parts from commercial food processor Made at Altona as an alternative design to the commercial Spong Mincer Glass jar to collect sampleforests commission victoria (fcv), bushfire, forest measurement -
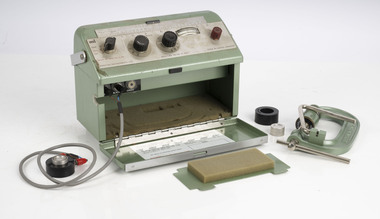
 Department of Energy, Environment and Climate Action
Delton Moisture meter
Used to measure moisture content by electric current resistance Representative samples of fuel such as bark, leaves, twigs etc were minced and the moisture measured The availability of fuel to burn depends largely on its moisture content. When it exceeds 20-25% not much will burn, whereas 12-15% is generally ideal for fuel reduction burning, but if the moisture content drops as low as 7-10% virtually everything will ignite, and fire behaviour becomes extreme. During the afternoon of the Ash Wednesday bushfires on 16 February 1983 fuel moisture contents were recorded at Stawell as low as 2.7%. Fine fuels like leaves and bark can rapidly absorb moisture after a shower of rain, or from the air when the Relative Humidity (RH) is high, and the temperature is low. Conversely, they can also dry out very quickly. So even though the overall fuel quantity in the forest doesn’t change, the fine fuel availability can increase rapidly from zero after rain to many tonnes per hectare as the fuel dries out. This can happen over a few hours on hot and windy days. Heavy fuels like logs on the ground take longer to dry out. Commercial timber moisture meter used to measure fuelDCR9-Tforests commission victoria (fcv), bushfire, forest measurement -
 Department of Energy, Environment and Climate Action
Marconi Moisture meter
Used to measure fuel moisture content Representative samples of fuel such as bark, leaves, twigs etc were minced and the moisture measured The availability of fuel to burn depends largely on its moisture content. When it exceeds 20-25% not much will burn, whereas 12-15% is generally ideal for fuel reduction burning, but if the moisture content drops as low as 7-10% virtually everything will ignite, and fire behaviour becomes extreme. During the afternoon of the Ash Wednesday bushfires on 16 February 1983 fuel moisture contents were recorded at Stawell as low as 2.7%. Fine fuels like leaves and bark can rapidly absorb moisture after a shower of rain, or from the air when the Relative Humidity (RH) is high, and the temperature is low. Conversely, they can also dry out very quickly. So even though the overall fuel quantity in the forest doesn’t change, the fine fuel availability can increase rapidly from zero after rain to many tonnes per hectare as the fuel dries out. This can happen over a few hours on hot and windy days. Heavy fuels like logs on the ground take longer to dry out. Adaption of a commercial timber moisture meter measure fuelTF 933 Cforests commission victoria (fcv), bushfire, forest measurement -
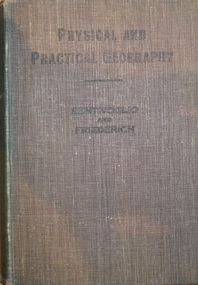 Federation University Historical Collection
Book, Physical and Practical Geography For Secondary Schools, c1935, c1935
Green cloth hardcovered book of 384 pages. Includes photographic and line illustrations.signed inside cover "K.H. Wilkie 1935"geography, k.h. wilkie, marie bentivoglio, f.f. fiederich, solar system, atmosphere, barometer, wind, rainfall, temperature, climate, climatic zones, rivers, glaciers, plains and plateau, mountains, volcanoes, deserts, oodnadatta, campel transport, lakes, lake frome, shorelines, oceans, tides, latitude and longtitude -
 Eltham District Historical Society Inc
Photograph, Fay Bridge, The Tree Project, 2009
Australia's worst natural disaster, fed by extreme temperatures, tornado-like wind speeds and tinder-dry land, culminated in the disaster we now know as Black Saturday, February 7, 2009. Before the sun would set on the blackest day in Australia's history, thousands of hectares would become blackened landscape and an unparalleled loss of lives could only mean that many areas would never be the same again. To remember the people lost to the devastating Black Saturday fires of 2009 and our brave CFA men and women who battled the elements to protect our towns, the Australian Blacksmiths Association (Victoria) Inc. invited blacksmiths from across the country and around the world to contribute to the creation of a steel gumtree. The Blacksmiths' Tree, as it came to be called, was erected on February 14, 2014. Five years in the making, this 10m high stainless steel and copper tree was forged with love and care by hundreds of blacksmiths across 20 countries. It stands in the township of Strathewen, Victoria, Australia to remember all of those who perished in the Black Saturday fires of 2009, those who fought the fires and those who continue to live their lives with hope and courage. The tree stands at the Peter Avola Memorial Pavilion, 160 Chadds Creek Road, Strathewen, Victoria.fay bridge collection, black saturday, kinglake, victorian bushfires - 2009, the tree project -
 Wooragee Landcare Group
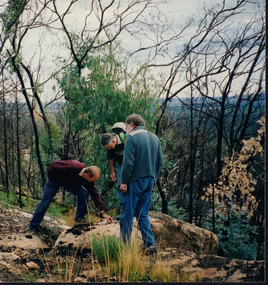
Photograph, 12th September 2004 or 15rh September 2004
This photograph was taken at Wooragee Landcare workshop (Quoll), field day in Mt Pilot park on Bush Recovery: After the Fires. This is part of the Biodiversity Month on September 2004. The Bush Recovery workshop was held on Sunday 12th September 2-4pm with Christine Watson, Sue Berwick and Natasha Schedvin, and another workshop on Wednesday, 15th September, 9am to 12 noon with local biologist Glen Johnson and botanists Gill Earl and Christine Watson. The topics involved in the training involved what species have returned, what species haven't, what recovery studies are being carried out, how are the barking owls and phascogales faring, and why is Mt Pilot important. The photograph shows L-R: Colin Payne; Jerry Alexander; Geoff Galbraith. Bush fires are common in Australia due to several reasons. One is due to the geographic spread of fire's seasons, secondly, the absence of El Nino conditions are also linked to fires. Climate change also affected Australia's hot and dry seasons. Australia's climate began warming since the 1970s. Human-induced fires also contributed to this increase in temperatures across the nation. Bush fires happened in Mt Pilot in 2003 but it has recovered well since. This makes Mt Pilot an important site to understand bushfire recovery. This photograph contributes to the scientific and historical records on bushfire recovery in Victoria. It creates a picture of Victorian community activities and efforts on biodiversity, climate change, and environmental care.Landscape coloured photograph printed on gloss paperReverse: WAN NA 0A2A0N0 NN2 0 163 / (No. 2)wooragee, wooragee landcare group, wooragee landcare, bush fires, bush recover, mt pilot, biodiversity month, botany, botanists, bush recovery, quoll, foxy, fox, forest, environment, climate change, bushfire recovery, bushfires, 2004 bushfire, field work, after the fires, fire, biodiversity -
 Flagstaff Hill Maritime Museum and Village
Domestic object - Hair Tongs, Marcel Grateau, 1900 +
Marcelling is a hair styling technique in which hot curling tongs are used to induce a curl into the hair. Its appearance was similar to that of a finger wave but it is created using a different method. Marcelled hair was a popular style for women's hair in the 1920s and 30s often in conjunction with a bob cut. For those women who had long hair, it was common to tie the hair at the nape of the neck and pin it above the ear with a stylish hairpin or flower. Accounts vary about the invention of the style, but Marcel Grateau (1852–1936) is widely credited with inventing the hair styling technique in the 1870s. He started with a small salon in Montmartre, Paris where his clients were the poorer classes. As he developed the waving method that would later become the Marcel wave, using heated curling irons, The inventor and stylist emigrated to the United States and changed his name to François Marcel Woelfflé, sometimes reported as François Marcel. He was granted U.S. patents for implements for performing the technique; the first, U.S. patent 806386, entitled "Curling-Iron", was published in 1905, and the second, entitled "Hair-Waving Iron", for an electric version, under the name François Marcel, was published in 1918. His obituary appeared under the name Francois Marcel Grateau in 1936. Originally the irons had to be heated in the fire, but hair easily got burnt until 1924 when electric irons were invented and the temperature could be regulated. A significant item that gives us a snapshot not only into women's hairstyles of the 1920s and 1930s but a look into the social norms of that era. Therefore the item is of social interest in regards to the story it tells and the development of women's fashion in hair styling.Marcel Tongs, metal, used to impart a hair wave by heating and crimping the hairNoneflagstaff hill, warrnambool, shipwrecked coast, flagstaff hill maritime museum, maritime museum, shipwreck coast, flagstaff hill maritime village, great ocean road, tongs, curling tongs, hairdressing -
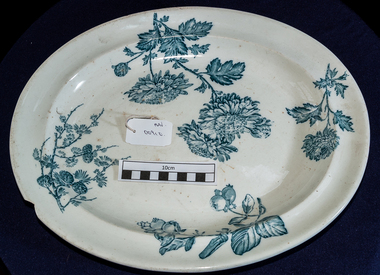 City of Moorabbin Historical Society (Operating the Box Cottage Museum)
Kitchen Equipment, china meat platter, c1900
Wedgwood was founded on 1 May 1759 by Josiah Wedgwood and in 1987 merged with Waterford Crystal to create Waterford Wedgwood, an Ireland-based luxury brands group. After the 2009 purchase by KPS Capital, Wedgwood became part of a group of companies known as WWRD Holdings Ltd, an acronym for "Waterford Wedgwood Royal Doulton." In 1765, Josiah Wedgwood created a new earthenware form which impressed the then British Queen consort Charlotte of Mecklenburg-Strelitz who gave permission to call it "Queen's Ware"; this new form sold extremely well across Europe. Wedgwood developed a number of further industrial innovations for his company, notably a way of measuring kiln temperatures accurately and new ware types Black Basalt and Jasper Ware. Wedgwood's most famous ware is jasperware. It was created to look like ancient cameo glass. It was inspired by the Portland Vase, a Roman vessel. Wedgwood had increasing success with hard paste porcelain which attempted to imitate the whiteness of tea-ware imported from China. High transportation costs and the demanding journey from the Far East meant that the supply of chinaware could not keep up with increasingly high demand. In 1812 Wedgwood produced their own bone china which, though not a commercial success at first eventually became an important part of an extremely profitable business. An oval white china platter with blue flowers and fruit. Back is marked WEDGWOOD CHRYSANTHEMUMOn base ; CHRYSANTHEMUM / i / W / 7 / WEDGWOOD china, pottery, crockery, england, moorabbin, bentleigh, cheltenham, kitchenware, wedgwood josiah -
 Flagstaff Hill Maritime Museum and Village
Tool - Bullet Mould, From 1600s to early 19th century
Musket balls are the ammunition used in muskets the weapons used during the English and American Civil Wars. The balls could be made from any metal alloy, but many were made from lead. Lead can be melted at reasonably low temperatures and so lead musket balls could be made over a camp fire. Lead could be readily sourced from such places like church roofs or even coffins, and recast from old musket balls, so it was an easy material to work with while preparing for battle. The soldier would carry a crucible in which to melt the lead, he would put the material into it and place it over the fire until it had formed into a liquid. Musket ball moulds like the subject item, had a small hole above one of the domes where the liquid could be poured into once the two domes were closed together. The soldier would wait until it cooled then opened the mould to reveal a solid lead ball inside. Because these were cast in halves even though pressed together, there would always be a small amount of liquid lead leakage which would form a thin crust around the ball. These needed to be filed off before being used inside a musket, so some soldiers would pop a few in their mouths and roll them around, chewing off the excess until the ball was smooth. The obvious downside to this method is that lead is poisonous. A tool used to make ammunition for black powder firearms either muskets or pistols from the early part of the 18th to mid 19th century. After this time enclosed brass cartridges that held the propellent powder and bullet were starting to come into wide spread use, negating the need for a firearm to first have black powder placed in a barrel then the ball rammed on top and finally the firearm primed with powder or a percussion cap.Musket rifle/ pistol bullet mold. Makes .50 -caliber- round balls with a sprew cutter to cut off excess lead.Marked 50flagstaff hill, warrnambool, shipwrecked coast, flagstaff hill maritime museum, maritime museum, shipwreck coast, flagstaff hill maritime village, great ocean road, shot pliers, lead shot, shot, armoury, firearms, bullet, cast bullet, lead ball, lead shot, scissor mould -
 Federation University Historical Collection
Photograph - Colour, Phil Bryce, Removal of a fibre-glass chimney extension from a chimney from the former Ballarat Brewery, 2015, 13/11/2015
The chimney extension on what was the former Carlton and United Breweries boiler house at Ballarat installed in 1972 and it is constructed of a special formulation of fibreglass reinforced plastics designed to operate at elevated temperature (ie boiler flue gas). It is thought to be one of 26 or 28 fibreglass boiler chimneys designed and installed in Victoria in the 1970s, and is thought to be one of the last to be removed. In its day the fibreglass chimney extension was at the cutting edge of fibreglass technology and is therefore well worth retaining. Removal of the chimney extension to the brick chimney outside the brewery building was deemed necessary to prolong the life of the chimney, and also because the fibreglass extension had reached end of life and posing a possible threat. According an Engineering assessment, fibreglass structures have a life expectancy of between 20 years (when fatigue loaded) and up to 100 years (static loaded). We don’t know when it was added to the chimney but believe it was most likely in the early 1970s. Given that it is subject to wind load and often observed to be moving in the wind it is likely that it will be at the end of its life. The chimney will be made good and we have the necessary planning approvals in place to undertake the works. The chimney extension was removed on 13 November 2015 in accordance with a planning permit obtained by the University. The extension is believed to have been added in the 1970s and was predominantly made from fibre glass. The structure was removed for safety reasons and to preserve the integrity of the historic brick chimney which supported it. Coloured digital photographs associated with the removal of a fibreglass extension to a chimney which was part of the Former Ballarat Brewery/Carlton and United Breweries complex. Images also include the last day the chimney was in situ.chimney, fibreglass, former ballarat brewery, former carlton and united breweries, ballarat school of mines, brewery complex -
 National Wool Museum
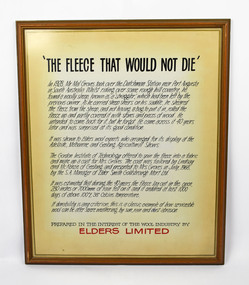
Text panel, Elders Limited, "The Fleece that would not die"
Text panel produced by Elders to accompany display of coat. In 1928 Mr Mal Groves took over the Dutchman Station near Port Augusta in South Australia. Whilst out riding in some rough country he came across a sheep that had been left by the previous owner of the station. As he carried shears with him, he sheared the sheep and left the fleece rolled up and partially covered by rocks and wood, as he had no bag to carry it back with him. He intended to come back for the fleece, but forgot about it until he came across it some forty years later. It was still in good condition (despite having experienced extreme temperatures and rainfall whilst in the open), so he showed it to Elders who arranged to display it at agricultural shows in Adelaide, Melbourne and Geelong. The Gordon Institute of Technology, Geelong, offered to spin the fleece into a fabric and make a coat for Mrs Groves. The fabric was tailored into a coat by Lindsay and McKenzie of Geelong and presented to Mrs Groves in July 1968 by the SA manager of Elder Smith Goldsbrough Mort Ltd. It is not know how the coat came to Elders from the Groves family, but Elders displayed the coat under the heading "The Fleece That Would Not Die" before donating it to the National Wool Museum in 1997. A video giving the history of the coat as well as this text panel used by Elders were also donated at the same time.Text panel with black and red text on cream paper, framed in wooden frame and glass, with hanging wire.shearing, elders limited, groves, mr mal groves, dutchman station, south australia -
 National Wool Museum
Video recording, Elders Limited, "The Fleece that would not die"
Video recording, produced to accompany display of coat. In 1928 Mr Mal Groves took over the Dutchman Station near Port Augusta in South Australia. Whilst out riding in some rough country he came across a sheep that had been left by the previous owner of the station. As he carried shears with him, he sheared the sheep and left the fleece rolled up and partially covered by rocks and wood, as he had no bag to carry it back with him. He intended to come back for the fleece, but forgot about it until he came across it some forty years later. It was still in good condition (despite having experienced extreme temperatures and rainfall whilst in the open), so he showed it to Elders who arranged to display it at agricultural shows in Adelaide, Melbourne and Geelong. The Gordon Institute of Technology, Geelong, offered to spin the fleece into a fabric and make a coat for Mrs Groves. The fabric was tailored into a coat by Lindsay and McKenzie of Geelong and presented to Mrs Groves in July 1968 by the SA manager of Elder Smith Goldsbrough Mort Ltd. It is not know how the coat came to Elders from the Groves family, but Elders displayed the coat under the heading "The Fleece That Would Not Die" before donating it to the National Wool Museum in 1997. A text panel giving the history of the coat as well as this video was also donated at the same time.Video recording, in a white case with Tasmanian Trades and Labour Council with compliments slip printed on yellow paper inserted into back sleeve.shearing wool - history, elders limited, groves, mr mal groves, shearing, wool - history -
 National Wool Museum
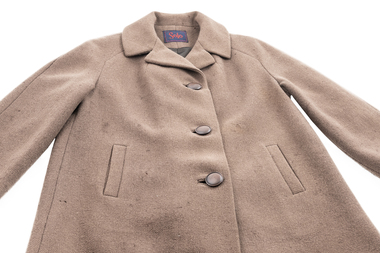
Coat, Lindsay and McKenzie, The Fleece That Would Not Die, 1968
This coat was produced from wool first shorn in c.1928. In 1928 Mr Mal Groves took over the Dutchman Station near Port Augusta in South Australia. Whilst out riding in some rough country he came across a sheep that had been left by the previous owner of the station. As he carried shears with him, he sheared the sheep and left the fleece rolled up and partially covered by rocks and wood, as he had no bag to carry it back with him. He intended to come back for the fleece, but forgot about it until he came across it some forty years later. It was still in good condition (despite having experienced extreme temperatures and rainfall whilst in the open), so he showed it to Elders who arranged to display it at agricultural shows in Adelaide, Melbourne and Geelong. The Gordon Institute of Technology, Geelong, offered to spin the fleece into a fabric and make a coat for Mrs Groves. The fabric was tailored into a coat by Lindsay and McKenzie of Geelong and presented to Mrs Groves in July 1968 by the South Australian manager of Elder Smith Goldsbrough Mort Ltd. It is not know how the coat came to Elders from the Groves family, but Elders displayed the coat under the heading "The Fleece That Would Not Die" before donating it to the National Wool Museum in 1997. A video giving the history of the coat and a text panel used by Elders were also donated at the same time.Coat, brown wool. Long sleeves, knee length with three circular brown buttons and two external pockets. Lined in brown satin, with a blue and red label at the base of the collar.Wording: Solo;Method: Embroidered;Location: Label at base of collar, inside coat Wording: PURE WOOL;Method: Printed;Location: Label on side seam, inside coatfashion wool - characteristics wool processing textile mills textile mills, lindsay and mckenzie elders limited gordon technical college, royal adelaide show - exhibition (31/08/2001 - 08/09/2001), groves, mr mal groves, mrs, dutchman station, south australia, fashion, wool - characteristics, wool processing, textile mills -
 Department of Energy, Environment and Climate Action
Spong Fuel Mincer
Used to prepare fuel samples to measure their moisture content. Representative samples of fine fuel such as bark, leaves, twigs etc were minced first through a course mincing plate, then a fine plate and the moisture content measured with a Speedy moisture meter or other device. The availability of fuel to burn depends largely on its moisture content. When it exceeds 20-25% not much will burn, whereas 12-15% is generally ideal for fuel reduction burning, but if the moisture content drops as low as 7-10% virtually everything will ignite, and fire behaviour becomes extreme. During the afternoon of the Ash Wednesday bushfires on 16 February 1983 fuel moisture contents were recorded at Stawell as low as 2.7%. Fine fuels like leaves and bark can rapidly absorb moisture after a shower of rain, or from the air when the Relative Humidity (RH) is high, and the temperature is low. Conversely, they can also dry out very quickly. So even though the overall fuel quantity in the forest doesn’t change, the fine fuel availability can increase rapidly from zero after rain to many tonnes per hectare as the fuel dries out. This can happen over a few hours on hot and windy days. Heavy fuels like logs on the ground take longer to dry out. Spong No 10 food mincerforests commission victoria (fcv), bushfire, forest measurement -
 The Beechworth Burke Museum
Animal specimen - Wedgetail Eagle
The Wedgetail Eagle (aquila audax) is one of the largest birds of prey located in Australia, Indonesia and Papa New Guinea. It feasts mostly on rabbits but can target mammals as large as koalas, wombats, possums and small kangaroos. The darker the colouring, the older the bird is. A mostly dark brown feathering can suggest over 10 years old, though females are usually paler. This species mates monogamously for life. They circle high in the sky to avoid temperatures close to the ground and to assert their dominance over their territory. This specimen is lighter than many documented photographs of the species. They're usually less patchy / speckled with lighter colours on the chest and back. Documenting the wingspan of this specimen would be of interest because some have been measured up to 230cm. This specimen is part of a collection of almost 200 animal specimens that were originally acquired as skins from various institutions across Australia, including the Australian Museum in Sydney and the National Museum of Victoria (known as Museums Victoria since 1983), as well as individuals such as amateur anthropologist Reynell Eveleigh Johns between 1860-1880. These skins were then mounted by members of the Burke Museum Committee and put-on display in the formal space of the Museum’s original exhibition hall where they continue to be on display. This display of taxidermy mounts initially served to instruct visitors to the Burke Museum of the natural world around them, today it serves as an insight into the collecting habits of the 19th century.This specimen is part of a significant and rare taxidermy mount collection in the Burke Museum. This collection is scientifically and culturally important for reminding us of how science continues to shape our understanding of the modern world. They demonstrate a capacity to hold evidence of how Australia’s fauna history existed in the past and are potentially important for future environmental research. This collection continues to be on display in the Museum and has become a key part to interpreting the collecting habits of the 19th century.This wedgetail eagle is posed with the head turned to the left. It has mostly dark brown feathers which is common for older birds in this species. Speckled light brown and white feathers cover it's neck, chest and a middle strip across the wings. This specimen stands upon a wooden platform. The bill is light grey and long legs dark brown. taxidermy mount, taxidermy, animalia, burke museum, beechworth, australian museum, skin, reynell eveleigh johns, bird, wedgetail eagle, aquila audax, birds of prey, australian bird, eagle -
 Stawell Historical Society Inc
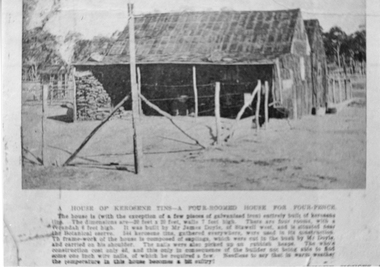
Photograph, Kerosene Tin House built by James Doyle of Stawell West
Kerosene Tin four roomed House build by James Doyle of Stawell West for Four Pence. Situated by the Botanic Reserve, now Grampians Caravan Park. Sepia photograph of a small two peaked home built of kerosene tins. A lean-to at with a large wood pile on the side of the building. A bush post and wire fence around the yard. Printed inscription on the base of photograph. Two enlarged black and white photographs taken from an original photo. A House of Kerosene Tins. A four roomed House for Four Pence. The house is (with exception of a few pieces of galvanised iron) entirely built of Kerosene Tins. The dimensions are 20 feet by 20 feet, walks 7 feet high. There are four rooms with a verandah 6 feet high. It was built by Mr. James Doyle of Stawell West and is erected near the Botanica Reserve. The Kerosene Tins, gathered everywhere, were used in its construction. The frame work of the house is composed of saplings, which were cut in the bush by Mr. Doyle and carried on his shoulder. The nails were picked up at the rubbish heaps. The whole construction cost only 4 pence, and this only in consequence of the builder not being able to find 1 inch nails of which he needed a few. Needless to say that in warm weather the temperature in this house becomes a bit sultry. stawell buildings -
 Moorabbin Air Museum
Document (Item) - Various articles, photo's and cards (in some cases multiple copies). See description for more details, Various articles, photo's and cards. See description for more details
Post WW2, PR, brochures , pamphlets, photos, newspaper articles, drawings. Includes G.T. Hudson's Aristo Aviat Flight computer, drawing of S.N.E.C.M.A turbo engine, Notar no tail rotor helicopter, A4 photos of Mustang, Messerschmitt 109, Boeing jet transport design, Dassault Dornier Alpha jet 2, RAN naval aircraft, Yak-Aem 130, Aermacchi MB-339C,Saab 304, geometrical tolerancing BS 308, CA15, Hawker Harrier, Jaguar GR Mk 1, Pratt % Whitney PW4000, 8000, F100 and F117 engines, Saab AJ37 Viggen, F-16, AIAA publications catalog 2004, Micro dot inserts, Kaynar locknuts, K-Fast tools, AH-1 Cobra, F-14, Concorde, SR-71, B-17, XB-70, F-4 Phantom, Panavia tornado, Allison turboprop 250 engine, Gas turbine performance, F-117, -
 Bendigo Historical Society Inc.
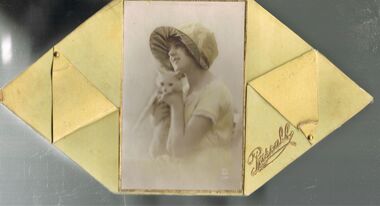
Container - CHOCOLATE BOX COLLECTION: PASCALL BOX, 1920s
Object.Pascall 1920s Yellow Chocolate Box. Design Flanged Sexangular Box with Curved Sectional Top, Sepia Photograph with Subject's Hat and Dress tinted in Pale Yellow in Centre of Lid. Photograph Surrounded by Gold Border. Subject Young Woman & Her Pet Cat. Photograph has White Mark PC Parts in a circle and the number 524 underneath. Inside Lid Pascall 1 lb Net. Contained in Box Labels Packers No 493 and Checkers No 476. Packaging Brown Paper and Fine Paper Shavings in Pale & Dark Colours. Also Another Tag Buff Paper & Red Text In Top Left Hand Corner is the Pascall London Trademark Purity & Sweetness Seal & In The Top Right-hand Corner is A Floral Emblem & The Words Furzedown. The Title On This Tag Reads Co-operation Between The Manufacturer & Consumer. The Remaining Text Reads: - These chocolates were packed with the greatest care and left in our factory in perfect condition. Extremely hot weather or contact with steam pipes may turn these chocolates grey. This is not an indication of age but of the temperature to which they have been exposed. Goods are all packed full weight; the paper shavings used are for packing and protection only. If any complaint necessary please return this ticket with the goods. James Pascall, Ltd London England. Chocolates are also still contained within the box all these years later.domestic equipment, containers, decorative chocolate box -
 Surrey Hills Historical Society Collection
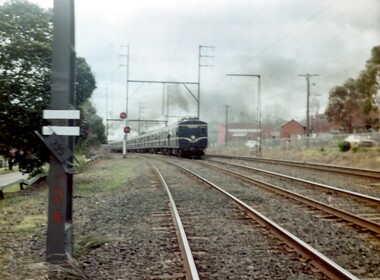
Photograph, A blue Harris electric train heads towards Union Road, Surrey Hills
The Harris blue electric trains were introduced in c1955 and followed the 'Red Rattlers'. They had a long life and were named after Norman Charles Harris, Chairman of Commissioners of the Victorian Railways, between 1940 and 1950. The first 30 7-carriage trains, known as the first series, were constructed in the United Kingdom by Gloucester Railway Carriage and Wagon Company, and delivered between 1956 and 1959. Another 30, the second series, were built by Martin & King in Melbourne, and delivered between 1961 and 1967. The trains had either two or three sets of hand-operated dual sliding doors per carriage side. Later they were fitted with power doors. Initially, until late 1978, the interiors were split into smoking and no-smoking compartments. In 1978 smoking on trains was abolished. Carriages were also designated as First or Second class until 1958, when one class travel was introduced. they had florescent lights but no heating. Most of the early carriages did not have end doors and gangways between carriages, but safety concerns led these being incorporated in the sets delivered from mid-1966. With the exceptions of the last few carriages built, all Harris trains contained asbestos insulation. The first sets contained blue asbestos, and the later sets contained white asbestos in the linings for insulation of noise and temperature. Due to the presence of asbestos, they began to be withdrawn from the mid-1980s and most were disposed of in the 1990s, by being buried at Talbot Quarry in Clayton, some having been wrapped in plastic. No original Harris trailer cars remain. A coloured photograph of a blue Harris electric train heading towards Surrey Hills station from Mont Albert station. The electricity sub-station and Lorne Parade are on the RHS of the photo and Beresford Street on the LHS. The grey, smoggy appearance of the sky suggests a winter's morning.surrey hills, trains, lorne parade, beresford street, norman charles harris, gloucester railway carriage and wagon company, martin & king, talbot quarry, harris blue train -
![Ceramic, Malcolm Boyd, Untitled [Male Form] by Malcolm Boyd, 1977](/media/collectors/530576742162ef0fa09a2288/items/556e8b9f2162f1015460fbfb/item-media/62a9b7295a061b9db7f1e053/item-fit-380x285.jpg) Federation University Art Collection
Federation University Art CollectionCeramic, Malcolm Boyd, Untitled [Male Form] by Malcolm Boyd, 1977
MALCOLM BOYD Born Gippsland, Victoria In 1977 Malcolm Boyd graduated with a Diploma of Visual Arts from the Gippsland Institute of Advanced Education. It was at this time that he presented this work to the Jan Feder Memorial Ceramics Collection. Over thirty years later he still has a passion for ceramic history and design. Boyd operated the Black Cockatoo Pottery from around 1980-1995, starting in Essendon, then moving to Ascot Vale, Stratford, Bairnsdale and finally Fernbank in Gippsland. His handbuilt stoneware pots and clay sculptures are wood fired at his East Gippsland studio. He often uses ochre coloured dam banks on his property at Fernbank. The local clays are crushed, screened and blended with a white stoneware body to produce a number of shades and textures. All Malcolm Boyd's pot's are hand built using moulding, coiling, slabbing, and modelling techniques, and are high temperature fired (1300C) to allow some of the very ancient oriental glazes to mature. All works spend at least 20 hours in the wood fired kilns. This work is part of the Jan Feder Memorial Ceramics Collection which was amassed with funds raised by Jan Feder's student peers at the Gippsland Centre for Art and Design in the mid 1980s after Jan Feder passed away. Although many of the works are donated the intention of the collection was to purchase from visiting lecturers who became leading ceramic artists around the world, as well as from many of the staff who taught at the Churchill Campus. This work is part of the Jan Feder Memorial Ceramics Collection. Jan Feder was an alumna of the Gippsland Campus who studied ceramics on the campus. She passed away in the mid 1980s. Her student peers raised funds to buy ceramic works in her memory. They bought works from visiting lecturers who became leading ceramic artists around the world, as well as from many of the staff who taught there.malcolm boyd, ceramics, artist, artwork, jan feder memorial ceramics collection, gippsland campus, alumni -
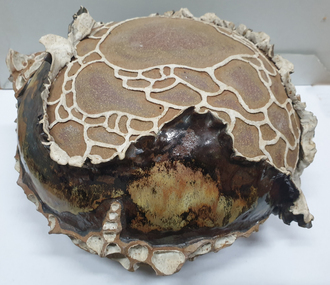 Federation University Art Collection
Ceramic, Malcolm Boyd, Stoneware sculptured sphere, 1977
MALCOLM BOYD Born Gippsland, Victoria In 1977 Malcolm Boyd graduated with a Diploma of Visual Arts from the Gippsland Institute of Advanced Education. It was at this time that he presented this work to the Jan Feder Memorial Ceramics Collection. Over thirty years later he still has a passion for ceramic history and design. Boyd operated the Black Cockatoo Pottery from around 1980-1995, starting in Essendon, then moving to Ascot Vale, Stratford, Bairnsdale and finally Fernbank in Gippsland. His handbuilt stoneware pots and clay sculptures are wood fired at his East Gippsland studio. He often uses ochre coloured dam banks on his property at Fernbank. The local clays are crushed, screened and blended with a white stoneware body to produce a number of shades and textures. All Malcolm Boyd's pot's are hand built using moulding, coiling, slabbing, and modelling techniques, and are high temperature fired (1300C) to allow some of the very ancient oriental glazes to mature. All works spend at least 20 hours in the wood fired kilns. This work is part of the Jan Feder Memorial Ceramics Collection which was amassed with funds raised by Jan Feder's student peers at the Gippsland Centre for Art and Design in the mid 1980s after Jan Feder passed away. Although many of the works are donated the intention of the collection was to purchase from visiting lecturers who became leading ceramic artists around the world, as well as from many of the staff who taught at the Churchill Campus. Jan Feder Memorial Collection Presented by the artist in 1977. malcolm boyd, ceramics, stoneware, artists, artwork, jan feder memorial ceramics collection, alumni, woodfire