Showing 188 items matching "army command"
-
 National Vietnam Veterans Museum (NVVM)
Photograph, Gibbons, Denis, Pleiku
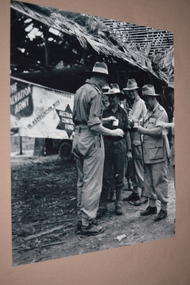
Denis Gibbons (1937 – 2011) Trained with the Australian Army, before travelling to Vietnam in January 1966, Denis stayed with the 1st Australian Task Force in Nui Dat working as a photographer. For almost five years Gibbons toured with nine Australian infantry battalions, posting compelling war images from within many combat zones before being flown out in late November 1970 after sustaining injuries. The images held within the National Vietnam Veterans Museum make up the Gibbons Collection.A colour photograph of three members of the Australian Army Training Team Vietnam (AATTV) discussing operational requirements with the senior Vietnamese Army Colonel at Pleiku, South Vietnam. The advisers with their American counterparts commanded a Montagnard Mike Force Battalion.A colour photograph of three members of the Australian Army Training Team Vietnam (AATTV) discussing operational requirements with the senior Vietnamese Army Colonel at Pleiku, South Vietnam. The advisers with their American counterparts commanded a Montagnard Mike Force Battalion.photograph, aattv, pleiku, south vietnam, montagnard mike force, gibbons collection catalogue, denis gibbons, photographer, vietnam war, australian army training team vietnam (aattv), vietnamese army colonel -
 National Vietnam Veterans Museum (NVVM)
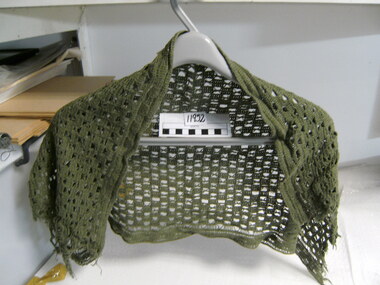
Equipment - Sweat rag
General purpose open weave cotton scrim as issued in Vietnam war. Used by National Serviceman, Lance Corporal B A Rosenthal, 3rd Battalion, The Royal Australian Regiment 1967-8, Mentioned in Despatches for his command and control during a section ambush in which he was wounded. Unit Citation for Gallantry for his involvement in the Battle of Fire Support Bases Coral and Balmoral.Green crochet cotton scarf used as a sweat rag for soldiers in jungle.scarf, sweat rag, sweat cloth, army scrim, rosenthal -
 National Vietnam Veterans Museum (NVVM)
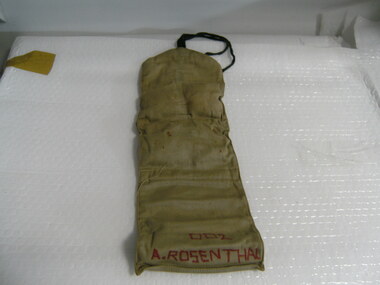
Equipment - Army Issue Sewing Kit
Standard issue sewing kit as used by National Serviceman, Lance Corporal B A Rosenthal, 3rd Battalion, The Royal Australian Regiment, Vietnam 1967-8, Mentioned in Despatches for his command and control during a section ambush in which he was wounded. Unit Citation for Gallantry for his involvement in the Battle of Fire Support Bases Coral and Balmoral.Green material sewing kit with 3 pockets containing vaarious threads, needles and pins for sewing.A Rosenthal 002 4718450kit sewing, house wife, rosenthal -
 National Vietnam Veterans Museum (NVVM)
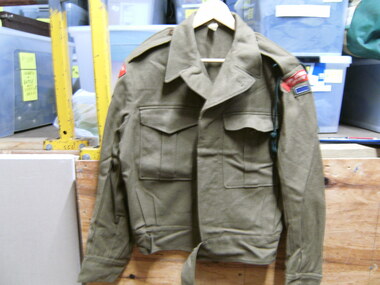
Uniform - Army jacket
Issued to National Serviceman, Lance Corporal B A Rosenthal, 3rd Battalion, The Royal Australian Regiment 1967-8, Mentioned in Despatches for his command and control during a section ambush in which he was wounded. Unit Citation for Gallantry for his involvement in the Battle of Fire Support Bases Coral and Balmoral.Green battle dress jacket with red Royal Australian Regiment badge on each shoulder. Green lanyard attached to left shoulder. Two blue material badges under red badges on either shoulder. Size 10Regimental No. 4718450 Name B.A. Rosenthaljacket, rosenthal, army dress jacket -
 National Vietnam Veterans Museum (NVVM)
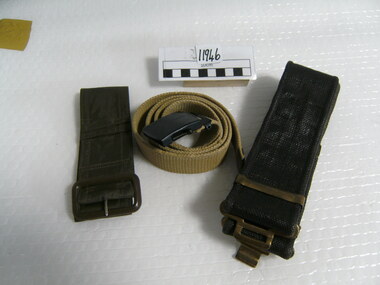
Equipment - Equipment, Army, Belts
Standard issue Army belts as used by National Serviceman, Lance Corporal B A Rosenthal, 3rd Battalion, The Royal Australian Regiment, Vietnam 1967-8, Mentioned in Despatches for his command and control during a section ambush in which he was wounded. Unit Citation for Gallantry for his involvement in the Battle of Fire Support Bases Coral and Balmoral.Three belts as follows. 1 - dress belt, black fabric withbrass fittings. 1 - hessian brown belt with black fittings. 1 - green plastic belt with metal buckle.Rosenthal 4718450belts, army belt, rosenthal -
 Bendigo Military Museum
Administrative record - Manual of Land Warfare - RASvy (Draft) by Maj C Watson 1984, Major C Watson, Canberra, 31 Jan 1984
This is a DRAFT document laying out the lines of command and control and duties of RASvy in Land Warfare. The document was prepared by Major C Watson in 31 Jan 1984. The document is missing its Title page. The Title was transcribed from an accompanying document " Technical Reports and papers held by Charlie Watson."26 x paper A4 sized pages of typed text, diagrams and tables held together with an ARNOS fastener. The document is missing its Title page. The Title was transcribed from an accompanying document " Technical Reports and papers held by Charlie Watson."royal australian survey corps, rasvy, fortuna, army survey regiment, army svy regt, asr -
 Wangaratta RSL Sub Branch
Uniform - Brassard, Interfet, c1999
INTERFET (International Force East Timor) brassard worn by all service personnel from all participating nations in Timor between October 1999 and February 2000, prior to the United Nations resuming control. INTERFET was commanded by an Australian, Major General Peter Cosgrove and approximately 7000 Australian service personnel were deployed. The International Force East Timor (INTERFET) was a multinational non-United Nations peacemaking taskforce, organised and led by Australia in accordance with United Nations resolutions to address the humanitarian and security crisis that took place in East Timor from 1999–2000 until the arrival of UN peacekeepers. Dark green army brassard with three patches.Australian flag patch, Interfet patch, International Force East Timor Peace patch.brassard, arm band -
 Bendigo Military Museum
Photograph - Visit by MAJ GEN Taylor to the Army Headquarters Survey Regiment, Fortuna, Bendigo, 1966
This is a set of two photographs of a visit to the Army Headquarters Survey Regiment, Fortuna. Bendigo in 1966, by MAJ GEN Taylor, GOC Southern Command. He was escorted by the CO - LTCOL Frank Buckland OBE, MID. LTCOL Frank Buckland OBE, MID was the CO of the Army Headquarters Survey Regiment from 1962 to 1965. After promotion to Colonel, he was appointed as Director of the Royal Australian Survey Corps from March 1967 to August 1972. COL Buckland OBE, MID was promoted to Brigadier (retired) to the honorary position as Colonel Commandant from January 1973 to January 1976. He served in the Australian Army from 01 June 1938 to 31 October 1972.This is a set of two photographs of MAJ GEN Taylor’s visit to the Army Headquarters Survey Regiment, Fortuna, Bendigo in 1966. The photographs were printed on photographic paper and are part of the Army Survey Regiment’s Collection. They were scanned at 300 dpi. .1) - Photo, black and white, 1966. L to R: MAJ GEN Taylor, CO LTCOL Frank Buckland OBE. .2) - Photo, black and white, 1966. L to R: MAJ Eddy Anderson MBE, MAJ GEN Taylor, CO LTCOL Frank Buckland OBE, unidentified (x2). .1P to .2P – no annotationsroyal australian survey corps, rasvy, army survey regiment, army svy regt, fortuna, asr -
 Wangaratta RSL Sub Branch
Print - Framed print
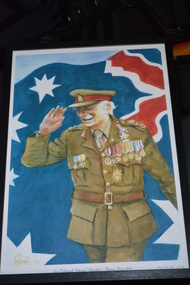
Colonel Sir Ernest Edward "Weary" Dunlop, AC, CMG, OBE (12 July 1907 – 2 July 1993) was an Australian surgeon who was renowned for his leadership while being held prisoner by the Japanese during World War II. Born 12 July 1907 Major Plains, Victoria Died 2 July 1993 (aged 85) Service/branch Australian Army Years of service 1935–1946 Rank Colonel Unit Royal Australian Army Medical Corps 2/2nd Casualty Clearing Station Commands held No.1 Allied General Hospital Battles/wars World War II Battle of Greece North African Campaign Syria-Lebanon campaign South West Pacific New Guinea Campaign South East Asia Campaign Awards Companion of the Order of Australia Knight Bachelor Companion of the Order of St Michael and St George Officer of the Order of the British Empire Knight of the Venerable Order of Saint John Mentioned in Despatches Black timber frame containing coloured caricature of saluting Army Officer with flag in background.Sir Edward "Weary" Dunlop - Anzac Day 1993 Print No 455 of 500colonel sir ernest edward dunlop, "weary" dunlop, surgeon -
 National Vietnam Veterans Museum (NVVM)
Photograph, Captain John White, AATTV, arrives in Vietnam, January 1968, 1/01/1968 12:00:00 AM
Captain John E D White, Australian Army Training Team in Vietnam (AATTV) took over command of 11 Mobile Strike Force (Mike Force) Company in Da Nang, Vietnam, in February 1968. He was 26 years old. The 2 NVA Division was moving from Laos into South Vietnam and his mission was to establish contact with the division and trace its movements south. In mid-March the company was air lifted to the Special Forces camp of Kham Duc, near the Laotian border. They used an old French Foreign Legion fort as a temporary base from which patrols could be sent out. White called it Ngok Tavak after a nearby mountain. Initially, patrols failed to find the enemy, but in late April a patrol clashed with the enemy. At the same time, White received intelligence that the NVA division was closing in. At night they could hear explosions in the distance heading toward them. White decided their best chance was to leave the fort and take to the jungle to adopt guerrilla tactics. However, in the meantime a platoon of United States Marine Corps artillery arrived bringing with them two howitzers and a stockpile of ammunition. To abandon the fort was to abandon the guns. White contacted Da Nang, explaining the predicament, and was ordered to remain where he was. A Civilian Irregular Defense Group (CIDG) platoon was sent to reinforce his numbers. This was a para military force comprised mainly of indigenous highlanders, trained by United States Special Forces. They also brought with them two mortars and their crews. At 3.15am on 10 May 1968 some members of the CIDG chose to assist the NVA to attack the fort instead of supporting Mike Force, and close hand to hand fighting followed, along with grenade attacks and heavy machine gun fire. Air support offered a brief respite from the NVA attack, and some NVA forces were pushed back outside the perimeter by counter attacks, but at 9am White contacted Da Nang to advise that his position was untenable. A second attack was imminent and they could not withstand it, so they would have to withdraw. The wounded were evacuated by helicopter (under orders from Major Mai, the NVA had not attacked the previous medical helicopters that collected the wounded under the cover of air strikes) and at 1pm the rest of the force evacuated east, into the jungle. The NVA did not notice their withdrawal, and continued mortar attacks on the fort for another ninety minutes. Seven kilometres from the fort White called for a helicopter withdrawal of his forces. The force was successfully lifted to Kham Duc and then Da Nang. (Credit AWM)Coloured image of John (Jed) White, aged 26 arriving at Tan Son Nhut Airport in full uniform, bag straps over left shoulder. Close- up of chest and head with plane visible in the background.AWM - p 11058,001capt john (jed) white, aattv, battle of ngok tavak -
 National Vietnam Veterans Museum (NVVM)
Plaque, Mobile Strike Force Shield
Captain John E D White, Australian Army Training Team in Vietnam (AATTV) took over command of 11 Mobile Strike Force (Mike Force) Company in Da Nang, Vietnam, in February 1968. He was 26 years old. The 2 NVA Division was moving from Laos into South Vietnam and his mission was to establish contact with the division and trace its movements south. In mid-March the company was air lifted to the Special Forces camp of Kham Duc, near the Laotian border. They used an old French Foreign Legion fort as a temporary base from which patrols could be sent out. White called it Ngok Tavak after a nearby mountain. Initially, patrols failed to find the enemy, but in late April a patrol clashed with the enemy. At the same time, White received intelligence that the NVA division was closing in. At night they could hear explosions in the distance heading toward them. White decided their best chance was to leave the fort and take to the jungle to adopt guerrilla tactics. However, in the meantime a platoon of United States Marine Corps artillery arrived bringing with them two howitzers and a stockpile of ammunition. To abandon the fort was to abandon the guns. White contacted Da Nang, explaining the predicament, and was ordered to remain where he was. A Civilian Irregular Defense Group (CIDG) platoon was sent to reinforce his numbers. This was a para military force comprised mainly of indigenous highlanders, trained by United States Special Forces. They also brought with them two mortars and their crews. At 3.15am on 10 May 1968 some members of the CIDG chose to assist the NVA to attack the fort instead of supporting Mike Force, and close hand to hand fighting followed, along with grenade attacks and heavy machine gun fire. Air support offered a brief respite from the NVA attack, and some NVA forces were pushed back outside the perimeter by counter attacks, but at 9am White contacted Da Nang to advise that his position was untenable. A second attack was imminent and they could not withstand it, so they would have to withdraw. The wounded were evacuated by helicopter (under orders from Major Mai, the NVA had not attacked the previous medical helicopters that collected the wounded under the cover of air strikes) and at 1pm the rest of the force evacuated east, into the jungle. The NVA did not notice their withdrawal, and continued mortar attacks on the fort for another ninety minutes. Seven kilometres from the fort White called for a helicopter withdrawal of his forces. The force was successfully lifted to Kham Duc and then Da Nang. (Credit AWM)A wooden shield painted grey/black celebrating the 40th Anniversary of the Battle of Ngok Tavak. There are three messages from mates written in black on the back. The shield was presented to Capt John (Jed) White.Presented to Captain John White, AATTV from the men of the Mobile Strike Force, Danang, Vietnam, 1968.mobile strike force, capt john (jed) white, shield, battle of ngok tavak -
 National Vietnam Veterans Museum (NVVM)
Photograph, Sketch of Battle Map, Ngok Tavak, Mary 1968
Captain John E D White, Australian Army Training Team in Vietnam (AATTV) took over command of 11 Mobile Strike Force (Mike Force) Company in Da Nang, Vietnam, in February 1968. He was 26 years old. The 2 NVA Division was moving from Laos into South Vietnam and his mission was to establish contact with the division and trace its movements south. In mid-March the company was air lifted to the Special Forces camp of Kham Duc, near the Laotian border. They used an old French Foreign Legion fort as a temporary base from which patrols could be sent out. White called it Ngok Tavak after a nearby mountain. Initially, patrols failed to find the enemy, but in late April a patrol clashed with the enemy. At the same time, White received intelligence that the NVA division was closing in. At night they could hear explosions in the distance heading toward them. White decided their best chance was to leave the fort and take to the jungle to adopt guerrilla tactics. However, in the meantime a platoon of United States Marine Corps artillery arrived bringing with them two howitzers and a stockpile of ammunition. To abandon the fort was to abandon the guns. White contacted Da Nang, explaining the predicament, and was ordered to remain where he was. A Civilian Irregular Defense Group (CIDG) platoon was sent to reinforce his numbers. This was a para military force comprised mainly of indigenous highlanders, trained by United States Special Forces. They also brought with them two mortars and their crews. At 3.15am on 10 May 1968 some members of the CIDG chose to assist the NVA to attack the fort instead of supporting Mike Force, and close hand to hand fighting followed, along with grenade attacks and heavy machine gun fire. Air support offered a brief respite from the NVA attack, and some NVA forces were pushed back outside the perimeter by counter attacks, but at 9am White contacted Da Nang to advise that his position was untenable. A second attack was imminent and they could not withstand it, so they would have to withdraw. The wounded were evacuated by helicopter (under orders from Major Mai, the NVA had not attacked the previous medical helicopters that collected the wounded under the cover of air strikes) and at 1pm the rest of the force evacuated east, into the jungle. The NVA did not notice their withdrawal, and continued mortar attacks on the fort for another ninety minutes. Seven kilometres from the fort White called for a helicopter withdrawal of his forces. The force was successfully lifted to Kham Duc and then Da Nang. (Credit AWM)Annotated hand-drawn map of the fort at Ngok Tavak, 10 May 1968.battle of ngok tavak, john white, battle map -
 Montmorency–Eltham RSL Sub Branch
Unknown - Hat, Fur Felt, New Zealand, WW1 NZ felt Hat, 1916-1918
This head-wear was Introduced by Lieutenant colonel William Malone whilst in command of a New Zealand Territorial unit (Taranaki Rifles) just prior to World War 1. The hat's crown was said to mirror the outline of Mount Taranaki. The hat was formerly adopted by the New Zealand army in France in early 1916 and is commonly referred to as the 'Lemon Squeezer'. It is still in use for ceremonial purposes. Note: Lieutenant colonel Malone was killed in action on Gallipoli in 1915 during the battle of Chunuk Bair. Fur felt hat, khaki, similar in appearance to a Scout's hat but with a higher crown and longer 'bashes'. Blue/red/blue cloth Puggaree with brass WW1 NZ Artillery badge. Often referred to as a New Zealand "Lemon squeezer" of WW1.hat, headgear -
![Newspaper - Newspaper clipping, [The Sun News-Pictorial], She's back as army nurse chief, Tuesday, February 28, 1950](/media/collectors/64a5077bc83bd7b7b94f4211/items/66e103401c71f49c490bb347/item-media/66e10dbc1c71f49c490d3be5/item-fit-380x285.jpg) Returned Nurses RSL Sub-branch
Returned Nurses RSL Sub-branchNewspaper - Newspaper clipping, [The Sun News-Pictorial], She's back as army nurse chief, Tuesday, February 28, 1950
Article about E[dith] L[ydia] Shaw being appointed Principal Matron of the Commonwealth Military Forces, Southern Command.Single column print article with photograph captioned "MATRON SHAW" in second column. Article is glued to a lined piece of paper with crossed out small clippings glued to other side. Article date is Tuesday, February 28, 1950.edith lydia shaw, principal matron, commonwealth military forces, southern command -
 Wangaratta RSL Sub Branch
Document - Framed photocopy of Instrument of Surrender of Japanese Forces Singapore
The Instrument of Surrender signed at Singapore by Admiral Lord Louis Mountbatten for the Allies and General Itagaki for the Japanese. During his time as Supreme Allied Commander of the Southeast Asia Theatre, Lord Mountbatten's command oversaw the recapture of Burma. A personal high point was the receipt of the Japanese surrender in Singapore when British troops returned to the island to receive the formal surrender of Japanese forces in the region led by General Itagaki on 12 September 1945, codenamed Operation Tiderace. General Itagaki was convicted of war crimes and executed inn 1948.The surrender of Imperial Japan was announced on August 15 and formally signed on September 2, 1945, bringing the hostilities of World War II to a close.Following the war, Mountbatten was known to have largely shunned the Japanese for the rest of his life out of respect for his men killed during the war, and as per his will, Japan was not invited to send diplomatic representatives to his funeral in 1979,Black frame with silver insert with glass of a photocopy of the Instrument of Surrender of the Japanese Forces. Script is in black on white paper with a red square seal at the bottom left, mounted on cream board.Instrument of surrender of Japanese Forces under the command or control of the Supreme Commander, Japanese Expeditionary forces, southern regions within the operational theatre of the Supreme Allied Commander, South East Asia. Signed at Singapore at 0341 hours (G.M.T.) on 12 September, 1945.wwii, world war 2, imperial japanese forces, surrender, singapore, japanese army -
 Bendigo Military Museum
Photograph - WRAAC Personnel posted to the Army Headquarters Survey Regiment, Fortuna Bendigo, c1950s – 1960s
This is a collection of seven photographs of Women’s Royal Australian Army Corps (WRAAC) personnel posted to the Army Headquarters Survey Regiment, Fortuna, Bendigo circa 1957 to 1964. After the disbandment of the Australian Women's Army Service (AWAS) in 1947 there was only one or two of civilian women in administrative positions at Fortuna. In February 1957 female positions from the disbanded Southern Command Field Survey Section in Melbourne were transferred to newly established positions at the Army Headquarters Survey Regiment, Bendigo. They were accommodated at the newly acquired ‘Turriff’ mansion in Carpenter Street, Bendigo. Their first Officer Commanding (OC) was CAPT Beryl Perry from 1957 to September 1960. Her replacement as OC was CAPT Carol Castor who served in several positions up to June 1967. The main areas of employment in these early days were in administrative positions, draughting in and retouching in Lithographic Squadron. WO2 MA McLaren was the female to reach the rank of WO2 as a Cartographic Squadron section commander in June 1961. WO1 Marj Knight served at Fortuna from 1959 to 1978 was the first female to reach the rank of WO1. WO1 Knight served in the senior Squadron Sergeant-Major and Technical Warrant Officer positions of Cartographic Squadron. She was also the first female PMC of the Army Survey Regiment SGT’s Mess. The WRAAC uniform seen in this collection was replaced in 1979. As the Australian Army implemented the disbandment of the WRAAC as a separate corps in 1980, WRAAC personnel posted to Royal Australian Survey Corps units were integrated into RA Svy.This is a collection of seven photographs of Women’s Royal Australian Army Corps (WRAAC) personnel posted to the Army Headquarters Survey Regiment, Fortuna Bendigo circa 1957 to 1964. The photographs were printed on photographic paper and are part of the Army Survey Regiment’s Collection. The photographs were scanned at 300 dpi. .1) - Photo, black & white, c1957. Back row – unidentified personnel, Front row – centre: CAPT Beryl Perry, unidentified personnel. .2) - Photo, black & white, c1958. Back row – unidentified personnel, Front row L to R: unidentified, SGT Margaret McLaren, CAPT Beryl Perry, unidentified (x2). .3) - Photo, black & white 1959. Back row – L to R: PTE Gwen Hill, PTE Hilary Clarkson, PTE Helen Paisley, PTE Pam Carseldine, PTE Margaret Ross, PTE Barbara Minto, PTE Margaret Taylor. Front row L to R: PTE Barbara Hawkin, PTE Joan Murray, SGT Margaret McLaren, CAPT Carol Castor, CPL Jenny Murray, CPL Julie Williams, PTE Phillipa Bowman. .4) - Photo, black & white, October 1963. L to R: WO2 Margaret McLaren, PTE Kay Brown, CAPT Carol Castor, PTE Helen Pasley, PTE Bev Madex, CPL Marj Knight. .5) - Photo, black & white, October 1963. L to R: PTE Bev Madex, PTE Helen Pasley, PTE Kay Brown, WO2 MA McLaren, CPL Marj Knight. .6) - Photo, black & white, August 1963. Back row – L to R: PTE Hollingsworth, PTE GM Hill, PTE PE Sykes, PTE Nola Strawbridge, PTE Jan Cruickshank, PTE Margaret Taylor, PTE Prescott, PTE RR Hutton, PTE BJ Madex, PTE BM Fuhrmann, PTE Cockburn. Front row – L to R: PTE NA Falot, LCPL JA Hurst, SGT Marj Knight, CAPT Carol Caster, CPL Jennifer Murray, LCPL A Burrows, unidentified. .7) - Photo, black & white, 1964. Back row – L to R: PTE Dianne Fowler, PTE Leslie Mortimer, PTE Marlene Penglase, PTE Marg Cooper, PTE Irene Rankins, PTE Elaine Veith, PTE Lyn Ireland, PTE Marg Murphy, PTE Nola Downes, PTE Joan Lawler, PTE Henni Schunck. Front row – L to R: PTE Loretta Hall, LCPL Jo McNamara, SGT Marj Knight, CAPT Carol Caster, CPL Nola Strawbridge, PTE Mary McHugh, PTE Kalen Sargent..1P to .3P, .7P - no annotation, .4P to .6P - Personnel (surnames, no rank) annotated on back.royal australian survey corps, rasvy, army survey regiment, army svy regt, fortuna, asr, wraac -
 National Vietnam Veterans Museum (NVVM)
Document, Australian Military Forces, Leave Pass, 5/06/1970 12:00:00 AM
White paper with black print. Purple ink stampLeave Pass Number G112380 / Army No. 3794332 Tpr McNamara J.P. (Name) / telephone No where member taking Leave - 75 Meakin St, Watsonia Vic / from 2400 12/6/70 to 2400 25/6/70 / Signed at Nui Dat 5/6/70 Stamp = Eastern Command Personnel Depot, Watsons Baypermissive orders, pass, leave, australian military forces -
 Wangaratta RSL Sub Branch
Print - Framed Print
... ). At the Battle of Omdurman (2 September 1898), an army commanded ...The charge of the 21st Lancers in September 1898 was one of the last full-scale cavalry charges of the British Army. The battle took place 6.4 km. (four miles) outside Omdurman, just north of Khartoum and marked the culmination of Major-General Sir Horatio Herbert (later Field Marshal, 1st Earl) Kitchener's campaign for the re-conquest of the Sudan, the 2nd Sudan War (1896-1898).At the Battle of Omdurman (2 September 1898), an army commanded by the British General Sir Herbert Kitchener defeated the army of Abdullah al-Taashi, the successor to the self-proclaimed Mahdi, Muhammad Ahmad. Kitchener was seeking revenge for the 1885 death of General Gordon. It was a demonstration of the superiority of a highly disciplined army equipped with modern rifles, machine guns, and artillery over a force twice their size armed with older weapons, and marked the success of British efforts to re-conquer the Sudan. Timber framed print depicting mounted soldiers in battleOmdurman Charge of 21st Lancers21st lancers, omdurman, sudan -
 Bendigo Military Museum
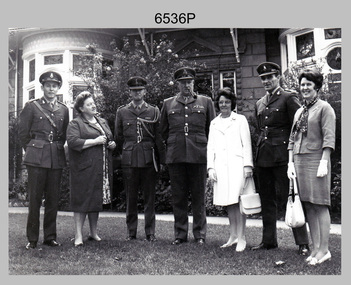
Photograph - Visit by General to the Army Survey Regiment, Fortuna, Bendigo, c1975
This photograph was most likely taken circa 1975 in the front garden of Fortuna Villa, during an Australian Army General’s visit to the Army Survey Regiment, Bendigo circa 1975. As there are no annotations on the photo, the names of the General, the aide de camp officer and guests are unknown. LTCOL Ridge was the CO of Army Headquarters Survey Regiment from 1972 to 1973 and continued as the CO of the renamed Army Survey Regiment from 1974 to 1975. He handed over to LTCOL Peter Constantine AM, who commanded the unit from 1975 to 1976.This is a photograph taken on the occasion of an Australian Army General’s visit to the Army Survey Regiment, Bendigo circa 1975. The black and white photograph was printed on photographic paper and are part of the Army Survey Regiment’s Collection. The photographic print was scanned at 300 dpi. .1) - Photo, black & white, c1975. L to R: CO LTCOL Donald Ridge, unidentified dignitary, guests and personnel.‘Visit by Gen??? 1973-1977’ annotated on cover sheet.royal australian survey corps, rasvy, army survey regiment, army svy regt, fortuna -
 Bendigo Military Museum
Photograph - Army Survey Regiment Freedom of Entry Parade Rehearsal, Fortuna. Bendigo, 1980
This set of 38 black and white photographs were taken at the Army Survey Regiment’s parade rehearsal held at Fortuna, Bendigo in 1980. The rehearsal was for the Freedom of Entry parade held 1-2 weeks later in 1980. The exact date for the Freedom of Entry parade is not known. The Freedom of Entry to the City of Bendigo was an honour first conferred by the Bendigo City Council to the Army Survey Regiment in 1970. The Freedom of Entry parade in 1980 was the fourth time the unit exercised its right of freedom of entry. The Regiment also exercised its Freedom of Entry with anniversary parades in 1977, 1980 and 1995. Refer to items 6020.8P, 6021.25P, 6248P, 6266, 6409.2, 6430.39P, 6490.53P and 6491.21P for more Army Survey Regiment Freedom of Entry photographs, documents and certificates. See item 6471.2P for photos of Lithographic Squadron taken on the same day of this parade rehearsal. This set of 38 black and white photographs of the Army Survey Regiment (Army Svy Regt) were taken in a rehearsal for the Freedom of Entry parade to the City of Bendigo, held 1-2 weeks later in 1980. The photographs are on 35mm negative film and were scanned at 96 dpi. They are part of the Army Survey Regiment’s Collection. .1) - Photo, black & white, 1980. WO1 John McCulloch observes the rehearsal. .2) - Photo, black & white, 1980. RSM WO1 Aub Harvey, WO1 Dave Thomson and WO1 Roger Rix observe the rehearsal. .3) - Photo, black & white, 1980. Under command of SSM WO1 Bob Mason, Air Survey Squadron marches onto the parade ground - Front rank L to R: SPR Peter Jones, SPR Barry Miller, CPL Alan Hawkins. .4) - Photo, black & white, 1980. Air Survey Squadron marches on the parade ground - L to R: SPR Peter Jones, CPL Lyall Camp, SPR Barry Miller, SPR Geoff Havelberg, unidentified, CPL Alan Hawkins, CPL Peter Treble, unidentified (x2), SGT Mick Hogan, SGT Bruce Hammond, unidentified, SPR Steve Linane, SPR Jamie McRae, unidentified (x2). .5) - Photo, black & white, 1980. Air Survey Squadron formed up – CAPT Peter Ralston on far left. .6) - Photo, black & white, 1980. Air Survey Squadron inspection – L to R: CAPT Peter Ralston, CPL Alan Hawkins, CO LTCOL Bob Skitch, SGT Mick Hogan, SGT Bruce Hammond, SPR Jamie McRae. .7) - Photo, black & white, 1980. Air Survey Squadron inspection – L to R: SPR Peter Jones, unidentified, CPL Paul Hopes, unidentified, SGT Rick van der Bom, LTCOL Bob Skitch, SPR Steve Linane, CPL Mick Minchin, unidentified, SPR Gae (Robinson) Amato, unidentified, SPR Chris ‘CPL Peter Treble, Charlie’ Brown, SPR Ginny (Turner) Rowe. .8) - Photo, black & white, 1980. Lithographic Squadron marches onto the parade ground - Front rank L to R: SPR Brian Fauth, SPR Roy Hicks, SPR Per Andersen, commanded by LT Steve Cooper. .9) - Photo, black & white, 1980. Lithographic Squadron marches onto the parade ground - L to R: SSM WO1 Ken Slater, Front rank SPR Brian Fauth, SPR Roy Hicks, SPR Per Andersen, LT Steve Cooper. .10) - Photo, black & white, 1980. Lithographic Squadron inspection - L to R: CAPT Stan Vote, LT Steve Cooper, CO LTCOL Bob Skitch, SPR Neville Carr, SPR Laurie Justin, SPR Keith Quinton. .11) - Photo, black & white, 1980. Lithographic Squadron inspection - L to R: unidentified, LT Steve Cooper, CPL Frank Lenane, CPL Mick ‘Buddha’ Ellis, SPR Martin van de Maele, CO LTCOL Bob Skitch, unidentified (x2), SPR Garry Hudson, remainder unidentified. .12) - Photo, black & white, 1980. Lithographic Squadron inspection - L to R: LT Steve Cooper, CPL Rob Bogumil, unidentified, CO LTCOL Bob Skitch, CPL Bill Jones, CPL John ‘Flash’ Anderson, CPL Warren ‘Waldo’ Shirley, unidentified. .13) - Photo, black & white, 1980. Lithographic Squadron inspection - L to R: unidentified (x4), CO LTCOL Bob Skitch, unidentified, CPL Bill Jones, LT Steve Cooper, CPL Warren ‘Waldo’ Shirley. .14) - Photo, black & white, 1980. Lithographic Squadron performs form - right file L to R: SPR Brian Fauth, SPR Roy Hicks, SPR Per Andersen. .15) - Photo, black & white, 1980. Lithographic Squadron completes form at the halt. .16) - Photo, black & white, 1980. Lithographic Squadron marches in column of route – right file L to R: SPR Keith Quinton, SPR John Whaling, SPR Martin van de Maele, SPR John Whaling, SPR Garry Hudson, unidentified. Centre marker: CPL Warren ‘Waldo’ Shirley, remainder unidentified. .17) - Photo, black & white, 1980. Lithographic Squadron marches in column of route – right file L to R: SPR John Whaling, SPR Martin van de Maele, SPR John Whaling, SPR Garry Hudson, unidentified. Centre marker CPL Warren ‘Waldo’ Shirley, remainder unidentified. .18) - Photo, black & white, 1980. Lithographic Squadron marches in column of route – L to R: SPR Per Andersen, CPL Josh Degroot, SPR Neville Carr, SPR Laurie Justin, SPR Keith Quinton, SPR John Whaling, SPR Martin van de Maele, SPR John Whaling, SPR Garry Hudson, unidentified. .19) - Photo, black & white, 1980. Lithographic Squadron marches in column of route – L to R: SPR Per Andersen, CPL Josh Degroot, SPR Neville Carr, SPR Laurie Justin, SPR Keith Quinton, SPR Martin van de Maele, SPR John Whaling, SPR Garry Hudson, unidentified (x2), CPL Warren ‘Waldo’ Shirley, unidentified. .20) - Photo, black & white, 1980. Lithographic Squadron rehearses ‘rest on arms reverse.’ .21) - Photo, black & white, 1980. Cartographic Squadron marches onto the parade ground in column of route - L to R: SPR Cheryl Lofthouse, unidentified, SSM WO1 Gordon Lowery, unidentified, SPR Megan (McBurney) Reynolds, unidentified (x6), SPR Peter Main, CPL Stu Symonds, SPR Greg Else, SPR Rod Skidmore. .22) - Photo, black & white, 1980. Cartographic Squadron marches onto the parade ground in column of route - L to R: SPR Rod Skidmore, SPR Greg Else, CPL Phil McGuire, CPL Dennis Learmonth, CPL Brad Peppler, CPL Trevor Bottomley, SPR Gina (Coore) Neilson, SPR Carla Dell, CPL Lynn Johnson, commanded by CAPT Bob Williams. .23) - Photo, black & white, 1980. Cartographic Squadron inspection - L to R: unidentified officer, CAPT Bob Williams, SPR Greg Else, CO LTCOL Bob Skitch, CPL Phil McGuire, CPL Dennis Learmonth, CPL Brad Peppler, CPL Trevor Bottomley. .24) - Photo, black & white, 1980. Cartographic Squadron inspection - L to R: RSM WO1 Aub Harvey, unidentified officer, CAPT Bob Williams, CO LTCOL Bob Skitch. Front rank L to R: SPR Rod Skidmore, CPL Phil McGuire, CPL Dennis Learmonth, CPL Brad Peppler, CPL Trevor Bottomley, SPR Gina (Coore) Neilson, SPR Carla Dell, CPL Lynn Johnson. Centre rank L to R: CPL Terry Danger, SPR John Martin, SPR Bob Sheppard. SPR Megan (McBurney) Reynolds. .25) - Photo, black & white, 1980. Cartographic Squadron inspection - Front rank L to R: CPL Phil McGuire, CAPT Bob Williams, CPL Brad Peppler, CO LTCOL Bob Skitch, CPL Trevor Bottomley, SPR Gina (Coore) Neilson, SPR Carla Dell, CPL Lynn Johnson. .26) - Photo, black & white, 1980. Cartographic Squadron inspection - L to R: WO1 Roger Rix, RSM WO1 Aub Harvey, unidentified officer. Front rank L to R: SPR Rod Skidmore, SPR Greg Else, CPL Phil McGuire, CPL Brad Peppler, CPL Trevor Bottomley, SPR Gina (Coore) Neilson, SPR Carla Dell, CPL Lynn Johnson. Centre rank L to R: CPL Terry Danger, SPR John Martin, SPR Bob Sheppard. SPR Megan (McBurney) Reynolds. .27) - Photo, black & white, 1980. Cartographic Squadron inspection - L to R: CPL Dennis Learmonth, CPL Brad Peppler, CO LTCOL Bob Skitch, CPL Trevor Bottomley, SPR Gina (Coore) Neilson, SPR Carla Dell, CPL Lynn Johnson. .28) - Photo, black & white, 1980. Cartographic Squadron inspection - L to R: CAPT Bob Williams, unidentified, CO LTCOL Bob Skitch, SPR John Martin, SPR Bob Sheppard, SPR Megan (McBurney) Reynolds, rear rank L to R: SPR Peter Main, unidentified (x3). .29) - Photo, black & white, 1980. Cartographic Squadron rehearses ‘reverse arms’ - L to R: SPR Peter Main, CPL Stu Symonds, SPR Rod Skidmore, SPR Greg Else, remainder unidentified. .30) - Photo, black & white, 1980. Cartographic Squadron rehearses ‘rest on arms reverse.’ - Front rank L to R: SPR Rod Skidmore, SPR Greg Else, CPL Phil McGuire, CPL Dennis Learmonth, CPL Brad Peppler, CPL Trevor Bottomley. remainder unidentified. Centre rank L to R: unidentified (x2), SPR John Martin, SPR Bob Sheppard, SPR Megan (McBurney) Reynolds. Rear rank L to R: unidentified (x3), SPR Carla Dell on far right. .31) - Photo, black & white, 1980. Cartographic Squadron marches in column of route. .32) - Photo, black & white, 1980. Cartographic Squadron marches in column of route. Left file L to R: SPR Rod Skidmore, SPR Greg Else, CPL Phil McGuire, CPL Dennis Learmonth, CPL Brad Peppler, CPL Trevor Bottomley, SPR Gina (Coore) Neilson, SPR Carla Dell, CPL Lynn Johnson. Centre file L to R: unidentified (x2), SPR Dan Cirsky, SPR Bob Sheppard. Commanded by CAPT Bob Williams (foreground). .33) - Photo, black & white, 1980. Cartographic Squadron rehearses ‘order arms.’ Front rank L to R: SPR Rod Skidmore, SPR Greg Else, CPL Phil McGuire, CPL Dennis Learmonth, CPL Brad Peppler, CPL Trevor Bottomley, SPR Gina (Coore) Neilson, SPR Carla Dell, CPL Lynn Johnson. Centre rank L to R: unidentified (x2), SPR Dan Cirsky, SPR Megan (McBurney) Reynolds, SPR Ilen Isaac. Rear rank L to R: SPR Cathy Regan, unidentified, SPR Cheryl Lofthouse. .34) - Photo, black & white, 1980. Cartographic Squadron rehearses ‘right dress.’ Front rank L to R: SPR Rod Skidmore, SPR Greg Else, CPL Phil McGuire, CPL Dennis Learmonth, CPL Brad Peppler, CPL Trevor Bottomley, SPR Gina (Coore) Neilson, SPR Carla Dell, CPL Lynn Johnson. Centre rank L to R: SPR John Martin, SPR Bob Sheppard. SPR Megan (McBurney) Reynolds, SPR Ilen Isaac. Rear rank L to R: unidentified (x2), SPR Cathy Regan, unidentified, SPR Cheryl Lofthouse. Commanded by CAPT Bob Williams (far left). 35) - Photo, black & white, 1980. Air Survey Squadron section rehearses marching with reverse arms. L to R: SPR Bob Hopper, CPL Rick Downie, CPL Paul Hopes, unidentified (x2, SGT Rick van der Bom, SPR Steve Hilton, CPL Peter Treble, unidentified, SPR John Lane, remainder unidentified. .36) - Photo, black & white, 1980. Air Survey Squadron section rehearses marching with reverse arms. L to R: CPL Alan Hawkins, CPL John Smith, SPR Dave Jobe, unidentified (x2), SGT Mick Hogan, SPR Barry Miller, WO1 Dave Thomson. .37) - Photo, black & white, 1980. Cartographic Squadron sections practice drill. .38) - Photo, black & white, 1980. Air Survey Squadron rest break from drill practice. L to R: unidentified (x2), CPL Noel McNamara, SSGT Peter Warwick, SSGT Greg Buckingham (facing away), SGT Jim Beard, unidentified, SPR Sharon (Jones) Treble (foreground), unidentified, SGT Bruce Gordon, SPR Kristin (Isaac) Skidmore.There are no personnel identified. royal australian survey corps, rasvy, army survey regiment, army svy regt, fortuna, asr -
 Bendigo Military Museum
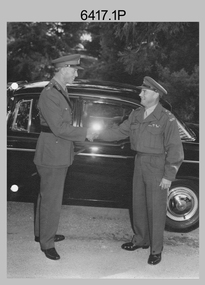
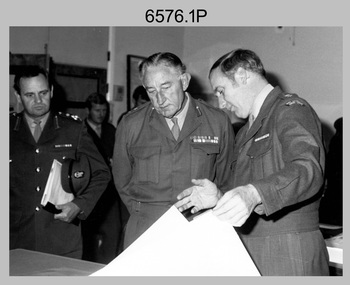
Photograph - Visit by MAJGEN David Engel AO OBE, to the Army Survey Regiment, Fortuna, Bendigo, 1982
This set of three photographs was taken the 30th of August 1982 during a visit to the Army Survey Regiment, Bendigo by the Deputy Chief of the General Staff - Major General David Frederick Walter Engel AO, OBE. As there are no annotations on the photo, the name of the Brigadier is unknown. LTCOL Peter Eddy was the CO of the Army Survey Regiment from 1981 to 1992 and handed over to LTCOL Jorge Gruszka, who commanded the unit from 1982 to 1985.This is set of three photographs taken on the occasion of a visit to the Army Survey Regiment, Bendigo by the Deputy Chief of the General Staff - Major General David Frederick Walter Engel AO, OBE on the 30th of August 1982. The black and white photograph was printed on photographic paper and are part of the Army Survey Regiment’s Collection. The photographic print was scanned at 300 dpi. .1) - Photo, black & white, 1982. Map production brief - L to R: unidentified Brigadier, unidentified visitor in background, MAJGEN David Engel AO OBE, CO LTCOL Peter Eddy. .2) - Photo, black & white, 1982. MAJGEN David Engel AO OBE views stereo aerial photography on a Wild B8 stereo plotter. .3) - Photo, black & white, 1982. Aerial photography brief - L to R: MAJGEN David Engel AO OBE, CO LTCOL Peter Eddy..1P to .3P –No personnel are identified. ‘Visit to ASR by MAJGEN Engel 30 Aug 1982’ annotated on cover sleeve.royal australian survey corps, rasvy, army survey regiment, army svy regt, fortuna -
 Bendigo Military Museum
Administrative record - Royal Australian Survey Corps - Central Command Operation Order C/1/61 Northern Territory 1961, DAD Svy, HQ Central Command , Keswick Barracks, SA, 1961
This is a Central Command Operation for the Royal Australian Survey Corps to conduct a Survey Operation in Northern Territory in 1961. The task is to acquire Survey Control for the production of maps coving the following 1:250 000 map areas of Alligator River, Mt Evelyn, Coburg Peninsula, (including the offshore Islands, Melville Island and Bathurst Island. The Operation Order details the tasks for the 6 x Officers (or equivalent) and 34 x OR's (or equivalent) and the support that was allocated including Frigate HMAS Gasgoyne, LSM landing craft, Trucks amphibian (DUKW), Helicopter and Cessna aircraft.A 11 x page foolscap size paper report and 1 x foldout map Annex held together with a paper clip. Two hole punched.Hand written File Number in top RH Corner "101-310-4". Distribution stamp in top LH Corner. Hand written No7 in Top RH Corner.royal australian survey corps, rasvy, fortuna, army survey regiment, army svy regt -
 Bendigo Military Museum
Administrative record - Royal Australian Survey Corps - Planning for Field Survey Operations for 1:250,000 - LtCol JK Herridge (RASvy) 1960, LtCol JB Herridge (RASvy), April 1960
This 13 x page document contains notes on planning for RASvy Field Survey Operations in Northern Command during 1958 and 1959 with helicopter support available for field operations for 1:250,000 mapping. The Document was written by LtCol JB Herridge (RASvy) at the School of Military Survey Balcombe April 1960.13 x foolscap pages of typed text, stapled and four holed punchedHand written "53" in top RH cornerroyal australian survey corps, rasvy, fortuna, army survey regiment, army svy regt, asr, school of military survey, sms -
 Wangaratta RSL Sub Branch
Photograph, c1945
TARAKAN, BORNEO, 1945-05-08. GENERAL SIR THOMAS A. BLAMEY, COMMANDER-IN-CHIEF, ALLIED LAND FORCES, SOUTH WEST PACIFIC AREA, (4), DRINKING COFFEE WITH SENIOR OFFICERS OUTSIDE THE SALVATION ARMY RED SHIELD HUT DURING HIS INSPECTION TOUR OF THE 2/23 INFANTRY BATTALION. IDENTIFIED PERSONNEL ARE:- BRIGADIER D.A. WHITEHEAD, COMMAND 26 INFANTRY BRIGADE, (1); LIEUTENANT COLONEL F.A.G. TUCKER, (2); LIEUTENANT COLONEL DWYER, (3); LIEUTENANT GENERAL F.H. BERRYMAN, GENERAL OFFICER COMMANDING 1 CORPS (5). Brigadier David Adie Whitehead had a distinguished and decorated career in both First and Second World Wars. He joined the Citizen Military Forces when it was raised in 1947 and commanded the 2nd Armoured Brigade (4th/19th Prince of Wales’s Light Horse and 8th/13th Victorian Mounted Rifles Regiments) till 1953 The 2/24th Battalion was an infantry battalion of the Australian Army, which served during World War II .A unit of all-volunteers, it was formed in July 1940 from primarily Victorian volunteers and was known as "Wangaratta's Own" because of the time the battalion spent in the town during its formative period prior to deployment overseas. It served in North Africa in 1941–1942 as part of the 26th Brigade, which was assigned to the 7th Division, before being reassigned to the 9th Division. In early 1943, the battalion returned to Australia and later took part in campaigns against the Japanese in New Guinea in 1943–1944 and Borneo in 1945, before being disbanded in 1946. The 2/24th suffered the highest number of casualties of any 2nd AIF infantry battalion. The Unit was granted the Freedom of the City by the Rural City of Wangaratta in 1990 and one of the first, if not the first, to receive this type of honourReproduced black and white photograph of four Army Officers having a brew under roof of thatched hut and in front of banner of The Salvation Army/Australian Comfort Fund Handwritten on note attached to rear -Whitehead on L Blamey on R - Qld tablelands (?)general blamey, brigadier whitehead, 26th brigade -
 Bendigo Military Museum
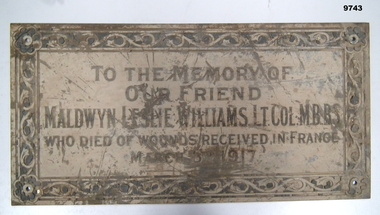
Plaque - MEMORIAL PLAQUE, WW1, C G Roeszler & Son, Post WW1
Born in Castlemaine 1886. Maldwyn L. Williams (Leslie) was a prominent doctor in Bendigo, both at Bendigo Base Hospital and in private practice. He played several games in the Victorian Football League (VFL) whilst at university. Enlisted in Citizens Military Force in 1909 as Captain in Royal Australian Army Medical Corps. Promoted to Major in 1913. Sept 1915 - appointed Major in regular army, 8th Field Ambulance Unit. Nov 1915 - sailed for Egypt; June 1916 - sailed for Marseilles. Jan 1917 - promoted to Lt. Colonel and command of 1st Field Ambulance Unit. Wounded near Bapaume 2nd March 1917; died from wounds 3rd March 1917. Buried at Dernancourt Cemetery, France. The engraver of the plaque was C.G. Roeszler & Son of Melbourne. This business was founded in 1869 and is still family-owned and trading today. This company is responsible for many examples of engraving around Melbourne, including work on the 1928 Ringwood Memorial Clock and in St Paul's Cathedral in Flinders St, Melbourne. Rectangular metal plaque, possibly brass. 4cm border featuring botanical motif. A flower with eight round petals at each corner - each flower has a 0.7cm hole at its centre. Decoration and inscription engraved and filled with black material, possibly shellac or enamel paint which is degraded, cracking, and loose.Main inscription: "TO THE MEMORY OF/OUR FRIEND/MALDWYN LESLIE WILLIAMS. LT. COL, M.B,B.S./WHO DIED OF WOUNDS RECEIVED IN FRANCE/MARCH 3RD ['RD" is in smaller font and higher that other letters with a dot beneath] 1917.' Bottom right: "C.G. ROESZLER & SON MELB".plaque, memorial -
 Bendigo Military Museum
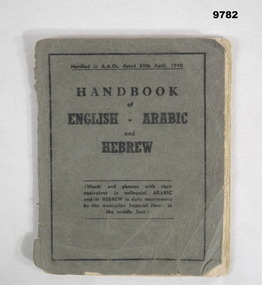
Booklet - HANDBOOK, WW2, MILITARY BOARD, Army Headquarters, Melbourne. Issued by Command of the Military Board, "HANDBOOK OF ENGLISH - ARABIC and HEBREW", 1940
From booklet cover "(Words and phrases with their/ equivalent in colloquial ARABIC/ and/or HEBREW in daily requirement/ by Australian Imperial Force in the Middle East)" Original owner of item "Frederick James BARNSTABLE" 2nd/2nd Pioneer Battalion VX 55245.Soft cover booklet. Booklet - cover cardboard, grey colour with black colour print on front cover. Spire with metal staples. 32 pages - cut, plain, white colour paper. Handwritten information on title page - ink and pencil.Handwritten information - black ink pen "C.B. Laffaw". Also what appears to be numerous grey lead pencil notations.booklet, hardcover, ww2, frederick james barnstable -
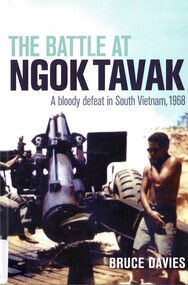 National Vietnam Veterans Museum (NVVM)
Book, Davies, Bruce, The Battle at Ngok Tavak: A bloody defeat in South Vietnam, 1968. (Copy 2), 2008
... of Ngok Tavak Australian Army Training Team Vietnam (AATTV) Laos ...In 1968, in the western jungle of Vietnam near Loas, a Special Forces Company under the command of an Australian Army Captain, supported by a Marine artillery detachment, occupied an old French Fort on a hill know as Ngok Tavak.In 1968, in the western jungle of Vietnam near Loas, a Special Forces Company under the command of an Australian Army Captain, supported by a Marine artillery detachment, occupied an old French Fort on a hill know as Ngok Tavak. vietnam, aattv, military participation -- american, battle of ngok tavak, australian army training team vietnam (aattv), laos, special forces company -
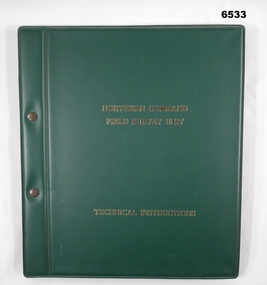 Bendigo Military Museum
Manual - Royal Australian Survey Corps - Northern Command Field Survey Unit Technical Instructions 1966-73, Northern Command Field Survey Unit, Brisbane, Aug 1966 - Feb 1973
The Royal Australian Survey had Field Survey Units located in most States of Australia. Northern Command Field Survey Unit was located in Brisbane. This folder contains technical Instructions for tasks carried out by the Unit from Survey control and data capture through to Field completion. The folder is held together by Chicago screws so that Instructions could be updated when necessary. Instruction No1 Production Data Records Aug 1966 23x pages, Instruction No2 Standard Operating Procedure for B8 Stereoplotting Oct 1967 4 x pages, Instruction No3 Provisional Compilation Specifications 1:100 mapping contouring Oct 1967 (Missing), Instruction No4 Horizontal Control Station Summaries Aug 1972 13 x pages, Instruction No5 Airphotography Mar 1972 8 x pages, Instruction No6 Reconnaisance Station marking and Station Notes Aerodist Operations Mar 1972, 13 x pages, Instruction No7 Field Completion Feb 1973, 7 x pages.A hard green plastic covered manual of 68 x paper pages of typed text diagrams and tables, some fold out Annexes. The pages are held together with two Chicago screwsWhite # "5 " inside front and back coversroyal australian survey corps, rasvy, fortuna, army survey regiment, army svy regt, asr, norther command field survey unit -
 National Vietnam Veterans Museum (NVVM)
Photograph, Gibbons, Denis, Trooping the Colour 2
Denis Gibbons (1937 – 2011) Trained with the Australian Army, before travelling to Vietnam in January 1966, Denis stayed with the 1st Australian Task Force in Nui Dat working as a photographer. For almost five years Gibbons toured with nine Australian infantry battalions, posting compelling war images from within many combat zones before being flown out in late November 1970 after sustaining injuries. The images held within the National Vietnam Veterans Museum make up the Gibbons Collection.A black and white photograph of Townsville, Queensland 19/08/1968 a portion of the guests, at the Trooping of the 6 RAR Regimental Colour. Left to right Maj Gen F G Hassett CBE DSO MVO the General Officer Commanding, Northern Command, Mrs Leah Lynch, The Hon Phillip Lynch MP, Minister for the Army, Mrs Tran Kim Phuong, His Excellency Mr Tran Kim Phuong, the Ambassador of the Republic of South Vietnam, Mrs Thomsonphotograph, 6 rar, townsville, maj gen f g hassett, the hon phillip lynch mp - minister for the army, mr tran kim phuong - ambassador of the republic of south vietnam, battle of long tan, gibbons collection catalogue, trooping of the colour, the distinguished service order (dso), member of the royal victorian order (a british order of knighthood), general officer commanding, mrs leah lynch, mrs thomson, denis gibbons -
 Bendigo Military Museum
Photograph - FRED CARLETON 2/23RD ALBUM, Lebanon
Frederick Lloyd Carleton VX1555 served in the 2/23rd Battalion, 9th Division in the Middle East and in the Pacific. The images detail his day to day life at the front and on leave. He served during the siege of Tobruk and at El Alamein, and was a lifelong member of the Bendigo sub-branch of the Rats of Tobruk Association. Refer Cat No 142.7 for his full service history. .01P) Brigadier R.W. Tovell, CBE, DSO & Bar, ED - MID 5 times. He had 5.5 years pre WW1 service in the Cadets, on discharge he held the rank of Lieutenant. Enlisted in the AIF 28.4.1915 age 29 years, appointed Lt 6.7.1915 in 2nd Reinforcements 29th BN. Embark for Eygpt 29.12.1915, embark for France 4.6.1916. He rose through the Ranks in various Commands to Brigade Major by 19.2.1918. Awarded MID24.10.1918, DSO & MID on 23.5.1919, MID on 30.10.1919. Appointment terminated in the AIF on 12.12.1920. Stayed on in the full time Army to be T/Brigader on 14.10.1939 to Command the 10th INF Brigade. Transfers to the 2nd AIF 1.7.1940 No VX46983and appointed to Command the 26th Brigade. Overseas service listed as Middle East 16.11.1940 - 10.11.1942. New Guinea 17.2.19144 - 21.3.1944 & 10.3.1945 - 23.3.1945, Darwin area 8.9.1944 - 19.9.1944. Awarded Bar to the DSO 30.12.1941, MID 26.6.1942 & 15.12.1942, CBE 15.4.1943. Appointed Deputy Adjutant General 3.5.1944, appointment terminated in the 2nd AIF on 20.12.1945, placed on the Reserve list of Officers with the rank of Colonel & Honorary Brigadier. Lt Col Evans VX478119. Bernard Evans had service going back to 1924. Enlisted in the 2nd AIF on 22.7.1940. His overseas service is listed as Middle East 16.11.1940 - 30.3.1943 - New Guinea 20.7.1943 - 10.11.1943, discharged fro m the AIF on 22.10.1945 with the rank of Colonel, awarded the DSO. .02P) Believed to be Benjamin Thomas Shiels VX58180, enlisted 24.6.1941, embarked for the Middle East 3.9.1941, KIA 29.10.1942. Joe Harrison is not yet identified. Collection of 76 photographs taken during service in 2/23rd in Middle EastSome photographs have inscriptions on the verso, and this information is included in the title information displayed when the image is clicked on.2/23rd battalion, tobruk, el alamein, western desert campain, fred carleton