Showing 254 items
matching railway truck
-
 Ballarat Tramway Museum
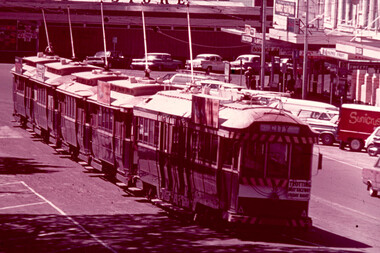
Slide - 35mm slide/s, Glen Mills, Nov. 1970
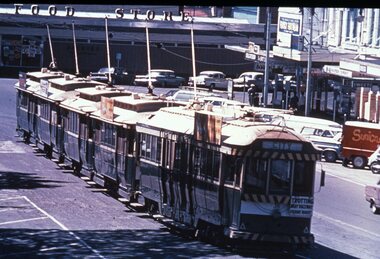
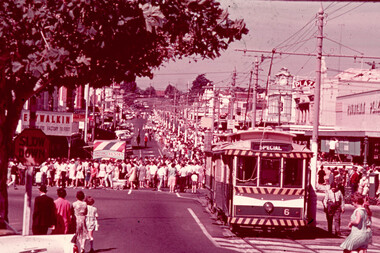
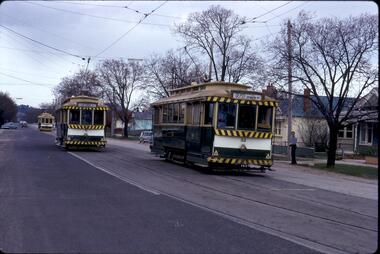
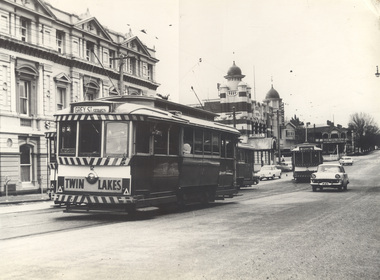
Agfa plastic mount (blue base, white cover) of a photograph of No. 36 and four single truckers at City or Grenville St Loop, with the buildings at the south east end of Sturt St. in the background is Dickins Food Store. A number of the trams have SEC roof advertisements and one unidentified one. Tram 36 has the "Trotting Bray Raceway Friday Night" auxiliary boards and is showing the destination of "CITY". Photo taken Nov 1970. One of a set of 20 slides made by the Association of Railway Enthusiast Provincial Tramways film strip. Reference Item 2560 details the ARE Film Strip and provide references to other slides. Slide rescanned at 3200 dpi 25-10-2020, jpg replaced, tiff file retained. This file was scanned in 2003 and may show colour changes."BAS 62" in pencil.tramways, trams, sturt st, city loop, grenville st., tram 36 -
 Ballarat Tramway Museum
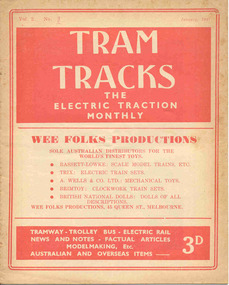
Magazine, Jack Richardson, "Tram Tracks - The Electric Traction Monthly", Jan to June 1947
Six issues of "Tram Tracks - The Electric Traction Monthly" of the Australian Electric Traction Association. Each issue has a standard cover, of the magazine name etc, featuring "Wee Folks Productions" models but are in different colours, all have been saddled stapled with two staples, except No. 6. The Volume and date details have been over printed. Back covers inside back covers have the same advertisements but the font varies vary. The six issues contain advertisements for the Wee Folks productions, Hartleys Sports store, Hearns Hobbies, Wattle Park, Johnson's Variety Store, Barnes Tennis Centre, The Model Dockyard, Robilt Models, Meadmore Model Engineering and Austral Bronze Pty Ltd, Hearns Hobbies, Christie Scale Model Railway and Equipment, Herbert Small (Meccano), the American Subscription Agency, Manufacturers' Mutual Insurance Ltd. 2465.1 - Vol. 2 No. 1 - 16 pages, Jan 1947, with cover printed in red. Has articles on the tram / car debate, Dunedin Tramways, Overlapping fare sections, type of trucks under Sydney tramcars, Brisbane Electric Railway (Power station), The Balmain Counterweight and Trolley buses in Australia. News items include Brisbane, Newcastle, Sydney, Melbourne, SEC, Hobart, VR, Adelaide, Kalgoorlie, Broome, electric trains in Melbourne and Sydney, and AETA notes. Photos include Sydney O, OP and P, VR PERM 63 and interior photo of a MMTB W4 class tram. 2465.2 - Vol. 2, No. 2 - 16 pages, Feb. 1947, with cover printed in dark blue. Has articles on Brisbane 400 class tramcar, Adelaide to Glenelg Brighton - Le Sands tramway, Melbourne Suburban railways, Diesel Electrics on the Southern Railway (US)and Birney Safety Car. News items include Brisbane, Sydney, Melbourne, VR, Fremantle and AETA notes. 2465.3 - Vol. 2, No. 3 - 12 pages, Mar. 1947, with cover printed in brown. Has articles on why NSW trams lose money, Duncan and Frazer, new trams in Johannesburg, Melbourne Suburban railways, and Sydney New Railway (Eastern Suburbs). News items Sydney, Melbourne, SEC, VR and Adelaide and AETA notes. 2465.4 - Vol. 2, No. 4 - 16 pages, Apr. 1947, with cover printed in green. Has articles on Duncan and Fraser (continued), In search of Ancient Warriors (old trams), Brisbane Electric Railway and some unusual fares arrangements. News items include Brisbane, Newcastle, Melbourne, Sydney, SEC, Launceston, Kalgoorlie, overseas, and AETA notes. Editorial looks at claims that the SW6 cars are the finest in the world, back numbers (notes that Tram Tracks started with a mimeographed club news sheet and now have circulation of nearly 200), costs of production etc. Has photographs of the interior of a SW6 850, a plan for Melbourne underground railway, the VR power operations room at Flinders St., Hobart trolley bus and a cartoon about Sydney traffic. 2465.5 - Vol. 2, No. 5 - 16 pages, May 1947, with cover printed in red. Has articles on Australian Light railways, Sydney's relief lines and the start of an article on NSWGT 600/1200V tramcars. Has news items on Brisbane, Sydney, MMTB, VR, Geelong, Ballarat, Launceston, Hobart and AETA notes. Editorial notes the first anniversary of the magazine and has a number of letters regarding this, content and the tram/car debate. 2465.6 - Vol. 2, No. 6 - 20 pages, June 1947, with cover printed in blue. Has articles on Cremorne bridge replacement (with photos), Neutral bay line and Tramcar transmission gears. News items include photos of MMTB track replacements, crowded trams, Brisbane, Sydney, Melbourne, and a photo of a Sydney tram passing under the new bridge work for Circular Quay station. 2465.7 - Vol. 2, No. 12 - pages 1-12, cover has an advert for Hartley Sporting Goods. Has cartoon on fares on Sydney trams by Peterson, not regarding retirement of Mr. H. Bell of MMTB, Melbourne Latrobe St and bus construction, Sydney tram cartoons from Emile Mercier, electric trains and other tramway news. (Item added 24-3-18 - from consolidation of Melbourne Tram Museum and BTM collections) trams, tramways, electric traction, aeta, models, australian tramways, duncan fraser, cartoons -
 Ballarat Tramway Museum
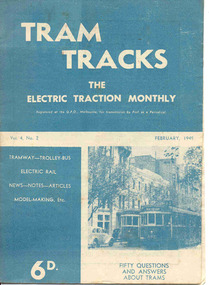
Magazine, Jack Richardson, "Tram Tracks - The Electric Traction Monthly", Feb. 1949 to August 1949
2467.1 - Vol. 4 No. 2, February 1949 of "Tram Tracks - The Electric Traction Monthly" of the Australian Electric Traction Association. Magazine consists of 16 printed pages with a 12 page supplement titled "Fifty Questions and Answers about trams in Australia". Has a single staple on the saddle. Incorporated within the magazine are articles or editorials on Tramways and Tramway Experts (Sydney and bus replacement), Interurban to St Kilda (conversion of VR St. Kilda line). General news items on Brisbane, Geelong, Launceston closure, Hobart, Bourke St routes, Perth, Adelaide, NSW, Christchurch, Overseas tramways and railways. Also has letters to the Editor, plans of a Birney tram for model makers and AETA Notes. Issue has advertisements for the Model Dockyard, ARLHS, The Hobby Shop, Barnes Tennis Centre, Fleet, Christie Model Railway Equipment of Sydney, Meadmore Model Engineering, Austral Bronze, Wattle Park, Traction Publications and Robilt "O" gauge locomotives. 2467.2 - Vol 4, No. 5 - May 1949 - 20 pages - red cover, 4th year, article by Peter Duckett with photos of Board members, "PCC Trucks here", MMTB advert for staff, news from Sydney, Newcastle, Melbourne (applications for new Chairman to replace Mr. Bell), Bendigo, Perth, Christchurch, Wellington, Wanganui, Bourke St construction work (photo of poles), Brisbane tramway history, map of CBD Melbourne, Melbourne and Sydney suburban railways, AETA News. 2467.3 - Vol 4, No. 6 - June 1949 - 16 pages - green pages, tramways and private cats, news from Sydney, Newcastle, Melbourne, Launceston, Hobart, article "Scrap Sydney Tams by 1960 - Newcastle this years say London experts", buses tackle football crowds (Sydney), Fremantle (Wal Jack letter), and Melbourne and Sydney suburban railways, AETA News. 2467.4 - Vol 4, No. 7 - July 1949 - 16 pages - tramways and the public, news from Sydney, Newcastle, Melbourne, appointment of R. Risson as new chairman, Perth, Adelaide, Launceston, tramcar solenoid brakes, National City Lines USA, and Melbourne and Sydney suburban railways, AETA News. 2467.5 - Vol 4, No. 8 - August 1949 - 8 pages - tramways and politics, photo of new points for Latrobe and William Sts, East Hills Line by C. C. Singleton, general tramway news, and advertisement for Robilt model railways. .2 to .4 added 15-2-2016 from the collection of Ian Stanley. .5 added 24-3-18 - from consolidation of Melbourne Tram Museum and BTM collections)trams, tramways, electric traction, aeta, australian tramways, mmtb, pcc, closure, sydney, newcastle, brisbane -
 Ballarat Tramway Museum
Slide - 35mm slide/s, Graham Evans, Sept. 1971
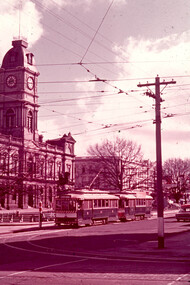
White cardboard mount, 35mm slide, from the Association of Railway Enthusiast's film strip titled "Provincial Tramway Film Strip" of Ballarat Trams No. 17 and 30 at the intersection of Sturt and Lydiard St. North with the Town Hall in the background. The film strip notes (Reg. Item 2560), provided the following caption details: ""CITY" in Ballarat was at the intersection of Sturt St. and Lydiard St which included the Post Office and City Hall, seen here, on diagonally opposite corners. Single Trucker No.30 will soon round the curve to Lydiard St. Nth. whilst No. 17 will proceed straight ahead to Victoria Street. -.Sept. '71 (Graham Evans)" See image btm2561p.tif for high level scan of image. Stamped on base of slide "11769" and written in ink on top edge "17 & 30 Lydiard St. Ballarat"tramways, trams, are, film strip, sturt st, town hall, tram 17, tram 30 -
 Ballarat Tramway Museum
Slide - 35mm slide/s, Glen Mills, Nov. 1970
White cardboard mount, 35mm slide, from the Association of Railway Enthusiast's film strip titled "Provincial Tramway Film Strip" of Ballarat Trams bogie No. 35 and four single truck cars in the storage loop, or City Loop at the east end of Sturt St. No. 35 has a "Bray Raceway Trotting Friday Night" on the front of the tram. The film strip notes (Reg. Item 2560), provided the following caption details: "At the east end of Sturt St., about 200 yards from "CITY" was "CITY LOOP" - a storage facility used to hold cars for peak loadings and emergency use. -Nov. '70 (Glen Mills) See image btm2562p.tif for high level scan of image. Stamped on base of slide "11770" and written in ink on top edge "Lydiard St. Ballarat"tramways, trams, are, film strip, city loop, sturt st, tram 35 -
 Ballarat Tramway Museum
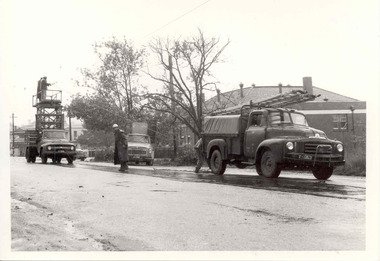
Photograph - Black & White Photograph/s, The Courier Ballarat, 23/04/1965 12:00:00 AM
Yields information about the way the SEC repair overhead failures on the Ballarat Tramway system - shows the trucks and the crews involved.Black and White copy photograph of a newspaper photograph taken by The Courier of repairs to damaged overhead wire, Lydiard St North, just to the north of the Railway level crossing. Tram services were disrupted as a result. Photo taken 23/4/1965, published 24/4/1965. Shows three SEC vehicles in use, including the tower truck. By the front of the truck, the overhead wire and a set of ears can be seen. The Victorian Railways Institute building is in the background. In the far background is the North Star hotel. The types of truck, from the left hand side are Ford (Tower Truck), International and a Bedford. Collected by Alan Bradley from the Ballarat Courier early 1980's. See Excel file "Record of Ballarat Courier Photos SEC era" (Archive Documents) for source of details.On rear stamped "Copyright, The Ballarat Courier Proprietary Limited." and "85%" in ink in the top left hand corner.tramways, trams, lydiard st nth, overhead, secv, repairs -
 Ballarat Tramway Museum
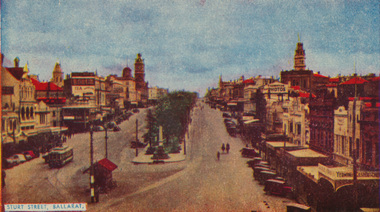
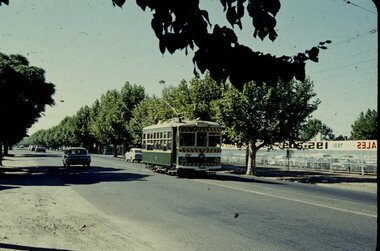
Postcard, Sturt St. in the mid 1940's
Printed colour postcard of photograph of Sturt St. in the mid 1940's looking from the top of a building in Grenville St. towards the West. Has a number of parked vehicles in kerbs, two people riding horses, a Vacuum Oil Co. truck in the bottom right hand corner and an SEC tram travelling west, just past the City Loop points. See Reg Item 675 for the same photograph - slightly cropped. Victorian Railways photograph. On rear the card has been ruled for address, stamp and titled postcard. Along the bottom edge is the publication details "ANSCOL - Australian Natural Scenic Colour - Thomas Tennant, 14 Jaques St., Chatswood N.S.W." trams, tramways, sturt st, postcards, sec, grenville st, tram 4 -
 Ballarat Tramway Museum
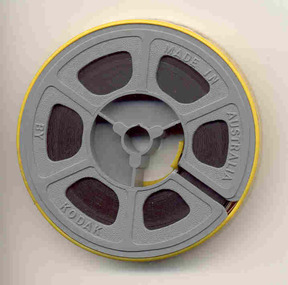
Film - Movie Film & Box, Kodak, 1960s
Yields information in movie film format of Ballarat trams in 1971 at the time of one of the closure tours and, a enthusiast tour, how the system operated and was used by people., Yields information in movie film format of Ballarat trams in 1971 at the time of one of the closure tours and, a enthusiast tour, how the system operated and was used by people.Movie film - 8mm, approx. 4.14 mins, with white leader strip on a plastic reel, within a Kodak movie yellow plastic container. Has been transferred to DVD - see Reg item 4100 as Segment No. 4. Filmed and made by an unknown person. Synopsis: based on time - Colour film Title "Ballarat trams specials" 0:00 No. 41 and two other bogie trams loading passengers outside the Ballarat railway station. 0:12 Image of R class loco and K class as 2nd loco at the station and train 0:18 Inside a bogie tram looking through saloon door showing the HTT logo. 0:23 From the front of a tram, or 39 turning from Lydiard St Nth into Sturt St and then proceeding along Sturt St. 0:31 Short sequence inside the tram with some passengers in the view 0:39 No. 21, showing Special in Sturt St West and then the two bogie trams following. 1:08 21 turning from Sturt St West into Hamilton Ave, followed by 41, 35 and 37 and then loading photographers. 1:58 As above north of Gardens Loop in Wendouree Parade. 2:07 Interior view of tram moving at speed, then Forest St corner showing church, and Wendouree Parade. 2:24 Drummond St Sth, crossing two trams at Bell St loop 2:29 Sebastopol line, from the window, heading towards the terminus. 2:44 No. 32 at Sebastopol terminus with the pole being turned. 3:01 Single trucker climbing Sturt St hill towards Lydiard St Nth. 3:17 No. 21 turning from Lydiard St Nth into Sturt St 3:31 Bogie tram climbing Sturt St hill towards Lydiard St Nth 3:55 Crossing the railway level crossing in Lydiard St Nth from the window of the tram. 4:02 Train departing from station – very poor sequence – appears to be a K class locomotive. 4:15 end Placed in a blue cardboard box specially made for the item 30/08/2010.trams, tramways, ballarat, vintage train, bell st, level crossings, lydiard st nth, sturt st west, tram 41, tram 39, tram 21, tram 35, tram 37, tram 32 -
 Ballarat Tramway Museum
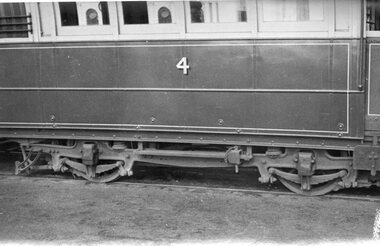
Photograph - Black & White Photograph/s, John Webster, 6/06/1950 12:00:00 AM
Yields information about the appearance of one Geelong's single truck trams and its Brush truck.Black and white photograph of the bogie or truck of Geelong No. 4, photographed at the Railway Station. Shows a close up of the Brush truck. The underframe and body bolts. Photographed by John Webster, 6/6/1950. Copy 1 - On rear in ink "Tram 4 bogey / Railway Station Geelong Vic" and on right hand edge "BB32 F2 / T15 / F16 / 6/6/50 1/50 at 11, VV HP3".tramways, trams, geelong, trucks, tram 4 -
 Ballarat Tramway Museum
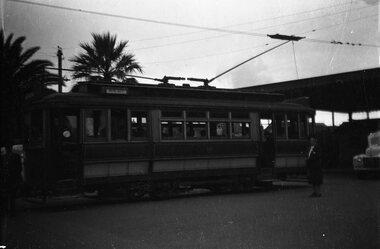
Photograph - B&W print of donated negative
Yields information about a converted Geelong Pengelly tram at the Railway Station, Yields information about a converted Geelong Pengelly tram at the Railway StationBlack and white digital print from scan of a donated negative showing a converted single truck Pengelly car at the Geelong Railway station. Has the destination of West. Photographer and date unknown. Black and White print made from scan of negative. Original Negative stored with Negatives. Image rescanned from copy neg and updated 1/6/2020.tramways, trams, geelong, railway station -
 Ballarat Tramway Museum
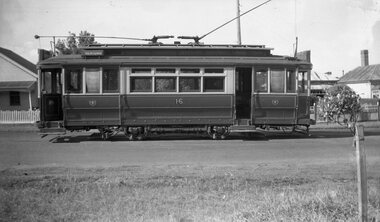
Photograph - B&W print of donated negative
Yields information about a converted Geelong Pengelly tram No. 16, Yields information about a converted Geelong Pengelly tram No. 16Black and white digital print from scan of a donated negative showing a converted single truck Pengelly car No. 16, possibly at a terminus - see below. Has the destination of Newtown. Photographer and date unknown. Black and White print made from scan of negative. Original Negative stored with Negatives. Dave O'Neil confirmed June 30/2009, after some searching at West terminus, photo was taken outside of the hotel. House with the chimney is still there. Though prior to 1951, West trams terminated at the Railway Station or Beach, and late 1930's at the Wharf. Some trams would do trips from those points to West and then would do a Newtown or Chilwell. This could explain destination showing Newtown, wasn't changed from Newown trip. Also in war years, some trams travelled from West to Newtown and Chilwell on Friday nights, late shopping. See related documents. Image rescanned from copy neg and updated 1/6/2020.tramways, trams, geelong, west, tram 16 -
 Ballarat Tramway Museum
Slide - 35mm slide/s, Ray Marsh, Sept. 1971
White cardboard mount, 35mm slide, from the Association of Railway Enthusiast's film strip titled "Provincial Tramway Film Strip" of the Charing Cross area on a rainy evening at sunset. Features three trams, Pall Mall and the Bendigo Post Office building. The film strip notes (Reg. Item 2560), provided the following caption details: "A rainy evening sees a pair of single truckers on "GOLDEN SQUARE" - "NORTH BENDIGO" line meeting an outbound "EAGLEHAWK" car at the Cross. Sept. '71 (Ray Marsh)" See image btm2581p.tif for high level scan of image. Stamped on base of slide "11790" and written in ink on top edge "Charing Cross Bendigo"tramways, trams, are, film strip, charing cross, bendigo, pall mall, night photo -
 Ballarat Tramway Museum
Slide - 35mm slide/s, Max Mitchell, Apr. 1969
White cardboard mount, 35mm slide, from the Association of Railway Enthusiast's film strip titled "Provincial Tramway Film Strip" of Bendigo No. 6 and another single trucker at Charing Cross, during the Bendigo Easter Fair Parade. The film strip notes (Reg. Item 2560), provided the following caption details: "Easter Monday afternoon in Bendigo was the traditional time for the float parade. Single truckers ran as second sections to the regular bogie cars on the "EAGLEHAWK" line until the commencement of the parade - which had to finish before they could proceed to the depot. - Apr. '69 (Max Mitchell)" See image btm2582p.tif for high level scan of image. Stamped on base of slide "11791" and written in ink on top edge "No. 6 Charing Cross"tramways, trams, are, film strip, charing cross, bendigo, easter fair, tram 6 -
 Ballarat Tramway Museum
Slide - 35mm slide/s, Graham Evans, Mar. 1972
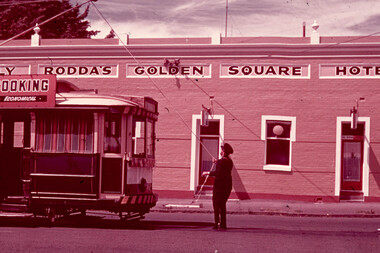
White cardboard mount, 35mm slide, from the Association of Railway Enthusiast's film strip titled "Provincial Tramway Film Strip" of a crew member reversing the pole of Bendigo No. 19 at the Golden Square terminus with the Golden Square hotel in the background. The film strip notes (Reg. Item 2560), provided the following caption details: ""Swinging the pole" was a ritual performed every time a single trucker reversed direction. Here No. 19 is dealt with at "GOLDEN SQUARE" - Mar '72 (Graham Evans)" See image btm2585p.tif for high level scan of image. Stamped on base of slide "11794" and written in ink on top edge "No. 19 Golden Square Bendigo"tramways, trams, are, film strip, golden square, trolley poles, crews, tram 19 -
 Ballarat Tramway Museum
Slide - 35mm slide/s, Max Michell, Mar. 1972
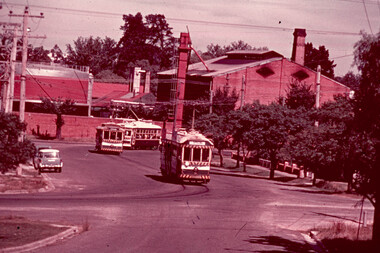
White cardboard mount, 35mm slide, from the Association of Railway Enthusiast's film strip titled "Provincial Tramway Film Strip" of Bendigo No. 5, 6 and 28 in bound in a convoy of Special trams on the North Bendigo route in Caledonia St. Has the Bendigo gas works in the background. Trams showing destination of Special. The film strip notes (Reg. Item 2560), provided the following caption details: "The three types of Bendigo car - Bogie No. 5, Single trucker No. 6 and Birney No. 28 - head away from "NORTH BENDIGO" in a special convoy. - Mar. '72 (Max Michell)" See image btm2590p.tif for high level scan of image. Stamped on base of slide "11800" and written in ink on top edge "No 5, 6 + 28 Nth Bendigo"tramways, trams, are, film strip, caledonia st, gas works, tram 6, tram 5, tram 28 -
 Ballarat Tramway Museum
Photograph - Digital image Set of 11, Stuart Loddington, 10 images of Ballarat trams prior to closure, 1971
Yields information about Ballarat Tramways and trams prior to the closure of the tramway system.Set of 11 digital images, comprising 1 donation text image and 10 images of Ballarat trams prior to closure, scanned from original slides by Stuart Lodington, 1971 prior to closure of the system. .1 - Donation text slide. .2 - No. 26 southbound in Lydiard St North, with the Ballarat Railway Station level crossing gates in the background. .3 - No. 27 and 30 crossing at Bell St Loop, Skipton St. (see also btm4976i4) .4 - No. 17 Wendouree Parade, near Gardens Loop .5 - Single truck tram at Victoria St terminus, taken from the west side of the Buninyong Rail line bridge, with CRB Roadwork sign, Eureka Caravan Park and Meagher Hotel in the background, possibly No. 11, see entry for .10 .6 - No. 12 and 30 crossing at the Urquhart St Loop, Drummond St South. .7 - No. 12 westbound in Sturt St, with Grenville St in the background. .8 - No. 17 at Gardens Loop with the Trolley pole being reversed. .9 - No. 30, Lydiard St North with Reid's Palace building in the background. .10 - No. 11 passing over the Buninyong rail line bridge, with Gardens via Sturt St West and a Twin Lakes sign. Has a number of children alongside the driver. .11 - No. 21 heading northbound in Wendouree Parade, Gardens, just to the north of the now BTM depot junction.trams, tramways, ballarat, level crossings, buninyong railway, lydiard st north, bell st, victoria st, wendouree parade, gardens, drummond st, sturt st, tram 26, tram 27, tram 30, tram 17, tram 12, tram 21, tram 11 -
 Ballarat Tramway Museum
Photograph - Digital image Set of 20
Set of 20 digital images of Bendigo Tramways, 1972 at or before closure while on a tram tour by Stuart Lodington. .1 - No. 28 and 5 at Eaglehawk terminus .2 - No. 28 leaving Charing Cross and travelling into View St with Armstrong Type Service building in background and Firestone Advertisements. .3 - No. 29 with Eaglehawk Town Hall and Post Office in background. .4 - No. 26 and 29 at start of double track, High St Eaglehawk .5 - No. 29 leaving Eaglehawk with shops in the background, Foodland, J. Bests .6 - No. 29 and 23 crossing Manchester Loop with Manchester Arms Hotel in the background and an old poppet head. .7 - No. 29 at ditto with poppet head in the background. .8 - No. 28 and two other trams at the Quarry Hill terminus. .9 - No. 29 in High St Bendigo with the Cathedral and Golden Gate Hotel in the background. .10 - No. 3 with destination Eaglehawk, in bound Carpenter St? .11 - No. 29 following a single trucker through a loop or the end of the double track near the depot. .12 - No. 23?, at Eaglehawk terminus, with Eaglehawk Town Hall in the background. .13 - Birney tram crossing the bridge at the Depot entrance - No. 29 .14 - No. 29 on the Eaglehawk line? .15 - as for .13 .16 - No. 29 entering the depot. .17 - No. 23, inbound from Eaglehawk, at Jobs Gully Loop with the railway overbridge in the background. .18 - No. 28 and two other trams (see also Reg Item 4982) for the same tram tour at Myrtle St. Loop. .19 - No. 21 with North Bendigo on the destination approaching the Golden Square terminus. .20 - No. 7 at Golden Square terminustrams, tramways, bendigo, eaglehawk, quarry hill, golden square, depot, tram 5, tram 29, tram 28, tram 26, tram 23, tram 7, tram 21 -
 Ballarat Tramway Museum
Photograph - Digital image Set of 20, 16/04/1972 12:00:00 AM
Set of 20 digital images of Bendigo Tramways, of the last running day of the Eaglehawk to Quarry Hill line 16 April 1972, .1 - No. 24 outbound to Eaglehawk .2 - No. 3? at Manchester Loop .3 - No. 24 outbound to Eaglehawk .4 - bogie tram crossing the rail over bridge from Eaglehawk .5 - No. 18 in View St .6 - No. 24 outbound to Eaglehawk .7 - No 18 at Eaglehawk with destination roll being changed, and shopping centre in the background. .8 - No. 24 crossing the railway overbridge, going to Eaglehawk .9 - No. 3 outbound to Eaglehawk .10 - No. 24 crossing the railway overbridge, going to Eaglehawk .11 - No. 3 and 24 crossing at Long Gully .12 - No. 18 at Eaglehawk with Leo A Hughes photographer building in the background and a CFA truck passing the tram. Tram SEC roof advertisement and a banner for "German -?- Circus" at Eaglehawk and dates. .13 - No. 3 inbound on the Eaglehawk line. .14 - No. 18 outbound to Eaglehawk .15 - ditto .16 - No. 18 at Eaglehawk terminus with the Mechanics Institute in the background. .17 - No. 24 at the Eaglehawk terminus .18 - No 24 at the intersection with Taylor St .19 - No. 24 at the Eaglehawk terminus .20 - dittotrams, tramways, bendigo, eaglehawk, long gully, manchester loop, tram 24, tram 18, tram 3 -
 Ballarat Tramway Museum
Photograph - Digital image Set of 8, 21/08/1971 12:00:00 AM
Yields information about the SEC Ballarat trams in the months before the closure of the SEC Tramway system. Yields information about the streetscape. Set of 8 Digital images, scanned from slides by Graeme Cleak, scanning by Peter Winspur 9/2011. .1 - Slide FS14 - No. 31 and 32 crossing at the High St Loop in Macarthur St. Tram 31 has the destination of Victoria St. Geoff Dean and his mini on the right hand side of the photograph. Another depot bound single trucker in the photograph, .2 - Slide FS3 - 31 outbound in Victoria St, with St Alipius church in the background. .3 - Slide FS5 - No. 31, and four other trams, some running special at Sturt and Lydiard Sts during the ARHS tour of that day. Has the ANZ Bank and SEC offices in the background. .4 - Slide FS9 - Nos. 39, 26 and two other trams in Lydiard St for the ARHS tour with Reid's Palace, Macleod & Co and J.J. Collier buildings in the background along with other buildings in Lydiard St North. Taken from the Provincial Hotel. .5 - Slide FS11 - No. 26 northbound showing Special running through the level crossing at Ballarat with the Kennedy Murray General Carrier in the background. Taken from the Provincial Hotel. .6 - Slide FS13 - No. 32 turning from Sturt St into Drummond Street North showing Depot via Drummond North, with the Southern Cross Hotel, Rimmington Bros and J.A, Malpass(?) buildings in the background. .7 - Slide FR35 - night shot of No. 17 (with Twin Lakes sign) and No. 32 in Nos 3 and 4 roads at the depot. .8 - Slide FR34 - night shot of the front of the depot - as above and No. 43 on "0" road. All photos 21-8-1971 trams, tramways, railway station, macarthur st, victoria st, sturt st, lydiard st north, level crossings, depot, tram 31, tram 32, tram 39, tram 26, tram 17, tram 43 -
 Ballarat Tramway Museum
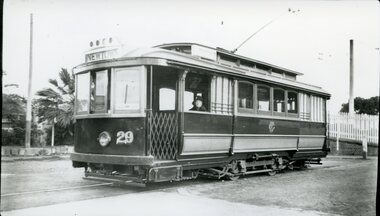
Photograph - Black & White Photograph/s, Geelong No. 29 at the Railway station, c1930
Black and White Photograph of Geelong No. 29 at the Railway station, c19?? Has the destination of Newtown, a MESCo logo on the side panel and on the side of the truck, a tow bar.In hand writing on the rear "24)" in top left hand corner. In the body of the photograph "at Railway Station" and along bottom edge a "William Scott" address label and "WFS / Geelong Heritage Centre"trams, tramways, geelong, railway station, mesco, tram 29 -
 Ballarat Tramway Museum
Slide - 35mm slide/s - set of 10, Campbell Duncan, Jan. 1971
Set of 10 Ferraniacolor slides - cardboard mounts taken on either 10/1/71 or 16/1/71. .1 - Birney No. 30, Golden Square line, inbound near Cathedral with car yard in background. .2 - ditto, with Cathedral gardens in background. .3 - single trucker, with two SEC roof adverts, entering Nolan St enroute to North Bendigo. Shows the driver sitting in a side on shot. A 4 square store in the background, with a fading advert for "Peeled Tomatoes". .4 - No. 6 turning from Nolan St into McCrae St with 4 square store in background. .5 - No. 26 at Quarry Hill with cemetery in background. .6 - No. 6 at the North Bendigo Terminus .7 - No. 26 outbound to Eaglehawk on the Railway Overbridge, Mt Korong Road. .8 - No. 17 (inbound to City and Quarry Hill) and another bogie crossing at a loop on the Eaglehawk line. Both trams have SEC roof adverts. The driver of the outbound car is boarding the tram. Based on .9, it is No. 3 at Long Gully. .9 - No. 3 waiting at Long Gully Loop . .10 - No. 26 at Quarry Hill terminus, with destination of Eaglehawk.In ink on slide: .1 - "1/2 mile out on Golden Square line - 10/1/71 (Sun)." .2 - "1/2 mile out on Golden Square line - 10/1/71" .3 - "Has just rounded curve near lake Weeroona on North Bendigo line - 10/1/71 (Sun)." .4 - "16/1/71" .5 - " 10/1/71 (Sun)." .6 - "North Bendigo terminus, 16/1/71 (Sat)" .7 - "10/1/71 (Sun) c 3pm" .8 - "Cross Eaglehawk line - 10/1/71 (Sun)." .9 - "Jackson St Loop on E'Hk line awaiting up - 10/1/71 " .10 - "Quarry Hill terminus Bendigo - - 10/1/71"tramways, trams, bendigo, golden square, high st, nolan st, north bendigo, quarry hill, long gully, railway bridge, tram 30, tram 6, tram 26, tram 17, tram 3 -
 Ballarat Tramway Museum
Photograph - Colour Print, Lilian Butler, Sep. 1971
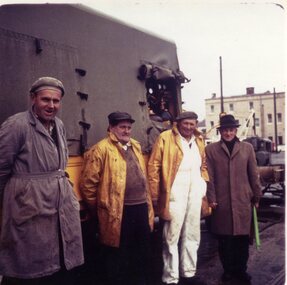
Possibly has a strong association with the tram track and depot maintenance staff at the time of closure of the SEC operated Ballarat system.Colour print of a group of four SEC workers standing alongside the cloth covered SEC Ballarat Tramway track gang truck, in Lydiard St North, with the railway gates in the background. The man on the right hand side is holding a rolled up green flag. These workers were not included in the staff photo. Refer to track diaries in the collection for possible names. Item was placed in an envelope marked "Mr. Vermeend" - retained with photograph in storage folder. Photo printed on Kodak Paper. Photograph by Lilian Butler?in ink on rear " Lydiard St Nth Ballarat. With my compliments Lilian Butler"trams, tramways, sec, depot, trackwork, track, personnel -
 Ballarat Tramway Museum
Photograph - Black and White photograph/s - mounted, John Phillips, c1971
Yields information about trams used, services and buildings in Lydiard St North near the railway station c1971.Black and White photograph mounted on heavy cardboard backing. Photo of Ballarat No. 12 with destination of Grey St Sebastopol, with tram behind it, showing "Special" and another two single truckers behind No. 12 in Lydiard St North, just before the Railway level crossing. In the background are Victoria House, Moodys' Provincial Hotel and Ludbrook House. Has parts of old support tape on rear. Note image scanned in two runs through a scanner, resulting in the shading in the image file.trams, tramways, lydiard st, railway crossing, provincial hotel, tram 12, tram 21 -
 Ballarat Tramway Museum
Photograph - Digital image, c1925
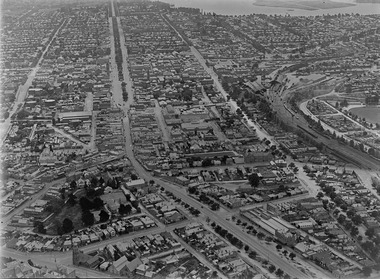
Yields information about Ballarat c1925 from an aerial photograph looking west.Digital photograph of Ballarat looking West c1925, aerial view, looking along Sturt St and Bridge St, taken from about Eureka and Kings St. Shows both the Alfred Hall, the Railway Station, Sunshine Biscuits and the Coliseum. Shows two single truckers at the east end of Sturt St and two at the west end of Bridge St or Grenville St. See email from Alan Bradley dated 28/7/2012 re date. See also Reg Item 5453 for another similar photograph.trams, tramways, ballarat, aerial views -
 Ballarat Tramway Museum
Slide - 35mm slide/s, Chas Bevan, 19/12/1970 12:00:00 AM
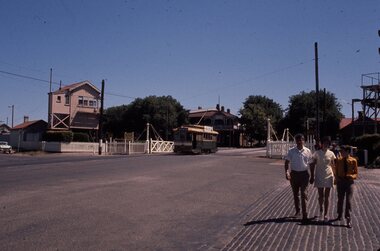
Yields information about the Lydiard St railway gates area and the buildings at the time.Colour slide - 35mm - of Ballarat single trucker No. 11? crossing the railway tracks in Lydiard St North with the B single box and Victoria House in the background. Photo taken by Chas Bevan on Saturday 19-12-1970."Ballarat trams 19-12-70 Lydiard St Nth"tramways, trams, lydiard st nth, railway crossing, tram 11 -
 Ballarat Tramway Museum
Slide - 35mm slide/s, Chas Bevan, 19/12/1970 12:00:00 AM
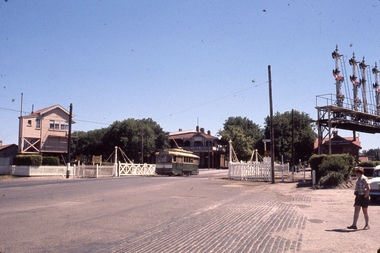
Yields information about the Lydiard St railway gates area and the buildings at the time.Colour slide - 35mm - of Ballarat single trucker (No. 26?) crossing the railway tracks in Lydiard St North, north bound with the B single box and Victoria House in the background. Photo taken by Chas Bevan on Saturday 19-12-1970."Ballarat trams 19-12-70 Lydiard St Nth"tramways, trams, lydiard st nth, railway crossing, tram 266 -
 Ballarat Tramway Museum
Slide - 35mm slide/s - set of 11, Eldon Hogan, mid 1960's to early 1970's
Set of 11 Agfa Plastic mounted slides - from the Eldon Hogan collection - possibly on an ARE Bendigo tours late 1960's or early 1970's with No. 18 Scanned on the Canon scanner at the depot 15/12/1971 at the time of the installation of the scanner. .1 - No 18 at Golden Square terminus with Billy Rodda's Golden Square Hotel in the background. .2 - ditto and the Victoria Bitter fence alongside the hotel. .3 - ditto and another single trucker. .4 - No. 18 at the Fire Station Loop, Golden Square line, with destination of Railway Station. .5 - No. 18 passing the Central Deborah mine, Violet St. Tram has a Briquette advertisement on the roof - the flaming briquettes. .6 - Another bogie tram at ditto. .7 - No. 18 and No. 6 crossing McCrae St loop near the depot junction? .8 - ditto .9 - No. 18 and a single trucker at the North Bendigo terminus. .10 - ditto .11 - with the single trucker leaving.tramways, trams, bendigo, golden square, central deborah, north bendigo, mccrae st, tram 18, tram 6 -
 Ballarat Tramway Museum
Album - Photo Album, c1970
Set of 16 photos of Ballarat tram system taken 1970c on a tour by an unknown Qld based person.Photo album containing 16 colour prints. Photo album has heavy card covers, covered in black textured plastic containing 12 clear plastic photo sleeves held with a white comb binder. Photos of Ballarat prior to closure, c1970. Photographer unknown. Donated by Peter Hyde of Brisbane Tramway Museum to BTM 3/2/2010, from a deceased estate. Photos apparently taken on a tram tour. .1 - No. 42 and a single trucker inbound in Sturt St. .2 - taken from tram ascending Bakery St hill in Victoria St. .3 - End of No. 42, with the destination "Haddon St via Drummond Nth" .4 - No. 11 and 42 in Lydiard St Nth, near the railway station. No. 11 showing special. .5 - photo of three people on the tour. .6 - Trams reversing at the Victoria St terminus .7 - ditto .8 - 11, 42 and 12? in Lydiard St North by railway station. .9 - Three trams at Sebastopol terminus. .10 - View in Albert St Sebastopol looking north along the track on the side of the road. .11 - View of the tram crossing in Albert St. .12 - 27 and 42 crossing Albert St Sebastopol. .13 - View of Albert St from the tram, north of the crossing looking at the reserved track 14. - Lydiard St North looking south .15 - 42 at the railway level crossing. .16 - View south of the railway level crossing, three trams, with passengers alighting.trams, tramways, ballarat, albert st, sebastopol, victoria st, sturt st, lydiard st nth, railway crossing -
 Otway Districts Historical Society
Photograph, R.L. Forster, Laver's Hill. UP goods shunting, 9 December 1954
Lavers Hill. UP goods shunting siding, 9 December 1954. Red Bedford truck in backgroung. Colour.colac; beech forest; crowes; lavers hill; railway; shunting; -
 Otway Districts Historical Society
Photograph, Victorian Railways, Derailment at Beech Forest, 1904, 4 October 1904
On Tuesday, 4 October 1904, the first serious railway accident occurred on the Colac-Beech Forest line near Beech Forest. As no train was scheduled that day in the afternoon the crew decided to fetch some wood from down the line. They fired the boiler on locomotive 3A, attached two trucks to the locomotive and moved out of the station. When they arrived opposite the Ditchley Park Hotel they stopped the engine and adjourned to the bar for some refreshments before beginning work. While they were engaged some local children boarded the unattended engine, started it, panicked when it began moving and jumped out leaving in to speed away and tip on a curve in a cutting at Ditchley. The engine was severely damaged. However, its cause remained an Otways secret. The official reason given for the accident is that the driver had fallen out of the engine while engaged in shunting allowing it to run away out of control.Locomotive No. 3A and goods wagons following their derailment at Beech Forest, 4 October 1904.beech forest; railways; narrow gauge; derailment;