Showing 331 items
matching route 11
-
 Moorabbin Air Museum
Mixed media (item) - Brian Ridgeway Collection Miscellaneous aircraft photos, newspaper items etc. See under "Description" Section
-
 Victorian Aboriginal Corporation for Languages
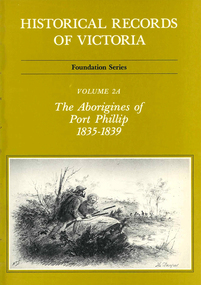
Book, Ian Macfarlane, Historical records of Victoria : foundation series : volume 2A : the Aborigines of Port Phillip 1835-1839, 1982
Reproductions of various transactions and reports dealing with Aboriginal people in Port Phillip in the period 1835-39, beginning with some of the earliest reports and tracing the evolution of government interaction and policy towards Aborigines in the 19th century. Covers mission work, government reports, the native police, conflicts with squatters, with numerous illustrations and original reports. Contents: Part I, Evolution of British policy Ch. 1. Proposals to appoint protectors of aborigines Ch. 2. Racial conflict in the year of official settlement at Port Phillip Ch. 3. House of Commons Select Committee on Aborigines Part II, The Wesleyan Mission at Buntingdale Ch. 4. Establishment and early operations of the Wesleyan mission Part III, The Government acts Ch. 5. Establishing the first government mission 1835-7 Ch. 6. Food and clothing for the Aborigines Ch. 7. Punishment of Aborigines found drunk, 1836-8 Ch. 8. Operations of the government mission, November 1837 to March 1839 Ch. 9. First attempt to form a native police corps Part IV, Growing conflict with squatters, 1837-8 Ch. 10. The disappearance of Gellibrand and Hesse Ch. 11. Attacks in the Western District Ch. 12. Attacks on the overland routes to Port Phillip Ch. 13. Evolution of policy in Sydney, 1838.b&w illustrations, b&w photographs, tables, document reproductionsvictorian history, colonisation, justice system -
Moorabbin Air Museum
Manual (Item) - Application and economic analysis of this model to Royal Dutch airlines routes, Boeing Model 377 Number SR-11
-
Moorabbin Air Museum
Document (Item) - Many newspaper articles why government should not allow another airline to operate on same routes as MMA, Ansett files Packet 11 MacRobertson Miller airlines controversy
-
 Ballarat Tramway Museum
Photograph - Digital image, Electric Street Railway Journal, "Improved one-man Operation in Australia", "The Principals of Differential Wages in Awards", "One Man cars in Australia"
Yields information about the operation of one man trams in Ballarat and Bendigo and the provision of information to the American tramway or Street car press. Has a strong association with the Author - Mr Pringle.Series of five digital images of items from the Electric Street Railway Journal about one-man tram operations and wages in Ballarat, written by the ESCo Manager, Mr P J Pringle, Chief Engineer and General Manager. Images i1 and i2 - pages 172 and 173 - letter titled "Improved one-man Operation in Australia", Vol 47 No. 4, 22/1/1916 - describing the operation, and how it operates. Reference to the use in other places in made by the author and the magazine. image i3 - general comment making possible reference to a UK magazine - and how one man tram are worked and their routes, including tickets and wages. From Vol 46, page 23, 4/12/1915. image i4 - "The Principals of Differential Wages in Awards" - Vol 56, No. 19., 6/11/1920 page 965, looking at wages based on locations, arbitration, over WW1, including cost of living and renting. image i5 - "One Man cars in Australia" - Vol 55, No. 24, 12/6/2020 - page 1206, looking at the accident rates between one and two man cars.trams, tramways, one man trams, electric street railway journal, ballarat, bendigo, esco, wages, fares, accidents -
 Ballarat Tramway Museum
Document - Report, Wal Jack, "History of Ballarat Tramways - 1887 - 1953", Original c1953, copy 2020
Part 1 - Ballarat Horse Trams - notes that much of the details was supplied by the late Inspector James. Part 2 - Electric Trams - gives dates for the withdrawal of the ESCo cars, routes, SEC and extensions, including the Forest City signals. 11 pages of a typed article or research report on foolscap paper titled "History of Ballarat Tramways - 1887 - 1953", written by Wal Jack, Gestetner printed. With the file is a set of A3 size laminated photocopies, provided by the donor. See also Reg Item 6419 for another copy.trams, tramways, sec, esco, ballarat, sec, horse trams, tramcars -
 Ballarat Tramway Museum
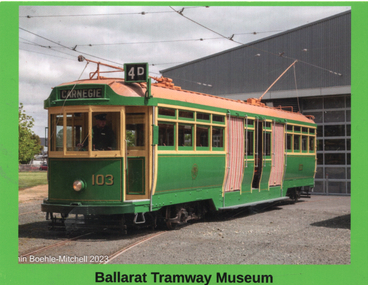
Postcard - L class tram 103 on depot fan, Benjamin Boehle-Mitchell, 28/10/2023
Printed for the 18/11/2023 Ballarat Tramway Festival - with the Melbourne Tramcar Preservation Association tram L class 103 on the depot fan. Tram showing the destination of Carnegie, route 4D.Demonstrates a BTM Event item to celebrate the W class Centenary.Postcard or printed photo full colour, plain back.btm, events, tramcars, l class, tram 103 -
 Ballarat Tramway Museum
Slide - 35mm slide/s - set of 11, Noel Simons, 23/10/1965 12:00:00 AM
Set of 11 Kodachrome transparencies taken on 23/10/1965 in Melbourne. 1178.1 - W7 1020 (on route 9A, Northcote via St Georges Road) with a W2 536 (Deepdene) behind at the corner of Victoria Parade and Brunswick St. East Melbourne or Fitzroy. Has Eastern Hill fire station and ICI building in background. 1020 has front dash panel ads for Queens Bridge Motors and Bridgestone tyres. 1178.2 - W5 759 (route 19, North Coburg) and W5 807 in Elizabeth St. Melbourne at the intersection of Bourke St. with the State Savings Bank building in the background. 759 has side ads, one of which is for CASTROL. 1178.3 -SW6 903 crossing Brunswick St. in Victoria Parade, Fitzroy bound for Deepdene, route 45. Photo taken after tram has passed photographer. 1178.4 - W7 1019 (route 96, East Brunswick Blyth St.) and W7 1010 (route 88 East Preston) in Nicholson St at intersection with Victoria Parade. A Herald newspaper truck is alongside 1019. 1178.5 - W7 1040 (route 96, East Brunswick Blyth St.) in Nicholson St at intersection with Albert St. Has Princess Theatre in the background. (High res scan added 26/10/2008 - copy to FOHTD) .1178.6 - W6 974 (route 89 East Preston Bell St.) in Bourke St. about to turn into Spring St. Has buildings on the south side of Bourke St in background, including Southern Cross Hotel. Note trees in tubs and red phone box by Windsor Hotel. 1178.7 - as for same location as 1178.6 - SW6 967 (route 96) and W6 971 (inbound - route 90 - City Spencer St.) 967 has Lucas ad on front dash. 1178.8 - W7 1013 (route 88 East Preston) photographed from W6 991 in Bourke St at corner of Russell St. Has Normans corner store, Treadways and Foys in background. 1178.9 - W2 553 (route 1 East Coburg) at the corner of Elizabeth St and Bourke St. Has the Leviathan, Roger David and Ezywalkin shops in the background. 1178.10 - W6 991 (route 88) and W7 (route 96) in Bourke St. at corner with Elizabeth St. Photo taken from the GPO steps. 991 has ads for BIC pens and CASTROL. In background are the State Savings Bank, Halls Books and McEwans shops. 1178.11 - Line up of north bound trams (3 +) lead by W2 449and southbound in Elizabeth St at corner of Collins St. Has Flinders St. station building in the background. Hi -res image of .10 added 22-12-2018All have date stamp of "23 Oct 1965" in purple ink. All black ink unless otherwise noted. 1178.1 - "W7 1020 turning into Brunswick St. from Victoria parade, East Melbourne (followed by W2 536) 1178.2 - "W5 799 and 807 in Elizabeth St. Melbourne at cnr. of Bourke St." 1178.3 - "SW6 903 entering reserved track in Victoria Parade, East Melbourne" 1178.4 - "W7 1019 and 1010 in Nicholson St. East Melbourne at Victoria Pde intersection" 1178.5 - "W7 1040 Melbourne's last tram (to date) in Nicholson St. at Albert St. intersection." 1178.6 - "W6 974 in Bourke St. Melbourne, about to turn into Spring St." 1178.7 - "W6 971 entering Bourke St. from Spring St. Melbourne, passes SW6 967 outward bound for East Brunswick" 1178.8 - "W7 1013 (seen from W6 991) in Bourke St. Melbourne crossing Russell St." 1178. 9 -"W2 553 in Elizabeth St. Melbourne at cnr of Bourke St." 1178.10 - "W6 991 and W7 1005 in Bourke St. Melbourne at cnr of Elizabeth St." 1178.11 - "W2 449 leads a line of Peak hour cars along Elizabeth St. Melbourne (at Collins St. corner)"tramways, trams, melbourne, victoria parade, nicholson st., brunswick st., bourke st, elizabeth st, tram 1020, tram 536, tram 799, tram 807, tram 903, tram 1019, tram 1010, tram 1040, tram 974, tram 967, tram 971, tram 1013, tram 553, tram 991, tram 1005, tram 449 -
 Ballarat Tramway Museum
Slide - 35mm slide/s - set of 17, Noel Simons, 20/11/1962 12:00:00 AM
Set of 17 transparencies taken on 20/11/1962 on Kodak mounts. 1187.1 - Bendigo No. 2 at the Quarry Hill terminus, showing destination of Quarry Hill. Has Cohns Drinks and Streets Ice Cream ads on dash panel, a SEC 'electric cooking' roof ad and another roof ad. Shows the Y terminus at this location, but tram standing just before it. Overhead in position. 1187.2 - as above, but closer up. 1187.3 - as above, but from the north side, showing cemetery in the background. 1187.4 - Bendigo No.3 at Eaglehawk terminus. Tram showing destination of Quarry Hill. Has the various buildings at Eaglehawk in the background including the Foodland store. Has Streets Ice cream and White Horse Whiskey ads on the dash panel. 1187.5 - Bendigo No. 18 at Garden Gully crossing loop, in bound, with destination of Eaglehawk. Passengers waiting for an Eaglehawk tram at the stop. Has a white horse whiskey ad on dash panel and SEC roof ads. Conductor standing in doorway looking out. 1187.6 - Bendigo No. 7 inbound in Nolan St. at cnr of McCrae St. showing destination of Golden Square. Has Streets Ice cream ad on dash panel and a Castrol Roof ad. 1187.7 - Bendigo No. 19 at the North Bendigo terminus with railway level crossing in background. Tram has a Cohns Drinks ad and an SEC 'Electric Cooking' roof ad. 1187.8 - Bendigo No. 2 at the Quarry Hill terminus, looking back into Bendigo, showing destination of Eaglehawk. 1187.9 - Bendigo No. 21 in McCrae St, near Nolan St outbound for North Bendigo. Photo taken after tram has passed photographer. 1187.10 - Bendigo Nos. 4 and 26 at Charing Cross in View St. with fountain alongside and the Beehive, Ezywalkin Buildings in the background. No. 26 has a Sandhurst Milk and SEC 'Electric Cooking' roof ad. 1187.11 - close up of 22E maximum traction truck and folded footstep. 1187.12 - Bendigo No. 19 at Charing Cross terminus, after tram has passed photographer, showing destination of North Bendigo, with the Beehive building in the background and passengers boarding tram. 1187.13 - Bendigo No. 11, turning from View St. into Pall Mall, showing Special with the conductor holding point bar. Has the Beehive and Ezywalkin Buildings in the background. 1187.14 - No. 7 at Charing Cross terminus, in Pall Mall, bound for Golden Square. Has the Beehive and Ezywalkin buildings in the background and passengers waiting at the tram stop. 1187.15 - No. 18 at the Charing Cross terminus, bound for Eaglehawk. Has the Beehive and Ezywalkin buildings in the background and passengers waiting at the tram stop. Also has the 'Safety Zone' sign in the photograph. 1187.16 - No. 2 at Quarry Hill terminus, night or dusk photo. Tram showing destination of Depot. 1187.17 - No. 26 at Charing Cross, night photo. Tram has destination of Quarry Hill, but is on the line for Eaglehawk. Photo looks along Mitchell St. Also shows Safety Zone sign. Information written on in black ink and date stamped on purple ink. 1187.1 - "No. 2 at Quarry Hill terminus Bendigo" 1187.2 - "No. 2 at Quarry Hill terminus Bendigo" 1187.3 - "No. 2 at Quarry Hill terminus Bendigo" 1187.4 - "No. 3 at Eaglehawk terminus" 1187.5 - "No. 18 in Mt Korong Road, Long Gully at cnr of Havilah Road (Eaglehawk Route)" 1187.6 - "No. 7 in Nolan St. Bendigo, at Cnr of McCrae St., near lake Weeroona, (North Bendigo Route)' 1187.7 - "No. 19 at North Bendigo terminus" 1187.8 - "No. 2 at Quarry Hill terminus" 1187.9 - "No. 21 in McCrae St. Bendigo, near Nolan St. (North Bendigo Route) 1187.10 - "4 and 26 at Alexandra Fountain, Charing Cross Bendigo" 1187.11 - "Truck of Bogie Car, Bendigo Tramways" 1187.12 - "No. 19 in Pall Mall at Charing Cross, Bendigo" 1187.13 - "Birney car No. 11 entering Pall Mall from View St. at Charing Cross Bendigo" 1187.14 - "No. 7 in Pall Mall at Charing Cross, Bendigo" 1187.15 - "No. 18 at Alexandra Fountain, Charing Cross, Bendigo" 1187.16 - "No. 2 at Quarry Hill terminus, Bendigo" 1187.17 - "No. 26 at Alexandra Fountain, Charing Cross, Bendigo" tramways, trams, bendigo, quarry hill, eaglehawk, north bendigo, maximum traction, night photo, tram 2, tram 3, tram 4, tram 7, tram 11, tram 18, tram 19, tram 21, tram 26 -
 Ballarat Tramway Museum
Slide - 35mm slide/s, Noel Simons, 21/11/1962 12:00:00 AM
... - No. 11 on Golden Square route, in High St. at intersection... route) 1188.14 - "Birney car No. 11 leaving Bendigo depot ...Set of 17 transparencies taken on 21/11/1962 on Kodak mounts. 1188.1 - Bendigo No. 11 at Depot Junction McCrae and Arnold St. with driver/conductor changing points. 1188.2 - Bendigo No. 4 at Charing Cross, side on photo, with City Club Hotel and Alexandra Fountain in the background. Tram has Castrol and SEC 'Electric Cooking' ads. 1188.3 - Bendigo No. 4 climbing View St. after tram has passed photographer. Tram has Streets Ice Cream and Cohns Soft Drinks ad on rear dash panel. In the background are the buildings in View St., including the Princess Theatre. Tram has destination of Eaglehawk. 1188.4 - Trams 2 and 4 crossing at the California Gully or Thorpe St Loop. 1188.5 - Bendigo 4 in Mt Korong Road. Tram inbound with destination of Quarry Hill, just leaving Garden Gully Loop. 1188.6 - Bendigo 4 and 17 crossing at the Hayes St. or Iron Bark Gully Loop. No. 17 bound for Eaglehawk, No. 4, Quarry Hill. 17 has two SEC roof ads and a white horse whiskey ad. 1188.7 - No. 17 bound for Eaglehawk, soon after leaving California Gully. Has large mullock heap in background. 1188.8 - Bendigo 2 and 17 crossing at the Thorpe St. or California Gully Loop. Has butchers shop in background. 1188.9 - Bendigo 17 at the Eaglehawk terminus. Has destination of Quarry Hill. In background is the hotel and shops at the terminus, showing ads for "Melbourne Bitter". Tram has two SEC 'Electric Cooking' ads. Driver and conductor about to assist two lady passengers with a pram and baby. 1188.10 - No. 17 at Eaglehawk terminus, awaiting departure. Has Eaglehawk Town Hall and Post Office in background. Tram has a Whitehorse Whiskey ad on the front dash panel. 1188.11 - No. 3 in High St. Eaglehawk, with destination of Eaglehawk. Has the shops on the south side of High St. in the background, including the Eaglehawk fish shop. Tram has two roof ads, one an SEC roof ad, and Cohns Drinks and Streets Ice cream ads on front dash panel. 1188.12 - as above, but after tram has passed photographer. Note the centre of the road poles. 1188.13 - No. 2 outbound for Eaglehawk at the intersection of Mt. Korong Road and the Calder Highway. Photo taken after the tram has passed the photographer. Has an Ampol service station in the background. 1188.14 - No. 11 leaving the Bendigo depot, crossing the bridge, with the Scrubber car in the background. 1188.15 - No. 21 at the North Bendigo terminus. Tram has destination of Golden Square and Cohns drink ad on front dash and two roof ads on side. 1188.16 - No. 11 on Golden Square route, in High St. at intersection with Old High St. 1188.17 - No. 11 at the Golden Square terminus, conductor turning the pole. Hotel on the left side of the photo. Note the road works barrier and red flag behind the tram. Slide has an end of roll mark on the right hand side of the image.Information written on in black ink and date stamped on purple ink. 1188.1 - "Birney car No. 11 in McCrae St. at Cnr of Arnold about to run into depot, Bendigo" 1188.2 - "No. 4 at Alexandra Fountain, Charing Cross Bendigo" 1188.3 - "No. 4 climbing the View St. Hill from Charing Cross, Bendigo (Eaglehawk Route)" 1188.4 - "No. 4 and 2 at Thorpe St. Loop, California Gully" 1188.5 - "No. 4 in Mt Korong Rd., Long Gully, Near Havilah Rd. (Bendigo) (Eaglehawk Route)" 1188.6 - "Nos. 17 and 4 crossing on Hayes St. Loop, Ironbark, Bendigo" 1188.7 - "No. 17 soon after leaving California Gully (Eaglehawk Route)" 1188.8 - "No.2 and 17 crossing on Thorpe St. Loop, California Gully (Eaglehawk Route)" 1188.9 - "No. 17 at Eaglehawk terminus" 1188.10 - "No. 17 at Eaglehawk terminus" 1188.11 - "No. 3 in High St. Eaglehawk" 1188.12 - "No. 3 nearing Eaglehawk terminus" 1188.13 - "No. 2 in Mt. Korong Rd., Ironbark. Calder highway on left (Eaglehawk route) 1188.14 - "Birney car No. 11 leaving Bendigo depot. Scrubber car at rear" 1188.15 - "No. 21 at North Bendigo Terminus" 1188.16 - "Birney car No. 11 in High St. Bendigo at intersection with Old High Street (Golden Square Route)" 1188.17 - "Birney Car No. 11 at Golden Square terminus, High St., Bendigo". tramways, trams, bendigo, depot junction, charing cross, view st., eaglehawk, north bendigo, golden square, tram 2, tram 3, tram 4, tram 11, tram 17, tram 21, tram scrubber -
 Ballarat Tramway Museum
Slide - 35mm slide/s, Noel Simons, 21/11/1962 12:00:00 AM
Set of 6 transparencies taken on 21/11/1962 on Kodak mounts. 1189.1 - Bendigo No.11 at Quarry Hill terminus. Photo taken looking in along the route. Tram has destination of North Bendigo. 1189.2 - No. 21 in Pall Mall bound for North Bendigo. Tram has roof ads for Mamouney's furniture and SEC. In the background are the National Bank building, Dad and Dave's Cafe and the Beehive Buildings and the London Pharmacy. 1189.3 - No. 2 in Mitchell St, just after crossing over railway bridge. Photo taken after tram has passed photographer. Has what appears to be an SEC road works crew in the background. Has destination of Quarry Hill. 1189.4 - No. 17 climbing Mitchell St. on the start of the single track section, just before crossing the railway bridge. Has destination of Quarry Hill and the large Maples building sign in the background. 1189.5 - as for 1189.4 but after tram has passed photographer. Has an Ilford film roof ad and an SEC roof ad. Railway bridge in the background. 1189.6 - No. 21 at Charing Cross with passengers boarding. Tram has destination of North Bendigo and roof ads for SEC 'Electric Cooking' and Sandhurst Milk. In background are the buildings on the south side of High St. Also has a SEC worker in white overalls sweeping the track.Information written on in black ink and date stamped on purple ink. 1189.1 - "Birney car No. 11 in High St. Bendigo at Golden Square terminus" 1189.2 - "No. 21 in Pall Mall Bendigo near Charing Cross" 1189.3 - "No. 2 in Mitchell St. Bendigo, just after crossing bridge over railway line (Quarry Hill route)" 1189.4 - "No. 17 in Mitchell St. Bendigo, climbing the hill the bridge over the railway line. (Quarry Hill route)" 1189.5 - "No. 17 in Mitchell St., Bendigo approaching bridge over Railway line (Quarry Hill route)" 1189.6 - "No. 21 at Charing Cross, Bendigo"tramways, trams, bendigo, golden square, pall mall, mitchell st., quarry hill, tram 2, tram 11, tram 17, tram 21 -
 Ballarat Tramway Museum
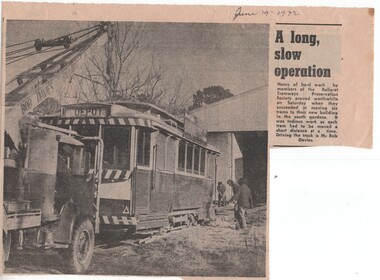
Newspaper, The Courier Ballarat, "A long slow operation", 19/06/1972 12:00:00 AM
Newspaper cutting from The Courier, Ballarat 19/6/1972 of the moving of tram 26 into the depot. Has photo of tram 26 being moved into the depot using steel channels and rails on their side. Also Bob Davies crane in photo assisting with move. The method of moving 26 was slow and difficult, having derailed it at the depot access road and dragged it up the road and then onto steel channels pushing it into the shed. Information to members for June-July 1972 gives the moving date as 16 June and completed on 17 June. The other trams were not moved until temporary track had been laid between the depot and the kerb in Wendouree Parade, roughly along the same route as the depot access track. The September 1972 issue gives full details of the move and the date. The photo was taken on Sat. 17 June. See Reg Item No. 1858 for Courier Print of the photo. Second copy added 5/11/2018 from donation of Glenise Kellett. See Information for Members (BTPS) - June-July 1972 and Sept. 1972."June 19 -1972" in top right hand cornerbtps, moving trams -
 Ballarat Tramway Museum
Book, City of Ballaarat, "Mayors Special Report Ballarat Tramways", Sep. 1971
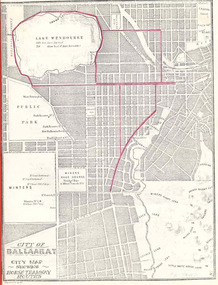
Historically significant for at the time it demonstrated aspects of the evolution of Ballarat Tramways and yields information about the formation of the tramways, the Councils viewpoint and has a strong association with the Mayor of the time.Twenty two page book, produced by photocopying, side stapled and bound with a red plastic binding, titled "Mayor's Special Report Ballarat Tramways", dated 20 September 1971 for presentation to the City of Ballaarat Council Meeting 27 Sept. 1971 and signed by the Mayor, J.A.Chisholm. Note pages 18 and 19 have been reversed. Comprises: Page 1 - map (image 1829i1) - of Ballarat (Ballaarat) showing the horse tram routes in red (appear to have been drawn in with a red pencil). Note the Sebastopol route terminates at Rubicon St. Page 3 - letter to the City Councillors from the Mayor Page 4 - Outline of the "The Ballarat Tramway System" Pages 5 - 7 - Conditions for tendering the horse tram system within the City of Ballarat" Pages 8 - 11 - Specifications and Agreement for the Ballaarat Tramways (horse trams). pages 12 - 19 - Memorandum of Agreement with the British Insulated Wire Company (later ESCo) Page 20 - Copy of letter from the Secretary of the SEC to the Minister of Fuel and Power, dated 10 Sept. 1971 advising of the formal abandonment of the Ballarat and Bendigo tramway systems. Page 21 - five photos (image 1829i3) of trams in Ballarat, including the bogie tram decorated for the Queens visit, courtesy of Mr. L. J. Denmead, Tramways Superintendent. Page 22 - Plan (image 1829i2) of Ballarat Bus Services, showing route numbers, destinations and existing tramway routes. 3rd copy added 16/7/2010trams, tramways, city of ballaarat, mayor's reports, ballaarat tramway company, british insulated wire company, esco, bus services, sec -
 Ballarat Tramway Museum
Photograph - Black & White Photograph/s, 1930's
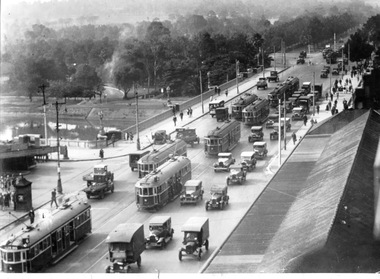
Black and white photo going to sepia toned, of about 11 W2's and many motor vehicles on Princes Bridge Melbourne, taken from the tower on Flinders Street station building, during the late 1930's. Many people on bridge, traffic jam of motor vehicles on the bridge itself. Note buildings at the Batman avenue terminus. Can see a tram trolley pole of a tram in Batman Avenue. No curve from Batman Ave. into Swanston St. At least two of the trams do not have route number boxes. There are a number of delivery vehicles in the photograph, but no horse drawn vehicles are to be seen.trams, tramways, melbourne, princes bridge, flinders st. station, batman ave., tram 321 -
 Ballarat Tramway Museum
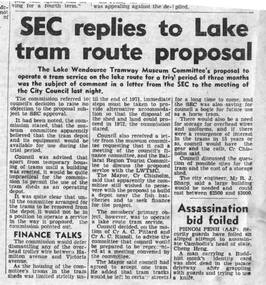
Newspaper, The Courier Ballarat, "SEC replies to Lake Tram route proposal", 14/09/1971 12:00:00 AM
Yields information about the discussions and views of the SEC about operation of historic trams in Ballarat after the closure of the SEC operated system.Newspaper clipping from The Courier, Ballarat, 14/9/1971 about a letter to the City Council from the SEC about the Lake Wendouree Tramway Museum Committee's proposal to operate a tram service on the lake route for a trail period. SEC said that this was not practical and advised that the sheds could only be used to house the trams. Noted that the SEC proposed to sell the land in 1972, and the Council's proposal that certain materials be stored. Quotes Cr. Chisholm (Mayor) and City Engineer (Mr. R. J. Sharp). Image added 20/11/2013In black ink in the top right hand corner of the item - '14/9/71'trams, tramways, museum establishment, btps, depot, city of ballarat -
Ballarat Tramway Museum
Map, Ministry of Transport, "Melbourne - Your Guide - Public Transport, No. 11, 1980", 1980
Pocket size - folded - public transport map of Melbourne, printed in colour on heavy paper, showing public transport services in greater Melbourne and on rear, route numbers and line maps of tram routes and train lines or services. Includes private bus routes. Printed 1980 by Government Printer. Issue No. 11. Image added 20-12-2016.On front cover, in biro, a telephone number "617 0900"trams, tramways, melbourne, map, routes -
 Ballarat Tramway Museum
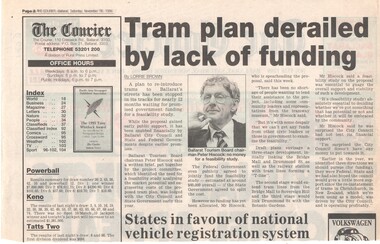
Newspaper, Lorrie Brown, "Tram plan derailed by lack of funding", 16/11/1996 12:00:00 AM
Item from the Ballarat Courier of 16/11/1996 written by Lorrie Brown quoting Peter Hiscock, chairman of the Ballarat Tourism Board that the funding for the feasibility study into the plan to re-introduce trams back to Ballarat, was still awaiting funding support from the State Government. Looks at the route outlines and the trams in Christchurch. Peter expressed surprise that the Ballarat Council had not lent its financial support. Includes a photo of Peter in a reflective mood. Item on Page 2 of the Courier.feasibility study, ballarat city tramway, ballarat revival -
 Ballarat Tramway Museum
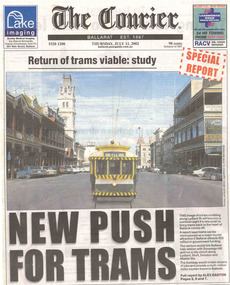
Newspaper, The Courier Ballarat, "Return of trams viable study", "New Push for Trams", "Taking tourism to the next level", "More tourists, more jobs expected", "Tram plan worthy of expected debate", 11/07/2002 12:00:00 AM
Set of three cuttings from The Courier, Ballarat dated Thursday 11/7/2002 regarding the reintroduction of trams to Ballarat. 2241.1 - Page 1 and 2 of The Courier, with page 1 titled "Return of trams viable study" and "New Push for Trams" as the commencement of a Special report showing a digitally constructed image of No. 13 in Lydiard St. North. Note the tram does not have a driver. Introduces reports by Alex Easton on pages 2, 6 and 7. On Page 2, titled "Taking tourism to the next level", has details of the Council viewpoints on the proposal, public consultation, a map of the route, and notes on the construction issues. Has a digital image of 13 crossing Sturt St. into Lydiard St. North. See images No. 1 to 3. 2241.2 - page 6 of The Courier, which joins with page 7 using the titled "More tourists, more jobs expected". Has Sections reviewing the study outcomes, benefits and a summary of the study. Page 6 has a photo of a passenger boarding No. 21, decorated as the Myers Christmas tram in Sturt St and a photo of Bridge St. in 1971 (very poor quality reproduction). See images No. 4 and 5. 2241.3 - page 7 of The Courier, has Sections detailing the history of Ballarat Trams, proposals for the City Tramway, costs, consultation, and comments from Peter Hiscock. Has a photo of Peter Hiscock and Mayor David Vendy in front of No. 13 at the BTM depot. See image No. 6. Also has a photo of Dianne Smith, Executive Director of Ballarat Tourism. On page 8, as part of The Courier's editorial Section, has comments on the proposals, titled "Tram plan worth of extended debate". Looks at the $20million cost. ballarat revival, editorial, ballarat city tramway, lydiard st. nth -
 Ballarat Tramway Museum
Slide - 35mm slide/s - set of 11, May 1979c
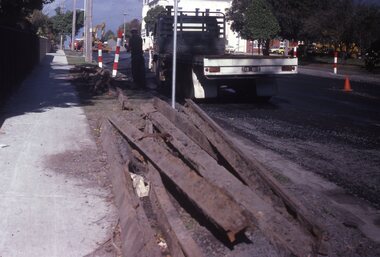
Set of eleven colour slides (Kodak) showing the removal of tram track in Geelong, c May 1979. All in Pakington St., Newtown, ex Newtown route. 2268.1 - slide 29 - look south from the north of Retreat Road. .2 - 30 - No. 276 in background, looking south .3 - 31 - City of Newtown Town Hall in background. .4 - 32 - opposite to that of No. 29. .5 - 33 - Looking south .6 - 34 - looking south with Aphrasia St. in the background. .7 - 35 - as for .2 .8 - 36 - Opposite No. 278, looking south .9 - 1 - opposite No. 276/278. .10 - 2 - ditto .11 - 3 - Outside No. 278, looking south. Bus stop still in position. See Letter to Dave O'Neil and responses.tramways, trams, geelong, track removal, pakington st, newtown -
 Ballarat Tramway Museum
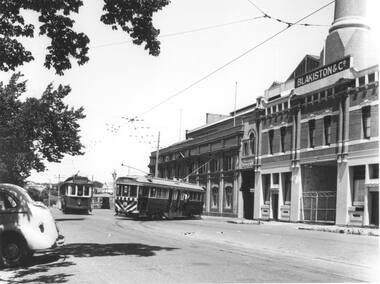
Photograph - Black & White Photograph/s - set of 3, Geoff Grant, 8/01/1956 12:00:00 AM
Yields information about the appearance of Geelong's trams in particular ex Melbourne J class trams after receipt in Geelong. This tram later became Ballarat No. 11.Black and white print from a Geoff Grant negative of a Geelong bogie tram entering Corio Terrace from the Geelong depot on 8/1/1956, while Pengelley 19 waits in the siding. The bogie tram (37) has destination of "Special", 19 - "Chilwell". Has the Geelong SEC depot/powerhouse building in the background with part of the Blakistons' sign visible. Photo used in Trolley Wire, Feb. 1999, page 11, article on Geelong tramways. Pencil marks on the rear of the photo indicate proposed used of the photo in the article. 2472.2 - As above but with the rear of the motor vehicle edited from the photograph. Produced by William Scott for his book, 2008. Two copies. Added 21/7/2009. 2472.3 - large format print from Lloyd Rogers collection via Robert Green 2/2014. Added 4-4-20192472 - On rear in red ink "Geelong Depot 8-1-56" in top left hand corner and in bottom left hand corner "G.A. Grant" 2472.1 - on rear of copy 1 in ink in top left hand corner "40) Geelong 8.1.1956 / G. Grant pic / modified image (background only). Last day of Chilwell Route in 1st closures. Single truck car being changed over about mid afternoon for a bogie car to cater for increased traffic / Cars 19 and 37." copy 2 - "Geelong 8.1.1956 / G. Grant pic / cars 19 & 37." copy 3 - "Geelong tram depot / 8th Jan 1956"trams, tramways, geelong, geelong depot, corio terrace, chilwell, tram 19, tram 37 -
 Ballarat Tramway Museum
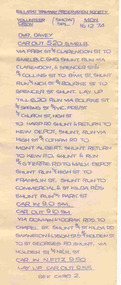
Ephemera - MMTB Special Table, Melbourne and Metropolitan Tramways Board (MMTB), Dec. 1974
Has a strong association with a BTPS organised tour and yields information about the tour arrangements., Has a strong association with a BTPS organised tour and yields information about the tour arrangements.Spirit duplicated, handwritten Special Table" or timetable for a BTPS charter tram tour using two separate sheets of paper. Issued by the MMTB for a BTPS special charter on 16/12/1974. Inspector Davies, out of South Melbourne Depot. Gives time and route arrangements. Second copy from donation of the Tom Murray Estate added 20-11-2016.trams, tramways, btps, charters, special trams -
 Ballarat Tramway Museum
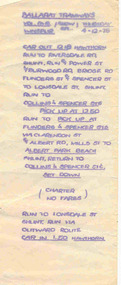
Ephemera - MMTB Special Table, Melbourne and Metropolitan Tramways Board (MMTB), Dec. 1975
Has a strong association with a BTPS organised tour and yields information about the tour arrangements., Has a strong association with a BTPS organised tour and yields information about the tour arrangements.Spirit duplicated, handwritten Special Table" or timetable for a charter tram tour. Issued by the MMTB for a BTPS special charter on 4/12/1975, Driver volunteer, Mr. Winspur, out of Hawthorn Depot. Gives time and route arrangements. Second copy from donation of the Tom Murray Estate added 20-11-2016.trams, tramways, btps, charters, special trams -
 Ballarat Tramway Museum
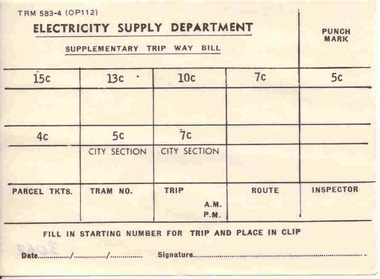
Document - Photocopy, State Electricity Commission of Victoria (SECV), "Supplementary Trip Way Bill", 1966
Yields information about the form used in Ballarat and Bendigo by the SEC to enabling ticket checking by Inspectors on the trams.Single sheet of paper titled "Supplementary Trip Way Bill", form No. TYE 583-4 (OP112), for filling in ticket starting numbers, for tickets from 8 ticket values through to 15c value. Also allows for parcel tickets, tram no, trip, route, inspector and punch marks. Has line for filling in date and signature at base of ticket. Used in late 1960's. Max. fare 15c Three copies held. See also Reg. item 68 and 279 for another sample - 1/- max value. See Fares in Ballarat – from Alan Bradley 11/4/2005 – appendix for Booktrams, tramways, secv rules, by laws, tickets, fares, ballarat, bendigo -
 Ballarat Tramway Museum
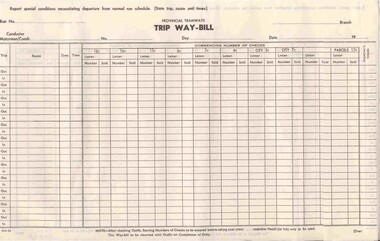
Document - Form/s, State Electricity Commission of Victoria (SECV), "Trip Way-Bill", 1969
Demonstrates aspects of the SEC governance and monitoring system, gives information on actual tram running, tickets sold against a date. Could be used by Inspectors to check tickets on a tram. Has City and Parcel tickets.Printed form titled "Trip Way-Bill" of the Provincial Tramways, on off white paper. Gives value of tickets up to 18c and parcel stamps of 13c. Has space for the Run No, Branch, Motorman/Conductor, Day, Date , route time and tram no and space for Inspectors Initials. Able to be used on both sides of the sheet. Has sheet or print number of 554-30. Two copies held. Five copies added 11/1/2007. trams, tramways, tickets, accounting, trip waybills, conductors -
 Ballarat Tramway Museum
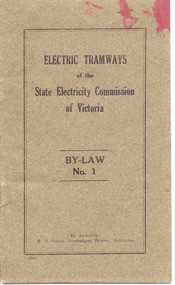
Book, State Electricity Commission of Victoria (SECV), "Electric Tramways of the State Electricity Commission of Victoria By-Law No. 1", 1937
Demonstrates aspects of the SEC governance system in issuing By-laws for the travelling public, as part of their Act. Yields information about fares charged for tram services in Ballarat, Bendigo and Geelong. Issued to crews.Twenty Four page booklet, plus medium weight card dark brown colour covers centre stapled. Book cover has title "Electric Tramways of the State Electricity Commission of Victoria By-Law No. 1". Pages are numbered pages 1 to 23, revoking By Laws dated 5/9/1932 (See Reg. Item 3109). Dated 9/3/1937. Gives definitions, fares and charges, regulations re passengers, behaviour, smoking, dangerous goods, luggage and behaviour of crews. Gives schedule of fares and charges for Ballarat, Bendigo and Geelong. Fares applied from 1937 to 1949 - see Reference. Details names of SEC Commissioners, Minister in Charge of Electrical Undertakings. Copy has numerous changes marked in red ink internally and pasted in changes to the text. Has Government Printer number 6967. Given the printing number on Reg. Item 3108 is a higher number and that H. Green was the Government Printer for this book and in 1936 (See Reg. Item 3068), indicates a copy printed in 1937. A piece of paper has been pinned to the copy on page 23, giving details of where to relieve on the Sebastopol route. Written in red ink. See Fares in Ballarat – from Alan Bradley 11/4/2005 – appendix for Book Copy - has numerous changes marked in red ink mainly, some pencil, internally and pasted in changes to the text.trams, tramways, secv rules, by laws, tickets, fares, ballarat, bendigo, geelong -
 Ballarat Tramway Museum
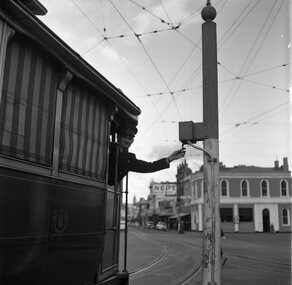
Photograph - B&W print of donated negative, John Webster, 11/4/1953
Yields information about the Bucks Head Hotel and demonstrates the way the signals were set in Bridge St for either the Mt Pleasant or Victoria St routesBlack and digital white print from a scan of a donated negative of a driver leaning out from a single trucker to set the switch on the signal for either the Victoria St or Mt Pleasant routes. Has the Bucks Head Hotel in the background. Shows the pole the signal controller or switch was mounted on. Black and White print made from scan of negative. Original Negative stored with Negatives. Image rescanned from copy neg and updated 31/5/2020. See On this basis, the envelope and marking matches that of Reg Item 4158, photo of No. 40, by John Webster and assumed taken on the same day as Item 4157, 4158, 4168, 4178 - 11/4/1953. Contained within Envelope No. 33.On left hand side of the negative in ink is "EI 35".tramways, trams, sturt st, grenville st, signals, bridge st -
 Ballarat Tramway Museum
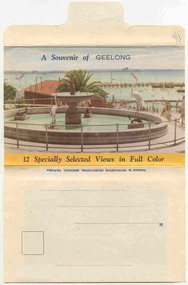
Postcard - Folder set, Nu-color-vue or Nucolorvue Productions, "A Souvenir of Geelong", 1950's
Set of 12 colour views of Geelong on a folded strip, glued within a colour printed cover, titled "A Souvenir of Geelong", printed on both sides of the strip. Booklet printed with an address area on rear. Produced by Nulcolorvue Productions, Mentone, Victoria. The rear has a slit on the rear cover that allowed the folder to be secured. On the inside of the front cover, has an introduction to Geelong, notes "modern tram and bus routes" Pictures are: 1. Gheringhap St showing Geelong City Hall and Post Office 2. The Barwon River, Geelong 3. T&G Building, Ryrie St - shows tramway overhead 4. Christ Church, Moorabool St 5. Malop St Geelong 6. Art Gallery and Park 7. St Marys Roman Catholic Cathedral 8. The Geelong Post Office with buses in background and a Safety Zone sign 9. Moorabool St Geelong - has overhead and a bar traffic light/ 10. Queens Park Geelong 11. The Waterfront at Geelong. 12. Eastern Beach Swimming Pool. Made during the early 1950's, given motor cars in the photo. trams, tramways, geelong, moorabool st, ryrie st -
 Ballarat Tramway Museum
Slide - 35mm slide/s, Bob Wilson, Dec. 1972
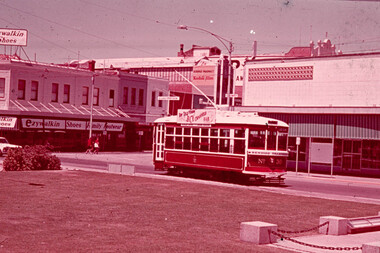
White cardboard mount, 35mm slide, from the Association of Railway Enthusiast's film strip titled "Provincial Tramway Film Strip" of a Bendigo Trust Birney tram, December 1972 at Charing Cross, outbound to the mine. Tram painted in the Bendigo Trust colour scheme and is fitted with a Bendigo Television BCV roof advertisement. "For Television BCV Channel 8 & 11" and underneath the roof advertisement a route sign "Gold Mine - Joss House". Photo has the Ezywalkin store in the background, Fountain Plaza in the foreground. The film strip notes (Reg. Item 2560), provided the following caption details: "The Bendigo Trust operates a tourist service over the former "NORTH BENDIGO" and part of the "GOLDEN SQUARE" lines using severally visually restored cars, such as Birney No. 30 at Charing Cross - Dec ' 72 (Bob Wilson) See image btm2598p.tif for high level scan of image. Stamped on base of slide "11808" and written in ink on top edge "No. 30 Charing Cross"tramways, trams, are, film strip, charing cross, bendigo trust, tram 30 -
 Ballarat Tramway Museum
Magazine, Melbourne and Metropolitan Tramways Board (MMTB), "MMTB News", 1967
Eight issues of "MMTB News" - The Magazine of the Melbourne and Metropolitan Tramways Board. No. 1 not in bag 11/9/2016 when checked - further checking to be done. All issues printed with an cream colour paper cover with the rest of the magazine white glass paper. 2721.1 - Vol. 4, No. 1 - 16 pages, January 1967, with a photo of the W7 1031 prior to running out of Preston Depot with its crew and depot starter, photo of opening of Glenferrie Rd Malvern, "Like to Drive a Tram?" - Hawthorn driver training school with photos, intake of new conductors, Stores - The Board's Housekeeper - Mr. D. Tatam, extension of the East Preston route, Children's Christmas party, trackwork and duplication of East Coburg to Bell St, laying of a cable tram cable. 2721.2 - Vol. 4, No. 2 - 16 pages, February 1967, with a photo of North Fitzroy bus crews prior to running out, "Sixty years of Essendon Tramways", R. Risson's speech to the ANA on 26/1, Annual report highlights, Tramways band, retirement of Max Jones. Photo of Mr. Risson scanned - see i9 2721.3 - Vol. 4, No. 3 - 16 pages, March 1967, with a photo of a model of the proposed St. Kilda junction arrangements, "Trams and Buses - they keep them rolling", St. Kilda Junction scheme, Overhead crews, Conductresses Uniforms, new conductors, sports and social club news. 2721.4 - Vol. 4, No. 4 - 16 pages, April 1967, with a photo of the reconstruction of Camberwell Road, "Melbourne Needs Trams", Tramways Band, Long Service awards, retirement of Roy Allen, Jack Moffatt World wide TV broadcast from South Melbourne depot, sports and social club news. 2721.5 - Vol. 4, No. 5 - 16 pages, May 1967, with a photo of bus maintenance work at North Fitzroy, Tram track maintenance procedures, retirement of Arthur Battye, death or Harold Wallace, sports and social club news. 2721.6 - Vol. 4, No. 6 - 16 pages, June 1967 with a photo of the World TV broadcast, "Our World" that featured South Melbourne Depot, tram track maintenance procedures, TMSV Visit to Rubicon with bus 570, staggered working hours, first MMTB built tramcars (T166), TMSV all night tour, retirement of Bill Trickey, sports and social club news. 2721.7 - Vol. 4, No. 7 - 16 pages, July - August 1967 with a photo of visiting US Sailors on a tramcar, changes to tramways routes (Norm Cross), retirement of Val Marchesi, Tom Addison, J. J. McKenzie, Gordon Mitchell, sports and social club news. 2721.8 - Vol. 4, No. 8 - 16 pages, September - October 1967 with a photo of Ray Harvey working on a RC2 Controller, tram charter by Bob Wilson, Essendon reunion, sports and social club news. Two copies of each other than No. 1, No. 3 and No. 8 as at 12/9/2016.-Each issue has stamped on the front cover or inside "The Australian Railway Historical Society (S.A. Branch).trams, tramways, mmtb, hawthorn, essendon, tramways band, st kilda road, trackwork, tmsv, tv broadcasts, tramcars -
 Ballarat Tramway Museum
Document - Photocopies, Royal South Street Society, Royal South Street Society Guide, 2008
Has a strong association with the work of the Royal South Street Society, who published a handbook/guide or manual for their competitions. Used a photograph published at about the same time.Set of 15 photocopies of pages from the Royal South Street Society Guide showing trams in Sturt St Ballarat. .1 - Sturt St Looking East - with an ESCo tram outside the town hall and other horse drawn vehicles - 1907 .2 - Sturt St Looking West - same image as in Reg item 2688 - 1907 .3 - Sturt St Looking East - with many vehicles and people - 1910 and the "Chef" kitch range stove advertisement sold by Middleton and Morris of Sturt St. .4 - Sturt and Lydiard St, with a tram turning from Sturt into Lydiard St, 1910 with the post office in the background - 1910 and an advertisement for Woderine medicine sold by Jas. A. Gear, herbalist. .5 - Sturt St looking West - tram turning from Sturt into Lydiard St, taken from near post office corner - 1911 and a advertisement for Williams the Shoeman. .6 - Sturt St. West - with an ESC0o tram outbound - the only vehicle - 1913. .7 - same photo as .3, with a Monster Military Carnival Advertisement for Nov. 8th - 1913 .8 - Sturt and Lydiard St from next to post office, looking west with two trams, one horse trailer and many people - a busy scene - 1914 .9 - Sebastopol tram No. 21 at Grenville St - 1928 - with the Ballarat Gas Company Show rooms in the background, the Sturt St shelter. The tram has a Suttons Organs roof advertisement. .10 - View of Sturt Street, showing City Hall Buildings, with an ESCo Sebastopol type tramcar crossing the street, taken from the post office stops. - 1928 - Advertisements for G. Ludbrook Furnishing Undertaker (Motor Service and Horse drawn vehicles) and R. Young Grocer. .11 - Sturt St looking West, looking west, with a Sebastopol type tram at Grenville St and the big shelter removed. Has many buildings and many people in the background - 1928. .12 - same photo as for .10 and Clarendon Presbyterian Ladies Collection, Ballarat photograph - 1929. .13 - Advertisement for Ballarat Tramways - cars for Coliseum, fare box, route numbers and route colour scheme - 1929. .14 - as for above, no date, but opposite is the is an item for the Mouth Organ Band Contest, "A" Grade - c1933, notes the Coburg Tramway Athletic Club Harmonica Band and the Malvern Tramways Harmonica band amongst the contestants. .15 - same as .9, with a advertisement for the Melbourne Coffee Palace - Bourke St. Photocopies made by Neville Hasket for the BTM 10/2008. See also Reg item 675 for alternative source details.Handwritten note on photocopiestrams, tramways, ballarat, sturt st., royal south street society, lydiard st, town hall, post office, esco