Showing 479 items matching "trams in street views"
-
 Ballarat Tramway Museum
Photograph - Digital image, W. J. Llewelyn, 6/03/1954 12:00:00 AM
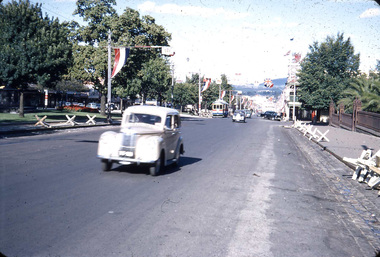
Yields information about the Royal Visit to Ballarat and the tram decorated for its visit along with other arrangements.Set of three eight digital images taken of Queen Elizabeth II to Ballarat 6/3/1954 by W. J. Llewelyn. .1 - Street view of Sturt St looking East at St Patrick's church, with No. 38 in the background and the wooden crowd control barriers stacked by the footpath. .2 - Crowd waiting at the intersection of Sturt and Lydiard St. .3 - Crowd waiting in Sturt St, with soldier's, outside Myers Store .4 - Crowd and guard of honour waiting at the station. .5 - The Queen and Duke in the official car in Sturt St. .6 - ditto with Myer Store in the background. .7 - Scottish unit marching at the intersection of Bridge St and Grenville St with he Bucks Head Hotel in the background. Note the sign on the hotel pointing to the Floral Carpet at the Alfred Hall. .8 - Band at the City Oval. Date obtained from http://wiki.prov.vic.gov.au/index.php/Royal_Visit_1954,_Locations_for_Visiting_Municipalities,_Ballarat (accessed 11-6-2017)trams, tramways, civic functions, royal visit, railway station, lydiard st, sturt st, city oval, myers, tram 38 -
 Ballarat Tramway Museum
Photograph - Digital image, W. J. Llewelyn, c1955
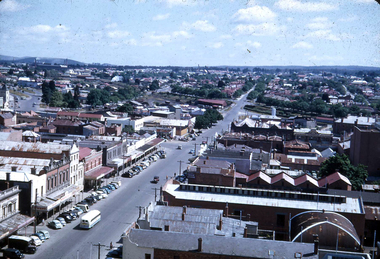
Set of two colour digital images taken by W. J. Llewelyn. .1 - Armstrong Street from the Town Hall tower - shows the street view, car parking arrangements prior to the construction of the Ballarat City Hall, c1955. The new Civic Hall was opened in 1956. Shows the railway timber yard. .2 - Sturt St showing Town Hall and the Myers building late 1950's? trams, tramways, armstrong st, railway, town hall, myers -
 Ballarat Tramway Museum
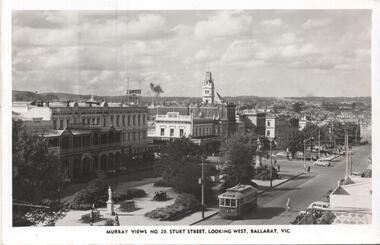
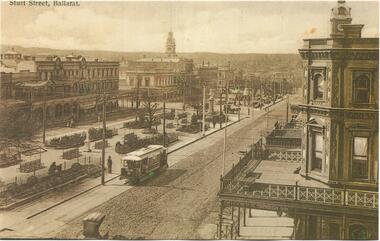
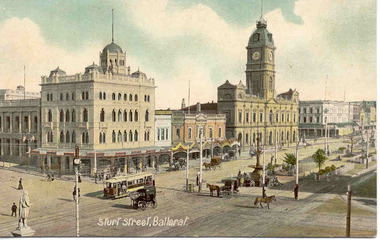
Postcard, Murray Views, Murray Views No. 29 - Sturt Street Looking West, Ballarat Vic.", c1955
Postcard - black and white - titled Murray Views No. 29 - Sturt Street Looking West, Ballarat Vic.", actually looking east from Doveton St towards Black Hill and Grenville St. Has tram 32 westbound to Gardens via Drummond St North. Divided back postcard with details of the maker on the right hand side, MV symbol and a space for a stamp. In the view are Lester House, Tunbridges, Crockers and the Post Office Tower. A Plume sign is also visible.Yields information about the appearance of Sturt St in the early 1950's, tram operations, buildings and motor vehicles.Postcard - divided back, unused Murray Viewstrams, tramways, sturt st, doveton st, tram 30 -
 Ballarat Tramway Museum
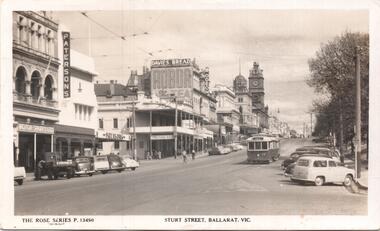
Postcard, Rose Stereograph Co, Sturt Street, Ballarat Vic.", c1955
Yields information about the appearance of Sturt St in the early 1950's, tram operations, buildings and motor vehicles.Postcard - black and white - titled The Rose Series P13490, Sturt St Ballarat Vic, looking west up the Sturt St Hill from Grenville St. Tram 30 is in the loop showing destination of City. A divided back postcard with the rose symbol, publisher details on the left side and that it is a real photograph. In the view are Patersons, the Carlyon's Hotel, The Mechanics Institute and the Odeon Theatre, Motor Spares Limited and other buildings through to the Town Hall.trams, tramways, sturt st, grenville st, tram 35 -
 Ballarat Tramway Museum
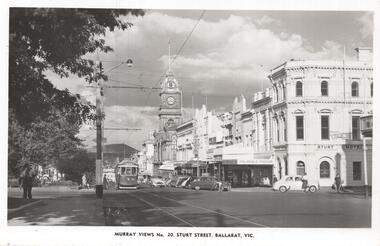
Postcard, Murray Views, Murray Views No. 20 - Sturt Street, Ballarat Vic.", c1955
Yields information about the appearance of Sturt St in the early 1930's, tram operations, buildings and motor vehicles.Postcard - black and white - titled Murray Views No. 20 - Sturt Street, Ballarat Vic.", looking east from Doveton St with the Town Hall in the background. Tram 35 is westbound, showing Sebastopol. On the corner of Doveton and Sturt is the Sturt Hotel with an auction notice, next door is Palmdale Frocks, Stansfield and Smith, Coles, Homecrafts and Myer. Divided back postcard with details of the maker on the right hand side, MV symbol and a space for a stamp. btm7363bw - black and white version of the image used for the Long Gallery - 9/2021 2nd copy added 28-12-2021 - most likely a reproduction of the original as it does not have a postcard back.on rear of 2nd copy in ink "Ballarat No. In Sturt St, eastwards at" and Keith Kings stamp.trams, tramways, sturt st, doveton st -
 Ballarat Tramway Museum
Postcard - copy, "Sturt St, Ballarat", c2000
Yields information about the appearance of Sturt St following the introduction of electric trams in 1905 and has a strong association with the work of Sovereign Hill and Rose Stereograph Co.Postcard reproduction - sepia coloured - of an ESCo tram near the intersection of Doveton St. and Sturt St. travelling west along the south side of Sturt Street. Photo appears to be taken soon after opening of the electric trams, as the tramway is well paved compared to the rest of the street which shows vehicle tracks etc. Small horse drawn vehicle crossing in front of the photograph. Shows buildings along the north side of Sturt St. and the building at the SE corner of Doveton St. ESCo tram has destination board on the front dash of the tram. See Reg Item 834 for a black and white view. Card reproduced for Sovereign Hill Gold Mining Township by Rose Stereograph Co. of Glen Waverley c2000. Divided back type with caption, production and the Rose Co. symbol on the rear.trams, tramways, sturt st, ballarat, esco, rose postcards -
 Ballarat Tramway Museum
Negative, Wal Jack, late 1930's
Yields information about Ballarat 's tram operations and Hospital Corner.Negative and Digital image of the Wal Jack Ballarat Negative file of No. 19 turning from Sturt St into Drummond St North end route to Gardens. In the background are the premises of Shell Petrol, Morris Ellis Motor Engineers, a hair dresser, a bakery, M. George and E Daly and the Great Southern Hotel. Also in the view is the ESCo street electrical pillar. trams, tramways, hospital corner, sturt st, drummond st, tram 19 -
 Ballarat Tramway Museum
Slide - 35mm slide/s - set of 17, Noel Simons, 20/11/1962 12:00:00 AM
Set of 17 transparencies taken on 20/11/1962 on Kodak mounts. 1187.1 - Bendigo No. 2 at the Quarry Hill terminus, showing destination of Quarry Hill. Has Cohns Drinks and Streets Ice Cream ads on dash panel, a SEC 'electric cooking' roof ad and another roof ad. Shows the Y terminus at this location, but tram standing just before it. Overhead in position. 1187.2 - as above, but closer up. 1187.3 - as above, but from the north side, showing cemetery in the background. 1187.4 - Bendigo No.3 at Eaglehawk terminus. Tram showing destination of Quarry Hill. Has the various buildings at Eaglehawk in the background including the Foodland store. Has Streets Ice cream and White Horse Whiskey ads on the dash panel. 1187.5 - Bendigo No. 18 at Garden Gully crossing loop, in bound, with destination of Eaglehawk. Passengers waiting for an Eaglehawk tram at the stop. Has a white horse whiskey ad on dash panel and SEC roof ads. Conductor standing in doorway looking out. 1187.6 - Bendigo No. 7 inbound in Nolan St. at cnr of McCrae St. showing destination of Golden Square. Has Streets Ice cream ad on dash panel and a Castrol Roof ad. 1187.7 - Bendigo No. 19 at the North Bendigo terminus with railway level crossing in background. Tram has a Cohns Drinks ad and an SEC 'Electric Cooking' roof ad. 1187.8 - Bendigo No. 2 at the Quarry Hill terminus, looking back into Bendigo, showing destination of Eaglehawk. 1187.9 - Bendigo No. 21 in McCrae St, near Nolan St outbound for North Bendigo. Photo taken after tram has passed photographer. 1187.10 - Bendigo Nos. 4 and 26 at Charing Cross in View St. with fountain alongside and the Beehive, Ezywalkin Buildings in the background. No. 26 has a Sandhurst Milk and SEC 'Electric Cooking' roof ad. 1187.11 - close up of 22E maximum traction truck and folded footstep. 1187.12 - Bendigo No. 19 at Charing Cross terminus, after tram has passed photographer, showing destination of North Bendigo, with the Beehive building in the background and passengers boarding tram. 1187.13 - Bendigo No. 11, turning from View St. into Pall Mall, showing Special with the conductor holding point bar. Has the Beehive and Ezywalkin Buildings in the background. 1187.14 - No. 7 at Charing Cross terminus, in Pall Mall, bound for Golden Square. Has the Beehive and Ezywalkin buildings in the background and passengers waiting at the tram stop. 1187.15 - No. 18 at the Charing Cross terminus, bound for Eaglehawk. Has the Beehive and Ezywalkin buildings in the background and passengers waiting at the tram stop. Also has the 'Safety Zone' sign in the photograph. 1187.16 - No. 2 at Quarry Hill terminus, night or dusk photo. Tram showing destination of Depot. 1187.17 - No. 26 at Charing Cross, night photo. Tram has destination of Quarry Hill, but is on the line for Eaglehawk. Photo looks along Mitchell St. Also shows Safety Zone sign. Information written on in black ink and date stamped on purple ink. 1187.1 - "No. 2 at Quarry Hill terminus Bendigo" 1187.2 - "No. 2 at Quarry Hill terminus Bendigo" 1187.3 - "No. 2 at Quarry Hill terminus Bendigo" 1187.4 - "No. 3 at Eaglehawk terminus" 1187.5 - "No. 18 in Mt Korong Road, Long Gully at cnr of Havilah Road (Eaglehawk Route)" 1187.6 - "No. 7 in Nolan St. Bendigo, at Cnr of McCrae St., near lake Weeroona, (North Bendigo Route)' 1187.7 - "No. 19 at North Bendigo terminus" 1187.8 - "No. 2 at Quarry Hill terminus" 1187.9 - "No. 21 in McCrae St. Bendigo, near Nolan St. (North Bendigo Route) 1187.10 - "4 and 26 at Alexandra Fountain, Charing Cross Bendigo" 1187.11 - "Truck of Bogie Car, Bendigo Tramways" 1187.12 - "No. 19 in Pall Mall at Charing Cross, Bendigo" 1187.13 - "Birney car No. 11 entering Pall Mall from View St. at Charing Cross Bendigo" 1187.14 - "No. 7 in Pall Mall at Charing Cross, Bendigo" 1187.15 - "No. 18 at Alexandra Fountain, Charing Cross, Bendigo" 1187.16 - "No. 2 at Quarry Hill terminus, Bendigo" 1187.17 - "No. 26 at Alexandra Fountain, Charing Cross, Bendigo" tramways, trams, bendigo, quarry hill, eaglehawk, north bendigo, maximum traction, night photo, tram 2, tram 3, tram 4, tram 7, tram 11, tram 18, tram 19, tram 21, tram 26 -
 Ballarat Tramway Museum
Slide - 35mm slide/s, Noel Simons, 21/11/1962 12:00:00 AM
Set of 17 transparencies taken on 21/11/1962 on Kodak mounts. 1188.1 - Bendigo No. 11 at Depot Junction McCrae and Arnold St. with driver/conductor changing points. 1188.2 - Bendigo No. 4 at Charing Cross, side on photo, with City Club Hotel and Alexandra Fountain in the background. Tram has Castrol and SEC 'Electric Cooking' ads. 1188.3 - Bendigo No. 4 climbing View St. after tram has passed photographer. Tram has Streets Ice Cream and Cohns Soft Drinks ad on rear dash panel. In the background are the buildings in View St., including the Princess Theatre. Tram has destination of Eaglehawk. 1188.4 - Trams 2 and 4 crossing at the California Gully or Thorpe St Loop. 1188.5 - Bendigo 4 in Mt Korong Road. Tram inbound with destination of Quarry Hill, just leaving Garden Gully Loop. 1188.6 - Bendigo 4 and 17 crossing at the Hayes St. or Iron Bark Gully Loop. No. 17 bound for Eaglehawk, No. 4, Quarry Hill. 17 has two SEC roof ads and a white horse whiskey ad. 1188.7 - No. 17 bound for Eaglehawk, soon after leaving California Gully. Has large mullock heap in background. 1188.8 - Bendigo 2 and 17 crossing at the Thorpe St. or California Gully Loop. Has butchers shop in background. 1188.9 - Bendigo 17 at the Eaglehawk terminus. Has destination of Quarry Hill. In background is the hotel and shops at the terminus, showing ads for "Melbourne Bitter". Tram has two SEC 'Electric Cooking' ads. Driver and conductor about to assist two lady passengers with a pram and baby. 1188.10 - No. 17 at Eaglehawk terminus, awaiting departure. Has Eaglehawk Town Hall and Post Office in background. Tram has a Whitehorse Whiskey ad on the front dash panel. 1188.11 - No. 3 in High St. Eaglehawk, with destination of Eaglehawk. Has the shops on the south side of High St. in the background, including the Eaglehawk fish shop. Tram has two roof ads, one an SEC roof ad, and Cohns Drinks and Streets Ice cream ads on front dash panel. 1188.12 - as above, but after tram has passed photographer. Note the centre of the road poles. 1188.13 - No. 2 outbound for Eaglehawk at the intersection of Mt. Korong Road and the Calder Highway. Photo taken after the tram has passed the photographer. Has an Ampol service station in the background. 1188.14 - No. 11 leaving the Bendigo depot, crossing the bridge, with the Scrubber car in the background. 1188.15 - No. 21 at the North Bendigo terminus. Tram has destination of Golden Square and Cohns drink ad on front dash and two roof ads on side. 1188.16 - No. 11 on Golden Square route, in High St. at intersection with Old High St. 1188.17 - No. 11 at the Golden Square terminus, conductor turning the pole. Hotel on the left side of the photo. Note the road works barrier and red flag behind the tram. Slide has an end of roll mark on the right hand side of the image.Information written on in black ink and date stamped on purple ink. 1188.1 - "Birney car No. 11 in McCrae St. at Cnr of Arnold about to run into depot, Bendigo" 1188.2 - "No. 4 at Alexandra Fountain, Charing Cross Bendigo" 1188.3 - "No. 4 climbing the View St. Hill from Charing Cross, Bendigo (Eaglehawk Route)" 1188.4 - "No. 4 and 2 at Thorpe St. Loop, California Gully" 1188.5 - "No. 4 in Mt Korong Rd., Long Gully, Near Havilah Rd. (Bendigo) (Eaglehawk Route)" 1188.6 - "Nos. 17 and 4 crossing on Hayes St. Loop, Ironbark, Bendigo" 1188.7 - "No. 17 soon after leaving California Gully (Eaglehawk Route)" 1188.8 - "No.2 and 17 crossing on Thorpe St. Loop, California Gully (Eaglehawk Route)" 1188.9 - "No. 17 at Eaglehawk terminus" 1188.10 - "No. 17 at Eaglehawk terminus" 1188.11 - "No. 3 in High St. Eaglehawk" 1188.12 - "No. 3 nearing Eaglehawk terminus" 1188.13 - "No. 2 in Mt. Korong Rd., Ironbark. Calder highway on left (Eaglehawk route) 1188.14 - "Birney car No. 11 leaving Bendigo depot. Scrubber car at rear" 1188.15 - "No. 21 at North Bendigo Terminus" 1188.16 - "Birney car No. 11 in High St. Bendigo at intersection with Old High Street (Golden Square Route)" 1188.17 - "Birney Car No. 11 at Golden Square terminus, High St., Bendigo". tramways, trams, bendigo, depot junction, charing cross, view st., eaglehawk, north bendigo, golden square, tram 2, tram 3, tram 4, tram 11, tram 17, tram 21, tram scrubber -
 Ballarat Tramway Museum
Slide - 35mm slide/s - set of 3, Noel Simons, 22/11/1962 12:00:00 AM
Set of 3 transparencies taken on 22/11/1962 on Kodak mounts. 1190.1 - No. 7 (bound for North Bendigo) at the Charing Cross stop with No. 19 just left for Quarry Hill. Has the buildings on the south side of High St. in the background, including RACV building. No. 7 has front dash panel ad for Streets ice cream, and roof ads for Ilford Film and an SEC "Cook with Electricity". Passengers are boarding the tram. 1190.2 - Bendigo No. 2 at Charing Cross with fountain in the background and other buildings on the south side of High St. Tram has two SEC roof ads - good side on view - "Electric Cooking - Matchless" and "Switch to Electric Cooking". 1190.3 - Nos. 19, 2 and 7 at Charing cross with a Austin ? motor car. Has buildings on the south side of High St. in the background, along with SEC and Ilford film roof ads.Information written on in black ink and date stamped on purple ink. 1190.1 - "Nos. 19 and 7 at Alexandra Fountain, Charing Cross, Bendigo" 1190.2 - "No. 2 at Alexandra Fountain, Charing Cross, Bendigo" 1190.3 - "Nos. 19, 2 and 7 at Alexandra Fountain, Charing Cross, Bendigo" tramways, trams, bendigo, charing cross, alexandra fountain, tram 2, tram 7, tram 19 -
 Ballarat Tramway Museum
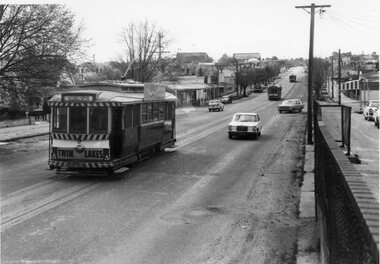
Slide - 35mm slide/s - set of 20, Noel Simons, 21/05/1971 12:00:00 AM
Set of 20 transparencies taken on 21/5/1971 on Kodak mounts. 1197.1 - Bendigo No. 5 en route to Eaglehawk at Creeth St Long Gully. Tram has a SEC roof ad and Cinzano roof ad. 1197.2 - No 5 approaching Needle Loop between Long Gully and California Gully. On left hand side is the City of Bendigo sign, indicating city boundary. 1197.3 - As for 1197.2 but actually entering loop. Photo taken after tram has passed photographer. 1197.4 - No. 26 bound for Eaglehawk descending the railway bridge near Eaglehawk, at Jobs Gully. 1197.5 - as for 1197.4, but after crossing bridge, now ascending a hill. Photo taken after tram has passed photographer. 1197.6 - No. 26 climbing High St. hill Eaglehawk, nearing end of Double track, bound for Quarry Hill. Shows centre of the road poles. 1197.7 - As for 1197.6, with tram entering single track section. Photo taken after tram has passed photographer. Has a BP service station in the background. 1197.8 - No. 26 (bound for Quarry Hill) crossing No. 17 (Eaglehawk) at Job's Gully Loop. 1197.9 - No. 17 climbing railway bridge at Job's Gully, en route to Eaglehawk. Photo taken after tram has passed photographer. 1197.10 - No.26 bound for Quarry Hill, leaving Long Gully Loop? Has the Creeth St. church in l197.l in the far background. Photo taken after tram has passed photographer. 1197.11 - Tramway Point work at the northern end of Long Gully Loop. 1197.12 - No. 17 en route for Quarry Hill turning into View St. from Bamard St. Tram has SEC roof ads "Everything fine in my all electric Kitchen' and 'Electric Cooking is Matchless'. 1197.13 - as for 1197.12, but tram has turned into View St and about to enter the double line track. Photo taken after tram has passed photographer. 1197.14 - No. 21 enters Nolan St after turning from MacRae St. en route to Bendigo. Note sign on its own post noting tram turns "Beware Tram Turns" and stop sign on adjacent pole "Trams stop on Request". No. 21 has two SEC roof ads. 1197.15 - No. 21 in Nolan St. after turning from Bridge St. (White Hills Road). Note signal light for Bridge St. loop on pole corner of street. Photo taken after tram has passed photographer. 1197.16 - No. 2 bound for Eaglehawk at unknown location. 1197.17 - Tram stop sign on a pole "CARS STOP BY REQUEST" 1197.18 - No. 5 in Carpenter St.? en route to Quarry Hill. 1197.19 - No. 28 has just arrive at Golden Square terminus, passengers are disembarking and the trolley pole is being turned. Golden Square Hotel in the background. 1197.20 - No. 28 at Golden Square terminus. Has a "Nothing beats Briquettes for hear roof ad. Information written on in black ink and date stamped on purple ink. 1197.1 - "No. 5 at Creeth St. Long Gully" 1197.2 - "No. 5 approaching Needle Loop between Long Gully and California Gully" 1197.3 - "No. 5 at Needle Loop between Long Gully and California Gully" 1197.4 - "No. 26 crossing railway bridge at Job's Gully near Eaglehawk" 1197.5 - "No. 26 just after crossing railway bridge at Job's Gully near Eaglehawk/ 1197.6 - "No. 26 in High St. Eaglehawk" 1197.7 - "No. 26 at end of double track in High St. Eaglehawk" 1197.8 - "Nos. 26 and 17 crossing at Job's Gully Loop" 1197.9 - "No. 17 crossing railway bridge at Job's Gully near Eaglehawk". 1197.10 - "No. 26 at Long Gully" 1197.11 - 'Northern end of points at Long Gully Loop". 1197.12 - "No. 17 turning into View St. from Bamard St. Bendigo". 1197.13 -'No. 17 at beginning of double track in View St. after leaving Bamard St. Bendigo. 1197.14 - "No. 21 enters Nolan St. from MacRae St. Bendigo." 1197.15 - "No. 21 in Nolan St. Bendigo just after leaving White Hills Road." 1197.16 - "No. 2" 1197.18 - "No. 5" 1197.19 - "Birney car No. 28 at Golden Square Terminus" 1197.20 "Birney car No. 28 at Golden Square Terminus" tramways, trams, bendigo, long gully, railway bridge, jobs gully, trackwork, nolan st, quarry hill, tram stops, golden square, tram 2, tram 5, tram 17, tram 21, tram 26, tram 28 -
 Ballarat Tramway Museum
Slide - 35mm slide/s - set of 32, Noel Simons, 25/02/1971 12:00:00 AM
Set of 31 transparencies taken on 25/2/1972 on Kodak mounts. 1201.1 - Bendigo No. 26 in Bond St. just after leaving Long Gully en route for Quarry Hill. Has Norris Supermarket in background. Has two SEC roof ads. 1201.2 - No. 26 climbing View St. from Charing Cross en route to Eaglehawk. Has ANZ bank and AMOCO service station in background. 1201.3 - as for 1201.3, but after tram has passed photographer. Has buildings west of Mackenzie St. in photograph. 1201.4 - Tram stop and centre of the road pole with two "CARS STOP BY REQUEST" signs mounted on pole at the corner of Mackenzie St. 1201.5 - same position as for 1201.3, but with No. 5 descending the street. 1201.6 - same position as for 1201.2, but with No. 5 descending the street. Photo taken after tram has passed photographer. 1201.7 - No. 7 in Nolan St. from across the park at Lake Weeroona. 1201.8 - No. 7 entering McCrae St from Nolan St. - distant view. Note "TRAM "sign on left hand side under tree and overhead in McCrae St. from former track that once was in this street. 1201.9 - No. 7 in High St. with Cathedral in background. Tram en route to North Bendigo. Note scaffolding around Cathedral main spire area. 1201.10 - No. 7 crossing Bendigo Creek bridge in High St. near Golden Square. Has a Caltex Service station in the background. 1201.11 - No. 7 at Golden Square terminus with Sunburst Fruit Juices and a Peters Ice cream delivery vans alongside. 1201.12 - as for 1201.11 but photo taken from behind tram, with the end of the rails in the photograph. 1201.13 - No. 7 and 21 in Pall Mall at Charing Cross with No. 5 in the background. Taken some distance away from the location. 1201.14 - No. 7 at Golden Square terminus, taken a short distance from the tram terminus. Shows Milk Bar on right hand side and the hotel on the left hand side. Taken from the south side of the roadway. 1201.15 - as from 1201.14 but taken from the north side of the roadway. 1201.16 - No 5 waiting at California Gully loop. Distant photo showing surrounds 1201.17 - No. 5 en route for Quarry Hill crossing No. 26 at California Gully. 1201.18 - No. 26 at Eaglehawk terminus with Eaglehawk Town Hall and Post Office in background. 1201.19 - No. 21 arriving at Charing Cross en route to North Bendigo. Has Alexandra Fountain in the background, ANZ bank RACV building, and other buildings on the north side of Pall Mall or Nolan St. 1201.20 - No. 26 en route for Quarry Hill at Charing Cross, with crew standing by front door. Has Colonial Mutual life building, Armstrong Tyre Service (Firestone) and a sign for Cohns Drinks in the background. 1201.21 - as for 1201.20 but with No. 5 en route to Eaglehawk now in photograph. 1201.22 - No. 26 at Quarry Hill terminus. 1201.23 - No. 26 at Quarry Hill terminus, view of front portion of tram only from a gate at the Bendigo cemetery. 1201.24 - Track at the end of the Quarry Hill line showing the point blades of the former "Y" terminus and the overhead for this. 1201.25 - No. 2 at the Quarry Hill terminus, looking along the former Trackwork. 1201.26 - as for 1201.25 1201.27 - number not used. 1201.28 - Golden Square terminus from some distance from the actual terminus, showing the Warning sign "TRAM" for motorists from the south. No. 7 at the terminus. 1201.29 - No. 7 passing through the Golden Square shopping centre. Numerous cars and pedestrians. Tram en route for North Bendigo. 1201.30 - No. 7 in High St. Golden Square, en route for North Bendigo. Photo taken after tram has passed photographer. 1201.31 - No. 7 in High St. just past Wattle St. with the Cathedral in the background. Tram has two SEC roof ads good side on photo, 'Everything's fine in my all electric kitchen' and 'Electrical cooking - clean, quick, economical'. 1201.32 - No. 7 in High St. nearing Wattle St. Has Cathedral in the background. Photo taken after tram has passed photographer.Information written on in black ink and date stamped on purple ink. 1201.1 - "No. 26 in Bond St just after leaving Long Gully" 1201.2 - "No. 26 climbing View St. from Charing Cross" 1201.3 - "No. 26 ascending View St. from Charing Cross (At Mackenzie St.)" 1201.4 - "View St. & Mackenzie St." 1201.5 - "No. 5 in View St. near Mackenzie St." 1201.6 - "No. 5 in View St. nearing Charing Cross." 1201.7 - "No. 7 in Nolan St. seen from Lake Weeroona Park." 1201.8 - "No. 7 entering McRae St. from Nolan St. Note "TRAM" warning sign on left. 1201.9 - "No. 7 in High St. passing Short St." 1201.10 - "No. 7 crossing Bendigo Creek bridge in High St. near Golden Square." 1201.11 - "No. 7 at Golden Square terminus" 1201.12 - "No. 7 at Golden Square terminus" 1201.13 - "No 7, 21 and 5 at Charing Cross" 1201.14 - "No. 7 at Golden Square terminus" 1201.15 - "No. 7 at Golden Square terminus" 1201.16 - "No 5 waiting at California Gully loop." 1201.17 - "Nos. 5 and 26 crossing at California Gully loop" 1201.18 - "No. 26 at Eaglehawk terminus" 1201.19 - "No. 21 arriving at Charing Cross from Golden Square" 1201.20 - "No. 26 at Charing Cross" 1201.21 - "Nos. 5 and 26 at Charing Cross." 1201.22 - "No. 26 at Quarry Hill terminus" 1201.23 - "No. 26 at Quarry Hill terminus seen through the gates of the Bendigo Cemetery." 1201.24 - "Quarry Hill terminus showing remains for former double track layout abandoned before 1964." 1201.25 - "No. 2 at Quarry Hill terminus" 1201.26 - "No. 2 at Quarry Hill terminus" 1201.28 - "The Southern approach to Golden Square with No. 7 standing at the terminus, "TRAM" warning sign on the left. 1201.29 - "No. 7 passing through Golden Square Shopping Centre" 1201.30 - "No. 7 in High St. Golden Square" 1201.31 - "No. 7 in High St. passing Wattle St." 1201.32 - "No. 7 in High St. nearing Wattle St."tramways, trams, bendigo, bond st., view st., nolan st., high st., eaglehawk, california gully, charing cross, quarry hill, trackwork, tram 2, tram 5, tram 7, tram 21, tram 26 -
 Ballarat Tramway Museum
Slide - 35mm slide/s set of 7, Noel Simons, 1972
Set of 7 transparencies undated on PAKON mounts - appear to be early 1970's. 1212.1 - No. 18 about to enter the Long Gully loop with ESSO service station on the right hand side. 1212.2 - No. 6 in Mitchell Street bound for Charing Cross. Tram has destination of "Rly Station". Has buildings on the east side of Mitchell St. in the background. 1212.3 - No. 7 (North Bendigo) and 29 (Golden Square) crossing. Actual location? 1212.4 - "No 6 showing 'SPECIAL' at Eaglehawk terminus. Has the Foodland store and Fruit shop in the background. 1212.5 - No. 19 at Eaglehawk terminus, on the extension to the normal Eaglehawk terminus. Tram has showing 'Eaglehawk'. Tram has two SEC roof ads. 1212.6 - No. 25 and another Bogie car at Quarry Hill terminus on last day. 1212.7 - No. 18 and 29 at Quarry Hill terminus. No.. 18 showing 'Quarry Hill' - has two SEC roof ads 'Electric Cooking - Matchless' and 'Everything's fine in my all electric kitchen' and No. 29 has a briquettes roof ad.Information typed onto a white label stuck on the slide. 1212.1 - "No. 18 at Long Gully" 1212.2 - "No. 6 in Mitchell Street." 1212.3 - "7 and 29 Lake View Hotel" 1212.4 - "No. 6 at Eaglehawk" 1212.5 - "No. 19 at Eaglehawk Term." 1212.6 - "Last cars Quarry Hill." 1212.7 - "18 & 29 Quarry Hill"tramways, trams, bendigo, long gully, mitchell st., eaglehawk, quarry hill, last tram, tram 6, tram 7, tram 18, tram 19, tram 25, tram 29 -
 Ballarat Tramway Museum
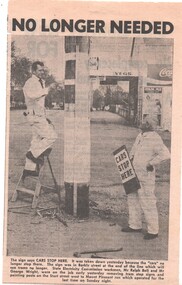
Newspaper, The Courier Ballarat, "No longer needed", 7/09/1971 12:00:00 AM
Yields information about the closure of the system and how the various small tasks, eg removal of tram stop signs were undertaken. The newspaper item details the name of the people.Newspaper clipping from The Courier, 7/9/1971 titled ""No longer needed" with a photo of two SEC workmen removing tram stop signs and painting poles on the Mt Pleasant route in Barkly St. Photo taken the previous day, following the closure of the route on Sunday. Has a photo of Mr. Ralph Bell and Mr George Wright. At corner with Cobden St. Has a Milk Bar in the background, advertising Streets Ice creek, Coca Cola, Briquettes and Vincent's Cold and Flu tablets. See Reg Item 3771 for a copy of the original photograph and a larger view of the scene. Second copy added 27/10/05. trams, tramways, mt pleasant, closure, tram stops, barkly st. -
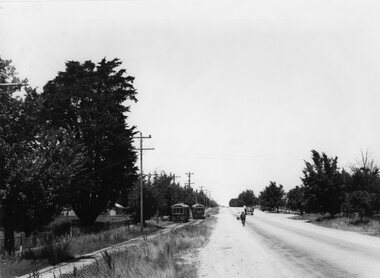
 Ballarat Tramway Museum
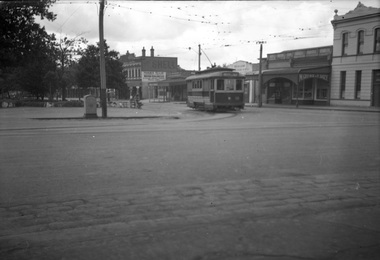
Photograph - Black & White Photograph/s - set of 2, Peter Bruce, 1971
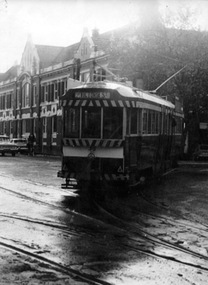
Yields information about the Hospital corner view with a tram turning into Sturt St. on a bleak day,Black and white photograph of Ballarat tram No. 35 turning from Drummond Street into Sturt St. at Hospital Corner. Tram has destination of Victoria St . Ballarat Base hospital buildings in background. Photo includes details of the trackwork and road condition at this location. Colour photocopy, laminated, of this photograph on display 4/2000 at 02-02-06 Digital Image of this photo added 7/2010 - see image i2. More detail in the digital image photograph. Peter Bruce Title: "35 Hospital Corner"trams, tramways, ballarat, hospital, sturt and drummond sts. , tram 35 -
 Ballarat Tramway Museum
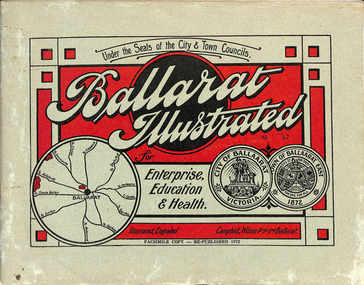
Book, "Ballarat Illustrated", 1972
Original c 1914 (see below), facsimile copy - re-published 1972. Original features photos of Ballarat City and Town, its buildings, parks and the various industries and organisations that were in Ballarat at the time of publication, including ESCo. Many photos features ESCo trams. Photos sepia toned. Has some red colour block printing on the front cover and rear, for Star Oil Engines. On inside back cover is a map with the places of interest and tram route map, marked in red. Pages are un-numbered. Original published by Ballarat East Town Council and Ballaarat City Council. On cover has number stamped in black in, "No. 87" (assume facsimile copy No.). Photos with publication show tram No. 21, built 1913 and ESCo photo page shows Mr. Pringle as Manager. Mr Pringle became manager in January 1911, As there is no photos of the "Avenue of Honour", or other mention of the first world war, assume original published about 1913 or 1914. Original shows Engravings and printing by "Campbell Wilson Prop Ltd, Ballarat". See Other Information as well for more listing details. High Resolution image added 31/8/2012 of i2 of ESCo page and i3 for Ballarat identies and sheet i4 extracted for Mr Pringle. PDF scan of full document added 21/5/2019 - see images btm633-1i.pdf and btm633-2i.pdf Notes on "Ballarat Illustrated" Reg. Item No. 733 From notes made by Neville Gower 12/1/1997 Cover: Inside front cover: Last paragraph, "Facilities for Travelling" - Electric trams serve all parts of Ballarat. Page 3: Street Scene, Municipal Town Hall, showing tram wiring Page 7: Street Scene, Lydiard St. North, intersection and tramway centre, with ESCo tram No. 21 in the bottom photo. Other photos features trams as well in Sturt St and Lydiard St. North. Page 9: Street Scene, Top photo of Sturt St. from Lydiard St. looking east, shows piles on right-hand side of road. Car parked by Post Office has a car registration number "9007". Bottom photo, an tram climbing hill, shows double trolley in the street, with early English type of pull offs. Page 13: Street Scenes and Historic Buildings: One of five photos, shows Victoria St. looking East, with tram track prominent in photo and how stone work was set up about the rails and overhead poles. Page 23: Street scene, Gardens North Entrance gates, shows details of gates near St. Aidans Drive. Note double trolley wire on poles, and style of insulators. No trams in photo, three ladies walking down the track. Page 37: Street Scene; Lydiard St views, top left hand photo, shows Railway station and railway gates with signal gantry and horse drawn vehicles. Tram tracks apparent. Bottom left hand photo shows Lydiard St. North, near Post Office, double track with centre poles - Single wire per track. Top right hand photo, showing Cemetery gates in background. Bottom right hand photo - from north end of Lydiard St. South, looking north, with an ESCo tram in background. Also has a parked car on left hand side. Page 45: Street Scenes - Bridge St; top photo at west end of Bridge St. with ESCo No. 11 with possibly double trolley wire in photo. Bottom photo at east end of Bridge St. with tram in background, shows junction. Double trolley heading out to Mt. Pleasant, single trolley for Victoria St. Page 45: Street Scenes - Bridge St; top photo at west end of Bridge St. with ESCo No. 11 with possibly double trolley wire in photo. Bottom photo at east end of Bridge St. with tram in background, shows junction. Double trolley heading out to Mt. Pleasant, single trolley for Victoria St. Page 61: Street Scenes and Historic Buildings - Public Institutions Ballarat - top left hand photo of the Hospital shows some tram track in foreground, with double trolley wire. Top right photo is of the Orphanage, the name of the tram terminus for many years. Page 68: Electric Supply Co. of Victoria's pages - top photo showing powerhouse in background, across the lake, can hardly see anything for the trees, except for the chimney. Bottom photos of the steam Turbo Generators and the switchboard. Gives Mr. P.J. Pringle as Chief Engineer and General Manager. He took over in Jan. 1911. Page 69: Ballarat East Views - features photo of Black Hill open cut, Ballarat East Railway Station, Ballarat Fire Station and "Victoria St. looking East", repeat of photo printed on page 12, but slightly darker. Image on system includes fire station and railway station, - Ballarat East. Page 78: Series of photos of various Ballarat VIP's of the era, fourth one in on top line features "P.J.Pringle, Electric Supply Co." Inside Back cover - map of Ballarat including tram lines and places of interest marked in red. Gives a detailed photographic presentation of Ballarat in 1914.80 page book with, in addition, light green card covers, titled "Ballarat Illustrated". Loose copy of page 9 and 10 held.trams, tramways, ballarat, local history, heritage buildings, esco -
 Ballarat Tramway Museum
Photograph - Black & White Photograph/s, 1900's mid to late?
Black and white photograph of Sturt St. Ballarat, east end, taken from a Grenville St. building looking west. Shows two ESCo trams, possibly No. 11 eastbound and 17?, westbound. Street track looks new, flags on many buildings in photo, good view of buildings on the West side of the street. Has caption "Sturt Street, Ballarat" top right hand corner and number "300,975(JW), bottom right hand corner. Photo mounted on black faced cardboard for display purposes. Has had tape on rear card, since removed. Part of photo also used in a Ballarat Business brochure, see Reg. Item No. ?trams, tramways, ballarat, sturt st, street scenes, esco , tram 11 (esco) and 17? (esco) -
 Ballarat Tramway Museum
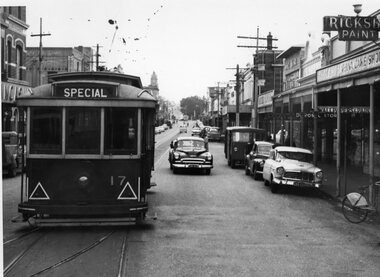
Photograph - Black & White Photograph/s, Keith Kings, 12/01/1957 12:00:00 AM
Black and white photograph of bogie trams crossing at Grey St. Loop, Albert St. Sebastopol, - Nos. 40 and 39 on 12/1/1957. Photo by Keith Kings. Colour photocopy, laminated, of this photograph on display 5/2000 at 02-02-06On rear of photo in blue ink. "Ballarat: "K.S. Kings No. u (w)(6) Copyright reserved" and "Albert Street, Sebastopol, is one of the most changed thoroughfares in greater Ballarat since this view was taken on 12/1/1957." Bogie cars nos. 40 and 39 cross on the Grey Street passing loop on the long single track side of the road route."trams, tramways, albert st, grey st., sebastopol, tram 39, tram 40 -
 Ballarat Tramway Museum
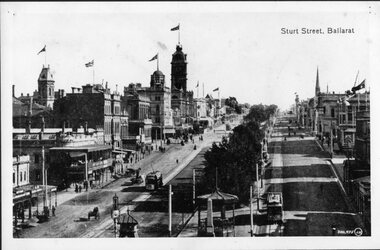
Postcard, "Sturt St Ballarat", 1905
Printed colour postcard of an ESCo tram west bound at the intersection of Sturt and Lydiard St. Ballarat, c1905. Has a number of horse drawn vehicles and pedestrians in the picture. Taken from the Post Office tower looking south west, with buildings on the south side of Sturt St., west of Lydiard St in the view. Has the Robert Burns statue in the bottom left hand corner. Titled "Sturt Street, Ballarat" along the bottom edge. On rear of postcard are the words "Post Card", and guidance where the message may be written and space for the address. In the stamp section, details for Inland 1/2d stamp needed, and for Foreign 1d. On the bottom of the space for the stamp, has the words "Printed in Britain" See Reg Item 3151 for the same photo (slightly different position and different cloud effects), but different manufacturer. trams, tramways, esco, sturt st, postcards, lydiard st. -
 Ballarat Tramway Museum
Postcard - Folder set, Rose Stereograph Co, "Rose Series Picturesque Views of Ballarat Australia", c1940
Set of 12 views of Ballarat printed with six photos on either side of a folded strip of paper contained within a heavy brown paper folder. Published by the Rose Stereograph Co. of Armadale Vic., titled "Rose Series Picturesque Views of Ballarat Australia". Front cover has address area, stamp position, a drawing of roses and publishers details. 1. "The Town Hall and Sturt St. " with two trams eastbound in Sturt St. The first tram is a Sebastopol type tramcar. (see image 4) 2. "Eureka Memorial" 3. "The Conservatory" 4. "The gardens and Town Hall, Sturt Street" 5. "Panorama of " Sturt St. from Town hall, looking east 6. "Avenue of Honour Arch" 7. "The Flight from Pompeii - The Gardens" statue 8. "Bridge Street" - showing an SEC single truck tram in the street (see image 5) 9. "The Statuary Pavilion, Botanical Gardens" 10. "Sturt St." 11. "Lake Wendouree" 12. "Sturt St." (from Grenville St.) - with two ESCo trams in photograph (see image 6) (See also Reg. Item 2268 for a single postcard using this image.) All have words "Ballarat Vic." after the caption. Images 1 of front cover, 2 and 3 are of the object itself. Date of photos seem to be varied over time from early 1930's through to 1940's given the different motor cars in the photographs. On front cover in pencil in stamp area "G $7-"trams, tramways, ballarat, rose postcards, sturt st, bridge st, gardens, esco -
 Ballarat Tramway Museum
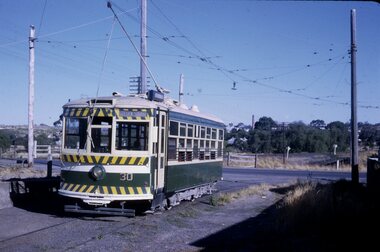
Slide - 35mm slide/s - set of 3, Peter Moses, Jan. 1969
Set of two colour slides taken at the North Bendigo terminus and another in Pall Mall, Bendigo, Jan. 1969. .1 - No. 30 at North Bendigo terminus - has destination "Golden Square" .2 - Interior view of Birney tram with crew members numbers 22, 29 and three seated passengers. .3 - View of Pall Mall looking north from the tram stop - has the Shamrock Hotel in the distance and other buildings on the east side of the street, including a 3BO (Bendigo radio) sign. Kodak cardboard mount slide, taken by Peter Moses, Jan. 1969.On the rear of all the slides "P. Moses" in black ink .1 -"Bendigo / North Bendigo terminus" in blue ink, and in red ink “12” .2 - " Jan 1969 Bendigo / Inside Brill car" in blue ink .3 - "Bendigo Pall Mall" in black ink and in red ink “7”.tramways, trams, bendigo, north bendigo, birney, tram crews, pall mall, tram 30 -
 Ballarat Tramway Museum
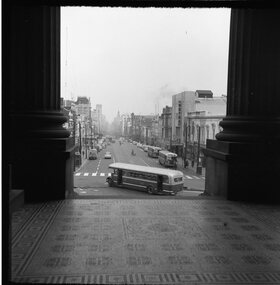
Photograph - Black & White Photograph/s, Geoff Grant, 16/06/1955 12:00:00 AM
View of Bourke Street Melbourne from just inside pillars of Parliament House looking west on 16 June 1955, a few days before the trams took over. MMTB Bus 580 turning into Bourke St from Spring St. Negative scanned hi res and imaged updated 20/5/2020.On rear in typed on paper "Buses inn Bourke St. A shot taken a few days before the trams took over. Taken from Parliament House steps 16 June 1955." & "Geoff Grant etc." stamp in btm rh corner.trams, tramways, melbourne, bourke st -
 Ballarat Tramway Museum
Photograph - Black & White Photograph/s, Geoff Grant, 19/06/1955 12:00:00 AM
Black & white photo out of rear cabin of M&MTB tram No. 988, running "bang road" or wrong line in Bourke St. on Sunday, 19 June 1955 while testing overhead. Good view of Bourke St. buildings looking towards GPO. Some motor cars in the street. Negative No. 315 on file. Scanned image of negative btm497i1 shows a wider image than the print. Geoff Grant's notes on the envelope that contained the negative - says that this was the first tram to run on the Bourke St. route. Negative scanned at hi res 21/5/2020.On typed paper on rear "View out of the rear cabin of 988 as it came up Bourke St. on Sunday the 19 June 1955" and "Geoff Grant" stamp in btm rh corner.trams, tramways, melbourne, bourke st., commissioning , tram 988 -
 Ballarat Tramway Museum
Photograph - Black & White Photograph/s - set of 2, Dave Macartney, 4/08/1968 12:00:00 AM
Yields information about intersection of Lydiard and Sturt Streets, in particular the post office building.Black and white photograph of SEC Ballarat tram No. 18 turning from Sturt St. into Lydiard St. with Post Office in background. Photo taken after tram has passed photographer. Tram has destination of "LYDIARD ST NTH". Taken 4/8/1968. Print a bit over exposed for the sky. 585.1 - a horizontal view of the same image. See also Reg Item 1014 for a different crop (vertical) view of the same photograph. Small copy of .1 added 10/10/2019. Image updated.trams, tramways, ballarat, lydiard st., post office , tram 18 -
 Ballarat Tramway Museum
Document - Photocopy, Neville Gower, " Mayor's Report 1972-1973", Jul. 1997
Photocopy of part of City of Ballaarat's Mayor's Report for 1972- 1973. Originals held in the Ballarat Library. One page covering roads and bridges and reconstruction of streets following removal of trams. Includes photos of part of Wendouree parade at View Point. Image added 18-12-2016trams, tramways, city of ballaarat, trams, railways, civic history -
 Ballarat Tramway Museum
Negative - Black and white print from negative, Travis Jeffrey, 12/12/1958 12:00:00 AM
Negative No. N374 and black and white print made by a laser printer (stored in folder) of Ballarat No. 20 at the City Terminus, intersection of Sturt and Lydiard Streets with the Ballarat Post Office in the background. Taken from the south side of the street - unusual view. Date 12/12/1958. hi res scan made and image updated 23/5/2020.Paper folder that contained the negative had "NR2A" in red ink, "BA1" in pencil, date stamp of "29 Dec 1958" on front, and date stamps "26 Sep 1962" on rear, top and bottom.trams, tramways, city terminus, sturt st, tram 20 -
 Ballarat Tramway Museum
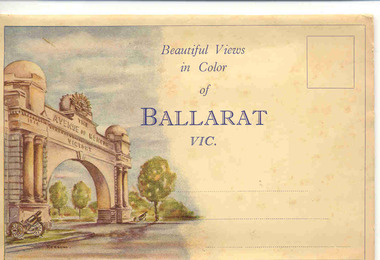
Postcard - Folder set, Valentine & Sons Publishing Co, "Beautiful Views in Color of Ballarat Vic", Early 1950's
... distance views of the trams in the streets. Demonstrates ...Shows views of Ballarat city, tourist attractions, Lake Wendouree in the 1950's, with some distance views of the trams in the streets. Demonstrates production of souvenirs of the era - folded postcards.Set of 9 coloured views of Ballarat printed with all photos on one side of a folded strip of paper glued within an colour printed light card folder. Published by The Valentine Publishing Co. Pty Ltd of Melbourne and Sydney., titled "Beautiful Views in Color of Ballarat Vic". Front cover has a image of the Arch of Victory on the left hand side with space for title, address area and stamp. Rear of Cover has printer name and a slit for the envelope to be closed over and sealed. 1. The Avenue of Honor and the Arch of Victory 2. The Eureka Stockade Memorial 3. The Old Curiosity shop 4. Town Hall Sturt St. (with trams in distance views, note Myers verandah still there) 5. Sturt St showing Mt. Warrenheip in the distance 6. Picturesque scene in the Gardens 7. The Boat shed and basin, Lake Wendouree 8. Sturt St. (from Greville St and large Robur Tea advertisement on building) 9. The Conservatory in the Gardens. From the motor vehicles in the photograph would say early 1950's. trams, tramways, ballarat, postcards, sturt st, bridge st, gardens, grenville st, lake wendouree -
 Ballarat Tramway Museum
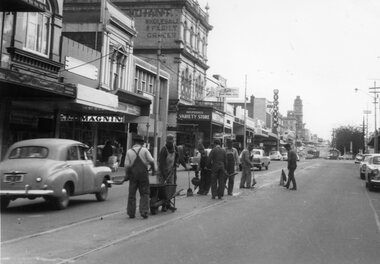
Photograph - Black & White Photograph/s, The Courier Ballarat, 20/09/1966 12:00:00 AM
Demonstrates nature and size of gang undertaking road repairs during 1966 in Bridge St and the buildings on the south side of the street.Black and White copy photograph of a newspaper photograph taken by The Courier, taken 20/9/1966, published 21/9/1966 of track repairs in Bridge St. Shows the nature of the work, and the level of the traffic in the streets at the time. Eight men working in the view. In the background are the buildings on the south side of Bridge St, including Magnin, a Disposal Variety store, Faull's Foot rest, and Dickins. In the far distance are two trams parked in the loop. Collected by Alan Bradley from the Ballarat Courier early 1980's. See Excel file "Record of Ballarat Courier Photos SEC era" (Archive Documents) for source of details.On rear stamped "Copyright, The Ballarat Courier Proprietary Limited." and "85%" in ink.tramways, trams, bridge st, road works -
 Ballarat Tramway Museum
Photograph - Black & White Photograph/s, The Courier Ballarat, 9/1971?
... was a brick wall on the east side of the street, Three trams ...Yields information about the streetscape in Lydiard St wall where a feature, since demolished was a brick wall on the east side of the street, Three trams in the view, possibly of a charter.Black and White copy photograph of a newspaper photograph taken by The Courier - published 5/01/1976 No. 17 in Lydiard St North, near Macarthur St with two other bogie trams in the background. Date of photo unknown, but probably September 1971. Tram has the destination of Sebastopol and a Twin Lakes advertisement on the front panel. shows the brick wall cutting in Lydiard St North near Macarthur St and a general streetscape looking north. Collected by Alan Bradley from the Ballarat Courier early 1980's. See Excel file "Record of Ballarat Courier Photos SEC era" (Archive Documents) for source of details.On rear stamped "Copyright, The Ballarat Courier Proprietary Limited."tramways, trams, closure, lydiard st nth, tram 17 -
 Ballarat Tramway Museum
Photograph - Black & White Photograph/s, State Electricity Commission of Victoria (SECV), late 1950's or early 1960
Yields information Bridge Street and the buildings at the junction with Main and Victoria St / Stones corner. Tram parked for some particular reason - see 3807.1 to .3 for a similar set of photographs. Shows shops and cars.Black and White photograph, No. 17 at Stone Corner, intersection of Bridge and Main Streets Ballarat. Parked just past the junction points - reason unknown, see also Reg Item 3803, 3807.1 to 3807.3 - for other photographs of the tram at the same location. Photo late 1950's or early 1960. Also has a number of interesting motor vehicles in the background. In the background a Ricksha Paints (pronounced Rickshaw), Allen's Vernal Cake Shop, Junction Shoes. Roddas, ANZ and the English Scottish Bank of Australia buildings in the view. tramways, trams, bridge st, stones corner, tram 17