Showing 11727 items
matching victoria -- histories
-
 Flagstaff Hill Maritime Museum and Village
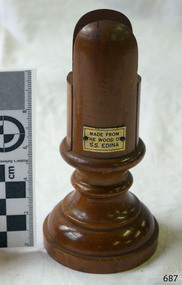
Card Holder, c. 1854 - 1957
... .) SS Edina’s interesting history includes English Chanel runs...' Society of Victoria Dandenong, Passengers in History, http ...This wooden cardholder has been made from the wood of the screw steamer S.S. Edina, most probably after she was broken up in 1957, but could have been made after one of several renovations during her lifetime. The slotted design of the cardholder allows a card to stand vertically and the base is made wider to stableise the holder. It could be used for holding items such as place cards, menus, table numbers. ABOUT THE S S EDINA The three masted iron screw steamer SS Edina was built in Glasgow, Scotland, in 1854 by Barclay and Curle. She was adorned with the figurehead of ‘fair maid of Judea’. The many years of service made SS Edina famous worldwide as the longest serving screw steamer. (The term screw steamer comes from being driven by a single propeller, sometimes called a screw, driven by a steam engine.) SS Edina’s interesting history includes English Chanel runs, serving in the Crimean Ware carrying ammunition, horses and stores to the Black Sea, and further service in the American Civil War and later, serving in the western district of Victoria as well as in Queensland and carried gold, currency and gold prospectors Australia to New Zealand. SS Edina had the privilege of being an escort vessel to H.R.H. the Duke of Edinburgh during his visit to Australia in 1867. In March 1863 SS Edina arrived in Port Phillip Bay, Melbourne, and was bought by Stephen Henty, of Portland fame, to work the cargo and passenger run from Melbourne – Warrnambool – Port Fairy - Portland. After a short time of working the run from Australia to New Zealand, with passengers and cargo that included gold and currency, she returned to her Melbourne - Warrnambool – Port Fairy run, with cargo including bales of wool produced in the western district of Victoria. The Warrnambool Steam Packet Company purchased SS Edina in 1867; she was now commanded by Captain John Thompson and Chief Engineer John Davies. She survived several mishaps at sea, had a complete service and overhaul, and several changes of commanders. In 1870 SS Edina was in Lady Bay, Warrnambool, when a gale sprung up and caused a collision with the iron screw steamer SS Dandenong. SS Edina’s figurehead was broken into pieces and it was not ever replaced. SS Edina was re-fitted in 1870 than was used as a coastal trader in Queensland for a period. She was then brought to Melbourne to carry cargo and passengers between Melbourne and Geelong and performed this service 1880-1938. During this time (1917) she was again refitted with a new mast, funnel, bridge and promenade deck, altering her appearance. In 1938, after more collisions, SS Edina was taken out of service. However she was later renamed Dinah and used as a ‘lighter’ (a vessel without engine or superstructure) to be towed and carry wool and general cargo between Melbourne and Geelong. In 1957, after 104 years, the SS Edina was broken up at Footscray, Melbourne. Remains of SS Edina’s hull can be found in the Maribyrnong River, Port Phillip Bay. [Reference: A Brief Review of Steam Navigation in Victoria; C Dickson Gregory; Centenary Maritime Exhibition catalogue, 1934; published by Shiplovers' Society of Victoria Dandenong, Passengers in History, http://passengersinhistory.sa.gov.au/node/924034 Edina, Victorian Heritage Database VHR S199 http://vhd.heritage.vic.gov.au/shipwrecks/heritage/199 SS Edina, Coastal Trader and Passenger Ship 1853-1938, Museum Victoria Collections, https://collections.museumvictoria.com.au/articles/6227 SS ‘Edina’ – the Longest Serving Screw Steamer in the World, POI Australia, https://poi-australia.com.au/ss-edina-the-longest-serving-steamer-in-the-world/ ]This card holder is made from wood from the SS Edina and is significant for its association with that vessel. The SS Edina is heritage listed on the Victorian Heritage Database VHR S199. She had endeared herself to the people of Port Phillip Bay as a passenger ferry, part of their history and culture. She played a significant role in the Crimean War, the American Civil War and the gold rush in New Zealand. She also served western Victoria for many years in her cargo and passenger runs. The SS Edina is famous for being the longest serving screw steamer in the world. After spending her first nine years overseas she arrived in Melbourne and her work included running the essential service of transporting cargo and passengers between Melbourne and the western Victoria ports of Warrnambool, Port Fairy and Portland. The SS Edina was purchased in the late 1860’s by local Warrnambool business, the Warrnambool Steam Packet Co. and continued trading from there as part of the local business community. The SS Edina’s original ‘fair maid of Judea’ figurehead was broken to pieces in a collision with another vessel (the SS Dandenong) in a gale off Warrnambool, Victoria, in 1870. Card holder, made from the wood from the SS Edina (screw steamer ship). Holder is cylindrical shape, wider turned wood base. Top is divided with a space in the centre tor inserting a card. Rectangular metal plaque, gold coloured, has a printed inscription within black border. Made c. 1854 - 1957.Printed in black lettering on gold coloured plaque "MADE FROM / THE WOOD OF / S.S. EDINA"warrnambool, shipwrecked coast, flagstaff hill, flagstaff hill maritime museum, maritime museum, shipwreck coast, flagstaff hill maritime village, shipwrecked artefact, barclay & curle, figurehead 'fair maid of judea', centenary maritime exhibition 1934, a brief review of steam navigation in victoria, pleasure steamer edina, trade and travel late 19th and early 20th century, trade melbourne to geelong, screw steamer edina, coastal trader edina, lighter dinah, cargo carrying for cremean war, cargo carrying for american civil war, passenger and trade in western district of victoria, export gold and currency and gold diggers to new zealand, export vessel to h r h the duke of edinburgh, melbourne - warrnambool - port fairy - portland cargo run, warrnambool steam packet company, stephen henty, captain john thompson, chief engineer john davies, lady bay warrnambool, lighter edina, shipping victoria, port phillip bay steamers, steamship great britain, edina, vhr s199 victorian heritage database, card holder, menu holder, table number holder, souvenir of the ss edina -
 Flagstaff Hill Maritime Museum and Village
Letter - William Ferrier, 14th November 1905
... of the most heroic in Victoria’s shipwreck history. (William Ferrier’s... of the most heroic in Victoria’s shipwreck history. (William Ferrier’s ...The letter to William Ferrier of South Warrnambool from the Prime Minister and the Parliament of the Commonwealth recognised the significance of William’s brave and courageous lifesaving act to the people of Australia; “They all feel that your conduct was worthy of the best deeds done by British sailors in the past and they are proud to know that Australia can produce such as you.” The story of that brave rescue follows on below … The ship from which the sailors were rescued was the three-masted, iron and steel barquentine the La Bella, built in Norway in 1893. She was one of two iron and steel ships by Johan Smith, The company was one of the leading shipping families in Tvedestrand, Norway. She was significant to Norwegian shipping, being one of only 27 iron and steel ships ever built in Norway. She was registered in New Zealand and engaged from 1902 in inter-colonial trading of timber in the Pacific, between New Zealand and Australia and was often in Port Phillip Bay, Victoria. On 5th October 1905, the twelve-year-old La Bella left Lyttleton, New Zealand carrying a cargo of timber bound for Warrnambool, Australia. She was manned by a crew of twelve: the Master, (Captain Mylius, previously 1st Mate of La Bella, appointed Captain to La Bella on 6th February 1903) 2 Mates, Cook, six able seamen, one ordinary seaman and a boy. Bad weather en route caused her to shelter at Burnie on Tasmania's North West coast. On November 10th, the 37th day of her journey, La Bella approached Warrnambool. Captain Mylius steered her towards Lady Bay Channel in heavy south-west seas and evening mist. He ordered the helmsman to steer for the light. As the ship came round, a tremendous sea struck her on the port quarter, causing her to breach broadside in a north-westerly direction into breakers. The helm was brought round twice more, but each time heavy seas broke over her, the third time throwing the La Bella on to a submerged reef in Lady Bay now known as La Bella Reef (about 100 yards from the Warrnambool breakwater). The sea was so rough that it even wrenched a one-and-a-half ton anchor from its fastenings and into the sea. As Captain Mylius headed to the steel wheelhouse, intending to send up a rocket flare, a huge sea slammed the steel door into him (resulting in massive bruising front and back) Despite his injuries he still managed to set off a blue light, which he held up in his hands. La Bella’s lifeboats were filled with seawater and broke up on their chocks. The blue light was the first indication to people on the shore that there was a ship in distress. The Harbour Master, Captain Roe (who lived in the Harbour Master’s House opposite Flagstaff Hill), organised a group of volunteers to crew the lifeboat because the trained crew was unavailable; the crewmen were working on a steamer in Port Fairy at the time. He then poured oil onto the water to try and smooth the sea. At around 11 pm three of the crew took shelter in the steel forecastle but the sea crashed into it and broke it up. While the rest of the crew and onlookers watched helplessly in the moonlight the bodies were washed away into the sea, never to be seen again. Some of the crew lashed themselves to the weather rail to keep from being washed away. Watson, the ordinary seaman, became tangled in the rigging lines and was too weak to move, so the 2nd Mate, Robertson, put a line onto him so that he wouldn’t wash off. Around 11 pm three of the crew were unconscious from exhaustion. The situation on La Bella was becoming dangerous. The 2nd Mate moved to the ‘house’ and soon afterwards the ship slipped in the heavy sea. The lashings of the 1st Mate and the ‘boy’ Denham had kept them safe until about 2 am when they were washed overboard; no one was able to help. One by one, the exhausted crew were being washed overboard, too weak to hold on any longer. During the night the La Bella had broken into two and the deckhouse ran out towards the sea. Two more men drowned when trying to reach the lifeboat. By sunrise, the only survivors of the twelve were the Master, 2nd Mate and three seamen. Early in the morning, Captain Roe used the rocket apparatus on shore to try and shoot a line to the ship for a safer rescue but each attempt fell short of the target. Several attempts were made by the lifeboat to rescue the stricken sailors, but the rough conditions made this difficult for the boat to get close enough to the ship and the lifeboat had to return to shore. During a final attempt to reach the ship Captain Mylius ordered his men to jump into the sea. Leonard Robertson, 2nd mate, jumped and swam towards the lifeboat, taking hold of the boat hook offered to him. Oscar Rosenholme managed to reach the boat floating on a piece of timber from the ship’s load and a third survivor, Noake, also made the boat. Along with the lifeboat rescue crew, 25-year-old William Ferrier rowed his small dingy through the heavy seas and managed to rescue the Captain, whom he landed on the breakwater. Ferrier then returned to the ship to attempt a final rescue, losing his oars and rowlocks into the high sea. Using just a spare paddle he skulled towards the La Bella, reaching her stern in time to cut loose the lone surviving sailor, Payne, from the lashing that held him to the ship; the terrified sailor dropped from the ship and into the dingy. Shortly after the last man was rescued, the La Bella was lifted by a huge wave and crashed back down on the reef; she broke up and sank. The ordeal had lasted ten hours. The survivors were taken to the nearby Bay View Hotel and gratefully received warm food and clothing, medical attention and a place to sleep. In the following days, an unidentified body of a young person has washed ashore; it was either Watson or Denham. The body was buried in the Warrnambool cemetery with an appropriate gravestone and inscription. William Ferrier became a national hero as news of the daring rescue spread. In recognition of his bravery in the two daring rescues, he was awarded the Silver Medal for Bravery by the Royal Humane Society and was honoured in the letter from the Prime Minister and the Parliament of the Commonwealth, telegrams and a cheque for £20 from the Governor-General, over £150 subscribed by the public, including Warrnambool and district and readers of The Argus, and a gold medal from the Glenelg Dinghy Club of South Australia. Ferrier’s rescue efforts are one of the most heroic in Victoria’s shipwreck history. (William Ferrier’s son, Frank, received a similar award almost fifty years later when he helped rescue four members of the crew on the yacht Merlan after it ran on to a reef near the Point Lonsdale Lighthouse. ) The wreck of La Bella now lies on her port side in 13 metres of sheltered water inside the reef she struck. The bow section is relatively intact and part of the stern has drifted north-easterly towards the mouth of the Hopkins River. The reef the La Bella struck now bears its name. Those five rescued from the La Bella were Captain George Mylius, Leonard Robertson (2nd Mate, 21 years old), R. Payne, Oscar Rosenholme and Jack Noake. Those seven who lost their lives were Mr Coulson (1st mate), Charles Jackman (cook) Gustave Johnson, Pierre Johann and Robert Gent (all able seamen), Harry Watson (ordinary seaman) and Jack Denham (ship’s boy), Captain Mylius was found guilty of careless navigation; he had sailed into the bay without the services of a pilot. His Master Certificate was suspended for twelve months. Later he was also charged with the manslaughter of one of the crew who had died when the La Bella was wrecked but found not guilty. The event’s adverse publicity and damage to his career took a toll on his health and he died of a heart attack six months after the wreck; he was only thirty-seven. His body was buried in the Melbourne General Cemetery. The La Bella was “the best documented of all sailing ships owned in New Zealand”. Her record books, ship logs, correspondence and supporting papers are still available. At the time of the tragedy, she was owned by Messers David C.Turnbull and Co. of Timaru, New Zealand timber merchants and shipping agents, who had purchased her on 13th December 1901. A detailed account of the last journey of La Bella can be read in “Leonard Robertson, the Whangaroa & La Bella” written by Jack Churchouse, published in 1982 by Millwood Press Ltd, Wellington, NZ. As well as this letter, Flagstaff Hill’s La Bella Collection includes a photograph of the wrecked La Bella, a brass rail holder and a postcard of William Ferrier with four of the survivors. Some 15 – 17 ships are believed to have sunk in Lady Bay, but only two have been discovered on the seafloor; the “La Bella” and the “Edinburgh Castle”. Both wrecks are popular diving sites and are preserved as significant historical marine and marine archaeological sites. This original congratulatory letter sent to William Ferrier by the Prime Minister and Government of Australia demonstrates the importance attached to his efforts for Victoria and to Australia. The letter is part of the La Bella Collection and is significant at both a local and state level. Its connection to the La Bella shipwreck and the rescue of five survivors highlights the dangers of Victoria’s Shipwreck Coast. The letter to William Ferrier from the Australian Government acknowledges the bravery of ordinary Australians who risked their lives to save victims of shipwrecks along the coast. The letter is significant to the history of Warrnambool as it honours William Ferrier, a local fisherman whose descendants continue to live in the area. It highlights the way of life of people who lived in coastal towns in 19th century Victoria and the effects of shipwrecks upon them. The letter connects to the postcard of William Ferrier with four of the five rescued crew, the photograph of the wreck of the La Bella and the artefact from the wreck, the rail holder. This letter is significant because of its association with the sailing ship “La Bella”. The “La Bella” is of local and state and national significance. It is one of the only two shipwrecks discovered in Lady Bay, Warrnambool, out of the 15-17 shipwrecks in the bay. Letter to William Ferrier of South Warrnambool from the Prime Minister and Members of Parliament commending him on his bravery. The printed letterhead includes a coat of arms in the top centre and the official address. The letter is very neatly hand written in black pen and includes 4 signatures of Members of Parliament. The rectangular paper is cream coloured with some yellow/brown discolouring. It has the letterhead on the right hand side of it and the written letter begins below the letterhead. The paper has been folded so that the right side becomes the cover page of the letter. The writing is continued onto the inside right hand page of the folded paper and the writing ends here. There is more recent writing on the bottom right hand corner of the back page. The paper has been officially folded in half a total 3 times and there is heavy discolouration on the sections that form the front and back of the folded letter. There is a 4th fold line that is less pronounced that the other folds and would make the paper the size to fit into a pocket. At several fold creases the paper has worn through. The edges of the paper have minor tears. The printed coat of arms is that of the House of Representatives. Underneath is printed “The Parliament of the Commonwealth, / Parliament House / Melbourne”. The hand written, letter is dated “14th November, 1905” and addressed to “Mr. William Ferrier / South Warrnambool” The letter begins “The Speaker, the Prime Minister and Members of the Ministry and its supporters, the Leader and Members of the Opposition, the Leader and Members of the Labour Party, being all the Members of the House of Representatives of the Federal Parliament of Australia” … It continues “desire to express to you their appreciation of your bravery in skulling out to the wreck of the “La Bella” at Warrnambool on Saturday, 11th November, 1905, and recovering therefrom two of the crew who were in imminent danger of their lives. They all feel that your conduct was worthy of the best deeds done by British sailors in the past and they are proud to know that Australia can produce such as you.” The letter is “Signed on behalf of the Members – Speaker (Frederick Holder ), Deputy Leader of the Opposition (Joseph Cook ), Prime Minister (Alfred Deakin), Leader of the Labour Party ( J.C. Watson)” On the back of the letter is blue ink handwriting “OWNER / G. FERRIER / TO. BE. PHOTOGRAPHED / 27-4-76”la bella, william ferrier, bill ferrier, lady bay, 1905, 10th november 1905, 11th november 1905, parliament of the commonwealth, prime minister, australian government, new zealand, flagstaff hill, warrnambool, shipwrecked coast, flagstaff hill maritime museum, maritime museum, shipwreck coast, flagstaff hill maritime village -
 Flagstaff Hill Maritime Museum and Village
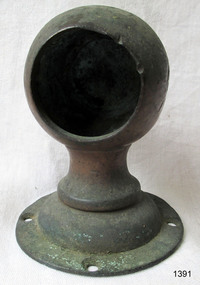
Functional object - Rail holder, About 1893, when the ship was made
... in Victoria’s shipwreck history. (William Ferrier’s son, Frank, received... in Victoria’s shipwreck history. (William Ferrier’s son, Frank, received ...This brass rail holder fixture would have been used to hold the end of a rail in place. There is no information as to where the fitting or rail would have been placed on the ship; sailing ships had many brass fittings. It was recovered from the wreck of the La Bella, which lies at the bottom of the Warrnambool Harbour. Some 15 ships are believed to have been wrecked in Lady Bay, but only two have been discovered on the sea floor; the La Bella and the Edinburgh Castle. Both wrecks are popular diving sites and are preserved as significant historical marine and marine archaeological sites. The story of the final voyage of the La Bella is summarised as follows … The ship from which the sailors were rescued was the three-masted, iron and steel barquentine the La Bella, built in Norway in 1893. She was one of two iron and steel ships by Johan Smith, the company being one of the leading shipping families in Tvedestrand, Norway. She was significant to Norwegian shipping, being one of only 27 iron and steel ships ever built in Norway. She was registered in New Zealand and engaged from 1902 in inter-colonial trading of timber in the pacific, between New Zealand and Australia and was often in Port Phillip Bay, Victoria. On 5th October, 1905, the twelve year old La Bella left Lyttleton, New Zealand carrying a cargo of timber bound for Warrnambool, Australia . She was manned by a crew of twelve: the Master, (Captain Mylius, previously 1st Mate of La Bella, appointed Captain to La Bella on 6th February 1903) 2 Mates, Cook, six able seamen, one ordinary seaman and a boy. . Bad weather en route caused her to shelter at Burnie on Tasmania's North West coast. On November 10th, the 37th day of her journey, La Bella approached Warrnambool. Captain Mylius steered her towards Lady Bay Channel in heavy south-west seas and evening mist. He ordered the helmsman to steer for the light. As the ship came round, a tremendous sea struck her on the port quarter, causing her to breach broadside in a north-westerly direction into breakers. The helm was brought round twice more, but each time heavy seas broke over her, the third time throwing the La Bella on to a submerged reef in Lady Bay now known as La Bella Reef (about 100 yards from the Warrnambool breakwater). The sea was so rough that it even wrenched a one-and-a-half ton anchor from its fastenings and into the sea. As Captain Mylius headed to the steel wheelhouse, intending to send up a rocket flare, a huge sea slammed the steel door into him (resulting in massive bruising front and back) Despite his injuries he still managed to set off a blue light, which he held up in his hands. La Bella’s lifeboats were filled with sea water and broke up on their chocks. The blue light was the first indication to people on shore that there was a ship in distress. The Harbour Master, Captain Roe (who lived in the Harbour Master’s House opposite Flagstaff Hill), organised a group of volunteers to crew the lifeboat because the trained crew was unavailable; the crewmen were working on a steamer in Port Fairy at the time. He then poured oil onto the water to try and smooth the sea. At around 11pm three of the crew took shelter in the steel forecastle but the sea crashed into it and broke it up. While the rest of the crew and onlookers watched helplessly in the moonlight the bodies were washed away into the sea, never to be seen again. Some of the crew lashed themselves to the weather rail to keep from being washed away. Watson, the ordinary seaman, became tangled in the rigging lines and was too weak to move, so the 2nd Mate, Robertson, put a line onto him so that he wouldn’t wash off. Around 11pm three of the crew were unconscious from exhaustion. The situation on La Bella was becoming dangerous. The 2nd Mate moved to the ‘house’ and soon afterwards the ship slipped in the heavy sea. The lashings of the 1st Mate and the ‘boy’ Denham had kept them safe until about 2am when they were washed overboard; no one was able to help. One by one, the exhausted crew were being washed overboard, too weak to hold on any longer. During the night the La Bella had broken into two and the deckhouse ran out towards the sea. Two more men drowned when trying to reach the lifeboat. By sunrise the only survivors of the twelve were the Master, 2nd Mate and three seamen. Early in the morning Captain Roe used the rocket apparatus on shore to try and shoot a line to the ship for a safer rescue but each attempt fell short of the target. Several attempts were made by the lifeboat to rescue the stricken sailors, but the rough conditions made this difficult for the boat to get close enough to the ship and the lifeboat had to return to shore. During a final attempt to reach the ship Captain Mylius ordered his men to jump into the sea. Leonard Robertson, 2nd mate, jumped and swam towards the lifeboat, taking hold of the boat hook offered to him. Oscar Rosenholme managed to reach the boat floating on a piece of timber from the ship’s load and a third survivor, Noake, also made the boat. Along with the lifeboat rescue crew, 25 year old William Ferrier rowed his small dingy through the heavy seas and managed to rescue the Captain, whom he landed on the breakwater. Ferrier then returned to the ship to attempt a final rescue, losing his oars and rowlocks into the high sea. Using just a spare paddle he skulled towards the La Bella, reaching her stern in time to cut loose the lone surviving sailor, Payne, from the lashing that held him to the ship; the terrified sailor dropped from the ship and into the dingy. Shortly after the last man was rescued, the La Bella was lifted by a huge wave and crashed back down on the reef; she broke up and sank. The ordeal had lasted ten hours. The survivors were taken to the nearby Bay View Hotel and gratefully received warm food and clothing, medical attention and a place to sleep. In the following days an unidentified body of a young person was washed ashore; it was either Watson or Denham. The body was buried in the Warrnambool cemetery with an appropriate gravestone and inscription. William Ferrier became a national hero as news of the daring rescue spread. In recognition of his bravery in the two daring rescues he was awarded the Silver Medal for Bravery by the Royal Humane Society and was honoured in the letter from the Prime Minister and the Parliament of the Commonwealth, telegrams and a cheque for £20 from the Governor General, over £150 subscribed by the public, including Warrnambool and district and readers of The Argus, and a gold medal from the Glenelg Dinghy Club of South Australia. Ferrier’s rescue efforts are one of the most heroic in Victoria’s shipwreck history. (William Ferrier’s son, Frank, received a similar award almost fifty years later, when he helped rescue four members of the crew on the yacht Merlan, after it ran on to a reef near the Point Lonsdale Lighthouse. ) The wreck of La Bella now lies on her port side in 13 metres of sheltered water inside the reef she struck. The bow section is relatively intact and part of the stern has drifted north-easterly towards the mouth of the Hopkins River. The reef the La Bella struck now bears its name. Those five rescued from the La Bella were Captain George Mylius, Leonard Robertson (2nd Mate, 21 years old), R. Payne, Oscar Rosenholme and Jack Noake. Those seven who lost their lives were Mr Coulson (1st mate), Charles Jackman (cook) Gustave Johnson, Pierre Johann and Robert Gent (all able seamen), Harry Watson (ordinary seaman) and Jack Denham (ship’s boy), Captain Mylius was found guilty of careless navigation; he had sailed into the bay without the services of a pilot. His Master Certificate was suspended for twelve months. Later he was also charged with manslaughter of one of the crew who had died when the La Bella was wrecked, but found not guilty. The event’s adverse publicity and damage to his career took a toll on his health and he died of a heart attack six months after the wreck; he was only thirty-seven. His body was buried in the Melbourne General Cemetery. The La Bella was “the best documented of all sailing ships owned in New Zealand”. Her record books, ship logs, correspondence and supporting papers are still available. At the time of the tragedy, she was owned by Messers David C.Turnbull and Co. of Timaru, New Zealand timber merchants and shipping agents, who had purchased her on 13th December 1901. A detailed account of the last journey of La Bella can be read in “Leonard Robertson, the Whangaroa & La Bella” written by Jack Churchouse, published in 1982 by Millwood Press Ltd, Wellington, NZ. Some 15 – 17 ships are believed to have sunk in Lady Bay, but only two have been discovered on the seafloor; the “La Bella” and the “Edinburgh Castle”. Both wrecks are popular diving sites and are preserved as significant historical marine and marine archaeological sites. As well as this letter, Flagstaff Hill’s La Bella Collection includes a photograph of the wrecked La Bella, a brass rail holder and a postcard of William Ferrier with four of the survivors. This original congratulatory letter sent to William Ferrier by the Prime Minister and Government of Australia demonstrates the importance attached to his efforts for Victoria and to Australia. The letter is part of the La Bella Collection and is significant at both a local and state level. Its connection to the La Bella shipwreck and the rescue of five survivors highlights the dangers of Victoria’s Shipwreck Coast. The letter to William Ferrier from the Australian Government acknowledges the bravery of ordinary Australians who risked their lives to save victims of shipwrecks along the coast. The letter is significant to the history of Warrnambool as it honours William Ferrier, a local fisherman whose descendants continue to live in the area. It highlights the way of life of people who lived in coastal towns in 19th century Victoria and the effects of shipwrecks upon them. The letter connects to the postcard of William Ferrier with four of the five rescued crew, the photograph of the wreck of the La Bella and the artefact from the wreck, the rail holder. This item is significant because of its association with the sailing ship “La Bella” . the “La Bella” is of local and state and national significance. It is one of the only two shipwrecks discovered in Lady Bay, Warrnambool, out of the 15-17 shipwrecks in the bay. Brass rail holder from the wreck "La Bella". This rail holder would have been used as a fitting for the end of a rail. It is made up of two parts and looks a little like a goblet in shape. The top is a hollow spherical shape with a circular hole cut out on one side, into which the end of a round rail would fit. There are two gouge marks close to each other on one side of the hole, about one centimetre apart, at 1 and 2 o’clock position. The sphere has a hollow pipe-like stem with a screw thread turned into the outside of the lower section and the bottom of the stem has been flared out after having the base fitted. The base is round and has a mound in the centre. The edge has four evenly spaced fixture holes around its edge. The metal shows signs of pitting and has mild encrustation. The fitting of the base is loose, allowing it to swivel in a complete circle. The top of the sphere is rough and has a dent in it. Underneath the base there is verdigris; some has flaked off and reveals a bright golden colour underneath. rail holder, brass rail holder, la bella, lady bay, norway, 1893, new zealand, captain mylius, william ferrier, flagstaff hill, warrnambool, shipwrecked coast, flagstaff hill maritime museum, maritime museum, shipwreck coast, flagstaff hill maritime village -
 Flagstaff Hill Maritime Museum and Village
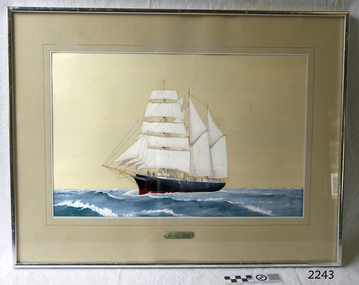
Painting - Maritime painting, The La Bella, 1980s
... in Victoria’s shipwreck history. (William Ferrier’s son, Frank, received... in Victoria’s shipwreck history. (William Ferrier’s son, Frank, received ...This painting of the “La Bella” is associated with Flagstaff Hill’s collection of artefacts from the wreck of the “La Bella”. It was painted around the 1980s by maritime artist Philip J. Gray. Some 15 – 17 ships are believed to have sunk in Lady Bay, but only two have been discovered on the seafloor; the “La Bella” and the “Edinburgh Castle”. Both wrecks are popular diving sites and are preserved as significant historical marine and marine archaeological sites. The Kosnar Picture Framing and Mirrors Shop identified the "GRAY 3135, Y04/111" as their job number for the framing and said that the label "ANOTHER KOSNAR FEATURE" was last used before about 1990. About artist Philip J. Gray “Philip is one of Australia’s leading maritime artists and his meticulous research and social commentary paintings of ships, such as, the Loch Ard and Schomberg form an important part of Warrnambool’s Flagstaff Hill Maritime Museum.” [Dr Marion Manifold, Artist and Art Historian, 2014] Philip James Gray was born in London but has lived most of his life in Australia. He graduated from a London school of art as an illustrator, specialising in technical and scientific illustration as well as other commercial and applied art. He was also a student for a time of Fyffe Christie - British figurative artist, mural painter and humanitarian – who had a great influence on his career. Philip has always worked as a professional artist and illustrator. Many publications on maritime history have featured his work. His paintings have been released and sold all over the world as limited edition prints. The State Library of Victoria’s ‘Latrobe Collection’ holds two of his paintings. His street painting of ‘The Ashes Contest’ decorates the brick wall of Old Bakery Laneway in Sunbury and a Sunbury café owner commissioned him to paint the ‘Sunbury Pop Festival’ as a remembrance of local history. Philip has been an active member of the Sunbury Art Society in Victoria for several years, serving on the committee for some of that time and being involved in exhibitions. He enjoys helping new artists and sharing his skills and experience. About the “La Bella” The wreck of the La Bella lies at the bottom of the Warrnambool Harbour in Lady Bay. Some 15 ships are believed to have been wrecked there but only two have been discovered on the sea floor; the La Bella and the Edinburgh Castle. Both wrecks are popular diving sites and are preserved as significant historical marine and marine archaeological sites. The story of the final voyage of the La Bella is summarised as follows … The ship from which the sailors were rescued was the three-masted, iron and steel barquentine the La Bella, built in Norway in 1893. She was one of two iron and steel ships by Johan Smith, the company being one of the leading shipping families in Tvedestrand, Norway. She was significant to Norwegian shipping, being one of only 27 iron and steel ships ever built in Norway. La Bella was registered in New Zealand and engaged from 1902 in inter-colonial trading of timber in the pacific, between New Zealand and Australia and was often in Port Phillip Bay, Victoria. On 5th October 1905 the twelve year old La Bella left Lyttleton, New Zealand carrying a cargo of timber bound for Warrnambool, Australia . She was manned by a crew of twelve: the Master, (Captain Mylius, previously 1st Mate of La Bella, appointed Captain to La Bella on 6th February 1903) 2 Mates, Cook, six able seamen, one ordinary seaman and a boy. Bad weather en-route caused her to shelter at Burnie on Tasmania's North West coast. On November 10th, the 37th day of her journey, La Bella approached Warrnambool. Captain Mylius steered her towards Lady Bay Channel in heavy south-west seas and evening mist. He ordered the helmsman to steer for the light. As the ship came round, a tremendous sea struck her on the port quarter, causing her to breach broadside in a north-westerly direction into breakers. The helm was brought round twice more, but each time heavy seas broke over her, the third time throwing the La Bella on to a submerged reef in Lady Bay now known as La Bella Reef (about 100 yards from the Warrnambool breakwater). The sea was so rough that it even wrenched a one-and-a-half ton anchor from its fastenings and into the sea. As Captain Mylius headed to the steel wheelhouse, intending to send up a rocket flare, a huge sea slammed the steel door into him (resulting in massive bruising front and back) Despite his injuries he still managed to set off a blue light, which he held up in his hands. La Bella’s lifeboats were filled with sea water and broke up on their chocks. The blue light was the first indication to people on shore that there was a ship in distress. The Harbour Master, Captain Roe (who lived in the Harbour Master’s House opposite Flagstaff Hill), organised a group of volunteers to crew the lifeboat because the trained crew was unavailable; the crewmen were working on a steamer in Port Fairy at the time. He then poured oil onto the water to try and smooth the sea. At around 11pm three of the crew took shelter in the steel forecastle but the sea crashed into it and broke it up. While the rest of the crew and onlookers watched helplessly in the moonlight the bodies were washed away into the sea, never to be seen again. Some of the crew lashed themselves to the weather rail to keep from being washed away. Watson, the ordinary seaman, became tangled in the rigging lines and was too weak to move, so the 2nd Mate, Robertson, put a line onto him so that he wouldn’t wash off. Around 11pm three of the crew were unconscious from exhaustion. The situation on La Bella was becoming dangerous. The 2nd Mate moved to the ‘house’ and soon afterwards the ship slipped in the heavy sea. The lashings of the 1st Mate and the ‘boy’ Denham had kept them safe until about 2am when they were washed overboard; no one was able to help. One by one, the exhausted crew were being washed overboard, too weak to hold on any longer. During the night the La Bella had broken into two and the deckhouse ran out towards the sea. Two more men drowned when trying to reach the lifeboat. By sunrise the only survivors of the twelve were the Master, 2nd Mate and three seamen. Early in the morning Captain Roe used the rocket apparatus on shore to try and shoot a line to the ship for a safer rescue but each attempt fell short of the target. Several attempts were made by the lifeboat to rescue the stricken sailors, but the rough conditions made this difficult for the boat to get close enough to the ship and the lifeboat had to return to shore. During a final attempt to reach the ship Captain Mylius ordered his men to jump into the sea. Leonard Robertson, 2nd mate, jumped and swam towards the lifeboat, taking hold of the boat hook offered to him. Oscar Rosenholme managed to reach the boat floating on a piece of timber from the ship’s load and a third survivor, Noake, also made the boat. Along with the lifeboat rescue crew, 25 year old William Ferrier rowed his small dingy through the heavy seas and managed to rescue the Captain, whom he landed on the breakwater. Ferrier then returned to the ship to attempt a final rescue, losing his oars and rowlocks into the high sea. Using just a spare paddle he skulled towards the La Bella, reaching her stern in time to cut loose the lone surviving sailor, Payne, from the lashing that held him to the ship; the terrified sailor dropped from the ship and into the dingy. Shortly after the last man was rescued, the La Bella was lifted by a huge wave and crashed back down on the reef; she broke up and sank. The ordeal had lasted ten hours. The survivors were taken to the nearby Bay View Hotel and gratefully received warm food and clothing, medical attention and a place to sleep. In the following days an unidentified body of a young person was washed ashore; it was either Watson or Denham. The body was buried in the Warrnambool cemetery with an appropriate gravestone and inscription. William Ferrier became a national hero as news of the daring rescue spread. In recognition of his bravery in the two daring rescues he was awarded the Silver Medal for Bravery by the Royal Humane Society and was honoured in the letter from the Prime Minister and the Parliament of the Commonwealth, telegrams and a cheque for £20 from the Governor General, over £150 subscribed by the public, including Warrnambool and district and readers of The Argus, and a gold medal from the Glenelg Dinghy Club of South Australia. Ferrier’s rescue efforts are one of the most heroic in Victoria’s shipwreck history. (William Ferrier’s son, Frank, received a similar award almost fifty years later, when he helped rescue four members of the crew on the yacht Merlan, after it ran on to a reef near the Point Lonsdale Lighthouse. ) The wreck of La Bella now lies on her port side in 13 metres of sheltered water inside the reef she struck. The bow section is relatively intact and part of the stern has drifted north-easterly towards the mouth of the Hopkins River. The reef the La Bella struck now bears its name. Those five rescued from the La Bella were Captain George Mylius, Leonard Robertson (2nd Mate, 21 years old), R. Payne, Oscar Rosenholme and Jack Noake. Those seven who lost their lives were Mr Coulson (1st mate), Charles Jackman (cook) Gustave Johnson, Pierre Johann and Robert Gent (all able seamen), Harry Watson (ordinary seaman) and Jack Denham (ship’s boy). Captain Mylius was found guilty of careless navigation; he had sailed into the bay without the services of a pilot. His Master Certificate was suspended for twelve months. Later he was also charged with manslaughter of one of the crew who had died when the La Bella was wrecked, but found not guilty. The event’s adverse publicity and damage to his career took a toll on his health and he died of a heart attack six months after the wreck; he was only thirty-seven. His body was buried in the Melbourne General Cemetery. The La Bella was “the best documented of all sailing ships owned in New Zealand”. Her record books, ship logs, correspondence and supporting papers are still available. At the time of the tragedy she was owned by Messers David C.Turnbull and Co. of Timaru, New Zealand timber merchants and shipping agents, who had purchased her on 13th December 1901. A detailed account of the last journey of La Bella can be read in “Leonard Robertson, the Whangaroa & La Bella” written by Jack Churchouse, published in 1982 by Millwood Press Ltd, Wellington, NZ.This painting of the La Bella by Philip J. Gray is part of the La Bella Collection and is significant at both a local and state level. Its connection to the La Bella shipwreck and the rescue of five survivors highlights the dangers of Victoria’s Shipwreck Coast. The painting connects with other objects and artefacts associated with the wreck of the La Bella. This painting is significant because of its association with the sailing ship “La Bella” . the “La Bella” is of local and state and national significance. It is one of the only two shipwrecks discovered in Lady Bay, Warrnambool, out of the 15-17 shipwrecks in the bay. Large framed painting of the three masted barquentine "La Bella" fully rigged. Painted by Phillip J Gray. A fine printed line squares off the painting. Beneath painting and line is a gold plate with black copper plate designating "La Bella" is encased in glass, surrounded by a silver-metal frame. Yellow and brown paper label is adhered to back of painting. Picture framed by Kosnar in Melbourne."The La Bella" on gold plaque Logo of "K" inside a brown square. "GRAY 3135, Y04/111", "ANOTHER KOSNAR FEATURE" flagstaff hill, warrnambool, shipwrecked-coast, flagstaff-hill, flagstaff-hill-maritime-museum, maritime-museum, shipwreck-coast, flagstaff-hill-maritime-village, painting, la bella, artist phillip j gray, maritime painting, lady bay warrnambool -
 Flagstaff Hill Maritime Museum and Village
Photograph, Between 1890 - 19-12-1937
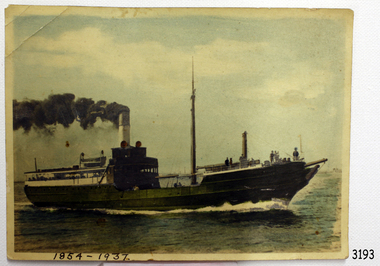
... interesting history includes English Chanel runs, serving...' Society of Victoria Dandenong, Passengers in History, http ...This photographic postcard of the SS Edina was taken after the 1890’s due to the style and configuration of the vessel. There is a black and white photograph of the same image also in our Collection (RN 3192). It is most likely that both of the photographs were donated by the same person because the people mentioned in the inscription on the black and white photograph’s reverse side connect with two of the people mentioned in the letter on the reverse of the coloured photograph. * RN 3192; Black & White photograph - inscription: "Donated by Mrs. Nancy Mason, Bay View. Owned by Mac Fordham, Chief Engineer, 'Edina', then given to Mrs. Mason's father-in-law Arnold Mason (both Engineers W.W. I)" The “Arnie” to whom the letter was addressed is likely to be Arnold Mason, Engineer. The author of the letter, “Mac”, is likely to be Mac Fordham, Chief Engineer of SS Edina. The transcribed letter tells of two men who know each other well and have an interest in the Edina. “Mac” mentions that he may be “too old” to be at sea again; this would also support the idea that the older writer would give his photographs to the perhaps younger “Arnie”. * RN 3193 (this photograph) - Transcription of pen and ink script handwriting = = = = = = = = = = = = 19-12-37 No. 1 Flat, “Goodwood Lodge” 196 Lennox Street, Richmond [Victoria] Dear Arnie , Been meaning to write for long time but you know, it’s just the usual routine of the seamen within Bay trades. Had a good trip back from Sydney. Took our time, spent almost a week coming back, rather monotonous in parts in the hill country, too many darn curves, still was a good trip. How are you all keeping? Suppose you’ve moved back to Drummoyne [erettris?], expect you can let the house in Manly easily enough. Noticed they had a strike at Cockatoo [Cockatoo Island NSW]. don’t suppose they pulled the boys out. How is Jack doing? Has [Willie?] commenced training yet, or no! too young, isn’t she? Been a lot of “paper” talk about the “Edina” finishing but nothing official that I’m aware of, but it’s always on the cards I suppose, then I suppose it will be to sea again if I’m not too old. Easy Winter only 3 trips per week, running every day from today until further notice. Trust [Mary?] Is well & all’s well with you too. Best wishes from us both for Xmas & New Year. Cheerio Mac = = = = = = = = = = = = ABOUT THE S S EDINA The three masted iron screw steamer SS Edina was built in Glasgow, Scotland, in 1854 by Barclay and Curle. She was adorned with the figurehead of ‘fair maid of Judea’. The many years of service made SS Edina famous world-wide as the longest serving screw steamer. (The term screw steamer comes from being driven by a single propeller, sometimes called a screw, driven by a steam engine.) SS Edina’s interesting history includes English Chanel runs, serving in the Crimean Ware carrying ammunition, horses and stores to the Black Sea, and further service in the American Civil War and later, serving in the western district of Victoria as well as in Queensland and carried gold, currency and gold prospectors Australia to New Zealand. SS Edina had the privilege of being an escort vessel to H.R.H. the Duke of Edinburgh during his visit to Australia in 1867. In March 1863 SS Edina arrived in Port Phillip Bay, Melbourne and was bought by Stephen Henty, of Portland fame, to work the cargo and passenger run from Melbourne – Warrnambool – Port Fairy - Portland. After a short time of working the run from Australia to New Zealand, with passengers and cargo that included gold and currency, she returned to her Melbourne - Warrnambool – Port Fairy run, with cargo including bales of wool produced in the western district of Victoria. The Warrnambool Steam Packet Company purchased SS Edina in 1867; she was now commanded by Captain John Thompson and Chief Engineer John Davies. She survived several mishaps at sea, had a complete service and overhaul and several changes of commanders. In 1870 SS Edina was in Lady Bay, Warrnambool, when a gale sprung up and caused a collision with the iron screw steamer SS Dandenong. SS Edina’s figurehead was broken into pieces and it was not ever replaced. SS Edina was re-fitted in 1870 then was used as a coastal trader in Queensland for a period. She was then brought to Melbourne to carry cargo and passengers between Melbourne and Geelong and performed this service 1880-1938. During this time (1917) she was again refitted with a new mast, funnel, bridge and promenade deck, altering her appearance. In 1938, after more collisions, SS Edina was taken out of service. However she was later renamed Dinah and used as a ‘lighter’ (a vessel without engine or superstructure) to be towed and carry wool and general cargo between Melbourne and Geelong. In 1957, after 104 years, the SS Edina was broken up at Footscray, Melbourne. Remains of SS Edina’s hull can be found in the Maribyrnong River, Port Phillip Bay. [Reference: A Brief Review of Steam Navigation in Victoria; C Dickson Gregory; Centenary Maritime Exhibition catalogue, 1934; published by Shiplovers' Society of Victoria Dandenong, Passengers in History, http://passengersinhistory.sa.gov.au/node/924034 Edina, Victorian Heritage Database VHR S199 http://vhd.heritage.vic.gov.au/shipwrecks/heritage/199 SS Edina, Coastal Trader and Passenger Ship 1853-1938, Museum Victoria Collections, https://collections.museumvictoria.com.au/articles/6227 SS ‘Edina’ – the Longest Serving Screw Steamer in the World, POI Australia, https://poi-australia.com.au/ss-edina-the-longest-serving-steamer-in-the-world/ ]This photographic postcard with the letter on the revers tell about the SS Edina and are significant for its association with the screw steamer SS Edina. The SS Edina is heritage listed on the Victorian Heritage Database VHR S199. She had endeared herself to the people of Port Phillip Bay as a passenger ferry, part of their history and culture. She played a significant role in the Crimean War, the American Civil War and the gold rush in New Zealand. She also served western Victoria for many years in her cargo and passenger runs. The SS Edina is famous for being the longest serving screw steamer in the world. After spending her first nine years overseas she arrived in Melbourne and her work included running the essential service of transporting cargo and passengers between Melbourne and the western Victoria ports of Warrnambool, Port Fairy and Portland. The SS Edina was purchased in the late 1860’s by local Warrnambool business, the Warrnambool Steam Packet Co. and continued trading from there as part of the local business community. The SS Edina’s original ‘fair maid of Judea’ figurehead was broken to pieces in a collision with another vessel (the SS Dandenong) in a gale off Warrnambool, Victoria, in 1870.Coloured (hand coloured) photographic postcard of SS Edina. Letter on reverse, hand written in pen and ink, from Mac to Arnie, dated 19-12-37 [1937]. The photograph shows the SS Edina moving under steam power, many people on both the bow and stern and a few people in the centre of the vessel. There are buildings on the shore in the background. The ship's configuration is dated post 1890.Hand written in pen on base of front “1854-1957” Hand written on back in blue pen and crossed out “REC 409” Hand written on back in pen ‘EDINA,’ “3173,” “086.2” Hand written letter dated 19-12-37, from Mac to Arnie. Script writing in pen and ink letter on reverse of photograph – see “Context” section for transcription. warrnambool, shipwrecked coast, flagstaff hill, flagstaff hill maritime museum, maritime museum, shipwreck coast, flagstaff hill maritime village, shipwrecked artefact, barclay & curle, figurehead 'fair maid of judea', centenary maritime exhibition 1934, a brief review of steam navigation in victoria, pleasure steamer edina, trade and travel late 19th and early 20th century, trade melbourne to geelong, screw steamer edina, coastal trader edina, lighter dinah, cargo carrying for cremean war, cargo carrying for american civil war, passenger and trade in western district of victoria, export gold and currency and gold diggers to new zealand, export vessel to h r h the duke of edinburgh, melbourne - warrnambool - port fairy - portland cargo run, warrnambool steam packet company, stephen henty, captain john thompson, chief engineer john davies, lady bay warrnambool, lighter edina, shipping victoria, port phillip bay steamers, steamship great britain, edina, vhr s199 victorian heritage database, photographic postcard of ss edina 1854-1957, letter by mac fordham chief engineer ss edina, letter to arnold mason, engineer -
 The Beechworth Burke Museum
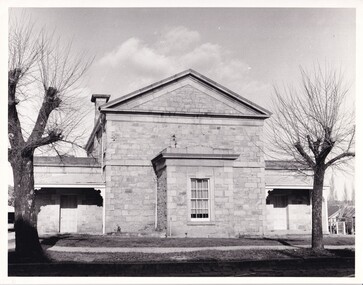
Photograph, c1970
... The Beechworth Historic Courthouse is a living history...-country The Beechworth Historic Courthouse is a living history ...The Beechworth Historic Courthouse is a living history museum in Victoria, Australia. Built in 1858, it has been in continuous service for 131 years and is currently home to a unique collection of artifacts, including its original furniture and fittings. The Courthouse Law Library is also recognised as being of outstanding national significance with many rare books held in the collection. The courthouse was built in 1858 and is located in the centre of the Beechworth Historic Precinct. It was built from granite with a double height gabled courtroom with the entrance via a central projecting porch. The building was classified in 1959 as part of Group Classification (B2615)with Forests Office, Lands Office, Police Lock-up & Police Station. The Courthouse is a significant site in Australia’s legal history because it was the location of more than 40 trials and hearings for the Kelly Gang and their sympathisers.This a rectangular, black and white photograph, unmounted.Reverse Ministry of Tourism, Melbourne1850s beechworth, beechworth courthouse, ned kelly, 1800s beechworth, kelly gang, beechworth historic courthouse, 1858, kelly trials, daniel kelly, dan kelly, edward kelly, ellen kelly, elizabeth scott, the first woman hanged in victoria, colony of victoria, 1863, domestic violence related murder -
 The Beechworth Burke Museum
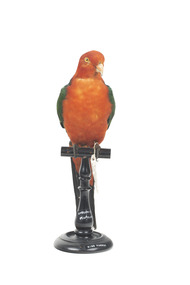
Animal specimen - King Parrot, Trustees of the Australian Museum, 1860-1880
This specimen is part of a collection of almost 200 animal specimens that were originally acquired as skins from various institutions across Australia, including the Australian Museum in Sydney and the National Museum of Victoria (known as Museums Victoria since 1983), as well as individuals such as amateur anthropologist Reynell Eveleigh Johns between 1860-1880. These skins were then mounted by members of the Burke Museum Committee and put-on display in the formal space of the Museum’s original exhibition hall where they continue to be on display. This display of taxidermy mounts initially served to instruct visitors to the Burke Museum of the natural world around them, today it serves as an insight into the collecting habits of the 19th century. The red-and green Australian King-Parrot is seldom seen flying above the tree tops of the dense forests which it inhabits — it prefers to fly below tree level, weaving in and out through the tree trunks instead. When they are disturbed by a person, they usually fly off with a harsh screech, and often do not land until they are lost to view. Their flight is swift and strong, characterised by deep, rhythmic wing-beats and regularly punctuated with rapid twists and turns.This specimen is part of a significant and rare taxidermy mount collection in the Burke Museum. This collection is scientifically and culturally important for reminding us of how science continues to shape our understanding of the modern world. They demonstrate a capacity to hold evidence of how Australia’s fauna history existed in the past and are potentially important for future environmental research. This collection continues to be on display in the Museum and has become a key part to interpreting the collecting habits of the 19th century. Male Australian King-Parrots are the only Australian parrots with a completely red head. Females are similar to males except that they have a completely green head and breast. Both sexes have a red belly and a green back, with green wings and a long green tail. King parrots are normally encountered in pairs or family groups. This particular specimen has duller colour and appears more orange with a misshapen head Label: National Museum Victoria / King Parrot / Aprosmietus W5435 / Gris (recht) Mount: APPOSMICTUS / SCAPULARIS / King Parrottaxidermy, parrot, bird, king parrot -
 The Beechworth Burke Museum
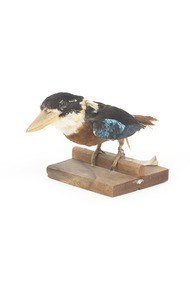
Animal specimen - Rufous-bellied Kookaburra (female), Trustees of the Australian Museum, 1860-1880
The Rufous-bellied Kookaburra is a large member of the Kingfisher family. It commonly resides in the dense rainforests of lowland New Guinea, Saibai Island, Indonesia, Biak, Maluku/Moluccas Islands, Papua New Guinea, Melanesia and Queensland in Australia. This is unlike other species of Kookaburra which commonly prefer to reside in locations of open country. Another aspect which makes this bird unique to other Kookaburra is its tendency to live in pairs and not in family groups which is typical of other Kookaburras. In the case of the Rufous-bellied Kookaburra, both parents incubate and care for the eggs/chicks. This Kookaburra feeds on small mammals, birds, reptiles and insects. The Rufous-bellied Kookaburra was originally named the Gaudichaud's Kookaburra after the French botanist Charles Gaudichaud-Beaupré. This species of Kookaburra is among the most colorful varieties of the Kookaburra alongside the Spangled Kookaburra. This specimen is part of a collection of almost 200 animal specimens that were originally acquired as skins from various institutions across Australia, including the Australian Museum in Sydney and the National Museum of Victoria (known as Museums Victoria since 1983), as well as individuals such as amateur anthropologist Reynell Eveleigh Johns between 1860-1880. These skins were then mounted by members of the Burke Museum Committee and put-on display in the formal space of the Museum’s original exhibition hall where they continue to be on display. This display of taxidermy mounts initially served to instruct visitors to the Burke Museum of the natural world around them, today it serves as an insight into the collecting habits of the 19th century.This specimen is part of a significant and rare taxidermy mount collection in the Burke Museum. This collection is scientifically and culturally important for reminding us of how science continues to shape our understanding of the modern world. They demonstrate a capacity to hold evidence of how Australia’s fauna history existed in the past and are potentially important for future environmental research. This collection continues to be on display in the Museum and has become a key part to interpreting the collecting habits of the 19th century. The Rufous-bellied Kookaburra is a large Kingfisher with a black coloured cap on the head, white collar around the neck, blue feathers on the wings and rump and a rufous belly. The female Kookaburra has a brown/rufous coloured tail, as is the case for this particular specimen which identifies it as female. This bird has a large white bill and pale coloured legs. The head is a large square shape and the body is stocky.Label: National Museum Victoria / 159a /taxidermy mount, taxidermy, animalia, burke museum, beechworth, australian museum, skin, reynell eveleigh johns, bird, australian birds, kingfisher, kookaburra, rufous-bellied kookaburra -
 The Beechworth Burke Museum
Photograph
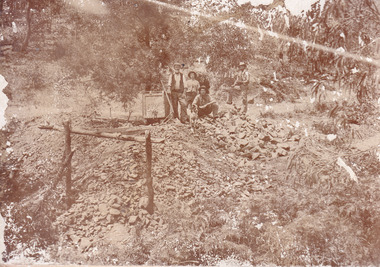
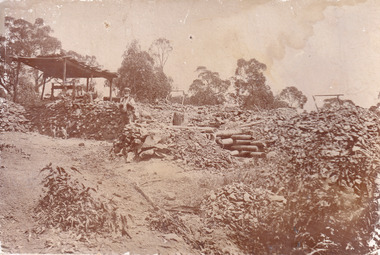
... into the history of Victoria and therefore, images like this one can reveal ...This photograph dates to 1899, towards the end of the gold rush in the Mopoke Gully area. A large opening to a mine can be seen behind the men in the photograph, with a wheeled cart on a track leading to the men's position, where the soil and rocks have been hauled away. This photograph interestingly contains dogs alongside the miners. While dogs have been recorded as deterrents to thieves in the Victorian goldfields, these dogs appear as companions to these men. Mopoke Gully mines came under the 'Fryer's Creek' division of the Castlemaine District during the Gold Rush. After the Gold Rush began in Victoria with the discovery of gold at Ballarat in 1851, Gold was found in Castlemaine by December of that year. 20,000 diggers were spread across the Castlemaine region, and the area was yielding about 23,000 ounces of gold per week. Mopoke Gully was the site of the Mopoke Gully Water Wheel, operating under the Bendigo and Fryers Goldmining Company from 1887 until 1900. This Water Wheel was used in the gold mining technique of 'sluicing'. Hydraulic sluicing uses high pressure water jets to blast away the earth, which runs through a sluice box, catching the gold with all remaining slurry washing away. This Water Wheel was built the same year as the more famous 'Chewton Water Wheel', but was smaller in diameter (60ft as opposed to Chewton's 72ft). The Mopoke Water Wheel ruins are quite intact today, and are a registered archaeological site. The search for gold is ingrained into the history of Victoria and therefore, images like this one can reveal important information for society and technology for the date when the photograph was taken. This image is of important historical significance for its ability to convey information about sluicing and the methods used to find gold in 1899. This photograph reveals important information on the use of dogs on Victorian goldfields in 1899. Dogs were used both as companions, such as this photograph depicts, as well as deterrents to thieves. Sepia coloured rectangular photograph printed on gloss photographic paper mounted on card. Obverse: Williams/ Good/ Luck Reverse: A02498/ 1997. 2498/ Good Luck/ Mine/ 1899/ Mopoke. beechworth, burke museum, gold, gold mining, 1899, castlemaine, mopoke gully, good luck mine, fryer's creek, gold rush, victorian gold rush, water wheel, sluicing, chewton -
 The Beechworth Burke Museum
Photograph
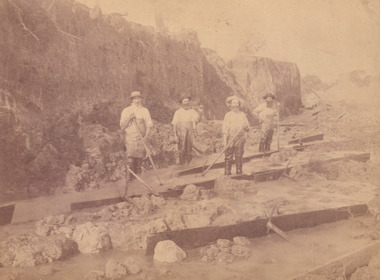
... into the history of Victoria and therefore, images like this one which ...This photograph dates to 1899, towards the end of the gold rush in the Mopoke Gully area. A slurry of rocks after they have been broken up is depicted, and this is part of the hydraulic sluicing mining process. Four men are relaxing under a wooden structure, with a fifth bearded man standing near a stone wall. This photograph interestingly contains dogs alongside the miners. While dogs have been recorded as deterrents to thieves in the Victorian goldfields, these dogs appear as companions to these men. Mopoke Gully mines came under the 'Fryer's Creek' division of the Castlemaine District during the Gold Rush. After the Gold Rush began in Victoria with the discovery of gold at Ballarat in 1851, Gold was found in Castlemaine by December of that year. 20,000 diggers were spread across the Castlemaine region, and the area was yielding about 23,000 ounces of gold per week. Mopoke Gully was the site of the Mopoke Gully Water Wheel, operating under the Bendigo and Fryers Goldmining Company from 1887 until 1900. This Water Wheel was used in the gold mining technique of 'sluicing'. Hydraulic sluicing uses high pressure water jets to blast away the earth, which runs through a sluice box, catching the gold with all remaining slurry washing away. Hydraulicking is the process of breaking up the rocks and suspending it in a slurry. This Water Wheel was built the same year as the more famous 'Chewton Water Wheel', but was smaller in diameter (60ft as opposed to Chewton's 72ft). The Mopoke Water Wheel ruins are quite intact today, and are a registered archaeological site.The search for gold is ingrained into the history of Victoria and therefore, images like this one which portray a sluicing site can reveal important information for society and technology for the date when the photograph was taken. This image is of important historical significance for its ability to convey information about sluicing and the methods used to find gold in 1899. It also shows a location where sluicing was undertook which provides insight into the impact of sluicing on the environment at a time when it was done. This photograph reveals important information on the use of dogs on Victorian goldfields in 1899. Dogs were used both as companions, such as this photograph depicts, as well as deterrents to thieves. Sepia coloured rectangular photograph printed on gloss photographic paper mounted on card.Obverse: Reverse: A02497/ 1997.2497/ 'Good/ Luck/ Mine'/ Morepork/ Gully/ Mrs Joyce/ Bright/ Tunnel/ 800 ft/ 1899. beechworth, burke museum, gold, gold mining, 1899, castlemaine, mopoke gully, good luck mine, fryer's creek, gold rush, victorian gold rush, water wheel, sluicing, chewton, slurry -
 The Beechworth Burke Museum
Photograph, c. 1870
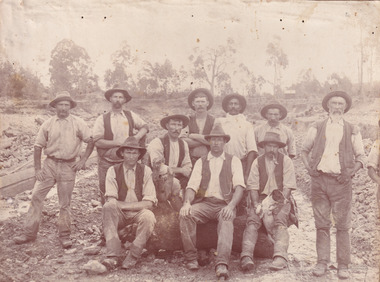
... 1853. The search for gold is ingrained into the history ...This photograph was captured at an undisclosed location and at an unidentified time but likely dates to approximately 1870. The photographer's details are not recorded and the identities of the men in the image are also not known. This image depicts a group of 10 men in typical miners fashion. Four of them are sat on a large log with one holding a small dog. Six miners stand behind those sitting. All these men are wearing a white button-up shirt and tan coloured work trousers. They wear heavy boots and seven have included a dark vest over their shirt. The man holding the dog has a pipe in his mouth. Two of these men are clean shaven with the remainder sporting a moustache and two with a beard. The ages of these men vary from late 20s to middle age. This group of men are located in a mining location with what appears to be an open cut mine in the background of the image. The ground is muddy and has elements which can help identify it as a mining location based on the condition of the landscape. The bottom of the men's trousers are muddy which provides the assurance that these men were working in this location when their photograph was captured. In the background there is one structure, possibly a dwelling, and bush which identifies the location as Australia. Open cut sluicing is a method used to extract gold and other precious metals from beneath the surface of the earth. This technique involved the use of high-powered hoses which broke down the soil enabling miners to come along and search this soil for gold. After the gold rush of the early 1850s, diggers had to enlist the assistance of heavy machinery and techniques like hydraulic sluicing in order to reach gold because the surface alluvial gold had already been discovered and removed. This heavy machinery was not used until after 1853. The search for gold is ingrained into the history of Victoria and therefore, images like this one which portray an open cut sluicing site can reveal important information for society and technology for the date when the photograph was taken. This image is of important historical significance for its ability to convey information about sluicing and the methods used to find gold in the late 1800s and early 1900s. It also shows a location where sluicing was undertook which provides insight into the impact of sluicing on the environment at a time when it was done. Images, like this one, of Australian gold rush history can reveal important information about the social and environmental impact of this period. This image depicts diggers standing in a mining location and therefore, this image has the capacity to reveal or support significant information for researchers studying the fashion and social status of diggers in Australia in approximately 1870. It can also provide information on the landscape of Australia in this period and the impact of mining for gold on both society and the Australian landscape. The Burke Museum is home to a substantial collection of Australian mining photographs which can be used to gain a deeper understanding into life on the gold fields, technology used in mining, the miners themselves and the impact of the gold digging on the environment.Sepia toned rectangular photograph printed on matte photographic paper mounted on board.Reverse: 1997.2518mining, goldfields, beechworth, 1870, australia, australian goldfields, diggers, victoria, sluicing, gold mining, miners, diggers victoria -
 The Beechworth Burke Museum
Photograph, c.1870
... . The search for gold is ingrained into the history of Victoria ...This photograph was taken in approximately 1870 and depicts four male miners standing in mining sluice at the Three Mile Goldfields. These men are wearing typical attire for 1870s gold miners. They wear white shirts, tan coloured pants with water proof shoes and most of the men are wearing an apron to prevent their clothing from becoming too dirty from the mud. Each man is wearing a wide brim hat and hold large wooden tools used for sorting through the sluice. Three of the four men have full beards. The photograph was donated to the Burke Museum by R. Ziegenbein before 2001 but the photographer and the individuals captured in the photo are unknown. The image depicts the landscape of the Three Mile Goldfields during a period when open cut sluicing was undertaken to reach gold. Open cut sluicing is a method used to extract gold and other precious metals from beneath the surface of the earth. This technique involved the use of high-powered hoses which broke down the soil enabling miners to come along and search this soil for gold. After the gold rush of the early 1850s, diggers had to enlist the assistance of heavy machinery and techniques like hydraulic sluicing in order to reach gold because the surface alluvial gold had already been discovered and removed. This heavy machinery was not used until after 1853. The Three Mile Goldfields was a site of rich alluvial gold deposits located about 5 km south of Beechworth in Victoria. Today, the location of this gold deposit is called Baarmutha. It was a popular area for gold mining in the 1850s but became largely abandoned by the following decade. In 1865, a man named John Pund recognized that the area could be potentially rich if a better water supply could be obtained. He secured a 15 year license with three other miners. Within the next five years, these men had constructed 19 km of water race going from Upper Nine Mile Creek to Three Mile Creek. By 1881, these four men had delivered 950,000 gallons to the Three Mile Sluicing area which is depicted in this photograph. Pund was later go into partnership with John Alston Wallace who would become owner of the Star Hotel in Beechworth. The Three Mile sluicing location continued to be operational until 1950. Sluice box workers were a vital part of gold mining regardless of how inefficient they were in the recovery of gold. After using hydraulic sluicing to cut away the earth, miners would use the big wooden boxes depicted in the image to catch the earth which would then be sifted for gold. However, accidents would occur often which would result in the gold washing away and unable to be recovered. It was not a very efficient system because the gold, which was alluvial and thus very fine, would often pass through the sluice box undetected.The search for gold is ingrained into the history of Victoria and therefore, images like this one which portray an open cut sluicing site can reveal important information for society and technology for the date when the photograph was taken. This image is of important historical significance for its ability to convey information about sluicing and the methods used to find gold in the late 1800s and early 1900s. It also shows a location where sluicing was undertook which provides insight into the impact of sluicing on the environment at a time when it was done. Images, like this one, of Australian gold rush history can reveal important information about the social and environmental impact of this period. This image depicts diggers standing in a mining location and therefore, this image has the capacity to reveal or support significant information for researchers studying the fashion and social status of diggers in Australia in approximately 1870. It can also provide information on the landscape of Australia in this period and the impact of mining for gold on both society and the Australian landscape. The Burke Museum is home to a substantial collection of Australian mining photographs which can be used to gain a deeper understanding into life on the gold fields, technology used in mining, the miners themselves and the impact of the gold digging on the environment.Sepia toned rectangular photograph printed on matte photographic paper and mounted on board.[illegible] about 1870 / 97 2514.1 / 2594 30three mile goldfields, goldfields, 1870, 1870 gold, australia, australian landscape, miners, gold miners, diggers, gold diggers, beechworth, victoria, sluice box workers, sluicing, sluice, mining -
 The Beechworth Burke Museum
Photograph - Photograph - Reproduction, W. D. Gibbon, Early 1900s
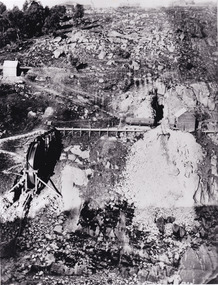
... is ingrained into the history of Victoria and therefore, images like ...This photograph was taken in 1911 at Three Mile Creek, about five kilometers south of Beechworth town. Significant digging took place at this location from late 1855, which led to a flood of workers and stores to follow, though daily earnings were slim compared to the nearby Woolshed site. This remained the case even after workers at Three Mile Creek attempted to protest around Beechworth during an election in November 1855. Three Mile Creek was one of seven significant divisions of the Beechworth Mining District formalised by the Governor-in-Council in 1858, though by the time this photograph was taken, the boundaries of the original seven districts had shifted to create seventeen divisions. The Three Mile Goldfields was a site of rich alluvial gold deposits located about 5km south of Beechworth in Victoria. Today, the location of this gold deposit is called Baarmutha. It was a popular area for gold mining in the 1850s but became largely abandoned by the following decade. In 1865, a man named John Pund (a man second from the left in the back row of this photograph shares this surname) recognized that the area could be potentially rich if a better water supply could be obtained. He secured a 15 year license with three other miners. Within the next five years, these men had constructed 19 km of water race going from Upper Nine Mile Creek to Three Mile Creek. By 1881, these four men had delivered 950,000 gallons to the Three Mile Sluicing area which is depicted in this photograph. Pund would later go into partnership with John Alston Wallace who would become owner of the Star Hotel in Beechworth. The Three Mile sluicing location continued to be operational until 1950. The eleven miners in this photograph are: Back row: Led Guthrie, P. Pund, F. Beel, [Unknown] Miller Front row: Paddy McNamara, J. King, W. Beel, [Unknown] Garland, J. Clarke, J. Ryan, H. Bartsh In the background of the photograph is a huge dirt wall that appears to suffer damage caused by hydraulic sluicing. Hydraulic sluicing is a specialised mining technique that involves directing high pressure water flows at dirt to uncover gold. The technique played a significant role in shaping Beechworth's landscape during the gold rush to create the topography seen today.The search for gold is ingrained into the history of Victoria and therefore, images like this one which portray an open cut sluicing site can reveal important information for society and technology for the date when the photograph was taken. This image is of important historical significance for its ability to convey information about sluicing and the methods used to find gold in the late 1800s and early 1900s. It also shows a location where sluicing was undertook which provides insight into the impact of sluicing on the environment at a time when it was done. Images, like this one, of Australian gold rush history can reveal important information about the social and environmental impact of this period. This image depicts diggers standing in a mining location and therefore, this image has the capacity to reveal or support significant information for researchers studying the fashion and social status of diggers in Australia in approximately 1911. It can also provide information on the landscape of Australia in this period and the impact of mining for gold on both society and the Australian landscape. The Burke Museum is home to a substantial collection of Australian mining photographs which can be used to gain a deeper understanding into life on the gold fields, technology used in mining, the miners themselves and the impact of the gold digging on the environment.Black and white / sepia rectangular reproduced photograph printed on glossy photographic paper mounted on board.beechworth, beechworth museum, mining, mining team, three mile creek, sluicing, hydraulic sluicing, photography, gold sluicing, gold mining, pund mining -
 The Beechworth Burke Museum
Photograph - Photograph - Reproduction, 1890-1900
... is ingrained into the history of Victoria and therefore, images like ...The photograph appears to depict the of the entrance to the Rocky Mountain Tunnel. The Rocky Mountain Tunnel runs from opening of the tunnel, underneath the Beechworth town, to the Gorge. This tunnel drained the excess water from the upper Spring Creek Goldfield to allow for mining access in the area. The Rocky Mountain Co. blasted through the granite rock to create the original 400ft-long tunnel in 1859, but between 1867 and 1871, the Rocky Mountain Gold Sluicing Co. widened and extended it. At its completion, it measured 14ft deep, 6ft wide, and almost half a mile long. The mining surveyor at Beechworth called it 'without doubt, the greatest undertaking of the kind in the colony'. When the company became the Rocky Mountain Extended Gold Sluicing Co. in the mid-1870s, they continued the tunnelling work. The work was reportedly vital to mining being able to continue at Beechworth and may have established world records in tunnelling through hard rock. The entrance at the Gorge side of the tunnel can be seen from the Beechworth Gorge Walk. The tunnel continues to be an outfall drain for the lake and the town.The search for gold is ingrained into the history of Victoria and therefore, images like this one which portray an open cut sluicing site can reveal important information for society and technology for the date when the photograph was taken. This image is of important historical significance for its ability to convey information about sluicing and the methods used to find gold in the late 1800s and early 1900s. It also shows a location where sluicing was undertook which provides insight into the impact of sluicing on the environment at a time when it was done. The Burke Museum is home to a substantial collection of Australian mining photographs which can be used to gain a deeper understanding into life on the gold fields, technology used in mining, the miners themselves and the impact of the gold digging on the environment.A black and white rectangular reproduced photograph printed on matte photographic paper.7814beechworth, beechworth museum, burke museum, australian museum, mining, rocky mountain mining co., rocky mountain mining company, mine, mining company, rocky mountain mine, mine entrance, rocky mountain, gold, gold mining -
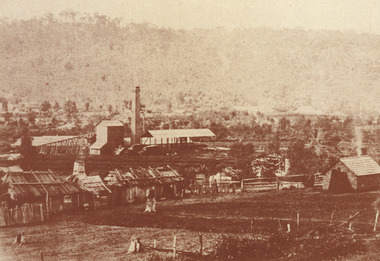 The Beechworth Burke Museum
Photograph, est. 1860-1875
... Beechworth itself. The search for gold is ingrained into the history ...In 1875, the Rocky Mountain Extended Gold Sluicing Company Ltd was created, utilising the previous Rocky Mountain claim for the area near Lake Sambell. The company employed A.L Martin to survey an area for a tunnel underneath Beechworth and Johnson Stephens to dig it. The tunnel was built at a rate of 40 feet a month and eventually measured 800 metres. The tunnel was a true accomplishment both in the present and during the 19th century. It was considered to be a marvelous engineering feat. Beechworth is renowned for its hydraulic sluice method of mining. This involved soil being exposed to torrents of water from high-pressure hoses. From 1876 until its closure in 1921, the mine produced an astounding 47,926 ozs of gold. Companies like this were the source of income for many Chinese gold-diggers who sought to make their fortune on the goldfields of Beechworth. During the height of the rush, the town had around 7,000 Chinese inhabitants living on the outskirts of town as they were not permitted to live within Beechworth itself.The search for gold is ingrained into the history of Victoria and therefore, images like this one which portrays an open-cut sluicing site can reveal important information for society and technology for the date when the photograph was taken. This image is of important historical significance for its ability to convey information about sluicing and the methods used to find gold in 1910. It also shows a location where sluicing was undertaken which provides insight into the impact of sluicing on the environment at a time when it was done. This image of the Rocky Mountain mine is historically significant as the mining complex is now non-existent, with the only remains being the tunnel built in 1880 by the company, which was considered one of the greatest engineering feats of the time. The image also provides a first-hand look into the social and cultural networks at play during the 19th century with racial segregation of the Chinese at the 'Chinese Camp', as well as an insight into Beechworth's origins during the Gold Rush.A sepia rectangular photograph printed on matte photographic paper as a postcardReverse: Historic Beechworth / 7792.1 / ROCKY MOUNTAIN MINE / Viewed from the “Chinese Camp”, shown partly in the foreground, we see the central plant of the famous Rocky Mountain Mining Company. This extensive complex, of which nothing remains, was situated between Silver Creek and the present Lake Sambell area. The company was responsible for a tunnel cut through solid bedrock underneath the town of Beechworth and surfacing near the keystone bridge on the Wangaratta side. Completed in 1880 it was declared to be one of the greatest engineering feats in Australia. The tunnel is still basically intact today. / Series by Wooragee Graphics: Historic Beechworth. / COPYRIGHT BURKE MUSEUM / No.72 beechworth, rocky mountain mine, sluicing, gold rush, mining, gold -
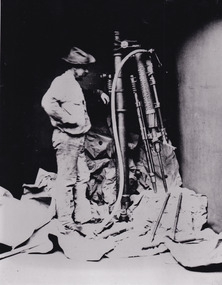 The Beechworth Burke Museum
Photograph - Photograph - Reproduction
... for gold is ingrained into the history of Victoria and therefore ...This photo depicts a man standing next to a large piece of mining equipment identified as a hydraulic chisel (alternative name: drifter dill or power rock drill). This piece of machinery was used in mining to place holes in the walls of a mine which were then filled with dynamite or other explosives for rock blasting or to make holes for plug and feather quarrying. The additional tools to the right of the photograph and in front of the machinery can be identified as either picks or as feather and wedges, the latter of which were used to split stone drilled by the hydraulic or power chisel. Depending on the date of the photograph, which is not provided, this chisel was either powered by electricity or by hydraulics. The following is written on the drill "R.C. FORD'S PATENT No91 / MELBOURNE VICTORIA 1879". The man depicted in this photograph wears a wide brim hat, a loose fitting white shirt and loose pants. He wears boots and has a medium sized dark beard. This attire, along with his locality in the mine and proficiency with the mining equipment, identifies this man as a miner working in this particular, but unidentified, mine. It depicts an instance of hydraulic chiseling which makes this photograph valuable for the study of mining techniques from a date c1880.The search for gold is ingrained into the history of Victoria and therefore, images like this one which portray the types of machinery used in mining can reveal important information for technology and highlight the methods used to break apart the earth in order to obtain access to gold and other precious materials during the period this photograph was captured. Further research into RC Ford can potentially reveal even further information pertaining to this photograph. This image is of important historical significance for its ability to convey information about the methods and machinery used to access gold or mine more in general. It also highlights the size of machinery at the time and allows us to compare this to the size of the person standing besides the machinery to better understand the manpower which would have been required to use and set-up this macinery.A black and white rectangular reproduced photograph printed on matte photographic paper.Reverse: 7816/ copy 1/3gold, sluicing, gold sluicing, hydraulic sluicing, gold and tin mine, mining, gold mining, beechworth, burke museum, melbourne, victoria, hat, mining machinery, machinery, r. c. ford -
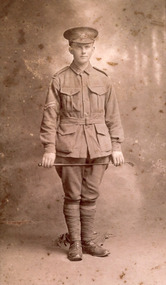 The Beechworth Burke Museum
Photograph, 1916-17
Portrait of William Edward Peach in First World War military uniform, holding a crop in front of his thighs with military kit on the ground behind him. A Beechworth postal employee who enlisted in 1915, this photograph is probably taken in 1917, as he is a corporal in the photo and was promoted to this rank in May 1917. This photograph is of historic significance as it depicts William Edward Peach, a Beechworth postal assistant who enlisted in the Australian Imperial Force (AIF) on his nineteenth birthday, 5 August 1915, which required his parents' permission. He was decorated with the military medal for his courage in battle 4/5 October 1917 at the Battle of Broodseinde Ridge near Ypres, the most successful allied attack of the Third Battle of Ypres (31 July to 10 November 1917), also known as the Battle of Paschendale, which saw the greatest loss of human life during World War One, with almost half a million lives were lost on all sides. According to the recommendation for his military medal, Peach 'displayed conspicuous courage and initiative', taking charge after his platoon commander became a casualty, handling the men 'under heavy fire with great skill'. He also assisted the Company Commander in reorganising their military objectives. The photograph is of social as well as historic significance for the Beechworth community, because it provides a direct link between local, national and international histories in relation to Australia' s participation in one of WWI's best-known battles. The record has strong research potential given the ongoing public and scholarly interest in war, history, and especially the ANZAC legend, which is commemorated annually on 25 April, known as ANZAC Day. Peach is also one of the diarists of WWI, including of this significant period of Australian military history, from 1916 to 18, which can be accessed via the Australian War Memorial. Sepia rectangular photograph printed on gloss Kodak photographic paper mounted on board. Reverse: BMM 8779 item catalogue number pencilled in right-hand bottom corner.military medal, defending australia and victoria, military service, hmat a64 demosthenes, wipers, anzac, burke museum, beechworth, ypres, australian military services, beechworth post office, first world war, wartime, our boys, belgium, flanders fields, ww1, british war medal, victory medal, broodseinde, third battle of ypres -
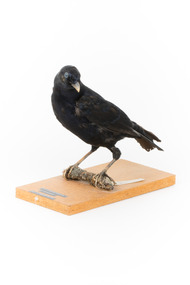 The Beechworth Burke Museum
Animal specimen - Satin Bowerbird, Trustees of the Australian Museum, 1860-1880
The Satin Bowerbird is a medium-sized common bird found from Queensland to Victoria in rainforests and wet sclerophyll forest. During the summer, the diet consists mostly of fruit, with insects as a supplement. They're famous for their courtship behaviour and for decorating stick-structured nests with blue sparkling objects. With it's stunning glossy blue-black feathers, which evolve from green-brown in appearance, this Satin Bowerbird is more than seven years old, and therefore, not any younger as they are often mistaken for females, which are supposed to look like the green catbird. The eyes of this mature male are violet-blue, and the bill is pale bluish white. This specimen is part of a collection of almost 200 animal specimens that were originally acquired as skins from various institutions across Australia, including the Australian Museum in Sydney and the National Museum of Victoria (known as Museums Victoria since 1983), as well as individuals such as amateur anthropologist Reynell Eveleigh Johns between 1860-1880. These skins were then mounted by members of the Burke Museum Committee and put-on display in the formal space of the Museum’s original exhibition hall where they continue to be on display. This display of taxidermy mounts initially served to instruct visitors to the Burke Museum of the natural world around them, today it serves as an insight into the collecting habits of the 19th century.This specimen is part of a significant and rare taxidermy mount collection in the Burke Museum. This collection is scientifically and culturally important for reminding us of how science continues to shape our understanding of the modern world. They demonstrate a capacity to hold evidence of how Australia’s fauna history existed in the past and are potentially important for future environmental research. This collection continues to be on display in the Museum and has become a key part to interpreting the collecting habits of the 19th century.Satin Bowerbirds are medium-sized birds. The adult male has striking glossy blue-black plumage, a pale bluish white bill and a violet-blue iris.Swing tag: National Museum Victoria / Satin Bowerbird / Ptilonorhynchus Violaceus / B2027 / (Vieillot) / W. Shaw Collin. / Mount: PTILONORHYNCHUS / VIOLACEUS / SATIN BOWERBIRD / taxidermy mount, taxidermy, animalia, burke museum, beechworth, australian museum, skin, reynell eveleigh johns, bird -
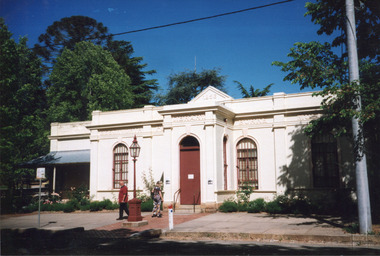 The Beechworth Burke Museum
Photograph, c1999-2000
This photograph taken c1999/2000, depicts the Burke Museum’s granite façade and vestibule entrance. The museum's large red door is closed and there is a white sign is attached to the door. The museum site dates to the 1857 founding of the Beechworth Public Library and Athenaeum by a newly formed Young Men's Association (YMA). In 1863 the museum was dedicated as a memorial to former Beechworth police superintendent (1854-1858) and explorer Robert O’Hara Burke, following Burke’s death from malnutrition on the Burke and Wills expedition in 1861. Funded by the Victorian Government and the Royal Society of Victoria, the officially titled 'Victorian Exploring Expedition' was tasked with being the first European party to traverse Australia from south to north. The Burke Museum holds objects from the famous expedition and explores the multi-layered history of Beechworth and surrounds from the gold rush era to the present.This photograph is historically significant for its depiction of the Burke Museum c1999/2000. The Burke Museum is Australia’s oldest regional museum and part of Beechworth's Historic and Cultural Precinct, one of Australia’s best preserved historic-town sites and a popular tourist destination. Once the government centre for a vast gold fields region, this collection of nationally significant buildings tells the story of how Australia grew and prospered. The frequent use of honey-coloured local granite as a building material, which can be seen in the museum's fabric, gives Beechworth’s historic buildings a distinct and cohesive local character. This photograph captures this distinctive character and may be compared and studied alongside other images of historic buildings in the Burke Museum Photographic Collection.Rectangular colour photograph printed on photographic paper.Reverse: 7031 / Label: Burke Museum / 1999/2000 /burke museum, indigo shire, beechworth athanaeum, beechworth library, beechworth historic building, historic precinct, burke museum exhibition, from the liedertafel to the skating rink, honey-coloured local granite, robert o'hara burke, victorian gold fields, historic towns in victoria, colonial australia, liedertafel, colonial entertainments, beechworth brass band, historic victorian architecture, australia's oldest regional museum, burke and wills expedition, first europeans to cross australia, yound mens associations, beechworth tourism, things to see in beechworth, beechworth historic trail, young men's associations -
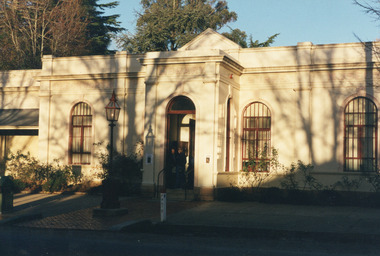 The Beechworth Burke Museum
Photograph, Unknown
This undated photograph depicts two people standing in the vestibule entrance at the Burke Museum, Beechworth. The museum site dates to the 1857 founding of the Beechworth Public Library and Athenaeum by a newly formed Young Men's Association (YMA). In 1863 the museum was dedicated as a memorial to former Beechworth police superintendent (1854-1858) and explorer Robert O’Hara Burke, following Burke’s death from malnutrition on the Burke and Wills expedition in 1861. Funded by the Victorian Government and the Royal Society of Victoria, the officially titled 'Victorian Exploring Expedition' was tasked with being the first European party to traverse Australia from south to north. The Burke Museum holds objects from the famous expedition and explores the multi-layered history of Beechworth and surrounds from the gold rush era to the present.This photograph is historically significant for its depiction of the Burke Museum and Loch Street streetscape. The Burke Museum is Australia’s oldest regional museum and part of Beechworth's Historic and Cultural Precinct, one of Australia’s best preserved historic-town sites and a popular tourist destination. Once the government centre for a vast gold fields region, this collection of nationally significant buildings tells the story of how Australia grew and prospered. The frequent use of honey-coloured local granite as a building material, which can be seen in the museum's fabric, gives Beechworth’s historic buildings a distinct and cohesive local character. This photograph may be compared and studied alongside other images of historic buildings in the Burke Museum Photographic Collection.Rectangular colour photograph printed on photographic paper.Reverse: 3440burke museum, beechworth athenaeum, beechworth library, beechworth historic precinct, robert o'hara burke, australia's oldest regional museum, indigo shire, beechworth athanaeum, beechworth historic building, historic precinct, honey-coloured local granite, victorian gold fields, historic towns in victoria, victoria's high country, colonial australia, beechworth tourism, things to see in beechworth, beechworth historic trail, historic victorian architecture, burke and wills expedition, first europeans to cross australia, young men's associations -
 The Beechworth Burke Museum
Photograph, c1990s
Taken in the 1990’s, the photograph depicts an exhibition in Beechworth featuring a series of shop fronts or a streetscape inspired by the 1850s gold rush to Beechworth. Gold was discovered in the Beechworth area in 1852, leading to a significant rush to the area as diggers and hopeful migrants alike hoped to strike it rich. This gold rush to Beechworth, which was part of a larger and prolonged gold rush to the Victorian colony in the 1850’s, led to significant communal, social, and economic shifts in the area and the colony.This photograph contains historical and social significance, connecting with several themes such as gold mining, making regional centres, and marking significant phases of development for Victoria’s towns. The gold rush of the 1850’s was a significant historical phase for the Victorian colony that led to widespread social, economic, and communal changes as the population of the colony nearly tripled in size. The rush to Beechworth after the discovery of gold in 1852 was one of the earliest gold finds. The photograph depicts an interpretation of store fronts in Beechworth during the 1850’s following the gold rush, providing an example of the historical interpretation of the Beechworth gold rush in the 1990’s. The photograph also demonstrates the enduring importance of Beechworth’s gold rush history to the local community, who continued to demonstrate an interest in the Beechworth gold rush. Colour rectangular photograph printed on photographic paper.Obverse: DANCING EVERY NIGHT 8 P.M-6 A.M/ GOLD DIGGERS ARMS HOTEL/ STAR (illegible)/ SALOON/ EST. 1853/ BEECHWORTH GOLD (illegible)/ J. DAVIDSON/ LICENSE/ BANK OF VICTORIA/ GOLD BUYING OFFICE/ EST. 1856 (illegible) Reverse: 3306 gold rush, beechworth, exhibition, victorian colony, shops, store fronts, streetscape, saloon, gold buyer, hotel, store, bank of victoria, j. davidson -
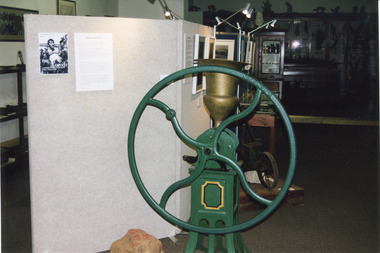 The Beechworth Burke Museum
Photograph, Estimate 1999
This photograph was taken in 1999 at 'The Harvest' exhibition at the Burke Museum for members of Baking Industry Victoria. The grain mill, manufactured by B.M. Purshouse in Wolverhampton, England, was of special interest.This photograph is of primary social significance to the Beechworth community because it depicts a 19th-century grain mill, manufactured by B.M. Purshouse in Wolverhampton, England, which was probably used at flour mills in the Ovens District, such as that at Tarrawingee, which opened in 1866. The purchase of agricultural machinery such as the grain mill accompanied the expansion of agriculture, including grain growing, in the Ovens District following the gold mining prosperity of the 1850s. This photograph may be of interest to researchers who wish to observe an image of the Purshouse grain mill.Colour rectangular photograph printed on matte AGFA photographic paper.Obverse: THE HARVEST / THE HARVEST Reverse: 2854beechworth, burke museum, promoting settlement, living in country towns, making regional centres, preserving traditions and commemorating, farming and agriculture, exhibitions, burke museum exhibitions, building local economies, transforming land, victorian agricultural history, marketing and promoting agricultural products, the harvest exhibition, harvests, victorian gold rush towns, grain mill, bm purshouse, crops and grain, baking industry victoria -
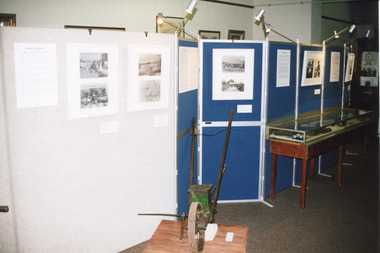 The Beechworth Burke Museum
Photograph, 1999
Taken in 1999, the photograph depicts a section of “The Harvest” exhibition held at the Burke Museum between May 1st and June 20th 1999 as part of the Baking Industry Victoria. In the foreground is believed to be an old seed distributor. The grain mill made by B. M. Purshouse in Wolverhampton, United Kingdom, was of special interest during the exhibition. This photograph is of historical and research significance, connecting with various themes such as farming, adapting to diverse environments, and the promotion of settlement in Victoria. The photograph is an example of an exhibition held at the Burke Museum in 1999, demonstrating the communal interest of Beechworth in their farming history. The photograph contains a strong interpretive capacity as it demonstrates the importance of farming to Beechworth and Beechworth's history, revealing the enduring connection between the local community and the surrounding land. The historical and research value of the photograph is further enhanced by the depiction of historical farming machinery, providing a means for future generations to view historical machines used in farming. Colour rectangular photograph printed on photographic paper.Reverse: 2857burke museum, the harvest, exhibition, baking industry, grain mill, b. m. purshouse, beechworth, baking industry victoria, seed, seed distributor -
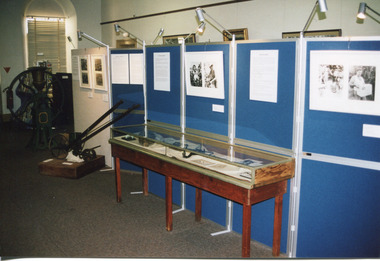 The Beechworth Burke Museum
Photograph, 1999
Taken in 1999, the photograph depicts a section of “The Harvest” exhibition held at the Burke Museum between May 1st and June 20th 1999 as part of the Baking Industry Victoria. In the foreground is depicted a seed distributor. The grain mill, which can be seen in the background, was made by B. M. Purshouse in Wolverhampton, United Kingdom, and was of special interest during the exhibition. This photograph is of historical and research significance, connecting with various themes such as farming, adapting to diverse environments, and the promotion of settlement in Victoria. The photograph is an example of an exhibition held at the Burke Museum in 1999, demonstrating the communal interest of Beechworth in their farming history. The photograph contains a strong interpretive capacity as it demonstrates the importance of farming to Beechworth and Beechworth's history, revealing the enduring connection between the local community and the surrounding land. The historical and research value of the photograph is further enhanced by the depiction of historical farming machinery, providing a means for future generations to view historical machines used in farming.Colour rectangular photograph printed on photographic paper.Reverse: 2855burke museum, the harvest, baking industry, baking industry victoria, seed distributor, grain mill, b. m. purshouse, beechworth, exhibition -
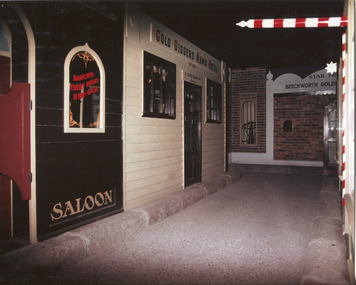 The Beechworth Burke Museum
Photograph, c1990
... that is ingrainded in many towns and communities of Victoria. This photograph ...Taken in the 1990's, this photograph depicts a row of shop fronts in the 'Street of Shops' exhibition in the Burke Museum in Beechworth. This exhibition was created and opened in 1979 and was intended to reflect and imitate a historic peirod in the town's past. The time period decpicted is that of the Gold Rush which swept through many Victorian towns from the 1850's onwards. For the town of Beechworth, the gold rush began in 1852, when gold was discovered in Spring Creek, drawing in many new residents seeking to make a fortune and transforming a once remote town into a bustling centre brimming with hope and opportunity. By 1857, the town contained over 200,000 residents and with this, the need for more amenities and intsitutions arose. Multiple churches, banks, schools, shops, hospitals and other essential buildings appearing over the years. The wealth acquired through the gold rush is largely responsible for the vast development of the town and many of its significant buildings which still remain to this day. This photograph also highlights the significance of this type of exhibition, providing a new mode of experiencing and learning about the past. The street depicts the many supporting trades and industries that arose from the mass migration during the gold rush. The creation of the Street of Shops in 1979 was envisioned by Roy Harvey who was the curator at the time, with the intention of recreating an authentic feel to the environment while collecting from the community to accurately portray the multiculturalism that is ingrainded in many towns and communities of Victoria. This photograph contains historical significance as it relates to and portrays an especially important period of time within Beechworth and Victoria's history. The gold rush phenomena ushered in a wave of hope and prosperity for citizens and immigrants alike. It provided many with the opportunity to strike it rich, while the town prospered and grew in many ways. This widespread development that accompanied the gold rush occured throughout Victoria and holds great historical importance when recording the social, economic and communal developments that occured throughout the time period which gave way to the beloved towns and communities we know today. Beechworth itself is acknowledged as Victoria's best-preserved gold mining town and deserves recognition of its significance. it also showcases the great significance of social develpment and globalization that occured throughout the state during this period. Coloured rectangular photograph printed on matte photographic paper and unmounted. Obverse: Dancing every night 8pm-6am [mirror] / Gold Diggers Arms Hotel façade / Star / Beechworth Gold / J. Davidson / Saloon Reverse: 3306 beechworth, burke museum, street of shops, gold rush, indigo shire gold rush, 1850s beechworth, burke museum exhibitions, saloon, gold buyer, hotel, historical streetscape, gold rush immigration -
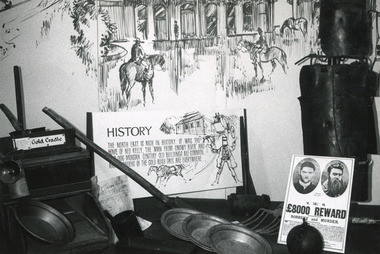 The Beechworth Burke Museum
Photograph, 1997
This photograph is recorded as having been taken in the North East Victoria Regional Tourist Authority, Wangaratta and depicts an exhibition display of items and interpretative labels associated with the Kelly Gang. The display was reportedly laid out as part of a Vic Tour Stamp, with items from the Burke Museum Collection.This photograph is of social significance due to its connection with the Burke Museum as well as the Kelly Gang. The Kelly Gang story is integral to the formation of the Australian identity and highlights the Irish oppression during the 1880s. Ned Kelly is an Australian icon, mythologised in Australian literature, art, folklore and history, and the Kelly Gang permeates Australia's national consciousness. The significance of the Burke Museum is also highlighted here, as the photograph shows the importance of the Kelly story to the Beechworth area and local identity, as well as its significance within the museum collection. The photograph is of strong research potential due to its depiction of the Kelly Gang history in Australia and its presentation of a historical museum exhibition which toured from Beechworth to other Victorian locations. With a depiction of the exhibition and associated label, the photograph provides insight into how the language and historical interpretation of Kelly Gang has developed, and how cultural and social opinions which are often shaped by exhibition displays, have shifted. Black and white rectangular photograph printed on matte photographic paper.Obverse: Gold Cradle / History / Claim 1835 / The north east is rich in history. It was the home of Ned Kelly, the 'Man from Snowy River' and (???) dog Mogan. Century old buildings are common and (???)nders of the gold rush days are everywhere / V. R. / £8000 Reward / Robbery and Murder / (indeterminate) Reverse: The historical display laid out in VICTOUR / 1997 3135 / North East Victoria/ Regional Tourist Authority/ P.O. Box 250/ Wangaratta. 3577 /BMMA03324burke museum, ned kelly, kelly gang, museum collection, exhibition, display, gallery, museum, exhibit -
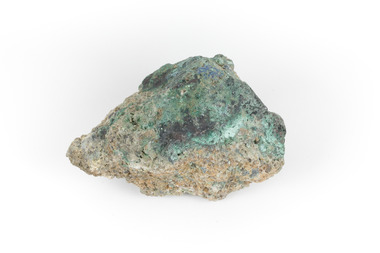 The Beechworth Burke Museum
Geological specimen - Malachite, Unknown
Malachite is typically found as crystalline aggregates or crusts, often banded in appearance, like agates. It is also often found as botryoidal clusters of radiating crystals, and as mammillary aggregates as well. Single crystals and clusters of distinguishable crystals are uncommon, but when found they are typically acicular to prismatic. It is also frequently found as a pseudomorph after Azurite crystals, which are generally more tabular in shape. This particular specimen was recovered from the Burra Burra Copper Mine in Burra, South Australia. Otherwise known as the 'Monster Mine', the Burra Burra Copper Mine was first established in 1848 upon the discovery of copper deposits in 1845. Within a few short years, people from around the world migrated to Burra to lay their claim in the copper economy. By April 1848 the mine was employing over 567 people and supporting a population of 1,500 in the local township. Up until 1860, the mine was the largest metals mine in Australia, producing approximately 50,000 tonnes of copper between 1845 to its closure in 1877. The Burra Burra Mine was also famous for a number of other specimens, including; crystalline azurite, cuprite, and botryoidal and malachite. Malachite is considered a rare gemstone in that the original deposits for the stones have been depleted leaving behind very few sources. In addition, the use of Malachite as gemstones and sculptural materials remains just as popular today as they were throughout history. It is quite common to cut the stone into beads for jewellery. The fact that Malachite has such a rich colour and one that does not fade with time or when exposed to light makes it particularly rare. This specimen is part of a larger collection of geological and mineral specimens collected from around Australia (and some parts of the world) and donated to the Burke Museum between 1868-1880. A large percentage of these specimens were collected in Victoria as part of the Geological Survey of Victoria that begun in 1852 (in response to the Gold Rush) to study and map the geology of Victoria. Collecting geological specimens was an important part of mapping and understanding the scientific makeup of the earth. Many of these specimens were sent to research and collecting organisations across Australia, including the Burke Museum, to educate and encourage further study. A solid hand-sized copper carbonate hydroxide mineral with shades of blue and light green throughout. burke museum, beechworth, indigo shire, beechworth museum, geological, geological specimen, mineralogy, burra, burra burra mine, south australia, malachite, malachite specimen -
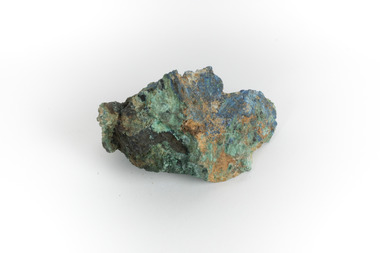 The Beechworth Burke Museum
Geological specimen - Malachite, Unknown
Malachite is a green copper carbonate hydroxide mineral and was one of the first ores used to make copper metal. Malachite has been utilised as a gemstone and sculptural material in the past as its distinctive green color does not fade when exposed to light or after long periods of time. Malachite is formed at shallow depths in the ground, in the oxidizing zone above copper deposits. The material has also been used as a pigment for painting throughout history. This particular specimen was recovered from the Burra Burra Copper Mine in Burra, South Australia. Otherwise known as the 'Monster Mine', the Burra Burra Copper Mine was first established in 1848 upon the discovery of copper deposits in 1845. Within a few short years, people from around the world migrated to Burra to lay their claim in the copper economy. By April 1848 the mine was employing over 567 people and supporting a population of 1,500 in the local township. Up until 1860, the mine was the largest metals mine in Australia, producing approximately 50,000 tonnes of copper between 1845 to its closure in 1877. The Burra Burra Mine was also famous for a number of other specimens, including; crystalline azurite, cuprite, and botryoidal and malachite.Malachite is considered a rare gemstone in that the original deposits for the stones have been depleted leaving behind very few sources. In addition, the use of Malachite as gemstones and sculptural materials remains just as popular today as they were throughout history. It is quite common to cut the stone into beads for jewellery. The fact that Malachite has such a rich colour and one that does not fade with time or when exposed to light makes it particularly rare. This specimen is part of a larger collection of geological and mineral specimens collected from around Australia (and some parts of the world) and donated to the Burke Museum between 1868-1880. A large percentage of these specimens were collected in Victoria as part of the Geological Survey of Victoria that begun in 1852 (in response to the Gold Rush) to study and map the geology of Victoria. Collecting geological specimens was an important part of mapping and understanding the scientific makeup of the earth. Many of these specimens were sent to research and collecting organisations across Australia, including the Burke Museum, to educate and encourage further study. A solid hand-sized copper carbonate hydroxide mineral with shades of yellow, blue, and light green throughout.geological, geological specimen, burke museum, indigo shire, malachite, malachite specimen, burra burra mine, burra, south australia, australian mines, mines, monster mine -
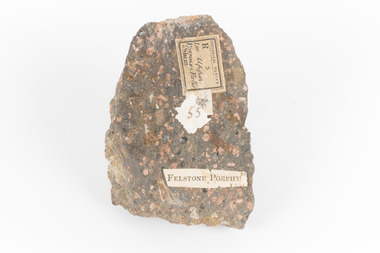 The Beechworth Burke Museum
Geological specimen - Porphyritic Rhyodacite
This specimen was recovered from the Nigretta Falls (previously named the Upper Wannon Falls), Victoria. The falls are fed by the Wannon River that has its head waters in the Grampians mountains. Approx. 10km upstream of the Wannon Falls, Nigretta is a multi-channel segmented cascade of smaller drops and bounces guided by patterns of joints in a much older (Devonian) rhyolitic volcanic rock. Both the Wannon and Nigretta Falls are iconic landscape features, entrenched in the history and identity of the region. These falls are particularly rare as they are the product of volcanic activity, which is unique in the context of the Volcanic Plain of Victoria. Waterfalls of this capacity are generally associated with the Uplands areas of Victoria, rather than the edges of the Volcanic Plain. This specimen is part of a larger collection of geological and mineral specimens collected from around Australia (and some parts of the world) and donated to the Burke Museum between 1868-1880. A large percentage of these specimens were collected in Victoria as part of the Geological Survey of Victoria that begun in 1852 (in response to the Gold Rush) to study and map the geology of Victoria. Collecting geological specimens was an important part of mapping and understanding the scientific makeup of the earth. Many of these specimens were sent to research and collecting organisations across Australia, including the Burke Museum, to educate and encourage further study. A solid, dark grey mineral specimen with pale terracotta coloured inclusions. Rhyodacite is a volcanic rock intermediate in composition between dacite and rhyolite. Rhyodacites form from rapid cooling of lava relatively rich in silica and low in alkali metal oxides.GEOLOGICAL SURVEY / R / S 55 FELSTONE PORPHYburke museum, beechworth, indigo shire, beechworth museum, geological, geological specimen, porphyritic rhyodacite, lava, nigretta falls, upper wannon falls, dacite, rhyolite, volcanic geology -
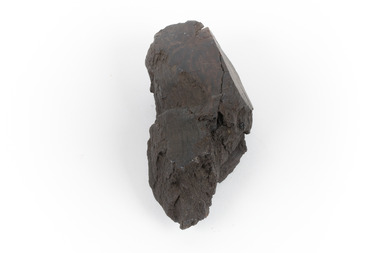 The Beechworth Burke Museum
Geological specimen - Brown coal
This particular specimen was recovered from the Lal Lal Coal and Iron Mine in Victoria, 19km from Ballarat. Brown Coal was discovered here in 1857, just alongside the Geelong to Ballarat Railway line. This discovery of lignite (brown coal) was the first in Victoria, which would bring important benefits to the region and state, both of which had previously been reliant on coal imports. In the 1860s, iron ore was found just 5km from Lal Lal, and the area was converted into an Iron Ore Mine. The Lal Lal Iron Mining Company took over operations in 1874, who then peaked iron production in 1884. This mine continued operations until June 1884, when the blast furnace was extinguished and never recommenced. The blast furnace at Lal Lal is considered one of the most important and highly significant sites ion early industrial history in Australia, as it is the only remaining best furnace from the nineteenth century in the Southern Hemisphere. The furnace ruins are 17 metres high, and are clearly visible today on Iron Mine Road, Lal Lal, near the Bungal Dam. This specimen of Lignite (brown coal) is significant, as it was mined from the area where brown coal was first discovered in Victoria, leading to an important and controversial future of the mining and use of brown coal in this State. The Victorian Heritage Database has listed the Lal Lal Coal Mine with local significance, with their Statement of Significance stating: "The Lal Lal coal mine is historically significant as the site of the first discovery of lignite (brown coal) in Victoria, and one that promised important benefits to regional and state industries that were reliant on coal imports at the time. The significance of the stie is reduced by the poor state of preservation of the coal mining and processing fabric". This specimen is part of a larger collection of geological and mineral specimens collected from around Australia (and some parts of the world) and donated to the Burke Museum between 1868-1880. A large percentage of these specimens were collected in Victoria as part of the Geological Survey of Victoria that begun in 1852 (in response to the Gold Rush) to study and map the geology of Victoria. Collecting geological specimens was an important part of mapping and understanding the scientific makeup of the earth. Many of these specimens were sent to research and collecting organisations across Australia, including the Burke Museum, to educate and encourage further study.A hand-sized light-weight, soft and combustable sedimentary rock specimen, that is dark brown in colour. The specimen has jagged edges, as though parts of the rock have crumbled away. Brown coal, or Lignite, is formed naturally from compressed peat, and is typically found in natural basins. The stages to the formation of coal ('coalification') begin with plant material and wood, which will decay if it is not subjected to deep burial or heating, and turn into Peat. Peat, when sufficiently compressed naturally, will turn into Brown Coal (Lignite), and finally into Black Coal (sub-bituminous, bituminous and anthracite). Each successive stage has a higher energy content and lower water content. It is brownish-black in colour. Brown Coal has a high moisture content, between 50 and 75 percent, and a low carbon content. Some Brown Coals may be stratified, with layers of plant matter, which means little coalification has occurred beyond the peat natural processing stage. When Brown Coal is submerged in dilute nitric acid or boiling potassium hydroxide solution, it reacts to produce a reddish solution, of which higher-ranked coals do not. When brown coal is pulverised and burned in boilers, the steam is used to drive turbines, which generates electricity. It is the lowest rank of coal, as when burned, it creates a relatively low heat content, which in turn does not create a great output of steam. burke museum, beechworth, indigo shire, beechworth museum, geological, geological specimen, mineralogy, brown coal, brown coal specimen, lignite, lal lal, lal lal coal mine, lal lal iron mine, ballarat, blast furnace