Showing 1531 items matching "high street road"
-
 Vision Australia
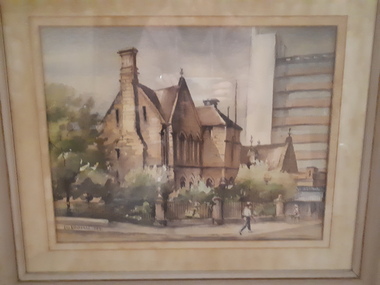
Painting - Artwork, Lin Ditchfield, Sydney Industrial Blind Institution in William Street, 1971
Watercolour by Lin Ditchfield of the Royal Blind Society of New South Wales (formerly the Sydney Industrial Blind Institution) in William Street, Sydney. Built in 1880, the Edmund Blacket designed building was eventually sold in 1971. Located on the corner of William Street and Boomerang Place, the site was keenly sought by developers as the city landscape transformed into high rise office builidings, as evidenced in the background of this painting.1 water colour in beige frameLin Ditchfield 1971royal blind society of new south wales, lin ditchfield -
 Charlton Golden Grains Museum Inc
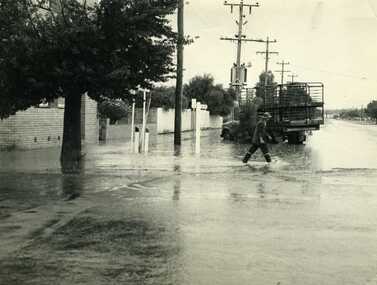
Photograph, Cameron, Ian, 1972 Flash Flood, Jan 1972
1972 Flash flood, cnr of High St and Armstrong St, Charlton.B/W photograph of 1972 flash flood Corner High Street & Armstrong Streets. Man crossing road through flood water.flood, charlton, armstrong street -
 Charlton Golden Grains Museum Inc
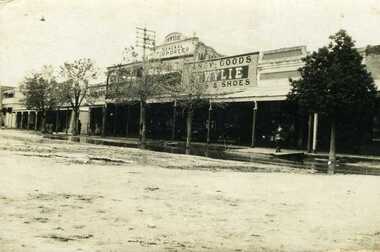
Photograph, Flood 1911, c. 1911
High St Charlton showing W. Wylie General Store, 1911 floodSepia photo of High St Charlton showing W. Wylie General Store and Golden Fleece Hotel after the 1911 flood. Two children standing on footpath with water on the road in front of them.charlton, wylie's building, flood, high street -
 Charlton Golden Grains Museum Inc
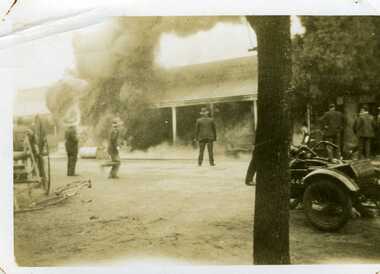
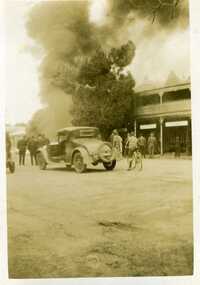
Photograph, Petrol bowser fire c.1930, c.1930
Spectators at petrol bowser fire, cnr of High & Armstrong Sts Charlton c. 1930Small black & white snapshot of petrol bowser fire. three men on the road, several men under tree, There is also a wagon, bicycle and motorbike with sidecar.fire, charlton, armstrong street -
 Charlton Golden Grains Museum Inc
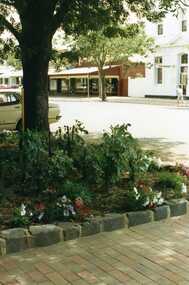
Photograph, Pollard, Jenny, Garden bed in front of Tippett's shop, c.1989
High St Charlton 1989. Garden bed in front of Tippett's Haberdashery and Furniture Shop (later House & Home). Across the street is the Westpac Bank and Arundell's Shoe Shop. The photo was taken by Jenny Pollard for the Shire of Charlton 1989.Colour photograph of garden bed showing stone edging and brickpaving. Large tree and petunias growing in bed. Westpac Bank across the road.tippett, arundell, westpac, high street, charlton -
 Charlton Golden Grains Museum Inc
Photograph, Petrol bowser fire c.1930, c.1930
Petrol bowser fire c. 1930 at garage cnr High & Armstrong St CharltonSmall balck & white snapshot of petrol bowser fire. a crowd of onlookers including a boy on a bicycle and a car on the road.fire, charlton, armstrong street -
 Charlton Golden Grains Museum Inc
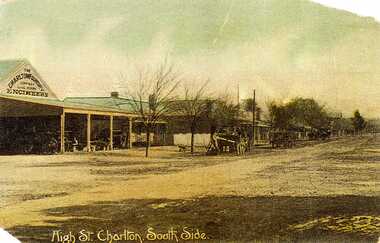
Postcard, High St. Charlton, South Side, c.1907
Charlton Foundry 1907 owned and operated by Dabrons. Had 20-30 employees.Copy of hand coloured post card. Shows High St Charlton on the south side looking west. Includes Foundry and residence, man unloading a cart. Another wagon is in front slightly down the street. Road is unpaved. One of a set of postcards taken in 1907. Writing at the bottom of the card reads High St. Charlton, South Side.dabron, charlton, foundry, high street, business, industry -
 Melbourne Tram Museum
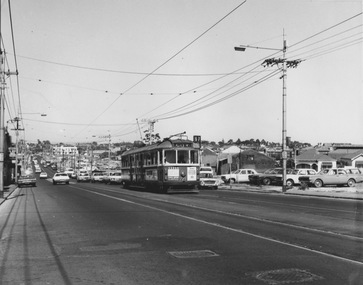
Photograph - W5 class 721 High Street, St Kilda, 1970s
Photograph of W5 class 721 city bound on route 67 ascends an uphill grade on a busy thoroughfare with numerous motor vehicles parked on vacant allotments along the southwest edge of the roadway. This is likely High Street, St Kilda at the commencement of road-widening works in the early 1970s. These works were to widen the narrow High Street between the wider Brighton Road and the newly rebuilt St Kilda Junction. Properties on the northeast edge of High Street remained. In these years the Carnegie route number changed from 4 to 67.Yields information about increase in motor vehicle traffic Black and white photograph with no notetram 721, route 4, route 67, high street st kilda, st kilda junction, road widening, brighton road, w5 class -
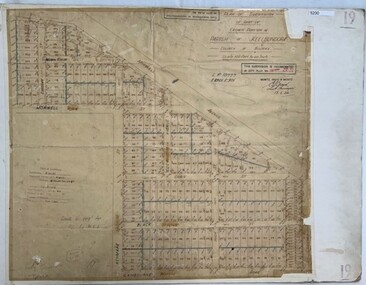 Greensborough Historical Society
Poster - Planning Document, City of Heidelberg, Subdivision Plan # 19 - Parish of Keelbundoora, Crown Portion 16, Watsonia "Black's subdivision', 1924
Subdivision Plan # 19 - Parish of Keelbundoora, Crown Portion 16, Watsonia "Black's subdivision". This subdivision plan includes proposed street names which were later changed (e.g. Morwell Street (not Morwell Avenue) now called Greenwood Drive). Includes Lambourn Road, Black Street, Grace Street, Eden Avenue, High Street, Kenmare Street, Morwell Avenue, Greensborough Road, Mundy Street, Ladd Street.An example of hard copy subdivision plans from the Greensborough area. Mainly from the Shire of Diamond Valley era (1964-1994).Plan (single sided) mounted on heavy card. Stamped and handwritten Council permissions, dates and other details. subdivision plans, city of heidelberg, greensborough, main street greensborough, shire of heidelberg, watsonia, black family -
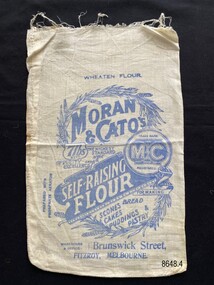 Flagstaff Hill Maritime Museum and Village
Textile - Flour bag - Moran & Cato's
The flour bag is an example of packaging from the grocery store, Moran & Cato's. Moran & Cato's were a large chain of grocery stores operating from the late nineteenth century to the mid twentieth century across Victoria, Tasmania and New South Wales. The address on the flour bag is for the warehouse (wholesale depot) of the business which was a significant building in Brunswick St, Fitzroy.The flour bag provides a snapshot of packaging for a well known grocery store of the early twentieth century. The advertisement on the back for 'Cleaned Fruits' is an example of advertising that highlighted important facts relevant to that time (e.g. "latest Special Machinery" and "with running water").Small calico flour bag for self-raising flour (7lb) supplied from Moran & Cato's in Brunswick Street, Fitzroy, Melbourne. The front of the bag includes not only the detail of the business but ideas for baking, images of wheat and claims as to its excellence. The back of the bag has a written advertisement for 'Cleaned Fruits' another product of the company.Front - Wheaten Flour, Moran & Cato's, Trade mark The M & C Brand Registered, 7lbs Nett, The Highest Standard of Purity and Excellence, prepared with phosphate aerator, Self-raising Flour, For making scones bread cakes puddings & pastry, Warehouse & Office- Brunswick Street, Fitzroy, Melbourne Back - Moran & Cato's, Cleaned Fruits are Perfection, (advertising text), The Same High Quality, The Same Prices at all our Branches.flagstaff hill maritime museum and village, great ocean road, shipwreck coast, calico, domestic object, textile, food storage, moran & cato's, flour bag, self-raising flour -
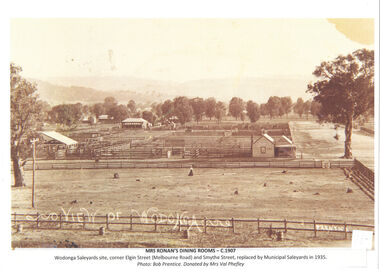 Wodonga & District Historical Society Inc
Photograph - Mrs Ronan's Dining Rooms
Before the construction of the Wodonga Municipal Saleyards which opened in 1935, there were four private saleyards which operated in Wodonga. They were owned by Gippsland & Northern Co-Operative Co. Ltd., Dalgety & Co., New Zealand Loan & Mercantile Agency Co. Ltd. and Younghusband Ltd. When Mrs Julia Ronan nee Arundel lost her husband John to tuberculosis in 1906, she quickly decided to move from their small farm into Wodonga with her 3 children. She was granted the lease of the ground she needed to establish her eating house at one shilling per year in a shed on the Dalgety's saleyard block. Two established merchants Albert Schlink and John Whan and butcher Jack Garrett agreed to allow her credit which enabled her to open Ronan's Dining Rooms at the Saleyards. It was often a challenging environment, with drovers, and horse- breakers, auctioneers and bushmen bringing huge mobs of cattle and horses to the saleyards. Stories of the premises include the unexpected arrival in the passage of a lively bullock which finished up on the girls' bed. Mrs Ronan persevered and beat all obstacles to finally move from the saleyards to the Wodonga Coffee Palace in High Street, beside the railway gates in 1921.This item is significant because it captures one of the private saleyards which operated prior to the establishment of the Wodonga Municipal Saleyards.A black and white image of the sale yards at Wodonga c1907 with the dining room operated by Mrs Ronan on the right.Beneath image: View of Wodonga Mrs Ronan's Dining c1907 Wodonga Sale site, Corner Elgin (Melbourne Road) and Smythe Street, replaced by Municipal Saleyards in 1935. Photo: Bob Prentice, Donated by Mrs Val Phefleywodonga saleyards, mrs julia ronan -
 Bendigo Historical Society Inc.
Document - LONG GULLY HISTORY GROUP COLLECTION: HISTORICAL GUIDE TO BENDIGO
Brochure with an invitation to visit Historical and Mining Museum in Mechanic's Institute, Eaglehawk. Drawing of poppet legs on the front with The Royal Historical Society of Victoria Bendigo Branch. Historical Guide to Bendigo including Self Tours of Bendigo's Famous Goldfields. Forward by John Hattam. Contributors are: H Biggs, Miss L J Parry, A Richardson, L C Bennetts and Edith Checcucci. Credits - The Bendigo Advertiser, Cambridge Press, Mines Department (Bendigo) and J R W Purves. Items include Bendigo Tramways Compiled by H Biggs, Early Bendigo Hotels Compiled by L C Bennetts, Eaglehawk Compiled by H Biggs, Noted Events Compiled by June Parry, The Bendigo Post Office Compiled by LC Bennetts, The Bendigo Goldfield. Introduction to Field and Guide to Some Famous Mines Compiled by A Richardson. Photos include: Pall Mall Bendigo, Ravenswood Homestead, An Early Battery at Kangaroo Flat, Historic High Street Golden Square, The Lonely Grave, Battery Tram c1888, Steam Tram c1892, Electric Tram c1903, The New Chum Railway Golden Square, United Hustlers and Redan Mine Sandhurst Road, Central Deborah Violet Street, Deborah Mine Quarry Hill, Deborah Mine 1000 ft level, First Motion Winding Engine at Central Deborah, Victoria Hill Area, and Looking south from New Chum Hill in 1890's. Also 11010.254, 255, 268, 288a, 288b, and 289.bendigo, history, long gully history group, the long gully history group - historical guide to bendigo, the royal historical society of victoria bendigo branch, historical and mining museum, mechanic's institute eaglehawk, librarian mechanic's institute, miss j parry, john hattam, h biggs, a richardson, l c bennetts, edith checcucci, bendigo advertiser, cambridge press, mines department (bendigo), j r w purves, mr a o'keefe, shire of marong, the sandhurst and eaglehawk tramway company, mr j taylor, mr j hanson, the bendigo tramway company, electric supply company, coliban water suply, juvenile industrial exhibition, geo lansell, cr a harkness, salvation army, vine and fruitgrowers association, decentralisation league, constable thomas ryan, miners association, art gallery, post office, miss broadfoot, bendigo hospital, opera company, bendigo development league, victorian women's franchise league, ana hall, the bendigonian, law courts, temperance hall, trades hall (old wardens court), roman catholic cathedral, shamrock hotel, bendigo philosophical society, old bendigonian society, bendigo fire brigade, bendigo volunteers to south african war, hawkins, porcupine inn, criterion hotel, royal hotel, bendigo hotel, black swan hotel, gillies bakery, hibernian hotel, sandhurst hotel, freemasons hotel, courthouse hotel, shamrock hotel, governor hotham, heffernan & crowley, new chum railway, victoria quartz, shenandoah, shamrock mine, hercules no 1 (originally pearl east), hercules new chum (late pearl), carlisle mine, mr arblaster, meurer, sandhurst bee, benevolent asylum, bendigo gas company, a lloyd, coliban water supply scheme, cr w v simons, eaglehawk council, j mouat, sir henry barkly, agricultural and horticultural exhibition, sandhurst and eaglehawk boroughs, cr john mcintyre, latham and watson's mine, galatea (model ship), st paul's church of england, rev g p despard, fine arts exhibition and exposition, bendigo rifle association, strathfieldsaye shire hall, corporate high school, bendigonian society, richard andrews, easter fair, g aspinall, j burnsides, sir h manners sutton, beehive stores, mining exchanges, bendigo water works, city family hotel, bendigo united friendly society medical institute and dispensary, benevolent asylum, jewish synagogue, masonic hall, school of mines, mr j h abbott, australian natives association, royal princess theatre, albion hall, central state school, high school, gravel hill state school, electricity commission, james mouat, warring natives, the rocks, joseph crook, gold discovery, marong district roads board, camp hotel, mr charles sherratt, city of bendigo, mt alexander north run, grice and heape, ravenswood, gibson and fenton, mrs john kennedy, mrs patrick farrel, mr j a paton, mr lachlan mclachlan, theatre royal, sir charles and lady hotham, harney's bridge, e j ennor, sandhurst fire brigade, the health of towns act, mr townsend, cornish & co, bendigo pottery, bendigo agricultural society, pike or pyke, baby health centre, sandhurst post office, government survey office, sandhurst trustees company, mr h b briston, savings bank, telegraph office, sir henry brougham lock, hon sir john nimmo, sandhurst public offices, the new prince of wales mine, new prince of wales no 2, the whip and jersey, lansell's big 180, new chum and victoria mine and battery, new chum railway, koch's pioneer, south new moon, catherine reef united, new moon, virginia mine, south belle vue, new chum railway, central nell gwynne, north nell gwynne, ironbark mine, new chum syncline, hercules, herculesl energetic, roberts & sons, harkness & co, horwoods, great southern, ulster, carlisle, cornish, new st mungo, duchess tribute, south devonshire, hopewell mine, saxby mine, mcnair & co, mr king, bourke and wills, sandhurst hotel, the dascombe nugget, victoria nugget, r r haverfield, ballerstedt, rae, wittscheibe, lazarus, cave and amos, bendigo amalgamated goldfields, bendigo mines limited, the deborah, north deborah, central deborah, the new red white and blue consolidated (big blue), union, lansell's new red white and blue 9later no 3 shaft), h harkness & co, thompson & co, central deborah, lansell's bendigo battery, north red white and blue, central red white and blue, roberts and sons, little 180 (originally lansell's 180 no 2 shaft), john brown knitwear factory, south ironbark originally victoria consols east shaft, ironbark (originally ironbark east shaft), manchester arms hotel, wattle gully mine chewton, hercules, old wheal-owl, central nell gwynne, gold mines hotel, bendigo city council, jack barker, the new chum syncline, the courier of the mines, telegraph office, bendigo cemetery, white hills cemetery, eaglehawk cemetery, kangaroo flat cemetery, new moon, suffolk united, north new moon, fortuna hustlers, buckell & jeffrey's, royal hustlers reserve no 2 (city and park shafts), jonathan harris, latham and watson, great hustlers, great extended hustlers, j hustler, latham, watson, tribute or pups shaft, bendigo's worst mining disaster, hustlers reef (old hustlers), hustlers reef no 1, lansell's comet, the old comet (cooper's claim), united hustlers and redan, comet hill state school, k k shaft, north or new hustlers (agnew hustler), johnson's no 3, south johnson's, lansell's sandhurst needle, cleopatra needle top, british american, collman and tacchi, south virginia, saddle reefs and spurs, pall mall bendigo, ravenswood homestead, an early battery at kangaroo flat, historic high street golden square, the lonely grave, battery tram c1888, steam tram c1892, electric tram c1903, teh new chum railway golden square, united hustlers and redan mine sandhurst road, central deborah violet street, deborah mine quarry hill, deborah mine 1000 ft level, first motion winding engine at central deborah, victoria hill area, looking south from new chum hill in 1890's -
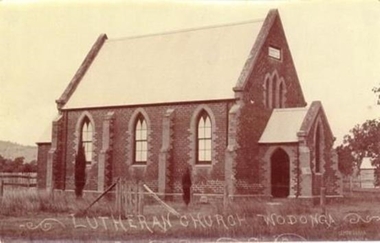 Wodonga & District Historical Society Inc
Photograph - Saint John's Lutheran Church, Wodonga
From the mid-1860s families of German ancestry arrived in the Wodonga district, travelling in groups from South Australia. The majority of these people were of the Lutheran religion. At first there was no Lutheran pastor or church in the area and they held services under the gum trees or in their homes once they had been built. The early arrivals included the Haeusler, Klinge, Bartel, Rothe and Paech families. They were later joined by members of the Muller, Lange, Pumpa, Lobbe, Heckendorf, Zeinert, Schubert, Schuster, Schubert and Terlich families amongst others. The first Lutheran Church was built in Havelock Street, Wodonga and was dedicated in 1875. This building was used for approximately 90 years until it was demolished and replaced by a temporary building and then a second church which was dedicated in 1978. The Ovens and Murray Advertiser on 4th August 1874 reported "The Rev. Goessling pastor of the German Lutheran Church, Gerogery has laid the foundation stone of the new church for the members of his denomination residing at Wodonga, in accordance with the rights of the church. The building was to be 30 feet by 20 feet and 14 feet high, of brick with white facings and Gothic windows. There was to be a porch and vestry, one at either end, measuring 8 feet by 10 feet". Plans were initiated to build a new church from the late 1990s. After many years of planning and hard work, the last service in the Saint John’s Lutheran Church in Havelock Street was held on Sunday 7th May 2023 and a new Church was constructed. From 14th May 2023 the Parish held its worship services in Luther Hall at Victory Lutheran College in Drage Road, West Wodonga. The new Saint John’s Church was consecrated on 18 August 2024.This photo is significant because it depicts the original Lutheran Church in Wodonga.A black and white photograph of an old stone church building.Lutheran Church Wodongawodonga churches, lutheran church wodonga -
 Bendigo Historical Society Inc.
Document - ALBERT RICHARDSON COLLECTION: UNITED HUSTLERS AND REDAN MINE
Four-page typed document plus location map. The United Hustlers and Redan mine was located in the North Bendigo, Long Gully area on the Hustlers line of reef. The lease was 153 acres and included Holdsworth, Holmes, Havilah Roads and Wood Street. The Redan shaft was 1,830ft and the South or K.K. Shaft was 1,960 ft. Poppet legs steel 71 ft high. Features of the plant are described including the engine house, winding engine, air compressor, boilers, fuel, winding ropes.bendigo, mining, united hustlers and redan mine -
 Bendigo Historical Society Inc.
Document - ALBERT RICHARDSON COLLECTION: GREAT EXTENDED HUSTLERS, TRIBUTE
Four-page typed document with information on the Great Extended Hustlers mine on the Hustlers line of reef. Formed in 1865 closed down in 1925. The mine was located a little to the south of the intersection of Hustlers Road and Anderson Street, North Bendigo. The mine plant and overall history of the mine is detailed in the document. The poppet head was steel, 70 ft high. Rear legs set on top of low mullock heap. Gold was first discovered here in 1853 by Jonathan Harris, who was later joined by two coloured men to whom he later sold out. They in turn sold out to a one-armed man, J. Hustler and Messrs. Latham and Watson. The poppet heads of the Great Extended Hustlers were later removed, and the extra 15 ft of the front lets cut to the Stanfield mine at Long Gully. From there to the Wattle Gully Mine at Chewton.bendigo, mining, great extended hustlers -
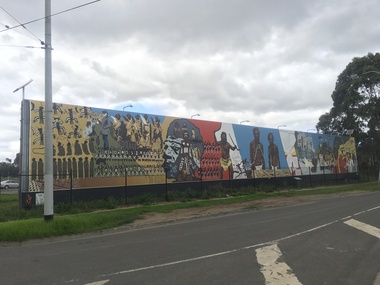 Darebin Art Collection
Artwork, other, Megan Evans, Millie Yarran, Ian Johnson, Les Griggs, Elaine Trott and Ray Thomas, Koori Mural, 1983
The Koori Mural was designed by artist Megan Evans in consultation with a committee from the Aborigines Advancement League consisting of the late Lin Onus, the late Molly Dyer, the late Ron Johnson and the late Elizabeth Hoffman. It was painted by Evans and renowned Aboriginal artist Ray Thomas along with Ian Johnson, Millie Yarram, Les Griggs, Elaine Trott and a number of volunteers. The mural has considerable historical and cultural significance and refers to the experiences of the the Aboriginal and Torres Strait Islander communities, from early colonial history to the more recent struggle for social justice. In 2014 the mural was replicated onto a vinyl banner and installed at its current site. The Northcote Koori Mural was originally located on Council land in High Street, Northcote, opposite the Northcote Town Hall. A huge, free-standing wall was built specifically to accommodate the mural which was painted on site. The land on which the mural was housed was later sold, however, and the mural was relocated to the Aborigines Advancement League in St. Georges Road, Thornbury. Conservation work in 2014 and original panels decommissioned and vinyl banner hung in its place (with Total Outdoor Media). In 2015 solar lights were installed along with landscaping to the front of the mural and a plaque depicting the history on the mural. -
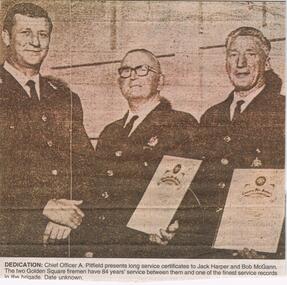 Bendigo Historical Society Inc.
Newspaper - JENNY FOLEY COLLECTION: DEDICATION
Golden Square Fire Brigade was established in High Street, Golden Square, in 1881. A New station building was opened in 2025 in Speciman Gully Road.Bendigo Advertiser '' the way we were'' from 2002. Dedication: Chief Officer A. Pitfield presents long service certificates to Jack Harper and Bob McGann. The two Golden Square firemen have 84 years' service between them and one of the finest service records in the brigade. Date unknown. The clip is in a folder.newspaper, bendigo advertiser, the way we were -
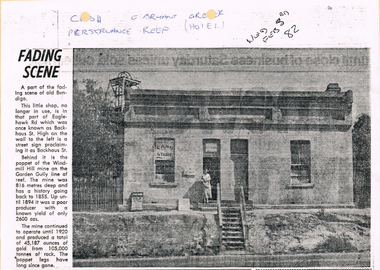 Bendigo Historical Society Inc.
Newspaper - LONG GULLY HISTORY GROUP COLLECTION: E BRYANT - GROCER
BHS CollectionCopy of a newspaper article titled Fading Scene. Photo shows a building with a stairway leading down to the road in front of it and a lady standing in the doorway. One window has Cash Store printed on it and there are two placards leaning on the building to the left of the lady. Each side of the building are shrubs and picket fence. In the background to the left is the poppet of the Windmill Hill Mine on the Garden Gully line of reef. It is in that part of Eaglehawk Rd which was once known as Backhaus St. High on the wall to the left is a street sign proclaiming it as Backhaus St. Written above the photo is C-sh, E Bryant, Gro-er (there are holes through the words), Perseverance Reef (Hotel). Wed Feb 3rd 82. Article is mounted on yellow card which is mounted on purple card and laminated.bendigo, history, long gully history group, the long gully history group - e bryant - grocer, windmill hill mine, garden gully line of reef, e bryant, perservance reef (hotel) -
 Lakes Entrance Historical Society
Postcard - Alpine Road High Country Victoria
Black and white postcard showing a section of the Alpine Road the route from Omeo to Bright across the High Countrytownship, topography, roads and streets -
 Lakes Entrance Historical Society
Photograph - 133 Myers St. Lakes Entrance, 1970
This tank provided good pressure for the house and septic tankColour photograph of cottage at 133 Myer Street showing stainless steele milk vat on high tank stand to collect water from town water supply Lakes Entrance Victoriabusinesses, roads and streets -
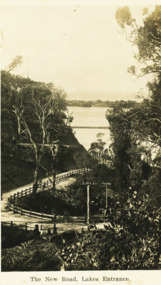 Lakes Entrance Historical Society
Postcard - The New Road Lakes Entrance, 1922 c
Also three postcards showing different views of the road around Jemmys Point 05281.1, .2 and .3Black and white postcard showing view of new alignment of the Princes Highway on Jemmys Point and part of the original high steep road approaching Lakes Entrance VictoriaThe New Road Lakes Entrance waterways, roads and streets -
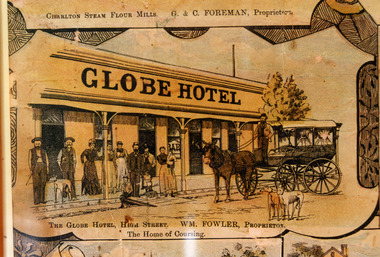 Charlton Golden Grains Museum Inc
Photograph - Lithograph, Rider & Mercer, Views of Charlton, c.1988
The Globe Hotel built 1874-75 for John Walsh was destroyed by fire and rebuilt in ?. Leased by William Fowler in 1891 who had been in Charlton since 1877. Copy of Lithograph of Charlton buildings. Large sign on building 'GLOBE HOTEL'. Eight men and women and three children standing in front of building, a horse and wagon also in front of the building with a man standing in the wagon holding the reins. Two greyhounds on the road.The Globe Hotel, High Street. WM. Fowler, Proprietor. The Home of Coursing.lithograph, globe hotel, fowler william, walsh john -
 Federation University Historical Collection
Postcard - photographic, High Street, Salisbury, Wiltshire, England
Salisbury is a cathedral city in Wiltshire, England, and the only city within the county. It is the 2nd-largest settlement in the county with a population of 40 302, between Chippenham at 35 800 and Swindon at 209 156. (Wikipedia)Black and white photographic postcard showing a road lined with three storey buildings. chatham-holmes family collection, salisbury, postcard -
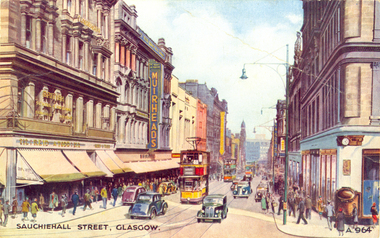 Federation University Historical Collection
Postcard - colour, Sauchiehall Street, Glasgow
auchiehall Street /ˈsʌxihɔːl/ is one of the main shopping/business streets in the city centre of Glasgow, Scotland. Along with Buchanan Street and Argyle Street, it forms the main shopping area of Glasgow, containing the majority of Glasgow's high street and chain stores.[1] Although commonly associated with the city centre, Sauchiehall street is over 11⁄2 miles (2.5 km) long, finally meeting Argyle Street in the West End, in front of the Kelvingrove Museum, where they form Dumbarton Road which continues through Partick. The two streets run parallel through the city centre, before starting to conjoin westward of the M8 motorway at Charing Cross. (Wikipedia)Colour postcard of a street with cars, double decker buses and four storey buildings. The street is Sauchiehall Street, Glasgow, Scotland.chatham-holmes family collection, glasgow, scotland, double decker bus -
 Ithacan Historical Society
Photograph, MacRobertson Girls' High School, 2015
This is a photograph of the steps leading up to the main entrance of the MacRobertson Girls' High School taken on the occasion of an event to honour the late Loula Rodopoulos (nee Raftopoulos) who attended in the late 1950s. Since the opening of the school on its present site in Albert Road in 1934 a number of young women Ithacan of descent have attended the school.A coloured photograph of a 1930s cream brick school building. -
 Wodonga & District Historical Society Inc
Photograph - State Bank of Victoria, Wodonga
The Title for the land on which this building stands was granted on 27 August 1857 and the land was bought by Keith Field and A. Maitland. It stood on 1 / 2 acre of land with 250 lengths down South Street and 200 lengths along Sydney Road. The 1 / 2 acre block on the northern side was also purchased by the same buyers. The State Savings Bank was built in 1915, just three years after the State Savings Bank of Victoria was established. It was branch number 731. The building served as a bank until about 1970. It is now owned and used as an office by a local law firm. It is a single storey rendered masonry building with a parapet concealing the roof. Key features of the High Street facade are horizontal bands of masonry, timber windows outlined with moulded details and ornamentation accentuated the door. A more modern branch was opened in a central location in High Street. The State Bank of Victoria was taken over by the Commonwealth Bank in 1990. These images record the premises of a bank which served the Wodonga community and businesses for many years.3 photos of the State Bank of Victoria in High Street Wodonga at various points in its history.state bank, wodonga businesses, financial institutions wodonga -
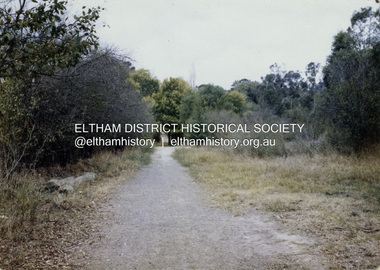
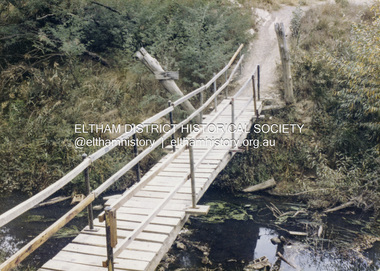 Eltham District Historical Society Inc
Colour Print, David Taylor, Footbridge over the Diamond Creek, Dalton Street Lane, Eltham, c.1976
The laneway past Skipper's house, an extension of Dalton Street on the western side of Main Road, has long been a regular route for Eltham High School students heading to and from school. Its present day name is Wingrove Park Trail. The footbridge over the creek was regularly subjected to damage or washed away during floods. A more substantive and flood resistant footbridge has since been erected. david taylor collection, eltham, wingrove park trail, dalton street lane, dalton street footbridge -
 Eltham District Historical Society Inc
Colour Print, David Taylor, Dalton Street Lane, Eltham, c.1976
The laneway past Skipper's house, an extension of Dalton Street on the western side of Main Road, has long been a regular route for Eltham High School students heading to and from school. Its present day name is Wingrove Park Trail. The footbridge over the creek was regularly subjected to damage or washed away during floods. A more substantive and flood resistant footbridge has since been erected. david taylor collection, eltham, wingrove park trail, dalton street lane, dalton street footbridge -
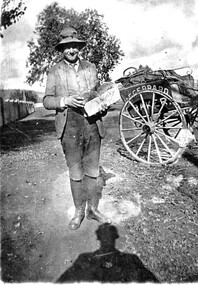 Wodonga & District Historical Society Inc
Photograph - James Gerrard, Baker in Wodonga, c1920
According to an advertisement in the Wodonga & Towong Sentinel on Friday 22 August 1913, James Frank Gerrard, formerly of Wangaratta, purchased a bakery owned by Mr. E. B. Atwood. The premises had been built in 1905. In approximately 1920 he was joined in Gerrard’s Bakery by his son James Frank Peter Gerrard who is depicted in this image. In 1923 James Sr became a traveller for Messrs W & P Smith North Eastern Flour Mills in Wangaratta, Victoria. His son continued to operate the bakery until 1925 when it was sold to T. S. Jones from Euroa. The premises continued to function as a bakery run by a succession of proprietors including F. Blackwell, P. J. Hide and the Birrell Brothers. In 1964 the premises and three neighbouring businesses were demolished to make way for Wodonga Home Furnishers. This building in turn was demolished in 1998 to facilitate the realignment of Elgin Street and High Streets. James Sr. and his wife Annie had a family of 12 children. He continued to work for W & P Smith until two years before his death in December 1944, in his 80th year. Their family included two other sons, Leslie Frank Sinclair Gerrard, who for some time ran a Watchmaker and Jeweller’s business in Wodonga and Charles Francis Alexander Gerrard who operated a Hairdresser and Tobacconist shop, also in Sydney Road, Wodonga. James Frank Peter Gerrard, pictured in this image, continued to live in the Albury-Wodonga area. He operated a variety of businesses including a wood yard and a taxi and bus service operating between Albury, Wodonga and Tallangatta. He died in Albury on 3rd December 1954.This image is significant because it documents an early businessman in Wodonga.A black and white image of a man holding a loaf of bread. His baker's cart is in the background.On side of cart:- J. F. GERRARD, BAKERearly wodonga businesses, bakeries wodonga, gerrard family -
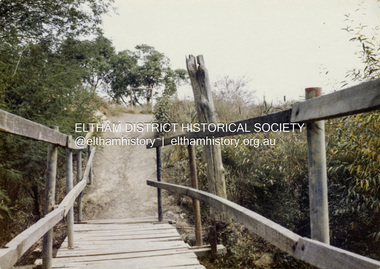 Eltham District Historical Society Inc
Colour Print, David Taylor, Footbridge over the Diamond Creek, Dalton Street Lane, Eltham. View heading west towards Bell Street, c.1976
The laneway past Skipper's house, an extension of Dalton Street on the western side of Main Road, has long been a regular route for Eltham High School students heading to and from school. Its present day name is Wingrove Park Trail. The footbridge over the creek was regularly subjected to damage or washed away during floods. A more substantive and flood resistant footbridge has since been erected. david taylor collection, eltham, wingrove park trail, dalton street lane, dalton street footbridge