Showing 32508 items
matching c.
-
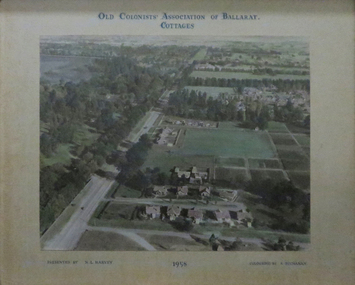 Old Colonists' Association of Ballarat Inc.
Photograph, N.L. Harvey, Old Colonists' Association of Ballarat Cottages, 1958, 1958
Aerial photographs of the Old Colonists' Association of Ballarat Cottages at Charles Anderson Grove. One of the first objectives of the Association was "to provide the shelter of a hose for those Pioneers of the Goldfields whom the reverses of fortune have deprived of the means of procuring the comforts of life in their declining years." The first home at Charles Anderson Grove was built in 1925. Before that time the Association provided relief for needy pioneers. relief included monthly monetary payments, loads of firewood, medical assistance and distribution of Christmas bosed of groceries to deserving pensioners, and in some cases payment of burial costs. ::a) The dominant purpose of the Association is to give public benevolent relief as a charity, but providing independent living accommodation in our Retirement Village for person in need who are over 65. ::b) To raise funds by membership subscription, commercial and residential rents, donations, gifts and voluntary work, for the purpose of providing direct relief of poverty, distress, misfortune or helplessness. ::c) To maintain the important heritage and ongoing viability of the Old Colonists' Association. (Revised Rules of the Old Colonists' Association of Ballarat Inc., 2016) old colonists' association of ballarat, charles anderson grove, retirement village -
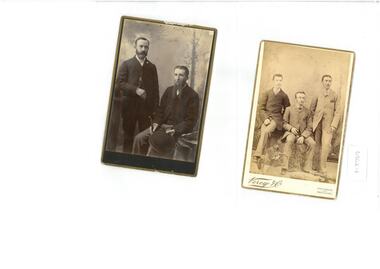
 Southern Sherbrooke Historical Society Inc.
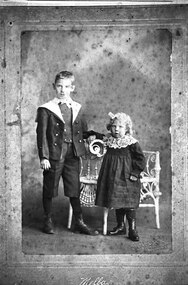
Photograph - Cissie and Percy Johns
B&W studio portrait of Percy and Minnie Agnes (Cissy) Johns, children of Edwin Johns of Selby. Percy is about 10 years old. He is wearing what appears to be a sailor suit comprising a dark, double-breasted jacket with a deep, pale collar which is squared off at the back, a dark waistcoat buttoned to the neck, with a pale bow and collar showing, and dark knee-length pants over dark stockings and ankle boots. The jacket is undone. Cissy looks to be about 3 or 4. She is wearing a dark, knee-length dress with a yoke, long sleeves, and a light, wide lace collar. She has dark stockings and calf-length buttoned boots. She has a bow in her hair. The children are standing in front of an ornate wicker chair with one arm resting on the arm of the chair. The name 'Melba' is written on the cardboard frame around the photo, and 'Melba [illegible but presumably '& Co.'] Melbourne' is embossed on the bottom right corner of the photo. The original photo is badly foxed. Dated c.1905. -
 Ballarat Tramway Museum
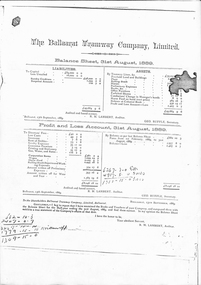
Document - Photocopies, Public Records Office of Victoria, BTCo Financial Reports, 1994
Photocopies of the half yearly financial reports for the Ballaarat Tramway Company Limited, giving details of the Balance sheets, the Profit and Loss statement and the Auditors reports (first three only) for the periods 31/8/1889 to 31/8/1890 (three number) and 28 Feb 1897 to 31 August 1902. Photocopies arranged by Alan Bradley c 1990 from files of Company Records held in the Public Records Office of Victoria. Item Year 1250.1 - 8/1889 1250.2 - 2/1890 1250.3 - 8/1890 1250.4 - 2/1897 1250.5 - 8/1897 1250.6 - 2/1898 1250.7 - 2/1899 1250.8 - 8/1899 1250.9 - 2/1900 1250.10 - 8/1900 1250.11 - 2/1901 1250.12 - 8/1901 1250.13 - 2/1902 1250.14 - 8/1902* All reports single page and formally typeset and printed. *1250.14 - Profit and loss account hand copied and type following being missed in the photocopying by the PROV. Rest of statement, typed and copied over two pages.trams, tramways, annual reports, ballaarat tramway company, horse trams, financial statements -
 Ballarat Tramway Museum
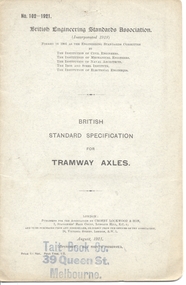
Book, British Engineering Standards Association and Australian Commonwealth Engineering Standards Association, "Tramway Axles", 1921 to 1933
.1 - Book - 16 pages + light grey cover, issued by the British Engineering Standards Association, British Standard Specification for Tramway Axles. Dated August 1921. Has standard Number 101-1921. Provides materials specification, testing and an index. Inside the front cover is a typed quarto sheet, that has been folded into four referring to the standard and "Amendments suggested to clauses 1, 8, 9 , 12 and 13". .2 - Book - 24 pages + grey covers, - Tentative Australian Standards specification for Tramway Axles, published by the Australian Commonwealth Engineering Standards Association, No. C 44 - 1927. Provides materials specification, testing and an index. .3 - Book - 28 pages + light grey cover, issued by the British Engineering Standards Association, British Standard Specification for Tramway Axles. Dated August 1921. Has standard Number 102-1930. Provides materials specification, testing and an index. On front cover and inside cover has amendments and a note that the British standard had been endorsed by Australian Standard C44 in Dec. 1933..1 - has the stamp of the "Tait Book Co. 39 Queen St. Melbourne" .2 - has in the top right hand corner, the ESCo Ballarat company stamp and the date "31 May 1928" .3 - on front cover stamp " Library Copy M.E.S." and a library label noting that the book is on loan from the Melbourne library and is dated 22/1/1935. Provides materials specification, testing and an index. On the lower edge has the stamp of the "Tait Book Co. 39 Queen St. Melbourne".trams, tramways, tramways, electrical equipment, axles -
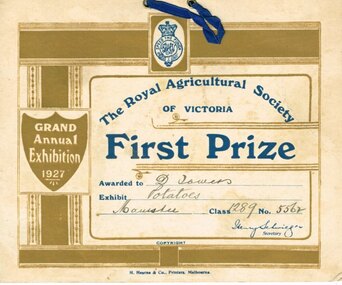 Otway Districts Historical Society
Prize, H. Hearne & Co. Pty. Ltd, Royal Agricultural Society of Victoria, Prizes, 1927-1933, 1927-1933
Cards. The Royal Agricultural Society of Victoria, Grand Annual Exhibition: (a) 1927; First Prize; D. Towers; Potatoes, Class 1289 No.5562, Henry Schwieger, Secretary. (b) 1927; Second Prize; D. Towers; Potatoes, Carman No 3, Class 1271 No.5437; Henry Schwieger, Secretary. (c) 1929; Third Prize; D. Towers; Potatoes, Carman No 1, Class 1329 No.6186; Henry Schwieger, Secretary. (d) 1930; Third Prize; D. Towers; Potatoes, Class 1349 No.61217; Henry Schwieger, Manager. (e) 1931; Third Prize; D. Towers; Potatoes, Class 1352 No.6456; Henry Schwieger, Manager. (f) 1932; First Prize; D. Towers; Potatoes (1 standard sack), Class 1367 No.7380; Louis Monod, Secretary. (g) 1933; Second Prize; Mrs L. Towers; Potatoes, Carman No 3, Class 1352 No.7434; Louis Monod, Secretary. (h) 1933; Second Prize; Mrs L. Towers; Potatoes, Class 1356 No.7445; Louis Monod, Secretary.the royal agricultural society of victoria; rasv; show; exhibition; potatoes; -
 Bendigo Historical Society Inc.
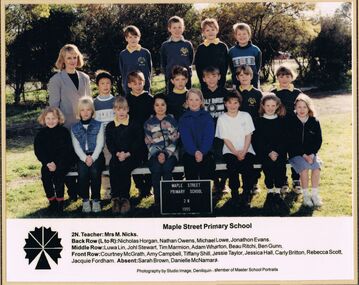
Photograph - MAPLE STREET PRIMARY SCHOOL COLLECTION: STAFF AND GRADE PHOTOS 1995
Colour photographs of staff and grades Maple Street Primary School, Golden Square, 1995. a. Grade 2N Teacher M. Nicks; b. staff photo: back row Debbie Kent, Fiona Day, Val Hall, Anne Hocking. Middle row Sandra Lacey, Maylene Rodda, John Waterson, Frank Gargiulo, Bob Elliott, Anita whittle, Front row Marge Gregsion, Marj Stevens, Wendy Neve, Sue Hoile, Meredith Nicks, Lynne Colbert, Annie Clark. C. Grade PH Teacher A. Hocking; Grade 3;/4W Teacher G. Wood; e. Grade 2R Teacher M. Rodda; f. Grade 5/6G Teacher F. Gargiulo, V. Hall; Grade 1D Teacher M. Gregeon, grade 1K Teacher D. Kent; i. Grade 5/6L Teacher S. Lacey. J. Grade 5/6M Teacher S. Hoile, A. Clark (RH side) k. Grade 3/4E Teacher E. Elliott; Grade 3/4D Teacher F. Daybendigo, education, maple street primary school -
 Bendigo Historical Society Inc.
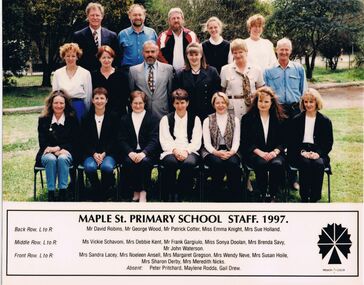
Photograph - MAPLE STREET PRIMARY SCHOOL COLLECTION: GRADE AND STAFF PHOTOS 1997
Colour photographs: Maple Street Primary School, Golden Square 1997. a. Staff photo back row: David Robins, George Wood, Patrick Cotter, Emma Knight, Sue Holland. Middle row Vickie Schavoni, Debbie Kent, Frank Gargiulo, Sonya Doolan, Brenda Savy, John Waterson. Front row: Sandra lacey, Noeleen Ansell, Margaret Gregson, Wendy Neve, Susan Hoile, Sharon Derby, Meredith Nicks. B. Prep 1/N 1997; c. Year 3/4C Teacher Patrick Cotter; d. Grade 3/4K Teacher Debbie Kent; e. Prep 1D Teacher Sharon Derby, f. Grade 5/6G Teacher Frank Gargiulo, g. Grade 3/4W Teacher George Wood, h. Grade 5/6L Teacher Sandra Lacey, I Grade 5/6S; j. Grade 1/2G Teacher M. Gregson; k. Grade 1/2RS Teacher Ms Schavoni. Photos have student names on bottom of image.bendigo, education, maple street primary school -
 Bendigo Historical Society Inc.
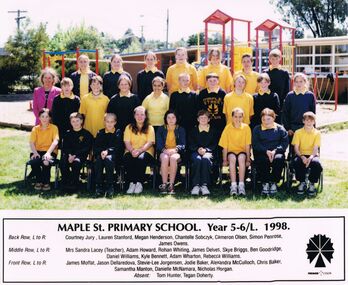
Photograph - MAPLE STREET PRIMARY SCHOOL COLLECTION: GRADE PHOTOS 1998
Colour photographs of staff and grades at Maple Street Primary School, Golden Square in 1998. a. Grade 5/6L Teacher Sandra Lacey; b Grade 3/4W Teacher George Wood; c. Pre N Teacher Meredith Nicks; d staff photo, left to right back row Sue Hoile, George Wood, Peter Pritchard, Sonya doolan, Sandra Lacey. Middle row Debbie Kent, Patrick Cotter, David Robins, Brenda Savy, Noeleen Ansell, Sharon Derby. Front row Maylene Rodda, Wendy Neve, Margaret Gregson, Barbara Reidy, Gail Drew, Meredith Nicks, Evelyn Bruhn. e. Grade 1G Teacher M. Gregson; f. Prep 1K Teacher Debbie Kent; g. Year 2MR Teacher Maylene Rodda, Evelyn Bruhn; h. Grade 2BR Teacher Barbara Reidy; i. Grade 3/4A Teacher Noeleen Ansell; j. Year 5/6C Teacher Patrick Cotter; k. Year 4/5S Teacher Sandra Savy;bendigo, education, maple street primary school -
 Bendigo Historical Society Inc.
Ephemera - Misc. Legal Documents and Receipts, 1950s - 1970s
BHS CollectionMisc. Legal Documents and Receipts 1. Itemised list of expenses relating to the deceased estate of M. J. Robertson; along with letter from Herring Bathurst and Bruce Barristers and Solicitors, High St Maryborough to Mrs Z. M. Lummis, 266 McKenzie St Golden Square on 20 March 1964. 2. Letter from Herring Bathurst and Bruce Barristers to Mrs Lummis enclosing a cheque, 6th April 1964. 3. Letter from Tatterall Sweep Consultation to Mrs Lummis advising of $100 win on 5th May 1972 4. Plan of house from C R Catto, builder, private bag, Inglewood Jan 12 1953 5.Invoice from Bendigo Rural Electrics, R H Wilkinson Manager, Killians Walk, Queen St, Bendigo, to Mrs Lummis, 1 off Hoover Keymatic $499 6. Mock-up of a cheque (Bank of Good Fortune) wishing a Happy Xmas and a Jolly New Year - Value 365 Happy Days) 7. Invoice for furniture. history, bendigo, merle lummis collection, c r catto builder inglewood, bendigo rural electrics, r h wilkinson, tattersalls, herring bathurst and bruce barristers and solicitors maryborough -
 Bendigo Historical Society Inc.
Photograph - CABINET CARD COLLECTION: CARDS
Six cabinet cards produced by Bendigo Photographers. All subjects unnamed. Black and white/sepia. A. 1. Photographer F De Kock & Co Cnr Mitchell and King Streets. Subject is two men, one standing and one seated, dressed formally in jackets, ties and pants. One is holding a hat, while the other's hat is by his elbow. 2. Photographer is Verey & Co Castlemaine and Daylesford. Subject is three men, two seated and one standing, dressed formally in coats and pants. The middle man is holding a cane. B 1. Photographer is Bartlett Bros View Place Sandhurst. Subject is a woman seated in a dining chair with a book on a table. She is dressed in a patterned long sleeved dress adorned with ribbons and lace. 2. Photographer is Bartlett Bros View Place Sandhurst. Subject is a woman posed in profile head and shoulders. C 1. Photographer is Bartlett Bros View Place Sandhurst. Subject is an infant, seated on a fur and dressed in a knitted outfit. 2. Photographer is Bartlett Bros View Place Sandhurst. Subject is a man head and shoulders shot.photograph, portrait -
 Bendigo Historical Society Inc.
Document - BASIL MILLER COLLECTION: TRAMS, c1963
Newspaper clipping. Bendigo Advertiser. Now! It's Cheaper to Travel By Tram! New economy city fares. Bendigo: From Barnard St. to Mollison St. or return... From Mundy Street to Wattle Street or return... 4d. (Children and Pensioners - 2d.) From Pall Mall : to Barnard Street, to Mollison Street, to Mundy Street, to Wattle and High Streets. 3d. (Children and Pensioners - 2d.) Beats walking every time! Advertisement on reverse: Sandhurst Football Club. Notice is hereby given that the Annual General Meeting of the above Club will be held in the Club rooms Queen Elizabeth Oval, on Friday, 29th November, 1963, at 7.45 pm. lists business to be conducted. B. c. Masterson, Hon. Secretary, 7 View Street, Kangaroo Flat. Advertisement: Genuine Car Sales, 243 Barnard Street, Bendigo. Phone 3-6530 - After hours 3-5592. 1956 Ford perfect Sedan. Full price 185 pounds or Dep. 60 pounds. Advertisements for Gleneagles Private Hospital and Dad and Dave Café.organization, business, bendigo trams -
 Melbourne Tram Museum
Document - Notice, Melbourne & Metropolitan Tramways Board (MMTB), "Reconstruction of Burnley Railway Bridge in Swan Street, Jun. 1969
Set of four notices regarding trackwork and reconstruction printed on foolscap paper. Signed by R. C. Drummond as Traffic Manager. .1 - Notice No. D1507 "Reconstruction of Burnley Railway Bridge in Swan Street - Sunday 13th April 1969" giving details of tram and bus rearrangements, procedure at the bridge for buses. .2 - Notice No. D1508 - regarding Burnley St rail bridge and the single line working that applied during the bridge reconstruction period - dated 10/4/1969. .3 - Notice No. D1546 about reconstruction of tram tracks in Collins St between Swanston and Elizabeth on Sunday 22 June 1969. Two pages, has been stapled in the top left hand corner. Gives bus and tram rearrangements. Dated 18/6/1969. .4 - Notice No. D1550 about reconstruction of tram tracks in Collins St near King St for 29 June 1969.. Two pages, has been stapled in the top left hand corner. Gives bus and tram rearrangements. Dated 24/6/1969.trams, tramways, mmtb, trackwork, burnley, swan st, signals, collins st -
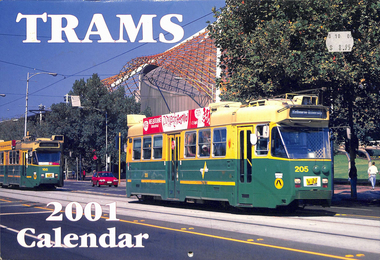 Melbourne Tram Museum
Ephemera - Calendar, Topmill Pty Ltd, "Trams - 2001", 2000
Wall Calendar - heavy card covers, 12 gloss art pages inside, titled "Trams - 2001" containing full colour photographs of Brisbane, Bendigo, Sydney, Melbourne, Perth, Adelaide and Rockhampton. Centre pages has postcards of Brisbane, Ballarat, Adelaide, Sydney, Hobart and Kalgoorlie. Has a list of tramway museums of Australasia, Melbourne tram photos of: Z3 205 VR 53 HTT 8 V 214 X 217 Z71 L 104 W5 774 SW5 682 - Merrin Eirth Z111 - Koorie tram - see Reg Item 4749 for a postcard size photograph. A 246 - Energy Victoria W2 - 150 years of Victoria. TMSV horse card 256 B2 in then then new Yarra trams colour scheme. Has a punched hole along the top edge to enable wall use. Provides dates for holidays, school holidays and Pension payment days and phases of the moon. Produced by Topmill Pty Ltd and distributed by Gordon & Gotch Pty Ltd. Photos by Noel Reed, Arthur Perry, Ray Marsh, Tracy Hardy, C Deantrams, tramways, ballarat, bendigo, melbourne, adelaide, sydney, brisbane, auckland, hobart, kalgoorlie, z class, vr, htt, v class, x class, l class, w5 class, b class, transporting art, tram 205, tram 53, tram 8, tram 214, tram 71, tram 217, tram 104, tram 774, tram 256, tram 682, tram 246, tram 111 -
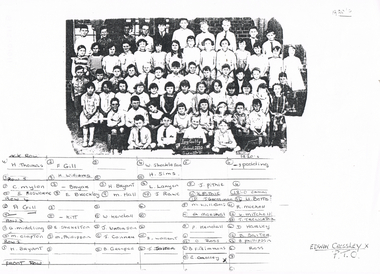 Bendigo Historical Society Inc.
Photograph - LONG GULLY HISTORY GROUP COLLECTION: LONG GULLY SCHOOL PHOTO 1920'S
Copy of a black and white Long Gully School 2120 Photo Grades III - V from the 1920's. Children are sitting or standing outside a brick building. Two children in the front row are holding up a blackboard with the name of the school and grades written on it. The known names are written under the photo. They are: H Thomas, F Gill, H Williams, W Sheckleton, H Sims, Spedding, C Mylon, E Rosewarne, Bryar, E Brockley, H Bryant, M Hall, L Lanyon, J Rowe, J Pithie, H Pithie, J Grossman, O Ermal, U? Betts, A Gill, Kitt, W Kendall, M Williams, G? Marshal, R Michell, W Mitchell, T Trewarta, A Middling, M Clapton, E Shekelton, M Phillipson, J Waterson, J Conner, Z Wallent, P Kendall, O Ross, D Harvey, B Salter, B Phillipson, H Bryant, B Grenfell, J Salter, B Fitzsimmons, E Crossley and Ross. The year and the name Edwin Crossley is written on the paper.bendigo, history, long gully history group, the long gully history group - long gully school photo 1920's, h thomas, f gill, h williams, w sheckleton, h sims, spedding, c mylon, e rosewarne, bryar, e brockley, h bryant, m hall, l lanyon, j rowe, j pithie, h pithie, j grossman, o ermal, u? betts, a gill, kitt, w kendall, m williams, g? marshal, r michell, w mitchell, t trewarta, a middling, m clapton, e shekelton, m phillipson, j waterson, j conner, z wallent, p kendall, o ross, d harvey, b salter, b phillipson, h bryant, b grenfell, j salter, b fitzsimmons, e crossley, ross. -
Bendigo Historical Society Inc.
Document - T J Connelly portrait, Michele Matthews Collection, 1992
Thomas Jefferson Connelly played an important role in role in seeking support for the movement towards federation of the Australian colonies. Connelly was the first Bendigo born Mayor of Bendigo, and the youngest Mayor of Bendigo. He died in 1892 aged just 34. The portrait was painted by Robert William Bugg from a Bartlett Bros. photograph. It was unveiled in the ANA Hall in View Street by Alfred Deakin on October 18, 1893. A re-enactment of the unveiling was held at the Bendigo Art Gallery on October 18 1993. a. Three page typewritten outline of the speech given by John Quick. b. Handwritten script of Quick's speech used at the re-enactment. c. Handwritten script of Alfred Deakin's speech used at the re-enactment. d. Yellow paper bifold program for the Centenary of the Unveiling of the Portrait of Thomas Jefferson Connelly. The part of John Quick was played by Robert Lloyd. The part of Alfred Deakin was played by Robert Jealous. The back page contains a Timeline of the life of Connelly who served on the City Council, including one year as Mayor (1888 - 1889). e. Newspaper cutting from the Bendigo Advertiser (published 6.11.1993) reporting on the re-enactment of the unveiling of the Connelly portrait. Includes a photo of the portrait with three descendants of T J Connelly - grand-daughter Joan Serpell and great grand children Ellie Thompson and John Hamilton. f. Photocopy of biographical information about Robert William BUGG. Unknown source. g. One page photocopy of six newspaper articles reporting on the life and death of Robert William Bugg - photographer and painter. Includes a photo of Mr. Bugg.sir john quick, federation, t j connelly, thomas jefferson connelly, robert william bugg, alfred deakin, paul boromeo -
 Flagstaff Hill Maritime Museum and Village
Domestic object - Bowl, Late 19th or early 20th Century
The Process of Making Pottery Decorating, Firing, Glazing, Making, Technical There is a rhythm and flow to clay. It can’t be done all at once! Even the making process! It can take weeks to get everything done, especially if you can only work on your pottery once a week! Even though we have three hour classes, it’s often just not enough time! Here is an overview of some of the processes so you have a bit more grasp on some of the technical stuff! Step One – Design There are SO many ideas out there for making stuff in clay! From delicate porcelain jewellery, through to heavy sculptural work and everything in between. Deciding your direction is sometimes not that easy – when you first start, try everything, you will naturally gravitate to the style that you enjoy! The options and variations are endless and can get a wee bit overwhelming too! Check in with me before you start to ensure your ideas will work, what order you might do things, how you could achieve the look you are seeking and any other technical data required! Step Two – Making Clay is thixotropic. This means that as you work with it, the clay first gets sloppier and wetter, before is begins to dry in the atmosphere. For most things, you simply can’t do all parts of the project at once. An example of work order might look like: Get last weeks work out from the shelves Prepare clay for today’s work – roll your clay, prepare balls for throwing, make the first stage of a pinch pot) Clean up last week’s work and put it on the shelf for bisque firing Check that you have any glazing to do – and do enough of it that you will have time to finish your main project Do the next step of your next project – there might be a further step that can’t be complete immediately, in that case, wrap your work well and put onto the shelves. Letting your work rest for a while can really help keep your work clean and professional looking. Many things require bagging under plastic to keep it ready for work the next week – put your name on the outside of the bag so you can find your work easily. We have stickers and markers. Consider how you want to decorate your work – coloured slip can be applied at a fairly wet stage (remembering that it will make your work even wetter!). Trying to apply slip to dry clay won’t work! If you want to do sgraffito – you will need to keep the work leather hard (a state of dryness where you can still work the clay with a little effort and a little water and care). Step Three – Drying Most of the time your work can go into the rack uncovered to let it dry out for the following week. If you want to continue forming or shaping you will need to double bag your work – put your work on a suitable sized bat and put the bat in a bag so the base of the bag is under the bat, then put another bag over the top of the work and tuck the top of the bag under the bat. If you want to trim (or turn) your thrown work the following week, it should also be double bagged. If your work is large, delicate, or of uneven thicknesses, you should lightly cover your work for drying. When considering the drying process, bare in mind the weather, humidity and wind! The hotter and dryer, the faster things dry and work can dry unevenly in the shelves – this can lead to cracking – another time to lightly cover your work for drying. Step Four – Trimming and Cleaning Up Your work is dry! It is called greenware now and it is at it’s most fragile! Handle everything with two hands. I often refer to soft hands – keep everything gentle and with your fingers spread as much as possible. Try to not pick up things like plates too much, and always with both hands! Before your work can be bisque fired it should be “cleaned up”. You work won’t go into the kiln if it has sharp edges – when glazed, sharp edges turn into razor blades! Use a piece of fly wire to rub the work all over – this will scratch a little so be light handed. Use a knife or metal kidney to scrape any areas that require a bit more dynamic treatment than the fly wire offers! Finally, a very light wipe over with a slightly damp sponge can help soften and soothe all of your edges and dags! Trimming thrown work: If you are planning to trim (or turn) your thrown work (and you should be), make sure you bag it well – your work should be leather hard to almost dry for easiest trimming. Use this step to finish the work completely – use a metal kidney to polish the surface, or a slightly damp sponge to give a freshly thrown look. Wipe the sponge around the rim after trimming, and check the inside of the pot for dags! Trimming slip cast work: Usually I will trim the rims of your work on the wheel the following day to make that stage easier, however you will still need to check your work for lumps and bumps. Last but not least – check that your name is still clearly on the bottom of your work. Step Five – Bisque Firing When the work is completely dry it can go into the bisque kiln. The bisque kiln is fired to 1000°C. This process burns off the water in the clay as well as some of the chemically bound water. The structure of the clay is not altered that much at this temperature. Inside the bisque kiln, the work is stacked a little, small bowl inside a larger bowl and onto a heavy plate. Smaller items like decorations or drink coasters might get stacked several high. Consideration is paid to the weight of the stack and shape of the work. A bisque kiln can fire about one and a half times the amount of work that the glaze kiln can fire. The firing takes about 10 hours to complete the cycle and about two days to cool down. Once it has been emptied the work is placed in the glaze room ready for you to decorate! Step Six – Glazing Decorating your work with colour can be a lot of fun – and time consuming! There are three main options for surface treatment at this stage: Oxide Washes Underglazes Glazes Washes and underglazes do not “glaze” the work – It will still need a layer of glaze to fully seal the clay (washes don’t need glaze on surfaces not designed for food or liquid as they can gloss up a little on their own). Underglazes are stable colourants that turn out pretty much how they look in the jar. They can be mixed with each other to form other colours and can be used like water colours to paint onto your work. Mostly they should have a clear glaze on top to seal them. Oxides are a different species – the pink oxide (cobalt) wash turns out bright blue for instance. They don’t always need a glaze on top, and some glazes can change the colour of the wash! The glazes need no other “glaze” on top! Be careful of unknown glaze interactions – you can put any combination of glaze in a bowl or on a plate, but only a single glaze on the outside of any vertical surface! Glazes are a chemical reaction under heat. We don’t know the exact chemicals in the Mayco glazes we use. I can guess by the way they interact with each other, however, on the whole, you need to test every idea you have, and not run the test on a vertical surface! Simply put, glaze is a layer of glass like substance that bonds with the clay underneath. Clay is made of silica, alumina and water. Glaze is made of mostly silica. Silica has a melting point of 1700°C and we fire to 1240°C. The silica requires a “flux” to help it melt at the lower temperature. Fluxes can be all sorts of chemicals – a common one is calcium – calcium has a melting point of 2500°C, however, together they both melt at a much lower temperature! Colourants are metal oxides like cobalt (blue), chrome (green through black), copper (green, blue, even red!), manganese (black, purple and pink) iron (red brown), etc. Different chemicals in the glaze can have dramatic effects. for example, barium carbonate (which we don’t use) turns manganese bright pink! Other elements can turn manganese dioxide brown, blue, purple and reddish brown. Manganese dioxide is a flux in and of itself as well. So, glazes that get their black and purple colours, often interact with other glazes and RUN! Our mirror black is a good example – it mixes really well with many glazes because it fluxes them – causes them to melt faster. It will also bring out many beautiful colours in the glazes because it’s black colouring most definitely comes from manganese dioxide! Glaze chemistry is a whole subject on it’s own! We use commercial Mayco glazes on purpose – for their huge range of colour possibilities, stability, cool interactions, artistic freedom with the ability to easily brush the glazes on and ease of use. We currently have almost 50 glazes on hand! A major project is to test the interactions of all glazes with each other. That is 2,500 test tiles!!!! I’m going to make the wall behind the wheels the feature wall of pretty colours! Step Seven – Glaze (Gloss or sometimes called “Glost”) Firing Most of the time this is the final stage of making your creation (but not always!) The glaze kiln goes to 1240°C. This is called cone 6, or midrange. It is the low end of stoneware temperatures. Stoneware clays and glazes are typically fired at cone 8 – 10, that is 1260 – 1290°C. The energy requirement to go from 1240°C to 1280°C is almost a 30% more! Our clay is formulated to vitrify (mature, turn “glass-like”) at 1240°, as are our glazes. A glaze kiln take around 12 hours to reach temperature and two to three days to cool down. Sometimes a third firing process is required – this is for decoration that is added to work after the glaze firing. For example – adding precious metals and lustres. this firing temperature is usually around 600 – 800°C depending upon the techniques being used. There are many students interested in gold and silver trims – we will be doing this third type of firing soon! After firing your work will be in the student finished work shelves. Remember to pay for it before you head out the door! There is a small extra charge for using porcelain clay (it’s more than twice the price of regular clay), and for any third firing process! Once your work has been fired it can not turn back into clay for millennia – so don’t fire it if you don’t like it! Put it in the bucket for recycling. https://firebirdstudios.com.au/the-process-of-making-pottery/ The bowl is an example of kitchenware used in the 19th century and still in use today.Bowl white ceramic. Crack on side. Badly stained.Backstamp very faint and unable to be read.flagstaff hill, warrnambool, shipwrecked-coast, flagstaff-hill, flagstaff-hill-maritime-museum, maritime-museum, shipwreck-coast, flagstaff-hill-maritime-village, mixing bowl, food preparation, kitchen equipment, ceramic -
 Flagstaff Hill Maritime Museum and Village
Domestic object - Bowl
The Process of Making Pottery Decorating, Firing, Glazing, Making, Technical There is a rhythm and flow to clay. It can’t be done all at once! Even the making process! It can take weeks to get everything done, especially if you can only work on your pottery once a week! Even though we have three hour classes, it’s often just not enough time! Here is an overview of some of the processes so you have a bit more grasp on some of the technical stuff! Step One – Design There are SO many ideas out there for making stuff in clay! From delicate porcelain jewellery, through to heavy sculptural work and everything in between. Deciding your direction is sometimes not that easy – when you first start, try everything, you will naturally gravitate to the style that you enjoy! The options and variations are endless and can get a wee bit overwhelming too! Check in with me before you start to ensure your ideas will work, what order you might do things, how you could achieve the look you are seeking and any other technical data required! Step Two – Making Clay is thixotropic. This means that as you work with it, the clay first gets sloppier and wetter, before is begins to dry in the atmosphere. For most things, you simply can’t do all parts of the project at once. An example of work order might look like: Get last weeks work out from the shelves Prepare clay for today’s work – roll your clay, prepare balls for throwing, make the first stage of a pinch pot) Clean up last week’s work and put it on the shelf for bisque firing Check that you have any glazing to do – and do enough of it that you will have time to finish your main project Do the next step of your next project – there might be a further step that can’t be complete immediately, in that case, wrap your work well and put onto the shelves. Letting your work rest for a while can really help keep your work clean and professional looking. Many things require bagging under plastic to keep it ready for work the next week – put your name on the outside of the bag so you can find your work easily. We have stickers and markers. Consider how you want to decorate your work – coloured slip can be applied at a fairly wet stage (remembering that it will make your work even wetter!). Trying to apply slip to dry clay won’t work! If you want to do sgraffito – you will need to keep the work leather hard (a state of dryness where you can still work the clay with a little effort and a little water and care). Step Three – Drying Most of the time your work can go into the rack uncovered to let it dry out for the following week. If you want to continue forming or shaping you will need to double bag your work – put your work on a suitable sized bat and put the bat in a bag so the base of the bag is under the bat, then put another bag over the top of the work and tuck the top of the bag under the bat. If you want to trim (or turn) your thrown work the following week, it should also be double bagged. If your work is large, delicate, or of uneven thicknesses, you should lightly cover your work for drying. When considering the drying process, bare in mind the weather, humidity and wind! The hotter and dryer, the faster things dry and work can dry unevenly in the shelves – this can lead to cracking – another time to lightly cover your work for drying. Step Four – Trimming and Cleaning Up Your work is dry! It is called greenware now and it is at it’s most fragile! Handle everything with two hands. I often refer to soft hands – keep everything gentle and with your fingers spread as much as possible. Try to not pick up things like plates too much, and always with both hands! Before your work can be bisque fired it should be “cleaned up”. You work won’t go into the kiln if it has sharp edges – when glazed, sharp edges turn into razor blades! Use a piece of fly wire to rub the work all over – this will scratch a little so be light handed. Use a knife or metal kidney to scrape any areas that require a bit more dynamic treatment than the fly wire offers! Finally, a very light wipe over with a slightly damp sponge can help soften and soothe all of your edges and dags! Trimming thrown work: If you are planning to trim (or turn) your thrown work (and you should be), make sure you bag it well – your work should be leather hard to almost dry for easiest trimming. Use this step to finish the work completely – use a metal kidney to polish the surface, or a slightly damp sponge to give a freshly thrown look. Wipe the sponge around the rim after trimming, and check the inside of the pot for dags! Trimming slip cast work: Usually I will trim the rims of your work on the wheel the following day to make that stage easier, however you will still need to check your work for lumps and bumps. Last but not least – check that your name is still clearly on the bottom of your work. Step Five – Bisque Firing When the work is completely dry it can go into the bisque kiln. The bisque kiln is fired to 1000°C. This process burns off the water in the clay as well as some of the chemically bound water. The structure of the clay is not altered that much at this temperature. Inside the bisque kiln, the work is stacked a little, small bowl inside a larger bowl and onto a heavy plate. Smaller items like decorations or drink coasters might get stacked several high. Consideration is paid to the weight of the stack and shape of the work. A bisque kiln can fire about one and a half times the amount of work that the glaze kiln can fire. The firing takes about 10 hours to complete the cycle and about two days to cool down. Once it has been emptied the work is placed in the glaze room ready for you to decorate! Step Six – Glazing Decorating your work with colour can be a lot of fun – and time consuming! There are three main options for surface treatment at this stage: Oxide Washes Underglazes Glazes Washes and underglazes do not “glaze” the work – It will still need a layer of glaze to fully seal the clay (washes don’t need glaze on surfaces not designed for food or liquid as they can gloss up a little on their own). Underglazes are stable colourants that turn out pretty much how they look in the jar. They can be mixed with each other to form other colours and can be used like water colours to paint onto your work. Mostly they should have a clear glaze on top to seal them. Oxides are a different species – the pink oxide (cobalt) wash turns out bright blue for instance. They don’t always need a glaze on top, and some glazes can change the colour of the wash! The glazes need no other “glaze” on top! Be careful of unknown glaze interactions – you can put any combination of glaze in a bowl or on a plate, but only a single glaze on the outside of any vertical surface! Glazes are a chemical reaction under heat. We don’t know the exact chemicals in the Mayco glazes we use. I can guess by the way they interact with each other, however, on the whole, you need to test every idea you have, and not run the test on a vertical surface! Simply put, glaze is a layer of glass like substance that bonds with the clay underneath. Clay is made of silica, alumina and water. Glaze is made of mostly silica. Silica has a melting point of 1700°C and we fire to 1240°C. The silica requires a “flux” to help it melt at the lower temperature. Fluxes can be all sorts of chemicals – a common one is calcium – calcium has a melting point of 2500°C, however, together they both melt at a much lower temperature! Colourants are metal oxides like cobalt (blue), chrome (green through black), copper (green, blue, even red!), manganese (black, purple and pink) iron (red brown), etc. Different chemicals in the glaze can have dramatic effects. for example, barium carbonate (which we don’t use) turns manganese bright pink! Other elements can turn manganese dioxide brown, blue, purple and reddish brown. Manganese dioxide is a flux in and of itself as well. So, glazes that get their black and purple colours, often interact with other glazes and RUN! Our mirror black is a good example – it mixes really well with many glazes because it fluxes them – causes them to melt faster. It will also bring out many beautiful colours in the glazes because it’s black colouring most definitely comes from manganese dioxide! Glaze chemistry is a whole subject on it’s own! We use commercial Mayco glazes on purpose – for their huge range of colour possibilities, stability, cool interactions, artistic freedom with the ability to easily brush the glazes on and ease of use. We currently have almost 50 glazes on hand! A major project is to test the interactions of all glazes with each other. That is 2,500 test tiles!!!! I’m going to make the wall behind the wheels the feature wall of pretty colours! Step Seven – Glaze (Gloss or sometimes called “Glost”) Firing Most of the time this is the final stage of making your creation (but not always!) The glaze kiln goes to 1240°C. This is called cone 6, or midrange. It is the low end of stoneware temperatures. Stoneware clays and glazes are typically fired at cone 8 – 10, that is 1260 – 1290°C. The energy requirement to go from 1240°C to 1280°C is almost a 30% more! Our clay is formulated to vitrify (mature, turn “glass-like”) at 1240°, as are our glazes. A glaze kiln take around 12 hours to reach temperature and two to three days to cool down. Sometimes a third firing process is required – this is for decoration that is added to work after the glaze firing. For example – adding precious metals and lustres. this firing temperature is usually around 600 – 800°C depending upon the techniques being used. There are many students interested in gold and silver trims – we will be doing this third type of firing soon! After firing your work will be in the student finished work shelves. Remember to pay for it before you head out the door! There is a small extra charge for using porcelain clay (it’s more than twice the price of regular clay), and for any third firing process! Once your work has been fired it can not turn back into clay for millennia – so don’t fire it if you don’t like it! Put it in the bucket for recycling. https://firebirdstudios.com.au/the-process-of-making-pottery/ This bowl is an example of kitchenware used in the 19th century and still in use today.Bowl white ceramic plain that has two sets of edging around lip. Inside bowl has plaster designed to look like cooking mixture.flagstaff hill, warrnambool, shipwrecked-coast, flagstaff-hill, flagstaff-hill-maritime-museum, maritime-museum, shipwreck-coast, flagstaff-hill-maritime-village, kitchen equipment, ceramic -
 Flagstaff Hill Maritime Museum and Village
Domestic object - Bowl, J & G Meakin, Late 19th or early 20th Century
The Process of Making Pottery Decorating, Firing, Glazing, Making, Technical There is a rhythm and flow to clay. It can’t be done all at once! Even the making process! It can take weeks to get everything done, especially if you can only work on your pottery once a week! Even though we have three hour classes, it’s often just not enough time! Here is an overview of some of the processes so you have a bit more grasp on some of the technical stuff! Step One – Design There are SO many ideas out there for making stuff in clay! From delicate porcelain jewellery, through to heavy sculptural work and everything in between. Deciding your direction is sometimes not that easy – when you first start, try everything, you will naturally gravitate to the style that you enjoy! The options and variations are endless and can get a wee bit overwhelming too! Check in with me before you start to ensure your ideas will work, what order you might do things, how you could achieve the look you are seeking and any other technical data required! Step Two – Making Clay is thixotropic. This means that as you work with it, the clay first gets sloppier and wetter, before is begins to dry in the atmosphere. For most things, you simply can’t do all parts of the project at once. An example of work order might look like: Get last weeks work out from the shelves Prepare clay for today’s work – roll your clay, prepare balls for throwing, make the first stage of a pinch pot) Clean up last week’s work and put it on the shelf for bisque firing Check that you have any glazing to do – and do enough of it that you will have time to finish your main project Do the next step of your next project – there might be a further step that can’t be complete immediately, in that case, wrap your work well and put onto the shelves. Letting your work rest for a while can really help keep your work clean and professional looking. Many things require bagging under plastic to keep it ready for work the next week – put your name on the outside of the bag so you can find your work easily. We have stickers and markers. Consider how you want to decorate your work – coloured slip can be applied at a fairly wet stage (remembering that it will make your work even wetter!). Trying to apply slip to dry clay won’t work! If you want to do sgraffito – you will need to keep the work leather hard (a state of dryness where you can still work the clay with a little effort and a little water and care). Step Three – Drying Most of the time your work can go into the rack uncovered to let it dry out for the following week. If you want to continue forming or shaping you will need to double bag your work – put your work on a suitable sized bat and put the bat in a bag so the base of the bag is under the bat, then put another bag over the top of the work and tuck the top of the bag under the bat. If you want to trim (or turn) your thrown work the following week, it should also be double bagged. If your work is large, delicate, or of uneven thicknesses, you should lightly cover your work for drying. When considering the drying process, bare in mind the weather, humidity and wind! The hotter and dryer, the faster things dry and work can dry unevenly in the shelves – this can lead to cracking – another time to lightly cover your work for drying. Step Four – Trimming and Cleaning Up Your work is dry! It is called greenware now and it is at it’s most fragile! Handle everything with two hands. I often refer to soft hands – keep everything gentle and with your fingers spread as much as possible. Try to not pick up things like plates too much, and always with both hands! Before your work can be bisque fired it should be “cleaned up”. You work won’t go into the kiln if it has sharp edges – when glazed, sharp edges turn into razor blades! Use a piece of fly wire to rub the work all over – this will scratch a little so be light handed. Use a knife or metal kidney to scrape any areas that require a bit more dynamic treatment than the fly wire offers! Finally, a very light wipe over with a slightly damp sponge can help soften and soothe all of your edges and dags! Trimming thrown work: If you are planning to trim (or turn) your thrown work (and you should be), make sure you bag it well – your work should be leather hard to almost dry for easiest trimming. Use this step to finish the work completely – use a metal kidney to polish the surface, or a slightly damp sponge to give a freshly thrown look. Wipe the sponge around the rim after trimming, and check the inside of the pot for dags! Trimming slip cast work: Usually I will trim the rims of your work on the wheel the following day to make that stage easier, however you will still need to check your work for lumps and bumps. Last but not least – check that your name is still clearly on the bottom of your work. Step Five – Bisque Firing When the work is completely dry it can go into the bisque kiln. The bisque kiln is fired to 1000°C. This process burns off the water in the clay as well as some of the chemically bound water. The structure of the clay is not altered that much at this temperature. Inside the bisque kiln, the work is stacked a little, small bowl inside a larger bowl and onto a heavy plate. Smaller items like decorations or drink coasters might get stacked several high. Consideration is paid to the weight of the stack and shape of the work. A bisque kiln can fire about one and a half times the amount of work that the glaze kiln can fire. The firing takes about 10 hours to complete the cycle and about two days to cool down. Once it has been emptied the work is placed in the glaze room ready for you to decorate! Step Six – Glazing Decorating your work with colour can be a lot of fun – and time consuming! There are three main options for surface treatment at this stage: Oxide Washes Underglazes Glazes Washes and underglazes do not “glaze” the work – It will still need a layer of glaze to fully seal the clay (washes don’t need glaze on surfaces not designed for food or liquid as they can gloss up a little on their own). Underglazes are stable colourants that turn out pretty much how they look in the jar. They can be mixed with each other to form other colours and can be used like water colours to paint onto your work. Mostly they should have a clear glaze on top to seal them. Oxides are a different species – the pink oxide (cobalt) wash turns out bright blue for instance. They don’t always need a glaze on top, and some glazes can change the colour of the wash! The glazes need no other “glaze” on top! Be careful of unknown glaze interactions – you can put any combination of glaze in a bowl or on a plate, but only a single glaze on the outside of any vertical surface! Glazes are a chemical reaction under heat. We don’t know the exact chemicals in the Mayco glazes we use. I can guess by the way they interact with each other, however, on the whole, you need to test every idea you have, and not run the test on a vertical surface! Simply put, glaze is a layer of glass like substance that bonds with the clay underneath. Clay is made of silica, alumina and water. Glaze is made of mostly silica. Silica has a melting point of 1700°C and we fire to 1240°C. The silica requires a “flux” to help it melt at the lower temperature. Fluxes can be all sorts of chemicals – a common one is calcium – calcium has a melting point of 2500°C, however, together they both melt at a much lower temperature! Colourants are metal oxides like cobalt (blue), chrome (green through black), copper (green, blue, even red!), manganese (black, purple and pink) iron (red brown), etc. Different chemicals in the glaze can have dramatic effects. for example, barium carbonate (which we don’t use) turns manganese bright pink! Other elements can turn manganese dioxide brown, blue, purple and reddish brown. Manganese dioxide is a flux in and of itself as well. So, glazes that get their black and purple colours, often interact with other glazes and RUN! Our mirror black is a good example – it mixes really well with many glazes because it fluxes them – causes them to melt faster. It will also bring out many beautiful colours in the glazes because it’s black colouring most definitely comes from manganese dioxide! Glaze chemistry is a whole subject on it’s own! We use commercial Mayco glazes on purpose – for their huge range of colour possibilities, stability, cool interactions, artistic freedom with the ability to easily brush the glazes on and ease of use. We currently have almost 50 glazes on hand! A major project is to test the interactions of all glazes with each other. That is 2,500 test tiles!!!! I’m going to make the wall behind the wheels the feature wall of pretty colours! Step Seven – Glaze (Gloss or sometimes called “Glost”) Firing Most of the time this is the final stage of making your creation (but not always!) The glaze kiln goes to 1240°C. This is called cone 6, or midrange. It is the low end of stoneware temperatures. Stoneware clays and glazes are typically fired at cone 8 – 10, that is 1260 – 1290°C. The energy requirement to go from 1240°C to 1280°C is almost a 30% more! Our clay is formulated to vitrify (mature, turn “glass-like”) at 1240°, as are our glazes. A glaze kiln take around 12 hours to reach temperature and two to three days to cool down. Sometimes a third firing process is required – this is for decoration that is added to work after the glaze firing. For example – adding precious metals and lustres. this firing temperature is usually around 600 – 800°C depending upon the techniques being used. There are many students interested in gold and silver trims – we will be doing this third type of firing soon! After firing your work will be in the student finished work shelves. Remember to pay for it before you head out the door! There is a small extra charge for using porcelain clay (it’s more than twice the price of regular clay), and for any third firing process! Once your work has been fired it can not turn back into clay for millennia – so don’t fire it if you don’t like it! Put it in the bucket for recycling. https://firebirdstudios.com.au/the-process-of-making-pottery/This bowl was made by renowned pottery company J & G Meakin of England. The firm was established in the mid-1800's. The bowl is an example of kitchenware used in the 19th century and still in use today.Bowl; white ceramic, round and tapering inwards towards base. Made by J and G Meakin England.On base, 'Ironstone China Reg SOL 391413' with symbolflagstaff hill, flagstaff hill maritime museum and village, warrnambool, maritime museum, maritime village, great ocean road, shipwreck coast, mixing bowl, food preparation, j & g meakin, pottery, stoke-on-trent, kitchen equipment, ceramic -
 Flagstaff Hill Maritime Museum and Village
Domestic object - Plate
The Process of Making Pottery Decorating, Firing, Glazing, Making, Technical There is a rhythm and flow to clay. It can’t be done all at once! Even the making process! It can take weeks to get everything done, especially if you can only work on your pottery once a week! Even though we have three hour classes, it’s often just not enough time! Here is an overview of some of the processes so you have a bit more grasp on some of the technical stuff! Step One – Design There are SO many ideas out there for making stuff in clay! From delicate porcelain jewellery, through to heavy sculptural work and everything in between. Deciding your direction is sometimes not that easy – when you first start, try everything, you will naturally gravitate to the style that you enjoy! The options and variations are endless and can get a wee bit overwhelming too! Check in with me before you start to ensure your ideas will work, what order you might do things, how you could achieve the look you are seeking and any other technical data required! Step Two – Making Clay is thixotropic. This means that as you work with it, the clay first gets sloppier and wetter, before is begins to dry in the atmosphere. For most things, you simply can’t do all parts of the project at once. An example of work order might look like: Get last weeks work out from the shelves Prepare clay for today’s work – roll your clay, prepare balls for throwing, make the first stage of a pinch pot) Clean up last week’s work and put it on the shelf for bisque firing Check that you have any glazing to do – and do enough of it that you will have time to finish your main project Do the next step of your next project – there might be a further step that can’t be complete immediately, in that case, wrap your work well and put onto the shelves. Letting your work rest for a while can really help keep your work clean and professional looking. Many things require bagging under plastic to keep it ready for work the next week – put your name on the outside of the bag so you can find your work easily. We have stickers and markers. Consider how you want to decorate your work – coloured slip can be applied at a fairly wet stage (remembering that it will make your work even wetter!). Trying to apply slip to dry clay won’t work! If you want to do sgraffito – you will need to keep the work leather hard (a state of dryness where you can still work the clay with a little effort and a little water and care). Step Three – Drying Most of the time your work can go into the rack uncovered to let it dry out for the following week. If you want to continue forming or shaping you will need to double bag your work – put your work on a suitable sized bat and put the bat in a bag so the base of the bag is under the bat, then put another bag over the top of the work and tuck the top of the bag under the bat. If you want to trim (or turn) your thrown work the following week, it should also be double bagged. If your work is large, delicate, or of uneven thicknesses, you should lightly cover your work for drying. When considering the drying process, bare in mind the weather, humidity and wind! The hotter and dryer, the faster things dry and work can dry unevenly in the shelves – this can lead to cracking – another time to lightly cover your work for drying. Step Four – Trimming and Cleaning Up Your work is dry! It is called greenware now and it is at it’s most fragile! Handle everything with two hands. I often refer to soft hands – keep everything gentle and with your fingers spread as much as possible. Try to not pick up things like plates too much, and always with both hands! Before your work can be bisque fired it should be “cleaned up”. You work won’t go into the kiln if it has sharp edges – when glazed, sharp edges turn into razor blades! Use a piece of fly wire to rub the work all over – this will scratch a little so be light handed. Use a knife or metal kidney to scrape any areas that require a bit more dynamic treatment than the fly wire offers! Finally, a very light wipe over with a slightly damp sponge can help soften and soothe all of your edges and dags! Trimming thrown work: If you are planning to trim (or turn) your thrown work (and you should be), make sure you bag it well – your work should be leather hard to almost dry for easiest trimming. Use this step to finish the work completely – use a metal kidney to polish the surface, or a slightly damp sponge to give a freshly thrown look. Wipe the sponge around the rim after trimming, and check the inside of the pot for dags! Trimming slip cast work: Usually I will trim the rims of your work on the wheel the following day to make that stage easier, however you will still need to check your work for lumps and bumps. Last but not least – check that your name is still clearly on the bottom of your work. Step Five – Bisque Firing When the work is completely dry it can go into the bisque kiln. The bisque kiln is fired to 1000°C. This process burns off the water in the clay as well as some of the chemically bound water. The structure of the clay is not altered that much at this temperature. Inside the bisque kiln, the work is stacked a little, small bowl inside a larger bowl and onto a heavy plate. Smaller items like decorations or drink coasters might get stacked several high. Consideration is paid to the weight of the stack and shape of the work. A bisque kiln can fire about one and a half times the amount of work that the glaze kiln can fire. The firing takes about 10 hours to complete the cycle and about two days to cool down. Once it has been emptied the work is placed in the glaze room ready for you to decorate! Step Six – Glazing Decorating your work with colour can be a lot of fun – and time consuming! There are three main options for surface treatment at this stage: Oxide Washes Underglazes Glazes Washes and underglazes do not “glaze” the work – It will still need a layer of glaze to fully seal the clay (washes don’t need glaze on surfaces not designed for food or liquid as they can gloss up a little on their own). Underglazes are stable colourants that turn out pretty much how they look in the jar. They can be mixed with each other to form other colours and can be used like water colours to paint onto your work. Mostly they should have a clear glaze on top to seal them. Oxides are a different species – the pink oxide (cobalt) wash turns out bright blue for instance. They don’t always need a glaze on top, and some glazes can change the colour of the wash! The glazes need no other “glaze” on top! Be careful of unknown glaze interactions – you can put any combination of glaze in a bowl or on a plate, but only a single glaze on the outside of any vertical surface! Glazes are a chemical reaction under heat. We don’t know the exact chemicals in the Mayco glazes we use. I can guess by the way they interact with each other, however, on the whole, you need to test every idea you have, and not run the test on a vertical surface! Simply put, glaze is a layer of glass like substance that bonds with the clay underneath. Clay is made of silica, alumina and water. Glaze is made of mostly silica. Silica has a melting point of 1700°C and we fire to 1240°C. The silica requires a “flux” to help it melt at the lower temperature. Fluxes can be all sorts of chemicals – a common one is calcium – calcium has a melting point of 2500°C, however, together they both melt at a much lower temperature! Colourants are metal oxides like cobalt (blue), chrome (green through black), copper (green, blue, even red!), manganese (black, purple and pink) iron (red brown), etc. Different chemicals in the glaze can have dramatic effects. for example, barium carbonate (which we don’t use) turns manganese bright pink! Other elements can turn manganese dioxide brown, blue, purple and reddish brown. Manganese dioxide is a flux in and of itself as well. So, glazes that get their black and purple colours, often interact with other glazes and RUN! Our mirror black is a good example – it mixes really well with many glazes because it fluxes them – causes them to melt faster. It will also bring out many beautiful colours in the glazes because it’s black colouring most definitely comes from manganese dioxide! Glaze chemistry is a whole subject on it’s own! We use commercial Mayco glazes on purpose – for their huge range of colour possibilities, stability, cool interactions, artistic freedom with the ability to easily brush the glazes on and ease of use. We currently have almost 50 glazes on hand! A major project is to test the interactions of all glazes with each other. That is 2,500 test tiles!!!! I’m going to make the wall behind the wheels the feature wall of pretty colours! Step Seven – Glaze (Gloss or sometimes called “Glost”) Firing Most of the time this is the final stage of making your creation (but not always!) The glaze kiln goes to 1240°C. This is called cone 6, or midrange. It is the low end of stoneware temperatures. Stoneware clays and glazes are typically fired at cone 8 – 10, that is 1260 – 1290°C. The energy requirement to go from 1240°C to 1280°C is almost a 30% more! Our clay is formulated to vitrify (mature, turn “glass-like”) at 1240°, as are our glazes. A glaze kiln take around 12 hours to reach temperature and two to three days to cool down. Sometimes a third firing process is required – this is for decoration that is added to work after the glaze firing. For example – adding precious metals and lustres. this firing temperature is usually around 600 – 800°C depending upon the techniques being used. There are many students interested in gold and silver trims – we will be doing this third type of firing soon! After firing your work will be in the student finished work shelves. Remember to pay for it before you head out the door! There is a small extra charge for using porcelain clay (it’s more than twice the price of regular clay), and for any third firing process! Once your work has been fired it can not turn back into clay for millennia – so don’t fire it if you don’t like it! Put it in the bucket for recycling. https://firebirdstudios.com.au/the-process-of-making-pottery/Ceramics have evolved over thousands of years.White earthenware dinner plate. Crazing evident all over.Backstamped ‘Made in England S LTD’flagstaff hill, warrnambool, shipwrecked-coast, flagstaff-hill, flagstaff-hill-maritime-museum, maritime-museum, shipwreck-coast, flagstaff-hill-maritime-village, ceramics, tableware -
 Flagstaff Hill Maritime Museum and Village
Domestic object - Plate, Johnson Bros
The Process of Making Pottery Decorating, Firing, Glazing, Making, Technical There is a rhythm and flow to clay. It can’t be done all at once! Even the making process! It can take weeks to get everything done, especially if you can only work on your pottery once a week! Even though we have three hour classes, it’s often just not enough time! Here is an overview of some of the processes so you have a bit more grasp on some of the technical stuff! Step One – Design There are SO many ideas out there for making stuff in clay! From delicate porcelain jewellery, through to heavy sculptural work and everything in between. Deciding your direction is sometimes not that easy – when you first start, try everything, you will naturally gravitate to the style that you enjoy! The options and variations are endless and can get a wee bit overwhelming too! Check in with me before you start to ensure your ideas will work, what order you might do things, how you could achieve the look you are seeking and any other technical data required! Step Two – Making Clay is thixotropic. This means that as you work with it, the clay first gets sloppier and wetter, before is begins to dry in the atmosphere. For most things, you simply can’t do all parts of the project at once. An example of work order might look like: Get last weeks work out from the shelves Prepare clay for today’s work – roll your clay, prepare balls for throwing, make the first stage of a pinch pot) Clean up last week’s work and put it on the shelf for bisque firing Check that you have any glazing to do – and do enough of it that you will have time to finish your main project Do the next step of your next project – there might be a further step that can’t be complete immediately, in that case, wrap your work well and put onto the shelves. Letting your work rest for a while can really help keep your work clean and professional looking. Many things require bagging under plastic to keep it ready for work the next week – put your name on the outside of the bag so you can find your work easily. We have stickers and markers. Consider how you want to decorate your work – coloured slip can be applied at a fairly wet stage (remembering that it will make your work even wetter!). Trying to apply slip to dry clay won’t work! If you want to do sgraffito – you will need to keep the work leather hard (a state of dryness where you can still work the clay with a little effort and a little water and care). Step Three – Drying Most of the time your work can go into the rack uncovered to let it dry out for the following week. If you want to continue forming or shaping you will need to double bag your work – put your work on a suitable sized bat and put the bat in a bag so the base of the bag is under the bat, then put another bag over the top of the work and tuck the top of the bag under the bat. If you want to trim (or turn) your thrown work the following week, it should also be double bagged. If your work is large, delicate, or of uneven thicknesses, you should lightly cover your work for drying. When considering the drying process, bare in mind the weather, humidity and wind! The hotter and dryer, the faster things dry and work can dry unevenly in the shelves – this can lead to cracking – another time to lightly cover your work for drying. Step Four – Trimming and Cleaning Up Your work is dry! It is called greenware now and it is at it’s most fragile! Handle everything with two hands. I often refer to soft hands – keep everything gentle and with your fingers spread as much as possible. Try to not pick up things like plates too much, and always with both hands! Before your work can be bisque fired it should be “cleaned up”. You work won’t go into the kiln if it has sharp edges – when glazed, sharp edges turn into razor blades! Use a piece of fly wire to rub the work all over – this will scratch a little so be light handed. Use a knife or metal kidney to scrape any areas that require a bit more dynamic treatment than the fly wire offers! Finally, a very light wipe over with a slightly damp sponge can help soften and soothe all of your edges and dags! Trimming thrown work: If you are planning to trim (or turn) your thrown work (and you should be), make sure you bag it well – your work should be leather hard to almost dry for easiest trimming. Use this step to finish the work completely – use a metal kidney to polish the surface, or a slightly damp sponge to give a freshly thrown look. Wipe the sponge around the rim after trimming, and check the inside of the pot for dags! Trimming slip cast work: Usually I will trim the rims of your work on the wheel the following day to make that stage easier, however you will still need to check your work for lumps and bumps. Last but not least – check that your name is still clearly on the bottom of your work. Step Five – Bisque Firing When the work is completely dry it can go into the bisque kiln. The bisque kiln is fired to 1000°C. This process burns off the water in the clay as well as some of the chemically bound water. The structure of the clay is not altered that much at this temperature. Inside the bisque kiln, the work is stacked a little, small bowl inside a larger bowl and onto a heavy plate. Smaller items like decorations or drink coasters might get stacked several high. Consideration is paid to the weight of the stack and shape of the work. A bisque kiln can fire about one and a half times the amount of work that the glaze kiln can fire. The firing takes about 10 hours to complete the cycle and about two days to cool down. Once it has been emptied the work is placed in the glaze room ready for you to decorate! Step Six – Glazing Decorating your work with colour can be a lot of fun – and time consuming! There are three main options for surface treatment at this stage: Oxide Washes Underglazes Glazes Washes and underglazes do not “glaze” the work – It will still need a layer of glaze to fully seal the clay (washes don’t need glaze on surfaces not designed for food or liquid as they can gloss up a little on their own). Underglazes are stable colourants that turn out pretty much how they look in the jar. They can be mixed with each other to form other colours and can be used like water colours to paint onto your work. Mostly they should have a clear glaze on top to seal them. Oxides are a different species – the pink oxide (cobalt) wash turns out bright blue for instance. They don’t always need a glaze on top, and some glazes can change the colour of the wash! The glazes need no other “glaze” on top! Be careful of unknown glaze interactions – you can put any combination of glaze in a bowl or on a plate, but only a single glaze on the outside of any vertical surface! Glazes are a chemical reaction under heat. We don’t know the exact chemicals in the Mayco glazes we use. I can guess by the way they interact with each other, however, on the whole, you need to test every idea you have, and not run the test on a vertical surface! Simply put, glaze is a layer of glass like substance that bonds with the clay underneath. Clay is made of silica, alumina and water. Glaze is made of mostly silica. Silica has a melting point of 1700°C and we fire to 1240°C. The silica requires a “flux” to help it melt at the lower temperature. Fluxes can be all sorts of chemicals – a common one is calcium – calcium has a melting point of 2500°C, however, together they both melt at a much lower temperature! Colourants are metal oxides like cobalt (blue), chrome (green through black), copper (green, blue, even red!), manganese (black, purple and pink) iron (red brown), etc. Different chemicals in the glaze can have dramatic effects. for example, barium carbonate (which we don’t use) turns manganese bright pink! Other elements can turn manganese dioxide brown, blue, purple and reddish brown. Manganese dioxide is a flux in and of itself as well. So, glazes that get their black and purple colours, often interact with other glazes and RUN! Our mirror black is a good example – it mixes really well with many glazes because it fluxes them – causes them to melt faster. It will also bring out many beautiful colours in the glazes because it’s black colouring most definitely comes from manganese dioxide! Glaze chemistry is a whole subject on it’s own! We use commercial Mayco glazes on purpose – for their huge range of colour possibilities, stability, cool interactions, artistic freedom with the ability to easily brush the glazes on and ease of use. We currently have almost 50 glazes on hand! A major project is to test the interactions of all glazes with each other. That is 2,500 test tiles!!!! I’m going to make the wall behind the wheels the feature wall of pretty colours! Step Seven – Glaze (Gloss or sometimes called “Glost”) Firing Most of the time this is the final stage of making your creation (but not always!) The glaze kiln goes to 1240°C. This is called cone 6, or midrange. It is the low end of stoneware temperatures. Stoneware clays and glazes are typically fired at cone 8 – 10, that is 1260 – 1290°C. The energy requirement to go from 1240°C to 1280°C is almost a 30% more! Our clay is formulated to vitrify (mature, turn “glass-like”) at 1240°, as are our glazes. A glaze kiln take around 12 hours to reach temperature and two to three days to cool down. Sometimes a third firing process is required – this is for decoration that is added to work after the glaze firing. For example – adding precious metals and lustres. this firing temperature is usually around 600 – 800°C depending upon the techniques being used. There are many students interested in gold and silver trims – we will be doing this third type of firing soon! After firing your work will be in the student finished work shelves. Remember to pay for it before you head out the door! There is a small extra charge for using porcelain clay (it’s more than twice the price of regular clay), and for any third firing process! Once your work has been fired it can not turn back into clay for millennia – so don’t fire it if you don’t like it! Put it in the bucket for recycling. https://firebirdstudios.com.au/the-process-of-making-pottery/Ceramics have evolved over thousands of years.A white earthenware side plate with a gadroon edge. Has water marks and chips on front.‘Johnson Bros England Reg No 15587’flagstaff hill, warrnambool, shipwrecked-coast, flagstaff-hill, flagstaff-hill-maritime-museum, maritime-museum, shipwreck-coast, flagstaff-hill-maritime-village, johnson bros, ceramics, tableware -
 Flagstaff Hill Maritime Museum and Village
Domestic object - Plate, Alfred Meakin
The Process of Making Pottery Decorating, Firing, Glazing, Making, Technical There is a rhythm and flow to clay. It can’t be done all at once! Even the making process! It can take weeks to get everything done, especially if you can only work on your pottery once a week! Even though we have three hour classes, it’s often just not enough time! Here is an overview of some of the processes so you have a bit more grasp on some of the technical stuff! Step One – Design There are SO many ideas out there for making stuff in clay! From delicate porcelain jewellery, through to heavy sculptural work and everything in between. Deciding your direction is sometimes not that easy – when you first start, try everything, you will naturally gravitate to the style that you enjoy! The options and variations are endless and can get a wee bit overwhelming too! Check in with me before you start to ensure your ideas will work, what order you might do things, how you could achieve the look you are seeking and any other technical data required! Step Two – Making Clay is thixotropic. This means that as you work with it, the clay first gets sloppier and wetter, before is begins to dry in the atmosphere. For most things, you simply can’t do all parts of the project at once. An example of work order might look like: Get last weeks work out from the shelves Prepare clay for today’s work – roll your clay, prepare balls for throwing, make the first stage of a pinch pot) Clean up last week’s work and put it on the shelf for bisque firing Check that you have any glazing to do – and do enough of it that you will have time to finish your main project Do the next step of your next project – there might be a further step that can’t be complete immediately, in that case, wrap your work well and put onto the shelves. Letting your work rest for a while can really help keep your work clean and professional looking. Many things require bagging under plastic to keep it ready for work the next week – put your name on the outside of the bag so you can find your work easily. We have stickers and markers. Consider how you want to decorate your work – coloured slip can be applied at a fairly wet stage (remembering that it will make your work even wetter!). Trying to apply slip to dry clay won’t work! If you want to do sgraffito – you will need to keep the work leather hard (a state of dryness where you can still work the clay with a little effort and a little water and care). Step Three – Drying Most of the time your work can go into the rack uncovered to let it dry out for the following week. If you want to continue forming or shaping you will need to double bag your work – put your work on a suitable sized bat and put the bat in a bag so the base of the bag is under the bat, then put another bag over the top of the work and tuck the top of the bag under the bat. If you want to trim (or turn) your thrown work the following week, it should also be double bagged. If your work is large, delicate, or of uneven thicknesses, you should lightly cover your work for drying. When considering the drying process, bare in mind the weather, humidity and wind! The hotter and dryer, the faster things dry and work can dry unevenly in the shelves – this can lead to cracking – another time to lightly cover your work for drying. Step Four – Trimming and Cleaning Up Your work is dry! It is called greenware now and it is at it’s most fragile! Handle everything with two hands. I often refer to soft hands – keep everything gentle and with your fingers spread as much as possible. Try to not pick up things like plates too much, and always with both hands! Before your work can be bisque fired it should be “cleaned up”. You work won’t go into the kiln if it has sharp edges – when glazed, sharp edges turn into razor blades! Use a piece of fly wire to rub the work all over – this will scratch a little so be light handed. Use a knife or metal kidney to scrape any areas that require a bit more dynamic treatment than the fly wire offers! Finally, a very light wipe over with a slightly damp sponge can help soften and soothe all of your edges and dags! Trimming thrown work: If you are planning to trim (or turn) your thrown work (and you should be), make sure you bag it well – your work should be leather hard to almost dry for easiest trimming. Use this step to finish the work completely – use a metal kidney to polish the surface, or a slightly damp sponge to give a freshly thrown look. Wipe the sponge around the rim after trimming, and check the inside of the pot for dags! Trimming slip cast work: Usually I will trim the rims of your work on the wheel the following day to make that stage easier, however you will still need to check your work for lumps and bumps. Last but not least – check that your name is still clearly on the bottom of your work. Step Five – Bisque Firing When the work is completely dry it can go into the bisque kiln. The bisque kiln is fired to 1000°C. This process burns off the water in the clay as well as some of the chemically bound water. The structure of the clay is not altered that much at this temperature. Inside the bisque kiln, the work is stacked a little, small bowl inside a larger bowl and onto a heavy plate. Smaller items like decorations or drink coasters might get stacked several high. Consideration is paid to the weight of the stack and shape of the work. A bisque kiln can fire about one and a half times the amount of work that the glaze kiln can fire. The firing takes about 10 hours to complete the cycle and about two days to cool down. Once it has been emptied the work is placed in the glaze room ready for you to decorate! Step Six – Glazing Decorating your work with colour can be a lot of fun – and time consuming! There are three main options for surface treatment at this stage: Oxide Washes Underglazes Glazes Washes and underglazes do not “glaze” the work – It will still need a layer of glaze to fully seal the clay (washes don’t need glaze on surfaces not designed for food or liquid as they can gloss up a little on their own). Underglazes are stable colourants that turn out pretty much how they look in the jar. They can be mixed with each other to form other colours and can be used like water colours to paint onto your work. Mostly they should have a clear glaze on top to seal them. Oxides are a different species – the pink oxide (cobalt) wash turns out bright blue for instance. They don’t always need a glaze on top, and some glazes can change the colour of the wash! The glazes need no other “glaze” on top! Be careful of unknown glaze interactions – you can put any combination of glaze in a bowl or on a plate, but only a single glaze on the outside of any vertical surface! Glazes are a chemical reaction under heat. We don’t know the exact chemicals in the Mayco glazes we use. I can guess by the way they interact with each other, however, on the whole, you need to test every idea you have, and not run the test on a vertical surface! Simply put, glaze is a layer of glass like substance that bonds with the clay underneath. Clay is made of silica, alumina and water. Glaze is made of mostly silica. Silica has a melting point of 1700°C and we fire to 1240°C. The silica requires a “flux” to help it melt at the lower temperature. Fluxes can be all sorts of chemicals – a common one is calcium – calcium has a melting point of 2500°C, however, together they both melt at a much lower temperature! Colourants are metal oxides like cobalt (blue), chrome (green through black), copper (green, blue, even red!), manganese (black, purple and pink) iron (red brown), etc. Different chemicals in the glaze can have dramatic effects. for example, barium carbonate (which we don’t use) turns manganese bright pink! Other elements can turn manganese dioxide brown, blue, purple and reddish brown. Manganese dioxide is a flux in and of itself as well. So, glazes that get their black and purple colours, often interact with other glazes and RUN! Our mirror black is a good example – it mixes really well with many glazes because it fluxes them – causes them to melt faster. It will also bring out many beautiful colours in the glazes because it’s black colouring most definitely comes from manganese dioxide! Glaze chemistry is a whole subject on it’s own! We use commercial Mayco glazes on purpose – for their huge range of colour possibilities, stability, cool interactions, artistic freedom with the ability to easily brush the glazes on and ease of use. We currently have almost 50 glazes on hand! A major project is to test the interactions of all glazes with each other. That is 2,500 test tiles!!!! I’m going to make the wall behind the wheels the feature wall of pretty colours! Step Seven – Glaze (Gloss or sometimes called “Glost”) Firing Most of the time this is the final stage of making your creation (but not always!) The glaze kiln goes to 1240°C. This is called cone 6, or midrange. It is the low end of stoneware temperatures. Stoneware clays and glazes are typically fired at cone 8 – 10, that is 1260 – 1290°C. The energy requirement to go from 1240°C to 1280°C is almost a 30% more! Our clay is formulated to vitrify (mature, turn “glass-like”) at 1240°, as are our glazes. A glaze kiln take around 12 hours to reach temperature and two to three days to cool down. Sometimes a third firing process is required – this is for decoration that is added to work after the glaze firing. For example – adding precious metals and lustres. this firing temperature is usually around 600 – 800°C depending upon the techniques being used. There are many students interested in gold and silver trims – we will be doing this third type of firing soon! After firing your work will be in the student finished work shelves. Remember to pay for it before you head out the door! There is a small extra charge for using porcelain clay (it’s more than twice the price of regular clay), and for any third firing process! Once your work has been fired it can not turn back into clay for millennia – so don’t fire it if you don’t like it! Put it in the bucket for recycling. https://firebirdstudios.com.au/the-process-of-making-pottery/Ceramics have evolved over thousands of years.Earthenware dessert plate, cream colour. Made by Alfred Meakin, England. Backstamped ‘Alfred Meakin England’. flagstaff hill, warrnambool, shipwrecked-coast, flagstaff-hill, flagstaff-hill-maritime-museum, maritime-museum, shipwreck-coast, flagstaff-hill-maritime-village, alfred meakin, ceramics, earthenware, kitchenware -
 Flagstaff Hill Maritime Museum and Village
Domestic object - Jug
The Process of Making Pottery Decorating, Firing, Glazing, Making, Technical There is a rhythm and flow to clay. It can’t be done all at once! Even the making process! It can take weeks to get everything done, especially if you can only work on your pottery once a week! Even though we have three hour classes, it’s often just not enough time! Here is an overview of some of the processes so you have a bit more grasp on some of the technical stuff! Step One – Design There are SO many ideas out there for making stuff in clay! From delicate porcelain jewellery, through to heavy sculptural work and everything in between. Deciding your direction is sometimes not that easy – when you first start, try everything, you will naturally gravitate to the style that you enjoy! The options and variations are endless and can get a wee bit overwhelming too! Check in with me before you start to ensure your ideas will work, what order you might do things, how you could achieve the look you are seeking and any other technical data required! Step Two – Making Clay is thixotropic. This means that as you work with it, the clay first gets sloppier and wetter, before is begins to dry in the atmosphere. For most things, you simply can’t do all parts of the project at once. An example of work order might look like: Get last weeks work out from the shelves Prepare clay for today’s work – roll your clay, prepare balls for throwing, make the first stage of a pinch pot) Clean up last week’s work and put it on the shelf for bisque firing Check that you have any glazing to do – and do enough of it that you will have time to finish your main project Do the next step of your next project – there might be a further step that can’t be complete immediately, in that case, wrap your work well and put onto the shelves. Letting your work rest for a while can really help keep your work clean and professional looking. Many things require bagging under plastic to keep it ready for work the next week – put your name on the outside of the bag so you can find your work easily. We have stickers and markers. Consider how you want to decorate your work – coloured slip can be applied at a fairly wet stage (remembering that it will make your work even wetter!). Trying to apply slip to dry clay won’t work! If you want to do sgraffito – you will need to keep the work leather hard (a state of dryness where you can still work the clay with a little effort and a little water and care). Step Three – Drying Most of the time your work can go into the rack uncovered to let it dry out for the following week. If you want to continue forming or shaping you will need to double bag your work – put your work on a suitable sized bat and put the bat in a bag so the base of the bag is under the bat, then put another bag over the top of the work and tuck the top of the bag under the bat. If you want to trim (or turn) your thrown work the following week, it should also be double bagged. If your work is large, delicate, or of uneven thicknesses, you should lightly cover your work for drying. When considering the drying process, bare in mind the weather, humidity and wind! The hotter and dryer, the faster things dry and work can dry unevenly in the shelves – this can lead to cracking – another time to lightly cover your work for drying. Step Four – Trimming and Cleaning Up Your work is dry! It is called greenware now and it is at it’s most fragile! Handle everything with two hands. I often refer to soft hands – keep everything gentle and with your fingers spread as much as possible. Try to not pick up things like plates too much, and always with both hands! Before your work can be bisque fired it should be “cleaned up”. You work won’t go into the kiln if it has sharp edges – when glazed, sharp edges turn into razor blades! Use a piece of fly wire to rub the work all over – this will scratch a little so be light handed. Use a knife or metal kidney to scrape any areas that require a bit more dynamic treatment than the fly wire offers! Finally, a very light wipe over with a slightly damp sponge can help soften and soothe all of your edges and dags! Trimming thrown work: If you are planning to trim (or turn) your thrown work (and you should be), make sure you bag it well – your work should be leather hard to almost dry for easiest trimming. Use this step to finish the work completely – use a metal kidney to polish the surface, or a slightly damp sponge to give a freshly thrown look. Wipe the sponge around the rim after trimming, and check the inside of the pot for dags! Trimming slip cast work: Usually I will trim the rims of your work on the wheel the following day to make that stage easier, however you will still need to check your work for lumps and bumps. Last but not least – check that your name is still clearly on the bottom of your work. Step Five – Bisque Firing When the work is completely dry it can go into the bisque kiln. The bisque kiln is fired to 1000°C. This process burns off the water in the clay as well as some of the chemically bound water. The structure of the clay is not altered that much at this temperature. Inside the bisque kiln, the work is stacked a little, small bowl inside a larger bowl and onto a heavy plate. Smaller items like decorations or drink coasters might get stacked several high. Consideration is paid to the weight of the stack and shape of the work. A bisque kiln can fire about one and a half times the amount of work that the glaze kiln can fire. The firing takes about 10 hours to complete the cycle and about two days to cool down. Once it has been emptied the work is placed in the glaze room ready for you to decorate! Step Six – Glazing Decorating your work with colour can be a lot of fun – and time consuming! There are three main options for surface treatment at this stage: Oxide Washes Underglazes Glazes Washes and underglazes do not “glaze” the work – It will still need a layer of glaze to fully seal the clay (washes don’t need glaze on surfaces not designed for food or liquid as they can gloss up a little on their own). Underglazes are stable colourants that turn out pretty much how they look in the jar. They can be mixed with each other to form other colours and can be used like water colours to paint onto your work. Mostly they should have a clear glaze on top to seal them. Oxides are a different species – the pink oxide (cobalt) wash turns out bright blue for instance. They don’t always need a glaze on top, and some glazes can change the colour of the wash! The glazes need no other “glaze” on top! Be careful of unknown glaze interactions – you can put any combination of glaze in a bowl or on a plate, but only a single glaze on the outside of any vertical surface! Glazes are a chemical reaction under heat. We don’t know the exact chemicals in the Mayco glazes we use. I can guess by the way they interact with each other, however, on the whole, you need to test every idea you have, and not run the test on a vertical surface! Simply put, glaze is a layer of glass like substance that bonds with the clay underneath. Clay is made of silica, alumina and water. Glaze is made of mostly silica. Silica has a melting point of 1700°C and we fire to 1240°C. The silica requires a “flux” to help it melt at the lower temperature. Fluxes can be all sorts of chemicals – a common one is calcium – calcium has a melting point of 2500°C, however, together they both melt at a much lower temperature! Colourants are metal oxides like cobalt (blue), chrome (green through black), copper (green, blue, even red!), manganese (black, purple and pink) iron (red brown), etc. Different chemicals in the glaze can have dramatic effects. for example, barium carbonate (which we don’t use) turns manganese bright pink! Other elements can turn manganese dioxide brown, blue, purple and reddish brown. Manganese dioxide is a flux in and of itself as well. So, glazes that get their black and purple colours, often interact with other glazes and RUN! Our mirror black is a good example – it mixes really well with many glazes because it fluxes them – causes them to melt faster. It will also bring out many beautiful colours in the glazes because it’s black colouring most definitely comes from manganese dioxide! Glaze chemistry is a whole subject on it’s own! We use commercial Mayco glazes on purpose – for their huge range of colour possibilities, stability, cool interactions, artistic freedom with the ability to easily brush the glazes on and ease of use. We currently have almost 50 glazes on hand! A major project is to test the interactions of all glazes with each other. That is 2,500 test tiles!!!! I’m going to make the wall behind the wheels the feature wall of pretty colours! Step Seven – Glaze (Gloss or sometimes called “Glost”) Firing Most of the time this is the final stage of making your creation (but not always!) The glaze kiln goes to 1240°C. This is called cone 6, or midrange. It is the low end of stoneware temperatures. Stoneware clays and glazes are typically fired at cone 8 – 10, that is 1260 – 1290°C. The energy requirement to go from 1240°C to 1280°C is almost a 30% more! Our clay is formulated to vitrify (mature, turn “glass-like”) at 1240°, as are our glazes. A glaze kiln take around 12 hours to reach temperature and two to three days to cool down. Sometimes a third firing process is required – this is for decoration that is added to work after the glaze firing. For example – adding precious metals and lustres. this firing temperature is usually around 600 – 800°C depending upon the techniques being used. There are many students interested in gold and silver trims – we will be doing this third type of firing soon! After firing your work will be in the student finished work shelves. Remember to pay for it before you head out the door! There is a small extra charge for using porcelain clay (it’s more than twice the price of regular clay), and for any third firing process! Once your work has been fired it can not turn back into clay for millennia – so don’t fire it if you don’t like it! Put it in the bucket for recycling. https://firebirdstudios.com.au/the-process-of-making-pottery/The form of the jug has been in use for many centuries.Stoneware jug. Two tone brown glaze with pierced lip behind spout. Spout chipped.None.flagstaff hill, warrnambool, shipwrecked-coast, flagstaff-hill, flagstaff-hill-maritime-museum, maritime-museum, shipwreck-coast, flagstaff-hill-maritime-village, jug, ceramic jug -
Federation University Historical Collection
Magazine, SMB Student Magazine 1939, 1939
School Council, Members of Staff, Magazine Committee, List of Full Course Students 1938, Full Course Commercial Students, Editorial, Personal Column, Obituary - Roy S. Hall - F. J. Martell, S.M.B Old Boys' Association, The Literary Society, Centenary Jottings, Fumes from the Lab, Broken Hill, News from Papua, Sidelights on the B.H.P. Cadet Training Scheme, Arts & Crafts Gossip, Sport, Commercial Notes, The Junior Techs, Junior Technical Sportinggreen, orange and blue soft covered magazine with black and green font. 93 pages including advertisements. Artwork Speciman - By Printing Class Students SMB J. Bickart of Bickarts - Lino Cut - By Bob McHutchison J. Bickart of Bickarts - Lino Cut - By Ernest Gribble Bickarts Lino Cut competition 1st Place - By Max Coward Professor p.3 - By A. Janetski The Treasurer - By Bob McHutchison The Editor - By Max Coward Fi-Fi - By Max Coward A Rustic Corner at White flat - By Enid Johnston Diner and Waiter p.12 - By Max Coward Bickarts Lino Cut competition 2nd Place - By Bob McHutchison Joyce - By Ernest Gribble Hotcha Club p.14 - By Adeline Helm Up from white flat - BY Isobel Boustead "What! Milk again?" - By Max Coward Keith - By Max Coward George - By Bob McHutchison Monty - By Bob McHutchison Frank - By Ernest Gribble Shirley - By Max Coward Bickarts Lino Cut competition section B 1st Place - By Violet D'angri Ice Cream p.25 - By Audrey Janetski Indignant Ratepayer - By Adeline Helm Maxie - By Bob McHutchison Enid - By Ernest Gribble Bickarts Lino Cut competition section B 2nd Place - By Marian Peirce Helper & Victim p.34 - By Max Coward Roma - By Ernest Gribble 1939 Overture - By Ernest Gribble Joan - By Bob McHutchison Barbara - By Fifi Malseed Kath - By Ernest Gribble Bickarts Lino Cut competition section C 1st Place - By W. Rowe Coralie - By Ernest Gribble Marion - By Bessie Sargent Betty - By Bob McHutchison Mick.H - By Bob McHutchison Rooster - By Bessie Sargent Stinker Lees - By Gordon Yorke Sammy - By Bessie Sargent Legs - By Ernest Gribble Jack and Jill - By Ernest Gribble Sunbeam - By Earnest Gribble Marj - By Bob Mchutchison Dorothy - By Bob McHutchison Joan - By Ernest Gribble Betty - By Ernest Gribble Bickarts Lino Cut competition section C 2nd Place - By F.P. Manning Helen - By Maurice Collins Donk - By Maurice Collins Out of Step - By Maurice Collins Rita - By Maurice Collins Betty - By Maurice Collins ballarat school of mines students' magazine 1939, smb, geoffrey angwin, francis butson, alma bayly, isabel boustead, roma bruce, robert w. bates, nataly callow, max coward, tom coburn, maurice collins, lloyd davies, jessie daniel, marion dolan, elsie fisher, ernest gribble, betty george, adeline helm, mavis heinz, gladys james, enid johnston, audrey janetski, lloyd jones, ray jackson, stan laurie, maureen mcrae, margaret mcdougall, bessie martin, sheila moss, ian moscript, bob mchutchison, john moorhouse, fifi malseed, estelle morris, barbara rogers, john robison, john robinson, roma sprake, bessie sargent, joyce scott, una semmler, margaret taylor, norma tatlock, avis vaughan, coral vernon, jeff wilkinson, max webster, gordon yorke -
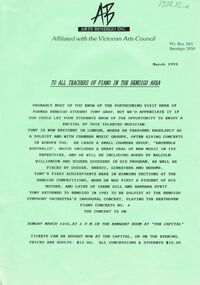 Bendigo Historical Society Inc.
Document - MERLE HALL COLLECTION: ARTS BENDIGO, VARIOUS SUNDRY DOCUMENTS
Merle Hall Collection - Arts Bendigo, Various sundry documents- a. One-page notice (''To All Teachers of Piano in the Bendigo Area'') of visit to Bendigo of former Bendigo student Tony Gray, notice date March 1993 - concert in the Banquet Room, Capital Theatre 14/3/1993; b. One-page notice of visit of Russian pianist Elisio Virsaladze and ''Moving Harps'' (trio) for October dates Year??; c. A5 brochure of information and dates for 1985 ''for many of the local and visiting arts-associated functions''. (3 pages of functions with dates, summary of performance and location of show; d. Single-page sheet of ''Arts Bendigo Activities Oct. '84 - Sept. '85 with paragraphs of ''Major Achievements'' and ''Disappointments'' and ''Thanks''. Also - ''Just Happened of Still To Come''; d. Six paged listing of 'Bendigo Subscribers' List 1979'' (Arts Council of Australia) with * annotations of being ''Financial'' - mostly personal names/addresses but some organizations. Approx 150 entries; e. two-paged list of ''Arts Bendigo Members July 1985'' with annotations of s= Single and F = Family members - approx 65 names; f. one-page Brief Report of Program Subcommittee June 1982, with rough analysis of attendance figures for recent shows; g. 3-page report of AB Development Sub-Committee meeting of 25/2/1985; h. two-paged report on ''Possible rehearsal and performing spaces in Bendigo area as known at June 1988 by Merle Hall, Secretary - brief details of 7 facilities and a number of ''Other'' facilities, with a final section on ''The Grand Vision''; i. One-page ''Proposals from Development Sub-committee'', prepared by Ellis C Blainer 3/3/87 - eight proposals in small detail; j. Bi-fold flyer ''Membership Information'' with description of AB activities and membership details/application form (not dated); k. A5 invitation of 'parchment' paper to ''25 Years of Achievement in the Arts'' (27/101995) - a brief AGM with a Social Evening from 8 pm; l. one-page invitation note accompanying the formal invitation to the special evening for 25th celebration of working with the arts in the Bendigo region. -
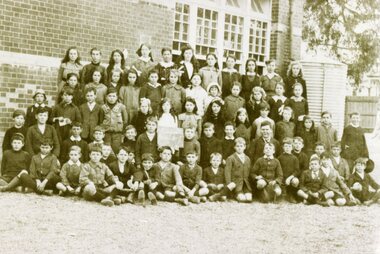 Ringwood and District Historical Society
Photograph, Ringwood State School - Grade 5-6, 1920
Black and white photograph - Grade 5-6, 1920"Attached to photograph" Back Row - L to R: D.Pickett, E.Tait, E.Clarke, E.Peacock, G.Evans, L.Greenwood, H.Pickett, E.Franks, ?, G.Barber, E.Martin. 2nd Row - L to R: R.Joseph, M.Flowers, ?, L.Pratt, ?, M.Pratt, C.Stock, ?, J.Madden, E.Luscombe, (?).Ellis, (?) Madden. 3rd Row - L to R: R.Bonsack, E.Hamilton, E.Wigley, R.Bradshaw, A.Dickson, J.Davidson, A.Pickett, L.Hunt, D.Skurrie, E.Thomas, T.Watson, (?) Luscombe, E.Black, S.Kay. 4th Row - L Maggs, J.Barry, W.Allen, W.Kraefft, W.Pump, A.White, A.Blood, W.Ginn, S.Clarke, C.Nelson. Front Row - H.FrankW.O'Brien, A.Holmes, H.Hunt, J.Stock, T.Murray, ? Von Horn, G.Eastwood, C.Whitechurch, E.Lane, G.Dickson, L.Pratt, W.Meyland, C.Burns, J.Pratt, W.Fisher, T.Rymers, ?, N.Bonsack, H.Little. ---- And Written on backing sheet of one of the enlargements, "Ringwood S. School 5th & 6th Grade, approx. 1918. Back row - D. Pickett, E. Tait, E. Clarke, E. Peacock, G. Evans, L. Greenswood, H. Pickett, E. Frank, x, G. Barvber, E. Martin. 4th row - R. Josephs, M. Flowers, x, L. Pratt, x, M. Pratt, C. Sto??, x, F. Madden, E. Luscombe, x, Ellis, Madden. 3rd row - R. Bensack, E. Hamilton, Evan Wigley, R. Bradshaw, A. Dickson, F. Davidson, A. Pickett, L. Hunt, D. Skurrie, E. Thomas, V. Watson (Wigley), Luscombe, E. Black, S. Kay. 2nd row - L. Maggs, F. Barry, W. Allen, W. Kraefft, W. Pump, A. White, A. Blood, W. Ginn, S. Clarke, C. Nelson. 1st row - H. Franks, W. O'Brien, A. Holmes, H. Hunt, J. Stock, T. Murray, x, Von Horan, G. Eastwood, C. Whitechurch, E. Lane, G. Dickson, L. Pratt, W. Mayland, C. Burns, J. Pratt, W. Fisher, F. Rymers, x, V. Bonsack, H. Little". 4th Row - L to R: L.Maggs, J.Barry, W.Allen, W.Kraefft, W.Pump, A.White, A.Blood, W.Ginn, S.Clarke, C.Nelson. Front Row - L to R: H.Franks, W.O'Brien, A.Holmes, H.Hunt, J.Stock, T.Murray, (?) VonHorn, G.Eastwood, C.Whitechurch, E.Lane, G.Dickson, L.Pratt, W.Meyland, C.Burns, J.Pratt, W.Fisher, T.Rymers, ?, N.Bonsack, H.Little. Teacher: -
 Eltham District Historical Society Inc
Document - Property Binder, 931 Main Road, Eltham
Present day location of Nongkhai Thai Eltham restaurant Formerly the location of: Luther Haleys Bakery and General Store (Sep 1902-1917) - Hayley built this store, which was the first store erected in the present-day Eltham shopping district Hannah Lloyd's General Store (1917-c.Feb 1920) Various owners Staff's General Store (c.1939-Feb 1965) then demolished Ray Staff Eltham Big Star Food Centre (c.1965-1967) Eltham Big Star Food Centre (Staffs new building c.1965-1967) A Country Heritage Furniture and Homewares (?-2006) Newspaper advertisement: Leader Associated Newspapers, 100 Years of News Special Edition, August 27, 1997, p6; A Country Heritage Newspaper advertisement: Diamond Valley Leader, 4 September 2006, Closing Down Sale, A Country Heritage In February 1965, Staffs Railway Store, the oldest business premises in the Eltham shopping district was demolished. Formerly a self-service grocery, restaurant and electrical repair shop, the building for many years housed Eltham’s only ‘family’ grocer and feed store. Earlier it had appeared to have been the town’s bakery. The building had been purchased in late March 1939 by Mr Eric N. Staff. At the time of E.N. Staff’s purchase there were huge bakers’ ovens located at the rear and the building also had a well and four toilets for employees. When the ‘pictures’ came to Eltham with the opening of the Eltham Public Hall across the road in 1941, Mr E.N. Staff extended the business and opened a milk bar and sweet shop. Further extensions re-established the tea rooms of days gone by. Mr E.N. Staff conducted business for about 15 years before handing over the reins to his son, Ray Staff. When his son Ray took over, the milk bar and tea rooms were closed for several years but the milk bar and was later re-opened and subsequently became a greengrocers and later again, a restaurant. The tea rooms section was converted to an electrical repair shop about 1955. Electoral Roll records for 1967 record Raymond Charles Staff at 929 Main Road, Eltham, grocer, and in 1968 at Lot 4, Hillcrest Avenue, Eltham, taxi truck operator. Staff’s store appears to have occupied 929-933 Main Road and the Eltham Big Star Food Centre was centred around 931 Main Road. It would appear that Ray continued to run the business for approximately two years after the original store was demolished and a new supermarket was built. Today, 931 Main Road is the Nongkhai Thai Restaurant and is precisely where the original Staffs store stood. Even though the facade has been modified at eye level with new larger windows, the upper facade is identical to that of the new Eltham Big Star Food Centre of 1965/66. But how did the original building, the oldest premises in the 1965 era shopping centre come about? On August 12th, 1902 at the Eltham Courthouse, appearing before T. Smallman, Esq,. Police Magistrate, and Messrs. W. Duncan and W.J. Taylor, Justices of the Peace is Luther Haley, baker. Wilfred Henry Johnston, by his agent Stanley Ernest Elder had applied for a warrant of ejectment under the Landlord and Tenant Act 1890 against Luther Haley from the bakery premises at the corner of Main Road and York Street. From the evidence presented we learn that Mrs Burgoyne of Eltham had purchased the property some months earlier from Mr Johnston, which consisted of a store and bakery establishment at Eltham occupied by Mr. Luther Haley, and whose lease expired some little time back, and up to the present time, Mr. Haley was not prepared to leave. He informed the court that he is unable to secure at Eltham a suitable house in which to carry on his business, but was building a place near the railway station which he expected to be done in about three weeks time, and he is then prepared to give up possession of the premises he now occupies. Mr Smallman informed the defendant, Luther Haley, that he will have to quit the premises in three weeks from the present date, and that a warrant of ejectment would be issued. However he also informed Mr Haley that he would order the warrant to lie in the office for three weeks from that date. The premises under construction referred to by Luther Haley in court were situated on the western side of Main Road, near the railway station slightly opposite present-day Arthur Street. It was opened around September 1902 as a General Store, Bakery and Tea Rooms. This was the original building in the present-day shopping precinct. At the time the only thing nearby was the railway station. Luther Haley’s business appeared to prosper and he would have catered to not only the locals abut also day visitors by train on Sundays coming up from Melbourne, offering fresh baked produce, tea rooms and summer drinks. The fields across Main Road running between present day Arthur Street and Luck Street were known as Haley’s Paddock and at times were used for community festivities and picnics. A newspaper report on the annual State schools picnic held at Haley’s Paddock on March 11, 1904 described it as “quite close to the railway station, and is quite capable of holding comfortably 10,000 people. With its ample shade and hilly surroundings, it is an ideal place for any gathering.” Luther Haley successfully ran his general store, bakery and tea rooms until 1917 when he and his family departed the district and moved to Westgarth Street in Northcote where he changed careers and became a publisher. It was then taken over by Hannah Lloyd and became known as Lloyd’s Railway General Store from 1917 to 1920. From then it had a succession of owners, one as short as two months until March 31, 1939 when the Grocery Business formerly carried on by Mr. T.K. White of Eltham for the previous eight years was purchased by Mr Eric N. Staff of Research and became known as E.N. Staff’s Railway Store. The ownership timeline for the store is as follows: Luther Haley Sep 1902-1917 Hannah Lloyd 1917-c.Feb 1920 Messrs J.R. & N.E. Lee 1920-Sep 1922 A. & E. Copeland Sep 1922-Sep 1925 Mr Price Sep 1925-Nov 1925 Mr Warren Nov 1925?-Nov 1926 A.W.J. Edwards Nov 1926-1931 T.K. White 1931-Mar 1939 Eric Staff Apr 1939-c.1954 Ray Staff c.1954-Feb 1965 then demolished Ray Staff Eltham Big Star Food Centre c.1965-1967 THROWBACKTHURSDAY: ELTHAM BIG STAR FOOD CENTRE, MAIN ROAD, 1966 https://elthamhistory.wordpress.com/2020/04/16/throwbackthursday-eltham-big-star-food-centre-main-road-1966/eltham, businesses, a country heritage, property, shops, main road eltham, a. copeland, a.w.j. edwards, big star food centre, e. copeland, eric staff, general store, hannah lloyd, j.r. lee, lloyd's general store, luther haley, n.e. lee, price, ray staff, staffs general store, supermarket, t.k. white -
 Orbost & District Historical Society
book, The Bridge, 1930's
This book was written by Dr J. J. C. Bradfield, (John Job Crew), 1867-1943. Dr JJC Bradfield was a visionary Australian engineer who worked with enormous energy and vision to build the infrastructure which he foresaw that Sydney would need as it grew. As early as 1903 Bradfield was making the case for the Sydney Harbour Bridge, in his presidential address as President of the Sydney University Engineering Society. Bradfield’s proposal — at that stage for a cantilever bridge between Dawes Point and Milsons Point — won the committee’s support and they recommended it be accepted. However, the First World War put a stop to these plans. While a bill to authorise the project passed the lower house of the NSW parliament in 1916, it failed to pass the upper house, on the grounds that funds should not be diverted from the war effort. With the war over, in 1922 the Sydney Harbour Bridge Act was passed by the NSW Parliament. The Sydney Harbour Bridge was officially opened in 1932 after Museum and St James railway stations were built. This book was written from the story broadcast by Dr. J.J.C. Bradfield. This item is a useful reference tool.A staple soft cover 16 pp booklet with a buff coloured cover. It has a sketch of the Sydney Harbour Bridge behind the title "The Bridge" in dark brown print. It contains information and photographs of the history and construction of Sydney Harbour Bridge.sydney-harbour-bridge bradfield-dr-j-j-c -
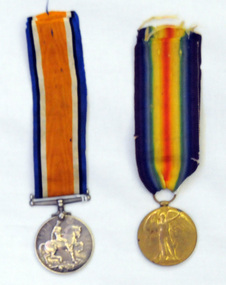 Orbost & District Historical Society
medals, 1919-1920
These medals are part of the Lawless Collection. The Lawless family lived in Orbost from 1907 - c 1920. John Francis Lawless had a saddlery shop. He died at an early age - 47 years - June 7 1912, leaving his wife, Elizabeth and seven children. The eldest son, Victor Rowland lawless volunteered for serv ice in WW1 but did not leave Australia because of illness. The second son, Edward Vincent Lawless (b 1895 d 1917) worked for McCoy & Co. in Orbost, coachbuilding, undertakers, general blacksmiths and farriers, prior to enlisting in WW!. He was trained as a signaller and was sent to France where he was killed in action on 9.10.1917. Elizabeth Lawless worked as a ladies' nurse (midwife) in Orbost prior to leaving the district in 1920. She lived to 6.6.1975 aged 104 years. The British War Medal was a medal given to people who had fought in the First World War. The Victory Medal (also called the Inter-Allied Victory Medal) is a First World War campaign medal of Britain and her then colonies and dominions which included Australia.These personal documents, photographs, medals and books give an insight into the human element of World War 1 ensuring that those who were part of the Orbost community and died while playing a vital role during this time are remembered.Two medals in recognition of service during WW1. 1846.3 is a silver medal a WW1 1914-18 British War Medal. Obverse: Bare head of King George V facing left; text around, 'GEORGIVS V BRITT: OMN: REX ET IND: IMP:'; the artist's initials 'B.M.' (Bertram MacKennal) are on the neck truncation. Reverse: Naked figure of St. George on horseback advancing right trampling a shield bearing an eagle design and a skull and crossbone. It has a blue/white/orange striped ribbon attached. 1846.4 is a gold coloured medal. The obverse in the medal shows the winged, full-length, full-front, figure of 'Victory' with her left arm extended and holding a palm branch in her right hand. The reverse has the words ‘THE GREAT / WAR FOR / CIVILISATION / 1914-1919' in four lines, all surrounded by a laurel wreath. It has a purple/blue/green/yellow and orange striped ribbon attached.medals ww1 lawless-family -
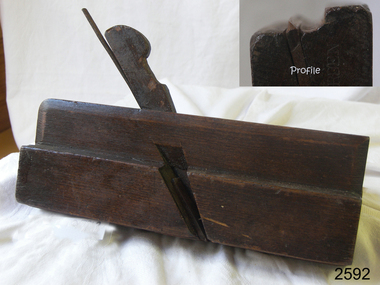 Flagstaff Hill Maritime Museum and Village
Tool - Moulding Plane, Charles Nurse, 1860-1900
The original Nurse family business began in 1841 in Maidstone Kent until 1861 where they were plane makers, moving to London in 1887 the company became C Nurse & Co. And continued until 1937 under that name at the (Invicta works). The majority of their plane making was done in London but there are Sheffield and Brighton marks on their tools as well. The company was not only wood plane makers but tool makers in general with the Charles Nurse & Co catalogue having 350 pages of tools for sale of varying types for different building trades and over 138 pages dedicated to woodworking tools. Records show that the company was at 182 Walworth Road London from 1887-1949. However, they had several retail outlets before this time and records indicate before 1887 Charles Nurse was at 32 Mill St Maidstone Kent, from 1844 -1860 but were in business before then. Also in Brighton at 135 Queens Road from 1865 -1871 and at 3 Mill Street Maidstone, again from 1872 - 1889 listed on records of the time as “plane and tool makers.”A vintage item made by a significant tool maker and retailer from the middle of the nineteenth century and into the first half of the twentieth century. These items were made commercially for firms and individuals that worked in wood and needed a tool that could produce an ornamental finish to timber. The tool was used before electric or mechanical routers or spindle moulders came into use. They were used by craftsmen to produce decorative mouldings by hand. These profiled planes came in various shapes and sizes. A significant tool that today is quite rare and sought after by collectors. It gives us a snapshot of how furniture and other decorative finishes were created on timber by the use of hand tools only. Moulding plane Side Bead - Single Box Size 5/16 Maker Charles and Co 1863 Stamped W. Burden (previous owner)flagstaff hill, warrnambool, shipwrecked-coast, flagstaff-hill, flagstaff-hill-maritime-museum, maritime-museum, shipwreck-coast, flagstaff-hill-maritime-village -
Glen Eira Historical Society
Article - Alma, Will
This file contains seven items about the life and international career of magician Will Alma: 1/A letter dated 15/06/1987, from Will Alma to Caulfield Historical Society which accompanied items he donated to CHS. 2/A letter dated 12/11/1987, from Will Alma to Caulfield Historical Society thanking them for sending him the Society’s October 1987 newsletter containing his brief biography. 3/Photocopy of article in CAULFIELD HISTORICAL SOCIETY NEWSLETTER No 30 of October 1987 about Will Alma. 4/Photocopy of cover and excerpt of article in Volume 67 of THE LINKING RING, dated March 1987, about magicians in Australia, including Will Alma. His photograph is on cover. 5/Transcript of article about Will Alma from THE LINKING RING, date and author unknown. 6/Transcript of article THE WILL ALMA LEGACY TO MAGIC by Margaret Yates, date and source unknown. Transcript of examination report by Leonard C. Mason to The Magic Circle, dated 17/06/1958, recommending promotion of Will Alma to membership of MIMC, London.alma will, sebastopol street, caulfield north, caulfield historical society, caulfield south, bishop oswald george, glen betty, alma william george, w.g. alma conjuring collection, caulfield historical society newsletter, zim, the magic circle mirror, will andrade’s magical review, mason leonard c, magicians, entertainers, entertainment equipment