Showing 258 items matching " crossing loop"
-
 Ballarat Tramway Museum
Photograph - Black & White Photograph/s - set of 7, 16/04/1972 12:00:00 AM
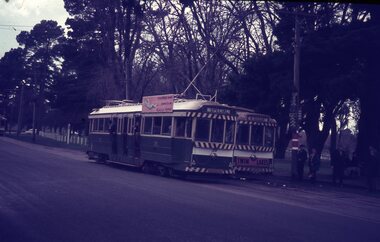
Yields information about the final day of the Bendigo tramways and some of the tramcars used.Set of seven black and white photographs of the day Bendigo Tramways closed 16-4-1972. Taken on Agfa paper. Has printing date of 18.8.72 stamped on rear. All have been used for display purposes. .1 - 25 leaving the depot .2 - 2 at Charing Cross, bound for Eaglehawk - has Ezywalkin Store in background. .3 - 18 crossing another tram at a loop on the Eaglehawk line. .4 - 28 at Charing Cross showing Special .5 - 26 inside depot, with Borough of Eaglehawk sign on the front bumper and bunting around the tram. .6 - 29 leaving the depot .7 - 26 in the final parade, with "Destination Eaglehawk" on a roof mounted advertisement board, with the Beehive building in the background and Coca Cola advertisement on top of the building. Photographer not known.3549.8 - has "photo No. 8" on rear and been marked out for publication. tramways, trams, bendigo, closure, eaglehawk, tram 25, tram 2, tram 18, tram 28, tram 26, tram 29 -
 Ballarat Tramway Museum
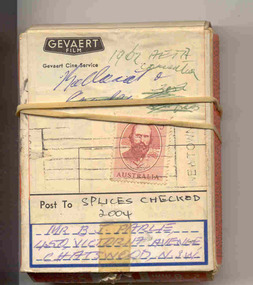
Film - Movie Film & Box, Gevaert, 1962
Yields information in movie film format of Ballarat trams in 1962, a enthusiast tour, how the system operated and was used by people., Yields information in movie film format of Ballarat trams in 1962, a enthusiast tour, how the system operated and was used by people.Movie film - 8mm, approx. 2.5mins, with green leader strip on a plastic reel, within a Gevaert film cardboard box, with a Harvin Film Laboratory, Marrickville NSW label and address to B.J. Parle, Chatswood and a 5d stamp. Titled "Ballarat 1962 AETA Convention". Has been transferred to DVD - see Reg item 4100 as Segment No. 5. Filmed and made by Ben Parle. Also transferred to DVD by Rod Cook Oct. 2015, via Roger Greenwood for use in his DVD, "The City of Ballarat Trams, Gardens & Gold" of 2016. See Reg Item 6883. Synopsis: based on time - Black and White film Title "Ballarat 1962 AETA Convention" 0:00 40 Sturt St, outbound 0:27 Bogie tram in Sturt St, inbound 0:39 No. 41, turning from Sturt into Drummond St. Nth 0:58 No. 37, turning from Sturt St, north track back into Drummond St Sth, 18 in the rear. 1:26 No. 18 departing Sebastopol and bouncing along. 1:46 No. 18 and 37 crossing Albert St Sebastopol 2:10 No. 18 and 37 arriving Grey St loop 2:33 endWritten labels giving title information on outside of box.trams, tramways, ballarat, drummond st, sturt st, sebastopol, tram 18, tram 37, tram 40 -
 Ballarat Tramway Museum
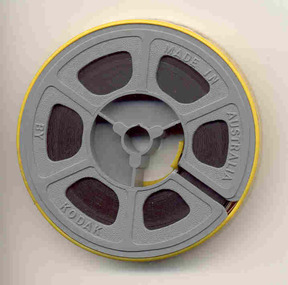
Film - Movie Film & Box, Kodak, 1960s
Yields information in movie film format of Ballarat trams in 1971 at the time of one of the closure tours and, a enthusiast tour, how the system operated and was used by people., Yields information in movie film format of Ballarat trams in 1971 at the time of one of the closure tours and, a enthusiast tour, how the system operated and was used by people.Movie film - 8mm, approx. 4.14 mins, with white leader strip on a plastic reel, within a Kodak movie yellow plastic container. Has been transferred to DVD - see Reg item 4100 as Segment No. 4. Filmed and made by an unknown person. Synopsis: based on time - Colour film Title "Ballarat trams specials" 0:00 No. 41 and two other bogie trams loading passengers outside the Ballarat railway station. 0:12 Image of R class loco and K class as 2nd loco at the station and train 0:18 Inside a bogie tram looking through saloon door showing the HTT logo. 0:23 From the front of a tram, or 39 turning from Lydiard St Nth into Sturt St and then proceeding along Sturt St. 0:31 Short sequence inside the tram with some passengers in the view 0:39 No. 21, showing Special in Sturt St West and then the two bogie trams following. 1:08 21 turning from Sturt St West into Hamilton Ave, followed by 41, 35 and 37 and then loading photographers. 1:58 As above north of Gardens Loop in Wendouree Parade. 2:07 Interior view of tram moving at speed, then Forest St corner showing church, and Wendouree Parade. 2:24 Drummond St Sth, crossing two trams at Bell St loop 2:29 Sebastopol line, from the window, heading towards the terminus. 2:44 No. 32 at Sebastopol terminus with the pole being turned. 3:01 Single trucker climbing Sturt St hill towards Lydiard St Nth. 3:17 No. 21 turning from Lydiard St Nth into Sturt St 3:31 Bogie tram climbing Sturt St hill towards Lydiard St Nth 3:55 Crossing the railway level crossing in Lydiard St Nth from the window of the tram. 4:02 Train departing from station – very poor sequence – appears to be a K class locomotive. 4:15 end Placed in a blue cardboard box specially made for the item 30/08/2010.trams, tramways, ballarat, vintage train, bell st, level crossings, lydiard st nth, sturt st west, tram 41, tram 39, tram 21, tram 35, tram 37, tram 32 -
 Ballarat Tramway Museum
Photograph - Black & White Photograph/s, Ron Hann, Jan. 1963
... tramcar and the tramcar it is crossing at the loop. tramways trams ...Yields information about the California Gully or Thorpe St Loop from the front of an in-bound tramcar and the tramcar it is crossing at the loop.Black and white print on heavy matt photographic paper of the Bendigo 2, crossing another bogie tram at the California Gully or Thorpe St Loop, c1963. Taken from the window of the inbound tramcar. No. 2 has the destination of Eaglehawk, a front dash panel advertisements for Whitehorse Whiskey and another for ice-cream? 2nd copy - laser print - with date etc on rear - added 22/2/2010, copy from Ron Hann. Printed on Fujifilm, Fujicolour Crystal Archive for Frontier".On rear in pencil "Eaglehawk line 1963" 2nd copy has label "Reference 6/214/27" Photo by Ron Hann" and another label "Eaglehawk Route Bendigo 01.63" tramways, trams, bendigo, eaglehawk, california gully, tram 2 -
 Ballarat Tramway Museum
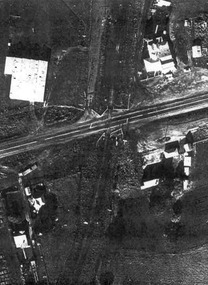
Document - Photocopies, John Phillips, Bungaree Aerial photo, 1980's
Demonstrates the use of bogie trams on the Lydiard St North route and the crossing of trams at Seymour St loop.Two sets of three copies of the Victorian Railways aerial photographs of Bungaree Railway station late 1960's early 1970's. Shows tennis court, station buildings, houses and sheds in the station yard. The level crossing does not appear to have any flashing lights installed on it.trams, tramways, bungaree, aerial views, victorian railways -
 Ballarat Tramway Museum
Photograph - Black & White Photograph/s, Dave Macartney, 25/07/1961 12:00:00 AM
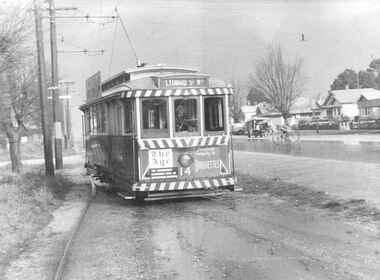
Yields information about the Grey St. loop and the street scene on a wet day with a milk car and bicycle in the view.Black and white photograph of No. 14 entering the Grey / Gray St. Loop, Albert St, Sebastopol. Taken during a rainy day with a horse drawn milk cart in the background and a cyclist crossing the road. The tram has the destination of Lydiard St. North, is running one man, the motorman / driver has a conductors bag around his neck. The tram also has dash canopy advertisements for "The Age" and Briquettes. Photo taken 25/7/1961 by Dave Macartney. Printed on stipple paper. Two copies held - 2nd in poor order - for temporary display only. Copy 3 - in good condition - added 26/7/2007, ex Alan Bradley 5/2007 - 203H x 252W.tramways, trams, sebastopol, albert st, grey st loop, horse drawn vehicle, milk cart, tram 14 -
 Ballarat Tramway Museum
Photograph - Black & White Photograph/s, John Phillips, late 1960's
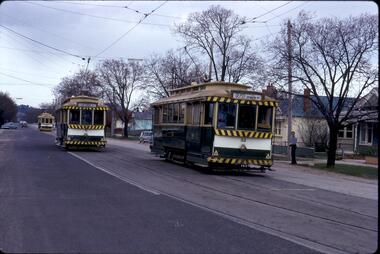
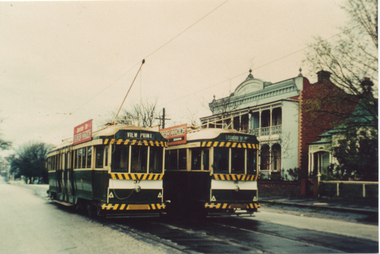
Black and white print of bogie tram No.35 and 28 crossing at the King St. Loop, late 1960's. No. 28 has destination of Victoria St and No. 35, View Point and a SEC roof advertisement. "Everything's under control in my all-electric kitchen". Photo by John Phillips. tramways, trams, king st, victoria st, tram 28, tram 35 -
 Ballarat Tramway Museum
Photograph - Black & White Photograph/s - set of 2, Dave Macartney, Apr. 1962
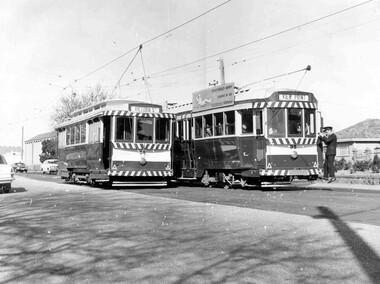
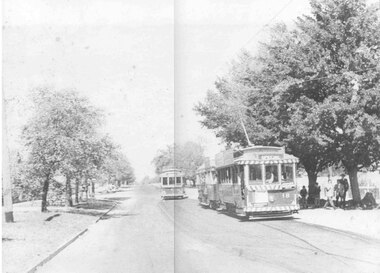
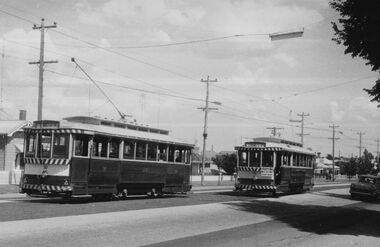
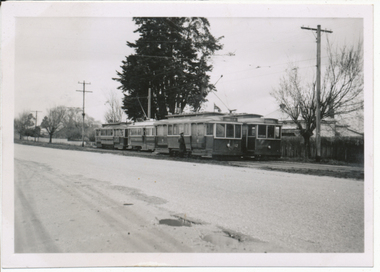
Black and white photograph of Ballarat trams 18 and 37 northbound in Lydiard St. North during the AETA East Convention tour of 1962. No 18 has an ATEA auxiliary board and is showing special. Tram 18 has an AGE newspaper ad on the drivers cab panel. See Reg. Item 674 for further details. Trams are crossing possibly No. 12 or 32 at Gregory St. loop. Number of participants standing under the trees. 3227.1 - additional print ex Alan Bradley 5/2007, made by John Phillips added - 203H x 253W. tramways, trams, ballarat, lydiard st. nth, aeta tour, specials, tram 18, tram 37 -
 Ballarat Tramway Museum
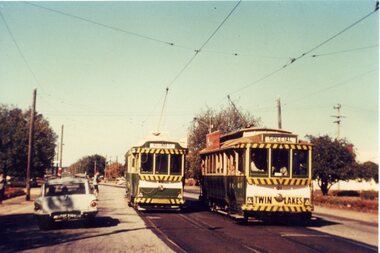
Postcard, Ron Scholten, SEC Ballarat No. 21 and 11?
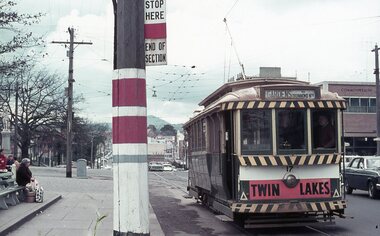
Colour photograph, printed on a postcard back format of SEC Ballarat No. 21 and 11? crossing at the Urquhart St loop, Drummond St South. No. 21, has destination of Bell St and No. 11?, destination of Lydiard St North and has a Twin Lakes sign on the front dash panel.trams, tramways, drummond st sth, urquhart st, tram 40 -
 Ballarat Tramway Museum
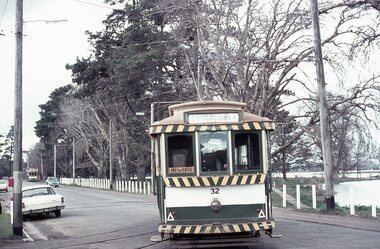
Postcard, Ron Scholten, SEC Ballarat No. 40, Victoria St
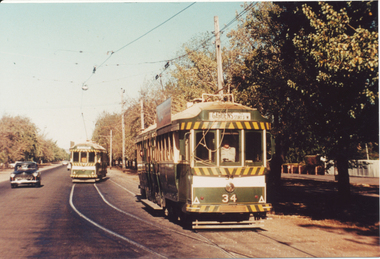
Colour photograph, printed on a postcard back format of SEC Ballarat No. 40 crossing No. 21 at the King St. loop. No. 40 outward bound, with destination of Victoria St, and No. 21, showing Special - tram tour. No. 21 has a yellow background Twin Lakes sign on front dash panel.trams, tramways, king st, victoria st, tram 41, tram 42 -
 Ballarat Tramway Museum
Photograph - Black & White Photograph/s, Ellis Collection, 1950
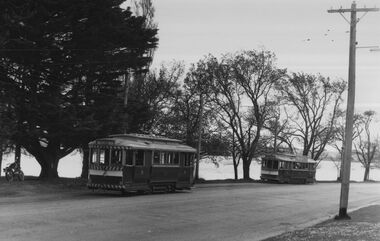
... the appearance of the Gardens Crossing Loop and tram 19. tramways trams ...Yields information about the appearance of the Gardens Crossing Loop and tram 19.Black and white photograph of No. 19 at Gardens Loop, as the tram leaves for Mt Pleasant, 1950. Tram stop pole has the stop, section and timetable boards. From the ARHS Archives, 2/2006, Ellis Collection. See Reg Item 7207 for neg and laminated print.On rear printed on label in blue ink " 19 Gardens Loop 1950 Ellis Collection ARHS Archive"tramways, trams, wendouree parade, gardens loop, tram 19 -
 Ballarat Tramway Museum
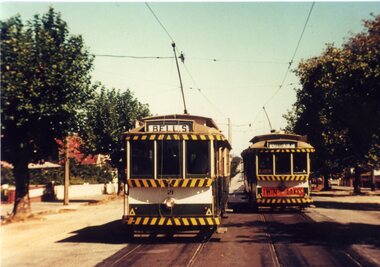
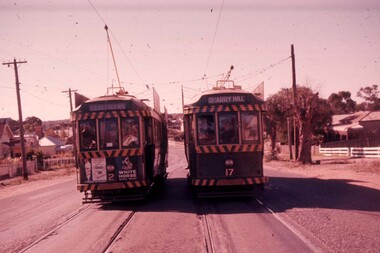
Slide - 35mm slide/s, Travis Jeffrey, c1962
Agfa plastic mount (blue base, white cover) with a photo of Bendigo 2, with destination of Eaglehawk, crossing No. 17 at Jobs Gull loop on the Eaglehawk line. No. 17 has destination of Quarry Hill. Has a Streets Ice cream and Whitehorse Whisky advertisements on the rear panel. Photo taken c1962."BES 27" in penciltramways, trams, bendigo, eaglehawk, jobs gully, tram 2, tram 17 -
 Ballarat Tramway Museum
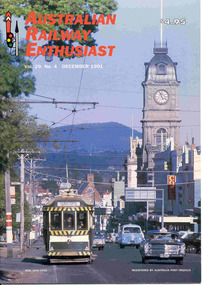
Magazine, Association of Railway Enthusiasts (ARE), "Australian Railway Enthusiast - Vol 29, No. 4, December 1991", Dec. 1991
Yields information about the personal views of the Ballarat tramway system and his photographs. Has a strong association with the author of the article.Copy of the Australian Railway Enthusiast - Vol 29, No. 4, December 1991, which has a front cover photograph of No. 40, west bound in Sturt St at intersection with Doveton St. (Photo by Glen Mills), centre page spread "Brisbane Traction Memories" - four photographs by Mick Morahan, a four page article with photographs by Chris Wurr "Ballarat Tramway Tribute "and on the inside rear page, a photograph of Elizabeth St. Hobart and King William St. Adelaide with trams. Ballarat Photographs: Page 14 - No. 31 at Mount Pleasant terminus Page 15 - No. 12 crossing Albert St. Sebastopol (has Skipton St. in the photo caption) Page 16 - No. 40 on the Dawson St. Crossover Page 16 - No. 26 and 27 crossing at the Bell St. Loop Page 17 - No. 17 at Sturt and Lydiard Sts Page 17 - Two trammies having a chat. Map of Ballarat provided by BTPS Ltd on page 15.trams, tramways, ballarat, recollections, lydiard st, sturt st, sebastopol -
 Ballarat Tramway Museum
Photograph - Black & White Photograph/s - set of 22, Eldon Hogan, 8/12/1974 12:00:00 AM
Set of 22 black and white photographs of the first trams along Wendouree Parade, 8 Dec. 1974 (See 1974-75 Annual Report) .1 - Rolf Jinks at depot Junction .2 - 27 entering Wendouree Parade - Clyde Croft .3 -ditto with Richard Gilbert with the flag .4 - 27 crossing the parade .5 - In Wendouree Parade .6 - ditto .7 -At St Aidans Drive .8 - ditto .9 - 27 returning to the depot .10 - ditto .11 - 40 returning to the depot .12 - 40 at the loop - Richard Gilbert and Clyde Croft .13 - ditto .14 -ditto .15 - 40 at St Aidans Drive .16 - ditto .17 - ditto .18 - the dust is flying. .19 - 40 at Gardens Loop .20 - ditto .21 - Wendouree Parade .22 - 40 entering the Parade. Photographer Eldon Hogan. Roll of negatives held - stored with negatives file.trams, tramways, btps, wendouree parade, first tram, testing, tram 27, tram 40 -
 Ballarat Tramway Museum
Photograph - Digital image Set of 10, 1971
Yields information about Ballarat Tramways and trams prior to the closure of the tramway system.Set of 10 digital images of Ballarat trams prior to closure, scanned from original slides by Stuart Lodington, 1971 prior to closure of the system. .1 - No. 17 at the City Centre, Sturt St, south side, with Gardens via Sturt St on destination roll. Can see the ESCo switch box in the back and the stop and section sign on the adjacent pole. .2 - No. 26 at Sebastopol terminus alongside the Royal Mail Hotel. The tram has yet to turn the pole or the destination roll. Note the Bus Stop sign on the pole, just prior to closure. .3 - ditto .4 - No. 27 and 30 crossing in Skipton St at the Bell St loop (see also btm4975i3) .5 - No. 32, Gardens, about to enter the Carlton St loop, with Lake Wendouree in background, Wendouree Parade. .6 - No. 32 at Depot junction, good photo of depot trackwork entry area. .7 - No. 21, Wendouree Parade, Gardens area, north bound, showing Gardens via Sturt. .8 - No. 12, inbound on Sturt St west at a tram stop. Has destination of Mt. Pleasant. .9 - No. 27 at Lydiard St north terminus with the shelter in the background. .10 - No. 21 at Gardens Loop, tram has destination of Mt. Pleasant. Crews sitting in the saloon.trams, tramways, ballarat, sturt st, sebastopol, drummond st sth, wendouree parade, carlton st, depot, depot junction, trackwork, gardens, sturt st west, crews, tram 17, tram 26, tram 27, tram 32, tram 21, tram 12 -
 Ballarat Tramway Museum
Photograph - Digital image Set of 10, Stuart Lodington, 1971
Set of 10 digital images of Ballarat trams prior to closure, scanned from original slides by Stuart Lodington, 1971 prior to closure of the system. .1 - No. 32 entering the depot from Wendouree Parade, with the Lake in the background. Shows the depot fire alarm on an adjacent pole. .2 - No. 26 at Sebastopol, before turning the pole. Has a bus stop sign on a pole already. .3 - No. 27 and 26? crossing at the Bell St loop in Skipton St. No. 27 has a Twin Lakes sign. .4 - No. 32 outbound to the Gardens in Hamilton Ave about to enter Wendouree Parade with Loreto convent and Olympic monument the background. .5 - No. 26, Albert St Sebastopol, approaching the Sebastopol terminus, with Sebastopol Food Stores building on the left of the photo. .6 - No. 12 leaving the Parker St. Loop, Sturt St West after crossing a tram. No. 12 has destination of Victoria St. .7 - No. 12 inward bound in Lydiard St North with Fine Art Gallery in the background, 3BA. No. 12 has destination of Sebastopol and has a Twin Lakes sign. .8 - No. 12 inward bound, Sturt St West, No. 12 has destination of Victoria St and has a Twin Lakes sign. .9 - No. 26 at Sebastopol terminus, outside the Royal Mail Hotel, has a bus stop sign on a pole. Tram pole yet to be turned, but destination adjusted to Lydiard St. North. .10 - No. 12 at Sebastopol terminus, outside the Royal Mail Hotel. No. 12 has destination of Lydiard St Nth and has a Twin Lakes sign.trams, tramways, ballarat, sturt st west, sebastopol, skipton st, wendouree parade, hamilton ave, depot, depot junction, parker st loop, bell st, lydiard st nth, tram 32, tram 26, tram 27, tram 12 -
 Ballarat Tramway Museum
Photograph - Digital image Set of 20, Dec. 1970
Set of 20 digital images of Bendigo Tramways December 1970 by Stuart Lodington. .1 - Bendigo track gang renewing a joint, McCrae St, with welding truck alongside and Birney No. 29. .2 - No. 5 at Quarry Hill terminus? .3 - No. 24 at the depot .4 - No. 2 on the Quarry Hill line .5 - No. 5 approaching the Eaglehawk terminus .6 - No. 29? at the Golden Square Terminus with Bill Rodda's Golden Square hotel in the background. .7 - No. 3 inbound on the Quarry Hill line. .8 - trams crossing on the Eaglehawk line, through the window of one tram. .9 - side on view of a B23D controller in a bogie tram .10 - No. 5 at the Eaglehawk terminus .11 - No. 21 at No. 21 crossing on the Golden Square line. No. 29 showing special, No.21 - North Bendigo, Fire Station Loop? .12 - No. 29 and another tram - near work site? .13 - interior view from Birney looking at the front of another tram parked behind. .14 - No. 29, No. 6 crossing at .15 - No. 6, showing special at Charing Cross. .16 - No. 5 and another tram at North Bendigo on a Special .17 - No. 28 at Charing Cross .18 - No. 5 on Special at a Loop on the Eaglehawk line .19 - No. 28, and two other trams at the Myrtle St Loop .20 - No. 18 showing Quarry Hill and two other trams on View St.trams, tramways, bendigo, trackwork, mccrae st, depot, quarry hill, eaglehawk, golden square, controllers, north bendigo, view st, tram 29, tram 5, tram 24, tram 2, tram 3, tram 6, tram 28, tram 18 -
 Ballarat Tramway Museum
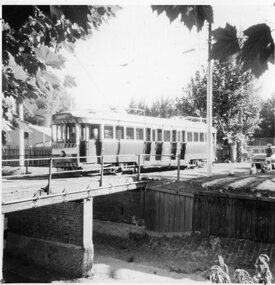
Photograph - Digital image Set of 20, 16/04/1972 12:00:00 AM
Set of 20 digital images of Bendigo Tramways, of the last running day of the Eaglehawk to Quarry Hill line 16 April 1972, .1 - No. 24 outbound to Eaglehawk .2 - No. 3? at Manchester Loop .3 - No. 24 outbound to Eaglehawk .4 - bogie tram crossing the rail over bridge from Eaglehawk .5 - No. 18 in View St .6 - No. 24 outbound to Eaglehawk .7 - No 18 at Eaglehawk with destination roll being changed, and shopping centre in the background. .8 - No. 24 crossing the railway overbridge, going to Eaglehawk .9 - No. 3 outbound to Eaglehawk .10 - No. 24 crossing the railway overbridge, going to Eaglehawk .11 - No. 3 and 24 crossing at Long Gully .12 - No. 18 at Eaglehawk with Leo A Hughes photographer building in the background and a CFA truck passing the tram. Tram SEC roof advertisement and a banner for "German -?- Circus" at Eaglehawk and dates. .13 - No. 3 inbound on the Eaglehawk line. .14 - No. 18 outbound to Eaglehawk .15 - ditto .16 - No. 18 at Eaglehawk terminus with the Mechanics Institute in the background. .17 - No. 24 at the Eaglehawk terminus .18 - No 24 at the intersection with Taylor St .19 - No. 24 at the Eaglehawk terminus .20 - dittotrams, tramways, bendigo, eaglehawk, long gully, manchester loop, tram 24, tram 18, tram 3 -
 Ballarat Tramway Museum
Photograph - Digital image Set of 20, 16/04/1972 12:00:00 AM
Set of 22 digital images of Bendigo Tramways, of the last running day of the Eaglehawk to Quarry Hill line 16 April 1972, .1 - No. 3 and 24 crossing at Long Gully .2 - No. 3 turning at the Cricket ground, Barnard and View Sts, inbound to the City and Quarry Hill .3 - No. 3 in bound to the City and Quarry Hill, Long Gully area .4 - No. 18 inbound to the City and Quarry Hill crossing the railway bridge from Eaglehawk. .5 - Manchester Loop .6 - No. 18 inbound to the City and Quarry Hill crossing the railway bridge from Eaglehawk. .7 - No. 18 about to enter Jobs Gully Loop .8 - No. 3 about to turn at the Cricket ground, Barnard and View Sts inbound to the City and Quarry Hill .9 - No. 3 turning at the Cricket ground, Barnard and View Sts, inbound to the City and Quarry Hill .10 - No. 18 at Eaglehawk terminus with the Mechanics Institute in the background. .11 - No. 3 in bound, Ironbark area. .12 - No. 3 at Long Gully Loop .13 - No. 3 outbound to Eaglehawk. .14 - No. 18 at Eaglehawk with German circus banner on tram .15 - No. 18 on the Eaglehawk line at Jobs Gully Loop .16 - No. 24 outbound to Eaglehawk at Taylor St .17 - No. 18 inbound to the City and Quarry Hill crossing the railway bridge from Eaglehawk. .18 - No. 3 at Manchester Loop .19 - No. 18 at Eaglehawk terminus .20 - No. 18 at Eaglehawk with German circus banner on tram .21 - bogie tram at Long Gully Loop. .22 - No. 24 outbound to Eaglehawk at Taylor Sttrams, tramways, bendigo, eaglehawk, long gully, jobs gully, manchester loop, tram 24, tram 18, tram 3 -
 Ballarat Tramway Museum
Photograph - Digital image set of 6, 27/06/1971 12:00:00 AM
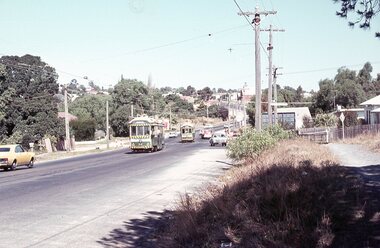
Yields information about the SEC Ballarat trams in the months before the closure of the SEC Tramway system. Yields information about the streetscape.Set of six Digital images, scanned from slides by Graeme Cleak, scanning by Peter Winspur 9/2011. .1 - Slide FQ16 - No. 41, outbound at the south end of Drummond St south about to turn into Skipton St, with the destination of Bell St. .2 - slide FQ18 - No. 41, outbound to Sebastopol terminus, Albert St, just before the terminus itself. .3 - slide FQ21 - No. 41, inbound Albert St Sebastopol with the Sebastopol Town Hall in the background. Tram has a "Bliss Bombs" roof advertisement on the side, "Make Bliss, Not Love". .4 - slide FQ22 - Trams 26 and 41, crossing at Grey St Sebastopol Loop. No. 41 has destination of Grey St. .5 - slide FQ27 - Trams 27 and 37, crossing at the Hamilton Ave loop, No. 41 inbound - with destination of Victoria St at the Hamilton Ave loop with the "Stonehenge" fence house in the background. Sturt St West. .6 - slide FS29 - No. 37 at Grenville St, Sturt St intersection with Bridge St in the background. Tram has the destination of View Point and is entering the loop itself. The destination was no longer in use at the time of the photograph and would indicate that the destination has been arranged. In the background is the Woolworths Big W store and the Dickins Food Store. All photos taken on 27/6/1971. trams, tramways, drummond st sth, sebastopol, grey st, albert st, sturt st west, grenville st, tram 41, tram 26, tram 27, tram 37 -
 Ballarat Tramway Museum
Photograph - Digital image Set of 8, 21/08/1971 12:00:00 AM
Yields information about the SEC Ballarat trams in the months before the closure of the SEC Tramway system. Yields information about the streetscape. Set of 8 Digital images, scanned from slides by Graeme Cleak, scanning by Peter Winspur 9/2011. .1 - Slide FS14 - No. 31 and 32 crossing at the High St Loop in Macarthur St. Tram 31 has the destination of Victoria St. Geoff Dean and his mini on the right hand side of the photograph. Another depot bound single trucker in the photograph, .2 - Slide FS3 - 31 outbound in Victoria St, with St Alipius church in the background. .3 - Slide FS5 - No. 31, and four other trams, some running special at Sturt and Lydiard Sts during the ARHS tour of that day. Has the ANZ Bank and SEC offices in the background. .4 - Slide FS9 - Nos. 39, 26 and two other trams in Lydiard St for the ARHS tour with Reid's Palace, Macleod & Co and J.J. Collier buildings in the background along with other buildings in Lydiard St North. Taken from the Provincial Hotel. .5 - Slide FS11 - No. 26 northbound showing Special running through the level crossing at Ballarat with the Kennedy Murray General Carrier in the background. Taken from the Provincial Hotel. .6 - Slide FS13 - No. 32 turning from Sturt St into Drummond Street North showing Depot via Drummond North, with the Southern Cross Hotel, Rimmington Bros and J.A, Malpass(?) buildings in the background. .7 - Slide FR35 - night shot of No. 17 (with Twin Lakes sign) and No. 32 in Nos 3 and 4 roads at the depot. .8 - Slide FR34 - night shot of the front of the depot - as above and No. 43 on "0" road. All photos 21-8-1971 trams, tramways, railway station, macarthur st, victoria st, sturt st, lydiard st north, level crossings, depot, tram 31, tram 32, tram 39, tram 26, tram 17, tram 43 -
 Ballarat Tramway Museum
Photograph - Digital image, c1971
Yields information about Ballarat streetscape and its trams in the closing days of the SEC tramway system.Digital image from a black and white print of trams 13 and 21 crossing at the Martin Ave Loop or the Haddon St Loop, Wendouree Parade. 13 in bound to Victoria St, 21 to the Gardens. Has Lake Wendouree in the background and Marc's motor cycle is on the left hand side. Photo by Marc Dahlstrom c1971.On rear is the Marc Dahlstrom stamp.trams, tramways, wendouree parade, martin ave, haddon st, tram 13, tram 21 -
 Ballarat Tramway Museum
Photograph - Digital image, c1971
Yields information about Ballarat streetscape and its trams in the closing days of the SEC tramway system.Digital image from a black and white print of trams 30 and 33 crossing at the Bell St loop in Skipton St. 30 is outbound to Sebastopol, 33 to Lydiard St with a Trotting at Bray Raceway auxiliary board on the tram. Photo by Marc Dahlstrom c1971.On rear is the Marc Dahlstrom stamp.trams, tramways, skipton st, bell st, tram 30, tram 33 -
 Ballarat Tramway Museum
Photograph - Black & White Photograph/s, c1960's
Demonstrates a common location of a tram photograph, Grey St Loop, Albert St Sebastopol and the appearance of the trams towards the closure of the system.B&W print of a bogie tram No. 35 at the Grey St Loop, bound for Lydiard St North, after crossing another tram, Albert St Sebastopol. Photo taken late 1960's or early 1960's prior to closure.On reverse side - black ink stamp "E.G.Butland"tramways, trams, sebastopol, albert st, grey st loop, tram 35 -
 Ballarat Tramway Museum
Slide - 35mm slide/s - set of 6, Campbell Duncan, 19/09/1971 12:00:00 AM
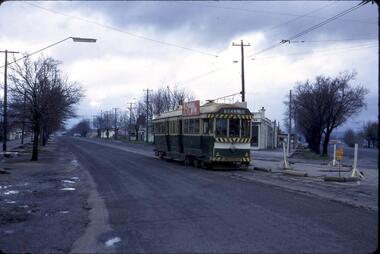
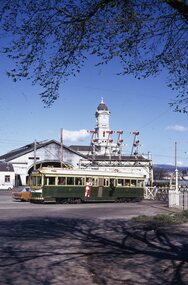
Yields information about the operations of the Ballarat Tramway system on the last day of SEC tramway operations in Ballarat.Set of 6 Kodak - Kodachrome slides - cardboard mounts - all taken on 19/9/1971, last day of operations prior to closure of the SEC operated tramway. .1 - Tram 40, waits at the level crossing gates - the gates are being opened. In the background is the station building and the signal gantry. Tram has the destination of Sebastopol. .2 - No. 42, with destination of Lydiard St north, northbound in Lydiard St, with railway station buildings and VRI in the background. .3 - No. 35 on inbound, Lydiard St North. .4 - No. 35, on inbound service, leaving Skipton St loop with another bogie in the background. .5 - No. 39 on inbound service, Albert St Sebastopol with the Sebastopol boundary sign and Binks Ford in the background. Tram has an everything under control in my all electric kitchen roof advert. .6 - No. 42, with destination of Sebastopol, Albert St Sebastopol.In ink on slide: .1 - Sun 19 Sept 71 - up Lydiard St Nth waits for gates to be opened after fast goods. .2 - Sun 19 Sept 1971, down Lydiard St Nth near VRI. .3 - Sun 19 Sept 1971, Up Lydiard St Nth .4 - Sun 19 Sept 1971, Up Sebastopol (supplementary service) has just crossed down in Skipton St near Drummond St. .5 - Sun 19 Sept 1971, Up Sebas at Ballarat / Sebastopol boundary. .6 - Sun 19 Sept 1971, c5.30pm down Sebas in Sebas shire.tramways, trams, lydiard st nth, railway station, level crossings, skipton st, albert st, sebastopol, closure, last day, tram 40, tram 42, tram 35, tram 39 -
 Ballarat Tramway Museum
Slide - 35mm slide/s - set of 5, Dave Simpson, late 1960's early 1970's
Set of five 35mm slides - Anscochrome white plastic mounts of tram 39 running a special (39), crossing other trams at Gardens Loop. .1 - 39 and 13 .2 - 39 and 26 .3 - 39 .4 - 39 .5 - 39 Tram 39 has a SEC - all under control in my all electric kitchen roof advertisement, 26 a Briquettes roof advert and 13 a Twin Lakes dash panel advert.tramways, trams, gardens loop, wendouree parade, special trams, tram 13, tram 26, tram 39 -
 Ballarat Tramway Museum
Photograph - Digital image, Keith Kings, 20/08/1955 12:00:00 AM
Yields information about the trams used by the AETA for a Ballarat tour to celebrate the Golden Jubilee of electric trams.Digital image from the Wal Jack Ballarat Album of the AETA Ballarat Golden Jubilee tour of 20/8/1955, of Specials 21 and 38, preceded by tram 31, crossing No. 12 at Grey St Loop, Sebastopol. Photograph by Keith Kings. See image i2 for rear of photograph.On rear of photograph in ink "Ballarat Golden Jubilee of electric trams, Specials 21 & 38, preceded by passenger car 31, crossing 12 at Grey St loop on Sebastopol. . 20/8/1955" and Keith Kings stamp in top right hand corner with number "P(c)(5)" written in.trams, tramways, aeta, tours, golden jubilee of trams, grey st loop, sebastopol, tram 21, tram 38, tram 31, tram 12 -
 Ballarat Tramway Museum
Postcard, Ron Scholten, SEC Ballarat trams 37 and 36
Demonstrates the use of bogie trams on the Lydiard St North route in Ballarat.Colour photograph, printed on a postcard back format of SEC Ballarat trams 37 and 36 crossing at the Seymour St Loop, late 1960's. Both trams have SEC Cooking with electricity Advertisements. No. 37 has the destination of View Point, No. 36 Lydiard St Nth.trams, tramways, lydiard st north, seymour st loop, tram 17 -
 Ballarat Tramway Museum
Postcard, SEC Ballarat trams 34
Yields information about the use of trams in Ballarat and tram operation in the Sturt St west as the loops, in particular the Parker St. Loop.Colour photograph, printed on a postcard back format of SEC Ballarat trams 34 and another bogie tram crossing at the Parker St loop in Sturt St West. Tram 34 has the destination of "Gardens via Sturt St West". Photo late 1960's or early 1970's.trams, tramways, sturt st west, parker st loop, tram 34 -
 Ballarat Tramway Museum
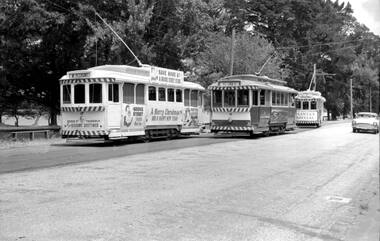
Photograph - Digital image, Mal Rowe, 21/12/1967 12:00:00 AM
Demonstrates the use of the Santa Trams or decorated trams in Ballarat for the Christmas season. Yields information about their decorations.Digital Image of the two 1967 Santa Trams crossing with tram 18 at Depot Loop 21/12/1967. Tram 17 dressed as the Bridge St traders Santa tram and No. 32 as the Myers sponsored Santa Tram. Tram 17 as the destination of Mt Pleasant, No. 18 - Victoria St and No. 32 - Special. Photo by Mal Rowe. -------- Original Message -------- Subject: [TramsDownUnder] Happy Christmas and ... [1 Attachment] Date: Sat, 21 Dec 2013 10:10:13 +1100 From: Mal Rowe trams, tramways, secv, santa tram, myers, bridge st traders, tram 17, tram 18, tram 32