Showing 692 items
matching tramway crossings
-
 Ballarat Tramway Museum
Photograph - Digital image Set of 20
Set of 20 digital images of Bendigo Tramways, 1972 at or before closure while on a tram tour by Stuart Lodington. .1 - No. 28 and 5 at Eaglehawk terminus .2 - No. 28 leaving Charing Cross and travelling into View St with Armstrong Type Service building in background and Firestone Advertisements. .3 - No. 29 with Eaglehawk Town Hall and Post Office in background. .4 - No. 26 and 29 at start of double track, High St Eaglehawk .5 - No. 29 leaving Eaglehawk with shops in the background, Foodland, J. Bests .6 - No. 29 and 23 crossing Manchester Loop with Manchester Arms Hotel in the background and an old poppet head. .7 - No. 29 at ditto with poppet head in the background. .8 - No. 28 and two other trams at the Quarry Hill terminus. .9 - No. 29 in High St Bendigo with the Cathedral and Golden Gate Hotel in the background. .10 - No. 3 with destination Eaglehawk, in bound Carpenter St? .11 - No. 29 following a single trucker through a loop or the end of the double track near the depot. .12 - No. 23?, at Eaglehawk terminus, with Eaglehawk Town Hall in the background. .13 - Birney tram crossing the bridge at the Depot entrance - No. 29 .14 - No. 29 on the Eaglehawk line? .15 - as for .13 .16 - No. 29 entering the depot. .17 - No. 23, inbound from Eaglehawk, at Jobs Gully Loop with the railway overbridge in the background. .18 - No. 28 and two other trams (see also Reg Item 4982) for the same tram tour at Myrtle St. Loop. .19 - No. 21 with North Bendigo on the destination approaching the Golden Square terminus. .20 - No. 7 at Golden Square terminustrams, tramways, bendigo, eaglehawk, quarry hill, golden square, depot, tram 5, tram 29, tram 28, tram 26, tram 23, tram 7, tram 21 -
 Ballarat Tramway Museum
Photograph - Digital image Set of 20, 1971-72
Set of 20 digital images of Bendigo Tramways, 1972 at or before closure while on a tram tour by Stuart Lodington. .1 - No. 7 at Golden Square terminus .2 - ditto .3 - No. 26 in bound on the Eaglehawk line with a crossing loop behind. .4 - Birney crossing the bridge by the tram depot. .5 - No. 29 running a special on the Eaglehawk line with a HBA billboard in the background. .6 - No. 29 with a driver walking in front of the tram at the above location. .7 - No. 29 on the Eaglehawk line .8 - ditto waiting for a tram at Manchester Loop with poppet head in the background. .9 - No. 29 on the Eaglehawk line .10 - Eaglehawk Town Hall at night. .11 - No. 7 at the depot junction in McCrae St, with Golden Square destination. .12 - No. 29 with the Camp Hotel Eaglehawk in the background. Also a Newsagent with The Sun, The Bendigo Advertiser and The Age signs on the building, High St .13 - No. 29 Mt Korong Rd, with the railway overbridge in the background. .14 - interior photo of Birney tram roof .15 - interior view of controls of Birney at Eaglehawk .16 - No. 29 outbound at the Depot Junction McCrae St. .17 - No. 18 at the Eaglehawk terminus .18 - close up view of No. 29 front. .19 - No. 29 in Nolan St, crossing the bridge, outbound. .20 - No. 18 at the Eaglehawk terminus with the Eaglehawk Town Hall, Post Office in the background. Has a circus banner on the side.trams, tramways, bendigo, eaglehawk, quarry hill, golden square, depot, mccrae st, nolan st, tram 7, tram 26, tram 29, tram 18 -
 Ballarat Tramway Museum
Photograph - Digital image Set of 20, 1971-72
Set of 22 digital images of Bendigo Tramways, 1972 at or before closure while on a tram tour by Stuart Lodington. .1 - No. 7 arriving at North Bendigo .2 - No. 5 departing Charing Cross along View St, with a Firestone tyres in the background. .3 - front view of a tram in View St with a blurred background image. .4 - No. 24 showing Eaglehawk destination .5 - No 26 and 3 in View St, with the Armstrong Tyre Service building in the background and signs for T&G and Cohn's Drinks. .6 - ditto .7 - No. 3 arriving at Charing Cross from Eaglehawk in View St, with a Quarry Hill destination. .8 - No. 3 and 18 at Charing Cross. .9 - No. 24 on the Quarry Hill line. .10 - No 26 in View St, with the Armstrong Tyre Service building in the background and signs for T&G and Cohn's Drinks. .11 - ditto, with fountain in view, Colonial Mutual building and a newsagent with a Herald sign on the building. .12 - No. 7 at North Bendigo terminus .13 - ditto with pole being reversed. .14 - No. 18 at Quarry Hill terminus with Northern Terrazzo sign in the background. .15 - No. 24 at Quarry Hill terminus .16 - No. 18 arriving at Charring Cross, with Fountain Plaza and Bendigo Pharmacy in the background. .17 - No. 3 and 18 at Charing Cross. .18 - No. 7 at North Bendigo terminus with pole being placed on the overhead. .19 - No. 26 in View St inbound, with Sandhurst Trustees sign in the background. .20 - No. 6 leaving Charing Cross in Pall Mall with Myer and other buildings in the background. .21 - No. 7 at North Bendigo .22 - Single trucker with two roof Advertisements crossing View St with fountain in view, Colonial Mutual building and a newsagent with a Herald sign on the building.trams, tramways, bendigo, eaglehawk, quarry hill, north bendigo, charing cross, view st, tram 7, tram 5, tram 24, tram 26, tram 5, tram 3, tram 18, tram 6 -
 Ballarat Tramway Museum
Photograph - Digital image Set of 20, 9/12/1972 12:00:00 AM
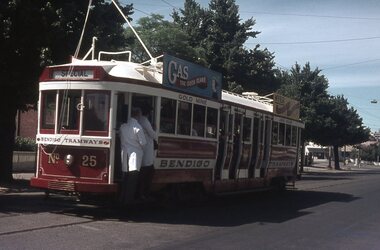
Set of 21 digital images of Bendigo Tramways, at the re-opening of the Bendigo tramways by the Bendigo Trust on 9/12/1972by Stuart Lodington. All trams in the first Bendigo Trust colours. .1 - No. 25 with Gas and Myer roof advertisements .2 - No. 30 with 3BO roof advert and a BP service station in the background. .3 - SEC single trucker at the Mine with a large "Tram Tours" sign on the front of the tram .4 - ditto .5 - No. 19 with a large group of passengers, Bendigo Motor Co and Sandhurst roof advertisements .6 - No. 30 in McCrae St .7 - view of opening march with band .8 - No. 19 in opening parade .9 - Opening Parade in High St with cathedral in the background .10 - No. 30 in Nolan St crossing bridge .11 - ditto .12 - No. 25 at the mine .13 - No. 30 leaving the mine .14 - No. 30 ditto with BCTV roof advert. .15 - Charing Cross with cenotaph, The Beehive building and Ezywalkin shoes and Coca Cola adverts .16 - No. 19 southbound in High St with City Centre Motel building in the background. .17 - No. 30 returning from North Bendigo .18 - No 25 in High St after leaving Gold Mine .19 - No. 30 at the Mine .20 - No. 30 in Nolan St .21 - No. 30 with 3BO roof advert and a BP service station in the background.trams, tramways, bendigo, north bendigo, charing cross, bendigo trust, central deborah, tram 25, tram 30, tram 19 -
 Ballarat Tramway Museum
Photograph - Digital image Set of 20, 16/04/1972 12:00:00 AM
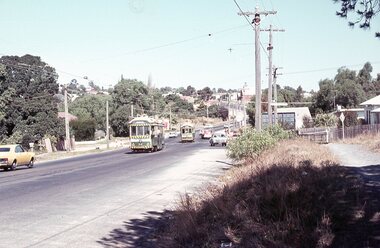
Set of 20 digital images of Bendigo Tramways, of the last running day of the Eaglehawk to Quarry Hill line 16 April 1972, .1 - No. 24 outbound to Eaglehawk .2 - No. 3? at Manchester Loop .3 - No. 24 outbound to Eaglehawk .4 - bogie tram crossing the rail over bridge from Eaglehawk .5 - No. 18 in View St .6 - No. 24 outbound to Eaglehawk .7 - No 18 at Eaglehawk with destination roll being changed, and shopping centre in the background. .8 - No. 24 crossing the railway overbridge, going to Eaglehawk .9 - No. 3 outbound to Eaglehawk .10 - No. 24 crossing the railway overbridge, going to Eaglehawk .11 - No. 3 and 24 crossing at Long Gully .12 - No. 18 at Eaglehawk with Leo A Hughes photographer building in the background and a CFA truck passing the tram. Tram SEC roof advertisement and a banner for "German -?- Circus" at Eaglehawk and dates. .13 - No. 3 inbound on the Eaglehawk line. .14 - No. 18 outbound to Eaglehawk .15 - ditto .16 - No. 18 at Eaglehawk terminus with the Mechanics Institute in the background. .17 - No. 24 at the Eaglehawk terminus .18 - No 24 at the intersection with Taylor St .19 - No. 24 at the Eaglehawk terminus .20 - dittotrams, tramways, bendigo, eaglehawk, long gully, manchester loop, tram 24, tram 18, tram 3 -
 Ballarat Tramway Museum
Photograph - Digital image Set of 20, 16/04/1972 12:00:00 AM
Set of 22 digital images of Bendigo Tramways, of the last running day of the Eaglehawk to Quarry Hill line 16 April 1972, .1 - No. 3 and 24 crossing at Long Gully .2 - No. 3 turning at the Cricket ground, Barnard and View Sts, inbound to the City and Quarry Hill .3 - No. 3 in bound to the City and Quarry Hill, Long Gully area .4 - No. 18 inbound to the City and Quarry Hill crossing the railway bridge from Eaglehawk. .5 - Manchester Loop .6 - No. 18 inbound to the City and Quarry Hill crossing the railway bridge from Eaglehawk. .7 - No. 18 about to enter Jobs Gully Loop .8 - No. 3 about to turn at the Cricket ground, Barnard and View Sts inbound to the City and Quarry Hill .9 - No. 3 turning at the Cricket ground, Barnard and View Sts, inbound to the City and Quarry Hill .10 - No. 18 at Eaglehawk terminus with the Mechanics Institute in the background. .11 - No. 3 in bound, Ironbark area. .12 - No. 3 at Long Gully Loop .13 - No. 3 outbound to Eaglehawk. .14 - No. 18 at Eaglehawk with German circus banner on tram .15 - No. 18 on the Eaglehawk line at Jobs Gully Loop .16 - No. 24 outbound to Eaglehawk at Taylor St .17 - No. 18 inbound to the City and Quarry Hill crossing the railway bridge from Eaglehawk. .18 - No. 3 at Manchester Loop .19 - No. 18 at Eaglehawk terminus .20 - No. 18 at Eaglehawk with German circus banner on tram .21 - bogie tram at Long Gully Loop. .22 - No. 24 outbound to Eaglehawk at Taylor Sttrams, tramways, bendigo, eaglehawk, long gully, jobs gully, manchester loop, tram 24, tram 18, tram 3 -
 Ballarat Tramway Museum
Photograph - Digital image Set of 8, 21/08/1971 12:00:00 AM
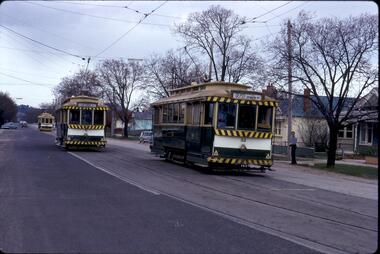
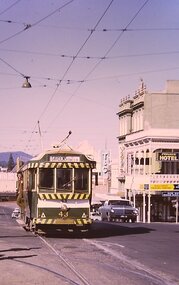
Yields information about the SEC Ballarat trams in the months before the closure of the SEC Tramway system. Yields information about the streetscape. Set of 8 Digital images, scanned from slides by Graeme Cleak, scanning by Peter Winspur 9/2011. .1 - Slide FS14 - No. 31 and 32 crossing at the High St Loop in Macarthur St. Tram 31 has the destination of Victoria St. Geoff Dean and his mini on the right hand side of the photograph. Another depot bound single trucker in the photograph, .2 - Slide FS3 - 31 outbound in Victoria St, with St Alipius church in the background. .3 - Slide FS5 - No. 31, and four other trams, some running special at Sturt and Lydiard Sts during the ARHS tour of that day. Has the ANZ Bank and SEC offices in the background. .4 - Slide FS9 - Nos. 39, 26 and two other trams in Lydiard St for the ARHS tour with Reid's Palace, Macleod & Co and J.J. Collier buildings in the background along with other buildings in Lydiard St North. Taken from the Provincial Hotel. .5 - Slide FS11 - No. 26 northbound showing Special running through the level crossing at Ballarat with the Kennedy Murray General Carrier in the background. Taken from the Provincial Hotel. .6 - Slide FS13 - No. 32 turning from Sturt St into Drummond Street North showing Depot via Drummond North, with the Southern Cross Hotel, Rimmington Bros and J.A, Malpass(?) buildings in the background. .7 - Slide FR35 - night shot of No. 17 (with Twin Lakes sign) and No. 32 in Nos 3 and 4 roads at the depot. .8 - Slide FR34 - night shot of the front of the depot - as above and No. 43 on "0" road. All photos 21-8-1971 trams, tramways, railway station, macarthur st, victoria st, sturt st, lydiard st north, level crossings, depot, tram 31, tram 32, tram 39, tram 26, tram 17, tram 43 -
 Ballarat Tramway Museum
Photograph - Digital image, c1971
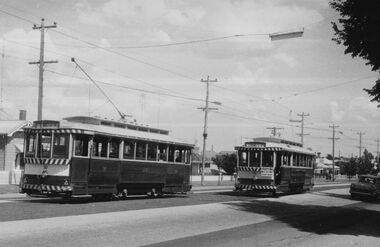
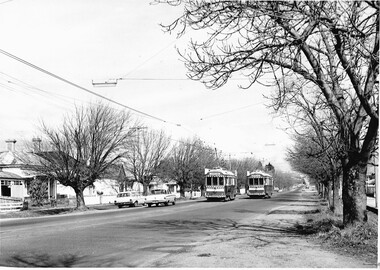
Yields information about Ballarat streetscape and its trams in the closing days of the SEC tramway system.Digital image from a black and white print of trams 13 and 21 crossing at the Martin Ave Loop or the Haddon St Loop, Wendouree Parade. 13 in bound to Victoria St, 21 to the Gardens. Has Lake Wendouree in the background and Marc's motor cycle is on the left hand side. Photo by Marc Dahlstrom c1971.On rear is the Marc Dahlstrom stamp.trams, tramways, wendouree parade, martin ave, haddon st, tram 13, tram 21 -
 Ballarat Tramway Museum
Photograph - Digital image, c1971
Yields information about Ballarat streetscape and its trams in the closing days of the SEC tramway system.Digital image from a black and white print of tram 12 north bound in Lydiard St North after crossing the level crossing - has Ballarat Railway Station in the background. A large number of people in the photograph indicating a possible rail tour. Photo taken from the balcony of the Victoria Guest House. Photo by Marc Dahlstrom c1971.On rear is the Marc Dahlstrom stamp.trams, tramways, railway station, lydiard st nth, level crossings, tram 12 -
 Ballarat Tramway Museum
Photograph - Digital image, c1971
Yields information about Ballarat streetscape and its trams in the closing days of the SEC tramway system.Digital image from a black and white print of trams 30 and 33 crossing at the Bell St loop in Skipton St. 30 is outbound to Sebastopol, 33 to Lydiard St with a Trotting at Bray Raceway auxiliary board on the tram. Photo by Marc Dahlstrom c1971.On rear is the Marc Dahlstrom stamp.trams, tramways, skipton st, bell st, tram 30, tram 33 -
 Ballarat Tramway Museum
Photograph - Digital image, c1971
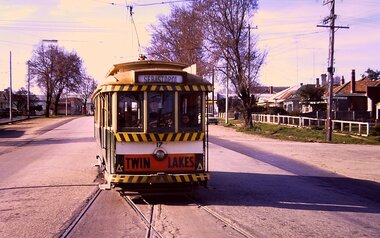
Yields information about Ballarat streetscape and its trams in the closing days of the SEC tramway system.Digital image from a black and white print of tram 11 outbound in Lydiard St North, crossing the railway level crossing. Has the Reid's Palace building and the railway station and signal gantry in the background. The tram has a "Bliss Bombs" (Make Bliss not Love) roof advertisement and a Twin Lakes sign. Photo by Marc Dahlstrom c1971. On rear is the Marc Dahlstrom stamp.trams, tramways, lydiard st, railway station, level crossings, tram 11 -
 Ballarat Tramway Museum
Photograph - Digital image, c1921
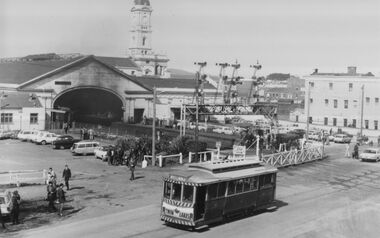
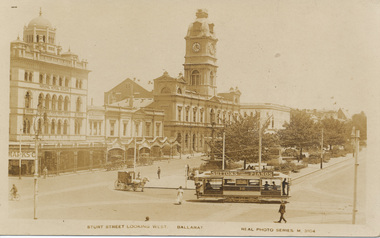
... Ballarat Tramway Museum South Gardens Reserve Wendouree ...Yields information the buildings, buildings and scene at the intersection of Sturt and Lydiard St with a tram crossing the road.Digital image from the Wal Jack Ballarat Album of a postcard - titled ""Sturt Street, Looking West, Ballarat" with ESCo tram No. 16 crossing from Sturt St south side (from Grenville St) into Lydiard St North. Has conductor on rear footstep. Appears to be taken on a hot day. Real Photo Series M 3104. Has a number of horse carts in the photograph. Tram has an advertisement for Suttons Pianos on the roof. Card produced by Valentines & Sons Publishing Co. Ltd. See rear of card for company location details. In the photo are advertisements or buildings for: National Mutual Building, Town Hall, and Marks & Co. Wal has dated the photo about 1921 in his album notes. For rear of postcard - see image i2.trams, tramways, esco, sturt st, lydiard st, town hall, tram 16 -
 Ballarat Tramway Museum
Photograph - Digital image, Wal Jack, 25/06/1957 12:00:00 AM
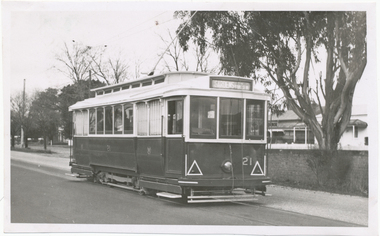
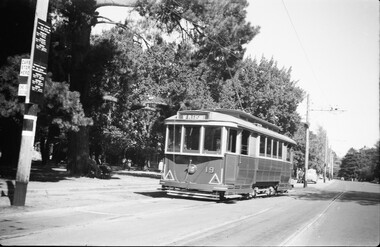
Yields information the appearance of the SEC tramcar No. 21, and the Victoria St landscape in 1957.Digital image from the Wal Jack Ballarat Album of trams No. 21 outbound in Victoria St before arriving at the terminus and crossing over the Buninyong Rail bridge. Tram has the destination of Gardens via Sturt St west. In the background is the bridge brickwork. Photo taken 25 June 1957. See image i2 for rear of photograph.on rear of photo in ink, "SEC Ballarat, No. 21 ex Adelaide No. 10, in Victoria St near terminus, 25 June '57" and "W.Jack photo Neg. to D. Colquhoun"trams, tramways, victoria st, tram 21 -
 Ballarat Tramway Museum
Photograph - Digital image, 9/04/1958 12:00:00 AM
... crossing that has been replaced. Trams tramways Level Crossings ...Yields information about one of the tramcars in the Museum's collection and its operation. Also yields information about a Melbourne level crossing that has been replaced.Digital image of W3 661 as Elsternwick level crossing in Glen Huntly Road, 9/4/1958, taken by Ian Brady. Shows the overhead arrangements, level crossing gates posts, signal box and the disc signal for the catch points. Has an Advertisements for Best Biscuits in the photograph. Glenhuntly road. See emails in the worksheet files - see re use and acknowledgement conditions. See Reg item 4162 for a John Alfred photograph after level crossing replacement works commenced featuring 661.trams, tramways, level crossings, tram 661 -
 Ballarat Tramway Museum
Photograph - Digital image, Wal Jack, 1940's
Yields information about the crossing point in Albert St Sebastopol during the early 1940's.Digital image from the Wal Jack Ballarat Album of a photograph of No. 17 crossing Albert St Sebastopol enroute to Sebastopol, c 1940's. Has houses in the background. Photo not dated. See image i2 for rear of photograph. See image i3 for hi res scan of print. See image i4 for hi res scan of negative On rear of photograph in ink "Ballarat Tramways No. 17 in Albert Sebastopol"trams, tramways, albert st, sebastopol, tram 17 -
 Ballarat Tramway Museum
Photograph - Digital image, Wal Jack, 14/03/1960 12:00:00 AM
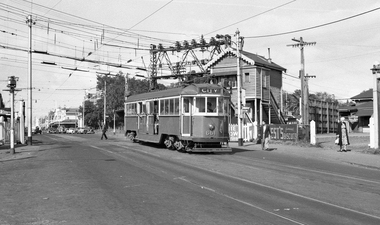
Yields information about the appearance of railway level crossing and Ballarat station in 1960.Digital image from the Wal Jack Ballarat Album of a photograph of No. 21 at the gates at Ballarat Railway station while R734 shunts onto the 1.40pm Horsham Passenger train, 14-3-1960. Photo Wal Jack. See image i2 for rear of photograph.On rear of photograph in ink "VR , SEC, Ballarat No. 21 tram newly painted waiting at rail gates Ballarat Rly Station. R734 4-6-4 backing on 1.40pm Horsham Passenger Train 14-3-60" and in top right hand corner, Wal Jack stamp with "2899" written in.trams, tramways, lydiard st, railway station, level crossings, tram 21 -
 Ballarat Tramway Museum
Photograph - Digital image, Chris Phillips, c1970
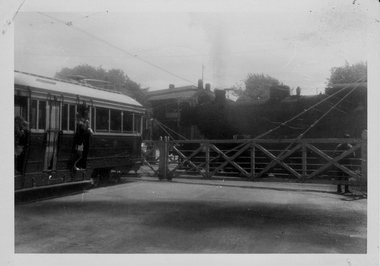
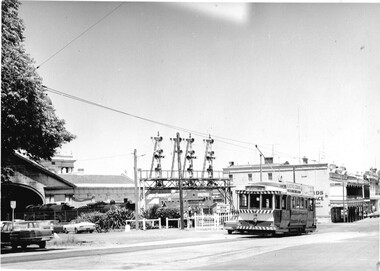
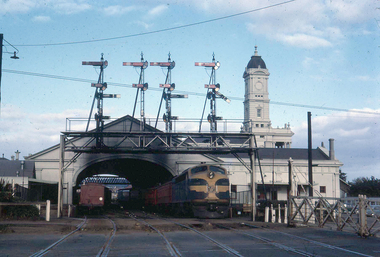
... in Lydiard St North at the railway level crossings. Trams tramways ...Yields information about the tram and railway operations in Lydiard St North at the railway level crossings.Digital image, black and white, of a bogie tram waiting at the Ballarat station level crossing for a locomotive (K class) to cross.trams, tramways, level crossings, lydiard st north, ballarat railway station, railways -
 Ballarat Tramway Museum
Photograph - Black & White Photograph/s, Negative, Ellis Collection, c1950
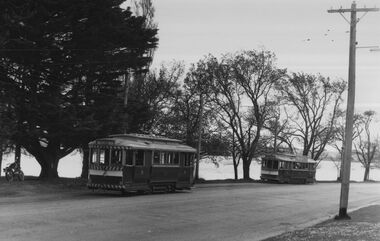
Yields information about the appearance of the Gardens Crossing Loop and tram 19.Black and white photograph of tram 19 leaving Gardens Loop with the destination of Mt Pleasant. Note the tram stop pole behind the tram, fitted with timetable boards, stop sign and section sign. Item donated comprised negative 1144, A4 print and laminated A4 print. Negative scanned at 2400dpi. See Reg Item 3376 for another print - noted that it was from the Ellis Collection. On the top edge of one of the prints "Wendouree Parade 1950 have print"trams, tramways, gardens loop, wendouree parade, tram stops, tram 19 -
 Ballarat Tramway Museum
Photograph - Black & White Photograph/s, Charles Craig, 1971
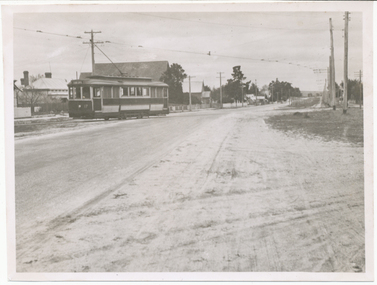
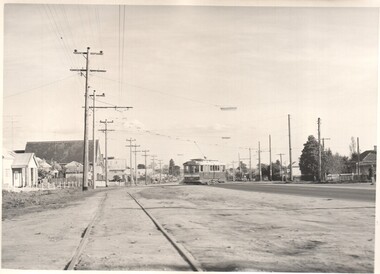
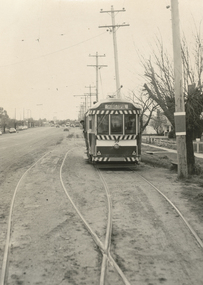
Yields information about the appearance of Albert St where the tram crossed at Ophir St, Sebastopol. Black and White photograph of a single trucker tram, with a Twin Lakes sign crossing Albert St, near Ophir St en route to Sebastopol. Shows the street scene at the time. Photo by Charles Craig - during 1971. trams, tramways, albert st, sebastopol, ophir st -
 Ballarat Tramway Museum
Photograph - Black & White Photograph/s - set of 6, Charles Craig, 1950s
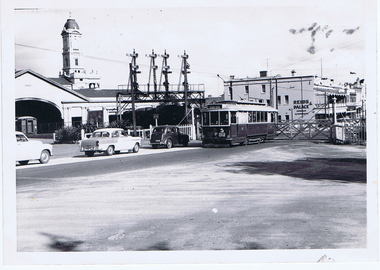
Yields information about the appearance and use of the Ballarat Railway Station level crossing by trams prior to closure.Set of six black and white photographs of trams at the railway level crossing, Ballarat, Lydiard St North featuring the railway station, gates and signals, Reeds Coffee Palace and the Provincial Hotel. .1 - 28 heading south, with an R class and a K class locomotive in the view. .2 - 11, heading north - taken during the 1950's. .3 - 17 parked right up to the gates while K184 shunts at the station. .4 - single trucker (number obscured) - most likely 17 giving the passengers in the previous photo. .5 - Photo with two single truckers in the view and the gates being closed after the tram has passed. .6 - 11, at the gates with a bogie tram behind. No. 11 has a Briquettes roof advert and a Twin Lakes sign. Photo by Charles Craig - during 1971, except for .2, taken during the 1950's. trams, tramways, lydiard st north, railway station, signals, level crossings, tram 28, tram 11, tram 17 -
 Ballarat Tramway Museum
Photograph - Black & White Photograph/s, Charles Craig, Aug. 1971
... crossing loop. Trams tramways Drummond St Nth Mill St loop Charles ...Yields information about tram operations in Drummond St North and the Mill St crossing loop.Black and white photograph of trams 41 and 38? crossing at the Mill St loop, Drummond St North. No. 41 is running a special and No. 38? running a Gardens via Drummond St North. Photo by Charles Camera, at the time of the first closure of the Ballarat system, 23/8/1971 when the Victoria St line closed.trams, tramways, drummond st nth, mill st loop -
 Ballarat Tramway Museum
Photograph - Black & White Photograph/s - set of 3, Charles Craig, Aug. 1971
... St crossing loop. Trams tramways Albert St Grey St Loop ...Yields information about tram operations in Albert St Sebastopol and the Grey St crossing loop.Set of three Black and white photograph of trams crossing at the Grey St Loop, Albert St Sebastopol .1 - 39 in the loop with destination of Sebastopol. .2 - 41 (Special) and 37 (Lydiard St Loop) at the loop - No. 41 has two Johnnie Walker roof advertisements. .3 - 42 and a single trucker in the loop with many people milling around. No. 42 running a special. Photo by Charles Craig, at the time of the first closure of the Ballarat system, 23/8/1971 when the Victoria St line closed.trams, tramways, albert st, grey st loop, sebastopol, tram 39, tram 41, tram 37, tram 42 -
 Ballarat Tramway Museum
Photograph - Black & White Photograph/s, Charles Craig, Aug. 1971
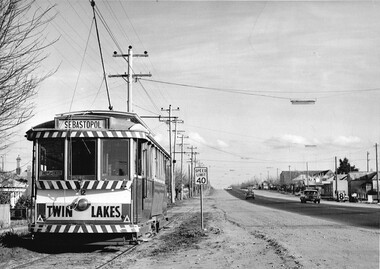
... St crossing loop. Trams tramways Albert St Grey St Loop ...Yields information about tram operations in Albert St Sebastopol and the Grey St crossing loop.Black and white photograph of No. 12 about to enter the Grey St loop, Albert St. Alongside the tram is a 40mph speed limit sign, Albert St shops and a Forest City signal. Photo by Charles Camera, at the time of the first closure of the Ballarat system, 23/8/1971 when the Victoria St line closed.trams, tramways, albert st, grey st loop, sebastopol, tram 12 -
 Ballarat Tramway Museum
Photograph - Colour Photograph/s, Roger Gosney, early 2015
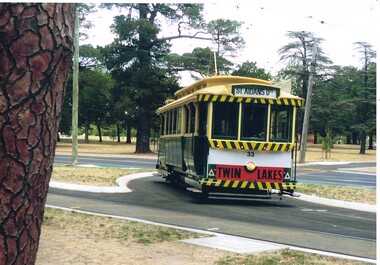
Yields information about the appearance of some of the tram fleet of the Museum during 2015.Laminated A3 size colour photo of No.33 crossing Wendouree Parade at Depot Junction, early 2015. Photo by Roger Gosney.trams, tramways, btm, depot junction, tram 33 -
 Ballarat Tramway Museum
Photograph - Digital image, W. J. Llewelyn, late 1960s
... . Trams tramways Railway Station Level Crossings Lydiard St North ...Set of three colour digital images taken by W. J. Llewelyn of the Ballarat Railway Station at Lydiard St North. .1 - Possibly a S class loco on the Horsham / Dimboola/Serviceton St, about to leave Ballarat station during the late 1960's or early 1970's. A freight train is on platform 2. Note the Parcels Office and that the clock had not been fitted to the station building. .2 - S305? shunting at Ballarat station, during the late 1960's or early 1970's. Photos taken from the signal box. .3 - R766 on a special train at the station - late 1980's. Has the failed Melbourne - Canberra - Sydney tourism venture carriages at the rear.trams, tramways, railway station, level crossings, lydiard st north, steam locomotive -
 Ballarat Tramway Museum
Photograph - Digital image, W. J. Llewelyn, 1/01/1970 12:00:00 AM
Yields information about the intersection of Sturt and Lydiard St.Digital images of tram 43 crossing Lydiard St in Sturt St, with destination of Gardens via Sturt St West. Has the T&G sign, Mechanics Institute and the Unicorn Hotel in the view. Photo by Chris Phillips. Image dated 1/1/1970 - to be confirmed. trams, tramways, sturt st, lydiard st, city, tram 43 -
 Ballarat Tramway Museum
Negative, Bruce Herbert, "Bendigo and Ballarat Trams (AETA Convention) 30 Mar 1975", 30/03/1975 12:00:00 AM
Negative folder - made by ROW1 International of West Germany containing 40 No. 35 mm negatives of the AETA 1975 Convention visit to Ballarat and Bendigo on 30-3-1975. 17 photos of Ballarat and 23 of Bendigo. Ballarat photos: 1 - 40 at the Wendouree Parade crossing loop showing trams stop signage and AETA members standing at the front of the tram. 2 - distant view of 27 in the loop and the "wide roadway" 3 - view of 40 northbound about to nearing loop with various cars in the view. 4 - 40 about to enter loop with 27 in background. 5 - 40 and 27 at loop 6 - 40 at St Aidans Drive 7 - 14 and 27 at loop with 40 in the background 8 - 27 leaving loop 9 - 14 leaving loop 10 - General view showing cars and 40 in the loop, looking north. 11 - as for 1 12 - ditto 13 - 40 northbound, 27 southbound at loop 14 - 27 at loop 15 - 26, 14 and 28 at depot including 1 road. 16 - ditto with people viewing the trams - shows the overhead on 1 road. 17 - X41 and B80 on train at Spencer St, probably the train the group travelled on. trams, tramways, btps, ballarat, aeta, bendigo, bendigo trust, wendouree parade, depot, gardens loop, motor vehicles, tram 40 tram 27 tram 26 tram 14 tram 28 -
 Ballarat Tramway Museum
Photograph - Digital image Set of 2, Chris Phillips, c1970
Yields information about the use of trams in the vicinity of Hospital Corner.Set of two digital images of trams at Hospital corner, c1970 by Chris Phillips.. .1 - No 39 inbound in Sturt St, about to cross Drummond St. Has the Hospital in the background and the tram stop. Tram has the destination of Mt Pleasant. .2 - No. 17 crossing Sturt St from Drummond St South. Has the destination of Lydiard St North. Has the buildings on the corner and the various directional signs in the view. Tram has a SEC roof advert - everything's under control in my all electric kitchen. Ritchie's food and liquor store in the background.trams, tramways, hospital corner, sturt st, drummond st, tram 39, tram 17 -
 Ballarat Tramway Museum
Photograph - Digital image, Chris Phillips, c1971
... Ballarat Tramway Museum South Gardens Reserve Wendouree ...Yields information about the tram track and trams at the Urquhart St crossing loop,Digital images of tram 17, destination Sebastopol entering the Bell St loop ??? to be checked.trams, tramways, sebastopol, tram 17 -
 Ballarat Tramway Museum
Photograph - Digital image, Chris Phillips, c1970
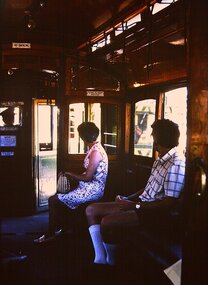
... view of a tram when crossing another tram. Trams tramways ...Yields information about the interior view of a tram when crossing another tram.Digital images of an interior photo within a tram, crossing another tram at a loop. Has two people in summer clothing. Photo by Chris Phillips, c1970.trams, tramways, interiors, ballarat