Showing 285 items
matching beehive bendigo
-
 Bendigo Historical Society Inc.
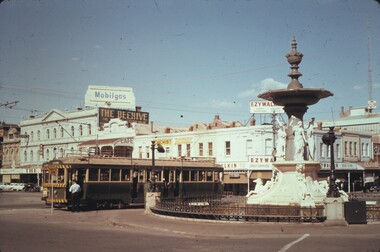
Slide - BENDIGO STREET VIEWS & FORTUNA, May 1962
Slide. Bendigo Street Views & Fortuna. The Beehive , Ezywalkin corner, The Fountain and a tram.slide, bendigo, bendigo street views & fortuna., bendigo street views & fortuna. -
 Bendigo Historical Society Inc.
Document - ARTICLES FOR RHSV BENDIGO BRANCH NEWSLETTER NOV. 1973
Articles for RHSV Bendigo Branch Newsletter Nov. 1973: 1. Bendigo Memories, 1860-80 (cont.) by G D Meudell , author of ''The Pleasant career of a spendthrift and his later reflections'. (Source 'Bendigo Advertiser' 1930); article by Mr R Buck - mention of wine growing in area; Henry Montague Marks (and father - auctioneer); Bank of Victoria; David Williamson; Dr Hugh Smith; E N Emmett; Malcolm Tolmie; Andrew Williamson; Jimmy Menzies; Lort Smith; A McD Cooper; William Davis; George Valentine; W B Reid; Bob Lewers,; Jack Tone; Dan Luxton. 2. ‘The burning of the Beehive'' (1871) - details of the fire, problems of loss of script and mention of Messrs Moore Bros; Messrs Buick & Co (drapers) using manuscript of the late Mrs Lucy Hill. 3. Article entitled '' Stiff Sentence'' re story of William Stanford (background to the Stanford Fountain, Melbourne) submitted by I Hendry; 4. Handwritten notes on ''The Diamond Hill Company (later Melbourne Hope) - two pages with the final page being located within Mosaic #6543 - mention, with mining details, of London Shaft; London Christmas Company; Melbourne Hope + typewritten article (full) published.document, names of bendigo pioneers, bendigo -
 Bendigo Historical Society Inc.
Photograph - PALL MALL
Sepia toned photo of Pall Mall, pictured within the image are a number of store fronts some of which are John Emery & Co, Melbourne Cash Store, C.C. Evans Pianoforte Harmonica & Music Warehouse, A.Carnduff Tobacconist, Callaway's Boots and Shoes, Beehive Building, Abbot New Times, Shamrock Hotel, markings on rear of image is a comic called 'The Bodgers By The Sea'photograph, landscape, pall mall, john emery & co, melbourne cash store, c.c. evans pianoforte harmonica & music warehouse, a.carnduff tobacconist, callaway's boots and shoes, beehive building, abbot new times, shamrock hotel, pall mall, comic, bodgers by the sea -
 Bendigo Historical Society Inc.
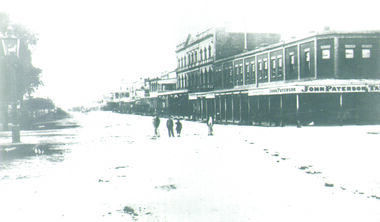
Photograph - PALL MALL, 1876
Black and White Photo of Pall Mall, Building at the Corner of Pall Mall and Mitchell Streets has the Sign 'John Paterson' and 'John Paterson Tailor', 4 small children are at the centre of the photo, Beehive Building, Shamrock Building in the distance, Markings on rear of the photo are 'Pall Mall', 'Holterman Collection 1876'buildings, commercial, pall mall, john paterson, beehive, shamrock -
 Bendigo Historical Society Inc.
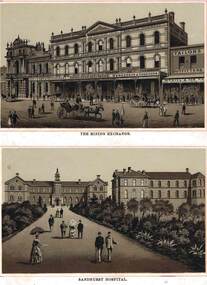
Photograph - THE MINING EXCHANGE - SANDHURST HOSPITAL, 1888
Black and White Photos, From the book 'Sandhurst Illustrated' by Schutze, Pictures feature 'The Mining Exchange Hotel', 'Beehive Chambers', Cafe & Restaurant, 'Henderson & Goodisson', Ezywalkin,Tailors and Outfitters Wm. Hill & Son Hat Manufacturers, many adults and children on footpath and roadway, three horse drawn carriages on roadway. 'Sandhurst Hospital' looking up driveway to main entrance, 12 adults ladies and gents, visiting or leaving the hospital. Lush shrubbery both side os drive.buildings, commercial, mining exchange/sandhurst hospital, mining exchange, sandhurst hospital, beehive, henderson & goodisson, hospital -
 Bendigo Historical Society Inc.
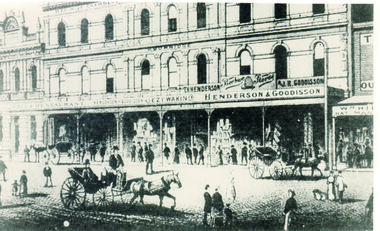
Photograph - MINING EXCHANGE, PALL MALL - SANDHURST, C. 1870
... Bendigo Historical Society Inc. Bendigo Historical Society ...Black and White Photo, The 'Beehive Chambers', Signs and advertising read - 'Café + Restaurant', 'Henderson & Goodisson', 'Ezy Wakin', 'Beehive Stores', Markings on back of photo read Mining Exchange, Pall Mall, Sandhurst. Three horse carriages with driver and passenger. T. H. Henderson. J. H. Goodison.buildings, commercial, beehive building, beehive stores, beehive, beehive chambers, pall mall, mining exchange, henderson & goodisson, t.h. henderson, j.r. goodisson -
 Bendigo Historical Society Inc.
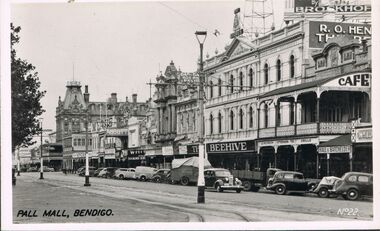
Photograph - BENDIGO - PALL MALL
Photograph - black and white. Photograph of Pall Mall, Bendigo. Written on right hand side No. 22. In the distance you can see shop names like 'Hall and Batchelder', 'Beehive', 'Abbott', 'The Shamrock'. Cafe. many cars parked in the gutter in front of the shops.place, streetscape, pall mall, pall mall bendigo -
 Bendigo Historical Society Inc.
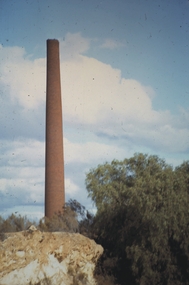
Slide - MALDON & SURROUNDING AREAS, Apr 1968
Slide. Maldon & Surrounding Areas. The 'Beehive' chimney stack.slide, maldon & surrounding areas., maldon & surrounding areas. -
 Bendigo Historical Society Inc.
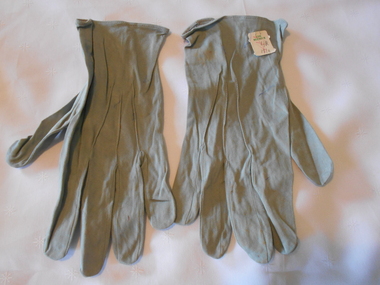
Textile - GREY COTTON GLOVES, Worn from 1960s onwards
Textiles. Grey cotton gloves. Fastened at wrist with dark grey plastic button (1.4 cm) and button hole. Three pin tucks on back of glove. Three other pairs still inside cellophane sleeves. 2 X size 10; 1 x size 9 1/2. Stapled. Beehive labels removed , uncatalogued.Label inside RH glove ''Dent's cotton Made in England''.Cardboard label-removed and stored separately, ''The Beehive 4R 13/11''. Printed on Cellophane sleeves, 'Dents gloves'. 'Hand in Glove with the World'. Made in England'. Picture of a Gloved hand holding a world glove.textiles, domestic, grey cotton gloves -
 Bendigo Historical Society Inc.
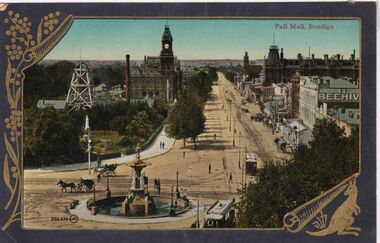
Photograph - CARWARDINE COLLECTION: PALL MALL BENDIGO
Coloured postcard, embellished with wattle left hand side, and kangaroo bottom Rh corner. Image shows Pall Mall, looking northwards. Post Office, Hustler's mine with brick chimney visible on left. Alexandra Fountain in centre bottom, horse drawn vehicles and two trams at Charing Cross. Henderson and Goode Beehive building and Shamrock Hotel on right. Receipt number 355/16bendigo, business, carwardine soap and candle -
 Bendigo Historical Society Inc.
Document - RESEARCH NOTES: ONE TREE HILL, STORMWATER CHANNEL, ANTHONY TROILLOPE, HORSE TRAMWAY TO GOLDEN SQUARE
Typed and handwritten notes. Mentioned are: - Some Notes Concerning The Eaglehawk Logs, Damaging the Stormwater Channel, where some Chinese were digging away the Creek, the cutting down of the giant gum tree which gave One Tree Hill its name, How Anthony Trollope saw Bendigo in the 1870's, A Proposed Horse Tramway to Golden Square, Society’s' Trip to Bridgewater Flour Mill, A talk on a trip to Malaya by Mr D Hester, Society News and Happenings, Old Bendigonians and Safety Cages,document, various notes, eaglehawk logs, bendigo advertiser 19/10/1858, damaging the stormwater channel, bendigo advertiser 11/8/1872, harneys bridge, gas works, constable rogers, constable james bradley, joch, john o'c hattam, one tree hill, ryan, trollope's fabulous bendigo, anthony trollope, 'trollope’s australia', nelson press, alex h stone, bendigo advertiser 5/7/1897, mr peter ellis, cr hoskins, horse tramway, historical society, water wheel flour mill, june parry, mr pat wodetzki, mr leo wodetzki, neil murray, mr k hester, mr wes harry, mr i hendry, mr henry jackson, mr connelly, mr irons, mr harney, dr smith, dr hoyle, rev dr bachaus, rev dr nish, rev joseph dare, hon angus mackay, mr haverfield, mr j k robshaw, w p neal, mr george lansell, hon j h abbott, m l c, mr j casey, dr james boyd, dr atkinson, dr easie, mr t h henderson, old beehive, francis brothers, mr john crowley, mr jacob cohn, art gallery, mr hugh mcdevitt, mr alexander bayne, mr f sciallero, camp reserve, hon w i winter-irvine, mr george avery fletcher, great central goldfield of victoria, safety cages, bendigo advertiser, j h seymour, mr horwood, new chum and victoria tribute company, james watson, seymour's patent safety cage, londerry tribute, national show sandhurst, h banfield, mr a llewllyn, 'dear old bendigo', thomas bracken, mr william heffernan, mr edward (ned) ryan, mr samuel bastard, mr charles bird, mcpherson and co, fern hill club, mr george tolhurst, tolhurst brothers, union bank, mr lawrence ryan, mr shadrack jones, charley armstrong, armstrong brothers, mr abraham solomen, mr bladiere mr r t wheeler -
 Bendigo Historical Society Inc.
Document - BENDIGO AND ITS HISTORICAL ASSOCIATIONS
Typed notes titled 'Bendigo and its Historical Associations. Mentioned are the buildings that were erected between the 1870's and the turn of the century, the buildings and churches, the meeting of diggers and the formation of the Red Ribbon League,the early gold miners, the purchase of the Central Deborah Mine, the Bendigo Easter Fair , the Chinese, and Eaglehawk.document, bendigo and its historical associations, lake eppalock, the beehive, beehive chambers, post office, law courts, shamrock hotel, town hall, home and hospital for the aged, bendigo base hospital, hospital hill, forest street wesley, congregational, st johns presbyterian, all saints pro-cathedral, red ribbon league, sacred heart cathedral, a n z bank, atkinson's building, holland bros, a h q survey regiment headquarters, george lansell, fortuna, pioneer, j b lazarus, theodore ballerstedt, victoria quartz mine, wm rae, witscheibes 'jewellers shop', gold mines hotel, david sterry, the bendigo and district tourist association, city council, central deborah gold mine, victoria hill, sun loong, loong, bendigo easter fair, chinese joss house, white hills cemetery, st killian's church, log lock-up, whipstick forest, a richardson, bendigo branch royal historical society of victoria -
 Bendigo Historical Society Inc.
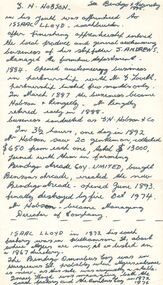
Document - G H HOBSON
Handwritten notes mentioning some Bendigo businesses. Mentions the formation of the Bendigo Arcade, where the Bendigo Omnibus Coy was, newsagencies, and where some businesses were in Hargreaves Street.document, names of bendigo pioneers, business, g h hobson, bendigo and vicinity 1895, issaac lloyd, j andrews, g lovell, hobson & pengelly, g hobson & co, bendigo arcade coy limited, bensons arcade, bendigo arcade, myers, the bendigo omnibus coy, arthur m armstrong, g w wicking, argus agency, beehive exchange hotel, isaac lloyd coach factory, arcade hotel, j h curnow, a raisbeck, dudley house, mr d collier -
 Bendigo Historical Society Inc.
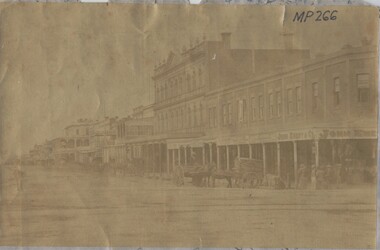
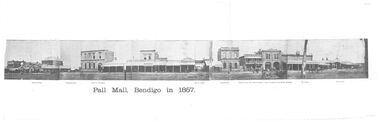
Photograph - BLACK AND WHITE PANORAMIC PHOTOGRAPH OF PALL MALL BENDIGO IN 1857
Black and white fold - out Panoramic Composite photograph of Pall mall Bendigo in 1857 on cream, aged paper showing the Shamrock hotel, Williamson St, Bank of Australasia, site of Arcade, Colonial Bank, Victoria Hotel (now National bank), Hall of Commerce (now Mining Exchange), the Beehive - Francis Brothers Beehive Stores, Pikes Corner, B Morey Saddler, Blythe & Inglis Family Grocer Provisions dealer, Horse Bazaar Cattle sale Yard, Jones & Shiress Chemists, horses and carts- enclosed in envelope addressed to 'Mrs Reube P Lumbe C/- Bethlehem Home for Aged Taylor St Specimen Hillbendigo, streetscape, pall mall, pall mall bendigo in 1857 / shamrock hotel / , colonial bank / victoria hotel /, hall of commerce / mining exchange / the beehive - francis brothers beehive stores/ pikes corner / b morey saddler / , blythe & inglis family grocer provisions dealer / jones & shiress chemists /, horse bazaar cattle sale yard -
 Bendigo Historical Society Inc.
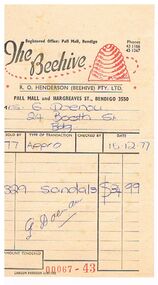
Document - 'THE BEEHIVE ' DOCKET RE SANDALS DATED 15.12.77
faded paper docket - 'The beehive ' docket re Sandals dated 15.12.77 / red printed logo of a beehive ' Mrs G. Doenou , 24 Booth St Bendigo, 329 sandals $34.99business, retail, general, 'the beehive ' / ' mrs g. doenou -
 Bendigo Historical Society Inc.
Document - BENDIGO POTTERY (EPSOM) PTY LTD
Typed page on the history of the Bendigo Pottery (Epsom) Pty. Ltd. It tells the story of George Duncan Guthrie, his arrival in Australia, his travels in Australia and finally settling in Bendigo where he set up the Bendigo Pottery.document, names of bendigo pioneers, bendigo pottery, bendigo pottery (epsom) pty ltd, mr w derham, royal doulton, clay division of humes, bendigo institute of technology, national gallery, george duncan guthrie, sailing ship washington, beehive shaped kilns -
 Ballarat Tramway Museum
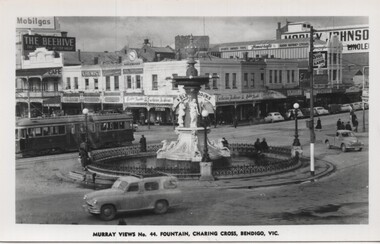
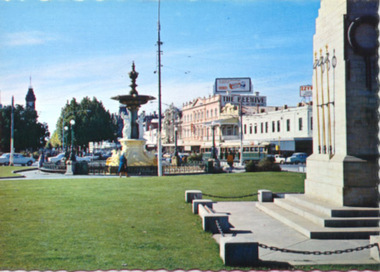
Postcard, Murray Views, "Murray Views No. 44 Fountain, Charing Cross Bendigo Vic", early 1950's
Postcard - most likely a reproduction of the original as it does not have a postcard back - titled "Murray Views No. 44 Fountain, Charing Cross Bendigo Vic". Shows an ex Hawthorn Bogie tram possibly on its way to Quarry Hill. In the background are the Beehive building, A G. Treloar Watchmaker, Melba Frocks, R. White, Edments, Hartleys, Astor Radio, Homecrafts store, and Morley Johnson building.On the rear in ink "Bendigo Charing Cross and Victoria Fountain" and the Keith Kings stamp.trams, tramways, bendigo, charing cross, bogie trams -
 Ballarat Tramway Museum
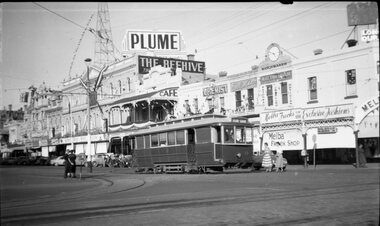
Negative, Wal Jack, 7/03/1954 12:00:00 AM
Negative and Digital images of the Wal Jack Bendigo Negative file of tram 19 at Charing Cross. Tram has the destination of Charing Cross. In the background is are decoration for the Royal Visit (on The Beehive building), Evelyn Amor, A. G. Trelor watchmaker, Melba Frocks, the latter with a sign provided by the RACV pointing towards Melbourne. A large Plume sign is on The Beehive building. Assumed taken on the same day as Reg Item 7878 - Royal Visit.trams, tramways, bendigo, pall mall, charing cross, royal visit, tram 19 -
 Ballarat Tramway Museum
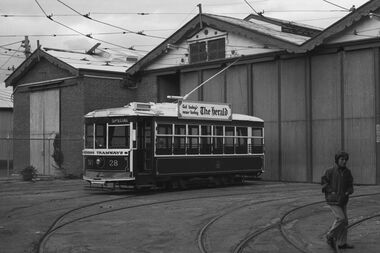
Negative, Bruce Herbert, "Bendigo and Ballarat Trams (AETA Convention) 30 Mar 1975", 30/03/1975 12:00:00 AM
Negative folder - made by ROW1 International of West Germany containing 40 No. 35 mm negatives of the AETA 1975 Convention visit to Ballarat and Bendigo on 30-3-1975. 17 photos of Ballarat and 23 of Bendigo. Bendigo photos: 1 - No. 28 at the depot 2 - ditto 3 - 24 and another bogie tram in side the depot 4 - No. 3? inside the depot 5 - 12, scrubber - 17 and two bogie trams 6 - scrubber and other bogie trams. 7 - general view with 24 and other bogie trams 8 - ditto 9 - Four trams at the Gold Mine, lead by 28. 10 - 19 at the Gold Mine 11 - single trucker with "tram tours" sign on the front 12 - 28 and two other cars at the Joss House, North Bendigo 13 - 19 and two other cars at the Joss House 14 - 30 at depot junction and loop 15 - 28 and 18 16 - 18 in the loop 17 - 28 and 18 McCrae St 18 - 28, 18 and 30 ditto 19 - 19 20 - No. 18 and 28 in Pall Mall with The Beehive in the background. Outside the building is an American Doughnut Kitchen van. The junction trackwork for the Eaglehawk lines remain in position. 21 - No. 30 northbound, with the City Family Hotel and other shops in the background. 22 - ditto and the cenotaph, 23 - B74 on a train at Spencer St. trams, tramways, btps, ballarat, aeta, bendigo, bendigo trust, depot, mccrae st, tram 28 tram 19 tram 30 tram 18 tram 24 tram 3 tram 12 tram 17 tram scrubber -
 Ballarat Tramway Museum
Photograph - Digital image, John Ward, 22/03/1970 12:00:00 AM
Digital image of three Bendigo trams at Charing Cross. Trams 7 (North Bendigo), 21 (Golden Square) and 2 (Quarry Hill). Has the Beehive building in the background, along with sings for 3BO, Myer, Amor gowns and Wm I Jones Chemist. The trams have some SEC Roof adverts. Photo by John Ward 22 March 1970. Slide title "00757 220370 SEC single truck trams 7 & 21 Pall Mall bogie tram 2 Mitchell St Charing Cross Bendigo Vic"trams, tramways, bendigo, charing cross, pall mall, mitchell st, tram 7, tram 21, tram 2 -
 Ballarat Tramway Museum
Slide - 35mm slide/s - set of 5, Noel Simons, 19/11/1962 12:00:00 AM
Set of 5 transparencies taken on 19/11/1962 on Kodak mounts. 1186.1 - Bendigo 21 bound for Golden Square at Charing Cross with The Beehive buildings and shops in Pall Mall in the background. Trams has an ad for Cohns drinks on front bumper, SEC Best for Cooking roof ad. and Mamouney's furniture roof ad. Two women passengers boarding. 1186.2 - Bendigo 26 crossing Pall Mall from Mitchell St. bound for Eaglehawk with "Ezywalkin" shop in background. Tram has an SEC 'Electric Cooking' roof ad and a 'Streets Ice cream' ad on front dash. 1186.3 - Bendigo 7 arriving at the Charing Cross stop, bound for North Bendigo. Has a Huttons dash panel ad, a Castrol roof ad. Buildings as for 1186.1. Passengers waiting at the stop. 1186.4 - Bendigo 19 leaving Charing Cross for Golden Square with City Club Hotel alongside and other buildings as for 1186.1 in the background. Tram has Briquettes ad on front dash and SEC 'Electric Cooking' roof ad. 1186.5 - Bendigo 21in High St. at corner of Short St. heading for Charing Cross. Destination half way between Depot and Railway Station. Tram has ads for Cohns Drinks on dash panel, SEC 'Cook with Electricity' and a Sandhurst Milk roof ads.Information written on in black ink and date stamped in purple ink. 1186.1 - "No. 21 in Pall Mall at Charing Cross, Bendigo" 1186.2 - "No. 26 arriving at Alexandra Fountain, Charing Cross, Bendigo" 1186.3 - "No. 7 in Pall Mall at Charing Cross, Bendigo" 1186.4 - "No. 19 in High St., Bendigo, leaving Charing Cross for Golden Square" 1186.5 - "No. 21 in High St. Bendigo, at corner of Short St." tramways, trams, bendigo, charing cross, pall mall, high st., tram 7, tram 19, tram 21, tram 26 -
 Ballarat Tramway Museum
Slide - 35mm slide/s - set of 17, Noel Simons, 20/11/1962 12:00:00 AM
... , showing destination of North Bendigo, with the Beehive building... photographer, showing destination of North Bendigo, with the Beehive ...Set of 17 transparencies taken on 20/11/1962 on Kodak mounts. 1187.1 - Bendigo No. 2 at the Quarry Hill terminus, showing destination of Quarry Hill. Has Cohns Drinks and Streets Ice Cream ads on dash panel, a SEC 'electric cooking' roof ad and another roof ad. Shows the Y terminus at this location, but tram standing just before it. Overhead in position. 1187.2 - as above, but closer up. 1187.3 - as above, but from the north side, showing cemetery in the background. 1187.4 - Bendigo No.3 at Eaglehawk terminus. Tram showing destination of Quarry Hill. Has the various buildings at Eaglehawk in the background including the Foodland store. Has Streets Ice cream and White Horse Whiskey ads on the dash panel. 1187.5 - Bendigo No. 18 at Garden Gully crossing loop, in bound, with destination of Eaglehawk. Passengers waiting for an Eaglehawk tram at the stop. Has a white horse whiskey ad on dash panel and SEC roof ads. Conductor standing in doorway looking out. 1187.6 - Bendigo No. 7 inbound in Nolan St. at cnr of McCrae St. showing destination of Golden Square. Has Streets Ice cream ad on dash panel and a Castrol Roof ad. 1187.7 - Bendigo No. 19 at the North Bendigo terminus with railway level crossing in background. Tram has a Cohns Drinks ad and an SEC 'Electric Cooking' roof ad. 1187.8 - Bendigo No. 2 at the Quarry Hill terminus, looking back into Bendigo, showing destination of Eaglehawk. 1187.9 - Bendigo No. 21 in McCrae St, near Nolan St outbound for North Bendigo. Photo taken after tram has passed photographer. 1187.10 - Bendigo Nos. 4 and 26 at Charing Cross in View St. with fountain alongside and the Beehive, Ezywalkin Buildings in the background. No. 26 has a Sandhurst Milk and SEC 'Electric Cooking' roof ad. 1187.11 - close up of 22E maximum traction truck and folded footstep. 1187.12 - Bendigo No. 19 at Charing Cross terminus, after tram has passed photographer, showing destination of North Bendigo, with the Beehive building in the background and passengers boarding tram. 1187.13 - Bendigo No. 11, turning from View St. into Pall Mall, showing Special with the conductor holding point bar. Has the Beehive and Ezywalkin Buildings in the background. 1187.14 - No. 7 at Charing Cross terminus, in Pall Mall, bound for Golden Square. Has the Beehive and Ezywalkin buildings in the background and passengers waiting at the tram stop. 1187.15 - No. 18 at the Charing Cross terminus, bound for Eaglehawk. Has the Beehive and Ezywalkin buildings in the background and passengers waiting at the tram stop. Also has the 'Safety Zone' sign in the photograph. 1187.16 - No. 2 at Quarry Hill terminus, night or dusk photo. Tram showing destination of Depot. 1187.17 - No. 26 at Charing Cross, night photo. Tram has destination of Quarry Hill, but is on the line for Eaglehawk. Photo looks along Mitchell St. Also shows Safety Zone sign. Information written on in black ink and date stamped on purple ink. 1187.1 - "No. 2 at Quarry Hill terminus Bendigo" 1187.2 - "No. 2 at Quarry Hill terminus Bendigo" 1187.3 - "No. 2 at Quarry Hill terminus Bendigo" 1187.4 - "No. 3 at Eaglehawk terminus" 1187.5 - "No. 18 in Mt Korong Road, Long Gully at cnr of Havilah Road (Eaglehawk Route)" 1187.6 - "No. 7 in Nolan St. Bendigo, at Cnr of McCrae St., near lake Weeroona, (North Bendigo Route)' 1187.7 - "No. 19 at North Bendigo terminus" 1187.8 - "No. 2 at Quarry Hill terminus" 1187.9 - "No. 21 in McCrae St. Bendigo, near Nolan St. (North Bendigo Route) 1187.10 - "4 and 26 at Alexandra Fountain, Charing Cross Bendigo" 1187.11 - "Truck of Bogie Car, Bendigo Tramways" 1187.12 - "No. 19 in Pall Mall at Charing Cross, Bendigo" 1187.13 - "Birney car No. 11 entering Pall Mall from View St. at Charing Cross Bendigo" 1187.14 - "No. 7 in Pall Mall at Charing Cross, Bendigo" 1187.15 - "No. 18 at Alexandra Fountain, Charing Cross, Bendigo" 1187.16 - "No. 2 at Quarry Hill terminus, Bendigo" 1187.17 - "No. 26 at Alexandra Fountain, Charing Cross, Bendigo" tramways, trams, bendigo, quarry hill, eaglehawk, north bendigo, maximum traction, night photo, tram 2, tram 3, tram 4, tram 7, tram 11, tram 18, tram 19, tram 21, tram 26 -
 Ballarat Tramway Museum
Slide - 35mm slide/s, Noel Simons, 21/11/1962 12:00:00 AM
Set of 6 transparencies taken on 21/11/1962 on Kodak mounts. 1189.1 - Bendigo No.11 at Quarry Hill terminus. Photo taken looking in along the route. Tram has destination of North Bendigo. 1189.2 - No. 21 in Pall Mall bound for North Bendigo. Tram has roof ads for Mamouney's furniture and SEC. In the background are the National Bank building, Dad and Dave's Cafe and the Beehive Buildings and the London Pharmacy. 1189.3 - No. 2 in Mitchell St, just after crossing over railway bridge. Photo taken after tram has passed photographer. Has what appears to be an SEC road works crew in the background. Has destination of Quarry Hill. 1189.4 - No. 17 climbing Mitchell St. on the start of the single track section, just before crossing the railway bridge. Has destination of Quarry Hill and the large Maples building sign in the background. 1189.5 - as for 1189.4 but after tram has passed photographer. Has an Ilford film roof ad and an SEC roof ad. Railway bridge in the background. 1189.6 - No. 21 at Charing Cross with passengers boarding. Tram has destination of North Bendigo and roof ads for SEC 'Electric Cooking' and Sandhurst Milk. In background are the buildings on the south side of High St. Also has a SEC worker in white overalls sweeping the track.Information written on in black ink and date stamped on purple ink. 1189.1 - "Birney car No. 11 in High St. Bendigo at Golden Square terminus" 1189.2 - "No. 21 in Pall Mall Bendigo near Charing Cross" 1189.3 - "No. 2 in Mitchell St. Bendigo, just after crossing bridge over railway line (Quarry Hill route)" 1189.4 - "No. 17 in Mitchell St. Bendigo, climbing the hill the bridge over the railway line. (Quarry Hill route)" 1189.5 - "No. 17 in Mitchell St., Bendigo approaching bridge over Railway line (Quarry Hill route)" 1189.6 - "No. 21 at Charing Cross, Bendigo"tramways, trams, bendigo, golden square, pall mall, mitchell st., quarry hill, tram 2, tram 11, tram 17, tram 21 -
 Ballarat Tramway Museum
Slide - 35mm slide/s - set of 24, Noel Simons, 20/05/1971 12:00:00 AM
Set of 24 transparencies taken on 20/5/1971 on Kodak mounts. 1195.1 - Bendigo 19 arriving at Charing Cross en route to North Bendigo with Fountain Plaza and the City Family Hotel in the background. No. 19 has two roof ads for the SEC. -'Electricity better for cooking' and 'Everything's under control in my all electric kitchen' 1195.2 - as above, but standing at the Charing cross stop, with the Beehive Stores and other buildings along the east side of Pall Mall in the background. 1195.3 - No 21 ex Golden Square crossing View St. trackwork in front of No. 25 waiting to depart for Quarry Hill. No.21 has two roof ads (as for No.19 in 1195.1) and No.25 has one SEC roof ad and another. Ezywalkin sign in the background, and Fountain Plaza. 1195.4 - as for 1195.3, but after 21 has arrived and 25 left for Quarry Hill. Has Ezywalkin store and the Beehive store in the background. 1195.5 - No. 5 at the Eaglehawk terminus. Photo taken with a cannon in foreground looking along High St. Eaglehawk. Has shops on the west side of High St. in the background. 1195.6 - No. 5 at the Eaglehawk terminus, close up of the rear of the tram - note tow bar arrangement. Has destination of Quarry Hill. 1195.7-Nos.25 and 5 crossing at the Thorpe St. Loop, California Gully. No. 25 bound for Eaglehawk (has SEC Briquette and electric cooking roof ads) and 5 en route for Quarry Hill with a SEC and Cinzano roof ad. 1195.8 - as for 1195.7, but after trams have passed each other. Has Borough Auto Service building in the background. 1195.9 - No. 5 in Mt Korong Road, towards Bamard Street, photo taken after tram has passed photographer. 1195.10 - No. 30 at the Golden Square terminus with the Milk Bar on the right hand side of the photograph. 1195.11 - No. 30 inbound at Fire Station Loop, High St. Golden Square. Has old fire station in the background. Passengers are boarding the tramcar. 1195.12 - No. 30 in High St, bound for North Bendigo between Vine and Wattle Streets. 1195.13 - No. 5 bound for Eaglehawk waits at Iron Bark Gully Loop, at Hayes St. 1195.14 - No. 5 and No. 2 crossing at Iron Bark Gully Loop. 1195.15 - No. 5 bound for Eaglehawk leaving the Manchester Loop, Long gully. 1195.16 - No. 5 passing William Street, Long Gully en route to Eaglehawk. 1195.17 - No. 5 just before the California Gully Crossing Loop. 1195.18 - Nos. 5 and 26 crossing at California Gully crossing Loop. No. 5 heading to Eaglehawk, 26, Quarry Hill. 1195.19 - No. 5 in High St. Eaglehawk with Bob Moyle's Victoria Hotel and the TAB in the background. 1195.20 - No. 5 in High St. Eaglehawk approaching the terminus. Photo taken after the tram has passed the photographer. Has Foodland store and J. Best Fruit supply in the background, along with Eaglehawk Town Hall. 1195.21 - No. 5 at the Eaglehawk terminus, photo taken along seldom used track along High St. 1195.22 - as for 1195.22 - but at the very end of the track. 1195.23 - No. 5 en route for Quarry Hill climbs High St. Eaglehawk with the Victoria Hotel and Eaglehawk Town Hall in the background. 1195.24 - No. 5 and 25 crossing at Jobs Gully Loop. Note 25 has a black on white destination roll, while No. 5 has a white on black destination roll. Information written on in black ink and date stamped on purple ink. 1195.1 - "No. 19 arrives at Charing Cross Bendigo from Golden Square" 1195.2 - "No. 19 about to leave Charing Cross for North Bendigo" 1195.3 - "No. 25 awaiting departure for Quarry Hill, watches No. 21 arrive at Charring Cross from Golden Square" 1195.4 - "No. 21 on North Bendigo service and No. 25 on Quarry Hill run await departure at Charing Cross" 1195.5 - "No. 5 at Eaglehawk terminus" 1195.6 - "No. 5 at Eaglehawk terminus" 1195.7 - "Nos. 5 and 25 crossing at Thorpe St. Loop, California". 1195.8 - "Nos. 25 and 5 crossing Thorpe St. Loop, California Gully". 1195.9 - "No. 5 descending Mt Korong Rd. towards Bamard St." 1195.10 - "Birney car No. 30 at Golden Square terminus" 1195.11 - "Birney car No. 30 in High Street near Thistle Street (Fire Station Loop)" 1195.12 - "No. 30 in High St. between vine and Wattle Streets" 1195.13 - "No. 25 at Hayes Street Loop Iron Bark". 1195.14 - "Nos. 2 and 5 crossing at Hayes Street Loop Iron Bark" 1195.15 - "No. 5 at Manchester Loop opposite Havilah Road, Long Gully" 1195.16 - "No. 5 passing William Street, Long Gully". 1195.17 - "No. 5 at California Gully" 1195,18 - "Nos. 26 and 5 at Thorpe St. Loop, California Gully". 1195.19 - "No. 5 in High St. Eaglehawk". 1195.20 - "No. 5 approaching Eaglehawk terminus" 1195.21 - "No. 5 at Eaglehawk terminus" 1195.22 - "No. 5 at Eaglehawk terminus" 1195.23 - "No. 5 in High St. Eaglehawk" tramways, trams, bendigo, charing cross, eaglehawk, california gully, golden square, iron bark gully, jobs gully, tram 2, tram 5, tram 19, tram 21, tram 25, tram 26, tram 30 -
 Ballarat Tramway Museum
Slide - 35mm slide/s - set of 4, Noel Simons, 24/05/1971 12:00:00 AM
Set of 4 transparencies taken on 24/5/1971 on Kodak mounts. 1199.1 - No. 21 in High St. at junction with old High St., near Fire Station Loop. Tram has two SEC roof ads. 1199.2 - No. 21 in High St. between Shamrock and Thistle Sts. Photo taken after the tram has passed the photographer. 1199.3 - Photo of a green box containing timetables for the four Bendigo routes. Located at Charing Cross. 1199.4 - Bendigo No. 23 en route to Eaglehawk at Charing Cross, with two SEC roof ads 'Everything's fine in my all electric kitchen' and "Switch to electric cooking'. Has the Ezywalkin building and the Beehive building in the background. Information written on in black ink and date stamped on purple ink. 1199.1 - "No. 21 in High St. at junction with old High St., near Fire Station Loop." 1199.2 - "No. 21 in High St. between Shamrock and Thistle Sts." 1199.3 - "Bendigo Tramways timetable at Alexandra Fountain Charing Cross." 1199.4 - "No. 23 at Alexandra Fountain Charing Cross, Bendigo." tramways, trams, bendigo, timetables, charing cross, high st., tram 21, tram 23 -
 Ballarat Tramway Museum
Slide - 35mm slide/s - set of 8, Noel Simons, 25/02/1972 12:00:00 AM
Set of 8 transparencies taken on 25/02/72 on Kodak mounts. 1202.1 - Night photo of Bendigo 5 at Charing Cross, waiting to depart to Quarry Hill. Tram has two SEC roof ads. Has Ezywalkin and the Beehive buildings in the background. 1202.2 - as for 1202.1 1202.3 - as for 1202.1 but further back and 7 and 21 waiting for their runs as well in Pall Mall. 1202.4 - 5 and 2 at Charing Cross, night photo, looking along Mitchell St. with Fountain Plaza on right of photo and Ezywalkin store. 1202.5 - No. 2 at Charing cross, bound for Eaglehawk. Tram has two SEC ads. 1202.6 - No. 26 at Quarry Hill terminus with the cemetery in the background. Tram has two SEC roof ads. 1202.7 - No. 26 in Mitchell St. bound for Eaglehawk, at Wills St. with the Hopetoun Hotel in the background. 1202.8 - as for 1202.6Information written on in blue ink and date stamped on purple ink. 1202.1 - "No. 5 at Charing Cross" 1202.2 - "No 5. at Charing Cross" 1202.3 - "Nos. 7, 21 and 5 at Charing Cross" 1202.4 - "Nos. 5 and 2 at Charing Cross" 1202.5 - "No. 2 at Charing Cross" 1202.6 - "No. 26 at Quarry Hill" 1202.7 - "No. 26 in Mitchell St. opposite Wills St." 1202.8 - "No. 26 at Quarry Hill" tramways, trams, bendigo, night photo, charing cross, quarry hill, mitchell st., tram 2, tram 5, tram 7, tram 21, tram 26 -
 Ballarat Tramway Museum
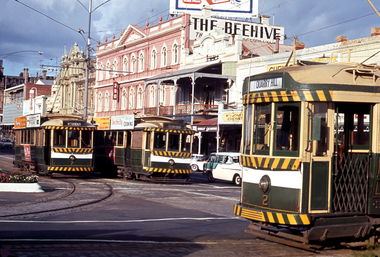
Slide - 35mm slide/s - set of 23, Noel Simons, 26/02/1972 12:00:00 AM
Set of 23 transparencies taken on 26/2/1972 on Kodak mounts. 1205.1 - Bendigo No. 25 on a special tour at Fire Station Loop, en route to Golden Square. 1205.2 - No. 21 and 25 crossing at Fire Station Loop, note photographers on the ground. No. 21 bound for North Bendigo. 1205.3 - as for 1205.3, but with trams departing loop and fire station in the background. 1205.4 - No. 25 at Golden Square Hotel with 'Rodda's Golden Square Hotel' in the background. Tram on a special tour, but showing destination of North Bendigo. 1205.5 - as for 1205.4 - but showing special. Has the end of the track in the photograph. 1205.6 - Nos. 7 and 25 (on a special tour) crossing at Myrtle St. Loop. 1205.7 - No. 7 leaving Myrtle St. loop with the mine poppet head in the background. Photo taken after tram has passed photographer. (Print made of this slide 10/2001 for use in the Gold Gold Gold exhibition of 10/2001 - See Reg. item 1979. 1205.8 - No. 25 entering depot. Tram showing 'special'. Tennis court on right has players. Photo taken after tram has passed photographer. 1205.9 - No. 24 (showing 'special') and No. 20 (showing 'Long Gully') at Bendigo Depot. 1205.10 - No. 24 on a special charter, leaving Bendigo depot. Tram has two 'Johnnie Walker' roof ads. 1205.11 - Bendigo depot with 29, 25 and a bogie car inside the depot doors. 1205.12 - As for 1205.11, but with 28 and 29. 1205.13 - No. 24 standing at front entrance of Bendigo depot with No. 20 in the background. 1205.14 - No. 24 running out into McCrae St showing special, with conductor on front step. 1205.15 - No. 24 in Caledonia St. at corner of Thunder St with the Gasworks in the background. 1205.16 - No. 5 en route for Quarry Hill at Charing cross with No. 26 (en route for Eaglehawk) about to arrive. Has former crossover at this location in the foreground. Has the Ezywalkin building in the background. 1205.17 - No. 5 and 26 at Charing Cross, with the Alexandra Fountain in the foreground and the Beehive and Ezywalkin buildings in the background. No.26 has two SEC roof ads. 1205.18 - Charing Cross looking along Pall Mall with trams 7 and 21 and 26 in the picture. 1205.19 - Charing Cross, with 21 departing for Golden Square and No. 5 heading for Quarry Hill. Has the Ezywalkin and the Beehive buildings in the background. 1205.20 - as for 1205.19, but a few moments later. Adjacent pole has a "NO ROAD" letter in reflectors vertically. 1205.21 - Charing Cross with Nos. 25, 21, 26 and 7, looking south from Pall Mall end. 1205.22 - No. 24 crossing Mitchell St. en route for Golden Square, showing 'special' with the Beehive and Ezywalkin buildings in the background. 1205.23 - Charing Cross with Nos. 24, 21 and 7 in the photo and Fountain Plaza in the background. Print of 1205.7 - stored in box D1.Information written on in blue ink and date stamped on purple ink. 1205.1 - "No. 25 at Fire Station Loop High Street, Golden Square." 1205.2 - "Nos. 25 and 21 crossing at Fire Station Loop, near Golden Square." 1205.3 - "Nos. 25 and 21 crossing at Fire Station Loop, near Golden Square." 1205.4 - "No. 25 at Golden Square terminus." 1205.5 - "No. 25 at Golden Square terminus." 1205.6 - "Nos. 7 and 25 crossing at Myrtle St. Loop." 1205.7 - "No. 7 leaving Myrtle St. Loop." 1205.8 - "No 25, entering Bendigo Depot." 1205.9 - "Nos. 20 and 24 at Bendigo Depot." 1205.10 - "No. 24 at Bendigo Depot." 1205.11 - "Nos. 25 and 29 at Bendigo Depot." 1205.12 - "Birney cars 29 and 28 at Bendigo Depot." 1205.13 - "No. 24 (with 20 beyond) at Bendigo Depot." 1205.14 - "No. 24 entering McCrae St. from Arnold St." 1204.15 - "No. 24 in Caledonia St. at cnr of Thunder St." 1204.16 - "No. 5 waits at Charing Cross as No. 26 arrives from Quarry Hill. Note remains of crossover abandoned on relocation in 1965." 1204.17 - "Nos. 5 and 26 at Charing Cross." 1204.18 - "Nos. 26, 7 and 21 at Charing Cross (No. 5 just visible behind No. 26)." 1204.19 - "No. 21 leaves Charing Cross for Golden Square as No. 5 starts off for Quarry Hill." 1204.20 - "No. 21 swings onto the single track Golden Square line as No. 5 heads into Mitchell St. towards Quarry Hill." 1204.21 - "Nos. 25, 21 and 26 watch No. 7 arrive at Charing Cross from Golden Square." 1204.22 - "No. 24 at Charing Cross crossing Mitchell St." 1204.23 - "Nos. 24, 21 and 7 at Charing Cross."tramways, trams, bendigo, golden square, myrtle st., fire station, depot, charing cross, tram 5, tram 7, tram 20, tram 21, tram 24, tram 25, tram 28, tram 29 -
 Ballarat Tramway Museum
Postcard, Nucolorvue postcards - Bendigo
Series of six (6) Nucolorvue postcards with serrated edges of scenes around Bendigo featuring Bendigo trams under the operation of either the SECV or the Bendigo Trust. 963.1 - "The Cenotaph and Alexandra Fountain" at Charing Cross. Has Bendigo bogie car in background. Also the Beehive building and Ezywalkin shoes. Nucolorvue postcard BE41 on rear and other information in green ink. 963.2 - "Tram No. 25, a maximum traction car built in 1916. Now operated by The Bendigo Trust between Central Deborah Mine and Emu Point." Features No. 25 in Bendigo Trust colours with Coca Cola and Bendigo Timber Co ads on the roof. On nearby pole is a "Bendigo Talking Vintage Tram" signs. In background is the Beehive building and other buildings near Charing Cross. Nucolorvue postcard BE52 on rear and other information in green ink. 963.3 - "Birney Tram No. 30 decorated for a Royal Tour occasion. The Bendigo trust operates this tram and others on a tourist service between Central Deborah Mine and the Chinese Joss House at Emu Point." Features No. 30 decorated for a visit of Prince Charles, 26/10/1974 with crown, Australian and English flags. Has Myer building in the background. On adjacent pole are two signs "Cars stop on Request". Nucolorvue postcard BE 44 on rear and information in green ink. 963.4 - "The Central Deborah Gold Mine and a vintage tram operated by the Bendigo Trust" Features Birney No. 28 at the mine terminus. Nucolorvue postcard BE48 on rear and other information in green ink. 963.5 - "Charing Cross Bendigo Vic." featuring SECV trams 5, 19 and other bogie car crossing street heading for Quarry Hill. Has Fountain Plaza building in background. Nucolorvue and other information in brown ink. 963.6 - "The Sacred Heart Cathedral looking from High St." Has tram 25 in Bendigo Trust colour running along street in front of Cathedral. Work to complete the spire on the Cathedral underway. Nucolorvue postcard BE47 and other information on rear in green ink. Bendigo Vintage Talking Trams - K.S.Kingstrams, tramways, bendigo, the bendigo trust, charing cross, royal visit, tram 37 -
 Ballarat Tramway Museum
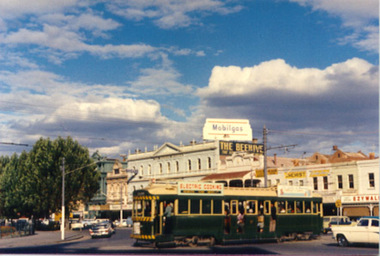
Photograph - Colour Photograph/s, 1962?
Colour postcard size print of an SEC Bendigo Bogie tram at Charing Cross. Photo undated, but could be 21.11.1962. Printed on AGFA paper. Tram fitted with dash canopy lighting, but no large white strip under the driver's windows. Photo out of focus. Has a SEC roof ad and another ad on the roof, non SEC. In background are the various buildings along Pall Mall. Tram well loaded with passengers. Can see the Ezywalkin, The Beehive and large a Mobilgas sign. Two copies held.bendigo, pall mall, charing cross -
 Ballarat Tramway Museum
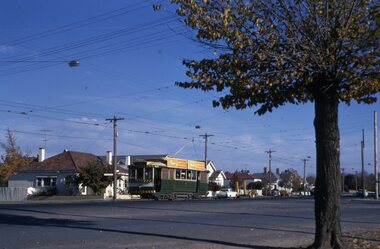
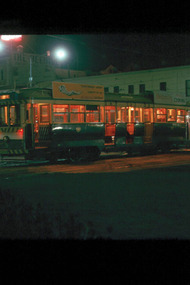
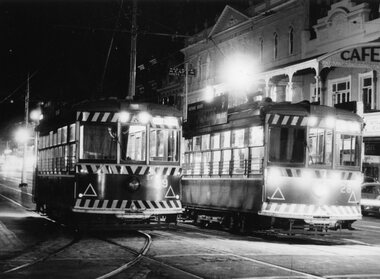
Photograph - Black & White Photograph/s, early 1960's
Black and White print of Bendigo SECV Bendigo trams 29 and 28 (Birney's) at night at the Charing Cross terminus for the Golden Square - North Bendigo route. Trams have dash canopy lights, but no large white strip under the drivers windows. Photo not dated but appears to be at during early 1960's. Has the Beehive Stores building, "Dad and Dave Cafe" and "W.I. Jones Chemist" store in the background. Tram 28 has a SECV briquette ad on the roof.trams, tramways, pall mall, bendigo, charing cross, tram 28, tram 29