Showing 301 items
matching bridge section
-
 Port Melbourne Historical & Preservation Society
Plan - Annotated and handcoloured by Peter Libbis to indicate his research into Libbis family residences and hotels on copy of a section of an MMBW map, Melbourne and Metropolitan Board of Works, c. 1980s
Peter LIBBIS obtained these copies from the MMBW when he researched his family history in the 1980s. He has annotated them, colour in hotels etc. Donated to Society in 1997.One of a group of 19 photocopies of various 20th century MMBW plans, annotated/coloured in to indicate residences of Libbis family and local hotels, by Peter LIBBIS in family and hotel research - North Port Station, Ingles to Bridgebusiness and traders - hotels, built environment - domestic, transport - railways, melbourne and metropolitan board of works, libbis family -
Port Melbourne Historical & Preservation Society
Plan - Annotated and handcoloured by Peter Libbis to indicate his research into Libbis family residences and hotels on copy of a section of an MMBW map, Melbourne and Metropolitan Board of Works, c. 1980s
Peter LIBBIS obtained these copies from the MMBW when he researched his family history in the 1980s. He has annotated them, colour in hotels etc. Donated to Society in 1997.One of a group of 19 photocopies of various 20th century MMBW plans, annotated/coloured in to indicate residences of Libbis family and local hotels, by Peter LIBBIS in family and hotel research - Bay/Crockford area, Ingles to Bridgebusiness and traders - hotels, built environment - domestic, transport - railways, melbourne and metropolitan board of works, libbis family -
 Bendigo Historical Society Inc.
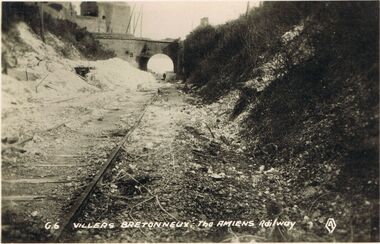
Postcard - ACC LOCK COLLECTION: VILLERS BRETONNEUX, THE AMIENS RAILWAY, POSTCARD, 1914-1918
Postcard, WW1, B&W image of section of the Amiens Railway at Villers Bretonneux. Double tracks in a cutting partially covered with rubble. Arch bridge in the background. Copy G6postcard, postcard, ww1, villers bretonneux, amiens, france, railway -
 Bendigo Historical Society Inc.
Document - CONNELLY, TATCHELL, DUNLOP COLLECTION: ACCOUNTS ESTATE OF ESTHER ISABELLE CANNING, 1893 - 1895
Document. Connelly, Tatchell & Dunlop - Accounts - Estate of Esther Isabelle Canning. 1 - 1893 - Acc from Oakley W H, Bridge St Bendigo. Furnishing Undertaker, Established 1853, to Mr Canning for the late Mrs Canning. Contains details of funeral expenses. Also contains receipt from Courtier? Sidney, Sexton, Kangaroo Flat Public Cemetery for Interment charges of Esther Isobel Canning. Independent Section, Label No 2221. 2 - 1895 - Acc from W Beebe & Son, Steam Granite, Marble & Stone Sawing Works, Mitchell St and Lyttleton Terrace, for supplying and fixing red gum edging etc at Kangaroo Flat Cemetery. Dated Apr 1st 1895. 3 - Blank paper titled Canning's Estate Receipts. 4 - 1894 - Receipt from Connelly, Tatchell & Dunlop for allowance to Canning John. Dated Feb 6 1894. 5 - 1894 - Receipt from Connelly, Tatchell & Dunlop for allowance to Canning John dated Mr 3 1894. 6 - 1894 - Receipt from Connelly, Tatchell & Dunlop for allowance to Canning John dated Mar 31 1894. 7 - 1894 - Receipt from Connelly, Tatchell & Dunlop for allowance to Canning T? dated May 19 1894. 8 - 1894 - Receipt from Connelly, Tatchell & Dunlop for allowance to Canning Thomas dated Apr 21 1894. 9 - 1895 - Receipt from Connelly, Tatchell & Dunlop for allowance to Canning John dated Jan 14 1895. 10 - 1895 - Receipt from Connelly, Tatchell & Dunlop for allowance to Canning John dated Mar 12 1895. 11 - 1895 - Receipt from Connelly, Tatchell & Dunlop for allowance to Canning John dated Apr 8 1895. 12 - Receipt from Connelly, Tatchell & Dunlop for allowance to Canning John dated May 7 1895.cottage, miners, connelly, tatchell & dunlop, oakley w h, mr canning, mrs canning, courtier? sidney, kangaroo flat public cemetery, w beebe & son, canning john, canning thomas -
 Bendigo Historical Society Inc.
Document - CONNELLY, TATCHELL, DUNLOP COLLECTION: ACCOUNTS ESTATE OF ESTHER ISABELL CANNING, 1893 -1894
Document. Accounts of Estate of Esther Isabelle Canning. 1 - 1894 - Account from Hinchcliffe Edwin, M. D., View Street Bendigo. 2 - 1894 - Account from Jones T R, Chemist & Druggist, Hargreaves Street, Sandhurst. 3 - 1894 - Ac. From William Bruce & Sons, B. B. Brewery, Bridge St. Bendigo, Brewers, Aerated Waters and Cordial Manufacturers, 2 April 1894. 4 - 1894 - Ac. From William Bruce & Sons, B. B. Brewery, Bridge St Bendigo, Brewers, Aerated Waters and Cordial Manufacturers. 1 March 1894. 5 - 1893 -Ac. From Burt, E Mrs, Nurse. 6 - 1894 - Receipt from Phoenix Fire Office of London, Victorian Branch, 60 Market St, Melbourne. Insurance from Fire for Property - Cottage, High St. 7 - 1893 - Receipt from Phoenix Fire Office of London, Victorian Branch, 60 Market St, Melbourne. Insurance from fire for property - Hotel, high St. 8 - 1894 - Ac from S. P. Co-Operative Co, Mitchell St, Bendigo, General Grocers, Tea and Provision Merchants. 9 - 1894 - Ac from Forbes T, Surveyor, View St, Bendigo. Subdivision of Allotment 5, Section 29A at Golden Square. 10 - 1893 - Ac from Mackay & Co, Bendigo Advertiser Office, Market Square, Bendigo. 11 - 1893 - Ac from Pritchard Geo, Aerated Water and Cordial Manufacturer, Arnold St Bendigo. 12 - 1893 - Receipt from McKenzie R C. 13 - 1894 - Ac from C H Hobson & Co, General Auctioneers, Bendigo Arcade Auction Rooms, Hargreaves St Bendigo.cottage, miners, connelly, tatchell & dunlop, hinchcliffe edwin, jones t r, william bruce & sons, b b brewery, burt e mrs, phoenix fire office of london, s p co-operative co, forbes t, mackay & co, bendigo advertiser office, pritchard geo, mckenzie r c, hobson c h -
 Dutch Australian Heritage Centre Victoria
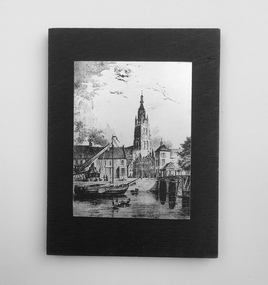
Etching
The Vliet is a canal in the western Netherlands, in the province of South Holland. It starts at the Oude Rijn at Leiden and joins the Delfshavense Schie canal at Delft. Places along its banks include Voorschoten, Leidschendam, Voorburg, The Hague and Rijswijk. The canal was dug in 47 AD under command of Roman general Corbulo, who wished to connect the river Rhine, of which the current Oude Rijn stream in Roman times was the main branch, to the Meuse estuary. It is unclear what the canal's trajectory was beyond the current city of Delft; the Delfshavense Schie canal, which connects Delft to the Nieuwe Maas river was not dug until 1389. In the Middle Ages the Vliet was an important trade link that attracted all kinds of trade, as it flowed through the heart of the County of Holland. Windmills have been constructed alongside the Vliet, including the completely renovated mill 'De salamander' in Leidschendam. The Vliet area was particularly attractive among richer families, who built their mansions along its banks.An historic small town scene etched (or possibly printed) on thin metal and subsequently fastened to a plywood backing. The delicately presented scene is said to show the intersection of Old Church Street and the Vliet Canal bridge in Voorburg, as well as a section of wharf. On the canal are one large and two much smaller vessels. A very tall crane-like construction arises from the wharf to the roof of waterside buildings. The people are soberly dressed in possibly 17th or 18th century costumes.On the reverse has been written: "Oude Kerkstraat Brug over de Vliet Voorburg". (Old Church Street; Bridge over the Vliet canal; Voorburg). However, research proves that the church is actually the Old Church in Delft, a short distance further down the Vliet Canal. -
 Hume City Civic Collection
Photograph, late 1990s
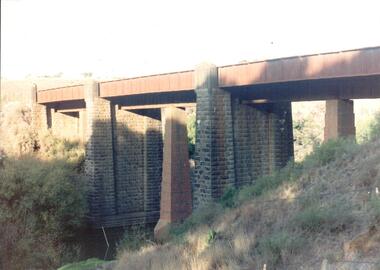
The bridge constructed from bluestone, brick and iron over the Jacksons Creek at Sunbury is an important structure on the Melbourne-Echuca rail line. The foundation stone for the bridge was laid on 13 January 1859 and the bridge opened in July 1861. It is of state significance.A coloured photograph of the bluestone and iron railway bridge which is ove the Jacksons Creek. The bridge has 3 bluestone pylons and three iron pylons with 3 sections of the iron spans visible across the top.transport, bridges, rail transport, darbyshire, g. c., jacksons creek, george evans collection -
 Hume City Civic Collection
Photograph, 1/01/1971
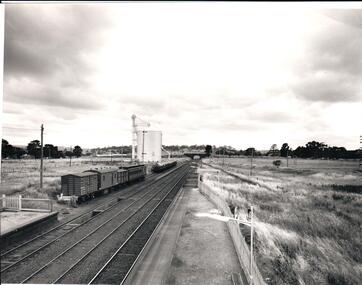
The photograph was taken when railway land on either side of the tracks was used for recreational purposes and agricultural related activities. The local sports ground is on the RHS of the photograph and was used to stage a number of the town's events.A black and white photograph of a section of the two railway platforms and three sets of rail tracks with a stone bridge in the distance. Four rail carriages and eight goods trucks are on a railway siding near a wheat silo. There is open land on either side of the rail tracks.sunbury railway station, wheat silos, railways, macedon street rail bridge., george evans collection -
 Sunshine and District Historical Society Incorporated
Base Plate, New H.V.McKAY FOOTBRIDGE, Circa 2013-2014
The steel mesh and crossbar sides of the new H.V.McKay footbridge are designed to replicate the appearance of the old crossbar gates which were at the old H.V.McKay works. The new bridge contains 111 of these plates attached to the centre of all crossbar sections which enclose both sides of the walkway of the bridge. The plate is a donated spare which was left over from the original manufactured plates that were attached to the new H.V.McKay footbridge. The plate is in our possession for safe keeping and for future reference.Stainless steel oval shaped plate with four holes for mounting to mesh sides of the walkway on the bridge. The plate has engraved lettering and lines intended to replicate a Sunshine Crossbar gate. H.V.McKAY SUNSHINE (The small c is underlined which can't be replicated on this data base)base plate, stainless steel plate, crossbar gates, regional rail link, hv mckay footbridge, h.v.mckay footbridge, sunshine -
 Nillumbik Shire Council
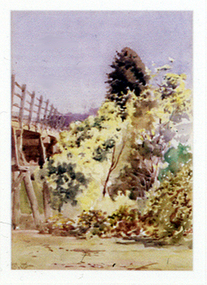
Painting: Walter WITHERS (b.1854 Warwickshire, UK — d.1914 Eltham, Aus), Trestle Bridge, Eltham, c.1903-10
... in the middle of the day. A small section of the wooden bridge... of the day. A small section of the wooden bridge is located ...Walter Withers was a significant Australian landscape artist and a member of the Heidelberg School of Australian Impressionists. In 1903 Withers bought 'Southernwood', a house on 2½ acres (1 ha) at Eltham, to which he added a studio. Because of ill health, he lived during the week at his studio in Oxford Chambers, Melbourne, and on weekends and holidays with his family at Eltham until his death in 1914. The Eltham rail bridge is a unique and valuable historic relic of an earlier steam locomotive transport era in the Diamond Creek Valley and has long formed an important part of a magnificent Eltham landscape. When built in 1902 it was close to the terminus point of the Heidelberg-Eltham rail extension, on the route of the proposed Diamond Valley Railway that was then planned to continue much further up the valley towards Kinglake. This bridge is situated in attractive river-valley parkland amidst the tall and spreading manna gums and candlebarks of the Diamond Creek Valley. The Alistair Knox Park river-valley landscape, of which the timber trestle bridge is an important visual component, has been classified by the National Trust. Large manna gum and candlebark trees adorn the adjacent creek banks, and historic Shillinglaw Cottage is also part of this much-prized Eltham landscape. Eltham is home to a historic wooden railway trestle bridge. Mainly of timber-pier and timber-beam construction, but varied by a few longer steel-joists spans on timber piers at the main stream channel, this substantial bridge has almost two hundred metres of timber deck. Built in 1902, it is the only railway bridge of predominantly timber construction that is still in regular use as an integral part of Melbourne's metropolitan electric railway network and one of extremely few timber rail bridges in the State that still carry trains. Apart from its important continuing social function as a carrier of rail transport for the Hurstbridge line, this impressive bridge and its beautiful parkland environs contribute much to the character of Eltham township and that town's special reputation as an historic centre of environmental and conservation concerns. This section of the Diamond Creek Valley was the subject of a Walter Withers painting in the earliest years of the twentieth century and has strong historic links with our Heidelberg School of painters. Watercolour painting on paper of Eltham's Trestle Bridge in the middle of the day. A small section of the wooden bridge is located to the left of the painting. The focus is predominately on the wattle, manna gum and candlebark trees that is to the right of the bridge. The golden hues typically represent the australian sunlight and landscape. "W.W" in gothic script on the lower right side of the painting. Not dated. withers, eltham, trestle bridge, railway, watercolour -
 Geelong Naval and Maritime Museum
Ditty Box, John Kidd's Ditty Box, c.1915-1930
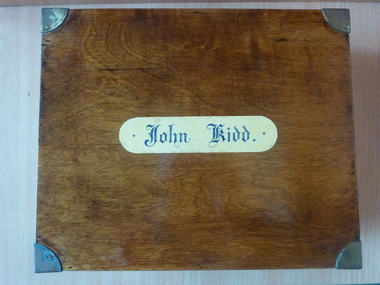
There is a single record with the RAN for a John Kidd, who commenced service in 1909 and left in 1912. Kidd was born in 1885 in Sydney and his mother lived in Queenscliff. He served on the HMAS Parramatta from 1911-1912. There is no evidence of him having served on the HMAS Melbourne. Kidd served from 1911-1912 on the HMAS Parramatta, the first ship launched for the Royal Australian Navy (RAN).A wooden box with mortise and tenon joins, brass fittings, circular handles, silver hinges and a name plate on the front. The box has a lift out section creating compartments. On the inside lid of the box is a postcard of the HMAS Melbourne surrounded by small rope decoration. A number of keepsakes are inside including a fidd for splicing ropes, a Capstan Wills tobacco tin, 3 postcards, a "Bengall Imperial" cut throat razor (T.R. Cadman & Sons, Sheffield England), black and white bakelite buttons with embossed crown and anchor and brass shank (either for war time or junior officers), gold naval buttons with embossed naval anchor and 2 piece shank (from a coat and cuffs), a bullet casing (Webley '45), a petty officers cloth badge (crossed anchors with a Crown), 4 shells, a good conduct badge (black with gold embroidery) and a red/brown vulcanized asbestos fibre fireproof dog- tag with rope attached."John Kidd" on front of box. "20171" stamped on edge of box. Tobacco tin: "Medium/"Capstan"/Registered/Ready Rubbed Fine Cut Tobacco/-1 oz net weight when packed/W.D. & H.O. Wills/(Australia) Ltd., Sydney. Postcard: Main Street, Samarai. Postcard: Sydney from Lavender Bay Kerry (Copyright) Sydney. Postcard: "Docks showing cathedral, Bristol BL 193. Copyright Lilywhite (1932) Ltd, Sowerby Bridge". Buttons: "AUSTRALIA/Y6-298", "Buttons Ltd B'HAM mark trade" "AUSTRALIA Stokes & Son Melbourne". Bullet casing "WEB WRA 45". Dog-Tag may read "L/Ford" written in ink?ditty box, john kidd, dog-tag, wwi identification tag, lilywhite ltd, w.d & h.o wills, stokes & son melbourne, naval buttons, hmas melbourne -
Stawell Historical Society Inc
Map, The Litho Co Ballarat, Glyntowyn Estate Campbells Bridge 1909, 1909
Shows Hoestead CC McCulloch ESQPaper map / Poster Advertising Subdivision of EstateMitchell Bros & White. 5003 Acres The Litho Co Ballarat Black Printing with Red Coloured Sectionsfarming -
 Stawell Historical Society Inc
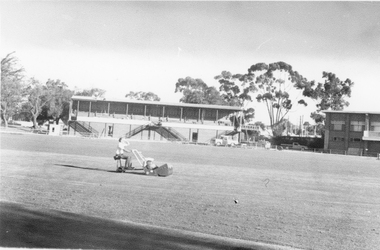
Photograph, Central Park Oval c 1980
c 1980 Parks and garden staff mowing Central Park Oval. No 2 Grandstand has its roof on. Also at the right end of the Grandstand is the Railway foot bridge which was demolished in 1991.. The Football Clubrooms built in mid 1960's is just in view on the right side. Photo of oval with garden staff mowing. No 2 Grandstand and just a section of the Football Clubhouse in view. c 1980'sstawell sports -
 Whitehorse Historical Society Inc.
Document, Plan of Subdivision, 1861
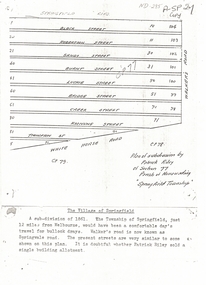
Copy of plan of subdivision by Patrick RileyCopy of plan of subdivision by Patrick Riley of Section 77, Parish of Nunawading 'Springfield Township' 1861. Bounded by Whitehorse Road, Walker's Road, (now known as Springvale Road) and Springfield RoadCopy of plan of subdivision by Patrick Rileyland sales, riley, patrick, whitehorse road, nunawading, walkers road, springfield road, black street, robertson street, sandy street, burnt street, luckie street, bridge street, creek street, koonung street, thompson street -
 Whitehorse Historical Society Inc.
Photograph - Coloured photograph, Quarry Road Mitcham
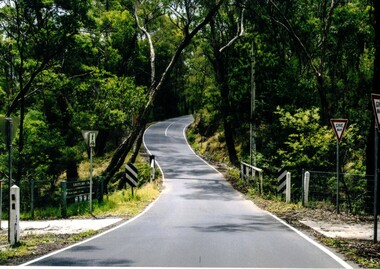
Coloured photograph of Quarry Road, Mitcham looking south. A bridge over Mullum Mullum Creek and the Eastlink Trail appear on the lower section of the photograph - 2012quarry road, mitcham. east link trail -
 Mt Dandenong & District Historical Society Inc.
Photograph, Tourist Track, Sassafras. Vic, c1920
The tourist track running alongside the creek from Sassafras Mechanics’ Hall to Emerald. In the early 1900s the track started at Rostrevor Guest House.Black & White postcard P1501 from the Rose Series. Shows a log bridge along a tree fern lined section of the Tourist Track.On reverse - POST CARD A Real Photograph. Produced in Australia.rose series, sassafras, track, postcard, mechanics' hall -
 Melbourne Legacy
Postcard, New bridge at Rodah, c.1912
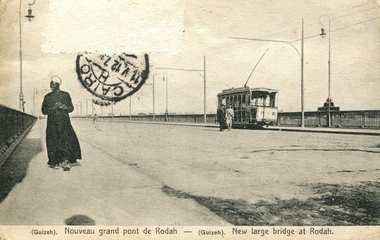
Postcards were a common form of souvenirs for soldiers who were travelling either during World War 1, or just after, or while returning to Australia. Was with other World War 1 memorabilia that has come from Private John Basil McLean, 2nd Reinforcements, 37th Battalion, A.I.F. J.B. McLean (Service No. 13824) was from near Maffra, Victoria and enlisted on 22 January 1916. He embarked on 16 December 1916 for Europe. His full war record is available from AWM. He spent time with the Australian Field Artillery (Pack Section). At the end of the war he worked for a year at the A.I.F. Headquarters in London before returning to Australia on the 'Ceramic', arriving Portsea in 1920.Postcards were a very common form of communication in the first World War. This postcard also records Gallipoli for those who didn't have cameras. This type of souvenir would have been familiar to the first Legatees as they had served in World War 1 and many had served at Gallipoli.Postcard showing black and white image of the bridge at Rodah, Guizeh (Giza). Several figures and a tram are also pictured crossing the bridge. A black postal stamp in the top left quadrant of the postcard indicates it was posted from Cairo. The back of the postcard contains a message. Based on the date and location it was posted from, the text could be Egyptian Arabic or it could be Pitman shorthand.Front - “(Guizeh) Nouveau grand pont de Rodah - (Guizeh) New large bridge at Rodah.” Back - “J/15/1912/ CARTE POSTALE / M J?. Hinaul / 20 Rue de Landrecies/ Le Cateau (Nord)/ France/ Ghino Dukich, 21 Rue Nubar Pacha - Le Caire, Egypte/ Serie A No. 25. Reproduction interdite” Stamps - Postes Egyptiennes/ Un Millieme”souvenir, war correspondence -
Ballarat Tramway Museum
Poster, State Electricity Commission of Victoria (SECV), "Now its cheaper to travel by tram!", Jun. 1963
Yield information and demonstrates the SEC's marketing of the City Section Fare in Ballarat.Poster - printed onto paper and cut to a size to be pasted or adhered to an interior tramcar advert titled "Now its cheaper to travel by tram!", advertising fares from Dawson St to the station or to the East End of Bridge St. Follows the introduction of the City Section Fares to the Railway Station. Based on Schedule of Fares and Charges Reg Item 1731 for June 1963.trams, tramways, posters, fares, advertisements, tickets -
 Ballarat Tramway Museum
Slide - 35mm slide/s, Robert Thomson, May. 1968
Yields information about trams in the lower section of Sturt St at Grenville St and the buildings during 1968.Kodak Kodachrome cardboard mount, colour slide of tram 20 passing the Grenville St shelter in Sturt St, about to enter Bridge St, with the destination of Mt Pleasant. There is a tram in the City Loop. Taken 5/68. In the photo are signs for T&G, Patersons, Thomas Jewellers, Bill Valpied and a Susan Day cakes truck. In the photo are the Ballarat Mechanics Institute building, the Ballarat Gas Company and Town Hall."5/68" in ink.tramways, trams, mt pleasant, grenville st, sturt st, city loop, tram 20 -
 Ballarat Tramway Museum
Slide - 35mm slide/s - set of 9, Noel Simons, Sept. 1971
Set of 9 Kodak Ready-mount with slides made from the Association of Railway Enthusiast Provincial Tramways film strip. Reference Item 2560 details the ARE Film Strip, and provide references to other slides. See also Reg. item 1164. 1174.9 on plain white mount. 1174.1 - Tram 40 North bound for Lydiard St. North at the Railway Gates, with the gates closed. Tram carrying a heavy load of passengers. Railway station building and car park in background. Taken from the signal box. 1174.2 - Tram 12 bound for Gardens, photographed across the median strip plantation near Dawson St. Image i2a - adjusted 9/2021 to remove colour cast. 1174.3 - Tram 43 in bound along Wendouree Parade near Barrett Ave, passing a former tram stop and with "Warning Oncoming Trams" sign mounted on an adjacent pole. See also Reg. item 1172.1 for a photo taken in May 1971. This photo taken after the closure of the Victoria St. line, as the tram stop has been painted out. 1174.4 - Looking along the track to Sebastopol terminus on the west side of Albert St. - telephoto shot showing bogie tram in the far distance. Shows the nature of the track, poles, tram stop frequency and in the fare distance the terminus. Also show the trees that used to be along this section of the track. 1174.5 - No. 42 showing "Special" in Macarthur St. approaching Drummond St. north. Photo taken from under the verandah of a shop on the south side of the street that were many years later to become the Tramcar Restaurant. Note metal fence to cemetery. 1174.6 - Nos. 21 (Sebastopol) crossing 14 (Lydiard St. Nth) at the loop between Sayle and Grey St. Photo taken looking south. 1174.7 - No. 12 bound for Mt Pleasant, in Bridge St. about to stop at the junction for the two routes. Telephoto photo looking west along Bridge St. with many cars in the photo. Very few people on the street itself. 1174.8 - No. 30 and 17 at the City Terminus, on the north side of Sturt St. Taken from the Post Office corner with the Town Hall in the background. 1174.9 - No. 39 inbound along Sturt St. West. with many cars on the road. Bus stop on a pole on the other side of the road.1174.1 - "No. 40 on Lydiard St. North service waits at the level crossing at Ballarat Railway Station." 1174.2 - "No. 12 bound for 'Gardens' seen across the centre plantation in Sturt St." 1174.3 - "Barrett Ave." 1174.4 - "The Sebastopol route near the terminus" 1174.6 - "Nos. 21 and 14 crossing at Sayle St. Loop on Sebastopol route" 1174.7 - "No. 12 at Eastern end of Bridge St." 1174.8 - "Nos. 30 and 17 in Sturt St. at Cnr of Lydiard St." 1174.9 - "No. 39 City bound from 'Gardens" in Sturt St. West" All have date stamp of "Sep 1971" in black ink. Writing in blue ink.tramways, trams, lydiard st. nth, railway crossing, sturt st, wendouree parade, sebastopol, macarthur st., bridge st., sturt st. west, tram 12, tram 14, tram 17, tram 21, tram 30, tram 39, tram 40, tram 42, tram 43 -
 Ballarat Tramway Museum
Slide - 35mm slide/s, Noel Simons, 21/11/1962 12:00:00 AM
Set of 6 transparencies taken on 21/11/1962 on Kodak mounts. 1189.1 - Bendigo No.11 at Quarry Hill terminus. Photo taken looking in along the route. Tram has destination of North Bendigo. 1189.2 - No. 21 in Pall Mall bound for North Bendigo. Tram has roof ads for Mamouney's furniture and SEC. In the background are the National Bank building, Dad and Dave's Cafe and the Beehive Buildings and the London Pharmacy. 1189.3 - No. 2 in Mitchell St, just after crossing over railway bridge. Photo taken after tram has passed photographer. Has what appears to be an SEC road works crew in the background. Has destination of Quarry Hill. 1189.4 - No. 17 climbing Mitchell St. on the start of the single track section, just before crossing the railway bridge. Has destination of Quarry Hill and the large Maples building sign in the background. 1189.5 - as for 1189.4 but after tram has passed photographer. Has an Ilford film roof ad and an SEC roof ad. Railway bridge in the background. 1189.6 - No. 21 at Charing Cross with passengers boarding. Tram has destination of North Bendigo and roof ads for SEC 'Electric Cooking' and Sandhurst Milk. In background are the buildings on the south side of High St. Also has a SEC worker in white overalls sweeping the track.Information written on in black ink and date stamped on purple ink. 1189.1 - "Birney car No. 11 in High St. Bendigo at Golden Square terminus" 1189.2 - "No. 21 in Pall Mall Bendigo near Charing Cross" 1189.3 - "No. 2 in Mitchell St. Bendigo, just after crossing bridge over railway line (Quarry Hill route)" 1189.4 - "No. 17 in Mitchell St. Bendigo, climbing the hill the bridge over the railway line. (Quarry Hill route)" 1189.5 - "No. 17 in Mitchell St., Bendigo approaching bridge over Railway line (Quarry Hill route)" 1189.6 - "No. 21 at Charing Cross, Bendigo"tramways, trams, bendigo, golden square, pall mall, mitchell st., quarry hill, tram 2, tram 11, tram 17, tram 21 -
 Ballarat Tramway Museum
Slide - 35mm slide/s - set of 20, Noel Simons, 21/05/1971 12:00:00 AM
Set of 20 transparencies taken on 21/5/1971 on Kodak mounts. 1197.1 - Bendigo No. 5 en route to Eaglehawk at Creeth St Long Gully. Tram has a SEC roof ad and Cinzano roof ad. 1197.2 - No 5 approaching Needle Loop between Long Gully and California Gully. On left hand side is the City of Bendigo sign, indicating city boundary. 1197.3 - As for 1197.2 but actually entering loop. Photo taken after tram has passed photographer. 1197.4 - No. 26 bound for Eaglehawk descending the railway bridge near Eaglehawk, at Jobs Gully. 1197.5 - as for 1197.4, but after crossing bridge, now ascending a hill. Photo taken after tram has passed photographer. 1197.6 - No. 26 climbing High St. hill Eaglehawk, nearing end of Double track, bound for Quarry Hill. Shows centre of the road poles. 1197.7 - As for 1197.6, with tram entering single track section. Photo taken after tram has passed photographer. Has a BP service station in the background. 1197.8 - No. 26 (bound for Quarry Hill) crossing No. 17 (Eaglehawk) at Job's Gully Loop. 1197.9 - No. 17 climbing railway bridge at Job's Gully, en route to Eaglehawk. Photo taken after tram has passed photographer. 1197.10 - No.26 bound for Quarry Hill, leaving Long Gully Loop? Has the Creeth St. church in l197.l in the far background. Photo taken after tram has passed photographer. 1197.11 - Tramway Point work at the northern end of Long Gully Loop. 1197.12 - No. 17 en route for Quarry Hill turning into View St. from Bamard St. Tram has SEC roof ads "Everything fine in my all electric Kitchen' and 'Electric Cooking is Matchless'. 1197.13 - as for 1197.12, but tram has turned into View St and about to enter the double line track. Photo taken after tram has passed photographer. 1197.14 - No. 21 enters Nolan St after turning from MacRae St. en route to Bendigo. Note sign on its own post noting tram turns "Beware Tram Turns" and stop sign on adjacent pole "Trams stop on Request". No. 21 has two SEC roof ads. 1197.15 - No. 21 in Nolan St. after turning from Bridge St. (White Hills Road). Note signal light for Bridge St. loop on pole corner of street. Photo taken after tram has passed photographer. 1197.16 - No. 2 bound for Eaglehawk at unknown location. 1197.17 - Tram stop sign on a pole "CARS STOP BY REQUEST" 1197.18 - No. 5 in Carpenter St.? en route to Quarry Hill. 1197.19 - No. 28 has just arrive at Golden Square terminus, passengers are disembarking and the trolley pole is being turned. Golden Square Hotel in the background. 1197.20 - No. 28 at Golden Square terminus. Has a "Nothing beats Briquettes for hear roof ad. Information written on in black ink and date stamped on purple ink. 1197.1 - "No. 5 at Creeth St. Long Gully" 1197.2 - "No. 5 approaching Needle Loop between Long Gully and California Gully" 1197.3 - "No. 5 at Needle Loop between Long Gully and California Gully" 1197.4 - "No. 26 crossing railway bridge at Job's Gully near Eaglehawk" 1197.5 - "No. 26 just after crossing railway bridge at Job's Gully near Eaglehawk/ 1197.6 - "No. 26 in High St. Eaglehawk" 1197.7 - "No. 26 at end of double track in High St. Eaglehawk" 1197.8 - "Nos. 26 and 17 crossing at Job's Gully Loop" 1197.9 - "No. 17 crossing railway bridge at Job's Gully near Eaglehawk". 1197.10 - "No. 26 at Long Gully" 1197.11 - 'Northern end of points at Long Gully Loop". 1197.12 - "No. 17 turning into View St. from Bamard St. Bendigo". 1197.13 -'No. 17 at beginning of double track in View St. after leaving Bamard St. Bendigo. 1197.14 - "No. 21 enters Nolan St. from MacRae St. Bendigo." 1197.15 - "No. 21 in Nolan St. Bendigo just after leaving White Hills Road." 1197.16 - "No. 2" 1197.18 - "No. 5" 1197.19 - "Birney car No. 28 at Golden Square Terminus" 1197.20 "Birney car No. 28 at Golden Square Terminus" tramways, trams, bendigo, long gully, railway bridge, jobs gully, trackwork, nolan st, quarry hill, tram stops, golden square, tram 2, tram 5, tram 17, tram 21, tram 26, tram 28 -
 Ballarat Tramway Museum
Photograph - Colour print of donated negatives - set of 8, Ron E. Fluck, 27/01/1979 12:00:00 AM
Set of 8 colour laser printed copies of colour 35mm negatives featuring photographs of trams taken by Ron Fluck in Melbourne on 27/1/1979 and 28/1/1979 (1758.6 and 1758.7). 1758.1 - (Negative No. 251) - W2 340 at Airport West terminus. Sleepered track section on inbound track - must have been running single line at the time, following changeover to new terminus from Essendon Airport to Airport west. 1758.2 - NN253 - Z16 at Wattle Park terminus. 1758.3 - NN252 - VR 700 at Footscray terminus. 1758.4 - NN250 - W2 340 enroute to the Airport West terminus. New freeway arrangement being constructed on the left hand side of the tramway. 1758.5 - NN254 - Z1 11 at East Burwood Terminus 1758.6 - NN255 - W2 234 at Batman Ave terminus - one of the trams painted in "Transporting Art Program" 1758.7 - NN256 - W2 234 and SW6 912 at Batman Ave terminus. 1758.8 - NN257 - Z1 88 and W5 726 at corner of Bourke and Spencer St. Melbourne, with the Mail Exchange in the background. See Destination City 5th Editionmelbourne, essendon airport, princes bridge, footscray, east burwood, wattle park, transporting art, tram 11, tram 234, tram 340, tram 700, tram 16, tram 726, tram 88, tram 912 -
 Ballarat Tramway Museum
Photograph - Black & White Photograph/s set of 19, Mar. 1972
Set of 19 black and white prints, all 89mm square of Bendigo trams, date machine printed on print is "Mar 1972". 981.1 - Tram 21 at North Bendigo terminus, with level crossing in background. Has destination "Golden Square" and two SEC roof ads. 981.2 - tram 2? at Eaglehawk, with destination "Depot", two SEC roof ads and "Leo A. Hughes Photographer" on side of building in background. 981.3 - tram 2? at Eaglehawk, side on view. 981.4 - tram 26 at Quarry Hill terminus looking back into city. 981.5 - tram 7 en route to North Bendigo at the site of the Bridge St. loop. Has a Peters Ice Cream truck and Sandhurst Fruit Juices truck on right side of photograph. 981.6 - tram 2 at Quarry Hill terminus. 981.7 - tram 2? at one of the loops on the Eaglehawk line, inbound? 981.8 - bogie tram at Charing Cross with fountain in background. Side on view looking south. 981.9 -trams 7 and 21 on Golden Square/North Bendigo line with bogie tram in background, at Charing Cross. Same as item 972. 981.10 - bogie tram at Charing Cross - has buildings in south west corner in background, including Colonial Mutual Life and an advertisement for the Herald newspaper. 981.11 - trams 25, 7 and two other trams at Charing Cross. 981.12 - trams 2 and 26 and three others at Charing Cross. 981.13 - tram 25 at Golden Square terminus, with Rodda's Golden Square Hotel in the background. Tram showing destination of "Nth Bendigo" 981.14 - tram 24, showing "Special" on depot access track. Has two Johnnie Walker roof ads on side. 981.15 - as above, but tram on bridge outside depot. 981.16 - trams 25 and 28 at depot 981.17 - tram 24 showing "Special" on depot access track with a single truck car in background. 981.18 - trams 2 and 26 at Charing Cross. Has advertisements for "Armstrong Tyre Service" and "Cohn's drinks" on buildings in background. 981.19 - Bendigo 2 at location?, about to enter a loop or double track section. Has hotel in background. On rear of each photo in the top left hand corner is a print number 1 to 19 in ink and location notes, generally "Bendigo"trams, tramways, charing cross, bendigo, golden square, quarry hill, tram 2, tram 21, tram 7, tram 24, tram 26 -
 Ballarat Tramway Museum
Newspaper, The Courier Ballarat, "Return of trams viable study", "New Push for Trams", "Taking tourism to the next level", "More tourists, more jobs expected", "Tram plan worthy of expected debate", 11/07/2002 12:00:00 AM
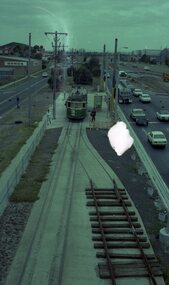
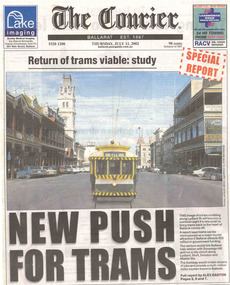
Set of three cuttings from The Courier, Ballarat dated Thursday 11/7/2002 regarding the reintroduction of trams to Ballarat. 2241.1 - Page 1 and 2 of The Courier, with page 1 titled "Return of trams viable study" and "New Push for Trams" as the commencement of a Special report showing a digitally constructed image of No. 13 in Lydiard St. North. Note the tram does not have a driver. Introduces reports by Alex Easton on pages 2, 6 and 7. On Page 2, titled "Taking tourism to the next level", has details of the Council viewpoints on the proposal, public consultation, a map of the route, and notes on the construction issues. Has a digital image of 13 crossing Sturt St. into Lydiard St. North. See images No. 1 to 3. 2241.2 - page 6 of The Courier, which joins with page 7 using the titled "More tourists, more jobs expected". Has Sections reviewing the study outcomes, benefits and a summary of the study. Page 6 has a photo of a passenger boarding No. 21, decorated as the Myers Christmas tram in Sturt St and a photo of Bridge St. in 1971 (very poor quality reproduction). See images No. 4 and 5. 2241.3 - page 7 of The Courier, has Sections detailing the history of Ballarat Trams, proposals for the City Tramway, costs, consultation, and comments from Peter Hiscock. Has a photo of Peter Hiscock and Mayor David Vendy in front of No. 13 at the BTM depot. See image No. 6. Also has a photo of Dianne Smith, Executive Director of Ballarat Tourism. On page 8, as part of The Courier's editorial Section, has comments on the proposals, titled "Tram plan worth of extended debate". Looks at the $20million cost. ballarat revival, editorial, ballarat city tramway, lydiard st. nth -
 Ballarat Tramway Museum
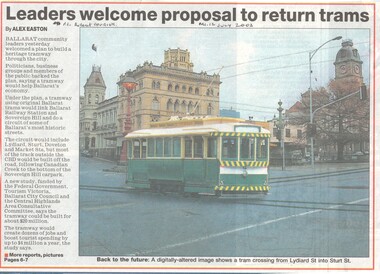
Newspaper, The Courier Ballarat, "Leaders welcome proposal to return trams", "Romantic image captures the city's imagination", 12/07/2002 12:00:00 AM
Set of three cuttings from The Courier, Ballarat dated Thursday 11/7/2002 regarding the reintroduction of trams to Ballarat. 2241.1 - Page 1 of The Courier, with page 1 titled "Leaders welcome proposal to return trams" with a digitally constructed image of No. 13 crossing Sturt St from Lydiard St. North. The item looks at the overall outcomes of the study and who funded it. See image No. 1. Text written by Alex Easton. 2241.2 - page 6 of The Courier, which joins with page 7 using the titled "Romantic image captures the city's imagination" reviewing reactions to the proposals from various politicians, business and community groups. Includes comments from Judy Verlin, former Mayor and impacts on traffic and parking issues. Also summarises in a Section "At a Glance" the pros and cons of the proposal. Has a photo of No. 31 at the intersection of Bridge, Victoria and Main Streets. Cartoon by Inkcinct, about the City Tramway and Sturt St redevelopment also on the page. 2241.3 - page 7 of The Courier, has Sections detailing the benefits of the proposals, inviting people to have their say and further summary information. Has a photo of Bendigo 5 in Pall Mall with destination of Eaglehawk and a photo of Christchurch No. 11 noting the economic benefits of trams in that city over the last seven years. Full Image and 2nd copy of sheets added 12-1-2016 from donation of Kathy Stanley. Second copy - Has date and page number written in under headline in ink.ballarat revival, christchurch, bendigo, ballarat city tramway -
 Ballarat Tramway Museum
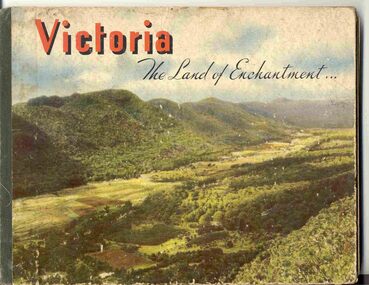
Book, Nu-color-vue or Nucolorvue Productions, "Victoria The Land of Enchantment", c1950
Book with hardcovers, 48 pages titled "Victoria The Land of Enchantment". Sewn in three sections, with a green strip of cloth and self end papers and printed outer paper, sides glued onto board covers. Consists of 43 colour photographs (full and half page) with captions, detailed text, and two black and white photos printed in blue on end covers. Photos of Mt Buffalo, Gippsland lakes, Mornington Beach, Yarra River, Flinders St. station from the Yarra, Collins and Spring St (with two W2's - see image No. 2), Parliament House, Kiewa Hydro scheme, Eildon Weir, Swan Hill Murray River Bridge, Bendigo Post Office, Melbourne Botanical Gardens, Ballarat - Grenville and Sturt St (No. 22 - see image No. 3), Lorne, Yallourn Power Station, Hume Weir, Maroondah Weir, Great Ocean Road, Warrnambool, Portland Beach, A timber train (see image No. 4), Mildura, flax mills, Eastern Geelong and the Prime Ministers Ave, Ballarat. Produced by Nucolorvue Productions, c1950. See also Reg Item 2925 for the same photo of No. 22 and Reg Item 5354 for a postcard. Purchased via eBay site - see attached sheets and packing slip. Purchased 10/2/2005 for A$12.50 including postage, from Virginia Georgopoulos of West Brunswick. eBay sheets and envelope with worksheet file. Has Swains 123 Pitt St, Sydney sticker on bottom left hand corner page 2trams, tramways, ballarat, sturt st, grenville st, bogie trams, geelong, bendigo, melbourne -
 Ballarat Tramway Museum
Ephemera - Timetable/s, State Electricity Commission of Victoria (SECV), "Official Time Table Bendigo June 1940", Jun. 1940
Centre pages show a map of the system and the sections. The extension to North Bendigo is yet to be constructed. Gives times for trams leaving the city or the terminals for the routes and for the Eaglehawk route, leaving Long Gully Bridge. Has four SECV Advertisements within the book for hot water, ovens - cookers, toasters and electric fan heaters. Three copies held. See item 5356 for a digital image of the same document with a photograph of Len Smith of Geelong loading a pram into a Birney tram.Provides details of 1940 tram services in Bendigo.Forty-page booklet, with orange lightweight covers, saddle-stapled, SECV Provincial Tramways with the title "Official Time Table Bendigo June 1940". Has address if Hargreaves St Bendigo on bottom of the cover. Two copies held.bendigo, timetables, secv -
 Ballarat Tramway Museum
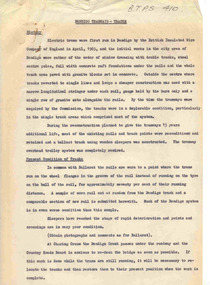
Document - Report, State Electricity Commission of Victoria (SECV), "Bendigo Tramways Track", 1960's
Yields historical notes about the method of track construction in Bendigo, the poor condition of the rails at the time of the report and the need to do work at Charing Cross.Typed foolscap sheet note or report titled "Bendigo Tramways - Tracks". Gives notes on the track construction methods of ESCo and reconstruction by the SEC. In the section titled 'Present Condition of Tracks". Note says need to obtain photographs and comments as for Ballarat. Also mentions that the CRB is anxious to re-deck the bridge running under Charing Cross - written date? Probably written for a report into the tramways by the SEC as part of a recommendation to close them. Appears to have been written in Ballarat, no mention of Geelong, so assume sometime in the 1960's.'BTPS 410" in top right hand corner.trams, tramways, bendigo, sec, esco, history, track, charing cross -
 Ballarat Tramway Museum
Film - Movie Film & Box, Kodak, 1960
Yields information in movie film format of Ballarat trams in 1960, how the system operated and was used by people., Yields information in movie film format of Ballarat trams in 1960, how the system operated and was used by people.Movie film - 8mm, approx. 30mins, with leader strip on a plastic reel, within a black and white plastic box, titled "Ballarat No. 1. 1960". Has been transferred to DVD - see Reg item 4100 as Segment No. 2. Made by Ben Parle. Also transferred to DVD by Rod Cook Oct. 2015, via Roger Greenwood for use in his DVD, "The City of Ballarat Trams, Gardens & Gold" of 2016. See Reg Item 6883. Synopsis: based on time. 0:00 View of typed introduction, noting that this is a pictorial record of Ballarat. 0:10 Title “The Tramways of Ballarat 1960, Part 1” 0:16 13, showing “View Point” at Stones Corner, Bridge St, east end, with trolley pole being turned, while another single trucker heads out towards Mt Pleasant. 0:25 13 leaving Stones Corner, short approach and then longer trailing shot of the tram going towards the City in Bridge St. 0:44 View out of front of tram in Bridge St heading towards the City, with cars in the photo, then passing through city Loop, no trams in the loop and running up to Lydiard St Nth and crossing the road. 1:22 Running up Sturt St from Armstrong St, passes over Dawson St X-over and up to the next intersection, Lyons St. 1:54 Title “The View Point Line” 1:59 19 inbound, in Ripon St, from crossing Mair St, towards camera and then passing away and turning into Sturt St. 2:49 View of a “Warning Oncoming Trams” sign 2:52 19 in Ripon St, going to View Point, crossing Webster St towards camera, then going away through the disconnected Victoria Ave loop, pass the “Warning Oncoming Trams” sign. Note very windy scene with people running across roads. 3:17 19 in Wendouree Parade, in bound, though showing destination View Point, going away from the camera, past the View Point Hotel. 3:39 19 coming towards camera near Excerpt or Devon St and then going away towards the terminus. 4:04 19 at the terminus, stationary, with a single trucker 3?, passing from Macarthur St into Wendouree Parade, behind 19. 4:20 33 coming towards camera in Wendouree Parade from St Aidans Drive, stopping to pick up passenger at Forest St and then going away towards the City, photographed from near the depot, on a wet and windy day. 4:54 35 in Wendouree Parade, coming towards the Camera from St Aidans Drive and then going away with the Gardens Loop area in the background. Tram stops at stop to let a passenger off. 5:28 21 leaving Gardens Loop for the City via the Depot, green light in signal can be seen. 5:43 28?, closely followed by 26 turn from Drummond St South into Sturt St. 6:18 Scene opens with shot of “Sebastopol” destination on a bogie tram. 6:21 Title “The Sebastopol Line” 6:24 21 turning from Sturt St into Drummond St Sth with destination of Bell St and then going away from the camera. 6:55 38 in Drummond St Sth, coming towards the camera and then passing the camera with Sturt St just in the view. 7:10 21, showing Gregory St, in Drummond St Sth, approaching and then going away, entering the Urquhart St Loop, 7:39 34 in Drummond St Sth (location check required (Latrobe?)), approaches camera, picks up passengers and the goes away. 8:09 39 at ? Street, turns from Drummond St Sth into Skipton St, after picking up and setting down passengers, bound for Sebastopol 8:55 35 inbound in Skipton St passes through the Bell Street Loop, and then goes away from the camera. 9:33 42 outbound in Skipton St, approaches the camera, passes and then crosses over the half the road into Albert St. 10:00 39 inbound in Albert St – location? 10:31 34 outbound for Sebastopol, approaches camera and just starts to pass by. 10:36 34 in Grey St crossing loop, crosses 42 inbound. 10:59 39 outbound in Albert St, with shopping centre in bound, approaches camera, passes and then crosses over Albert St. Mid morning scene. 11:39 39 inbound, Albert St south, approaches camera and then passes and the crosses over Albert St. 12:16 41 outbound in Albert St passes the camera, and pulls into the terminus with the conductor getting out on the back bumper to pull the pole down as the tram stops and a passenger walks into the Royal Hotel. 12:39 Title “The Lydiard Street North Line” 12:44 Filmed from the Hotel balcony, 21 inbound in Lydiard St Nth passes over Mair St, stops while 33 passes in the other direction. 13:18 With the red light showing on the Seymour St loop signal, 33 inbound for Sebastopol stops and picks up many passengers, passes the camera and runs past the VRI building in the background and through the loop. Possibly filmed on a Sunday given the ladies dresses and quieter streets. 14:01 30 outbound, passes the camera and stops at Macarthur St. Filmed alongside the brick wall of the cutting. 14:28 30 inbound arrives, passes through the Gregory St loop and then proceeds past the camera, making a stop to pick up passengers. 15:14 28 in Lydiard St Nth – location?, approaches and goes away from the camera, north of Gregory St. 15:34 28 ditto location? 15:53 21 arrives at the terminus with passengers getting on and off. 16:11 View of the a vertical positioned “End of Section” sign on a pole at the terminus and then lifting the camera to see the timetable board and the stop sign. 16:33 31 in Bridge St passing Morseheads and then turning into Sturt St, stops at the Grenville St stop, while another single trucker comes down to the stop from the City. 16:58 31 outbound in Bridge St, with destination of Victoria St. 17:14 Title “The Victoria Street Line” 17:18 31 outbound to Victoria St from Stones Corner. Starts with an overhead shot, shows clock at the Caltex service station,. 17:37 31 inbound approaching Bakery Hill and then descending to the junction after it passes camera. 18:09 25 climbing outbound in Victoria St, passing the camera, to then pass through the King St loop. 18:47 25 inbound in Victoria St, passing the camera, then pass through the King St loop, with St Alypius Church in the background. 19:36 14 approaching the rail bridge in Victoria St and stopping at the 2nd last stop to left of passengers. 20:01 14 leaving the terminus and approaching the camera and the a short sequence going away, to the next stop to pick up quite a few passengers. 20:14 “Trams Stop Here” sign, metal wrap around on a steel pole. 20:16 Title “The Mount Pleasant Line” 20:21 11 inbound in Main St, with a passenger leaping off the tramcar and another getting off just before the junction. 20:45 11 passes the junction and then proceeds away from the camera in Bridge St. 21:04 30 outbound in Main St, then turns into Barkly St, a bus (Eclipse Motors) passes in Main St just before the sequence ends. 21:31 30 inbound near Steinfield St. (exact location?) 21:49 25 approaches the camera, then proceeds away and passes through the Grant St. loop. 22:29 25 inbound, windy day, between Grant and Cobden, (exact location?), with a horse drawn bread van in the view and the breadman walking behind the tram as it passes. 23:02 11 outbound in Barkly St, (exact location?) 23:37 11 inbound in Barkly St (exact location?) 23:44 Mt Pleasant terminus signage 23:50 30 approaches the terminus and then stops with the conductor alighting turning the pole, passengers getting on and off and the driver appearing at the other end. 24:32 Title “The Gardens Via Sturt St. West Line” 24:35 21 outbound in Sturt St near Raglan St, approaches and passes the Camera. 25:09 12, showing City Oval, approaches and passes the camera, outbound near Windermere St. 25:33 13 showing View Point, goes away from the camera – location? 25:44 12 comes from St. West, inbound passes the camera and then stop as the next stop next Talbot St? 26:21 Short sequence of a “Warning Oncoming Trams” sign 26:28 42 inbound in Sturt St West, just before Ripon St, view coming towards camera and then going away to cross Ripon St. 27:10 34 passes through the Parker St loop 27:25 35 or 39 inbound past the college in Sturt St West 28:04 41 outbound at the Russell St curve, passes away from the camera. 28:11 35? inbound passes away from the camera through the Victoria Park or Morrison St loop, swinging out into the roadway. 28:29 View of timetable sign at Hamilton Ave. 28:37 35 turning from Sturt St West into Hamilton Ave, can see the conductor changing over the barrier rails. 29:11 42 inbound, crosses another bogie tram (35?) at Carlton St loop then passes the camera and goes past the Olympic rings monument. 29:42 12 approaches the Carlton St gates. 30:07 12 outbound, crosses a bogie tram in the loop with both trams then leaving the loop. 30:20 Title “End of Part One” Written labels giving title information on outside of box.trams, tramways, ballarat, sebastopol, lydiard st north, victoria st, mt pleasant, sturt st west