Showing 269 items matching "golden north"
-
 Ballarat Tramway Museum
Slide - 35mm slide/s, Travis Jeffrey, c1962
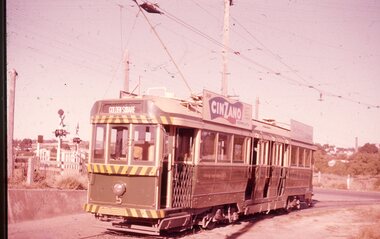
Agfa plastic mount (blue base, white cover) with a photo of Bendigo No. 5 in the crossing loop at Myrtle St. loop. No. 5 has a Cinzano roof advertisements and one other. Tram has destination of North Bendigo. Photo taken c1962."BES 25" in penciltramways, trams, bendigo, golden square, myrtle st, tram 5 -
 Ballarat Tramway Museum
Slide - 35mm slide/s, Travis Jeffrey, c1962
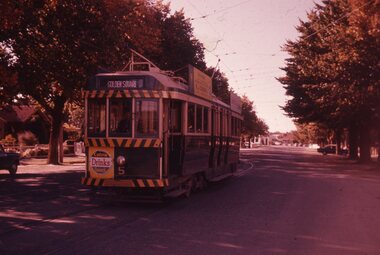
Agfa plastic mount (blue base, white cover) with a photo of Bendigo 5 at North Bendigo terminus. Tram has the destination of Golden Square. Photo has the level crossing in the background. Tram has a "Cinzano" and another roof advertisement. Photo taken c1962."BES 30" in penciltramways, trams, bendigo, north bendigo, tram 5 -
 Ballarat Tramway Museum
Slide - 35mm slide/s, Travis Jeffrey, c1962
Agfa plastic mount (blue base, white cover) with a photo of Bendigo 5 passing through the Bridge St Loop. Tram has the destination of Golden Square, a Cohns Soft drink ad on the dash panel and a "R.J. Conroy" roof advertisement. Photo taken c1962."BES 31" in penciltramways, trams, bendigo, north bendigo, bridge st, tram 5 -
 Ballarat Tramway Museum
Negative, Travis Jeffrey, 17/06/1962 12:00:00 AM
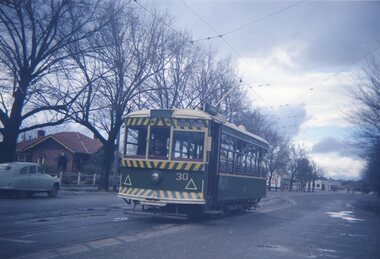
Colour Negative No. N396, of Bendigo Birney No. 30 on the North Bendigo line at the Bridge St. loop. Tram has the destination of Golden Square. Photo possibly 17/6/1962. Colour laser printed copy of image stored in box 73. Image scanned at hi res 27/5/2020 and image updated.In red pen on folder that contained negative, "NR69B" and "17 Jun 62". trams, tramways, bendigo, bridge st, north bendigo, tram 30 -
 Ballarat Tramway Museum
Negative, Travis Jeffrey, 5/08/1962 12:00:00 AM
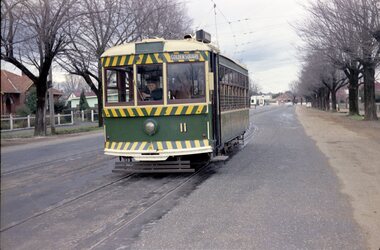
Colour Negative No. N407, of the Bendigo No 11 on the North Bendigo line at the Bridge St. loop. Tram has the destination of Golden Square. Photo taken possibly on 5/8/1962. Colour laser printed copy of image stored in box 73. Original negative hires scan and image updated 28/5/2020.In red pen on folder that contained negative, "NR95B" and "5 Aug 62". trams, tramways, bendigo, north bendigo, bridge st, tram 11 -
 Ballarat Tramway Museum
Photograph - Digital image Set of 20
Set of 20 digital images of Bendigo Tramways, 1972 at or before closure while on a tram tour by Stuart Lodington. .1 - No. 28 and 5 at Eaglehawk terminus .2 - No. 28 leaving Charing Cross and travelling into View St with Armstrong Type Service building in background and Firestone Advertisements. .3 - No. 29 with Eaglehawk Town Hall and Post Office in background. .4 - No. 26 and 29 at start of double track, High St Eaglehawk .5 - No. 29 leaving Eaglehawk with shops in the background, Foodland, J. Bests .6 - No. 29 and 23 crossing Manchester Loop with Manchester Arms Hotel in the background and an old poppet head. .7 - No. 29 at ditto with poppet head in the background. .8 - No. 28 and two other trams at the Quarry Hill terminus. .9 - No. 29 in High St Bendigo with the Cathedral and Golden Gate Hotel in the background. .10 - No. 3 with destination Eaglehawk, in bound Carpenter St? .11 - No. 29 following a single trucker through a loop or the end of the double track near the depot. .12 - No. 23?, at Eaglehawk terminus, with Eaglehawk Town Hall in the background. .13 - Birney tram crossing the bridge at the Depot entrance - No. 29 .14 - No. 29 on the Eaglehawk line? .15 - as for .13 .16 - No. 29 entering the depot. .17 - No. 23, inbound from Eaglehawk, at Jobs Gully Loop with the railway overbridge in the background. .18 - No. 28 and two other trams (see also Reg Item 4982) for the same tram tour at Myrtle St. Loop. .19 - No. 21 with North Bendigo on the destination approaching the Golden Square terminus. .20 - No. 7 at Golden Square terminustrams, tramways, bendigo, eaglehawk, quarry hill, golden square, depot, tram 5, tram 29, tram 28, tram 26, tram 23, tram 7, tram 21 -
 Ballarat Tramway Museum
Photograph - Black & White Photograph/s, Chris Wurr, early 1970's
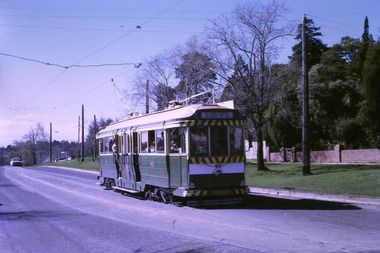
Yields information about the appearance of Bendigo Birney trams early 1970's en route to North Bendigo and its tree lined streets.Black and White Photograph of SEC Bendigo 30, Birney at North Bendigo terminus with the driver turning the trolley pole. Tram has the destination of Golden Square. Photo shows the fitting in the overhead to help locate the trolley pole on the inbound wire. Photo Chris Wurr, early 1970's. "Photo by Chris Wurr" stamped on the rear.trams, tramways, bendigo, north bendigo, overhead, birney, tram 30 -
 Ballarat Tramway Museum
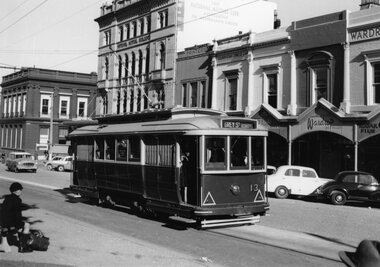
Photograph - Black & White Photograph/s, Doug Colquhoun, 24/03/1959 12:00:00 AM
Yields information about Ballarat Trams and streetscapes late 1950's and the details of Sturt St shops.Black and white print of Ballarat 13, at the Sturt St stop, just west of Lydiard St. North, 24/3/1959. Photo by Doug Colquhoun. Has the Commonwealth Bank, National Mutual Building, Golden Star Chinese Cafe, V & L. Leslie Hairdresser and Wardrop Tailor shops in the background. Two copies. A school boy with cap is sitting on the bench opposite the tram. Tram has the destination of Grey St Sebastopol. Photo print courtesy of Port Dock Railway Museum, now the National Railway Museum. See worksheet 4311 for letter and details of prints sent to Bill Scott, 19/10/2001. Any photo credit to mention NRM Collection.On rear of copy 1"SEC Ballarat / 13 / Sturt St/ 24/3/59 / D. A. Colquhoun" Copy 2 "DAC" in ink, bottom right hand corner.trams, tramways, sturt st, schools, commonwealth bank, tram 13 -
 Ballarat Tramway Museum
Slide - 35mm slide/s - set of 10, Campbell Duncan, Jan. 1971
Set of 10 Ferraniacolor slides - cardboard mounts taken on either 10/1/71 or 16/1/71. .1 - Birney No. 30, Golden Square line, inbound near Cathedral with car yard in background. .2 - ditto, with Cathedral gardens in background. .3 - single trucker, with two SEC roof adverts, entering Nolan St enroute to North Bendigo. Shows the driver sitting in a side on shot. A 4 square store in the background, with a fading advert for "Peeled Tomatoes". .4 - No. 6 turning from Nolan St into McCrae St with 4 square store in background. .5 - No. 26 at Quarry Hill with cemetery in background. .6 - No. 6 at the North Bendigo Terminus .7 - No. 26 outbound to Eaglehawk on the Railway Overbridge, Mt Korong Road. .8 - No. 17 (inbound to City and Quarry Hill) and another bogie crossing at a loop on the Eaglehawk line. Both trams have SEC roof adverts. The driver of the outbound car is boarding the tram. Based on .9, it is No. 3 at Long Gully. .9 - No. 3 waiting at Long Gully Loop . .10 - No. 26 at Quarry Hill terminus, with destination of Eaglehawk.In ink on slide: .1 - "1/2 mile out on Golden Square line - 10/1/71 (Sun)." .2 - "1/2 mile out on Golden Square line - 10/1/71" .3 - "Has just rounded curve near lake Weeroona on North Bendigo line - 10/1/71 (Sun)." .4 - "16/1/71" .5 - " 10/1/71 (Sun)." .6 - "North Bendigo terminus, 16/1/71 (Sat)" .7 - "10/1/71 (Sun) c 3pm" .8 - "Cross Eaglehawk line - 10/1/71 (Sun)." .9 - "Jackson St Loop on E'Hk line awaiting up - 10/1/71 " .10 - "Quarry Hill terminus Bendigo - - 10/1/71"tramways, trams, bendigo, golden square, high st, nolan st, north bendigo, quarry hill, long gully, railway bridge, tram 30, tram 6, tram 26, tram 17, tram 3 -
 Ballarat Tramway Museum
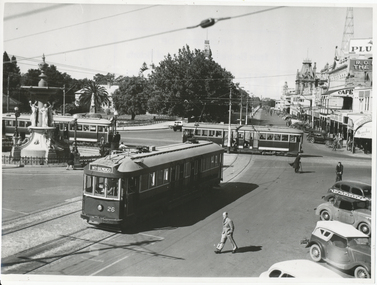
Postcard, Rose Stereograph Co, "Looking north from Charing Cross Bendigo Vic", c1950
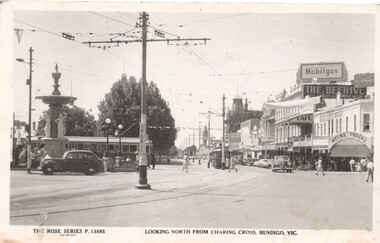
Black and white postcard of Charing Cross Bendigo, early 1950's or late 1940's. Rose Series postcard P13585, of a bogie tram heading to Eaglehawk behind the fountain and a single trucker heading for Golden Square hidden behind a pole. A number of motor cars in the scene along with people in summer clothing. In the background is the Beehive building, Mobilgas advertisement on top of the Beehive building and "Melba Frocks" shop on the corner, later Ezywalkin shoes. The postcard has the title underneath of "Looking north from Charing Cross Bendigo Vic". Divided back type with Rose Postcard Rose logo and that it was published by the Rose Stereograph Co. Armadale Victoria. Has not been used.trams, tramways, bendigo, charing cross, rose postcards -
 Ballarat Tramway Museum
Slide - 35mm slide/s, Jim Rush, early 1970's
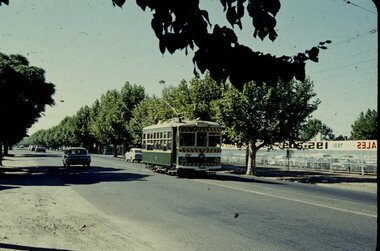
Colour 35mm slide in white cardboard mount of Bendigo 6, with the destination of Golden Square inbound in Nolan St with the White Hills Bendigo works in the background. Photo from the collection of Lilian Butler.in ink on rear "No. 6 Bendigo fleet was No. 25 Ballarat" and "Jim Rush took this slide in Nolan Street, Bendigo North"tramways, trams, bendigo, north bendigo, nolan st, tram 6 -
 Ballarat Tramway Museum
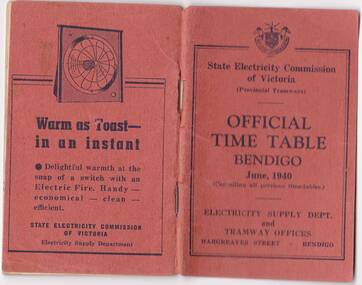
Photograph - Digital image, State Electricity Commission of Victoria (SECV), "Official Timetable Bendigo June 1940"
Yields information about the Bendigo Tram services.Digital image or copy of the SEC "Official Timetable Bendigo June 1940", 22 image files - 44 pages, giving details of the fares, transfers, luggage or parcels, lost property, times of each tram on the Quarry Hill, Eaglehawk, Lake Weeroona and Golden Square for both directions and Monday to Thursday, Friday, Saturday and Sunday. Has a number of advertisements for SEC home equipment, cookers, toasters, refrigerator, electric radiators and hot water. In the middle page is a map of the Tramway Routes, which has been hand drawn to shown North Bendigo and the depot location. Inside the rear cover, on a sheet headed "Memorandum" is a photograph, taped in of a conductor loading a pram onto a Birney tram. Under the photograph is in ink "Len Smith (Geelong)" See item3127 for an original copy and pdf scan. trams, tramways, bendigo, timetables -
 Ballarat Tramway Museum
Photograph - Digital image Set of 9, Tony Smith, 19/09/1971 12:00:00 AM
Yields information about Ballarat Tramways and trams prior to the closure of the tramway system.Set of 9 digital images of Ballarat trams prior to closure, scanned from original slides by Tony Smith, 1971 prior to closure of the system. This set of slides appears to be the last day of operations - 19/9/1971 .1 - 40 south bound in Lydiard St Nth, at the Gregory St Loop. .2 - 40 after passing through the loop .3 - 42, north bound in Lydiard St. North at Macarthur St. .4 - 42 southbound at the Railway station level crossing with the Kennedy Murray Pty Ltd General Carriers building at the station yard in the background. .5 - 42 southbound in Lydiard St North after crossing the railway - taken from the signal box (B) with Reids Palace in the background and the Provincial Hotel. .6 - 35 northbound after passing through the level crossing. .7 - bogie tram crossing the tracks with Ballarat Railway Station in the background. .8 - bogie tram entering the double track section in Lydiard St with Reids Palace in the background. Note the new bus stop bay. .9 - 35 and another bogie in Sturt St, with the Town Hall, Golden Star Chinese Cafe and Georges Fish & Chip shop in the background.trams, tramways, lydiard st nth, gregory st, level crossings, ballarat railway station, sturt st, closure, tram 40, tram 42, tram 35 -
 Ballarat Tramway Museum
Photograph - Black & White Photograph/s, mid to late 1950's
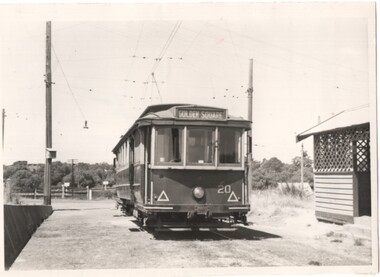
Black and white photograph of Bendigo 20 at the North Bendigo terminus. Tram showing the destination of Golden Square. Has the tram shelter at the terminus in the photograph. Photographer unknown - see history of object. See Keith Kings, The Bendigo Tramways, re the fitting of reflective tape in 1956, page 59.In the rear in ink "Bendigo"trams, tramways, north bendigo, tram 20 -
 Ballarat Tramway Museum
Slide - 35mm slide/s - set of 20, Eldon Hogan, 22/05/1971 12:00:00 AM
Set of 20 35mm Agfa colour blue and white plastic mount slide - featuring photos taken during an Association of Railway Enthusiasts Tour by Eldon Hogan. Folder had the date "22/5/1971" on it. Scanned on the Canon scanner at the depot 15/12/2005 at the time of the installation of the scanner. .1 - No. 25 in Nolan St with Lake Weeroona in the background. .2 - Three Birneys at the Depot junction, 30 and 29 with Conoles Hotel, McCrae St in the background. .3 - No. 5 in front of the Shamrock Hotel, Pall Mall .4 - No. 29 in front of the Shamrock Hotel with Stonemasons sign in the background. .5 - No. 18 ditto .6 - No. 30 and another Birney at the Quarry Hill terminus .7 - No. 24 southbound High St at the Violet St intersection with a "Mine Open" sign in the foreground and the Cathedral in the background. .8 - No. 19 at the Golden Square terminus, with the Golden Square Hotel in the background. .9 - No. 29 - side on view, North Bendigo line? Thunder St? .10 - No. 30 crossing the railway overbridge, inbound from Eaglehawk with a number of photographers in the foreground. .11 - No. 29? ditto .12 - No. 5 outbound - side on view, Thunder St, North Bendigo line? .13 - No. 29 and 30 at the intersection of High St and Brazier St with Church or School hall in the background. .14 - ditto .15 - ditto .16 - No. 25 and the two Birneys at the Eaglehawk terminus. .17 - No. 29 and two other trams at ditto .18 - No. 30 and 19 adjacent to the Lake View Hotel, McCrae St .19 - No. 5 and 25 crossing on the Eaglehawk Line, Ironbark? .20 - No. 29 at Quarry Hilltramways, trams, bendigo, lake weeroona, pall mall, golden square, eaglehawk, quarry hill, tram 25, tram 30, tram 29, tram 5, tram 18, tram 19, tram 24, tram 25 -
 Ballarat Tramway Museum
Slide - 35mm slide/s - set of 11, Eldon Hogan, mid 1960's to early 1970's
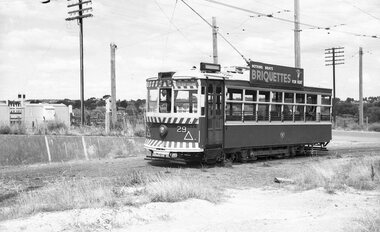
... Parade Ballarat Ballarat goldfields Tramways trams Bendigo Golden ...Set of 11 Agfa Plastic mounted slides - from the Eldon Hogan collection - possibly on an ARE Bendigo tours late 1960's or early 1970's with No. 18 Scanned on the Canon scanner at the depot 15/12/1971 at the time of the installation of the scanner. .1 - No 18 at Golden Square terminus with Billy Rodda's Golden Square Hotel in the background. .2 - ditto and the Victoria Bitter fence alongside the hotel. .3 - ditto and another single trucker. .4 - No. 18 at the Fire Station Loop, Golden Square line, with destination of Railway Station. .5 - No. 18 passing the Central Deborah mine, Violet St. Tram has a Briquette advertisement on the roof - the flaming briquettes. .6 - Another bogie tram at ditto. .7 - No. 18 and No. 6 crossing McCrae St loop near the depot junction? .8 - ditto .9 - No. 18 and a single trucker at the North Bendigo terminus. .10 - ditto .11 - with the single trucker leaving.tramways, trams, bendigo, golden square, central deborah, north bendigo, mccrae st, tram 18, tram 6 -
 Ballarat Tramway Museum
Slide - 35mm slide/s - set of 11, Eldon Hogan, mid 1960's to early 1970's
Set of 11 Agfa Plastic mounted slides - from the Eldon Hogan collection - featuring an ARE tour with Nos. 21, 29 and 25 to Bendigo, mid 1960's. Scanned on the Canon scanner at the depot 15/12/1971 at the time of the installation of the scanner. .1 - four trams at Charing Cross - includes 19 and 25. .2 - 21 and 25 at the depot junction. .3 - 21 and 29 Quarry Hill route? .4 - 29 ditto .5 - 24 at Golden Square terminus - photo taken from the city side - note all the little shops and buildings on the left hand side of the photograph. .6 - 29, 21 and 25 at Eaglehawk .7 - 29 - side on view - Eaglehawk line? .8 - ditto with 21 .9 - 29 - North Bendigo line? - side on view .10 - 29 and 21 - vacant paddocks - Eaglehawk line .11 - 29 crossing the railway overbridge, Eaglehawk line, in bound. Trams have SEC roof advertisements. tramways, trams, bendigo, eaglehawk, charing cross, golden square, tram 21, tram 29, tram 25, tram 19 -
 Ballarat Tramway Museum
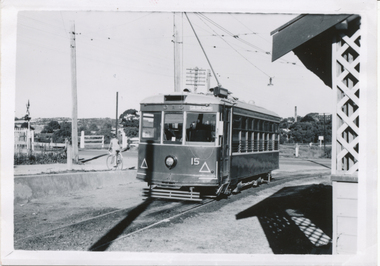
Photograph - Black & White Photograph/s, Wal Jack, 12/04/1950 12:00:00 AM
Black and White print contained within the Wal Jack Bendigo and Geelong Album, see Reg Item 5003 for more details. Photo of Bendigo Birney No.15 at North Bendigo, Photo Wal Jack, with the destination of Golden Square - 12-4-1959. Has the level crossing and rail line in the background and part of the tram stop shelter. i1 - scan of print in the album i2 - rear of image i3 - scan of negative at 3200dpi added 6/6/2020. On the rear in black ink "SEC Bendigo, No. 15 at Nth Bendigo 12-4-1959. Has the Wal Jack copyright stamp in the top right corner with the number "T219" written in.trams, tramways, bendigo, north bendigo, level crossings, birney, tram 15 -
 Ballarat Tramway Museum
Photograph - Black & White Photograph/s, Wal Jack, 12/04/1959 12:00:00 AM
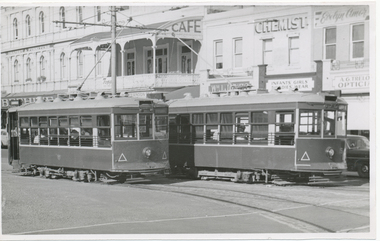
Black and White print contained within the Wal Jack Bendigo and Geelong Album, see Reg Item 5003 for more details. Photo of Bendigo Birney No. 29 and 15 in Pall Mall, near Charing Cross, 12-4-1959, Photo by Wal Jack. Has in the background, The Beehive buildings, Jopp? Cafe, Wm Jones building, Chemist, and A.G. Trello? Opticians. i1 - scan of print in the album i2 - rear of image i3 - scan of negative at 3200dpi added 6/6/2020. On the rear in black ink "SEC Bendigo #29 (left) for North Bendigo, and 15 (right) for Golden Square, photographed from #28, at Pall Mall 3.40pm, Sun 12th April 1959", in bottom left hand corner "Wal Jack Photo"trams, tramways, bendigo, pall mall, charing cross, birney, tram 15, tram 29 -
 Ballarat Tramway Museum
Photograph - Black & White Photograph/s, Leon Marshall Wood, 29/12/1947 12:00:00 AM
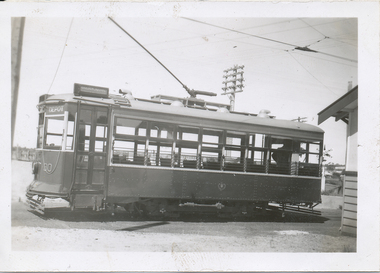
Black and White print contained within the Wal Jack Bendigo and Geelong Album, see Reg Item 5003 for more details. Photo of Bendigo Birney No.30 at North Bendigo, Photo Leon Marshall Wood, with the destination of Golden Square - 29-12-1947. Has the level crossing and rail line in the background and part of the tram stop shelter. On the rear in black ink "SEC of Victoria Bendigo, ex Geelong "Birney" car No. 30 Nth Bendigo terminus. In the bottom left hand corner "29.12.1947" The Leon Marshall Wood stamp in green ink and the number "SEC 15" written in.trams, tramways, bendigo, north bendigo, level crossings, birney, tram 30 -
 Ballarat Tramway Museum
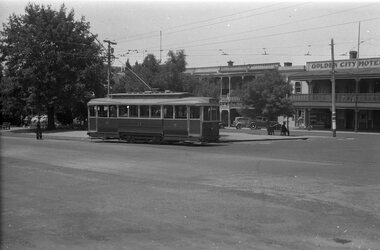
Photograph - Black & White Photograph/s, State Electricity Commission of Victoria (SECV), late 1940's
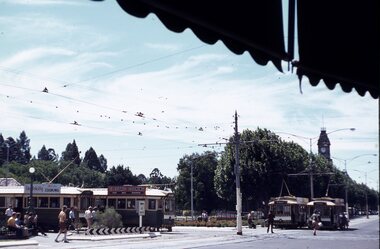
Black and White print contained within the Wal Jack Bendigo and Geelong Album, see Reg Item 5003 for more details. Photo of the Charing Cross with three bogie trams at the intersection, SEC publicity photo c1950. Two of the bogies crossing on the Eaglehawk - Quarry Hill line have white or cream strips on the lower edge of the body. No 26 has the destination of North Bendigo, though it is on Golden Square line with the driver standing just inside the doorway. In the background is the fountain, the Gardens and Pall Mall. SEC Publicity Photo, see Inscriptions for notes re photo. On the rear is the SEC Publicity Photo stamp, with negative number 21.1 written in, "Yallourn" in pencil and a typed piece of paper taped to the rear of the photo noting the Provincial tramways owned by the SEC, but that it is loss making.trams, tramways, bendigo, charing cross, secv, pall mall, tram 26 -
 Bendigo Historical Society Inc.
Document - REEFS AND SPURS ON BENDIGO GOLDFIELD
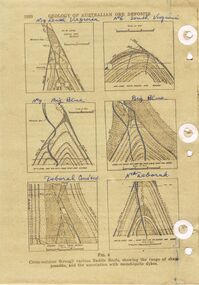
Three pages of information (copied ) regarding reefs and spurs on Bendigo Goldfield. Page 1020 'Geology of Australian ore deposits', drawings labelled in blue biro: No 19 level Virginia Mine, No 6 level South Virginia; No 9 level, Big blue, Big Blue, Deborah Cons'ted ( consolidated?) North Deborah. On bottom ' cross sections through various saddle reefs, showing the range of shape possible, and the association with monchiquite dykes' Page 1021 ( cont) Virginia South Extended; 3000ft New Chum Rly; Catherine Reef, Spurs in Carlisle. On bottom ' Cross sections through a trough reef, 'double' saddle reef and spurry systems. Final page: mines listed and descriptions of workings: Golden Age, Johnson's Reef Extended, Golden Pyke, Constellation, Great Northern, Virginia, Specimen Hill United, New Argus, Clarence United, North Argus, South New Moon.bendigo, mining, reefs and spurs -
 Bendigo Historical Society Inc.
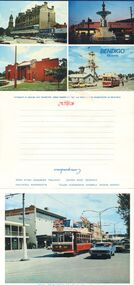
Document - BENDIGO VICTORIA'S GOLDEN CITY TOURISM BROCHURE ?1960S, ?1960s
Bendigo Victoria's Golden City Tourism Brochure Postcards 1960's. Charing Cross and Pall Mall looking north to the Post Office, Central Deborah Gold Mine and Vintage Tram, Chinese Joss House Emu Point Finn Street Bendigo, Charing Cross looking towards the Post Office Pall Mall Bendigo, Bendigo Vintage Tram Pall Mall Bendigo, Royal Tour Tram No. 30 Pall Mall Bendigo, Lake Eppalock at the Bendigo Yacht Club, Dusk Alexandra Fountain Pall Mall Bendigo, Sacred Heart Cathedral From High Street Bendigo, Central Deborah Gold Mine, Shamrock Hotel.bendigo, tourism, postcard -
 Bendigo Historical Society Inc.
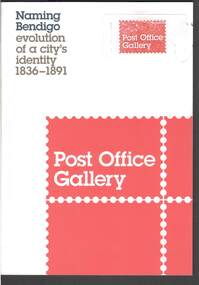
Book - NAMING BENDIGO: EVOLUTION OF A CITY'S IDENTITY 1836 TO1891
Red and white covered booklet titled 'Naming Bendigo evolution of a city's identity 1836 - 1891. It has a sketch map of Bendigo and Golden Square in 1851. It has a number of photos of early paintings, postcards and objects. The Foreword is written by Cr Rod Campbell, Mayor of the City of Greater Bendigo and the Introduction is written by Karen Quinlan, Director. The chapters are titled: Naming Bendigo evolution of a city's identity 1836 - 1891; The Gibson brothers soon renamed the run a popular choice in the 19th century; and to direct that the said place shall be called and known as Sandhurst; endeavoured to ascertain from what source, and at what time, the name of Bendigo arose: "The diggers...at Bendigo are recherché as to names;" and the Exhibition Checklist.event, exhibition, naming bendigo, naming bendigo - evolution of a city's identity 1836-1891, post office gallery, bendigo art galery, studio round, bambra, sandra bruce, karen quinlan, ian hill, national library of australia, city of greater bendigo, elaine harrington, vic lane, reg and judy macdonald, dennis o'hoy, sandhurst trustees, phil wilkins, darren wright, eaglehawk, eppalock, epsom, flora hill, golden square, kangaroo flat, strathfieldsaye, mount alexander run (north, or no 2 - ravenswood run -
 Bendigo Historical Society Inc.
Slide - Images by Arthur Pulfer, 1957-1970
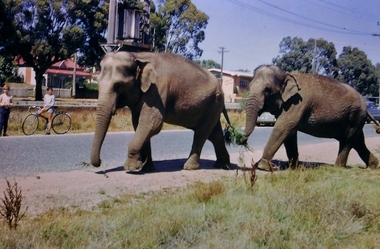
ROSEVIEW 407 High Street, Golden Square Bendigo "Roseview" was designed by Godfrey Eathorne and constructed in 1939. It is one of the few Streamline Moderne houses in the Central Goldfields region, and was one of the earliest constructed in the Bendigo region. It is an outstanding example of this style of housing. It resembles an ocean liner, and reflects the emphasis on the streamlining of methods of transportation. It utilizes both flat and curved surfaces and has little external ornamentation. The use of materials such as rounded glass windows and metal window and door frames reflects an innovative approach to construction consistent with the style. "Roseview" was constructed on a large scale, with large and spacious rooms. It reflects the prominent social status and wealth of the original owner, together with the desire for a building in 'the latest' style which was sure to attract attention and prominence in the region. It has been maintained largely in original condition. CARALULUP HOTEL 'The Sun' dated January 17, 1941 on the back. It states that 'The licence of Caralulup Hotel, near Talbot, has been surrendered, thus severing an 80 year association with the district' State Library of Victoria TOLMER GOLD ESCORT ROUTE The gold rush in New South Wales and Victoria left few able miners in South Australia. Bad economic conditions saw more than 15,000 men leave the Kapunda and Burra mines by the end of 1851. Alexander Tolmer, Commissioner of Police in 1852 proposed that the gold won by South Australians should be brought back to South Australia under an escort consisting of only a few men. In March a Gold Escort was on its way back to Adelaide with almost 6,000 ounces of gold for the vaults of the Treasury Building. After this successful trip Tolmer led two other escorts before handing over his duties. A total of eighteen gold escorts were made, the last one during November and December 1853 when Inspector Wyndham was in charge. You’ll find Gold Escort Route Monuments between Meningie, Coonalpyn and Tintinara.Many images from by Arthur Pulfer copied to slides. Twenty Slides of Bendigo: Bullen's Circus Bendigo February 1966 "Roseview", Pethard's Home at 407 High Street, Golden Square, Bendigo. 25th March 1957. House is possibly on the Midland Highway Epsom, Bendigo - 8 April 1955 Kangaroo Flat Bus Lines mini bus The Big Tree Sedgwick Road March 1972 The old Golden Gully Hotel Diamond Hill Road, Bendigo The old Lockup Eaglehawk Bendigo September 1967 Market Gardens - possibly North Bendigo North Deborah Mine photo taken from Breen Street 1958 Laying the track to get the engine into the park, looking down Mitchell Street Bendigo Engine R766 in the Victorian Railways Institute Park Railway Place Bendigo On the Methodist Church Steps Arnold street Bendigo Miner's Hut at Moliagul Basket Lunch - White Hills Botanical Gardens - St johns 100 year celebrations White Hills Swimming Pool February 1970 White Hills Botanical Gardens Bendigo Bendigo Show Parade 1958 The Arrival of the Cobb and Co Coach in Bendigo September 1963 history, bendigo, james lerk collection, golden square high school, dragon loong, white hill botanical gardens, 407 high street bendigo, r766 engine, bullens circus, caralulup, moligual, bendigo show, tolmer's gold route, kangaroo flat bus lines, eaglehawk lockup, arnold street methodist church, elephants -
 Bendigo Historical Society Inc.
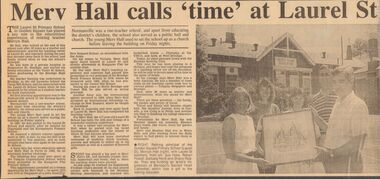
Newspaper - GOLDEN SQUARE P.S. LAUREL ST. 1189 COLLECTION: NEWSPAPER CUTTINGS
Newspaper cutting mentioning the retirement and career of Mervyn Hall, a teacher at the Golden Square Primary School (Laurel St). Photo shows Mervyn Hall with teachers, Sue Hoile, Robyn Powell, Barbara Reidt and Shane Rodda. They are presenting him with an artist's impression of Bendigo's Sacred Heart Cathedral.education, primary, golden square laurel st p.s., golden square primary school 1189 collection - newspaper cuttings, mervyn hall, sue hoile, robyn powell, barbara reidt, shane rodda, violet st school, bendigo high school, camp hill school, tongala consolidated school, kangaroo flat primary school, bendigo north primary school, comet hill school, eaglehawk football club, bendigo matting association, bendigo bowling club, apexian, janene hall, craig hall, blair hall, heather hall -
 Ballarat Tramway Museum
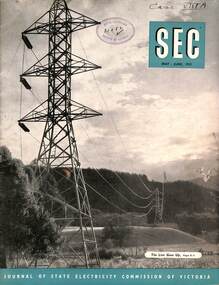
Magazine, State Electricity Commission of Victoria (SECV), SEC News, May June 1953
Published for the staff of the SEC, features the Kiewa Valley transmission line, North East towns and workers, industry, Bendigo Tram's Golden Jubilee, (AETA Visit, Mr George Laurens, Doug Dean, Tom Lynch and Basil Miller), electrical safety, meter reading in the country, sports, electric cooking, and sports section. In the retirements were Mr P Pithie, Senior Traffic Inspector Geelong, Mr V Pipps Depot Foreman Geelong and Mr S Watson, Geelong Senior depot clerk. On the inside cover are photos of the package power stations being installed at Geelong, Ballarat (Ballarat B) and Mildura.Demonstrates a SECV Staff magazine.Magazine, 36 pages, black and white production, centre stapled.Has RHSV stamp on the cover and "Case ViiiA" in inktramways, geelong, secv, retirements, ballarat b power station, power stations, bendigo -
 Ballarat Tramway Museum
Negative, Wal Jack, late 1940;s
Yields information about the use of the Dawson St crossover during a disruption - reverse to the normal methods.Negative and Digital image of the Wal Jack Ballarat Negative file of No. 17 traversing the Dawson St crossing the other way to that normally used from the north side to the south side. The tram has passengers and the destination of Sebastopol. A workman is standing near where the points blade are. Could have been a disruption at Lydiard St North. Possibly late 1940's. In the background is the Golden City Hotel. trams, tramways, dawson st, sturt st, tram 17 -
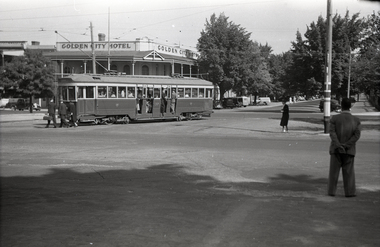 Ballarat Tramway Museum
Negative, Wal Jack, early 1950's
Yields information about the use of the Dawson St crossover with loaded passenger cars and from the north side to the south side.Negative and Digital images of the Wal Jack Ballarat Negative file of No. 37 using the Dawson St cross over from the north side to the south side, with a large load of passengers. Destination appears to be Gardens via Sturt St West. In the background is the Golden City Hotel. Possibly the early 1950's.trams, tramways, sturt st, dawson st, tram services, tram 37 -
 Ballarat Tramway Museum
Negative, Wal Jack, 6/01/1963 12:00:00 AM
Negative and Digital images of the Wal Jack Bendigo Negative file of Bendigo Birney No. 29 at the North Bendigo terminus with the railway level crossing in the background. Tram has the destination of Golden Square and a Briquettes roof advertisement. Based on the cars in the photo and Reg Item 452, date could be 6-1-1963trams, tramways, bendigo, north bendigo, level crossings, tram 29