Showing 381 items matching "route 10"
-
 Ballarat Tramway Museum
Map, Survey and Mapping for MMTB, "Map of Melbourne's Trams and Bus routes and all night services", Jan. 1967
Fold out sheet coloured map, 12 portions or folds, - title - "Map of Melbourne's Trams and Bus routes and all night services" map shows trams lines, route numbers, terminal points, bus routes, railway lines, blow up of city area with places of interest and key. On rear details, places of interest, suburb index, index to routes, first and last services, Sunday am services, all night bus services and locations of depots and head office. 2nd copy added 11-8-2006. Images of document - scanned to A3 size and overlapping added 30/10/13 On rear "out of date" stamp and 1 "cancelled" stamp - red ink.trams, tramways, melbourne, map, tram & bus services, all night services -
 Ballarat Tramway Museum
Map, Compiled by MMTB, "Map and timetable of Melbourne Tram and Bus Services" - May 1956, May. 1956
Fold out map (10 sections), coloured of Melbourne's Tram and Bus routes, route numbers, rail lines, municipalities boundaries and location of major places of interest. At base of map - timetable of all night trams and bus services. On rear index to routes, 1st and last services, time of Sunday am services, Latrobe St. services and photo of Wattle Park.trams, tramways, melbourne, map, tram & bus services, all night services, mmtb -
 Ballarat Tramway Museum
Book, A. Weston & Geoff Clark of North Sydney Boys High School, "The Ballarat Tram", Jul. 1971
Produced by the North Sydney Boys High School Railway club, prior to the closure of the Ballarat system - little else written and published at the time about the history and details of the system. A very good booklet for the time - produced entirely by the wax cut stencil process. Has a strong association with the people who prepared the document.Twenty page booklet on the history, operation and tramcars of Ballarat, produced by the Nth Sydney Boys High School Railway Club in July 1971. Printed on a wax cut stencil process, with green covers, drawings, maps, track layout, fleet list, gives tentative closure dates, route descriptions, sketches, stapled on edge. Title "The Ballarat Tram". Stapled on the left hand side. Three copies held - 3rd copy added 22/10/05. 4th copy added 11/10/2007 and image of cover added as well. pdf image of copy added 2/11/13 - to produce the scan, copy 2 was unstapled and filed loose - may not open properly in dbtext. find file and open directly. See Reg Item 6388 for the Bendigo version.3rd copy - page 3 - in black ink "Ballarat Tramway Preservation Society Catalogue No. 118", On top right hand corner "Graeme Breydon address stamp"trams, tramways, ballarat trams, secv, tramcars -
 Ballarat Tramway Museum
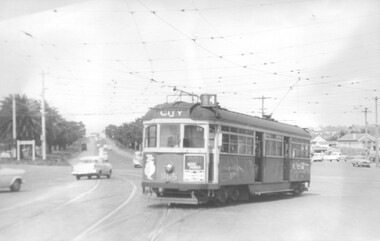
Photograph - Black & White Photograph/s, Wal Jack, 4/01/1943 12:00:00 AM
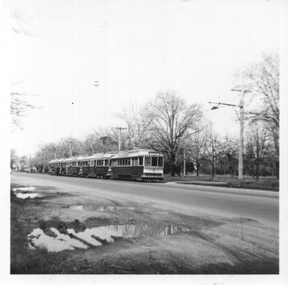
Black & white photograph of M&MTB 'E' 41 on Balloon loop at St. Kilda 4-1-1943. Tram has painted white strip under drivers windows, above headlight and bumper bars (part) and on edge of footboards. Has Kew-Cotham Road destination. Route 69. See inscription markings for further details. Note: the tram class was originally and E, but maximum traction cars were later classified by the MMTB as "C"; see Destination city p14. Tram was later to become SECV Ballarat No. 38. Hi Res image and of back added 10-12-2013 Reimaged 17/7/2017 both front and back.On rear in ink. 'M&MTB, 'C' class No. 41 (Maximum Traction Trucks) ex Prahran & Malvern TT. car on Balloon Loop, Esplanade St. Kilda, (opp. Luna Park). St. Kilda - Cotham Rd. Kew line - route No. 69. 4-1-43' Has been stamped 'W.Jack, No. T337, copyright'.trams, tramways, mmtb, st kilda , tram 41 -
![Roadway Scene on the Black Spur / [by] Nicholas Caire, circa 1876](/media/collectors/550653872162f11fb04854aa/items/577759b7d0cdd10a5c1a5d0a/item-media/57775a11d0cdd10a5c1aab42/item-fit-380x285.jpg) Kew Historical Society Inc
Kew Historical Society IncPhotograph, Anglo-Australasian Photographic Company, Roadway Scene on the Black Spur, c.1876
Nicholas Caire was born on Guernsey in the Channel Islands in 1837. He arrived in Adelaide with his parents in about 1860. In 1867, following photographic journeys in Gippsland, he opened a studio in Adelaide. From 1870 to 1876 he lived and worked in Talbot in Central Victoria. In 1876 he purchased T. F. Chuck's studios in the Royal Arcade Melbourne. In 1885, following the introduction of dry plate photography, he began a series of landscape series, which were commercially successful. As a photographer, he travelled extensively through Victoria, photographing places few of his contemporaries had previously seen. He died in 1918. Reference: Jack Cato, 'Caire, Nicholas John (1837–1918)', Australian Dictionary of BiographyAn original, rare photograph from the series 'Views of Victoria: General Series' by the photographer, Nicholas Caire (1837-1918). The series of 60 photographs that comprise the series was issued c. 1876 and reinforced a neo-Romantic view of the Australian landscape to which a growing nationalist movement would respond. Nicholas Caire was active as a photographer in Australia from 1858 until his death in 1918. His vision of the Australian bush and pioneer life had a counterpart in the works of Henry Lawson and other nationalist poets, authors and painters.Albumen silver photograph mounted on boardprinted in ink on support l.c.: ROADWAY SCENE ON THE BLACK SPUR. / COPYRIGHT REGISTERED printed in ink (vertically) on support reverse u.c.l.: J.W. FORBES, Agent, printed in ink (vertically) on support reverse c.l.: ANGLO-AUSTRALASIAN PHOTOGRAPHIC COMPANY, MELBOURNE. printed in ink (vertically) on support reverse c.: VIEWS OF VICTORIA. / (GENERAL SERIES.) / No. 18. / ROADWAY SCENE ON THE BLACK SPUR. / The road which is represented in this illustration has lately been constructed by the Government at considerable / expense. It is three miles in length from the base to the summit, some portions of which are very steep. Mails / are conveyed by Cobb & Co.'s Coaches to Marysville and Woodspoint via this route daily. The scenery on the Black / Spur, and beyond as far as Myrtle Creek, is exceedinly picturesque. printed in ink (vertically) on support reverse l.c.l.: 10 Temple Court, Collins Street West.nicholas caire (1837-1918), landscape photography, black spur - victoria -
 Kew Historical Society Inc
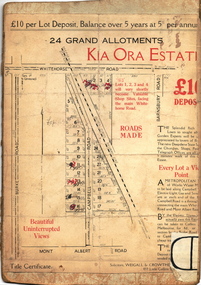
Plan - Subdivision Plan, Kia Ora Estate, 1930s
Twenty-five grand allotments were offered for sale in the subdivision known as the Kia Ora Estate in Balwyn in the early 1930s. The streets identified in the subdivision include Whitehorse Road, Barnsbury Road, Campbell Road, Mont Albert Road and Burke Road. The lots were advertised for £10 deposit, with the balance to be paid over 5 years at 5 per cent per annum. The lots bordering Whitehorse Road were nominated as potential valuable shop sites, while the Mont Albert Road lots were advertised as having ‘wonderful views’. The Outer Circle Railway Line is shown traversing the subdivision. The route of the Railway in this area is now a walking/bike track bordered by strips of parkland.subdivision plans - balwyn, kia ora estate -
 Kew Historical Society Inc
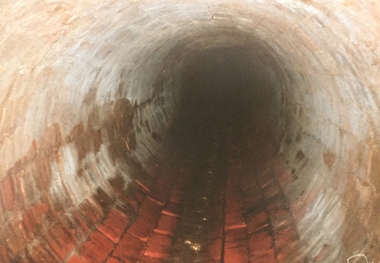
Photograph - Kew Main Drain, 1984
'Kew, Kew East, Balwyn & Balwyn North are located approximately 7km north east of Melbourne. Four main stormwater drains service the area flowing from south to north. Three of the drains: Deepdene Drain; Balwyn Drain & Glass Creek converge in Kew East just west of Burke Road at Kew High School before discharging into the Yarra River. The fourth drain, Kew Main Drain connects directly with the Yarra River to the West of Glass Creek.' The Kew Main Drain is a barrel drain that was created in the 1930s, and follows the route of the former Connor's Creek from the vicinity of Genazzano FCJ College to the Yarra River in East KewImportant and verifiable evidence of the construction methods used by the Melbourne & Metropolitan Board of Works in building the Kew Main Drain, before its reconstruction in c.1985.Original print colour positive photograph of the Kew Main Drain, provided on 14/12.84 to the Chief Engineer of the City of Kew, Ian Poulter, by the Supervising Engineer (Works), Southern and Eastern Drainage, Melbourne & Metropolitan Board of Works. The record includes an image of the reverse as well as the donation document from the MMBW."A84/1855-10 / 750mm council drain looking U/S [up stream] from Parkhill Road, Kew."kew main drain, stormwater drains -- kew (vic.), connor's creek -- kew (vic.) -
 The 5th/6th Battalion Royal Victoria Regiment Historical Collection
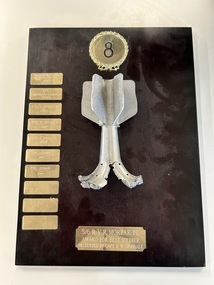
Award - 5/6 RVR Mortar PL. Award for Best Soldier
5/6 RVR Mortar PL. Award for Best Soldier5/6 RVR Mortar PL. Award for Best Soldier. The presation notes the names of the recipients Dark veneered rectangular wooden board, with routed edges. A chromed tail fin that has been exploded ( bolted to centre of board) located centrally at the top of the trophy is a 65mm diameter gold wreath with a large black "8" in its centre. on the left of the mortar are 10, 20mm x 50mm brass plaques with the names of the recipents enscribed dating from 1992- 2000. Located centrally at the base of the presentation is a 100mm x 31mm brass plaque with the trophies name enscribed within. "5/6 R V R MORTAR PL AWARD FOR BEST SOLDIER PRESENTED BY CAPT. D. W. STOGDALE" "PTE C. BLACK 1992" "CPL CADOGAN-COWPER 1995" "CPL L. CONDON 1996" "PTE STACEY 1997" PTE S. FRENCH 1998" "PTE CLARK 1999" "PTE STEERE 2000"5/6 rvr mortar platoon, 5/6 rvr, 5/6 rvr bhq, award -
 Ballarat Tramway Museum
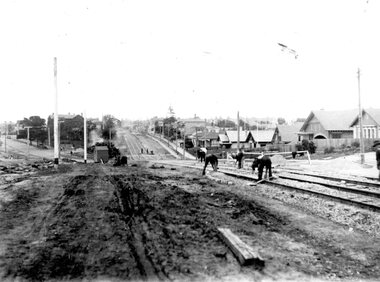
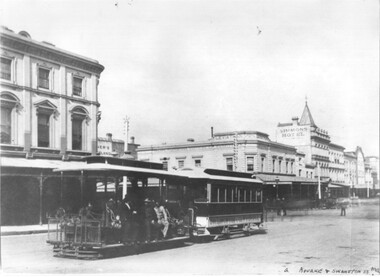
Photograph - Geelong Tramway North line
Men laying sleeper tram tracks for the North tram route along The Esplanade. In the midddle distance, the double track towards the city is in Mercer St. (now The Esplanade South). The street off to the left is Victoria Tce., (now Western Beach Road). 1928Black and white print on paper.GRS710/25/1/10 and 25-10, written on the reverse in paper. The No., 2 inside a circle, written on the reverse in ink.geelong tramway, geelong tramway laying sleeper tracks -
 Melbourne Tram Museum
Administrative record - Tram fare route diagrams or maps, Melbourne & Metropolitan Tramways Board (MMTB), 1930s
The route maps give for each tram, including cable trams, and bus routes, a map of the fare structure, sections, all-night routes, details of transfers and tickets such as combined tickets. Not dated as such but sheet 1 has a note regarding the East Brighton - St Kilda route that it was out of date from 16/10/1938.Yields information about the MMTB fare structure for tram, and bus routes during the 1930s.Album brown card heavy card coves, secured with two interscrews containing a type index, 33 cartridge paper sheets with ink drawings and six loose sheets. Hand drawn in black, red and green ink.mmtb, tramways, fares, maps, routes, buses, cable trams -
 Bendigo Military Museum
Photograph - 4th Field Survey Squadron deployed on Operation NERIGHT, Queensland & Northern Territory, 1989
This is a set of 19 photographs taken in 1989 during 4th Field Survey Squadron’s deployment on Operation NERIGHT 89 in Queensland and the Northern Territory. It was a two-part operation in 1989 with work conducted in the areas of Camooweal and Weipa. Part 1 was the field completion of topographic maps conducted near Camooweal QLD, along the Barkley Highway on the border between NT and QLD, from the 12th of September to the 20th of October 1989. A Bell Kiowa LOH helicopter from 162 Recce Sqn supported topographic field completion. Operation NERIGHT 89 Part 2 was the acquisition of mapping control by GPS field parties utilising Texas Instruments TI4100 Global Positioning System receivers around Weipa on Cape York Peninsula from the 22nd of September to the 22nd of October 1989. Part 2 Two Bell UH-1H Iroquois helicopters from RAAF’s 35 Squadron were principally used to deploy GPS field parties. Identification photography of control points was taken by air camera operators in AAAvn Pilatus Porter aircraft from 173 Gen Spt Sqn fitted with an RC10 aerial camera. The two parts of the operation were conducted concurrently. This is a set of 19 photographs taken in 1989 during 4th Field Survey Squadron’s deployment on Operation Neright in Queensland & the Northern Territory. The colour photographs are on 35mm negative film and are part of the Army Survey Regiment’s Collection. The photographs were scanned at 96 dpi. .1) to .3) - Photo, colour, 1989. En-route to areas of survey operations. .4) to .5) - Photo, colour, 1989. Unidentified personnel relax next to river/waterhole. .6) - Photo, colour, 1989. Two Bell UH-1H Iroquois helicopters from RAAF’s 35 SQN utilised in the movement of GPS parties. .7) to .9) - Photo, colour, 1989. Unidentified soldier practices repelling from a UH1H Iroquois helicopter. .10) - Photo, colour, 1989. Inside the cockpit of a UH1H Iroquois helicopter. .11) - Photo, colour, 1989. Field Party camp with GPS equipment in foreground. Unidentified soldier prepares a meal. .12) - Photo, colour, 1989. GPS antenna plumbed over a survey ground mark. Witness post on left. .13) & .14) - Photo, colour, 1989. Unknown Cape York Peninsula beaches. .15) & .16) - Photo, colour, 1989. Dramatic fire next to base camp. .17) - Photo, colour, 1989. Aboriginal rock art at unknown location. .18) - Photo, colour, 1989. Aboriginal rock art at unknown location. L to R: unidentified, SPR Andrew Quin. .19) - Photo, colour, 1989. Aboriginal rock art at unknown location. LT Chris Topovsek..1P to .19P – There are no personnel identified. ‘1989 OP NERIGHT’ annotated on negative sleeve.royal australian survey corps, rasvy, 4 fd svy sqn, op neright 89 -
 Ballarat Tramway Museum
Photograph - Geelong Forest City signal lights, Keith Kings, Oct. 1955
Photo shows a Forest City style signal light on a pole at the corner of Pakington St and Retreat Road Geelong, Newtown 17/10/1955. Photo by Keith Kings, Number Q(m)(3). In the background are two ladies, a young boy and pram with a young child.Yields information about the Forest City signals in Geelong on the Newtown Route.Black and white photograph with notes on rear.See Contexttrams, tramways, secv, forest city signals, signals, pakington st, retreat road -
 Melbourne Tram Museum
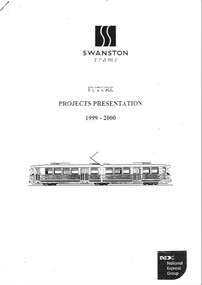
Document - Report, Swanston Trams, "Swanston Trams future projects presentation 1999 - 2000", Oct, 1999
Report - photocopied 27 x A4 sheets, stapled in the top left hand corner titled "Swanston Trams future projects presentation 1999 - 2000" looking for submissions from consultants to undertake a number of projects - signed by Russell Nathan, 6/10/1999. Projects included - (see image i3) - ticket machines at various locations, a city sights tram service, all night tram service, deviation of route 82, Park St link, tram maintenance facilities, consolidation of depots, tram stop improvements and traffic management initiatives.trams, tramways, swanston trams, national express, proposals, route 82 -
 Ballarat Tramway Museum
Photograph - Tram Tour - Sturt St West, 5-10-1969
... In ink "Tramcade Sturt St en route to Gardens 7/10/69"... "Tramcade Sturt St en route to Gardens 7/10/69" Black and white ...Photograph showing four trams, led by No. 21 and three bogies in Sturt St West on a tram tour of Ballarat. Based on the tours database - see reference - the tour took place on the 5-10-1969, the ARE and SPER in conjunction with the Vintage Train. Trams used were 21, 37, 41 and 35.Yields information about the 1969 Vintage Train, tour in conjunction with SPER and the ARE.Black and white print with photographers notes on the rear in ink.In ink "Tramcade Sturt St en route to Gardens 7/10/69"tramcars, trams, tours, are, sper, vintage train, tram 21 -
 Ballarat Tramway Museum
Album - Postcards & Photographs - Vic Solomons and others - Australian Tramways, Vic Solomons, 2023
Contains 184 images of postcards and photographs collected primarily by Vic Solomons of Sydney, with others from the collection of Wal Jack and Warren Doubleday. Covers almost all of Australia's tramway systems. 1 Post Card Hay St Perth Looking East No 3 Unknown Perth 2 Post Card Cars 30 & 90 both on Route 19 pass in Barrack St looking South Perth WA 1935.02.18 Perth 3 Post Card Hay St Looking East Perth WA Unknown Perth 4 Post Card William St Perth WA Unknown Perth 5 Post Card Perth from Shaftsbury Hotel Unknown Perth 6 Post Card Hay St Perth WA Looking East Unknown Perth 7 Post Card Barrack St Perth Unknown Perth 8 Post Card Murray Views No 3 High St Showing Town Hall Fremantle WA Unknown Fremantle 9 Post Card High St Fremantle WA Unknown Fremantle 10 Post Card View of Bolder City Golden Mile in the Background (Section No 1) 1908.08.20 Kalgoolie 11 Post Card Hannan St Kalgoolie 1900.08.19 Kalgoolie 12 Post Card Hannan St Kalgoolie WA (No 2) Unknown Kalgoolie 13 Post Card Intersection Hannan & Maritana Sts Kalgoolie WA Unknown Kalgoolie 14 Post Card Hannan St Kalgoolie Unknown Kalgoolie 15 Post Card Lane Street Bolder City Unknown Kalgoolie 16 Post Card Hobart Double Deck Tram Unknown Hobart 17 Post Card Macquarie St Hobart Unknown Hobart 18 Photo Liverpool Street Hobart Unknown Hobart 19 Photo Hobart 21 Unknown Hobart 20 Photo Hobart 14 in Elizabeth St Hobart Unknown Hobart 21 Post Card Macquarie St Hobart Unknown Hobart 22 Post Card Macquarie St Hobart Tas Unknown Hobart 23 Photo Double Decker Tram 3 at G.P.O. Hobart Tas No 31 Unknown Hobart 24 Post Card Double Decker Tram 19 Hobart Tas A B Series No 24 Unknown Hobart 25 Photo Hobart Municipal Tramways Tas No 95 Unknown Hobart 26 Post Card Elizabeth St Hobart Unknown Hobart 27 Post Card Elizabeth St Hobart Unknown Hobart 28 Post Card Elizabeth St Hobart Unknown Hobart 29 Post Card Elizabeth St Hobart Tas Unknown Hobart 30 Post Card HMT 21 with crew at Beach Road Terminus Unknown Hobart 31 Post Card HMT 9 & another with crew at Beach Road Terminus. Front cover photo of Destination GPO 1921.01.00 Hobart 32 Post Card Cascade Road and Mount Wellington Hobart Unknown Hobart 33 Post Card Elizabeth St Hobart Unknown Hobart 34 Post Card Elizabeth St Hobart Unknown Hobart 35 Post Card Elizabeth St Hobart 1915.04.07 Hobart 36 Post Card Macquarie St Hobart Tas Unknown Hobart 37 Post Card Macquarie St showing Post Office Hobart 1908.03.12 Hobart 38 Post Card Hobart Municipal Tramways 21 Unknown Hobart 39 Post Card Elizabeth St Hobart Tas Unknown Hobart 40 Post Card Liverpool Street Hobart Unknown Hobart 41 Post Card Electric Tram Launceston Tas 446 W J Little Photo 1919.02.08 Launbceston 42 Post Card Launceston Tram no 3 1911.08.30 Launbceston 43 Post Card Launceston Tram no 3 passes tram No 1 Unknown Launbceston 44 Post Card Tram 6 at Trevallyn a popular suburb Launceston Tasmania Unknown Launbceston 45 Post Card Tram 7 at Trevallyn Road Terminus Launceston Tasmania Unknown Launbceston 46 Post Card Tram 4 in Brisbane St Launceston Unknown Launbceston 47 Post Card Tram 9 in Brisbane St Launceston Tasmania Unknown Launbceston 48 Post Card Camerom Street Launceston Tasmania Unknown Launbceston 49 Post Card Murray Views No 15 Jetty Road Glenelg Terminus 1962-02-08 Adelaide 50 Post Card Bay Tram at Jetty Road Terminus Glenelg SA Unknown Adelaide 51 Post Card Tram 3 in King William Street Adelaide S Aust Unknown Adelaide 52 Post Card Valentine Series No 3065 The Old Horse Tram Victor Harbour Unknown Victor Harbour 53 Post Card Bourke Street Melbourne with Cable Car Looking East 1904.04.25 Melbourne 54 Post Card Opening of New Electric Tramway Elsternwick 1913-11-13 Melbourne 55 Post Card Cable trams in Clarendon St Sth Melb Unknown Melbourne 56 Post Card Pall Mall from Charing Cross Bendigo Unknown Bendigo 57 Post Card Tram 4 & 7 pass at The Fountain and Mitchell Street Bendigo Vic Rose Series P 3198 Unknown Bendigo 58 Post Card M&MTB 133 at Charing Cross bound for Eaglehawk Bendigo Vic Murray Views No 45 Unknown Bendigo 59 Post Card Pall Mall Bendigo Vic Unknown Bendigo 60 Post Card Charing Cross & Mitchell St Bendigo Trams passing 1919.00.00 Bendigo 61 Post Card Pall Mall Looking East Unknown Bendigo 62 Post Card Electric Trams and City Hotel Bendigo Vic Unknown Bendigo 63 Post Card Moorabool Street Geelong V 23 Unknown Geelong 64 Post Card Murray Views No 3 Moorabool Street Geelong Vic Unknown Geelong 65 Post Card The Rose Series P 2487 Ryrie Street Geelong Vic Unknown Geelong 66 Post Card Southern Cross Series 2696 Ryrie Stret Geelong Vic Unknown Geelong 67 Post Card The Rose Series P 1490 Ryrie Street Geelong Vic 1920-03-04 Geelong 68 Post Card Valentine Series No 1568 Lower Sturt Street Ballarat Unknown Ballarat 69 Post Card Rose Series P 1710 Sturt Street Ballarat Victoria Unknown Ballarat 70 Post Card Sturt Street Ballarat Victoria Unknown Ballarat 71 Post Card Horse Tram In Sturt Street Ballarat 1905.11.10 Ballarat 72 Post Card Sturt Street Ballarat Looking North-West Unknown Ballarat 73 Post Card Shoppes Square Sturt Street Ballarat Looking North Unknown Ballarat 74 Post Card Junction Sturt and Lydiard Streets Ballarat 1909-09-01 Ballarat 75 Post Card The Electric Supply Co Souvenir Tram Ticket No 3085of the opening of Electric System August 18 1905 1905.08.18 Ballarat 76 Post Card Sturt Street Ballarat Victoria 1907.11.25 Ballarat 77 Post Card Off to the Gardens Electric Tram Ballarat Unknown Ballarat 78 Post Card Sturt Street Ballarat 1907.04.16 Ballarat 79 Post Card Sturt Street Ballarat Looking East Electric tram with Double Deck Trailer 1911.04.17 Ballarat 80 Post Card Sturt Street Ballarat Looking East Unknown Ballarat 81 Post Card Sturt Street Ballarat Looking West 1911.03.01 Ballarat 82 Post Card Town Hall and Sturt Street Ballarat Unknown Ballarat 83 Post Card Lydiard Street Ballarat 1906.11.23 Ballarat 84 Post Card Looking North along Adelaide Street from George Street Brisbane Sidues Series No 764 Unknown Brisbane 85 Post Card Looking South along Queen Street from the Creek Street Intersection Brisbane Qld Sirues Series No 1379 Unknown Brisbane 86 Post Card George Street from near Supreme Court Brisbane Unknown Brisbane 87 Post Card Queen and Eagle Streets Brisbane 1907.07.04 Brisbane 88 Post Card Queen Street showing His Majesty’s Theatre Brisbane Unknown Brisbane 89 Post Card Queen Street Treasury Building 1908.01.20 Brisbane 90 Post Card G P O and Queen Street Brisbane Unknown Brisbane 91 Post Card Queen Street Brisbane Looking from Wharf Street Unknown Brisbane 92 Post Card Customs House Brisbane 1905.02.16 Brisbane 93 Post Card Queen St Brisbane 1905.09.16 Brisbane 94 Post Card Queen St Brisbane 1907.11.19 Brisbane 95 Post Card Treasury Buildings Brisbane Unknown Brisbane 96 Post Card Queen and Eagle Streets Brisbane Unknown Brisbane 97 Post Card The Valley Corner Brisbane Unknown Brisbane 98 Post Card Brisbane Queen Street opposite General Post Office Unknown Brisbane 99 Post Card North Quay and Milton Beach Brisbane Q Unknown Brisbane 100 Post Card Victoria Bridge Brisbane South Side 1907.08.14 Brisbane 101 Post Card Victoria Bridge Brisbane Unknown Brisbane 102 Post Card Breakfast Creek Bridge Brisbane Q Unknown Brisbane 103 Post Card Melbourne Street Station South Brisbane Queensland Unknown Brisbane 104 Post Card General Post Office Queen Street Brisbane 1955.09.23 Brisbane 105 Post Card Customs House Brisbane 1904.11.04 Brisbane 106 Post Card Queen St Brisbane 1919.11.00 Brisbane 107 Post Card Queen St Brisbane Sidues Series No 627 Unknown Brisbane 108 Post Card Creek Street Brisbane Queensland Unknown Brisbane 109 Post Card Customs House and Garden Reach Brisbane Queensland 1910.00.08 Brisbane 110 Post Card Queen and Creek Streets Brisbane 1909.06.07 Brisbane 111 Post Card Queensland National Bank andd Queen Street Brisbane Queensland Unknown Brisbane 112 Post Card Queen Street and Treasury Buildings Brisbane 0000.09.07 Brisbane 113 Post Card Queen Street showing “Courier” Buildings Brisbane Unknown Brisbane 114 Post Card Intersection George & Roma Streets Brisbane Q 1916.05.11 Brisbane 115 Post Card Adelaide Street Brisbane Q Unknown Brisbane 116 Post Card G P O Queen Street Brisbane Q Unknown Brisbane 117 Post Card Treasury Building Brisbane 1906.03-20 Brisbane 118 Post Card Queen and Eagle Streets Brisbane 1907.02.01 Brisbane 119 Post Card Queen St Brisbane Unknown Brisbane 120 Post Card Queen St Brisbane Q Unknown Brisbane 121 Post Card Victoria Bridge Brisbane 1906.07.30 Brisbane 122 Post Card An Unusual View showing Head of Queen Street Victoria Bridge & South SideSuburbs Brisbane Q Unknown Brisbane 123 Post Card Petries Bight Brisbane Q Unknown Brisbane 124 Post Card South End Victoria Bridge Brisbane Q Unknown Brisbane 125 Post Card Customs House Brisbane Unknown Brisbane 126 Post Card Photo of toastrack car circa 1910 Unknown Brisbane 127 Post Card Treasury Buildings Brisbane Unknown Brisbane 128 Post Card East Street Rockhampton with Steam Tram & trailer Unknown Rockhampton 129 Post Card Post Office Rockhampton with steam tram Unknown Rockhampton 130 Post Card East Street Rockhampton with Steam Trams Rose Series P 7154 Unknown Rockhampton 131 Post Card William Street Rockhampton Rose Series P 7156 Unknown Rockhampton 132 Post Card Central East Street Rockhampton Q with Steam Trams Unknown Rockhampton 133 Photo Sturt St Ballarat Unknown Ballarat 134 Photo Bridge Street Ballarat Unknown Ballarat 135 Post Card George St Sydney Unknown Sydney 136 Post Card Elizabeth St Sydney Unknown Sydney 137 Post Card Railway Square Unknown Sydney 138 Post Card Sydney Harbor Bridge - pending receipt 139 Post Card Kings Cross - Mowbray Series with description on rear from C Roy G Field Unknown Sydney 140 Post Card Kings Cross - Mowbray Series with description on rear from C Roy G Field Unknown Sydney 141 Post Card Central Railway Station Sydney - Rose Series P6033 1954-01-26 Sydney 142 Post card William Street Darlinghurst looking towards City - Rose Series P6602 unknown Sydney 143 Post Card Circular Quay Sydney - Rose Series P6680 Unknown Sydney 144 Post Card View at Manly NSW - Rose Series B1003 Unknown Sydney 145 Post Card Hunter St Newcastle NSW - Rose Series P7843 Unknown Newcastle 146 Post Card Bank Corner Newcastle NSW - Mowbray Series No. 155 Unknown Newcastle 147 Post Card Hunter St Newcastle NSW Unknown Newcastle 148 Post Card Criterion Hotel Hunter St Newcastle NSW Unknown Newcastle 149 Photo Horse tram at Newtown Station 1894 to 1898 - PTC photo c1894 Newtown 150 Photo Steam tram motor No 3 at Railway Square 1879 1879 Sydney 151 Photo Railway steam tram c1900 with a horse drawn double deck bus c1900 Sydney 152 Photo Steam motor 5A and doubled deck bus Unknown Sydney 153 Photo Steam motor 53A with detail notes on rear 1922 Sydney 154 Photo Cable tram set at Milsons Point ferry terminal c1900 Sydney 155 Photo Early Sydney electric car - Ocean St - Rose Bay Unknown Sydney 156 Photo George St looking souoth c1905 c1905 Sydney 157 Photo Tram 165 at Circular Quay Unknown Sydney 158 Photo Tramcar ferry or transporter at The Spit Unknown Sydney 159 Photo tram 882 George St at Marti Place, 1937 1937 Sydney 160 Photo Tram 826 Railway Sq area Unknown Sydney 161 Photo Railway Sq in background, Broadway with double decker bus and toastrack car late 1930s Sydney 162 Photo Coupled St Pitt St? - photo Ben Parle Feb. 1950 Sydney 163 Photo Electric tram No. 2 - North Sydney with side trolley pole running Unknown Sydney 164 Photo George St - Horden's Corner Unknown Sydney 165 Photo George St at Martin Place c1920 Sydney 166 Photo Castlereagh St Sydney c1928 c1928 Sydney 167 Photo Railway Sqare c1920 c1920 Sydney 168 Photo Darling St Countereweight Unknown Sydney 169 Photo Trolley bus depot Unknown Sydney 170 Photo Trolley bus No. 14 Unknown Sydney 171 Photo Newcastle Railway Station with steam tram - Wharf Road?? Unknown Newcastle 172 Photo High St West Maitland - steam tram Unknown Maitland 173 Photo High St West Maitland - steam tram Unknown Maitland 174 Post Card Argent St near tram terminal Broken Hill NSW c1900 Broken Hill 175 postcard Argent St looking south Broken Hill - with Ken Magor's notes on rear Unknown Broken Hill 176 Photo Toronto - steam tram 61A Unknown Toronto 177 Photo 124A trial run 1911? Sutherland - Cronulla line 1911 Sutherland 178 Photo 103A at a tram stop Unknown Sydney 179 Photo Cable tram set at Crows Nest terminus grip car 12, trailer 22 Unknown Sydney 180 Photo Cable tram Queens Square Sydney 1903 Sydney 181 Photo cars 2078 and 2077 Chatswood late 1950s Sydney 182 Photo car 1877 Balmain area late 1950s Sydney 183 Photo Trolley bus - Rockdale destination Late 1950s Sydney 184 Photo Broken Hill steam tram - motor 18A North Tram Unknown Broken Hill 185 Photo Millars Point Sydney NSW - ferry/tram interchange, unknown Sydney All items imaged including the rear or back where there was writing of information. All files stored on the Museum's Photo Collections directory. Demonstrates through the medium of many images, Australian tramway systems and Ballarat's place in them.Album - heavy card covers, plastic lined with postcard or 6x4 photo sleeves.australia, tramways, postcards, photographs, steam trams, horse trams, cable trams, trolley buses -
 Melbourne Tram Museum
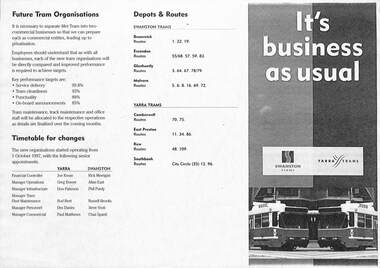
Pamphlet - PTC split, Public Transport Corporation (PTC), It's business as usual, 9/1997
Gives details of the split of the tram division of the Public Transport Corporation Vic to come into effect on 1-10-1997 into two business divisions - Yarra Trams and Swanston Trams. Includes a map showing which entity was to operate what section of Melbourne Trams. Prepared for employee information. Provides information on who would be the senior managers, a timetable, depots and routes to be operated and the logos that would be used.Yields information about the split of the Public Transport Corporation Tram division in preparation for the future privatisation. Pamphlet - photocopy titled Pamphlet - It's business as usual about the split up of the PTC to Swanston Trams and Yarra Trams. Two copies held.trams, tramways, yarra trams, swanston trams, ptc, managers, depots, public transport corporation -
 Melbourne Tram Museum
Photograph - Last day of original Essendon Airport tram terminus, Ron Scholten, 7-10-1976
The original line to the Essendon Aerodrome was constructed in 1943 to serve the airport and aircraft construction. It was funded by the Commonwealth Government. By 1976, patronage to the airport terminus in Vaughan St had dropped, the crossing of the highway to the Tullamarine Airport opened in 1970, was dangerous, and the highway needed to be widened. The new terminus was a short distance to the north between Mathews Ave and the Highway. This series of photographs show the last day of operations to the original terminus and the changeover, which was done in about 7 hours. No buses were required. It was done by workers of the Melbourne and Metropolitan Tramways Board. The line was later extended to Airport West. .1 - W5 789, (Essendon Airport Route 59) about to turn from Mathews Ave into Vaughan St. Has new track and footbridge in the foreground. .2 - W5 791 on the siding or spur at the airport terminus, the last tram to use this facility. .3 - W2 571, at the Airport terminus alongside Vaughan St on the last morning of the use of this terminus. The Bundy clock can be seen behind the pole on the lefthand side and the Brick passenger shelter. Shows buffer stops, and Forestair hanger behind. .4 - W2 595 turning from Vaughan St into Mathews Ave. Has the tram stop No. 55 in the view. .5 - W5 839 turning from Vaughan St into Mathews Ave. Shows the flashing yellow light that gave some protection to the trams. .6 - W2 247 about to turn into Vaughan St. Driver about to reboard the tram. Note the new copper trolley wire is up for the new track but has been pulled to the west side using rope. .7 - W5 805, turning from Mathews Ave into Vaughan St, to the old Essendon Airport terminus. Has a new track in the foreground, and the overhead for the curves is still in position. .8 - W6 991 turning from Vaughan St into Matthews Ave, at 855am, the last tram from the old terminus. The track gang has commenced work to remove the outbound curve. Would appear four passengers waiting at the tram stop, two with lunch bags. Note the cattle grid in the foreground between the rails. New rails on the ground on the left-hand side. See Reg Item 6163 for further photos of this event.Yields information about the last day of the operation of the original Essendon Airport tram line.Set of 8 Kodachrome cardboard mount colour slides of the relocation of the Essendon Airport tram terminus 7-10-1976, by Ron Scholten.All slides have detailed descriptions on the reartrams, tramways, essendon aerodrome, essendon airport, closure, new tramways, route 59, w5 789, w5 791, w2 571, w2 595, w5 839, w2 247, w5 805, w6 991, w2 class, w5 class, w6 class, mmtb, trackwork -
 Melbourne Tram Museum
Photograph - Changing the Location of the Essendon Airport terminus, Ron Scholten, 7-10-1976
The original line to the Essendon Aerodrome was constructed in 1943 to serve the airport and aircraft construction. It was funded by the Commonwealth Government. By 1976, patronage to the airport terminus in Vaughan St had dropped, the crossing of the highway to the Tullamarine Airport opened in 1970, was dangerous, and the highway needed to be widened. The new terminus was a short distance to the north between Mathews Ave and the Highway. This series of photographs show the operation of a tram service during the changeover. Trams ran from the Niddrie crossover near Keilor Road to a temporary terminus just short of the worksite, with cars running "bang" road or the wrong way for one trip along either line. This would have been controlled by an Inspector at the Niddrie end. The work was done over a 7-hour period, including changing the overhead over. Work would have been completed after the changeover period. .1 - W5 800 at “temporary” Essendon Airport terminus, Cnr Mathews Ave, Vaughan St. after running “bang” road or the wrong way to this point from the Niddrie or Keilor Road crossover. Curves have been removed.. Has an Inspector chatting to a man with a hat standing alongside the tram. The shelter has a City of Keilor logo on it. .2 - W5 684, taken from the overbridge at the TAA stop - during the changeover of the tracks. Tram running “bang” road from Niddrie to the temporary terminus. .3 - SW5 787, temporary terminus in Mathews Ave, about to return to Niddrie as an “up” car on the “down” line. .4 - MMTB Track gang commissioning and placing rails at the new terminus with scrubber 10 waiting. Overhead in position with overhead for the curves partly removed. Mobile Crane on the left-hand side moving a formwork piece into position .5 - 10W cleaning new track at the new terminus. .6 - Rail Scrubber 10W at work cleaning head of rails where new concrete section. Has a TAA bus on the right side. .7 - W5 783 is about to be the first passenger tram to the terminus, at 3.50 pm About 20 workmen are completing the inbound or up track. .8 - W5 783 about to be the first passenger tram to the terminus, at 3.50 pm About 20 workmen are completing the inbound or up track.Yields information about the last day of the operation of the original Essendon Airport tram line and the works done for the new terminus.Set of 8 Kodachrome cardboard mount colour slides of the relocation of the Essendon Airport tram terminus 7-10-1976, by Ron Scholten. All slides have detailed descriptions on the rear trams, tramways, essendon aerodrome, essendon airport, closure, new tramways, route 59, mmtb, trackwork, w5 800, w5 684, sw5 787, scrubber 10w, w5 783, w5 class, sw5 class, taa airlines, city of keilor -
 Melbourne Tram Museum
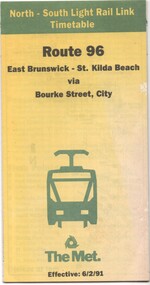
Document - Timetable - Route 96 - East Brunswick - St Kilda Beach, The Met, 2/1991
... Document - 10 fold sheet - Timetable - Route 96 - East... Document - 10 fold sheet - Timetable - Route 96 - East Brunswick ...Timetable dated 6-2-1991 provides information on the East Brunswick to St Kilda Beach via Bourke Street services, including a map, route description, time points, fare secrtions and contact details. Published by The Met. Has the words "North-South Light Rail Link" on the top of the document. Yields information about Route 96 tram services on the St Kilda light rail line.Document - 10 fold sheet - Timetable - Route 96 - East Brunswick - St Kilda Beachtramways, timetable, route 96, east brunswick, st kilda beach, light rail, the met -
 Melbourne Tram Museum
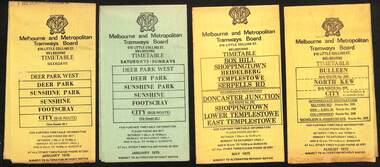
Ephemera - Timetables - MMTB Buses, Melbourne & Metropolitan Tramways Board (MMTB)
Timetables - provide information on ticketing, fares, timing points, with a description of the route and a map. Not all services had been allocated a route number at the time. 1 - Deer Park West - Sunshine - Footscray - City - Jan 1975, including a separate weekend timetable' 2 - Box Hill - Shoppingtown - Templestowe - May 1975 3 - Bulleen - North Kew City - Routes 203, 204, 205, 206, 208 and 209 - August 1972 4 - North Altona - City - route 232 - June 1979 5 - Clifton Hill - Elsternwick route - route 246, Point Ormond - route 247 and 248 - June 1974 6 - La Trobe University - Northland - West Heidelberg - City - routes 256, 251, 253, 254, 252, 255 - August 1974 7 - Warrandyte - Park Orchards - Ringwood - routes 273, 274, 275 - Feb. 1974 8 - Warrandyte - Donvale - Templestowe - Shoppingtown - City - routes 276, 277, 278, 294, 278, 280, 299, 268 - April 1975 9 - East Kew, Box Hill Doncaster, Shoppingtown - routes 284, 285, 270 - May 1974 10 - Box Hill - Mitcham, East Doncaster, Ringwood - routes 287, 286, 288, 282, 283, 272 - March 1974' 11 - Box Hill - North Blackburn - route 290 - March 1974 12 - Fishermans Bend - City - routes 233, 235, 237 - Feb 1979.Yields information about MMTB Bus services during the 1970s.Set of twelve MMTB Bus timetables - multifolded printed on yellow paper, except for Deer Park timetables for Saturdays and Sundays printed on green paper.timetable, the met, buses, box hill, doncaster, templestowe, warrandyte, elsternwick, fishermans bend, deer park, altona, sunshine, footscray, shoppingtown -
 Melbourne Tram Museum
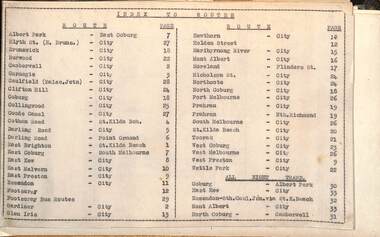
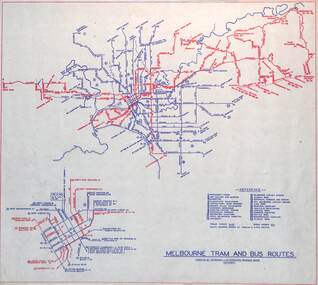
Map, Melbourne & Metropolitan Tramways Board (MMTB), "Melbourne tram and bus routes", c1961
... of the Footscray lines on 10/3/1962. Shows route numbers at termini... of the Footscray lines on 10/3/1962. Shows route numbers at termini ...Map showing MMTB tram and bus routes following the closure of the Point Ormond line on 22/10/1960 and before the closure of the Footscray lines on 10/3/1962. Shows route numbers at termini and along the route and points of interest in a reference table. Yields information the MMTB services c1961.Map - printed in two colours on paper. Two copies held.tramways, map, mmtb, tram, bus, routes -
 Melbourne Tram Museum
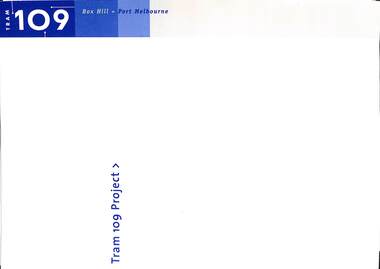
Document - Opening of Box Hill Extension Route 109 Press documents, Ministry of Transport, May 2003
Produced for the opening of the Box Hill Extension, 2 May 2003, extending the tram line from Union Road Mont Albert to Station Street Box Hill. Became known as Route 109 - Port Melbourne Box Hill.Provides the background to the 2003 extension of the Mont Albert tram to Box Hill.Documents - mainly folded to A4 enclosed within a card folder prepared for the event. .1 - folder - folded card to hold the following items .2 - 10 fold DL pamphlet providing map, technical information and tram stops. .3 - A2 folded sheet for the Route 109 project - introduction by the Minister for Transport, Peter Batchelor .4 - A3 folded sheet giving background history to the area .5 - 2 page Press Release dated 2/5/2003 .6 - A4 sheet with CD containing a photo of the 30/9/1916 Opening by Mr. A Bailey trams, tramways, new tramway, box hill, opening, route 109, mont albert -
 Melbourne Tram Museum
Photograph - Black and White - W6 965 reversing at Elsternwick, John Alfred
Photo shows - W6 965 (route 4, City) reversing at Elsternwick, using the Point Ormond leg of the triangle of the intersection at the intersection with Brighton Road and Glenhuntly Rd, due to the work to replace the Elsternwick level crossing. Dated 2-10-1960.Yields information about alterations to tram services during a level crossing removal project.Photograph - Black and White - W6 965 reversing at ElsternwickHas details typed on rear, date stamp and John Alfred Stamp. tramways, tramcars, w6 class, elsternwick, brighton road, glenhuntly road, tram 965, route 4 -
 Melbourne Tram Museum
Album - David Frost Slide Collection, David Frost
Photo - see pdf file for further information. Number Brief Description date DFC1 A general view from the former railway platform at Port Melb Station looking towards Station Pier on opening day 20-12-1987 DFC2 A2 285 in the Tramway Platform at Port Melbourne Station on opening Day 20-12-1987 DFC3 A2 285 in the Tramway Platform at Port Melbourne Station on opening Day 20-12-1987 DFC4 A2 285 in the Tramway Platform at Port Melbourne Station on opening Day 20-12-1987 DFC5 A2 273 at St Kilda Tramway Station on opening day 22-11-1987 DFC6 A2 273 turning from Fitzroy St into St Kilda Tramway Station on opening day 22-11-1987 DFC7 B1 2001 at St Kilda Tramway Station turning into Fitzroy St on opening day 22-11-1987 DFC8 B1 2002 enters St Kilda Tramway Station on opening day 22-11-1987 DFC9 An A2 approaches St Kilda Tramway Station on opening day 22-11-1987 DFC10 Concreting the connecting curve from Fitroy St into St Kilda Station c July 1987 DFC11 An MTA AEC MKVI bus in Grey St St Kilda at Dalgety St with Tramway works in the background c July 1987 DFC12 Grey St St Kilda at Dalgety St with Tramway works in the background in Fitzroy St c July 1987 DFC13 Concreting the connecting curve from Fitroy St into St Kilda Station c July 1987 DFC14 Restaurant Tram 442 in Fitzroy St at Grey St Passing MTA bus 59 outside St Kilda Station c1986 DFC15 Former VR tram stop sign painted on a pole at Glenhuntly Rd & Broadway DFC16 Former VR Elwood Tram Depot under demolition 1996 DFC17 Former VR Elwood Tram Depot under demolition 1996 DFC18 Former VR Elwood Tram Depot under demolition 1996 DFC19 Former VR Elwood Tram Depot under demolition 1996 DFC20 Former VR Elwood Tram Depot under demolition 1996 DFC21 Former VR Elwood Tram Depot under demolition 1996 DFC22 Former VR Elwood Tram Depot under demolition 1996 DFC23 Former VR Elwood Tram Depot under demolition 1996 DFC24 MTS Tower waggon in use at the former VR Elwood Tram Depot under demolition 1996 DFC25 A Sign advertising the sale of the Former VR Elwood Tram Depot – 10/8/1996 1996 DFC26 Former VR Elwood Tram Depot under demolition 1996 DFC27 Interior of a shed at the former VR Elwood Tram Depot under demolition 1996 DFC28 Former VR Elwood Tram Depot under demolition 1996 DFC29 Former VR Elwood Tram Depot under demolition 1996 DFC30 Former VR Elwood Tram Depot under demolition 1996 DFC31 VR 20, former breakdown car in Bob Prentice’s Back Yard Jan 1974 DFC32 VR 20 on a low loader en route to Bob Prentice’s for preservation 1959 DFC33 VR 20 as the breakdown car on the St Kilda Electric Street Railway c1955 DFC34 VR 39 waits in St Kilda St as breakdown car 20 enters Elwood Depot c1955 DFC35 VR 54 and 50 in the rear yard of Elwood Depot c1958 DFC36 VR 50 in the rear yard of Elwood Depot c1958 DFC37 VR 50 in the rear yard of Elwood Depot c1958 DFC38 VR 28 in St Kilda St outside Elwood depot after the line had been cut back to this point c1958 DFC39 VR 29 in St Kilda St outside Elwood depot after the line had been cut back to this point c1958 DFC40 VR 35 passes 28 on the St Kilda Electric Street Railway c1955 DFC41 VR 39 on the St Kilda Electric Street Railway c1955 DFC42 Y1 613 on a tour c1970 DFC43 VR 54 in St Kilda St outside Elwood Depot c1955 DFC44 VR 28 at Brighton Beach Terminus c1955 DFC45 VR 33 being washed in the wash bay at the rear of Elwood Depot c1955 DFC46 VR 20 breakdown car running into Elwood Depot c1955 DFC47 VR 3 in the rear yard at Elwood Depot c1955 DFC48 VR 51 on an AETA Tour running out of Elwood Depot c1958 DFC49 VR 28 on the St Kilda Electric Street Railway c1955 DFC50 VR 28 with crew in St Kilda St outside Elwood depot after the line had been cut back to this point 1959 DFC51 VR 52 in Grey St near Fitzroy St c1958 DFC52 VR 51 on a AETA Tour passes 33 in Grey St near Fitzroy St c1958 DFC53 VR 29 in Grey St near Fitzroy St c1958 DFC54 VR51 on an AETA Tour shunts as 52 waits on the St Kilda Electric Street Railway c1958 DFC55 VR 51 on the Black Rock Electric Street Railway c1955 DFC56 VR 28 in St Kilda St outside Elwood depot after the line had been cut back to this point c1958 DFC57 Combined Rail-Tram Tickets of the Black Rock Electric Street Railway Feb 1975 DFC58 Combined Rail-Tram Tickets of the St Kilda Electric Street Railway Feb 1975 DFC59 Electric Street Railway & Motor Coach Paper Tear off Tickets Feb 1975 DFC60 VR 52 & 53 on Rt 82 pass in Cordite Ave near Wests Rd Sept 1975 DFC61 Z 68 & 52 in East Preston Depot in M&MTB Livery c1977 DFC62 Copy photo of VR 18 in Elwood Depot c1910 DFC63 VR 51 as a one man car at Black Rock Terminus c1955 DFC64 VR 53 on Rt 82 in Droop St Footscray Jan 1974 DFC65 B2 2027 on Rt 96 in South Melb Station c1988 DFC66 VR 20 as preserved in Bob Prentice’s backyard High St Prahran Jan 1974 DFC67 VR 700 on Rt 82 in Droop St Footsray c1978 DFC68 VR 28 as the last car from ST Kilda Station 28-2-1959 DFC69 VR 700 at the Rt 82 Moonee Ponds Terminus c1978 DFC70 VR 52 waiting time at the Rt 82 Footscray Terminus, the driver intently stares at the bundy clock as the Braid and the Connie gossip Jul 1972 DFC71 VR 54 shunting outside Elwood Depot to return to St Kilda Station 1959 DFC72 SW6 969 in MTA Livery blocking the entrance to South Melb Depot presumably during the scratch ticket dispute Jan 1990 DFC73 VR 52 & 53 on Rt 82 pass in Droop St Footscray Sept 1975 DFC74 VR 700 after withdrawl in the Newport Railway museum in the process of a repaint c1985 DFC75 VR 700 after withdrawl in the Newport Railway museum in the process of a repaint c1985 DFC76 VR 700 on Rt 82 in Droop St Footsray at The Cresent c1978 DFC77 VR 700 on Rt 82 in Droop St Footsray c1978 DFC78 Former VR tram depot in use as an MTA Bus depot c1990 DFC79 VR 52 waiting time at the Rt 82 Footscray Terminus Jul 1972 DFC80 VR 52 waiting time at the Rt 82 Footscray Terminus with Connie changing the pole Jul 1972 DFC81 VR 52 at the Rt 82 Moonee Ponds Terminus with the crew chatting 7-12-1974 DFC82 VR 52 on Rt 82 on the reserved track in Raleigh Rd Ascot Vale Jan 1974 DFC83 VR 53 on Rt 82 in Leeds St Footscray about to turn into Hopkins St April 1976 DFC84 VR 53 on Rt 82 in Droop St Footsray Jan 1974 DFC85 VR 700 on Rt 82 in Droop St Footsray at Hopkins St c1978 DFC86 Z 52 in MTA livery on Rt 19 in Elizabeth St near Bourke St c1985 DFC87 VR 52 at the Rt 82 Moonee Ponds Terminus Jul 1972 DFC88 VR 53 at the Rt 82 Footscray Terminus Jan 1974 DFC89 VR 52 freshly outshopped from the workshops and W7 1011 at the Bourke St Terminus with 52 on display for the 1968 railway exhibition 1968 DFC90 Painting of W class 369 in Chocolate & Cream c1930 DFC91 Charing Cross, Bendigo at night c1965 DFC92 Ballarat ? c1965 DFC93 Bendigo 18 on an AETA tour in McCrae St near Tramway Ave c1965 DFC94 View from the roof of a tram in the body shop at Preston Workshops 1977 DFC95 View from the roof of a tram in the body shop at Preston Workshops 1977 DFC96 View from the roof of a tram in the body shop at Preston Workshops showing the panto on 546 1977 DFC97 Interior view of Carlton Control Centre showing desk and wall panel c1968 DFC98 W2 493 on Rt 55 in Kingsway outside South Melb Depot Aug 1973 DFC99 W2 496 in Sturt St at Kingsway on Rt 1 Jul 1973 DFC100 Z class truck c1975 DFC101 Z3 116 in Bourke St at King St as new c1979 DFC102 Bob Prentice on tour c1968 DFC103 SW6 900 as an advertising tram for Newsday at night 1969 DFC104 597 Jul 1973 DFC105 W2 480 on Rt 3 passing under the railway bridge at Caulfield Oct 1972 DFC106 Interior view of Carlton Control Centre showing desk c1968 DFC107 SW6 856 on Rt 77 at night Jul 1973 DFC108 W2 496 in Sturt St at Kingsway on Rt 1 Jul 1973 DFC109 PCC 980 on a tour at South Melb Depot c1968 DFC110 SW6 856 on Rt 77 at night Jul 1973 DFC111 View from the roof of a tram in the body shop at Preston Workshops showing the panto on 546 1977 DFC112 Dandenong Rd from Chapel St Nov 1968 DFC113 A Z class car turns from Gertrude into Nicholson St c1990 DFC114 SW6 900 as an advertising tram for Newsday at night 1969 DFC115 Port Melbourne Station showing Centennial bridge and station building prior to closure. 10-1987 DFC116 Port Melbourne station with train prior to closure, looking south 10-1987 Demonstrates the work of David Frost in photography and or collecting slides.Assembled album in a black presentation folder of 116 colour slides, 6 slide sleeves, collected or photographed by David Frost. Many are TMSV or Windsor Publications slides. All photographs have been scanned and placed on the Museum's G drive. A list of all photographs with details has been compiled. melbourne, tramways, trams, vr trams, elwood, st kilda light rail, port melbourne, opening, elwood depot, buses -
 Melbourne Tram Museum
Photograph - Queen Elizabeth Royal Tram Z3 158 - set of 8, David Frost, 26-10-2011
The photos show Z3 158 dressed for the Royal Visit of 26-10-2011, to transport Queen Elizabeth II from Federation Square to Government House Drive. The 3rd photo shows the Breakdown / recovery truck R10 alongside the tram at one point. Photos also show interior posters and of it running a route 55 Domain Interchange in William St after the event. Image 9 - The Age report about the tram and the nominated driver - 25-10-2011 - Z-class a tram fit for a Queen.Provides a series of photographs of the Queen's visit to Melbourne in 2011.Set of 8 colour prints of Z3 158 as the Royal tram, printed on Kodak Royal Papertrams, tramways, royal visit, royal tram, z3 class, tram 158, princes bridge, r10, domain interchange, route 55, the age -
 Melbourne Tram Museum
Photograph - Set of 12 - construction of King St overpass in Flinders St, 1959
Photos show the construction of King St overpass in Flinders St which was part of the project to construct a bridge over the Yarra River and provide a new southern outlet road between the city and eventually St Kilda Junction. The overpass construction was commenced in 1959 with tramway works first commencing. It was demolished in 2005. 1 - looking west at Market St. 2 - looking east from Spencer and Flinders St with the railway viaduct behind. 3 - Tram lines diverted onto the new overpass. Note the hand-powered overhead tower on the left behind the compressor. 4 - Tracks partially diverted. 5 - Looking east at Spencer and Flinders St with a Dunlop tyre truck in the view. 6 - prior to the diversion onto the new bridge. 7 - Looking east near William St. with W2 451 (Route 48, North Balwyn) in the view. 8 - Bridge works near King St. Original tracks still in use. 9 - Looking east prior to the introduction of the temporary tracks on the south side of the new overpass. 10 - SW6 852 and a W2 on new overpass trackwork - old trackwork being demolished. 11 - Cross over at Spencer St in Flinders St, prior to change over. 12 - Looking west at Flinders and Spencer St with SW6 853 turning into Spencer St.Yields information about the construction of the King St overpass in Flinders St during 1959.Set of 12 black and white prints of the construction of the King St overpass in Flinders St.trams, tramways, flinders st, king st overpass, construction, bridges, w2 class, sw6 class, tram 451, tram 853, tram 852 -
 Melbourne Tram Museum
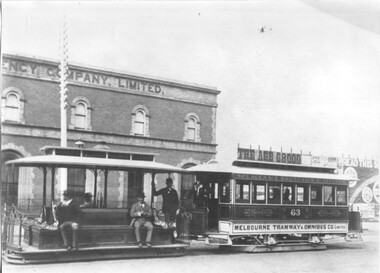
Photograph - Black and white - cable tram Collins St at Spencer St, John William Lindt, c1890
Photo of a cable tram set - saloon trailer No. 63 in Collins St at Spencer St. The grip car is not fitted with staunchions and there are no destination signs on it. The trailer is lettered for the "Spencer & Brunswick St Fitzroy" route with its rocker panel highly decorated. In the background are a building for the Agency Company Limited and an advert on a hoarding for The Age newspaper. The grip man and conductor are standing on their respective platforms. Photo possibly soon after the line opened on 2-10-1886. Photo by John William Lindt c1890 - see reference. Yields information about cable trams in Collins St.Black and white photograph on paper.trams, tramways, cable trams, collins st, spencer st, tram 63, j w lindt -
 Melbourne Tram Museum
Photograph - Black and white - cable tram Bourke & Swanston Sts
Photo of a cable tram set - at the corner of Swanston and Bourke St. The saloon trailer is possibly No. 162 and is lettered for the Collingwood and Clifton Hill route. The grip car is yet to be fitted with staunchions on its sides or destination signs. In the background is the Leviathan store, Simons Hotel and Coles Book Arcade. Photo possibly soon after the line opened on 10-8-1887.Yields information about cable trams in Bourke St.Black and white photograph on paper."Bourke & Swanston Mel" in bottom right hand corner.trams, tramways, cable trams, bourke st, swanston st, leviathan store -
 Bendigo Historical Society Inc.
Document - BILL ASHMAN COLLECTION: CORRESPONDENCE
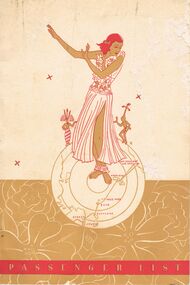
S. S. Mariposa Souvenir Passenger List. Sailing from Los Angeles Harbor, 10 P.M., March 29, 1938. Lists the names of the crew and First Class Passengers including Mr. R. H. S. Abbott. Front of the Passenger List has a circle on the front with the route from Los Angeles to Melbourne. In the centre of the circle and extending above it is an island girl dancing. The bottom part is coloured brown with white floral pattern and Passenger List on a reddish background.sciences, bill ashman collection - correspondence, s s mariposa souvenir passenger list, the oceanic steamship company, r h s abbott -
 Melbourne Tram Museum
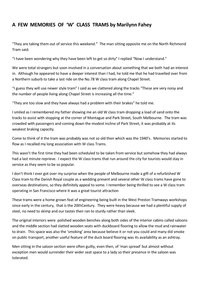
Document, Marilynn Fahey, "A few Memories of "W" class tram by Marilynn Fahey", 2015
Two page article or manuscript titled "A few Memories of "W" class tram by Marilynn Fahey". Article used in a City of Port Phillip book during the 2015 Seniors Festival and in an exhibition during 2016. Describes the writers view of the demise of W class trams in Chapel St, the tramcars themselves, their ambiance, that one went to Denmark, conductors, use, operations, operation of the trams on route 78. The Museum provided a number of photographs to the City - see emails with Anne Scambary for use in a digital story exhibition. Item as a word document provided by Anne as the basis of the photo request. The first date for the Speaking stories: Digital histories 2016 is at the St Kilda Town Hall Foyer, 10 October - 17 October, 8.30AM- 5PM. Kind regards Anne Scambary Art & Heritage Programs , Vibrant & Creative City T: 9209 6416 , W: www.portphillip.vic.gov.au Private Bag 3, St Kilda, VIC 3182trams, tramways, route 78, w class, articles, stories, chapel st, conductors