Showing 2893 items
matching £1 note
-
 University of Melbourne, Burnley Campus Archives
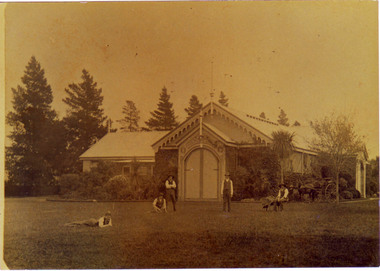
Photograph - Sepia print, A.P. Winzenried, Pavilion, c. 1890
Notes by E.B. Littlejohn, "Note that the early Pavilion was built with 2 large entrances to allow horse drawn carriages to drive through. Entrance at centre of picture is on eastern side, not the front entrance which can be seen at extreme right and is well established." Note by T.H. Kneen, "The Pavilion early 1890's." The photo was adapted for use on the Diploma Certificate of the Royal Horticultural School, Burnley, Department of Agriculture.Copy of sepia photograph made by A.P. Winzenried for possible use in, "Green Grows Our Garden. Horse and cart and five students, 1 with a wooden wheelbarrow, standing and reclining on the lawn in front of the Pavilion.a.p. winzenried, green grows our garden, pavilion, horse and cart, east entrance, diploma certificate, students, students working outside, lawn -
 University of Melbourne, Burnley Campus Archives
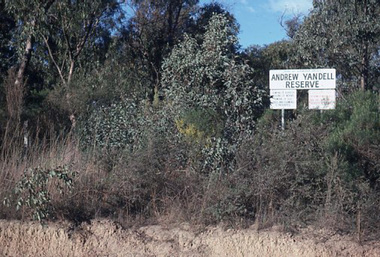
Slide - Colour slides, Yandell Reserve, 1975
8 slides dated "Aug 75." Excursion to Yandell Reserve. 1 labelled, "Looking down St. Helena Road from in front of Yandell Reserve (Note all the trees.)"excursion, yandell reserve -
 University of Melbourne, Burnley Campus Archives
Photograph - Colour slides, Visit to Japan, 1962
(1) Photographs of what appears to be a visit to Japan and dated 24.02.1962. (2) 2 Japanese pamphlets one of Aichi Prefectural Landscape Planting Center which has a tracing paper overlay in English. Note on envelope they were stored in "> Jim P(Pleasance?) from CJ."japan, pamphlets, aichi prefectural landscape planting center -
University of Melbourne, Burnley Campus Archives
Administrative record, Andrew Smith et al, University of Melbourne Institute of Land and Food Resources Burnley Campus Gardens Staffing 2003-04, 2003-2005
mainrenance, garden maintenance, property & buildings, staff descriptions, transition -
University of Melbourne, Burnley Campus Archives
Document - Invitation list and Speech, Andrew Smith, Geoff Olive, 1999
geoff olive, andrew smith, retirement party -
University of Melbourne, Burnley Campus Archives
Booklet, Home Garden Design, 1983.1997
short courses, home garden design, students, john patrick, ivo dean, victorian college of agriculture and horticulture, vcah -
University of Melbourne, Burnley Campus Archives
Administrative record, Burnley College Advisory Committee, 1978-1982
constitution, course information, burnley college advisory committee minutes, agricultural colleges amendment act, education -
 University of Melbourne, Burnley Campus Archives
Document, Practical Tree Management Courses, 1978-1982
Led to Arboriculture courses at Burnleyarboriculture, tree maintenance, urban tree management, courses -
University of Melbourne, Burnley Campus Archives
Booklet, Braeside Metropolitan Park, 1985-1987
parks, hon a mccutcheon -
University of Melbourne, Burnley Campus Archives
Journal, The Garden, 2019
gardening -
Friends of Ballarat Botanical Gardens History Group
Work on paper - Adam Lindsay Gordon Plaque, Mrs Ida Buckley to Mayor of Ballarat, 8/01/1934, 8/1/1934
Mrs Ida Buckley wrote to the Mayor of Ballarat concerning a plaque in memory of Adam Lindsay Gordon, where it should be positioned within Craig's Hotel. Mrs Buckley requests copies of the Courier when there is an account of the unveiling of the plaque.The Adam Lindsay Plaque Is part of the Gordon history in Ballarat, considered important in 1934. It is interesting to note that Mrs Ida Buckley was married to the son of the highly respected Buckley&Nunn Department store, an important part of the Melbourne retail scene until well into the twentieth century. 1 typed sheet of correspondence of Mrs Ida BuckleyOne correction in black biro "Nunn".john garner, doctor, john garner collection, ballarat botanical gardens, friends of ballarat botanical gardens, mrs ida buckley, james fennings, adam lindsay gordon plaque, australian poet, mr angus greenfield, mr darling, ballarat courier, westminster abbey, gardens, ballarat -
Friends of Ballarat Botanical Gardens History Group
Work on paper - North Gardens Wetlands Information Notes, Friends of Ballarat Botanical Gardens (Guiding Friends Group), C 2001
Important information about the North Gardens Wetlands and the primary objective of improving storm water quality.This project was completed in March 2001 and besides its ecological importance, it provides a destination at the northern end of the Gardens, creates social linkages between various environmental groups as well as improving the aesthetic standards of the site.1 page set out with subheadings.Nonenorth gardens, north gardens wetlands, north gardens wetlands project, ballarat botanical gardens, friends of ballarat botanical gardens, john garner, regional indigenous plants, aquatic and terrestrial plants, storm water, john garner collection, gardens, ballarat, garner -
Friends of Ballarat Botanical Gardens History Group
Work on paper - Crown Land Reserves Improvement Program, Two Projects, C 2001
These documents provide detailed information about improvements to the Adam Lindsay Gordon Cottage and plans for the Removal of Wishing Well and New Water Feature and Path Re-Alignment which has not been completed.These documents give details on how improvements to the Adam Lindsay Gordon Cottage Area would enhance the site and planning for a new water feature and the major re-alignment of paths within the Gardens.3 sheets of paper. 1. entitled Crown Land Reserves Improvement Programme 2. Diagram listing the costings for the Adam Lindsay Gordon Cottage Area 3. Costings listed for the Removal of the Wishing Well and New Water Feature and Path Re-Alignment.p.1 question mark in black biro, end of 4th line. p.2 notes written in blue biro below the diagram are most relevant.john garner, doctor john garner, ballarat botanical gardens, friends of ballarat botanical gardens, crown land reserves improvement programme, adam lindsay gordon cottage area, the removal of the wishing well and installation of new water feature, costs, clips grants programme., gardens, ballarat, john garner collection -
Friends of Ballarat Botanical Gardens History Group
Work on paper - Victoria Park Precinct, City of Ballarat, Notes on the Parkland in the Nineteenth Century, Unknown
This page gives information about Victoria Park essentially from 1884-1894.Some idea is given here of Victoria Park back in history and plans for the planting of trees.1 page headed Victoria Park with a rough sketch of the Parkland area. There is an unfinished sentence at the bottom of the page and no page to follow.Nonejohn garner, doctor john garner, weston bates, george longley, curator, ballarat botanical gardens, night soil, ballarat council parks and gardens committee, gum trees, pines, victoria park, history friends of ballarat botanical gardens, john garner collection, gardens, ballarat -
 Mrs Aeneas Gunn Memorial Library
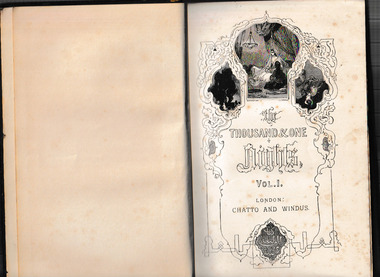
Edward Stanley Poole, The thousand and one nights, commonly the Arabian nights' entertainments v.1, 1912
The thousand and one nights, commonly called, in England, The Arabian nights' entertainments: a new translation from the Arabic, with copious notes by E.W.Lane, illustrated from original designs by W.Harvey. London, C.KnightsIll, p.555.non-fictionThe thousand and one nights, commonly called, in England, The Arabian nights' entertainments: a new translation from the Arabic, with copious notes by E.W.Lane, illustrated from original designs by W.Harvey. London, C.Knightsfables - arabic, fairy tales - arabic -
Canterbury History Group
Ephemera - 8 McGregor Street Canterbury, 2001
Real estate advertisement for the sale by auction of "Ashford" 8 McGregor Street Canterbury, on Saturday 1 September 2001. Includes coloured photographs of the Interior and exterior of the house and floor and site plans. A note on the flyer by Robin Kelly indicates that the property was passed in at $670, 000 and sold later.canterbury, mcgregor street, ashford, edwardian style, maling road -
Canterbury History Group
Ephemera - 6 McGregor Street Canterbury, 1/02/2011 12:00:00 AM
Real estate advertisement for the sale by auction of "Arundel Manor" 6 McGregor Street Canterbury on Saturday 25 February 2011. Includes coloured photographs of the interior and exterior of the property and floor and site plans. A note on the flyer by Robin Kelly indicates that the property was passed in at $1, 458, 000 and later withdrawn from sale.canterbury, mcgregor street, arundel manor, edwardian style, swimming pools -
Canterbury History Group
Ephemera - 14 McGregor Street Canterbury, [2007]
Real estate advertisement for the sale of 14 McGregor Street Canterbury. Includes coloured photographs of the interior and exterior. A note by Robin Kelly reports the sale for $1, 420, 000 but no date.canterbury, mcgregor street, edwardian style -
Wonga Park Community Cottage History Group
Work on paper - Newsletter, Wonga Park & District Residents' Association News & Notes March 1993
-
 Beechworth RSL Sub-Branch
Certificate, c. 1923
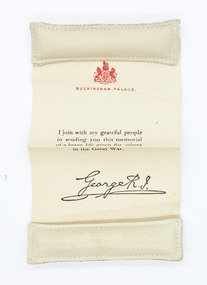
This cylinder was constructed for the postage of two documents (0060.2 and 0060.3), to notify the family of Pte James Thomas Newton (945215) 3rd Battalion, Australian Imperial Force, of his passing. The documents appear to be addressed to M A Newton, though James Thomas Newton's next of kin is listed as David Newton, his father. James Thomas enlisted on 18 July 1916, joining the 3rd battalion, first in "B" Company and . James Thomas' service records indicate that he died on 9 October 1916 in a field hospital, Liverpool, NSW. He was ailed by bronchial pneumonia for 13 days before succumbing to the illness. A telegram suggests that the family were notified on the day of his death and received the cylinder and documents in the post 6 years later. Cream coloured card paper rolled into scroll for transport inside card cylinder (0060.1). Note bears embossed stamp of the British crest above red printed text "BUCKINGHAM PALACE". A signature from King George V is at the bottom of the text.Handwritten signature "George R. I."post, postal, postage, death notice, certificate, private james thomas newton, 3rd battalion, australian imperial force, first world war, world was i, world war 1 -
 Melton City Libraries
Document, Darlingsford land title, 1863
Thomas Bell Darling purchased 176 acres from the Toolern Creek to Ferris Road. A house and bluestone barn/stables were built. The property was owned by Ralph Parkinson, followed by Richard Manning. SUMMARY – Darlingsford – Auction 1910 Darlingsford – Auction 1910 Melton Express October FRIDAY, October 28th At Three O’Clock At the RAGLAN HOTEL, MELTON SUBDIVISIONAL SALE of the DARLINGSFORD ESTATE, MELTON. Having a long frontage to the TOOLERN CREEK. In the Estate of the late RICHARD MANNING’ W. S. KEAST and L.A. FAIRBAIRN & CO., Auctioneers (in conjunction). Have received instructions from R.F. and J.L. Robertson, executors of Richard Manning deceased to offer by Public Auction, property almost adjoining Melton township, and having a frontage to the Toolern Creek, subdivided in to four lots as under:- Lot 1. – The homestead block containing 176 acres, being portion A, section 11, parish Kororoit together with the improvements, which consist of a 6-roomed stone house, milking shed, dairy, U.G. tank. Lot 2 – 177 acres 2 rood 23 perches, being Crown portion B of section 11 parish Kororoit. This block adjoins the homestead and is partly fenced. Lot 3 – 187 acres, Crown allotment C, section 11, parish Kororoit. adjoining the above lot. Lot 4 - 157 acres 1 rood 27 perches, being Crown allotment 9, section 12, parish of Kororoit. This block is only divided from the above lots by road, and adjoining Messrs. McVean and Gaitskill’s properties. This is one of the best known properties in the Melton district as a cultivation an grazing form, and its close proximity to the township makes it a very valuable, and portion of which could be cut into township blocks and should command a ready sale. For absolute sale. Terms- one fifth cash, one fifth in eight years, balance in 7 years with interest a the rate of 4 1/2 percent. Plan on application For further particulars apply W.S. KEAST, 610 Collins street, Melbourne; and L.A. FAIRBAIRN & Co., St James-buildings, Williams street, or at Bacchus Marsh; and as to the title, Dugdale and Creber, St. James-buildings, William Street Melbourne. Express November 5, 1910 On Friday last, Mr W.S. Keast and Messrs L.A. Fairbairn & Co., in conjunction, offered at the Raglan the Manning Estate known as Darlingsford, comprising of 700 acres, divided into four lots. Lot 4 was submitted first and passed in at L8 per acre. Lot 1 was then put up and went up to L13 per acre, at which it was also passed in. Lot 3 was next offered, and there being no bid was also passed in. Lot 2 was not offered. Express March 18, 1911 The Manning Estate of Darlingsford 600 acres was sold to Mr. Ernie for an undisclosed price. Note: Map KOROROIT COUNTY OF BOURKE Crown Grant Section 11 Portion A Thomas. B. Darling 176 . 0 . 0 acres on 29.3.1853 Lot 1 Portion B A. Russell 170 . 0 . 0 acres on 29.3.1853 Lot 2 Portion C Peter Inglis 176 . 0 . 0 acres on 29.3.1853 Lot 3 Section 12 Portion 3 P. Inglis 157 . 1 . 27 acres on 17.17.1863 Total 176 170 176 157. 1.27 679 . 1.27 acres November 5th 1910 On Friday night last Mr W S Keast and Messrs L A Fairbairn & Co, in conjunction offered at the Raglan Hotel the Manning Estate known as Darlingsford, comprising of 700 acres, divided into four Lots. Lot 4 was submitted first, and was passed in at L8.0.0. per acre. Lot 1 was then put up and went to L13.0.0. per acre at which it was passed in. Lot 3 was next offered, and then Lot 3 was next offered, and then being no bid was passed in. Lot 2 was not offered. October 22nd Notice of sale. 700 acres of splendid land close to the railway station. Divided onto 4 Lots 3 of which are maiden land and the whole of the acres is chocolate soil. No 1 Lot belonged to the late Mr Ralph Parkinson, and for years was liberally supplied with manure and crushed bones, and is capable of producing many crops.. The property being sold to wind up the Estate. Gisborne Gazette Friday December 17th 1911 Mr Sharp has sold his farm at the back of the township to Mr. E Barrie; price L15/10/ per acre. Agreement between Thomas Bell Darling and Ralph Parkinsonlocal identities -
 Melton City Libraries
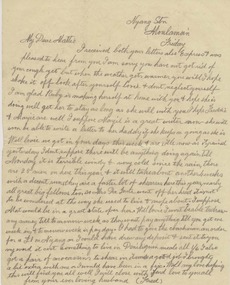
Letter, Letters from Fred to Mattie, 1910-11, 1913-14, 1916, 1920
Letters sent to Martha (Mattie) dated from 1907 to 1920. Each letter is an edited version of the original pertaining to aspects of Fred Myers life as a shearer. Cobran Stn via Deniliquin Thursday Sept 1st 1910 …I got a reply from Eynesbury and a favourable reply, it starts on the 13th Oct so I will have plenty of time to get there, in fact far to much as we will finish here in a month full time so that will leave a fortnight to spare. We got rain here at last and it has put us back considerably as we only worked Monday. I have been idle ever since. We will probably start again Saturday. The weather has taken up nice and fine again…. I hope it will keep up to the cut out now I have 800 sheep shorn up to date and am fifth among thirty men so I’m doing well I think. Did you get the pound I sent? I’m sending two more this time, which I drew on Saturday. I don’t like sending too much as there is a chance of it going astray. Postcard Cobran Sept 18 1910 Just a note to let you know I am all right. I was disappointed not getting a letter yesterday, Saturday…I won’t get it now till next Saturday. We have three weeks here yet. I am sending 2 and tell me if you got the other 1. Cobran Stn via Deniliquin NSW Sunday 21st August (1911) ..I’m having a good time here, a good cook and the best of everything, no fires to lights or kettles to boil just get up and wire in but plenty of hard work. The sheep here a pretty rough but much better than Wandook. I am well among them here we had a little rain on Friday but not enough to stop us so we have got one full week in and the weather is now lovely I have been basking in the sunshine all morning and feel strong and fit as a fiddle. They are all a grand lot of men here I only knew one out of the lot but now them all pretty well now. We have a bit of a concert here every night almost. There are a few good singers here and we also had a phonograph up from the station with all the latest records. We have has two dances amongst ourselves, very boisterous affairs indeed they do make the dust fly. I have not ventured to take part in them yet and don’ think I will either. I get enough dancing all day long and besides I have to furnish the music. You ought to see them going when I rattle up the concertina they do make the dust fly. Sample of letters written by Fred Myers to his wife Mattie Myerslocal identities -
 Kilmore Historical Society
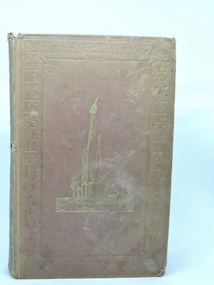
Himalayan Journals, Himalayan Journals or Notes of a Naturalist, Vol. 1 of 2, 1854
Notes of a naturist in Bengal, the Sikkim, and Nepal Himalayas, the Khasia Mountains, etc. Dedicated to Charles Darwin by his affectionate friend, the author.Red/brown cloth-covered hardback book. Embossed design around borders of front and back covers, front cover shows central image in gold colour. Maps and engraved illustrations. Cover worn & stained. Fair condition.Sticker inside front cover, 'Upham & Beet/(late Redwell)/46,New Bond Street'. On 2nd flyleaf '83'. Title page has small cut out section top right corner.kilmore mechanics institute library. -
Tarnagulla History Archive
Photograph - Photograph: Group of people, Tarnagulla, c.1905
Williams Family Collection. An original photograph, mounted on card backing. Monochrome photograph depicting a group of men and children in an outdoor setting. Pepper tree foilage in background. Some pieces of cricket equipment in foreground. A copy of this photo in the collection (THA-2019.0196) is accompanied by a note which identifies some of the subjects as: Left to right: Children in tree: none identified. Back row of men 1. _________ 2. ________ 3. _______ 4. Mr. Martin 5. George Ramm 6. Mr. Davies 7. Mr. Minton Middle row of men: 1. _______ 2. Jim Dyer 3. ________ 4. _________ 5. Arthur Newman 6. J. Duggan 7. Runting 8. Ted Toole 9. Lew Williams 10. ____________ Front: 1.____________ 2. ____________ 3. with child, Nicholls, married Emily Renshaw, Dave Nicholls? Handwritten on reverse: "L.Williams...Leo Fitzgerald, Clyde House, 182 Collins St, Melbourne".tarnagulla -
 Parks Victoria - Wilsons Promontory Lightstation
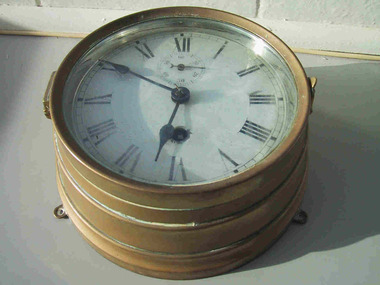
Clock
The brass wall clock retains its key. It was provided by the Department of Shipping and Transport in about 1900 and is original to the lightstation. It was mounted in the watchroom, a small extension at the front of the lighthouse (later radar station), where lightkeepers completed many of their reports and recorded radio schedules, weather observations, distress calls and other data. Good, reliable clocks were also essential for maintaining a strict roster of hours for winding the clockwork mechanism that kept the lens active. The name of the clock’s manufacturer has not been determined. More specifically it was used for logging radio schedules that were made at five minutes to midday, everyday, and for recording the times of weather observations, distress and any other calls that came in. AMSA notes that ‘Lightkeepers who used this clock were said to have polished and wound it every week while it was in use until the 1990s when its otherwise impeccable time keeping mechanisms finally became inaccurate’.The brass clock at Wilsons Promontory illustrates the importance of timekeeping in a nineteenth century lighthouse. Despite its slightly chipped face, the timepiece has first level contributory significance for its historic association with the watch room and confirmed provenance. The significance of this clock also lies with its complete provenance..1. Brass clock with a circular white face and black roman numerals. Three brackets at back to attach to wall. Face of clock is covered by a hinged glass cover with a fastener. .2. key. Roman numerals on face of main clock. "1-12" On inner dial "10-20-30-40-50-60" -
 Tarnagulla History Archive
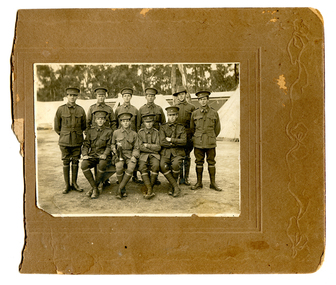
Photograph: Soldiers from Tarnagulla & district, c. 1914-1918
David Gordon Collection. Original sepia photograph (mounted on card backing) of soldiers in uniform posed in a military camp. Subjects are residents of Tarnagulla and other towns in surrounding district. All subjects served in First World War, dating the image to circa 1914-1918. A note accompanying a copy of this photo (THA-2019.0024) gives the following names: (Left to Right) Back Row: 1. ______________ 2. _______________ 3. Bert Whimpey 4. Bill Langan 5. Will Kilgour 6. Claude Whimpey 7. _______________ 8. ________________ Front Row: 1. Perce Ison 2. Arthur Whimpey 3. Syd Akers 4. Dave Roper -
Tarnagulla History Archive
Postcard: Tarnagulla soldiers, c. 1914-1918
David Gordon Collection. Same image as THA-2019.0203 and THA-2019.0023. Names from those items: Accompanied by a note that gives the following names: (Left to Right) Back Row: 1. Jim Browbill (Simpson's Creek) 2. Geo. Whyte (Tarnagulla) 3. Ken Bramley (Arnold's Bridge) 4. Geo. Riordan (Arnold's Bridge) Third Row from front: 1. Harold Spedding 2. Hewie Spedding (Laanecoorie) 3. Jack Graham (Murphy's Creek) 4. Syd Akers (Tarnagulla) 5. Geo. Corrie (Tarnagulla) Second row from front: 1. Geo. Clark (Llanelly) 2. Allan Mitchell (Llanelly) 3. Sergt. Anderson (Laanecoorie) 4. Jack Mitchell (Llanelly) 5. Will Kilgour (Tarnagulla) Front Row: 1. Fred Jackson (Tarnagulla) Subjects are residents of Tarnagulla and other towns in surrounding district. All served in First World War, dating the image to circa 1914-1918.military -
 Melbourne Legacy
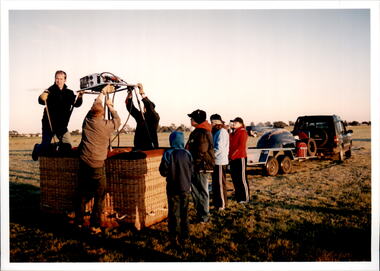
Photograph - Junior legatee outing, Ballooning in Benalla, 2003
Legacy have many programs to send young junior legatees on activities, camps and outings. The photos show preparations for a balloon ride. There are more photos of the event, a note with the photos say it was 'Ballooning weekend at Benalla 2003'.A record of a Legacy providing experiences for the junior legatees.Colour photo x 4 of a balloon basket being prepared for take off in a field.Printed on the back 'No.1' to 'No.4' which are the image numbers.junior legatee outing, ballooning