Showing 3524 items matching " tram 3"
-
 Melbourne Tram Museum
Document - ASEA Action - Tramcar Restaurant, ASEA, 3-9-1983
Page 2 of the ASEA journal dated 3 September 1983 describing the 415V, 20kVA 3 phase power supply to the Melbourne Tramcar Restaurant operated by the Colonial Tramcar Restaurant. Quotes Paul Stephen-Daly of the Company. Notes the issues in the variations in the power supply to Melbourne trams. Has a photo of the tram and an interior photo with people seated.Yields information about construction of the first Tramcar Restaurant in Melbourne.Newspaper cutting from the ASEA Action magazine September 1983 - Tramcar Restauranttrams, tramcars, colonial tramcar restaurant, restaurant tram, power supply, asea -
 Melbourne Tram Museum
Photograph - Set of 3 colour prints - St Kilda light rail, George Bishop, April 1999
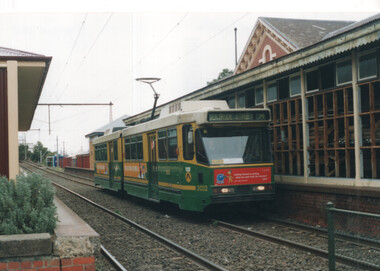
Set of three photographs taken by George Bishop on April 1999 - All route 96 - East Brunswick to St Kilda Beach 1 - B2 2032 at the former Albert Park Railway Station 2 - B1 2001 at Albert Park 3 - B2 2057 Albert ParkYields information about the operation of Melbourne trams during early 1995.Set of three colour prints printed on Kodak paperDetails of the photograph and photographer on the rear in ink.trams, tramways, st kilda, b2 class, b1 class, tram 2032, tram 2001, tram 2057, albert park, st kilda light rail, light rail -
 Melbourne Tram Museum
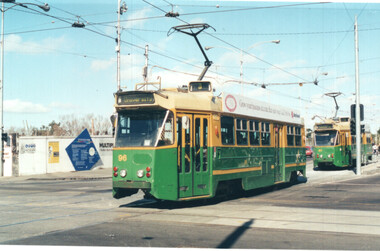
Photograph - Set of 6 colour prints of trams at Corner of Flinders and Swanston Streets, George Bishop, c1999
Set of six colour photographs of trams at the corner of Swanston and Flinders Streets. In the background can be seen the construction of the Federation Square project which commenced in 1999. 1 - Z 96 (Route 3, University) at Flinders and Swanston Streets. 2 - Z 37 (University route 5) 3 - SW6 888, City Circle, westbound. 4 - Z3 140 (East Coburg Route 1) - would appear that the car is not doing their hook turn properly 5 - B2 2037 westbound (Route 70, City Flinders St) 6 - Z 41 (Route 72, University)Yields information about the operation of Melbourne trams during the late 1990s.Set of six Colour prints printed on Kodak paperDetails of the photograph and photographer on the rear in ink.trams, tramways, z3 class, z class, tram 96, tram 37, city circle, tram 888, hook turns, tram 140, b2 class, tram 2037 -
 Melbourne Tram Museum
Album - Ron Scholten Slide Collection, Ron Scholten
Photo - see pdf file for further information. Number Brief Description RSC1 PCC 1041 at the gates of Preston Workshops on a test run without it’s trolley retriever RSC2 PCC 1041 in Glenhuntly Road on Route 67 en route to Carnegie crossing the Railway Gates at Glenhuntly Station RSC3 W2 482 stored at Malvern Depot with Olympic Park on the Destination RSC4 Cable Car Set 64 in Swanston St outside Princess Bridge Station in Bound with open top Double Deck Bus, Trak Motors ? Departing from Flinders St Station RSC5 W3 669 in St George Rd at Sumner St en route to Preston Workshops for scrapping RSC6 Cable Car in Lygon St en route to Carlton RSC7 PCC 1041 turning from St Georges Rd into Miller St to enter Preston Workshops RSC8 Flinders St Station with cable cars RSC9 PCC 1041 in strife on it’s maiden day in service. Trams on route 88 delayed in Queens Parade Clifton Hill RSC10 Flinders St at William St with Cable Cars RSC11 L 104 on the fan of the new shed at Malvern Depot on a TMSV tour RSC12 Cable Set 1 after it’s restoration at Preston Workshops on the fan near the front gate RSC13 X1 466 at a suburban terminus of the Footscray System RSC14 X2 680 at Point Ormond Terminus RSC15 An ex Launceston Tram at the outside terminus of the Penny Royal Complex Tramway in Launceston RSC16 Q 148 at Preston Workshops awaiting disposal RSC17 Elizabeth St with Cable Cars RSC18 Elizabeth and Bourke St corner outside the GPO with cable cars RSC19 Collins St with Cable Cars RSC20 A photo taken from the observation deck of the ICI building showing a view of Parliament house with a w class tram in Nicholson St RSC21 Auburn Horse car with a posed photo of all the tramwaymen employed RSC22 Cheltenham Double Deck Horsecar with a full load of passengers RSC23 City of Northcote cable trailer 3 at a terminus RSC24 City of Northcote Cable cars passing in High St Northcote RSC25 St Kilda Rd at Princes Bridge with Cable Cars RSC26 Flinders St with Cable Cars RSC27 Cable Cars RSC28 Bourke St looking towards Elizabeth St from Queen St RSC29 Cable cars in Bourke St at Elizabeth St looking East RSC30 Cable cars in Elizabeth St at the terminus at Flinders St RSC31 Cable cars in Bourke St at Swanston St looking west RSC32 Cable cars in Swanston St at Flinders St looking North RSC33 Cable cars in Collins St near Russell St RSC34 Cable cars in Elizabeth St at Bourke St RSC35 Cable cars in Collins St at Elizabeth St RSC36 Cable Cars in Swanston St at Flinders St RSC37 Cable cars in Collins St RSC38 Cable Cars RSC39 Cable cars in St Kilda Rd near Princes Bridge RSC40 Cable cars in Collins St East of Swanston St RSC41 Cable cars in Spring St outside Parliament house RSC42 K 92 in M&MTB Chocolate and cream livery but with a P&MTT Destination box on Route 14 RSC43 Thornbury depot viewed from Miller St and St Georges rd. Two W2 class cars are laying over between the peaks RSC44 Z3 201 in Met Livery passes D1 3510 in new M Tram livery. A Staff member in uniform stands in the doorway. Dandenong Rd RSC45 D1 3530 advertising Heinekin Super Golf on Route 55 in Royal Park RSC46 D1 3504 in M Tram livery on the reserved track in Matthews Ave near Essendon Airport showing Route 81 Travancore . I suspect it is a private enthusiasts charter due to the Malvern W class run number in the rear windscreen RSC47 D1 3504 on Route 64 in Dandenong Rd in M Tram Livery RSC48 D1 3504 in M Tram Livery at Airport West Terminus RSC49 D1 3504 in M Tram Livery in Union Rd outside the Showgrounds RSC50 D1 3504 at West Maribyrnong Terminus in M Tram Livery RSC51 D1 3503 in M Tram Livery in Malvern Depot RSC52 SW6 960 and VR 53 in Harbour Esplanade for the NMEL&T Co Centenary RSC53 Hawthorn Tramways Trust 32 in Harbour Esplanade for the NMEL&T Co Centenary RSC54 VR 53 & B 2042 in Harbour Esplanade for the NMEL&T Co Centenary RSC55 VR 53 & C 3016 in Harbour Esplanade for the NMEL&T Co Centenary RSC56 NMEL&T Co 13 usually V214 in Harbour Esplanade for the NMEL&T Co Centenary RSC57 NMEL&T Co 13 usually V214 at Preston Workshops for the NMEL&T Co Centenary RSC58 Hawthorn Tramways Trust Lettering on HTT 32 in Harbour Esplanade for the NMEL&T Co Centenary RSC59 Hawthorn Tramways Trust 32 in Harbour Esplanade for the NMEL&T Co Centenary RSC60 Hawthorn Tramways Trust 32in Harbour Esplanade for the NMEL&T Co Centenary RSC61 Hawthorn Tramways Trust 32 in Harbour Esplanade for the NMEL&T Co Centenary RSC62 NMEL&T Co 13 usually V214 at Preston Workshops for the NMEL&T Co Centenary RSC63 W2 516 and another on route 59 wait to shunt at Essendon Airdrome Terminus as W2 571 on route 49 departs. This was the last day of operation. RSC64 Australia’s First Electric Tram at Box Hill with Tramwaymen including H J Hilton who is in the centre RSC65 W2 484 en route to St Kilda Junction and another wait for passengers after a race meeting at Caulfield Racecourse RSC66 X1 463 on the Footscray system en route to Russell St RSC67 Geelong 35 on Chilwell Route, Formerly HTT 13, M&MTB 119, then Bendigo 1 and Ballarat 37 RSC68 P&MTT 4 on Opening Day of the system in Glenferrie Rd RSC69 Bendigo 6 in McCrae St near the Depot end route to North Bendigo RSC70 P&MTT 4 in Glenferrie on opening day of the System RSC71 Scrubber 3 stripped and awaiting scrapping at Preston Workshops RSC72 Scrubber 4 at South Melbourne Depot RSC73 Q 191 & 139 at Preston Workshops awaiting scrapping RSC74 Rail Grinder 3 at Preston Workshops as purchased from Sydney RSC75 Y 469 waits to shunt at Wattle Park Terminus as Y1 613 departs on driver training duties RSC76 VR 53 on the outside roads at Essendon Depot RSC77 W5 796 with three doors and square windows running out of Brunswick Depot in Cameron St, with a supplementary destination board showing “City via Swanston St” RSC78 W2 258 on the wheel grinder road at Brunswick depot RSC79 X2 676 on a TMSV tour, W5 817 & 836 & VR 53 on the open roads at Essendon Depot RSC80 PCC 1041 on test, passes W71035 in High St Preston RSC81 D1 class production number 7 as delivered on test in Matthews Ave RSC82 W2 383 on route 5 turning from the reserved track in Dandenong Rd into St Kilda Rd at St Kilda Junction RSC83 Z3 204 as advertising tram for Vodaphone Grand Prix running into Malvern Depot new shed RSC84 Z1 4 on test in St Georges Rd RSC85 PCC 1041 on Route 96 in Burke St near Exhibition St RSC86 Z1 3 without numbers on test turning from Miller St in St Georges Rd RSC87 Track components stored in Coldblo Rd at Malvern Depot with Z class cars adjacent RSC88 D1 3501 in M Tram Livery on Route 55 in Peel St at Franklin St RSC89 C 3001 in Yarra Trams Livery Porto 018 & D13502 in M Tram Livery on Display in Harbourside Esplanade RSC90 D1 class tram production number 7, in as delivered condition on test in Matthews Ave RSC91 D1 3503 inside Malvern Depot RSC92 SW6 955 and W6 974 in St Kilda at City Rd at Dusk RSC93 Freight Car 19 at Preston Workshops in green Livery RSC94 Rail Grinder 3 in green Livery at South Melb Per Way Yard RSC95 A SW6 class car on route 50 shunting at Elizabeth St Terminus at night, taken from Flinders St Station RSC96 W2 588 & 435 in St Kilda Rd at Batman Ave RSC97 Y1 613 in service at Wattle Park Terminus RSC98 W2 588 in Wellington Parade en-route to the City with a Grand Final Load of passengers followed closely by 384 RSC99 W2 558 on a MCG Footy Special entering the Simpson St sidings RSC100 W3 657 & an L Class in the new shed at Malvern Depot RSC101 Y1 613 in St Kilda Rd on an enthusiasts tour in St Kilda Rd south of St Kilda jun RSC102 Y1 613 on an enthusiasts tour in Clarendon St with the two extra tracks on the Viaduct under construction RSC103 W6 976 on the fan of the new shed at Malvern Depot RSC104 W7 1024 as an advertising car for Bank of NSW at the route 1 terminus at South Melb Beach RSC105 PCC 980 on route 96 in Nicholson St near North Fitzroy Depot RSC106 SW6 890 with dash canopy lighting in Market St on the opening day of William St Services RSC107 W2 444 with big numbers heads a line of footy specials in Simpson St Sidings RSC108 Cable Cars in Elizabeth St RSC109 NMEL&T co 2 with a trailer outside the power station in Mount Alexander Rd RSC110 Alf Twentyman’s cable car set in his Northcote backyard RSC111 Cable Cars in Queens Parade Clifton Hill RSC112 Cable cars in Collins St outside the Townhall RSC113 PCC 1041 at Carnegie terminus RSC114 Cable cars in Elizabeth St RSC115 Cable cars in Collins St near Swanston St RSC116 HTT 19 turns from Riversdale Rd into Camberwell Rd at Camberwell Junction RSC117 W1 419 official builders photo of first car of the class RSC118 Cable car with a full load of passengers RSC119 W1 422 illuminated for the visit of T.R.H. The Duke and Duchess of York RSC120 PCC 1041 in strife on it’s maiden day in service. Trams on route 88 delayed in Queens Parade Clifton Hill RSC121 Bendigo birney in Finn St near North Bendigo terminus RSC122 SW6 in St Kilda Rd at Domain Rd at night RSC123 All 3 of Alf Twentyman’s cable cars in his Northcote backyard RSC124 Cable trailer 256 being unloaded into the shed at Bylands RSC125 Cable grip car 1 being removed from the Melbourne Museum RSC126 Alf Twentyman's cable cars in his Northcote Backyard RSC127 Alf Twentyman's cable cars in his Northcote Backyard RSC128 Alf Twentyman's cable cars in his Northcote Backyard RSC129 Alf Twentyman's cable cars in his Northcote Backyard RSC130 W class car in Swanston St at Collins St RSC131 Y1 469, L & W3 on the run out of Glenhuntly Depot on a tour RSC132 W7 1024 as an advertising tram for Bank of NSW at Clifton Hill RSC133 W2 496 on a footy special in Simpson St Sidings RSC134 W2 as originally converted to a test car at Preston Workshops RSC135 W3 667 in Brunswick Depot with Ellen Butland at the controls RSC136 W3 669 on it’s final run at Victoria Prd & Brunswick St RSC137 W2 571 in Wellington Prd at Clarendon St with a Footy Final load of Passengers RSC138 Y1 613 shunts at Spencer St Terminus as X217 waits on Australia Day Pageant RSC139 PCC 1041 on Rt 96 in Burke St outside the Southern Cross Hotel RSC140 890 with accident damage on the outside roads at Preston Workshops c1978 RSC141 535 on Rt 4 at the old St Kilda Jun c1967 RSC142 1041 on Rt 88 turns from Bourke St into Spring St 1973 RSC143 102 on a tour at Albert Park Beach Terminus Feb 1972 RSC144 833, 835 & 834 in the shed at Malvern Depot c1976 RSC145 281 in Wellington Parade on a football very crowded special c1974 RSC146 464 Ballarat Rd 1960 RSC147 181 Explosives Fty - at Footscray Station - July 1960 RSC148 181 Williamstown Road 1960 RSC149 Cable car set at Alf Twentyman’s c1970 RSC150 X 217 at Malvern Depot c1970 RSC151 X1 465 and T181 Footscray Football ground in Barkly St. c1960 RSC152 Scrubber 5 at South Melbourne depot c1960 RSC153 X1 465 Footscray to Russell St, c1960 RSC154 X1 467 Leeds St Footscray 1960 RSC155 PMTT 4 Glenferrie Road, 1910 RSC156 S 164 at Malvern Depot c1970 RSC157 T178 Footscray c1960 RSC158 Cleaner No. 7 at South Melbourne depot c1960 RSC159 Two Y classes at Princes Bridge / Batman Ave mid 1950s RSC160 Swanston St – Nu color vue slide – M142 Demonstrates the work of Ron Scholten in photography, collection and/or production of duplicate slidesAssembled album in a black presentation folder of 160 colour slides, 8 slide sleeves, collected or produced by Ron Scholten. Many are TMSV or Windsor Publications slides. All photographs have been scanned and placed on the Museum's G drive. A list of all photographs with details has been compiled. melbourne, tramways, trams, cable trams -
 Melbourne Tram Museum
Album - David Frost Slide Collection, David Frost
Photo - see pdf file for further information. Number Brief Description date DFC1 A general view from the former railway platform at Port Melb Station looking towards Station Pier on opening day 20-12-1987 DFC2 A2 285 in the Tramway Platform at Port Melbourne Station on opening Day 20-12-1987 DFC3 A2 285 in the Tramway Platform at Port Melbourne Station on opening Day 20-12-1987 DFC4 A2 285 in the Tramway Platform at Port Melbourne Station on opening Day 20-12-1987 DFC5 A2 273 at St Kilda Tramway Station on opening day 22-11-1987 DFC6 A2 273 turning from Fitzroy St into St Kilda Tramway Station on opening day 22-11-1987 DFC7 B1 2001 at St Kilda Tramway Station turning into Fitzroy St on opening day 22-11-1987 DFC8 B1 2002 enters St Kilda Tramway Station on opening day 22-11-1987 DFC9 An A2 approaches St Kilda Tramway Station on opening day 22-11-1987 DFC10 Concreting the connecting curve from Fitroy St into St Kilda Station c July 1987 DFC11 An MTA AEC MKVI bus in Grey St St Kilda at Dalgety St with Tramway works in the background c July 1987 DFC12 Grey St St Kilda at Dalgety St with Tramway works in the background in Fitzroy St c July 1987 DFC13 Concreting the connecting curve from Fitroy St into St Kilda Station c July 1987 DFC14 Restaurant Tram 442 in Fitzroy St at Grey St Passing MTA bus 59 outside St Kilda Station c1986 DFC15 Former VR tram stop sign painted on a pole at Glenhuntly Rd & Broadway DFC16 Former VR Elwood Tram Depot under demolition 1996 DFC17 Former VR Elwood Tram Depot under demolition 1996 DFC18 Former VR Elwood Tram Depot under demolition 1996 DFC19 Former VR Elwood Tram Depot under demolition 1996 DFC20 Former VR Elwood Tram Depot under demolition 1996 DFC21 Former VR Elwood Tram Depot under demolition 1996 DFC22 Former VR Elwood Tram Depot under demolition 1996 DFC23 Former VR Elwood Tram Depot under demolition 1996 DFC24 MTS Tower waggon in use at the former VR Elwood Tram Depot under demolition 1996 DFC25 A Sign advertising the sale of the Former VR Elwood Tram Depot – 10/8/1996 1996 DFC26 Former VR Elwood Tram Depot under demolition 1996 DFC27 Interior of a shed at the former VR Elwood Tram Depot under demolition 1996 DFC28 Former VR Elwood Tram Depot under demolition 1996 DFC29 Former VR Elwood Tram Depot under demolition 1996 DFC30 Former VR Elwood Tram Depot under demolition 1996 DFC31 VR 20, former breakdown car in Bob Prentice’s Back Yard Jan 1974 DFC32 VR 20 on a low loader en route to Bob Prentice’s for preservation 1959 DFC33 VR 20 as the breakdown car on the St Kilda Electric Street Railway c1955 DFC34 VR 39 waits in St Kilda St as breakdown car 20 enters Elwood Depot c1955 DFC35 VR 54 and 50 in the rear yard of Elwood Depot c1958 DFC36 VR 50 in the rear yard of Elwood Depot c1958 DFC37 VR 50 in the rear yard of Elwood Depot c1958 DFC38 VR 28 in St Kilda St outside Elwood depot after the line had been cut back to this point c1958 DFC39 VR 29 in St Kilda St outside Elwood depot after the line had been cut back to this point c1958 DFC40 VR 35 passes 28 on the St Kilda Electric Street Railway c1955 DFC41 VR 39 on the St Kilda Electric Street Railway c1955 DFC42 Y1 613 on a tour c1970 DFC43 VR 54 in St Kilda St outside Elwood Depot c1955 DFC44 VR 28 at Brighton Beach Terminus c1955 DFC45 VR 33 being washed in the wash bay at the rear of Elwood Depot c1955 DFC46 VR 20 breakdown car running into Elwood Depot c1955 DFC47 VR 3 in the rear yard at Elwood Depot c1955 DFC48 VR 51 on an AETA Tour running out of Elwood Depot c1958 DFC49 VR 28 on the St Kilda Electric Street Railway c1955 DFC50 VR 28 with crew in St Kilda St outside Elwood depot after the line had been cut back to this point 1959 DFC51 VR 52 in Grey St near Fitzroy St c1958 DFC52 VR 51 on a AETA Tour passes 33 in Grey St near Fitzroy St c1958 DFC53 VR 29 in Grey St near Fitzroy St c1958 DFC54 VR51 on an AETA Tour shunts as 52 waits on the St Kilda Electric Street Railway c1958 DFC55 VR 51 on the Black Rock Electric Street Railway c1955 DFC56 VR 28 in St Kilda St outside Elwood depot after the line had been cut back to this point c1958 DFC57 Combined Rail-Tram Tickets of the Black Rock Electric Street Railway Feb 1975 DFC58 Combined Rail-Tram Tickets of the St Kilda Electric Street Railway Feb 1975 DFC59 Electric Street Railway & Motor Coach Paper Tear off Tickets Feb 1975 DFC60 VR 52 & 53 on Rt 82 pass in Cordite Ave near Wests Rd Sept 1975 DFC61 Z 68 & 52 in East Preston Depot in M&MTB Livery c1977 DFC62 Copy photo of VR 18 in Elwood Depot c1910 DFC63 VR 51 as a one man car at Black Rock Terminus c1955 DFC64 VR 53 on Rt 82 in Droop St Footscray Jan 1974 DFC65 B2 2027 on Rt 96 in South Melb Station c1988 DFC66 VR 20 as preserved in Bob Prentice’s backyard High St Prahran Jan 1974 DFC67 VR 700 on Rt 82 in Droop St Footsray c1978 DFC68 VR 28 as the last car from ST Kilda Station 28-2-1959 DFC69 VR 700 at the Rt 82 Moonee Ponds Terminus c1978 DFC70 VR 52 waiting time at the Rt 82 Footscray Terminus, the driver intently stares at the bundy clock as the Braid and the Connie gossip Jul 1972 DFC71 VR 54 shunting outside Elwood Depot to return to St Kilda Station 1959 DFC72 SW6 969 in MTA Livery blocking the entrance to South Melb Depot presumably during the scratch ticket dispute Jan 1990 DFC73 VR 52 & 53 on Rt 82 pass in Droop St Footscray Sept 1975 DFC74 VR 700 after withdrawl in the Newport Railway museum in the process of a repaint c1985 DFC75 VR 700 after withdrawl in the Newport Railway museum in the process of a repaint c1985 DFC76 VR 700 on Rt 82 in Droop St Footsray at The Cresent c1978 DFC77 VR 700 on Rt 82 in Droop St Footsray c1978 DFC78 Former VR tram depot in use as an MTA Bus depot c1990 DFC79 VR 52 waiting time at the Rt 82 Footscray Terminus Jul 1972 DFC80 VR 52 waiting time at the Rt 82 Footscray Terminus with Connie changing the pole Jul 1972 DFC81 VR 52 at the Rt 82 Moonee Ponds Terminus with the crew chatting 7-12-1974 DFC82 VR 52 on Rt 82 on the reserved track in Raleigh Rd Ascot Vale Jan 1974 DFC83 VR 53 on Rt 82 in Leeds St Footscray about to turn into Hopkins St April 1976 DFC84 VR 53 on Rt 82 in Droop St Footsray Jan 1974 DFC85 VR 700 on Rt 82 in Droop St Footsray at Hopkins St c1978 DFC86 Z 52 in MTA livery on Rt 19 in Elizabeth St near Bourke St c1985 DFC87 VR 52 at the Rt 82 Moonee Ponds Terminus Jul 1972 DFC88 VR 53 at the Rt 82 Footscray Terminus Jan 1974 DFC89 VR 52 freshly outshopped from the workshops and W7 1011 at the Bourke St Terminus with 52 on display for the 1968 railway exhibition 1968 DFC90 Painting of W class 369 in Chocolate & Cream c1930 DFC91 Charing Cross, Bendigo at night c1965 DFC92 Ballarat ? c1965 DFC93 Bendigo 18 on an AETA tour in McCrae St near Tramway Ave c1965 DFC94 View from the roof of a tram in the body shop at Preston Workshops 1977 DFC95 View from the roof of a tram in the body shop at Preston Workshops 1977 DFC96 View from the roof of a tram in the body shop at Preston Workshops showing the panto on 546 1977 DFC97 Interior view of Carlton Control Centre showing desk and wall panel c1968 DFC98 W2 493 on Rt 55 in Kingsway outside South Melb Depot Aug 1973 DFC99 W2 496 in Sturt St at Kingsway on Rt 1 Jul 1973 DFC100 Z class truck c1975 DFC101 Z3 116 in Bourke St at King St as new c1979 DFC102 Bob Prentice on tour c1968 DFC103 SW6 900 as an advertising tram for Newsday at night 1969 DFC104 597 Jul 1973 DFC105 W2 480 on Rt 3 passing under the railway bridge at Caulfield Oct 1972 DFC106 Interior view of Carlton Control Centre showing desk c1968 DFC107 SW6 856 on Rt 77 at night Jul 1973 DFC108 W2 496 in Sturt St at Kingsway on Rt 1 Jul 1973 DFC109 PCC 980 on a tour at South Melb Depot c1968 DFC110 SW6 856 on Rt 77 at night Jul 1973 DFC111 View from the roof of a tram in the body shop at Preston Workshops showing the panto on 546 1977 DFC112 Dandenong Rd from Chapel St Nov 1968 DFC113 A Z class car turns from Gertrude into Nicholson St c1990 DFC114 SW6 900 as an advertising tram for Newsday at night 1969 DFC115 Port Melbourne Station showing Centennial bridge and station building prior to closure. 10-1987 DFC116 Port Melbourne station with train prior to closure, looking south 10-1987 Demonstrates the work of David Frost in photography and or collecting slides.Assembled album in a black presentation folder of 116 colour slides, 6 slide sleeves, collected or photographed by David Frost. Many are TMSV or Windsor Publications slides. All photographs have been scanned and placed on the Museum's G drive. A list of all photographs with details has been compiled. melbourne, tramways, trams, vr trams, elwood, st kilda light rail, port melbourne, opening, elwood depot, buses -
 Melbourne Tram Museum
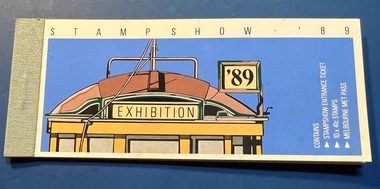
Souvenir - Ticket , infomation and stamps, Australia Post, Stampshow '89, 1989
Item demonstrates some of the souvenirs and stamps issued for the 1989 Stamp show including a Melbourne Met Pass ticket valid for use on a specific day. See Reg Item 6027 for other paperwork.Part of the extensive paperwork issued for the 1989 stamp show which featured historic tramcars.Souvenir booklet comprising entrance ticket, information sheets, 10x 41c cable tram stamps and a Melbourne Met Pass for the 1989 Stamp show - six card sheets + stamps - stapled. Has been punched for 22 October. Second copy added 14/3/2024 - in unused condition.trams, tramways, souvenirs, stamp show, australia post, the met, tickets, stamps, cable trams -
 Melbourne Tram Museum
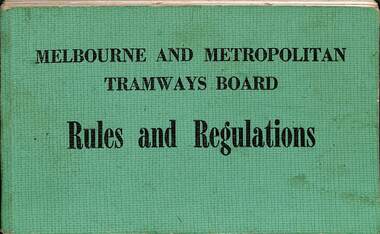
Book, Melbourne & Metropolitan Tramways Board (MMTB), "Rules and Regulations", 1974
Provides rules for both tramway and motor bus operations, has index pages 3 to 28, rules for both systems and specific type of vehicle, ticket machines and ticket issuing. At rear is MMTB By-Law 11 and By-Law, the latter dated 1956. Issued to F Reale-Key who worked for the Civil Engineering at South Melbourne Depot. Section of the MMTB or The Met and was authorised to drive trams. Dated Nov. 1974. For a photo of Frank standing in front of tram 8, see "MetLines - Vol 1, No. 9 December 1985". See Item 82 for a full scan of the document.Demonstrates the Rules and Regulations issued to drivers and to those authorised to drive trams or buses.Book - green Rexine covers, 106 pages with title - "Melbourne and Metropolitan Tramways Board - Rules and Regulations". Six sections, sewn into covers, dated Nov. 1974. See image i2 for details.tramways, trams, mmtb, the met, drivers, training, south melbourne depot, civil engineering department, instructions, rules, regulations -
 Melbourne Tram Museum
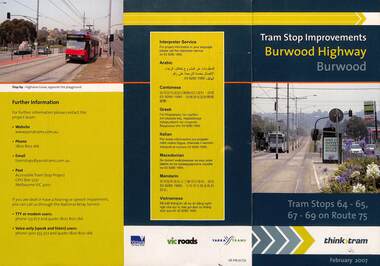
Pamphlet, VicRoads, "Tram stop improvements Burwood Highway Burwood", Feb. 2007
Pamphlet dated Feb. 2007 detailing the installation of platform or super stops in Burwood Highway Burwood in four locations. Has location map. Part of the VicRoads Yarra Trams Think Tram project. Route 75.Yields information about the installation of super stops in Burwood Highway during 2007.Pamphlet - 3 fold DL - full colour.trams, tramways, super stops, platform stops, route 75, burwood highway, burwood -
 Melbourne Tram Museum
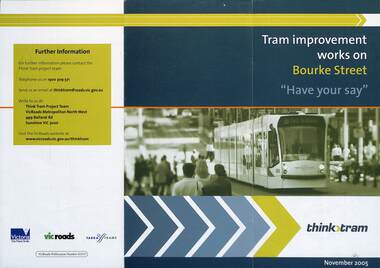
Pamphlet, VicRoads, "Tram stop improvements works on Bourke St", 2005 to 2007
Set of four Pamphlets - DL - full colour for installation of Bourke St super stops or platform stops in Bourke St. 1 - Have your say - 3 fold DL - Nov. 2005 2 - Have you say - 5 fold DL with a proposed plan - June 2006 3 - Construction - Spring and Spencer St - 3 fold DL - with plan - May 2007 4 - Constructon - William, Queen and Russell streets - with plans - Sept. 2007Yields information about the installation of super stops in Bourke St 2005 to 2007.Set of four Pamphlets - DL - full colour trams, tramways, super stops, platform stops, bourke st, planning, construction -
 Melbourne Tram Museum
Pamphlet, VicRoads, "Nicholson Street at Albert Street Platform Tram Stops", May 2008
Pamphlet - "Nicholson Street at Albert Street Platform Tram Stops" - includes a plan of the proposed work, timing, and benefits of the installation. May 2008.Yields information about the installation of super stops at Nicholson and Albert Sts.Pamphlet - 3 fold DL full colourtrams, tramways, super stops, platform stops, planning, construction, nicholson st, albert st -
 Melbourne Tram Museum
Album - Public Transport Tickets, David Frost
Tickets collected by the donor contains: Sheet 1 - Victorian Railways combined rail / tram St Kilda Brighton line 2 - ditto - most used with part tickets 3 - mainly rail and bus 4 - rail and bus 5 - ditto with some rail only 6 - ditto - with tickets torn in half 7 - rail and bus weekly 8 - Single and return tickets for Sandringham to Black Rock 9 - ditto with tickets torn to cancel them 10 - various rail tickets - mixed including some country and weekly tickets 11 - combined train and bus tickets post 1956 12 - Mixed railway tickets - including first and second class suburban 13 - General railway tickets 14 - Rail tickets just prior to Neighbourhood tickets. 15 - ditto with some NSW tickets 16 - MMTB Section tickets and others systems. 17 - Miscellaneous tickets 18 - Miscellaneous tourist operator tickets 19 - ditto 20 - Train world examples 21 - Metcards 22 - Metcards 23 - Metcards - printed for events etc. 24 - Metcards 25 - Frankston line Connex timetable, V/Line ticket folder and Ganga phone card. Yields information about the Victorian Railways rail and tram ticketing systems.Album - red plastic cover two ring spring binder, with gold block "Swap Card Album" - with a $14.50 price label in the top right hand corner. Contains 25 used or partly used card plastic sleeves and four unused sleves. tickets, st kilda brighton electric tramway, victorian railways, metcard, sandringham to black rock, buses, vr, railways, tramways, mmtb, train world -
 Melbourne Tram Museum
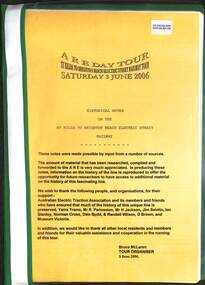
Document, Bruce McLaren, "ARE Day Tour - St Kilda to Brighton Beach", June 2006
Tour notes compiled for "ARE Day Tour - St Kilda to Brighton Beach" - 3-6-2006 by Bruce McLaren. Compiled from various sources such as Destination City 5th edition, VR annual reports, VR to 62, Memories of the Railway Trams by Jim Seletto, Tram Tracks - AETA, the Brighton Electric Line by L Marshall-Wood, Bradshaws Guide and Yarra trams 2006 pamphlets.Yields information about the St Kilda Brighton Electric tramway for a tour.Tour notes - approx 60 A4 sheets double side within an Esselte green binder. Has a railfan shop $17.95 price label on the top right hand corner.vr trams, are, tour notes, bruce mclaren, st kilda brighton electric tramway -
 Melbourne Tram Museum
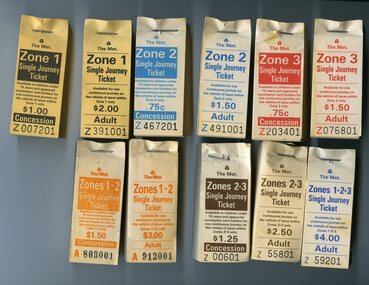
Ephemera - The Met Zone Paper ticket blocks, The Met, mid 1980s
Tickets issued during the mid-1980s by The Met during the era of three-zone travel. Each ticket has the first The Met logo on the top of the ticket. Printed on off-white paper, except Zone 1, printed on light yellow paper. The Zone 1+2+3 concession ticket is not included in the set, see item 1677 for a sample. 1 - Zone 1 Adult - black $2 - Z391001 2 - Zone 1 Concession black - $1 - Z007201 3 - Zone 2 - Adult $1.50 - blue - Z491001 4 - Zone 2 - Concession - blue - $0.75 - Z467201 5 - Zone 3 - Adult $1.50 - red - Z076801 6 - Zone 3 - Concession - red - Z203401 7 - Zones 1+2 - Adult $3 - orange - A912001 8 - Zones 1+2 - Concession - $1.50 - orange - A803001 9 - Zones 2+3 - Adult $2.50 - brown - Z55801 10 - Zones 2+3 - Concession - brown - $1.25 - Z00601 11 - Zones 1+2+3 - blue - Adult $4 - Z59201 Demonstrates the ticketing system used in Melbourne during the mid 1980s.Blocks of tickets - 11 sets - 200 tickets, stapled onto a heavy cardboard backing with a single metal staple. Numbers in black ink. the met, public transport, tickets, concession fares, tramways, railways, buses -
 Melbourne Tram Museum
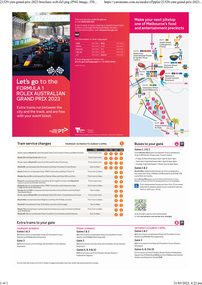
Pamphlet, Yarra Trams, "Lets go to the Formula 1 Rolex Australian Grand Prix 2023", March 2023
Pamphlet downloaded from Yarra Trams and Public Transport Victoria website 31-3-2023 and service changes document detailing the transport arrangements to the various gates from the city. Trams were free to use with a Grand Prix ticket.Details the transport arrangements for the 2023 Grand Prix.Pamphlet - 6 fold - DL full colour - titled "Lets go to the Formula 1 Rolex Australian Grand Prix 2023" and three A4 page associated Service changes document.grand prix, albert park, yarra trams, special event services, trams, ptv -
 Melbourne Tram Museum
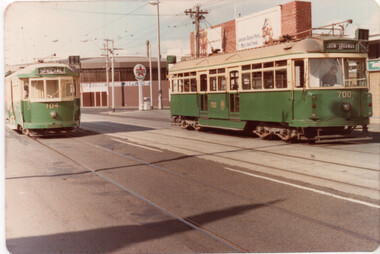
Photograph - Set of two photographs - Union Road - Ascot Vale VR700 and L104, 1-3-1980
Set of two colour photos showing VR class tram 700 and L class 104 on the ARHS & TMSV tour 1-3-1980. L104 is on the Showgrounds siding, with tram 700 in Union Road, just to the north of Epsom Road. In the background are Showgrounds buildings and a Caltex Service Station. In the second photo, W5 685 inbound to the city is seen between the two trams. Yields information the history of ARHS and TMSV tours.Set of two colour prints on Kodak paper, dated Mar. 1980tramways, trams, vr class, w5 class, tram 700, tram 104, tours, tram 685, l class, showgrounds -
 Melbourne Tram Museum
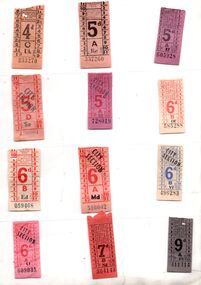
Ephemera - Set of 19 pre-decimal paper tram tickets, Melbourne & Metropolitan Tramways Board (MMTB), 1950s
Set of 19 MMTB paper tram tickets of the 1950s. All numbers in black and generally printed with black ink unless noted. Many of them have Stamina Trousers adverts on rear generally with thoughts for the month or the name of a store. Includes two advertising John Randle City Hair Salons. 1 - 4d - on off white paper, C Uk 333270 2 - 5d - on off white paper, A Re 337260 3 - 5d - on light red paper, A Ef 605928 4 - 5d - City Section, on very light red paper, printed in red ink, D Se 190001 5 - 5d - City Section on pink paper, printed in red ink, A Of 728019 6 - 6d - on off white paper, printed in red ink, B Of 585288 7 - 6d - on off white paper, printed in red ink larger size than that above - B Ed 059468 8 - 6d - City Section, on very light red paper, printed in red ink, A Md 590002 9 - 6d - City Section, on off white paper, printed in blue ink, B Vf 496283 10 - 6d - City Section, on light red paper, printed in red ink, A Lf 609035 11 - 7d - on orange paper, B Nd 304143 12 - 9d - on grey paper, A Fb 411414 13 - 10d - on off white paper, printed in blue ink - B N 227003 - note the value has been printed in reverse. 14 - 10d - red paper, B U 472173 15 - 1/1 - green paper, B N 626610 16 - 1/2 - orange paper, A Hb 424870 17 - 1/6 - yellow paper, B Ad 138958 18 - 1/9 - blue paper, B Ab 461351 19 - 2/- - pink paper, A Ac 899940 Yields information about the value and colours of Melbourne tram tickets in use prior to Decimal conversion in 1966.Set of 19 paper or flimsy paper tickets MMTB of varying colours and values.tramways, tickets, melbourne, mmtb, city section, stamina trousers, john randle hair salons. -
 Melbourne Tram Museum
Document - List of Melbourne Buses, Bus and Coach Society of Victoria (BCSV), "Publication M3", August 1982
Provides a detailed list of buses operated in Melbourne by both the MMTB and the Victorian railways and the many private operators at the time. Details the chassis, body builders, operator, depot, fleet number, registration, body date, seating code, seating capacity and bus ownership history. Provides a publication date of of August 1982 on page 3. Yields extensive information about Melbourne's suburban bus fleet in 1982 with details of the Government and Privately owned fleet.Duplicated document - originally a 55 page A4 document - missing page 54 and covers. Page 55 loose. mmtb, buses, melbourne, route numbers, lists, fleet list, victorian railways, vr buses, bcsv -
 Melbourne Tram Museum
Ephemera - Rail & Tram weekly tickets, Victorian Railways (VR), c1935
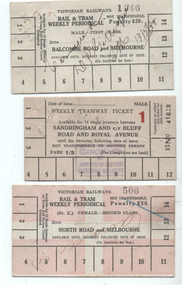
Set of three Victorian Railways Rail & Tram weekly Periodicals with conditions of travel on the rear, See reference page 124 and Figure 6-27. Such tickets were introduced on 1/7/1939. All tickets were available for 14 tram trips only, but unlimited rail trips: 1 - Balcombe Road and Melbourne - First Class - white card - No. 1346, marked cancelled 13/5/1939 2 - Sandringham and cnr Bluff Road and Royal Ave - white card - Male, No. 41618, price 1/3 with a red 1 (first class?) - stamped cancelled 3 - North Road and Melbourne - white card overprinted in pink to leave a cross, Female, No. 506, Second class, with cancelled hand written on the front.Demonstrates a Victorian Railways Rail and Tram weekly tickets for both their tramways and the changes made over time. May have been used for training samples.Set of three printed card tickets with over printing and hand writing as shown.tickets, vr, vr trams, victorian railways, st kilda brighton tramway, weekly tickets, sandringham to black rock -
 Melbourne Tram Museum
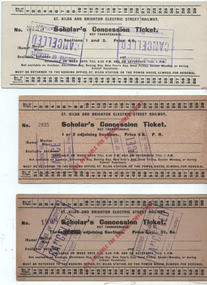
Ephemera - Set of 5 Tram Scholars's Concession Ticket, Victorian Railways (VR), 1915 - 1928
Set of 5 Tram Scholars's Concession Ticket - all printed with the heading "St Kilda and Brighton Electric Street Railway", See reference page 126 for background. Type used between Jan 1915 and 1928. Gives hours of availability, not available or holidays or during school vacations. Three have been overstamped "Not Available for smoking compartments". All have plain backs. See item 7799 for a used sample and associated correspondence. 1 - No 3126, sections 1 and 2, price 4/6 2 - No. 2895, 1 and 2 adjoining sections price 4/6 3 - No. 1998 - three adjoining sections, price 5/- 4 - No. 398 - four adjoining sections, price 6/3 5 - No. 294 - dittoDemonstrates a set of Victorian Railways Scholar's tickets used on the St Kilda Brighton tramway.Set of five card tickets - all have been stamped "Cancelled" by the Auditor of Receipts.tickets, vr, vr trams, victorian railways, st kilda brighton tramway, scholar's tickets -
 Melbourne Tram Museum
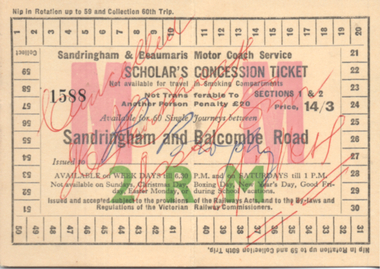
Ephemera - Motor Coach Scholars's Concession Ticket, Victorian Railways (VR), 1950s
Scholar's concession ticket available for 60 trips, No. 1588, fare 14/3 between Sandringham and Balcombe Road by the Co-ordinated Motor Coach service. See reference 165 and figure 7-82 for an example. Has been cancelled in red ink. Has hours of availability and conditions of use printed on the ticket.Demonstrates a set of Victorian Railways Scholar's tickets used on the former Sandringham - Black Rock service replacement bus service.Printed card ticket, with tape on the outside fold.tickets, vr, vr trams, victorian railways, scholar's tickets, sandringham to black rock, buses -
 Ballarat Tramway Museum
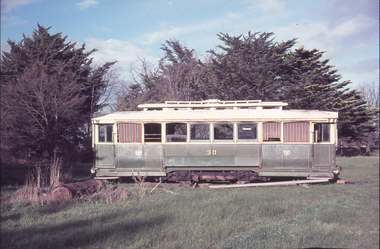
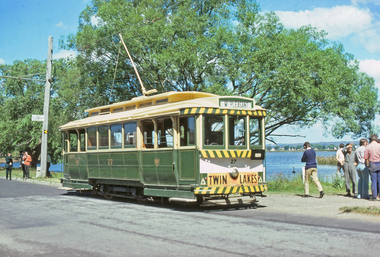
Slide - 35mm slide/s - set of 3, John Theodore, SECV Tram 30, c1973
Photographs of former Ballarat tram 30 the Ballarat Council Depot following recovery from Kaniva in July 1974. See item 3929 disposal list shows that it was to go to St Arnaud, but went to a property in Kaniva Lions Club - refer to Feb. 2015 Fares Please! See Reg Item 2177 for a cutting of the tram being loaded.Yields information about tram 30 following its disposal and how it was in the open paddock.Set of 3 AGFA blue and white plastic mount 35mm slides.Various notations by John as to the slide number and the trams in pencil and ink.tramways, trams, closure, tramcars, disposal, tram 30, offsite store -
 Ballarat Tramway Museum
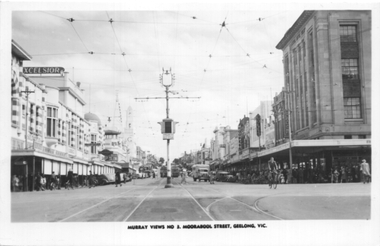
Postcard, Murray Views, "Murray Views No. 3 Moorabool Street Geelong Vic", early 1950s
Postcard produced by Murray View of Gympie, of the corner of Malop and Moorabool Streets Geelong, looking south along Moorabool St. In the distance can be seen two trams. In the view at Solomans, the T&G building, Hookers, Coles, and a set of neon bar traffic lights.Yields information about the view of Moorabool St at Malop St early 1950s.Black and white Postcard divided back, unused. Card No. 3tramways, trams, geelong, moorabool st, malop st -
 Bendigo Historical Society Inc.
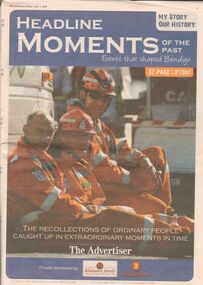
Newspaper - THE ADVERTISER: FRIDAY JULY 3, 2009 HISTORY-EVENTS THAT SHAPED BENDIGO 32 PAGES, 1881
Headline Moments of the Past The Advertiser, Friday July 3, 2009 History - Events That Shaped Bendigo 32 Page Supplement. Newspaper supplement includes images and articles as diverse as the construction of Alexander Fountain in 1881, The Great Depression 1930s, End of World War II 1945, CBD Floods 1949, Queen Elizabeth's Visit 1954, Olympic Games (Melb) and first television in Bendigo 1956, Bendigo farewells local champion horse 1958, Demolition of verandahs on local buildings 1960s, opening of Eppalock 1964, The Vietnam War 1965-1975, The new dragon Sun Loong 1970, The last tram run and Faraday kidnapping 1972, opening of Sacred Heart Cathedral 1977, opening of Hargreaves Mall 1982, Killians Walk Fire and Gaol Siege 1987, Local government Amalgamation 1993, Opening of Marketplace and Discovery Centre 1995, Restoration of Rosalind Park Cascades 1997, Bendigo Tornado 2003. This publication has not been scanned.bendigo, history, bendigo advertiser, alexander fountain construction 1881, bendigo cbd floods 1949, dmolitition of bendigo building verandahs 1960s, last tram run 1972, killians walk fire 1987, bendigo tornado 2003 -
 Ballarat Tramway Museum
Photograph - Digital image Set of 6, Hugh Ballantyne, 7/12/1974
Photos of BTPS tram 27 making its first trip along Wendouree Parade following the installation of the depot junction trackwork on Saturday 7 December 1974. .1 and .2 - St Aidans Drive .3 to .6 - at Carlton St Images scanned and altered by Roderick Smith from the Hugh Ballantyne collection August to September 2017.Yields information about the establishment by the BTPS of a tram service in Wendouree Parade. Has a strong association with those involved.Set of six digital images trams, tramways, opening, first tram, btps, wendouree parade, carlton st, st aidans drive, tram 27 -
 Ballarat Tramway Museum
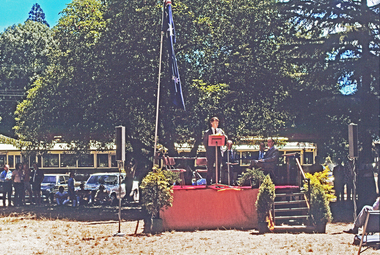
Photograph - Digital image Set of 5, Hugh Ballantyne, 1/02/1975
Yields information about the official opening by the BTPS of a tram service in Wendouree Parade. Has a strong association with those involved.Set of five images of the official opening ceremony for the BTPS- 1/2/1975 as the Ballarat Tourist Tramway. .1 - Clyde Croft - BTPS Secretary speaking .2 - ditto .3 - Chairman of the SEC Mr Trethowan speaking - see also Reg item 2272. .4 - ditto .5 - Maurice Calnin, President of the BTPS speaking. Images scanned and altered by Roderick Smith from the Hugh Ballantyne collection August to September 2017.trams, tramways, opening, first tram, btps, wendouree parade, depot, sec -
 Ballarat Tramway Museum
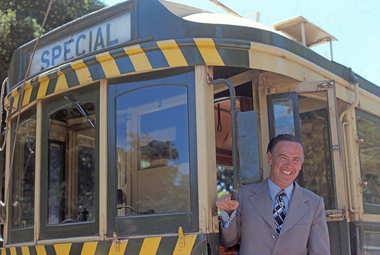
Photograph - Digital image Set of 3, Hugh Ballantyne, 1/02/1975
Yields information about the official opening by the BTPS of a tram service in Wendouree Parade. Has a strong association with those involved.Set of three images of the official opening ceremony for the BTPS- 1/2/1975 as the Ballarat Tourist Tramway featuring the Chairman of the SEC on No. 40 with Clyde Croft. Images scanned and altered by Roderick Smith from the Hugh Ballantyne collection August to September 2017.trams, tramways, opening, first tram, btps, wendouree parade, depot, secv, tram 40 -
 Ballarat Tramway Museum
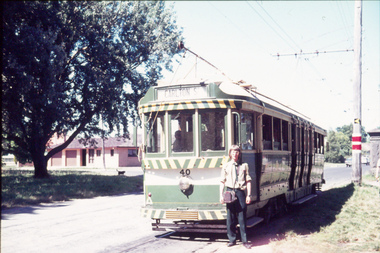
Slide - 35mm slide/s - set of 7, John Theodore, Dec 1974/Jan 1975
Yields information about the early operations in Wendouree Parade prior to the official opening.Set of 7 AGFA blue and white plastic mount 35mm slides of early running on Wendouree Parade - late December 1974, January 1975. .1 - 40 at St Aidans Drive (note destination of Carlton St), with Graeme Jordan standing in front of the tram. .2 - 40 at the Loop with a very temporary auxiliary Board. Has destination of St Aidans Drive. .3 - ditto .4 - 26 at St Aidans Drive showing Sturt St West. .5 - ditto .6 - 40 at Gardens Loop .7 - 26 at St Aidans Drive showing Gregory St destination. Various notations by John as to the slide number and the trams in pencil and ink.tramways, trams, btps, commissioning, wendouree parade, st aidans drive, gardens loop, tram 40, tram 26 -
 Kew Historical Society Inc
Article, The New Electric Tramway, Malvern to Kew
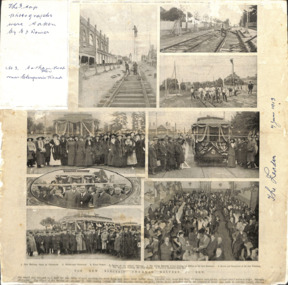
One of a group of photographs, including three within a published photo collage , taken by Edgar James Dower in the second decade of the twentieth century. Born and raised in Olinda, Dower later moved to Surrey Hills. He worked as an adult as a clerk in the city office of the Metropolitan Gas Company, and in his role as a 'collector', he was able to photograph scenes including the construction of tramlines, railways and associated buildings in Kew, Hawthorn, Camberwell and Surrey Hills. Later he established a real estate agency with his brother - the E.J. Dower Real Estate Agency, Mount Dandenong Office.The photo collage is an historically significant record of the development of transport infrastructure which was used to connect Victorians in the first two decades of the twentieth century. This development resulted from increases in population and the consequent extension of Melbourne's suburbs. The photographs, both individually and collectively, richly detail the labour of workers and the tools and machinery used to create and extend Melbourne's public transport network in the years preceding and during World War 1.Photo collage, published in The Leader newspaper in 1913, to commemorate the opening of the Malvern to Kew Tramway. The numbered photos are: 1. Kew Railway Gates at Glenferrie. 2. Burke Road Terminus. 3. Final Stages. 4. Ladies at the Official Opening. 5. The Acting Mayoress of Kew Cutting the Ribbon at the Kew Boundary. 6. Mayor and Councillors at the Kew Terminus. 7. The Cutting the First Ribbon. 8. Guests at the Hawthorn Town Hall.Inscribed in ink by Edgar J Dower top left: "The 3 top photographs were taken by E J Dower. No.3 Cotham Road Kew near Glenferrie Road"theme -- connecting victorians by transport and communications, theme -- travelling by tram -
 Ballarat Tramway Museum
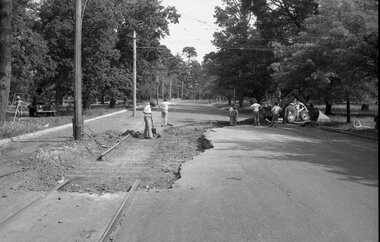
Negative - BTPS trackwork Wendouree Parade, Dave Macartney, 22/11/1974
Set of three negatives - two showing the excavation of Wendouree Parade for the installation of the track across the Parade to connect with the depot. The 1974-75 BTPS Annual reports recorded that track work commenced on Friday 22/11/1974 and was completed the following Monday. The 3rd photo shows tram 40 at the end of the access track pending the connection.Yields information about the installation of depot junction trackwork by the BTPSSet of 3 x 35mm black and white negatives.btps, access track, new track, trackwork, depot junction -
 Melbourne Tram Museum
Document - Notice - introduction on trams by depots, Melbourne & Metropolitan Tramways Board (MMTB), "Ferodo brake shoes", 1/1968
Document - "Ferodo brake shoes" - dated 26/1/1968 advising that as of 29/1/1968 a start will be made to fitting non-metallic (Ferodo) brake shoes to wide-body trams at Malvern Depot. Notes that Preston and North Fitzroy Trams have had them fitted since 4/1967. Provides information about their characteristics and changeover as cast iron shoes wear out. Second document issued to Kew Depot, dated 11/1/1968, signed by J Ritchie Acting Traffic Manager. Third set of documents about the introduction to South Melbourne, Glen Huntly, Camberwell, Brunswick, Essendon and Malvern Depots.Yields information about the timing of the fitting of a different type of brake shoe on trams that were a lot more effective than cast iron and their background history.Set of 3 Documents - single foolscap sheet with two punched holes on left side. Second copy, quarto sheet has a piece of paper glue to the base of the sheet.tramways, trams, ferodo brakes shoes, brakes