Showing 9182 items matching "bayer"
-
![Photograph - Photograph, Black and white, Peckham Photographic Studios, Geo Beachcroft, Hanging on up aloft [the] C.B. Pedersen, c. 1935](/media/collectors/4f729f5897f83e0308601603/items/4f72bbce97f83e03086061e1/item-media/581a839ad0cdd11ed4ac0ec3/item-fit-380x285.jpg) Mission to Seafarers Victoria
Mission to Seafarers VictoriaPhotograph - Photograph, Black and white, Peckham Photographic Studios, Geo Beachcroft, Hanging on up aloft [the] C.B. Pedersen, c. 1935
Snapshot in time of tall ship and the relaxed clambering about the rigging by sailors. The C.B. Pedersen is also referred to as a Training Ship for Swedish seamen and cadets. A reference in Annual reports and in Jottings from our log notes that classes in Swedish amongst other languages were offered by the LHLG to members and some of the earliest photographs note Swedish sailors relaxing. The first officer and captain of the C.B. Pedersen are depicted in photograph (0706) on permanent display. In the Sydney Morning Herald, Tuesday 27 April 1937, page 12: "The C. B. Pedersen was built in 1891. It has visited Australia several times, the most recent occasion having been in 1935, when It was anchored in Port Phillip Bay, Victoria, for several weeks, awaiting a suitable cargo. At length the master, (Captain Hjalmar Dahlström) announced that, as no cargo could be obtained he would be prepared to carry passengers in a voyage to Gothenburg, via Torres Strait. Eight persons, including three women and a small boy were accepted as passengers, and signed on as members of the crew at salaries of 1/ a month". Artist Violet Teague was one of the passengers. She painted during the voyage and exhibited her work in 1938. Built in 1891 the C.B Pedersen, a four-masted steel barque (2142 tons) was used as a training Barque. The ship foundered in April 1937, the crew was saved. Several other photographs of the C.B. Pedersen taken by the same studio are held at the State Library of Victoria.Training of seamen has always been of of keen interest to the Mission to Seamen and many cadets have been welcomed over the 20th Century when widespread training was undertaken by a number of seafaring nations. Black and white photograph of 9 men hanging from ropes in the rigging. One man is upside down, another is holding his hat out. The mast is off to the right-hand side of the photograph and there are several ropes and chains.On the back of the photograph in the top left-hand corner is an ink stamp with the text "Peckham Photographic Studios/Geo Beachcroft/Propr./21 Charlotte St./Richmond/Victoria, Australia". In black pen is the text "Hanging on up aloft/C.B.Pedersen".richmond, chains, rope, seafarers, rigging, peckham photographic studios, geo beachcroft propr, cb pedersen, tall ships, captain hjalmar dahlström, windjammer -
 4th/19th Prince of Wales's Light Horse Regiment Unit History Room
Medals, Burma Star, abt 1945
The Burma Star was granted for operational service in the Burma Campaign between 11 December 1941 and 2 September 1945. Eligibility The Burma Star is awarded for operational service in the Burma Campaign from 11 December 1941 to 2 September 1945. In addition for: Navy - six months qualifying service for 1939-1945 Star first, then operational service in the Bay of Bengal and in the Malacca Strait; Army - service on land in Bengal and Assam from 1 May 1942 to 31 December 1943, areas of Bengal and Assam east of the Brahmaputra from 1 January 1944 to 2 September 1945 and operational service in China and Malaya from 16 February 1942 to 2 September 1945; and Air Force - one operational sortie for aircrew and qualifying service as for Army for other Air Force personnel. The Medal The Burma Star is a six–pointed star of yellow copper zinc alloy. The obverse has a central design of the Royal and Imperial cypher, surmounted by a crown. The cypher is surrounded by a circlet containing the words ‘The Burma Star'. Stars issued to Australian personnel have recipient names engraved on the plain reverse. The Ribbon The Burma Star ribbon is red with edges of dark blue and orange. The red and dark blue represent the British Commonwealth Forces and the orange represents the sun. One clasp was issued for the Burma Star: Pacific When the ribbon is worn alone a silver rosette ribbon emblem is worn to denote the award of a clasp to the medal. Full size with no ribbon Miniature with clasp: Pacific -
 Victoria Police Museum
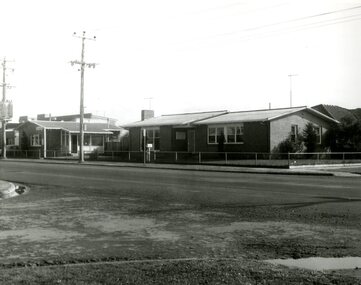
Police Stations (Altona)
Altona is a suburb of Melbourne, 13 km south-west of Melbourne's CBD and located within the City of Hobsons Bay Altona Police Station opened as a temporary police station in 1919 in the Melbourne District. It was on the corner Sargood and Blyth Streets. It was staffed by one 1st Constable. The original police station was in a small room attached to the front of a 5-roomed weather-board dwelling with an iron roof on land measuring 66' x 165'. There was also a kitchen, vestibule, wash-house, office, one W.C. and a lock-up. In 1929 it became part of the Bourke District. On 31 March 1958 it moved into newly built government premises at 51-53 Blyth Street, on the corner of Bent Street. The building consisted of a cream brick veneer police residence and police station with cell. Staff was increased to a Sergeant in Charge and 3 Constables. A new police station was opened in Altona North on 7th October 1979. The Altona Police Station remained as a sub-station for a few a short time until the building was sold. July 2019 - a new police station is being constructed at 1 Galvin Street, Altona. Galvin Street was names after S/C Michael Arthur Galvin, 3651, who was appointed on 5 Jan 1886 and resigned on 4 Dec 1913. He was Werribee Shire President 1926-1927 and 1940-1941 8 black and white photos of new police station, 1963police stations; altona police station -
 City of Moorabbin Historical Society (Operating the Box Cottage Museum)
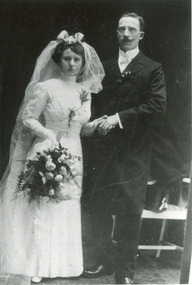
Photograph, B/W, x3 Wedding August & Frieda Rietmann 1910 and Certicicate, 1910,1915
August Rietmann (1877-1951) of Lustdorf ,Switzerland, married Maria Frieda Oesschlager (2/21878- 22/7/1942) of Baden Baden, Germany on 6/8/1910 In 1915 August and his wife Frieda migrated to Melbourne, Victoria, Australia. They leased Box Cottage, Ormond in 1917 and raised two children, Stefanie (1918 -2006) and William (1920- 1997). 1935 August purchased the property and the family used the Cottage during the day and slept in the Front House. August was a monumental mason, potter and sculptor, and was employed at Corbens Ltd Clifton Hill, to carve war memorials in Victoria post WW1 c 1915-1922. During the 1920's August set up his own business in pressed cement making pot plants, columns,paving slabs and lampstands. He continued to carve headstones and figures and took contract work for Artists eg Paul Mountford. He built a workshop in the Barn and used the Cottage for plaster moulding. His son William joined the business and and the family continued to use the site after August died in 1951. Rietman's Landscaping Ltd moved to Bay Road Highett in 1953 and later to Carrum. The land, containing the Box Cottage, was sold to Lewis Timber Pty Ltd in 1970 and Mr Lewis proposed that Moorabbin City Council should preserve the heritage Cottage. In 1984 the Cottage was dismantled and reconstructed in the adjacent Joyce Park.The Rietman family is an example of the diverse nationalities that lived and worked productively in Moorabbin Shire 1871–1933 , the City of Moorabbin 1934-1994 and continues today in the Cities of Glen Eira, Kingston, Bayside, and Monash. August, a sculptor and stone mason, was employed by Corben Pty Ltd Clifton Hill to carve WW1 Memorials before establishing his own successful masonry business in the Box Cottage during the latter 1920s. After becoming interested in pressed cement casting, he took on apprentices (1930s Depression) and among his products were garden furniture, pots and also street lamp standards, some of which were installed in St Kilda Road. After August’s death in 1951, his family continued the business ‘Rietman’s Landscaping Ltd.’, at Highett and Carrum.a) Photograph Black & White August & Frieda Rietmann Wedding 6/8/1910 in Baden Baden ; b) Passport Photograph August Rietmann 1915; c) Photograph Frieda Rietmann 1915; d) Document Wedding Certificate August & Frieda Rietmann Baden Baden 1910a) b) c) Handwritten information d) Official Document in Germanrietmann august, rietman august, rietmann frieda, rietman frieda, stonnington city town hall, war memorials, world war 1 1914-1918, rietman stefanie, rennick stefanie, francis stefanie, rietman william, rietman ray, mountford paul, malvern city town hall,box cottage museum ormond, box william, box elizabeth, joyce park ormond, rietman's landscaping pty ltd, bay road highett, macrobertson pty ltd, coleraine soldier memorial 1921, -
 City of Moorabbin Historical Society (Operating the Box Cottage Museum)
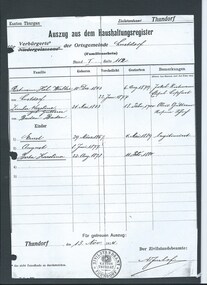
Documents, x3 Printed, Census Lustdorf 1914,15, Swiss Citizen Pass1915, 1914-1915
August Rietmann (1877-1951) of Lustdorf ,Switzerland, married Maria Frieda Oesschlager (2/21878- 22/7/1942) of Baden Baden, Germany on 6/8/1910 In 1915 August and his wife Frieda migrated to Melbourne, Victoria, Australia. They leased Box Cottage, Ormond in 1917 and raised two children, Stefanie (1918 -2006) and William (1920- 1997). 1935 August purchased the property and the family used the Cottage during the day and slept in the Front House. August was a monumental mason, potter and sculptor, and was employed at Corbens Ltd Clifton Hill, to carve war memorials in Victoria post WW1 c 1915-1922. During the 1920's August set up his own business in pressed cement making pot plants, columns,paving slabs and lampstands. He continued to carve headstones and figures and took contract work for Artists eg Paul Mountford. He built a workshop in the Barn and used the Cottage for plaster moulding. His son William joined the business and and the family continued to use the site after August died in 1951. Rietmann Landscaping Ltd moved to Bay Road Highett in 1953 and later to Carrum. The land, containing the Box Cottage, was sold to Lewis Timber Pty Ltd in 1970 and Mr Lewis proposed that Moorabbin City Council should preserve the heritage Cottage. In 1984 the Cottage was dismantled and reconstructed in the adjacent Joyce Park. The Rietman family is an example of the diverse nationalities that lived and worked productively in Moorabbin Shire 1871–1933 , the City of Moorabbin 1934-1994 and continues today in the Cities of Glen Eira, Kingston, Bayside, and Monash. August, a sculptor and stone mason, was employed by Corben Pty Ltd Clifton Hill to carve WW1 Memorials before establishing his own successful masonry business in the Box Cottage during the latter 1920s. After becoming interested in pressed cement casting, he took on apprentices (1930s Depression) and among his products were garden furniture, pots and also street lamp standards, some of which were installed in St Kilda Road. After August’s death in 1951, his family continued the business ‘Rietman’s Landscaping Ltd.’, at Highett and Carrum.Documents a) Census 1914 Household Register Lustdorf, Switzerland; b) Census 1915 Household Register Lustdorf, Switzerland; c) Swiss Confederation Citizen ship I.D Pass Frieda Rietman 4/8/1915;Printed Government Documents in Swiss Language lustdorf switzerland, rietmann august, rietman august, rietmann frieda, rietman frieda, stonnington city town hall, war memorials, world war 1 1914-1918, rietman stefanie, rennick stefanie, francis stefanie, rietman william, rietman ray, mountford paul, malvern city town hall,box cottage museum ormond, box william, box elizabeth, joyce park ormond, rietman's landscaping pty ltd, bay road highett, macrobertson pty ltd, coleraine soldier memorial 1921,, box cottage museum ormond -
 City of Moorabbin Historical Society (Operating the Box Cottage Museum)
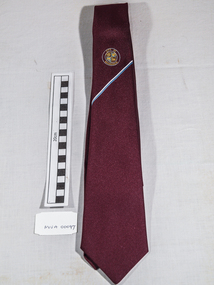
Clothing - Clothing, City of Moorabbin Tie, Circa 1960s
The City of Moorabbin existed from 1934 until 1994. Henry Dendy's Special Survey in 1841 of 5,120 acres in the Parish of Moorabbin , extended from Port Phillip Bay , then East to Boundary Road, South to South Road and North to North Road and became known as Brighton. 1859 Brighton became a Borough with its boundary Thomas Street ,and Bluff Road. In 1862 The Moorabbin Roads Board was formed and the extended area now included Cheltenham, Hampton, Sandringham, Black Rock, Beaumaris, Mentone and Mordialloc .and Little Brighton became known as Bentleigh. In 1871 the area became known as The Shire of Moorabbin. Gradually the area was separated into The Borough of Sandringham 1917, ( Black Rock, Beaumaris , Sandringham and Hampton ) Borough of Mentone and Mordialloc 1920, ( Parkdale ). In 1934 The City of Moorabbin was established for the area from South East corner of Thomas Street and North Road , East to Warrigal Road, Clayton Road, Kingston Road , Lower Dandenong Road, then South along Nepean Highway to Balcombe Road and along Bluff Road, Cummins Road, Nepean Highway, Thomas Street to North Road In the 1994 Amalgamation of Councils the City of Moorabbin was divided between the new City of Kingston in the South ( from South Road) and the new City of Glen Eira to the North . It was the largest Municipality in Victoria with a population of 118,865 in 1974This tie c 1960 is a memento of the City of Moorabbin 1934 - 1994Maroon colour, polyester, man's tie with the crest of City of Moorabbin woven on front.around circle enclosing Coat of Arms ; CITY OF MOORABBIN city of moorabbin, moorabbin roads board, moorabbin, brighton, dendy's special survey 1841, early settlers, pioneers, market gardners, dendy henry, were jonathan b, cheltenham, bentleigh, mentone, sandringham, mair william, bent thomas -
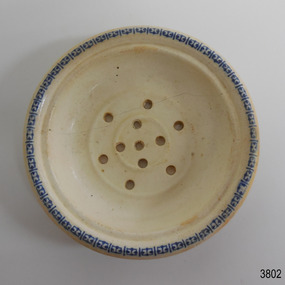 Flagstaff Hill Maritime Museum and Village
Ceramic - Soap dish, circa 1883
This ceramic soap dish was recovered from the wreck of the 1882-1883 George Roper between the late 1960’s to early 1970’s. It is one of the shipwreck artefacts in the John Chance Collection. Soap dishes were often part of a wash set that also included a water jug and wash bowl. The holes in the dish allowed water to drain out of the dish, keeping the soap dry for next use. The GEORGE ROPER 1882 - 1883 - The George Roper was a 4-masted iron sailing ship built in Liverpool, England, in 1882 for fast international trade with Australia. The large vessel was launched in February 1883. The ship was on its first trip, departing Liverpool for Melbourne, captained by John Ward and a crew of 31. She had almost reached her destination on July 4 1883, approaching Port Phillip Bay and being towed by the steam tug William. The weather changed to rough with fog and both the George Roper and the William hit the dangerous Lonsdale Reef at Port Phillip Heads. The Captain and crew were eventually rescued and taken to Queenscliff. Salvage syndicates were able to recover a lot of the cargo before the George Roper broke up and sank. Amongst the cargo was soft goods, draperies, household items, spirits of malt and distilled liquors, chemicals, dynamite, and 1,400 tons of steel rails for the Victorian Government. Also in the hold were Russell Stourbridge bricks, as paying ballast. This 1880s soap dish is an example of personal hygiene accessories and may have been part of a set comprising jug, bowl and dish.. The soap dish is also significant as it was recovered by John Chance, a diver from the wreck of the George Roper in the 1960s-70s. Items that come from several wrecks along Victoria's coast have since been donated to the Flagstaff Hill Maritime Village’s museum collection by his family, illustrating this item’s level of historical value. The soap dish is significant for its association with the barque George Roper, which is considered historically and archaeologically significant and as such, is listed on the Victorian Heritage Database, VHR S286. The George Roper is an example of a vessel built specifically for fast travel to and from Australia with a large shipment of cargo. Its cargo of steel rails adds to the historical significance of international trade to the growing colony of Australia and Victoria in particular, with rail transportation soon to become a faster and safer form of transportation between colonial towns. Divers can still access parts of the scattered wreck and other artefacts recovered in the 1970s and 1980s can be viewed in both public and private collections. Soap dish; glazed white porcelain. Round shallow bowl with blue patterned border, resembling butterflies. Two raised, concentric rings are moulded into the base. Six pierced holes are evenly spaced between the rings, five holes are in the centre of the dish.flagstaff hill, warrnambool, flagstaff hill maritime museum, maritime museum, shipwreck coast, flagstaff hill maritime village, great ocean road, john chance, west coast trader, george roper, captain john ward, russell stourbridge bricks, port phillip heads, lonsdale reef, dive wreck, vhr s286, coastal trader, ceramic, vintage, personal hygiene, bathroom accessory, soap dish -
 National Wool Museum
Sculpture - Bollard, Jan Mitchell, The Lost Bollards, 1999
Geelong is famous for its bollards. Created by local artist Jan Mitchell, the colourful bollards spot the foreshore, representing a fascinating and fun chronicle of the city’s past. Few people know that Mitchell planned for a flock of sheep to be part of her public art project. The wool industry is an important part of Geelong’s history, so Mitchell thought what better than a flock of sheep to welcome people to the city. The flock (and a Shepard) were to be placed out on the Melbourne-Geelong highway, near Lara, to welcome travellers to the city. The sheep would then be scattered along the road as a wayfinding signal to bring people to Geelong. When traffic authorities heard the plan for bollard sheep along the road, they squashed the project as a potential distraction for drivers. Another flock was also suggested for the hills of the eastern gardens, overlooking the bay. This was also disapproved; so Mitchell only ever partially completed four sheep bollards. The bollards are remnants of Jan Mitchell’s flock of sheep. The sheep also show the evolution of one of Geelong’s most iconic art installations. From the first sheep showing the raw timber of the old Yarra Street pier, to the sheep without a face, through to the completed sheep, it is possible to trace Mitchell’s process in the preparation of the bollards. The lost bollards form part of the National Wool Museum’s unique collection. The first bollard is the least complete, still in its original timber colour. From the central cylindrical shape, an additional wedge protrudes. This unpainted wedge forms what would have been the face of the sheep, with an ear present on either side that would have been painted white. Presently they are a bare metal. No legs are present on this bollard. The second and third bollard are completed to a similar level. They have a central cylindrical shape with an additional wedge protruding from the front of the timber. This wedge forms what would have been the face of the sheep, with an ear present on either side. The face and ears have been painted white but the finer details such as the eyes have not been added. These bollards bodies have also been painted white and have their legs attached. The legs are thin metal cylinders, approximately 50mm in diameter and 500mm long. The fourth bollard Is complete. It has the same central cylindrical shape with an additional wedge protruding from the front of the timber. This wedge forms the completed face of the sheep, with an ear present on either side that has been painted white. The face also features completed painted eyes. This bollard has its legs attached. The legs are thin metal cylinders, approximately 50mm in diameter and 500mm long. geelong, bollards, geelong's bollards, jan mitchell -
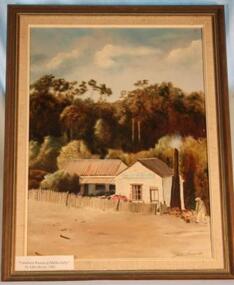 Otway Districts Historical Society
Painting - Oil painting, framed, The Luncheon Rooms at Melba Gully, 1981
Forming the headwaters of the Johanna River and noted for its majestic Myrtle Beech and Blackwood trees, in 1921 the property came into the possession of Mrs Jessie Fry, wife of Mr Thomas Fry, a well-known and respected local bushman and timber getter. Here the family lived and it was Mrs Fry who named the place 'Melba Gully'. Sometime in the late 1920s Mrs Fry was approached by Pioneer Tours, the bus company, to see if she would provide lunches and afternoon teas for their passengers travelling between Apollo Bay and Port Campbell. Mrs Fry rose to the challenge; the Melba Gully Luncheon Rooms were built adjoining the Fry home and she was in business. Mrs Fry was unfailing in her courtesy and kindness. She was also a splendid cook, known for her feather-light scones and sponges. Home-produced strawberries and cream were a special treat. Visitors were also taken on a tour of 'The Gully', often guided by one of her young sons. Melba Gully Visitors Book is testimony to her many satisfied customers. Tom and Jessie Fry sold the property on her retirement in 1947 and the tearooms ceased to operate. It again changed hands in 1958 to Otway residents Mr and Mrs Axel Madsen, and in 1975 they made the magnificent gesture of gifting the 48 hectare Melba Gully to the people of Victoria..Framed painting in oils of a weatherboard house with picket fence, before a backdrop of forest. A figure chopping wood is at the right.Signature of artist John Driver, 1981melba gully, jessie fry, thomas fry, buses, tours, weatherboard house, john driver -
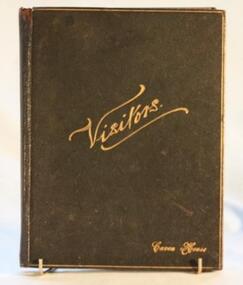 Otway Districts Historical Society
Book - Visitors Book, Melba Gully Visitors Book, 1937-1958
Forming the headwaters of the Johanna River and noted for its majestic Myrtle Beech and Blackwood trees, in 1921 the property came into the possession of Mrs Jessie Fry, wife of Mr Thomas Fry, a well-known and respected local bushman and timber getter. Here the family lived and it was Mrs Fry who named the place 'Melba Gully'. Sometime in the late 1920s Mrs Fry was approached by Pioneer Tours, the bus company, to see if she would provide lunches and afternoon teas for their passengers travelling between Apollo Bay and Port Campbell. Mrs Fry rose to the challenge; the Melba Gully Luncheon Rooms were built adjoining the Fry home and she was in business. Mrs Fry was unfailing in her courtesy and kindness. She was also a splendid cook, known for her feather-light scones and sponges. Home-produced strawberries and cream were a special treat. Visitors were also taken on a tour of 'The Gully', often guided by one of her young sons. Melba Gully Visitors Book, running from November 1937 until the end of 1958, is testimony to her many satisfied customers. Tom and Jessie Fry sold the property on her retirement in 1947 although the tearooms continued to operate. It again changed hands in 1958 to Otway residents Mr and Mrs Axel Madsen, when it finally closed, and in 1975 they made the magnificent gesture of gifting the 48 hectare Melba Gully to the people of Victoria..Melba Gully Visitors Book. Foolscap, leather-bound, lined pages with margin approximately 30mm from left. Added, 24 p. unlined quarto.Full of inscriptions, cover to coverlavers hill, melba gully, jessie fry, thomas fry, axel madsen -
 Queenscliffe Maritime Museum
Instrument - Barometer and Clock mounted on a timber cabinet and 10 associated items from the TSS Nairana, 1915
Bass Strait passenger ship Nairana. Built for Bass Strait ferry operator Huddart Parker & Co. Ltd. of Melbourne during World War One, the Nairana was requisitioned by the Royal Navy and completed as a seaplane carrier, HMS Nairana. Serving from 1917 to 1920 participating in the capture of Archangel during the Bolshevik Revolution. After 1920 she was decommissioned as a seaplane carrier and returned to her Australian owners crossing Bass Strait until she was laid up in 1948. Just off Port Phillip Heads on April 12 1936, a strong wave struck the Nairana, tipping her over for two minutes before she righted herself again. During the horrifying two minutes, four people were drowned, and eight people were injured. The ship was reportedly carrying roughly one tonne of concrete in the hull when she tipped. Reports from the local papers said that it was a tidal wave meanwhile others were saying it was either an earthquake or a total lie. A later paper said that the ship had been caught in a rip at the mouth of the bay, causing the tragedy. The S.S Nairana, was sold for £4,000 (over $170,200 in today’s money!) in 1951 after two years of being stranded on the beach at Port Melbourne, when the moorings broke one night during a storm and drifted ashore, causing her to wreck.Items associated with the TSS/HMS Nairana in its military and civilian roles and items relating to Capt. JF Spence, navigation Officer and possibly later the captain who sailed with the Nairana out of Plymouth after WWI. .01 Barometer and Clock from Dining Saloon .02 Commemorative plaque describing the HMS Nairana's WWI service with timber mount for plaque with information sheet attached. .03 Clock Key .04 Two 2 Log books owned by Capt. Spence containing the navigation calculations for the journey from Plymouth to Melbourne. .05 Huddart Parker hat badge [Capt. JF Spence].Barometer and Clock from dining saloon, TSS Nairana 1917 - 1951 Clock Key - 4 50-No9 Hat badge - HPtss nairana, wwi, bass strait, huddart parker, capt. spence -
 National Wool Museum
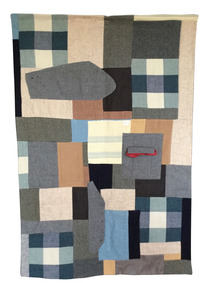
Textile - Quilt, By Wagga Design, 2017
‘By Wagga Design’ is the winner of the Art Quilt Australia 2019 Expressions: Wool Quilt Prize. Barbara Mellor, of St Helens in Tasmania, made this quilt after researching the history of waggas and was fascinated by this early form of recycling. ‘By Wagga Design’ is her contemporary take on the traditional wagga that was born out of hard times and limited resources. Barbara wrote the poem below while thinking of the workers who used waggas while travelling: Black night campfire night sheep in the shadows dreams on the track a comforting wagga stitched with love for a homesick heart. The wagga was made in 2017 and was first submitted into the Bay of Fires Art Prize. In 2018 the wagga was submitted into the Break O’Day Stitchers Quilting and Embroidery Exhibition, where it won the Hanger’s Prize. Barbara sourced the fabrics used from a variety of places. Some are from her personal collection while others were given to her. She purchased a woollen three-piece suit from a local op shop and decided to incorporate it into the design, making some unique and distinctive shapes. Another distinctive feature of the quilt is the patch labelled ‘Parkside’. Barbara noted that it was cut from a blanket she purchased from a garage sale from a property that had once been a caravan park titled ‘Parkside’ in the 1960s. The filling of the wagga contains the rest of the Parkside blanket.Quilt made from various woollen garments and bedding in cool tone colours. Patches mostly cut into square and rectangle shapes. Three patches made from a second-hand woollen suit, showcasing the arm with cuff buttons, pocket flap on a hip pocket containing a pocket square and front of vest with buttons. wagga, art quilt australia, expressions: wool quilt prize -
 Flagstaff Hill Maritime Museum and Village
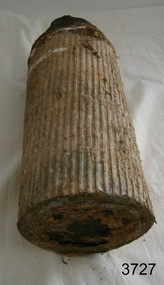
Weapon - Ammunition Shell, late 19th-early 20th century
Ammunition shell was used in a 40 lb Armstrong Rifled Breach Loading (RBL) Gun. The shell was fired into Westernport Bay by the Hastings Battery Field Artillery in late 1800’s or early 1900’s. It was recovered by divers in recent times. It does not contain explosives because the projectile and explosive were separate items. The Armstrong 40 lb BL Gun There were 4 x 40lb Armstrong (RBL) Guns issued to the Ham and Beef Battery at Hastings Victoria. After the Hastings Battery field artillery disbanded, the 4 Guns were transferred from the Hastings Battery to the Warrnambool Battery field artillery in 1904. (There is a photograph of one of these guns on its carriage, pictured in front of the Orderly room (Drill Hall) at Warrnambool, which is now the Library of South West TAFE). The 40lb Armstrong Guns were recalled back to Melbourne when the government issued the updated 4.7inch QF (Quick Firing) Naval Guns, mounted on carriages, to the Warrnambool Garrison Artillery 1907. The Hastings Museum today holds one of the original 40lb Armstrong RBL guns that were at first at Hastings and then Warrnambool, evidenced by tracing the numbers on that gun. This gun has now been restored. Surviving 40 lb Armstrong BL Guns in Australia The Hastings Museum has restored one of the Guns that was at Hastings and then from 1904-1907 in Warrnambool. This Gun is now on display at the Hastings Museum. This ammunition shell from a 40lb Armstrong RBL gun is very significant because of its association with the Warrnambool Battery Field Artillery in the early 1904-1907. It is known that the original 40lb Armstrong RBL gun used in Warrnambool is now restored and on display at the Hastings Museum. Ammunition shell from a 40Ib Armstrong Rifled Breach loading (RBL) Gun. Metal bullet-shaped object, flat base, tapering to cone-shaped tip. Parallel equidistant ridges run from outer edge of base to position where cone shape begins. Tip has a square-shaped hole in the centre and has a very uneven surface. Base has corrosion and metal is flaking away. Does not contain explosives. Remnants of white paint-like substance in several places. From the Hastings, Victoria, area. Late 19th - early 20th century.flagstaff hill, warrnambool, shipwrecked coast, flagstaff hill maritime museum, maritime museum, shipwreck coast, flagstaff hill maritime village, great ocean road, ammunition shell, 40 lb armstrong rbl gun, volunteer corps, war equipment, defence forces, warrnambool bettery field artillery, hastings battery field artillery, defence of warrnambool -
 Flagstaff Hill Maritime Museum and Village
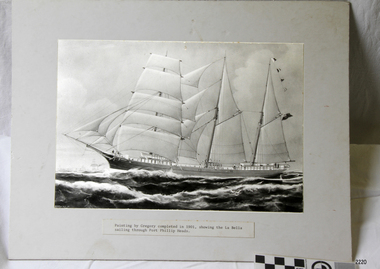
Photograph - Vessel, Sailing Ship, A.V. Gregory, 1901
This photograph is a copy of an original painting by the Australian marine artist A V Gregory (1867-1957), also known as Arthur Victor Gregory. Gregory lived and worked in South Melbourne. He took over the Gregory Studio owned by his father, George Frederick Gregory, painting actively between 1899 and 1932. He usually signed his works as ‘A V Gregory’. Some of his original works have been sold for thousands of dollars. The barque "La Bella" was built in 1893 in Norway. On 31st October she commenced her maiden voyage. After six voyages, the vessel was offered for sale in Hamburg. After much negotiation, she was sold on December 1900 for £3,600 to Mr D C Turnbull and sailed back to New Zealand. The "La Bella" was primarily used on the Australian-New Zealand run, her cargo being timber, coal and produce. In October 1904, she ran aground at Owhira bay, New Zealand. The vessel was subsequently refloated. In November 1904, the "La Bella" attempted to enter Warrnambool Harbour without a pilot aboard. The vessel struck Annabella reef and many members of the crew perished. The "La Bella" captain was later charged and found guilty of negligence. In 1905 he was charged and tried for manslaughter. He died of a heart attack later that year and is buried in an unmarked grave at Melbourne General Cemetery.The detailed image of the vessel depicted in this photograph shows one of the many sail and steam vessels painted by the renowned Victorian marine artist A V Gregory, whose original works are highly valued today by marine collectors.Photograph of a painting of the three-masted sailing ship "La Bella" sailing through Port Phillip Heads. The original painting is by marine artist A V Gregory. A label is pasted below the photograph. The artist's signature is visible.Signed "GREGORY-01" Painted on the ship's bow "LA BELLA" Typed label "Painted by Gregory completed in 1901, showing the La Bella sailing through Port Phillip Heads'.flagstaff hill, flagstaff hill maritime museum and village, warrnambool, maritime museum, maritime village, great ocean road, shipwreck coast, la bella, d c turnbull, warrnambool harbour, lady bay -
 City of Moorabbin Historical Society (Operating the Box Cottage Museum)
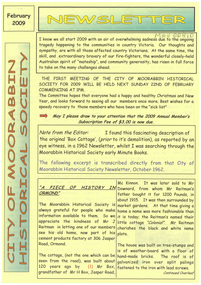
Newsletter, City of Moorabbin Historical Society Feb 2009, February 2009
The City of Moorabbin Historical Society was formed c 1960 by a group of Moorabbin residents who were concerned that the history of the area should be preserved. A good response to a call for items related to the historical area of Moorabbin Shire brought donations of a wide variety of artefacts which are now preserved by the current members of CMHS at Box Cottage Museum . Helen Stanley, Secretary of CMHS, began producing a Newsletter for members in April 2007 to provide current information and well researched items of historical interest.Helen Stanley has produced a bi-monthly Newsletter, 2007 - 2013, for the members of the City of Moorabbin Historical Society that contains well researched interesting historical items, notification of upcoming events, current advice from Royal Australian Historical Society , Museums Australia Victoria and activities of Local Historical Societies. The Newsletter is an important record of the activities of the CMHS. Tom Sheehy, past President of CMHS, was an Historian and Author of ‘Battlers Tamed the Sandbelt’. 2 x A4 paper printed on 3 sides Issue 10 of the bi-monthly, City of Moorabbin Historical Society Newsletter produced by Society member and Secretary, Mrs Helen Stanley in February 2009. The Victorian Bushfire tragedy around Marysville is still unfolding as this Newsletter is written. The first meeting for the year is February 22nd and subscriptions are due. An excerpt is transcribed from the City of Moorabbin Historical Society Newsletter October 1962, “A Piece of History in Ormond” by an unknown eyewitness author, describing the original “Box Cottage” situated in Mr J. Reitman’s cement products factory at 306 Jasper Road, Ormond prior to demolition. The current Editor gives information obtained from further recent research . An Article by Tom Sheehy, past President and Historian, February 1979 “The Vineyards of Moorabbin”. The ‘Brighton Estate” began when Henry Moor brought Vine cuttings from Camden NSW 1848 and they were productive after 3 years. Many Vineyards then appeared from Port Phillip Bay to East Boundary Road and produced 2/3 of the annual Victorian grape crop. Disease or insect caused failure in1858 and the land reverted to market gardens. A coloured photocopied photo of Box Cottage 2005. CITY of MOORABBIN HISTORICAL SOCIETY / FEBRUARY 2009 NEWSLETTERcity of moorabbin historical society, stanley helen, sheehy tom, melbourne, moorabbin, brighton, cheltenham, ormond, bentleigh, vineyards, fruit growing, vine diseases, winemaking, grapes, market gardeners, pioneers, early settlers, moorabbin shire, box cottage museum, dairy, port phillip bay, brighton estate, moor henry, cambden estate, reitman j., reitman w., cement, pottery, jasper road ormond, east boundary road brighton, dendy’s special survey 1851, point nepean road, south road brighton, thomas street brighton, north road brighton, county of bourke, box h., box william, bruton william, brighton brewery, parish of moorabbin, parish of prahran, markets, shingle roof, weather-board, downward mr., mckinnon -
Port Melbourne Historical & Preservation Society
Film - Video Recording - Digital, I Wish I Had Been There, 28 Jul 2020
The Port Melbourne Historical and Preservation made history on the 28 July 2020 when, because of the COVID-19 pandemic, we hosted our first meeting via Zoom.Digital video recording of PMHPS meeting held via Zoom on 28 July 2020. Eight members spoke on the theme “I Wish I Had Been There …” Margaret BRIDE wishes she had there when Wilbraham LIARDET had ridden up and down Bay Street proclaiming the separation of Victoria from New South Wales. John MAY wishes he was there in 1937 when Port Melbourne and Williamstown Football Clubs swapped players. Sue LEONG wishes she was there in July, 1901 in front of the building where she now lives but previously was a stables and carrier’s business. David RADCLIFFE wishes he was there in March, 1924 when the HMS Hood and the HMS Repulse arrived in Port Melbourne. Beris CAMPBELL wishes she was there in 1974 at Arch TODD's Mayoral Ball at Port Melbourne Town Hall. Garry SMART wishes he was there for the Sandridge Council meeting held at the newly built court house on 23 August 1860. Helen BARRY wishes she was there at the Graham Street railway gates where her grandfather proposed to her grandmother. Lex JOHNSON wishes he was there on the last Saturday in August, 1946 when Port Melbourne took on Coburg at North Port Oval.margaret bride, wilbraham frederick evelyn liardet, wfe liardet, separation, john may, port melbourne football club, williamstown football club, sue leong, knight's transport, david radcliffe, hms hood, hms repulse, beris campbell, archibald (arch) todd, celebations - balls, gary smart, local government - municipal district of sandridge, court house, helen barry, lex johnston, coburg football club -
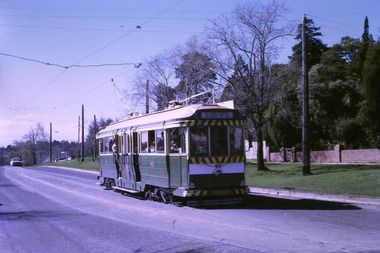 Ballarat Tramway Museum
Photograph - Digital image Set of 9, Tony Smith, 19/09/1971 12:00:00 AM
Yields information about Ballarat Tramways and trams prior to the closure of the tramway system.Set of 9 digital images of Ballarat trams prior to closure, scanned from original slides by Tony Smith, 1971 prior to closure of the system. This set of slides appears to be the last day of operations - 19/9/1971 .1 - 40 south bound in Lydiard St Nth, at the Gregory St Loop. .2 - 40 after passing through the loop .3 - 42, north bound in Lydiard St. North at Macarthur St. .4 - 42 southbound at the Railway station level crossing with the Kennedy Murray Pty Ltd General Carriers building at the station yard in the background. .5 - 42 southbound in Lydiard St North after crossing the railway - taken from the signal box (B) with Reids Palace in the background and the Provincial Hotel. .6 - 35 northbound after passing through the level crossing. .7 - bogie tram crossing the tracks with Ballarat Railway Station in the background. .8 - bogie tram entering the double track section in Lydiard St with Reids Palace in the background. Note the new bus stop bay. .9 - 35 and another bogie in Sturt St, with the Town Hall, Golden Star Chinese Cafe and Georges Fish & Chip shop in the background.trams, tramways, lydiard st nth, gregory st, level crossings, ballarat railway station, sturt st, closure, tram 40, tram 42, tram 35 -
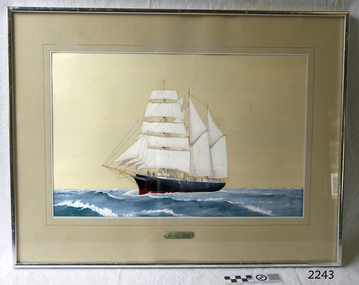 Flagstaff Hill Maritime Museum and Village
Painting - Maritime painting, The La Bella, 1980s
This painting of the “La Bella” is associated with Flagstaff Hill’s collection of artefacts from the wreck of the “La Bella”. It was painted around the 1980s by maritime artist Philip J. Gray. Some 15 – 17 ships are believed to have sunk in Lady Bay, but only two have been discovered on the seafloor; the “La Bella” and the “Edinburgh Castle”. Both wrecks are popular diving sites and are preserved as significant historical marine and marine archaeological sites. The Kosnar Picture Framing and Mirrors Shop identified the "GRAY 3135, Y04/111" as their job number for the framing and said that the label "ANOTHER KOSNAR FEATURE" was last used before about 1990. About artist Philip J. Gray “Philip is one of Australia’s leading maritime artists and his meticulous research and social commentary paintings of ships, such as, the Loch Ard and Schomberg form an important part of Warrnambool’s Flagstaff Hill Maritime Museum.” [Dr Marion Manifold, Artist and Art Historian, 2014] Philip James Gray was born in London but has lived most of his life in Australia. He graduated from a London school of art as an illustrator, specialising in technical and scientific illustration as well as other commercial and applied art. He was also a student for a time of Fyffe Christie - British figurative artist, mural painter and humanitarian – who had a great influence on his career. Philip has always worked as a professional artist and illustrator. Many publications on maritime history have featured his work. His paintings have been released and sold all over the world as limited edition prints. The State Library of Victoria’s ‘Latrobe Collection’ holds two of his paintings. His street painting of ‘The Ashes Contest’ decorates the brick wall of Old Bakery Laneway in Sunbury and a Sunbury café owner commissioned him to paint the ‘Sunbury Pop Festival’ as a remembrance of local history. Philip has been an active member of the Sunbury Art Society in Victoria for several years, serving on the committee for some of that time and being involved in exhibitions. He enjoys helping new artists and sharing his skills and experience. About the “La Bella” The wreck of the La Bella lies at the bottom of the Warrnambool Harbour in Lady Bay. Some 15 ships are believed to have been wrecked there but only two have been discovered on the sea floor; the La Bella and the Edinburgh Castle. Both wrecks are popular diving sites and are preserved as significant historical marine and marine archaeological sites. The story of the final voyage of the La Bella is summarised as follows … The ship from which the sailors were rescued was the three-masted, iron and steel barquentine the La Bella, built in Norway in 1893. She was one of two iron and steel ships by Johan Smith, the company being one of the leading shipping families in Tvedestrand, Norway. She was significant to Norwegian shipping, being one of only 27 iron and steel ships ever built in Norway. La Bella was registered in New Zealand and engaged from 1902 in inter-colonial trading of timber in the pacific, between New Zealand and Australia and was often in Port Phillip Bay, Victoria. On 5th October 1905 the twelve year old La Bella left Lyttleton, New Zealand carrying a cargo of timber bound for Warrnambool, Australia . She was manned by a crew of twelve: the Master, (Captain Mylius, previously 1st Mate of La Bella, appointed Captain to La Bella on 6th February 1903) 2 Mates, Cook, six able seamen, one ordinary seaman and a boy. Bad weather en-route caused her to shelter at Burnie on Tasmania's North West coast. On November 10th, the 37th day of her journey, La Bella approached Warrnambool. Captain Mylius steered her towards Lady Bay Channel in heavy south-west seas and evening mist. He ordered the helmsman to steer for the light. As the ship came round, a tremendous sea struck her on the port quarter, causing her to breach broadside in a north-westerly direction into breakers. The helm was brought round twice more, but each time heavy seas broke over her, the third time throwing the La Bella on to a submerged reef in Lady Bay now known as La Bella Reef (about 100 yards from the Warrnambool breakwater). The sea was so rough that it even wrenched a one-and-a-half ton anchor from its fastenings and into the sea. As Captain Mylius headed to the steel wheelhouse, intending to send up a rocket flare, a huge sea slammed the steel door into him (resulting in massive bruising front and back) Despite his injuries he still managed to set off a blue light, which he held up in his hands. La Bella’s lifeboats were filled with sea water and broke up on their chocks. The blue light was the first indication to people on shore that there was a ship in distress. The Harbour Master, Captain Roe (who lived in the Harbour Master’s House opposite Flagstaff Hill), organised a group of volunteers to crew the lifeboat because the trained crew was unavailable; the crewmen were working on a steamer in Port Fairy at the time. He then poured oil onto the water to try and smooth the sea. At around 11pm three of the crew took shelter in the steel forecastle but the sea crashed into it and broke it up. While the rest of the crew and onlookers watched helplessly in the moonlight the bodies were washed away into the sea, never to be seen again. Some of the crew lashed themselves to the weather rail to keep from being washed away. Watson, the ordinary seaman, became tangled in the rigging lines and was too weak to move, so the 2nd Mate, Robertson, put a line onto him so that he wouldn’t wash off. Around 11pm three of the crew were unconscious from exhaustion. The situation on La Bella was becoming dangerous. The 2nd Mate moved to the ‘house’ and soon afterwards the ship slipped in the heavy sea. The lashings of the 1st Mate and the ‘boy’ Denham had kept them safe until about 2am when they were washed overboard; no one was able to help. One by one, the exhausted crew were being washed overboard, too weak to hold on any longer. During the night the La Bella had broken into two and the deckhouse ran out towards the sea. Two more men drowned when trying to reach the lifeboat. By sunrise the only survivors of the twelve were the Master, 2nd Mate and three seamen. Early in the morning Captain Roe used the rocket apparatus on shore to try and shoot a line to the ship for a safer rescue but each attempt fell short of the target. Several attempts were made by the lifeboat to rescue the stricken sailors, but the rough conditions made this difficult for the boat to get close enough to the ship and the lifeboat had to return to shore. During a final attempt to reach the ship Captain Mylius ordered his men to jump into the sea. Leonard Robertson, 2nd mate, jumped and swam towards the lifeboat, taking hold of the boat hook offered to him. Oscar Rosenholme managed to reach the boat floating on a piece of timber from the ship’s load and a third survivor, Noake, also made the boat. Along with the lifeboat rescue crew, 25 year old William Ferrier rowed his small dingy through the heavy seas and managed to rescue the Captain, whom he landed on the breakwater. Ferrier then returned to the ship to attempt a final rescue, losing his oars and rowlocks into the high sea. Using just a spare paddle he skulled towards the La Bella, reaching her stern in time to cut loose the lone surviving sailor, Payne, from the lashing that held him to the ship; the terrified sailor dropped from the ship and into the dingy. Shortly after the last man was rescued, the La Bella was lifted by a huge wave and crashed back down on the reef; she broke up and sank. The ordeal had lasted ten hours. The survivors were taken to the nearby Bay View Hotel and gratefully received warm food and clothing, medical attention and a place to sleep. In the following days an unidentified body of a young person was washed ashore; it was either Watson or Denham. The body was buried in the Warrnambool cemetery with an appropriate gravestone and inscription. William Ferrier became a national hero as news of the daring rescue spread. In recognition of his bravery in the two daring rescues he was awarded the Silver Medal for Bravery by the Royal Humane Society and was honoured in the letter from the Prime Minister and the Parliament of the Commonwealth, telegrams and a cheque for £20 from the Governor General, over £150 subscribed by the public, including Warrnambool and district and readers of The Argus, and a gold medal from the Glenelg Dinghy Club of South Australia. Ferrier’s rescue efforts are one of the most heroic in Victoria’s shipwreck history. (William Ferrier’s son, Frank, received a similar award almost fifty years later, when he helped rescue four members of the crew on the yacht Merlan, after it ran on to a reef near the Point Lonsdale Lighthouse. ) The wreck of La Bella now lies on her port side in 13 metres of sheltered water inside the reef she struck. The bow section is relatively intact and part of the stern has drifted north-easterly towards the mouth of the Hopkins River. The reef the La Bella struck now bears its name. Those five rescued from the La Bella were Captain George Mylius, Leonard Robertson (2nd Mate, 21 years old), R. Payne, Oscar Rosenholme and Jack Noake. Those seven who lost their lives were Mr Coulson (1st mate), Charles Jackman (cook) Gustave Johnson, Pierre Johann and Robert Gent (all able seamen), Harry Watson (ordinary seaman) and Jack Denham (ship’s boy). Captain Mylius was found guilty of careless navigation; he had sailed into the bay without the services of a pilot. His Master Certificate was suspended for twelve months. Later he was also charged with manslaughter of one of the crew who had died when the La Bella was wrecked, but found not guilty. The event’s adverse publicity and damage to his career took a toll on his health and he died of a heart attack six months after the wreck; he was only thirty-seven. His body was buried in the Melbourne General Cemetery. The La Bella was “the best documented of all sailing ships owned in New Zealand”. Her record books, ship logs, correspondence and supporting papers are still available. At the time of the tragedy she was owned by Messers David C.Turnbull and Co. of Timaru, New Zealand timber merchants and shipping agents, who had purchased her on 13th December 1901. A detailed account of the last journey of La Bella can be read in “Leonard Robertson, the Whangaroa & La Bella” written by Jack Churchouse, published in 1982 by Millwood Press Ltd, Wellington, NZ.This painting of the La Bella by Philip J. Gray is part of the La Bella Collection and is significant at both a local and state level. Its connection to the La Bella shipwreck and the rescue of five survivors highlights the dangers of Victoria’s Shipwreck Coast. The painting connects with other objects and artefacts associated with the wreck of the La Bella. This painting is significant because of its association with the sailing ship “La Bella” . the “La Bella” is of local and state and national significance. It is one of the only two shipwrecks discovered in Lady Bay, Warrnambool, out of the 15-17 shipwrecks in the bay. Large framed painting of the three masted barquentine "La Bella" fully rigged. Painted by Phillip J Gray. A fine printed line squares off the painting. Beneath painting and line is a gold plate with black copper plate designating "La Bella" is encased in glass, surrounded by a silver-metal frame. Yellow and brown paper label is adhered to back of painting. Picture framed by Kosnar in Melbourne."The La Bella" on gold plaque Logo of "K" inside a brown square. "GRAY 3135, Y04/111", "ANOTHER KOSNAR FEATURE" flagstaff hill, warrnambool, shipwrecked-coast, flagstaff-hill, flagstaff-hill-maritime-museum, maritime-museum, shipwreck-coast, flagstaff-hill-maritime-village, painting, la bella, artist phillip j gray, maritime painting, lady bay warrnambool -
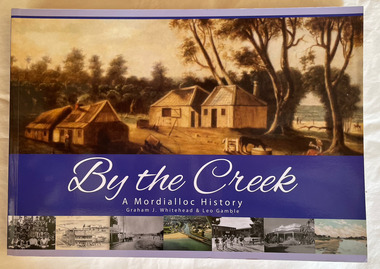 City of Moorabbin Historical Society (Operating the Box Cottage Museum)
Book, Whitehead, Graham et al, By The Creek : A Mordialloc History, 2014
Foreword -- Acknowledgements -- By the creek -- Tragedy of the Bunurong people: the Mordialloc connection -- The Muddy creek -- Mordialloc Pier -- They're racing at Mordialloc -- Official opening of Mordialloc Railway Station -- Politicians at Mordialloc -- Mordialloc baths -- Mornington versus Mordialloc: the fateful football match -- FancyDress Carnival at Mordialloc -- The Mordialloc baby murders -- Mordialloc great war memorials -- Spanish flu -- The freemasons at Mordizlloc -- The beginnings of Mordialloc College -- A place to play: Mordialloc's Rotunda -- The Mordialloc brass band -- Mordialloc Carnival 1923-1939 -- Mordialloc Carnival 1940-1968 -- Typhoid outbreak and Mordialloc -- Onion odour at Mordialloc -- Desecration of beach pavilion -- Shindig at the Mordialloc Life Saving Club -- Mordialloc Community and Youth Centre -- Mordialloc Elderly Citizens' Club -- Unforgettable memories: Mordialloc meals on wheels -- No pipeline across the bay -- Pedestrian bridge across Mordialloc Creek -- Page sources of illustrations and photographers -- Index.256 pages : illustrations, portraits non-fictionForeword -- Acknowledgements -- By the creek -- Tragedy of the Bunurong people: the Mordialloc connection -- The Muddy creek -- Mordialloc Pier -- They're racing at Mordialloc -- Official opening of Mordialloc Railway Station -- Politicians at Mordialloc -- Mordialloc baths -- Mornington versus Mordialloc: the fateful football match -- FancyDress Carnival at Mordialloc -- The Mordialloc baby murders -- Mordialloc great war memorials -- Spanish flu -- The freemasons at Mordizlloc -- The beginnings of Mordialloc College -- A place to play: Mordialloc's Rotunda -- The Mordialloc brass band -- Mordialloc Carnival 1923-1939 -- Mordialloc Carnival 1940-1968 -- Typhoid outbreak and Mordialloc -- Onion odour at Mordialloc -- Desecration of beach pavilion -- Shindig at the Mordialloc Life Saving Club -- Mordialloc Community and Youth Centre -- Mordialloc Elderly Citizens' Club -- Unforgettable memories: Mordialloc meals on wheels -- No pipeline across the bay -- Pedestrian bridge across Mordialloc Creek -- Page sources of illustrations and photographers -- Index.mordialloc, typhoid, mordialloc creek -
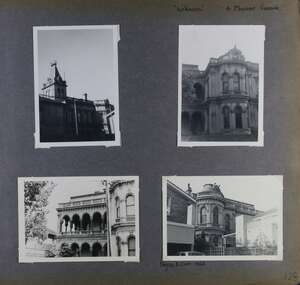 Glen Eira Historical Society
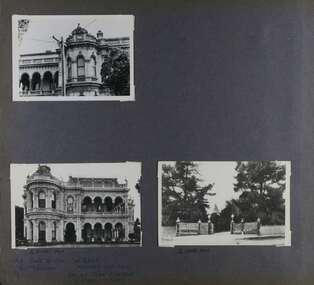
Album - Album page, Labassa, 4 Manor Grove, Circa 1972
This photograph is part of the Caulfield Historical Album 1972. This album was created in approximately 1972 as part of a project by the Caulfield Historical Society to assist in identifying buildings worthy of preservation. The album is related to a Survey the Caulfield Historical Society developed in collaboration with the National Trust of Australia (Victoria) and Caulfield City Council to identify historic buildings within the City of Caulfield that warranted the protection of a National Trust Classification. Principal photographer thought to be Trevor Hart, member of Caulfield Historical Society. Most photographs were taken between 1966-1972 with a small number of photographs being older and from unknown sources. All photographs are black and white except where stated, with 386 photographs over 198 pages. HISTORY:-- From Victorian Heritage Database citation for Labassa https://vhd.heritagecouncil.vic.gov.au/places/278 as at (26/10/2020) Labassa, Caulfield is one of Melbourne's most lavishly decorated nineteenth century mansions. It resulted from the extensive remodelling in 1890, of an earlier house, known as Sylliott Hill, which was begun in 1862-3 for lawyer, Richard A. Billing. The land at the corner of Balaclava and Orrong Roads was first acquired in 1854 by William Lyall, transferred to his partner, John Mickle, in 1859, who also acquired the adjoining allotment in Balaclava Road, and the three allotments were conveyed to Billing. His first eight-roomed house was extended significantly in 1873 into a twenty-roomed house by architects Crouch and Wilson, who were possibly also responsible for the first house. This reflected Billing's success as a barrister, and he resided at this property until his death in 1882. In 1883 prominent Melbourne businessman, Alexander William Robertson, leased the Sylliott Hill property from Billing's widow, and in 1885 he purchased the adjoining allotment in Balaclava Road. He purchased the Billing's property in 1887 and renamed the 6.31 hectare property, Ontario. In 1889-90, Robertson commissioned the German born architect, John A. B. Koch, to extensively remodel the house into a thirty-five roomed mansion. The existing house was extended and altered, largely resulting in the nineteenth century mansion as it now appears. After Robertson's death in 1896, the house was tenanted until it was eventually sold to the mining millionaire, John Boyd Watson, in 1904. He renamed the property Labassa and carried out repair and re-decoration work to the house. In the early twentieth century, many large estates were subdivided into smaller allotments as the demand for land grew and it became difficult to maintain such large estates. After Watson's death in 1911, portions of the Labassa estate were offered for sale, with Mrs Watson retaining a 1.73 hectare portion containing the house. In 1913 forty-six allotments were auctioned at Labassa Estate, with the formation of Labassa Grove and Ontario Street to the east of the property. Labassa was first recorded as containing flats in 1923 and in the late 1920s, the owner, Robert Hannon, built a red brick block of flats adjacent to the house. Subdivision continued, until the National Trust of Australia (Victoria) purchased the house in 1980 and subsequently purchased adjoining sites, one to the south-east in 1984 (house demolished in 1988) and to the west in 1988. Labassa as it now stands is substantially as it appeared when Koch completed the work in 1890. The original two storey house was transformed into a French Renaissance style mansion, with the addition of a two level L-shaped arcaded verandah and two prominent terminating bays to the south and the east. The building is of unpainted cement render with dressed bluestone plinths, balustraded parapet and steep, slate covered, flat topped mansard roofs behind. A truncated conical roof is a feature of the south bay and a helmeted head is incorporated in the parapet over the east bay. The main south and east facades incorporate many cast cement details, including sculptures, elaborate cornices, swagged Corinthian columns and caryatid consoles flanking the entrance porch, as well as pink marble panels and imitation marble, or scagliola, on curved surfaces. At the rear of the building is a two storey wing and a single storey cottage, the former being connected to the main house by a tower. This section of the house was constructed in 1873. The estate at its peak included stables (1873), conservatory (probably 1890) and a tennis pavilion (probably 1890). All of these outbuildings survive, with the stables and conservatory being converted for residential use after 1922. Internally a range of decorative treatments remain from the late nineteenth century and the early twentieth century, both from the Robertson and Watson periods of occupancy. These include wallpapers, ceiling decoration, chimney pieces, mouldings, joinery and decorative glass. From Victorian Heritage Database citation for H0135 Labassa 2/2A Manor Grove Caulfield North https://vhd.heritagecouncil.vic.gov.au/places/278 as at (26/10/2020) HOW IS IT SIGNIFICANT? Labassa, Caulfield is of architectural, aesthetic and historical significance to the State of Victoria. WHY IS IT SIGNIFICANT? Labassa, Caulfield is of architectural significance as the most prominent example of a small number of houses built in Australia in the French Renaissance style. It is of further note due to the German interpretation of the style and the use of Hellenistic sources, via Germany. It is exceptional for its lavish treatment externally, including marble, scagliola, caryatids, swagged columns, mansard roofs and ornamental cresting. Labassa is of architectural significance as the most important surviving example of German architect, John Koch's domestic work. He undertook a large variety of work in Melbourne, including a number of houses, however Labassa is the most lavish example of his work. Labassa is of aesthetic significance for its outstanding assemblage of late nineteenth and early twentieth century European style interior decoration, which remain remarkably intact. These include a trompe l'oeil ceiling, painted ceilings, embossed imitation leather and other papers, chimney pieces, ceramic tilework, oak parquetry and stained glass, including a tripartite window by Ferguson and Urie, probably dating from the 1873 period. Labassa is of historical significance as an illustrative example of the wealth acquired by a number of prominent Victorian families in the second half of the 19th century. The early development of the property, Sylliott Hill, was due to the wealth acquired by Richard Billing, barrister and fifth Victorian to be appointed Queen's Counsel in 1878. The significant development in 1890 of Ontario, is illustrative of the wealth of Alexander Robertson, a partner in Cobb and Co., a director of Goldsborough Mort & Co., and a pastoral speculator. John B. Watson, whose father had acquired great wealth from the goldfields of Bendigo and subsequently invested in city and country properties, was the third resident to impact on the house, particularly the interiors. The Labassa estate is of historical significance as an illustrative example of the development that occurred in such suburbs as Caulfield in the 1880s due to the land boom, its proximity to Melbourne and the establishment of the Melbourne to Gippsland railway in 1879. It is also illustrative of an estate which succumbed to the pressures of subdividing in the early twentieth century, as properties became difficult to maintain and demand for land close to the city grew. It was typically divided into flats in the 1920s and was used as such for about sixty years. It is of historical significance for its associations with the remnants of the earlier estate which remain extant. These include the stables, conservatory (H2005) and tennis pavilion which all remain on separate sites. Also significant are the remains of early electrical wiring and fittings. Labassa was one of the first houses in Caulfield to be electrified and some of the original wires remain. [Online Data Upgrade Project 2004]Page 128 of Photograph Album with four photographs (two portrait and two landscape) of Labassa.Handwritten: "Labassa" 4 Manor Grove [top right] / Neg 232 8 Oct 1966 [under bottom right photo] / 128 [bottom right]trevor hart, bracketed eaves, slate roof, bay windows, decorative brackets, caulfield north, labassa, richard a. billing, balaclava road, orrong road, sylliott hill, william lyall, crouch and wilson, alexander william robertson, ontario, 1880's, john a. b. koch, mansion, john boyd watson, labassa grove, french renaissance style, l-shaped arcaded verandah, bluestone plinths, balustraded parapet, flat topped mansard roofs, conical roof, elaborate cornices, corinthian columns, caryatid consoles, marble panels, imitation marble, scagliola, tower, conservatory, stables, tennis pavilion, mouldings, decorative glass, caryatids, swagged columns, ornamental cresting, trompe l'oeil ceiling, embossed imitation leather, oak parquetry, stained glass, tripartite window, triple window, ferguson and urie, 1870's, flats, 1920's, electric wiring, 1860's, verandahs, curved windows, arched windows, italianate, terraces, gargoyles, ornamentation, ornate entrance, la bassa, manor grove, st kilda east, victorian, cast iron work, john koch, richard billing, architects, electrification, john mickle, land subdivision, mrs watson, labassa estate, robert hannon, national trust of australia (victoria), sculpture -
 Glen Eira Historical Society
Album - Album page, Labassa, 4 Manor Grove, Circa 1972
This photograph is part of the Caulfield Historical Album 1972. This album was created in approximately 1972 as part of a project by the Caulfield Historical Society to assist in identifying buildings worthy of preservation. The album is related to a Survey the Caulfield Historical Society developed in collaboration with the National Trust of Australia (Victoria) and Caulfield City Council to identify historic buildings within the City of Caulfield that warranted the protection of a National Trust Classification. Principal photographer thought to be Trevor Hart, member of Caulfield Historical Society. Most photographs were taken between 1966-1972 with a small number of photographs being older and from unknown sources. All photographs are black and white except where stated, with 386 photographs over 198 pages. HISTORY:-- From Victorian Heritage Database citation for Labassa https://vhd.heritagecouncil.vic.gov.au/places/278 as at (26/10/2020) Labassa, Caulfield is one of Melbourne's most lavishly decorated nineteenth century mansions. It resulted from the extensive remodelling in 1890, of an earlier house, known as Sylliott Hill, which was begun in 1862-3 for lawyer, Richard A. Billing. The land at the corner of Balaclava and Orrong Roads was first acquired in 1854 by William Lyall, transferred to his partner, John Mickle, in 1859, who also acquired the adjoining allotment in Balaclava Road, and the three allotments were conveyed to Billing. His first eight-roomed house was extended significantly in 1873 into a twenty-roomed house by architects Crouch and Wilson, who were possibly also responsible for the first house. This reflected Billing's success as a barrister, and he resided at this property until his death in 1882. In 1883 prominent Melbourne businessman, Alexander William Robertson, leased the Sylliott Hill property from Billing's widow, and in 1885 he purchased the adjoining allotment in Balaclava Road. He purchased the Billing's property in 1887 and renamed the 6.31 hectare property, Ontario. In 1889-90, Robertson commissioned the German born architect, John A. B. Koch, to extensively remodel the house into a thirty-five roomed mansion. The existing house was extended and altered, largely resulting in the nineteenth century mansion as it now appears. After Robertson's death in 1896, the house was tenanted until it was eventually sold to the mining millionaire, John Boyd Watson, in 1904. He renamed the property Labassa and carried out repair and re-decoration work to the house. In the early twentieth century, many large estates were subdivided into smaller allotments as the demand for land grew and it became difficult to maintain such large estates. After Watson's death in 1911, portions of the Labassa estate were offered for sale, with Mrs Watson retaining a 1.73 hectare portion containing the house. In 1913 forty-six allotments were auctioned at Labassa Estate, with the formation of Labassa Grove and Ontario Street to the east of the property. Labassa was first recorded as containing flats in 1923 and in the late 1920s, the owner, Robert Hannon, built a red brick block of flats adjacent to the house. Subdivision continued, until the National Trust of Australia (Victoria) purchased the house in 1980 and subsequently purchased adjoining sites, one to the south-east in 1984 (house demolished in 1988) and to the west in 1988. Labassa as it now stands is substantially as it appeared when Koch completed the work in 1890. The original two storey house was transformed into a French Renaissance style mansion, with the addition of a two level L-shaped arcaded verandah and two prominent terminating bays to the south and the east. The building is of unpainted cement render with dressed bluestone plinths, balustraded parapet and steep, slate covered, flat topped mansard roofs behind. A truncated conical roof is a feature of the south bay and a helmeted head is incorporated in the parapet over the east bay. The main south and east facades incorporate many cast cement details, including sculptures, elaborate cornices, swagged Corinthian columns and caryatid consoles flanking the entrance porch, as well as pink marble panels and imitation marble, or scagliola, on curved surfaces. At the rear of the building is a two storey wing and a single storey cottage, the former being connected to the main house by a tower. This section of the house was constructed in 1873. The estate at its peak included stables (1873), conservatory (probably 1890) and a tennis pavilion (probably 1890). All of these outbuildings survive, with the stables and conservatory being converted for residential use after 1922. Internally a range of decorative treatments remain from the late nineteenth century and the early twentieth century, both from the Robertson and Watson periods of occupancy. These include wallpapers, ceiling decoration, chimney pieces, mouldings, joinery and decorative glass.From Victorian Heritage Database citation for H0135 Labassa 2/2A Manor Grove Caulfield North https://vhd.heritagecouncil.vic.gov.au/places/278 as at (26/10/2020) HOW IS IT SIGNIFICANT? Labassa, Caulfield is of architectural, aesthetic and historical significance to the State of Victoria. WHY IS IT SIGNIFICANT? Labassa, Caulfield is of architectural significance as the most prominent example of a small number of houses built in Australia in the French Renaissance style. It is of further note due to the German interpretation of the style and the use of Hellenistic sources, via Germany. It is exceptional for its lavish treatment externally, including marble, scagliola, caryatids, swagged columns, mansard roofs and ornamental cresting. Labassa is of architectural significance as the most important surviving example of German architect, John Koch's domestic work. He undertook a large variety of work in Melbourne, including a number of houses, however Labassa is the most lavish example of his work. Labassa is of aesthetic significance for its outstanding assemblage of late nineteenth and early twentieth century European style interior decoration, which remain remarkably intact. These include a trompe l'oeil ceiling, painted ceilings, embossed imitation leather and other papers, chimney pieces, ceramic tilework, oak parquetry and stained glass, including a tripartite window by Ferguson and Urie, probably dating from the 1873 period. Labassa is of historical significance as an illustrative example of the wealth acquired by a number of prominent Victorian families in the second half of the 19th century. The early development of the property, Sylliott Hill, was due to the wealth acquired by Richard Billing, barrister and fifth Victorian to be appointed Queen's Counsel in 1878. The significant development in 1890 of Ontario, is illustrative of the wealth of Alexander Robertson, a partner in Cobb and Co., a director of Goldsborough Mort & Co., and a pastoral speculator. John B. Watson, whose father had acquired great wealth from the goldfields of Bendigo and subsequently invested in city and country properties, was the third resident to impact on the house, particularly the interiors. The Labassa estate is of historical significance as an illustrative example of the development that occurred in such suburbs as Caulfield in the 1880s due to the land boom, its proximity to Melbourne and the establishment of the Melbourne to Gippsland railway in 1879. It is also illustrative of an estate which succumbed to the pressures of subdividing in the early twentieth century, as properties became difficult to maintain and demand for land close to the city grew. It was typically divided into flats in the 1920s and was used as such for about sixty years. It is of historical significance for its associations with the remnants of the earlier estate which remain extant. These include the stables, conservatory (H2005) and tennis pavilion which all remain on separate sites. Also significant are the remains of early electrical wiring and fittings. Labassa was one of the first houses in Caulfield to be electrified and some of the original wires remain. [Online Data Upgrade Project 2004]Page 129 of Photograph Album with three landscape photographs of Labassa. One of the photographs is of Labassa's drive and gates.Handwritten: 4 JUNE 1910 / SALE JUNE 28 1910 "LA BASSA' / "AUSTRALASIAN" FORMERLY "ONTARIO"/ RES OF JOHN B WATSON / 15 ACRES 3 ROADS [under bottom left photo] / 4 JUNE 1910 [under bottom right photo] / 129 [bottom left]trevor hart, bracketed eaves, intricate lacework, slate roof, bay windows, decorative brackets, caulfield north, labassa, richard a. billing, balaclava road, orrong road, sylliott hill, william lyall, crouch and wilson, alexander william robertson, ontario, 1880's, john a. b. koch, mansion, john boyd watson, labassa grove, french renaissance style, l-shaped arcaded verandah, bluestone plinths, balustraded parapet, flat topped mansard roofs, conical roof, elaborate cornices, corinthian columns, caryatid consoles, marble panels, imitation marble, scagliola, tower, conservatory, stables, tennis pavilion, mouldings, decorative glass, caryatids, swagged columns, ornamental cresting, trompe l'oeil ceiling, embossed imitation leather, oak parquetry, stained glass, tripartite window, triple window, ferguson and urie, 1870's, flats, 1920's, electric wiring, 1860's, verandahs, curved windows, arched windows, italianate, terraces, gargoyles, ornamentation, ornate entrance, la bassa, manor grove, st kilda east, gates, cast iron work, richard billing, architects, john koch, electrification, victorian style, drives, john mickle, land subdivision, mrs watson, labassa estate, robert hannon, national trust of australia (victoria), sculpture -
 Flagstaff Hill Maritime Museum and Village
Postcard - People, Bill Ferrier - rescuer, 11th November, 1905
The postcard shows a photograph of William Ferrier, the 25-year-old Warrnambool fisherman from South Warrnambool whose rescue of two sailors from the wrecked La Bella made him an overnight National hero, quoted as “one of the most heroic rescues in Victoria’s shipwreck history”. The La Bella was wrecked on 10th November 1905 and the photograph was taken on the next day. In the photograph, William Ferrier is seated in the centre, with four of the five survivors beside him: (from left to right) Leonard Robertson, R. Payne, Oscar Rosenholme and Jack Noake. The photograph was taken by Foyle Photography Studio in Warrnambool, originally owned by James Charles Foyle. He previously had a photographic studio in Melbourne 1882 1887, then opened “Foyle’s Photo Card Studios” in Liebig St, Warrnambool. James Foyle died on 13th July 1905 and his son and daughter, Charles and Lilian Foyle continued on with the business until 1945. This photograph was most likely taken by either Charles or Lilian Foyle. The story of William Ferrier’s brave act follows on below … The ship from which the sailors were rescued was the three-masted, iron and steel barquentine the La Bella, built in Norway in 1893. She was one of two iron and steel ships by Johan Smith, the company was one of the leading shipping families in Tvedestrand, Norway. She was significant to Norwegian shipping, being one of only 27 iron and steel ships ever built in Norway. She was registered in New Zealand and engaged from 1902 in inter-colonial trading of timber in the Pacific, between New Zealand and Australia and was often in Port Phillip Bay, Victoria. On 5th October 1905, the twelve-year-old La Bella left Lyttleton, New Zealand carrying a cargo of timber bound for Warrnambool, Australia. She was manned by a crew of twelve: the Master, (Captain Mylius, previously 1st Mate of La Bella, appointed Captain to La Bella on 6th February 1903) 2 Mates, Cook, six able seamen, one ordinary seaman and a boy. Bad weather en route caused her to shelter at Burnie on Tasmania's North West coast. On November 10th, the 37th day of her journey, La Bella approached Warrnambool. Captain Mylius steered her towards Lady Bay Channel in heavy south-west seas and evening mist. He ordered the helmsman to steer for the light. As the ship came round, a tremendous sea struck her on the port quarter, causing her to breach broadside in a northwesterly direction into breakers. The helm was brought round twice more, but each time heavy seas broke over her, the third time throwing the La Bella on to a submerged reef in Lady Bay now known as La Bella Reef (about 100 yards from the Warrnambool breakwater). The sea was so rough that it even wrenched a one-and-a-half ton anchor from its fastenings and into the sea. As Captain Mylius headed to the steel wheelhouse, intending to send up a rocket flare, a huge sea slammed the steel door into him (resulting in massive bruising front and back) Despite his injuries he still managed to set off a blue light, which he held up in his hands. La Bella’s lifeboats were filled with seawater and broke up on their chocks. The blue light was the first indication to people on the shore that there was a ship in distress. The Harbour Master, Captain Roe (who lived in the Harbour Master’s House opposite Flagstaff Hill), organised a group of volunteers to crew the lifeboat because the trained crew was unavailable; the crewmen were working on a steamer in Port Fairy at the time. He then poured oil onto the water to try and smooth the sea. At around 11 pm three of the crew took shelter in the steel forecastle but the sea crashed into it and broke it up. While the rest of the crew and onlookers watched helplessly in the moonlight the bodies were washed away into the sea, never to be seen again. Some of the crew lashed themselves to the weather rail to keep from being washed away. Watson, the ordinary seaman, became tangled in the rigging lines and was too weak to move, so the 2nd Mate, Robertson, put a line onto him so that he wouldn’t wash off. Around 11 pm three of the crew were unconscious from exhaustion. The situation on La Bella was becoming dangerous. The 2nd Mate moved to the ‘house’ and soon afterwards the ship slipped in the heavy sea. The lashings of the 1st Mate and the ‘boy’ Denham had kept them safe until about 2 am when they were washed overboard; no one was able to help. One by one, the exhausted crew were being washed overboard, too weak to hold on any longer. During the night the La Bella had broken into two and the deckhouse ran out towards the sea. Two more men drowned when trying to reach the lifeboat. By sunrise, the only survivors of the twelve were the Master, 2nd Mate and three seamen. Early in the morning, Captain Roe used the rocket apparatus on shore to try and shoot a line to the ship for a safer rescue but each attempt fell short of the target. Several attempts were made by the lifeboat to rescue the stricken sailors, but the rough conditions made this difficult for the boat to get close enough to the ship and the lifeboat had to return to shore. During a final attempt to reach the ship Captain Mylius ordered his men to jump into the sea. Leonard Robertson, 2nd mate, jumped and swam towards the lifeboat, taking hold of the boat hook offered to him. Oscar Rosenholme managed to reach the boat floating on a piece of timber from the ship’s load and a third survivor, Noake, also made the boat. Along with the lifeboat rescue crew, 25-year-old William Ferrier rowed his small dingy through the heavy seas and managed to rescue the Captain, whom he landed on the breakwater. Ferrier then returned to the ship to attempt a final rescue, losing his oars and rowlocks into the high sea. Using just a spare paddle he skulled towards the La Bella, reaching her stern in time to cut loose the lone surviving sailor, Payne, from the lashing that held him to the ship; the terrified sailor dropped from the ship and into the dingy. Shortly after the last man was rescued, the La Bella was lifted by a huge wave and crashed back down on the reef; she broke up and sank. The ordeal had lasted ten hours. The survivors were taken to the nearby Bay View Hotel and gratefully received warm food and clothing, medical attention and a place to sleep. In the following days, an unidentified body of a young person had washed ashore; it was either Watson or Denham. The body was buried in the Warrnambool cemetery with an appropriate gravestone and inscription. William Ferrier became a national hero as news of the daring rescue spread. In recognition of his bravery in the two daring rescues, he was awarded the Silver Medal for Bravery by the Royal Humane Society and was honoured in the letter from the Prime Minister and the Parliament of the Commonwealth, telegrams and a cheque for £20 from the Governor-General, over £150 subscribed by the public, including Warrnambool and district and readers of The Argus, and a gold medal from the Glenelg Dinghy Club of South Australia. Ferrier’s rescue efforts are one of the most heroic in Victoria’s shipwreck history. (William Ferrier’s son, Frank, received a similar award almost fifty years later when he helped rescue four members of the crew on the yacht Merlan after it ran on to a reef near the Point Lonsdale Lighthouse. ) The wreck of La Bella now lies on her port side in 13 metres of sheltered water inside the reef she struck. The bow section is relatively intact and part of the stern has drifted north-easterly towards the mouth of the Hopkins River. The reef the La Bella struck now bears its name. Those five rescued from the La Bella were Captain George Mylius, Leonard Robertson (2nd Mate, 21 years old), R. Payne, Oscar Rosenholme and Jack Noake. Those seven who lost their lives were Mr Coulson (1st mate), Charles Jackman (cook) Gustave Johnson, Pierre Johann and Robert Gent (all able seamen), Harry Watson (ordinary seaman) and Jack Denham (ship’s boy), Captain Mylius was found guilty of careless navigation; he had sailed into the bay without the services of a pilot. His Master Certificate was suspended for twelve months. Later he was also charged with manslaughter of one of the crew who had died when the La Bella was wrecked but found not guilty. The event’s adverse publicity and damage to his career took a toll on his health and he died of a heart attack six months after the wreck; he was only thirty-seven. His body was buried in the Melbourne General Cemetery. The La Bella was “the best documented of all sailing ships owned in New Zealand”. Her record books, ship logs, correspondence and supporting papers are still available. At the time of the tragedy, she was owned by Messers David C.Turnbull and Co. of Timaru, New Zealand timber merchants and shipping agents, who had purchased her on 13th December 1901. A detailed account of the last journey of La Bella can be read in “Leonard Robertson, the Whangaroa & La Bella” written by Jack Churchouse, published in 1982 by Millwood Press Ltd, Wellington, NZ. As well as this postcard, Flagstaff Hill’s La Bella Collection includes a photograph of the wrecked La Bella, a brass rail holder and the letter from the Prime Minister and other Members of Parliament that was sent to William Ferrier to commend him for his bravery. Some 15 – 17 ships are believed to have sunk in Lady Bay, but only two have been discovered on the seafloor; the “La Bella” and the “Edinburgh Castle”. Both wrecks are popular diving sites and are preserved as significant historical marine and marine archaeological sites. This postcard is part of the La Bella Collection and is significant at both a local and state level. Its connection to the La Bella shipwreck and the rescue of five survivors highlights the dangers of Victoria’s Shipwreck Coast. The photograph of William Ferrier and four of the five survivors demonstrates the bravery of ordinary Australians who risked their lives to save victims of shipwrecks along the coast. The postcard is significant to the history of Warrnambool as it portrays William Ferrier, a local fisherman whose descendants continue to live in the area. It highlights the way of life of people who lived in coastal towns in 19th century Victoria and the effects of shipwrecks upon them. The postcard connects to the congratulatory letter which was sent to William Ferrier by the Prime Minister and Government of Australia and demonstrates the importance they attached to his efforts for Victoria and to Australia. The postcard is also an example of the photography of Foyle Photographers who were in the town of Warrnambool from the late 1800’s. Charles and Lillian Foyle took over the business when their father James died in 1905. Lillian Foyle is significant as the first woman photographer in Warrnambool. It is not known whether Charles of Lillian took this photograph. This postcard is significant because of its association with the sailing ship “La Bella”. The “La Bella” is of local and state and national significance. It is one of the only two shipwrecks discovered in Lady Bay, Warrnambool, out of the 15-17 shipwrecks in the bay. Sepia photograph of William (Bill) Ferrier (seated in the middle), heroic rescuer of two crew members of the La Bella, wrecked at Warrnambool. The photograph is a postcard and shows five men dressed formally in suits and hats. Printed below the photograph are the name and place of the photographer, a royal crest and the details of two patrons of the photographer. Also below the photograph are some handwritten words in black pen. On the back of the postcard is a handwritten message in the same writing as the front.Printed on the front of the card is “Foyle, WARRNAMBOOL” “PATRONS: / HIS ROYAL HIGHNESS THE DUKE OF CORNWALL & YORK. / HIS EXCELLENCY LORD BRAS_ EY, R.O.B.” Handwritten on the front of the card is “Bill Ferrier / rescuer / Oh my hero _ _ _ “ Handwritten on the back of the card is a message. “La Bella” Wrecked off W.Bool Breakwater Nov. 1906 (_ _ _ _ show night) Payne Noake Rosenholme Robertson and Capt Mylius (saved) (moonlight bright) Watson (_ _ _ _ boy) Richwoud [possibly Richmond] drowned” and signed “Desdewoua [possibly Desdemona] Slogos”la bella, foyle, william ferrier, bill ferrier, lady bay, 1905, 10th november 1905, 11th november 1905, parliament of the commonwealth, royal humane society medal, flagstaff hill, warrnambool, shipwrecked coast, flagstaff hill maritime museum, maritime museum, shipwreck coast, flagstaff hill maritime village -
 Flagstaff Hill Maritime Museum and Village
Letter - William Ferrier, 14th November 1905
The letter to William Ferrier of South Warrnambool from the Prime Minister and the Parliament of the Commonwealth recognised the significance of William’s brave and courageous lifesaving act to the people of Australia; “They all feel that your conduct was worthy of the best deeds done by British sailors in the past and they are proud to know that Australia can produce such as you.” The story of that brave rescue follows on below … The ship from which the sailors were rescued was the three-masted, iron and steel barquentine the La Bella, built in Norway in 1893. She was one of two iron and steel ships by Johan Smith, The company was one of the leading shipping families in Tvedestrand, Norway. She was significant to Norwegian shipping, being one of only 27 iron and steel ships ever built in Norway. She was registered in New Zealand and engaged from 1902 in inter-colonial trading of timber in the Pacific, between New Zealand and Australia and was often in Port Phillip Bay, Victoria. On 5th October 1905, the twelve-year-old La Bella left Lyttleton, New Zealand carrying a cargo of timber bound for Warrnambool, Australia. She was manned by a crew of twelve: the Master, (Captain Mylius, previously 1st Mate of La Bella, appointed Captain to La Bella on 6th February 1903) 2 Mates, Cook, six able seamen, one ordinary seaman and a boy. Bad weather en route caused her to shelter at Burnie on Tasmania's North West coast. On November 10th, the 37th day of her journey, La Bella approached Warrnambool. Captain Mylius steered her towards Lady Bay Channel in heavy south-west seas and evening mist. He ordered the helmsman to steer for the light. As the ship came round, a tremendous sea struck her on the port quarter, causing her to breach broadside in a north-westerly direction into breakers. The helm was brought round twice more, but each time heavy seas broke over her, the third time throwing the La Bella on to a submerged reef in Lady Bay now known as La Bella Reef (about 100 yards from the Warrnambool breakwater). The sea was so rough that it even wrenched a one-and-a-half ton anchor from its fastenings and into the sea. As Captain Mylius headed to the steel wheelhouse, intending to send up a rocket flare, a huge sea slammed the steel door into him (resulting in massive bruising front and back) Despite his injuries he still managed to set off a blue light, which he held up in his hands. La Bella’s lifeboats were filled with seawater and broke up on their chocks. The blue light was the first indication to people on the shore that there was a ship in distress. The Harbour Master, Captain Roe (who lived in the Harbour Master’s House opposite Flagstaff Hill), organised a group of volunteers to crew the lifeboat because the trained crew was unavailable; the crewmen were working on a steamer in Port Fairy at the time. He then poured oil onto the water to try and smooth the sea. At around 11 pm three of the crew took shelter in the steel forecastle but the sea crashed into it and broke it up. While the rest of the crew and onlookers watched helplessly in the moonlight the bodies were washed away into the sea, never to be seen again. Some of the crew lashed themselves to the weather rail to keep from being washed away. Watson, the ordinary seaman, became tangled in the rigging lines and was too weak to move, so the 2nd Mate, Robertson, put a line onto him so that he wouldn’t wash off. Around 11 pm three of the crew were unconscious from exhaustion. The situation on La Bella was becoming dangerous. The 2nd Mate moved to the ‘house’ and soon afterwards the ship slipped in the heavy sea. The lashings of the 1st Mate and the ‘boy’ Denham had kept them safe until about 2 am when they were washed overboard; no one was able to help. One by one, the exhausted crew were being washed overboard, too weak to hold on any longer. During the night the La Bella had broken into two and the deckhouse ran out towards the sea. Two more men drowned when trying to reach the lifeboat. By sunrise, the only survivors of the twelve were the Master, 2nd Mate and three seamen. Early in the morning, Captain Roe used the rocket apparatus on shore to try and shoot a line to the ship for a safer rescue but each attempt fell short of the target. Several attempts were made by the lifeboat to rescue the stricken sailors, but the rough conditions made this difficult for the boat to get close enough to the ship and the lifeboat had to return to shore. During a final attempt to reach the ship Captain Mylius ordered his men to jump into the sea. Leonard Robertson, 2nd mate, jumped and swam towards the lifeboat, taking hold of the boat hook offered to him. Oscar Rosenholme managed to reach the boat floating on a piece of timber from the ship’s load and a third survivor, Noake, also made the boat. Along with the lifeboat rescue crew, 25-year-old William Ferrier rowed his small dingy through the heavy seas and managed to rescue the Captain, whom he landed on the breakwater. Ferrier then returned to the ship to attempt a final rescue, losing his oars and rowlocks into the high sea. Using just a spare paddle he skulled towards the La Bella, reaching her stern in time to cut loose the lone surviving sailor, Payne, from the lashing that held him to the ship; the terrified sailor dropped from the ship and into the dingy. Shortly after the last man was rescued, the La Bella was lifted by a huge wave and crashed back down on the reef; she broke up and sank. The ordeal had lasted ten hours. The survivors were taken to the nearby Bay View Hotel and gratefully received warm food and clothing, medical attention and a place to sleep. In the following days, an unidentified body of a young person has washed ashore; it was either Watson or Denham. The body was buried in the Warrnambool cemetery with an appropriate gravestone and inscription. William Ferrier became a national hero as news of the daring rescue spread. In recognition of his bravery in the two daring rescues, he was awarded the Silver Medal for Bravery by the Royal Humane Society and was honoured in the letter from the Prime Minister and the Parliament of the Commonwealth, telegrams and a cheque for £20 from the Governor-General, over £150 subscribed by the public, including Warrnambool and district and readers of The Argus, and a gold medal from the Glenelg Dinghy Club of South Australia. Ferrier’s rescue efforts are one of the most heroic in Victoria’s shipwreck history. (William Ferrier’s son, Frank, received a similar award almost fifty years later when he helped rescue four members of the crew on the yacht Merlan after it ran on to a reef near the Point Lonsdale Lighthouse. ) The wreck of La Bella now lies on her port side in 13 metres of sheltered water inside the reef she struck. The bow section is relatively intact and part of the stern has drifted north-easterly towards the mouth of the Hopkins River. The reef the La Bella struck now bears its name. Those five rescued from the La Bella were Captain George Mylius, Leonard Robertson (2nd Mate, 21 years old), R. Payne, Oscar Rosenholme and Jack Noake. Those seven who lost their lives were Mr Coulson (1st mate), Charles Jackman (cook) Gustave Johnson, Pierre Johann and Robert Gent (all able seamen), Harry Watson (ordinary seaman) and Jack Denham (ship’s boy), Captain Mylius was found guilty of careless navigation; he had sailed into the bay without the services of a pilot. His Master Certificate was suspended for twelve months. Later he was also charged with the manslaughter of one of the crew who had died when the La Bella was wrecked but found not guilty. The event’s adverse publicity and damage to his career took a toll on his health and he died of a heart attack six months after the wreck; he was only thirty-seven. His body was buried in the Melbourne General Cemetery. The La Bella was “the best documented of all sailing ships owned in New Zealand”. Her record books, ship logs, correspondence and supporting papers are still available. At the time of the tragedy, she was owned by Messers David C.Turnbull and Co. of Timaru, New Zealand timber merchants and shipping agents, who had purchased her on 13th December 1901. A detailed account of the last journey of La Bella can be read in “Leonard Robertson, the Whangaroa & La Bella” written by Jack Churchouse, published in 1982 by Millwood Press Ltd, Wellington, NZ. As well as this letter, Flagstaff Hill’s La Bella Collection includes a photograph of the wrecked La Bella, a brass rail holder and a postcard of William Ferrier with four of the survivors. Some 15 – 17 ships are believed to have sunk in Lady Bay, but only two have been discovered on the seafloor; the “La Bella” and the “Edinburgh Castle”. Both wrecks are popular diving sites and are preserved as significant historical marine and marine archaeological sites. This original congratulatory letter sent to William Ferrier by the Prime Minister and Government of Australia demonstrates the importance attached to his efforts for Victoria and to Australia. The letter is part of the La Bella Collection and is significant at both a local and state level. Its connection to the La Bella shipwreck and the rescue of five survivors highlights the dangers of Victoria’s Shipwreck Coast. The letter to William Ferrier from the Australian Government acknowledges the bravery of ordinary Australians who risked their lives to save victims of shipwrecks along the coast. The letter is significant to the history of Warrnambool as it honours William Ferrier, a local fisherman whose descendants continue to live in the area. It highlights the way of life of people who lived in coastal towns in 19th century Victoria and the effects of shipwrecks upon them. The letter connects to the postcard of William Ferrier with four of the five rescued crew, the photograph of the wreck of the La Bella and the artefact from the wreck, the rail holder. This letter is significant because of its association with the sailing ship “La Bella”. The “La Bella” is of local and state and national significance. It is one of the only two shipwrecks discovered in Lady Bay, Warrnambool, out of the 15-17 shipwrecks in the bay. Letter to William Ferrier of South Warrnambool from the Prime Minister and Members of Parliament commending him on his bravery. The printed letterhead includes a coat of arms in the top centre and the official address. The letter is very neatly hand written in black pen and includes 4 signatures of Members of Parliament. The rectangular paper is cream coloured with some yellow/brown discolouring. It has the letterhead on the right hand side of it and the written letter begins below the letterhead. The paper has been folded so that the right side becomes the cover page of the letter. The writing is continued onto the inside right hand page of the folded paper and the writing ends here. There is more recent writing on the bottom right hand corner of the back page. The paper has been officially folded in half a total 3 times and there is heavy discolouration on the sections that form the front and back of the folded letter. There is a 4th fold line that is less pronounced that the other folds and would make the paper the size to fit into a pocket. At several fold creases the paper has worn through. The edges of the paper have minor tears. The printed coat of arms is that of the House of Representatives. Underneath is printed “The Parliament of the Commonwealth, / Parliament House / Melbourne”. The hand written, letter is dated “14th November, 1905” and addressed to “Mr. William Ferrier / South Warrnambool” The letter begins “The Speaker, the Prime Minister and Members of the Ministry and its supporters, the Leader and Members of the Opposition, the Leader and Members of the Labour Party, being all the Members of the House of Representatives of the Federal Parliament of Australia” … It continues “desire to express to you their appreciation of your bravery in skulling out to the wreck of the “La Bella” at Warrnambool on Saturday, 11th November, 1905, and recovering therefrom two of the crew who were in imminent danger of their lives. They all feel that your conduct was worthy of the best deeds done by British sailors in the past and they are proud to know that Australia can produce such as you.” The letter is “Signed on behalf of the Members – Speaker (Frederick Holder ), Deputy Leader of the Opposition (Joseph Cook ), Prime Minister (Alfred Deakin), Leader of the Labour Party ( J.C. Watson)” On the back of the letter is blue ink handwriting “OWNER / G. FERRIER / TO. BE. PHOTOGRAPHED / 27-4-76”la bella, william ferrier, bill ferrier, lady bay, 1905, 10th november 1905, 11th november 1905, parliament of the commonwealth, prime minister, australian government, new zealand, flagstaff hill, warrnambool, shipwrecked coast, flagstaff hill maritime museum, maritime museum, shipwreck coast, flagstaff hill maritime village -
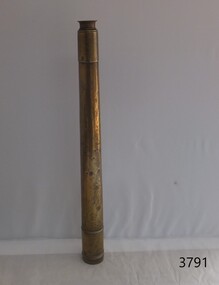 Flagstaff Hill Maritime Museum and Village
Instrument - Marine Telescope, 1870-1880
This telescope was amongst various items collected from a sea dive in Port Phillip Bay. The diver was the caretaker of the Port Lonsdale Lighthouse, who dived on various wrecks in the bay during the 1960's. After the caretaker's death, his son sold off many of the shipwreck artefacts. The telescope was purchased from the caretaker's son in the 1990's by a previous owner of the Marine Shop, Queenscliff, Victoria. John Browning was particularly well known for his scientific advances in the fields of spectroscopy, astronomy, and optometry. Between 1856 and 1872, Browning acquired provisional patents for designs of numerous scientific instruments. He was also the recipient of an award at the 1862 International Exhibition held in London. Also recognised for his temperature-compensated aneroid barometer. Browning's scientific instruments were used in physics, chemistry, and biology. The products he designed and manufactured included spectroscopes, telescopes, microscopes, barometers, photometers, cameras, ophthalmologist, and electrical equipment such as electric lamps. John Browning was born around 1831 in Kent, England. His father, William Spencer Browning, was a maker of nautical instruments. John Browning's great-grandfather was also an instrument maker as well as John’s brother Samuel Browning of the firms Spencer & Browning and Spencer, Browning & Rust, who also manufactured navigational instruments. The latter firm was in operation in London from 1784 to 1840 and was succeeded by the firm of Spencer, Browning & Co. John Browning initially intended to follow the medical profession and entered Guy's Hospital, a teaching hospital and a school of medicine. Despite having passed the required examinations, however, he abandoned his plans. Instead, he apprenticed with his father, William Spencer Browning. At the same time, in the late 1840s, he was a student attending the Royal College of Chemistry several days per week. By the early 1870s, practical optics had become John Browning's primary interest, and he listed his occupation as an optician on the census records from 1871 to 1901. He was well known among London's ophthalmic surgeons for his various ophthalmic instruments. He had a large part in reforming the art of crafting spectacles. Other achievements were as an author of the book, How to Use Our Eyes and How to Preserve them by the Aid of Spectacles. Published in 1883, the book included thirty-seven illustrations, including a diagram demonstrating the anatomy of the eye. In 1895, he was one of the founders of the "British Ophthalmology" the first professional organisation for optometry. He was not only its first president but also registered as its first member so many considered him to be the first professional optometrist. Other professional organisations he belonged too was as a member of “The Aeronautical Society of Great Britain”. In 1871 constructing the first wind tunnel located at Greenwich Marine Engineering Works. He was also a member of other scientific organisations, such as the “Microscopical Society of London”, the “Meteorological Society”, and the “Royal”. Then in 1908 the company of W. Watson & Son, opticians and camera makers, took over John Browning's company since 1901 John Browning had been semi-retired but in 1908 he fully retired and moved to Bournemouth in Hampshire. He died in Cheltenham, Gloucestershire in 1925.The telescope is significant for its association with one of the world’s leading scientific instrument makers and inventor of the 19th and early 20th century. It is believed the donation came off a wreck either in Port Philip Bay or between Point Lonsdale and the Nepean Heads making it a significant maritime historical artefact. Its provenance is good given it was taken off a wreck in this area by the Point Lonsdale lighthouse caretaker. Examples of John Browning's telescopes because of their scientific and historical importance are highly valued by collectors.Marine style single draw brass telescope with a sunshade. The single draw has no split and the second cartridge is held in a long brass tube within the single draw, mounted from the objective end. The eyepiece is flat and at the end of the first draw in a very faded engraving that is believed to read "John Browning, 63 Strand, and should read London under the word strand but this is hard to establish given the engravings condition. This interpretation of the engraving has been arrived at by examination of other John Browning telescope engraving examples."John Browning, engraved to the first tube in copper plate style "63 STRAND" Engraved under in capital textflagstaff hill, flagstaff hill maritime museum and village, warrnambool, maritime museum, maritime village, great ocean road, shipwreck coast, shipwreck artefact, port phillip bay, port lonsdale lighthouse, wreck, 1960’s diver, queenscliff marine shop, john browning, telescope, spectroscopy, optometry, scientific instruments, william spencer browning, optician, navigational instrument, microscopical society of london, aeronautical society, marine technology -
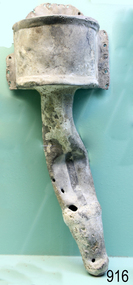 Flagstaff Hill Maritime Museum and Village
Functional object - Urinal, circa 1825
It is probable that the urinal was situated in the forward part of the ship rather than the stern, being one of two placed on either side of the deck and housed immediately adjacent to the doors into for-castle, or crew sleeping quarters. The toilets on maritime vessels were (and still are) called the ‘heads’, after the sanitation arrangements common until the end of the eighteenth century. The name was given to the ‘head’ of the ship, forward of the forecastle and around the beak or bowsprit. These first lavatories were floored with grating or nets so the force of the sea could wash them clean, and they were always used on the lee or non-weather side so the effluent fell directly into the water rather than back on board. The Children wrecking: The barque Children was one of the first vessels to be lost in the Western District the vessel was wrecked to the east of Warrnambool on 14th January 1838. When it ran ashore in hurricane-force winds, 22 passengers and crew were fortunate to escape being battered to death on the rocks. The Children broke up within 20 minutes, sweeping sixteen of those on board to their deaths. After eleven days, the survivors, all of whom were injured, were rescued and taken to Portland. According to Lloyd's Shipping Register 1837-1839, the Children was built in 1825 at Liverpool and operated by owners Gordon & Co, of London. Registration number 123/1837, James Henty then bought her in 1837 as a three-masted barque of 254 tons, with a hull of “part pitch pine, felt sheathed” and “coppered in 1837” at Launceston registered number 6/1837. In 1838 the Children, under her master Captain H. Browne, completed a successful round trip from Launceston to London (carrying wool and whale oil loaded in Portland), returning in late November of that year carrying a general cargo including house bricks used for ballast. On the 11th of January 1839, the Children sailed from Launceston for Adelaide, with 24 passengers, 14 crew, and an awkward mixed cargo, including 1500 sheep, 8 bullocks, 7 horses, and farming implements, and six whaleboats with associated whaling gear. One account states that when the Children were “put out from port she was light and badly ballasted”. The vessel immediately encountered four days of hurricane-force storms, eventually clearing on the early morning of the 14th. However, it was too late to take accurate measurements of the sun or stars to establish their position relative to the coast. The Children collided with a limestone stack at the entrance of Childers Cove, and the seas smashed her into pieces within half an hour. All the cargo and 16 lives were lost including 8 children. The Henty brothers contributed £150 towards a fund for the 22 survivors at a memorial service held in Launceston later that year. It was a major financial setback for James Henty and his brothers, but one from which they recovered. In a submission to the Governor of New South Wales dated 24 March 1840, the Henty’s summarised their work over the previous six years of establishing the Portland settlement stating. “Six stations have been occupied, one at Portland Bay three at the open country about 60 miles inland called ‘Merino Downs’ They have erected two houses at Portland Bay and two others at Merino Downs”.This urinal is significant as part of the vessels original fittings he Children was delivering cargo intended for the Portland Bay settlement of her owners the James Henty brothers The wreck is also significant as one of the first vessels to have been lost in the Western District of Warrnambool. As a result the shipwreck of the Children is registered with the Victorian Heritage Register S116. A lead urinal with a rounded back at the top splash plate with an attached semi-circular receptacle or basin (20cm deep and projecting forward 30cm). At the sides are flanges with bolt holes connecting to a ship's wall. The urinal is drained by a funnel-shaped outlet also made of lead, reducing from a 10cm radius to a joined 5 cm pipe. The urinal was recovered from the wreck of the CHILDREN.Noneflagstaff hill, warrnambool, flagstaff-hill, flagstaff-hill-maritime-museum, shipwreck-coast, shipwreck artefact, the children, lead ship’s plumbing, crew urinal, the ‘heads’, ship plumbing, james henty, portland bay, urinal, ship's urinal -
 Flagstaff Hill Maritime Museum and Village
Document - Poster, Warrnambool Steam Navigation Co, ca.1938
This poster is typical of posters displayed by steam packet companies of the mid-19th to early 20th centuries. It advertises the passage and freight available on a local coastal trader. The steamships operated between the major ports along the western coast of Victoria between Melbourne and Portland. The traveller was not guaranteed the passage times due to possible weather changes. Discounts were offered for return trips within a month of the ticket's issue. The price of freight included 'lighterage', which was the service of a smaller vessel called a 'lighter' expressly designed to transport goods between ship and shore. This particular poster has been recreated; it advertises the services of the screw steamer SS Edina. The information on the poster applies to the years between 1871 and 1873. During that period the Master of the Edina was Captain John Thompson, the Edina was owned by the Warrnambool Steam Navigation Company and the secretary of the firm was Thos. Mackay. The passenger fares are in line with fares from that period, as seen in a display advertisement published in the Hamilton Spectator on January 17th, 1872. The 1853 Glasgow-built Screw Ship Edina had a long life. The ship served in both the Crimean War and the American Civil War. The Edina also traded in UK and European waters. The Henty family of Portland, Victoria, purchased Edina in 1863 for use as a coastal trader. The Edina had several owners and spent many years of service along the South West Coast of Victoria between Melbourne and Portland. The vessel transported passengers and freight in Port Phillip Bay, between Melbourne and Geelong, between 1880 and 1938. After 84 years of service, the Edina was renamed ‘Dinah’ and was stripped down for use as a lighter. The vessel was broken up in 1957 at Footscray, Melbourne. The remains of Edina’s hull can be found in the Maribyrnong River, Port Phillip Bay. The poster was owned by the donor's grandfather, Bruce Duff (1922-2003) who was an avid sailor and a lover of nautical history. He and his wife Mona (1924-2014) were buried in Portarlington Cemetery, Victoria. Duff would have been about 13 years old when the Edina was finally retired from service in 1938. His interest in the Edina could have come from a trip on the vessel or from watching it in operation in the ports along the coast. Duff has collected this poster as a memento of the Edina and is likely to have preserved it at a much later date when the lamination process was readily available. [Flagstaff Hill's collection includes a photograph of the Edina at the Moorabool Street Wharf, Geelong, which was in Duff's locality. The References for this poster include a link to Museum Victoria's photograph of two boys watching the Edina from a jetty.] Flagstaff Hill's Village has its own 'Examiner' Office where volunteers demonstrate the historic printing press in that building. They use original letter-type to create posters, print labels onto lolly bags and designs on fabrics. One of the volunteer printers has produced a poster closely resembling the donated poster. His replication includes a woodcut of the ship, which he skilfully crafted himself.This poster advertises the sailing of the steamer SS Edina and the information has local and State significance for its association with the trading ports of the Edina, and the associated names on the poster; Warrnambool Steam Navigation Company, Captain John Thompson and Thos. Mackay. This poster's message has a strong connection to the history of the businesses and community of Warrnambool and the people of Port Phillip Bay, where it was a passenger ferry for many years. The poster is an example of advertising used by shipping agents in the mid-19th to early 20th centuries. Its information includes the accurate costs to passengers and freighters and the type of timetable the vessels were likely to follow. The poster's connection with the Screw Steamship Edina is historically significant, as the vessel was the longest serving screw steamer in the world. The ship spent its first nine years overseas then arrived in Melbourne. The vessel's work included running the essential service of transporting cargo and passengers between Melbourne and the western Victoria ports of Warrnambool, Port Fairy and Portland. The Edina is listed on the Victorian Heritage Database VHR S199. Poster, A3 size, brown text on cream paper, laminated. Re-created poster of the Warrnambool Steam Navigation Company (Limited) advertising passage and freight on its Screw Steamship, SS Edina. It states days, times and fees for passage and freight from Warrnambool to Melbourne, and return. It names the ship's Master, Captain John Thompson and the Company's Secretary, Tho. Mackay. It displays a line drawing of a 3-masted ship with full sails.Printed image [side profile of a 3 masted vessel, bow facing left] Printed text includes "The Warrnambool Steam Navigation Company (Limited). The Company's Steam Ship "EDINA", Captain John Thompson, Will leave Melbourne for Warrnambool on Tuesdays, returning from Warrnambool every Thursday, At Five o'clock p.m. (weather permitting). FARES: Saloon £2 0 0 Steerage £1 0 0 Saloon return £3 0 0 Saloon return £1 10 00 - Children under 13 years half fares - Refreshments supplied onboard at a moderate scale of charge. Freight, including lighterage, - From Melbourne to Warrnambool - 12s per ton; from Warrnambool to Melbourne, 15s per ton. Passengers are requested to obtain their tickets at the offers, and shippers to make early application for space. Return tickets available for one month from date of issue. - THO. MACKAY, secretary. "warrnambool, shipwreck coast, flagstaff hill, flagstaff hill maritime museum, maritime museum, fair maid of judea, steam navigation, pleasure steamer, ss edina a, trade 19th century, travel 19th century, warrnambool to melbourne, warrnambool to geelong, warrnambool to port fairy, warrnambool to portland, screw steamer, coastal trader, crimean war, american civil war, gold export, h r h duke of edinburgh, warrnambool steam packet company, stephen henty, captain john thompson, chief engineer john davies, lady bay, lighter edina, port phillip bay steamers, vhr s199, dinah, warrnambool steam navigation company, advertising poster, shipping agent, flier, maritime village, flagstaff hill maritime museum & village, great ocean road, block printing, woodblock printing, relief printing, moorabool st wharf, western steam navigation company, tho. mackay, re-created poster -
 Flagstaff Hill Maritime Museum and Village
Functional object - Ship's Wheel, 1871 or earlier
The ship building company E. & A. Sewall, from Bath, Maine, USA, built many ships that had wheels with the same decorative, starburst pattern on them as this particular wheel segment, including the Eric the Red. The wheel was manufactured by their local Bath foundry, Geo. Moulton & Co. and sold to the Sewall yard for $100, according to the construction accounts of the vessel. Eric the Red was a wooden, three masted clipper ship. She had 1,580 tons register and was the largest full-rigged ship built at Bath, Maine, USA in 1871. She was built and registered by Arthur Sewall, later to become the partnership E. & A. Sewall, and was the 51st ship built by this company. The annually-published List of Merchant Vessels of the U.S. shows that Bath was still the home port of Eric the Red in 1880. The vessel was named after the Viking discoverer, Eric the Red, who was the first European to reach the shores of North America (in 980AD). The ship Eric the Red at first traded in coal between America and Britain, and later traded in guano nitrates from South America. In 1879 she was re-metalled and was in first class condition. On 10th June 1880 (some records say 12th June) Eric the Red departed New York for Melbourne and then Sydney. She had been commissioned by American trade representatives to carry a special cargo of 500 exhibits (1400 tons) - about a quarter to a third of America’s total exhibits - from America for the U.S.A. pavilion at Melbourne’s first International Exhibition. The exhibits included furniture, ironmongery, wines, chemicals, dental and surgical instruments, paper, cages, bronze lamp trimmings, axles, stamped ware, astronomical and time globes, samples of corn and the choicest of leaf tobacco. Other general cargo included merchandise such as cases of kerosene and turpentine, brooms, Bristol's Sarsaparilla, Wheeler and Wilson sewing machines, Wheeler’s thresher machine, axe handles and tools, cases of silver plate, toys, pianos and organs, carriages and Yankee notions. The Eric the Red left New York under the command of Captain Z. Allen (or some records say Captain Jacques Allen) and 24 other crew including the owner’s son third mate Ned Sewall. There were 2 saloon passengers also. On 4th September 1880 the ship had been sailing for an uneventful 85 days and the voyage was almost at its end. Eric the Red approached Cape Otway in a moderate north-west wind and hazy and overcast atmosphere. Around 1:30am Captain Allen sighted the Cape Otway light and was keeping the ship 5-6 miles offshore to stay clear of the hazardous Otway Reef. However he had badly misjudged his position. The ship hit the Otway Reef about 2 miles out to sea, south west of the Cape Otway light station. Captain Allen ordered the wheel to be put ‘hard up’ thinking that she might float off the reef. A heavy sea knocked the man away from the wheel, broke the wheel ropes and carried away the rudder. The sea swamped the lifeboats, the mizzenmast fell, with all of its rigging, then the mainmast fell and the ship broke in two. Some said that the passenger Vaughan, who was travelling for his health and not very strong, was washed overboard and never seen again. The ship started breaking up. The forward house came adrift with three of the crew on it as well as a longboat, which the men succeeded in launching and keeping afloat by continually bailing with their sea boots. The captain, the third mate (the owner’s son) and others clung to the mizzenmast in the sea. Then the owner’s son was washed away off the mast. Within 10 minutes the rest of the ship was in pieces, completely wrecked, with cargo and wreckage floating in the sea. The captain encouraged the second mate to swim with him to the deckhouse where there were other crew but the second mate wouldn’t go with him. Eventually the Captain made it to the deckhouse and the men pulled him up. At about 4:30am the group of men on the deckhouse saw the lights of a steamer and called for help. At the same time they noticed the second mate and the other man had drifted nearby, still on the spur, and pulled them both onto the wreck. The coastal steamer Dawn was returning to Warrnambool from Melbourne, its sailing time different to its usual schedule. Cries were heard coming from out of the darkness. Captain Jones sent out two life boats, and fired off rockets and blue lights to illuminate the area. They picked up the three survivors who were in the long boat from Eric the Red. Two men were picked up out of the water, one being the owner’s son who was clinging to floating kerosene boxes. At daylight the Dawn then rescued the 18 men from the floating portion of the deckhouse, which had drifted about 4 miles from where they’d struck the reef. Shortly after the rescue the deckhouse drifted onto breakers and was thrown onto rocks at Point Franklin, about 2 miles east of Cape Otway. Captain Jones had signalled to Cape Otway lighthouse the number of the Eric the Red and later signalled that there was a wreck at Otway Reef but there was no response from the lighthouse. The captain and crew of the Dawn spent several more hours searching unsuccessfully for more survivors, even going back as far as Apollo Bay. On board the Dawn the exhausted men received care and attention to their needs and wants, including much needed clothing. Captain Allen was amongst the 23 battered and injured men who were rescued and later taken to Warrnambool for care. Warrnambool’s mayor and town clerk offered them all hospitality, the three badly injured men going to the hospital and others to the Olive Branch Hotel, then on to Melbourne. Captain Allen’s leg injury prevented him from going ashore so he and three other men travelled on the Dawn to Portland. They were met by the mayor who also treated them all with great kindness. Captain Allen took the train back to Melbourne then returned to America. Those saved were Captain Z. Allen (or Jacques Allen), J. Darcy chief mate, James F. Lawrence second mate, Ned Sewall third mate and owner’s son, John French the cook, C. Nelson sail maker, Clarence W. New passenger, and the able seamen Dickenson, J. Black, Denis White, C. Herbert, C. Thompson, A. Brooks, D. Wilson, J. Ellis, Q. Thompson, C. Newman, W. Paul, J. Davis, M. Horenleng, J. Ogduff, T. W. Drew, R. Richardson. Four men had lost their lives; three of them were crew (Gus Dahlgreen ship’s carpenter, H. Ackman steward, who drowned in his cabin, and George Silver seaman) and one a passenger (J. B. Vaughan). The body of one of them had been found washed up at Cape Otway and was later buried in the lighthouse cemetery; another body was seen on an inaccessible ledge. Twelve months later the second mate James F. Lawrence, from Nova Scotia, passed away in the Warrnambool district; an obituary was displayed in the local paper. The captain and crew of the Dawn were recognised by the United States Government in July 1881 for their humane efforts and bravery, being thanked and presented with substantial monetary rewards, medals and gifts. Neither the ship, nor its cargo, was insured. The ship was worth about £15,000 and the cargo was reportedly worth £40,000; only about £2,000 worth had been recovered. Cargo and wreckage washed up at Apollo Bay, Peterborough, Port Campbell, Western Port and according to some reports, even as far away as the beaches of New Zealand. The day after the wreck the government steam ship Pharos was sent from Queenscliff to clear the shipping lanes of debris that could be a danger to ships. The large midship deckhouse of the ship was found floating in a calm sea near Henty Reef. Items such as an American chair, a ladder and a nest of boxes were all on top of the deckhouse. As it was so large and could cause danger to passing ships, Captain Payne had the deckhouse towed towards the shore just beyond Apollo Bay. Between Apollo Bay and Blanket Bay the captain and crew of Pharos collected Wheeler and Wilson sewing machines, nests of boxes, bottles of Bristol’s sarsaparilla, pieces of common American chairs, axe handles, a Wheelers’ Patent thresher and a sailor’s trunk with the words “A. James” on the front. A ship’s flag-board bearing the words “Eric the Red” was found on the deckhouse; finally those on board the Pharos had the name of the wrecked vessel. During this operation Pharos came across the government steamer Victoria and also a steamer S.S. Otway, both of which were picking up flotsam and wreckage. A whole side of the hull and three large pieces of the other side of the hull, with some of the copper sheathing stripped off, had floated on to Point Franklin. Some of the vessels yards and portions of her masts were on shore. The pieces of canvas attached to the yards and masts confirmed that the vessel had been under sail. The beach there was piled with debris several feet high. There were many cases of Diamond Oil kerosene, labelled R. W. Cameron and Company, New York. There were also many large planks of red pine, portions of a small white boat and a large, well-used oar. Other items found ashore included sewing machines (some consigned to ‘Long and Co.”) and notions, axe and scythe handles, hay forks, wooden pegs, rolls of wire (some branded “T.S” and Co, Melbourne”), kegs of nails branded “A.T. and Co.” from the factory of A. Field and Son, Taunton, Massachusetts, croquet balls and mallets, buggy fittings, rat traps, perfumery, cutlery and Douay Bibles, clocks, bicycles, chairs, a fly wheel, a cooking stove, timber, boxes, pianos, organs and a ladder. (Wooden clothes pegs drifted in for many years). There seemed to be no personal luggage or clothing. The Pharos encountered a long line, about one and a half miles, of floating wreckage about 10 miles off land, south east of Cape Otway, and in some places about 40 feet wide. It seemed that more than half of it was from Eric the Red. The ship’s crew rescued 3 cases that were for the Melbourne Exhibition and other items from amongst the debris. There were also chairs, doors, musical instruments, washing boards, nests of trunks and fly catchers floating in the sea. Most of the goods were saturated and smelt of kerosene. A section of the hull lies buried in the sand at Parker River Beach. An anchor with chain is embedded in the rocks east of Point Franklin and a second anchor, thought to be from Eric the Red, is on display at the Cape Otway light station. (There is a photograph of a life belt on the verandah of Rivernook Guest House in Princetown with the words “ERIC THE RED / BOSTON”. This is rather a mystery as the ship was registered in Bath, Maine, USA.) Parts of the ship are on display at Bimbi Park Caravan Park and at Apollo Bay Museum. Flagstaff Hill Maritime Village also has part of the helm (steering wheel), a carved wooden sword (said to be the only remaining portion of the ship’s figurehead; further research is currently being carried out), a door, a metal rod, samples of wood and a medal for bravery. Much of the wreckage was recovered by the local residents before police and other authorities arrived at the scene. Looters went to great effort to salvage goods, being lowered down the high cliff faces to areas with little or no beach to collect items from the wreckage, their mates above watching out for dangerous waves. A Tasmanian newspaper reports on a court case in Stawell, Victoria, noting a man who was caught 2 months later selling tobacco from the wreckage of Eric the Red. Some of the silverware is still treasured by descendants of Mr Mackenzie who was given these items by officials for his help in securing the cargo. The gifts included silver coffee and tea pots, half a dozen silver serviette rings and two sewing machines. The wreck and cargo were sold to a Melbourne man who salvaged a quantity of high quality tobacco and dental and surgical instruments. Timbers from the ship were salvaged and used in the construction of houses and sheds around Apollo Bay, including a guest house, Milford House (since burnt down in bushfires), which had furniture, fittings and timber on the dining room floor from the ship. A 39.7 foot long trading ketch, the Apollo, was also built from its timbers by Mr Burgess in 1883 and subsequently used in Tasmanian waters. It was the first attempt at ship building in Apollo bay. In 1881 a red light was installed about 300 feet above sea level at the base of the Cape Otway lighthouse to warn ships when they were too close to shore; It would not be visible unless a ship came within 3 miles from it. This has proved to be an effective warning. The State Library of Victoria has a lithograph in its collection depicting the steamer Dawn and the shipwrecked men, titled. "Wreck of the ship Eric the Red, Cape Otway: rescue of the crew by the Dawn". “The Eric the Red is historically significant as one of Victoria's major 19th century shipwrecks. (Heritage Victoria Eric the Red; HV ID 239) The wreck led to the provision of an additional warning light placed below the Cape Otway lighthouse to alert mariners to the location of Otway Reef. The site is archaeologically significant for its remains of a large and varied cargo and ship's fittings being scattered over a wide area. The site is recreationally and aesthetically significant as it is one of the few sites along this coast where tourists can visit identifiable remains of a large wooden shipwreck, and for its location set against the background of Cape Otway, Bass Strait, and the Cape Otway lighthouse.“ (Victorian Heritage Database Registration Number S239, Official Number 8745 USA) Segment of a ship's wheel, or helm, from the wreck of the sailing ship Eric the Red. The wheel part is an arc shape from the outer rim of the wheel and is made up of three layers of timber. The centre layer is a dark, dense timber and is wider than the two outer layers, which are less dense and lighter in colour. The wheel segment has a vertically symmetrical, decorative copper plate inlaid on the front. The plate has a starburst pattern; six stars decorate it, each at a point where there is a metal fitting going through the three layers of timber to the rear side of the wheel. On the rear each of the six fittings has an individual copper star around it. The edges of the helm are rounded and bevelled, polished to a shine in a dark stain. Around each of the stars, front and back, the wood is a lighter colour, as though the metal in that area being polished frequently. The length of the segment suggests that it has probably come from a wheel or helm that had ten spokes. (Ref: F.H.M.M. 16th March 1994, 239.6.610.3.7. Artefact Reg No ER/1.)flagstaff hill, warrnambool, shipwrecked-coast, flagstaff-hill, flagstaff-hill-maritime-museum, maritime-museum, shipwreck-coast, flagstaff-hill-maritime-village, ship's-wheel, eric-the-red, helm, shei's wheel, ship's steering wheel -
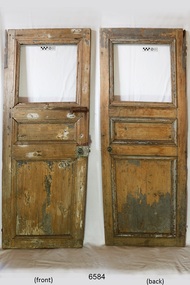 Flagstaff Hill Maritime Museum and Village
Furniture - Door, 1871 or earlier
The wooden door was salvaged from the wreck of the sailing ship Eric the Red, which was a wooden, three masted clipper ship. Eric the Red was the largest full-rigged ship built at Bath, Maine, USA in 1871, having had a 1,580 tons register. She was built and registered by Arthur Sewall, later to become the partnership E. & A. Sewall, the 51st ship built by this company. The annually-published List of Merchant Vessels of the U.S. shows Bath was still the home port of Eric the Red in 1880. The vessel was named after the Viking discoverer, Eric the Red, who was the first European to reach the shores of North America (in 980AD). The ship Eric the Red at first traded in coal between America and Britain, and later traded in guano nitrates from South America. In 1879 she was re-metalled and was in first class condition. On 10th June 1880 (some records say 12th June) Eric the Red departed New York for Melbourne and then Sydney. She had been commissioned by American trade representatives to carry a special cargo of 500 exhibits (1400 tons) – about a quarter to a third of America’s total exhibits - from America for the U.S.A. pavilion at Melbourne’s first International Exhibition. The exhibits included furniture, ironmongery, wines, chemicals, dental and surgical instruments, paper, cages, bronze lamp trimmings, axles, stamped ware, astronomical and time globes, samples of corn and the choicest of leaf tobacco. Other general cargo included merchandise such as cases of kerosene and turpentine, brooms, Bristol's Sarsaparilla, Wheeler and Wilson sewing machines, Wheeler’s thresher machine, axe handles and tools, cases of silver plate, toys, pianos and organs, carriages and Yankee notions. The Eric the Red left New York under the command of Captain Z. Allen (or some records say Captain Jacques Allen) and 24 other crew including the owner’s son third mate Ned Sewall. There were 2 saloon passengers also. The ship had been sailing for an uneventful 85 days and the voyage was almost at its end. On 4th September 1880 the Eric the Red approached Cape Otway with a moderate north-west wind and hazy and overcast atmosphere. Around 1:30am Captain Allen sighted the Cape Otway light and was keeping the ship 5-6 miles offshore to stay clear of the hazardous Otway Reef. However he had badly misjudged his position. The ship hit the Otway Reef about 2 miles out to sea, south west of the Cape Otway light station. He ordered the wheel to be put ‘hard up’ thinking that she might float off the reef. A heavy sea knocked the man away from the wheel, broke the wheel ropes and carried away the rudder. The sea swamped the lifeboats. The mizzenmast fell, with all of its rigging, then the mainmast also fell and the ship broke in two. Some said that the passenger Vaughan, who was travelling for his health and not very strong, was washed overboard and never seen again. The ship started breaking up. The forward house came adrift with three of the crew on it as well as a longboat, which the men succeeded in launching and keeping afloat by continually bailing with their sea boots. The captain, the third mate (the owner’s son) and others clung to the mizzenmast in the sea. Then the owner’s son was washed away off the mast. Within 10 minutes the rest of the ship was in pieces, completely wrecked, with cargo and wreckage floating in the sea. The captain encouraged the second mate to swim with him to the deckhouse where there were other crew but the second mate wouldn’t go with him. Eventually the Captain made it to the deckhouse and the men pulled him up. At about 4:30am the group of men on the deckhouse saw the lights of a steamer and called for help. At the same time they noticed the second mate and the other man had drifted nearby, still on the spur, and pulled them both onto the wreck. The coastal steamer Dawn was returning to Warrnambool from Melbourne, its sailing time different to its usual schedule. Captain Jones sent out two life boats, and fired off rockets and blue lights to illuminate the area. They picked up the three survivors who were in the long boat from Eric the Red. Two men were picked up out of the water, one being the owner’s son who was clinging to floating kerosene boxes. At daylight the Dawn then rescued the 18 men from the floating portion of the deckhouse, which had drifted about 4 miles from where they’d struck the reef. Shortly after the rescue the deckhouse drifted onto breakers and was thrown onto rocks at Point Franklin, about 2 miles east of Cape Otway. Captain Jones had signalled to Cape Otway lighthouse the number of the Eric the Red and later signalled that there was a wreck at Otway Reef but there was no response from the lighthouse. The captain and crew of the Dawn spent several more hours searching unsuccessfully for more survivors, even going back as far as Apollo Bay. On board the Dawn the exhausted men received care and attention to their needs and wants, including much needed clothing. Captain Allen was amongst the 23 battered and injured men who were rescued and later taken to Warrnambool for care. Warrnambool’s mayor and town clerk offered them all hospitality, the three badly injured men going to the hospital for care and others to the Olive Branch Hotel, then on to Melbourne. Captain Allen’s leg injury prevented him from going ashore so he and three other men travelled on the Dawn to Portland. They were met by the mayor who also treated them all with great kindness. Captain Allen took the train back to Melbourne then returned to America. Those saved were Captain Z. Allen (or Jacques Allen), J. Darcy chief mate, James F. Lawrence second mate, Ned Sewall third mate and owner’s son, John French the cook, C. Nelson sail maker, Clarence W. New passenger, and the able seamen Dickenson, J. Black, Denis White, C. Herbert, C. Thompson, A. Brooks, D. Wilson, J. Ellis, Q. Thompson, C. Newman, W. Paul, J. Davis, M. Horenleng, J. Ogduff, T. W. Drew, R. Richardson. Four men had lost their lives; three of them were crew (Gus Dahlgreen ship’s carpenter, H. Ackman steward, who drowned in his cabin, and George Silver seaman) and one a passenger (J. B. Vaughan). The body of one of them had been found washed up at Cape Otway and was later buried in the lighthouse cemetery; another body was seen on an inaccessible ledge. Twelve months later the second mate James F. Lawrence, from Nova Scotia, passed away in the Warrnambool district; an obituary was displayed in the local paper. The captain and crew of the Dawn were recognised by the United States Government in July 1881 for their humane efforts, being thanked and presented with substantial monetary rewards, medals and gifts. Neither the ship, nor its cargo, was insured. The ship was worth about £15,000 and the cargo was reportedly worth £40,000; only about £2,000 worth had been recovered. Cargo and wreckage washed up at Apollo Bay, Peterborough, Port Campbell, Western Port and according to some reports, even as far away as the beaches of New Zealand. The day after the wreck the government steam ship Pharos was sent from Queenscliff to clear the shipping lanes of debris that could be a danger to ships. The large midship deckhouse of the ship was found floating in a calm sea near Henty Reef. Items such as an American chair, a ladder and a nest of boxes were all on top of the deckhouse. As it was so large and could cause danger to passing ships, Captain Payne had the deckhouse towed towards the shore just beyond Apollo Bay. Between Apollo Bay and Blanket Bay the captain and crew of Pharos collected Wheeler and Wilson sewing machines, nests of boxes, bottles of Bristol’s sarsaparilla, pieces of common American chairs, axe handles, a Wheelers’ Patent thresher and a sailor’s trunk with the words “A. James” on the front. A ship’s flag-board bearing the words “Eric the Red” was found on the deckhouse; finally those on board the Pharos had the name of the wrecked vessel. During this operation Pharos came across the government steamer Victoria and also a steamer S.S. Otway, both of which were picking up flotsam and wreckage. A whole side of the hull and three large pieces of the other side of the hull, with some of the copper sheathing stripped off, had floated on to Point Franklin. Some of the vessels yards and portions of her masts were on shore. The pieces of canvas attached to the yards and masts confirmed that the vessel had been under sail. The beach there was piled with debris several feet high. There were many cases of Diamond Oil kerosene, labelled R. W. Cameron and Company, New York. There were also many large planks of red pine, portions of a small white boat and a large, well-used oar. Other items found ashore included sewing machines (some consigned to ‘Long and Co.”) and notions, axe and scythe handles, hay forks, wooden pegs, rolls of wire (some branded “T.S” and Co, Melbourne”), kegs of nails branded “A.T. and Co.” from the factory of A. Field and Son, Taunton, Massachusetts, croquet balls and mallets, buggy fittings, rat traps, perfumery, cutlery and Douay Bibles, clocks, bicycles, chairs, a fly wheel, a cooking stove, timber, boxes, pianos, organs and a ladder. (Wooden clothes pegs drifted in for many years). There seemed to be no personal luggage or clothing. The Pharos encountered a long line, about one and a half miles, of floating wreckage about 10 miles off land, south east of Cape Otway, and in some places about 40 feet wide. It seemed that more than half of it was from Eric the Red. The ship’s crew rescued 3 cases that were for the Melbourne Exhibition and other items from amongst the debris. There were also chairs, doors, musical instruments, washing boards, nests of trunks and fly catchers floating in the sea. Most of the goods were saturated and smelt of kerosene. A section of the hull lies buried in the sand at Parker River Beach. An anchor with chain is embedded in the rocks east of Point Franklin and a second anchor, thought to be from Eric the Red, is on display at the Cape Otway light station. (There is a photograph of a life belt on the verandah of Rivernook Guest House in Princetown with the words “ERIC THE RED / BOSTON”. This is rather a mystery as the ship was registered in Bath, Maine, USA.) Parts of the ship are on display at Bimbi Park Caravan Park and at Apollo Bay Museum. Flagstaff Hill Maritime Village also has part of the helm (steering wheel), a carved wooden sword (said to be the only remaining portion of the ship’s figurehead; further research is currently being carried out), a door, a metal rod and samples of wood. Much of the wreckage was recovered by the local residents before police and other authorities arrived at the scene. Looters went to great effort to salvage goods, being lowered down the high cliff faces to areas with little or no beach to collect items from the wreckage, their mates above watching out for dangerous waves. A Tasmanian newspaper reports on a court case in Stawell, Victoria, noting a man who was caught 2 months later selling tobacco from the wreckage of Eric the Red. Some of the silverware is still treasured by descendants of Mr Mackenzie who was given these items by officials for his help in securing the cargo. The gifts included silver coffee and tea pots, half a dozen silver serviette rings and two sewing machines. The wreck and cargo were sold to a Melbourne man who salvaged a quantity of high quality tobacco and dental and surgical instruments. Timbers from the ship were salvaged and used in the construction of houses and sheds around Apollo Bay, including a guest house, Milford House (since burnt down in bushfires), which had furniture, fittings and timber on the dining room floor from the ship. A 39.7 foot long trading ketch, the Apollo, was also built from its timbers by Mr Burgess in 1883 and subsequently used in Tasmanian waters. It was the first attempt at ship building in Apollo bay. In 1881 a red light was installed about 300 feet above sea level at the base of the Cape Otway lighthouse to warn ships when they were too close to shore; It would not be visible unless a ship came within 3 miles from it. This has proved to be an effective warning. The State Library of Victoria has a lithograph in its collection depicting the steamer Dawn and the shipwrecked men, titled. "Wreck of the ship Eric the Red, Cape Otway: rescue of the crew by the Dawn". “The Eric the Red is historically significant as one of Victoria's major 19th century shipwrecks. (Heritage Victoria Eric the Red; HV ID 239) The wreck led to the provision of an additional warning light placed below the Cape Otway lighthouse to alert mariners to the location of Otway Reef. The site is archaeologically significant for its remains of a large and varied cargo and ship's fittings being scattered over a wide area. The site is recreationally and aesthetically significant as it is one of the few sites along this coast where tourists can visit identifiable remains of a large wooden shipwreck, and for its location set against the background of Cape Otway, Bass Strait, and the Cape Otway lighthouse.“ (Victorian Heritage Database Registration Number S239, Official Number 8745 USA) Door from the wreck of the ship Eric the Red. The wooden singular rectangular door includes three insert panel sections. The top section is square shaped and is missing its panel or glass. The centre timber panel is about a third of the height of the top panel and the bottom timber panel is approximately equal in height to the total height of the two upper panels. The door fastenings include both a metal door latch and traditional door bolt. They are both attached to the front right hand side of the door. The bolt is just below the top panel, and the door latch is in approximately the centre of that side. The door latch has a round mark where a handle could have been attached. The wood of the door has scraping marks in a semi-circle around the door latch where the latch has swung around on its one remaining fastening and grazed the surface. There is a metal hinge at the top section of the door on the opposite side to the latch. The painted surface has been scraped back to expose the wood. The door is shorter than the average height of a person. On the reverse of the door there are lines on the panels, just inside their edges, is what appears to be pencil. The door is not aligned straight but is skew to centre.warrnambool, flagstaff hill, flagstaff hill maritime village, maritime museum, shipwreck coast, great ocean road, shipwreck artefact, eric the red, jaques allen, sewall, 1880, melbourne exhibition 1880, cape otway, otway reef, victorian shipwreck, bass strait, eric-the-red, door -
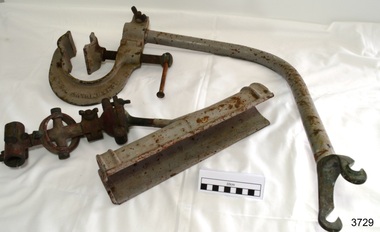 Flagstaff Hill Maritime Museum and Village
Equipment - Rocket Launcher, Government of Victoria, ca 1910s
This rocket launcher has fittings to mount it onto a lifeboat or similar vessel. Once mounted, a it would be fitted with a line-throwing rocket that would be launched from the vessel and aimed over the shipwreck. The line would be fixed to the ship in distress. A heavier line would then be sent out to the wrecked vessel and survivors would be hauled to safety. Its design suggests that it dates to the First World War ear of the 1910s. The coastline of South West Victoria is the site of over 600 shipwrecks and many lost lives; even in Warrnambool’s Lady Bay there were around 16 known shipwrecks between 1850 and 1905, with eight lives lost. Victoria’s Government responded to the need for lifesaving equipment and, in 1858, the provision of rocket and mortar apparatus was approved for the lifeboat stations. In 1859 the first Government-built lifeboat arrived at Warrnambool Harbour and a shed was soon built for it on the Tramway Jetty, followed by a rocket house in 1864 to safely store the rocket rescue equipment. In 1878 the buildings were moved to the Breakwater (constructed from 1874-1890), and in 1910 the new Lifeboat Warrnambool arrived with its ‘self-righting’ design. For almost a hundred years the lifesaving and rescue crews, mostly local volunteers, trained regularly to rehearse and maintain their rescue skills. They were summoned when needed by alarms, gunshots, ringing bells and foghorns. In July 1873 a brass bell was erected at Flagstaff Hill specifically to call the rescue crew upon news of a shipwreck. Some crew members became local heroes but all served an important role. Rocket apparatus was used as recently as the 1950s. This item is significant for its connection with maritime history and marine technology. Lifesaving has been an important part of the services performed coastal Victoria, including Warrnambool, in its very early days, supported by State and Local Government, and based on the methods and experience of Great Britain. Hundreds of shipwrecks along the coast are evidence of the rough weather and rugged coastline. Ordinary citizens, the Harbour employees, and the volunteer boat and rescue crew, saved lives in adverse circumstances. Some were recognised as heroes, others went unrecognised.Rocket launcher, lifesaving equipment, attaches to rail on vessel. Schermuly's Patent, Grey metal, L shaped pipe with large clamp on one end and small, hooked U shaped fitting on the other. Connects to half-cylinder sleeve with gimbal fitting, ball joint and adjusting fittings; painted grey and red. "SCHERMULY'S PATENT" cast into clamp.Cast into metal "SCHERMULY'S PATENT" flagstaff hill, flagstaff hill maritime museum and village, warrnambool, maritime museum, maritime village, great ocean road, shipwreck coast, rocket launcher, rocket apparatus, rocket firing equipment, lifesaving equipment, wwi, world war i, 1210s, schermuly’s patent, schermuly launcher, sea rescue, lifesaving, shipwreck, life-saving, rescue crew, rocket rescue, rocket crew, line rescue, maritime activities, marine technology, volunteer crew, boat to ship rescue, william schermuly, -
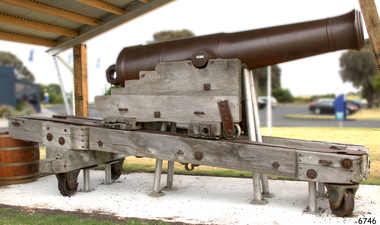 Flagstaff Hill Maritime Museum and Village
Weapon - Cannon, 1861
The artillery piece of the cannon was cast at the Low Moor foundry in England in 1861. It is a 68 pound muzzle loading cannon, capable of firing a 68 pound weight projectile. The arrow on the top of the barrel is the symbol of government ownership. It is probably one of the artillery pieces purchased by the Victorian government in response to the 1863 report by Captain Scratchley, which recommended 19 such artillery pieces be bought for the defence of Hobsons Bay, (Williamstown, Melbourne) (Billets p.12). It was possibly brought to Warrnambool in the late 1860s or the 1870s, to be used for training purposes by volunteers and local militia. The wrought iron runners were probably added to the slides at a later date. This model of carriage had been manufactured since 1855, and the traversing slide since 1860. The traversing slide of the wooden carriage absorbs the recoil when the gun is then returns to the gun to its original position for loading and re-firing. The properties of the timber (regarded as being Burmese teak) have helped to preserve these carriages in Australia. This particular carriage and traversing slide would have been manufactured about the same time as the gun (in 1861) in the Royal Carriage Department of the Royal Gun Factory in Woolwich, England. The gun would then have been assembled on the traversing slide of the carriage, then despatched as a unit. The wooden slide compressor mechanism that belongs to the cannon was used to limit the recoil when the cannon was fired. It is now stored separately for purposes of preservation. It is extremely rare, as it is the only one surviving in this group of South Western Victorian cannons.This 68 pdr cannon, mounted with its original wooden carriage, is part of the South Western Victoria collection of surviving 19th Century artillery pieces, item number W/F/02. It is rated as EXTREMELY RARE on a State, National and World level. The 68 pound smooth bore cannon of this period are not particularly rare either in Australia or overseas; its significance lies in its Victorian provenance and as an element in a major collection of 19th century cannon. The number of surviving carriages with traversing slides in this group in South Western Victoria is unique in Australia and probably in the World. Out of 10 such platforms surviving in Australia, the South Western Victorian group has half. Several survive around the world but probably not in such a large group. The wooden sliding compressor mechanism belonging to this cannon is extremely rare, and the only one in this South Western Victorian group of Guns and Cannons. As a whole, this cannon has undergone very little restoration or modification, giving it a high level of integrity.Warrnambool Garrison Cannon. 68pdr smoothbore, muzzle-loading, cast-iron cannon. Manufactured in Low Moor, 1861, No. 10310. Mounted on the wooden carriage with wrought iron traversing slide and wrought iron runners and fittings. The cannon's Cascabel is cast with a loop. The wooden slide Compressor Mechanism, or Recoil Mechanism, is extremely rare. This mechanism comprises two equal-sized sections of wood, one on each side of the centre, joined by metal rods. In the centre of this wooden platform, with openings, top and bottom is a 15cm diameter metal cylinder with two cusps on the edge of the top (this wood has split over time). Two parallel sides each have two 1cm thick metal "L' plates attached 15cm long and 8.5cm wide. With the unit is ‘ L’ bracket, curved bracket and bolt head.Cannon trunnion "LOW MOOR / 10310 / 1861" Top of the barrel "7045, (symbol of an arrow pointing up), 95 – 3 – 14, 1861, 209" Cascabel "CV / N / C" The rear of left-hand slide " "OD” “JW” “No 33” Side chock – “JW” twice. flagstaff hill, warrnambool, shipwrecked-coast, flagstaff-hill, flagstaff-hill-maritime-museum, maritime-museum, shipwreck-coast, flagstaff-hill-maritime-village, muzzle loading cannon, 68 pound cannon, low moor foundry, royal gun factory, warrnambool militia, warrnambool garrison volunteers, warrnambool fortifications, wooden sliding compression mechanism, carriage and traversing slide, 19th century cannon, traversing platform, garrison sliding carriage, 68 pounder