Showing 10085 items
matching photographer
-
 Bendigo Historical Society Inc.
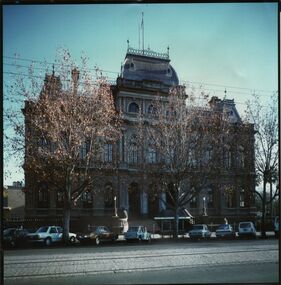
Photograph - AULSEBROOK AND MARTIN COLLECTION: LAW COURTS PALL MALL
Colour photo: Law Courts, Pall Mall, Bendigo. Cars parked kerbside in front of building, pedestrian seat with roof on pavement edge. Trees on roadside, tram tracks in foreground. Photo appears to be 1980's. Stamped on back of photo 'Aulsebrook & Martin Pty Ltd., Photographers, 6 Ruth St., Golden Square 3555 Phone 054 437565bendigo, buildings, law courts pall mall -
 Uniting Church Archives - Synod of Victoria
Photograph
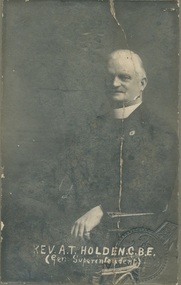
Albert Thomas Holden was born in 1866 at Geelong, died in 1935 and is buried in Boroondara cemetery. From 1883-84 he taught in Kyneton and became a Methodist lay preacher. He graduated with a B.A. from Ormond College in 1888. He entered the Methodist ministry and worked in Burwood and at the Omeo Home Mission. During 1892 he toured Europe and the Middle East with Rev Bickford. In 1898 Holden was an army chaplain and served South Africa. He became Methodist Chaplain General in 1913. In 1904 Holden became Secretary of Methodist Home Missions and traveled throughout Australia. Holden was General Superintendent of the Methodist Church of Australasia from 1929 - 1932 and then President- General. Holden became a Freemason in 1898. [taken from the Australian Dictionary of Biography]Seated sepia toned studio portrait of Rev A T Holden C.B.E. wearing clerical collar and sitting in cane chair, he looking at the camera with his body turned to his right. He has two badges on his left lapel. The photograph has the name of the photographer embossed at the bottom right. It has an inscription handwritten in white ink at the bottom."REV. A.T.HOLDEN. C.B.E. (Gen. superintendent)"rev albert thomas holden methodist minister, methodist home missions secretary, victorian fourth contingent (imperial bushmen), methodist chaplain general, australian imperial force, general superintendent of the methodist church of australasia, grand master of the grand lodge of freemasons of victoria -
 Northern District School of Nursing. Managed by Bendigo Historical Society Inc.
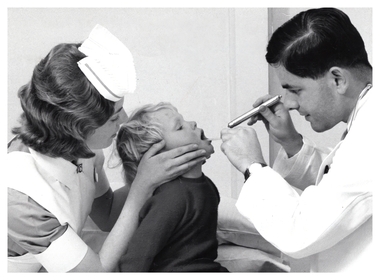
Photograph - Child Oral Examination, 1963
The Northern District School of Nursing opened in 1950 to address the issues around nurse recruitment, training and education that had previously been hospital based. The residential school was to provide theoretical and in-house education and practical training over three years. The students would also receive practical hands-on training in the wards of associated hospitals. The Northern District School of Nursing operated from Lister House, Rowan Street, Bendigo. It was the first independent school of nursing in Victoria and continued until it closed in 1989.School 57 - Oral examination of a child. A male doctor is holding a penlight and spatula to examine a child's mouth with assistance from a third year nurse who supports the child's head. From the rear of the photo is written: Nr Adeline McKenzie School 57 P.T.S. 13/2/1963, Dr J. ? Zammitt ? MD, Martin Washington, the Bendigo Photographer.nurse training, ndsn, lister house, school 57 -
 Ballarat Tramway Museum
Photograph - Black & White Photograph/s, Sutcliffe Pty Ltd, 1926
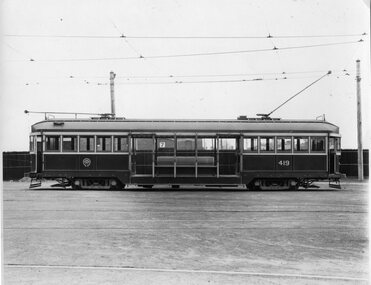
Black and white photograph of W1 419 photographed side on at South Melbourne Depot - 1926c. Photographed by Sutcliffe Pty Ltd. Assumed photograph taken soon after the tram was built in 1926. Has "Sutcliffe Pty. Ltd. Photographers Cromwell buildings 366a Bourke St. Melbourne" stamp in purple on back of photo. See Destination City, 4th Edition.On rear in pencil "W1 we have 30 of these. No more will be constructed." "M&MTB" and "41".trams, tramways, mmtb, w1 class, tram 419 -
 Ballarat Tramway Museum
Photograph - Black & White Photograph/s, c1971
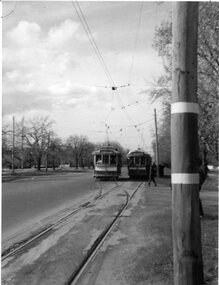
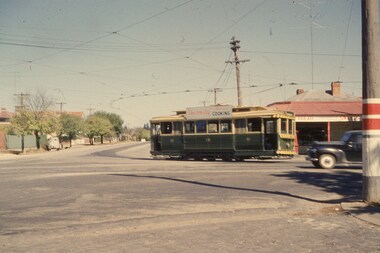
Yields information about the loops on the Sturt St west line and aspects of the operation of the Ballarat tramway system prior to closure.Black and white photograph of trams crossing, possible at the Parker St loop in Sturt St west - special trams - two outbound and one single trucker inbound - going to Mt Pleasant. Probably taken c1971 prior to the closure. Note the overhead wire - double overhead through the "straight" and inbound overhead only via the loop. Photographer unknown.tramways, trams, sturt st west, loops, parker st loop -
 Ballarat Tramway Museum
Photograph - Black & White Photograph/s, 5/09/1971 12:00:00 AM
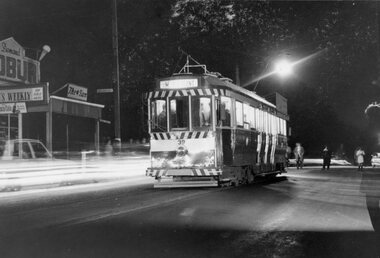
Yields information about the last tram to depart from the Mt Pleasant terminus at the time of the closure of the tram line in Sept. 1971.Black and white photograph of Ballarat No. 39 at the Mt Pleasant terminus on 5/9/1971, last tram to leave the terminus before the line closed. Has a number of people in the background, and the Milk bar at the terminus with the Robur, The Sun and Women's Weekly magazine advertisements on the building. Photographer unknown at the time of cataloguing. See Reg Item 2908 for a Courier Article.On rear in ink "TS(2)" and in pencil "Mt Pleasant, last car WO 39 5-9-71" and pencil marks showing how the photo is to be cropped for publication.tramways, trams, last tram, closure, mt pleasant, tram 39 -
 Ballarat Tramway Museum
Photograph - B&W print of donated negative
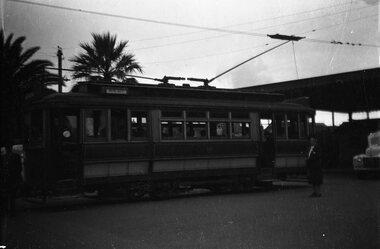
Yields information about a converted Geelong Pengelly tram at the Railway Station, Yields information about a converted Geelong Pengelly tram at the Railway StationBlack and white digital print from scan of a donated negative showing a converted single truck Pengelly car at the Geelong Railway station. Has the destination of West. Photographer and date unknown. Black and White print made from scan of negative. Original Negative stored with Negatives. Image rescanned from copy neg and updated 1/6/2020.tramways, trams, geelong, railway station -
 Ballarat Tramway Museum
Photograph - Black & White Photograph/s, mid to late 1950's
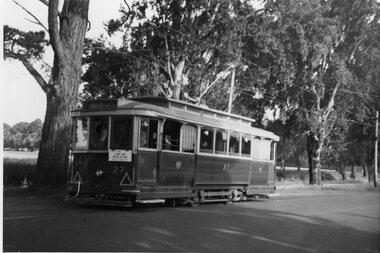
Yields information about Wendouree Parade and the Carlton St crossing loop area.Black and white photograph of Ballarat 27 in Wendouree Parade, Carlton St crossing loop. It appears (the photo is not well focused) to have the destination of Gardens via Sturt St West. The auxiliary board cannot be read. Photographer unknown - see history of object. Keith Kings, The Bendigo Tramways, re the fitting of reflective tape in 1956, page 59.In the rear in ink - "Ballarat"trams, tramways, wendouree parade, carlton st, tram 27 -
 Ballarat Tramway Museum
Photograph - Black & White Photograph/s, 1940
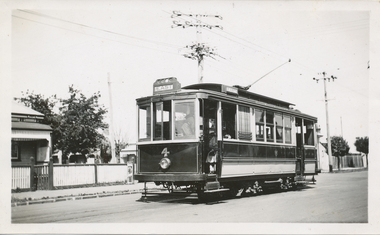
Black and White print contained within the Wal Jack Bendigo and Geelong Album, see Reg Item 5003 for more details. Photo of Geelong No. 4 at the Chilwell terminus, 1940, no details of photographer. Tram has the destination of East. A lady is seated in the front talking to the driver. Wal's album notes provides the date of 1940. Printed on "Selo" paper. On the rear in blue ink "Geelong No. 4" in ink.trams, tramways, geelong, chilwell, tram 4 -
 Ballarat Tramway Museum
Photograph - Black & White Photograph/s, late 1940s?
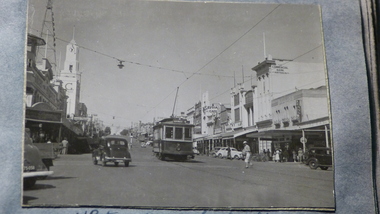
Black and White print contained within the Wal Jack Bendigo and Geelong Album, see Reg Item 5003 for more details. Photo of Geelong No. 5 in Moorabool St, late 1940's. No details of photographer. Has the T&G building, Savoia Cafe, The Commercial Bank of Australia in the background. Photo has been glued onto the album sheet.trams, tramways, geelong, moorabool st, tram 5 -
 Ballarat Tramway Museum
Photograph - Black & White Photograph/s, 24/06/1949 12:00:00 AM
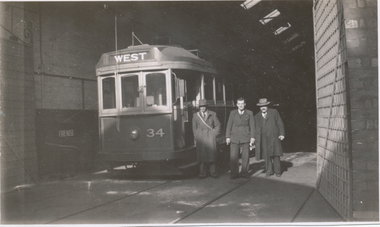
Black and White print contained within the Wal Jack Bendigo and Geelong Album, see Reg Item 5003 for more details. Photo of Geelong No. 34 in the No. 2 shed of Geelong with Wal Jack, S. Stephens and Ken Train alongside. Tram has the destination of West. See also Reg Item 7831 for the subsequent photo. No details on photographer. On rear in ink "SEC Geelong Tys, MT bogie tram No. 34 ex MMTB standing in paint shop 24/6/49. Alongside being Messrs W. Jack, S. Stephens and K. Train" Also photo information 5.4:122, 1/25 sec @50ft."trams, tramways, geelong, depot, tram 34 -
 Ballarat Tramway Museum
Photograph - Black & White Photograph/s, 8/01/1956 12:00:00 AM
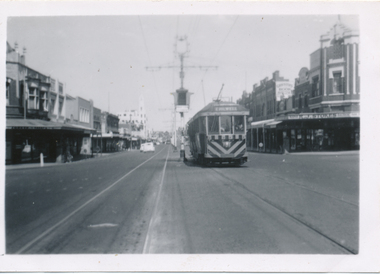
Black and White print contained within the Wal Jack Bendigo and Geelong Album, see Reg Item 5003 for more details. Photo of Geelong No 35 in Ryrie St, at Gheringhap St with destination of Chilwell, on the last day of service on this line. Has a bar traffic light in the photo and R. J. Stokes store. 8/1/1956. No details on photographer. On rear in ink "No.35 Chilwell bound in Ryrie St opposite Gheringhap St, Post Office Corner Geelong 8/1/56"trams, tramways, geelong, last day, ryrie st, traffic lights, tram 35 -
 Ballarat Tramway Museum
Slide - 35mm slide/s, Keith Kings, 12/04/1958 12:00:00 AM
Photo of Ballarat trams 21 and 41 at depot junction. 12/4/1958. Tram 21 fitted with large reflective triangles and reflective strips on bumpers and doors. Has 'Mt Pleasant' destination. By depot junction tram stop with lake in background. Very little of tram 41 in photo. Has been stamped with photographers details. Photo by Keith Kings.'K.S.Kings No. K(y)(212), Ballarat 21 (&41) depot junction 1/50 f4+; Ex Adelaide 'A' class No. 10 12/4/58' in blue ink, and purple ink for stamp.tramways, trams, depot, wendouree parade, tram 21, tram 41 -
 Ballarat Tramway Museum
Slide - 35mm slide/s, Wal Jack, 23/03/1962 12:00:00 AM
Photo of No. 18 turning from MacArthur St. into Drummond St. north, taken from north west corner. Side on view of 18. Tram fitted with dash canopy lighting and SEC ad on roof. Adjacent to photographer is a compulsory tram stop painted on a pole with a white painted over section below it. Photo taken on 23-3-1962.'SEC Ballarat, No. 18 in Macarthur St., turning into Drummond St. 23-3-62' in blue inktramways, trams, macarthur st., drummond st., tram 18 -
 Kew Historical Society Inc
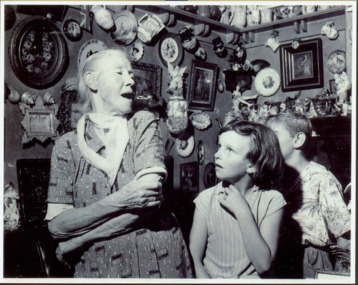
Photograph - Grace Tabulo at 'Fairyland', c.1960
'Fairyland' at 57 Malmsbury Street, Kew - the home and garden of Jim and Grace Tabulo - was a major local, state and international tourist attraction from the 1940s to the mid 1960s. The Kew Historical Society's collection contains original photographs, visitor books and items that were once displayed in the house by the Tabulos. Grace Tabulo died in 1973 and is buried with her husband Jim in the Boroondara General Cemetery (PRES B 1973). Following her death at the age of 88, the house was sold and its contents distributed. The cottage is now a private residence.The 'Fairyland' collection is of local and statewide significance, as a varied and comprehensive record of this major Melbourne tourist attraction.Large, original black and white print positive of the owner of 'Fairyland' Grace Tabulo, with two visiting children who watch a pet myna bird take food from Mrs Tabulo's mouth. The room, like the rest of the house (and garden) includes numerous mementos and decorative items. While there is no marking to the reverse, it may be that this photo was professionally taken by a press photographer.Nilgrace tabulo, fairyland, 57 malmsbury street -
 Kew Historical Society Inc
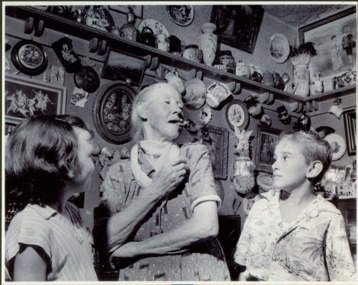
Photograph - Grace Tabulo at 'Fairyland', c.1960
'Fairyland' at 57 Malmsbury Street, Kew - the home and garden of Jim and Grace Tabulo - was a major local, state and international tourist attraction from the 1940s to the mid 1960s. The Kew Historical Society's collection contains original photographs, visitor books and items that were once displayed in the house by the Tabulos. Grace Tabulo died in 1973 and is buried with her husband Jim in the Boroondara General Cemetery (PRES B 1973). Following her death at the age of 88, the house was sold and its contents distributed. The cottage is now a private residence.The 'Fairyland' collection is of local and statewide significance, as a varied and comprehensive record of this major Melbourne tourist attraction.Large, original black and white print positive of the owner of 'Fairyland' Grace Tabulo, with two visiting children who watch a pet myna bird take food from Mrs Tabulo's mouth. The room, like the rest of the house (and garden) includes numerous mementos and decorative items. While there is no marking to the reverse, it may be that this photo was professionally taken by a press photographer.Nilgrace tabulo, fairyland, 57 malmsbury street -
 Kew Historical Society Inc
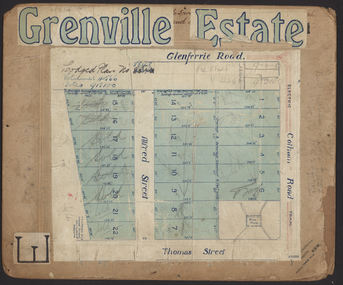
Map - Subdivision Plan, Grenville Estate, 1922
Pru Sanderson, in her groundbreaking ‘City of Kew Urban Conservation Study : Volume 2 - Development History’ (1988), summarised the periods of urban development and subdivisions of land in Kew. The periods that she identified included 1845-1880, 1880-1893, 1893-1921, 1921-1933, 1933-1943, and Post-War Development. These periods were selected as they represented periods of rapid growth or decline in urban development. An obvious starting point for Sanderson’s groupings involved population growth and the associated economic cycles. These cycles also highlighted urban expansion onto land that was predominantly rural, although in other cases it represented the decline and breakup of large estates. A number of the plans in the Kew Historical Society’s collection can also be found in other collections, such as those of the State Library of Victoria and the Boroondara Library Service. A number are however unique to the collection.Subdivision plans are historically important documents used as evidence of the growth of suburbs in Australia. They frequently provide information about when the land was sold on which a built structure was subsequently constructed as well as evidence relating to surveyors and real estate and financial agents. The numerous subdivision plans in the Kew Historical Society's collection represent working documents, ranging from the initial sketches made in planning a subdivision to printed plans on which auctioneers or agents listed the prices for which individual lots were sold. In a number of cases, the reverse of a subdivision plan in the collection includes a photograph of a house that was also for sale by the agent. These photographs provide significant heritage information relating house design and decoration, fencing and household gardens.In advertising the twenty-two sites of the Grenville Estate in Cotham Road and Alfred Street, Kew, the auctioneers emphasised the proximity of the development to shops, schools, and churches. That mansions surrounded the Estate was publicised as an added attraction. The plan shows how at this stage A regrettable aspect of this plan is that it is pasted over, and obscures a real estate photograph by the Kew photographer Josiah Earl Barnes.subdivision plans - kew, grenville estate, glenferrie road, alfred street, thomas street, cotham road -
 Melbourne Tram Museum
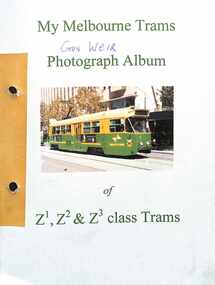
Album, Gus Weir, My Melbourne Trams - Z1, Z2 & Z3 class trams, 1980 to 2011
Compiled by Gus Weir of the Wellington Tramway Museum, former Wellington tram driver. Comprises some 70 double-sided album sheets for photographs of Melbourne Z1, Z2 and Z3 class trams. Scanned into 6 parts as pdf files. Many photos taken at Domain Interchange, Swanston Walk, Bourke St, St Kilda Road, Elizbeth St and La Trobe St. Photos by Gus himself during Melbourne visits with some by B R Symons, D W Jones, and Michael P Hawkins Part 1 - Introduction - Z1, 1, 2, 3, 4, 5, 7, 9, 10, 14, 19 & 22. Part 2 - Z1, 28, 31, 34, 37, 39, 49, 43, 45, 47, 49, 50, 52, 54, 56, 58, 59, 61, 63, 65, 71, 70, 73, 80, 81, 84, 85, 86, 87, 89, 93 & 95. Part 3 - Z1 & Z2 & Z3 - 96, 100, 101, 108, 112, 113, 114, 115, 116, 117, 120, 122, 123, 125, 126, 128, 199, 136, 137 & 138 Part 4 - Z3 138, 139, 148, 150, 151, 154, 157, 155, 158 (Royal Tram), 160, 163, 164, 166, 167, 168, 169, 170 & 173 Part 5 - Z3 175, 176. 178, 179, 181, 182, 185, 186, 187, 193, 194, 196, 197, 199, 201, 203, & 204 Part 6 - Z3 204, 205, 208, 209, 211, 217, 219, 220, 222, 223, 224, 225, 226, 228, 229 & 230, Yields detailed information about Melbourne trams from 1980 to 2011Set of 70 album sheets most with four photos - some blanks to allow for further photos. Each photo has a label on the rear, with details of the photograph location, photographer and date. An insert label on each page gives tram number, location and date. See last image file - Gus Weir Obituary - Wellington Tramway Museum 2019.tramways, tramcars, albums, z1 class, z2 class, z3 class, melbourne, mmtb, the met, ptc, yarra trams, swanston trams, m>tram, domain junction, swanston st, bourke st -
 Melbourne Tram Museum
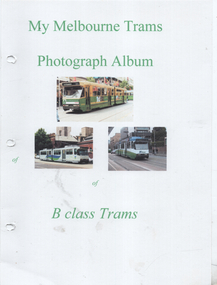
Album, Gus Weir, My Melbourne Trams - B class trams, 1990 to 2011
Compiled by Gus Weir of the Wellington Tramway Museum, former Wellington tram driver. Comprises some 44 double-sided album sheets for photographs of Melbourne B class trams. Scanned into 4 parts as pdf files. Many photos taken at Domain Interchange, Swanston Walk, Bourke St, St Kilda Road, Elizbeth St, docklands, St Vincents Plaza, and La Trobe St. Photos by Gus himself during Melbourne visits. Part 1 - Introduction - B1 - 2001, 2002, B2 2003, 2005, 2009, 2010, 2027, 2010, 2012, 2014, 2106, 2026, 2027, 2032 & 2034. Part 2 - B2 2036, 2037, 2040, 2041, 2042, 2045, 2047, 2048, 2049, 2051, 2052, 2055, 2060, 2063, 2067, 2119, 2068, 2069, 2077 & 2078 Part 3 - B2 2078, 2085, 2087, 2093, 2094, 2047, 2049, 2100, 2101, 2103, 2089, 2114, 2104, 2105, 2106, 2108, 2109 & 2111. Part 4 - B2 2112, 2115, 2117, 2120, 2123, 2125. 2126, 2131 & 2132.Yields detailed information about Melbourne trams from 1990 to 2011Set of 44 album sheets most with four photos within a PerforMore spring clip album, heavy card covers, plastic cover with a Negative pocket, and some blanks to allow for further photos. Each photo has a label on the rear, with details of the photograph's location, photographer, and date. An insert label on each page gives the tram number, location, and date.tramways, tramcars, albums, melbourne, mmtb, the met, ptc, yarra trams, swanston trams, m>tram, domain junction, swanston st, bourke st, elizabeth st, b class, b1 class -
 Melbourne Tram Museum
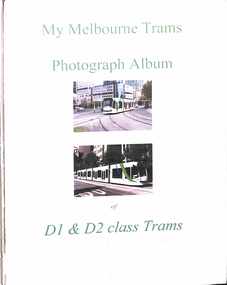
Album, Gus Weir, My Melbourne Trams - D1 & D2 class trams, 2002 to 2012
Compiled by Gus Weir of the Wellington Tramway Museum, former Wellington tram driver. Comprises some 43 double-sided album sheets for photographs of Melbourne D1 & D2 class trams. Scanned into 4 parts as pdf files. Many photos taken at Domain Interchange, Swanston Walk, Bourke St, St Kilda Road, Port Junction, Elizbeth St, docklands, Swanston Walk, St Vincents Plaza, Toorak, and La Trobe St. Photos by Gus himself during Melbourne visits. Part 1 - Introduction - D1 3501, 3502, 3503, 3504, 3505, 3506, 3508, 3510, 3511, 3512, 3513 Part 2 - D1 3513, 3514, 3515, 3516, 3517, 3519, 3521, 3522, 3523, 3524, 3525, 2526, 3529, 3530 Part 3 - D1 3531, 3534, 3536, 3537, 3538, D2 5001, 5002, 5003, 5103, 5004, 5005, 5006, 5007, 5008, 5016, 5010 Part 4 - D2 5010, 5011, 5013, 5014, 5015, 5016, 5017, 5018, 5019, 5020, 5021Yields detailed information about Melbourne trams from 2002 to 2012Set of 43 album sheets generally with four photos within a bound album, heavy brown card covers, plastic cover with a Negative pocket, and some blanks to allow for further photos. Each photo has a label on the rear, with details of the photograph's location, photographer, and date. An insert label on each page gives the tram number, location, and date.tramways, tramcars, albums, melbourne, yarra trams, m>tram, domain junction, swanston st, bourke st, elizabeth st, d1 class, d2 class -
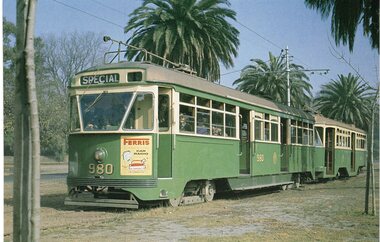 Melbourne Tram Museum
Photograph - Illustration/s, Topmill, 1996
Set of two illustrations from the 1996 Topmill Calendar of tram 980, backed onto another sheet of lightweight card or another photograph. See Reg Item 246. .1 - PCC 980 and Y1 611 - by Dr D. Ellerton, 24-4-1962 in Dandenong Rd. .2 - PCC 980, in Victoria Parade, same date and photographer.in ink on rear "MMTB #980"trams, tramways, dandenong road, victoria parade, calendar, tram 980, pcc class -
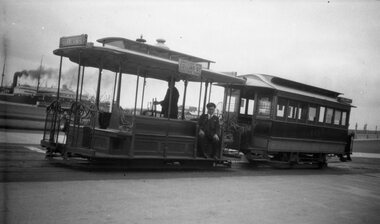 Melbourne Tram Museum
Negative, Wal Larsen, 1937c
Negative of a cable grip car at the Port Melbourne terminus, c1937, with the grip man and conductor on the grip car. Trailer 449. In the background is Station Pier and shipping. The grip car has the destination of Collins St on the front and "Connects with Collins St electric cars" on the side. Photographer could be Wal Larsen based on negative size - see Reg Item 5064.Written on rear of album print "Cable tram No. 449 at Port Melbourne terminus"trams, tramways, cable trams, port melbourne, station pier, tram 449 -
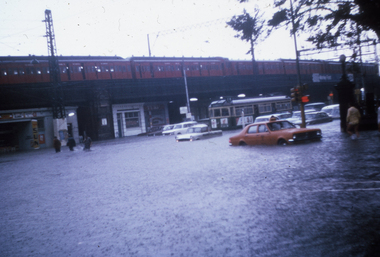 Melbourne Tram Museum
Slide - Set of 3, Ron Scholten, 17/02/1972 12:00:00 AM
Set of three colour slides of flooding in Flinders St at Market St on 17/2/72. See Reg Item 114 for flooding in Elizabeth St. TMSV Copy slides. .1 - Looking west from Market and Flinders St with a tram stopped and a train on the viaduct. .2 - As above .3 - looking east Photographer possibly Ron ScholtenKeith has written details on the rear of each slide including the date and the "TMSV 332 Flinders St Melbourne" stamp.trams, tramways, melbourne, flooding, flinders st, market st, tmsv -
 Glenelg Shire Council Cultural Collection
Postcard - Postcard - Hospital Portland , Victoria, n.d
Black and white photo postcard. View of old Portland hospital, taken from street (Bentinck or Fern). Buildings obscured by large trees, and high stone fence. Nurse standing either side of metal gate, with a 'PORTLAND HOSPITAL' sign on it. Woman in a two-seater roadster parked near gate. A man and 2 nurses can be seen in the groundsFront: 'THE PUBLIC HOSPITAL, PORTLAND VIC. TOYE, PHOTO' - white script on black bottom border Back: Purple stamp: 'TOYE BROS. Photographers, Hamilton & Portland' -
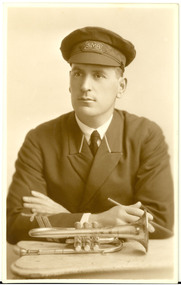 Federation University Historical Collection
Photograph, Frank Wright in Soldiers Memorial Band outfit
Frank Wright was a renown resident of Smeaton, where he was born. He lived at Laura Villa, and attended Smeaton State School. His father William was a gold miner and his mother's name was Sarah. Their family won many singing and instrumental awards. Frank was tutored by Percy Code and became the Australian Open Cornet Champion by the age of eighteen. A year later, Frank conducted the City of Ballarat Band, and later the Ballarat Soldiers’ Memorial Band. He formed the Frank Wright Frisco Band and Frank Wright and his Coliseum Orchestra. These bands won many South Street awards, and Frank as conductor won many awards in the Australian Band Championship contest. In 1933 Frank Wright sailed to England to conduct the famous St Hilda’s Band and was later appointed Musical Director of the London County Council, where he organized many amazing concerts in parks, in and around the London district. He was made Professor of Brass and Military Band Scoring and conducted at the Guildhall of Music and Drama. Frank was often invited to adjudicate Brass Band Championships around Europe, in Australia, including South Street and in New Zealand. The Frank Wright Medal at the Royal South Street competition is awarded to an individual recognized as making an outstanding contribution to brass music in Australia.Two photographs - .1) a sepia photograph of a seated man in uniform leaning with arms crossed on a marble topped table. A baton is held in his right hand. On the table is lying a cornet. The man is Frank Wright and the uniform is from the Soldiers Memorial Band .2) the same photo in black and white only largerBoth photographs have Richards & Co. Ballarat embossed in the bottom right hand corner. .2) has a Richards & Co. Photographers Ballarat stamp on the reverse sidefrank wright, cornet, soldiers memorial band, uniform, baton -
 Rutherglen Historical Society
Image, N. R. McGeehan, 1935
Black and white postcard photograph of large group of people attending a ball.Written on a section of the photo: "A Memento of the Hibernian Ball, Rutherglen, 1935" On back of photo, in an oval stamp: "N. R. McGeehan, 154 Hotham St., Ripponlea, Photographer"ball, dances, hibernian ball -
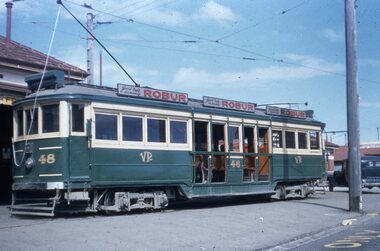 Ballarat Tramway Museum
Slide - 35mm slide/s, Keith Kings, 29/09/1956 12:00:00 AM
Kodak Ektachrome slide, white cardboard mount, of VR No. 48 at Sandringham Railway Station on 29/9/1956. Photograph by Keith Kings. Tram has three individual Robur Tea advertisements mounted on the roof.On top of slide is photographers stamp and slide no K(y)(102). On sides are letters "28/2/62'. On base are words 'V.R. 48 at Sandringham Railway Station'.tramways, trams, vr, sandringham, tram 48 -
 Port Fairy Historical Society Museum and Archives
Photograph, Alex Wilkins, c1940's
This photograph depicts Port Fairy streets in the 1940's showing Cox Street, William Street,Lower half of Bank Street River and sea. The Gas works are visible on Cox StreetThis photograph taken in the 1940's is significant because of the detail of that is shows regarding the set out of the streets and the vacant landblack and white photograph of the streets of Port Fairy2 stamps - ALEX WILKINS Photographer Warrnambool, Mrs O.G. Powell Phone 883 Port Fairy.( No 6 set over Sect 4) 4-6 streets, moyne river, port fairy, cox street, william street, gas works -
 Bendigo Historical Society Inc.
Photograph - Three children (two girls and a baby), August 2024
BHS CollectionStudio posed sepia photograph of three children (two girls and a baby).Photographer's stamped mount - D. Mendelson Albury; under Vice-Regal patronage. To dear Mrs. Harvey with Ethel's best love, inscribed on the rear of the mounted photograph.history, eaglehawk -
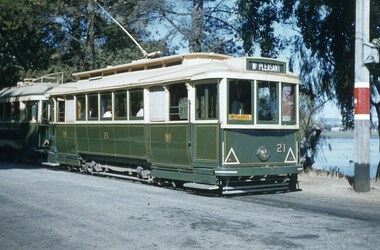
 Ballarat Tramway Museum
Slide - 35mm slide/s - set of 20, Noel Simons, 21/05/1971 12:00:00 AM
Set of 20 transparencies taken on 21/5/1971 on Kodak mounts. 1197.1 - Bendigo No. 5 en route to Eaglehawk at Creeth St Long Gully. Tram has a SEC roof ad and Cinzano roof ad. 1197.2 - No 5 approaching Needle Loop between Long Gully and California Gully. On left hand side is the City of Bendigo sign, indicating city boundary. 1197.3 - As for 1197.2 but actually entering loop. Photo taken after tram has passed photographer. 1197.4 - No. 26 bound for Eaglehawk descending the railway bridge near Eaglehawk, at Jobs Gully. 1197.5 - as for 1197.4, but after crossing bridge, now ascending a hill. Photo taken after tram has passed photographer. 1197.6 - No. 26 climbing High St. hill Eaglehawk, nearing end of Double track, bound for Quarry Hill. Shows centre of the road poles. 1197.7 - As for 1197.6, with tram entering single track section. Photo taken after tram has passed photographer. Has a BP service station in the background. 1197.8 - No. 26 (bound for Quarry Hill) crossing No. 17 (Eaglehawk) at Job's Gully Loop. 1197.9 - No. 17 climbing railway bridge at Job's Gully, en route to Eaglehawk. Photo taken after tram has passed photographer. 1197.10 - No.26 bound for Quarry Hill, leaving Long Gully Loop? Has the Creeth St. church in l197.l in the far background. Photo taken after tram has passed photographer. 1197.11 - Tramway Point work at the northern end of Long Gully Loop. 1197.12 - No. 17 en route for Quarry Hill turning into View St. from Bamard St. Tram has SEC roof ads "Everything fine in my all electric Kitchen' and 'Electric Cooking is Matchless'. 1197.13 - as for 1197.12, but tram has turned into View St and about to enter the double line track. Photo taken after tram has passed photographer. 1197.14 - No. 21 enters Nolan St after turning from MacRae St. en route to Bendigo. Note sign on its own post noting tram turns "Beware Tram Turns" and stop sign on adjacent pole "Trams stop on Request". No. 21 has two SEC roof ads. 1197.15 - No. 21 in Nolan St. after turning from Bridge St. (White Hills Road). Note signal light for Bridge St. loop on pole corner of street. Photo taken after tram has passed photographer. 1197.16 - No. 2 bound for Eaglehawk at unknown location. 1197.17 - Tram stop sign on a pole "CARS STOP BY REQUEST" 1197.18 - No. 5 in Carpenter St.? en route to Quarry Hill. 1197.19 - No. 28 has just arrive at Golden Square terminus, passengers are disembarking and the trolley pole is being turned. Golden Square Hotel in the background. 1197.20 - No. 28 at Golden Square terminus. Has a "Nothing beats Briquettes for hear roof ad. Information written on in black ink and date stamped on purple ink. 1197.1 - "No. 5 at Creeth St. Long Gully" 1197.2 - "No. 5 approaching Needle Loop between Long Gully and California Gully" 1197.3 - "No. 5 at Needle Loop between Long Gully and California Gully" 1197.4 - "No. 26 crossing railway bridge at Job's Gully near Eaglehawk" 1197.5 - "No. 26 just after crossing railway bridge at Job's Gully near Eaglehawk/ 1197.6 - "No. 26 in High St. Eaglehawk" 1197.7 - "No. 26 at end of double track in High St. Eaglehawk" 1197.8 - "Nos. 26 and 17 crossing at Job's Gully Loop" 1197.9 - "No. 17 crossing railway bridge at Job's Gully near Eaglehawk". 1197.10 - "No. 26 at Long Gully" 1197.11 - 'Northern end of points at Long Gully Loop". 1197.12 - "No. 17 turning into View St. from Bamard St. Bendigo". 1197.13 -'No. 17 at beginning of double track in View St. after leaving Bamard St. Bendigo. 1197.14 - "No. 21 enters Nolan St. from MacRae St. Bendigo." 1197.15 - "No. 21 in Nolan St. Bendigo just after leaving White Hills Road." 1197.16 - "No. 2" 1197.18 - "No. 5" 1197.19 - "Birney car No. 28 at Golden Square Terminus" 1197.20 "Birney car No. 28 at Golden Square Terminus" tramways, trams, bendigo, long gully, railway bridge, jobs gully, trackwork, nolan st, quarry hill, tram stops, golden square, tram 2, tram 5, tram 17, tram 21, tram 26, tram 28