Showing 244 items matching "cone"
-
 Ballarat Tramway Museum
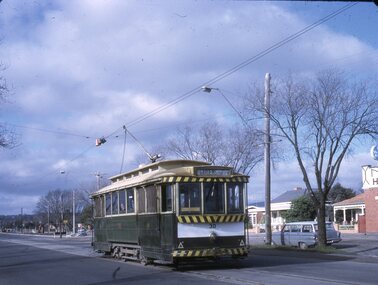
Slide - 27 mm sq slide/s set of 6, Lilian Butler, Tram No. 38 at the Victoria St terminus, Aug. 1971
Yields information about the streetscapes of Ballarat on the Gardens to Victoria St route and in particular buildings and people that crewed the trams.Set of six Colour 27 x 27 mm slide in a Kodachrome cardboard mount. .1 - Tram No. 38 at the Victoria St terminus, with the destination of Gardens via Sturt St West. Note the red traffic cone in the overhead by the trolley wheel positioning location device. .2 - crew of No. 30 by the tram - R. Knight (57) and Conductor W. Nancarrow (8) .3 - No. 30 at Gardens Loop .4 - as for .2 - see Also Reg item 6455. .5 - view from tram at intersection of Wendouree Parade and MacArthur St, View Point. .6 - view of trackwork at intersection of Drummond and Sturt Streets with the Southern Cross Hotel in the background. Slide mount date August 1971. Photo from the collection of Lilian Butler.ballarat, tramways, trams, victoria st, crews, gardens loop, view point, hospital corner, tram 30 -
 Ballarat Tramway Museum
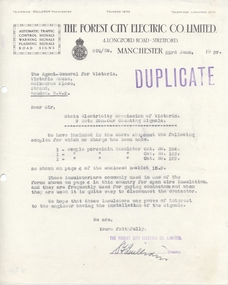
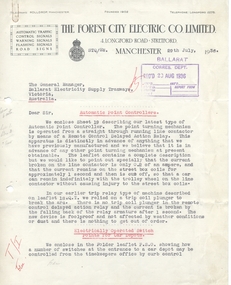
Pamphlet, State Electricity Commission of Victoria (SECV), "Overhead Line Material", Jun. 1937
Yields information about equipment made for Overhead tramway range and materials used and how correspondence was exchanged with the SEC via the Agent General.4914.1 - Letter from The Forest City Electric Co. Limited of Manchester 23/6/1937, to the Agent General for Victoria and the SEC, notifying that they have included within the shipment free of charge, three sample insulators and booklet 15.2. 4914.2 - Booklet or Sheet 15.2, titled "Overhead Line Material" comprising 12 pages showing details of porcelain insulators available from The Forest City Electric Co., and other associated equipment, including cap and cone suspensions, wood strain insulators, Giant Strain Insulators, overhead frogs, crossings, bonding compressors and contactors. Each sheet had three staples on left hand side and two punch holes. There were removed for scanning and have not been replaced.trams, tramways, overhead, forest city signals, insulation, trackwork, trolley wire -
 Melbourne Legacy
Photograph, Tree Plaques, 1988
Photos of plaques at the base of trees at the Shrine of Remembrance. One is of the Lone Pine planted from by Legacy from the seeds of a cone from Gallipoli and planted by Legatee Stan Savige in 1933 in remembrance of fallen comrades of the 24th Battalion. The plaque is in the form of the red and white diamond badge of the 24th Battalion. This tree had to be removed in 2012 due to its age had led to safety concerns. Also a plaque from the Olive tree of peace planted by Legatee Frank Doolan in 1973 which was the 50th anniversary of Legacy. Other trees were for Netherlands' Service Personnel, and the 18th squadron NEI-RAAF Forces Association, and the fallen comrades of the RAAF Beaufort squadrons. There is also a tree for the 'Carry On' Club of Victoria. These photos were taken at the same time as views of the Legacy Garden and photos of the man and donkey statue at the Shrine of Remembrance. Believed to be late 1980s when the garden was renamed for Legacy, and before 1998 when the statue of the Widow and Children was installed. Photos were in a scrapbook of photos spanning 1983 to 1991.A record of trees at the Shrine.Colour photo x 5 of plaques at the base of trees planted at the Shrine of Remembrance.Printed on reverse 'shrine of remembrance, memorial -
 City of Moorabbin Historical Society (Operating the Box Cottage Museum)
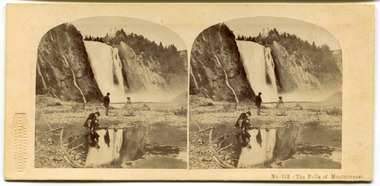
Leisure object - Stereograph card, The Falls of Montmorenci, Quebec, 1908
The London Stereoscopic and Photographic Company began in 1854 as the London Stereoscope Company (LSC), from 1856 was known as the London Stereoscopic Company, and from May 1859 as the London Stereoscopic and Photographic Company.This card is from the collection of a pioneer family of the City of Moorabbin.Stereograph Card manufactured by 'The London Stereoscopic Company' 54 Cheapside - black and whiteThe Falls of Montmorenci, near Qubec, Canada "These beautiful falls are eight miles distant from Quebec, on the Montmorenci river and situated at a point where the river is sixty feet wide. The descent of the torrent is 250 feet higher than those of Niagra, but only about fifty feet in width. The effect of the view of these falls upon the beholder is most delightful. The river at some distance seems suspended in the air, in a sheet of billowy foam. The water which first breaks over the ledge in on sheet is more and more divided as it plunges against the successive layers of rock, which it almost completely veils from view; the spray becomes very delicate and abundant, from top to bottom, hanging over, and revolving round the torrent, till it becomes lighter and more evanescent than the whitest fleecy clouds of summer." In the winter time the spray form the fall freezes in the form of a cone to a height of nearly 100 feet, and at such time the falls a greatly resorted to for the amusement of sliding down the cone with the tobogen, or Indian sleigh. The comparatively short distance from the city and the extreme beauty of the scenery along the whole route, render these falls an attractive scene for the inhabitants, who account a visit amongst their usual recreations.quebec, canada, the falls of montmorenci, moorabbin, stereograph cards -
 Ballarat Heritage Services
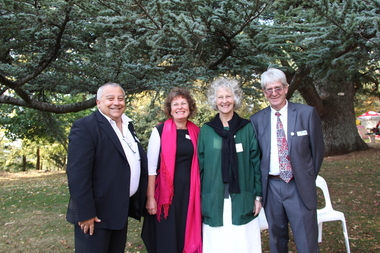
Photograph - Digital photographs, L.J. Gervasoni, Wombat Hill Botanic Gardens 150 anniversary event Daylesford organiser Gael Shannon, 2013
The Wombat Hill Botanic Gardens 150 anniversary event organiser was Gael Shannon. The Daylesford Botanic Gardens are of historic, scientific (botanic), and aesthetic significance to the State of Victoria. The Daylesford Botanic Gardens are historically significant as a fine example of a regional botanic garden demonstrating the typical characteristics of a carriage drive, informal park layout, decorative structures and works such as the memorial tower, conservatory, rotunda, cascade and fernery, which contrasts with the open lawns planted with specimen trees, areas of intensive horticultural interest and close proximity to a township developed during the mid to late nineteenth century. The Daylesford Botanic Gardens are historically significant for the design input by noted landscape designer William Sangster, and for the survival of his 1884 plan, which is a rare example of a plan from this prolific garden designer. The Daylesford Botanic Gardens are of scientific (botanic) significance for the extensive conifer collection and cool climate plants. The Gardens contain an outstanding collection of conifers and other mature trees, many of which were donated by renowned botanist Ferdinand von Mueller. Significant trees include Pinus ponderosa (Western Yellow Pine), Pinus coulteri (Big Cone Pine), twoAbies nordmanniana (Caucasian Fir), Abies pinsapo, (Spanish Fir) and a Cedrus atlantica f. glauca(Blue Atlas Cedar), Pinus wallichiana (Bhutan Pine), Pinus pinaster (Maritime Pine), Sequoiadendron giganteum (Giant Redwood), (Monkey Puzzle) and Aesculus hippocastanum (Horse Chestnut), many the largest or finest examples in Victoria. Other outstanding trees include a Tilia cordata (Small-leaved European Linden), a row of Cupressus lusitanica (Mexican cypress), a Quercus robur (English Oak) planted in 1863, avenues of Dutch Elms and a rare Quercus leucotrichophora (Himalayan Oak). The Daylesford Botanic Gardens are of aesthetic significance as a rare example of a botanic garden spectacularly sited on an extinct volcanic cone which allows a panoramic view, aided by the 1938 Pioneers’ Memorial Tower, as well as vistas within and out of the gardens and from the township to the gardens. As the most prominent local landmark, the Garden’s vertical dominance in the landscape provides a dark contrast to the elms avenues, oaks and other deciduous species. (Heritage Victoria Register, )Four people photographed at the 150th anniversary event at the Wombat Botanic Gardens.victoria, 150, anniversary, botanic, gardens, wombat hill, botanic gardens, heritage, celebration, garden party, daylesford, people, crowd, community, organiser, tour, gael shannon, don henderson, wombat hill botanic gardens -
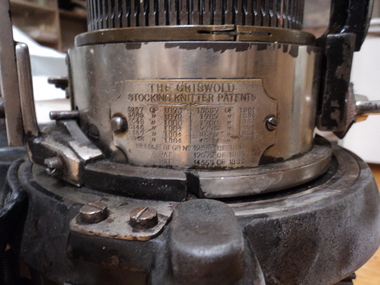 National Wool Museum
Griswold stocking knitting machine, c1890 - 1900
The machine was most recently used by donor's father c2008 to knit socks, but had been used for many years earlier. According to family history, it is believed that the machine came to Australia with donor's grandparents in the early 20th century, and was created c1890-1900. It is still in working order and a demonstration was given by the donor during the acquisition process.Griswold stocking knitter machine. Black steel manual machine which clamps on to the edge of a table and is operated by turning a handle. Centre of machine is a cylinder which can be lined with pins to create the sock/stocking. Two detached parts of the machine include a bobbin holder and yarn feeder. Accompanying items include: 3 examples of incomplete attempted socks made by donor. 4 envelops containing instructions, pattersn, notes and advice on using the machine, created by donor's father and grandfather. 1 bobbin with grey yarn. 2 metal machinery pieces. 2 tins containing pins for the machine. 1 metal yarn feeder cone. 10 weights plus two weight stands. Stocking knitter machine has an identifier plate with patent numbers on the side. -
 The Beechworth Burke Museum
Photograph - Lantern Slide, c1900
This glass slide depicts a group of school children standing in Queen Victoria Park (previously Beechworth Botanic Gardens), circa 1900. Queen Victoria Park was first secured in 1858 by the Beechworth Council with the assistance of the Central Board of Health (CBH). The CBH was a firm believer in the socially beneficial effects of parks and other recreation areas which is why they aided the council in securing the parkland. the council held a local competition for the design of the park and decided on a plan called "Better late than never" by Hungarian nobleman, J.A. Rochlitz. The first non-native trees were planted in 1861 and have since been heritage listed on the National Trust's register of significant trees. There are nine trees located in Queen Victoria Park that are currently on the National Trust's register. These are the Loblolly Pine, Italian Cypress, Shore Pine, and the Big Cone Pine. These trees hold significance as they date back to 1875 and show rare and localised examples of these types of species which are not seen in many other places in Victoria. The trees in the background of the glass slide depict a species of the pine tree and may be some of the trees still standing in Queen Victoria Park today.This glass slide captures social and historical significance as it not only captures a moment in time of these school children, but it also shows environmental significance for the heritage trees depicted in the background.burke museum, beechworth, lantern slide, slide, glass slide, plate, burke museum collection, photograph, monochrome, queen victoria park, indigo shire, school, j.a. rochlitz, beechworth council -
 Kiewa Valley Historical Society
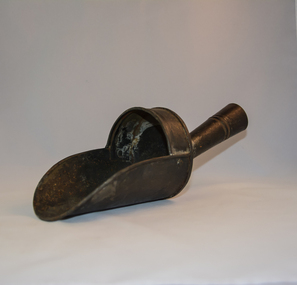
Scoop metal, no makers identification, circa mid to late 1900's
This scoop was professionally made and well before plastics and aluminium scoops were manufactured. It was in a period when mass production and cheap imports where not common. This item would have been produced well after World War II and before the cheap Asian imports. It was a period in time(the last years) when items such as this scoop were made to last and consumerism was not at the "throw away" mass consumption time of the late 1900's. The rural sector in the Kiewa Valley used this type of "made to last" domestic implement when home made cakes and pastries were commonly made in the household kitchen. Because of the relatively isolation of the valley, bulk supplies of flour, sugar and other cooking ingredients were the required quantity for both domestic household and farm use. Local general stores also had these scoops to provide clients with their required flour, sugar and other bulk loose grains (processed or unprocessed) This lite galvanised rolled steel flour/sugar scoop has a tapered handle extruding from a small cone shaped base. It has a half circle scoop extending from a full circular base which has a small containment ridge which acts as a collection rim. The collection scoop has its front shovel end tapered and rolled edge (outwards) presenting a barrier and air relief when thrust into the flour/sugar. All the edges are rolled and connection links have been soldered. The handle is not of solid steel which accounts for the light weight. The base of the "shovel" is slightly concave to allow gravitational forces to keep the flour centre of mass. The handle has a ridge pressed in the sheet metal at about two thirds up the shaft All metal to metal joins have been pressed and soldered together.loose grains, sugar, millet, nus, nails, loose grocery items. -
 Ringwood and District Historical Society
Document - Folder, Land Sale - Monterey Park Subdivision, Warrandyte Road, Ringwood North, Vic. - 1981
Foolscap manilla folder containing double-sided flyer advertising residential subdivision development, including outline of local facilities and services, with locality map and layout of Monterey Park streets. Subdivision includes Parkwood High School, Tortice Drive, Heape Way, Appleberry Place, Stringybark Court, Conifer Court, Crawley Grove, Monterey Close (later Monterey Place), Lucy Place, Middlebrook Drive, Gahnia Close, Glanfield Court, Cone Close, Jull Parade, Pinus Close (later Pinetree Court), Radiata Close, Old Warrandyte Road, and entry from Warrandyte Road. Vendor - Jennings Industries Limited, 690 Springvale Road, Mulgrave, 3170, Phone 5618000. A4 enclosures with tables showing each allotment List Price, Builders Price, Cash Price and Terms Price. Information page headed "Form of Restrictive Covenant to be incorporated in Transfer" specific to Certificates of Title. Restrictive Covenant (summary): (Name/s) "... will not erect or construct or cause to be erected or constructed on the land hereby transferred (a) Any front boundary fence, other than a fence which does not exceed one metre in height unless the same is set back as least 1.5 metres from the front boundary and the same is effectively screened from that boundary by the planting of trees, shrubs or plants. (b) Any side boundary fence other than a fence which is set back at least 1.5 metres from the front boundary on which does not exceed 1 metre in height within 1.5 metres of the front boundary. (c) For a period of 5 years from the date hereof, any building on the said land unless and until the Plans and Specifications thereof have first been approved by the said Residential Developments Pty. Limited. (d) For a period of 2 years from the date hereof whilst the said land remains vacant any Signboard or Notice advertising the sale of the said lot or any other lot. These covenants shall appear on the Certificate of Title to issue for the said land and run with the land." -
 Flagstaff Hill Maritime Museum and Village
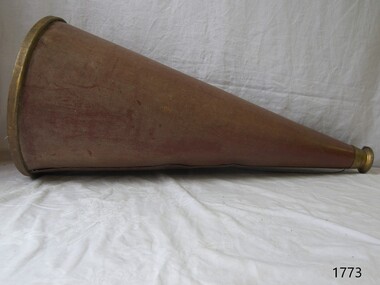
Functional object - Megaphone, Merriman Brothers, First quarter of the 20th century
A megaphone or loudhailer is usually portable or hand-held, the cone-shaped acoustic horn used to amplify a person's voice or other sounds and direct it in a given direction. Used to communicate with others over distances. In Greek mythology, "Stentor" was a Greek herald during the Trojan War. His name has given rise to the adjective "stentorian", meaning loud-voiced, for which he was famous. The large funnel-shaped device is made of recoated cardboard that is riveted together. It has a metal mouthpiece at the narrow end and a metal edge at the wide end, and a metal handle. The design indicates that it is a ‘Stentor Megaphone’ patented on 4 April 1899 by a company in Boston. Stentor brand megaphones were manufactured by Merriman Brothers, in Boston. In 1898 the brothers specialised in hardware for yachts their workshop was at 139 Border St. East Boston, Mass. They also made other equipment, which included pulley blocks, winches and fittings, and were well-known worldwide before the company closed in 1995. Merriman megaphones, including the familiar cheerleader megaphones, came in different sizes, Their patent for the device, dated April 4, 1899, specified details such as the 'rivets, metal mouthpiece, and adjacent parts, and an undated pamphlet promoting the Stentor Megaphone emphasizes its 'highly finished' appearance 'with nickel mouthpiece, rim and other fittings'. The Stentor Megaphone has significance for its provenance and historic value, and also as a relatively rare item of equipment once used worldwide in marine situations, such as light stations and many other similar applications where a person voice needed to be amplified.Megaphone conical shape cardboard with riveted seam, nickel plated reinforcing ring, mouthguard Made in the USAflagstaff hill, warrnambool, shipwrecked-coast, flagstaff-hill, flagstaff-hill-maritime-museum, maritime-museum, shipwreck-coast, flagstaff-hill-maritime-village, megaphone, loud hailer -
 Ballaarat Mechanics' Institute (BMI Ballarat)
Landsborough St Milk Bar, Geoff Wallis, 1970s
This photograph is held in the Ballaarat Mechanics' Institute Audio Visual Collection. Please contact BMI for all print and usage inquiries. Ballarat artist and educator Geoff Wallis took a series of photographs of Ballarat Milk Bars in the 1970s. This is one of his favourites. He notes: “My ‘local’ is not the pub that stands on a corner only 100 metres from my home but the milk bar that is across the road from the pub in Peel Street North. It is an extraordinary example of the milk bar fulfilling its time-honoured role of being every suburb or town’s Aladdin’s Cave. It is well worth a visit. I photographed this milk bar in 1979 when it was a much more conventional shop and then continued on taking photographs of all the milk bars I could locate around Ballarat. The photographs were to be the starting point for an artistic project but this didn’t eventuate. Though my motivation was primarily artistic I was also interested in milk bars as familiar and essential parts of daily life. Their accoutrements of Peters Ice Cream cones, newspaper headlines, and colourful signage made them distinctive features of the townscape. Milk bars had been part of my life from when I first was sent to ‘the shop’ as a little boy clutching a ration card. My parents bought a milk bar in Camberwell when I was nine and though I only lived there for a year, it is still vivid in my mind. Lollies, comics, ice cream, milkshakes -- all the treasures essential for a happy childhood -- awaited any child who pushed through the door. Though milk bars were once scattered throughout the city, competition from many sources is making them an endangered species.”ballarat, milk bar, shop, landsborough, herald, groceries -
 Ballarat Tramway Museum
Pamphlet, The Forest City Electric Co. Limited England, "Forest City" products, 1936
Yields information about the equipment offered to Ballarat at the time of the determining what type of signals to put in to improve safety on the system, following the take over by the SEC of the tramways. Gives details about other tramway equipment available on the market place.A set of documents under cover of a Forest City letter dated 29/7/1936 to the General Manager Ballarat, typed in black and red ink. Has a date received stamp of 20 August 1936. Contains the following items. 4911.1 - Letter from "The Forest City Electric Co. Limited" to ESCo re Point controllers, tramway signals and warning signs, dated 29/7/1936 - 2 pages 4911.2 - Collins Patent Automatic Point Turner - sheet 19 - 4 pages - sheet 19, two copies 4911.2a - ditto, sheet 18 QT - four pages 4911.3 - Electrically operated Point switches, overhead frogs and signals for tramcar depots. - four pages 4911.4 - Automatic Tramway Signals - five pages - sheet ATS1 4911.5 - Universal Insulator - Sheet 17 - 2 pages 4911.6 - Porcelain hangers - sheet 15/1 - 2 pages 4911.7 - Porcelain insulators for cap and cone suspensions - page 11, 1 page. 4911.8 - Motor Bus and Tramcar Stage and Fare Signs in Cast Aluminium - sheet MD2 - 1 page 4911.9 - Flashers and Spellers - Sheet F1 - 2 pages 4911.10 - Forest City Relays - 2 pages 4911.11 - Traffic light - 1 page, sheet 2A Note the letter the price of the non car counting signals is 20 pounds, including freight.On letter notes in margins and margin on page 2 against tramway signals, marked in red. On rear of page 2 is a pencil sketch.trams, tramways, signals, overhead, traffic lights, points -
 Bendigo Military Museum
Badge - ACTIVE SERVICE, MEMBERSHIP BADGES, All post 1945
.1) badge, brass, "Returned From Active Service". Crown at top over wings. Rising Sun and Anchor. Boomerang at base with "Returned From Active Service, rear has 2 lugs and pin. Rear is stamped with a number. .2) Membership badge, metal, centre has 3 figures, crown at top with pin date 1954 membership. Front of badge "Returned Sailors, Soldiers and Airmans Imperial league of Australia. Numbered stamped badge on rear with 2 lugs and pin. .3) Membership badge, metal centre has 3 figures crown at top with pine date 1994 membership. Front of badge "Returned Services League Australia". Numbered stamped badge on rear with 2 lugs and pin. .4) Membership badge, metal, 5 star shape with wreath around. Centre in light blue circle "Ex POW R.A". Small pin at bottom in red with "50" denoting membership 1950. rear has 2 lugs and is stamped with number. .5) Membership badge, metal, crown at top, centre has depiction of barbwire through blue background. At bottom is a "v" then scroll with "Ex Prisoner of War Assn" in red. rear lhas 2 lugs and pin. .6) Membership badge, metal cone shape with small hole at top. Pin with "73" under denoting membership 1970. At bottom in blue "Rising Sun, Wings and Anchor surrounded by "Chelsea Returned Servicemens Club". Rear is numbered stamp..1) Issued by Commonwealth Government of Australia” .2) “Property of League V41531” .3) “Property of League V80354” .4) "593" .6) "470"”numismatics - medals /military, membership -
 Ballarat Tramway Museum
Document - Folder with papers, State Electricity Commission of Victoria (SECV), 1930's
Yields information about how the SEC filed pamphlets or information papers about tramway overhead and associated equipment and letters.Green cardboard file folder with metal clip and binder - "The Acorn Individual File - Foolscap size with title blocks containing the following items: 4910 - Tangential Suspension - overhead 4911.1 - Letter from "The Forest City Electric Co. Limited" to ESCo re Point controllers, tramway signals and warning signs, dated 29/7/1936 - 2 pages 4911.2 - Collins Patent Automatic Point Turner - sheet 19 - 4 pages - sheet 19, two copies 4911.2a - ditto, sheet 18 QT - four pages 4911.3 - Electrically operated Point switches, overhead frogs and signals for tramcar depots. - four pages 4911.4 - Automatic Tramway Signals - five pages - sheet ATS1 4911.5 - Universal Insulator - Sheet 17 - 2 pages 4911.6 - Porcelain hangers - sheet 15/1 - 2 pages 4911.7 - Porcelain insulators for cap and cone supension - page 11, 1 page. 4911.8 - Motor Bus and Tramcar Stage and Fare Signs in Cast Aluminium - sheet MD2 - 1 page 4911.9 - Flashers and Spellers - Sheet F1 - 2 pages 4911.10 - Forest City Relays - 2 pages 4911.11 - Traffic light - 1 page, sheet 2A 4912 - Memo re Suitability of Mr A. Widdop as a linesman - 18/11/1936 4913.1 - Letter dated 22/6/1937 from Agent General in London to the SEC Melbourne regarding shipment of the Non-Car Counting Signals. 4913.2 - Letter from the Forest City Electric Co 18/6/1937, regarding forwarding a blue print for the signals. 4914 - Letter from the Forest City Electric Co 23/6/1937, regarding forwarding sample insulators and booklet 15.2 4915 - Letter from Sands Hill Manufacturing Co to ESCo re regarding overhead crossings - dated 13/4/1928. 4916 - Memo dated 14/3/1934 to Mr Pringle, regarding tension in trolley wire. 4917 - Letter from T. Strickland MMTB to Bendigo re standard height for ears above rail level - 16/3/1934. Some of these document Scanned in pdf form to COTMA Library 1/2011 On rear of file: Top of file - "Tramways", in title block "Tramway Overhead & Signals" and in bottom right hand corner - "230". On spine - in pencil - "Overhead Parts and Proceedings"trams, tramways, signals, overhead, pamphlets, manual -
 The Beechworth Burke Museum
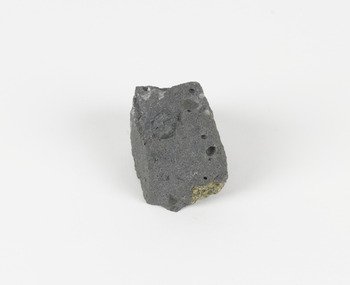
Geological specimen - Basalt (igneous-volcanic) containing Olivine, unknown
This particular geological specimen was found in Mount Franklin or Lalgambook in Djadjawurrung, located between Daylesford and Newstead, approximately ninety minutes drive from Melbourne. The mountain is an example of a breached scoria cone (a steep conical hill of loose pyroclastic fragments) which was created by a volcanic eruption about 470,000 years ago, a date which may indicate the age of this geological specimen. The volcanic eruptions of Mount Franklin were most likely witnessed by members of the Dja Dja Wurrung Aboriginal tribe, who referred to this country as the 'smoking grounds'. Mount Franklin and the surrounding area appears to have been a place of considerable religious significance to Aboriginal people, there is evidence which indicates that frequent large ceremonial gatherings took place in the area. Basalt is the most common rock on Earth’s surface, more than 90% of all volcanic rock on Earth is basalt. Basalt is an aphanitic extrusive igneous rock formed from the rapid cooling of low-viscosity lava exposed at or very near the surface of a rocky planet or moon. Specimens are black in colour and weather to dark green or brown. Basalt is rich in iron and magnesium and is mainly composed of olivine, pyroxene, and plagioclase. Olivine is the name of a group of rock-forming silicate minerals with compositions ranging between Mg2SiO4 and Fe2SiO4. Unlike other minerals, Olivine has a very high crystallisation temperature which makes it the first of the minerals to crystallise from magma. As magma cools, the crystals begin to form and settle on the bottom of the lava and form basalts that are abnormally enriched in olivine in the lower part of lava flows. According to H. M. King (on geology.com) "Olivine is thought to be an important mineral in Earth's mantle. Its presence as a mantle mineral has been inferred by a change in the behaviour of seismic waves as they cross the boundary between Earth's crust and mantle". Lava from Mount Franklin and other volcanoes in the area filled valleys and buried the gold bearing streams that became the renowned ‘deep leads’ of the gold mining era. In 1852, as part of the Victorian gold rush, gold was discovered in the immediate area, this gold was created by lava flows during the Newer Volcanic period, which were mined intensively during the nineteenth century. Around 1865 the presence of a deep lead in Mount Franklin was established. Deep lead mining was initially unsuccessful, and it was not until the late 1870s that the Franklinford Gold Mining Company mined at Mount Franklin on a significant scale. A few years later the Mount Franklin Estate Gold Mining Company also struck gold, followed by the Shakespeare and Great Western companies in the mid-1880s. By the late 1880s, however, deep lead mining had ceased in the area. Soon after gold was discovered in 1851, Victoria’s Governor La Trobe wrote to the Colonial Office in London, urging ‘the propriety of selecting and appointing as Mineral Surveyor for this Colony a gentleman possessed of the requisite qualifications and acquaintance with geological science and phenomena’. Alfred Selwyn was appointed geological surveyor in Australia in 1852 which began the Geological Survey of Victoria. In 1853-69 the Geological Survey issued under Selwyn's direction sixty-one geological maps and numerous reports; they were of such high standard that a writer in the Quarterly Journal of the Geological Society of London bracketed the survey with that of the United States of America as the best in the world. During his years spent in Australia, Selwyn collected numerous significant geological specimens, examples of which are held in collections such as the Burke Museum.This geological specimen is an example of basalt and olivine which shows the volcanic lava activity and geographical specific nature of Mt Franklin as a significant volcanic site. According to Agriculture Victoria 'The crater is one of the deepest in the Central Highlands area. It is a major megacryst site with some of the largest known Victorian examples of megacrysts of augite and an orthoclase. The small parasitic mound of Lady Franklin on the western flanks adds to the geological interest of the site'. This specimen also highlights the locality as a significant place for both indigenous activity and Victorian gold rush era mining practices. This specimen is part of a larger collection of geological and mineral specimens collected from around Australia (and some parts of the world) and donated to the Burke Museum between 1868-1880. A large percentage of these specimens were collected in Victoria as part of the Geological Survey of Victoria that begun in 1852 (in response to the Gold Rush) to study and map the geology of Victoria. Collecting geological specimens was an important part of mapping and understanding the scientific makeup of the earth. Many of these specimens were sent to research and collecting organisations across Australia, including the Burke Museum, to educate and encourage further study.An angular, solid hand-sized piece of grey volcanic Basalt with green/brown Olivine phenocrysts along one flat edge.Olivine in basalt / - label is probably / correct. / C. Willman / 15/4/21burke museum, beechworth, indigo shire, beechworth museum, geological, geological specimen, mineralogy, basalt, igneous rock, igneous-volcanic, volcanic geology, volcanic, olivine, olivine specimen, basaltoid -
 Melbourne Tram Museum
Document - Folder, William Pollock, "The Melbourne Cable Tramway System", c1940
Folder - heavy red covers with two screw sets containing a photocopy of a report by William Pollock, prepared after the closure of the cable tram system titled ""The Melbourne Cable Tramway System". Image numbers listed: Folder – htd4715i1 Inside of folder – htd4715i2.jpg Report –Photocopy of a 14 foolscap sheets, paper titled “The Melbourne Cable Tramway System” by William Pollock, describing the system in detail, listing 26 appendices. Has notes on each Power Station, including a table of opening, closing, power produced and cables, fuel, permanent way (track), cables, underground gear, tunnels, flooding and the grip. Image – htd4714i3.pdf Appendix 1 – Handwritten table “Cost the Melbourne Tramway System” – photocopied special size sheet folded. See image htd4715i4.jpg 2 – Drawing – Typical Power House layout - image htd4715i5.jpg 3 – Drawing – Head of Cable Driver – htd4715i6.jpg 4 – Drawing – Rope Drive – htd4715i7.jpg 5 – Photocopy of a Fuel and Water test sheet for the Esplanade Power House – two sheets – 14/5/1918 – htd4715i8.jpg and htd4715i9.jpg 6 – Section of Cable Tram track – htd4715i10.jpg 7 – Tar Burner used by MTOC 1893 – 1900 - htd4715i11.jpg 8 – Yoke Bracket for line drums – A1 Pulley – htd4715i12.jpg 9 – Tunnel Yoke – htd4715i13.jpg 10 – Elevating Wheel or Pulley with shield plate – htd4715i14.jpg 11 – Curve Pulleys, curve drum and rubbing bar – 2 sheets – htd4715i15.jpg and htd4715i16.jpg 12 – Curve or Conical drum – htd4715i17.jpg 13 – Cable Separating pulley or cone line drum – htd4715i18.jpg 14 – Yoke Pulley or General Pulley – htd4715i19.jpg 15 – Yoke Bracket for Drums – htd4715i20.jpg 16 – Automatic Switch Gear – htd4715i21.jpg 17 – Hand operated switch gear – htd4715i22.jpg 18 – Hand pickup – htd4715i23.jpg 19 & 20 – Photo of bunched strands and damaged cable – htd4715i24 21 – Diagram of Rope – Clarendon St Rope No. 41 – htd4715i25.jpg 22 – Strand Alarm – htd4715i26.jpg 23 – Rope History – two sheets – htd4715i27 and htd4715i28.jpg 24 – Rope Splice – htd4715i29.jpg 25 – Cable Grip – htd4715i30.jpg 26 – Crown Pulley – two sheets – htd4715i30 and htd4715i31trams, tramways, drawings, tramcars, cable trams, trackwork, mto co, reports -
 Flagstaff Hill Maritime Museum and Village
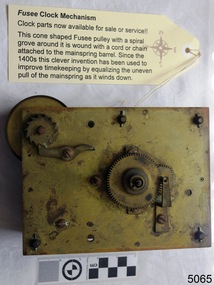
Machine - Fusee Clock Mechanism, early 20th Century
The origin of the fusee is not known. Many sources credit clockmaker Jacob Zech of Prague with inventing it around 1525. The earliest dated fusee clock was made by Zech in 1525, but the fusee appeared earlier, with the first spring-driven clocks in the 15th century. The idea probably did not originate with clockmakers, since the earliest known example is in a crossbow windlass shown in a 1405 military manuscript. Drawings from the 15th century by Filippo Brunelleschi and Leonardo da Vinci also show fusee mechanisms. The earliest existing clock with a fusee, also the earliest spring-powered clock, is the Burgunderuhr (Burgundy clock), a chamber clock whose iconography suggests that it was made for Phillipe the Good, Duke of Burgundy about 1430. Springs were first employed to power clocks in the 15th century, to make them smaller and portable.[1][5] These early spring-driven clocks were much less accurate than weight-driven clocks. Unlike a weight on a cord, which exerts a constant force to turn the clock's wheels, the force a spring exerts diminishes as the spring unwinds. The primitive verge and foliot timekeeping mechanism, used in all early clocks, was sensitive to changes in drive force. So early spring-driven clocks slowed down over their running period as the mainspring unwound. This problem is called lack of isochronism. Two solutions to this problem appeared with the first spring-driven clocks; the stack freed and the fusee. The stack freed, a crude cam compensator, added a lot of friction and was abandoned after less than a century. The fusee was a much more lasting idea. As the movement ran, the tapering shape of the fusee pulley continuously changed the mechanical advantage of the pull from the mainspring, compensating for the diminishing spring force. Clockmakers empirically discovered the correct shape for the fusee, which is not a simple cone but a hyperboloid. The first fusees were long and slender, but later ones have a squatter compact shape. Fusees became the standard method of getting constant force from a mainspring, used in most spring-wound clocks, and watches when they appeared in the 17th century. Around 1726 John Harrison added the maintaining power spring to the fusee to keep marine chronometers running during winding, and this was generally adopted. The fusee was a good mainspring compensator, but it was also expensive, difficult to adjust, and had other disadvantages: It was bulky and tall and made pocket watches unfashionably thick. If the mainspring broke and had to be replaced, a frequent occurrence with early mainsprings, the fusee had to be readjusted to the new spring. If the fusee chain broke, the force of the mainspring sent the end whipping about the inside of the clock, causing damage. The invention of the pendulum and the balance spring in the mid-17th century made clocks and watches much more isochronous, by making the timekeeping element a harmonic oscillator, with a natural "beat" resistant to change. The pendulum clock with an anchor escapement, invented in 1670, was sufficiently independent of drive force so that only a few had fusees. In pocketwatches, the verge escapement, which required a fusee, was gradually replaced by escapements which were less sensitive to changes in mainspring force: the cylinder and later the lever escapement. In 1760, Jean-Antoine Lépine dispensed with the fusee, inventing a going barrel to power the watch gear train directly. This contained a very long mainspring, of which only a few turns were used to power the watch. Accordingly, only a part of the mainspring's 'torque curve' was used, where the torque was approximately constant. In the 1780s, pursuing thinner watches, French watchmakers adopted the going barrel with the cylinder escapement. By 1850, the Swiss and American watchmaking industries employed the going barrel exclusively, aided by new methods of adjusting the balance spring so that it was isochronous. England continued to make the bulkier full plate fusee watches until about 1900. They were inexpensive models sold to the lower classes and were derisively called "turnips". After this, the only remaining use for the fusee was in marine chronometers, where the highest precision was needed, and bulk was less of a disadvantage until they became obsolete in the 1970s. Item is an example of clock mechanisms used until 1910 for many different styles of clocks and went out of fashion in the 1970s due to improvements in clock and watch making.Brass fusse clock movement, It has very heavy brass plates and wheels, high-count machined pinions, and a fusee. The mounting of the pendulum is missing and It has a recoil escapement. A fusee is a conical pulley driven through a chain by the spring barrel. As the spring runs down, the chain acts at a larger and larger radius on the conical pulley, equalising the driving torque. This keeps the rate of the clock more even over the whole run. It has motion work to drive an hour hand as well as a minute hand and the centre arbor is extended behind the back plate to drive some other mechanism.Inscription scratched on back"AM 40" flagstaff hill, warrnambool, shipwrecked-coast, flagstaff-hill, flagstaff-hill-maritime-museum, maritime-museum, shipwreck-coast, flagstaff-hill-maritime-village, clock mechanism, fusee mechanism, horology -
 Flagstaff Hill Maritime Museum and Village
Domestic object - Bowl, Late 19th or early 20th Century
The Process of Making Pottery Decorating, Firing, Glazing, Making, Technical There is a rhythm and flow to clay. It can’t be done all at once! Even the making process! It can take weeks to get everything done, especially if you can only work on your pottery once a week! Even though we have three hour classes, it’s often just not enough time! Here is an overview of some of the processes so you have a bit more grasp on some of the technical stuff! Step One – Design There are SO many ideas out there for making stuff in clay! From delicate porcelain jewellery, through to heavy sculptural work and everything in between. Deciding your direction is sometimes not that easy – when you first start, try everything, you will naturally gravitate to the style that you enjoy! The options and variations are endless and can get a wee bit overwhelming too! Check in with me before you start to ensure your ideas will work, what order you might do things, how you could achieve the look you are seeking and any other technical data required! Step Two – Making Clay is thixotropic. This means that as you work with it, the clay first gets sloppier and wetter, before is begins to dry in the atmosphere. For most things, you simply can’t do all parts of the project at once. An example of work order might look like: Get last weeks work out from the shelves Prepare clay for today’s work – roll your clay, prepare balls for throwing, make the first stage of a pinch pot) Clean up last week’s work and put it on the shelf for bisque firing Check that you have any glazing to do – and do enough of it that you will have time to finish your main project Do the next step of your next project – there might be a further step that can’t be complete immediately, in that case, wrap your work well and put onto the shelves. Letting your work rest for a while can really help keep your work clean and professional looking. Many things require bagging under plastic to keep it ready for work the next week – put your name on the outside of the bag so you can find your work easily. We have stickers and markers. Consider how you want to decorate your work – coloured slip can be applied at a fairly wet stage (remembering that it will make your work even wetter!). Trying to apply slip to dry clay won’t work! If you want to do sgraffito – you will need to keep the work leather hard (a state of dryness where you can still work the clay with a little effort and a little water and care). Step Three – Drying Most of the time your work can go into the rack uncovered to let it dry out for the following week. If you want to continue forming or shaping you will need to double bag your work – put your work on a suitable sized bat and put the bat in a bag so the base of the bag is under the bat, then put another bag over the top of the work and tuck the top of the bag under the bat. If you want to trim (or turn) your thrown work the following week, it should also be double bagged. If your work is large, delicate, or of uneven thicknesses, you should lightly cover your work for drying. When considering the drying process, bare in mind the weather, humidity and wind! The hotter and dryer, the faster things dry and work can dry unevenly in the shelves – this can lead to cracking – another time to lightly cover your work for drying. Step Four – Trimming and Cleaning Up Your work is dry! It is called greenware now and it is at it’s most fragile! Handle everything with two hands. I often refer to soft hands – keep everything gentle and with your fingers spread as much as possible. Try to not pick up things like plates too much, and always with both hands! Before your work can be bisque fired it should be “cleaned up”. You work won’t go into the kiln if it has sharp edges – when glazed, sharp edges turn into razor blades! Use a piece of fly wire to rub the work all over – this will scratch a little so be light handed. Use a knife or metal kidney to scrape any areas that require a bit more dynamic treatment than the fly wire offers! Finally, a very light wipe over with a slightly damp sponge can help soften and soothe all of your edges and dags! Trimming thrown work: If you are planning to trim (or turn) your thrown work (and you should be), make sure you bag it well – your work should be leather hard to almost dry for easiest trimming. Use this step to finish the work completely – use a metal kidney to polish the surface, or a slightly damp sponge to give a freshly thrown look. Wipe the sponge around the rim after trimming, and check the inside of the pot for dags! Trimming slip cast work: Usually I will trim the rims of your work on the wheel the following day to make that stage easier, however you will still need to check your work for lumps and bumps. Last but not least – check that your name is still clearly on the bottom of your work. Step Five – Bisque Firing When the work is completely dry it can go into the bisque kiln. The bisque kiln is fired to 1000°C. This process burns off the water in the clay as well as some of the chemically bound water. The structure of the clay is not altered that much at this temperature. Inside the bisque kiln, the work is stacked a little, small bowl inside a larger bowl and onto a heavy plate. Smaller items like decorations or drink coasters might get stacked several high. Consideration is paid to the weight of the stack and shape of the work. A bisque kiln can fire about one and a half times the amount of work that the glaze kiln can fire. The firing takes about 10 hours to complete the cycle and about two days to cool down. Once it has been emptied the work is placed in the glaze room ready for you to decorate! Step Six – Glazing Decorating your work with colour can be a lot of fun – and time consuming! There are three main options for surface treatment at this stage: Oxide Washes Underglazes Glazes Washes and underglazes do not “glaze” the work – It will still need a layer of glaze to fully seal the clay (washes don’t need glaze on surfaces not designed for food or liquid as they can gloss up a little on their own). Underglazes are stable colourants that turn out pretty much how they look in the jar. They can be mixed with each other to form other colours and can be used like water colours to paint onto your work. Mostly they should have a clear glaze on top to seal them. Oxides are a different species – the pink oxide (cobalt) wash turns out bright blue for instance. They don’t always need a glaze on top, and some glazes can change the colour of the wash! The glazes need no other “glaze” on top! Be careful of unknown glaze interactions – you can put any combination of glaze in a bowl or on a plate, but only a single glaze on the outside of any vertical surface! Glazes are a chemical reaction under heat. We don’t know the exact chemicals in the Mayco glazes we use. I can guess by the way they interact with each other, however, on the whole, you need to test every idea you have, and not run the test on a vertical surface! Simply put, glaze is a layer of glass like substance that bonds with the clay underneath. Clay is made of silica, alumina and water. Glaze is made of mostly silica. Silica has a melting point of 1700°C and we fire to 1240°C. The silica requires a “flux” to help it melt at the lower temperature. Fluxes can be all sorts of chemicals – a common one is calcium – calcium has a melting point of 2500°C, however, together they both melt at a much lower temperature! Colourants are metal oxides like cobalt (blue), chrome (green through black), copper (green, blue, even red!), manganese (black, purple and pink) iron (red brown), etc. Different chemicals in the glaze can have dramatic effects. for example, barium carbonate (which we don’t use) turns manganese bright pink! Other elements can turn manganese dioxide brown, blue, purple and reddish brown. Manganese dioxide is a flux in and of itself as well. So, glazes that get their black and purple colours, often interact with other glazes and RUN! Our mirror black is a good example – it mixes really well with many glazes because it fluxes them – causes them to melt faster. It will also bring out many beautiful colours in the glazes because it’s black colouring most definitely comes from manganese dioxide! Glaze chemistry is a whole subject on it’s own! We use commercial Mayco glazes on purpose – for their huge range of colour possibilities, stability, cool interactions, artistic freedom with the ability to easily brush the glazes on and ease of use. We currently have almost 50 glazes on hand! A major project is to test the interactions of all glazes with each other. That is 2,500 test tiles!!!! I’m going to make the wall behind the wheels the feature wall of pretty colours! Step Seven – Glaze (Gloss or sometimes called “Glost”) Firing Most of the time this is the final stage of making your creation (but not always!) The glaze kiln goes to 1240°C. This is called cone 6, or midrange. It is the low end of stoneware temperatures. Stoneware clays and glazes are typically fired at cone 8 – 10, that is 1260 – 1290°C. The energy requirement to go from 1240°C to 1280°C is almost a 30% more! Our clay is formulated to vitrify (mature, turn “glass-like”) at 1240°, as are our glazes. A glaze kiln take around 12 hours to reach temperature and two to three days to cool down. Sometimes a third firing process is required – this is for decoration that is added to work after the glaze firing. For example – adding precious metals and lustres. this firing temperature is usually around 600 – 800°C depending upon the techniques being used. There are many students interested in gold and silver trims – we will be doing this third type of firing soon! After firing your work will be in the student finished work shelves. Remember to pay for it before you head out the door! There is a small extra charge for using porcelain clay (it’s more than twice the price of regular clay), and for any third firing process! Once your work has been fired it can not turn back into clay for millennia – so don’t fire it if you don’t like it! Put it in the bucket for recycling. https://firebirdstudios.com.au/the-process-of-making-pottery/ The bowl is an example of kitchenware used in the 19th century and still in use today.Bowl white ceramic. Crack on side. Badly stained.Backstamp very faint and unable to be read.flagstaff hill, warrnambool, shipwrecked-coast, flagstaff-hill, flagstaff-hill-maritime-museum, maritime-museum, shipwreck-coast, flagstaff-hill-maritime-village, mixing bowl, food preparation, kitchen equipment, ceramic -
 Flagstaff Hill Maritime Museum and Village
Domestic object - Bowl
The Process of Making Pottery Decorating, Firing, Glazing, Making, Technical There is a rhythm and flow to clay. It can’t be done all at once! Even the making process! It can take weeks to get everything done, especially if you can only work on your pottery once a week! Even though we have three hour classes, it’s often just not enough time! Here is an overview of some of the processes so you have a bit more grasp on some of the technical stuff! Step One – Design There are SO many ideas out there for making stuff in clay! From delicate porcelain jewellery, through to heavy sculptural work and everything in between. Deciding your direction is sometimes not that easy – when you first start, try everything, you will naturally gravitate to the style that you enjoy! The options and variations are endless and can get a wee bit overwhelming too! Check in with me before you start to ensure your ideas will work, what order you might do things, how you could achieve the look you are seeking and any other technical data required! Step Two – Making Clay is thixotropic. This means that as you work with it, the clay first gets sloppier and wetter, before is begins to dry in the atmosphere. For most things, you simply can’t do all parts of the project at once. An example of work order might look like: Get last weeks work out from the shelves Prepare clay for today’s work – roll your clay, prepare balls for throwing, make the first stage of a pinch pot) Clean up last week’s work and put it on the shelf for bisque firing Check that you have any glazing to do – and do enough of it that you will have time to finish your main project Do the next step of your next project – there might be a further step that can’t be complete immediately, in that case, wrap your work well and put onto the shelves. Letting your work rest for a while can really help keep your work clean and professional looking. Many things require bagging under plastic to keep it ready for work the next week – put your name on the outside of the bag so you can find your work easily. We have stickers and markers. Consider how you want to decorate your work – coloured slip can be applied at a fairly wet stage (remembering that it will make your work even wetter!). Trying to apply slip to dry clay won’t work! If you want to do sgraffito – you will need to keep the work leather hard (a state of dryness where you can still work the clay with a little effort and a little water and care). Step Three – Drying Most of the time your work can go into the rack uncovered to let it dry out for the following week. If you want to continue forming or shaping you will need to double bag your work – put your work on a suitable sized bat and put the bat in a bag so the base of the bag is under the bat, then put another bag over the top of the work and tuck the top of the bag under the bat. If you want to trim (or turn) your thrown work the following week, it should also be double bagged. If your work is large, delicate, or of uneven thicknesses, you should lightly cover your work for drying. When considering the drying process, bare in mind the weather, humidity and wind! The hotter and dryer, the faster things dry and work can dry unevenly in the shelves – this can lead to cracking – another time to lightly cover your work for drying. Step Four – Trimming and Cleaning Up Your work is dry! It is called greenware now and it is at it’s most fragile! Handle everything with two hands. I often refer to soft hands – keep everything gentle and with your fingers spread as much as possible. Try to not pick up things like plates too much, and always with both hands! Before your work can be bisque fired it should be “cleaned up”. You work won’t go into the kiln if it has sharp edges – when glazed, sharp edges turn into razor blades! Use a piece of fly wire to rub the work all over – this will scratch a little so be light handed. Use a knife or metal kidney to scrape any areas that require a bit more dynamic treatment than the fly wire offers! Finally, a very light wipe over with a slightly damp sponge can help soften and soothe all of your edges and dags! Trimming thrown work: If you are planning to trim (or turn) your thrown work (and you should be), make sure you bag it well – your work should be leather hard to almost dry for easiest trimming. Use this step to finish the work completely – use a metal kidney to polish the surface, or a slightly damp sponge to give a freshly thrown look. Wipe the sponge around the rim after trimming, and check the inside of the pot for dags! Trimming slip cast work: Usually I will trim the rims of your work on the wheel the following day to make that stage easier, however you will still need to check your work for lumps and bumps. Last but not least – check that your name is still clearly on the bottom of your work. Step Five – Bisque Firing When the work is completely dry it can go into the bisque kiln. The bisque kiln is fired to 1000°C. This process burns off the water in the clay as well as some of the chemically bound water. The structure of the clay is not altered that much at this temperature. Inside the bisque kiln, the work is stacked a little, small bowl inside a larger bowl and onto a heavy plate. Smaller items like decorations or drink coasters might get stacked several high. Consideration is paid to the weight of the stack and shape of the work. A bisque kiln can fire about one and a half times the amount of work that the glaze kiln can fire. The firing takes about 10 hours to complete the cycle and about two days to cool down. Once it has been emptied the work is placed in the glaze room ready for you to decorate! Step Six – Glazing Decorating your work with colour can be a lot of fun – and time consuming! There are three main options for surface treatment at this stage: Oxide Washes Underglazes Glazes Washes and underglazes do not “glaze” the work – It will still need a layer of glaze to fully seal the clay (washes don’t need glaze on surfaces not designed for food or liquid as they can gloss up a little on their own). Underglazes are stable colourants that turn out pretty much how they look in the jar. They can be mixed with each other to form other colours and can be used like water colours to paint onto your work. Mostly they should have a clear glaze on top to seal them. Oxides are a different species – the pink oxide (cobalt) wash turns out bright blue for instance. They don’t always need a glaze on top, and some glazes can change the colour of the wash! The glazes need no other “glaze” on top! Be careful of unknown glaze interactions – you can put any combination of glaze in a bowl or on a plate, but only a single glaze on the outside of any vertical surface! Glazes are a chemical reaction under heat. We don’t know the exact chemicals in the Mayco glazes we use. I can guess by the way they interact with each other, however, on the whole, you need to test every idea you have, and not run the test on a vertical surface! Simply put, glaze is a layer of glass like substance that bonds with the clay underneath. Clay is made of silica, alumina and water. Glaze is made of mostly silica. Silica has a melting point of 1700°C and we fire to 1240°C. The silica requires a “flux” to help it melt at the lower temperature. Fluxes can be all sorts of chemicals – a common one is calcium – calcium has a melting point of 2500°C, however, together they both melt at a much lower temperature! Colourants are metal oxides like cobalt (blue), chrome (green through black), copper (green, blue, even red!), manganese (black, purple and pink) iron (red brown), etc. Different chemicals in the glaze can have dramatic effects. for example, barium carbonate (which we don’t use) turns manganese bright pink! Other elements can turn manganese dioxide brown, blue, purple and reddish brown. Manganese dioxide is a flux in and of itself as well. So, glazes that get their black and purple colours, often interact with other glazes and RUN! Our mirror black is a good example – it mixes really well with many glazes because it fluxes them – causes them to melt faster. It will also bring out many beautiful colours in the glazes because it’s black colouring most definitely comes from manganese dioxide! Glaze chemistry is a whole subject on it’s own! We use commercial Mayco glazes on purpose – for their huge range of colour possibilities, stability, cool interactions, artistic freedom with the ability to easily brush the glazes on and ease of use. We currently have almost 50 glazes on hand! A major project is to test the interactions of all glazes with each other. That is 2,500 test tiles!!!! I’m going to make the wall behind the wheels the feature wall of pretty colours! Step Seven – Glaze (Gloss or sometimes called “Glost”) Firing Most of the time this is the final stage of making your creation (but not always!) The glaze kiln goes to 1240°C. This is called cone 6, or midrange. It is the low end of stoneware temperatures. Stoneware clays and glazes are typically fired at cone 8 – 10, that is 1260 – 1290°C. The energy requirement to go from 1240°C to 1280°C is almost a 30% more! Our clay is formulated to vitrify (mature, turn “glass-like”) at 1240°, as are our glazes. A glaze kiln take around 12 hours to reach temperature and two to three days to cool down. Sometimes a third firing process is required – this is for decoration that is added to work after the glaze firing. For example – adding precious metals and lustres. this firing temperature is usually around 600 – 800°C depending upon the techniques being used. There are many students interested in gold and silver trims – we will be doing this third type of firing soon! After firing your work will be in the student finished work shelves. Remember to pay for it before you head out the door! There is a small extra charge for using porcelain clay (it’s more than twice the price of regular clay), and for any third firing process! Once your work has been fired it can not turn back into clay for millennia – so don’t fire it if you don’t like it! Put it in the bucket for recycling. https://firebirdstudios.com.au/the-process-of-making-pottery/ This bowl is an example of kitchenware used in the 19th century and still in use today.Bowl white ceramic plain that has two sets of edging around lip. Inside bowl has plaster designed to look like cooking mixture.flagstaff hill, warrnambool, shipwrecked-coast, flagstaff-hill, flagstaff-hill-maritime-museum, maritime-museum, shipwreck-coast, flagstaff-hill-maritime-village, kitchen equipment, ceramic -
 Flagstaff Hill Maritime Museum and Village
Domestic object - Bowl, J & G Meakin, Late 19th or early 20th Century
The Process of Making Pottery Decorating, Firing, Glazing, Making, Technical There is a rhythm and flow to clay. It can’t be done all at once! Even the making process! It can take weeks to get everything done, especially if you can only work on your pottery once a week! Even though we have three hour classes, it’s often just not enough time! Here is an overview of some of the processes so you have a bit more grasp on some of the technical stuff! Step One – Design There are SO many ideas out there for making stuff in clay! From delicate porcelain jewellery, through to heavy sculptural work and everything in between. Deciding your direction is sometimes not that easy – when you first start, try everything, you will naturally gravitate to the style that you enjoy! The options and variations are endless and can get a wee bit overwhelming too! Check in with me before you start to ensure your ideas will work, what order you might do things, how you could achieve the look you are seeking and any other technical data required! Step Two – Making Clay is thixotropic. This means that as you work with it, the clay first gets sloppier and wetter, before is begins to dry in the atmosphere. For most things, you simply can’t do all parts of the project at once. An example of work order might look like: Get last weeks work out from the shelves Prepare clay for today’s work – roll your clay, prepare balls for throwing, make the first stage of a pinch pot) Clean up last week’s work and put it on the shelf for bisque firing Check that you have any glazing to do – and do enough of it that you will have time to finish your main project Do the next step of your next project – there might be a further step that can’t be complete immediately, in that case, wrap your work well and put onto the shelves. Letting your work rest for a while can really help keep your work clean and professional looking. Many things require bagging under plastic to keep it ready for work the next week – put your name on the outside of the bag so you can find your work easily. We have stickers and markers. Consider how you want to decorate your work – coloured slip can be applied at a fairly wet stage (remembering that it will make your work even wetter!). Trying to apply slip to dry clay won’t work! If you want to do sgraffito – you will need to keep the work leather hard (a state of dryness where you can still work the clay with a little effort and a little water and care). Step Three – Drying Most of the time your work can go into the rack uncovered to let it dry out for the following week. If you want to continue forming or shaping you will need to double bag your work – put your work on a suitable sized bat and put the bat in a bag so the base of the bag is under the bat, then put another bag over the top of the work and tuck the top of the bag under the bat. If you want to trim (or turn) your thrown work the following week, it should also be double bagged. If your work is large, delicate, or of uneven thicknesses, you should lightly cover your work for drying. When considering the drying process, bare in mind the weather, humidity and wind! The hotter and dryer, the faster things dry and work can dry unevenly in the shelves – this can lead to cracking – another time to lightly cover your work for drying. Step Four – Trimming and Cleaning Up Your work is dry! It is called greenware now and it is at it’s most fragile! Handle everything with two hands. I often refer to soft hands – keep everything gentle and with your fingers spread as much as possible. Try to not pick up things like plates too much, and always with both hands! Before your work can be bisque fired it should be “cleaned up”. You work won’t go into the kiln if it has sharp edges – when glazed, sharp edges turn into razor blades! Use a piece of fly wire to rub the work all over – this will scratch a little so be light handed. Use a knife or metal kidney to scrape any areas that require a bit more dynamic treatment than the fly wire offers! Finally, a very light wipe over with a slightly damp sponge can help soften and soothe all of your edges and dags! Trimming thrown work: If you are planning to trim (or turn) your thrown work (and you should be), make sure you bag it well – your work should be leather hard to almost dry for easiest trimming. Use this step to finish the work completely – use a metal kidney to polish the surface, or a slightly damp sponge to give a freshly thrown look. Wipe the sponge around the rim after trimming, and check the inside of the pot for dags! Trimming slip cast work: Usually I will trim the rims of your work on the wheel the following day to make that stage easier, however you will still need to check your work for lumps and bumps. Last but not least – check that your name is still clearly on the bottom of your work. Step Five – Bisque Firing When the work is completely dry it can go into the bisque kiln. The bisque kiln is fired to 1000°C. This process burns off the water in the clay as well as some of the chemically bound water. The structure of the clay is not altered that much at this temperature. Inside the bisque kiln, the work is stacked a little, small bowl inside a larger bowl and onto a heavy plate. Smaller items like decorations or drink coasters might get stacked several high. Consideration is paid to the weight of the stack and shape of the work. A bisque kiln can fire about one and a half times the amount of work that the glaze kiln can fire. The firing takes about 10 hours to complete the cycle and about two days to cool down. Once it has been emptied the work is placed in the glaze room ready for you to decorate! Step Six – Glazing Decorating your work with colour can be a lot of fun – and time consuming! There are three main options for surface treatment at this stage: Oxide Washes Underglazes Glazes Washes and underglazes do not “glaze” the work – It will still need a layer of glaze to fully seal the clay (washes don’t need glaze on surfaces not designed for food or liquid as they can gloss up a little on their own). Underglazes are stable colourants that turn out pretty much how they look in the jar. They can be mixed with each other to form other colours and can be used like water colours to paint onto your work. Mostly they should have a clear glaze on top to seal them. Oxides are a different species – the pink oxide (cobalt) wash turns out bright blue for instance. They don’t always need a glaze on top, and some glazes can change the colour of the wash! The glazes need no other “glaze” on top! Be careful of unknown glaze interactions – you can put any combination of glaze in a bowl or on a plate, but only a single glaze on the outside of any vertical surface! Glazes are a chemical reaction under heat. We don’t know the exact chemicals in the Mayco glazes we use. I can guess by the way they interact with each other, however, on the whole, you need to test every idea you have, and not run the test on a vertical surface! Simply put, glaze is a layer of glass like substance that bonds with the clay underneath. Clay is made of silica, alumina and water. Glaze is made of mostly silica. Silica has a melting point of 1700°C and we fire to 1240°C. The silica requires a “flux” to help it melt at the lower temperature. Fluxes can be all sorts of chemicals – a common one is calcium – calcium has a melting point of 2500°C, however, together they both melt at a much lower temperature! Colourants are metal oxides like cobalt (blue), chrome (green through black), copper (green, blue, even red!), manganese (black, purple and pink) iron (red brown), etc. Different chemicals in the glaze can have dramatic effects. for example, barium carbonate (which we don’t use) turns manganese bright pink! Other elements can turn manganese dioxide brown, blue, purple and reddish brown. Manganese dioxide is a flux in and of itself as well. So, glazes that get their black and purple colours, often interact with other glazes and RUN! Our mirror black is a good example – it mixes really well with many glazes because it fluxes them – causes them to melt faster. It will also bring out many beautiful colours in the glazes because it’s black colouring most definitely comes from manganese dioxide! Glaze chemistry is a whole subject on it’s own! We use commercial Mayco glazes on purpose – for their huge range of colour possibilities, stability, cool interactions, artistic freedom with the ability to easily brush the glazes on and ease of use. We currently have almost 50 glazes on hand! A major project is to test the interactions of all glazes with each other. That is 2,500 test tiles!!!! I’m going to make the wall behind the wheels the feature wall of pretty colours! Step Seven – Glaze (Gloss or sometimes called “Glost”) Firing Most of the time this is the final stage of making your creation (but not always!) The glaze kiln goes to 1240°C. This is called cone 6, or midrange. It is the low end of stoneware temperatures. Stoneware clays and glazes are typically fired at cone 8 – 10, that is 1260 – 1290°C. The energy requirement to go from 1240°C to 1280°C is almost a 30% more! Our clay is formulated to vitrify (mature, turn “glass-like”) at 1240°, as are our glazes. A glaze kiln take around 12 hours to reach temperature and two to three days to cool down. Sometimes a third firing process is required – this is for decoration that is added to work after the glaze firing. For example – adding precious metals and lustres. this firing temperature is usually around 600 – 800°C depending upon the techniques being used. There are many students interested in gold and silver trims – we will be doing this third type of firing soon! After firing your work will be in the student finished work shelves. Remember to pay for it before you head out the door! There is a small extra charge for using porcelain clay (it’s more than twice the price of regular clay), and for any third firing process! Once your work has been fired it can not turn back into clay for millennia – so don’t fire it if you don’t like it! Put it in the bucket for recycling. https://firebirdstudios.com.au/the-process-of-making-pottery/This bowl was made by renowned pottery company J & G Meakin of England. The firm was established in the mid-1800's. The bowl is an example of kitchenware used in the 19th century and still in use today.Bowl; white ceramic, round and tapering inwards towards base. Made by J and G Meakin England.On base, 'Ironstone China Reg SOL 391413' with symbolflagstaff hill, flagstaff hill maritime museum and village, warrnambool, maritime museum, maritime village, great ocean road, shipwreck coast, mixing bowl, food preparation, j & g meakin, pottery, stoke-on-trent, kitchen equipment, ceramic -
 Flagstaff Hill Maritime Museum and Village
Domestic object - Plate
The Process of Making Pottery Decorating, Firing, Glazing, Making, Technical There is a rhythm and flow to clay. It can’t be done all at once! Even the making process! It can take weeks to get everything done, especially if you can only work on your pottery once a week! Even though we have three hour classes, it’s often just not enough time! Here is an overview of some of the processes so you have a bit more grasp on some of the technical stuff! Step One – Design There are SO many ideas out there for making stuff in clay! From delicate porcelain jewellery, through to heavy sculptural work and everything in between. Deciding your direction is sometimes not that easy – when you first start, try everything, you will naturally gravitate to the style that you enjoy! The options and variations are endless and can get a wee bit overwhelming too! Check in with me before you start to ensure your ideas will work, what order you might do things, how you could achieve the look you are seeking and any other technical data required! Step Two – Making Clay is thixotropic. This means that as you work with it, the clay first gets sloppier and wetter, before is begins to dry in the atmosphere. For most things, you simply can’t do all parts of the project at once. An example of work order might look like: Get last weeks work out from the shelves Prepare clay for today’s work – roll your clay, prepare balls for throwing, make the first stage of a pinch pot) Clean up last week’s work and put it on the shelf for bisque firing Check that you have any glazing to do – and do enough of it that you will have time to finish your main project Do the next step of your next project – there might be a further step that can’t be complete immediately, in that case, wrap your work well and put onto the shelves. Letting your work rest for a while can really help keep your work clean and professional looking. Many things require bagging under plastic to keep it ready for work the next week – put your name on the outside of the bag so you can find your work easily. We have stickers and markers. Consider how you want to decorate your work – coloured slip can be applied at a fairly wet stage (remembering that it will make your work even wetter!). Trying to apply slip to dry clay won’t work! If you want to do sgraffito – you will need to keep the work leather hard (a state of dryness where you can still work the clay with a little effort and a little water and care). Step Three – Drying Most of the time your work can go into the rack uncovered to let it dry out for the following week. If you want to continue forming or shaping you will need to double bag your work – put your work on a suitable sized bat and put the bat in a bag so the base of the bag is under the bat, then put another bag over the top of the work and tuck the top of the bag under the bat. If you want to trim (or turn) your thrown work the following week, it should also be double bagged. If your work is large, delicate, or of uneven thicknesses, you should lightly cover your work for drying. When considering the drying process, bare in mind the weather, humidity and wind! The hotter and dryer, the faster things dry and work can dry unevenly in the shelves – this can lead to cracking – another time to lightly cover your work for drying. Step Four – Trimming and Cleaning Up Your work is dry! It is called greenware now and it is at it’s most fragile! Handle everything with two hands. I often refer to soft hands – keep everything gentle and with your fingers spread as much as possible. Try to not pick up things like plates too much, and always with both hands! Before your work can be bisque fired it should be “cleaned up”. You work won’t go into the kiln if it has sharp edges – when glazed, sharp edges turn into razor blades! Use a piece of fly wire to rub the work all over – this will scratch a little so be light handed. Use a knife or metal kidney to scrape any areas that require a bit more dynamic treatment than the fly wire offers! Finally, a very light wipe over with a slightly damp sponge can help soften and soothe all of your edges and dags! Trimming thrown work: If you are planning to trim (or turn) your thrown work (and you should be), make sure you bag it well – your work should be leather hard to almost dry for easiest trimming. Use this step to finish the work completely – use a metal kidney to polish the surface, or a slightly damp sponge to give a freshly thrown look. Wipe the sponge around the rim after trimming, and check the inside of the pot for dags! Trimming slip cast work: Usually I will trim the rims of your work on the wheel the following day to make that stage easier, however you will still need to check your work for lumps and bumps. Last but not least – check that your name is still clearly on the bottom of your work. Step Five – Bisque Firing When the work is completely dry it can go into the bisque kiln. The bisque kiln is fired to 1000°C. This process burns off the water in the clay as well as some of the chemically bound water. The structure of the clay is not altered that much at this temperature. Inside the bisque kiln, the work is stacked a little, small bowl inside a larger bowl and onto a heavy plate. Smaller items like decorations or drink coasters might get stacked several high. Consideration is paid to the weight of the stack and shape of the work. A bisque kiln can fire about one and a half times the amount of work that the glaze kiln can fire. The firing takes about 10 hours to complete the cycle and about two days to cool down. Once it has been emptied the work is placed in the glaze room ready for you to decorate! Step Six – Glazing Decorating your work with colour can be a lot of fun – and time consuming! There are three main options for surface treatment at this stage: Oxide Washes Underglazes Glazes Washes and underglazes do not “glaze” the work – It will still need a layer of glaze to fully seal the clay (washes don’t need glaze on surfaces not designed for food or liquid as they can gloss up a little on their own). Underglazes are stable colourants that turn out pretty much how they look in the jar. They can be mixed with each other to form other colours and can be used like water colours to paint onto your work. Mostly they should have a clear glaze on top to seal them. Oxides are a different species – the pink oxide (cobalt) wash turns out bright blue for instance. They don’t always need a glaze on top, and some glazes can change the colour of the wash! The glazes need no other “glaze” on top! Be careful of unknown glaze interactions – you can put any combination of glaze in a bowl or on a plate, but only a single glaze on the outside of any vertical surface! Glazes are a chemical reaction under heat. We don’t know the exact chemicals in the Mayco glazes we use. I can guess by the way they interact with each other, however, on the whole, you need to test every idea you have, and not run the test on a vertical surface! Simply put, glaze is a layer of glass like substance that bonds with the clay underneath. Clay is made of silica, alumina and water. Glaze is made of mostly silica. Silica has a melting point of 1700°C and we fire to 1240°C. The silica requires a “flux” to help it melt at the lower temperature. Fluxes can be all sorts of chemicals – a common one is calcium – calcium has a melting point of 2500°C, however, together they both melt at a much lower temperature! Colourants are metal oxides like cobalt (blue), chrome (green through black), copper (green, blue, even red!), manganese (black, purple and pink) iron (red brown), etc. Different chemicals in the glaze can have dramatic effects. for example, barium carbonate (which we don’t use) turns manganese bright pink! Other elements can turn manganese dioxide brown, blue, purple and reddish brown. Manganese dioxide is a flux in and of itself as well. So, glazes that get their black and purple colours, often interact with other glazes and RUN! Our mirror black is a good example – it mixes really well with many glazes because it fluxes them – causes them to melt faster. It will also bring out many beautiful colours in the glazes because it’s black colouring most definitely comes from manganese dioxide! Glaze chemistry is a whole subject on it’s own! We use commercial Mayco glazes on purpose – for their huge range of colour possibilities, stability, cool interactions, artistic freedom with the ability to easily brush the glazes on and ease of use. We currently have almost 50 glazes on hand! A major project is to test the interactions of all glazes with each other. That is 2,500 test tiles!!!! I’m going to make the wall behind the wheels the feature wall of pretty colours! Step Seven – Glaze (Gloss or sometimes called “Glost”) Firing Most of the time this is the final stage of making your creation (but not always!) The glaze kiln goes to 1240°C. This is called cone 6, or midrange. It is the low end of stoneware temperatures. Stoneware clays and glazes are typically fired at cone 8 – 10, that is 1260 – 1290°C. The energy requirement to go from 1240°C to 1280°C is almost a 30% more! Our clay is formulated to vitrify (mature, turn “glass-like”) at 1240°, as are our glazes. A glaze kiln take around 12 hours to reach temperature and two to three days to cool down. Sometimes a third firing process is required – this is for decoration that is added to work after the glaze firing. For example – adding precious metals and lustres. this firing temperature is usually around 600 – 800°C depending upon the techniques being used. There are many students interested in gold and silver trims – we will be doing this third type of firing soon! After firing your work will be in the student finished work shelves. Remember to pay for it before you head out the door! There is a small extra charge for using porcelain clay (it’s more than twice the price of regular clay), and for any third firing process! Once your work has been fired it can not turn back into clay for millennia – so don’t fire it if you don’t like it! Put it in the bucket for recycling. https://firebirdstudios.com.au/the-process-of-making-pottery/Ceramics have evolved over thousands of years.White earthenware dinner plate. Crazing evident all over.Backstamped ‘Made in England S LTD’flagstaff hill, warrnambool, shipwrecked-coast, flagstaff-hill, flagstaff-hill-maritime-museum, maritime-museum, shipwreck-coast, flagstaff-hill-maritime-village, ceramics, tableware -
 Flagstaff Hill Maritime Museum and Village
Domestic object - Plate, Johnson Bros
The Process of Making Pottery Decorating, Firing, Glazing, Making, Technical There is a rhythm and flow to clay. It can’t be done all at once! Even the making process! It can take weeks to get everything done, especially if you can only work on your pottery once a week! Even though we have three hour classes, it’s often just not enough time! Here is an overview of some of the processes so you have a bit more grasp on some of the technical stuff! Step One – Design There are SO many ideas out there for making stuff in clay! From delicate porcelain jewellery, through to heavy sculptural work and everything in between. Deciding your direction is sometimes not that easy – when you first start, try everything, you will naturally gravitate to the style that you enjoy! The options and variations are endless and can get a wee bit overwhelming too! Check in with me before you start to ensure your ideas will work, what order you might do things, how you could achieve the look you are seeking and any other technical data required! Step Two – Making Clay is thixotropic. This means that as you work with it, the clay first gets sloppier and wetter, before is begins to dry in the atmosphere. For most things, you simply can’t do all parts of the project at once. An example of work order might look like: Get last weeks work out from the shelves Prepare clay for today’s work – roll your clay, prepare balls for throwing, make the first stage of a pinch pot) Clean up last week’s work and put it on the shelf for bisque firing Check that you have any glazing to do – and do enough of it that you will have time to finish your main project Do the next step of your next project – there might be a further step that can’t be complete immediately, in that case, wrap your work well and put onto the shelves. Letting your work rest for a while can really help keep your work clean and professional looking. Many things require bagging under plastic to keep it ready for work the next week – put your name on the outside of the bag so you can find your work easily. We have stickers and markers. Consider how you want to decorate your work – coloured slip can be applied at a fairly wet stage (remembering that it will make your work even wetter!). Trying to apply slip to dry clay won’t work! If you want to do sgraffito – you will need to keep the work leather hard (a state of dryness where you can still work the clay with a little effort and a little water and care). Step Three – Drying Most of the time your work can go into the rack uncovered to let it dry out for the following week. If you want to continue forming or shaping you will need to double bag your work – put your work on a suitable sized bat and put the bat in a bag so the base of the bag is under the bat, then put another bag over the top of the work and tuck the top of the bag under the bat. If you want to trim (or turn) your thrown work the following week, it should also be double bagged. If your work is large, delicate, or of uneven thicknesses, you should lightly cover your work for drying. When considering the drying process, bare in mind the weather, humidity and wind! The hotter and dryer, the faster things dry and work can dry unevenly in the shelves – this can lead to cracking – another time to lightly cover your work for drying. Step Four – Trimming and Cleaning Up Your work is dry! It is called greenware now and it is at it’s most fragile! Handle everything with two hands. I often refer to soft hands – keep everything gentle and with your fingers spread as much as possible. Try to not pick up things like plates too much, and always with both hands! Before your work can be bisque fired it should be “cleaned up”. You work won’t go into the kiln if it has sharp edges – when glazed, sharp edges turn into razor blades! Use a piece of fly wire to rub the work all over – this will scratch a little so be light handed. Use a knife or metal kidney to scrape any areas that require a bit more dynamic treatment than the fly wire offers! Finally, a very light wipe over with a slightly damp sponge can help soften and soothe all of your edges and dags! Trimming thrown work: If you are planning to trim (or turn) your thrown work (and you should be), make sure you bag it well – your work should be leather hard to almost dry for easiest trimming. Use this step to finish the work completely – use a metal kidney to polish the surface, or a slightly damp sponge to give a freshly thrown look. Wipe the sponge around the rim after trimming, and check the inside of the pot for dags! Trimming slip cast work: Usually I will trim the rims of your work on the wheel the following day to make that stage easier, however you will still need to check your work for lumps and bumps. Last but not least – check that your name is still clearly on the bottom of your work. Step Five – Bisque Firing When the work is completely dry it can go into the bisque kiln. The bisque kiln is fired to 1000°C. This process burns off the water in the clay as well as some of the chemically bound water. The structure of the clay is not altered that much at this temperature. Inside the bisque kiln, the work is stacked a little, small bowl inside a larger bowl and onto a heavy plate. Smaller items like decorations or drink coasters might get stacked several high. Consideration is paid to the weight of the stack and shape of the work. A bisque kiln can fire about one and a half times the amount of work that the glaze kiln can fire. The firing takes about 10 hours to complete the cycle and about two days to cool down. Once it has been emptied the work is placed in the glaze room ready for you to decorate! Step Six – Glazing Decorating your work with colour can be a lot of fun – and time consuming! There are three main options for surface treatment at this stage: Oxide Washes Underglazes Glazes Washes and underglazes do not “glaze” the work – It will still need a layer of glaze to fully seal the clay (washes don’t need glaze on surfaces not designed for food or liquid as they can gloss up a little on their own). Underglazes are stable colourants that turn out pretty much how they look in the jar. They can be mixed with each other to form other colours and can be used like water colours to paint onto your work. Mostly they should have a clear glaze on top to seal them. Oxides are a different species – the pink oxide (cobalt) wash turns out bright blue for instance. They don’t always need a glaze on top, and some glazes can change the colour of the wash! The glazes need no other “glaze” on top! Be careful of unknown glaze interactions – you can put any combination of glaze in a bowl or on a plate, but only a single glaze on the outside of any vertical surface! Glazes are a chemical reaction under heat. We don’t know the exact chemicals in the Mayco glazes we use. I can guess by the way they interact with each other, however, on the whole, you need to test every idea you have, and not run the test on a vertical surface! Simply put, glaze is a layer of glass like substance that bonds with the clay underneath. Clay is made of silica, alumina and water. Glaze is made of mostly silica. Silica has a melting point of 1700°C and we fire to 1240°C. The silica requires a “flux” to help it melt at the lower temperature. Fluxes can be all sorts of chemicals – a common one is calcium – calcium has a melting point of 2500°C, however, together they both melt at a much lower temperature! Colourants are metal oxides like cobalt (blue), chrome (green through black), copper (green, blue, even red!), manganese (black, purple and pink) iron (red brown), etc. Different chemicals in the glaze can have dramatic effects. for example, barium carbonate (which we don’t use) turns manganese bright pink! Other elements can turn manganese dioxide brown, blue, purple and reddish brown. Manganese dioxide is a flux in and of itself as well. So, glazes that get their black and purple colours, often interact with other glazes and RUN! Our mirror black is a good example – it mixes really well with many glazes because it fluxes them – causes them to melt faster. It will also bring out many beautiful colours in the glazes because it’s black colouring most definitely comes from manganese dioxide! Glaze chemistry is a whole subject on it’s own! We use commercial Mayco glazes on purpose – for their huge range of colour possibilities, stability, cool interactions, artistic freedom with the ability to easily brush the glazes on and ease of use. We currently have almost 50 glazes on hand! A major project is to test the interactions of all glazes with each other. That is 2,500 test tiles!!!! I’m going to make the wall behind the wheels the feature wall of pretty colours! Step Seven – Glaze (Gloss or sometimes called “Glost”) Firing Most of the time this is the final stage of making your creation (but not always!) The glaze kiln goes to 1240°C. This is called cone 6, or midrange. It is the low end of stoneware temperatures. Stoneware clays and glazes are typically fired at cone 8 – 10, that is 1260 – 1290°C. The energy requirement to go from 1240°C to 1280°C is almost a 30% more! Our clay is formulated to vitrify (mature, turn “glass-like”) at 1240°, as are our glazes. A glaze kiln take around 12 hours to reach temperature and two to three days to cool down. Sometimes a third firing process is required – this is for decoration that is added to work after the glaze firing. For example – adding precious metals and lustres. this firing temperature is usually around 600 – 800°C depending upon the techniques being used. There are many students interested in gold and silver trims – we will be doing this third type of firing soon! After firing your work will be in the student finished work shelves. Remember to pay for it before you head out the door! There is a small extra charge for using porcelain clay (it’s more than twice the price of regular clay), and for any third firing process! Once your work has been fired it can not turn back into clay for millennia – so don’t fire it if you don’t like it! Put it in the bucket for recycling. https://firebirdstudios.com.au/the-process-of-making-pottery/Ceramics have evolved over thousands of years.A white earthenware side plate with a gadroon edge. Has water marks and chips on front.‘Johnson Bros England Reg No 15587’flagstaff hill, warrnambool, shipwrecked-coast, flagstaff-hill, flagstaff-hill-maritime-museum, maritime-museum, shipwreck-coast, flagstaff-hill-maritime-village, johnson bros, ceramics, tableware -
 Flagstaff Hill Maritime Museum and Village
Domestic object - Plate, Alfred Meakin
The Process of Making Pottery Decorating, Firing, Glazing, Making, Technical There is a rhythm and flow to clay. It can’t be done all at once! Even the making process! It can take weeks to get everything done, especially if you can only work on your pottery once a week! Even though we have three hour classes, it’s often just not enough time! Here is an overview of some of the processes so you have a bit more grasp on some of the technical stuff! Step One – Design There are SO many ideas out there for making stuff in clay! From delicate porcelain jewellery, through to heavy sculptural work and everything in between. Deciding your direction is sometimes not that easy – when you first start, try everything, you will naturally gravitate to the style that you enjoy! The options and variations are endless and can get a wee bit overwhelming too! Check in with me before you start to ensure your ideas will work, what order you might do things, how you could achieve the look you are seeking and any other technical data required! Step Two – Making Clay is thixotropic. This means that as you work with it, the clay first gets sloppier and wetter, before is begins to dry in the atmosphere. For most things, you simply can’t do all parts of the project at once. An example of work order might look like: Get last weeks work out from the shelves Prepare clay for today’s work – roll your clay, prepare balls for throwing, make the first stage of a pinch pot) Clean up last week’s work and put it on the shelf for bisque firing Check that you have any glazing to do – and do enough of it that you will have time to finish your main project Do the next step of your next project – there might be a further step that can’t be complete immediately, in that case, wrap your work well and put onto the shelves. Letting your work rest for a while can really help keep your work clean and professional looking. Many things require bagging under plastic to keep it ready for work the next week – put your name on the outside of the bag so you can find your work easily. We have stickers and markers. Consider how you want to decorate your work – coloured slip can be applied at a fairly wet stage (remembering that it will make your work even wetter!). Trying to apply slip to dry clay won’t work! If you want to do sgraffito – you will need to keep the work leather hard (a state of dryness where you can still work the clay with a little effort and a little water and care). Step Three – Drying Most of the time your work can go into the rack uncovered to let it dry out for the following week. If you want to continue forming or shaping you will need to double bag your work – put your work on a suitable sized bat and put the bat in a bag so the base of the bag is under the bat, then put another bag over the top of the work and tuck the top of the bag under the bat. If you want to trim (or turn) your thrown work the following week, it should also be double bagged. If your work is large, delicate, or of uneven thicknesses, you should lightly cover your work for drying. When considering the drying process, bare in mind the weather, humidity and wind! The hotter and dryer, the faster things dry and work can dry unevenly in the shelves – this can lead to cracking – another time to lightly cover your work for drying. Step Four – Trimming and Cleaning Up Your work is dry! It is called greenware now and it is at it’s most fragile! Handle everything with two hands. I often refer to soft hands – keep everything gentle and with your fingers spread as much as possible. Try to not pick up things like plates too much, and always with both hands! Before your work can be bisque fired it should be “cleaned up”. You work won’t go into the kiln if it has sharp edges – when glazed, sharp edges turn into razor blades! Use a piece of fly wire to rub the work all over – this will scratch a little so be light handed. Use a knife or metal kidney to scrape any areas that require a bit more dynamic treatment than the fly wire offers! Finally, a very light wipe over with a slightly damp sponge can help soften and soothe all of your edges and dags! Trimming thrown work: If you are planning to trim (or turn) your thrown work (and you should be), make sure you bag it well – your work should be leather hard to almost dry for easiest trimming. Use this step to finish the work completely – use a metal kidney to polish the surface, or a slightly damp sponge to give a freshly thrown look. Wipe the sponge around the rim after trimming, and check the inside of the pot for dags! Trimming slip cast work: Usually I will trim the rims of your work on the wheel the following day to make that stage easier, however you will still need to check your work for lumps and bumps. Last but not least – check that your name is still clearly on the bottom of your work. Step Five – Bisque Firing When the work is completely dry it can go into the bisque kiln. The bisque kiln is fired to 1000°C. This process burns off the water in the clay as well as some of the chemically bound water. The structure of the clay is not altered that much at this temperature. Inside the bisque kiln, the work is stacked a little, small bowl inside a larger bowl and onto a heavy plate. Smaller items like decorations or drink coasters might get stacked several high. Consideration is paid to the weight of the stack and shape of the work. A bisque kiln can fire about one and a half times the amount of work that the glaze kiln can fire. The firing takes about 10 hours to complete the cycle and about two days to cool down. Once it has been emptied the work is placed in the glaze room ready for you to decorate! Step Six – Glazing Decorating your work with colour can be a lot of fun – and time consuming! There are three main options for surface treatment at this stage: Oxide Washes Underglazes Glazes Washes and underglazes do not “glaze” the work – It will still need a layer of glaze to fully seal the clay (washes don’t need glaze on surfaces not designed for food or liquid as they can gloss up a little on their own). Underglazes are stable colourants that turn out pretty much how they look in the jar. They can be mixed with each other to form other colours and can be used like water colours to paint onto your work. Mostly they should have a clear glaze on top to seal them. Oxides are a different species – the pink oxide (cobalt) wash turns out bright blue for instance. They don’t always need a glaze on top, and some glazes can change the colour of the wash! The glazes need no other “glaze” on top! Be careful of unknown glaze interactions – you can put any combination of glaze in a bowl or on a plate, but only a single glaze on the outside of any vertical surface! Glazes are a chemical reaction under heat. We don’t know the exact chemicals in the Mayco glazes we use. I can guess by the way they interact with each other, however, on the whole, you need to test every idea you have, and not run the test on a vertical surface! Simply put, glaze is a layer of glass like substance that bonds with the clay underneath. Clay is made of silica, alumina and water. Glaze is made of mostly silica. Silica has a melting point of 1700°C and we fire to 1240°C. The silica requires a “flux” to help it melt at the lower temperature. Fluxes can be all sorts of chemicals – a common one is calcium – calcium has a melting point of 2500°C, however, together they both melt at a much lower temperature! Colourants are metal oxides like cobalt (blue), chrome (green through black), copper (green, blue, even red!), manganese (black, purple and pink) iron (red brown), etc. Different chemicals in the glaze can have dramatic effects. for example, barium carbonate (which we don’t use) turns manganese bright pink! Other elements can turn manganese dioxide brown, blue, purple and reddish brown. Manganese dioxide is a flux in and of itself as well. So, glazes that get their black and purple colours, often interact with other glazes and RUN! Our mirror black is a good example – it mixes really well with many glazes because it fluxes them – causes them to melt faster. It will also bring out many beautiful colours in the glazes because it’s black colouring most definitely comes from manganese dioxide! Glaze chemistry is a whole subject on it’s own! We use commercial Mayco glazes on purpose – for their huge range of colour possibilities, stability, cool interactions, artistic freedom with the ability to easily brush the glazes on and ease of use. We currently have almost 50 glazes on hand! A major project is to test the interactions of all glazes with each other. That is 2,500 test tiles!!!! I’m going to make the wall behind the wheels the feature wall of pretty colours! Step Seven – Glaze (Gloss or sometimes called “Glost”) Firing Most of the time this is the final stage of making your creation (but not always!) The glaze kiln goes to 1240°C. This is called cone 6, or midrange. It is the low end of stoneware temperatures. Stoneware clays and glazes are typically fired at cone 8 – 10, that is 1260 – 1290°C. The energy requirement to go from 1240°C to 1280°C is almost a 30% more! Our clay is formulated to vitrify (mature, turn “glass-like”) at 1240°, as are our glazes. A glaze kiln take around 12 hours to reach temperature and two to three days to cool down. Sometimes a third firing process is required – this is for decoration that is added to work after the glaze firing. For example – adding precious metals and lustres. this firing temperature is usually around 600 – 800°C depending upon the techniques being used. There are many students interested in gold and silver trims – we will be doing this third type of firing soon! After firing your work will be in the student finished work shelves. Remember to pay for it before you head out the door! There is a small extra charge for using porcelain clay (it’s more than twice the price of regular clay), and for any third firing process! Once your work has been fired it can not turn back into clay for millennia – so don’t fire it if you don’t like it! Put it in the bucket for recycling. https://firebirdstudios.com.au/the-process-of-making-pottery/Ceramics have evolved over thousands of years.Earthenware dessert plate, cream colour. Made by Alfred Meakin, England. Backstamped ‘Alfred Meakin England’. flagstaff hill, warrnambool, shipwrecked-coast, flagstaff-hill, flagstaff-hill-maritime-museum, maritime-museum, shipwreck-coast, flagstaff-hill-maritime-village, alfred meakin, ceramics, earthenware, kitchenware -
 Flagstaff Hill Maritime Museum and Village
Domestic object - Jug
The Process of Making Pottery Decorating, Firing, Glazing, Making, Technical There is a rhythm and flow to clay. It can’t be done all at once! Even the making process! It can take weeks to get everything done, especially if you can only work on your pottery once a week! Even though we have three hour classes, it’s often just not enough time! Here is an overview of some of the processes so you have a bit more grasp on some of the technical stuff! Step One – Design There are SO many ideas out there for making stuff in clay! From delicate porcelain jewellery, through to heavy sculptural work and everything in between. Deciding your direction is sometimes not that easy – when you first start, try everything, you will naturally gravitate to the style that you enjoy! The options and variations are endless and can get a wee bit overwhelming too! Check in with me before you start to ensure your ideas will work, what order you might do things, how you could achieve the look you are seeking and any other technical data required! Step Two – Making Clay is thixotropic. This means that as you work with it, the clay first gets sloppier and wetter, before is begins to dry in the atmosphere. For most things, you simply can’t do all parts of the project at once. An example of work order might look like: Get last weeks work out from the shelves Prepare clay for today’s work – roll your clay, prepare balls for throwing, make the first stage of a pinch pot) Clean up last week’s work and put it on the shelf for bisque firing Check that you have any glazing to do – and do enough of it that you will have time to finish your main project Do the next step of your next project – there might be a further step that can’t be complete immediately, in that case, wrap your work well and put onto the shelves. Letting your work rest for a while can really help keep your work clean and professional looking. Many things require bagging under plastic to keep it ready for work the next week – put your name on the outside of the bag so you can find your work easily. We have stickers and markers. Consider how you want to decorate your work – coloured slip can be applied at a fairly wet stage (remembering that it will make your work even wetter!). Trying to apply slip to dry clay won’t work! If you want to do sgraffito – you will need to keep the work leather hard (a state of dryness where you can still work the clay with a little effort and a little water and care). Step Three – Drying Most of the time your work can go into the rack uncovered to let it dry out for the following week. If you want to continue forming or shaping you will need to double bag your work – put your work on a suitable sized bat and put the bat in a bag so the base of the bag is under the bat, then put another bag over the top of the work and tuck the top of the bag under the bat. If you want to trim (or turn) your thrown work the following week, it should also be double bagged. If your work is large, delicate, or of uneven thicknesses, you should lightly cover your work for drying. When considering the drying process, bare in mind the weather, humidity and wind! The hotter and dryer, the faster things dry and work can dry unevenly in the shelves – this can lead to cracking – another time to lightly cover your work for drying. Step Four – Trimming and Cleaning Up Your work is dry! It is called greenware now and it is at it’s most fragile! Handle everything with two hands. I often refer to soft hands – keep everything gentle and with your fingers spread as much as possible. Try to not pick up things like plates too much, and always with both hands! Before your work can be bisque fired it should be “cleaned up”. You work won’t go into the kiln if it has sharp edges – when glazed, sharp edges turn into razor blades! Use a piece of fly wire to rub the work all over – this will scratch a little so be light handed. Use a knife or metal kidney to scrape any areas that require a bit more dynamic treatment than the fly wire offers! Finally, a very light wipe over with a slightly damp sponge can help soften and soothe all of your edges and dags! Trimming thrown work: If you are planning to trim (or turn) your thrown work (and you should be), make sure you bag it well – your work should be leather hard to almost dry for easiest trimming. Use this step to finish the work completely – use a metal kidney to polish the surface, or a slightly damp sponge to give a freshly thrown look. Wipe the sponge around the rim after trimming, and check the inside of the pot for dags! Trimming slip cast work: Usually I will trim the rims of your work on the wheel the following day to make that stage easier, however you will still need to check your work for lumps and bumps. Last but not least – check that your name is still clearly on the bottom of your work. Step Five – Bisque Firing When the work is completely dry it can go into the bisque kiln. The bisque kiln is fired to 1000°C. This process burns off the water in the clay as well as some of the chemically bound water. The structure of the clay is not altered that much at this temperature. Inside the bisque kiln, the work is stacked a little, small bowl inside a larger bowl and onto a heavy plate. Smaller items like decorations or drink coasters might get stacked several high. Consideration is paid to the weight of the stack and shape of the work. A bisque kiln can fire about one and a half times the amount of work that the glaze kiln can fire. The firing takes about 10 hours to complete the cycle and about two days to cool down. Once it has been emptied the work is placed in the glaze room ready for you to decorate! Step Six – Glazing Decorating your work with colour can be a lot of fun – and time consuming! There are three main options for surface treatment at this stage: Oxide Washes Underglazes Glazes Washes and underglazes do not “glaze” the work – It will still need a layer of glaze to fully seal the clay (washes don’t need glaze on surfaces not designed for food or liquid as they can gloss up a little on their own). Underglazes are stable colourants that turn out pretty much how they look in the jar. They can be mixed with each other to form other colours and can be used like water colours to paint onto your work. Mostly they should have a clear glaze on top to seal them. Oxides are a different species – the pink oxide (cobalt) wash turns out bright blue for instance. They don’t always need a glaze on top, and some glazes can change the colour of the wash! The glazes need no other “glaze” on top! Be careful of unknown glaze interactions – you can put any combination of glaze in a bowl or on a plate, but only a single glaze on the outside of any vertical surface! Glazes are a chemical reaction under heat. We don’t know the exact chemicals in the Mayco glazes we use. I can guess by the way they interact with each other, however, on the whole, you need to test every idea you have, and not run the test on a vertical surface! Simply put, glaze is a layer of glass like substance that bonds with the clay underneath. Clay is made of silica, alumina and water. Glaze is made of mostly silica. Silica has a melting point of 1700°C and we fire to 1240°C. The silica requires a “flux” to help it melt at the lower temperature. Fluxes can be all sorts of chemicals – a common one is calcium – calcium has a melting point of 2500°C, however, together they both melt at a much lower temperature! Colourants are metal oxides like cobalt (blue), chrome (green through black), copper (green, blue, even red!), manganese (black, purple and pink) iron (red brown), etc. Different chemicals in the glaze can have dramatic effects. for example, barium carbonate (which we don’t use) turns manganese bright pink! Other elements can turn manganese dioxide brown, blue, purple and reddish brown. Manganese dioxide is a flux in and of itself as well. So, glazes that get their black and purple colours, often interact with other glazes and RUN! Our mirror black is a good example – it mixes really well with many glazes because it fluxes them – causes them to melt faster. It will also bring out many beautiful colours in the glazes because it’s black colouring most definitely comes from manganese dioxide! Glaze chemistry is a whole subject on it’s own! We use commercial Mayco glazes on purpose – for their huge range of colour possibilities, stability, cool interactions, artistic freedom with the ability to easily brush the glazes on and ease of use. We currently have almost 50 glazes on hand! A major project is to test the interactions of all glazes with each other. That is 2,500 test tiles!!!! I’m going to make the wall behind the wheels the feature wall of pretty colours! Step Seven – Glaze (Gloss or sometimes called “Glost”) Firing Most of the time this is the final stage of making your creation (but not always!) The glaze kiln goes to 1240°C. This is called cone 6, or midrange. It is the low end of stoneware temperatures. Stoneware clays and glazes are typically fired at cone 8 – 10, that is 1260 – 1290°C. The energy requirement to go from 1240°C to 1280°C is almost a 30% more! Our clay is formulated to vitrify (mature, turn “glass-like”) at 1240°, as are our glazes. A glaze kiln take around 12 hours to reach temperature and two to three days to cool down. Sometimes a third firing process is required – this is for decoration that is added to work after the glaze firing. For example – adding precious metals and lustres. this firing temperature is usually around 600 – 800°C depending upon the techniques being used. There are many students interested in gold and silver trims – we will be doing this third type of firing soon! After firing your work will be in the student finished work shelves. Remember to pay for it before you head out the door! There is a small extra charge for using porcelain clay (it’s more than twice the price of regular clay), and for any third firing process! Once your work has been fired it can not turn back into clay for millennia – so don’t fire it if you don’t like it! Put it in the bucket for recycling. https://firebirdstudios.com.au/the-process-of-making-pottery/The form of the jug has been in use for many centuries.Stoneware jug. Two tone brown glaze with pierced lip behind spout. Spout chipped.None.flagstaff hill, warrnambool, shipwrecked-coast, flagstaff-hill, flagstaff-hill-maritime-museum, maritime-museum, shipwreck-coast, flagstaff-hill-maritime-village, jug, ceramic jug -
 Ringwood and District Historical Society
Photograph, Maroondah Highway, looking west, at the coner of Wantirna Road,in 2008. Showing the Clocktower and Haymes Paint (south-west corner)
Photographic record by Russ Haines, RDHS, in 2008. -
 Eltham District Historical Society Inc
Photograph, Officers in charge of Eltham Police Station (1857-2015), 22 Sep 2018
The first Eltham Police Station was in the small building opposite Dalton Street rented from Mr Jarrold in 1857. In 1859 a dedicated Police Residence was built at 728 Main Road. A small weatherboard Police Station was attached to the side of the residence and a blue stone cell at the rear. Also on site were stables for the police horses. The Eltham Courthouse was built in 1860 and is the oldest public building in the district. In 1959 the Victoria Police purchased a house in Pryor Street to be refurbished as the Eltham Police Station. In 1961 the Police in Eltham move into Pryor Street refurbished buildings and office. During 2001 to 2002, the Eltham Police Station was demolished and a new complex constructed on site. The original 1859 Police residence is now home to the Eltham District Historical Society.albert frederick charles glover, allan fenton, arthur eggleston dungey, bertie stanton, charles briant, charles thomas martin, clyne harold mcphan, ebenezer williamson, eltham police station, gerard joseph o'toole, graham vincent joyce, harold shields, ian william bruce, isaac newton stevens, james boxhall, james chester draper, john scully, john stanley mcgough, john stuart bateman, john thomas cone, myles archibald lyons, peter lawlor, richard roberts, robert harry chrisfield, robert llewellyn, samuel james king, samuel o'donnell, sidney frederick little, thomas maher, victoria police, william charles sargeant, james francis fitzpatrick -
 Glen Eira Historical Society
Article - Rosstown Railway
This file contains three items: 1/A review of the ROSSTOWN RAIL TRAIL from LIVING IN GLEN EIRA, vol. 11, 2004, Issue 4, no. 25, date and author unknown. The review explains the purpose of the Rail Trail with a brief narrative of the history behind Rosstown Sugar Mill Railway line. Concluding with information on the location of the Trail and the expected time required to walk the entire track included in the review is a map of the Rail Trail, which marks significant sites along the trail with historic pictures. 2/A newspaper article from THE AGE, dated Tuesday 21/10/1980 and written by Iola Matthews, reporting on the circumstances that led to the publication of the book RETURN TO ROSSTOWN written by Des Jowett and Ian Weickhardt. The article begins with a brief biography of the authors before moving into details of the book’s content, providing a further biography of W. Murray Ross which includes information on his financial ventures – particularly the Rosstown Rail – his marriage and children. The article includes a black and white photograph of Weickhardt and Jowett walking along the route of the railway line, an illustration of the Rosstown sugar works and a map of the area surrounding the site of the mill. 3/Three photocopies of a black and white illustration of the Rosstown sugar works from the east, undated and artist unknown.rosstown rail trail, rosstown, ross william, ross w. murray, ross murray, sugar beet mills, mills, elsternwick, land transport, railways, railway lines, railway routes, carnegie neville street, carnegie miller street, factories, market gardens, horticulture, peat, soils, land forms, topography, geology, civic issues, cone sugar industry, elsternwick plaza, elsternwick, glenhuntly road, parks and reserves, ee gunn reserve, caulfield racecourse, sportsgrounds, caulfield, carnegie, riddell parade, clarence street, aileen avenue, princes park, dover street, marara road, oakleigh road, rosanna street, murrumbeena crescent, north road, kooyong road, hawthorn road, booran road, koornang road, poath road, warragul road, railway platforms, railway buildings, bambra road, swamps, landforms, landfill, council landfill, railway bridges, bridges, railway underpasses, sporting clubs, tennis clubs, bowls clubs, rosstown railway, rosanna street reserve, maps, railway maps, living in glen eira, weickhardt ian, jowett des, caulfield south, curraweena road, oakleigh, caulfield technical school, return to rosstown, beet sugar industry, crops, land booms, land development and subdivisions, bent thomas, fink benjamin, sugar works, rosstown hotel, oamdenong road, rosstown dry cleaners, shops, rosstown road, rosstown plate, people by circumstance, migrants, accountants, occupations, professionals, the grange, real estate, grange road, financial agents, judges, rosstown estate, financial trouble, rabbit preserving, breweries, political debates, political issues, political electorates, politics, political science, debt, financial loans, court procedures, court cases, legal events and activities, malleson and riggall, widowers, seabeach railway, economics, economic deadline, depression 1890s, economic crash, mortgages, divorce, social problems, poverty, ross claude, ross roderick, world war 1914-1918, wars, military history, servicemen, australian flying corps, engineers, caulfield council, swagmen, homelessness, glenhuntly road, glenhuntly road tram, woornack road, leila road, wild cherry road, melten avenue, illustrations, steam trains, trains, horse and cart, horse-drawn transport, railway stations -
Port Melbourne Historical & Preservation Society
Financial record - Order, J E Earl Timber and Hardware, Customers and staff of J E Earl, Sep 1922
Found under floorboards when building demolished, April 1999. Reason for storage under floorboards unknown; found by 'bottle diggers' and sold to Peter Libbis of the Society in April of 1999Packet of 160 smaller sized papers from collection of orders for goods from J.E. Earl, September 1922, handwritten on various bits of paper from scraps to company order forms. Yes!business and traders - timber, built environment, j e earl pty ltd, wormald brothers pty ltd, swallow & ariell ltd, o t box factory, a t harman & sons pty ltd, robert harper & co ltd, a e wearne & son, w c cone & co, joshua brothers distillery -
Port Melbourne Historical & Preservation Society
Financial record - Order, J E Earl Timber and Hardware, Customers and staff of J E Earl, Sep 1922
Found under floorboards when building demolished, April 1999. Reason for storage under floorboards unknown; found by 'bottle diggers' and sold to Peter Libbis of the Society in April of 1999Packet of 57 medium sized papers from collection of orders for goods from J.E. Earl, September 1922, handwritten on various bits of paper from scraps to company order forms. Yes!business and traders - timber, built environment, j e earl pty ltd, wormald brothers pty ltd, swallow & ariell ltd, o t box factory, a t harman & sons pty ltd, robert harper & co ltd, a e wearne & son, w c cone & co, joshua brothers distillery -
Port Melbourne Historical & Preservation Society
Financial record - Order, J E Earl Timber and Hardware, Customers and staff of J E Earl, Sep 1922
Found under floorboards when building demolished, April 1999. Reason for storage under floorboards unknown; found by 'bottle diggers' and sold to Peter Libbis of the Society in April of 1999Packet of fragile papers from collection of orders for goods from J.E. Earl, September 1922, handwritten on various bits of paper from scraps to company order forms. Yes!business and traders - timber, built environment, j e earl pty ltd, wormald brothers pty ltd, swallow & ariell ltd, o t box factory, a t harman & sons pty ltd, robert harper & co ltd, a e wearne & son, w c cone & co, joshua brothers distillery, port melbourne yacht club