Showing 731 items
matching high fire
-
 Eltham District Historical Society Inc
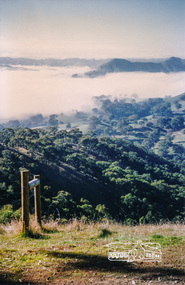
Photograph, Murchison Gap viewed from Strath Creek, Autumn Excursion, Hume and Hovell's 1824 expedition, 26 May 1996, 26/05/1996
[article by Bettina Woodburn in EDHS Newsletter No. 109, July 1996:] ON THE TRAIL OF HUME AND HOVELL - REPORT ON THE AUTUMN EXCURSION - On a green and fresh morning (Sunday 26th May 1996) the Cobb and Co coach (driven by the most obliging Peter Tampion) set off in a north easterly direction from Eltham to connect with Hume and Hovell's route on their 1824 explorations of central Victoria. The Society would follow a series of monuments erected for the 1924 centenary of the expedition from King Parrot Creek (Tuesday 7th December 1824), through Strath Creek, over Sunday Creek (Sunday 12th December 1824) at Broadford, Tullamarine, St Albans, Deer Park, through Werribee, skirting east of the You Yangs to Lara and Avalon Beach. Because their distance-measuring wheel had broken and a one degree mistake was made in calculations, the two leaders of the original group of six convict-companions arrived at Corio Bay, instead of the expected Western Port, discovered earlier by Flinders. From below Mt. Disappointment (Hume and Hovell's difficulties in "scrambling over brush and rock", "leeches in forest, as well as no water", "cutting grass 4-5 ft. high", dreadful scrub", "devil flies") we took an easier route, saw the Strath Creek memorial in ground fog and a wonderful "field of dreams", the Hume-Hovell privately owned cricket ground with its white picket boundary fence. Now, after a steep climb, in sunshine under gums we stretched and viewed magnificent rolling hills and fog-filled valleys - not "smoke from Aborigines' bush fires". After morning tea at Broadford we followed the Sunday Creek valley beside the Hume Freeway, passed the Wallan Wallan Rest Area (more appropriately Hume and Hovell Rest Area) to tum right at Beveridge. In Gellibrand Hill Park, near the headwaters of the Moonee Ponds Creek, we experienced the landscape the first European settlers saw - huge river red gums and rolling pastures. The gardens and sheltered courtyard of the 1840s, timber, brought from .....[?] prefabricated Woodlands Homestead, provided a pleasant lunch stop. We enjoyed a private tour, panoramic views over Melbourne and surroundings and the excitement of arriving and departing aircraft. Our next river crossing was at Werribee, "in a vast treeless plain", then we drove on by-ways no coach had previously travelled, to find "an immense sheet of water" salty Corio Bay, off-course to the west. In late afternoon of a super, calm, late autumn day we headed homewards. Back at Eltham we were rather surprised to find that we had travelled a total of 347 km. Thanks again to Russell Yeoman for his research and organization. What a wonderful day! Colour photographactivities, hume and hovell, murchison valley, murchison gap, strath creek -
 Eltham District Historical Society Inc
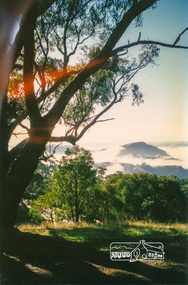
Photograph, Murchison Gap viewed from Strath Creek, Autumn Excursion, Hume and Hovell's 1824 expedition, 26 May 1996, 26/05/1996
[article by Bettina Woodburn in EDHS Newsletter No. 109, July 1996:] ON THE TRAIL OF HUME AND HOVELL - REPORT ON THE AUTUMN EXCURSION - On a green and fresh morning (Sunday 26th May 1996) the Cobb and Co coach (driven by the most obliging Peter Tampion) set off in a north easterly direction from Eltham to connect with Hume and Hovell's route on their 1824 explorations of central Victoria. The Society would follow a series of monuments erected for the 1924 centenary of the expedition from King Parrot Creek (Tuesday 7th December 1824), through Strath Creek, over Sunday Creek (Sunday 12th December 1824) at Broadford, Tullamarine, St Albans, Deer Park, through Werribee, skirting east of the You Yangs to Lara and Avalon Beach. Because their distance-measuring wheel had broken and a one degree mistake was made in calculations, the two leaders of the original group of six convict-companions arrived at Corio Bay, instead of the expected Western Port, discovered earlier by Flinders. From below Mt. Disappointment (Hume and Hovell's difficulties in "scrambling over brush and rock", "leeches in forest, as well as no water", "cutting grass 4-5 ft. high", dreadful scrub", "devil flies") we took an easier route, saw the Strath Creek memorial in ground fog and a wonderful "field of dreams", the Hume-Hovell privately owned cricket ground with its white picket boundary fence. Now, after a steep climb, in sunshine under gums we stretched and viewed magnificent rolling hills and fog-filled valleys - not "smoke from Aborigines' bush fires". After morning tea at Broadford we followed the Sunday Creek valley beside the Hume Freeway, passed the Wallan Wallan Rest Area (more appropriately Hume and Hovell Rest Area) to tum right at Beveridge. In Gellibrand Hill Park, near the headwaters of the Moonee Ponds Creek, we experienced the landscape the first European settlers saw - huge river red gums and rolling pastures. The gardens and sheltered courtyard of the 1840s, timber, brought from .....[?] prefabricated Woodlands Homestead, provided a pleasant lunch stop. We enjoyed a private tour, panoramic views over Melbourne and surroundings and the excitement of arriving and departing aircraft. Our next river crossing was at Werribee, "in a vast treeless plain", then we drove on by-ways no coach had previously travelled, to find "an immense sheet of water" salty Corio Bay, off-course to the west. In late afternoon of a super, calm, late autumn day we headed homewards. Back at Eltham we were rather surprised to find that we had travelled a total of 347 km. Thanks again to Russell Yeoman for his research and organization. What a wonderful day! Colour photographactivities, hume and hovell, murchison valley, murchison gap, strath creek -
 Eltham District Historical Society Inc
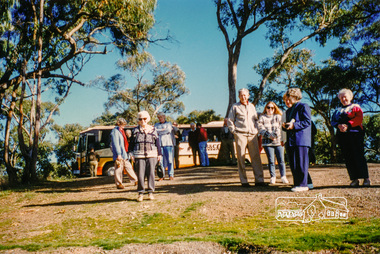
Photograph, Autumn Excursion, Hume and Hovell's 1824 expedition, 26 May 1996, 26/05/1996
[article by Bettina Woodburn in EDHS Newsletter No. 109, July 1996:] ON THE TRAIL OF HUME AND HOVELL - REPORT ON THE AUTUMN EXCURSION - On a green and fresh morning (Sunday 26th May 1996) the Cobb and Co coach (driven by the most obliging Peter Tampion) set off in a north easterly direction from Eltham to connect with Hume and Hovell's route on their 1824 explorations of central Victoria. The Society would follow a series of monuments erected for the 1924 centenary of the expedition from King Parrot Creek (Tuesday 7th December 1824), through Strath Creek, over Sunday Creek (Sunday 12th December 1824) at Broadford, Tullamarine, St Albans, Deer Park, through Werribee, skirting east of the You Yangs to Lara and Avalon Beach. Because their distance-measuring wheel had broken and a one degree mistake was made in calculations, the two leaders of the original group of six convict-companions arrived at Corio Bay, instead of the expected Western Port, discovered earlier by Flinders. From below Mt. Disappointment (Hume and Hovell's difficulties in "scrambling over brush and rock", "leeches in forest, as well as no water", "cutting grass 4-5 ft. high", dreadful scrub", "devil flies") we took an easier route, saw the Strath Creek memorial in ground fog and a wonderful "field of dreams", the Hume-Hovell privately owned cricket ground with its white picket boundary fence. Now, after a steep climb, in sunshine under gums we stretched and viewed magnificent rolling hills and fog-filled valleys - not "smoke from Aborigines' bush fires". After morning tea at Broadford we followed the Sunday Creek valley beside the Hume Freeway, passed the Wallan Wallan Rest Area (more appropriately Hume and Hovell Rest Area) to tum right at Beveridge. In Gellibrand Hill Park, near the headwaters of the Moonee Ponds Creek, we experienced the landscape the first European settlers saw - huge river red gums and rolling pastures. The gardens and sheltered courtyard of the 1840s, timber, brought from .....[?] prefabricated Woodlands Homestead, provided a pleasant lunch stop. We enjoyed a private tour, panoramic views over Melbourne and surroundings and the excitement of arriving and departing aircraft. Our next river crossing was at Werribee, "in a vast treeless plain", then we drove on by-ways no coach had previously travelled, to find "an immense sheet of water" salty Corio Bay, off-course to the west. In late afternoon of a super, calm, late autumn day we headed homewards. Back at Eltham we were rather surprised to find that we had travelled a total of 347 km. Thanks again to Russell Yeoman for his research and organization. What a wonderful day! Colour photographactivities, hume and hovell -
 Eltham District Historical Society Inc
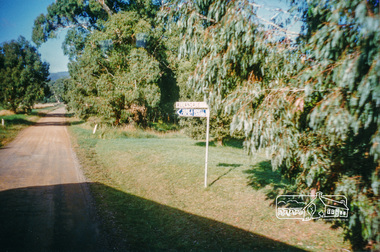
Photograph, Sign to Hume and Hovell Cricket Ground, at Allandale Road, Strath Creek, Autumn Excursion, Hume and Hovell's 1824 expedition, 26 May 1996, 26/05/1996
[article by Bettina Woodburn in EDHS Newsletter No. 109, July 1996:] ON THE TRAIL OF HUME AND HOVELL - REPORT ON THE AUTUMN EXCURSION - On a green and fresh morning (Sunday 26th May 1996) the Cobb and Co coach (driven by the most obliging Peter Tampion) set off in a north easterly direction from Eltham to connect with Hume and Hovell's route on their 1824 explorations of central Victoria. The Society would follow a series of monuments erected for the 1924 centenary of the expedition from King Parrot Creek (Tuesday 7th December 1824), through Strath Creek, over Sunday Creek (Sunday 12th December 1824) at Broadford, Tullamarine, St Albans, Deer Park, through Werribee, skirting east of the You Yangs to Lara and Avalon Beach. Because their distance-measuring wheel had broken and a one degree mistake was made in calculations, the two leaders of the original group of six convict-companions arrived at Corio Bay, instead of the expected Western Port, discovered earlier by Flinders. From below Mt. Disappointment (Hume and Hovell's difficulties in "scrambling over brush and rock", "leeches in forest, as well as no water", "cutting grass 4-5 ft. high", dreadful scrub", "devil flies") we took an easier route, saw the Strath Creek memorial in ground fog and a wonderful "field of dreams", the Hume-Hovell privately owned cricket ground with its white picket boundary fence. Now, after a steep climb, in sunshine under gums we stretched and viewed magnificent rolling hills and fog-filled valleys - not "smoke from Aborigines' bush fires". After morning tea at Broadford we followed the Sunday Creek valley beside the Hume Freeway, passed the Wallan Wallan Rest Area (more appropriately Hume and Hovell Rest Area) to tum right at Beveridge. In Gellibrand Hill Park, near the headwaters of the Moonee Ponds Creek, we experienced the landscape the first European settlers saw - huge river red gums and rolling pastures. The gardens and sheltered courtyard of the 1840s, timber, brought from .....[?] prefabricated Woodlands Homestead, provided a pleasant lunch stop. We enjoyed a private tour, panoramic views over Melbourne and surroundings and the excitement of arriving and departing aircraft. Our next river crossing was at Werribee, "in a vast treeless plain", then we drove on by-ways no coach had previously travelled, to find "an immense sheet of water" salty Corio Bay, off-course to the west. In late afternoon of a super, calm, late autumn day we headed homewards. Back at Eltham we were rather surprised to find that we had travelled a total of 347 km. Thanks again to Russell Yeoman for his research and organization. What a wonderful day! Colour photographactivities, hume and hovell, allandale road, strath creek -
 Eltham District Historical Society Inc
Photograph, Autumn Excursion, Hume and Hovell's 1824 expedition, 26 May 1996, 26/05/1996
[article by Bettina Woodburn in EDHS Newsletter No. 109, July 1996:] ON THE TRAIL OF HUME AND HOVELL - REPORT ON THE AUTUMN EXCURSION - On a green and fresh morning (Sunday 26th May 1996) the Cobb and Co coach (driven by the most obliging Peter Tampion) set off in a north easterly direction from Eltham to connect with Hume and Hovell's route on their 1824 explorations of central Victoria. The Society would follow a series of monuments erected for the 1924 centenary of the expedition from King Parrot Creek (Tuesday 7th December 1824), through Strath Creek, over Sunday Creek (Sunday 12th December 1824) at Broadford, Tullamarine, St Albans, Deer Park, through Werribee, skirting east of the You Yangs to Lara and Avalon Beach. Because their distance-measuring wheel had broken and a one degree mistake was made in calculations, the two leaders of the original group of six convict-companions arrived at Corio Bay, instead of the expected Western Port, discovered earlier by Flinders. From below Mt. Disappointment (Hume and Hovell's difficulties in "scrambling over brush and rock", "leeches in forest, as well as no water", "cutting grass 4-5 ft. high", dreadful scrub", "devil flies") we took an easier route, saw the Strath Creek memorial in ground fog and a wonderful "field of dreams", the Hume-Hovell privately owned cricket ground with its white picket boundary fence. Now, after a steep climb, in sunshine under gums we stretched and viewed magnificent rolling hills and fog-filled valleys - not "smoke from Aborigines' bush fires". After morning tea at Broadford we followed the Sunday Creek valley beside the Hume Freeway, passed the Wallan Wallan Rest Area (more appropriately Hume and Hovell Rest Area) to tum right at Beveridge. In Gellibrand Hill Park, near the headwaters of the Moonee Ponds Creek, we experienced the landscape the first European settlers saw - huge river red gums and rolling pastures. The gardens and sheltered courtyard of the 1840s, timber, brought from .....[?] prefabricated Woodlands Homestead, provided a pleasant lunch stop. We enjoyed a private tour, panoramic views over Melbourne and surroundings and the excitement of arriving and departing aircraft. Our next river crossing was at Werribee, "in a vast treeless plain", then we drove on by-ways no coach had previously travelled, to find "an immense sheet of water" salty Corio Bay, off-course to the west. In late afternoon of a super, calm, late autumn day we headed homewards. Back at Eltham we were rather surprised to find that we had travelled a total of 347 km. Thanks again to Russell Yeoman for his research and organization. What a wonderful day! Colour photographactivities, hume and hovell -
 Eltham District Historical Society Inc
Photograph, Autumn Excursion, Hume and Hovell's 1824 expedition, 26 May 1996, 26/05/1996
[article by Bettina Woodburn in EDHS Newsletter No. 109, July 1996:] ON THE TRAIL OF HUME AND HOVELL - REPORT ON THE AUTUMN EXCURSION - On a green and fresh morning (Sunday 26th May 1996) the Cobb and Co coach (driven by the most obliging Peter Tampion) set off in a north easterly direction from Eltham to connect with Hume and Hovell's route on their 1824 explorations of central Victoria. The Society would follow a series of monuments erected for the 1924 centenary of the expedition from King Parrot Creek (Tuesday 7th December 1824), through Strath Creek, over Sunday Creek (Sunday 12th December 1824) at Broadford, Tullamarine, St Albans, Deer Park, through Werribee, skirting east of the You Yangs to Lara and Avalon Beach. Because their distance-measuring wheel had broken and a one degree mistake was made in calculations, the two leaders of the original group of six convict-companions arrived at Corio Bay, instead of the expected Western Port, discovered earlier by Flinders. From below Mt. Disappointment (Hume and Hovell's difficulties in "scrambling over brush and rock", "leeches in forest, as well as no water", "cutting grass 4-5 ft. high", dreadful scrub", "devil flies") we took an easier route, saw the Strath Creek memorial in ground fog and a wonderful "field of dreams", the Hume-Hovell privately owned cricket ground with its white picket boundary fence. Now, after a steep climb, in sunshine under gums we stretched and viewed magnificent rolling hills and fog-filled valleys - not "smoke from Aborigines' bush fires". After morning tea at Broadford we followed the Sunday Creek valley beside the Hume Freeway, passed the Wallan Wallan Rest Area (more appropriately Hume and Hovell Rest Area) to tum right at Beveridge. In Gellibrand Hill Park, near the headwaters of the Moonee Ponds Creek, we experienced the landscape the first European settlers saw - huge river red gums and rolling pastures. The gardens and sheltered courtyard of the 1840s, timber, brought from .....[?] prefabricated Woodlands Homestead, provided a pleasant lunch stop. We enjoyed a private tour, panoramic views over Melbourne and surroundings and the excitement of arriving and departing aircraft. Our next river crossing was at Werribee, "in a vast treeless plain", then we drove on by-ways no coach had previously travelled, to find "an immense sheet of water" salty Corio Bay, off-course to the west. In late afternoon of a super, calm, late autumn day we headed homewards. Back at Eltham we were rather surprised to find that we had travelled a total of 347 km. Thanks again to Russell Yeoman for his research and organization. What a wonderful day! Colour photographactivities, hume and hovell -
 Federation University Historical Collection
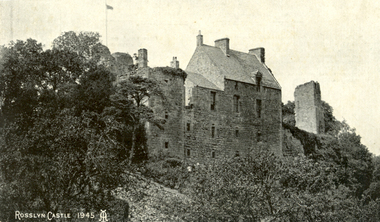
Postcard, Roslin, c1945
Roslin Castle, the seat of the St Clair Family, was founded in 1304. It is partly in ruins. According to legend some millions of pounds worth of treasure being hidden in the vaults. it is said to be under the charge of a lady of the ancient St Clair family. She is to wake from her slumber and point out the spot where the treasure lies. It is located near the village of Roslin in Midlothian, Scotland. It is located around 9 miles south of Edinburgh, on the north bank of the North Esk, only a few hundred metres from the famous Rosslyn Chapel. (See http://en.wikipedia.org/wiki/Roslin_Castle)Three postcards showing different views of Roslin Castle. .1) A stone building on a hill side, with flying flag, .2) The Courtyard, Roslin Castle .3) The Bakehouse, Roslin Castle.1) This a fine view taken from the Glen. Formerly the castle was eight storeys high, five above and three underground. .2) While at Edinburgh I went out to Roslin saw there the Castle and Church. They are both very old dating back 500 hundred years. .3) The hole in the wall is the oven, is an immense thing. A fire was lit in the oven then pulled out and the heat in the stone did the baking.roslin, rosslyn, roslin castle, st clair, spirit, ghost, baking, oven, bread -
 Bright & District Historical Society operating the Bright Museum
Fire Irons - Tongs
... Museum 2 Station Street Bright high-country Fire irons fire tongs ...Fire Tongs - ornate brass handlefire irons, fire tongs, tongs, brass -
Bright & District Historical Society operating the Bright Museum
Fire Irons - Poker
... Museum 2 Station Street Bright high-country Fire Irons Fire poker ...Poker with ornate brass handlefire irons, fire poker, poker, brass -
Bright & District Historical Society operating the Bright Museum
Fire Irons - Shovel
... Museum 2 Station Street Bright high-country Fire Irons fire ...Fire Irons - shovel with ornate brass handlefire irons, fire shovel, brass -
Bright & District Historical Society operating the Bright Museum
Fire irons
... Museum 2 Station Street Bright high-country irons fire domestic ...Brass stand in shape of a cobra, with four brass fireplace utensils - Long poker, short poker, tongs, shovelirons, fire, domestic, utensil -
Bright & District Historical Society operating the Bright Museum
Fire irons
... Museum 2 Station Street Bright high-country brass fire tongs Fire ...00062.1 : Brass fire tongs - ornate handle. 00062.2 : Brass poker - ornate handle. 00062.3 : Brass shovel - ornate handle.brass, fire tongs, fire poker, fire shovel -
 Federation University Historical Collection
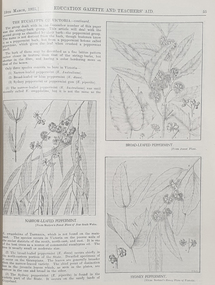
Book, Victoria Education Gazette and Teachers' Aid, 1921-1930, 1921-1930
The Victoria Education Gazette and Teachers' Aid was published for Victoria's teachers and was sent to all school on the state. In 1920 The Ballarat School of Mines had donated 136 pounds 14 shillings and 10 pence to the Victorian Education Department's War Relief Account, and the Ballarat Junior Technical School had donated 10 pounds 6 shillings and 10 pence.Ten black hard covered volumes with red tape spine, covering 1921 to 1930. The gazettes include Education Department appointments, transfers, resignations and retirements, vacancies, notices, queries, notices of books, examination papers, original articles, lesson plans, suggestions for lessons, drawing, obituaries, notes on nature study, mathematics, music, sloyd woodwork, English grammar, Victorian State School Swimming Clubs, Geography, penmanship, science, History, Latin, Geography, The School Garden, horticulture, singing, World War One; ANZAC Day, lifesaving, Astronomy, Empire Day, ANZAC Buffet London, Victorian Education Department's War Relief Fund .1) 1928. Articles include: New Caledonia, Swimming and Lifesaving, School forestry, a visit to the pyramids, Exploration of Gippsland, paul de Strezelecki, Angus McMillan, Villers Bretonneux Memorial School, American Black Walnut, Red Gum, Messmate Stringybark, The Great Barrier Reef, retirement of Frank Tate, Stawell High School, Report on Some Aspects of Education in the United States, Jubilee Education Exhibition , New School Readers; measured Drawing Images include: Macarthur Street School's Plantation, Maryborough School Plantation, Pinus Insignis (Radiata) ready for Milling, Creswick State Forest, Metalwork, Daylesford Pine Plantation four years old, Henry Harvey (art Inspector); Omeo School Endowment Plantation; Frank Tate; Stawell High School Drawings From Casts; Lake Tyers School Endowment Plantation, measured drawing, Thomas H. Stuart, GEorge Swinburne. J.R. Tantham-Fryer, Cookery Class, John Edward Thomas. .3) War Savings Stampsm Swimming and Life-saving, Teh Rural School System of Victoria, Imaginative Composition, ANZAC Day, Retardation, Teh Bright Child Hudson Hard Obituary, Leeches, Relief for Distress in Europe, Dental, Teachers' Library, History of Portarlington, J.E. Stevens Obituary, Victorian Teachers in England Images: Swimming and Life-Saving Medallion .3) Swimming and Lifesaving, Bronze medallion, Victoria Leage of Victori, War Savings Stamps, Rural School Sytem of Victoria, .4) War Relief, Talbot Colony for Epileptics Masonmeadows, Discipline New and Old (Percy Samson), Soldier teachers, Preservation of Australian Birds, Arbor Day, Jubilee of Free Education, Teaching Geography, Poery in Schools, School Committees, Shelter Pavilion, Mysia Memorial School, Clovers, Jubilee Exhibition, Domestic Arts, Louis Pasteur, .5) Victoria League of Victoria, An Endowment Scheme (Pine Plantations), School Endowment Plantations, Protecting our trees by Owen Jones,. Victorian State Schools Horticultural Society, Sloyd Woodwork, School Forestry, Thomas Brodribb Obituary and portrait, Imperial Education Conference London, school Management and Method, School plantations, Eucalypt plantations in the Bendix and Heathcote District, Junior Red Cross, Jubilee Education Exhibition, Gould League Competitions, handwriting, The School Magazine, Frank Tate in London, Victorian beetles, Council of Public Education, Villers Bretonneux and its new School, Death of Samuel Summons, Woodwork Summer School, Swimming, Japanese Relief Fund, Retirement of John Cross, reminiscences of the Late Mr Albert Mattingley .6) Thomas H. Trengrove and the Villers Bretonneux School hall and pilaster carvings, forestry, visit of Maryborough teachers to Ballarat Water Reserves, noxious weeds, relief for Distressed Europe, The Dalton Plan, Empire Day, Retirement of Mr Fussell, Centenary of Hume and Hovell Expedition, League of Kindness, Effective Nature Study in a Rural School, Some Facts About Paper and their Bearing Upon School Plantations, Council of the Working Men's College Melbourne, Maria Montessori, University Vacation School, Horticulture in State Schools, An Informal Chat About French Schools (C.R. McRae), The Vacation School, Johann Heinrich Pestalozzi, Inspector's Report on a 5th-class School, Can Children Write Verse, John Adams, Victoria League of Victoria, R.F. Toutcher, Sir James Barbie's Address to High-School Girls, Impressions of a High School Teacher Abroad (R.D. Collman), The Spirit of the School Plantation Scheme, Monument of the Late Mr and Mrs A.T. Sharp at Box Hill Cemetery, The Teaching of Geography, The Treatment of Poetry in Class, Two Difficult Arithmetic Lessons, Location of Principal Australian Timbers, Dr John Smyth, Stammering and its Influence on Education, Wireless Broadcasting as an Educational Medium, Boys School at Villers Brettonneux, The New School at Villers Brettonneux, Bird Day, Messmate or Stringybark, What Every Woman Knows, Director's Report on Denmark .7)1925 . Includes: School Forestry, horticulture, J.H. Betheras retirement, Ivanhoe School, Coburg School, Moorabool Junior Technical School, Villers Bretonneux School hall and pilaster carvings, Francis Ormond, William Charles Kernot, Corsican Pnes at Creswick, Ballarat High School Plantation, Workin Men's College, RMIT, Naorrow LEafed Peppermint, Education and World Peace, Eucalypts of Victoria, John C. Eccles, Blue Gum. Manners, Giving the Poorly Nourished Boy A Chance, Native Ferns, Marybourough Technical School, Memorial School at Villers-Brettonneux .8) Experimental Plots in Country Schools (W.W. Gay), Villers Bretonneaux and its Memorial School. nominated classes for Art Teachers, The Teachers Act 1925, Horsham High School, Richmond Technical School, Farewell to Messrs C.R. Long and Ponsonby Carew-Smyth, Frank Tate, Phyiscal Training, Arbor Day, ANZAC Day, Shakespeare Day,Bendigo Junior Techncial School, Musical Appreciation, Motor Dental Unit, School Camps, Education Act of 1872: Mr Angus McKay's Part (George Mackay), A Bush Fire Experience (Irene Stable), Black Sunday, Californian Red Pine, Women's Education in America, Farewell to Lord and Lady Stradbroke, Grevilia Robusta, Silky Oak, Redwood, John E. Grant, The Need for Research (Donald Clark), Junior Drama, Ida D. Marshall, John Pounds, Australian Books, Fish Creek School, State Boundaries, History in the Curriculum, Ceramic Art in Australia (Percy E. Everett), Choice of School Songs, Tasmanian Beech, Should History be Taught on a National or an International Basis, Hydatid Disease, James Holland Obituary, Florrie Hodges, Queensland Maple, Post Bushfire Ruins at Fumina, Arbor Day at Fumina, Queensland Rosewood, Omeo Endowment Plantation, Bird Day, Junior Red Cross, Pioneers' Day, Edward Henty, Junior Technical Schools, Yellow Pine, History and Progress of Needlework, A.B.C. of Astronomy, Northumberland Mental tests, Queensland Red Cedar, Teh Globe Theatre, .9) 1927 includes The ABC of Astronomy, Atr Theatre, English Beech, Angus McMillan Art Pottery, School Singing, State Schools' Nursery, School endowment plantations, Making a Man, experimental proof of Charles's Law, John Smyth obituary and portrait, Linton Pine Planation, motivation of arithmetic, Women's Classes at Dookie, Swimming and Lifesaving, Pioneers Day, Drawing, Ballarat High School planation, biting fly, Tir-Na-N'og, John Byatt retirement and portrait, Technical Schools Conference at Daylesford, Ethel Osborne and portrait, library. Francis Thompson portrait, Adam Lindsay Gordon, Solar movement, motor transport, Liverpool Cathedral, Teh Story of the Cathedral, Bendigo School of Mines, Omeo School pine plantation, Egypt and the Nile, Self-Criticism Images include Ballarat High School Pine Plantation, Vale Park, Francis Ormond, Woking Men's College (RMIT), W.N. Kernot, A Stand of Corsican Pines at Creswick, Victoria .10) Some Remarks on the Relationship of the technical Schools to the University (Donald Clark) , Present Day Education in England , Memorial to Joseph Cornwall, Spelling, motivation, Singing, State Scholarships, Agriculture, T.W. Bothroyd, The Swimmer - A Summer School Sketch (H.H. Croll), Swimming woodwork, Farewell to Dr Sutton. ,Drowning, War Savings Movement, White Beech. George S. Browne , Example of School Honor Book, Blackwood, Optimistic teacher, Soldier settlement around Shapparton, Oral Hygiene, Cinema Machines, Basketball, Wakter M. Camble obituary, ANZAC day Pilgrimage in England, Froebel's System, Montessori Method, War Relief Fund, New Zealand Kauri Tree, Bat Tenis at a Bush School., Advice to Australian Girls, Chrysanthemums, Royal Visit, National Parks of Victoria, Maurice Copland Obituary, total eclipse of the Moon, School libraries, The teacher and the COmmunity (A.M. Barry), The Reading Lesson, Swimming and Life-saving, MElbourne Teachers' College War Memorial Windows Old Trainees War Memorial, Cultivating a Natinoal Art education gazette, school, education, teaching, teacher, world war one, school plantations, macarthur street pine plantation, school forestry, creswick state forest, anzac day, armistance celebrations, frank tate, frank tate retirement, drawing from cast, education department school readers, lake tyers pine plantation, w.n. kernot, rmit, working men's college, francis ormond, pine plantations, calenbeem park, creswick, villers-brettonneux school hall and carvings, thomas trengrove, corsican pines, creswick, pine endowment plantations, mccarthur st primary school pine plantation, ballarat high school pine plantation, vale park, mount pleasant primary school pine plantation, golden point pine plantation, angus macmillan, paul de strzelecki, gippsland, villers-bretonneaux memorial school, francis thompson, english ash, pestalozzi centenary, shakespeare day, swimming classes, clear pine, cinema in education, american black walnut, red gum, thomas wolliam bothroyd obituary, and portrait, physical training displays, teaching of spelling, ohm's law, blue gum -
 Flagstaff Hill Maritime Museum and Village
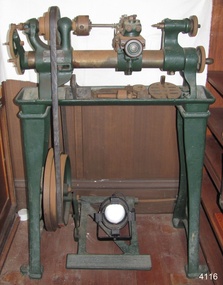
Machine - Treadle Lathe, 1920-1923
The lathe-making business incorporated in 1902 as Drummond Bros Ltd originated in the fertile mind of Mr Arthur Drummond, said to have been living at that time at Pinks Hill, on the southern edge of Broad Street Common, west of Guildford. Mr Drummond, whose accomplishments included several pictures hung in the Royal Academy, was unable to find a lathe suitable for use in model engineering. In 1896 he designed for himself a ‘small centre lathe … which had a compound slide rest with feed-screws and adjustable slides’. He also designed and built ‘lathes of 4.5 inch and 5 inch centre height, which had beds of a special form whereby the use of a gap piece was eliminated but the advantages of a gap-bed lathe were retained’. Assisted by his brother, Mr Frank Drummond, who had served an apprenticeship to an engineering firm at Tunbridge Wells, the first lathes were made in a workshop adjoining Arthur Drummond’s house. The demand that speedily built up led to the decision to form a company and manufacture the lathes for sale commercially. Land was acquired nearby, at Rydes Hill, and the first factory built. The enterprise was a success, and the company quickly established ‘a high reputation in this country and abroad for multi-tool and copying lathes, and gear-cutting machines’. Other lathes were added to the range, including the first of the ’round bed’ machines for which the firm became widely known. A Drummond 3.5 inch lathe was among the equipment of Captain Scott’s 1912 expedition to the South Pole, and large numbers of 3.5 inch and 4 inch designs were exported to Australia, Canada and India. By the outbreak of war in 1914, 5 inch, 6 inch and 7 inch screw cutting lathes, arranged for power drive, were on sale. Large orders were received from the government for 3.5 inch lathes, for use in destroyers and submarines, and 5 inch lathes for the mechanised section of the Army Service Corps. The latter were used in mobile workshops. The factory worked night and day to supply the forces’ needs, until production was disrupted by a fire which destroyed a large part of the works in May 1915. As soon as rebuilding was complete work restarted. At the end of the war the entire production was being taken by the Government departments, a special feature being a precision screw lathe, bought by the Ministry of Munitions in 1918. Between the wars Drummond Bros Ltd introduced new machines for the motor vehicle, and later the aircraft industry, and the works were extended on many occasions to fulfill the increasing orders. The Maxicut multi-tool lathe (1925), designed for high-production turning operations, was one of the first machines of this type to be built in England. It was followed (1928) by an hydraulic version for turning gear blanks, and similar work. Further developments provided machines which, during the Second World War, turned all the crankshafts and propeller shafts for Bristol engines. Others, ordered by the Ministry of Supply were employed in turning shells, and many other specific needs of vehicle and aircraft manufacture were catered for by new types of Drummond lathes. Production of the small centre lathes ceased during the war when the company needed to concentrate on building multi-tool lathes and gear shapers. After the war a completely new Maxicut range was introduced, replacing the older versions, and fully automatic. The types were continually developed, and new versions manufactured until the end of the company’s life in 1980. The disappearance from the scene of Mr Arthur Drummond in 1946, and the end of the company’s autonomous existence in 1953 when the company was acquired by William Asquith Ltd, which was in turn bought by Staveley in 1966, meant that the factory at Rydes Hill became one – albeit very effective – part of a large national engineering company. Achievements at the Guildford works during its last years included the development of automated Maxicut gear-shapers in what was ‘probably the most fully automated gear shop in the country’, while a machine from Guildford was sent to the Osaka Fair in 1962. In 1963 an agreement was signed with Hindustan Machine Tools for the manufacture of Maxicut gear-shapers in state owned factories in Bangalore and Chandigarh. During 1963 the two largest multi-tool lathes ever made in the UK were installed in Ambrose Shardlow’s works in Sheffield for handling cranks up to 14 foot long. In 1976 Drummond lathes were included in Staveley’s £14,000,000 installation in Moscow of an automated production line for Zil motor cars. Up to the end invention continued at Guildford: a new Drummond Multi-turn memory-controlled machine was shown at the International Machine Tool Exhibition in 1977. This could not save the works from the pressures of the late 1970s, and Staveley Industries closed its Guildford site in 1980.An early example of a lathe that was designed primarily for the hobbyist model maker. It is in good condition and sought today by collectors as many of it's attributes were innovative at the time and lead to further development and incorporation of some of its features into more industrial models of production machinery. Lathe, round bed, treadle powered lathe, Drummond Type A, Serial number and maker's inscription. 1920-1923, Made by Drummond Brothers in Guildford, Surrey, England. Lathe is complete with Chuck, Tool post and Tail Stock in situ (30 extra parts)"MADE BY DRUMMOND BROTHERS LIMITED - PATENT TEES - RYDE'S HILL n GUILDFORD SURREY", "Serial Number 01470," "L44" or "L45 " flagstaff hill, warrnambool, shipwrecked coast, flagstaff hill maritime museum, maritime museum, shipwreck coast, flagstaff hill maritime village, great ocean road, lathe 1920-1923, round bed lathe, treadle lathe, drummond type a, guildford surrey, drummond brothers guildford surrey england, tread'e -
 Flagstaff Hill Maritime Museum and Village
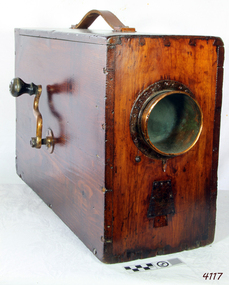
Instrument - Foghorn, Late 19th century
A foghorn is a device that uses sound to warn of navigational hazards like rocky coastlines, or boats of the presence of other vessels, in foggy conditions. The term is most often used with marine transport. When visual navigation aids such as lighthouses are obscured, foghorns provide an audible warning of rocky outcrops, shoals, headlands, or other dangers to shipping. An early form of fog signal was to use a bell, gong, explosive signal or firing a cannon to alert shipping. From the early 20th century an improved device called the diaphone was used in place of these other devices, The diaphone horn was based directly on the organ stop of the same name invented by Robert Hope-Jones, creator of the Wurlitzer organ. Hope-Jones' design was based on a piston that was closed only at its bottom end and had slots, perpendicular to its axis, cut through its sides, the slotted piston moved within a similarly slotted cylinder. Outside of the cylinder was a reservoir of high-pressure air. Initially, this air would be admitted behind the piston, pushing it forward. When the slots of the piston aligned with those of the cylinder, air passed into the piston, making a sound and pushing the piston back to its starting position, whence the cycle would be repeated. This method of producing a low audible sound was further developed as a fog signal by John Northey of Toronto and these diaphones were powered by compressed air produced by an electric motor or other mechanical means that admitted extremely powerful low-frequency notes. The example in the Flagstaff collection is an early cased and portable diaphone used on pleasure or sailing craft. By manually turning the crank handle air is produced and fed into valves that direct air across vibrating metal reeds to produce the required sound. in foggy weather, fog horns are used to pinpoint a vessels position and to indicate how the vessel is sailing in foggy conditions. One blast, when sailing on starboard tack and two blasts, when sailing on a port tack and three dots, when with wind is behind the vessel. Since the automation of lighthouses became common in the 1960s and 1970s, most older foghorn marine installations have been removed to avoid the need to run the complex machinery associated with them, and have been replaced with an electrically powered diaphragm or compressed air horns. The example in the collection is significant as it was used in the early 19th century for sailing vessels was important but these portable crank fog horns have also been superseded by modern electric varieties. Therefore the item has a historical connection with sailing and maritime pursuits from our past.English Rotary Norwegian Pattern nautical foghorn within a boxed pine varnished case with exposed corner dovetailing, original leather carrying strap, brass side crank, and original copper trumped horn. Card accessory with Directions for Use in both English and French.Noneflagstaff hill, warrnambool, shipwrecked coast, flagstaff hill maritime museum, maritime museum, shipwreck coast, flagstaff hill maritime village, great ocean road, foghorn, maritime technology, maritime communication, marine warning signal, portable foghorn, bellows foghorn, crank handle, robert hope-jones, john northey -
 Flagstaff Hill Maritime Museum and Village
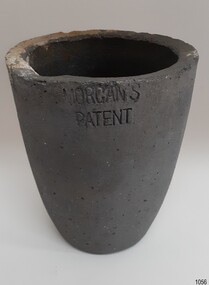
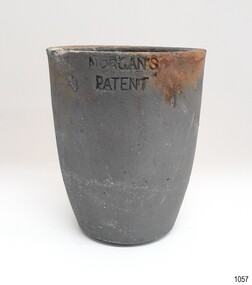
Functional object - Crucible, The Patent Plumbago Crucible Company, circa 1878
This crucible was raised from the wreck of the LOCH ARD. It is one of six similar relics, in a range of sizes, now in the Flagstaff Hill collection. All bear markings to indicate their manufacture by the Morgan brothers of Battersea, trading as the Patent Plumbago Crucible Co. A crucible is a container used for purifying and melting metals so that they can be cast in a mould to a predetermined shape and use. They must withstand extremely high temperatures, and abrupt cooling, and shed their contents with minimal adherence. The addition of graphite to the traditional firing clays greatly enhanced the durability of industrial crucibles in mid-Victorian Britain, a significant technological advance at a time of great activity in foundries and expansion of demand for refined metals. The Morgans first noticed the advantages of graphite crucibles at the Great Exhibition held in London in 1851. Initially, they contracted to be sole selling agents for the American-made products of Joseph Dixon and Co. from New Jersey, but in 1856 they obtained that firm’s manufacturing rights and began producing their own graphite crucibles from the South London site. The Morgans imported crystalline graphite in 4-5 cwt casks from the British colony of Ceylon (now Sri Lanka) and mixed it with conventional English (Stourbridge) clays to be fired in kilns. Their products were purchased by the Royal Mints in London and India, and exported to official mints in France and Germany. They were successful exhibitors of their crucibles and furnaces at the London Exhibition held in 1861 (Class 1, Mining, quarrying, metallurgy and mineral products, Exhibit 265, Patent Plumbago Crucible Co). The range of sizes represented by the six crucibles retrieved from the LOCH ARD, suggests they may have been part of a sample shipment intended for similar promotion in the Australian colonies ― at Melbourne’s International Exhibition to be held in 1880. The summary of the LOCH ARD cargo manifest, by Don Charlwood in ‘Wrecks and Reputations’, does not mention any crucibles, implying that they were not a large consignment of uniform items. A newspaper account of an 1864 tour of the Morgan brothers’ ‘Black Potteries’ at Battersea indicates: “All the pots were numbered according to their contents, each number standing for one kilogram, or a little over two pounds; a No. 2 crucible contains two kilogrammes; a No. 3, three kilogrammes, and so on.” These numbers are obscured by marine sediment on three of the crucibles in the Flagstaff Hill collection, but those legible on the remaining three are 5, 6, and 8. None of the six is of the same size from a visual appraisal. A brief history of the Loch Ard (1873-1878): - The sailing ship Loch Ard was one of the famous Loch Line of ships that sailed the long voyage from England to Australia. Barclay, Curdle and Co. built the three-masted iron vessel in Glasgow in 1873. It had sailed three trips to Australia and one trip to Calcutta before its fateful voyage. Loch Ard left England on March 2, 1878, under the command of recently married, 29-year-old Captain Gibbs. It was bound for Melbourne with a crew of 37, plus 17 passengers. The general cargo reflected the affluence of Melbourne at the time. Onboard were straw hats, umbrellas, perfumes, clay pipes, pianos, clocks, confectionery, linen and candles, and a heavier load of railway irons, cement, lead and copper. Other cargo included items intended for display in the Melbourne International Exhibition of 1880. The Loch Ard had been sailing for three months and was close to its destination on June 1, 1878. Captain Gibbs had expected to see land at about 3 am but the Loch Ard ran into a fog that greatly reduced visibility and there was no sign of land or the Cape Otway lighthouse. The fog lifted at 4 am and the sheer cliffs of Victoria's west coast were much closer to them than Captain Gibbs expected. He tried to manage the vessel but failed and the ship struck a reef at the base of Mutton Bird Island, near Port Campbell. The top deck loosened from the hull, and the masts and rigging crashed down, knocking passengers and crew overboard. The lifeboat was launched by Tom Pearce but crashed into the side of Loch Ard and capsized. He clung onto its overturned hull and sheltered under it. He drifted out to sea and the tide brought him back to what is now called Loch Ard Gorge. He swam to shore and found a cave for shelter. A passenger, Eva Carmichael, had raced onto the deck to find out what was happening and was confronted by towering cliffs above the ship. She was soon swept off the ship by a huge wave. Eva saw Tom Pearce on a small rocky beach and yelled to attract his attention. He swam out and dragged her to the shelter of the cave. He revived her with a bottle of brandy from a case that had washed up on the beach. Tom scaled a cliff in search of help and followed some horse hoof prints. He came from two men from Glenample Station, three and a half miles away. He told the men of the tragedy and then returned to the gorge while the two men rode back to the station to get help. They reached Loch Ard Gorge and took the two shipwreck survivors to Glenample Station to recover. Eva stayed at the station for six weeks before returning to Ireland by steamship. In Melbourne, Tom Pearce received a hero's welcome and was presented with a medal and some money. Of the 54 crew members and passengers on board, only two survived: the apprentice, Tom Pearce and the young woman passenger, Eva Carmichael, who lost her family in the tragedy. The shipwreck of the LOCH ARD is of State significance ― Victorian Heritage Register S417. Flagstaff Hill’s collection of artefacts from LOCH ARD is significant for being one of the largest collections of artefacts from this shipwreck in Victoria. It is significant for its association with the shipwreck, which is on the Victorian Heritage Register (VHR S417). The collection is significant because of the relationship between the objects, as together they have a high potential to interpret the story of the LOCH ARD. The LOCH ARD collection is archaeologically significant as the remains of a large international passenger and cargo ship. The LOCH ARD collection is historically significant for representing aspects of Victoria’s shipping history and its potential to interpret sub-theme 1.5 of Victoria’s Framework of Historical Themes (living with natural processes). The collection is also historically significant for its association with the LOCH ARD, which was one of the worst and best-known shipwrecks in Victoria’s history.A Morgan’s Patent graphite crucible No.8 (i.e. 8kgs capacity), one of a set. It was recovered from the wreck of the LOCH ARD. It is in its original grey colouring with minimal sediment accretion on the top rim. It rises in a slight curve from a flat circular base to a wider rim with a pouring lip. Maker’s marks on the side of the container clearly identify the manufacturer. The maker's details are stamped into the base around and within a circle. A white sticker is attached. Made by the Patent Plumbago Crucible Company at the Battersea Works in London. Number “8”. Letters “MORGAN’S PATENT”. Details on the base "MORGAN'S PATENT" "THE PATENT PLUMBAGO CRUCIBLE COMPANY" Symbol [8] above "BATTERSEA WORKS LONDON" Handwritten on a white sticker in black pen "LA/89"flagstaff hill, warrnambool, maritime museum, shipwreck coast, great ocean road, loch line, loch ard, captain gibbs, eva carmichael, tom pearce, glenample station, mutton bird island, loch ard gorge, graphite crucible, plumbago crucible, morgans crucible company, flagstaff hill maritime museum and village, fluxing pots, crucible, morgan’s patent, morgan brothers, patent plumbago crucible co, battersea works, london, port campbell -
 Flagstaff Hill Maritime Museum and Village
Functional object - Crucible, The Patent Plumbago Crucible Company, circa 1878
This crucible was raised from the wreck of the LOCH ARD. It is one of six similar relics, in a range of sizes, now in the Flagstaff Hill collection. All bear markings to indicate their manufacture by the Morgan brothers of Battersea, trading as the Patent Plumbago Crucible Co. A crucible is a container used for purifying and melting metals so that they can be cast in a mould to a predetermined shape and use. They must withstand extremely high temperatures, and abrupt cooling, and shed their contents with minimal adherence. The addition of graphite to the traditional firing clays greatly enhanced the durability of industrial crucibles in mid-Victorian Britain, a significant technological advance at a time of great activity in foundries and expansion of demand for refined metals. The Morgans first noticed the advantages of graphite crucibles at the Great Exhibition held in London in 1851. Initially, they contracted to be sole selling agents for the American-made products of Joseph Dixon and Co. from New Jersey, but in 1856 they obtained that firm’s manufacturing rights and began producing their own graphite crucibles from the South London site. The Morgans imported crystalline graphite in 4-5 cwt casks from the British colony of Ceylon (now Sri Lanka) and mixed it with conventional English (Stourbridge) clays to be fired in kilns. Their products were purchased by the Royal Mints in London and India, and exported to official mints in France and Germany. They were successful exhibitors of their crucibles and furnaces at the London Exhibition held in 1861 (Class 1, Mining, quarrying, metallurgy and mineral products, Exhibit 265, Patent Plumbago Crucible Co). The range of sizes represented by the six crucibles retrieved from the LOCH ARD, suggests they may have been part of a sample shipment intended for similar promotion in the Australian colonies ― at Melbourne’s International Exhibition to be held in 1880. The summary of the LOCH ARD cargo manifest, by Don Charlwood in ‘Wrecks and Reputations’, does not mention any crucibles, implying that they were not a large consignment of uniform items. A newspaper account of an 1864 tour of the Morgan brothers’ ‘Black Potteries’ at Battersea indicates: “All the pots were numbered according to their contents, each number standing for one kilogram, or a little over two pounds; a No. 2 crucible contains two kilogrammes; a No. 3, three kilogrammes, and so on.” These numbers are obscured by marine sediment on three of the crucibles in the Flagstaff Hill collection, but those legible on the remaining three are 5, 6, and 8. None of the six is of the same size from a visual appraisal. A brief history of the Loch Ard (1873-1878): - The sailing ship Loch Ard was one of the famous Loch Line of ships that sailed the long voyage from England to Australia. Barclay, Curdle and Co. built the three-masted iron vessel in Glasgow in 1873. It had sailed three trips to Australia and one trip to Calcutta before its fateful voyage. Loch Ard left England on March 2, 1878, under the command of recently married, 29-year-old Captain Gibbs. It was bound for Melbourne with a crew of 37, plus 17 passengers. The general cargo reflected the affluence of Melbourne at the time. Onboard were straw hats, umbrellas, perfumes, clay pipes, pianos, clocks, confectionery, linen and candles, and a heavier load of railway irons, cement, lead and copper. Other cargo included items intended for display in the Melbourne International Exhibition of 1880. The Loch Ard had been sailing for three months and was close to its destination on June 1, 1878. Captain Gibbs had expected to see land at about 3 am but the Loch Ard ran into a fog that greatly reduced visibility and there was no sign of land or the Cape Otway lighthouse. The fog lifted at 4 am and the sheer cliffs of Victoria's west coast were much closer to them than Captain Gibbs expected. He tried to manage the vessel but failed and the ship struck a reef at the base of Mutton Bird Island, near Port Campbell. The top deck loosened from the hull, and the masts and rigging crashed down, knocking passengers and crew overboard. The lifeboat was launched by Tom Pearce but crashed into the side of Loch Ard and capsized. He clung onto its overturned hull and sheltered under it. He drifted out to sea and the tide brought him back to what is now called Loch Ard Gorge. He swam to shore and found a cave for shelter. A passenger, Eva Carmichael, had raced onto the deck to find out what was happening and was confronted by towering cliffs above the ship. She was soon swept off the ship by a huge wave. Eva saw Tom Pearce on a small rocky beach and yelled to attract his attention. He swam out and dragged her to the shelter of the cave. He revived her with a bottle of brandy from a case that had washed up on the beach. Tom scaled a cliff in search of help and followed some horse hoof prints. He came from two men from Glenample Station, three and a half miles away. He told the men of the tragedy and then returned to the gorge while the two men rode back to the station to get help. They reached Loch Ard Gorge and took the two shipwreck survivors to Glenample Station to recover. Eva stayed at the station for six weeks before returning to Ireland by steamship. In Melbourne, Tom Pearce received a hero's welcome and was presented with a medal and some money. Of the 54 crew members and passengers on board, only two survived: the apprentice, Tom Pearce and the young woman passenger, Eva Carmichael, who lost her family in the tragedy. The shipwreck of the LOCH ARD is of State significance ― Victorian Heritage Register S417 Flagstaff Hill’s collection of artefacts from LOCH ARD is significant for being one of the largest collections of artefacts from this shipwreck in Victoria. It is significant for its association with the shipwreck, which is on the Victorian Heritage Register (VHR S417). The collection is significant because of the relationship between the objects, as together they have a high potential to interpret the story of the LOCH ARD. The LOCH ARD collection is archaeologically significant as the remains of a large international passenger and cargo ship. The LOCH ARD collection is historically significant for representing aspects of Victoria’s shipping history and its potential to interpret sub-theme 1.5 of Victoria’s Framework of Historical Themes (living with natural processes). The collection is also historically significant for its association with the LOCH ARD, which was one of the worst and best-known ahipwrecks in Victoria’s history.A Morgan’s Patent graphite crucible No.4 (i.e. 4kgs capacity), one of a set of three. It was recovered from the wreck of the LOCH ARD. It is in its original grey colouring with minimal sediment accretion on the top rim. It rises in a slight curve from a flat circular base to a wider rim with a pouring lip. Maker’s marks on the side of the container clearly identify the manufacturer. The maker's details are stamped into the base around and within a circle. A white sticker is attached. Made by the Patent Plumbago Crucible Company at the Battersea Works in London.Number or. Letters “MORGAN’S PATENT”. Details on the base "MORGAN'S PATENT" "THE PATENT PLUMBAGO CRUCIBLE COMPANY" Symbol [4] above "BATTERSEA WORKS LONDON" Handwritten on a white sticker in black pen "L89"flagstaff hill, warrnambool, flagstaff hill maritime museum, maritime museum, shipwreck coast, flagstaff hill maritime village, great ocean road, loch line, loch ard, captain gibbs, eva carmichael, tom pearce, glenample station, mutton bird island, loch ard gorge, graphite crucible, plumbago crucible, morgan's crucible company, flagstaff hill maritime museum and village, fluxing pots, crucible, morgan’s patent, morgan brothers, patent plumbago crucible co, battersea works, london, port campbell -
 Flagstaff Hill Maritime Museum and Village
Domestic object - Plate
The Process of Making Pottery Decorating, Firing, Glazing, Making, Technical There is a rhythm and flow to clay. It can’t be done all at once! Even the making process! It can take weeks to get everything done, especially if you can only work on your pottery once a week! Even though we have three hour classes, it’s often just not enough time! Here is an overview of some of the processes so you have a bit more grasp on some of the technical stuff! Step One – Design There are SO many ideas out there for making stuff in clay! From delicate porcelain jewellery, through to heavy sculptural work and everything in between. Deciding your direction is sometimes not that easy – when you first start, try everything, you will naturally gravitate to the style that you enjoy! The options and variations are endless and can get a wee bit overwhelming too! Check in with me before you start to ensure your ideas will work, what order you might do things, how you could achieve the look you are seeking and any other technical data required! Step Two – Making Clay is thixotropic. This means that as you work with it, the clay first gets sloppier and wetter, before is begins to dry in the atmosphere. For most things, you simply can’t do all parts of the project at once. An example of work order might look like: Get last weeks work out from the shelves Prepare clay for today’s work – roll your clay, prepare balls for throwing, make the first stage of a pinch pot) Clean up last week’s work and put it on the shelf for bisque firing Check that you have any glazing to do – and do enough of it that you will have time to finish your main project Do the next step of your next project – there might be a further step that can’t be complete immediately, in that case, wrap your work well and put onto the shelves. Letting your work rest for a while can really help keep your work clean and professional looking. Many things require bagging under plastic to keep it ready for work the next week – put your name on the outside of the bag so you can find your work easily. We have stickers and markers. Consider how you want to decorate your work – coloured slip can be applied at a fairly wet stage (remembering that it will make your work even wetter!). Trying to apply slip to dry clay won’t work! If you want to do sgraffito – you will need to keep the work leather hard (a state of dryness where you can still work the clay with a little effort and a little water and care). Step Three – Drying Most of the time your work can go into the rack uncovered to let it dry out for the following week. If you want to continue forming or shaping you will need to double bag your work – put your work on a suitable sized bat and put the bat in a bag so the base of the bag is under the bat, then put another bag over the top of the work and tuck the top of the bag under the bat. If you want to trim (or turn) your thrown work the following week, it should also be double bagged. If your work is large, delicate, or of uneven thicknesses, you should lightly cover your work for drying. When considering the drying process, bare in mind the weather, humidity and wind! The hotter and dryer, the faster things dry and work can dry unevenly in the shelves – this can lead to cracking – another time to lightly cover your work for drying. Step Four – Trimming and Cleaning Up Your work is dry! It is called greenware now and it is at it’s most fragile! Handle everything with two hands. I often refer to soft hands – keep everything gentle and with your fingers spread as much as possible. Try to not pick up things like plates too much, and always with both hands! Before your work can be bisque fired it should be “cleaned up”. You work won’t go into the kiln if it has sharp edges – when glazed, sharp edges turn into razor blades! Use a piece of fly wire to rub the work all over – this will scratch a little so be light handed. Use a knife or metal kidney to scrape any areas that require a bit more dynamic treatment than the fly wire offers! Finally, a very light wipe over with a slightly damp sponge can help soften and soothe all of your edges and dags! Trimming thrown work: If you are planning to trim (or turn) your thrown work (and you should be), make sure you bag it well – your work should be leather hard to almost dry for easiest trimming. Use this step to finish the work completely – use a metal kidney to polish the surface, or a slightly damp sponge to give a freshly thrown look. Wipe the sponge around the rim after trimming, and check the inside of the pot for dags! Trimming slip cast work: Usually I will trim the rims of your work on the wheel the following day to make that stage easier, however you will still need to check your work for lumps and bumps. Last but not least – check that your name is still clearly on the bottom of your work. Step Five – Bisque Firing When the work is completely dry it can go into the bisque kiln. The bisque kiln is fired to 1000°C. This process burns off the water in the clay as well as some of the chemically bound water. The structure of the clay is not altered that much at this temperature. Inside the bisque kiln, the work is stacked a little, small bowl inside a larger bowl and onto a heavy plate. Smaller items like decorations or drink coasters might get stacked several high. Consideration is paid to the weight of the stack and shape of the work. A bisque kiln can fire about one and a half times the amount of work that the glaze kiln can fire. The firing takes about 10 hours to complete the cycle and about two days to cool down. Once it has been emptied the work is placed in the glaze room ready for you to decorate! Step Six – Glazing Decorating your work with colour can be a lot of fun – and time consuming! There are three main options for surface treatment at this stage: Oxide Washes Underglazes Glazes Washes and underglazes do not “glaze” the work – It will still need a layer of glaze to fully seal the clay (washes don’t need glaze on surfaces not designed for food or liquid as they can gloss up a little on their own). Underglazes are stable colourants that turn out pretty much how they look in the jar. They can be mixed with each other to form other colours and can be used like water colours to paint onto your work. Mostly they should have a clear glaze on top to seal them. Oxides are a different species – the pink oxide (cobalt) wash turns out bright blue for instance. They don’t always need a glaze on top, and some glazes can change the colour of the wash! The glazes need no other “glaze” on top! Be careful of unknown glaze interactions – you can put any combination of glaze in a bowl or on a plate, but only a single glaze on the outside of any vertical surface! Glazes are a chemical reaction under heat. We don’t know the exact chemicals in the Mayco glazes we use. I can guess by the way they interact with each other, however, on the whole, you need to test every idea you have, and not run the test on a vertical surface! Simply put, glaze is a layer of glass like substance that bonds with the clay underneath. Clay is made of silica, alumina and water. Glaze is made of mostly silica. Silica has a melting point of 1700°C and we fire to 1240°C. The silica requires a “flux” to help it melt at the lower temperature. Fluxes can be all sorts of chemicals – a common one is calcium – calcium has a melting point of 2500°C, however, together they both melt at a much lower temperature! Colourants are metal oxides like cobalt (blue), chrome (green through black), copper (green, blue, even red!), manganese (black, purple and pink) iron (red brown), etc. Different chemicals in the glaze can have dramatic effects. for example, barium carbonate (which we don’t use) turns manganese bright pink! Other elements can turn manganese dioxide brown, blue, purple and reddish brown. Manganese dioxide is a flux in and of itself as well. So, glazes that get their black and purple colours, often interact with other glazes and RUN! Our mirror black is a good example – it mixes really well with many glazes because it fluxes them – causes them to melt faster. It will also bring out many beautiful colours in the glazes because it’s black colouring most definitely comes from manganese dioxide! Glaze chemistry is a whole subject on it’s own! We use commercial Mayco glazes on purpose – for their huge range of colour possibilities, stability, cool interactions, artistic freedom with the ability to easily brush the glazes on and ease of use. We currently have almost 50 glazes on hand! A major project is to test the interactions of all glazes with each other. That is 2,500 test tiles!!!! I’m going to make the wall behind the wheels the feature wall of pretty colours! Step Seven – Glaze (Gloss or sometimes called “Glost”) Firing Most of the time this is the final stage of making your creation (but not always!) The glaze kiln goes to 1240°C. This is called cone 6, or midrange. It is the low end of stoneware temperatures. Stoneware clays and glazes are typically fired at cone 8 – 10, that is 1260 – 1290°C. The energy requirement to go from 1240°C to 1280°C is almost a 30% more! Our clay is formulated to vitrify (mature, turn “glass-like”) at 1240°, as are our glazes. A glaze kiln take around 12 hours to reach temperature and two to three days to cool down. Sometimes a third firing process is required – this is for decoration that is added to work after the glaze firing. For example – adding precious metals and lustres. this firing temperature is usually around 600 – 800°C depending upon the techniques being used. There are many students interested in gold and silver trims – we will be doing this third type of firing soon! After firing your work will be in the student finished work shelves. Remember to pay for it before you head out the door! There is a small extra charge for using porcelain clay (it’s more than twice the price of regular clay), and for any third firing process! Once your work has been fired it can not turn back into clay for millennia – so don’t fire it if you don’t like it! Put it in the bucket for recycling. https://firebirdstudios.com.au/the-process-of-making-pottery/Ceramics have evolved over thousands of years.White earthenware dinner plate. Crazing evident all over.Backstamped ‘Made in England S LTD’flagstaff hill, warrnambool, shipwrecked-coast, flagstaff-hill, flagstaff-hill-maritime-museum, maritime-museum, shipwreck-coast, flagstaff-hill-maritime-village, ceramics, tableware -
 Flagstaff Hill Maritime Museum and Village
Domestic object - Plate, Johnson Bros
The Process of Making Pottery Decorating, Firing, Glazing, Making, Technical There is a rhythm and flow to clay. It can’t be done all at once! Even the making process! It can take weeks to get everything done, especially if you can only work on your pottery once a week! Even though we have three hour classes, it’s often just not enough time! Here is an overview of some of the processes so you have a bit more grasp on some of the technical stuff! Step One – Design There are SO many ideas out there for making stuff in clay! From delicate porcelain jewellery, through to heavy sculptural work and everything in between. Deciding your direction is sometimes not that easy – when you first start, try everything, you will naturally gravitate to the style that you enjoy! The options and variations are endless and can get a wee bit overwhelming too! Check in with me before you start to ensure your ideas will work, what order you might do things, how you could achieve the look you are seeking and any other technical data required! Step Two – Making Clay is thixotropic. This means that as you work with it, the clay first gets sloppier and wetter, before is begins to dry in the atmosphere. For most things, you simply can’t do all parts of the project at once. An example of work order might look like: Get last weeks work out from the shelves Prepare clay for today’s work – roll your clay, prepare balls for throwing, make the first stage of a pinch pot) Clean up last week’s work and put it on the shelf for bisque firing Check that you have any glazing to do – and do enough of it that you will have time to finish your main project Do the next step of your next project – there might be a further step that can’t be complete immediately, in that case, wrap your work well and put onto the shelves. Letting your work rest for a while can really help keep your work clean and professional looking. Many things require bagging under plastic to keep it ready for work the next week – put your name on the outside of the bag so you can find your work easily. We have stickers and markers. Consider how you want to decorate your work – coloured slip can be applied at a fairly wet stage (remembering that it will make your work even wetter!). Trying to apply slip to dry clay won’t work! If you want to do sgraffito – you will need to keep the work leather hard (a state of dryness where you can still work the clay with a little effort and a little water and care). Step Three – Drying Most of the time your work can go into the rack uncovered to let it dry out for the following week. If you want to continue forming or shaping you will need to double bag your work – put your work on a suitable sized bat and put the bat in a bag so the base of the bag is under the bat, then put another bag over the top of the work and tuck the top of the bag under the bat. If you want to trim (or turn) your thrown work the following week, it should also be double bagged. If your work is large, delicate, or of uneven thicknesses, you should lightly cover your work for drying. When considering the drying process, bare in mind the weather, humidity and wind! The hotter and dryer, the faster things dry and work can dry unevenly in the shelves – this can lead to cracking – another time to lightly cover your work for drying. Step Four – Trimming and Cleaning Up Your work is dry! It is called greenware now and it is at it’s most fragile! Handle everything with two hands. I often refer to soft hands – keep everything gentle and with your fingers spread as much as possible. Try to not pick up things like plates too much, and always with both hands! Before your work can be bisque fired it should be “cleaned up”. You work won’t go into the kiln if it has sharp edges – when glazed, sharp edges turn into razor blades! Use a piece of fly wire to rub the work all over – this will scratch a little so be light handed. Use a knife or metal kidney to scrape any areas that require a bit more dynamic treatment than the fly wire offers! Finally, a very light wipe over with a slightly damp sponge can help soften and soothe all of your edges and dags! Trimming thrown work: If you are planning to trim (or turn) your thrown work (and you should be), make sure you bag it well – your work should be leather hard to almost dry for easiest trimming. Use this step to finish the work completely – use a metal kidney to polish the surface, or a slightly damp sponge to give a freshly thrown look. Wipe the sponge around the rim after trimming, and check the inside of the pot for dags! Trimming slip cast work: Usually I will trim the rims of your work on the wheel the following day to make that stage easier, however you will still need to check your work for lumps and bumps. Last but not least – check that your name is still clearly on the bottom of your work. Step Five – Bisque Firing When the work is completely dry it can go into the bisque kiln. The bisque kiln is fired to 1000°C. This process burns off the water in the clay as well as some of the chemically bound water. The structure of the clay is not altered that much at this temperature. Inside the bisque kiln, the work is stacked a little, small bowl inside a larger bowl and onto a heavy plate. Smaller items like decorations or drink coasters might get stacked several high. Consideration is paid to the weight of the stack and shape of the work. A bisque kiln can fire about one and a half times the amount of work that the glaze kiln can fire. The firing takes about 10 hours to complete the cycle and about two days to cool down. Once it has been emptied the work is placed in the glaze room ready for you to decorate! Step Six – Glazing Decorating your work with colour can be a lot of fun – and time consuming! There are three main options for surface treatment at this stage: Oxide Washes Underglazes Glazes Washes and underglazes do not “glaze” the work – It will still need a layer of glaze to fully seal the clay (washes don’t need glaze on surfaces not designed for food or liquid as they can gloss up a little on their own). Underglazes are stable colourants that turn out pretty much how they look in the jar. They can be mixed with each other to form other colours and can be used like water colours to paint onto your work. Mostly they should have a clear glaze on top to seal them. Oxides are a different species – the pink oxide (cobalt) wash turns out bright blue for instance. They don’t always need a glaze on top, and some glazes can change the colour of the wash! The glazes need no other “glaze” on top! Be careful of unknown glaze interactions – you can put any combination of glaze in a bowl or on a plate, but only a single glaze on the outside of any vertical surface! Glazes are a chemical reaction under heat. We don’t know the exact chemicals in the Mayco glazes we use. I can guess by the way they interact with each other, however, on the whole, you need to test every idea you have, and not run the test on a vertical surface! Simply put, glaze is a layer of glass like substance that bonds with the clay underneath. Clay is made of silica, alumina and water. Glaze is made of mostly silica. Silica has a melting point of 1700°C and we fire to 1240°C. The silica requires a “flux” to help it melt at the lower temperature. Fluxes can be all sorts of chemicals – a common one is calcium – calcium has a melting point of 2500°C, however, together they both melt at a much lower temperature! Colourants are metal oxides like cobalt (blue), chrome (green through black), copper (green, blue, even red!), manganese (black, purple and pink) iron (red brown), etc. Different chemicals in the glaze can have dramatic effects. for example, barium carbonate (which we don’t use) turns manganese bright pink! Other elements can turn manganese dioxide brown, blue, purple and reddish brown. Manganese dioxide is a flux in and of itself as well. So, glazes that get their black and purple colours, often interact with other glazes and RUN! Our mirror black is a good example – it mixes really well with many glazes because it fluxes them – causes them to melt faster. It will also bring out many beautiful colours in the glazes because it’s black colouring most definitely comes from manganese dioxide! Glaze chemistry is a whole subject on it’s own! We use commercial Mayco glazes on purpose – for their huge range of colour possibilities, stability, cool interactions, artistic freedom with the ability to easily brush the glazes on and ease of use. We currently have almost 50 glazes on hand! A major project is to test the interactions of all glazes with each other. That is 2,500 test tiles!!!! I’m going to make the wall behind the wheels the feature wall of pretty colours! Step Seven – Glaze (Gloss or sometimes called “Glost”) Firing Most of the time this is the final stage of making your creation (but not always!) The glaze kiln goes to 1240°C. This is called cone 6, or midrange. It is the low end of stoneware temperatures. Stoneware clays and glazes are typically fired at cone 8 – 10, that is 1260 – 1290°C. The energy requirement to go from 1240°C to 1280°C is almost a 30% more! Our clay is formulated to vitrify (mature, turn “glass-like”) at 1240°, as are our glazes. A glaze kiln take around 12 hours to reach temperature and two to three days to cool down. Sometimes a third firing process is required – this is for decoration that is added to work after the glaze firing. For example – adding precious metals and lustres. this firing temperature is usually around 600 – 800°C depending upon the techniques being used. There are many students interested in gold and silver trims – we will be doing this third type of firing soon! After firing your work will be in the student finished work shelves. Remember to pay for it before you head out the door! There is a small extra charge for using porcelain clay (it’s more than twice the price of regular clay), and for any third firing process! Once your work has been fired it can not turn back into clay for millennia – so don’t fire it if you don’t like it! Put it in the bucket for recycling. https://firebirdstudios.com.au/the-process-of-making-pottery/Ceramics have evolved over thousands of years.A white earthenware side plate with a gadroon edge. Has water marks and chips on front.‘Johnson Bros England Reg No 15587’flagstaff hill, warrnambool, shipwrecked-coast, flagstaff-hill, flagstaff-hill-maritime-museum, maritime-museum, shipwreck-coast, flagstaff-hill-maritime-village, johnson bros, ceramics, tableware -
 Flagstaff Hill Maritime Museum and Village
Domestic object - Plate, Alfred Meakin
The Process of Making Pottery Decorating, Firing, Glazing, Making, Technical There is a rhythm and flow to clay. It can’t be done all at once! Even the making process! It can take weeks to get everything done, especially if you can only work on your pottery once a week! Even though we have three hour classes, it’s often just not enough time! Here is an overview of some of the processes so you have a bit more grasp on some of the technical stuff! Step One – Design There are SO many ideas out there for making stuff in clay! From delicate porcelain jewellery, through to heavy sculptural work and everything in between. Deciding your direction is sometimes not that easy – when you first start, try everything, you will naturally gravitate to the style that you enjoy! The options and variations are endless and can get a wee bit overwhelming too! Check in with me before you start to ensure your ideas will work, what order you might do things, how you could achieve the look you are seeking and any other technical data required! Step Two – Making Clay is thixotropic. This means that as you work with it, the clay first gets sloppier and wetter, before is begins to dry in the atmosphere. For most things, you simply can’t do all parts of the project at once. An example of work order might look like: Get last weeks work out from the shelves Prepare clay for today’s work – roll your clay, prepare balls for throwing, make the first stage of a pinch pot) Clean up last week’s work and put it on the shelf for bisque firing Check that you have any glazing to do – and do enough of it that you will have time to finish your main project Do the next step of your next project – there might be a further step that can’t be complete immediately, in that case, wrap your work well and put onto the shelves. Letting your work rest for a while can really help keep your work clean and professional looking. Many things require bagging under plastic to keep it ready for work the next week – put your name on the outside of the bag so you can find your work easily. We have stickers and markers. Consider how you want to decorate your work – coloured slip can be applied at a fairly wet stage (remembering that it will make your work even wetter!). Trying to apply slip to dry clay won’t work! If you want to do sgraffito – you will need to keep the work leather hard (a state of dryness where you can still work the clay with a little effort and a little water and care). Step Three – Drying Most of the time your work can go into the rack uncovered to let it dry out for the following week. If you want to continue forming or shaping you will need to double bag your work – put your work on a suitable sized bat and put the bat in a bag so the base of the bag is under the bat, then put another bag over the top of the work and tuck the top of the bag under the bat. If you want to trim (or turn) your thrown work the following week, it should also be double bagged. If your work is large, delicate, or of uneven thicknesses, you should lightly cover your work for drying. When considering the drying process, bare in mind the weather, humidity and wind! The hotter and dryer, the faster things dry and work can dry unevenly in the shelves – this can lead to cracking – another time to lightly cover your work for drying. Step Four – Trimming and Cleaning Up Your work is dry! It is called greenware now and it is at it’s most fragile! Handle everything with two hands. I often refer to soft hands – keep everything gentle and with your fingers spread as much as possible. Try to not pick up things like plates too much, and always with both hands! Before your work can be bisque fired it should be “cleaned up”. You work won’t go into the kiln if it has sharp edges – when glazed, sharp edges turn into razor blades! Use a piece of fly wire to rub the work all over – this will scratch a little so be light handed. Use a knife or metal kidney to scrape any areas that require a bit more dynamic treatment than the fly wire offers! Finally, a very light wipe over with a slightly damp sponge can help soften and soothe all of your edges and dags! Trimming thrown work: If you are planning to trim (or turn) your thrown work (and you should be), make sure you bag it well – your work should be leather hard to almost dry for easiest trimming. Use this step to finish the work completely – use a metal kidney to polish the surface, or a slightly damp sponge to give a freshly thrown look. Wipe the sponge around the rim after trimming, and check the inside of the pot for dags! Trimming slip cast work: Usually I will trim the rims of your work on the wheel the following day to make that stage easier, however you will still need to check your work for lumps and bumps. Last but not least – check that your name is still clearly on the bottom of your work. Step Five – Bisque Firing When the work is completely dry it can go into the bisque kiln. The bisque kiln is fired to 1000°C. This process burns off the water in the clay as well as some of the chemically bound water. The structure of the clay is not altered that much at this temperature. Inside the bisque kiln, the work is stacked a little, small bowl inside a larger bowl and onto a heavy plate. Smaller items like decorations or drink coasters might get stacked several high. Consideration is paid to the weight of the stack and shape of the work. A bisque kiln can fire about one and a half times the amount of work that the glaze kiln can fire. The firing takes about 10 hours to complete the cycle and about two days to cool down. Once it has been emptied the work is placed in the glaze room ready for you to decorate! Step Six – Glazing Decorating your work with colour can be a lot of fun – and time consuming! There are three main options for surface treatment at this stage: Oxide Washes Underglazes Glazes Washes and underglazes do not “glaze” the work – It will still need a layer of glaze to fully seal the clay (washes don’t need glaze on surfaces not designed for food or liquid as they can gloss up a little on their own). Underglazes are stable colourants that turn out pretty much how they look in the jar. They can be mixed with each other to form other colours and can be used like water colours to paint onto your work. Mostly they should have a clear glaze on top to seal them. Oxides are a different species – the pink oxide (cobalt) wash turns out bright blue for instance. They don’t always need a glaze on top, and some glazes can change the colour of the wash! The glazes need no other “glaze” on top! Be careful of unknown glaze interactions – you can put any combination of glaze in a bowl or on a plate, but only a single glaze on the outside of any vertical surface! Glazes are a chemical reaction under heat. We don’t know the exact chemicals in the Mayco glazes we use. I can guess by the way they interact with each other, however, on the whole, you need to test every idea you have, and not run the test on a vertical surface! Simply put, glaze is a layer of glass like substance that bonds with the clay underneath. Clay is made of silica, alumina and water. Glaze is made of mostly silica. Silica has a melting point of 1700°C and we fire to 1240°C. The silica requires a “flux” to help it melt at the lower temperature. Fluxes can be all sorts of chemicals – a common one is calcium – calcium has a melting point of 2500°C, however, together they both melt at a much lower temperature! Colourants are metal oxides like cobalt (blue), chrome (green through black), copper (green, blue, even red!), manganese (black, purple and pink) iron (red brown), etc. Different chemicals in the glaze can have dramatic effects. for example, barium carbonate (which we don’t use) turns manganese bright pink! Other elements can turn manganese dioxide brown, blue, purple and reddish brown. Manganese dioxide is a flux in and of itself as well. So, glazes that get their black and purple colours, often interact with other glazes and RUN! Our mirror black is a good example – it mixes really well with many glazes because it fluxes them – causes them to melt faster. It will also bring out many beautiful colours in the glazes because it’s black colouring most definitely comes from manganese dioxide! Glaze chemistry is a whole subject on it’s own! We use commercial Mayco glazes on purpose – for their huge range of colour possibilities, stability, cool interactions, artistic freedom with the ability to easily brush the glazes on and ease of use. We currently have almost 50 glazes on hand! A major project is to test the interactions of all glazes with each other. That is 2,500 test tiles!!!! I’m going to make the wall behind the wheels the feature wall of pretty colours! Step Seven – Glaze (Gloss or sometimes called “Glost”) Firing Most of the time this is the final stage of making your creation (but not always!) The glaze kiln goes to 1240°C. This is called cone 6, or midrange. It is the low end of stoneware temperatures. Stoneware clays and glazes are typically fired at cone 8 – 10, that is 1260 – 1290°C. The energy requirement to go from 1240°C to 1280°C is almost a 30% more! Our clay is formulated to vitrify (mature, turn “glass-like”) at 1240°, as are our glazes. A glaze kiln take around 12 hours to reach temperature and two to three days to cool down. Sometimes a third firing process is required – this is for decoration that is added to work after the glaze firing. For example – adding precious metals and lustres. this firing temperature is usually around 600 – 800°C depending upon the techniques being used. There are many students interested in gold and silver trims – we will be doing this third type of firing soon! After firing your work will be in the student finished work shelves. Remember to pay for it before you head out the door! There is a small extra charge for using porcelain clay (it’s more than twice the price of regular clay), and for any third firing process! Once your work has been fired it can not turn back into clay for millennia – so don’t fire it if you don’t like it! Put it in the bucket for recycling. https://firebirdstudios.com.au/the-process-of-making-pottery/Ceramics have evolved over thousands of years.Earthenware dessert plate, cream colour. Made by Alfred Meakin, England. Backstamped ‘Alfred Meakin England’. flagstaff hill, warrnambool, shipwrecked-coast, flagstaff-hill, flagstaff-hill-maritime-museum, maritime-museum, shipwreck-coast, flagstaff-hill-maritime-village, alfred meakin, ceramics, earthenware, kitchenware -
 Flagstaff Hill Maritime Museum and Village
Domestic object - Jug
The Process of Making Pottery Decorating, Firing, Glazing, Making, Technical There is a rhythm and flow to clay. It can’t be done all at once! Even the making process! It can take weeks to get everything done, especially if you can only work on your pottery once a week! Even though we have three hour classes, it’s often just not enough time! Here is an overview of some of the processes so you have a bit more grasp on some of the technical stuff! Step One – Design There are SO many ideas out there for making stuff in clay! From delicate porcelain jewellery, through to heavy sculptural work and everything in between. Deciding your direction is sometimes not that easy – when you first start, try everything, you will naturally gravitate to the style that you enjoy! The options and variations are endless and can get a wee bit overwhelming too! Check in with me before you start to ensure your ideas will work, what order you might do things, how you could achieve the look you are seeking and any other technical data required! Step Two – Making Clay is thixotropic. This means that as you work with it, the clay first gets sloppier and wetter, before is begins to dry in the atmosphere. For most things, you simply can’t do all parts of the project at once. An example of work order might look like: Get last weeks work out from the shelves Prepare clay for today’s work – roll your clay, prepare balls for throwing, make the first stage of a pinch pot) Clean up last week’s work and put it on the shelf for bisque firing Check that you have any glazing to do – and do enough of it that you will have time to finish your main project Do the next step of your next project – there might be a further step that can’t be complete immediately, in that case, wrap your work well and put onto the shelves. Letting your work rest for a while can really help keep your work clean and professional looking. Many things require bagging under plastic to keep it ready for work the next week – put your name on the outside of the bag so you can find your work easily. We have stickers and markers. Consider how you want to decorate your work – coloured slip can be applied at a fairly wet stage (remembering that it will make your work even wetter!). Trying to apply slip to dry clay won’t work! If you want to do sgraffito – you will need to keep the work leather hard (a state of dryness where you can still work the clay with a little effort and a little water and care). Step Three – Drying Most of the time your work can go into the rack uncovered to let it dry out for the following week. If you want to continue forming or shaping you will need to double bag your work – put your work on a suitable sized bat and put the bat in a bag so the base of the bag is under the bat, then put another bag over the top of the work and tuck the top of the bag under the bat. If you want to trim (or turn) your thrown work the following week, it should also be double bagged. If your work is large, delicate, or of uneven thicknesses, you should lightly cover your work for drying. When considering the drying process, bare in mind the weather, humidity and wind! The hotter and dryer, the faster things dry and work can dry unevenly in the shelves – this can lead to cracking – another time to lightly cover your work for drying. Step Four – Trimming and Cleaning Up Your work is dry! It is called greenware now and it is at it’s most fragile! Handle everything with two hands. I often refer to soft hands – keep everything gentle and with your fingers spread as much as possible. Try to not pick up things like plates too much, and always with both hands! Before your work can be bisque fired it should be “cleaned up”. You work won’t go into the kiln if it has sharp edges – when glazed, sharp edges turn into razor blades! Use a piece of fly wire to rub the work all over – this will scratch a little so be light handed. Use a knife or metal kidney to scrape any areas that require a bit more dynamic treatment than the fly wire offers! Finally, a very light wipe over with a slightly damp sponge can help soften and soothe all of your edges and dags! Trimming thrown work: If you are planning to trim (or turn) your thrown work (and you should be), make sure you bag it well – your work should be leather hard to almost dry for easiest trimming. Use this step to finish the work completely – use a metal kidney to polish the surface, or a slightly damp sponge to give a freshly thrown look. Wipe the sponge around the rim after trimming, and check the inside of the pot for dags! Trimming slip cast work: Usually I will trim the rims of your work on the wheel the following day to make that stage easier, however you will still need to check your work for lumps and bumps. Last but not least – check that your name is still clearly on the bottom of your work. Step Five – Bisque Firing When the work is completely dry it can go into the bisque kiln. The bisque kiln is fired to 1000°C. This process burns off the water in the clay as well as some of the chemically bound water. The structure of the clay is not altered that much at this temperature. Inside the bisque kiln, the work is stacked a little, small bowl inside a larger bowl and onto a heavy plate. Smaller items like decorations or drink coasters might get stacked several high. Consideration is paid to the weight of the stack and shape of the work. A bisque kiln can fire about one and a half times the amount of work that the glaze kiln can fire. The firing takes about 10 hours to complete the cycle and about two days to cool down. Once it has been emptied the work is placed in the glaze room ready for you to decorate! Step Six – Glazing Decorating your work with colour can be a lot of fun – and time consuming! There are three main options for surface treatment at this stage: Oxide Washes Underglazes Glazes Washes and underglazes do not “glaze” the work – It will still need a layer of glaze to fully seal the clay (washes don’t need glaze on surfaces not designed for food or liquid as they can gloss up a little on their own). Underglazes are stable colourants that turn out pretty much how they look in the jar. They can be mixed with each other to form other colours and can be used like water colours to paint onto your work. Mostly they should have a clear glaze on top to seal them. Oxides are a different species – the pink oxide (cobalt) wash turns out bright blue for instance. They don’t always need a glaze on top, and some glazes can change the colour of the wash! The glazes need no other “glaze” on top! Be careful of unknown glaze interactions – you can put any combination of glaze in a bowl or on a plate, but only a single glaze on the outside of any vertical surface! Glazes are a chemical reaction under heat. We don’t know the exact chemicals in the Mayco glazes we use. I can guess by the way they interact with each other, however, on the whole, you need to test every idea you have, and not run the test on a vertical surface! Simply put, glaze is a layer of glass like substance that bonds with the clay underneath. Clay is made of silica, alumina and water. Glaze is made of mostly silica. Silica has a melting point of 1700°C and we fire to 1240°C. The silica requires a “flux” to help it melt at the lower temperature. Fluxes can be all sorts of chemicals – a common one is calcium – calcium has a melting point of 2500°C, however, together they both melt at a much lower temperature! Colourants are metal oxides like cobalt (blue), chrome (green through black), copper (green, blue, even red!), manganese (black, purple and pink) iron (red brown), etc. Different chemicals in the glaze can have dramatic effects. for example, barium carbonate (which we don’t use) turns manganese bright pink! Other elements can turn manganese dioxide brown, blue, purple and reddish brown. Manganese dioxide is a flux in and of itself as well. So, glazes that get their black and purple colours, often interact with other glazes and RUN! Our mirror black is a good example – it mixes really well with many glazes because it fluxes them – causes them to melt faster. It will also bring out many beautiful colours in the glazes because it’s black colouring most definitely comes from manganese dioxide! Glaze chemistry is a whole subject on it’s own! We use commercial Mayco glazes on purpose – for their huge range of colour possibilities, stability, cool interactions, artistic freedom with the ability to easily brush the glazes on and ease of use. We currently have almost 50 glazes on hand! A major project is to test the interactions of all glazes with each other. That is 2,500 test tiles!!!! I’m going to make the wall behind the wheels the feature wall of pretty colours! Step Seven – Glaze (Gloss or sometimes called “Glost”) Firing Most of the time this is the final stage of making your creation (but not always!) The glaze kiln goes to 1240°C. This is called cone 6, or midrange. It is the low end of stoneware temperatures. Stoneware clays and glazes are typically fired at cone 8 – 10, that is 1260 – 1290°C. The energy requirement to go from 1240°C to 1280°C is almost a 30% more! Our clay is formulated to vitrify (mature, turn “glass-like”) at 1240°, as are our glazes. A glaze kiln take around 12 hours to reach temperature and two to three days to cool down. Sometimes a third firing process is required – this is for decoration that is added to work after the glaze firing. For example – adding precious metals and lustres. this firing temperature is usually around 600 – 800°C depending upon the techniques being used. There are many students interested in gold and silver trims – we will be doing this third type of firing soon! After firing your work will be in the student finished work shelves. Remember to pay for it before you head out the door! There is a small extra charge for using porcelain clay (it’s more than twice the price of regular clay), and for any third firing process! Once your work has been fired it can not turn back into clay for millennia – so don’t fire it if you don’t like it! Put it in the bucket for recycling. https://firebirdstudios.com.au/the-process-of-making-pottery/The form of the jug has been in use for many centuries.Stoneware jug. Two tone brown glaze with pierced lip behind spout. Spout chipped.None.flagstaff hill, warrnambool, shipwrecked-coast, flagstaff-hill, flagstaff-hill-maritime-museum, maritime-museum, shipwreck-coast, flagstaff-hill-maritime-village, jug, ceramic jug -
Federation University Historical Collection
Booklet, Ballarat School of Mines Student's Magazine, Second Term, 1907, 1907
Table of contents: Editorial, Notes on a sluicing scheme and plant, A trip through Eastern Gippsland, Rapid volumetric method for the estimation of phosphoric acid, The making potassium bromate, Engines for electrical work, Round the common fires and in the corridors, Brief notes on the installation and management of the high speed engines with special reference to the Belliss-Morcom engine, Sporting notes, Football, Sporting pars, News and notes, Electric furnaces, Patents, papers or work of former students, Notes on rope gearing, Answers to correspondents, Past students, Correspondence, Editorial notes.Green coloured booklet of 28 pages.ballarat school of mines, students' magazine, norman buley, ernest w. trend, beaumont, buley, charles, elliott, crossley, robin, pearce,, stanger-leathes, treloar, coulter, bieske, davenport, seward, clinton, ditchburn, dawson, campbell, past students, j. h. crittenden, adam mortan, bob allen, r. g. todd, w. wallace, arthur s. coyte, f. stewart, herbert coombes, t. phillipson, alf. a. booth, charles bailey, g. duncan, w. cairncross, j. richardson,, w. kennedy, c. m. harris, hubert f. hall, k. byron moore, w. white -
 Red Cliffs Military Museum
Copy of a letter, Letter to Walter West from W.H. Birdwood, 19/4/1919 (exact)
Sent by W.H. Birdwood but no signature. This is another of 5 documents in a large frame called the West Collectioncopy of typed letter to Walter West from W.H. BirdwoodTop left corner: Copy. Top right Australian Imperial Force 130 Horseferry Road, Westminster, S.W.1 19th April, 1919 Dear West, I send you my heartiest congratulations on the award to you of the Military Cross, of which I have only now been informed; in recognition of your very good and gallant work in our operations at Montbregain on 5th October last. When your platoon was held up by heavy fire from a strong post, you most gallantly rushed forwatd alone, and bombing the position captures the gun and crew. Later, when your flank could not make progress owing to fire from a post containing two machine guns, you crawled round to the right, and rushed this post, which you captured with one of the guns, killing three and taking another three of the garrison prisoners. On your company commander becoming casualty, you took command, and consolidated the line with good judgment and ability. throughout you displayed courage, initiative and determination of a very high order. I am indeed pleased that your splendid work has been recognised in this way. with kindest regards and good wishes to you for the future. Yours sincerely. W. H. Birdwood ww1, walter, thomas, west, mm, mc -
 Australian Commando Association - Victoria
Book - 6th Div, Shawn OLeary, To The Green Fields Beyond:The story of the 6th Division Cavalry Commandos
The comprehensive history of the 6th Australian Division Cavalry Commandos – a (now out of print) reprint of one of the rarer Armoured unit history books. This is the story of one of Australia’s most famous fighting regiments during World War II. As an armoured cavalry unit it fought the Italians and Germans in the sands of the African desert and the Vichy French in the mountains of Syria. Later as a dismounted commando unit it fought the Japanese in the terrifying jungles of New Guinea. The heroism of the men in its ranks and the actions in which they engaged are portrayed in a way which makes battle deeds leap realistically from the pages. “To The Green Fields Beyond” is a documented and detailed book which is of value to everyone who is interested in Australia’s story. Seldom before has such a contribution been made to record of our national history. The book has been approved and sponsored by the Australian War Memorial. The 6th Division Cavalry Regiment was formed in November 1939 and, just two months later, was sent overseas to the Middle East in January 1940. Arriving in Egypt, the regiment immediately went to Palestine, where it joined the rest of the 6th Division and trained using machine-gun carriers and, from October, six old Vickers light tanks. At the end of the year the regiment moved into the Western Desert, where it joined British forces ready for the major offensive to commence on 9 December. Two days later the regiment became the first unit of the 2nd Australian Imperial Force (AIF) to go into action when one of its squadron fought a sharp action against the Italians holding Garn el Grein and Fort Maddalina on 11 and 12 December. By 21 December British forces had captured Sidi Barrrani and the desert was now open for the 6th Division’s advance along the Libyan coast. On 3 January 1941 the division attacked and captured the Italian fort of Bardia. The regiment’s A Squadron, under the command of Major Denzil Macarthur-Onslow, who went on to command the 4th Armoured Brigade, supported the attack. Tobruk was the next Italian fort to be captured, with the regiment again in support and covering the 19th Brigade’s advance. The regiment, though, was under-equipped and without its full compliment of vehicles, using only machine gun carriers. To compensate for this, A Squadron was parity re-equipped with captured Italian light tanks, which had large kangaroos painted on the hulls and turrets to distinguish them from enemy vehicles. After Tobruk, the regiment was used as part of the advance guard in the capture of Derna and then Benghazi. In April the unit moved to Helwan, where it was equipped with Vickers light tanks and machine-gun carriers, and operated with British troops in capturing Sollum. Towards the end of May the regiment moved to Palestine, where it came under the command of the 7th Division for the imminent invasion of Syria. The regiment experienced its heaviest fighting during the Syrian campaign, which began on 7 June. A Squadron was attached to the 21st Brigade and advanced along the coast, where the rugged hills made it difficult to manoeuvre the tanks and carriers. The squadron was relieved by one of the 9th Division Cavalry Regiment’s squadrons on 13 and 14 June. C Squadron, meanwhile, was with the 25th Brigade, and advanced along the Rosh Pinna road, engaging strong enemy defences at Fort Khirbe. C Squadron was relieved by B Squadron, which was later attacked by Vichy French tanks that were supported by heavy artillery and machine-gun fire, which forced the Australians to withdrawal. Always willing or needing to improvise during the campaign, A and B Squadrons both operated three captured French R35 Renault light tanks, while C Squadron provided personnel for a horse troop, quickly nicknamed the “Kelly Gang”, to patrol the high, rugged hills near the Mardjayoun–Banis Road. The regiment remained in Syria as part of the occupation force and returned to Australia in March 1942. It was sent to the Adelaide River, in the Northern Territory, and then later to Murgon, in Queensland. In 1943 and 1944 divisional cavalry regiments were reorganised into cavalry (commando) regiments. In January 1944 the 6th Division Cavalry Regiment became the 2/6th Cavalry (Commando) Regiment. The regiment lost its vehicles and became the administrative headquarters for the 2/7th, 2/9th, and 2/10th Commando Squadrons. The regiment remained with the 6th Division and participated in the Aitpae–Wewak campaign, in New Guinea, during 1945. Includes Nominal Rollnon-fictionThe comprehensive history of the 6th Australian Division Cavalry Commandos – a (now out of print) reprint of one of the rarer Armoured unit history books. This is the story of one of Australia’s most famous fighting regiments during World War II. As an armoured cavalry unit it fought the Italians and Germans in the sands of the African desert and the Vichy French in the mountains of Syria. Later as a dismounted commando unit it fought the Japanese in the terrifying jungles of New Guinea. The heroism of the men in its ranks and the actions in which they engaged are portrayed in a way which makes battle deeds leap realistically from the pages. “To The Green Fields Beyond” is a documented and detailed book which is of value to everyone who is interested in Australia’s story. Seldom before has such a contribution been made to record of our national history. The book has been approved and sponsored by the Australian War Memorial. The 6th Division Cavalry Regiment was formed in November 1939 and, just two months later, was sent overseas to the Middle East in January 1940. Arriving in Egypt, the regiment immediately went to Palestine, where it joined the rest of the 6th Division and trained using machine-gun carriers and, from October, six old Vickers light tanks. At the end of the year the regiment moved into the Western Desert, where it joined British forces ready for the major offensive to commence on 9 December. Two days later the regiment became the first unit of the 2nd Australian Imperial Force (AIF) to go into action when one of its squadron fought a sharp action against the Italians holding Garn el Grein and Fort Maddalina on 11 and 12 December. By 21 December British forces had captured Sidi Barrrani and the desert was now open for the 6th Division’s advance along the Libyan coast. On 3 January 1941 the division attacked and captured the Italian fort of Bardia. The regiment’s A Squadron, under the command of Major Denzil Macarthur-Onslow, who went on to command the 4th Armoured Brigade, supported the attack. Tobruk was the next Italian fort to be captured, with the regiment again in support and covering the 19th Brigade’s advance. The regiment, though, was under-equipped and without its full compliment of vehicles, using only machine gun carriers. To compensate for this, A Squadron was parity re-equipped with captured Italian light tanks, which had large kangaroos painted on the hulls and turrets to distinguish them from enemy vehicles. After Tobruk, the regiment was used as part of the advance guard in the capture of Derna and then Benghazi. In April the unit moved to Helwan, where it was equipped with Vickers light tanks and machine-gun carriers, and operated with British troops in capturing Sollum. Towards the end of May the regiment moved to Palestine, where it came under the command of the 7th Division for the imminent invasion of Syria. The regiment experienced its heaviest fighting during the Syrian campaign, which began on 7 June. A Squadron was attached to the 21st Brigade and advanced along the coast, where the rugged hills made it difficult to manoeuvre the tanks and carriers. The squadron was relieved by one of the 9th Division Cavalry Regiment’s squadrons on 13 and 14 June. C Squadron, meanwhile, was with the 25th Brigade, and advanced along the Rosh Pinna road, engaging strong enemy defences at Fort Khirbe. C Squadron was relieved by B Squadron, which was later attacked by Vichy French tanks that were supported by heavy artillery and machine-gun fire, which forced the Australians to withdrawal. Always willing or needing to improvise during the campaign, A and B Squadrons both operated three captured French R35 Renault light tanks, while C Squadron provided personnel for a horse troop, quickly nicknamed the “Kelly Gang”, to patrol the high, rugged hills near the Mardjayoun–Banis Road. The regiment remained in Syria as part of the occupation force and returned to Australia in March 1942. It was sent to the Adelaide River, in the Northern Territory, and then later to Murgon, in Queensland. In 1943 and 1944 divisional cavalry regiments were reorganised into cavalry (commando) regiments. In January 1944 the 6th Division Cavalry Regiment became the 2/6th Cavalry (Commando) Regiment. The regiment lost its vehicles and became the administrative headquarters for the 2/7th, 2/9th, and 2/10th Commando Squadrons. The regiment remained with the 6th Division and participated in the Aitpae–Wewak campaign, in New Guinea, during 1945. Includes Nominal Rollww2, australian commandos, australian special forces, world war 2 -
 Ringwood and District Historical Society
Newspaper - Clipping, Norwood High School/Secondary College, Ringwood, Victoria - School campsite fire, 1991
Local newspaper article, 10 January, 1991 by Carolyn Deed, reporting buildings at the school's country retreat at Gooram, south of Euroa, were burnt to the ground when a blaze swept through the area. Norwood High School principal, Mr Ian McPharlan, rushed to the site as soon as he heard the news that fires had hit the area and arrived to find only charred remains of what had been the result of 20 years of hard labor from the school and community. -
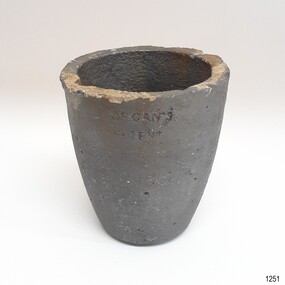 Flagstaff Hill Maritime Museum and Village
Functional object - Crucible, The Patent Plumbago Crucible Company, circa 1873
Crucibles are used for heating and pouring molten metal. The set of six crucibles was raised from the wreck of the Loch Ard and includes a range of sizes, now in the Flagstaff Hill collection. All were manufactured by the Morgan brothers who founded the Patent Plumbago Crucible Company in 1856, making crucibles in a small factory in Battersea London. A crucible is a container used for purifying and melting metals so that they can be cast in a mould to a predetermined shape and use. They must withstand extremely high temperatures, and abrupt cooling, and shed their contents with minimal adherence. The addition of graphite to the traditional firing clays greatly enhanced the durability of industrial crucibles this technique was pioneered by the Morgan Bros thereby making a significant technological advance in foundry technology and metallurgy. The Morgans first noticed the advantages of graphite crucibles at the Great Exhibition held in London in 1851. Initially, they contracted to be sole selling agents for the American-made products of Joseph Dixon and Co. from New Jersey, but in 1856 they obtained that firm's manufacturing rights and began producing their graphite crucibles from the South London site. The Morgans imported crystalline graphite in 4-5 cwt casks from the British colony of Ceylon (now Sri Lanka) and mixed it with conventional English (Stourbridge) clays to be fired in kilns. Their products were purchased by the Royal Mints in London and India and exported to official mints in France and Germany. They were successful exhibitors of their crucibles and furnaces at the London Exhibition held in 1861 (Class 1, Mining, quarrying, metallurgy and mineral products, Exhibit 265, Patent Plumbago Crucible Co). The range of sizes represented by the six crucibles retrieved from the Loch Ard suggests they may have been part of a sample shipment intended for similar promotion in the Australian colonies or at Melbourne's International Exhibition to be held in 1880. A newspaper account of an 1864 tour of the Morgan brothers' 'Black Potteries' at Battersea indicates: "All the pots were numbered according to their contents, each number standing for one kilogram or a little over two pounds; a No. 2 crucible contains two kilograms; a No. 3, three kilograms, and so on." These numbers are obscured by marine sediment on three of the crucibles in the Flagstaff Hill collection, but those legible on the remaining three are 5, 6, and 8. None of the six is of the same size. A brief history of the Loch Ard (1873-1878): - The sailing ship Loch Ard was one of the famous Loch Line of ships that sailed the long voyage from England to Australia. Barclay, Curdle and Co. built the three-masted iron vessel in Glasgow in 1873. It had sailed three trips to Australia and one trip to Calcutta before its fateful voyage. Loch Ard left England on March 2, 1878, under the command of recently married, 29-year-old Captain Gibbs. It was bound for Melbourne with a crew of 37, plus 17 passengers. The general cargo reflected the affluence of Melbourne at the time. Onboard were straw hats, umbrellas, perfumes, clay pipes, pianos, clocks, confectionery, linen and candles, and a heavier load of railway irons, cement, lead and copper. Other cargo included items intended for display in the Melbourne International Exhibition of 1880. The Loch Ard had been sailing for three months and was close to its destination on June 1, 1878. Captain Gibbs had expected to see land at about 3 am but the Loch Ard ran into a fog that greatly reduced visibility and there was no sign of land or the Cape Otway lighthouse. The fog lifted at 4 am and the sheer cliffs of Victoria's west coast were much closer to them than Captain Gibbs expected. He tried to manage the vessel but failed and the ship struck a reef at the base of Mutton Bird Island, near Port Campbell. The top deck loosened from the hull, and the masts and rigging crashed down, knocking passengers and crew overboard. The lifeboat was launched by Tom Pearce but crashed into the side of Loch Ard and capsized. He clung onto its overturned hull and sheltered under it. He drifted out to sea and the tide brought him back to what is now called Loch Ard Gorge. He swam to shore and found a cave for shelter. A passenger, Eva Carmichael, had raced onto the deck to find out what was happening and was confronted by towering cliffs above the ship. She was soon swept off the ship by a huge wave. Eva saw Tom Pearce on a small rocky beach and yelled to attract his attention. He swam out and dragged her to the shelter of the cave. He revived her with a bottle of brandy from a case that had washed up on the beach. Tom scaled a cliff in search of help and followed some horse hoof prints. He came from two men from Glenample Station, three and a half miles away. He told the men of the tragedy and then returned to the gorge while the two men rode back to the station to get help. They reached Loch Ard Gorge and took the two shipwreck survivors to Glenample Station to recover. Eva stayed at the station for six weeks before returning to Ireland by steamship. In Melbourne, Tom Pearce received a hero's welcome and was presented with a medal and some money. Of the 54 crew members and passengers on board, only two survived: the apprentice, Tom Pearce and the young woman passenger, Eva Carmichael, who lost her family in the tragedy. The shipwreck of the Loch Ard is of significance for Victoria and is registered on the Victorian Heritage Register ( S 417). Flagstaff Hill has a varied collection of artefacts from Loch Ard and its collection is significant for being one of the largest accumulation of artefacts from this notable Victorian shipwreck of which the subject items are a small part. The collection's objects give us a snapshot of how we can interpret the story of this tragic event. The collection is also archaeologically significant as it represents aspects of Victoria's shipping history that allows us to interpret Victoria's social and historical themes of the time. Through is associated with the worst and best-known shipwreck in Victoria's history.This crucible is the smallest of three nested crucibles, or fluxing pots, numbered according to their size. These containers rise slightly from a smaller flat base to a wider open top with a lip for pouring. They were recovered from the wreck of the Loch Ard. The crucibles have a coating of sediment that obscures some of their numerical specifications of size and capacity. Made by the Patent Plumbago Crucible Company at the Battersea Works in London. The number on this crucible is obscured by the sticker.Stamped into side "MORGAN'S PATENT" Stemped into base "MORGAN'S PATENT" "THE PATENT PLUMBAGO CRUCIBLE COMPANY" Sticker "L 96"flagstaff hill, warrnambool, graphite crucible, plumbago crucible, morgan's crucible company, loch ard, morgan potteries, crucible, fluxing pot, nested crucibles, heat proof container, metal worker, maritime museum, shipwreck coast, flagstaff hill maritime village, great ocean road, loch line, morgans crucible company, flagstaff hill maritime museum and village, fluxing pots, morgan’s patent, morgan brothers, patent plumbago crucible co, battersea works, london, loch ard gorge, port campbell -
 Flagstaff Hill Maritime Museum and Village
Functional object - Water standpipe, Langlands Bros. & Co, 1880-1893
This water standpipe is believed to be the only one of its kind in working order. It was originally located in Warrnambool, on the hillside at the corner of Mickle Crescent and Banyan Street, providing water for the Chinese Market Gardens below, on the flats. It was removed from this location on May 2nd, 1979, with the intention to relocate it at the new Flagstaff Hill Maritime Museum & Village. The standpipe lay in storage for years until the Warrnambool Company, Chemblast, offered to restore it for use as a working display. The display was officially opened on March 31, 2014. The water from the adjacent lake is drawn out with a hand operated water pump, and goes up into the standpipe, where flows through the canvas hose and into the top of the Furphy Farm Water Cart. The display is a visual acknowledgement of the years served by Flagstaff Hill volunteer and Friends of Flagstaff Hill Chairperson, Bob Crossman. Warrnambool’s early settlers had no water supply prior to the mid-1850s. They relied on rain water tanks, domestic wells and springs. The town experienced a huge, destructive fire in William Bateman Jnr. & Co.’s large produce store in November 1856, which highlighted the need for both a fire brigade and a good supply of water. In 1863 a volunteer fire brigade was established. In August 1880 the town celebrated the installation of its first water standpipe on the corner of Liebig and Timor streets. The water was pumped from springs at Cannon Hill through the connected pipeline to the standpipe, then distributed to households via horse and cart. Each of the licenced cart drivers were compelled by Council regulations to keep their carts full from sunset to sunrise, ready to cart water to outbreaks of fire. They received a fee for this service. In 1893 the town installed a water supply, sourced from the Merri River, stored in a reservoir basin and tower in north Liebig Street, and distributed throughout the town in a system of pipes. By late 1939 a reticulated supply was installed, with the water piped in under the Otway Scheme. Standpipes are still used in modern times in rural and remote areas for homes, farms, stock, agriculture and firefighting. Many commercial or government owned standpipes are metered, charging a fee for the quantities of water supplied. This water standpipe was made by Langlands Foundry Co. Limited, Melbourne, which was establish in 1842. It was Melbourne’s first foundry and iron shipbuilder, and one of the largest employers in Victoria at the time. Langlands was known for its high quality workmanship and wide range of goods for mining, engineering, marine, railway and other industrial uses. The company made the first cast bell, the first lamp posts in the colony, and the boiler for the first Australian train. In the 1860s it produced cast iron pipes for the Board of Works, which laid the pipes for Melbourne’s first reticulated water supply. The firm was bought by Austral Otis Co. in 1897.This water standpipe is significant historically as it is believed to be the only one of its type in working condition. The standpipe is significant for being manufactured by early colonial firm Langlands Foundry of Melbourne, which was known for high quality, cast iron products. The firm made the boiler for the first Australian train, assembled the first Australian paddle steamer and made the first Australian cast bell and lamp posts. Langlands was one of the largest employers in Victoria at the time. The standpipe is significant historically as it represents the evolution of water supply services in Australia. Standpipe; vertical cast iron water pipe, painted crimson, fixed in position, tapering inward from the round base to the rectangular joint near the finial on top. A hexagonal pipe extends at right angles from the joint, with an outlet fitting and flow-controlling wheel on the end. A length of canvas hose hangs from the outlet fitting. Inscriptions are on one face of the joint. The standpipe was made by Langlands Foundry Company of Melbourne. Embossed “LANGLANDS FOUNDRY CO. / LIMITED / ENGINEERS / MELBOURNE”warrnambool, flagstaff hill maritime museum, maritime museum, shipwreck coast, flagstaff hill maritime village, great ocean road, flagstaff hill, standpipe, stand-pipe, water standpipe, fire standpipe, firefighting equipment, water supply equipment, chinese market gardens, banyan street, liebig street, water tower, bateman’s fire, working display, water supply, town water, rural water, reticulated water, cannon hill spring, merri river, otway water, water carters, horse and cart water supply, volunteer fire brigade, langlands foundry, early melbourne, iron works, bob crossman, late 19th century water supply -
 Bendigo Historical Society Inc.
Document - MINING IN BENDIGO COLLECTION: BENDIGO GOLD FIELDS, 1968
Typed copy of the Bendigo Gold Fields , collected and arranged by V. R. Dwyer, 1968. On front cover: Australian Gold Production Bendigo Gold Field. Image of tin dish washing. Cover has an image of two people tin dish washing. Notes include a brief history of gold in Australia, Bendigo Goldfield yields, Bendigo Gold Nuggets, Victorian Nuggets, gold prices, yield for the years 1851 to 1890, lines of reef, mine shafts and depth, location, public buildings and organisations and mines listed for each reef. Typed copy of this document is held in Folder 130, number 3621.18.cottage, miners, mining in bendigo, bendigo gold fields index, v r dwyer, strzelecki, edward hargreaves, thomas hancock, henry frenchman, wittscheibe, ballerstedt, fortuna villa, george lansell, the rocks, victoria nugget, dascombe nugget, welcome stranger, welcome nugget, canadian nugget, sarah sands, lady hotham, maryborough, heron nugget, blanche barkley, vicount canterbury, precious nugget, poseidon, gold prices, gold yield 1851 - 1890, location of shafts, mechanics institute, old masonic hall, court, st killians, forrest st methodist church, hospital, baptist church, bendigo gas company, st andrews presbyterian church, bendigo benevolent home, railway, st marys church of england, bendigo m p building society, st pausl church of england, high school, city family hotel, fire brigade, b u f s dispensary, synagogue, beehive store, school of mines, bendigo miners association, st marys convent, dr backhaus, st mathews long gully, salvation army, post office, art gallery, sacred heart cathedral, eaglehawk town hall -
 Bendigo Historical Society Inc.
Postcard - EAGLEHAWK FIRE STATION POSTCARD, 16th October, 1909
Hand tinted? Postcard depicting the Eaglehawk fire station. The card is from A. V. Spoefug ?? To W. T. J. Anderson, Stationer, High Street Eaglehawk. Message is 'Please do not send any more Advertisers, will call and pay you Saturday the 30th ------. Dated 16th October 1909.postcard, photograph, fire station, postcard, eaglehawk, fire station, stationer. eahlehawk businesses