Showing 254 items matching "railway trucks"
-
 Ballarat Tramway Museum
Document - Report, N. F. Henley, "The development of the Manchester bogie", 1988
Article looks at the development of the maximum traction bogie, the Brill 22E in regard to the engineering aspects. Written by N. F Henley with drawings of the various concepts and history of the Brill truck. See item 9663 for s similar article on the Brill 21E truck.Yields information about the development of the Brill 22E truck which is used on some of the BTM trams.Seven A4 sheets, photocopy of an article titled "The development of the Manchester bogie" from the UK magazine Tramway Review published by the Light Railway Transit Association, Winter 1988.trams, tramways, maximum traction, bogies, trucks, brill trucks -
 Victorian Railway History Library
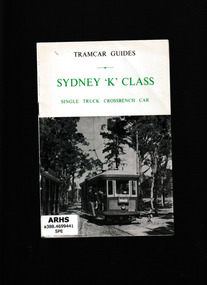
Booklet, South Pacific Electric Railway Co-operative Society, Sydney "K" class : single truck crossbench car, 197?
A pictorial and descriptive account of the Sydney "K" class : single truck crossbench carIll, p.11.non-fictionA pictorial and descriptive account of the Sydney "K" class : single truck crossbench cartramways - sydney, tramways - rolling stock - sydney. -
 Sunbury Family History and Heritage Society Inc.
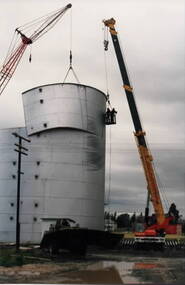
Photograph, Wheat silo, c1984
A wheat silo was erected on railway land adjacent to the Sunbury Station in 1967. Frank Millett handled the operations. As bulk handling was the preferred way to transport wheat, the silo gave local cereal growers to deliver their grain to the railhead. Over the years of the operation 200 grain wagons delivered wheat annually to the silo. In 1984 the silo was dismantled and removed.Cereal growing was one of the agricultural activities carried out in the Sunbury and surrounding areas for many years.A non-digital coloured photograph of a metal wheat silo being dismantled. A crane is beside the silo and two men are suspended from the crane in a basket to ensure that the sheets of iron land safely on the truck. wheat storage, silos, frank millett, cereal crops, sunbury railway station -
 Melbourne Tram Museum
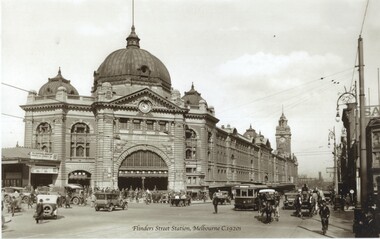
Photograph - Black and white - Flinders St Station c1920's
Shows H class tram number 57, east bound in Flinders St with the Flinders Street Railway station in the background. Has a number of horse drawn vehicles in the view along with motor cars and trucks, some of them doing a hook turn. A policeman is on point duty. Photo taken after Flinders St converted to electric trams from cable trams in 1927. Commercial print from a SLV photo.Yields information about the location, the streetscape and the trams and vehicles in use at the time. Original photo taken from a Rose Series - Southern Cross Series No. 5. See State Library of Victorian Collection - H2011.27DBlack and white photograph of Flinders St Station Melbourne, late 1920's with H class tram 57 in the view."RSCP 327" & "C1929" in pencil and "H57" in red ink on rear.tramways, h class, trams, tram 57, flinders st, flinders st station, horse drawn vehicles, mmtb -
 Melbourne Tram Museum
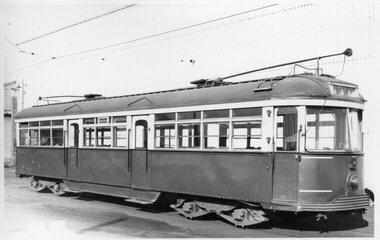
Photograph - Black and White - Victorian Railways Tram at Preston Workshops 1959
Photograph of one of the three Victorian Railways "Luxury" cars that were sold to the MMTB following the closure of the final section of the St Kilda - Brighton tramway on 28-2-1959. The tramcar has been placed on No. 15 trucks to enable movement around the workshops. Two of the trams, No. 52 and 53 were modified with longer running boards, full driver's bulkheads to replace the blackout blinds, route number boxes, removal of the red oil lamps above the headlight, conversion to from Broad gauge (5'3") to standard gauge, changes to destination boxes, seating and many other changes. Reference Destination City, Edition 5, page 103.Yields information about the former VR "Luxury" trams sold to the MMTB in 1959.Black and white photograph of one of the three Victorian Railways Trams sold to the MMTB at Preston Workshops.tramways, mmtb, trams, victorian railways, st kilda brighton electric tramway, preston workshops, vr class -
 Melbourne Tram Museum
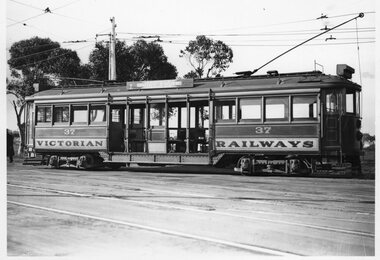
Photograph - Black and White - VR 37 at Elwood, Victorian Railways (VR)
Photo shows Victorian Railways tramcar No. 37 at Elwood depot. Bogies or trucks are of the Brill 77E type.Yields information about the Victorian Railways bogie trams.Photograph - Black and White - VR 37 at Elwoodtramways, trams, victorian railways, vr trams, elwood depot, brill 77e, tram 37 -
 Melbourne Tram Museum
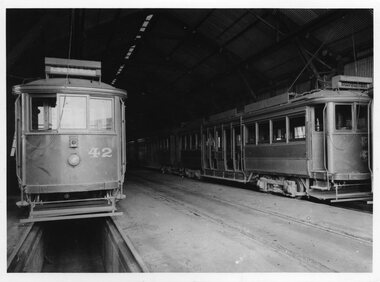
Photograph - Black and White - VR 42 and 33 at Elwood depot, Victorian Railways (VR)
Photo shows Victorian Railways tramcar No. 42 and 33 at Elwood depot. Bogies or trucks are of the Brill 77E type. Note the oil lamp on the driver's dash panel - all VR trams carried them.Yields information about the Victorian Railways bogie trams.Photograph - Black and White - VR 42 and 33 at Elwoodtramways, trams, victorian railways, vr trams, elwood depot, brill 77e, tram 42, tram 33 -
 Melbourne Tram Museum
Album - Charles Craig - part 1 of 2, 1950s to 1970s
Photo - see pdf file for further information. Number Brief Description CC1 S178 at Elsternwick level crossing track works CC2 Building East Preston Depot 1955 CC3 Camberwell depot – post WW2 – lots of trams and a black cat CC4 W2 584 and SW6 958 northbound – Chapel St and Brighton Road CC5 W2 357 – southbound, Chapel St Brighton Road CC6 Pascoe Vale Road, Raceday working – note the signal CC7 The Preston Workshops - The Argus, post WW2, 223, 647 et al CC8 923 or is it 922 being built at Preston – The Argus photo - CC8A 832 being positioned onto trucks at Preston after an overhaul – Argus Photo – see also CC306 CC9 Footscray depot` CC10 W5 797 in St Kilda Road during track works – 1950s CC11 W2 457 at Kew Post Office CC12 Wellington Parade – W2 432, 492 and 337 – special event CC13 Swan St line up of trams – football? Or other special event – Sinclair’s bus on the right side. CC14 W2 630 being washed at a depot – The Argus photo CC15 Royal Park line at Flemington Road – W2 355 and W5 786 CC16 Nicholson St track construction from a tram cab CC17 T181 on tour at Gordon St CC18 T181 on Maribyrnong Bridge CC19 Ditto at River St just off bridge CC20 As for CC18 CC21 At Raleigh Rd CC22 T181 at Footscray depot CC23 Track construction, Nicholson, just north of Gertrude CC24 Commissioning overhead Bourke St tram 988 CC25 Queens Parade – 997 and 994 CC26 Swapping trolley wheel to skid – commissioning CC27 Track construction in Gertrude St CC28 985 in Queens Parade running special CC29 997 in Queens Parade CC30 1033 at North Fitzroy – AETA Special CC31 Bourke St at Elizabeth St – has passengers on board CC32 W6 985, 996 Queens Parade, Mk 3 bus 333 CC33 As above CC34 Showing construction at Nicholson & Gertrude – Bourke St CC35 W2 223 on Burnley temporary bridge – VR track expansion CC36 W5 823 – ditto CC37 Tram on old bridge prior to removal CC38 W2 433 on temporary bridge with new bridge beams and old track CC39 Looking down showing temporary single track – Swan St CC40 Tait train passing under tram bridge CC41 SW6 on single line – off loading CC42 W2 547 at City Road Junction CC43 City Road Jtn – 1969 – 596 and 771 CC44 City Road Jtn – 1969 – 596 and 771 (same as CC45 438 in Flinders St CC46 355 somewhere CC47 552 somewhere CC47A 364 at Preston Workshops? CC48 W2 334 on Traverser – Preston Workshops CC49 Wellington pade – large line up of trams, c1950 925, and 611 CC50 W2 493 Franklin st – advertising for Savings Certificates CC51 Possibly 551 with advertising for fund raising for Blind institute CC52 249 at Hawthorn – Riversdale Junction – with a Tally Ho and Village Fair Aux. board CC53 MMTB Postcard of 511 CC54 Wattle Park terminus with Single line warning sign CC55 Wattle Park Duplication CC56 36 at Domain Junction – 833 CC57 36 at Domain Junction CC58 36 at Domain Junction with 810 and 833 CC59 36 in Swanston by Flinders St Station CC60 36 in Spencer St at A’Beckett CC61 36 crossing Collins St CC62 36 crossing Collins St CC63 36 northbound in St Kilda Road with Shrine in background CC64 36 northbound in Swanston St at Flinders St CC65 Postcard – Ballarat 36 in Domain Road CC66 Postcard - Stampshow – Hawthorn Horse tram CC67 Postcard - Stampshow – Peace cable tram CC68 Postcard - 1041 and cable car set 1 at Preston CC69 Postcard - Colins & Elizabeth – greetings from old Melbourne CC70 Postcard - Cable car set at Preston CC71 Postcard - Twentyman’s cable cars CC72 Postcard - Nu-color-vue – horse tram 256 CC73 Cable car set – Market & Flinders CC74 Cable trams at Twentymans’ in their shed CC75 Cable tram track at Bourke & Spencer prior to removal CC76 Cable tram bogie at Preston Workshops – used as a dolly CC77 Cable trams at Twentymans’ CC78 Postcard - Valentines – Bourke looking west from Swanston CC79 Postcard - Rose 3938 – Bourke at Swanston – the Leviathan building CC80 Postcard - Valentines – Elizabeth St looking south from Collins – No. 19 CC81 Postcard - Rose P4765 – Bourke St Melbourne CC82 Postcard - Rose 4090 – cable tram passing Parliament house CC83 Postcard - Valentines – GPO Elizabeth St CC84 Interior of cable trailer with clothing on a set CC85 Elizabeth St looking north CC86 Cigarette card - Collins St No. 41- WD HO Wills CC87 Postcard - Rialto building with cable set CC88 Postcard - Valentines - Swanston at Flinders looking north CC89 CC90 Q 150 Hanna St – dated on rear CC91 176 turning – photo ex Alan Jungworth CC92 161 on Princes Bridge – minimum fare 4d sign and Inspector CC93 459 at Point Ormond CC94 158 at Gordon St – side on view CC95 X 217 in Swanston St CC96 X 217 in Swanston St with an East Brighton destination CC97 T177 CC98 T177 Peel St – no destination roll – being transferred? CC99 X1 462 in Glenhuntly Road to Point Ormond CC100 X1 462 in Glenhuntly Road to Elsternwick Rly Station CC101 X1 462 in Glenhuntly Road to Point Ormond CC102 Q 150 Hanna St CC103 190 at Camberwell Depot CC104 T182 at Footscray CC105 X1 466 and W2 at Footscray CC106 190 at Camberwell Depot CC107 X1 467 Barkly St Footscray CC108 X2 679 turning into William St from La Trobe St CC109 X2 677 Glenhuntly Road with Point Ormond Destination CC110 Postcard T180 CC111 Postcard format – X1 467 on a truck – see also CC178 CC112 Postcard format – X1 467 at Wantirna South CC113 Q200 and SW6 896 at Thornbury – has labels on rear CC114 T177, Ballarat Road – has labels on rear CC115 T178 at Point Ormond CC116 Postcard X1 465 and 466 CC117 Postcard – X2 676 CC118 Postcard – TMSV X2 217 CC119 810 on temporary bridging – 24-12-67 CC120 W2 575 – Queens Parade junction in, still temporary bridging, substation under construction CC121 Forming Queens Parade Junction base slab CC122 W2 596 prior to tramway works – all tracks still in position CC123 It’s a mass of reinforcing – bridging being formed CC124 Looking north with substation being built CC125 Looking east with some rather tight curves, Wellington St still in use CC126 SW6 958 ex Wellington St with all tracks and signal box and buildings. CC127 Victoria Pde at Gisborne looking east – at least 4 cars CC128 SW6 893? With dash canopy lights and SW6 862 and a man with a newspaper CC129 SW6 894 on the S curves, with tram in Wellington St CC130 Similar photo CC131 W2 564 turning into Wellington St – the concrete tracks are not that old CC132 W2 552 running out of Wellington St CC133 W5 732 from Fitzroy St into St Kilda Road with next iteration in position – very wonky CC134 W5 764 turning into Fitzroy St CC135 SW6 947 turning from Wellington St CC136 W2 586 running out of High St CC137 W2 500 turning into Wellington St CC138 W2 543 in Wellington St inbound CC139 L103 with St Kilda Junction destination, and a tower truck on right CC140 Workmen – new track in Queensway in use CC141 Ditto CC142 L103 in Queensway, and another car in bound CC143 Looking east along Wellington St which has been taken out of use. Also a MMTB Roller CC144 W5 824 and a W2 and all types of wobbly temporary track CC145 W2 354 to High St CC146 Sw6 947 on the S bends CC147 W2 500 looking north – tram on the S bends CC148 SW6 896 leaving the S bend CC149 W2 357 and a MMTB City bus with trees/gardens on the side CC150 W5 817 Elliot Ave – see also CC302 CC151 W2 552 – note the large trolley bridge CC152 W2 550 at depot or workshops CC153 1B truck CC154 SW2 432 CC155 W2 155 at Glenhuntly CC156 SW6 937 on AETA tour? CC157 X2 677 on Footscray service – Ballarat Rd? CC158 W2 641 – High St Kew? CC159 SW6 847 – Power St Hawthorn CC160 Simpson St – big line up CC161 W2 546 truck No. 1? CC162 W2s at Glenhuntly depot CC163 No. 15 truck under 899 CC164 206 and other junk at Preston Workshops CC165 W in Swanston St Melbourne – Rose series card CC166 Y1 613 Batman Ave?? or William St at Collins CC167 Tram plans CC168 X 217 Swanston St – see also 95 and 96 CC169 217 in Swanston St – same as 95 CC169A 192 in St Kilda Road at Princes bridge CC170 192 in St Kilda Road at Princes bridge CC171 Bendigo 3 arriving Malvern depot – being unloaded CC172 Ditto CC173 T180 at a depot CC174 X1 463 wheel set CC175 C30 – dog car side view – close up CC176 C30 dog car CC177 206 and 30 at Preston Workshops CC178 X1 467 on a truck – see CC111 also CC179 42 CC180 42 at a depot, no destination box CC181 W2 556 1A type truck CC182 Flinders St Station – Rose Series CC183 W7 1035 Spring – Nicholson St CC184 W7 1022 MMTB Post Card CC185 Adelaide 178 – has on rear – R. Lilburn 4/82 CC186 Adelaide 175 – has on rear – R. Lilburn 4/82 CC187 Y1 610 on AETA tour CC188 Y1 610 on AETA tour with large group – Point Ormond CC189 AETA display – has GH55-32 in pencil on rear CC190 AETA display – has GH55-29 in pencil on rear CC191 Y1 610 on AETA tour with large group – Point Ormond CC192 VR 53 at Footscray CC193 VR cars 40 and 34 at Elwood wash dock CC194 W7 1024 as the 1970 Christmas tram CC195 Geelong – loading a set of 22E trucks CC196 Geelong 10 and 23 running an AETA special CC197 Geelong – AETA special CC198 Geelong 7 at Junction CC199 Geelong 10, in the city CC200 Geelong 33 with Belmont destination CC201 Geelong 15 Eastern Park destination 29-3-1948 CC202 Geelong 23 at Railway Station – 29-3-1948 CC203 Geelong 23 at Railway Station – 29-3-1948 CC204 Geelong – loading a bogie tram CC205 Geelong – loading a bogie tram CC206 Geelong 40 – loaded on truck CC207 Geelong 40 – on jacks CC208 Geelong 40 on jacks – 19 behind CC209 Geelong 38 with two workers on either side CC210 – 214 Australian Historic Tramways stamp folder and set CC215 Bendigo 17 at depot – has dup JBS on rear CC216 Bendigo 20, 29 bogie and straight sill car at Charing Cross CC217 Bendigo one man bogie Pall Mall CC218 Bendigo – Bogie 23, other cars and welding truck at depot CC219 Bendigo 7 with Quarry Hill destination CC220 Bendigo 21 with Lake Weerona destination CC221 ESCo 18 Ballarat CC222 Ballarat bogie 22 on AETA special CC223 Ditto CC224 Ballarat 34 at Stones Corner – R Lilburn CC225 Ballarat 15 in Bridge St – R Lilburn CC226 Ballarat 40 at Gardens – R Lilburn CC227 Ballarat 37 running out of depot – R Lilburn CC228 Postcard – Valentines – Sturt St with loaded horse tram trailer CC229 AETA Geelong tram tour ticket – 29-3-1948 CC230 Postcard – Geelong – Valentine 2114 – T&G building CC231 Postcard – PMTT ! – High St Malvern CC232 Postcard – Empire – Glenferrie Road, Malvern at Wattletree Rd CC233 Postcard Y469, MMTB CC234 Postcard Z2 Spring St CC235 Postcard – Z1 MMTB CC236 Postcard – Stamp Show W1 431 CC237 Postcard – Stamp show B2005 CC238 Postcard – Stamp show W6 982 CC239 Postcard – Valentines 1264 – Johnstone Park with tram in distance CC240 Postcard – Rose 10711 – Swanston and Lonsdale – Hospital and W232 CC241 Postcard – Rose 4827 – Fitzroy St St Kilda W2 362 and 548 CC242 Postcard – Valentines – 939 – St Kilda War Memorial, W and a R? CC243 Postcard – Valentines – 572 – St Kilda War Memorial, W 413 and 140? CC244 Postcard – Valentines – 938 – Uper and Lower Esplanade – L 104 CC245 Postcard – St Kilda Rd at Princes Bridge Y1 and W CC246 Postcard – Biscay BG82 – W5 814 - CC247 Postcard – Biscay 796112 – Bourke St looking west CC248 Postcard – Biscay 796109 – Bourke St looking east CC249 Postcard – Biscay 2AUS58 – Z5 Bourke St CC250 Postcard – Biscay BG 249 – Swanston St CC251 Postcard – National View – St Kilda Rd – shrine and Prince Henrys W2 405 CC252 Postcard – Nu color vue – 11 ML 156 – St Kilda Rd CC253 Postcard – Nu color vue – 11 ML 153 – Swanston St CC254 Postcard – Nu Color vue – Collins St 442 CC255 Postcard – Pitt card – Adelaide – H 364 at Victoria St CC256 Postcard – SPER L/P 154 CC257 Postcard – BTMS – 550 CC258 Postcard – SPER – Brisbane 295 CC259 Adelaide 131 at Burnside – has R Lilburn on card, c1911 CC260 Adelaide 194 CC261 Adelaide 235, with two crew, The News photo CC262 Rockhampton, outside post office – has source of photo details CC263 Sydney – 2086 and 2062 arriving Circular Quay CC264 Sydney – P class – Pitt St? CC265 Sydney – 1610 at Circular Quay CC266 Brisbane 99 and 468 CC267 Sydney with bridge behind CC268 Steam tram Paramatta Park – 103 CC269 Sydney – Museum Station =- Elizabeth St CC270 Sydney – weed burner 137S at a loop Demonstrates the work of Charles Craig in photography and collection of prints.Assembled album in a black presentation folder of 270 photographs from the Charles Craig Collection - 86 sleeves - part 1 of 2. All photographs have been scanned and placed on the Museum's G drive. A list of all photographs with details where possible has been compiled. Victorian Provincial, Launceston, Hobart and Sydney tram photos have been transferred to other Museums, image files retained.melbourne, tramways, tramcars, trams, charles craig, st kilda junction, trackworks -
 Melbourne Tram Museum
Album - David Frost Slide Collection, David Frost
Photo - see pdf file for further information. Number Brief Description date DFC1 A general view from the former railway platform at Port Melb Station looking towards Station Pier on opening day 20-12-1987 DFC2 A2 285 in the Tramway Platform at Port Melbourne Station on opening Day 20-12-1987 DFC3 A2 285 in the Tramway Platform at Port Melbourne Station on opening Day 20-12-1987 DFC4 A2 285 in the Tramway Platform at Port Melbourne Station on opening Day 20-12-1987 DFC5 A2 273 at St Kilda Tramway Station on opening day 22-11-1987 DFC6 A2 273 turning from Fitzroy St into St Kilda Tramway Station on opening day 22-11-1987 DFC7 B1 2001 at St Kilda Tramway Station turning into Fitzroy St on opening day 22-11-1987 DFC8 B1 2002 enters St Kilda Tramway Station on opening day 22-11-1987 DFC9 An A2 approaches St Kilda Tramway Station on opening day 22-11-1987 DFC10 Concreting the connecting curve from Fitroy St into St Kilda Station c July 1987 DFC11 An MTA AEC MKVI bus in Grey St St Kilda at Dalgety St with Tramway works in the background c July 1987 DFC12 Grey St St Kilda at Dalgety St with Tramway works in the background in Fitzroy St c July 1987 DFC13 Concreting the connecting curve from Fitroy St into St Kilda Station c July 1987 DFC14 Restaurant Tram 442 in Fitzroy St at Grey St Passing MTA bus 59 outside St Kilda Station c1986 DFC15 Former VR tram stop sign painted on a pole at Glenhuntly Rd & Broadway DFC16 Former VR Elwood Tram Depot under demolition 1996 DFC17 Former VR Elwood Tram Depot under demolition 1996 DFC18 Former VR Elwood Tram Depot under demolition 1996 DFC19 Former VR Elwood Tram Depot under demolition 1996 DFC20 Former VR Elwood Tram Depot under demolition 1996 DFC21 Former VR Elwood Tram Depot under demolition 1996 DFC22 Former VR Elwood Tram Depot under demolition 1996 DFC23 Former VR Elwood Tram Depot under demolition 1996 DFC24 MTS Tower waggon in use at the former VR Elwood Tram Depot under demolition 1996 DFC25 A Sign advertising the sale of the Former VR Elwood Tram Depot – 10/8/1996 1996 DFC26 Former VR Elwood Tram Depot under demolition 1996 DFC27 Interior of a shed at the former VR Elwood Tram Depot under demolition 1996 DFC28 Former VR Elwood Tram Depot under demolition 1996 DFC29 Former VR Elwood Tram Depot under demolition 1996 DFC30 Former VR Elwood Tram Depot under demolition 1996 DFC31 VR 20, former breakdown car in Bob Prentice’s Back Yard Jan 1974 DFC32 VR 20 on a low loader en route to Bob Prentice’s for preservation 1959 DFC33 VR 20 as the breakdown car on the St Kilda Electric Street Railway c1955 DFC34 VR 39 waits in St Kilda St as breakdown car 20 enters Elwood Depot c1955 DFC35 VR 54 and 50 in the rear yard of Elwood Depot c1958 DFC36 VR 50 in the rear yard of Elwood Depot c1958 DFC37 VR 50 in the rear yard of Elwood Depot c1958 DFC38 VR 28 in St Kilda St outside Elwood depot after the line had been cut back to this point c1958 DFC39 VR 29 in St Kilda St outside Elwood depot after the line had been cut back to this point c1958 DFC40 VR 35 passes 28 on the St Kilda Electric Street Railway c1955 DFC41 VR 39 on the St Kilda Electric Street Railway c1955 DFC42 Y1 613 on a tour c1970 DFC43 VR 54 in St Kilda St outside Elwood Depot c1955 DFC44 VR 28 at Brighton Beach Terminus c1955 DFC45 VR 33 being washed in the wash bay at the rear of Elwood Depot c1955 DFC46 VR 20 breakdown car running into Elwood Depot c1955 DFC47 VR 3 in the rear yard at Elwood Depot c1955 DFC48 VR 51 on an AETA Tour running out of Elwood Depot c1958 DFC49 VR 28 on the St Kilda Electric Street Railway c1955 DFC50 VR 28 with crew in St Kilda St outside Elwood depot after the line had been cut back to this point 1959 DFC51 VR 52 in Grey St near Fitzroy St c1958 DFC52 VR 51 on a AETA Tour passes 33 in Grey St near Fitzroy St c1958 DFC53 VR 29 in Grey St near Fitzroy St c1958 DFC54 VR51 on an AETA Tour shunts as 52 waits on the St Kilda Electric Street Railway c1958 DFC55 VR 51 on the Black Rock Electric Street Railway c1955 DFC56 VR 28 in St Kilda St outside Elwood depot after the line had been cut back to this point c1958 DFC57 Combined Rail-Tram Tickets of the Black Rock Electric Street Railway Feb 1975 DFC58 Combined Rail-Tram Tickets of the St Kilda Electric Street Railway Feb 1975 DFC59 Electric Street Railway & Motor Coach Paper Tear off Tickets Feb 1975 DFC60 VR 52 & 53 on Rt 82 pass in Cordite Ave near Wests Rd Sept 1975 DFC61 Z 68 & 52 in East Preston Depot in M&MTB Livery c1977 DFC62 Copy photo of VR 18 in Elwood Depot c1910 DFC63 VR 51 as a one man car at Black Rock Terminus c1955 DFC64 VR 53 on Rt 82 in Droop St Footscray Jan 1974 DFC65 B2 2027 on Rt 96 in South Melb Station c1988 DFC66 VR 20 as preserved in Bob Prentice’s backyard High St Prahran Jan 1974 DFC67 VR 700 on Rt 82 in Droop St Footsray c1978 DFC68 VR 28 as the last car from ST Kilda Station 28-2-1959 DFC69 VR 700 at the Rt 82 Moonee Ponds Terminus c1978 DFC70 VR 52 waiting time at the Rt 82 Footscray Terminus, the driver intently stares at the bundy clock as the Braid and the Connie gossip Jul 1972 DFC71 VR 54 shunting outside Elwood Depot to return to St Kilda Station 1959 DFC72 SW6 969 in MTA Livery blocking the entrance to South Melb Depot presumably during the scratch ticket dispute Jan 1990 DFC73 VR 52 & 53 on Rt 82 pass in Droop St Footscray Sept 1975 DFC74 VR 700 after withdrawl in the Newport Railway museum in the process of a repaint c1985 DFC75 VR 700 after withdrawl in the Newport Railway museum in the process of a repaint c1985 DFC76 VR 700 on Rt 82 in Droop St Footsray at The Cresent c1978 DFC77 VR 700 on Rt 82 in Droop St Footsray c1978 DFC78 Former VR tram depot in use as an MTA Bus depot c1990 DFC79 VR 52 waiting time at the Rt 82 Footscray Terminus Jul 1972 DFC80 VR 52 waiting time at the Rt 82 Footscray Terminus with Connie changing the pole Jul 1972 DFC81 VR 52 at the Rt 82 Moonee Ponds Terminus with the crew chatting 7-12-1974 DFC82 VR 52 on Rt 82 on the reserved track in Raleigh Rd Ascot Vale Jan 1974 DFC83 VR 53 on Rt 82 in Leeds St Footscray about to turn into Hopkins St April 1976 DFC84 VR 53 on Rt 82 in Droop St Footsray Jan 1974 DFC85 VR 700 on Rt 82 in Droop St Footsray at Hopkins St c1978 DFC86 Z 52 in MTA livery on Rt 19 in Elizabeth St near Bourke St c1985 DFC87 VR 52 at the Rt 82 Moonee Ponds Terminus Jul 1972 DFC88 VR 53 at the Rt 82 Footscray Terminus Jan 1974 DFC89 VR 52 freshly outshopped from the workshops and W7 1011 at the Bourke St Terminus with 52 on display for the 1968 railway exhibition 1968 DFC90 Painting of W class 369 in Chocolate & Cream c1930 DFC91 Charing Cross, Bendigo at night c1965 DFC92 Ballarat ? c1965 DFC93 Bendigo 18 on an AETA tour in McCrae St near Tramway Ave c1965 DFC94 View from the roof of a tram in the body shop at Preston Workshops 1977 DFC95 View from the roof of a tram in the body shop at Preston Workshops 1977 DFC96 View from the roof of a tram in the body shop at Preston Workshops showing the panto on 546 1977 DFC97 Interior view of Carlton Control Centre showing desk and wall panel c1968 DFC98 W2 493 on Rt 55 in Kingsway outside South Melb Depot Aug 1973 DFC99 W2 496 in Sturt St at Kingsway on Rt 1 Jul 1973 DFC100 Z class truck c1975 DFC101 Z3 116 in Bourke St at King St as new c1979 DFC102 Bob Prentice on tour c1968 DFC103 SW6 900 as an advertising tram for Newsday at night 1969 DFC104 597 Jul 1973 DFC105 W2 480 on Rt 3 passing under the railway bridge at Caulfield Oct 1972 DFC106 Interior view of Carlton Control Centre showing desk c1968 DFC107 SW6 856 on Rt 77 at night Jul 1973 DFC108 W2 496 in Sturt St at Kingsway on Rt 1 Jul 1973 DFC109 PCC 980 on a tour at South Melb Depot c1968 DFC110 SW6 856 on Rt 77 at night Jul 1973 DFC111 View from the roof of a tram in the body shop at Preston Workshops showing the panto on 546 1977 DFC112 Dandenong Rd from Chapel St Nov 1968 DFC113 A Z class car turns from Gertrude into Nicholson St c1990 DFC114 SW6 900 as an advertising tram for Newsday at night 1969 DFC115 Port Melbourne Station showing Centennial bridge and station building prior to closure. 10-1987 DFC116 Port Melbourne station with train prior to closure, looking south 10-1987 Demonstrates the work of David Frost in photography and or collecting slides.Assembled album in a black presentation folder of 116 colour slides, 6 slide sleeves, collected or photographed by David Frost. Many are TMSV or Windsor Publications slides. All photographs have been scanned and placed on the Museum's G drive. A list of all photographs with details has been compiled. melbourne, tramways, trams, vr trams, elwood, st kilda light rail, port melbourne, opening, elwood depot, buses -
 Melbourne Tram Museum
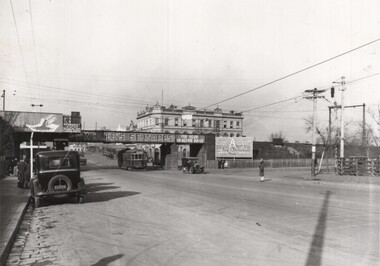
Photograph - Set of 12 - construction of King St overpass in Flinders St, 1959
Photos show the construction of King St overpass in Flinders St which was part of the project to construct a bridge over the Yarra River and provide a new southern outlet road between the city and eventually St Kilda Junction. The overpass construction was commenced in 1959 with tramway works first commencing. It was demolished in 2005. 1 - looking west at Market St. 2 - looking east from Spencer and Flinders St with the railway viaduct behind. 3 - Tram lines diverted onto the new overpass. Note the hand-powered overhead tower on the left behind the compressor. 4 - Tracks partially diverted. 5 - Looking east at Spencer and Flinders St with a Dunlop tyre truck in the view. 6 - prior to the diversion onto the new bridge. 7 - Looking east near William St. with W2 451 (Route 48, North Balwyn) in the view. 8 - Bridge works near King St. Original tracks still in use. 9 - Looking east prior to the introduction of the temporary tracks on the south side of the new overpass. 10 - SW6 852 and a W2 on new overpass trackwork - old trackwork being demolished. 11 - Cross over at Spencer St in Flinders St, prior to change over. 12 - Looking west at Flinders and Spencer St with SW6 853 turning into Spencer St.Yields information about the construction of the King St overpass in Flinders St during 1959.Set of 12 black and white prints of the construction of the King St overpass in Flinders St.trams, tramways, flinders st, king st overpass, construction, bridges, w2 class, sw6 class, tram 451, tram 853, tram 852 -
 Ballarat Tramway Museum
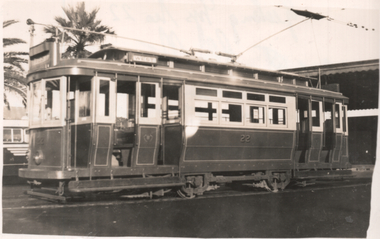
Photograph - Geelong 22 at Railway Station, C Roy G Field, 6/1949
The photograph shows Geelong tram No. 22 at the Geelong Railway station . Photo by Roy Field 6/49. Roy provides notes on the rear of the photo about the tram's two trolley poles, radial truck and that it was built by Pengelley. Yields information about tram 22 and the railway station terminus.Black and white photograph with details on rear.See rear image a C Roy Field stamptramways, trams, geelong, geelong railway station, tram 22 -
 Melbourne Tram Museum
Document - Research Notes, Ron Scholten, "Key Dates - Prahran and Malvern Tramways Trust", 2010
Two A4 sheets stapled titled "Key Dates - Prahran and Malvern Tramways Trust" and PMTT Map on page 2 giving opening dates , and other important dates for the Trust. Has the PMTT logo, reproduction of a painting of No. 26 by Graham Lee and two PMTT drawings of a single truck 4 wheel tram and a Maximum Traction bogie tram. Map shows the railway lines, cable lines, PMTT lines and HTT lines.trams, tramways, pmtt, history, opening, htt, kew -
 National Wool Museum
Photograph - Transporting Wool, 1960s
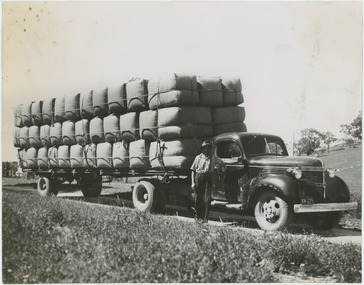
One of fifty one photographs originally in a photo album found in the National Wool Museum’s office. The album was water damaged and the images were removed for conservation. The images follow the process of wool. Beginning in a sheep paddock and finishing as a folded fabric. It includes all the steps in between in this process, including shearing, transporting, selling, washing and the many different steps in the process of turning a single thread of wool into fabric.Black and white image showing a man standing in front of a truck loaded with wool bales. The bales are being transported from Boorowa to Sydney.AUSTRALIAN NATIONAL PUBLICITY / ASSOCIATION / FLINDERS STREET RAILWAY BUILDING, / MELBOURNE AUSTRALIA / W40. Seventy bales of Wool going by motor vehicle from Boorowa to / Sydney.wool industry, working life, women, boonoke station, farming, sheep farming, agriculture, sheep stations, transport, wool processing, shearing, textile industry, wool -
 Melbourne Tram Museum
Photograph - Framed Photographs, Malvern Framing Gallery, "Flinders Street Station 1944", late 1920s
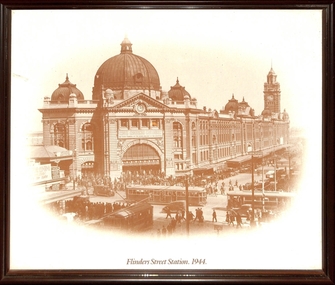
Taken from St Paul's Cathedral steps. Has a small part of the Princes Bridge Station building on the left hand side. The Swanston St canopy of Flinders St station has the words "Cross Crossings Cautiously". A W class tram is northbound while an S or T class tram is southbound while another single trucker is west bound to Spencer St in Flinders St. The trams in the photo were used prior to 1944. All W class trams were converted to W2 class prior to 1944 and the single trucker westbound had been scrapped by then. Photo dated late 1920s.Yields information about the intersection of Flinders and Swanston Sts late 1920s.Reproduced photograph, sepia-toned titled "Flinders St Railway Station 1944' in a brown wooden frame with a gold line, paper backed with a cotton hanging strip. On rear in ink at the top - "Donated to Hawthorn Tram Museum Feb. 19th 2012 Ron Scholten"trams, tramways, melbourne, flinders st station, w class, s class -
 Melbourne Tram Museum
Photograph - set of 9 Black & White Photograph/s, Melbourne & Metropolitan Tramways Board (MMTB), 1966
Series of 9 black and white photographs of the traffic congestion in the CBD during 1951. .1 - view looking south along Spencer St from Collins St showing the VR Head office, and the railway viaduct with a Berger Paint advertisement, Has one wide body tram with dash canopy lighting and three W2's. Also one small bus. Has "G3" in pencil on rear. .2 - similar view but with a different vehicle mix - W2 317 (Richmond Route 28), an SW6 route 27 and another W2 (route 41). Includes one large truck carrying Land Rover boxes. Typed on rear "Enlargement of No. 72 - Sheet No. 26 (Report P25/1/8) and in ink initials and "For Testing Engs 1/11/51". .3 - View looking north along Swanston St Princes Bridge with a route 6 tram and Princes Bridge Station and St Pauls Cathedral. On rear in pencil "11/2" .4 - Spencer St - trams crossing Spencer St bridge - W5 781 (Route 10) and a W2 649, route 9, South Melbourne Beach. .5 - Queensbridge under bridge - showing many cars jammed and the railway viaduct. .6 - ?? - Collins St - National Mutual and Shaw Savill Line offices - has a Safety Zone stand. .7 - Collins St looking east from Market St - with many trams in the view and many cars. .8 - Collins at Market St with a SW6 with dash canopy lighting - route 45, followed by a route 9A .9 - same location - total chaos. See also Reg 4520 for another 7 photos of the same series.trams, tramways, traffic control, congestion, spencer st, route 27, route 28, route 41, route 6, princes bridge, swanston st, w2 class, sw6 class, route 10, route 9, spencer st bridge, market st, collins st, route 45, route 9a, tram 317, tram 781, tram 649 -
 Melbourne Tram Museum
Pamphlet, Prahran & Malvern Tramway Trust (PMTT), "Information for passengers - Round trip through Melbourne and Suburbs by Cable and Electric Tramways", c1918/19
Pamphlet - special size sheet, was originally folded into three titled "Information for passengers - Round trip through Melbourne and Suburbs by Cable and Electric Tramways", giving details of the trip, where the trams could be boarded, Description of Route, map shows the route along with other tram routes. Also show railway stations. Has a photo of a PMTT single trucker. c1918/19 2 copies held.trams, tramways, pmtt, cable trams, tours, round trip, map -
 Melbourne Tram Museum
Slide - Set of 5, John Webster, 17/10/1959 12:00:00 AM
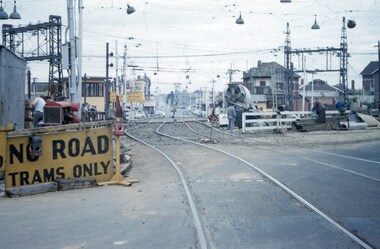
Set of five Colour slides, Kodak, brown cardboard of the removal of the Elsternwick Level crossing on 17-10-1959 .1 - looking east along Glenhuntly Road, showing the level crossing, concrete truck and road protection signs and the temporary track. .2 - W2 287 traversing the temporary track over the level crossing. Tram has the destination of route 4B, Sth Caulfield via Glenhuntly Road. Also has adverts for APEX and Fitwear socks. .3 - ditto on the crossing. .4 - ditto past the crossing. .5 - W2 551 (Carnegie Route 4) and L 103 (City route 4B) on the level crossing. 551 has adverts for Castle Vintage Sherry and Apex. 103 has adverts for Remy Martin Brandy, Alongside is a Victorian Railways sign advertising trains to the city.Hand writing on rear in ink; .1 - 17-10-59 - KFH1 .2 - KFH 1a .3 - KFH 1b .4 - KFH 1c .5 - KFH 1etrams, tramways, elsternwick, level crossings, railway squares, w2 class, l class, carnegie, south caulfield, glenhuntly rd, tram 287, tram 551, tram 103 -
 Melbourne Tram Museum
Negative, Wal Jack, 21/04/1945 12:00:00 AM
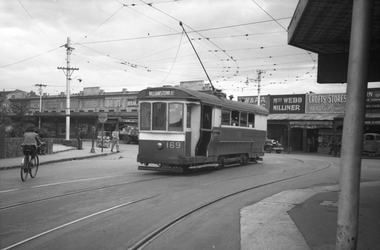
Black and white negative, by Wal Jack, of S 169, Williamstown Road turning from Irving St into Nicholson St over the railway line. In the background are Malvern Cycles, a frock shop, Footscray Fish Shop, Bancroft's Dry cleaners, Moran and Cato, Miss Webb Milliner, Crofts Grocery, A I Brown delivery truck, tram stop sign, fire alarm and a road "Major Stop Road".trams, tramways, footscray, nicholson st, irving st, williamstown road, s class, tram 169 -
 Melbourne Tram Museum
Album - Photographs - Comeng Dandenong, 1980s - 1990s
In March 2024, Milissa Box (DTP) was at a trash and treasure market. She'd found a $5 photo album for sale with some photos that she thought might be of interest… From what I can gather it belonged to the gentleman pictured who was a worker at Dandenong in the Comeng and ABB eras. He appears to have worked on the Z3, A1/A2, B1/B2 class trams, Hong Kong LRVs, Comeng Melbourne suburban trains, and later the extra Victorian-purchased XP power cars and XAM sleepers to enable the Riverina XPT to be extended to Melbourne. It's clear he was very proud of the vehicles he'd helped to build. I have scanned a selection of the images, which appear to be a mix of official builder's portraits, team photos, and self-taken shots showing candid everyday scenes on the shop floor. There are also images of the launch of the XP power cars with then-Victorian Premier Joan Kirner; and some personal visits to see the Flying Scotsman, Victorian Goldfields Railway, Coal Creek, etc. Filename Description Date Comeng Scans 2024-03-05 0001 Three Comeng workers (including the photographer) stand in front of Comeng suburban train 697M (Chopper unit) c. June-July 1989 Comeng Scans 2024-03-05 0002 Three Comeng workers (including the photographer) stand in front of Comeng suburban train 697M (Chopper unit) c. June-July 1989 Comeng Scans 2024-03-05 0003 Hong Kong Light Rail Phase 1 LRV 1013 being lifted onto its transport loader c. 1987-88 Comeng Scans 2024-03-05 0004 Walter Wright transport truck (Mack) waits to draw a heavy transport platform out of a shed at Comeng Dandenong. Hong Kong Phase I LRV (1024) can be seen inside the shed c. 1988 Comeng Scans 2024-03-05 0005 Hong Kong Light Rail Phase 1 LRV 1013 on its transport loader in a shed at Comeng Dandenong ready for transport c. 1988 Comeng Scans 2024-03-05 0006 Hong Kong Light Rail Phase 1 LRV 1013 on its transport loader in a shed at Comeng Dandenong ready for transport c. 1988 Comeng Scans 2024-03-05 0007 The photographer is pictured fitting components to the cab of a Phase I Hong Kong LRV No 1026 c. 1988 Comeng Scans 2024-03-05 0008 Hong Kong Light Rail Phase 1 LRV 1013 on its transport loader at Comeng Dandenong ready for transport c. 1988 Comeng Scans 2024-03-05 0009 Hong Kong Light Rail Phase 1 LRV 1013 on its transport loader at Comeng Dandenong ready for transport c. 1988 Comeng Scans 2024-03-05 0010 Hong Kong Light Rail Phase 1 LRV 1013 on its transport loader at Comeng Dandenong ready for transport c. 1988 Comeng Scans 2024-03-05 0011 The photographer and a colleague are pictured in the car park posing for a photo at Comeng Dandenong c. 1988 Comeng Scans 2024-03-05 0012 The photographer and a colleague are pictured inside the cab of Comeng suburban train 697M, posing for a photo at Comeng Dandenong c. 1989 Comeng Scans 2024-03-05 0013 A stainless steel Hitachi train bodyshell is being transported on a truck-trailer. Possibly taken at Martin and King in Bayswater, under transport to the station for railing to Somerton for fitout. This is a later series M car with the rear-mounted pantograph (note the mounting lugs above the non-driving end) c. 1980 Comeng Scans 2024-03-05 0014 A shot at Comeng Dandenong of the onsite workforce standing in front of a Phase I Hong Kong LRV. c.1987-88 Comeng Scans 2024-03-05 0015 A shot at Comeng Dandenong of the onsite workforce standing in front of a Phase I Hong Kong LRV. c.1987-88 Comeng Scans 2024-03-05 0016 Hong Kong Light Rail Phase 1 LRV 1038 on its transport loader at Port of Melbourne ready for transport c. 1988 Comeng Scans 2024-03-05 0017 Three Comeng workers (including the photographer) stand in front of a workbench at Comeng Dandenong c. June-July 1989 Comeng Scans 2024-03-05 0018 A newly completed Comeng train (wearing VicRail teacup orange) on the factory access track at Comeng Dandenong c. 1981 Comeng Scans 2024-03-05 0019 A newly completed Z3 class tram on a transporter, with its bogie frames waiting transport to Preston Workshops for final fitout and commissioning c. 1981 Comeng Scans 2024-03-05 0020 A newly completed Comeng train (wearing VicRail teacup orange) on the factory access track at Comeng Dandenong c. 1981 Comeng Scans 2024-03-05 0021 A newly completed Z3 class tram on a transporter, with its bogie frames waiting transport to Preston Workshops for final fitout and commissioning c. 1981 Comeng Scans 2024-03-05 0022 A Comeng/ABB artist impression presumably part of their bid for the Double Decker demonstrator train for Melbourne. Note the similarity to similar Comeng sets constructed for Sydney. c. Nov 1989 – April 1990 Comeng Scans 2024-03-05 0023 Victorian Railways steam locomotive K 169 on static display at Coal Creek. c. 1980s Comeng Scans 2024-03-05 0024 Comeng suburban train carriage 1190T on a traverser in the yard at Comeng Dandenong. c. June-July 1989 Comeng Scans 2024-03-05 0025 Comeng suburban train carriages the yard at Comeng Dandenong. c. June-July 1989 Comeng Scans 2024-03-05 0026 Comeng suburban train carriages the yard at Comeng Dandenong. c. June-July 1989 Comeng Scans 2024-03-05 0027 Comeng suburban train carriages the yard at Comeng Dandenong. c. June-July 1989 Comeng Scans 2024-03-05 0028 Comeng suburban train carriages the yard at Comeng Dandenong. c. June-July 1989 Comeng Scans 2024-03-05 0029 Comeng suburban train in a shed at Comeng Dandenong. c. June-July 1989 Comeng Scans 2024-03-05 0030 Comeng suburban train carriage 1190T on a traverser in the yard at Comeng Dandenong – possible Factory Acceptance Inspection by the Met c. June-July 1989 Comeng Scans 2024-03-05 0031 Comeng suburban train carriage 1190T being tractor-shunted in the yard at Comeng Dandenong – possible Factory Acceptance Inspection by the Met c. June-July 1989 Comeng Scans 2024-03-05 0032 Two Comeng workers carry a train part (possibly a first aid kit) for fitting to a Comeng suburban train. c. June-July 1989 Comeng Scans 2024-03-05 0033 Comeng suburban train carriage 1190T on a traverser in the yard at Comeng Dandenong – possible Factory Acceptance Inspection by the Met. One of the Met staff appears to be giving one of the Comeng workers a kiss on the cheek. c. June-July 1989 Comeng Scans 2024-03-05 0034 A B2 Class tram is on a low-loader multiwheel transport trailer waiting transport to Preston Workshops; while what appears to be a classic AP6 Valiant Safari Wagon is in the foreground. c. June-July 1989 Comeng Scans 2024-03-05 0035 A B2 Class tram is on a low-loader multiwheel transport trailer waiting transport to Preston Workshops; while a worker poses for a photo with his hand on the rigging. c. June-July 1989 Comeng Scans 2024-03-05 0036 A B2 Class tram is on a low-loader multiwheel transport trailer waiting transport to Preston Workshops; An HT Holden Belmont sedan has been posed in front to appear as if it is towing the heavy vehicle. c. June-July 1989 Comeng Scans 2024-03-05 0037 A B2 Class tram is on a low-loader multiwheel transport trailer waiting transport to Preston Workshops; An HT Holden Belmont sedan has been posed in front to appear as if it is towing the heavy vehicle. c. June-July 1989 Comeng Scans 2024-03-05 0038 A1 Class tram 232 is pictured up on stands while various A/B class tram cab frames are in the foreground in various stages of assembly. Of note, 232 appears to have been returned to Dandenong for major repair or other work, and shows signs of having been in traffic for some time (weathering and wear) c. June-July 1989 Comeng Scans 2024-03-05 0039 various A/B class tram cab frames are in the foreground in various stages of assembly. c. June-July 1989 Comeng Scans 2024-03-05 0040 A group of Comeng Dandenong workers stopped on a tea break. c. June-July 1989 Comeng Scans 2024-03-05 0041 An A/B Class tram cab being fitted out with electronics and controls. c. June-July 1989 Comeng Scans 2024-03-05 0042 A new Comeng suburban train in Metropolitan Transit livery on the test track at Comeng Dandenong. c. mid 1980s Comeng Scans 2024-03-05 0043 A new Comeng suburban train in Metropolitan Transit livery on the test track at Comeng Dandenong. c. mid 1980s Comeng Scans 2024-03-05 0044 Interior shot of a new Comeng suburban train at Comeng Dandenong. c. mid 1980s Comeng Scans 2024-03-05 0045 Interior shot of a new Comeng suburban train at Comeng Dandenong. c. mid 1980s Comeng Scans 2024-03-05 0046 The exterior sign at Dandenong showing ABB brand. Early 1990s Comeng Scans 2024-03-05 0047 A B2 Class tram is on a low-loader multiwheel transport trailer waiting transport to Preston Workshops. Early 1990s Comeng Scans 2024-03-05 0048 The Brush generator and Paxman Valenta engine as fitted inside a new XP power car for NSW Countrylink (paid for by Victoria) c. 1992 Comeng Scans 2024-03-05 0049 An exterior shot of a new Countrylink XP power car for NSW under construction (paid for by Victoria) c. 1992 Comeng Scans 2024-03-05 0050 Two new XAM class XPT sleeper carriages under construction at Comeng Dandenong c. 1992 Comeng Scans 2024-03-05 0051 A B2 class tram under construction at Comeng Dandenong Early 1990s Comeng Scans 2024-03-05 0052 A B2 class tram under construction at Comeng Dandenong Early 1990s Comeng Scans 2024-03-05 0053 An exterior shot of a new Countrylink XP power car for NSW being moved out of the shed c. 1992 Comeng Scans 2024-03-05 0054 An exterior shot of a new Countrylink XP power car at Comeng Dandenong c. 1992 Comeng Scans 2024-03-05 0055 An exterior shot of a new Countrylink XP power car at Comeng Dandenong c. 1992 Comeng Scans 2024-03-05 0056 An exterior shot of a new Countrylink XP power car at Comeng Dandenong c. 1992 Comeng Scans 2024-03-05 0057 B2 class trams under construction at Comeng Dandenong Early 1990s Comeng Scans 2024-03-05 0058 An XP Powercar from NSW wearing the Intercity XPT Candy Livery at Comeng Dandenong. It is not known if this was originally painted in this livery (incorrectly) or if this was one of the first delivered series transported to Dandenong to aid the construction process of the four additional locomotives. Early 1990s Comeng Scans 2024-03-05 0059 Melbourne B2 Class tram B2.2100 (renumbered from 2102) painted in the distinctive Chocolate and Cream livery to mark the completion of 100 B2 class trams Early 1990s Comeng Scans 2024-03-05 0060 A factory forklift wearing a hand painted “We love Labo(u)r” cardboard sign, possibly in connection to a media event with the Victorian Premier onsite at Comeng Dandenong. c. 1992 Comeng Scans 2024-03-05 0061 An exterior shot of a new Countrylink XP power car at Comeng Dandenong c. 1992 Comeng Scans 2024-03-05 0062 Two new new Countrylink XP power cars under construction and final fitout at Comeng Dandenong c. 1992 Comeng Scans 2024-03-05 0063 An exterior shot of a new Countrylink XP power car on the traverser at Comeng Dandenong c. 1992 Comeng Scans 2024-03-05 0064 A B2 Class tram is on a low-loader multiwheel transport trailer waiting transport to Preston Workshops. A large banner is draped on the side explaining that this is the 106th vehicle delivered to the Public Transport Corporation (B2.2108). c. Oct 1992 (based on delivery date) Comeng Scans 2024-03-05 0065 Victorian Premier Joan Kirner addresses a group of dignitaries in front of an ABB banner inside the main administration building at Dandenong, on the occasion of the first XPT power car purchased by Victoria being unveiled at a media event c. 1992 Comeng Scans 2024-03-05 0066 An ABB executive addresses a group of dignitaries in front of an ABB banner inside the main administration building at Dandenong, on the occasion of the first XPT power car purchased by Victoria being unveiled at a media event c. 1992 Comeng Scans 2024-03-05 0067 Victorian Premier Joan Kirner addresses the media in front of a completed XP class XPT power car at Dandenong, on the occasion of the first XPT power car purchased by Victoria being unveiled at a media event c. 1992 Comeng Scans 2024-03-05 0068 An exterior shot of a new Countrylink XP power car at Comeng Dandenong c. 1992 Comeng Scans 2024-03-05 0069 A Melbourne B2 class tram undergoing testing on the test circuit at ABB Dandenong c. early 1990s Comeng Scans 2024-03-05 0070 An XPlorer type DMU emerges from a shed at ABB Dandenong c.1994 Comeng Scans 2024-03-05 0071 Voith final drive axle mounted units for XPlorer railcars waiting to be fitted at Dandenong. c.1994 Comeng Scans 2024-03-05 0072 A completed XAM class sleeper carriage at ABB Dandenong. c.1993 Comeng Scans 2024-03-05 0073 Completed XPlorer railcars wait transfer to South Dynon for bogie exchange and transfer to NSW at ABB Dandenong. c. 1994 Comeng Scans 2024-03-05 0074 A clipping from an ABB internal newsletter outlining the staff-led initiative to commemorate the 100th B2 class tram with a special livery c.1992 Has photographs of ABB, Steamrail tours, Castlemaine and Maldon Railway, Fying Scotsman 4472 visit and Puffing Billy.Yields information about the people and events at Commonwealth Engineering plant Dandenong and the activities of the unknown compiler.Album containing 40 leaves, photos in a heavy card 3 ring spring binder.comeng, commonwealth engineering co., tramcars, hong kong, nsw, sydney, melbourne, railways, the met, b class, cmr, steam engines, abb, asea brown boveri -
 Melbourne Tram Museum
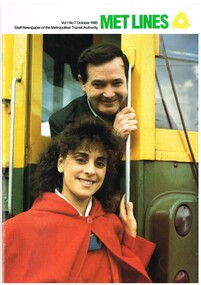
Magazine, Metropolitan Transit Authority (MTA), "Met Lines", October 1985 - December 1985
Magazine, published by the Metropolitan Transit Authority of Victoria "Met Lines" (Metlines) - A4, printed on white gloss paper, with the MTA logo or symbol. Issued under the name of L. A. Strouse as Chairman. Continues from Reg Item 1058 "Met Lines" - printed in an A3 version, Now a monthly version printed in an A4 size. Major tram and bus items listed. Tramway and bus names only listed, not railway. .1 - Vol 1 No. 5 - August 1985 - 20 pages - announcement of trams for Hong Kong, Minister Tom Roper, tram posters, an article on the work of the TMSV with photos. Retired tramway employees association, Minister visiting Brunswick depot, Melbourne Brighton Bus Lines joins the Met - has photos of staff. .2 - Vol 1 No. 6 - September 1985 - 20 pages - tram emergency crew - derailment of 34 at Russell and Burke and Emergency crew at work and in front of truck, Joe Saccasan foreman at South Melbourne and artist, Doncaster Bus depot, The Met Transporter at the Royal Melbourne show. .3 - Vol 1 No. 7 - October 1985- 20 pages - front page Emery Worldwide courier Elizabeth Sciberra with driver John Edwards, competition to detail a photo of cable tram conductor with very large safety pins (for the bell punch tickets), Hong Kong Kowloon-Canton KCRC inspection tour of Preston Workshops, new tram track construction, Essendon depot Soccer Club premiers winners, Malvern Depot photos and story, Norm Cross and making of Malcolm, Conductor training at Hawthorn depot, photo of enthusiast Paul Jordan, Bus and Coach Society of Victoria article with photos of MMTB Double Decker 244 and a Thornycroft bus No. 14. Article on MMTB uniforms - cable trams, PMTT with photos. .4 - Vol 1 No. 8 - November 1985 - 20 pages - front page cable sketches of cable trams - Met Annual Report, Personnel management, 100 years of Melbourne's tram - many photographs, history timeline for trams, Marketing new posters (See Reg Item 585), tram tours, the Outer Circle Railway - bike path, Essendon depot to be redeveloped, lunch at Hawthorn Training School, tram wheel grinding - James Hajjar. .5 - Vol No. 9 - December 1985 - 20 pages - MTCO Conductor competition - Ray Marsh, Met Posters, Footscray Bus Depot, Scrubber trams, calendar, tram centenary celebrations a success, old Bourke St head office plaque unveiling by Tom Roper and Keith Kings of TMSV, Eric Hobday MMTB Relieving Depot Master remembers the cable trams last day, Alan Jennings retirement, lists personnel movements within The Met. For next year 1986 - see Reg Item 1086trams, tramways, mta, the met, cable trams, conductors, bell punch, hong kong, tram track, malcolm, training, hawthorn, bscv, buses, uniforms, pmtt, mmtb, annual reports, personnel, 100 years of electric trams, posters, outer circle railway, footscray depot, scrubber tram, tmsv, posters, melbourne brighton bus, brunswick depot, r10 vehicle, emergency, derailments, tram 8w, tram 11w, tram 34 -
 Melbourne Tram Museum
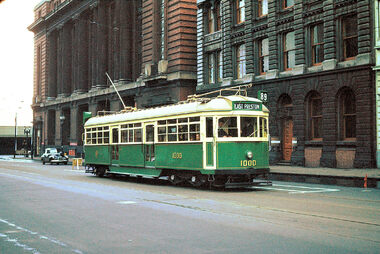
Photograph - Digital Image, W6 1000 on the opening day of the service in Bourke St, 26/06/1955 12:00:00 AM
Set of 4 digital images of W6 1000 on the opening day of the service in Bourke St via High St Northcote to East Preston on 26/6/1955. .1 - 1000 (East Preston route 89) at Spencer St, note the sign behind the tram and the newly painted safety zone. Has the Mail Exchange in the background. .2 - ditto at Spencer St with Carlyon's Hotel and the Spencer St Railway station in the background. .3 - tram arriving at the East Preston depot leads - has adverts for Milo, Kiwi boot polish and Pleshur's shoes. .4 - ditto with a Book Repairs Shop, R. P Evans, Goweville Hotel advertising Fosters Lager, and the Melody Picture theatre, In the background is Bell St with a set of clock traffic lights and two tower wagons and a Pura Milk truck just behind the tram.trams, tramways, w6 class, opening, route 89, bourke st, east preston, high st, northcote, tower trucks, traffic lights, bell st, tram 1000 -
 Melbourne Tram Museum
Photograph - Black and White photographs and digital images, Victorian Railways, c1926
.1 - Black and White photo of W 324 passing under the rail over bridge in Racecourse Road Newmarket between July 1925 and Nov. 1929. Tram was converted to a W2 in November 1929. The Doutta Galla Hotel in the background. On the left of the bridge is Newmarket Station and on the right of the photo is the fence of the stockyards. The bridge has an advert for Wolfes Schnapps and Blue? Label Tea. On the embankment is a sign for Life Guard Life Insurance? A lady is waiting at the tram stop. The photo is part of the VR Advertising series, made to show advertisers where signs could go. image i2 - cropped image showing the tramcar by itself. .2 and .3 - Z3 class 209 in about the same position, with a large KIA motor vehicle advertisement. The yellow crash beams and truck parking bay are a result of too many large trucks hitting the bridge. Photo by Warren Doubleday 26/4/2021On rear in ink "ADV 202"trams, tramways, newmarket, racecourse road, flemington, w class, tram stops, advertisements, z3 class, tram 324, tram 203 -
 Melbourne Tram Museum
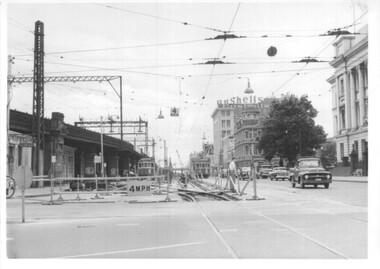
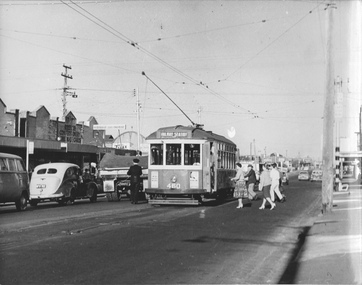
Photograph - X1 460 Ballarat Rd, Jim Seletto, c1960
Photograph shows X1 class tram 460 with destination Railway Station at the corner of Ballarat Rd and Summerhill Rd. The road is busy with cars and trucks and a number of men and women are walking from the curb to board the tram. The single male crew member (driver/conductor) is swinging the single trolley pole to the rear of the tram.Yields information about MMTB X1 and the final years of the short Footscray lines before their closure in 1962Black and white with photograph's note on rearIn biro on rear: '460 Ballarat Rd, J Seletto Photo JSE 11'trams, ballarat rd, footscray, x1 class, tram 460, one man operations, tramways -
 Melbourne Tram Museum
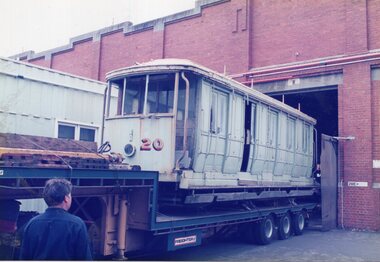
Photograph - Series of 4 - VR tramcar 20, Lloyd Rogers, 1992, 1993 and 2005
Series of four photographs by Lloyd Rogers of Victorian Railways tramcar No. 20 1 - arriving at Preston Workshops - 2/12/1992 2 - The body of VR Tram 20 on stands at Preston Workshops - 1993 3 - the 21E truck from the tram at the Preston Workshops with Lloyd Rogers standing alongside 1993 4 - The 21E truck from VR 20 is being reassembled at Bendigo tram depot 1-2-2005.Yields information about former VR tramcar No. 20 after its recovery.Series of four photograph printed on Kodak paper.Two have details on rear including photo numbervr trams, tram 20, tramcars, preston workshops, bendigo -
 Victorian Railway History Library
Book, Colortype Printing (Vic) Pty Ltd, Victorian Railway Rolling Stock Diagrams and Particulars 1926-1961, 1986
Rolling stock diagrams of 5'3" & 2'6" steam locomotives, electric locomotives diesel locomotives & cars, carriages, cranes, vans, trucks & trams of the Victorian Railways from 1921 to 1961.ill, p.194.non-fictionRolling stock diagrams of 5'3" & 2'6" steam locomotives, electric locomotives diesel locomotives & cars, carriages, cranes, vans, trucks & trams of the Victorian Railways from 1921 to 1961.locomotives -- australia -- history, railway rollingstock - victoria -
 Victorian Railway History Library
Book, Victorian Model Railway Society, Victorian Railway Rolling Stock Diagrams and Particulars Spencer St 1904, 1978
... , vans & trucks of the Victorian Railways up to 1904. ill, p.68 ...Rollingstock diagrams of steam locomotives, cars, cranes, vans & trucks of the Victorian Railways up to 1904.ill, p.68.non-fictionRollingstock diagrams of steam locomotives, cars, cranes, vans & trucks of the Victorian Railways up to 1904.locomotives -- australia -- history, railway rollingstock - victoria -
 Victorian Railway History Library
Book, Colortype Printing (Vic) Pty Ltd, Victorian Railway Rolling Stock Diagrams and Particulars 1904-1921, 1979
... Locomotives -- Australia -- History Railway rollingstock ...Rolling stock diagrams of 5'3" & 2'6" steam locomotives, electric locomotives & cars, carriages, cranes, vans & trucks of the Victorian Railways from 1904 to 1921.ill, p.133.non-fictionRolling stock diagrams of 5'3" & 2'6" steam locomotives, electric locomotives & cars, carriages, cranes, vans & trucks of the Victorian Railways from 1904 to 1921.locomotives -- australia -- history, railway rollingstock - victoria -
 Charlton Golden Grains Museum Inc
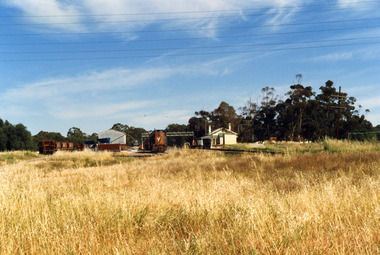
Photograph, Charlton Shire, Charlton Railway Station c. 1987, c.1987
Charlton Railway Station was established in 1882 and closed down in the late 1970s.Colour photograph of the disused Charlton Railway Station. On the right, there is a small cream and green weatherboard building with a large verandah. There is a train engine and trucks in the middle of the photo and some other trucks to the left. There is a large corrugated iron shed and a small dark grey crane behind it. There is a large area of high grass in the foreground and six electricity wires through the top of the photo.transport, railway station, charlton -
 Flagstaff Hill Maritime Museum and Village
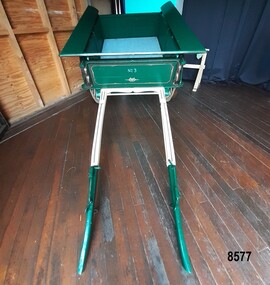
Vehicle - Tip Dray, Prior to 1930s
A Dray is a type of dead axle wagon that was used to transport heavy loads or objects. They had a flat level floor and while some had no sides, others had box bodies and sides. Tip Drays (also known as Tip Carts, Muck Cart, Scotch Cart, Tumbrel or Putt in different parts of England) were smaller than other drays as their loads were heavy and usually only pulled by one horse. Their basic design included two wheels, a tipping body and shafts. The Tip Dray has a unique mechanism that allows the top to tip backwards to tip the load out of the back of the dray. The tipper was activated by a handle at the front allowing the driver to operate it while still having control over the horse. A Tip Dray was an indispensable piece of equipment in the days before tractors and mechanical trucks. They were used by farmers and carters to transport hay, rocks, bricks, gravel and rubbish etc. and because they were useful for dumping loads, they were favoured for use in road and railway construction. A photo in the collection of the Lorne Historical Society shows a tipping dray being used during the construction of the Great Ocean Road. They were part of the daily street traffic in towns and cities around Australia from the early days of settlement. In Australia in the early 1900's, carters began to join unions to protect their jobs and pay. N.S.W. had a "Trolley, Draymen and Carters Union", Queensland had a "Tip Dray Men's Association" and in W. A. the "Top Dray Driver's Union" had a "cessation of work" in 1911 when they were fighting for an increase in their day's wages. In 1910 a meeting of Tip Carters was held in Geelong at the Trades Hall to discuss the formation of a union (The Geelong Tip Dray Carters) which was a success and a schedule of rates for all carting, whether by contract or day labor, was fixed. By 1912 they had "labelled" more than 50 drays and had representatives on the "Trades Hall and Eight Hours Committee". By the mid 1930's and early 1940's, tip drays were being superseded by mechanical trucks and utes. However tip drays continued to be used in some circumstances. They were a practical solution to the problem of petrol rationing during W. W. 2. It was noted in a letter to the editor in the "Sunshine Advocate" in 1938 that a positive argument for continued use of Tip Drays for rubbish collection related to the idea that a horse drawn vehicle involved with lots of stops and starts at different houses (very like a milkman's delivery route) often involved the horse "driving itself" while the driver picked up the rubbish - something a motor truck was unable to do! Another article written in August 1935 and published in the Age in a parliamentary report into the rubber industry noted "tip drays had almost disappeared and in their place, metal was carted in 5 ton motor trucks" but the report went on to say that as a part of the Government relief work (during the Great Depression) the Government had "to some extent reintroduced the tip drays so that a greater number of men would be employed". This particular tip dray was owned by Mr. Oswald (Jack) Bourke. He used it to deliver dry goods from Sunbury to the Queen Victoria Market in Melbourne several times a week in the 1930's and then (between 1945 and 1962) Mr. Bourke used it on the garbage round in Springvale Victoria for the Springvale Council. The Council owned three drays and the "No. 3" painted on this dray is in recognition of its original number. After the death of Mr. Bourke in 1990, one of Mr. Bourke's sons (Andy) found the dray in a shed and restored it. The sign writing on the back and side panels were added during the restoration. This Tipping Dray is a significant example of a horse drawn vehicle that was used by workers from the early days of white settlement through to the 1940's and even into the early 1960's. It was used in a range of "working class" occupations - road construction, railway construction, carting goods, rubbish collection etc. and would have been found in cities, country towns and on farms.A wooden and metal tipping dray with a box body and four sides. It has two iron and wooden wheels (with 14 spokes), two wooden shafts and a metal tipping mechanism. The back panel folds down to allow loads to be dumped out. It is painted in green and cream with sign writing on one of the sides and on the front and back panels. It features decorative painted lines and designs in burgundy, cream and light blue on most of the wooden parts. The tipping mechanism is on the front of the dray's left side and consists of a metal pin secured with a metal ring, and a lever.Front of dray - "No. 3" Side of dray - "A. & M. BOURKE / Contractors / LONGWARRY" Back of dray - "G.T. ANDREWS / QUEEN VICTORIA MARKET - Stand C23 / Phone DANDENONG 225"flagstaff hill maritime museum and village, warrnambool, shipwreck coast, tipping dray, dray, tip dray, tip cart, vehicles, horse drawn vehicle, springvale council, jack bourke, muck cart, scotch cart, tumbrel, putt, box body, oswald bourke, sunbury, queen victoria market, melbourne, no. 3 -
 Melbourne Tram Museum
Document, Frank Shennen, "Melbourne cable car rolling stock numbers, depots etc.", May 1966
... Editor of "Truck & Bus Transportation" and "Railway... Editor of "Truck & Bus Transportation" and "Railway ...Document compiled by Frank Shennen (1907-1998), Managing Editor of "Truck & Bus Transportation" and "Railway Transportation" from own and other records, May 1966. The first page of the records list the source and basis of the records compiled for each cable trailer and dummy or grip car, listing the depot, the line operated on, with remarks about colours, numbers, builder, special features and whether a photo held or seen by Frank. Provides a list by depot as well.Demonstrates an extensive record compiled by Frank Sheenen about Melbourne cable trams.Exercise book - Woolstar - ruled, 80 pages centre stapled.On front cover "F Shennen, "Melbourne cable car rolling stock numbers, depots etc." in ink.tramcars, tramways, cable trams, personal papers, bogie cable trailers, records