Showing 7832 items matching "ride-on"
-
 Warrnambool and District Historical Society Inc.
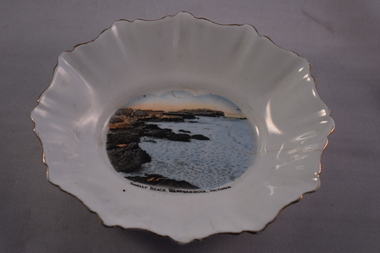
Dish, Souvenir Dish, Mid 20th century
... Stoke-on-Trent, England ...This item is one that was sold to tourists in Warrnambool in the mid to late 20th century. The dish has been mass produced in England and the image of Shelly Beach in Warrnambool added later, probably in Australia. As it is a Royal Stafford china piece it would have been a relatively costly item. It could have been bought for use in the buyer’s home or as a present for another person. Souvenir dishes such as this one have been popular souvenir items for tourists for over 100 years. Warrnambool, as a coastal location, has always been a tourist town and it remains today an important industry for the city. This dish is of interest as an example of the items sold to tourists in the mid 20th century. It will be useful for display.This is an oval-shaped china dish with fluted sides and a fluted edge and gold paint around the edge. The gold edging is partly worn off. The dish is white with a multi-coloured image set into the base of the dish. There is a crack on one side of the dish. On the base of the dish is a crown symbol and details of the manufacturer. ‘Shelly Beach, Warrnambool, Victoria’ “Royal Stafford China Made in England” tourism in warrnambool, history of warrnambool -
 Flagstaff Hill Maritime Museum and Village
Domestic object - Plate, Johnson Bros, Early 20th century
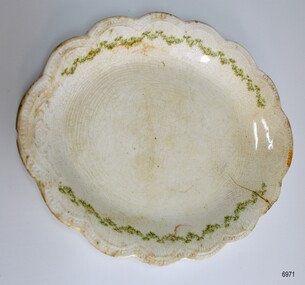
... Stoke-on-Trent, England, United Kingdom ...This white oval plate with a dainty green border and self-pattern was made by the famous ceramics manufacturer Johnson Brothers of England. The pattern was patented on April 15th 1902. The serving plate is typical of dinnerware brought into Australia by migrants or importers of pottery and used in Australian households, giving many years of service. The Johnson Brothers firm was established by Frederick Johnson in 1883, at works in Hanley, Stoke-on-Trent. Frederick was later joined by his brothers Henry and Robert. The company's focus was to supply the export market. In 1968 the company became part of the Wedgewood Group. J. & G. Meakin Eagle Pottery temporarily took over the tableware division in 2000, and China took over all Johnson Bros. products in 2003. All of the Wedgewood Group was taken over by Fiskers in 2015, who discontinued the Johnson Brothers line of products. This serving plate is an example of domestic crockery used in Australia in the late 19th and early 20th centuries. It originated from England and was made by a well-known ceramic manufacturer.Plate, oval, earthenware, scalloped edge with impressed pattern and border of small green leaves. Maker's mark and name is on reverse. Pattern was patented on April 15th 1902. Made by Johnson Bros. of England.Maker's Mark; [Crown symbol] above "JOHNSON BROS, ENGLAND" "PATD APRIL 15TH 1902"flagstaff hill, warrnambool, maritime museum, maritime village, great ocean road, shipwreck coast, dinnerware, serving plate, johnson bros, english serving plate, green leaf border, oval plate, platter, chinaware, plateware, crockery, chine, porcelain, earthenware -
 Flagstaff Hill Maritime Museum and Village
Container - Ceramic Bottle (Chinese Style), Minton Potteries, Late 19th century
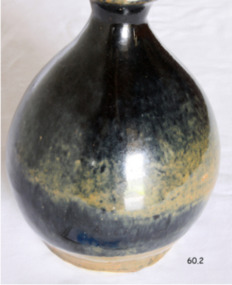
... Eldon Place London Road, Stoke on Trent, UK Midlands ...The subject item is believed to be a "Chinese style stoneware liquor bottle used to store "Tiger Whiskey" (rice wine). These Chinese liquor bottles are made of glazed pottery known as brown stoneware and have been made throughout the centuries by many makers until well after American Prohibition. Later varieties from the mid 20th century are commonly found in the USA with the raised lettering "Federal Law Forbids Sale Or Re-use of this bottle" a sure sign of post-1934 manufacture. This example is interesting as it has a British Minton mark of two triangles on the base indicating a date of 1879 and was likely exported to Australia by Minton. These ceramic bottles virtually always have irregularities and flaws which indicate a product has been hastily manufactured, in any event, this is a fine example of a relatively common item that may have been copied by Minton and sold as a decorative domestic item for display or mass produced for storing liquor. Giles Family: The pair of ceramic bottles were given to Vera Giles by Jim Thompson and are just many 19th century items of furniture, linen and crockery donated to Flagstaff Hill Maritime Village by, Vera and Aurelin Giles. The items are associated with Warrnambool and the Giles Family history. Items donated by the family have come to be known as the “Giles Collection”. Many items in the Lighthouse Keeper’s Cottage were donated by Vera and Aurelin Giles and mostly came from the home of Vera’s parents-in-law, Henry Giles and his wife Mary Jane (nee Freckleton) who married in 1880 and whose photos are on display in the parlour. Henry was born at Tower Hill in 1858, and was a labourer on the construction of the Warrnambool Breakwater before leaving in 1895 for around seven years to build bridges in NSW. Mary Jane was born in 1860 at Cooramook and she attended Mailor’s Flat State School and where she eventually was to become a student teacher. After which she became a governess at “Injemiara” where her grandfather, Francis Freckleton, had once owned land. Henry and Mary’s family consisted of six, some of the children were born at Mailor’s Flat and later some children at Wangoom. They lived with their parents at Wangoom and Purnim west, and this is where Henry died in 1933 and Mary Jane in 1940. A significant item of lead-glazed ceramic with the possibility it was made by the Minton potteries in England who were renowned for making quality pottery. The item style is in all probability a copy of a Chinese liquor bottle that was in common use throughout the British colonies and America up until the mid 20th Century. The Giles family collection has social significance at a local level, because it illustrates the level of material support the Warrnambool community gave to Flagstaff Hill when the Museum was established.Chinese liquor bottle one of a pair, lead glazed ceramic, dark brown and blue/black. Part of the Giles Collection.Mark of a double triangle, apex touching, on base, (Minton mark for 1879).flagstaff hill, warrnambool, shipwrecked coast, flagstaff hill maritime museum, shipwreck coast, flagstaff hill maritime village, great ocean road, vase, pottery, ceramic ornament, domestic ware, late 19th - early 20th centuy ornament, giles collection, henry giles, tower hill, cooramook, warrnambool breakwater, mailor’s flat, wangoom, 19th century household goods -
 Flagstaff Hill Maritime Museum and Village
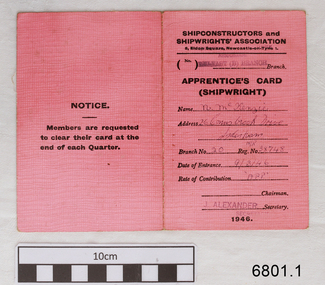
Financial record - Membership Card, Shipconstructors’ and Shipwrights’ Association, Shipconstructors' and Shipwrights' Association, 1946
... Newcastle-on-Tyne 1, Northern Island ...Several items once belonging to shipwright Norman McKenzie were donated to Flagstaff Hill Maritime Museum and Village. They relate to Norman’s apprenticeship and certification as a Shipwright in Belfast, his Union membership and his employment as a shipwright in Melbourne. One of the items, a union Rules Book inscribed with the name H.B. Thomas and dated 1902, had within its pages Norman’s Indenture of Apprenticeship, dated 1941, Norman Desmond McKenzie was born in Belfast in 1925 and lived at 10 Pansy Street Belfast, Northern Ireland. At the age of 16 years, he began a 5-year Shipwright’s apprenticeship with Harland & Wolff Limited, Shipbuilding & Engineering Works, Belfast. He was a member of the Ship Constructors’ and Shipwrights’ Association, Belfast (B) Branch 20. His Registration Number was 38748. He completed his apprenticeship on December 16th, 1946, aged 21 years, his address was 26 Connsbrook Drive, Sydenham, N. Belfast. In October 1949 Norman received Clearance from his Union as a financial member to move to another branch. He had completed his Apprenticeship on December 16th 1946. Two months later he migrated to Australia, arrived in Victoria and became a Financial Member of the Victorian branch of the Federated Shipwrights, Ship Constructors, Naval Architects, Ships’ Draughtsmen and Boat Builders’ Association of Australia, Victoria branch. One of Norman’s donated books is the Rules of the Shipwrights' Provident Union of the Port of London. It is inscribed on several pages with the name H.B. Thomas and includes the year 1902 and the address of 29 Brickwood Street, Gardenvale. This is a location in Victoria, Australia. The Victoria Government Gazette, February 1959, in the section “Removal from Registration on The Architects Registration Board of Victoria, during the year ended 31st December 1956” lists “Deceased – Thomas, H.B., 29 Brickwood Street, Gardenvale”. The Architects Union includes Naval Architects and Shipwrights and other trades that came under the same union. It seems likely that when he was in Melbourne, Norman worked as a Shipwright for H.B. Thomas and was given the Rules book by Thomas, perhaps as a reference book or maybe as a gift. Around that same time, December 1949, Norman met his wife-to-be, Daphne, in Melbourne. Daphne had migrated from London with her family and her father found work with the Melbourne Harbour Trust. They married in Melbourne in 1953 and their family grew to include five children. In 2003 Norman and Daphne moved to Warrnambool and then years later they celebrated their 60th wedding anniversary. Norman passed away on July 28th 2015 at Warrnambool’s South West Healthcare hospital.Norman McKenzie's Rules Book, Union Cards, Indenture of Apprenticeship, and other documents tell the story of a young Irish lad's work and qualifications to become a shipwright and his migration to Australia. The young man found a job and a wife who had also migrated, and they raised a family in Melbourne. He and his wife then retired to Warrnambool to enjoy their later years. The collection of documents relating to Norman McKenzie is significant for its connection with the shipping industry of the early 1900s, the migration of qualified tradesmen to Victoria, and their contribution to the development of Victoria. The collection also shows the role of the Union in the shipping industry. The documents link shipwright Norman McKenzie to the Shipwright's Union in London and in Australia, and to shipbuilder H B Thomas in Melbourne, most likely his employer.- Apprentice's Membership Card, Shipconstructors' and Shipwrights' Association; pink fabric covered card covers with white paper pages that record the member's contributions. for the year 1946 - enclosed within the Card is a printed and signed white paper Certificate of Shipwrights' Clearance Line, Shipconstructors' and Shipwrights' Association, Branch Transfer papers for N.McKenzie, 1st October 1949. ON THE CARD: Stamped "BELFAST (B) branch" "J ALEXANDER" Handwritten "N. McKenzie, 26 Connsbrook Drive, Sydenham," NIR", (Branch Nu.) "20", (Reg No.) "38748" "9/3/46", (Rate) "APP" ON CERTIFICATE: "(99) BELFAST B" "N McKenzie" "NIR" "38748" (Member No.) "221" "24" (years of age) (CLASS OF MEMBER" "Full Benefit" "!st October 1949" (Signature Of) "John Alexander"union card, apprentice shipwright, branch transfer papers, union membership, m mckenzie, 1946, flagstaff hill, warrnambool, maritime village, maritime museum, shipwreck coast, great ocean road, norman mckenzie, norman desmond mckenzie, belfast shipwright, shipwright's apprenticeship, harland & wolff limited, shipbuilding & engineering works, the ship constructors’ and shipwrights’ association, registered shipwright, victorian branch of the federated shipwrights, ship constructors, naval architects, ships’ draughtsmen and boat builders’ association of australia, victoria branch, shipwrights' provident union, h.b. thomas, architects registration board of victoria, naval architect, daphne, norman and daphne mckenzie, indenture of apprenticeship, 1941, 1949 -
 Phillip Island and District Historical Society Inc.
Book, YEATS, William Butler, collected works in verse & prose of William Butler Yeats, 1908
... Stratford-on Avon ...Labelled ' Himmer Bequest'. Stamped 'Cowes Library?' -
Phillip Island and District Historical Society Inc.
Book, YEATS, William Butler, Poems lyrical and narrative, being the first volume of The collected works in verse and prose of William Butler Yeats, 1908
... Stratford-on Avon ...Labelled 'Himmer Bequest', 'Ex Libris Rudolf Himmer'. Stamped 'Cowes Public Library'. -
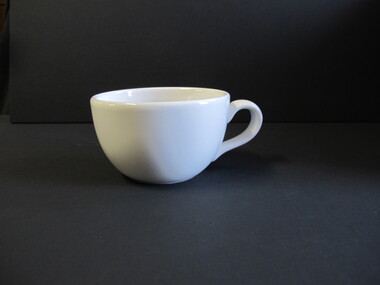 Mission to Seafarers Victoria
Domestic object - Tea Cup, 1980-2000
... Stoke on Trent, England ...Representative of ubiquitous tea/coffee cups used at MTSV Simple white glazed ironstone drinking cup, with handle in black ink: 1800-2010/DUDSON/FINEST VITRIFIED/4034/MADE IN STOCK-ON-TRENT/ENGLANDdomestic life, tableware, china -
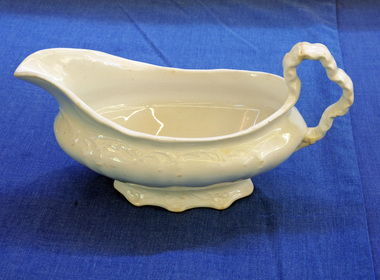 Orbost & District Historical Society
gravy boat, Early 20th century
... Bedford, Stoke-on-Trent, England. ...This item is an example of an item of domestic tableware commonly used in the first half of the 20th century.A white porcelain gravy boat with a pouring lip. It has a raised pattern. The handle is ear-shaped.On bottom -Ridgeways ENGLAND Royal Semi-Porcelain Guaranteed -
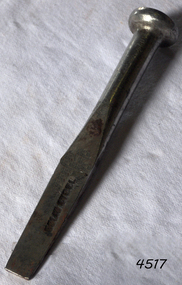 Flagstaff Hill Maritime Museum and Village
Tool - Caulking Tool, Ward & Payne Ltd, Late 19th century
... Limbrick Road, on the river Loxley, Hillsborough, Midlands ...Caulking is the traditional technique used on wooden vessels built with butted or clinker-built planks to fill the gaps between these planks while still allowing the wood to flex and move. This involved driving the irons, hammered in with the mallet, deep into the seams to open them up. After this, spun yarn, oakum (hemp) or cotton was driven deep into the gaps. The hemp or cotton was soaked in creosote or pine tar to make the joins watertight. Caulking also played a structural role in tightening up the hull or deck by reducing the longitudinal movement of the neighbouring planks. The subject item was made by Ward & Payne of the Limbrick Works at Hillsborough, Sheffield England manufacturers of hand-forged tools. Their trademark registered in 1850 was a Letter "W" & "P" stamped into the steel. The firm was established by David Ward (1767-1822) in 1803 the company became David Ward & Sons, in 1837 after Ward's son Edward joined the firm. In 1845 Henry Payne the founder's son-in-law became a partner but died in 1850 after which the company reverted to the Ward family. The business then concentrated on making carving tools, chisels and gouges. In 1882 David Ward's grandson David Ward Jr. (1835-1889) purchased land and built a factory at Sheffield North known as the "Limerick Wheel". For a time Wards operated from both 106-114 West Street Sheffield and at Limbrick Road, Hillsborough on the river Loxley. By 1911 they had expanded into making spades, forks, sheep shears and many other types of edged tools including drills and wood planes. In 1967 Wilkinson Sword purchased all the company's share capital and continued to sell Ward & Payne tools until 1970 when a fire burned the factory down and housing development was built on the site. The subject item is significant as it gives a snapshot of the technological development of sailing ships and their operation before steam-powered vessels took over around the world. Tools such as the subject item demonstrate the traditional craftsmanship and skill of the shipwright and the aesthetic quality of the timber ships designs of the time. Caulking tool with square end"WARD Sheffield"flagstaff hill, warrnambool, flagstaff hill maritime museum, shipwreck coast, flagstaff hill maritime village, james s steele, caulking iron, caulking tool, shipwright tools, ward & payne sheffield, forged tools -
 Flagstaff Hill Maritime Museum and Village
Container - Ceramic Bottle (Chinese Style), Minton Potteries, Late 19th century
... Eldon Place London Road, Stoke on Trent, UK Midlands ...The subject item is believed to be a "Chinese style stoneware liquor bottle used to store "Tiger Whiskey" (rice wine). These Chinese liquor jugs are made of glazed pottery known as brown stoneware and have been made throughout the centuries by many makers until well after American Prohibition. Later varieties from the mid 20th century are commonly found in the USA with the raised lettering "Federal Law Forbids Sale Or Re-use of this bottle" a sure sign of post-1934 manufacture. This example is interesting as it has a British Minton mark of two triangles on the base indicating a date of 1879 and was likely exported to Australia by Minton. These ceramic bottles virtually always have irregularities and flaws which indicate a product has been hastily manufactured, in any event, this is a fine example of a relatively common item that may have been copied by Minton and sold as a decorative domestic item for display or mass produced for storing liquor. Giles Family: The pair of ceramic bottles were given to Vera Giles by Jim Thompson and are just many 19th century items of furniture, linen and crockery donated to Flagstaff Hill Maritime Village by, Vera and Aurelin Giles. The items are associated with Warrnambool and the Giles Family history. Items donated by the family have come to be known as the “Giles Collection”. Many items in the Lighthouse Keeper’s Cottage were donated by Vera and Aurelin Giles and mostly came from the home of Vera’s parents-in-law, Henry Giles and his wife Mary Jane (nee Freckleton) who married in 1880 and whose photos are on display in the parlour. Henry was born at Tower Hill in 1858, and was a labourer on the construction of the Warrnambool Breakwater before leaving in 1895 for around seven years to build bridges in NSW. Mary Jane was born in 1860 at Cooramook and she attended Mailor’s Flat State School and where she eventually was to become a student teacher. After which she became a governess at “Injemiara” where her grandfather, Francis Freckleton, had once owned land. Henry and Mary’s family consisted of six, some of the children were born at Mailor’s Flat and later some children at Wangoom. They lived with their parents at Wangoom and Purnim west, and this is where Henry died in 1933 and Mary Jane in 1940. A significant item of lead-glazed ceramic with the possibility it was made by the Minton potteries in England who were renowned for making quality pottery. The item style is in all probability a copy of a Chinese liquor bottle that was in common use throughout the British colonies and America up until the mid 20th Century. The Giles family collection has social significance at a local level, because it illustrates the level of material support the Warrnambool community gave to Flagstaff Hill when the Museum was established.Chinese liquor bottle one of a pair, lead glazed ceramic, dark brown and blue/black. Part of the Giles Collection.Mark of a double triangle, apex touching, on base, (Minton mark for 1879).flagstaff hill, warrnambool, shipwrecked coast, flagstaff hill maritime museum, maritime museum, shipwreck coast, flagstaff hill maritime village, great ocean road, vase, pottery, ceramic ornament, domestic ware, late 19th - early 20th centuy ornament, giles collection, henry giles, tower hill, cooramook, warrnambool breakwater, mailor’s flat, wangoom, 19th century household goods -
 Flagstaff Hill Maritime Museum and Village
Ceramic - Floor Tile, circa 1878
... Stoke on Trent, Staffordshire, England ...This Minton floor tile is from the wreck of the Loch Ard and is currently on display in the Great Circle Gallery at Flagstaff Hill. The iron hulled clipper ship from the Loch Line was heading for Port Phillip from London, when it ran into the cliffs of Mutton Bird Island near Port Campbell. The Loch Ard was laden with a high value cargo including luxury goods intended for display at the Melbourne International Exhibition in 1880. One notable survivor from the ship’s freight manifest was the well packed Minton porcelain peacock, a two meter high ceramic masterpiece of vivid glazed colours. (This is also on display in the Great Circle Gallery). The almost total loss of life and property from the Loch Ard registered as a shocking tragedy for the Colony of Victoria, at a time when social confidence and economic optimism were otherwise high. Wealth generated from Gold and Wool was increasingly being spent on grandiose private residences and imposing public buildings. The demand for quality furnishings and fittings was therefore strong. Among the products consigned to burgeoning colonial markets by the Milton pottery at Stoke upon Trent, were their new range of colourfully patterned but very durable floor tiles ideal for the high-traffic spaces in the large civic buildings then being constructed in Australia and America. These new floor tiles were “encaustic”, meaning that their designs and colours were encased “within” the depth of the tile. Rather than their decorative patterns being glazed onto the surface of the tile, their inlaid designs were created during the manufacturing process, as “coloured slips” (or liquid clay) were poured into a deep pre-molded casting. When fired, the resulting tile was colours-fast and design-fast. The Minton floor tile is significant for its hard-wearing yet attractive design. The shipwreck of the Loch Ard is of significance for Victoria and is registered on the Victorian Heritage Register ( S 417). Flagstaff Hill has a varied collection of artefacts from Loch Ard and its collection is significant for being one of the largest accumulations of artefacts from this notable Victorian shipwreck of which the subject items are a small part. The collections of objects give us a snapshot of how we can interpret the story of this tragic event. The collection is also archaeologically significant as it represents aspects of Victoria's shipping history that allows us to interpret Victoria's social and historical themes of the time. Through is associated with the worst and best-known shipwreck in Victoria's history. A square Minton floor tile with a dark brown, beige and white pattern. The tile has a piece broken off along one side and some chipping along the edges. This ‘encaustic’ floor tile was recovered from the shipwreck of the LOCH ARD. Branded "... MINTON&CO Patent ..."flagstaff hill, warrnambool, flagstaff hill maritime museum, shipwreck coast, flagstaff hill maritime village, great ocean road, loch line, loch ard, captain gibbs, eva carmichael, tom pearce, glenample station, mutton bird island, minton floor tile, encaustic tile, melbourne international exhibition, floor tile -
 Flagstaff Hill Maritime Museum and Village
Domestic object - Bowl, J & G Meakin, Late 19th or early 20th Century
... Hanley, Stoke-on-Trent, Staffordshire, England ...The Process of Making Pottery Decorating, Firing, Glazing, Making, Technical There is a rhythm and flow to clay. It can’t be done all at once! Even the making process! It can take weeks to get everything done, especially if you can only work on your pottery once a week! Even though we have three hour classes, it’s often just not enough time! Here is an overview of some of the processes so you have a bit more grasp on some of the technical stuff! Step One – Design There are SO many ideas out there for making stuff in clay! From delicate porcelain jewellery, through to heavy sculptural work and everything in between. Deciding your direction is sometimes not that easy – when you first start, try everything, you will naturally gravitate to the style that you enjoy! The options and variations are endless and can get a wee bit overwhelming too! Check in with me before you start to ensure your ideas will work, what order you might do things, how you could achieve the look you are seeking and any other technical data required! Step Two – Making Clay is thixotropic. This means that as you work with it, the clay first gets sloppier and wetter, before is begins to dry in the atmosphere. For most things, you simply can’t do all parts of the project at once. An example of work order might look like: Get last weeks work out from the shelves Prepare clay for today’s work – roll your clay, prepare balls for throwing, make the first stage of a pinch pot) Clean up last week’s work and put it on the shelf for bisque firing Check that you have any glazing to do – and do enough of it that you will have time to finish your main project Do the next step of your next project – there might be a further step that can’t be complete immediately, in that case, wrap your work well and put onto the shelves. Letting your work rest for a while can really help keep your work clean and professional looking. Many things require bagging under plastic to keep it ready for work the next week – put your name on the outside of the bag so you can find your work easily. We have stickers and markers. Consider how you want to decorate your work – coloured slip can be applied at a fairly wet stage (remembering that it will make your work even wetter!). Trying to apply slip to dry clay won’t work! If you want to do sgraffito – you will need to keep the work leather hard (a state of dryness where you can still work the clay with a little effort and a little water and care). Step Three – Drying Most of the time your work can go into the rack uncovered to let it dry out for the following week. If you want to continue forming or shaping you will need to double bag your work – put your work on a suitable sized bat and put the bat in a bag so the base of the bag is under the bat, then put another bag over the top of the work and tuck the top of the bag under the bat. If you want to trim (or turn) your thrown work the following week, it should also be double bagged. If your work is large, delicate, or of uneven thicknesses, you should lightly cover your work for drying. When considering the drying process, bare in mind the weather, humidity and wind! The hotter and dryer, the faster things dry and work can dry unevenly in the shelves – this can lead to cracking – another time to lightly cover your work for drying. Step Four – Trimming and Cleaning Up Your work is dry! It is called greenware now and it is at it’s most fragile! Handle everything with two hands. I often refer to soft hands – keep everything gentle and with your fingers spread as much as possible. Try to not pick up things like plates too much, and always with both hands! Before your work can be bisque fired it should be “cleaned up”. You work won’t go into the kiln if it has sharp edges – when glazed, sharp edges turn into razor blades! Use a piece of fly wire to rub the work all over – this will scratch a little so be light handed. Use a knife or metal kidney to scrape any areas that require a bit more dynamic treatment than the fly wire offers! Finally, a very light wipe over with a slightly damp sponge can help soften and soothe all of your edges and dags! Trimming thrown work: If you are planning to trim (or turn) your thrown work (and you should be), make sure you bag it well – your work should be leather hard to almost dry for easiest trimming. Use this step to finish the work completely – use a metal kidney to polish the surface, or a slightly damp sponge to give a freshly thrown look. Wipe the sponge around the rim after trimming, and check the inside of the pot for dags! Trimming slip cast work: Usually I will trim the rims of your work on the wheel the following day to make that stage easier, however you will still need to check your work for lumps and bumps. Last but not least – check that your name is still clearly on the bottom of your work. Step Five – Bisque Firing When the work is completely dry it can go into the bisque kiln. The bisque kiln is fired to 1000°C. This process burns off the water in the clay as well as some of the chemically bound water. The structure of the clay is not altered that much at this temperature. Inside the bisque kiln, the work is stacked a little, small bowl inside a larger bowl and onto a heavy plate. Smaller items like decorations or drink coasters might get stacked several high. Consideration is paid to the weight of the stack and shape of the work. A bisque kiln can fire about one and a half times the amount of work that the glaze kiln can fire. The firing takes about 10 hours to complete the cycle and about two days to cool down. Once it has been emptied the work is placed in the glaze room ready for you to decorate! Step Six – Glazing Decorating your work with colour can be a lot of fun – and time consuming! There are three main options for surface treatment at this stage: Oxide Washes Underglazes Glazes Washes and underglazes do not “glaze” the work – It will still need a layer of glaze to fully seal the clay (washes don’t need glaze on surfaces not designed for food or liquid as they can gloss up a little on their own). Underglazes are stable colourants that turn out pretty much how they look in the jar. They can be mixed with each other to form other colours and can be used like water colours to paint onto your work. Mostly they should have a clear glaze on top to seal them. Oxides are a different species – the pink oxide (cobalt) wash turns out bright blue for instance. They don’t always need a glaze on top, and some glazes can change the colour of the wash! The glazes need no other “glaze” on top! Be careful of unknown glaze interactions – you can put any combination of glaze in a bowl or on a plate, but only a single glaze on the outside of any vertical surface! Glazes are a chemical reaction under heat. We don’t know the exact chemicals in the Mayco glazes we use. I can guess by the way they interact with each other, however, on the whole, you need to test every idea you have, and not run the test on a vertical surface! Simply put, glaze is a layer of glass like substance that bonds with the clay underneath. Clay is made of silica, alumina and water. Glaze is made of mostly silica. Silica has a melting point of 1700°C and we fire to 1240°C. The silica requires a “flux” to help it melt at the lower temperature. Fluxes can be all sorts of chemicals – a common one is calcium – calcium has a melting point of 2500°C, however, together they both melt at a much lower temperature! Colourants are metal oxides like cobalt (blue), chrome (green through black), copper (green, blue, even red!), manganese (black, purple and pink) iron (red brown), etc. Different chemicals in the glaze can have dramatic effects. for example, barium carbonate (which we don’t use) turns manganese bright pink! Other elements can turn manganese dioxide brown, blue, purple and reddish brown. Manganese dioxide is a flux in and of itself as well. So, glazes that get their black and purple colours, often interact with other glazes and RUN! Our mirror black is a good example – it mixes really well with many glazes because it fluxes them – causes them to melt faster. It will also bring out many beautiful colours in the glazes because it’s black colouring most definitely comes from manganese dioxide! Glaze chemistry is a whole subject on it’s own! We use commercial Mayco glazes on purpose – for their huge range of colour possibilities, stability, cool interactions, artistic freedom with the ability to easily brush the glazes on and ease of use. We currently have almost 50 glazes on hand! A major project is to test the interactions of all glazes with each other. That is 2,500 test tiles!!!! I’m going to make the wall behind the wheels the feature wall of pretty colours! Step Seven – Glaze (Gloss or sometimes called “Glost”) Firing Most of the time this is the final stage of making your creation (but not always!) The glaze kiln goes to 1240°C. This is called cone 6, or midrange. It is the low end of stoneware temperatures. Stoneware clays and glazes are typically fired at cone 8 – 10, that is 1260 – 1290°C. The energy requirement to go from 1240°C to 1280°C is almost a 30% more! Our clay is formulated to vitrify (mature, turn “glass-like”) at 1240°, as are our glazes. A glaze kiln take around 12 hours to reach temperature and two to three days to cool down. Sometimes a third firing process is required – this is for decoration that is added to work after the glaze firing. For example – adding precious metals and lustres. this firing temperature is usually around 600 – 800°C depending upon the techniques being used. There are many students interested in gold and silver trims – we will be doing this third type of firing soon! After firing your work will be in the student finished work shelves. Remember to pay for it before you head out the door! There is a small extra charge for using porcelain clay (it’s more than twice the price of regular clay), and for any third firing process! Once your work has been fired it can not turn back into clay for millennia – so don’t fire it if you don’t like it! Put it in the bucket for recycling. https://firebirdstudios.com.au/the-process-of-making-pottery/This bowl was made by renowned pottery company J & G Meakin of England. The firm was established in the mid-1800's. The bowl is an example of kitchenware used in the 19th century and still in use today.Bowl; white ceramic, round and tapering inwards towards base. Made by J and G Meakin England.On base, 'Ironstone China Reg SOL 391413' with symbolflagstaff hill, flagstaff hill maritime museum and village, warrnambool, maritime museum, maritime village, great ocean road, shipwreck coast, mixing bowl, food preparation, j & g meakin, pottery, stoke-on-trent, kitchen equipment, ceramic -
 Flagstaff Hill Maritime Museum and Village
Ceramic - Floor Tile, circa 1878
... Stoke on Trent, Staffordshire, England ...This Minton floor tile is from the wreck of the Loch Ard. The iron-hulled clipper ship from the Loch Line was heading for Port Phillip from London, when it ran into the cliffs of Mutton Bird Island near Port Campbell. The Loch Ard was laden with high-value cargo including luxury goods intended for display at the Melbourne International Exhibition in 1880. One notable survivor from the ship’s freight manifest was the well-packed Minton porcelain peacock, a two-meter high ceramic masterpiece of vivid glazed colours. (This is also on display in the Great Circle Gallery). The almost total loss of life and property from the Loch Ard registered as a shocking tragedy for the Colony of Victoria, at a time when social confidence and economic optimism were otherwise high. The wealth generated from Gold and Wool was increasingly being spent on grandiose private residences and imposing public buildings. The demand for quality furnishings and fittings was therefore strong. Among the products consigned to burgeoning colonial markets by the Milton Pottery at Stoke upon Trent, were their new range of colourfully patterned but very durable floor tiles ideal for the high-traffic spaces in the large civic buildings then being constructed in Australia and America. These floor tiles were “encaustic”, meaning that their designs and colours were encased “within” the depth of the tile. Rather than their decorative patterns being glazed onto the surface of the tile, their inlaid designs were created during the manufacturing process, as “coloured slips” (or liquid clay) were poured into a deep pre-moulded casting. When fired, the resulting tile was colour-fast and design-fast. The Minton floor tile is significant for its hard-wearing yet attractive design. The shipwreck of the Loch Ard is of significance for Victoria and is registered on the Victorian Heritage Register ( S 417). Flagstaff Hill has a varied collection of artefacts from Loch Ard and its collection is significant for being one of the largest accumulations of artefacts from this notable Victorian shipwreck of which the subject items are a small part. The collections of objects give us a snapshot of how we can interpret the story of this tragic event. The collection is also archaeologically significant as it represents aspects of Victoria's shipping history that allows us to interpret Victoria's social and historical themes of the time. Through is associated with the worst and best-known shipwreck in Victoria's history. A square Minton floor tile with a white background, and beige, dark blue, light blue and black geometric pattern as well as leaves in the design. The tile has corner broken off and some chipping along the edges. The reverse has five rows of five evenly spaced holes. The back of the tile has inscriptions. Made by Minton & Co. at Stoke upon Trent. This encaustic floor tile was recovered from the shipwreck of the LOCH ARD. Branded "... MINTON&CO / PATENT / STOKE UPON TRENT"flagstaff hill, warrnambool, flagstaff hill maritime museum, shipwreck coast, flagstaff hill maritime village, great ocean road, loch line, loch ard, captain gibbs, eva carmichael, tom pearce, glenample station, mutton bird island, minton floor tile, encaustic tile, melbourne international exhibition, floor tile, minton tile, minton & co., stoke upon trent -
Bright & District Historical Society operating the Bright Museum
Water Jug, E & C Challinor Fenton Potteries, 1862 - 1891
... Stoke-on-Trent, England ...Reconstructed, but incomplete, ceramic water jug. Design of three urns on each side of the jug in green. Ornate pattern in green around the rim.Portland; E & C Challinorwater jug, dunphy's hotel, buckland valley, ceramics, aldo gios, tableware -
 Flagstaff Hill Maritime Museum and Village
Functional object - Step Tread Protector, Russell & Co, 1886
... Greenock Shipyards on River Clyde, Scotland ...The ornate brass step protector was used to protect stair treads and was fitted to the front edge of a tread to minimise wearing of the wooden tread. This item was recovered from the wreck of the Falls of Halladale. The Falls of Halladale was an iron-hulled, four-masted barque, used as a bulk carrier of general cargo. She left New York in August 1908 bound for Melbourne and Sydney. In her hold was general cargo consisting of roofing tiles, barbed wire, stoves, oil, and benzene as well as many other manufactured items. After three months at sea and close to her destination, a navigational error caused the Falls of Halladale to be wrecked on a reef off the Peterborough headland on the 15th of November, 1908. The captain and 29 crew members survived, but her cargo was largely lost, despite two salvage attempts in 1908-09 and 1910. The Court of Marine Inquiry in Melbourne ruled that the foundering of the ship was entirely due to Captain David Wood Thomson's navigational error, not too technical failure of the Clyde-built ship. The Falls of Halladale was built in1886 by Russell & Co., at Greenock shipyards on the River Clyde, Scotland for Wright, Breakenridge & Co of Glasgow. She was one of several designs of Falls Line of ships named after waterfalls in Scotland. The company had been founded between 1870- 1873 as a partnership between Joseph Russell, Anderson Rodger, and William Todd Lithgow. During the period 1882-92 Russell & Co. standardised designs, which sped up their building process so much that they were able to build 271 ships during that time. The Falls of Halladale had a sturdy construction built to carry maximum cargo and was able to maintain full sail in heavy gales, one of the last of the 'windjammers' that sailed the Trade Route. She and her sister ship, the Falls of Garry, were the first ships in the world to include fore and aft lifting bridges. Previous to this, heavily loaded vessels could have heavy seas break along the full length of the deck, causing serious injury or even death to those on deck. The new, raised catwalk-type decking allowed the crew to move above the deck in stormy conditions. The Falls of Halladale shipwreck is listed on the Victorian Heritage (No. S255). She was one of the last ships to sail the Trade Routes from Europe and the Americas. Also of significance is that the vessel was one of the first ships to have fore and aft lifting bridges as a significant safety feature still in use on modern vessels today. The subject model is an example of an International Cargo Ship used during the 19th and early 20th centuries to transport goods around the world and representing aspects of Victoria’s shipping industry. Step tread protector; brass with fancy cutouts. Lower section has screw holes drilled through. Recovered from the wreck of the Falls of Halladale. flagstaff hill, warrnambool, maritime museum, maritime village, great ocean road, shipwreck coast, shipwreck artefact, step tread protector, ship fitting, falls of halladale -
 Flagstaff Hill Maritime Museum and Village
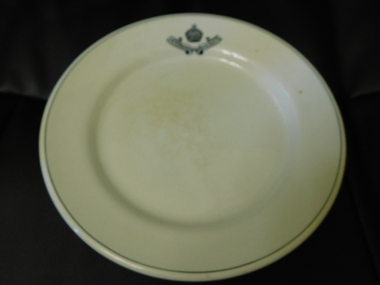
Domestic object - Plate
... Stoke-on-Trent, Staffordshire, UK ...The Process of Making Pottery Decorating, Firing, Glazing, Making, Technical There is a rhythm and flow to clay. It can’t be done all at once! Even the making process! It can take weeks to get everything done, especially if you can only work on your pottery once a week! Even though we have three hour classes, it’s often just not enough time! Here is an overview of some of the processes so you have a bit more grasp on some of the technical stuff! Step One – Design There are SO many ideas out there for making stuff in clay! From delicate porcelain jewellery, through to heavy sculptural work and everything in between. Deciding your direction is sometimes not that easy – when you first start, try everything, you will naturally gravitate to the style that you enjoy! The options and variations are endless and can get a wee bit overwhelming too! Check in with me before you start to ensure your ideas will work, what order you might do things, how you could achieve the look you are seeking and any other technical data required! Step Two – Making Clay is thixotropic. This means that as you work with it, the clay first gets sloppier and wetter, before is begins to dry in the atmosphere. For most things, you simply can’t do all parts of the project at once. An example of work order might look like: Get last weeks work out from the shelves Prepare clay for today’s work – roll your clay, prepare balls for throwing, make the first stage of a pinch pot) Clean up last week’s work and put it on the shelf for bisque firing Check that you have any glazing to do – and do enough of it that you will have time to finish your main project Do the next step of your next project – there might be a further step that can’t be complete immediately, in that case, wrap your work well and put onto the shelves. Letting your work rest for a while can really help keep your work clean and professional looking. Many things require bagging under plastic to keep it ready for work the next week – put your name on the outside of the bag so you can find your work easily. We have stickers and markers. Consider how you want to decorate your work – coloured slip can be applied at a fairly wet stage (remembering that it will make your work even wetter!). Trying to apply slip to dry clay won’t work! If you want to do sgraffito – you will need to keep the work leather hard (a state of dryness where you can still work the clay with a little effort and a little water and care). Step Three – Drying Most of the time your work can go into the rack uncovered to let it dry out for the following week. If you want to continue forming or shaping you will need to double bag your work – put your work on a suitable sized bat and put the bat in a bag so the base of the bag is under the bat, then put another bag over the top of the work and tuck the top of the bag under the bat. If you want to trim (or turn) your thrown work the following week, it should also be double bagged. If your work is large, delicate, or of uneven thicknesses, you should lightly cover your work for drying. When considering the drying process, bare in mind the weather, humidity and wind! The hotter and dryer, the faster things dry and work can dry unevenly in the shelves – this can lead to cracking – another time to lightly cover your work for drying. Step Four – Trimming and Cleaning Up Your work is dry! It is called greenware now and it is at it’s most fragile! Handle everything with two hands. I often refer to soft hands – keep everything gentle and with your fingers spread as much as possible. Try to not pick up things like plates too much, and always with both hands! Before your work can be bisque fired it should be “cleaned up”. You work won’t go into the kiln if it has sharp edges – when glazed, sharp edges turn into razor blades! Use a piece of fly wire to rub the work all over – this will scratch a little so be light handed. Use a knife or metal kidney to scrape any areas that require a bit more dynamic treatment than the fly wire offers! Finally, a very light wipe over with a slightly damp sponge can help soften and soothe all of your edges and dags! Trimming thrown work: If you are planning to trim (or turn) your thrown work (and you should be), make sure you bag it well – your work should be leather hard to almost dry for easiest trimming. Use this step to finish the work completely – use a metal kidney to polish the surface, or a slightly damp sponge to give a freshly thrown look. Wipe the sponge around the rim after trimming, and check the inside of the pot for dags! Trimming slip cast work: Usually I will trim the rims of your work on the wheel the following day to make that stage easier, however you will still need to check your work for lumps and bumps. Last but not least – check that your name is still clearly on the bottom of your work. Step Five – Bisque Firing When the work is completely dry it can go into the bisque kiln. The bisque kiln is fired to 1000°C. This process burns off the water in the clay as well as some of the chemically bound water. The structure of the clay is not altered that much at this temperature. Inside the bisque kiln, the work is stacked a little, small bowl inside a larger bowl and onto a heavy plate. Smaller items like decorations or drink coasters might get stacked several high. Consideration is paid to the weight of the stack and shape of the work. A bisque kiln can fire about one and a half times the amount of work that the glaze kiln can fire. The firing takes about 10 hours to complete the cycle and about two days to cool down. Once it has been emptied the work is placed in the glaze room ready for you to decorate! Step Six – Glazing Decorating your work with colour can be a lot of fun – and time consuming! There are three main options for surface treatment at this stage: Oxide Washes Underglazes Glazes Washes and underglazes do not “glaze” the work – It will still need a layer of glaze to fully seal the clay (washes don’t need glaze on surfaces not designed for food or liquid as they can gloss up a little on their own). Underglazes are stable colourants that turn out pretty much how they look in the jar. They can be mixed with each other to form other colours and can be used like water colours to paint onto your work. Mostly they should have a clear glaze on top to seal them. Oxides are a different species – the pink oxide (cobalt) wash turns out bright blue for instance. They don’t always need a glaze on top, and some glazes can change the colour of the wash! The glazes need no other “glaze” on top! Be careful of unknown glaze interactions – you can put any combination of glaze in a bowl or on a plate, but only a single glaze on the outside of any vertical surface! Glazes are a chemical reaction under heat. We don’t know the exact chemicals in the Mayco glazes we use. I can guess by the way they interact with each other, however, on the whole, you need to test every idea you have, and not run the test on a vertical surface! Simply put, glaze is a layer of glass like substance that bonds with the clay underneath. Clay is made of silica, alumina and water. Glaze is made of mostly silica. Silica has a melting point of 1700°C and we fire to 1240°C. The silica requires a “flux” to help it melt at the lower temperature. Fluxes can be all sorts of chemicals – a common one is calcium – calcium has a melting point of 2500°C, however, together they both melt at a much lower temperature! Colourants are metal oxides like cobalt (blue), chrome (green through black), copper (green, blue, even red!), manganese (black, purple and pink) iron (red brown), etc. Different chemicals in the glaze can have dramatic effects. for example, barium carbonate (which we don’t use) turns manganese bright pink! Other elements can turn manganese dioxide brown, blue, purple and reddish brown. Manganese dioxide is a flux in and of itself as well. So, glazes that get their black and purple colours, often interact with other glazes and RUN! Our mirror black is a good example – it mixes really well with many glazes because it fluxes them – causes them to melt faster. It will also bring out many beautiful colours in the glazes because it’s black colouring most definitely comes from manganese dioxide! Glaze chemistry is a whole subject on it’s own! We use commercial Mayco glazes on purpose – for their huge range of colour possibilities, stability, cool interactions, artistic freedom with the ability to easily brush the glazes on and ease of use. We currently have almost 50 glazes on hand! A major project is to test the interactions of all glazes with each other. That is 2,500 test tiles!!!! I’m going to make the wall behind the wheels the feature wall of pretty colours! Step Seven – Glaze (Gloss or sometimes called “Glost”) Firing Most of the time this is the final stage of making your creation (but not always!) The glaze kiln goes to 1240°C. This is called cone 6, or midrange. It is the low end of stoneware temperatures. Stoneware clays and glazes are typically fired at cone 8 – 10, that is 1260 – 1290°C. The energy requirement to go from 1240°C to 1280°C is almost a 30% more! Our clay is formulated to vitrify (mature, turn “glass-like”) at 1240°, as are our glazes. A glaze kiln take around 12 hours to reach temperature and two to three days to cool down. Sometimes a third firing process is required – this is for decoration that is added to work after the glaze firing. For example – adding precious metals and lustres. this firing temperature is usually around 600 – 800°C depending upon the techniques being used. There are many students interested in gold and silver trims – we will be doing this third type of firing soon! After firing your work will be in the student finished work shelves. Remember to pay for it before you head out the door! There is a small extra charge for using porcelain clay (it’s more than twice the price of regular clay), and for any third firing process! Once your work has been fired it can not turn back into clay for millennia – so don’t fire it if you don’t like it! Put it in the bucket for recycling. https://firebirdstudios.com.au/the-process-of-making-pottery/Ceramics have evolved over thousands of years.White earthenware dinner plate. Crazing evident all over.Backstamped ‘Made in England S LTD’flagstaff hill, warrnambool, shipwrecked-coast, flagstaff-hill, flagstaff-hill-maritime-museum, maritime-museum, shipwreck-coast, flagstaff-hill-maritime-village, ceramics, tableware -
 Flagstaff Hill Maritime Museum and Village
Domestic object - Plate, Johnson Bros
... Stoke-on-Trent, Staffordshire, UK ...The Process of Making Pottery Decorating, Firing, Glazing, Making, Technical There is a rhythm and flow to clay. It can’t be done all at once! Even the making process! It can take weeks to get everything done, especially if you can only work on your pottery once a week! Even though we have three hour classes, it’s often just not enough time! Here is an overview of some of the processes so you have a bit more grasp on some of the technical stuff! Step One – Design There are SO many ideas out there for making stuff in clay! From delicate porcelain jewellery, through to heavy sculptural work and everything in between. Deciding your direction is sometimes not that easy – when you first start, try everything, you will naturally gravitate to the style that you enjoy! The options and variations are endless and can get a wee bit overwhelming too! Check in with me before you start to ensure your ideas will work, what order you might do things, how you could achieve the look you are seeking and any other technical data required! Step Two – Making Clay is thixotropic. This means that as you work with it, the clay first gets sloppier and wetter, before is begins to dry in the atmosphere. For most things, you simply can’t do all parts of the project at once. An example of work order might look like: Get last weeks work out from the shelves Prepare clay for today’s work – roll your clay, prepare balls for throwing, make the first stage of a pinch pot) Clean up last week’s work and put it on the shelf for bisque firing Check that you have any glazing to do – and do enough of it that you will have time to finish your main project Do the next step of your next project – there might be a further step that can’t be complete immediately, in that case, wrap your work well and put onto the shelves. Letting your work rest for a while can really help keep your work clean and professional looking. Many things require bagging under plastic to keep it ready for work the next week – put your name on the outside of the bag so you can find your work easily. We have stickers and markers. Consider how you want to decorate your work – coloured slip can be applied at a fairly wet stage (remembering that it will make your work even wetter!). Trying to apply slip to dry clay won’t work! If you want to do sgraffito – you will need to keep the work leather hard (a state of dryness where you can still work the clay with a little effort and a little water and care). Step Three – Drying Most of the time your work can go into the rack uncovered to let it dry out for the following week. If you want to continue forming or shaping you will need to double bag your work – put your work on a suitable sized bat and put the bat in a bag so the base of the bag is under the bat, then put another bag over the top of the work and tuck the top of the bag under the bat. If you want to trim (or turn) your thrown work the following week, it should also be double bagged. If your work is large, delicate, or of uneven thicknesses, you should lightly cover your work for drying. When considering the drying process, bare in mind the weather, humidity and wind! The hotter and dryer, the faster things dry and work can dry unevenly in the shelves – this can lead to cracking – another time to lightly cover your work for drying. Step Four – Trimming and Cleaning Up Your work is dry! It is called greenware now and it is at it’s most fragile! Handle everything with two hands. I often refer to soft hands – keep everything gentle and with your fingers spread as much as possible. Try to not pick up things like plates too much, and always with both hands! Before your work can be bisque fired it should be “cleaned up”. You work won’t go into the kiln if it has sharp edges – when glazed, sharp edges turn into razor blades! Use a piece of fly wire to rub the work all over – this will scratch a little so be light handed. Use a knife or metal kidney to scrape any areas that require a bit more dynamic treatment than the fly wire offers! Finally, a very light wipe over with a slightly damp sponge can help soften and soothe all of your edges and dags! Trimming thrown work: If you are planning to trim (or turn) your thrown work (and you should be), make sure you bag it well – your work should be leather hard to almost dry for easiest trimming. Use this step to finish the work completely – use a metal kidney to polish the surface, or a slightly damp sponge to give a freshly thrown look. Wipe the sponge around the rim after trimming, and check the inside of the pot for dags! Trimming slip cast work: Usually I will trim the rims of your work on the wheel the following day to make that stage easier, however you will still need to check your work for lumps and bumps. Last but not least – check that your name is still clearly on the bottom of your work. Step Five – Bisque Firing When the work is completely dry it can go into the bisque kiln. The bisque kiln is fired to 1000°C. This process burns off the water in the clay as well as some of the chemically bound water. The structure of the clay is not altered that much at this temperature. Inside the bisque kiln, the work is stacked a little, small bowl inside a larger bowl and onto a heavy plate. Smaller items like decorations or drink coasters might get stacked several high. Consideration is paid to the weight of the stack and shape of the work. A bisque kiln can fire about one and a half times the amount of work that the glaze kiln can fire. The firing takes about 10 hours to complete the cycle and about two days to cool down. Once it has been emptied the work is placed in the glaze room ready for you to decorate! Step Six – Glazing Decorating your work with colour can be a lot of fun – and time consuming! There are three main options for surface treatment at this stage: Oxide Washes Underglazes Glazes Washes and underglazes do not “glaze” the work – It will still need a layer of glaze to fully seal the clay (washes don’t need glaze on surfaces not designed for food or liquid as they can gloss up a little on their own). Underglazes are stable colourants that turn out pretty much how they look in the jar. They can be mixed with each other to form other colours and can be used like water colours to paint onto your work. Mostly they should have a clear glaze on top to seal them. Oxides are a different species – the pink oxide (cobalt) wash turns out bright blue for instance. They don’t always need a glaze on top, and some glazes can change the colour of the wash! The glazes need no other “glaze” on top! Be careful of unknown glaze interactions – you can put any combination of glaze in a bowl or on a plate, but only a single glaze on the outside of any vertical surface! Glazes are a chemical reaction under heat. We don’t know the exact chemicals in the Mayco glazes we use. I can guess by the way they interact with each other, however, on the whole, you need to test every idea you have, and not run the test on a vertical surface! Simply put, glaze is a layer of glass like substance that bonds with the clay underneath. Clay is made of silica, alumina and water. Glaze is made of mostly silica. Silica has a melting point of 1700°C and we fire to 1240°C. The silica requires a “flux” to help it melt at the lower temperature. Fluxes can be all sorts of chemicals – a common one is calcium – calcium has a melting point of 2500°C, however, together they both melt at a much lower temperature! Colourants are metal oxides like cobalt (blue), chrome (green through black), copper (green, blue, even red!), manganese (black, purple and pink) iron (red brown), etc. Different chemicals in the glaze can have dramatic effects. for example, barium carbonate (which we don’t use) turns manganese bright pink! Other elements can turn manganese dioxide brown, blue, purple and reddish brown. Manganese dioxide is a flux in and of itself as well. So, glazes that get their black and purple colours, often interact with other glazes and RUN! Our mirror black is a good example – it mixes really well with many glazes because it fluxes them – causes them to melt faster. It will also bring out many beautiful colours in the glazes because it’s black colouring most definitely comes from manganese dioxide! Glaze chemistry is a whole subject on it’s own! We use commercial Mayco glazes on purpose – for their huge range of colour possibilities, stability, cool interactions, artistic freedom with the ability to easily brush the glazes on and ease of use. We currently have almost 50 glazes on hand! A major project is to test the interactions of all glazes with each other. That is 2,500 test tiles!!!! I’m going to make the wall behind the wheels the feature wall of pretty colours! Step Seven – Glaze (Gloss or sometimes called “Glost”) Firing Most of the time this is the final stage of making your creation (but not always!) The glaze kiln goes to 1240°C. This is called cone 6, or midrange. It is the low end of stoneware temperatures. Stoneware clays and glazes are typically fired at cone 8 – 10, that is 1260 – 1290°C. The energy requirement to go from 1240°C to 1280°C is almost a 30% more! Our clay is formulated to vitrify (mature, turn “glass-like”) at 1240°, as are our glazes. A glaze kiln take around 12 hours to reach temperature and two to three days to cool down. Sometimes a third firing process is required – this is for decoration that is added to work after the glaze firing. For example – adding precious metals and lustres. this firing temperature is usually around 600 – 800°C depending upon the techniques being used. There are many students interested in gold and silver trims – we will be doing this third type of firing soon! After firing your work will be in the student finished work shelves. Remember to pay for it before you head out the door! There is a small extra charge for using porcelain clay (it’s more than twice the price of regular clay), and for any third firing process! Once your work has been fired it can not turn back into clay for millennia – so don’t fire it if you don’t like it! Put it in the bucket for recycling. https://firebirdstudios.com.au/the-process-of-making-pottery/Ceramics have evolved over thousands of years.A white earthenware side plate with a gadroon edge. Has water marks and chips on front.‘Johnson Bros England Reg No 15587’flagstaff hill, warrnambool, shipwrecked-coast, flagstaff-hill, flagstaff-hill-maritime-museum, maritime-museum, shipwreck-coast, flagstaff-hill-maritime-village, johnson bros, ceramics, tableware -
 Flagstaff Hill Maritime Museum and Village
Domestic object - Plate, Alfred Meakin
... Stoke-on-Trent, Staffordshire, UK ...The Process of Making Pottery Decorating, Firing, Glazing, Making, Technical There is a rhythm and flow to clay. It can’t be done all at once! Even the making process! It can take weeks to get everything done, especially if you can only work on your pottery once a week! Even though we have three hour classes, it’s often just not enough time! Here is an overview of some of the processes so you have a bit more grasp on some of the technical stuff! Step One – Design There are SO many ideas out there for making stuff in clay! From delicate porcelain jewellery, through to heavy sculptural work and everything in between. Deciding your direction is sometimes not that easy – when you first start, try everything, you will naturally gravitate to the style that you enjoy! The options and variations are endless and can get a wee bit overwhelming too! Check in with me before you start to ensure your ideas will work, what order you might do things, how you could achieve the look you are seeking and any other technical data required! Step Two – Making Clay is thixotropic. This means that as you work with it, the clay first gets sloppier and wetter, before is begins to dry in the atmosphere. For most things, you simply can’t do all parts of the project at once. An example of work order might look like: Get last weeks work out from the shelves Prepare clay for today’s work – roll your clay, prepare balls for throwing, make the first stage of a pinch pot) Clean up last week’s work and put it on the shelf for bisque firing Check that you have any glazing to do – and do enough of it that you will have time to finish your main project Do the next step of your next project – there might be a further step that can’t be complete immediately, in that case, wrap your work well and put onto the shelves. Letting your work rest for a while can really help keep your work clean and professional looking. Many things require bagging under plastic to keep it ready for work the next week – put your name on the outside of the bag so you can find your work easily. We have stickers and markers. Consider how you want to decorate your work – coloured slip can be applied at a fairly wet stage (remembering that it will make your work even wetter!). Trying to apply slip to dry clay won’t work! If you want to do sgraffito – you will need to keep the work leather hard (a state of dryness where you can still work the clay with a little effort and a little water and care). Step Three – Drying Most of the time your work can go into the rack uncovered to let it dry out for the following week. If you want to continue forming or shaping you will need to double bag your work – put your work on a suitable sized bat and put the bat in a bag so the base of the bag is under the bat, then put another bag over the top of the work and tuck the top of the bag under the bat. If you want to trim (or turn) your thrown work the following week, it should also be double bagged. If your work is large, delicate, or of uneven thicknesses, you should lightly cover your work for drying. When considering the drying process, bare in mind the weather, humidity and wind! The hotter and dryer, the faster things dry and work can dry unevenly in the shelves – this can lead to cracking – another time to lightly cover your work for drying. Step Four – Trimming and Cleaning Up Your work is dry! It is called greenware now and it is at it’s most fragile! Handle everything with two hands. I often refer to soft hands – keep everything gentle and with your fingers spread as much as possible. Try to not pick up things like plates too much, and always with both hands! Before your work can be bisque fired it should be “cleaned up”. You work won’t go into the kiln if it has sharp edges – when glazed, sharp edges turn into razor blades! Use a piece of fly wire to rub the work all over – this will scratch a little so be light handed. Use a knife or metal kidney to scrape any areas that require a bit more dynamic treatment than the fly wire offers! Finally, a very light wipe over with a slightly damp sponge can help soften and soothe all of your edges and dags! Trimming thrown work: If you are planning to trim (or turn) your thrown work (and you should be), make sure you bag it well – your work should be leather hard to almost dry for easiest trimming. Use this step to finish the work completely – use a metal kidney to polish the surface, or a slightly damp sponge to give a freshly thrown look. Wipe the sponge around the rim after trimming, and check the inside of the pot for dags! Trimming slip cast work: Usually I will trim the rims of your work on the wheel the following day to make that stage easier, however you will still need to check your work for lumps and bumps. Last but not least – check that your name is still clearly on the bottom of your work. Step Five – Bisque Firing When the work is completely dry it can go into the bisque kiln. The bisque kiln is fired to 1000°C. This process burns off the water in the clay as well as some of the chemically bound water. The structure of the clay is not altered that much at this temperature. Inside the bisque kiln, the work is stacked a little, small bowl inside a larger bowl and onto a heavy plate. Smaller items like decorations or drink coasters might get stacked several high. Consideration is paid to the weight of the stack and shape of the work. A bisque kiln can fire about one and a half times the amount of work that the glaze kiln can fire. The firing takes about 10 hours to complete the cycle and about two days to cool down. Once it has been emptied the work is placed in the glaze room ready for you to decorate! Step Six – Glazing Decorating your work with colour can be a lot of fun – and time consuming! There are three main options for surface treatment at this stage: Oxide Washes Underglazes Glazes Washes and underglazes do not “glaze” the work – It will still need a layer of glaze to fully seal the clay (washes don’t need glaze on surfaces not designed for food or liquid as they can gloss up a little on their own). Underglazes are stable colourants that turn out pretty much how they look in the jar. They can be mixed with each other to form other colours and can be used like water colours to paint onto your work. Mostly they should have a clear glaze on top to seal them. Oxides are a different species – the pink oxide (cobalt) wash turns out bright blue for instance. They don’t always need a glaze on top, and some glazes can change the colour of the wash! The glazes need no other “glaze” on top! Be careful of unknown glaze interactions – you can put any combination of glaze in a bowl or on a plate, but only a single glaze on the outside of any vertical surface! Glazes are a chemical reaction under heat. We don’t know the exact chemicals in the Mayco glazes we use. I can guess by the way they interact with each other, however, on the whole, you need to test every idea you have, and not run the test on a vertical surface! Simply put, glaze is a layer of glass like substance that bonds with the clay underneath. Clay is made of silica, alumina and water. Glaze is made of mostly silica. Silica has a melting point of 1700°C and we fire to 1240°C. The silica requires a “flux” to help it melt at the lower temperature. Fluxes can be all sorts of chemicals – a common one is calcium – calcium has a melting point of 2500°C, however, together they both melt at a much lower temperature! Colourants are metal oxides like cobalt (blue), chrome (green through black), copper (green, blue, even red!), manganese (black, purple and pink) iron (red brown), etc. Different chemicals in the glaze can have dramatic effects. for example, barium carbonate (which we don’t use) turns manganese bright pink! Other elements can turn manganese dioxide brown, blue, purple and reddish brown. Manganese dioxide is a flux in and of itself as well. So, glazes that get their black and purple colours, often interact with other glazes and RUN! Our mirror black is a good example – it mixes really well with many glazes because it fluxes them – causes them to melt faster. It will also bring out many beautiful colours in the glazes because it’s black colouring most definitely comes from manganese dioxide! Glaze chemistry is a whole subject on it’s own! We use commercial Mayco glazes on purpose – for their huge range of colour possibilities, stability, cool interactions, artistic freedom with the ability to easily brush the glazes on and ease of use. We currently have almost 50 glazes on hand! A major project is to test the interactions of all glazes with each other. That is 2,500 test tiles!!!! I’m going to make the wall behind the wheels the feature wall of pretty colours! Step Seven – Glaze (Gloss or sometimes called “Glost”) Firing Most of the time this is the final stage of making your creation (but not always!) The glaze kiln goes to 1240°C. This is called cone 6, or midrange. It is the low end of stoneware temperatures. Stoneware clays and glazes are typically fired at cone 8 – 10, that is 1260 – 1290°C. The energy requirement to go from 1240°C to 1280°C is almost a 30% more! Our clay is formulated to vitrify (mature, turn “glass-like”) at 1240°, as are our glazes. A glaze kiln take around 12 hours to reach temperature and two to three days to cool down. Sometimes a third firing process is required – this is for decoration that is added to work after the glaze firing. For example – adding precious metals and lustres. this firing temperature is usually around 600 – 800°C depending upon the techniques being used. There are many students interested in gold and silver trims – we will be doing this third type of firing soon! After firing your work will be in the student finished work shelves. Remember to pay for it before you head out the door! There is a small extra charge for using porcelain clay (it’s more than twice the price of regular clay), and for any third firing process! Once your work has been fired it can not turn back into clay for millennia – so don’t fire it if you don’t like it! Put it in the bucket for recycling. https://firebirdstudios.com.au/the-process-of-making-pottery/Ceramics have evolved over thousands of years.Earthenware dessert plate, cream colour. Made by Alfred Meakin, England. Backstamped ‘Alfred Meakin England’. flagstaff hill, warrnambool, shipwrecked-coast, flagstaff-hill, flagstaff-hill-maritime-museum, maritime-museum, shipwreck-coast, flagstaff-hill-maritime-village, alfred meakin, ceramics, earthenware, kitchenware -
 City of Moorabbin Historical Society (Operating the Box Cottage Museum)
Ornaments, 'Carlton Ware' Heron / Egret, c1890 - c1930
... Stoke -on-Trent, England ...Carlton Ware was a famous Stoke-on-Trent based pottery manufacturer. The company was established in 1890 by James Frederick Wiltshaw, William Herbert Robinson and James Alcock Robinson trading under the name of Wiltshaw and Robinson. The trademark "Carlton Ware" was introduced in 1894, and the company's factory was renamed the Carlton Works. It reached its artistic high-point with superb hand-painted domestic pottery in high art deco styles during the 1920s and 1930.A china ornament representing a Heron or Egret'Carltonware'pottery, porcelain, craftwork, carlton ware, stoke on trent, wiltshaw james frederick, robinson william herbert, robinson james alcock, herron john, bentleigh, moorabbin, ormond, ornaments, early settlers -
 Puffing Billy Railway
Railway Mine and Plantation (RMP) 0-6-0 Diesel Mechanical Locomotive 2' Gauge - "LI'L TOOT", 1951
... Uxbridge Street, Burton-on-Trent, England ...Builders Number 3354 Build for Inkerman Mill Queensland in 1951 Displayed at the British Industrial Fair at Castle Bromwich, England 1951 prior to delivery to Australia Weight: 10 Tons Known at Inkerman mill as "LI'L TOOT" Major Ernest E. Baguley (1863–1948) was a British engineer.- In the years leading up to the First World War, Baguley served in the Territorial Army and became Second-in-Command, 6th Battalion, North Staffordshire Regiment, rising to the rank of Major. He served in France from 1914 to 1915. Baguley (Engineers) Ltd After the War there was a decline in the production of road vehicles (probably due to competition from other manufacturers) and an increase in the production of railway equipment. The name of the company was changed from Baguley Cars Ltd to Baguley (Engineers) Ltd on 10 April 1923. Following a dispute with their partners Drewry Cars. Ltd, Baguley (Engineers) Ltd went into decline and entered liquidation in 1931. Most of the plant and effects, including Major Baguley's own Baguley car, were sold at auction on 10 November 1931. E. E. Baguley Ltd Major Baguley was a great survivor of WW1 and, he set up a small repair business for Baguley products at Clarence Street, Burton-on-Trent. A new company, E. E. Baguley Ltd, was registered on 30 April 1932 and was soon building locomotives again. In 1934 E. E. Baguley Ltd moved to larger premises at Uxbridge Street, Burton-on-Trent. The company merged with Drewry to form Baguley-Drewry Ltd in 1962.Historic - Industrial Narrow Gauge Railway Diesel Mechanical Locomotive - Pioneer Sugar Mills - Inkerman Sugar Mill, Home Hill, Queensland, AustraliaRail Mine and Plantation (RMP) 0-6-0 Diesel Mechanical 2' Gauge - " LI'L TOOT " Builders Number 3354 Steel (Painted)RMP / 3354 "LI'L TOOT"rmp, diesel, mechanical, locomotive, 2', 2' gauge, puffing billy, inkerman, li'l toot, industrial narrow gauge railway, e. e. baguley ltd, pioneer sugar mills - inkerman sugar mill, rail mine and plantation (rmp) -
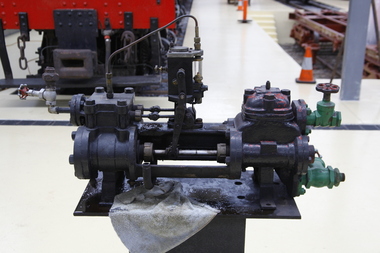 Puffing Billy Railway
Steam Pump, Worthington - Simpson steam driven pump, circa 1917
... Newark-on-Trent , Nottinghamshire, England ...Worthington Steam Pump This type of horizontal duplex steam pump was most commonly made by Worthington-Simpson Ltd., England. It was really two double-acting pumps placed side by side. Worthington pumps of this size would feed a small boiler with water whilst larger similar pumps up to six feet long would be used to pump bulk liquids. This type of horizontal duplex steam pump was most commonly made by Worthington-Simpson Ltd., England. It was really two double-acting pumps placed side by side. Worthington pumps of this size would feed a small boiler with water whilst larger similar pumps up to six feet long would be used to pump bulk liquids.Historic - horizontal duplex steam pump made by Worthington - SimpsonSteam Pump made of Steel, bronzeWorthington-Simson ltd Newark-on-trent England No 5073449 Size 4 1/2 x 2 3/4 x 4puffing billy, worthington steam pump, worthington - simpson -
 Puffing Billy Railway
Bread Plate, Victorian Railways Black & White, June 1953 "6-53" = "month-year"
... Tunstall, Stoke-on-Trent, England ...Victorian Railways Bread Plate - Black & White Maker : W H Grindley & Co (Ltd) Earthenware manufacturer at the Newfield Pottery and then the Woodfield Pottery, Tunstall, Stoke-on-Trent The company was founded at the Newfield Pottery in 1880 by William Harry Grindley (princliple partner) and Mr Turner (the '& Co.') They produced Earthenware and Ironstone China - particularly for the Canadian, United States, South American and Australian markets. In 1891 the company moved to the Woodfield Pottery, Woodland Street, Tunstall. In 1960 the business was purchased by Alfred Clough Ltd. In 1978 renamed Grindley of Stoke (ceramics) Ltd. Federated Potteries Co. Ltd. took them over in 1982 and in 1988 the business was re-purchase by W. H. Grindley. 1991 saw the company in the hands of the receivers. and the same year they were taken over by Woodlands Pottery. DURALINE (trade mark) printed mark used by Grindley Hotel Ware Co Ltd c.1930's onwards The Number i.e "6-53" = "month-year" Supplier to Victorian railways : Loftus Moran, Melbourne: Mr Loftus Henry Moran was well known in the tea trade. Originally employed by Griffiths Bros Ltd, he started his own business, Loftus Moran Pty Ltd, in 1909 In 1913 he purchased the tea business of Mcintyre Bros, and later' that of Steele Bros, and absorbed them in his own company. He had a wide business connection among hotels and guest houses for supplying crockery and other supplies. Ref: DEATH OF MR LOFTUS MORAN (1944, May 27). The Argus (Melbourne, Vic. : 1848 - 1957), p. 4. http://nla.gov.au/nla.news-article11809686 1st Advertisement of the Plates in the papers: CHIPPED CROCKERY. Nothing is more objectionable than chipped crockery--besides its use is illegal. DURALINE Plates, manufactured by The Grindley Hotel Ware Co., are tough as raw-hide. This is why they are used by practically every hotel and institution in Australia. Obtainable only from LOFTUS MORAN PTY. LTD., Hotel Supply Specialists, 131 Queen's Bridge Street, Melbourne South Advertising (29 March 1933, ). The Argus (Melbourne, Vic. ), p. 7. http://nla.gov.au/nla.news-article4726734Historic - Victorian Railways - Refreashment Services crockery - plateceramic Victorian Railways Bread Plate - Black & White Victorian Railways ( in black on fount of plate ) "DURALINE" ( in Black on back of plate ) super Vitrified GRINDLEY HotelWare Co England Loftus Moran Pty Ld Melbourne 8 -53puffing billy, victorian railways, crockery, plate -
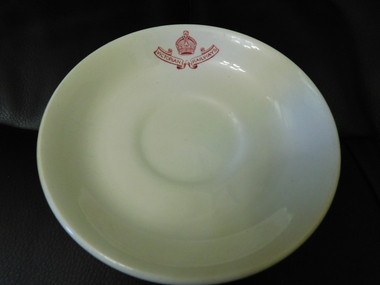 Puffing Billy Railway
Victorian Railways Saucer Plate, May 1954 "5-54" = "month-year"
... Tunstall, Stoke-on-Trent, , England ...Victorian Railways Saucer Plate - Red & White Supplier to Victorian railways : Loftus Moran, Melbourne: Mr Loftus Henry Moran was well known in the tea trade. Originally employed by Griffiths Bros Ltd, he started his own business, Loftus Moran Pty Ltd, in 1909 In 1913 he purchased the tea business of McIntyre Bros, and later, that of Steele Bros, and absorbed them in his own company. He had a wide business connection among hotels and guest houses for supplying crockery and other supplies. Ref: DEATH OF MR LOFTUS MORAN (1944, May 27). The Argus (Melbourne, Vic. : 1848 - 1957), p. 4. http://nla.gov.au/nla.news-article11809686 1st Advertisement of the Plates in the papers: CHIPPED CROCKERY. Nothing is more objectionable than chipped crockery--besides its use is illegal. DURALINE Plates, manufactured by The Grindley Hotel Ware Co., are tough as raw-hide. This is why they are used by practically every hotel and institution in Australia. Obtainable only from LOFTUS MORAN PTY. LTD., Hotel Supply Specialists, 131 Queen's Bridge Street, Melbourne South Advertising (29 March 1933, ). The Argus (Melbourne, Vic. ), p. 7. http://nla.gov.au/nla.news-article4726734Historic - Victorian Railways - Refreshment Services crockery - plateCeramic Victorian Railways Saucer Plate - Red & White Victorian Railways ( in Red on fount of plate ) "DURALINE" ( in Black on back of plate ) super Vitrified GRINDLEY HotelWare Co England Loftus Moran Pty Ld Melbourne 5 -54 puffing billy, victorian railways, crockery, plate -
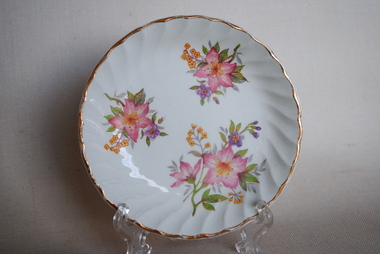 Anglesea and District Historical Society
Pin Dish, Swinnertons, 1950's
... Hanley Stoke-on-Trent, Staffordshire, England ...Small dish with flutter edging with pink flowers.SWINNERTONS / STAFFORDSHIRE / MADE IN ENGLANDpin dish, swinnertons -
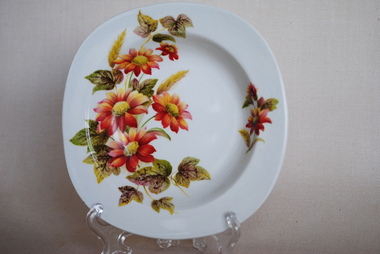 Anglesea and District Historical Society
Bowl, Alfred Meakin (Tunstall) Ltd, Royal Albert & Newfield Potteries
... Tunstall, Stoke-on-Trent, Staffordshire, England ...Small bowl-dish with rim. Brown daisy pattern.Glo-White-Ironstone / crown symbol / Alfred Meakin / Englandplate, bowl, meakin -
 Anglesea and District Historical Society
Souvenir Plate, Estimated 1937
... Stoke on Trent, England ...Souvenir plate commemorating Coronation May 12, 1937 of King George 6th and Queen Elizabeth - crowned in Westminster Abbey. Cream china plate with British Coat of Arms. Names of King George 6th and Queen Elizabeth in red on gold background around edge with "Crowned May 12 1937'".Royal Crest - By appointment. A Perpetual Souvenir in Paragon China to commemorate the Coronation of their majesties King George 6th and Queen Elizabeth crowned in Westminster Abbey May 12 1937. Registered and copyright. Made in England.plate, coronation 1937 souvenir -
 Anglesea and District Historical Society
Electric Shaver, Arvin Electric Ltd, Estimated 1951
... Fernbrook Avenue, Southend-on-Sea, Essex, England, United ...Electric shaver in ivory-coloured plastic casing with stainless steel head and metal terminal encasing wiring. Three-point plug attached.Front: ARVIN / DE LUXE / AC / DC/ 15W Reverse: MANUFACTURED IN / ENGLAND / PAT No. 524412 / OTHER PATS PENDelectric shaver, arvin -
Anglesea and District Historical Society
Plate, J & G Meakin, Eagle & Eastwood Pottery Works, 'LILAC' PLATE, 1912
... Hanley, Stoke-on-Trent, England, United Kingdom ...Basically square with indented corners. "Lilac" trees and sprigs. Green edging.Regd. SOL - 391413 / J & G MEAKIN ENGLAND / (Unreadable bottom line)meakin, plate -
 Anglesea and District Historical Society
Queen Elizabeth II Coronation Souvenir Mugs, 1953
... Keele Street, Stoke-on-Trent, England, United Kingdom ...Pair of Keele Street Pottery souvenir mugs of 1953 coronation of Queen Elizabeth 2. 1. One cream mug with gold trim. 2. One pale green mug with dark green trim.Marked "ENGLAND KSP" on base with "M" on base of cream mug.keele street pottery, coronation mug, queen elizabeth 2 -
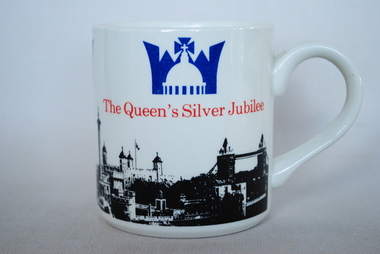 Anglesea and District Historical Society
Ironstone Mug, Ironstone Mug in celebration of HM Queen Elizabeth 2 - 1952-1977, Estimated 1977
... Stoke-on-Trent, England, United Kingdom ...Souvenir mug in white ironstone with black painting of London scenes headed "London Celebrations 1977" on one side and "The Queen's Silver Jubilee" on the other. Card attached with list of dates and occurrences in the Queen's life from 21 April 1925 to 14 November 1973.Stamp of "ADAMS - Real English Ironstone. Made in England. / Established 1657" - on bottom of mug.queen elizabeth 2, silver jubilee souvenir, ironstone mug