Showing 583 items
matching route 4
-
 Bendigo Historical Society Inc.
Map - BENDIGO BUS ROUTES, 1934 - 1958 ?
Map: Bendigo bus Routes, State Electricity Commission of Victoria, Electricity Supply Department. Printed on the bottom right hand corner F.E.B 23-12-47 , R.L.A. 5-9-58, 19-9-34, 27-11-37. 4 Mapsmap, bendigo, transport, state electricity commission, bendigo bus routes -
 Wangaratta RSL Sub Branch
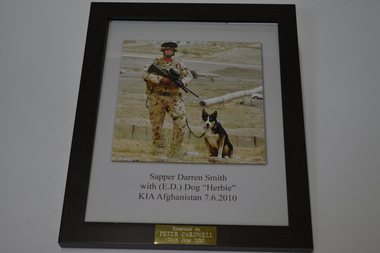
Memorabilia - Framed photograph, Sapper Darren Smith
Sapper Darren Smith was born in Adelaide, South Australia in November 1984. Darren enlisted into the Australian Army Reserve in November 2001 and subsequently transferred to the Australian Regular Army in October 2004. After five years service in the Royal Australian Engineers, Darren deployed to Afghanistan in March 2010 while posted to the 2nd Combat Engineer Regiment. Darren was involved in a route clearance task ahead of an Australian patrol in the Mirabad Valley on 7th June 2010. He and his Explosive Detection Dog ‘Herbie’, a 3-1/2 year old Collie Cross. were inspecting a suspected improvised explosive device when it was detonated by insurgents. Darren and Herbie were both Killed In Action by the blast.Sapper Darren SMITH and Army explosive detection dog "Herbie" were killed in action in Afghanistan in 2010.Brown timber frame containing reproduced photograph of armed soldier and dogSapper Darren Smith with (E.D.) Dog "Herbie" KIA Afghanistan 7.6.2010 darren smith, afghanistan, "herbie", australian army -
 Tatura Irrigation & Wartime Camps Museum
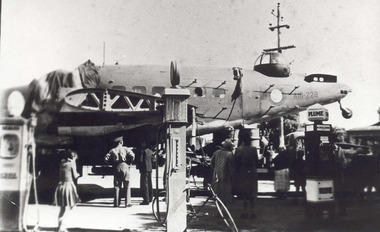
Photograph, Liberator
This dismantled allied bomber "Liberator" crashed at Waranga Basin after flying low over Camps 3 & 4. Photograph taken at the garage, corner Hogan and Ross Streets on route to Tocumwal for repairs. Foam backed copy in file.Black and white photographallied bomber, liberator, waranga basin, aeroplane, plane, crashed plane, tatura crashed plane, waranga plane -
Tatura Irrigation & Wartime Camps Museum
Photograph, Tatura Firsts Scouts
Tatura Firsts Scouts at Frankston Jamboree, January 1935.|Photo 1.Thelma Holden; Eilleen Buckley; Re. Charles Patmore; Isobel Maskell.|Photo 2. James Crawford, Patrol Leader.|Photo 3. En route; Len Mills seated on suitcase.|Photo 4. Les Seaborn, Scout Master, in long white socks.|Photo 5. Les Seaborn in full uniform.photograph, people -
 Victorian Aboriginal Corporation for Languages
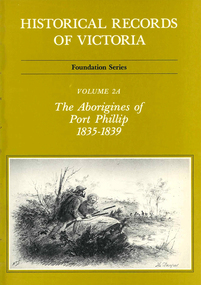
Book, Ian Macfarlane, Historical records of Victoria : foundation series : volume 2A : the Aborigines of Port Phillip 1835-1839, 1982
Reproductions of various transactions and reports dealing with Aboriginal people in Port Phillip in the period 1835-39, beginning with some of the earliest reports and tracing the evolution of government interaction and policy towards Aborigines in the 19th century. Covers mission work, government reports, the native police, conflicts with squatters, with numerous illustrations and original reports. Contents: Part I, Evolution of British policy Ch. 1. Proposals to appoint protectors of aborigines Ch. 2. Racial conflict in the year of official settlement at Port Phillip Ch. 3. House of Commons Select Committee on Aborigines Part II, The Wesleyan Mission at Buntingdale Ch. 4. Establishment and early operations of the Wesleyan mission Part III, The Government acts Ch. 5. Establishing the first government mission 1835-7 Ch. 6. Food and clothing for the Aborigines Ch. 7. Punishment of Aborigines found drunk, 1836-8 Ch. 8. Operations of the government mission, November 1837 to March 1839 Ch. 9. First attempt to form a native police corps Part IV, Growing conflict with squatters, 1837-8 Ch. 10. The disappearance of Gellibrand and Hesse Ch. 11. Attacks in the Western District Ch. 12. Attacks on the overland routes to Port Phillip Ch. 13. Evolution of policy in Sydney, 1838.b&w illustrations, b&w photographs, tables, document reproductionsvictorian history, colonisation, justice system -
 Whitehorse Historical Society Inc.
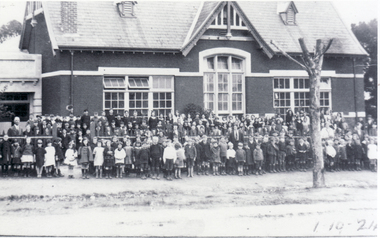
Photograph, Pupils Outside Mitcham State School, 1/10/1924 12:00:00 AM
Information - J.Bamford: 'In the late 1930's and 40's there were two parts of the Mitcham State School. The Bubs and grades 1 to 3 were in a building on Mitcham Road that was near the laneway behind the shops,and grades 4 to 8 were further down Mitcham Road. There were several houses on Mitcham Road to the left of this photograph, with parkland behind.. The left rear of the school also joined the park. The right side of the school joined Sampson's orchard, which went down as far as Springfield Road. This road was then called the Stock Route because that was what it was back then.' By the number of children present, it appears that both sections of the school got together for this 1924 photograph.field, jean., mitcham state school, no. 2904, mitcham road, mitcham, victoria street mitcham -
Dandenong/Cranbourne RSL Sub Branch
Large frame containing 4 photographs, Circa 1940s
Large wooden frame with 4 black and white photographs of M V Krait and crew.Photograph # 1 depicts M V Krait manned by "z" Special Unit Troops. Photo # 2 shows M V Krait who sank 38,000 tons of Japanese shipping in raids they carried out. Anchored in Hawksbury River N.S.W. Photo # 3 shows the crew of M.V. Krait blacking their skins wearing sarongs to resemble fishermen. (Note Japanese flag on rear of ship.) Photo # 4 the M V Krait en route to Singapore. -
 8th/13th Victorian Mounted Rifles Regimental Collection
Born digital image, September 1993
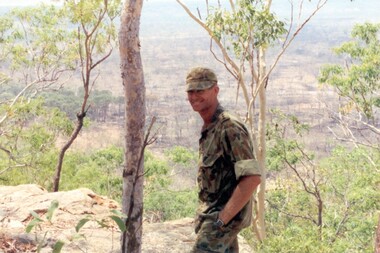
The Dibb Report into mainland defence of Australia,1986, among other things identified the requirement for protection of key assets in Northern Australia and the possibility of involving Army Reserve (Ares) units in this thus releasing regular forces for offensive operations. Dibb also pointed out that this defined role would result in a huge lift in Ares morale. In June 1988, the 3rd Division (3Div) conducted a Tactical Exercise without Troops (TEWT), Exercise ‘Distant Trumpet’ in the Katherine- Darwin area to study problems associated with defence against low level incursions against Tindal RAAF Base. Exercise ‘Northern Explorer’ followed in October of that year when units of the 3Div including A Squadron 8/13 Victorian Mounted Rifles sent patrol groups to get a first taste of environment and conditions. Post-Exercise reports had to include recommendations re: health, equipment and adaptation of Standing Operating Procedures (SOPs) in preparation for the new role deploying to Northern Australia. The first deployment by 8/13 Vistorian Mounted Rifles was in 1988. Deployments continued i following years. In September 1993, 3 Troop (Wangaratta) VMR Squadron 4/19 PWLH commanded by Captain Kelvin Robertson deployed to NT. The training began with airfield defence at Tindal followed by a 1000km recon into Arnhem Land in four Landrovers. The troop reported on the conditions of the roads, airfields, bridges (mainly causeways) resources such as fuel supplies in the towns and infrastructure. Each troop taking different route. 3 Troop had the Northern route through Kakadu National park across the East Alligator River to Oenpelli then to Maningrida and Ramangining and south to the Central Arnhem Road and back to Tindal Air force Base. Kelvin Robertson enlisted on 6 April 1981 at Cobram where Lieutenant Dan Wyborn was the troop leader at 2 Troop A Squadron 8th/13th Victorian Mounted Rifles (2TP A SQN 8/13 VMR). He completed the Initial Employment Training Course (IET) and then an M113A1 driver’s course in March 1982. Course Senior Instructor (SI) was Captain (CAPT) John McLean and wing instructor Warrant Officer Class 2 (WO2) Mick Baxter (ex-Driving & Servicing Wing instructor at the School of Armour). He served with 2TP at Cobram as a trooper Driver/Signaller until June 1982 when he was selected for officer training. He served two years as an Officer Cadet in Course 21 at Officer Cadet Training Unit (OCTU) graduating in June 1984. He returned to 8/13 VMR and completed the 1/85 Army Reserve (ARES) Regimental Officers Basic Course (ROBC Reconnaissance), then was posted immediately as 1 TP LDR for the Hay Booligal Annual Field Exercise (AFX). In 1985 he took command of 2TP at Cobram until Nov 1987 when he transferred to C Squadron First Armoured Regiment (CSQN 1AR). This began six months full time duty in which Lieutenant (LT) Robertson completed the regular army 1/88 (ROBC Tank), and then served as CSQN's first and only ARES Leopard Tank TP LDR until the next ARES LT was trained up as 2TP LDR. He later served as the CSQN Liaison Officer (LO) on the First Brigade (1 Bde) exercise ‘Predators Advance’ and as a staff officer on a Second Division (2Div) exercise. In Jan 1991 he studied at the Reserve Command and Staff College (RCSC). Upon completion of Grade 3 he was promoted to CAPT and transferred back to a reconnaissance troop, 3TP VMR SQN 4th/19th Prince of Wales’s Light Horse (4/19PWLH) at Wangaratta. CAPT Robertson transferred to the Inactive List in 1994, but in 2011 returned to the Active List serving as Operations Captain (OPS CAPT) at Regimental Headquarters (RHQ) 12th/16th Hunter River Lancers (12/16 HRL)and later Second-In-Command (2IC) Tamworth-based Operations Support Squadron (OPSPT SQN), and at 9 day exercises at Singleton range and an exercise at Townville High Range in Protective Mobility Vehicle (PMV) Bushmasters. In 2013 after completing the ARES Grade 3 Staff Officers course in Brisbane he returned home to Jerilderie and served as 2IC A SQN 4/19 PWLH based at Latchford Barracks Bonegilla. He was awarded the Defence Long Service Medal (DLSM) in 2014. Highlights of his career included being Parade Commander for the 75th anniversary Beersheba parade in Canberra on 31 October 1992. The guard, drawn from the VMR SQN 4/19 PWLH represented the 4th Light Horse Regiment, a participant of the Charge. Then twenty years later, 2012, he was invited to speak at the Quirindi Anzac Day ceremony. On this occasion he was serving with 12/16 HRL, so in two ceremonies, 20 years apart, he had represented both the 4th LHR and the 12th LHR, the two lead Regiments that charged Beersheba. CAPT Robertson was placed on the Inactive List again in 2015. Illustrates Reserve training in NT.Colour image of soldier with landscape in background being Captain Kelvin Robertson 3 Troop Leader (Wangaratta) VMR Squadron 4th/19th Prince of Wales’s Light Horse Regiment looking out over the Arafura swamp near the Maningrida to Ramingining road in Arnhem Land during exercise in the Northern Territory, September 1993.tindal, robertson -
 8th/13th Victorian Mounted Rifles Regimental Collection
Photograph
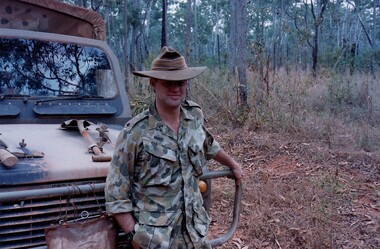
The extensive stock routes of the Booligal area made a good training area for a reconnaissance squadron.Black and white photograph of Private Roche, A Squadron 8/13 Victorian Mounted Rifles at wheel of Land Rover during annual exercise in Booligal area 1983. -
 8th/13th Victorian Mounted Rifles Regimental Collection
Photograph
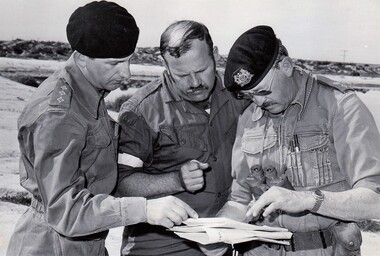
The reconnaissance squadron made use of the wide stock routes in the Booligal area for training.Black and white photograph of 3 soldiers studying a map while on 8/13 Victorian Mounted Rifles annual exercise at Booligal NSW in 1983. From left : Captain D. Cameron, SERGEANT e bEASLEY AND lIEUTENANT cOLONEL d. hUNTER. -
 8th/13th Victorian Mounted Rifles Regimental Collection
Photograph
The Dibb Report into mainland defence of Australia,1986, among other things identified the requirement for protection of key assets in Northern Australia and the possibility of involving Army Reserve (Ares) units in this thus releasing regular forces for offensive operations. Dibb also pointed out that this defined role would result in a huge lift in Ares morale. In June 1988, the 3rd Division (3Div) conducted a Tactical Exercise without Troops (TEWT), Exercise ‘Distant Trumpet’ in the Katherine- Darwin area to study problems associated with defence against low level incursions against Tindal RAAF Base. Exercise ‘Northern Explorer’ followed in October of that year when units of the 3Div including A Squadron 8/13 Victorian Mounted Rifles sent patrol groups to get a first taste of environment and conditions. Post-Exercise reports had to include recommendations re: health, equipment and adaptation of Standing Operating Procedures (SOPs) in preparation for the new role deploying to Northern Australia. The first deployment by 8/13 Victorian Mounted Rifles was in 1988. Deployments continued in following years. In September 1993, 3 Troop (Wangaratta) VMR Squadron 4/19 PWLH commanded by Captain Kelvin Robertson deployed to NT. The training began with airfield defence at Tindal followed by a 1000km recon into Arnhem Land in four Landrovers. The troop reported on the conditions of the roads, airfields, bridges (mainly causeways) resources such as fuel supplies in the towns and infrastructure. Each troop taking different route. 3 Troop had the Northern route through Kakadu National park across the East Alligator River to Oenpelli then to Maningrida and Ramangining and south to the Central Arnhem Road and back to Tindal Air force Base Major Annett later commanded 4/19 Prince of Wales's Light Horse, and later again 4th Brigade 2nd Division.. Colour photograph of Major M. Annett, Officer Commanding VMR Squadron 4/19Prince of Wales's Light Horse during annual exercise Northern Territory 1994. -
 8th/13th Victorian Mounted Rifles Regimental Collection
Photograph
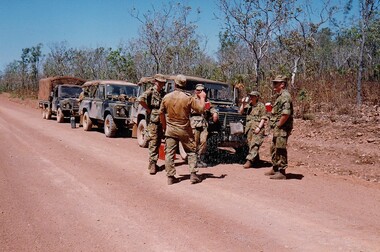
The Dibb Report into mainland defence of Australia,1986, among other things identified the requirement for protection of key assets in Northern Australia and the possibility of involving Army Reserve (Ares) units in this thus releasing regular forces for offensive operations. Dibb also pointed out that this defined role would result in a huge lift in Ares morale. In June 1988, the 3rd Division (3Div) conducted a Tactical Exercise without Troops (TEWT), Exercise ‘Distant Trumpet’ in the Katherine- Darwin area to study problems associated with defence against low level incursions against Tindal RAAF Base. Exercise ‘Northern Explorer’ followed in October of that year when units of the 3Div including A Squadron 8/13 Victorian Mounted Rifles sent patrol groups to get a first taste of environment and conditions. Post-Exercise reports had to include recommendations re: health, equipment and adaptation of Standing Operating Procedures (SOPs) in preparation for the new role deploying to Northern Australia. The first deployment by 8/13 Victorian Mounted Rifles was in 1988. Deployments continued in following years. In September 1993, 3 Troop (Wangaratta) VMR Squadron 4/19 PWLH commanded by Captain Kelvin Robertson deployed to NT. The training began with airfield defence at Tindal followed by a 1000km recon into Arnhem Land in four Landrovers. The troop reported on the conditions of the roads, airfields, bridges (mainly causeways) resources such as fuel supplies in the towns and infrastructure. Each troop taking different route. 3 Troop had the Northern route through Kakadu National park across the East Alligator River to Oenpelli then to Maningrida and Ramangining and south to the Central Arnhem Road and back to Tindal Air force Base. Colour photograph of five soldiers and three vehicles of VMR Squadron,4/19 Prince of Wales's Light Horse on roadside during annual exercise in Northern Territory 1994.military, vehicles, soldiers, northern territory, training, vmr -
 8th/13th Victorian Mounted Rifles Regimental Collection
Photograph
The Dibb Report into mainland defence of Australia,1986, among other things identified the requirement for protection of key assets in Northern Australia and the possibility of involving Army Reserve (Ares) units in this thus releasing regular forces for offensive operations. Dibb also pointed out that this defined role would result in a huge lift in Ares morale. In June 1988, the 3rd Division (3Div) conducted a Tactical Exercise without Troops (TEWT), Exercise ‘Distant Trumpet’ in the Katherine- Darwin area to study problems associated with defence against low level incursions against Tindal RAAF Base. Exercise ‘Northern Explorer’ followed in October of that year when units of the 3Div including A Squadron 8/13 Victorian Mounted Rifles sent patrol groups to get a first taste of environment and conditions. Post-Exercise reports had to include recommendations re: health, equipment and adaptation of Standing Operating Procedures (SOPs) in preparation for the new role deploying to Northern Australia. The first deployment by 8/13 Victorian Mounted Rifles was in 1988. Deployments continued in following years. In September 1993, 3 Troop (Wangaratta) VMR Squadron 4/19 PWLH commanded by Captain Kelvin Robertson deployed to NT. The training began with airfield defence at Tindal followed by a 1000km recon into Arnhem Land in four Landrovers. The troop reported on the conditions of the roads, airfields, bridges (mainly causeways) resources such as fuel supplies in the towns and infrastructure. Each troop taking different route. 3 Troop had the Northern route through Kakadu National park across the East Alligator River to Oenpelli then to Maningrida and Ramangining and south to the Central Arnhem Road and back to Tindal Air force Base. Colour photograph of group of soldiers of VMR Squadron 4/19Prince of Wales's Light Horse studying maps on bonnet of Land Rover during annual exercise in Northern Territory 1994.Major M. Annett wearing slouch hat, Sergeant Gary Wynn,without hat,,on his left. -
 8th/13th Victorian Mounted Rifles Regimental Collection
Photograph
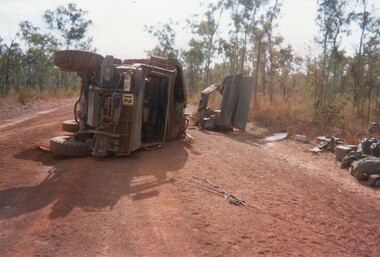
The Dibb Report into mainland defence of Australia,1986, among other things identified the requirement for protection of key assets in Northern Australia and the possibility of involving Army Reserve (Ares) units in this thus releasing regular forces for offensive operations. Dibb also pointed out that this defined role would result in a huge lift in Ares morale. In June 1988, the 3rd Division (3Div) conducted a Tactical Exercise without Troops (TEWT), Exercise ‘Distant Trumpet’ in the Katherine- Darwin area to study problems associated with defence against low level incursions against Tindal RAAF Base. Exercise ‘Northern Explorer’ followed in October of that year when units of the 3Div including A Squadron 8/13 Victorian Mounted Rifles sent patrol groups to get a first taste of environment and conditions. Post-Exercise reports had to include recommendations re: health, equipment and adaptation of Standing Operating Procedures (SOPs) in preparation for the new role deploying to Northern Australia. The first deployment by 8/13 Victorian Mounted Rifles was in 1988. Deployments continued in following years. In September 1993, 3 Troop (Wangaratta) VMR Squadron 4/19 PWLH commanded by Captain Kelvin Robertson deployed to NT. The training began with airfield defence at Tindal followed by a 1000km recon into Arnhem Land in four Landrovers. The troop reported on the conditions of the roads, airfields, bridges (mainly causeways) resources such as fuel supplies in the towns and infrastructure. Each troop taking different route. 3 Troop had the Northern route through Kakadu National park across the East Alligator River to Oenpelli then to Maningrida and Ramangining and south to the Central Arnhem Road and back to Tindal Air force Base. Two colour photographs of vehicle mishap during VMR Squadron 4/19Prince of Wales's Light Horse annual exercise in Northern Territory 1994.Second photo shows driver receiving medical attention. -
 8th/13th Victorian Mounted Rifles Regimental Collection
Photograph
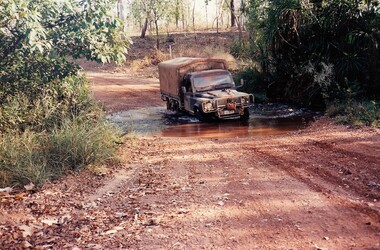
The Dibb Report into mainland defence of Australia,1986, among other things identified the requirement for protection of key assets in Northern Australia and the possibility of involving Army Reserve (Ares) units in this thus releasing regular forces for offensive operations. Dibb also pointed out that this defined role would result in a huge lift in Ares morale. In June 1988, the 3rd Division (3Div) conducted a Tactical Exercise without Troops (TEWT), Exercise ‘Distant Trumpet’ in the Katherine- Darwin area to study problems associated with defence against low level incursions against Tindal RAAF Base. Exercise ‘Northern Explorer’ followed in October of that year when units of the 3Div including A Squadron 8/13 Victorian Mounted Rifles sent patrol groups to get a first taste of environment and conditions. Post-Exercise reports had to include recommendations re: health, equipment and adaptation of Standing Operating Procedures (SOPs) in preparation for the new role deploying to Northern Australia. The first deployment by 8/13 Victorian Mounted Rifles was in 1988. Deployments continued in following years. In September 1993, 3 Troop (Wangaratta) VMR Squadron 4/19 PWLH commanded by Captain Kelvin Robertson deployed to NT. The training began with airfield defence at Tindal followed by a 1000km recon into Arnhem Land in four Landrovers. The troop reported on the conditions of the roads, airfields, bridges (mainly causeways) resources such as fuel supplies in the towns and infrastructure. Each troop taking different route. 3 Troop had the Northern route through Kakadu National park across the East Alligator River to Oenpelli then to Maningrida and Ramangining and south to the Central Arnhem Road and back to Tindal Air force Base. Two colour photographs of creek crossings, one more challenging than the other,during the annual exercise in Northern Territory, conducted by VMR Squadron 4/19 Prince of Wales's Light horse, 1994. -
 8th/13th Victorian Mounted Rifles Regimental Collection
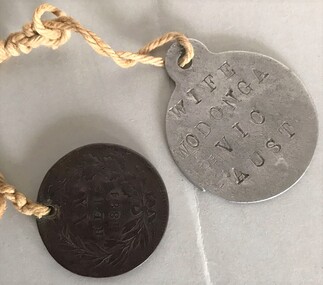
Badge - Identity disc Schleibs
Frederick August Schleibs a 44 year old farmer of Wodonga enlisted in AIF 30 March 1916 and was allocated to 2nd Pioneer Battalion with regimental number 2972. En route to England he was hospitalised at Cape Town with injured knee. He was returned to Australia and discharged 27 October 1916. He reenlisted 21 February 1917 and sailed with 28th Reinforcements 8th Light Horse to Egypt. He returned to Australia following the war. Unusual to see a foreign coin used as an identity disc.Soldiers identify disc set connected by string; one aluminium and one a Portuguese 20 Reis coin. Both are stamped with information relating to 3383 Frederick Augustus Schleibs who served with 8th Australian Light Horse in World War One.On aluminium disc "A F Schleibs / 3383 / 8LH / CE", and on reverse "Wife / Wadonga / Vic / Aust". On coin "FAS / 3383 / CE"schleibs, light horse, 8th, world war one, wwi, aif, pioneer, wodonga -
Moorabbin Air Museum
Document (Item) - Correspondence relating to East West airlines and the Kempsey route, File 4 East West airlines Kempsey Dubbo
-
 Ballarat Tramway Museum
Photograph - Digital image, Electric Street Railway Journal, "Improved one-man Operation in Australia", "The Principals of Differential Wages in Awards", "One Man cars in Australia"
Yields information about the operation of one man trams in Ballarat and Bendigo and the provision of information to the American tramway or Street car press. Has a strong association with the Author - Mr Pringle.Series of five digital images of items from the Electric Street Railway Journal about one-man tram operations and wages in Ballarat, written by the ESCo Manager, Mr P J Pringle, Chief Engineer and General Manager. Images i1 and i2 - pages 172 and 173 - letter titled "Improved one-man Operation in Australia", Vol 47 No. 4, 22/1/1916 - describing the operation, and how it operates. Reference to the use in other places in made by the author and the magazine. image i3 - general comment making possible reference to a UK magazine - and how one man tram are worked and their routes, including tickets and wages. From Vol 46, page 23, 4/12/1915. image i4 - "The Principals of Differential Wages in Awards" - Vol 56, No. 19., 6/11/1920 page 965, looking at wages based on locations, arbitration, over WW1, including cost of living and renting. image i5 - "One Man cars in Australia" - Vol 55, No. 24, 12/6/2020 - page 1206, looking at the accident rates between one and two man cars.trams, tramways, one man trams, electric street railway journal, ballarat, bendigo, esco, wages, fares, accidents -
 Ballarat Tramway Museum
Document - Report, Electric Supply Co. of Vic (ESCo), "Comparisons of Passengers per car Mile", "Revenue per car mile of track", "Year ended 31/3/1922", "Change issued to motormen daily", "Passengers and Revenue per car Mile", 19/05/1922 12:00:00 AM
Yields information and demonstrates the use of statistical reports for 1922 to management in the UK and comparisons with other systems.Report - 5 quarto or foolscap sheets, carbon copy by ESCo dated 19/5/1922 for Ballarat. 1 - "Comparisons of Passengers per car Mile" - for each route 2 - "Revenue per car mile of track" - for each route and comparisons with Melbourne, Launceston, Adelaide and Wellington 3 - "Year ended 31/3/1922" - Gross Expenditure vs Receipts 4 - "Change issued to motormen daily" - since introduction of Cash Fare System 5 - "Passengers and Revenue per car Mile" - comparison with English and Australian systems. Provides source of information. trams, tramways, ballarat, reports, operations, finances, esco -
 Ballarat Tramway Museum
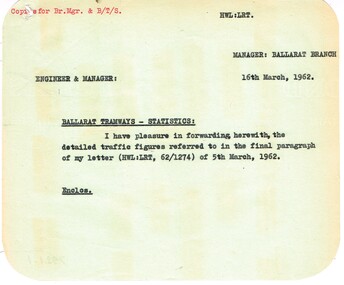
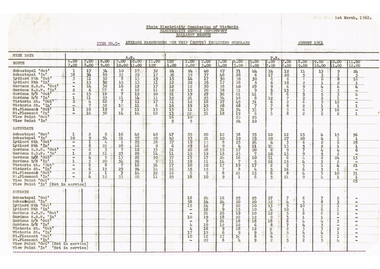
Administrative record - Memorandum, State Electricity Commission of Victoria (SECV), cuttings from The Courier re possible closure, Mar. 1962
Yields information about the passenger traffic in Ballarat during Feb. 1962, Yields information about the passenger traffic in Ballarat during Feb. 1962Memorandum and Report to the Engineer & Manager from the Ballarat Manager - all with rounded corners. .1 - Memorandum dated 16/3/1962 forwarded detailed traffic figures referred to in a letter of 5/3/1962 .2 - detailed analysis of average passengers per trip including scholars for each route by hour - was dated Feb. 1962, but has been crossed out. .3 - Passenger density and direction per hour for each route - Saturday - was dated Feb. 1962 - but has been crossed out and August 1963 written in. .4 - as for .3 - for Sundays. See Reg Item 7931 for similar reports and 8030 for another version.trams, tramways, reports, passengers, ballarat -
 Ballarat Tramway Museum
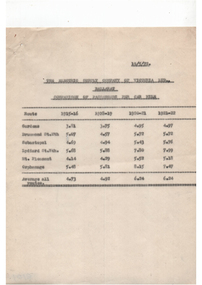
Document - Report, State Electricity Commission of Victoria (SECV), "Average Passengers per trip (route) including Scholars", "Passenger density and direction per hour each route", post 8/1961
Yields information about the passenger traffic in Ballarat during August 1961 and passenger density.Set of four type reports on statistics for the Ballarat tramway system, for August 1961. .1 - "Average Passengers per trip (route) including Scholars" .2 - "Passenger density and direction per hour each route - weekdays" - see image 2a and 2b .3 - ditto - Saturdays 4 - ditto - Sundays See Reg Item 7921 for similar reports.trams, tramways, reports, passengers, employees, fares, tramcars, routes, revenue, finances, tickets -
 Ballarat Tramway Museum
Newspaper, State Electricity Commission of Victoria (SEC) and The Courier Ballarat, SEC Spring Song, Feb. 1962
Yields information about the views of various letter writers, views of the Courier, union views, rehabilitation costs and employment.Foolscap sheet of plain paper, with rounded corners, with 4 newspaper cuttings, concerning the mooted closure of the Ballarat Tram system 28 Feb and 2 March 1962. All from The Courier, unless noted otherwise. 1 - "SEC Spring Song" - 23/2/62 - Editorial - about the SEC actions to desert Ballarat, Council meeting with Parliamentary representatives, cost of new cars and always a second-hand place. 2 - "Tramways" - 24-2-62 - letter by R. Courtney, Union Secretary, re use of new trams, one-man cars and Mr. Mawby's jet propelled buses. 2nd letter, written by a car driver, lamenting the closure, employment of trammies and SEC 3 - Untitled article - 27/2/62 - cost of rehabilitating the system given compared to buses, cost estimate from TRB, concessions (not to Pensioners), bus routes in Geelong, people preferred any replacement bus service to be run by a public authority. 4 - "Tram Employees" - 24-2-1962 - SEC would find alternative employment for the displaced tramway workers.closure, letter to the editor, editorial, sec, rehabilitation, staff, buses, concession fares -
 Ballarat Tramway Museum
Newspaper, State Electricity Commission of Victoria (SEC) and The Courier Ballarat, Tram men to ask for Transport Inquiry, Feb. 1962
Yields information about the views of various letter writers, views of the Courier, union views, rehabilitation costs Geelong, public meetings, finances and protest action.Set of three Foolscap sheet of plain paper, with rounded corners, with 8 newspaper cuttings, concerning the mooted closure of the Ballarat Tram system 6 Feb to 9 Feb 1962. All from The Courier, unless noted otherwise. 1 - "Tram Men to ask for Transport Inquiry" - 6-2-62 - about the local Trades Hall supporting a enquiry into the trams - Secretary Mr. A C Williams, re public operated transport as well. 2 - "Bendigo Move" - 6-2-62 - notes that Bendigo Trades Hall people will be meeting with Mr. Bolte when he visits Bendigo. 3 - "Trolley Buses" - 7-2-62 - W J Parsons, re use of Trolley buses and Fare Boxes 4 - "Sister Cities" - 7-2-62 - work with Bendigo and notes Bolte visit to Bendigo 5 - "Costly Routes" - 8-2-62 - notes a DLP meeting and the better routes needed. 6 - "Sebastopol Delegate for Conference on Trams" - 9-2-62 - Mayor of Sebastopol, Cr F Wilson, to represent the Borough on trams. 7 - "Bolte Guarded" - 9-2-62 - could not receive the deputation while in Bendigo, talk to the Minister. 8 - "Tram v Bus" - 9-2-62 - reporting on the lack of buses in Geelong, not worth running services following a visit.closure, letter to the editor, editorial, sec, fares, geelong, atmoea, meetings, unions, trolley buses -
 Ballarat Tramway Museum
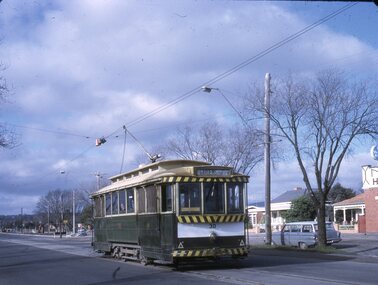
Photograph - Bendigo Tram No. 2, 4/1949
... "BENDIGO No2 on EAGLEHAWK Route" "Taken by I.K.Winney 4/49... Bendigo Tramcar 2 Eaglehawk "BENDIGO No2 on EAGLEHAWK Route ...Bendigo Tram No. 2. Photographer :I.K. Winney, tram displaying a white disc on the front dash that indicates a following tram in the same single line section.Yields information about SEC tramway operations.Black and white photograph on plain paper"BENDIGO No2 on EAGLEHAWK Route" "Taken by I.K.Winney 4/49" "N.J. THORPE NEG." "15 154/88"bendigo, bendigo tramcar 2, eaglehawk -
 Ballarat Tramway Museum
Slide - 27 mm sq slide/s set of 6, Lilian Butler, Tram No. 38 at the Victoria St terminus, Aug. 1971
Yields information about the streetscapes of Ballarat on the Gardens to Victoria St route and in particular buildings and people that crewed the trams.Set of six Colour 27 x 27 mm slide in a Kodachrome cardboard mount. .1 - Tram No. 38 at the Victoria St terminus, with the destination of Gardens via Sturt St West. Note the red traffic cone in the overhead by the trolley wheel positioning location device. .2 - crew of No. 30 by the tram - R. Knight (57) and Conductor W. Nancarrow (8) .3 - No. 30 at Gardens Loop .4 - as for .2 - see Also Reg item 6455. .5 - view from tram at intersection of Wendouree Parade and MacArthur St, View Point. .6 - view of trackwork at intersection of Drummond and Sturt Streets with the Southern Cross Hotel in the background. Slide mount date August 1971. Photo from the collection of Lilian Butler.ballarat, tramways, trams, victoria st, crews, gardens loop, view point, hospital corner, tram 30 -
 Ballarat Tramway Museum
Slide - 27 mm sq slide/s - set of 9 - Victoria St and crews, Lilian Butler, Aug. 1971
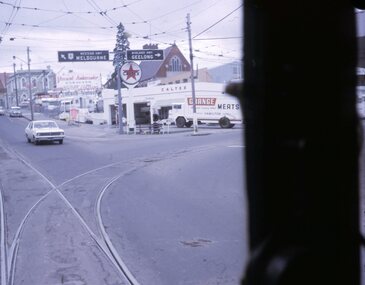
Yields information about the streetscapes of Ballarat on the Gardens to Victoria St route and in particular buildings and people that crewed the trams.Set of nine Colour 27 x 27 mm slide in a Kodachrome cardboard mount. .1 - R. Williams (Motorman) and Danny Powell (badge 30) standing in front of a tram at Victoria St. The tram has the destination of Gardens via Sturt St West. .2 - view of No. 113 Victoria St - now Ardenlee B&B. .3 - Sunshine Biscuit Factory .4 - Mack's Hotel .5 - Stones Corner - intersection of Victoria and Mt Pleasant routes .6 - Crossing Grenville St .7 - No. 30 at the City terminus, Lydiard St with Racey's and the SEC office in the background. .8 - as for .5, but looking east with the Caltex service station in the background. .9 - No. 30 at the Victoria St terminus. Slide mount date August 1971. Photo from the collection of Lilian Butler.ballarat, tramways, trams, victoria st, bridge st, stones corner, tram 30 -
 Ballarat Tramway Museum
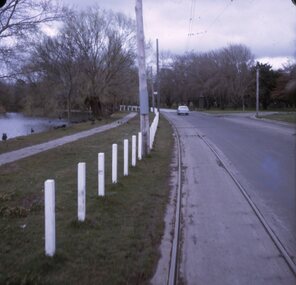
Slide - 27 mm sq slide/s - set of 11, Lilian Butler, Wendouree Parade and Sturt St West, Sep. 1971
Yields information about the streetscapes of Ballarat depot to Pleasant St route and in particular buildings and people that crewed the trams.Set of eleven Colour 27 x 27 mm slide in a Kodachrome cardboard mount. .1 - Wendouree Parade looking west towards St Aidans Drive - the gate pillars can be seen. .2 - ditto looking west - Fairyland .3 - ditto looking towards Gardens Loop .4 - No. 41 at Gardens Loop, with destination of Gardens via Drummond North .5 - ditto showing Mt Pleasant .6 - ditto, just past the now BTM Depot Junction. .7 - Carlton St - showing the gates .8 - Looking towards Hamilton Ave from within Carlton St loop with the signal showing red. .9 - Turning from Hamilton Ave into Sturt St West. .10 - Sturt St west looking east with the Loreto convent walls on the left hand side. .11 - Sturt St - Pleasant St intersection - showing road surface, a tram coming towards the intersection and buildings on either side. Slide mount date September 1971. Photo from the collection of Lilian Butler.ballarat, tramways, trams, wendouree parade, st aidans drive, gardens loop, depot junction, carlton st, carlton st loop, signals, sturt st west, pleasant st, tram 41 -
 Ballarat Tramway Museum
Slide - 27 mm sq slide/s - set of 7, Lilian Butler, Mt Pleasant line, Sep. 1971
Yields information about the streetscapes of Stones Corner to Mt Pleasant route and in particular buildings and people that crewed the trams.Set of seven Colour 27 x 27 mm slide in a Kodachrome cardboard mount. .1 - Tram turning onto the Mt Pleasant line at Stones Corner - Bridge St, Main Road .2 - Main Road looking south with Inland Body Works building on the left and Ampol Service Station .3 - Mt Pleasant terminus with the butcher shop on the left and the diary on the right - shows the terminating tram track .4 - Conductor changing pole. .5 - Putting pole on the overhead .6 - Conductor (D O'Leary - No. 38) standing in front of tram and Motorman or driver (N. Hall - No. 43) .7 - ditto with number visible. See Reg item 3425 for crew lists. Slide mount date September 1971. Photo from the collection of Lilian Butler.ballarat, tramways, trams, stones corner, main road, mt pleasant, crews, drivers, conductors, trolley poles, tram 41 -
 Ballarat Tramway Museum
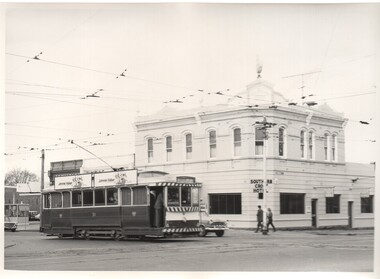
Photograph - Black & White Photograph/s - set of 5, Charles Craig, 1971
Yields information about the intersection of Sturt St and Drummond St and its use by trams in the period before the closure of the SEC system. Shows the Southern Cross Hotel.Set of five Black and White photographs of trams near the intersection of Sturt St and Drummond St South, Hospital Corner. All have the Southern Cross Hotel in the background .1 - No. 31 crosses Drummond St, Gardens via Sturt St West, with two Johnnie Walker Roof adverts. .2 - No. 40 turns from Drummond St South en route to Lydiard St North, while another bogie car waits. Both trams have an electric cooking roof advert. .3 - No. 17 crosses Sturt St with two bogie trams in the view - appears to have been taken before .2. Note the passengers getting off the tram on the south side. .4 - No. 21 turning into Drummond St south, with destination of Sebastopol. Tram has an electric cooking roof advert. .5 - No. 33 crosses Sturt St from Sebastopol while another tram waits at the Sturt St stop. Photo by Charles Craig - during 1971. trams, tramways, sturt st, hospital corner, drummond st sth, tram 31, tram 40, tram 17, tram 21, tram 33 -
 Ballarat Tramway Museum
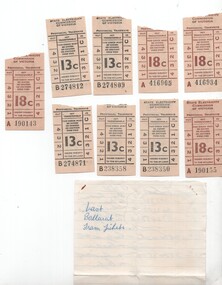
Ephemera - Ticket/s, State Electricity Commission of Victoria (SECV), Set of 8 tickets - closure of Mt Pleasant, 1971
Provides information about the last tickets issued on the Mt Pleasant route at the time of closure and sample tickets.Set of 8 tickets and handwritten notes regarding the last tickets issued on 5/9/1971 when the Mt Pleasant - Gardens via Sturt St west route closed. .1 - hand written noted on a ruled sheet of paper from a note book - listing the last tickets for 4c, 5, 7c and 13c on the route for both the last tram to and from the city. .2 - Set of 4 No. 18c - brown print on off white paper, ticket nos. A190143, 190155, 416905 and 416934 - not listed on the above sheet. .3 - set 5 No. 13c - black print on off-white paper, ticket nos. B274809, 812, 871 and B238350 and 358. Collected and noted by Keith Kings at the time.trams, tramways, secv, closure, tickets, last tram, mt pleasant, gardens