Showing 692 items
matching tramway crossings
-
 Ballarat Tramway Museum
Negative - Set of 3, Campbell Duncan, 2/07/1971 12:00:00 AM
Yields information about tram operations and the street views in Wendouree Parade near Barrett Ave and Carlton St.Set of 3 photographs taken on 28/2/1971 by Campbell Duncan of trams in Wendouree Parade. .1 - No. 26 in bound to Victoria St in Wendouree Parade, near Barrett Ave. .2 - ditto .3 - No. 27 (Mt Pleasant) and No. 32 (Victoria St) crossing at the Carlton St Loop.trams, tramways, wendouree parade, carlton st loop, barrett ave, tram 26 tram 32 tram 27 -
 Ballarat Tramway Museum
Negative, Campbell Duncan, 10/08/1971 12:00:00 AM
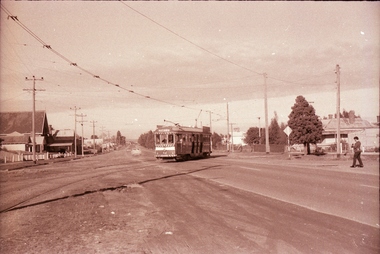
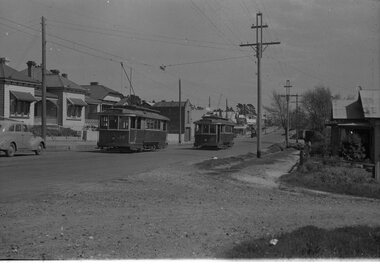
Yields information about tram operations and the street views in the area of the crossing Albert St, Sebastopol.Photographs taken on 10/8/1971 by Campbell Duncan of No. 42 crossing Albert St, Sebastopol at Ophir St, with the destination of Lydiard St North. The person on the right hand side appears to be Bill Jessup.trams, tramways, albert st, sebastopol, ophir st, tram 42 -
 Ballarat Tramway Museum
Negative - Set of 5, Campbell Duncan, 10/08/1971 12:00:00 AM
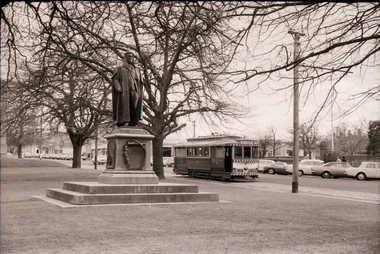
Yields information about tram operations and the street views in Sturt St near Lyons St.Set of 5 photographs taken on 10/8/1971 by Campbell Duncan of trams in Sturt St near Lyons St. .1 - No. 27 inbound with a Twin Lakes and destination of Mt Pleasant, passing the Peter Lalor statue in the median strip. .2 - No. 34 outbound crossing Dawson St with the Golden City Hotel in the background. .3 - No. 21 outbound with St Patrick's Cathedral in the background and the Adam Lindsay Gordon statue (1969) memorial to the horses killed in the First World War. 4. ditto .5 - No. 13 inbound with a Twin Lakes sign and destination of Victoria St, crossing Lyons St, with St Andrews Kirk in the background. For notes on the statues see: http://www.ballarat.vic.gov.au/media/499947/sturt%20street%20gardens%20calm%20plan.pdf (accessed 11/12/16)trams, tramways, sturt st, dawson st, lyons st, statues, tram 27 tram 34 tram 21 -
 Ballarat Tramway Museum
Negative - Set of 10, Campbell Duncan, 10/08/1971 12:00:00 AM
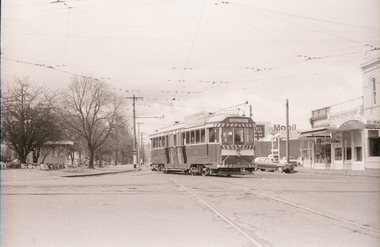
Yields information about tram operations and the street views at Hospital Corner.Set of 10 photographs taken on 10/8/1971 by Campbell Duncan of trams at Hospital Corner. .1 - No. 35 turning from Sturt into Drummond St South heading for Sebastopol. .2 - No. 31 inbound to Mt Pleasant with Hospital in background. Tram has two Johnny Walker whiskey roof adverts. .3 - No. 27 turning from Sturt St into Drummond St North, to the Gardens. Has the Mobil Service station and other buildings in the background and the ESCo street pillar. .4 - No. 43 turning from Drummond St South into Sturt St with the Southern Cross Hotel etc in the background. .5 - ditto - side on view. .6 - No. 39 and a single trucker on the north side of Sturt St - No. 39 has arrived from the depot via Sturt St west and about to turn to run to Grey St. .7 - ditto .8 - ditto .9 - ditto .10 - No. 39 crossing Sturt St in Drummond St.trams, tramways, hospital corner, drummond st, sturt st, electrical equipment, tram 35 tram 39 tram 31 tram 27 tram 43 -
 Ballarat Tramway Museum
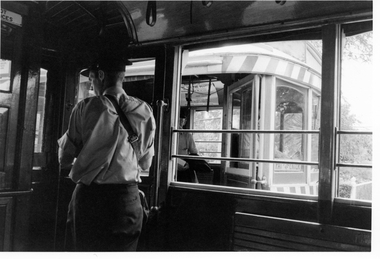
Photograph - Digital image, George Coop, 1968 - 1970
Digital Image of two crewmen conversing between tramcars while at a crossing loop and possibly swapping cars.trams, tramways, loops, conductors, crews -
 Ballarat Tramway Museum
Photograph - Digital image Set of 5, George Coop, 1968 - 1970
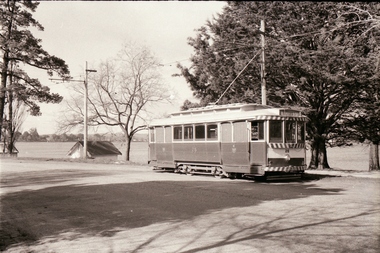
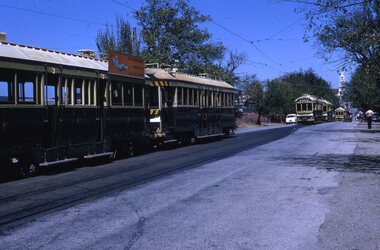
Yields information about Wendouree Parade near Gardens Loop and Carlton StFive (5) Digital images taken by George Coop during the period 1968 - 1970, of SEC trams in the Gardens area. .1 - 17 in Gardens Loop with destination of Victoria St. .2 - 43 climbing the hill to Carlton St Loop. Has the destination of Mt Pleasant .3 - 26 and 31 in Carlton St Loop. 26 - Victoria St and 31, Mt Pleasant .4 - 33 climbing the hill to Carlton St, has the destination of Victoria St. .5 - 26 and 31 - side on at Carlton St loop (end of rowing coarse), crossing 26 - has a Briquettes roof advert and 31 a Electric Cooking advert. trams, tramways, wendouree parade, gardens loop, carlton st loop, tram 17, tram 43, tram 26, tram 31, tram 33 -
 Ballarat Tramway Museum
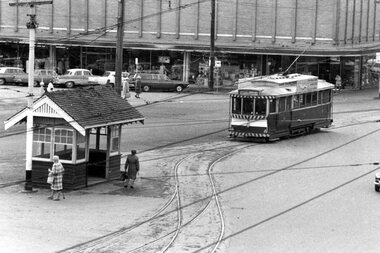
Photograph - Digital image Set of 5, George Coop, 1968 - 1970
Yields information about the tram operations at the intersection of Bridge and Grenville St and Sturt St.Five (5) Digital images taken by George Coop during the period 1968 - 1970, of SEC trams in the Grenville St area. .1 - Tram 31 crossing Grenville St to pick up passengers in Sturt St - the shelter in the foreground and the Woolworth's Big W store in the background. .2 - Tram 17 picking up a passenger at the Shelter, with the Dickins store in the background. Tram has a "Make Bliss not Love" roof advert and has a destination of Gardens via Sturt St West. .3 - Tram 13 - as for .1 .4 - ditto with 12 in the City Loop - in the background are the Magnet Bakery, Begonia City Butch and Gilbert and Jury shop. .5 - Tram 26, in Bridge St, with the points at Grenville St in the foreground. Tram has the destination of Gardens via Sturt St West. In the background are the shops for Faull's shoes and Suttons HMV. trams, tramways, grenville st, shelters, bridge st, sturt st, city loop, passengers, tram 31, tram 17, tram 13, tram 12, tram 26 -
 Ballarat Tramway Museum
Photograph - Digital image Set of 6, George Coop, 1968 - 1970
... - Tram 32, northbound, crossing the railway tracks, taken from ...Yields information about the tram operations at or near the Ballarat Railway Station.Six (6) Digital images taken by George Coop during the period 1968 - 1970, of SEC trams in Lydiard St North near or at the Railway station/ .1 - Tram 28 northbound with the station building and signal gantry in the background. No. 28 has a White Florist roof advert. .2 - Tram 32 southbound - taken from the signal box, has the gate wheel in the foreground. .3 - Tram 27 south bound, with destination of Sebastopol, with the station building, signal gantry and Reid's Coffee Palace in the background. No. 27 has a Twin Lakes sign and a Bliss Bombs roof advert. .4 - Tram 32, northbound, crossing the railway tracks, taken from the signal box has the railway station goods shed, building and signal gantry in the background. The tram has a Wilkinson Sword Razor blades roof advert. .5 - Tram 28, southbound from signal box. See image .1 for details. .6 - Tram 27, southbound in Lydiard St north with Bliss Bombs advert and destination of Sebastopol. Has the goods yard in the background. Taken through the verandah of Victoria House. trams, tramways, level crossings, railway station, lydiard st north, signals, tram 28, tram 32, tram 27 -
 Ballarat Tramway Museum
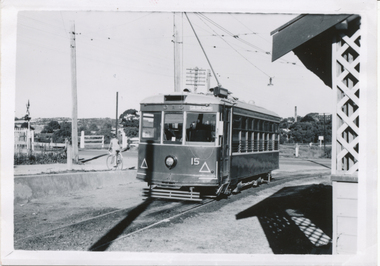
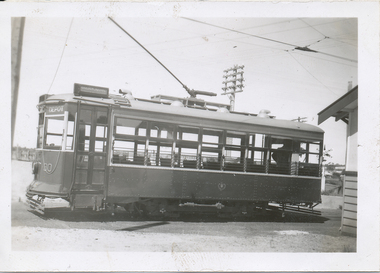
Photograph - Black & White Photograph/s, Wal Jack, 12/04/1950 12:00:00 AM
Black and White print contained within the Wal Jack Bendigo and Geelong Album, see Reg Item 5003 for more details. Photo of Bendigo Birney No.15 at North Bendigo, Photo Wal Jack, with the destination of Golden Square - 12-4-1959. Has the level crossing and rail line in the background and part of the tram stop shelter. i1 - scan of print in the album i2 - rear of image i3 - scan of negative at 3200dpi added 6/6/2020. On the rear in black ink "SEC Bendigo, No. 15 at Nth Bendigo 12-4-1959. Has the Wal Jack copyright stamp in the top right corner with the number "T219" written in.trams, tramways, bendigo, north bendigo, level crossings, birney, tram 15 -
 Ballarat Tramway Museum
Photograph - Black & White Photograph/s, Leon Marshall Wood, 29/12/1947 12:00:00 AM
Black and White print contained within the Wal Jack Bendigo and Geelong Album, see Reg Item 5003 for more details. Photo of Bendigo Birney No.30 at North Bendigo, Photo Leon Marshall Wood, with the destination of Golden Square - 29-12-1947. Has the level crossing and rail line in the background and part of the tram stop shelter. On the rear in black ink "SEC of Victoria Bendigo, ex Geelong "Birney" car No. 30 Nth Bendigo terminus. In the bottom left hand corner "29.12.1947" The Leon Marshall Wood stamp in green ink and the number "SEC 15" written in.trams, tramways, bendigo, north bendigo, level crossings, birney, tram 30 -
 Ballarat Tramway Museum
Photograph - Black & White Photograph/s, c1950
Black and White print contained within the Wal Jack Bendigo and Geelong Album, see Reg Item 5003 for more details. Photo of Bendigo Birney No. 30 leaving North Bendigo terminus, crossing Thunder St with the level crossing in the foreground. Photo c1950. On rear in ink "SEC B"trams, tramways, bendigo, birney, north bendigo, level crossings, tram 30 -
 Ballarat Tramway Museum
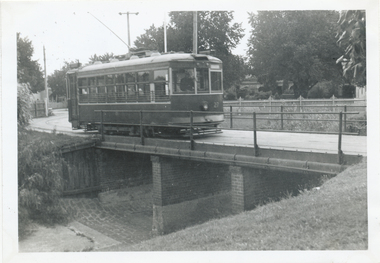
Photograph - Black & White Photograph/s, Wal Jack, 10/04/1950 12:00:00 AM
Black and White print contained within the Wal Jack Bendigo and Geelong Album, see Reg Item 5003 for more details. Photo of Bendigo Birney No. 27 crossing the bridge entering the depot 10-4-1950, Photo by Wal Jack. Printed on Ilford paper. i1 - scan of print in the album i2 - rear of image i3 - scan of negative at 3200dpi added 6/6/2020. On the rear in blue ink "SEC Bendigo Birney #27 crossing over creek near depot 10-4-50" with Wal Jack copyright stamp in the top right hand corner and the number "T210" written in.trams, tramways, bendigo, depot, birney, tram 27 -
 Ballarat Tramway Museum
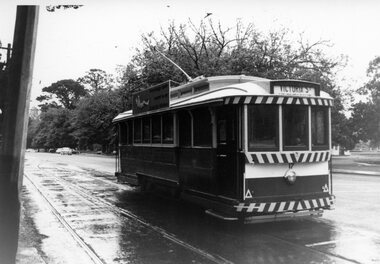
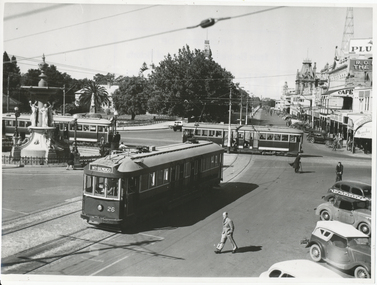
Photograph - Black & White Photograph/s, State Electricity Commission of Victoria (SECV), late 1940's
Black and White print contained within the Wal Jack Bendigo and Geelong Album, see Reg Item 5003 for more details. Photo of the Charing Cross with three bogie trams at the intersection, SEC publicity photo c1950. Two of the bogies crossing on the Eaglehawk - Quarry Hill line have white or cream strips on the lower edge of the body. No 26 has the destination of North Bendigo, though it is on Golden Square line with the driver standing just inside the doorway. In the background is the fountain, the Gardens and Pall Mall. SEC Publicity Photo, see Inscriptions for notes re photo. On the rear is the SEC Publicity Photo stamp, with negative number 21.1 written in, "Yallourn" in pencil and a typed piece of paper taped to the rear of the photo noting the Provincial tramways owned by the SEC, but that it is loss making.trams, tramways, bendigo, charing cross, secv, pall mall, tram 26 -
 Ballarat Tramway Museum
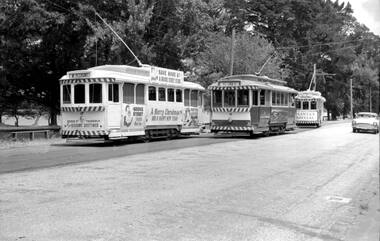
Photograph - Digital image, Mal Rowe, 21/12/1967 12:00:00 AM
Demonstrates the use of the Santa Trams or decorated trams in Ballarat for the Christmas season. Yields information about their decorations.Digital Image of the two 1967 Santa Trams crossing with tram 18 at Depot Loop 21/12/1967. Tram 17 dressed as the Bridge St traders Santa tram and No. 32 as the Myers sponsored Santa Tram. Tram 17 as the destination of Mt Pleasant, No. 18 - Victoria St and No. 32 - Special. Photo by Mal Rowe. -------- Original Message -------- Subject: [TramsDownUnder] Happy Christmas and ... [1 Attachment] Date: Sat, 21 Dec 2013 10:10:13 +1100 From: Mal Rowe -
 Ballarat Tramway Museum
Negative, Wal Jack, early 1950's
Yields information about tram services on the Mt Pleasant line during the early 1950'sNegative and Digital images of the Wal Jack Ballarat Negative file of trams 26 and 33 crossing at the Grant St loop in Barkly St Mt Pleasant. No. 26 has the destination of Mt Pleasant and No.33, destination of City Oval.trams, tramways, barkly st, grant st, mt pleasant, tram 33 tram 26 -
 Ballarat Tramway Museum
Negative, Wal Jack, early 1960's
Yields information about Ballarat tram operations in Drummond St South during the early 1960's at the Urquhart St Loop.Negative and Digital images of the Wal Jack Ballarat Negative file of 41 and 21 northbound in Drummond St South after crossing No. 39 at the Urquhart St loop. No. 41 (Lydiard St Nth) and No. 21 (City). Both cars have adverts for dancing at Civic Hall and No. 21, Twin Lakes. In the background is a store advertising The Age, The Sun and The Herald newspapers. Photo early 1960's. See Reg Item 376 for a photo taken at the same time - note the car mirror.trams, tramways, drummond st south, urquhart st, tram 41 tram 21 tram 39 -
 Ballarat Tramway Museum
Negative, Wal Jack, early 1960's
Yields information about Ballarat tram No. 30 about to cross the level crossing in Lydiard St North at the railway station.Negative and Digital images of the Wal Jack Ballarat Negative file of No 30 to Sebastopol about to cross the Lydiard St North Level crossing at the railway station. Tram has a White Horse Whiskey Advert. trams, tramways, lydiard st north, railway station, level crossings, tram 30 -
 Ballarat Tramway Museum
Negative, Wal Jack, early 1960's
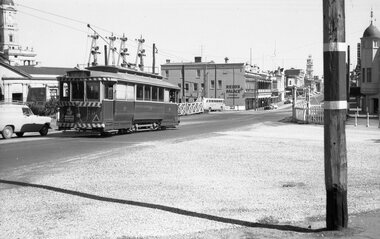
Yields information about tram services and the street scene during the early 1960's outside the Town Hall.Negative and Digital images of the Wal Jack Ballarat Negative file of No. 35 west bound in Sturt St crossing Armstrong St with another tram in the view behind. Tram running "Special" and has a Electric cooking roof advert. In the background is the Town Hall, the National Mutual Building and the Commonwealth Bank. Alongside is a Holden Ute. trams, tramways, sturt st, armstrong st, town hall, tram 35 -
 Ballarat Tramway Museum
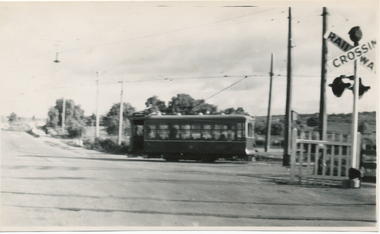
Negative, Wal Jack, 6/01/1963 12:00:00 AM
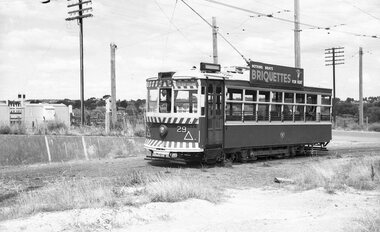
Negative and Digital images of the Wal Jack Bendigo Negative file of Bendigo Birney No. 29 at the North Bendigo terminus with the railway level crossing in the background. Tram has the destination of Golden Square and a Briquettes roof advertisement. Based on the cars in the photo and Reg Item 452, date could be 6-1-1963trams, tramways, bendigo, north bendigo, level crossings, tram 29 -
 Ballarat Tramway Museum
Slide - 35mm slide/s - set of 5, Roy J Mitchell, late 1960's
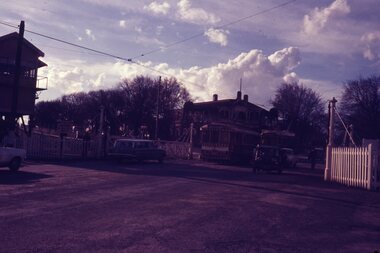
Set of four green Fuji Film green plastic slides during late 1960's of: 1 - tram No. 11 southbound in Lydiard St North, at the level crossing with destination of Sebastopol. Has Osborne House in the background. .2 - ditto with tram 39 showing special .3 - Bogie tram crossing No. 11 (showing City) at Gregory St. No. 11 has a Twin Lakes sign .4 - Part of one of the timetable board as the City terminus, Sturt and Lydiard Sts. .5 - No. 17 with driver/conductor reversing the pole. Has the city in the far distance, looking back towards the city.On each slide in ink "Roy Mitchell" , "Tram" "1958-1971". .1 - "20" .2 - "28" .4 - "15"tramways, trams, lydiard st north, level crossings, gregory st, timetable boards, tram 11, tram 39, tram 17 -
 Ballarat Tramway Museum
Negative, Wal Jack, c1950
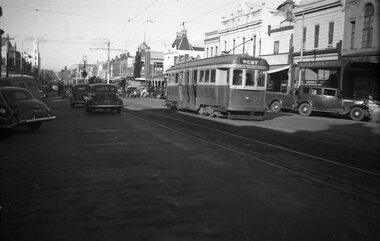
Negative and Digital images of the Wal Jack Geelong Negative file of Geelong bogie 36 outbound to West after crossing Moolap St (the second set of bar lights). A four wheeler can be seen at the intersection. In the background is a Snooker / Billiard parlour and L. F. Weaver ? Agent. !950's. trams, tramways, geelong, ryrie st, tram 36 -
 Ballarat Tramway Museum
Negative, Wal Jack, late 1940s
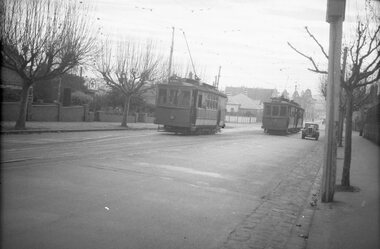
Negative and Digital images of the Wal Jack Geelong Negative file of Geelong 18 and another car crossing at the Autumn St Loop\ in Pakington St West Geelong. Tram has the destination of West and the other car Station. In the background is Hambrook Milliner and a hotel. Photo possibly late 1940's. trams, tramways, geelong, pakington st, west, tram 18 -
 Ballarat Tramway Museum
Negative, Wal Jack, late 1940s
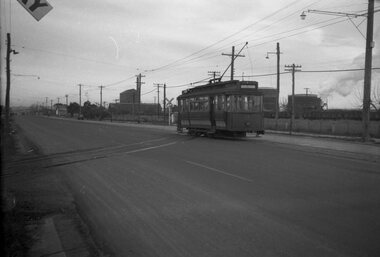
... tramways Geelong North Level Crossings tram 17 Wal Jack ...Negative and Digital images of the Wal Jack Geelong Negative file of Geelong 17 inbound in Melbourne Road on the North line, near Swinburne St at the level crossing used for goods traffic, opposite North Geelong railway yard. Tram has the destination of Belmont. In the background are various gasholders. Photo late 1940's. trams, tramways, geelong, north, level crossings, tram 17 -
 Ballarat Tramway Museum
Negative, Wal Jack, late 1940's
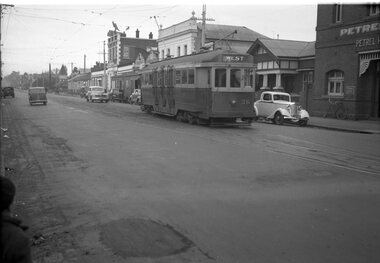
Negative and Digital images of the Wal Jack Geelong Negative file of Geelong 36 in Pakington St near the corner with Collins St, leaving the crossing loop, heading for West. Has the Petrel Hotel in the background. Photo late 1940's. trams, tramways, geelong, pakington st, west, tram 36 -
 Ballarat Tramway Museum
Negative, Wal Jack, mid to late 1940's
Negative and Digital images of the Wal Jack Geelong Negative file of the Geelong 3? (East) and 5 (Newtown) and another car following crossing at the Retreat Road crossing loop? (Not sure here) in Pakington St. Photo mid to late 1940's. trams, tramways, geelong, pakington st, tram 5? tram 3 -
 Ballarat Tramway Museum
Slide - 35mm slide/s, 3/03/1968 12:00:00 AM
35mm colour slide - Kodak white cardboard of a line up of trams in Lydiard St North, Sunday 3/3/1968, looking towards the railway level crossing from the Seymour St loop. Has trams 41, 34, 43, 36, 40, 11, 20, 11, 39, 37 and 21 over crossing. Special service for the Vintage Train.In ink "Ballarat Sunday 3/3/68, Lydiard St North towards railway xing from loop, 41, 34, 43, 36, 40, 11, 20, 11, 39, 37 and 21 over crossing, as specials for passengers off "The Vintage Train"" and KSK stamp with number "19-1"tramways, trams, seymour st, lydiard st nth, tours, vintage train, tram 41, tram 34, tram 43, tram 36 -
 Ballarat Tramway Museum
Slide - 35mm slide/s, Keith Caldwell, 8/03/1960 12:00:00 AM
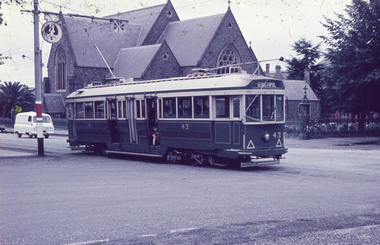
Yields information about the Sturt St, tram 40 and St Patrick's Cathedral.Agfa colour slide, white cardboard mount, photo by Keith Caldwell on 8/3/1960 of: Tram 43 en-route to Sebastopol, south side of Sturt St with St Patrick's in the background. Tram crossing Lyons St. Has two flags in the bracket arm, one of the South Australia Piping Shrike.Stamped on bottom of slide "8 Mar 60"., In ink "BxAT"tramways, trams, sturt st, lyons st, st patrick's, tram 43 -
 Ballarat Tramway Museum
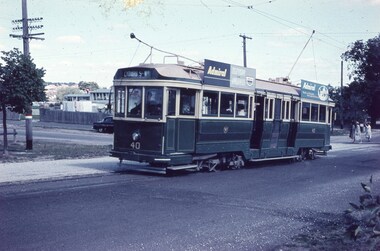
Slide - 35mm slide/s, Keith Caldwell, 8/03/1960 12:00:00 AM
Yields information about the Lydiard St North services.Agfa colour slide, white cardboard mount, photo by Keith Caldwell on 8/3/1960 of: Tram 40 with destination of Lydiard St at the corner of ??? and >?>>>/ Tram has two Admiral TV roof advertisements. Would appear that three ladies have just got of the tram and crossing the road behind the tram.Stamped on bottom of slide "8 Mar 60". In ink "Ballarat"tramways, trams, lydiard st, tram stops, passengers, tram 40 -
 Ballarat Tramway Museum
Slide - 35mm slide/s, Keith Caldwell, 8/03/1960 12:00:00 AM
Yields information about the tram 11 and the Martin Ave loop.Agfa colour slide, white cardboard mount, photo by Keith Caldwell on 8/3/1960 of: Tram 11 crossing another tram at Martin Ave or Haddon St in Wendouree Parade. Tram 11 has the destination of Gardens via Drummond North.Stamped on bottom of slide "8 Mar 60". In ink "Ballarat car 11"tramways, trams, martin ave, haddon st, wendouree parade, tram 11 -
 Ballarat Tramway Museum
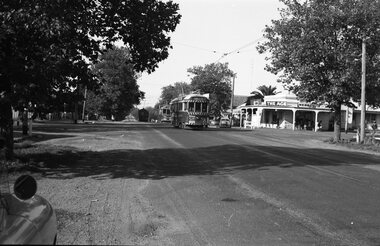
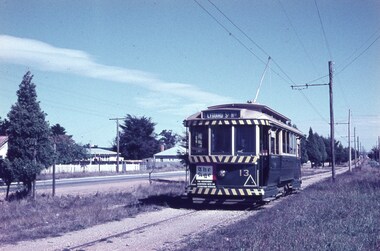
Slide - 35mm slide/s, Keith Caldwell, 12/03/1962 12:00:00 AM
Yields information about the nature of Albert St Sebastopol and the trams used.Agfa colour slide, white cardboard mount, photo by Keith Caldwell on 12/3/1962 of: Tram 13 inbound from Sebastopol in Albert St just before crossing the road. Tram has the destination of Lydiard St North and has an The Age advert on the front dash panel..In ink "Sebastopol #13 12.3.62"tramways, trams, albert st, sebastopol, tram 13