Showing 557 items matching "light line"
-
 Learmonth and District Historical Society Inc.
Photo - King, Richards & Co. Photos Ballaarat, Councilor John King.1883-84
Councilor John King was elected to council in1875-78 and again in1883-89.He served one term as President in1887-88.He was a resident of Burrumbeet.This original photo forms part of collection of photos of all councilors for the year 1883-84. Photo of Councilor John King is in Sepia and oval in shape,it is gold around the edge of cutout and mount is light tan, there is a fine black line around photo.It is second from bottom on left hand side of collection of photos of all councilors for 1883-84.Councilor King's name is enscribed at the bottom of photo.PRESENTED by the PRESIDENT J.DALGLEISH ESQ.to the BALLAARAT SHIRE COUNCIL. 1883-84.ballarat shire council, 1883 84, john king, burrumbeet -
 Learmonth and District Historical Society Inc.
Photo - Findlay, Richards & Co. Photos Ballaarat, Councilor Alexander Findlay 1883-84
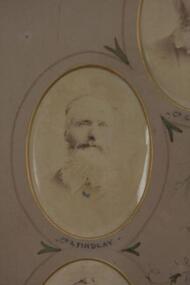
Councilor Alexander Findlay was elected to council in 1873 and again in 1879-85.He did not serve as President during that time.He resided at Ercildourne.This original photo forms part of a collection of photos showing all councilors for the year 1883-84.This oval sepia photo is of Councilor Alexander Findlay,set in a "light tan" mount with gold around edge of "cutout". A fine black line surounds the photo linking it to the next.It forms part of a collection of photos of all councilors for the year 1883-84 and is second from the top,left hand side. PRESENTED by the PRESIDENT J.DALGLEISH ESQ.To the BALLAARAT SHIRE COUNCIL 1883-84.ballaarat shire council 1883 84, alexander findlay, ercildourne -
 Learmonth and District Historical Society Inc.
Photo - Rennie, Richards & Co. Photos, Councilor George Rennie 1883-84
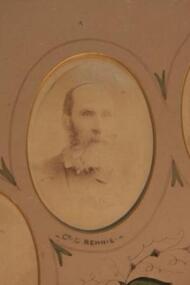
Councilor George Rennie was elected as a member of council in 1875 until 1890.He served two terms as President,1885-86 and 1886-87.He was a resident of Learmonth.This Original photo is a part of a collection of photos of all councilors for the year 1883-84. The photo of Councilor George Rennie is in sepia,and oval in shape.It is set in a "light tan" mount and has gold edging around the "cutout",A fine black line is drawn around the photo which links it to the next. It is at the top left of circle of photos of all councilors for 1883-84.PRESENTED by the President J.DALGLEISH ESQ.to the BALLARAT SHIRE COUNCIL.1883-84. learmonth, ballaarat shire council, george rennie 1883 84 -
 Learmonth and District Historical Society Inc.
Photo. Baird.J, Richards & Co.Photos Ballaarat, Councilor J.Baird, 1883-84
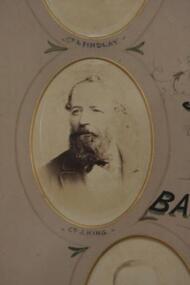
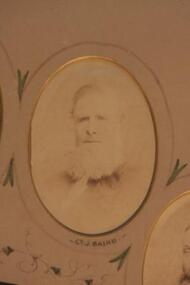
Councilor James Baird was first Elected to council in1863 until 1865 and again in 1868 until 1887.He was elected the first President of the Ballarat Shire in1863-64.He also served three further terms as President in1874-75,1875-76 and 1879-80 This Original photo forms part of a collection of photos of all councilors for the year 1883-84. The photo of Councilor James Baird, is in Sepia and oval in shape,set in a "light tan" mount with gold edging around cutout.Councilor J.Bairds' name is inscribed at base of photo.Around the photo is drawn a fine line with decorative features which connect it to the next.It is set at the top right of circle of photos of all councilors for 1883-84.PRESENTED by the PRESIDENT J.DALGLEISH ESQ.to the BALLAARAT SHIRE COUNCIL.1883-84.ballarat shire council, james baird, first shire president 1883 84 -
 Learmonth and District Historical Society Inc.
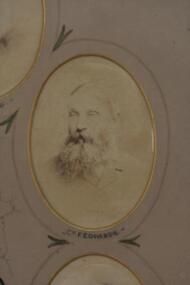
Photo-Edwards, Richards & Co.Photos Ballaarat, Councilor Francis Edwards 1883-84, "circa 1884"
Councilor Francis Edwards was elected as a member of council in1872 until 1886.He only served one term as President in1878-79.His residence was Coghills Creek and later Ascot.This original photo forms part of a collection showing all councilors for the year 1883-84.This photo of Councilor Francis Edwards,is in sepia and oval in shape set in a "light tan" mount with gold trim around "cutout".Around photo a fine line is drawn with decorative features connecting it to the next photo. Councilor J.Edwards name is inscribed at the base of the photo.It is set on the right side, second from top of circle of photos showing all councilors for 1883-84. PRESENTED by the PRESIDENT J. DALGLIESH ESQ.to the BALLAARAT SHIRE COUNCIL 1883-84.ascot, ballarat shire council, francis edwards 1883 84, coghils creek -
 Learmonth and District Historical Society Inc.
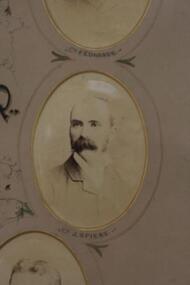
Photo - Spiers, Richards & Co. Photos, Ballaarat, Councilor John Pollock Spiers. 1883-84, "circa 1884"
Councilor John Pollock Spiers was elected to council in 1878 until 1880,1880 until 1892,1893 until 1902,1904 until 1910 and 1915 until 1918.He served two terms as President,1889-90 and 1899-1900.Councilor Spiers was a resident of Learmonth.Part of original collection of photos showing all councilors for 1883-84. This photo of Councilor John Pollock Spiers is in sepia tones and oval in shape,set in a "light tan"mount with gold edging around the cut out.Surounding the photo is a fine line and decorative features which link it to the next photo. It is on the right side second from bottom of the circle of photos showing all councilors for 1883-84. PRESENTED by the PRESIDENT J.DALGLIESH ESQ. to the BALLAARAT SHIRE COUNCIL 1883-84.ballarat shire council, john pollock spiers 1883 84 -
 Learmonth and District Historical Society Inc.
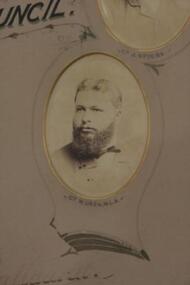
Photo - Uren, Richards & Co. Photos.Ballaarat, Councilor W.Uren.(M.L.A.) 1883-84, "Circa1884"
Councilor William Henry Uren was elected as a member of council in1876 until 1889.He served three terms as President,1880-81,1881-82 and 1882-83.His residence was at Cardigan.This original photo is part of a collection of photos which show all councilors for the year 1883-84. This photo of Councilor William Henry Uren (M.L.A.) in sepia tones and oval in shape,is set in a"light tan" mount with gold trim to the edge of the "cutout". Around the photo is a fine line with decorative ink features which link it to the photo next to it.It is at the bottom right of the circle of photos showing all councilors for the year 1883-84.PRESENTED by the PRESIDENT J.DALGLIESH,ESQ.to the BALLAARAT SHIRE COUNCIL 1883-84.ballarat shire council, 1883 84, william henry uren mla -
 Learmonth and District Historical Society Inc.
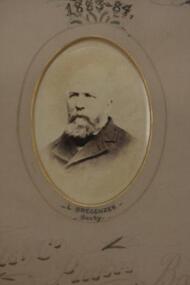
Photo - Bregenzer, Richards & Co. Photos Ballaarat, L.Bregenzer, Shire Secretary 1883-84, "circa 1884"
Mr.Louis Bregenzer was Secretary for Ballarat Shire Council in1883-84.Part of original collection of photos showing all councilors for the year 1883-84.Photo of Mr. L.Bregenzer is in sepia and oval in shape,set in a "light tan" mount with gold trim around edge of "cutout".Around photo is a fine line and decorative features which connect it with the next photo.It is at the bottom of the circle of photos showing all councilors for 1883-84.At the bottom of photo is inscribed L.Bregenzer, Secretary.PRESENTED by the PRESIDENT J. DALGLIESH ESQ. to the BALLAARATLSHIRE COUNCIL.1883-84.ballarat shire council, louis bregenzer secretary 1883 84 -
 Flagstaff Hill Maritime Museum and Village
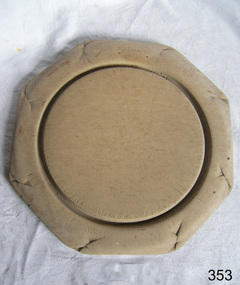
Domestic object - Bread Board
In the high tech, fast paced society that we live in, it’s easy to take some things for granted. Case in point: the wood cutting board on which you’ll probably be preparing the evening’s dinner. Have you ever taken the time to think about the history of the cutting board? Where did it come from, and what did ancient civilizations use to cut their meats, fruits and vegetables? Wood throughout the ages Since the dawn of time, wood has been one of the most available materials used by mankind to build tools and lodgings, so it’s not really surprising to know that wood has been used in the preparation of food since the prehistoric ages. Of course, back then, cavemen probably used an unpolished slab of tree trunk to cut the kill of the day on and they probably didn’t think twice about saving it once the meal was over. Chances are they probably threw it in the fire with the rest of the wood needed to kindle it. Advances in technology Throughout the centuries, mankind evolved and started creating machines from steam, electricity and metal. When the circular saw was invented, nicer, cleaner slabs of wood were cut and used as cutting boards. Since soft wood was the most available type of wood at the time, it was the material of choice for to be used for cutting boards. Boards were made smaller since the slab of wood could now be cut to any desired size. Since they were made smaller, they were also used to eat off of and some people referred to them as trenchers. Trenchers were originally pieces of stale hard bread that were used as substitute plates. Wood trenchers quickly became the replacements of the eatable dinnerware. The butcher block: the cutting board’s larger cousin In the industrial ages, many industries rapidly developed, and the butchery industry followed this trend as well. Before the invention of the cutting board, butchers used tree rounds to carve their meat on. The rounds were often too soft and they rapidly became unsanitary. Hard maple wood butcher blocks were the preferred choice of the industry. They were made to be extremely thick and durable, so durable in fact, that a butcher could use the same block for almost his entire career. Cutting boards around the world As cutting boards began to be more and more used in kitchens around North America, the rest of the world crafted such boards from different materials. The East used thick bamboo as their material of choice. Despite its frail appearance, bamboo is quite strong and made durable cutting boards and butcher blocks. Europe used maple in the crafting of their cutting boards while Persia used flat pieces of polished wood in their kitchens. The world then saw cutting boards that were being made from other materials like plastic and they came in all shapes and sizes, but they always served the same purpose, to provide a household with a safe, clean surface on which to prepare meals for their friends and family members. https://www.woodcuttingboards.com/news/quick-history-of-the-cutting-board-47.aspxThe bread board is an example of kitchen equipment used during Victorian times and similar to those used today.Bread board. Wooden, octagonal, plain sanded light wood. Has decoration around edge and indented circular line to delineate round cutting board section.None.flagstaff hill, warrnambool, shipwrecked-coast, flagstaff-hill, flagstaff-hill-maritime-museum, maritime-museum, shipwreck-coast, flagstaff-hill-maritime-village, bread board, cutting board, pastry board, kitchen utensil, kitchen equipment, baking equipment, food preparation -
 Marysville & District Historical Society
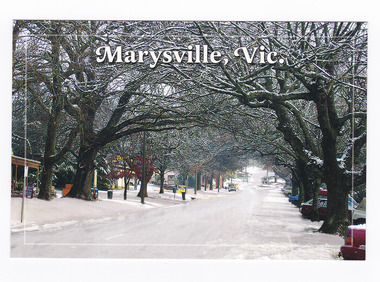
Postcard (item) - Colour postcard, Graphic Print Postcards, Marysville, Vic, 2004
A colour photograph of a snow covered Murchison Street in Marysville in Victoria.A colour photograph of a snow covered Murchison Street in Marysville in Victoria. This photograph was taken in 2004 before the 2009 Black Saturday bushfires that destroyed most of the businesses in the main street.Marysville's main street covered with a light layer of snow. Marysville is a small country town in Victoria, just 10/ minutes from Lake Mountain, one of Australia's best/ Cross Country Skiing Resorts. Graphic in Print/ Postcards Place/ Stamp/ Here Graphic in Print/ Country Towns Collection/ Classic 2/ c 2004/ Ph: (03) 5966 8523 Fax: (03) 5966 8458 Mob: 418 593 534marysville, victoria, murchison street, snow, postcard, souvenir, graphic in print, country town collection -
 Marysville & District Historical Society
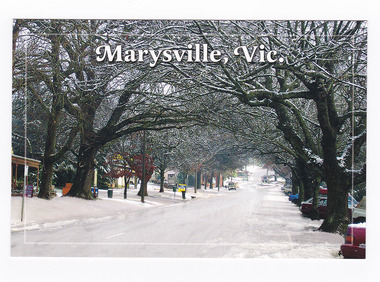
Postcard (item) - Colour postcard, Graphic Print Postcards, Marysville, Vic, 2004
A colour photograph of a snow covered Murchison Street in Marysville in Victoria.A colour photograph of a snow covered Murchison Street in Marysville in Victoria. This photograph was taken in 2004 before the 2009 Black Saturday bushfires that destroyed most of the businesses in the main street.Marysville's main street covered with a light layer of snow. Marysville is a small country town in Victoria, just 10/ minutes from Lake Mountain, one of Australia's best/ Cross Country Skiing Resorts. Graphic in Print/ Postcards Place/ Stamp/ Here Graphic in Print/ Country Towns Collection/ Classic 2/ c 2004/ Ph: (03) 5966 8523 Fax: (03) 5966 8458 Mob: 418 593 534marysville, victoria, murchison street, snow, postcard, souvenir, graphic in print, country town collection -
 Flagstaff Hill Maritime Museum and Village
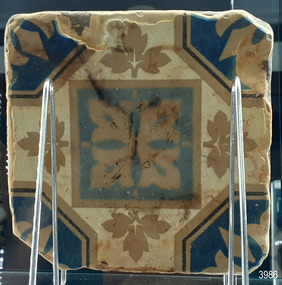
Ceramic - Floor Tile, circa 1878
This Minton floor tile is from the wreck of the Loch Ard. The iron-hulled clipper ship from the Loch Line was heading for Port Phillip from London, when it ran into the cliffs of Mutton Bird Island near Port Campbell. The Loch Ard was laden with high-value cargo including luxury goods intended for display at the Melbourne International Exhibition in 1880. One notable survivor from the ship’s freight manifest was the well-packed Minton porcelain peacock, a two-meter high ceramic masterpiece of vivid glazed colours. (This is also on display in the Great Circle Gallery). The almost total loss of life and property from the Loch Ard registered as a shocking tragedy for the Colony of Victoria, at a time when social confidence and economic optimism were otherwise high. The wealth generated from Gold and Wool was increasingly being spent on grandiose private residences and imposing public buildings. The demand for quality furnishings and fittings was therefore strong. Among the products consigned to burgeoning colonial markets by the Milton Pottery at Stoke upon Trent, were their new range of colourfully patterned but very durable floor tiles ideal for the high-traffic spaces in the large civic buildings then being constructed in Australia and America. These floor tiles were “encaustic”, meaning that their designs and colours were encased “within” the depth of the tile. Rather than their decorative patterns being glazed onto the surface of the tile, their inlaid designs were created during the manufacturing process, as “coloured slips” (or liquid clay) were poured into a deep pre-moulded casting. When fired, the resulting tile was colour-fast and design-fast. The Minton floor tile is significant for its hard-wearing yet attractive design. The shipwreck of the Loch Ard is of significance for Victoria and is registered on the Victorian Heritage Register ( S 417). Flagstaff Hill has a varied collection of artefacts from Loch Ard and its collection is significant for being one of the largest accumulations of artefacts from this notable Victorian shipwreck of which the subject items are a small part. The collections of objects give us a snapshot of how we can interpret the story of this tragic event. The collection is also archaeologically significant as it represents aspects of Victoria's shipping history that allows us to interpret Victoria's social and historical themes of the time. Through is associated with the worst and best-known shipwreck in Victoria's history. A square Minton floor tile with a white background, and beige, dark blue, light blue and black geometric pattern as well as leaves in the design. The tile has corner broken off and some chipping along the edges. The reverse has five rows of five evenly spaced holes. The back of the tile has inscriptions. Made by Minton & Co. at Stoke upon Trent. This encaustic floor tile was recovered from the shipwreck of the LOCH ARD. Branded "... MINTON&CO / PATENT / STOKE UPON TRENT"flagstaff hill, warrnambool, flagstaff hill maritime museum, shipwreck coast, flagstaff hill maritime village, great ocean road, loch line, loch ard, captain gibbs, eva carmichael, tom pearce, glenample station, mutton bird island, minton floor tile, encaustic tile, melbourne international exhibition, floor tile, minton tile, minton & co., stoke upon trent -
 Blacksmith's Cottage and Forge
Lamp, 1900 (estimated)
This item type was used during the First World War throughout Europe. This item is an artillery siege lamp. It was used by artillery units. The lamps were powered by a single candle, the light being magnified by a lens. A shutter closes over the lens to give an illuminated vertical line. They were used originally in fortified siege artillery posititions as a general purpose lamp. They were also used as aiming lamps when they were placed in front of artillery posititions and used as a guide in aiming at night. Further research has suggested that this item may have been attached to bicycles for illuminating the way in the blackout.This item is considered rare and important. It is historically and technically siginficant at a national level. Painted black metal(tin) candle power, hand held or placed on flat area, open base so candle can be inserted and 'screwed' in, side door for lighting, fron magnifying glass, metal lens cover with vertical slit. There is considerable damage to the black paint in the external regions of the lamp.world war one, military, candle, artillery, europe, lamp, black, artillery siege lamp, artillery units, candle power, aiming lamp, wwi, 1900, australian war memorial, bike light, bike, bicycle, bicycle lamp, blackout -
 Federation University Historical Collection
Photograph, Noel L. Harvey, Yendon Railway Station, 1968, 03/12/1968
Buninyong had no railway station so residents would travel to Yendon to catch the train. The Yendon Railway Station building was demolished soon after this photograph was taken. The bluestone was purchased by John Vernon, and was used to construct retaining walls in a garden enclosure between the first two buildings at the new Ballarat Institute of Advanced Education campus at Mt Helen. This is now known as the courtyard between building 'F' and building 'G' at the University of Ballarat mt Helen Campus. The following article was published in the Ballarat Courier on 06 December 1968. 'Yendon Station to be demolished - The old bluestone railway station at Yendon is to be demolished. C.A.D. Fisken told Buninyong Shire Council of the proposal at its meeting yesterday. Fortunately, he said, the beautiful stonework would not be lost. It would be used and incorporated in the new School of Mines building at Mt Helen. the retention of the century-old building was the subject of representations by Council to the Railways following the closure of the station for goods traffic 'some time ago'. The building had also been noted by the National Trust as one of special interest. The Railways Department advised the meeting that an inspection had been made at the Yendon level crossing, but no recommendation could be made at present for installation of flashing light signals.'Bluestone building with dressed bluestone door and window jambs and chimney. The roof is corrugated iron. The platform edge is also of bluestone construction. The building is the former Yendon Railway Station (now demolished) on the Ballarat -Geelong main line (the original Melbourne to Ballarat mainline). When the line was opened, this station may have been originally called Buninyong as it was built a number of years before the Ballarat to Buninyong branch line was built. This this has subsequently caused some confusion. The station was later renamed Yendon. Verso in blue ballpoint pen 'No 47 Yendon Railway Stn' Stamped in purple ink 'N.L. Harvey & Son, Photographers, 131 Sturt Streeet Ballarat, Phone 25766, After hours 23397, Will photograph anywhere anytime any place. (in pen 3/12/68),university of ballarat, ballarat institute of advanced education, yendon, railway, bluestone, john vernon -
 Federation University Historical Collection
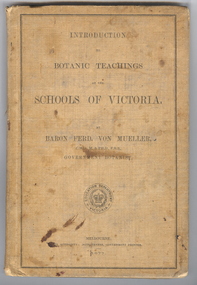
Book, Ferdinand von Mueller, Introduction to Botanic Teachings at the Schools of Victoria, 1877, 1877 (exact)
Ferdinand von Mueller was an examiner of botany at the Ballarat School of Mines (SMB) between 1880 and 1888. During that era he was active in donating related items to the School. When the Ballarat School of Mines Council agreed to introduce pharmacy and botany classes in 1879, it was apparent students would require access to botanical specimens in order to further their studies. Council members, who were inspired by the work of Baron Ferdinand von Mueller, authorised development of an area along the School's northern boundary, fronting Lydiard Street South, and oversaw the establishment of the new Botanical Gardens. Baron von Mueller took a practical role the development of SMB's Botanical Gardens from the beginning. He became a generous benefactor who 'donated collections of seeds and leguminous fodder plants, including valued grasses of interest and use to agriculturalists and graziers generally' to SMB over many years. Ferdinand von Mueller's entry on the University of Ballarat Honour Roll can be found at http://www.ballarat.edu.au/curator/honour-roll/honourroll_von_mueller.shtml A light brown, hardcovered book of 152 pages. Chapters include Eucalyptus Trees; Wattles or Acacias; Casuarinas or Sheoaks; Cypress Pines or Sandarac trees; Exocarpos trees of Natice Cherry trees; Mistletoes; Native Honeysuckles or Banksias; Bellflower, Lobelia and Goodenia; Heaths; Correas; Mallow; Buttercups and Clematis; Cruciferous Plants; Mints; Orchids; grasses; ferns. The book has numerous botanical line drawings, and a comprehensive index.Inside front cover "J. Clement Souter M.D."victorian, schools, botany, ferdinand von mueller, von mueller, botanic illustrations, j. clement souter -
 Federation University Historical Collection
Tool, Brick mould and brick, 1) UNKNOWN .2) c.1888
... in the base piece appear to be hand-made. Remnants of clay still line.... Remnants of clay still line the interior. .2) Light brown brick ...John Nunn was one of the earliest brickmakers on record in Ballarat and has a road named for him - Nunn Street - where he resided..1) An oblong-shaped timber box open at top. Only butt joints are used. Iron strapping wraps around the vertical pieces of timber and across the top edge of the box. The longest pieces of vertical timber protrude past the end and are shaped like solid handles - one is broken. On each end piece there are small, blank iron plates held with screws. The base piece of timber is made from two different width weatherboard-style timbers. The nails in the base piece appear to be hand-made. Remnants of clay still line the interior. .2) Light brown brick. Please note: Brick mould and brick may be from different sources..1) Handwritten (possibly in ink) on one long side: MR H. G. SMITH ...(illegible) Ballarat .2) Imprinted: J. NUNNjohn nunn, j nunn, brick, mould, brick mould, industrial mould, brickmaker, ballarat, clay, ceramics -
 Federation University Historical Collection
Booklet - Document, Robert Ashley et al, 'The Lal Lal Iron Tramway', 1970
High on a series of terraces overlooking the Moorabool River stands the remains of the Lal Lal Blast Furnace, classified 'A' by the National trust (to be preserved at all costs). This was the location of Victoria's only pig iron industry. A series of tramways served the works, as a well surveyed narrow-gauge tramway connected the blast furnace with the Victorian Roailways' main line about 3.5 miles away. Light Railways, no 24, Summer 1970-71, 36 pages. This booklet considers the Lal Lal Iron Tramwaylal lal iron, lal lal blast furnace, tramways, railways, pig iron, ironstone quarry, industrial heritage -
 Federation University Historical Collection
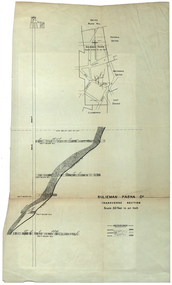
Plan, Sulieman Pasha Co Plan Transverse Section
The Sulieman Pasha is possibly named after the most important Sultan of the Ottoman Empire, Suleiman One, or Suleiman the Magnificent, when the Ottoman Empire was at its peak. Or potentially a number of Ottoman governors, statesmen and military commanders with the same name after, however the spelling is slightly different to the mine name. No Turkish connection was found relating to the formation of the company, and remains unconfirmed. The mine operated from two shafts; No. 1 near the corner of Humffray and Mair streets, and also near where the Welcome Nugget (2217 ounces) was found years earlier; and the controversial No. 2 shaft several blocks south bordering the northern side of the main highway through Ballarat. The company produced 62 666 ounces of gold, the twelfth highest quartz reef gold production for any mine on the Ballarat goldfield. Some crushing figure examples are January-June 1881: 3674 tonnes 1085 ounces; January-June 1885: 2949 tonnes 1281 ounces; July-December 1885: 4459 tonnes 1119 ounces; January-June 1887: 1869 tonnes 730 ounces; July-December 1892: 1450 tonnes 771 ounces; July-December 1896: 4365 tonnes 1372 ounces. Like many mines in the area, gold grades were low. John Watson was noted as mine manager in the 1880s, and John Williams 1890s. The company was re-organised twice increasing the number of shares from 4000 to 24 000, and increasing the capital available. The Sulieman Pasha Company was formed in 1878. David Fitzpatrick was given the honour of turning the first sod of both the No.1 and later No. 2 shafts. The first dividend was given to shareholders in July 1881. The company obtained a prospecting vote (government grant) to start, and was very proud to be the first Victorian gold mining company to pay the funds back to the government. The event was marked by a lavish banquet laid out for ministers and government officials by the company. Leases were purchased to the south in 1885 to the Llanberris Mine boundary, after poor results began accumulating from the small No. 1 shaft. To take advantage of this new land the company planned to sink a second shaft. Initially this was to take place on government land, but the uproar from nearby residents caused the company to purchase land along the Main Road (now Western Highway), and the old Yarrowee Hotel which had occupied the site since the alluvial digger days of the 1850's was demolished. The area had since those days become heavily occupied with a number of shops, houses, a post office, church and two schools in the immediate area. The thought of an underground mine next door drew considerable opposition. The company (before the days of public relations departments) wrote 'most people would have thought that progress as vital as mining would be supported by tradesmen whose business rely on the mining industry. It seems when it comes to mining they are bereft of their senses, and considering the low ebb of mining in Ballarat East, the action of our opponents are unaccountable. (Sarcastically) There are certain engineering difficulties in moving the quartz reefs to a new location, but if we could to appease our opponents we would'. The company also wanted to take over 4 acres of the St Paul's school oval for machinery, but accused the St Paul's Church of wanting extortionate amounts of money upfront, and on a yearly basis for the privilege. It stated the church could not be opposed to mining when several years earlier it had formed its own company to mine the land, only for shareholders to lose their money. In 1886, the company approached the Minister for Mines, and attended heated public meetings on the matter. The local residents, shop owners, and church submitted a 60 person petition to the local council and government authorities. They stated the shaft contravened the mining statutes, which stating no mining could take place within 150 yards of a public building or church. A speech by a resident stated 'mining always comes with glorious pictures of the great benefits which would accrue all parties concerned if their request is granted, but if property is destroyed or depreciated in value, no-one then comes forward and compensates them'. The No. 2 shaft was approved including taking over part of the school oval. In 1888, workers at the company's No. 2 shaft went on strike to try and bring their wages in line with other mines in the district (the No. 1 shaft was operated by tributers). William Madden (26) was killed from a fall of earth underground the same year, while a year later his father John Madden (70) was similarly killed in the Madame Berry Mine elsewhere in the district. In 1897 as the amount of gold being found fell away, it came to light part of the deal to purchase the Yarrowee Hotel site was a 5% royalty on gold found. Shareholders could not understand why they were paying a royalty to the former owners of the property. The mine closed in 1898 due to a lack of gold. In 1902 a boy (age unknown) called Charles Lee was killed from a fractured skull while working to dismantle the Sulieman Pasha plant. The fuss over the No. 2 shaft had a sequel. On the company winding up, the land was purchased by J.S. Trethowan who built a house next to the shaft. In 1907, the shaft caved-in creating a sinkhole immediately at the back of the house. A Mr Chamberlain heard a deep rumbling sound at 5am, and looked out the window to see his fowl house and thirteen chickens disappear down an expanding hole. He then went back to bed, and called the police later in the day. The shaft was 1050 feet deep, and the hole at the surface that developed was 20 feet by 17 feet across, and 20 feet depth. In 1930 it is reported a syndicate had been formed to clean out the old shaft, and re-open the mine. It is assumed this was the No. 1 shaft but no more was found. (https://www.mindat.org/loc-304239.html, accessed 07/08/2019) A transverse section plan of the Sulieman Pasha Mine.sulieman pasha company, plan, mining, united black hill mine, victoria united mine, victoria street, britannia united mine, last chance mine, llanberris mine, ottoman empire, john watson, john williams, david fitzpatrick -
 Flagstaff Hill Maritime Museum and Village
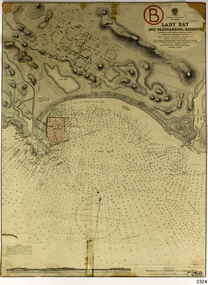
Document - Navigation Chart, Admiralty Office, Lady Bay and Warrnambool Harbour, 1893
This navigation cart of Lady Bay and Warrnambool Harbour was originally surveyed in 1870 but this version includes the update for magnetic variation in 1893. Since the printing of the chart several annotations have been added. These include an additional stamp dated 15-8-1910, a handwritten comment across the top of the page dated August 1910, and another handwritten comment regarding the ‘Proposed Extension of Dock’ dated 19-2-1925, plus connected drawings, notes and figures. The 1925 proposal on this chart may have been a reaction to the Royal Commission of 1923, when the damaged stonework on the seaward side of the Warrnambool Breakwater, caused by the action of the sea, was the subject of enquiry. A conference between the Public Works, Water Commission and the Harbour Trust concluded that it would less costly to make repairs to prevent further damage rather than replaced the damage portion of the wall. A contract was raised in late 1924 to deposit rubble on the damaged side of the breakwater to minimise the Southern Ocean’s destructive action and work had started by August 1925. The Breakwater construction had begun in 1874 and was completed in 1890. The Victorian Government had commissioned Sir John Coode, a British harbour engineer, to present a plan to complete the Warrnambool Breakwater but his original plan was too expensive. He prepared a revised plan for a shorter structure. The construction proved to be too short to protect adequately from the weather and didn't allow enough depth for larger vessels to come into port. The decreasing trade was further affected by siltation in the bay due to the breakwater, and the completion of the railway line. The situation of the harbour became a real problem by 1910 and required continuous dredging. In 1914 the Breakwater was extended but proved to be a failure because the work began to subside and by 1920 about two thirds of the harbour was silted up. Alterations made in the 1920's increased the silting problem and by the 1940's the harbour was no longer used. More alterations were made in the 1950's and 1960's. This chart is significant for its strong connection to the maritime history of Warrnambool Harbour and Lady Bay and the Warrnambool Breakwater. The Warrnambool Breakwater is registered as a place of significance on the Victorian Heritage Database (VHR H2024). The Warrnambool Breakwater is one of the most important late 19th century maritime engineering projects in Victoria and significant in the development of Victorian coastal shipping. It is also significant for its connection with British harbour engineer, Sir John Coode. The chart is a historical record of structures existing in 1893; the Warrnambool Jetties, Warrnambool Breakwater in Lady Bay, the leading lights (lighthouses), streets, roads, bridges and many buildings. It also shows the lay of the land and seabed. Navigation Chart: Lady Bay and Warrnambool Harbour, Australia - South Coast - Victoria. Surveyed by Nav. Lieut. H.J. Stanley, R.N., 1870. Updated for Magnetic Variation, 1893. The rectangular chart is printed on heavy cream paper. Stamps are shaped rectangular, oval and round. Around the Breakwater and Jetty area are handwritten notes, dotted and joined lines, numbers and signatures, and shading of red and green. The chart shows the surrounds of Warrnambool Harbour, Lady Bay, the Breakwater and Jetty, roads, bridges and the streets in Warrnambool. It has sounding details, and angles of line from the leading lights.Stamp, rectangular, including "AUG 1910" Stamp, double oval " - - - -CHART" Stamp, hand drawn, red circle, with "B" inside Hand written note "22-8-1910 - - - - - of surveying C. Ca - - - request of 15-8-10 [initials] " Notes and lines in red pen, including a grid of sounding numbers: "1300" "1050" "1200" "Possible Extension of Dock" "19-2-25" "Dock Dredged to 20 Ft" Notes and lines in blue pen "Extension of Dock to accommodate vessels drawing 20 Feet" and "Light not visible south of this line" Red dots (4) with yellow highlight at both leading lights, breakwater and jettyflagstaff hill, warrnambool, flagstaff hill maritime museum & village, maritime museum, maritime village, shipwreck coast, map, chart, navigation chart, plan, lady bay, warrnambool harbour, port of warrnambool, breakwater, jetty, pier, dock extension, proposed extension, vhr h2024, 1870, 1893, 1910, 1925, warrnambool town late 1800s, warrnambool streets late 1800s royal commission, 1923, public works, water commission, harbour trust, victorian harbours, sir jon coode -
 Flagstaff Hill Maritime Museum and Village
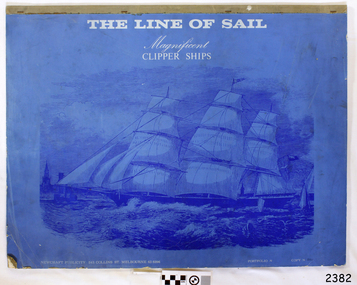
Book - Portfolio, Newcraft Pulicity, The Line of Sail; Magnificent Clipper Ships, 1969
... The White Star Line Clipper Ship “MORNING LIGHT” The Aberdeen...” – Australian Clipper The White Star Line Clipper Ship “MORNING LIGHT ...These prints include large sailing ships that were also referred to as Clippers and Tall Ships. These ships were used to transport cargo and passengers across the world in the 19th century. They were powered purely by harnessing the wind. It could take three to four months to sail in this manner from England to Australia. On many occasions the ships were wrecked, often close to their destination, through errors of navigation. The method of production of the original images is over a century old. The Melbourne publisher of this portfolio book, Newcraft Publicity, describes the contents as follows-' Magnificent Clipper Ships: Clipper ships in the line of sail make the most romantic and spectacular pictorial chapter of marine history. This collection depicting early clippers and other types of sailing ships were originally fine engravings on wooden printing blocks used in newspapers a century ago. They were taken directly from the original newspaper prints, and reproduced in enamel inks to provide a choice of fine line prints suitable for framing. LIST OF PRINTS- The New Australian Clipper "BLUE JACKET" The Clipper Ship “CHRYSOLIER” The “GAUNTLET” Clipper Ship The New American Clipper “GREAT REPUBLIC” The Clipper Ship “GUIDING STAR” New Emigrant Ship “HESPERIDES” for the South Australian Line Capt. Beatson’s Expedition in search of Sir John Franklin – the “ISABEL” The Black Ball Line Clipper Ship “JAMES BAINES” The “MERCHANT PRINCE” – Australian Clipper The White Star Line Clipper Ship “MORNING LIGHT” The Aberdeen Clipper Built Barque “PHOENICIAN” New Australian Clipper Ship the “ROYAL FAMILY” The “SOVEREIGN OF THE SEAS” American Clipper The New Iron Clipper Built Ship “TAYLEUR” for Australia H.M. New Frigate “THETIS” The American Clipper Ship “WITCH OF THE WAVE” ABOUT THE PUBLISHER- The Newcraft Publicity was a Melbourne business that operated in the 1960s at 243 Collins Street, Melbourne.This portfolio book of clipper ship prints is historically significant as it shows an important part of Australia's history, It includes some of the shipping lines famous in the 19th century for transporting passengers and goods to Australia. The prints are also significant for their origin in the carved wooden blocks used a century ago for creating images for the newspapers of the time. Book is also significant from being one of a limited edition of books produced. There are copes in both the Victorian State Library and the National Library of Australia.The Line of Sail is a portfolio of sixteen fine line, black and white prints on paper. The subject is clipper ships. The covers are paper-covered card, coloured a strong blue with white line images and text. The image side of the pages has a sheen, the back is matt. Each print has a caption. The top of the book is stapled and bound with grey tape. Produced by Newcraft Publicity, Melbourne. Limited Edition - Copy Number 086. Stamped on front cover "086"flagstaff hill, warrnambool, shipwrecked-coast, flagstaff-hill, flagstaff-hill-maritime-museum, maritime-museum, shipwreck-coast, flagstaff-hill-maritime-village, lithographs, newscraft publicity, book, the line of sail, dlipper ships, tall shipos, sailing ships, wood block print, newspaper drawings, newcraft productions, newcraft melbourne, portfolio of clipper ships, limited edition, wooden engravings, magnificent clipper ships -
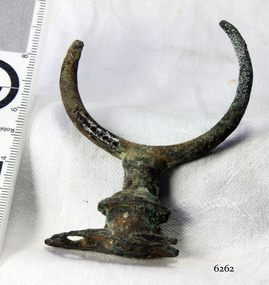
 Flagstaff Hill Maritime Museum and Village
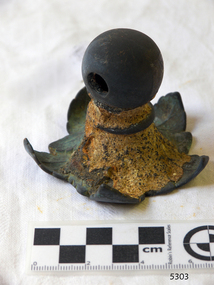
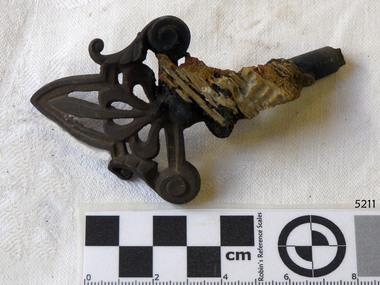
Light Fitting
Ref L/29 LA 32 254 HISTORY OF THE LOCH ARD The LOCH ARD belonged to the famous Loch Line which sailed many ships from England to Australia. Built in Glasgow by Barclay, Curdle and Co. in 1873, the LOCH ARD was a three-masted square rigged iron sailing ship. The ship measured 262ft 7" (79.87m) in length, 38ft (11.58m) in width, 23ft (7m) in depth and had a gross tonnage of 1693 tons. The LOCH ARD's main mast measured a massive 150ft (45.7m) in height. LOCH ARD made three trips to Australia and one trip to Calcutta before its final voyage. LOCH ARD left England on March 2, 1878, under the command of Captain Gibbs, a newly married, 29 year old. She was bound for Melbourne with a crew of 37, plus 17 passengers and a load of cargo. The general cargo reflected the affluence of Melbourne at the time. On board were straw hats, umbrella, perfumes, clay pipes, pianos, clocks, confectionary, linen and candles, as well as a heavier load of railway irons, cement, lead and copper. There were items included that intended for display in the Melbourne International Exhibition in 1880. The voyage to Port Phillip was long but uneventful. At 3am on June 1, 1878, Captain Gibbs was expecting to see land and the passengers were becoming excited as they prepared to view their new homeland in the early morning. But LOCH ARD was running into a fog which greatly reduced visibility. Captain Gibbs was becoming anxious as there was no sign of land or the Cape Otway lighthouse. At 4am the fog lifted. A man aloft announced that he could see breakers. The sheer cliffs of Victoria's west coast came into view, and Captain Gibbs realised that the ship was much closer to them than expected. He ordered as much sail to be set as time would permit and then attempted to steer the vessel out to sea. On coming head on into the wind, the ship lost momentum, the sails fell limp and LOCH ARD's bow swung back. Gibbs then ordered the anchors to be released in an attempt to hold its position. The anchors sank some 50 fathoms - but did not hold. By this time LOCH ARD was among the breakers and the tall cliffs of Mutton Bird Island rose behind the ship. Just half a mile from the coast, the ship's bow was suddenly pulled around by the anchor. The captain tried to tack out to sea, but the ship struck a reef at the base of Mutton Bird Island, near Port Campbell. Waves broke over the ship and the top deck was loosened from the hull. The masts and rigging came crashing down knocking passengers and crew overboard. When a lifeboat was finally launched, it crashed into the side of LOCH ARD and capsized. Tom Pearce, who had launched the boat, managed to cling to its overturned hull and shelter beneath it. He drifted out to sea and then on the flood tide came into what is now known as LOCH ARD Gorge. He swam to shore, bruised and dazed, and found a cave in which to shelter. Some of the crew stayed below deck to shelter from the falling rigging but drowned when the ship slipped off the reef into deeper water. Eva Carmichael had raced onto deck to find out what was happening only to be confronted by towering cliffs looming above the stricken ship. In all the chaos, Captain Gibbs grabbed Eva and said, "If you are saved Eva, let my dear wife know that I died like a sailor". That was the last Eva Carmichael saw of the captain. She was swept off the ship by a huge wave. Eva saw Tom Pearce on a small rocky beach and yelled to attract his attention. He dived in and swam to the exhausted woman and dragged her to shore. He took her to the cave and broke open case of brandy which had washed up on the beach. He opened a bottle to revive the unconscious woman. A few hours later Tom scaled a cliff in search of help. He followed hoof prints and came by chance upon two men from nearby Glenample Station three and a half miles away. In a state of exhaustion, he told the men of the tragedy. Tom returned to the gorge while the two men rode back to the station to get help. By the time they reached LOCH ARD Gorge, it was cold and dark. The two shipwreck survivors were taken to Glenample Station to recover. Eva stayed at the station for six weeks before returning to Ireland, this time by steamship. In Melbourne, Tom Pearce received a hero's welcome. He was presented with the first gold medal of the Royal Humane Society of Victoria and a £1000 cheque from the Victorian Government. Concerts were performed to honour the young man's bravery and to raise money for those who lost family in the LOCH ARD disaster. Of the 54 crew members and passengers on board, only two survived: the apprentice, Tom Pearce and the young woman passenger, Eva Carmichael, who lost all of her family in the tragedy. Ten days after the LOCH ARD tragedy, salvage rights to the wreck were sold at auction for £2,120. Cargo valued at £3,000 was salvaged and placed on the beach, but most washed back into the sea when another storm developed. The wreck of LOCH ARD still lies at the base of Mutton Bird Island. Much of the cargo has now been salvaged and some was washed up into what is now known as LOCH ARD Gorge. Cargo and artefacts have also been illegally salvaged over many years before protective legislation was introduced. One of the most unlikely pieces of cargo to have survived the shipwreck was a Minton porcelain peacock - one of only nine in the world. The peacock was destined for the Melbourne International Exhibition in 1880. It had been well packed, which gave it adequate protection during the violent storm. Today, the Minton peacock can be seen at the Flagstaff Hill Maritime Museum in Warrnambool. From Australia's most dramatic shipwreck it has now become Australia's most valuable shipwreck artefact and is one of very few 'objects' on the Victorian State Heritage Register. Flagstaff Hill’s collection of artefacts from LOCH ARD is significant for being one of the largest collections of artefacts from this shipwreck in Victoria. It is significant for its association with the shipwreck, which is on the Victorian Heritage Register (VHR S417). The collection is significant because of the relationship between the objects, as together they have a high potential to interpret the story of the LOCH ARD. The LOCH ARD collection is archaeologically significant as the remains of a large international passenger and cargo ship. The LOCH ARD collection is historically significant for representing aspects of Victoria’s shipping history and its potential to interpret sub-theme 1.5 of Victoria’s Framework of Historical Themes (living with natural processes). The collection is also historically significant for its association with the LOCH ARD, which was one of the worst and best known shipwrecks in Victoria’s history. Light Fitting. Has encrustation and some verdigris on surface. Base has a leaf pattern. Recovered from the wreck of the Loch Ard. Artefact Rego No LA/29.flagstaff hill, warrnambool, shipwrecked coast, flagstaff hill maritime museum, maritime museum, shipwreck coast, flagstaff hill maritime village, great ocean road, loch line, loch ard, captain gibbs, eva carmichael, tom pearce, glenample station, mutton bird island, loch ard gorge, light fitting -
 Flagstaff Hill Maritime Museum and Village
Functional object - Gas Tap, Before 1878
History of the Loch Ard: The Loch Ard got it’s name from ”Loch Ard” a loch which lies to the west of Aberfoyle, and to the east of Loch Lomond. It means "high lake" in Scottish Gaelic.The vessel belonged to the famous Loch Line which sailed many vessels from England to Australia. The Loch Ard was built in Glasgow by Barclay, Curdle and Co. in 1873, the vessel was a three-masted square-rigged iron sailing ship that measured 79.87 meters in length, 11.58 m in width, and 7 m in depth with a gross tonnage of 1693 tons with a mainmast that measured a massive 45.7 m in height. Loch Ard made three trips to Australia and one trip to Calcutta before its fateful voyage. Loch Ard left England on March 2, 1878, under the command of 29-year-old Captain Gibbs, who was newly married. The ship was bound for Melbourne with a crew of 37, plus 17 passengers. The general cargo reflected the affluence of Melbourne at the time. Onboard were straw hats, umbrella, perfumes, clay pipes, pianos, clocks, confectionery, linen and candles, as well as a heavier load of railway irons, cement, lead and copper. There were other items included that were intended for display in the Melbourne International Exhibition of 1880. The voyage to Port Phillip was long but uneventful. Then at 3 am on June 1, 1878, Captain Gibbs was expecting to see land. But the Loch Ard was running into a fog which greatly reduced visibility. Captain Gibbs was becoming anxious as there was no sign of land or the Cape Otway lighthouse. At 4 am the fog lifted and a lookout aloft announced that he could see breakers. The sheer cliffs of Victoria's west coast came into view, and Captain Gibbs realised that the ship was much closer to them than expected. He ordered as much sail to be set as time would permit and then attempted to steer the vessel out to sea. On coming head-on into the wind, the ship lost momentum, the sails fell limp and Loch Ard's bow swung back towards land. Gibbs then ordered the anchors to be released in an attempt to hold its position. The anchors sank some 50 fathoms - but did not hold. By this time the ship was among the breakers and the tall cliffs of Mutton Bird Island rose behind. Just half a mile from the coast, the ship's bow was suddenly pulled around by the anchor. The captain tried to tack out to sea, but the ship struck a reef at the base of Mutton Bird Island, near Port Campbell. Waves subsequently broke over the ship and the top deck became loosened from the hull. The masts and rigging came crashing down knocking passengers and crew overboard. When a lifeboat was finally launched, it crashed into the side of Loch Ard and capsized. Tom Pearce, who had launched the boat, managed to cling to its overturned hull and shelter beneath it. He drifted out to sea and then on the flood tide came into what is now known as Loch Ard Gorge. He swam to shore, bruised and dazed, and found a cave in which to shelter. Some of the crew stayed below deck to shelter from the falling rigging but drowned when the ship slipped off the reef into deeper water. Eva Carmichael a passenger had raced onto the deck to find out what was happening only to be confronted by towering cliffs looming above the stricken ship. In all the chaos, Captain Gibbs grabbed Eva and said, "If you are saved Eva, let my dear wife know that I died like a sailor". That was the last Eva Carmichael saw of the captain. She was swept off the ship by a huge wave. Eva saw Tom Pearce on a small rocky beach and yelled to attract his attention. He dived in and swam to the exhausted woman and dragged her to shore. He took her to the cave and broke the open case of brandy which had washed up on the beach. He opened a bottle to revive the unconscious woman. A few hours later Tom scaled a cliff in search of help. He followed hoof prints and came by chance upon two men from nearby Glenample Station three and a half miles away. In a complete state of exhaustion, he told the men of the tragedy. Tom then returned to the gorge while the two men rode back to the station to get help. By the time they reached Loch Ard Gorge, it was cold and dark. The two shipwreck survivors were taken to Glenample Station to recover. Eva stayed at the station for six weeks before returning to Ireland by steamship. In Melbourne, Tom Pearce received a hero's welcome. He was presented with the first gold medal of the Royal Humane Society of Victoria and a £1000 cheque from the Victorian Government. Concerts were performed to honour the young man's bravery and to raise money for those who lost family in the disaster. Of the 54 crew members and passengers on board, only two survived: the apprentice, Tom Pearce and the young woman passenger, Eva Carmichael, who lost her family in the tragedy. Ten days after the Loch Ard tragedy, salvage rights to the wreck were sold at auction for £2,120. Cargo valued at £3,000 was salvaged and placed on the beach, but most washed back into the sea when another storm developed. The wreck of Loch Ard still lies at the base of Mutton Bird Island. Much of the cargo has now been salvaged and some items were washed up into Loch Ard Gorge. Cargo and artefacts have also been illegally salvaged over many years before protective legislation was introduced in March 1982. One of the most unlikely pieces of cargo to have survived the shipwreck was a Minton majolica peacock- one of only nine in the world. The peacock was destined for the Melbourne 1880 International Exhibition in. It had been well packed, which gave it adequate protection during the violent storm. Today the Minton peacock can be seen at the Flagstaff Hill Maritime Museum in Warrnambool. From Australia's most dramatic shipwreck it has now become Australia's most valuable shipwreck artifact and is one of very few 'objects' on the Victorian State Heritage Register.The shipwreck of the Loch Ard is of significance for Victoria and is registered on the Victorian Heritage Register ( S 417). Flagstaff Hill has a varied collection of artefacts from Loch Ard and its collection is significant for being one of the largest accumulation of artefacts from this notable Victorian shipwreck. The collections object is to also give us a snapshot into history so we are able to interpret the story of this tragic event. The collection is also archaeologically significant as it represents aspects of Victoria's shipping history that allows us to interpret Victoria's social and historical themes of the time. The collections historically significance is that it is associated unfortunately with the worst and best-known shipwreck in Victoria's history. Brass gas light tap with fancy metal work on the end. Recovered from the wreck of the Loch Ard. flagstaff hill, warrnambool, shipwrecked coast, flagstaff hill maritime museum, maritime museum, shipwreck coast, flagstaff hill maritime village, great ocean road, loch line, loch ard, captain gibbs, eva carmichael, tom pearce, glenample station, mutton bird island, loch ard gorge, brass gas tap, gas tap, light fitting -
 Flagstaff Hill Maritime Museum and Village
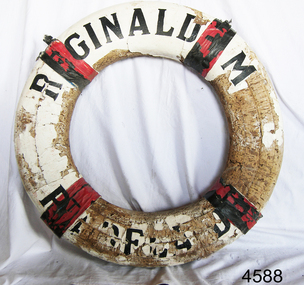
Equipment - Lifebuoy, John Murch, 1922
Lifebuoy is from the ketch Reginald M, built in Port Adelaide by John Murch in 1922. Lifebuoys were part of the emergency lifesaving equipment carried on vessels in the late 19th and early 20th century. The ring was made of strips of cork wood joined together to make the ring shape then covered in canvas and sealed usually with white paint. Four evenly spaced canvas reinforcing bands would be added for strength and for a place to thread a rope or line. A lifebuoy, or life-preserver, is used as a buoyancy device often thrown to an endangered or distressed person in the water to keep them afloat while they receive help. It is usually connected by a rope to a person in a safe area such a nearby vessel or on shore. Lifebuoys is a made from a buoyant materials such as cork or foam and ae usually covered with canvas for protection and to make it easy to grip. The first use of life saving devices in recent centuries was by the Nordic people, who used light weight wood or cork blocks to keep afloat. Cork lifebuoys were used from the late 19th to early 20th century. Kapok fibre was then used as a filling for buoys but wasn’t entirely successful. Light weight balsa wood was used as a filler after WW1. In 1928 Peter Markus invented and patented the first inflatable life-preserver. By WW2 foam was combined with Kapok. Laws were passed over time that has required aeroplanes and water going-vessels to carry life-preservers on board. The Reginald M 1922- The two-masted coastal trading ketch Reginald M was built by John (Jack) Murch in Port Adelaide, South Australia, in 1922 and it was launched there in Largs Bay in the same year. It is thought that the keel was hewn from two telegraph poles - its owner was a regular visitor to salvage yards. Its cargo at times included Guano, Barley, Wool, Horses, Cattle, Timber, Explosives, Potatoes, Shell Grit and Gypsum. At one time the vessel was used as a customs boat, renamed 'HMC No. 3, Pt Adelaide'. In 1969 she was used by a mining and railway company as a barge to carry explosives. In 1972 the vessel was renamed 'T.S. Macquarie' and planned to be used for sea cadet training.; this did not eventuate. It was sold again and went to Melbourne to be used for pleasure sailing, and again sold for use as a ferry. Late in 1975 Flagstaff Hill purchased the vessel to be used as an exhibit at the Maritime Village where many visitors enjoyed being able to board and explore a real ship with a long history. Sadly, in late 2016, the decision was made to 'decommission' the vessel due to the continuing high cost of maintenance and the risk to public safety. Many of the components of the vessel are held as part of Flagstaff Hill's collection.The lifebuoy is an example of equipment carried on vessels in the late 19th and early 20th century to help preserve life. There were many lives lost in Australia’s colonial period, particularly along the coast of South West Victoria. The lifebuoy is significant for its connection with the Australian built, 1922 coastal trader, Reginald M. Lifebuoy, round , cork, filled, white canvas cover with four red tabs. Text is printed in black on quarters 1 and 3. This lifebuoy once belonged to the vessel 'Reginald M' , Pt Adelaide. "REGINALD M / Pt ADELAIDE".flagstaff hill, warrnambool, shipwrecked-coast, flagstaff-hill, flagstaff-hill-maritime-museum, maritime-museum, shipwreck-coast, flagstaff-hill-maritime-village, lifebuoy, lifesaving, ship equipment, reginald m, life rings, safety ring, life-saving buoy, ring buoy, life preserver, personal floating device, floatation device, safety equipment, coastal trader, john murch, reg webb -
 Flagstaff Hill Maritime Museum and Village
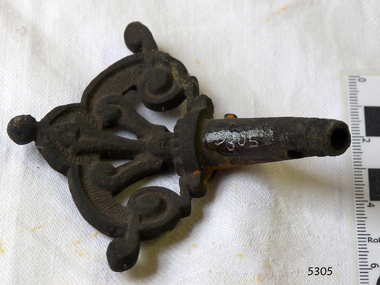
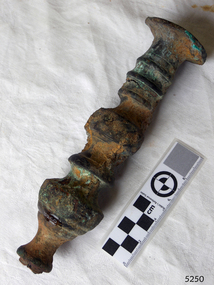
Functional object - Gas Tap, ca 1878
History of the Loch Ard: The Loch Ard got it’s name from ”Loch Ard” a loch which lies to the west of Aberfoyle, and to the east of Loch Lomond. It means "high lake" in Scottish Gaelic.The vessel belonged to the famous Loch Line which sailed many vessels from England to Australia. The Loch Ard was built in Glasgow by Barclay, Curdle and Co. in 1873, the vessel was a three-masted square-rigged iron sailing ship that measured 79.87 meters in length, 11.58 m in width, and 7 m in depth with a gross tonnage of 1693 tons with a mainmast that measured a massive 45.7 m in height. Loch Ard made three trips to Australia and one trip to Calcutta before its fateful voyage. Loch Ard left England on March 2, 1878, under the command of 29-year-old Captain Gibbs, who was newly married. The ship was bound for Melbourne with a crew of 37, plus 17 passengers. The general cargo reflected the affluence of Melbourne at the time. Onboard were straw hats, umbrella, perfumes, clay pipes, pianos, clocks, confectionery, linen and candles, as well as a heavier load of railway irons, cement, lead and copper. There were other items included that were intended for display in the Melbourne International Exhibition of 1880. The voyage to Port Phillip was long but uneventful. Then at 3 am on June 1, 1878, Captain Gibbs was expecting to see land. But the Loch Ard was running into a fog which greatly reduced visibility. Captain Gibbs was becoming anxious as there was no sign of land or the Cape Otway lighthouse. At 4 am the fog lifted and a lookout aloft announced that he could see breakers. The sheer cliffs of Victoria's west coast came into view, and Captain Gibbs realised that the ship was much closer to them than expected. He ordered as much sail to be set as time would permit and then attempted to steer the vessel out to sea. On coming head-on into the wind, the ship lost momentum, the sails fell limp and Loch Ard's bow swung back towards land. Gibbs then ordered the anchors to be released in an attempt to hold its position. The anchors sank some 50 fathoms - but did not hold. By this time the ship was among the breakers and the tall cliffs of Mutton Bird Island rose behind. Just half a mile from the coast, the ship's bow was suddenly pulled around by the anchor. The captain tried to tack out to sea, but the ship struck a reef at the base of Mutton Bird Island, near Port Campbell. Waves subsequently broke over the ship and the top deck became loosened from the hull. The masts and rigging came crashing down knocking passengers and crew overboard. When a lifeboat was finally launched, it crashed into the side of Loch Ard and capsized. Tom Pearce, who had launched the boat, managed to cling to its overturned hull and shelter beneath it. He drifted out to sea and then on the flood tide came into what is now known as Loch Ard Gorge. He swam to shore, bruised and dazed, and found a cave in which to shelter. Some of the crew stayed below deck to shelter from the falling rigging but drowned when the ship slipped off the reef into deeper water. Eva Carmichael a passenger had raced onto the deck to find out what was happening only to be confronted by towering cliffs looming above the stricken ship. In all the chaos, Captain Gibbs grabbed Eva and said, "If you are saved Eva, let my dear wife know that I died like a sailor". That was the last Eva Carmichael saw of the captain. She was swept off the ship by a huge wave. Eva saw Tom Pearce on a small rocky beach and yelled to attract his attention. He dived in and swam to the exhausted woman and dragged her to shore. He took her to the cave and broke the open case of brandy which had washed up on the beach. He opened a bottle to revive the unconscious woman. A few hours later Tom scaled a cliff in search of help. He followed hoof prints and came by chance upon two men from nearby Glenample Station three and a half miles away. In a complete state of exhaustion, he told the men of the tragedy. Tom then returned to the gorge while the two men rode back to the station to get help. By the time they reached Loch Ard Gorge, it was cold and dark. The two shipwreck survivors were taken to Glenample Station to recover. Eva stayed at the station for six weeks before returning to Ireland by steamship. In Melbourne, Tom Pearce received a hero's welcome. He was presented with the first gold medal of the Royal Humane Society of Victoria and a £1000 cheque from the Victorian Government. Concerts were performed to honour the young man's bravery and to raise money for those who lost family in the disaster. Of the 54 crew members and passengers on board, only two survived: the apprentice, Tom Pearce and the young woman passenger, Eva Carmichael, who lost her family in the tragedy. Ten days after the Loch Ard tragedy, salvage rights to the wreck were sold at auction for £2,120. Cargo valued at £3,000 was salvaged and placed on the beach, but most washed back into the sea when another storm developed. The wreck of Loch Ard still lies at the base of Mutton Bird Island. Much of the cargo has now been salvaged and some items were washed up into Loch Ard Gorge. Cargo and artefacts have also been illegally salvaged over many years before protective legislation was introduced in March 1982. One of the most unlikely pieces of cargo to have survived the shipwreck was a Minton majolica peacock- one of only nine in the world. The peacock was destined for the Melbourne 1880 International Exhibition in. It had been well packed, which gave it adequate protection during the violent storm. Today the Minton peacock can be seen at the Flagstaff Hill Maritime Museum in Warrnambool. From Australia's most dramatic shipwreck it has now become Australia's most valuable shipwreck artifact and is one of very few 'objects' on the Victorian State Heritage Register.The shipwreck of the Loch Ard is of significance for Victoria and is registered on the Victorian Heritage Register ( S 417). Flagstaff Hill has a varied collection of artefacts from Loch Ard and its collection is significant for being one of the largest accumulation of artefacts from this notable Victorian shipwreck. The collections object is to also give us a snapshot into history so we are able to interpret the story of this tragic event. The collection is also archaeologically significant as it represents aspects of Victoria's shipping history that allows us to interpret Victoria's social and historical themes of the time. The collections historically significance is that it is associated unfortunately with the worst and best-known shipwreck in Victoria's history. Brass gas light tap fitting has fancy metal work at the end. Recovered from the Loch Ard wreck. Noneflagstaff hill, warrnambool, shipwrecked coast, flagstaff hill maritime museum, maritime museum, shipwreck coast, flagstaff hill maritime village, great ocean road, loch line, loch ard, captain gibbs, eva carmichael, tom pearce, glenample station, mutton bird island, loch ard gorge, gas tap, brass gas tap -
 Flagstaff Hill Maritime Museum and Village
Functional object - Gas Tap, Before 1878
History of the Loch Ard: The Loch Ard got it’s name from ”Loch Ard” a loch which lies to the west of Aberfoyle, and to the east of Loch Lomond. It means "high lake" in Scottish Gaelic.The vessel belonged to the famous Loch Line which sailed many vessels from England to Australia. The Loch Ard was built in Glasgow by Barclay, Curdle and Co. in 1873, the vessel was a three-masted square-rigged iron sailing ship that measured 79.87 meters in length, 11.58 m in width, and 7 m in depth with a gross tonnage of 1693 tons with a mainmast that measured a massive 45.7 m in height. Loch Ard made three trips to Australia and one trip to Calcutta before its fateful voyage. Loch Ard left England on March 2, 1878, under the command of 29-year-old Captain Gibbs, who was newly married. The ship was bound for Melbourne with a crew of 37, plus 17 passengers. The general cargo reflected the affluence of Melbourne at the time. Onboard were straw hats, umbrella, perfumes, clay pipes, pianos, clocks, confectionery, linen and candles, as well as a heavier load of railway irons, cement, lead and copper. There were other items included that were intended for display in the Melbourne International Exhibition of 1880. The voyage to Port Phillip was long but uneventful. Then at 3 am on June 1, 1878, Captain Gibbs was expecting to see land. But the Loch Ard was running into a fog which greatly reduced visibility. Captain Gibbs was becoming anxious as there was no sign of land or the Cape Otway lighthouse. At 4 am the fog lifted and a lookout aloft announced that he could see breakers. The sheer cliffs of Victoria's west coast came into view, and Captain Gibbs realised that the ship was much closer to them than expected. He ordered as much sail to be set as time would permit and then attempted to steer the vessel out to sea. On coming head-on into the wind, the ship lost momentum, the sails fell limp and Loch Ard's bow swung back towards land. Gibbs then ordered the anchors to be released in an attempt to hold its position. The anchors sank some 50 fathoms - but did not hold. By this time the ship was among the breakers and the tall cliffs of Mutton Bird Island rose behind. Just half a mile from the coast, the ship's bow was suddenly pulled around by the anchor. The captain tried to tack out to sea, but the ship struck a reef at the base of Mutton Bird Island, near Port Campbell. Waves subsequently broke over the ship and the top deck became loosened from the hull. The masts and rigging came crashing down knocking passengers and crew overboard. When a lifeboat was finally launched, it crashed into the side of Loch Ard and capsized. Tom Pearce, who had launched the boat, managed to cling to its overturned hull and shelter beneath it. He drifted out to sea and then on the flood tide came into what is now known as Loch Ard Gorge. He swam to shore, bruised and dazed, and found a cave in which to shelter. Some of the crew stayed below deck to shelter from the falling rigging but drowned when the ship slipped off the reef into deeper water. Eva Carmichael a passenger had raced onto the deck to find out what was happening only to be confronted by towering cliffs looming above the stricken ship. In all the chaos, Captain Gibbs grabbed Eva and said, "If you are saved Eva, let my dear wife know that I died like a sailor". That was the last Eva Carmichael saw of the captain. She was swept off the ship by a huge wave. Eva saw Tom Pearce on a small rocky beach and yelled to attract his attention. He dived in and swam to the exhausted woman and dragged her to shore. He took her to the cave and broke the open case of brandy which had washed up on the beach. He opened a bottle to revive the unconscious woman. A few hours later Tom scaled a cliff in search of help. He followed hoof prints and came by chance upon two men from nearby Glenample Station three and a half miles away. In a complete state of exhaustion, he told the men of the tragedy. Tom then returned to the gorge while the two men rode back to the station to get help. By the time they reached Loch Ard Gorge, it was cold and dark. The two shipwreck survivors were taken to Glenample Station to recover. Eva stayed at the station for six weeks before returning to Ireland by steamship. In Melbourne, Tom Pearce received a hero's welcome. He was presented with the first gold medal of the Royal Humane Society of Victoria and a £1000 cheque from the Victorian Government. Concerts were performed to honour the young man's bravery and to raise money for those who lost family in the disaster. Of the 54 crew members and passengers on board, only two survived: the apprentice, Tom Pearce and the young woman passenger, Eva Carmichael, who lost her family in the tragedy. Ten days after the Loch Ard tragedy, salvage rights to the wreck were sold at auction for £2,120. Cargo valued at £3,000 was salvaged and placed on the beach, but most washed back into the sea when another storm developed. The wreck of Loch Ard still lies at the base of Mutton Bird Island. Much of the cargo has now been salvaged and some items were washed up into Loch Ard Gorge. Cargo and artefacts have also been illegally salvaged over many years before protective legislation was introduced in March 1982. One of the most unlikely pieces of cargo to have survived the shipwreck was a Minton majolica peacock- one of only nine in the world. The peacock was destined for the Melbourne 1880 International Exhibition in. It had been well packed, which gave it adequate protection during the violent storm. Today the Minton peacock can be seen at the Flagstaff Hill Maritime Museum in Warrnambool. From Australia's most dramatic shipwreck it has now become Australia's most valuable shipwreck artifact and is one of very few 'objects' on the Victorian State Heritage Register.The shipwreck of the Loch Ard is of significance for Victoria and is registered on the Victorian Heritage Register ( S 417). Flagstaff Hill has a varied collection of artefacts from Loch Ard and its collection is significant for being one of the largest accumulation of artefacts from this notable Victorian shipwreck. The collections object is to also give us a snapshot into history so we are able to interpret the story of this tragic event. The collection is also archaeologically significant as it represents aspects of Victoria's shipping history that allows us to interpret Victoria's social and historical themes of the time. The collections historically significance is that it is associated unfortunately with the worst and best-known shipwreck in Victoria's history. Brass gas light tap with fancy metalwork end, recovered from the wreck of the Loch Ard. flagstaff hill, warrnambool, shipwrecked coast, flagstaff hill maritime museum, maritime museum, shipwreck coast, flagstaff hill maritime village, great ocean road, loch line, loch ard, captain gibbs, eva carmichael, tom pearce, glenample station, mutton bird island, loch ard gorge, brass gas tap, brass light fitting, gas fitting -
 Flagstaff Hill Maritime Museum and Village
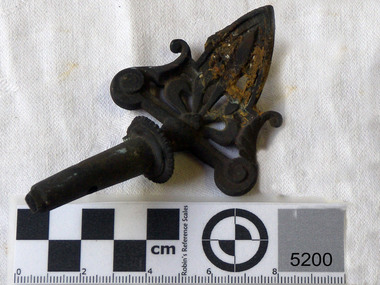
Light Fitting
HISTORY OF THE LOCH ARD The LOCH ARD belonged to the famous Loch Line which sailed many ships from England to Australia. Built in Glasgow by Barclay, Curdle and Co. in 1873, the LOCH ARD was a three-masted square rigged iron sailing ship. The ship measured 262ft 7" (79.87m) in length, 38ft (11.58m) in width, 23ft (7m) in depth and had a gross tonnage of 1693 tons. The LOCH ARD's main mast measured a massive 150ft (45.7m) in height. LOCH ARD made three trips to Australia and one trip to Calcutta before its final voyage. LOCH ARD left England on March 2, 1878, under the command of Captain Gibbs, a newly married, 29 year old. She was bound for Melbourne with a crew of 37, plus 17 passengers and a load of cargo. The general cargo reflected the affluence of Melbourne at the time. On board were straw hats, umbrella, perfumes, clay pipes, pianos, clocks, confectionary, linen and candles, as well as a heavier load of railway irons, cement, lead and copper. There were items included that intended for display in the Melbourne International Exhibition in 1880. The voyage to Port Phillip was long but uneventful. At 3am on June 1, 1878, Captain Gibbs was expecting to see land and the passengers were becoming excited as they prepared to view their new homeland in the early morning. But LOCH ARD was running into a fog which greatly reduced visibility. Captain Gibbs was becoming anxious as there was no sign of land or the Cape Otway lighthouse. At 4am the fog lifted. A man aloft announced that he could see breakers. The sheer cliffs of Victoria's west coast came into view, and Captain Gibbs realised that the ship was much closer to them than expected. He ordered as much sail to be set as time would permit and then attempted to steer the vessel out to sea. On coming head on into the wind, the ship lost momentum, the sails fell limp and LOCH ARD's bow swung back. Gibbs then ordered the anchors to be released in an attempt to hold its position. The anchors sank some 50 fathoms - but did not hold. By this time LOCH ARD was among the breakers and the tall cliffs of Mutton Bird Island rose behind the ship. Just half a mile from the coast, the ship's bow was suddenly pulled around by the anchor. The captain tried to tack out to sea, but the ship struck a reef at the base of Mutton Bird Island, near Port Campbell. Waves broke over the ship and the top deck was loosened from the hull. The masts and rigging came crashing down knocking passengers and crew overboard. When a lifeboat was finally launched, it crashed into the side of LOCH ARD and capsized. Tom Pearce, who had launched the boat, managed to cling to its overturned hull and shelter beneath it. He drifted out to sea and then on the flood tide came into what is now known as LOCH ARD Gorge. He swam to shore, bruised and dazed, and found a cave in which to shelter. Some of the crew stayed below deck to shelter from the falling rigging but drowned when the ship slipped off the reef into deeper water. Eva Carmichael had raced onto deck to find out what was happening only to be confronted by towering cliffs looming above the stricken ship. In all the chaos, Captain Gibbs grabbed Eva and said, "If you are saved Eva, let my dear wife know that I died like a sailor". That was the last Eva Carmichael saw of the captain. She was swept off the ship by a huge wave. Eva saw Tom Pearce on a small rocky beach and yelled to attract his attention. He dived in and swam to the exhausted woman and dragged her to shore. He took her to the cave and broke open case of brandy which had washed up on the beach. He opened a bottle to revive the unconscious woman. A few hours later Tom scaled a cliff in search of help. He followed hoof prints and came by chance upon two men from nearby Glenample Station three and a half miles away. In a state of exhaustion, he told the men of the tragedy. Tom returned to the gorge while the two men rode back to the station to get help. By the time they reached LOCH ARD Gorge, it was cold and dark. The two shipwreck survivors were taken to Glenample Station to recover. Eva stayed at the station for six weeks before returning to Ireland, this time by steamship. In Melbourne, Tom Pearce received a hero's welcome. He was presented with the first gold medal of the Royal Humane Society of Victoria and a £1000 cheque from the Victorian Government. Concerts were performed to honour the young man's bravery and to raise money for those who lost family in the LOCH ARD disaster. Of the 54 crew members and passengers on board, only two survived: the apprentice, Tom Pearce and the young woman passenger, Eva Carmichael, who lost all of her family in the tragedy. Ten days after the LOCH ARD tragedy, salvage rights to the wreck were sold at auction for £2,120. Cargo valued at £3,000 was salvaged and placed on the beach, but most washed back into the sea when another storm developed. The wreck of LOCH ARD still lies at the base of Mutton Bird Island. Much of the cargo has now been salvaged and some was washed up into what is now known as LOCH ARD Gorge. Cargo and artefacts have also been illegally salvaged over many years before protective legislation was introduced. One of the most unlikely pieces of cargo to have survived the shipwreck was a Minton porcelain peacock - one of only nine in the world. The peacock was destined for the Melbourne International Exhibition in 1880. It had been well packed, which gave it adequate protection during the violent storm. Today, the Minton peacock can be seen at the Flagstaff Hill Maritime Museum in Warrnambool. From Australia's most dramatic shipwreck it has now become Australia's most valuable shipwreck artefact and is one of very few 'objects' on the Victorian State Heritage Register. Flagstaff Hill’s collection of artefacts from LOCH ARD is significant for being one of the largest collections of artefacts from this shipwreck in Victoria. It is significant for its association with the shipwreck, which is on the Victorian Heritage Register (VHR S417). The collection is significant because of the relationship between the objects, as together they have a high potential to interpret the story of the LOCH ARD. The LOCH ARD collection is archaeologically significant as the remains of a large international passenger and cargo ship. The LOCH ARD collection is historically significant for representing aspects of Victoria’s shipping history and its potential to interpret sub-theme 1.5 of Victoria’s Framework of Historical Themes (living with natural processes). The collection is also historically significant for its association with the LOCH ARD, which was one of the worst and best known shipwrecks in Victoria’s history. Section of ornate light fitting, brass stem is cracked. Slight encrustation and verdigris. Recovered from the wreck of the Loch Ard. Artefact Rego No LA/??.flagstaff hill, warrnambool, shipwrecked coast, flagstaff hill maritime museum, maritime museum, shipwreck coast, flagstaff hill maritime village, great ocean road, loch line, loch ard, captain gibbs, eva carmichael, tom pearce, glenample station, mutton bird island, loch ard gorge, light fitting -
 Flagstaff Hill Maritime Museum and Village
Harness rein-guide
When the ship Schomberg was launched in 1855, she was considered the most perfect clipper ship ever to be built. James Blaine’s Black Ball Line had commissioned her to be built for their fleet of passenger liners. At a cost of £43,103, the Aberdeen builders designed her to sail faster than the quick clippers designed by North American Donald McKay. She was a three masted wooden clipper ship, built with diagonal planking of British oat with layers of Scottish larch. This luxury vessel was designed to transport emigrants to Melbourne in superior comfort. She had ventilation ducts to provide air to the lower decks and a dining saloon, smoking room, library and bathrooms for the first class passengers. At the launch of Schomberg’s maiden voyage, her master Captain ‘Bully’ Forbes, drunkenly predicted that he would make the journey between Liverpool and Melbourne in 60 days. Schomberg departed Liverpool on 6 October 1855 with 430 passengers and 3000 tons cargo including iron rails and equipment intended the build the Geelong Railway and a bridge over the Yarra from Melbourne to Hawthorn. The winds were poor as Schomberg sailed across the equator, slowing her journey considerably. She was 78 days out of Liverpool when she ran aground on a sand-spit near Peterborough, Victoria, on 27 December; the sand spit and the currents were not marked on Forbes’s map. Overnight, the crew launched a lifeboat to find a safe place to land the ship’s passengers. The scouting party returned to Schomberg and advised Forbes that it was best to wait until morning because the rough seas could easily overturn the small lifeboats. The ship’s Chief Officer spotted SS Queen at dawn and signalled the steamer. The master of the SS Queen approached the stranded vessel and all of Schomberg’s passengers were able to disembark safely. The Black Ball Line’s Melbourne agent sent a steamer to retrieve the passengers’ baggage from the Schomberg. Other steamers helped unload her cargo until the weather changed and prevented the salvage teams from accessing the ship. Local merchants Manifold & Bostock bought the wreck and cargo, but did not attempt to salvage the cargo still on board the ship. They eventually sold it on to a Melbourne businessman and two seafarers. After two of the men drowned when they tried to reach Schomberg, salvage efforts were abandoned.32 In 1975, divers from Flagstaff Hill, including Peter Ronald, found an ornate communion set at the wreck. The set comprised a jug, two chalices, a plate and a lid. The lid did not fit any of the other objects and in 1978 a piece of the lid broke off, revealing a glint of gold. As museum staff carefully examined the lid and removed marine growth, they found a diamond ring, which is currently on display in the Great Circle Gallery.33 Flagstaff Hill also holds ship fittings and equipment, personal effects, a lithograph, tickets and photograph from the Schomberg. Most of the artefacts were salvaged from the wreck by Peter Ronald, former director of Flagstaff Hill. The Schomberg, which is on the Victorian Heritage Register (VHR S612), has great historical significance as a rare example of a large, fast clipper ship on the England to Australia run, carrying emigrants at the time of the Victorian gold rush. She represents the technical advances made to break sailing records between Europe and Australia. Flagstaff Hill’s collection of artefacts from the Schomberg is significant for its association with the shipwreck. The collection is primarily significant because of the relationship between the objects, as together they have a high potential to interpret the story of the Schomberg. It is archaeologically significant as the remains of an international passenger Ship. It is historically significant for representing aspects of Victoria’s shipping history and for its association with the shipwreck and the ship, which was designed to be fastest and most luxurious of its day Brass Rein Guides from a horse harnesss light encrustation and verdigris. Ring broken and segment missing. Recovered from the wreck of the Schomberg.warrnambool, shipwrecked-coast, flagstaff-hill, flagstaff-hill-maritime-museum, maritime-museum, shipwreck-coast, flagstaff-hill-maritime-village, schomberg, shipwrecked-artefact, clipper ship, black ball line, 1855 shipwreck, aberdeen clipper ship, captain forbes, peterborough shipwreck, ss queen, brass rein guides, horse harnesss -
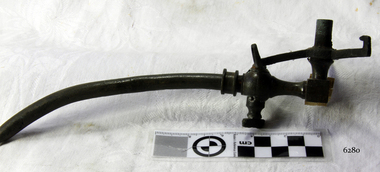 Flagstaff Hill Maritime Museum and Village
Gas Light Fitting
When the ship Schomberg was launched in 1855, she was considered the most perfect clipper ship ever to be built. James Blaine’s Black Ball Line had commissioned her to be built for their fleet of passenger liners. At a cost of £43,103, the Aberdeen builders designed her to sail faster than the quick clippers designed by North American Donald McKay. She was a three masted wooden clipper ship, built with diagonal planking of British oat with layers of Scottish larch. This luxury vessel was designed to transport emigrants to Melbourne in superior comfort. She had ventilation ducts to provide air to the lower decks and a dining saloon, smoking room, library and bathrooms for the first class passengers. At the launch of Schomberg’s maiden voyage, her master Captain ‘Bully’ Forbes, drunkenly predicted that he would make the journey between Liverpool and Melbourne in 60 days. Schomberg departed Liverpool on 6 October 1855 with 430 passengers and 3000 tons cargo including iron rails and equipment intended the build the Geelong Railway and a bridge over the Yarra from Melbourne to Hawthorn. The winds were poor as Schomberg sailed across the equator, slowing her journey considerably. She was 78 days out of Liverpool when she ran aground on a sand-spit near Peterborough, Victoria, on 27 December; the sand spit and the currents were not marked on Forbes’s map. Overnight, the crew launched a lifeboat to find a safe place to land the ship’s passengers. The scouting party returned to Schomberg and advised Forbes that it was best to wait until morning because the rough seas could easily overturn the small lifeboats. The ship’s Chief Officer spotted SS Queen at dawn and signalled the steamer. The master of the SS Queen approached the stranded vessel and all of Schomberg’s passengers were able to disembark safely. The Black Ball Line’s Melbourne agent sent a steamer to retrieve the passengers’ baggage from the Schomberg. Other steamers helped unload her cargo until the weather changed and prevented the salvage teams from accessing the ship. Local merchants Manifold & Bostock bought the wreck and cargo, but did not attempt to salvage the cargo still on board the ship. They eventually sold it on to a Melbourne businessman and two seafarers. After two of the men drowned when they tried to reach Schomberg, salvage efforts were abandoned.32 In 1975, divers from Flagstaff Hill, including Peter Ronald, found an ornate communion set at the wreck. The set comprised a jug, two chalices, a plate and a lid. The lid did not fit any of the other objects and in 1978 a piece of the lid broke off, revealing a glint of gold. As museum staff carefully examined the lid and removed marine growth, they found a diamond ring, which is currently on display in the Great Circle Gallery.33 Flagstaff Hill also holds ship fittings and equipment, personal effects, a lithograph, tickets and photograph from the Schomberg. Most of the artefacts were salvaged from the wreck by Peter Ronald, former director of Flagstaff Hill. The Schomberg, which is on the Victorian Heritage Register (VHR S612), has great historical significance as a rare example of a large, fast clipper ship on the England to Australia run, carrying emigrants at the time of the Victorian gold rush. She represents the technical advances made to break sailing records between Europe and Australia. Flagstaff Hill’s collection of artefacts from the Schomberg is significant for its association with the shipwreck. The collection is primarily significant because of the relationship between the objects, as together they have a high potential to interpret the story of the Schomberg. It is archaeologically significant as the remains of an international passenger Ship. It is historically significant for representing aspects of Victoria’s shipping history and for its association with the shipwreck and the ship, which was designed to be fastest and most luxurious of its day Gas Light Fitting, brass has small gate-valve in line and a three armed diffuser holder. Recovered from the wreck of the Schomberg. Artefact Reg No S/77warrnambool, shipwrecked-coast, flagstaff-hill, flagstaff-hill-maritime-museum, maritime-museum, shipwreck-coast, flagstaff-hill-maritime-village, schomberg, shipwrecked-artefact, clipper ship, black ball line, 1855 shipwreck, aberdeen clipper ship, captain forbes, peterborough shipwreck, ss queen, gas light fitting, brass gas light fitting -
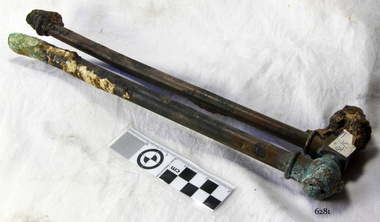 Flagstaff Hill Maritime Museum and Village
Gas Light Fitting
When the ship Schomberg was launched in 1855, she was considered the most perfect clipper ship ever to be built. James Blaine’s Black Ball Line had commissioned her to be built for their fleet of passenger liners. At a cost of £43,103, the Aberdeen builders designed her to sail faster than the quick clippers designed by North American Donald McKay. She was a three masted wooden clipper ship, built with diagonal planking of British oat with layers of Scottish larch. This luxury vessel was designed to transport emigrants to Melbourne in superior comfort. She had ventilation ducts to provide air to the lower decks and a dining saloon, smoking room, library and bathrooms for the first class passengers. At the launch of Schomberg’s maiden voyage, her master Captain ‘Bully’ Forbes, drunkenly predicted that he would make the journey between Liverpool and Melbourne in 60 days. Schomberg departed Liverpool on 6 October 1855 with 430 passengers and 3000 tons cargo including iron rails and equipment intended the build the Geelong Railway and a bridge over the Yarra from Melbourne to Hawthorn. The winds were poor as Schomberg sailed across the equator, slowing her journey considerably. She was 78 days out of Liverpool when she ran aground on a sand-spit near Peterborough, Victoria, on 27 December; the sand spit and the currents were not marked on Forbes’s map. Overnight, the crew launched a lifeboat to find a safe place to land the ship’s passengers. The scouting party returned to Schomberg and advised Forbes that it was best to wait until morning because the rough seas could easily overturn the small lifeboats. The ship’s Chief Officer spotted SS Queen at dawn and signalled the steamer. The master of the SS Queen approached the stranded vessel and all of Schomberg’s passengers were able to disembark safely. The Black Ball Line’s Melbourne agent sent a steamer to retrieve the passengers’ baggage from the Schomberg. Other steamers helped unload her cargo until the weather changed and prevented the salvage teams from accessing the ship. Local merchants Manifold & Bostock bought the wreck and cargo, but did not attempt to salvage the cargo still on board the ship. They eventually sold it on to a Melbourne businessman and two seafarers. After two of the men drowned when they tried to reach Schomberg, salvage efforts were abandoned.32 In 1975, divers from Flagstaff Hill, including Peter Ronald, found an ornate communion set at the wreck. The set comprised a jug, two chalices, a plate and a lid. The lid did not fit any of the other objects and in 1978 a piece of the lid broke off, revealing a glint of gold. As museum staff carefully examined the lid and removed marine growth, they found a diamond ring, which is currently on display in the Great Circle Gallery.33 Flagstaff Hill also holds ship fittings and equipment, personal effects, a lithograph, tickets and photograph from the Schomberg. Most of the artefacts were salvaged from the wreck by Peter Ronald, former director of Flagstaff Hill. The Schomberg, which is on the Victorian Heritage Register (VHR S612), has great historical significance as a rare example of a large, fast clipper ship on the England to Australia run, carrying emigrants at the time of the Victorian gold rush. She represents the technical advances made to break sailing records between Europe and Australia. Flagstaff Hill’s collection of artefacts from the Schomberg is significant for its association with the shipwreck. The collection is primarily significant because of the relationship between the objects, as together they have a high potential to interpret the story of the Schomberg. It is archaeologically significant as the remains of an international passenger Ship. It is historically significant for representing aspects of Victoria’s shipping history and for its association with the shipwreck and the ship, which was designed to be fastest and most luxurious of its day Gas Light Fitting. Brass, two pipes and joint of a swinging armed gas bracket. Has concretion on joint and pipe ends and some verdigris. Recovered from the wreck of the Schomberg. Artefact Reg No S/78.warrnambool, shipwrecked-coast, flagstaff-hill, flagstaff-hill-maritime-museum, maritime-museum, shipwreck-coast, flagstaff-hill-maritime-village, schomberg, shipwrecked-artefact, clipper ship, black ball line, 1855 shipwreck, aberdeen clipper ship, captain forbes, peterborough shipwreck, ss queen, gas light fitting, brass -
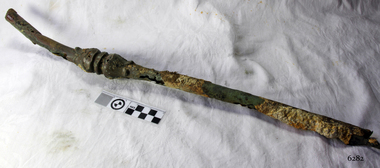 Flagstaff Hill Maritime Museum and Village
Gas Light Fitting
When the ship Schomberg was launched in 1855, she was considered the most perfect clipper ship ever to be built. James Blaine’s Black Ball Line had commissioned her to be built for their fleet of passenger liners. At a cost of £43,103, the Aberdeen builders designed her to sail faster than the quick clippers designed by North American Donald McKay. She was a three masted wooden clipper ship, built with diagonal planking of British oat with layers of Scottish larch. This luxury vessel was designed to transport emigrants to Melbourne in superior comfort. She had ventilation ducts to provide air to the lower decks and a dining saloon, smoking room, library and bathrooms for the first class passengers. At the launch of Schomberg’s maiden voyage, her master Captain ‘Bully’ Forbes, drunkenly predicted that he would make the journey between Liverpool and Melbourne in 60 days. Schomberg departed Liverpool on 6 October 1855 with 430 passengers and 3000 tons cargo including iron rails and equipment intended the build the Geelong Railway and a bridge over the Yarra from Melbourne to Hawthorn. The winds were poor as Schomberg sailed across the equator, slowing her journey considerably. She was 78 days out of Liverpool when she ran aground on a sand-spit near Peterborough, Victoria, on 27 December; the sand spit and the currents were not marked on Forbes’s map. Overnight, the crew launched a lifeboat to find a safe place to land the ship’s passengers. The scouting party returned to Schomberg and advised Forbes that it was best to wait until morning because the rough seas could easily overturn the small lifeboats. The ship’s Chief Officer spotted SS Queen at dawn and signalled the steamer. The master of the SS Queen approached the stranded vessel and all of Schomberg’s passengers were able to disembark safely. The Black Ball Line’s Melbourne agent sent a steamer to retrieve the passengers’ baggage from the Schomberg. Other steamers helped unload her cargo until the weather changed and prevented the salvage teams from accessing the ship. Local merchants Manifold & Bostock bought the wreck and cargo, but did not attempt to salvage the cargo still on board the ship. They eventually sold it on to a Melbourne businessman and two seafarers. After two of the men drowned when they tried to reach Schomberg, salvage efforts were abandoned.32 In 1975, divers from Flagstaff Hill, including Peter Ronald, found an ornate communion set at the wreck. The set comprised a jug, two chalices, a plate and a lid. The lid did not fit any of the other objects and in 1978 a piece of the lid broke off, revealing a glint of gold. As museum staff carefully examined the lid and removed marine growth, they found a diamond ring, which is currently on display in the Great Circle Gallery.33 Flagstaff Hill also holds ship fittings and equipment, personal effects, a lithograph, tickets and photograph from the Schomberg. Most of the artefacts were salvaged from the wreck by Peter Ronald, former director of Flagstaff Hill. The Schomberg, which is on the Victorian Heritage Register (VHR S612), has great historical significance as a rare example of a large, fast clipper ship on the England to Australia run, carrying emigrants at the time of the Victorian gold rush. She represents the technical advances made to break sailing records between Europe and Australia. Flagstaff Hill’s collection of artefacts from the Schomberg is significant for its association with the shipwreck. The collection is primarily significant because of the relationship between the objects, as together they have a high potential to interpret the story of the Schomberg. It is archaeologically significant as the remains of an international passenger Ship. It is historically significant for representing aspects of Victoria’s shipping history and for its association with the shipwreck and the ship, which was designed to be fastest and most luxurious of its day Gas Light Fitting. Copper, two sections of pipe joined with an ornate joiner. Badly corroded with heavy encrustation in parts and some verdigris. 1' 10" long. Recovered from the wreck of the Schomberg. Artefact Reg No S/79.warrnambool, shipwrecked-coast, flagstaff-hill, flagstaff-hill-maritime-museum, maritime-museum, shipwreck-coast, flagstaff-hill-maritime-village, schomberg, shipwrecked-artefact, clipper ship, black ball line, 1855 shipwreck, aberdeen clipper ship, captain forbes, peterborough shipwreck, ss queen, gas light fitting, copper gas light fitting