Showing 264 items
matching signal station
-
 Melbourne Tram Museum
Photograph - 1926 Hudson Super 6 - Riversdale and Warragul Roads, Ray Pearson, 1930s
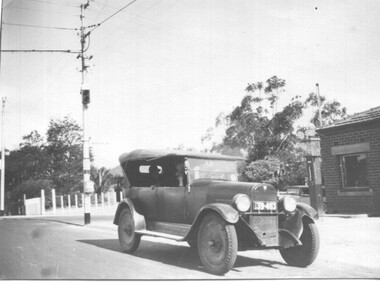
Photograph of a 1926 Hudson Super 6 parked at the tea room/kiosk on the intersection of Riversdale Road and Warragul Road. Distinguishing features of the car include the triangular badge on the radiator and the unusual disc wheels. The 1926 Hudson also had horizontal radiator shutters. On this vehicle, a finer mesh has been attached in front of the shutters. This is normal practice when insects such as locusts are in plague. At the time, Warragul Road was known as East Boundary Road. Behind the car on the tramway pole is a colour light tramway signal for the single-line section between Warragul Road and the terminus. On 1 July 1928, the Wattle Park line was extended from Boundary Road via Riversdale Road to Elgar Road. It was built as a single track with a passing loop about halfway along, plus a passing loop at the former Boundary Road terminus. The tramway pole has a stop sign and a telephone box as well. In a box of negatives received is an envelope noting the car was owned by Ray Pearson and photo taken during the 1930s. Inside the motor car are two people, the driver, and a lady. In the background is part of the tea rooms located at this corner with a Shell gravity-fed petrol bowser. At the time, petrol was not sold at Service Stations on a Sunday - Sunday trading laws, but they allowed Tea Rooms or kiosks to be open.Yields information the intersection of Warragul and Riversdale Road and MMTB single line signals.Black and white photograph on Velox paper.On rear in pencil "Colour light signal Wattle Park Route, down end loop line, corner of Riversdale and East Boundary Roads".trams, tramways, riversdale road, wattle park, warragul road, motor cars, hudson super 6, shell fuel, signalling, single line, ray pearson -
 Melbourne Tram Museum
Photograph - Black & White Photograph/s, 2009
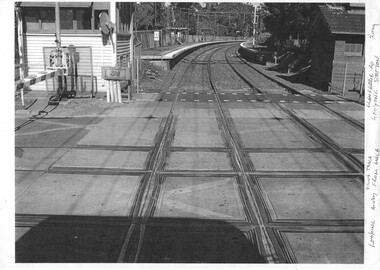
Set of two Photographs printed on A4 sheet, photocopy - of the rail tram level crossing at Glenferrie Road, Kooyong showing the rubber inserts and the level crossing - taken from the cab of a train in either direction. Shows the level crossing, platform and track, along with part of the signal box and boom barriers.1 - "Looking away down track from Melbourne - Glenferrie Rd Kooyong Station - 2009" 2 - "Looking towards Melbourne up track - Glenferrie Rd Kooyong Station - 2009"trams, tramways, kooyong, level crossings, glenferrie road, tramway square, railway squares -
 Melbourne Tram Museum
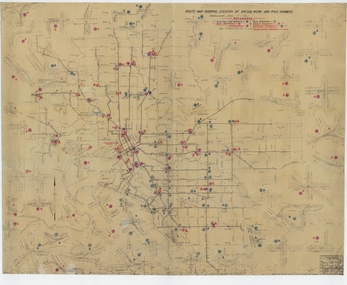
Drawing, Melbourne & Metropolitan Tramways Board (MMTB), "Route Map showing location of special work and pole numbers" "Electric Tramway Routes - showing routes in colours and numbers", late 1941
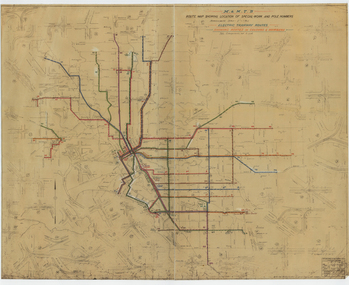
Map of the system shown at two inches = 1 mile. Drawing No. P5799. Shows crossovers, track layouts at junctions, signal cabins roads, railways and stations. Originally signed by Perway Engineer - 20/12/1940, though originally drawn in 1922. Has been marked up in coloured pencil to show the routes and route numbers. The plan shows the lines to Maribyrnong Munitions works along Cordite Ave and Wests Road and the track from Moonee Ponds to Union Road, which opened in July 1941, but not the extension to Essendon Airport built-in 1942. See Reg Item 1561 for a 1963 version and 1683 for a 1987 versionDemonstrates the use of a MMTB drawing to show tram routes and their route numbers at the time.Drawings - dyeline cloth backed print - titled - "Route Map showing location of special work and pole numbers" and subtitled - "Electric Tramway Routes - showing routes in colours and numbers". trams, tramways, mmtb, trackwork, tramways, junction, map, world war 2 -
 Melbourne Tram Museum
Drawing, Melbourne & Metropolitan Tramways Board (MMTB), "Route Map showing location of special work and pole numbers" "All night tram routes in colours", late 1941
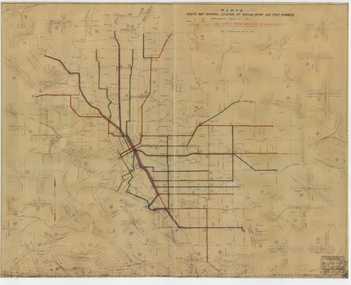
Map of the system shown at two inches = 1 mile. Drawing No. P5799. Shows crossovers, track layouts at junctions, signal cabins roads, railways, and stations. Originally signed by Perway Engineer - 20/12/1940, though originally drawn in 1922. Has been marked up in colour pencil to show the all-night routes and the individual services. The plan shows the lines to Maribyrnong Munitions works along Cordite Ave and Wests Road and the track from Moonee Ponds to Union Road, opened in July 1941, but not the extension to Essendon Airport built in 1942.Demonstrates a detail drawing of Melbourne tramways, junctions and pole numbers.Drawings - dyeline cloth-backed print - titled - "Route Map showing the location of special work and pole numbers" and subtitled - "All night tram routes in colours". trams, tramways, mmtb, trackwork, tramways, junction, map, world war 2, night trams -
 Melbourne Tram Museum
Drawing, Melbourne & Metropolitan Tramways Board (MMTB), "Route Map showing location of special work and pole numbers" "substations", late 1942
Map of the system shown at two inches = 1 mile. Drawing No. P5799. Shows crossovers, track layouts at junctions, signal cabins roads, railways, and stations. Originally signed by Perway Engineer - 20/12/1940, though originally drawn in 1922. The plan shows the lines to Maribyrnong Munitions works along Cordite Ave and Wests Road and the track from Moonee Ponds to Union Road, opened in July 1941, and the extension to Essendon Airport built in 1942, but not the Queen St North Essendon substation. Shows underground cables, tram and bus depot, workshop locations, and substation locations and their priority.Yields information about the MMTB substation locations in 1942.Drawing - dyeline cloth backed print - titled - "Route Map showing location of special work and pole numbers" and subtitled - "Substations". trams, tramways, mmtb, trackwork, tramways, junction, map, world war 2, substation -
 Melbourne Tram Museum
Negative - Set of 2, Wal Jack, 30/08/1941 12:00:00 AM
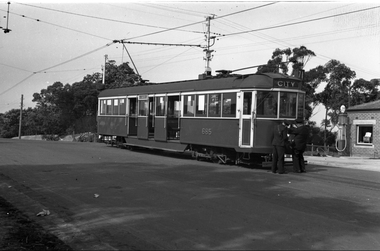
Set of two Black and white negatives, by Wal Jack, of CW5 685 (City, Route 71) at the intersection of Warragul Road and Riversdale Road. The first photo shows two crewmen looking at the headlight on the tram. The second photo shows it is fitted with a war time head light mask and shows a crewman walking out of the building - a service station with Shell pumps. Above the tram on a pole is a tram signal for the single line operation between Warragul Road and the Wattle Park terminus. See also item 6771 for a photo of the pole itself. Photo dated 30-8-1941, in the Wal Jack album.trams, tramways, cw5 class, wattle park, riversdale road, headlight mask, route 71, tram 685 -
 Melbourne Tram Museum
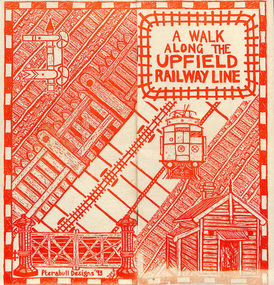
Pamphlet, Brunswick Community History Group, "A walk along the Upfield railway line", 1993
Pamphlet or small booklet, 12 pages on recycled paper, centre stapled titled "A walk along the Upfield railway line", outlining the history of the line, dates, hand operated gates, Royal Park to Brunswick, cable trams and the Sarah sands, sketches, The Jewell, map, Brunswick Station, grain stores, substation, Brunswick tram depot, sidings and railway signals. Published by the Brunswick Community History Group in 1993In ink page 3 "KS 8-7-94"trams, tramways, upfield, brunswick, railways, level crossings -
 Melbourne Tram Museum
Ephemera - Christmas Card, Peter Duckett, c1990
Christmas Cards prepared by Peter and Patti Duckett and sent to Keith Kings Printed photo on exterior with red printed ribbons, photo corners on inside with another photo and gold block print and the Duckett's address. Photographs by Peter Duckett or from his collection. Item not dated. Cover photo of St Kilda Junction mid 1960's, prior to the reconstruction of the junction detailed in the notes inside the card. Has the service station with the word "Flash" on the roof. Inside photo shows the junction in the cable tram era, with motor cars and the signal box"To Keith" in ink.trams, tramways, christmas cards, st kilda junction, cable trams -
 Melbourne Tram Museum
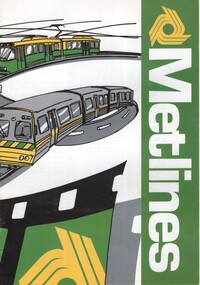
Magazine, Metropolitan Transit Authority (MTA), "Met Lines", 1989
Magazine, published by the Metropolitan Transit Authority of Victoria "Met Lines" (Metlines) - A4, printed on white gloss paper, centre stapled with the MTA logo or symbol. Issued under the name of Kevin Shea as Chairman. Continues from Reg Item 1183 "Met Lines" - printed in an A4 version. Notes Editor as Judi Lalor and writer Sandra McLaren. Chris Astridge Major tram and bus items listed. Tramway names only listed, not railway. .1 - March 1989 - 20 pages - Track gangs, graffiti, signalling, making recruitment videos, body building at Preston Workshops. .2 - June 1989 - 16 pages - Flinders St station cover theme - 16 pages - modifications to Z class tram lights to improve visibility at stops, payroll, Wattle Park rejuvenation project, Essendon Depot Soccer team, Ian Barkla on Puffing Billy. .3 - September 1989 - 20 pages - Show grounds theme - Met Planning, Metplan, Met Plan, Jolimont Rail Yards, Mill Park Light rail extension, photo of 2004, The Met shop, 60th anniversary of Camberwell tram depot, apprentice awards, Melbourne Stamp show 1989, Wattle Park, New billiard table at Malvern, recycling of W2 trams in to mobile Tramburgers - Jim Johnstone and Greg Hart - was going to franchise 60 trams cut in half. (See also Reg Item 406 for other background - also see Jim Johnson) .4 - December 1989 - 20 pages - Christmas theme cover - "On the buses", the Met Bus workshop, details the bus maintenance, bundy clocks - where they were maintained, size of the bus fleet and major depots. Festoon lighting at Flinders St station and retirement of Howard Smith - see image i5. For next year 1990 - see Reg Item 1185.trams, tramways, the met, mta, preston workshops, tramcars, repairs, wattle park, essendon depot, metplan, camberwell depot, postage stamps, post office, malvern depot, scrapped trams, w2 class, flinders st station, bundy clock, buses, tram 2004 -
 Melbourne Tram Museum
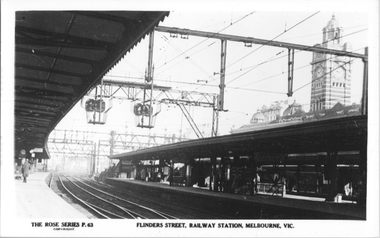
Postcard, Rose Stereograph Co, "Flinders Street, Railway station, Melbourne", mid 1930s
Rose Series postcard No. 63, "Flinders Street, Railway station, Melbourne" looking at platforms 9 and 10 showing track arrangements, signals and platforms with some people.Yields information about the Flinders St railway station platforms.Postcard - printed real photograph with Rose Stereograph Co. name on the rear.flinders st station, platforms, railways -
 Melbourne Tram Museum
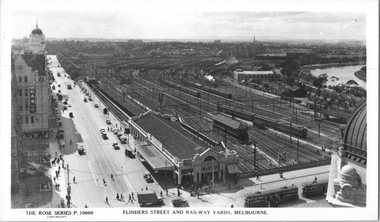
Postcard, Rose Stereograph Co, "Flinders Street and Railway Yards, Melbourne", 1930s
Rose Series postcard No. P 10660, titled "Flinders Street and Railway Yards, Melbourne" showing Princes Bridge Station buildings, the extensive railway yards of the time, signal boxes, Batman Ave, and the Yarra River. There are two trams visible in Flinders Street and another two trams, W2 class, in Swanston Street - both of these seem to have wind deflectors rather than doors on the 'on-side"Yields information about Princes Bridge and the associated railway yards during the 1930s.Postcard - printed real photograph with Rose Stereograph Co. name on the rear.tramways, trams, flinders st station, yarra river, flinders st, princes bridge station, railways, swanston st, w2 class -
 Melbourne Tram Museum
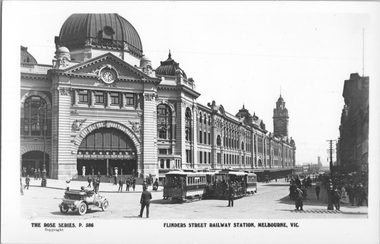
Postcard, Rose Stereograph Co, "Flinders Street Railway Station, Melbourne", 1910s
Rose Series postcard No. P 586, titled "Flinders Street Railway Station, Melbourne" looking at the station entrance from St Paul's cathedral steps. Has two cable tram sets on the Richmond line. One trailer is possibly No. 16. it's clearly one of the original fully imported trailers. In the view is also a policeman directing traffic and an MTOCo employee in the middle of the intersection - a signalman? The driver of the open-top vehicle is signaling a right-hand turn.Yields information about Flinders St station 1910s.Postcard - printed real photograph with Rose Stereograph Co. name on the rear.On rear in pencil "KM-M-081"trams, tramways, swanston st, flinders st station, flinders st, cable trams -
 Ringwood and District Historical Society
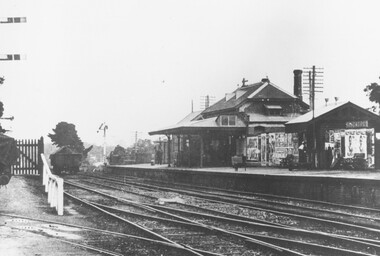
Photograph, Photograph of Ringwood Station looking west before 1920
Black and White photographText on accompanying sheet reads, "Picture & Abbots Lager sign taken after 1912 because of the bracket signals, before 1926 because signal box is on north side, but before 1920 because there is no footbridge. -
 Ringwood and District Historical Society
Photograph, Ringwood railway station precinct - derailment 22/6/1945
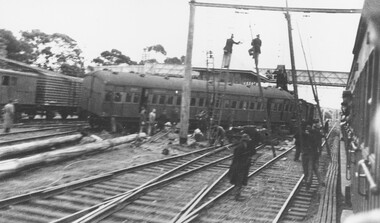
A porter illegally in the signal box moved the points under a train coming into the south platform from a siding. The 5th carriage took two lines as shown, and brought down the overhead stanchions over both the passenger and goods lines. For about 36 hours, the service beyond Mitcham was maintained by steam trains connecting with electrics at Mitcham. Men are pictured putting up temporary overhead stanchions over the passenger lines around 10 a.m. on Saturday 22/6/1945 and another photograph shows the steam crane near the signal box lifting the Melbourne end of the derailed carriage. Accompanying typed sheet reads, "...shows the steam crane about outside the signal box lifting the Melbourne end of the derailed carriage". -
 Ringwood and District Historical Society
Newspaper - Newspaper Clipping, 1949 newspaper clipping featuring 1916 photograph of Ringwood Railway Station staff - J. Trevenar, A.S.M.; J. Lawlor, junior clerk; O. Green, signalman; R. Boyle, yard porter; the next was the signal adjuster, name not known; P.A. Stuart, lad porter, later A>S>M> at Ringwood S.M. at Ringwood. The accompanying article also describes a later accident in which R. Boyle was killed
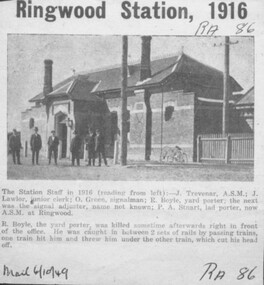
Heading of article reads, "Ringwood Station, 1916". Article reads, "The Station Staff in 1916 (reading from left):- J. Trevenar, A.S.M.; J. Lawlor, junior clerk; O. Green, signalman; R. Boyle, yard porter; the next was the signal adjuster, name not known; P.A. Stuart, lad porter, now A.S.M. at Ringwood. R. Boyle, the yard porter, was killed sometime afterwards right in front of the office. He was caught in between 2 sets of rails by passing trains, one train hit him and threw him under the other train, which cut his head off." "Mail 6/10/49". -
 Ringwood and District Historical Society
Photograph, Ringwood railway station precinct. Post number 35 in view from the foot bridge. The signalman is giving the staff to the driver of a dog box suburban train, from Bayswater
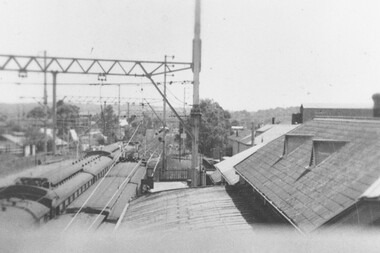
Black and White PhotographAccompanying sheet reads, " 'Post 35' shows the scene from the foot bridge. The signalman is giving the staff to the driver of a dog box suburban train, from Bayswater because there is a train probably on arrival Croydon on the Croydon line. The right hand arm of the bracket is off for Bayswater. Post 35 at that time was a prefab structure which replaced the signal posts knocked down on 22/6/1945. The red brick building bottom right corner is the relay room which included devices which would probably have prevented the June 1945 accident". -
 Ringwood and District Historical Society
Photograph, Ringwood railway station looking east circa 1920's
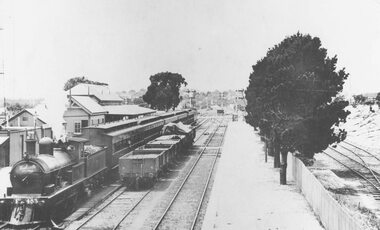
Undated photograph of Ringwood railway station precinct, however some indication of date has been determined by a railway enthusiast- see inscriptionNo inscription but accompanying typed information reads, "From a postcard..... It doesn't show the footbridge and so it was taken before 13/12/1920. And the signal with the six arms on it is seen in the background and therefore it must have been taken after October, 1912". -
 Ringwood and District Historical Society
Photograph, Ringwood railway station precinct. View from pedestrian overpass looking west towards Melbourne c.1948
Black and White photographAccompanying typed sheet reads, "...shows the Croydon train in the north platform ready with signal off to leave for Melbourne". -
 Ringwood and District Historical Society
Photograph, Ringwood railway station precinct. ca 1899-1912
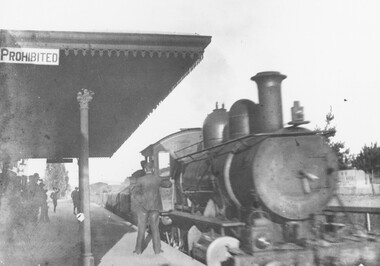
Accompanying sheet reads as follows, "Shows a goods train arriving from either Croydon or Bayswater, probably the former. The Stationmaster is holding up his hand to take a large electric staff indicating that it was taken between 1899 and 1912. The signals also indicate that it was taken before 1912". -
 Ringwood and District Historical Society
Photograph, Ringwood railway station precinct. Easterly view from train approaching north platform from Melbourne c.1948
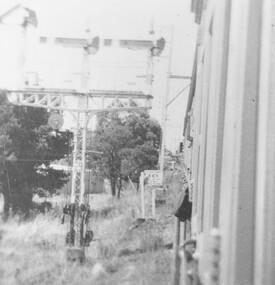
Typed on accompanying sheet, "...shows the three arms of a disc of the arrival signals from Melbourne. I took this picture about 1948". -
 Bendigo Military Museum
Instrument - Duplex Heliograph Mk V - 1940 with Tripod, LUCO Art Metal Coy Ltd, London, 1940
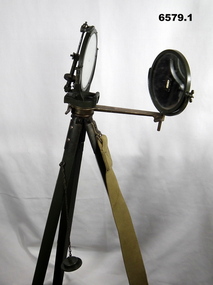
The Heliograph MkV is a fascinating piece of historical surveying and communications equipment. It was primarily used for visual signaling by reflecting sunlight with a mirror to send coded messages over long distances. This method was primarily useful in remote areas where other forms of communication were not available. The MkV model, specifically, was widely used by the British Army and other military forces from around 1906 until the mid 1960s. It remained in use with the Australian Army Survey Corps until the mid 1980s. The device typically included a 5 - inch mirror and was often mounted on a tripod for stability. Initially the instrument was used to communicate between survey stations using Morse code to coordinate their activities. Later when better forms of communication were available, they were used for precise angle alignment where the sunlight reflection from the mirror was targeted between the survey stations to give very accurate results. The MkV was relatively light weight and portable, making it ideal for use in the field. It could be setup and adjusted quickly. The heliograph had an adjustable mirror that could be tilted to reflect sunlight towards a distant receiver. Surveyors could align the mirror using a sighting device. Whilst it was primarily used by the Military it was also used in civil surveying particularly in the remote areas of Australia. The British Army Mark V version uses a flat round mirror with a small unsilvered spot in the centre. The sender aligned the heliograph to the target by looking at the reflected target in the mirror and moving their head until the target was hidden by the unsilvered spot. Keeping their head still, they then adjusted the aiming rod so its cross wires bisected the target, they then turned up the sighting vane, which covered the cross wires with a diagram of a cross, and aligned the mirror with the tangent and elevation screws, so the small shadow that was a reflection of the unsilvered spot hole was on the cross target. This indicated that the sunbeam was pointing at the target. If the sun was in front of the sender, its rays were reflected directly from this mirror to the receiving station. If the sun was behind the sender, the sighting rod was replaced by a second mirror, to capture the sunlight and direct it onto the main mirror to reflect it to the receiving station.. 1 Brish Army "Mance" Mk V A253 Heliograph has two 125mm diameter mirrors on a brass arm with targeting attachments. The Instrument is mounted on a three-legged tripod of brass and mahogany with spiked feet, approximately 1.2 metres high. The instrument was made by LUCO Art Metal Co Ltd, London in 1940. .2 A military green metal carrying safety storage case with khaki shoulder strap.A253 stamped on instrumentroyal australian survey corps, rasvy, fortuna, army survey regiment, army svy regt, asr -
 Melbourne Tram Museum
Photograph - Victoria Parade and Gisborne St - cable trams
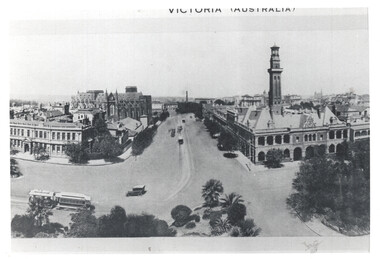
Photo shows the intersection of Victoria Parade looking south possibly from the Eastern Hill Hotel or adjacent building. Shows the Eastern Hill fire station, St Patricks and the Eye and Ear hospital. The are a number of cable trams in the view, including the signal box. Has the words "Victoria Australia" on top of the photo. Demonstrates a photo showing the intersection of Victoria Parade and Gisborne St.Black and white print with a plain back.tramways, cable trams, eastern hill, victoria parade, gisborne st -
 Ringwood and District Historical Society
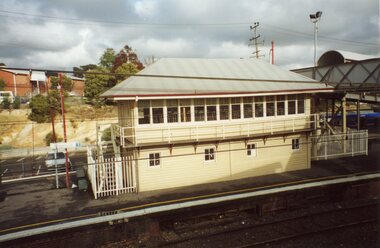
Photograph, Ringwood Railway Precinct circa 2008, showing the heritage Signal Box, later relocated on the north side of the Station building
-
 Melbourne Tram Museum
Ephemera - Greetings card - Swanston St at Collins St - cable trams, Jack Cranston, c1905
Greetings card with a photo of Swanston St looking south from Collins St. On the left side of the photo is a cable tram signal shelter with a signal man at the levers. A St Kilda tram is southbound. Image prior to the construction of Flinders St station building. The Water Tower clock is visible at Princes Bridge Station - see reference. It was moved from Elizabeth St to Princes Bridge in 1902. The card was produced Jack Cranston and published for Glencon Insurance Assessors. See item 8448 for images of the card itself.Yields information about cable trams in Swanston St and a cable tram signalmen c1905.Greetings card with a colour photograph, printed on stippled paper.tramcars, tramways, cable trams, mtoco, swanston st, signalmen