Showing 386 items
matching stop information
-
 Melbourne Tram Museum
Postcard, Rose Stereograph Co, "St Paul's Cathedral, Melbourne", early 1940s
Rose Series postcard No. P 657, titled "St Paul's Cathedral, Melbourne". Photo shows two southbound trams, A W2 class car, possible bound for Toorak on route 8, followed by W3 class car at the Flinders Street stop in Swanston Street. Traffic lights for this intersection can be seen attached to street lighting and overhead pole. All the trams have the war time white strip under the driver's windows and the part white bumper bar. The photo appears to have been taken from the dome of the Flinders Street Railway station.Yields information about St Paul's Cathedral and tram services, early 1940s.Postcard - printed real photograph with Rose Stereograph Co. name on the rear. Two copies held.tramways, trams, w2 class, swanston st, st paul's cathedral, flinders st, w3 class, world war ii -
 Melbourne Tram Museum
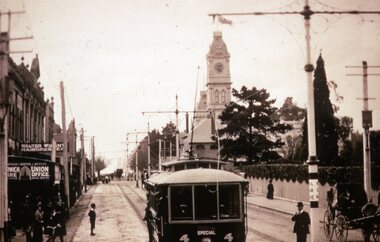
Postcard, Valentine's, "Swanston Street, Melbourne", 1930s
Valentine's postcard titled "Swanston Street, Melbourne", Number V45, looking south from the yard at St Paul's Cathedral to Flinders St Station. There is a W2 Class tram at both the southbound tram stop in Swanston St and one in Flinders St. In the background is St Paul's Cathedral, Princes Bridge station, Flinders St station, and Young and Jackson Hotel, Yields information about Swanston Street during the 1930s.Postcard - printed, unused, Valentine Seriestrams, tramways, swanston st, princes bridge station, flinders street, w2 class -
 Falls Creek Historical Society
Journal - Schuss Vol. 23. No. 6 August 1957
Schuss was advertised as Victoria’s Official Ski Journal It was issued monthly from 1935 to 1961 except during the war when summer issues covered two months. This continued after the war, but it averaged 10 issues annually over its 25 year life. Schuss was published by the Ski Club of Victoria which had a membership of 38 Ski Clubs and demanded to be recognised as the prime authority on skiing in the state. The other 30 ski clubs with 85% of the members disagreed and the politics of skiing became heated. These clubs formed the Federation of Victorian Ski Clubs with their own journal, Ski Horizon. With the establishment of the Victorian Ski Association, Ski-Horizon published its last issue in Nov - Dec. 1955 and the role of the official journal was fully taken over by “Schuss”. This item is significant because it contains stories, images and information documenting the development of the ski facilities at Falls Creek.The journal features stories and events chronicling developments in Victoria and internationally. In this issue:- Front Cover features a photo of John Hilton Wood's Snow Cat below the summit of Mt Buller taken by Eric Burt. Page 211 - Stop Press Items including recent Ski event results Page 217 features a detailed report on Australia's first Ski Chair-Lift at Falls Creek, Victoria which began operation on Saturday 27th July. It was built by Bob Hymans to the design of Dr V Hajek.schuss journal, the ski club of victoria, bob hymans -
 Melbourne Tram Museum
Document - Notice to Passengers, Melbourne & Metropolitan Tramways Board (MMTB), British Commonwealth Youth Sunday, May 1961
Notice to Passengers about the change of services for the British Commonwealth Youth Sunday and May Day Marches on Sunday 7/5/1961. Trams in Swanston St did not run between LaTrobe St and City Roads and cross streets stopped before Swanston St or were diverted by LaTrobe St. Buses were also affected. Signed by B H Misson Traffic Manager. These notices were displayed in the tramcars.Yields information about the closure of Swanston St for marches or processions during 1961. A typical notice and arrangements for such an event.Notice - printed two colours with a sheet of paper glued to the base of the item.Has on top edge "320" in ink.tramways, swanston st, notices, mmtb, procession -
 Ballarat Tramway Museum
Postcard, Rose Stereograph Co, "Corner of Lydiard and Sturt Streets, Ballarat", c1929
postcard - titled "The Corner of Lydiard and Sturt Streets Ballarat Vic", photo looks southwest from the Post Office steps towards the southwest corner - has Craigs Hotel, National Mutual Life, town hall shops including Anderson Printer and the Town Hall in the picture along with Robbie Burns statue. The Rose Series Postcard No. P 1783. An ESCo tram is parked at the tram stop - No. 5? Several horse-drawn and motor vehicles are in the photograph. Wal Jack has dated the photo about 1930 on the rear of the postcard and about 1929 in his album notes - see item 5126 for the digital image. Yields information the buildings, buildings and scene at the intersection of Sturt and Lydiard St with a number of vehicles in the view.Postcard or copy photograph of Rose Stereograph Co. postcard, No P 1783ballarat, trams, tramways, esco, lydiard st, sturt st, town hall, tram 5 ? -
 Ballarat Tramway Museum
Photograph - Bendigo tram 12, 1950s
Photograph of Bendigo Tram 12 with a North Bendigo destination, leaving at a tram stop. Has a shop in the background. Photographer unknown, 1950s given the colour scheme. Tram ex Melbourne No. 107 sold to SEC in 1935, as Ballarat 19, swapped with Bendigo during 1960 and became Bendigo 12. Yields information about Bendigo tram 12.Photograph, black and white on plain paper.tramways, trams, bendigo, tram 12, north bendigo -
 Peninsula Grammar
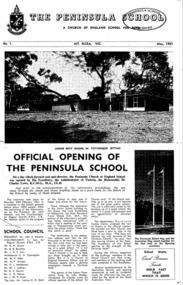
Newsletter, The Peninsula School Gazette, August, 1961
The Gazette was a newsletter of Peninsula Grammar (formerly the Peninsula School) used to communicate to families of students and to highlight events, activities and achievements.Black and white printed newsletter, 6 pages.non-fictionThe Gazette was a newsletter of Peninsula Grammar (formerly the Peninsula School) used to communicate to families of students and to highlight events, activities and achievements.newsletters, foundation -
 Peninsula Grammar
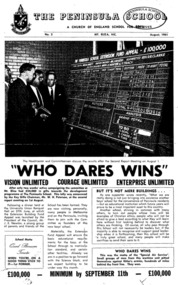
Newsletter, Peninsula Grammar (formerly known as the Peninsula School), The Peninsula School Gazette, August, 1961
The Gazette was a newsletter of Peninsula Grammar (formerly the Peninsula School) used to communicate to families of students and to highlight events, activities and achievements.Black and white printed newsletter, 4 pages.non-fictionThe Gazette was a newsletter of Peninsula Grammar (formerly the Peninsula School) used to communicate to families of students and to highlight events, activities and achievements. -
 Peninsula Grammar
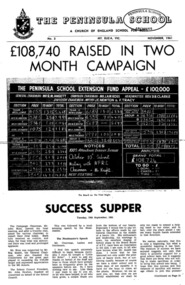
Newsletter, Peninsula Grammar (formerly known as the Peninsula School), The Peninsula School Gazette, November, 1961
The Gazette was a newsletter of Peninsula Grammar (formerly the Peninsula School) used to communicate to families of students and to highlight events, activities and achievements.Black and white printed newsletter, 6 pages.non-fictionThe Gazette was a newsletter of Peninsula Grammar (formerly the Peninsula School) used to communicate to families of students and to highlight events, activities and achievements.newsletters, foundation -
 Ballarat Tramway Museum
Photograph - Digital image Set of 2 - tram 21, Graham Parry, 1971
Photographed inn Ballarat during 1971 prior to closure of the system by Graham Parry. All images from the scanned negative. .1 - tram 21 at the city terminus, Sturt St, with a Lydiard St North destination and a Twin Lakes sign. In the background is another tram on the other side of the road, the short tram stop pole and the Town Hall. .2 - ditto taken from the Post Office steps.Yields information about the Mt Pleasant terminus and tram operations in 1971.Set of two digital images of photograph of tramstrams, tramways, sturt st, lydiard st north, town hall, tram 21 -
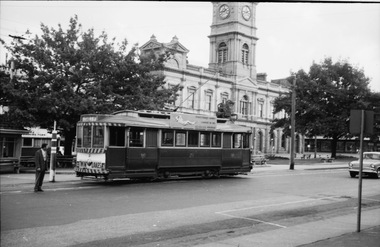
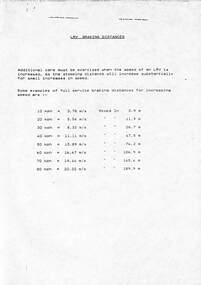 Melbourne Tram Museum
Document, "LRV Braking distances", c1990
Sheet produced to show drivers the length that a LRV (B class) takes to stop at speeds at full service braking from 10kmph to 80kmph - varies from 2.9m to 189.9mYields information about tram braking distances for LRVsPhotocopied sheet A4 titled "LRV Braking distances"tramways, trams, brakes, tram brakes, lrv, b class -
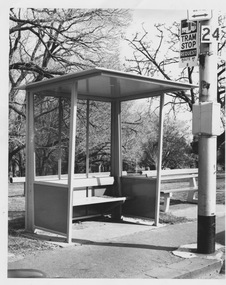 Melbourne Tram Museum
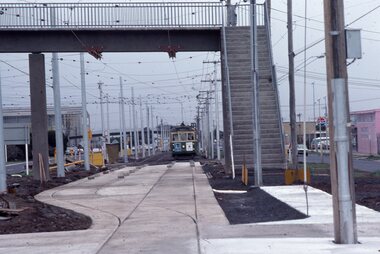
Photograph - Short modular passenger shelter on Toorak Rd
This photograph shows empty shorter version of modular passenger shelter with tram stop sign 24 route 8 in foreground, older style wooden and concrete seat adjacent, and parkland in background.Yields information about roadside facilities for travellersBlack and white photograph with texta note on rearModulartram, passenger shelter, modular, toorak rd, route 8 -
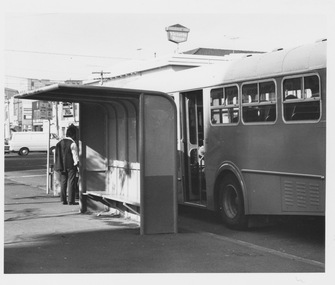 Melbourne Tram Museum
Photograph - Older style metal modular passenger shelter at bus stop
This photograph shows empty modular metal passenger shelter at bus stop with modern bus and crew member closeby.Yields information about roadside facilities for travellersBlack and white photograph with texta note on rearMetal Sheltertram, passenger shelter, modular, metal shelter, bus stop -
 Melbourne Tram Museum
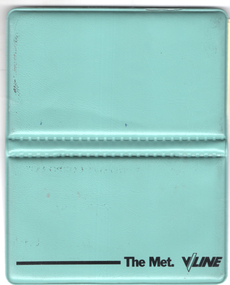
Functional object - Pad of driver reminder forms for disabled passengers, Public Transport Corporation (PTC), c1990
... information about a stop reminder system for disabled passengers ...Issued to drivers to remind them when they had to assist disabled passengers from a train, bus or tram. Issued by the PTC disability services. Has The Met and V/line logos. c1990.Yields information about a stop reminder system for disabled passengers.Plastic folder, printed with sleeves and a pad of printed post it notes.tramways, the met, v/line, disability services, drivers -
 Ballarat Tramway Museum
Slide - 35mm slide/s, Robert Thomson, No. 32 at the Gardens Loop, 2/04/1964 12:00:00 AM
Yields information about Ballarat's trams during 1964 and the Gardens tram stop.Kodachrome cardboard mount, colour slide of No. 32 at the Gardens Loop. Tram has adverts for Electric cooking, Castrol oil, dancing at the Civic Hall and Twin Lakes. Dated 2-4-1964. Tram stop alongside the tram shows all the signs that were provided at this location."Ballarat Single truck 32 2-4-64" in ink.tramways, trams, gardens loop, wendouree parade, tram stops, tram 32 -
 Ballarat Tramway Museum
Album - Postcards & Photographs - Vic Solomons and others - Australian Tramways, Vic Solomons, 2023
Contains 184 images of postcards and photographs collected primarily by Vic Solomons of Sydney, with others from the collection of Wal Jack and Warren Doubleday. Covers almost all of Australia's tramway systems. 1 Post Card Hay St Perth Looking East No 3 Unknown Perth 2 Post Card Cars 30 & 90 both on Route 19 pass in Barrack St looking South Perth WA 1935.02.18 Perth 3 Post Card Hay St Looking East Perth WA Unknown Perth 4 Post Card William St Perth WA Unknown Perth 5 Post Card Perth from Shaftsbury Hotel Unknown Perth 6 Post Card Hay St Perth WA Looking East Unknown Perth 7 Post Card Barrack St Perth Unknown Perth 8 Post Card Murray Views No 3 High St Showing Town Hall Fremantle WA Unknown Fremantle 9 Post Card High St Fremantle WA Unknown Fremantle 10 Post Card View of Bolder City Golden Mile in the Background (Section No 1) 1908.08.20 Kalgoolie 11 Post Card Hannan St Kalgoolie 1900.08.19 Kalgoolie 12 Post Card Hannan St Kalgoolie WA (No 2) Unknown Kalgoolie 13 Post Card Intersection Hannan & Maritana Sts Kalgoolie WA Unknown Kalgoolie 14 Post Card Hannan St Kalgoolie Unknown Kalgoolie 15 Post Card Lane Street Bolder City Unknown Kalgoolie 16 Post Card Hobart Double Deck Tram Unknown Hobart 17 Post Card Macquarie St Hobart Unknown Hobart 18 Photo Liverpool Street Hobart Unknown Hobart 19 Photo Hobart 21 Unknown Hobart 20 Photo Hobart 14 in Elizabeth St Hobart Unknown Hobart 21 Post Card Macquarie St Hobart Unknown Hobart 22 Post Card Macquarie St Hobart Tas Unknown Hobart 23 Photo Double Decker Tram 3 at G.P.O. Hobart Tas No 31 Unknown Hobart 24 Post Card Double Decker Tram 19 Hobart Tas A B Series No 24 Unknown Hobart 25 Photo Hobart Municipal Tramways Tas No 95 Unknown Hobart 26 Post Card Elizabeth St Hobart Unknown Hobart 27 Post Card Elizabeth St Hobart Unknown Hobart 28 Post Card Elizabeth St Hobart Unknown Hobart 29 Post Card Elizabeth St Hobart Tas Unknown Hobart 30 Post Card HMT 21 with crew at Beach Road Terminus Unknown Hobart 31 Post Card HMT 9 & another with crew at Beach Road Terminus. Front cover photo of Destination GPO 1921.01.00 Hobart 32 Post Card Cascade Road and Mount Wellington Hobart Unknown Hobart 33 Post Card Elizabeth St Hobart Unknown Hobart 34 Post Card Elizabeth St Hobart Unknown Hobart 35 Post Card Elizabeth St Hobart 1915.04.07 Hobart 36 Post Card Macquarie St Hobart Tas Unknown Hobart 37 Post Card Macquarie St showing Post Office Hobart 1908.03.12 Hobart 38 Post Card Hobart Municipal Tramways 21 Unknown Hobart 39 Post Card Elizabeth St Hobart Tas Unknown Hobart 40 Post Card Liverpool Street Hobart Unknown Hobart 41 Post Card Electric Tram Launceston Tas 446 W J Little Photo 1919.02.08 Launbceston 42 Post Card Launceston Tram no 3 1911.08.30 Launbceston 43 Post Card Launceston Tram no 3 passes tram No 1 Unknown Launbceston 44 Post Card Tram 6 at Trevallyn a popular suburb Launceston Tasmania Unknown Launbceston 45 Post Card Tram 7 at Trevallyn Road Terminus Launceston Tasmania Unknown Launbceston 46 Post Card Tram 4 in Brisbane St Launceston Unknown Launbceston 47 Post Card Tram 9 in Brisbane St Launceston Tasmania Unknown Launbceston 48 Post Card Camerom Street Launceston Tasmania Unknown Launbceston 49 Post Card Murray Views No 15 Jetty Road Glenelg Terminus 1962-02-08 Adelaide 50 Post Card Bay Tram at Jetty Road Terminus Glenelg SA Unknown Adelaide 51 Post Card Tram 3 in King William Street Adelaide S Aust Unknown Adelaide 52 Post Card Valentine Series No 3065 The Old Horse Tram Victor Harbour Unknown Victor Harbour 53 Post Card Bourke Street Melbourne with Cable Car Looking East 1904.04.25 Melbourne 54 Post Card Opening of New Electric Tramway Elsternwick 1913-11-13 Melbourne 55 Post Card Cable trams in Clarendon St Sth Melb Unknown Melbourne 56 Post Card Pall Mall from Charing Cross Bendigo Unknown Bendigo 57 Post Card Tram 4 & 7 pass at The Fountain and Mitchell Street Bendigo Vic Rose Series P 3198 Unknown Bendigo 58 Post Card M&MTB 133 at Charing Cross bound for Eaglehawk Bendigo Vic Murray Views No 45 Unknown Bendigo 59 Post Card Pall Mall Bendigo Vic Unknown Bendigo 60 Post Card Charing Cross & Mitchell St Bendigo Trams passing 1919.00.00 Bendigo 61 Post Card Pall Mall Looking East Unknown Bendigo 62 Post Card Electric Trams and City Hotel Bendigo Vic Unknown Bendigo 63 Post Card Moorabool Street Geelong V 23 Unknown Geelong 64 Post Card Murray Views No 3 Moorabool Street Geelong Vic Unknown Geelong 65 Post Card The Rose Series P 2487 Ryrie Street Geelong Vic Unknown Geelong 66 Post Card Southern Cross Series 2696 Ryrie Stret Geelong Vic Unknown Geelong 67 Post Card The Rose Series P 1490 Ryrie Street Geelong Vic 1920-03-04 Geelong 68 Post Card Valentine Series No 1568 Lower Sturt Street Ballarat Unknown Ballarat 69 Post Card Rose Series P 1710 Sturt Street Ballarat Victoria Unknown Ballarat 70 Post Card Sturt Street Ballarat Victoria Unknown Ballarat 71 Post Card Horse Tram In Sturt Street Ballarat 1905.11.10 Ballarat 72 Post Card Sturt Street Ballarat Looking North-West Unknown Ballarat 73 Post Card Shoppes Square Sturt Street Ballarat Looking North Unknown Ballarat 74 Post Card Junction Sturt and Lydiard Streets Ballarat 1909-09-01 Ballarat 75 Post Card The Electric Supply Co Souvenir Tram Ticket No 3085of the opening of Electric System August 18 1905 1905.08.18 Ballarat 76 Post Card Sturt Street Ballarat Victoria 1907.11.25 Ballarat 77 Post Card Off to the Gardens Electric Tram Ballarat Unknown Ballarat 78 Post Card Sturt Street Ballarat 1907.04.16 Ballarat 79 Post Card Sturt Street Ballarat Looking East Electric tram with Double Deck Trailer 1911.04.17 Ballarat 80 Post Card Sturt Street Ballarat Looking East Unknown Ballarat 81 Post Card Sturt Street Ballarat Looking West 1911.03.01 Ballarat 82 Post Card Town Hall and Sturt Street Ballarat Unknown Ballarat 83 Post Card Lydiard Street Ballarat 1906.11.23 Ballarat 84 Post Card Looking North along Adelaide Street from George Street Brisbane Sidues Series No 764 Unknown Brisbane 85 Post Card Looking South along Queen Street from the Creek Street Intersection Brisbane Qld Sirues Series No 1379 Unknown Brisbane 86 Post Card George Street from near Supreme Court Brisbane Unknown Brisbane 87 Post Card Queen and Eagle Streets Brisbane 1907.07.04 Brisbane 88 Post Card Queen Street showing His Majesty’s Theatre Brisbane Unknown Brisbane 89 Post Card Queen Street Treasury Building 1908.01.20 Brisbane 90 Post Card G P O and Queen Street Brisbane Unknown Brisbane 91 Post Card Queen Street Brisbane Looking from Wharf Street Unknown Brisbane 92 Post Card Customs House Brisbane 1905.02.16 Brisbane 93 Post Card Queen St Brisbane 1905.09.16 Brisbane 94 Post Card Queen St Brisbane 1907.11.19 Brisbane 95 Post Card Treasury Buildings Brisbane Unknown Brisbane 96 Post Card Queen and Eagle Streets Brisbane Unknown Brisbane 97 Post Card The Valley Corner Brisbane Unknown Brisbane 98 Post Card Brisbane Queen Street opposite General Post Office Unknown Brisbane 99 Post Card North Quay and Milton Beach Brisbane Q Unknown Brisbane 100 Post Card Victoria Bridge Brisbane South Side 1907.08.14 Brisbane 101 Post Card Victoria Bridge Brisbane Unknown Brisbane 102 Post Card Breakfast Creek Bridge Brisbane Q Unknown Brisbane 103 Post Card Melbourne Street Station South Brisbane Queensland Unknown Brisbane 104 Post Card General Post Office Queen Street Brisbane 1955.09.23 Brisbane 105 Post Card Customs House Brisbane 1904.11.04 Brisbane 106 Post Card Queen St Brisbane 1919.11.00 Brisbane 107 Post Card Queen St Brisbane Sidues Series No 627 Unknown Brisbane 108 Post Card Creek Street Brisbane Queensland Unknown Brisbane 109 Post Card Customs House and Garden Reach Brisbane Queensland 1910.00.08 Brisbane 110 Post Card Queen and Creek Streets Brisbane 1909.06.07 Brisbane 111 Post Card Queensland National Bank andd Queen Street Brisbane Queensland Unknown Brisbane 112 Post Card Queen Street and Treasury Buildings Brisbane 0000.09.07 Brisbane 113 Post Card Queen Street showing “Courier” Buildings Brisbane Unknown Brisbane 114 Post Card Intersection George & Roma Streets Brisbane Q 1916.05.11 Brisbane 115 Post Card Adelaide Street Brisbane Q Unknown Brisbane 116 Post Card G P O Queen Street Brisbane Q Unknown Brisbane 117 Post Card Treasury Building Brisbane 1906.03-20 Brisbane 118 Post Card Queen and Eagle Streets Brisbane 1907.02.01 Brisbane 119 Post Card Queen St Brisbane Unknown Brisbane 120 Post Card Queen St Brisbane Q Unknown Brisbane 121 Post Card Victoria Bridge Brisbane 1906.07.30 Brisbane 122 Post Card An Unusual View showing Head of Queen Street Victoria Bridge & South SideSuburbs Brisbane Q Unknown Brisbane 123 Post Card Petries Bight Brisbane Q Unknown Brisbane 124 Post Card South End Victoria Bridge Brisbane Q Unknown Brisbane 125 Post Card Customs House Brisbane Unknown Brisbane 126 Post Card Photo of toastrack car circa 1910 Unknown Brisbane 127 Post Card Treasury Buildings Brisbane Unknown Brisbane 128 Post Card East Street Rockhampton with Steam Tram & trailer Unknown Rockhampton 129 Post Card Post Office Rockhampton with steam tram Unknown Rockhampton 130 Post Card East Street Rockhampton with Steam Trams Rose Series P 7154 Unknown Rockhampton 131 Post Card William Street Rockhampton Rose Series P 7156 Unknown Rockhampton 132 Post Card Central East Street Rockhampton Q with Steam Trams Unknown Rockhampton 133 Photo Sturt St Ballarat Unknown Ballarat 134 Photo Bridge Street Ballarat Unknown Ballarat 135 Post Card George St Sydney Unknown Sydney 136 Post Card Elizabeth St Sydney Unknown Sydney 137 Post Card Railway Square Unknown Sydney 138 Post Card Sydney Harbor Bridge - pending receipt 139 Post Card Kings Cross - Mowbray Series with description on rear from C Roy G Field Unknown Sydney 140 Post Card Kings Cross - Mowbray Series with description on rear from C Roy G Field Unknown Sydney 141 Post Card Central Railway Station Sydney - Rose Series P6033 1954-01-26 Sydney 142 Post card William Street Darlinghurst looking towards City - Rose Series P6602 unknown Sydney 143 Post Card Circular Quay Sydney - Rose Series P6680 Unknown Sydney 144 Post Card View at Manly NSW - Rose Series B1003 Unknown Sydney 145 Post Card Hunter St Newcastle NSW - Rose Series P7843 Unknown Newcastle 146 Post Card Bank Corner Newcastle NSW - Mowbray Series No. 155 Unknown Newcastle 147 Post Card Hunter St Newcastle NSW Unknown Newcastle 148 Post Card Criterion Hotel Hunter St Newcastle NSW Unknown Newcastle 149 Photo Horse tram at Newtown Station 1894 to 1898 - PTC photo c1894 Newtown 150 Photo Steam tram motor No 3 at Railway Square 1879 1879 Sydney 151 Photo Railway steam tram c1900 with a horse drawn double deck bus c1900 Sydney 152 Photo Steam motor 5A and doubled deck bus Unknown Sydney 153 Photo Steam motor 53A with detail notes on rear 1922 Sydney 154 Photo Cable tram set at Milsons Point ferry terminal c1900 Sydney 155 Photo Early Sydney electric car - Ocean St - Rose Bay Unknown Sydney 156 Photo George St looking souoth c1905 c1905 Sydney 157 Photo Tram 165 at Circular Quay Unknown Sydney 158 Photo Tramcar ferry or transporter at The Spit Unknown Sydney 159 Photo tram 882 George St at Marti Place, 1937 1937 Sydney 160 Photo Tram 826 Railway Sq area Unknown Sydney 161 Photo Railway Sq in background, Broadway with double decker bus and toastrack car late 1930s Sydney 162 Photo Coupled St Pitt St? - photo Ben Parle Feb. 1950 Sydney 163 Photo Electric tram No. 2 - North Sydney with side trolley pole running Unknown Sydney 164 Photo George St - Horden's Corner Unknown Sydney 165 Photo George St at Martin Place c1920 Sydney 166 Photo Castlereagh St Sydney c1928 c1928 Sydney 167 Photo Railway Sqare c1920 c1920 Sydney 168 Photo Darling St Countereweight Unknown Sydney 169 Photo Trolley bus depot Unknown Sydney 170 Photo Trolley bus No. 14 Unknown Sydney 171 Photo Newcastle Railway Station with steam tram - Wharf Road?? Unknown Newcastle 172 Photo High St West Maitland - steam tram Unknown Maitland 173 Photo High St West Maitland - steam tram Unknown Maitland 174 Post Card Argent St near tram terminal Broken Hill NSW c1900 Broken Hill 175 postcard Argent St looking south Broken Hill - with Ken Magor's notes on rear Unknown Broken Hill 176 Photo Toronto - steam tram 61A Unknown Toronto 177 Photo 124A trial run 1911? Sutherland - Cronulla line 1911 Sutherland 178 Photo 103A at a tram stop Unknown Sydney 179 Photo Cable tram set at Crows Nest terminus grip car 12, trailer 22 Unknown Sydney 180 Photo Cable tram Queens Square Sydney 1903 Sydney 181 Photo cars 2078 and 2077 Chatswood late 1950s Sydney 182 Photo car 1877 Balmain area late 1950s Sydney 183 Photo Trolley bus - Rockdale destination Late 1950s Sydney 184 Photo Broken Hill steam tram - motor 18A North Tram Unknown Broken Hill 185 Photo Millars Point Sydney NSW - ferry/tram interchange, unknown Sydney All items imaged including the rear or back where there was writing of information. All files stored on the Museum's Photo Collections directory. Demonstrates through the medium of many images, Australian tramway systems and Ballarat's place in them.Album - heavy card covers, plastic lined with postcard or 6x4 photo sleeves.australia, tramways, postcards, photographs, steam trams, horse trams, cable trams, trolley buses -
 Ballarat Tramway Museum
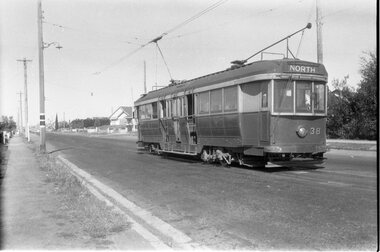
Negative - Geelong Belmont terminus tram 38, Laurie Gallop, early 1956
Photo shows Geelong No. 38 at the Belmont terminus, High Street with the return destination of North. Note the compulsory tram stop on the left-hand pole. One of a set of photos was taken between 15/2/1956 and 3/3/1956 when services operated only between Belmont and North before the final closure of the Belmont route on 25/31956 and that bogie tram 31 is not shown on the board, having gone to Ballarat on 15/2/1956 - see item 5554. See item 8213 for an article on the Geelong system by Keith Kings. Yields information about the Belmont tram terminus prior to closure.Black and white Negative - 120 sizetram stops, tramways, high st, geelong, tram 38, belmont -
 Ballarat Tramway Museum
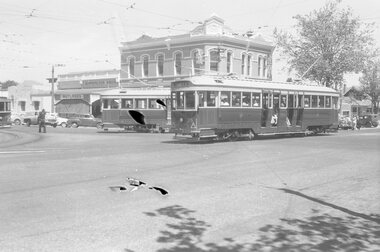
Negative - Hospital corner - Drummond and Sturt Streets, Laurie Gallop, 1950s
The photo shows three trams at Hospital Corner, during the mid to late1950s. Tram 35 turns from Drummond Street South on its way to Lydiard St North. Another bogie tram is turning into Drummond St South while No. 25 waits at the tram stop. A conductor can be seen walking forward with a point bar. In the background is the sign for Rimmiington Bros Butchers and the Southern Cross Hotel. The negative has been damaged - photographer unknown.Yields information about the tram operations at Hospital Corner Ballarat.Black and white Negative - 120 sizetram stops, tramways, sturt st, drummond st, tram 25, tram 35, conductor -
 Ballarat Tramway Museum
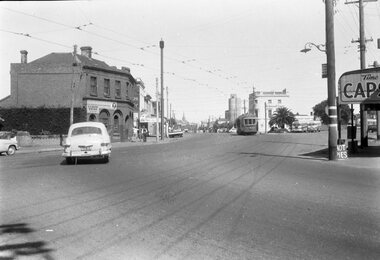
Negative - Geelong tram 36 Mercer St, Laurie Gallop, early 1956
Photo shows Geelong tram 36 outbound to North in Mercer St at Ginn St. In the background is a shop selling Franklins Lemon Swish, a four & Twenty Pie shop, Toppa Ice cream, a Coca Cola truck, a Hotel advertising Richmond Lager, three parked buses and a shop advertising hot pies. On the pole is a tram stop with a metal "CARS STOP HERE" sign. On the left-hand side of the photograph a surveyor can be seen at work.Yields information about the Geelong operations toward the closure of the tram system.Black and white Negative - 120 sizetramways, geelong, mercer st, tram 36, tram stops -
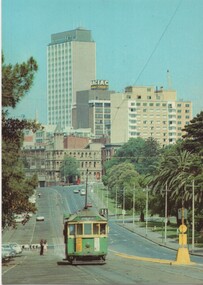 Melbourne Tram Museum
Postcard - National View, Nucolorvue Publishing, Wellington Parade Melbourne, early 1970's
One of a series of postcards published by National View by Murfett Publishers Australia. Has the details on the rear with place for a stamp, address etc, and logo. Shows W2 546 (Spencer St Route 38), possibly about to pick up passengers at the Jolimont Road Stop. At the time Wellington Parade was effectively a one-way street with extensive car parking on the south side. Shows a Safety Zone on the north side of the tram tracks. Has the CRA building, the hotel on the corner of Flinders and Spring St that was demolished for Shell House. See Reg Item 3555 for a later view by the same company.Yields information about the appearance of Wellington Parade, Jolimont, mid to late 1970's.Postcard - National View - plain edges, Wellington Parade looking west towards the CBD. Card No. P-1014-2w2 class, postcard, souvenir, wellington parade, route 38, tram 546, national view -
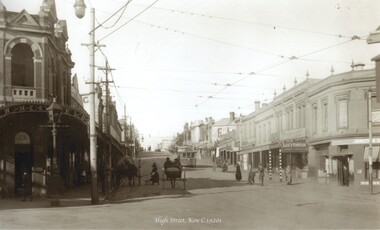 Melbourne Tram Museum
Photograph - Black and white - High St Kew c1920's
Shows High St Kew, looking east from the junction with a four wheel tram approaching the intersection with people waiting to board the tram. On the right is a sign "Happy Thoughts - the trade supplied" and under it "Lucy Hinton Tobacco"Yields information about the location, the streetscape and the trams and vehicles in use at the time. Black and white photograph of High St Kew, looking east with a four wheel tram in the view."RSCP 328" & "C1918" in pencil on rear.tramways, trams, kew junction, high st kew, tram stops -
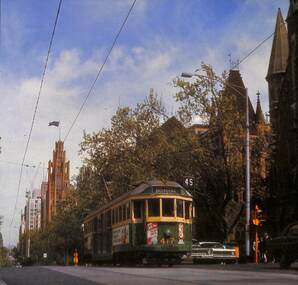 Melbourne Tram Museum
Photograph - Colour illustration - W2 417 Collins St - 1971
Points of interest in the photograph are the lack of white lines along the tracks, safety zone equipment behind the tram, the "Hail Cars Here" tram stop sign on a steel pole by a traffic light and the style of traffic light. Two advertising panels on the front of the tram advertise "Jex Soap Pads" and the musical "Hair" at the Metro Theatre Bourke St. Two Fords are alongside the tramcar. The original source of photograph unknown. The Musical "Hair" was presented in Melbourne during 1971. Yields information about the location, the streetscape and the trams and vehicles in use at the time. Colour illustration of M&MTB tram W2 417 on a route 45, Deepdene service in Collins St. Melbourne at the intersection of Russell St. with the Scots Church in the background.tramways, trams, collins st, w2 class, tram 417, traffic lights, deepdene, route 45 -
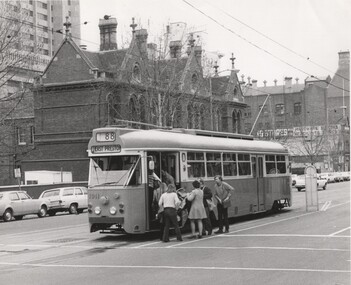 Melbourne Tram Museum
Photograph - Black and White - PCC 1041 - Bourke St 1973
Photograph of PCC car 1041 (Route 88, West Preston) built by the MMTB in 1973 as a prototype for the Z class tram at the King St tram stop, loading passengers through the front door. In the background is Melbourne West or Bourke St West Police Station. Yields information about the location, the streetscape and the prototype tram in use at the time. Black and white photograph of PCC 1041 - Bourke St at Kings St 1973 on rear in ink "RSCP330" and "1973"tramways, trams, tram 1041, mmtb, bourke st, route 88, east preston, bourke street west police station, pcc class -
 Melbourne Tram Museum
Photograph - Last day of original Essendon Airport tram terminus, Ron Scholten, 7-10-1976
The original line to the Essendon Aerodrome was constructed in 1943 to serve the airport and aircraft construction. It was funded by the Commonwealth Government. By 1976, patronage to the airport terminus in Vaughan St had dropped, the crossing of the highway to the Tullamarine Airport opened in 1970, was dangerous, and the highway needed to be widened. The new terminus was a short distance to the north between Mathews Ave and the Highway. This series of photographs show the last day of operations to the original terminus and the changeover, which was done in about 7 hours. No buses were required. It was done by workers of the Melbourne and Metropolitan Tramways Board. The line was later extended to Airport West. .1 - W5 789, (Essendon Airport Route 59) about to turn from Mathews Ave into Vaughan St. Has new track and footbridge in the foreground. .2 - W5 791 on the siding or spur at the airport terminus, the last tram to use this facility. .3 - W2 571, at the Airport terminus alongside Vaughan St on the last morning of the use of this terminus. The Bundy clock can be seen behind the pole on the lefthand side and the Brick passenger shelter. Shows buffer stops, and Forestair hanger behind. .4 - W2 595 turning from Vaughan St into Mathews Ave. Has the tram stop No. 55 in the view. .5 - W5 839 turning from Vaughan St into Mathews Ave. Shows the flashing yellow light that gave some protection to the trams. .6 - W2 247 about to turn into Vaughan St. Driver about to reboard the tram. Note the new copper trolley wire is up for the new track but has been pulled to the west side using rope. .7 - W5 805, turning from Mathews Ave into Vaughan St, to the old Essendon Airport terminus. Has a new track in the foreground, and the overhead for the curves is still in position. .8 - W6 991 turning from Vaughan St into Matthews Ave, at 855am, the last tram from the old terminus. The track gang has commenced work to remove the outbound curve. Would appear four passengers waiting at the tram stop, two with lunch bags. Note the cattle grid in the foreground between the rails. New rails on the ground on the left-hand side. See Reg Item 6163 for further photos of this event.Yields information about the last day of the operation of the original Essendon Airport tram line.Set of 8 Kodachrome cardboard mount colour slides of the relocation of the Essendon Airport tram terminus 7-10-1976, by Ron Scholten.All slides have detailed descriptions on the reartrams, tramways, essendon aerodrome, essendon airport, closure, new tramways, route 59, w5 789, w5 791, w2 571, w2 595, w5 839, w2 247, w5 805, w6 991, w2 class, w5 class, w6 class, mmtb, trackwork -
 Melbourne Tram Museum
Slide - Black and white reproduction photograph - PMTT tram 4 Glenferrie Road 1910
Photograph - PMTT tram 4 Glenferrie Road 1910, possibly undertaking testing prior to the official opening on 30/5/1910. Photo shows the centre of the road overhead support poles in Glenferrie Road and a "Hail Cars Here" sign. In the background is the Malvern Town Hall, signs for Norwich Union and Walter Wright Hairdresser.Yields information about the opening of the tram lines built by the PMTTKodachrome cardboard duplicate slide - Black and white reproduction photograph - PMTT tram 4 Glenferrie Road 1910 "MP5" in penciltrams, tramways, opening, tram 4, pmtt, glenferrie road, tram stop -
 Melbourne Tram Museum
Slide - Black and white reproduction photograph - K class tram 92, mid 1920s
Photograph - of a K class four-wheel or single truck tram on a PMTT route 14 (STRATHALBYN ST (Kew) - VICTORIA BRIDGE) tram service, at Harp Road and High St. The reference gives the tram based at Kew Depot in 1928. The tram was originally a Prahran and Malvern Tramways Trust tram, though, by the time of this photograph, it has been re-lettered for the MMTB, which took over the PMTT in 1920. The photograph has been marked up for a submission possibly to either Council or the MMTB for a waiting room or shelter at this location. The wall of the Harp of Erin Hotel and a Victoria Bitter sign can be seen on the right-hand side. The original photo appears to have been torn. Original photo mid to late 1920's.Yields information about the K class tram of the MMTB and methods of seeking a tram stop shelter and High Street and Harp Road intersection.Kodachrome cardboard duplicate slide - Black and white reproduction photograph - K class tram 92 - at Harp Road Kew "MP17" in penciltrams, tramways, kew, harp road, route 14, k class tram, tram 92, harp of erin, victoria bitter, high st, strathalbyn st -
 Melbourne Tram Museum
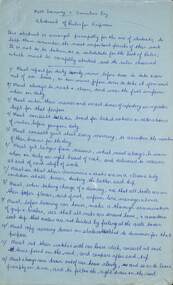
Document, Melbourne Tramway & Omnibus Co - abstracts of Rules for Gripmen
Copy of a document from an original source, handwritten and partly typed. Details the 104 Rules that applied to the Melbourne Tramway and Omnibus Company grip men for cable tram operations. Gives rules for their personal behaviour, duties, operations, management of passengers, shunting, use of the gong, not converse with passengers, what to do if a flock of sheep on the line, use of the grip, stop and starting of the tram (known as a train), care of the rope, end of the shift duties and knowledge of the Rules and Regulations.Yields information about the rules that Melbourne cable tram grip men operated by.Set of two blue foolscap handwritten sheets consisting of five sheets each (Rules 1 to 76) and one typed sheet (Rules 77 to 104) titled Melbourne Tramway & Omnibus Co - abstracts of Rules for Gripmentramways, trams, cable trams, grip men, rules, mtoco -
 Melbourne Tram Museum
Book - The Scots Church - The Leaflet Spring 2022, Michael North - Scots Church, "Tram Stop", Sept 2022
Tram Stop article written by Michael North looks at the structure at the Elizabeth St tram terminus, named after Sir Robert Risson and his convictions to support the Melbourne tramway system including the campaigns to replace Melbourne's iconic trams with buses and motor cars. Has a photo of the terminal building by Mal Rowe - Sir Robert Risson Tram Terminus. The rear cover image of La Trobe St.Yields information about the Elizabeth St tram terminus and its memorial to Sir Robert Risson, MMTB Chairman 1949 to 1970,Book - magazine - 48 pages, perfect bound, full colour titled The Scots Church - The Leaflet Spring 2022 containing an article on the Robert Risson Tram Stop at the Elizabeth St tram terminus.trams, tramways, robert risson, elizabeth street, memorials -
 Melbourne Tram Museum
Document, Public Transport Victoria (PTV), Brunswick Tram Depot upgrade, 7-7-2022
Consultation document for the upgrade redevelopment of Brunswick tram depot including the provision of a super stop in Moreland Road. Outlines the proposal and provides a plan. When first published had a tram track extension along Moreland Road, but this was later removed.Yields information about the proposed upgrade of Brunswick Tram depot 2022Five A4 page consultative document, about the upgrade of Brunswick Tram Depot. Only 5 of the 9 pages collected.tramways, brunswick depot, trackwork, sydney road -
 Melbourne Tram Museum
Pamphlet - Metro Tunnel - Anzac Station tram corridor works, Rail Projects Victoria, 11/2022
Provides information about the works planned to realign tram tracks at the Metro Tunnel Anzac station, following the completion of the surface works. Gives timing, tram routes affected, plans of the proposals, contact details. All St Kilda Road routes would be affected from 27/11/2022 to 17/12/2022, tram stops would be closed, bus replacement services. includes works to remove the Glenhuntly Road level crossing at Glenhuntly Station. Yields information about the trackworks for the future Anzac Station interchange and St Kilda Road services.Set of two documents issued by Rail Projects Victoria (Metro Tunnel) and Yarra Trams with regard to the reallignment of tram tracks at Anzac Station Nov. 2022 1 - Metro Tunnel - Works proposed, maps - 6 A4 pages 2 - Yarra Trams - Service Changes St Kilda Road works - 4 A4 pages.anzac station, metro tunnel, tramways, st kilda road, domain road, domain interchange, park street, track work, tram tracks, glenhuntly road, glenhuntly station, level crossings