Showing 3735 items matching "the beach"
-
 Flagstaff Hill Maritime Museum and Village
Furniture - Chair, 1855-1900
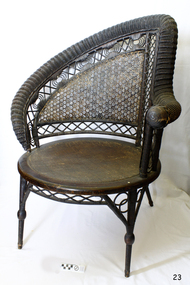
Heywood & Wakefield Furniture Co: The Heywood-Wakefield Company is an American furniture manufacturer established in 1897 that went on to become a major presence in the US. Its older products are considered collectibles and have been featured on television antique programs. The Heywood brothers established themselves in 1826, as furniture makers and the Wakefield Company began in 1855 as a separate company. Both firms produced wicker and rattan furniture, and as these products became increasingly popular towards the end of the century, they became serious rivals. In 1897 the companies merged as Heywood Brothers & Wakefield Company (this name was changed to Heywood-Wakefield Company in 1921), purchasing Washburn-Heywood Chair Company in 1916, Oregon Chair Company in 1920, and Lloyd Manufacturing Company in 1921. While its wooden furniture plant in Gardner, Massachusetts closed in 1979, a branch in Menominee, Michigan continued to manufacture metal outdoor seats, auditorium seats, and school furniture. The Heywood-Wakefield Company Complex in Gardner was added to the National Historic Register in 1983. The South Beach Furniture Company acquired the rights to the name in 1994 and reproduces its wooden furniture. Both founding companies produced wicker and rattan furniture in the late 19th century. The wicker styles drew on the Aesthetic Movement and Japanese influences simpler designs arose in the wake of the Arts and Crafts Movement. The merged entity stayed abreast of wicker furniture trends by hiring designers such as Paul Frankl and Donald Deskey during the 1920s. Its furniture was exhibited at the 1933 Century of Progress exhibition and the 1964 New York World's Fair. During the 1930s and 1940s, Heywood-Wakefield began producing furniture using sleek designs based on French Art Deco.The chair has social significance at a local level, because it illustrates the level of material support the Warrnambool community gave to Flagstaff Hill when the village and Museum was established. The wicker nursing chair is a fine example of late 19th century light weight domestic furniture that today are very collectible items and quite rare and valuable.Nurse wicker chair, wood, cane and rattan with round rushed seat. The one left arm being that to support the infant during feeding. 1870s-1890s. Believed to have been made by Heywood Brothers & Wakefield Company, USA. flagstaff hill, warrnambool, flagstaff hill maritime museum, shipwreck coast, great ocean road, 19th century furniture, rolled serpentine wicker work, cane armchair, classic wicker furniture, victorian style furniture, domestic furniture late 19th century, heywood-wakefield company, feeding chair, nursing chair, mother's chair, nursery furniture -
 Flagstaff Hill Maritime Museum and Village
Wood Sample, 1854
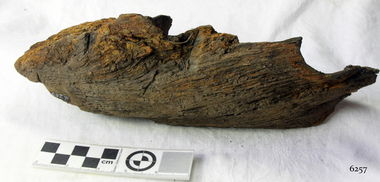
This timber fragment is from the shipwreck of the SCHOMBERG (1855). The bow of the ship broke off after an unsuccessful salvage attempt to tow her off the Peterborough reef. At the wreck-site the submerged hull points north towards the beach but the front section is missing. Parts of the bow have been carried away by the eastward bearing ocean currents and have come ashore on the western coast of New Zealand’s South Island. Don Charlwood writes in Wrecks & Reputations (1977) that in 1871 “a piece of wreckage over 20 feet long and 12 feet wide was brought out” by land from its remote location at Tauperika Creek. In 1875 “an even larger section was brought out by sea”. It was suggested at the time that these relics of a large wooden sailing ship were from the wreck of the SCHOMBERG some 20 years earlier on the Victorian coast. “To corroborate the theory”, Charlwood continues, “a piece was sent to Halls of Aberdeen [the ship’s builders in Scotland]. They identified it as having come from the ship they had launched with such pride in 1852.” Charlwood, whose great-grandparents were passengers on the SCHOMBERG’s fateful maiden voyage, acquired some samples of the wreckage timber recovered in New Zealand, and brought them back with him to Australia. In 1976 “comparison was made of timbers from the New Zealand find and timber from the remains of the hull at Peterborough. They proved to be from the same ship.” The extraordinary journey of these pieces of wood from the once mighty clipper ship SCHOMBERG came to an end in 1984, when they were given to Flagstaff Hill by the author, and reunited with other shipwreck timbers and copper bolts from the vessel that are on display at the Maritime Village. The shipwreck of the SCHOMBERG is of State significance - Victorian Heritage Register S612The artefact is a small piece of wood that was broken from the timbers of the shipwreck of the SCHOMBERG (1855) and carried by the eastern currents to New Zealand (1875). It has 2 drilled holes that show faint screw marks and no metallic residue (possibly for patent treenails). The top surface is rounded, of a dark colour, and showing clear grains that have been worn smooth by the action of the sea. There is a reddish stain on the timber where breakage has occurred. The wood appears to have been strong in its original condition but is now light to lift and soft and crumbly at its exposed edges. The artefact is in fragile condition.flagstaff hill, warrnambool, shipwrecked-coast, flagstaff-hill, flagstaff-hill-maritime-museum, maritime-museum, shipwreck-coast, flagstaff-hill-maritime-village, schomberg, shipwreck timber, don charlwood, ‘wrecks & reputations’ -
 Flagstaff Hill Maritime Museum and Village
Wood Sample, 1854
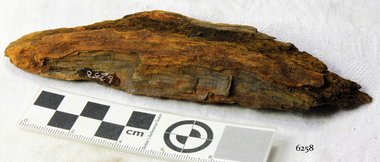
This timber fragment is from the shipwreck of the SCHOMBERG (1855). The bow of the ship broke off after an unsuccessful salvage attempt to tow her off the Peterborough reef. At the wreck-site the submerged hull points north towards the beach but the front section is missing. Parts of the bow have been carried away by the eastward bearing ocean currents and have come ashore on the western coast of New Zealand’s South Island. Don Charlwood writes in Wrecks & Reputations (1977) that in 1871 “a piece of wreckage over 20 feet long and 12 feet wide was brought out” by land from its remote location at Tauperika Creek. In 1875 “an even larger section was brought out by sea”. It was suggested at the time that these relics of a large wooden sailing ship were from the wreck of the SCHOMBERG some 20 years earlier on the Victorian coast. “To corroborate the theory”, Charlwood continues, “a piece was sent to Halls of Aberdeen [the ship’s builders in Scotland]. They identified it as having come from the ship they had launched with such pride in 1852.” Charlwood, whose great-grandparents were passengers on the SCHOMBERG’s fateful maiden voyage, acquired some samples of the wreckage timber recovered in New Zealand, and brought them back with him to Australia. In 1976 “comparison was made of timbers from the New Zealand find and timber from the remains of the hull at Peterborough. They proved to be from the same ship.” The extraordinary journey of these pieces of wood from the once mighty clipper ship SCHOMBERG came to an end in 1984, when they were given to Flagstaff Hill by the author, and reunited with other shipwreck timbers and copper bolts from the vessel that are on display at the Maritime Village. The shipwreck of the SCHOMBERG is of State significance - Victorian Heritage Register S612A small piece of wood broken from the timbers of the shipwrecked clipper SCHOMBERG (1855, Peterborough) and retrieved from the southwest coast of New Zealand’s South Island. The artefact bears a reddish stain on exposed parts but the main surface is grey coloured. It appears to have been split off other wood fragments in the Flagstaff Hill collection (6257, 6259). It presents as a lighter less dense wood than oak, but may have lost mass through submersion.flagstaff hill, warrnambool, shipwrecked-coast, flagstaff-hill, flagstaff-hill-maritime-museum, maritime-museum, shipwreck-coast, flagstaff-hill-maritime-village, schomberg, shipwreck timber, don charlwood, ‘wrecks & reputations’ -
 Flagstaff Hill Maritime Museum and Village
Wood Sample, 1854
This timber fragment is from the shipwreck of the SCHOMBERG (1855). The bow of the ship broke off after an unsuccessful salvage attempt to tow her off the Peterborough reef. At the wreck-site the submerged hull points north towards the beach but the front section is missing. Parts of the bow have been carried away by the eastward bearing ocean currents and have come ashore on the western coast of New Zealand’s South Island. Don Charlwood writes in Wrecks & Reputations (1977) that in 1871 “a piece of wreckage over 20 feet long and 12 feet wide was brought out” by land from its remote location at Tauperika Creek. In 1875 “an even larger section was brought out by sea”. It was suggested at the time that these relics of a large wooden sailing ship were from the wreck of the SCHOMBERG some 20 years earlier on the Victorian coast. “To corroborate the theory”, Charlwood continues, “a piece was sent to Halls of Aberdeen [the ship’s builders in Scotland]. They identified it as having come from the ship they had launched with such pride in 1852.” Charlwood, whose great-grandparents were passengers on the SCHOMBERG’s fateful maiden voyage, acquired some samples of the wreckage timber recovered in New Zealand, and brought them back with him to Australia. In 1976 “comparison was made of timbers from the New Zealand find and timber from the remains of the hull at Peterborough. They proved to be from the same ship.” The extraordinary journey of these pieces of wood from the once mighty clipper ship SCHOMBERG came to an end in 1984, when they were given to Flagstaff Hill by the author, and reunited with other shipwreck timbers and copper bolts from the vessel that are on display at the Maritime Village. The shipwreck of the SCHOMBERG is of State significance - Victorian Heritage Register S612A piece of wood broken from the timbers of the shipwrecked SCHOMBERG (1855, Peterborough) and retrieved from the southwest coast of New Zealand’s South Island. The artefact is a light grey colour with plain long grain and bears a reddish stain on parts. Part of a drilled hole is red stained with traces of corroded metal still evident. The piece appears to have split off from other fragments that are in the Flagstaff Hill collection (6257, 6258) and it is in fragile condition.flagstaff hill, warrnambool, shipwrecked-coast, flagstaff-hill, flagstaff-hill-maritime-museum, maritime-museum, shipwreck-coast, flagstaff-hill-maritime-village, schomberg, shipwreck timber, don charlwood, ‘wrecks & reputations’ -
 Kew Historical Society Inc
Clothing - Fur Stole, Fitted Brown Mink Stole by K Feitel, 1930-1950
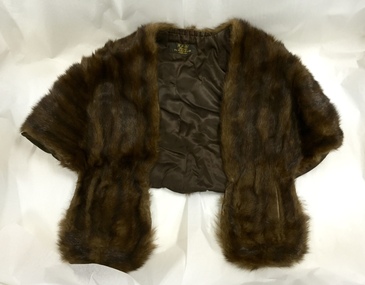
The furriers Keitel were established in Australia early in the Twentieth Century. The business was initially in Port Melbourne in Beach Street and later in Lt Collins Street, Melbourne. In 1916, 1918, 1924, and 1927 there were newspaper reports of robberies at the business; an indication of the monetary value of furs in the past. There was an interesting connection to Jewish refugees to Australia reported in Australian newspapers in 1939, which relates to the Keitel family. OFFICER'S WIDOW A REFUGEE MELBOURNE, Wednesday. - A widow, whose husband was killed in action while a German officer in the Great, War, reached Melbourne in the Marella, a refugee from Nazi Germany. She is Mrs L. Fuchs, and on the wharf she met her, brother, Mr K. Feitel, a Melbourne furrier, for the first time in 40 years. Another, brother, Mr I. Feitel, travelled with her from Vienna. Mr I Feitel is a watchmaker, and has been in the business in Australia for about 50 years. He has brought with him an agency to establish here, for the well-known Swiss watchmaking company, Chaux-de-fonds. ESCAPED INTO HOLLAND. Having escaped from Germany into Holland, 80 refugees brought to Australia in the Marella were taken by Dutch ships to Batavia, where they Joined the Marella. Seven landed in Brisbane, 40 in Sydney, and 33 in Melbourne. There was only a few British subjects in the ship. The Jewish refugees include a cattle breeder, a lawyer for a Viennese bank, dentists, clothing , manu facturers, machinery experts, and general merchants. (Source: Evening New (Rockhampton, 4 May1939, p. 4) In 1947, Mr Kallman Feitel died and the business was carried on by his family.A fashionable fur stole created by a major furriers in Melbourne.Large brown lined mink fur stole. Label: K. Feitel, Furrier, 290 Lt Collins Street, Melbourne.furs, costume accessories, women's clothing, fur stoles -
 Surrey Hills Historical Society Collection
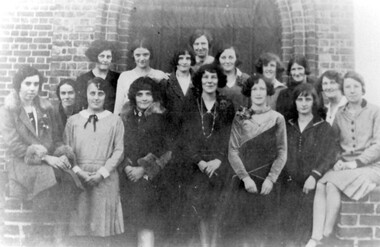
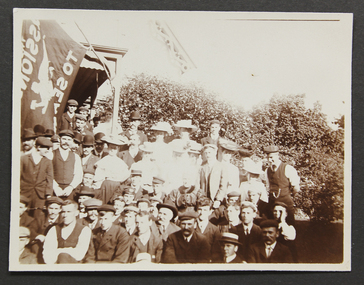
Photograph, Holy Trinity Kindergarten Sunday School teachers, 1920s
Miss Patience Cornell, the leader of the group, is in the centre. Training classes were held for leaders at St Pauls Cathedral and St Johns, concluding with examinations. They then trained their assistants. Holy Trinity was known for implementing new ideas and programs for their 70 children. Far right is Miss Joy Dicker, who was leader from 1930 for 30 years. Identified as: Back LtoR: Doris Wiles, Doris Hearne, Beryl Hearne, …, Mary Chipperfield, Lal Clark, … Centre: Patience Cornell Front: … Wilson, Jessie Collins, Muriel Chipperfield, Una Blakie, Marj Andrews, Myra Lock, Joy Dicker Patience Cornell was the daughter of Frank and Blanche Cornell. Frank Cornell was first listed in Surrey Hills in 1906 at (6) Lorne Parade. In 1908 the listing gives his occupation as a clerk. He was born in 1869 in Richmond, Victoria and died 15 April 1917 in Surrey Hills from a stroke. His wife Blanche Annie Parsons Cornell (nee Bracher) was born in 1869 in Hokitika, New Zealand; she died on 21 January 1940. Children were: Gilbert Frank Cornell (b1894, Hawthorn; d1908, at Frankston beach, an accidental drowning) Ruth Amelia Cornell (b 1899, Kew; d 29 May 1977, Kew) Lorna Amy Cornell (b 1906, Surrey Hills; d unknown) Patience Blanche Cornell (b1907, Surrey Hills; d unknown). Ruth Amelia married David Ellis, c1922 in Surrey Hills. David was a dentist who practised in Surrey Hills for many years. Patience (Pat) Blanche married Norman Henry Brewer (1893–1975) in 1931 in Surrey Hills. A black and white photograph of sixteen girls standing in the doorway of a church.(miss) patience cornell, (miss) joy dicker, (ms) doris wiles, (ms) doris hearne, (ms) beryl hearne, (ms) mary chipperfield, (ms) lal clark, (ms) -, wilson, (ms) jessie collins, (ms) muriel chipperfield, (ms) una blakie, (ms) myra lock, holy trinity church of england, kindergarten teachers, clothing and dress, 1920-1929, (ms) marj andrews -
 Phillip Island and District Historical Society Inc.
Photographs, 1940's to 1960's
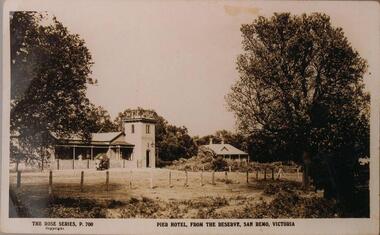
Part of a collection of photographs donated by Bruce Bennett. Photographs from collections of: David Johnson, I Mannix, Legg, Charlie Blackney, Des Chilcott, Ted Walton, Len Bagley and Brian Davis.233-20. Black & White photograph of a postcard. The Pier Hotel and house set in paddock and surrounded by large trees and reserve at San Remo, Victoria. 233-21. Black & White photograph of a photograph. Bentons Guesthouse, San Remo, Victoria. 233-22. Black & White photograph of a photograph. Herbie Kirkland or Clive Fox?? on barge at Newhaven, showing cray caufs lined up on jetty in the background. 233-23. Black & White photograph of a photograph. San Remo Hotel. 233-24. Black & White photograph of a photograph. Breakwater at San Remo circa 1940 with family on the beach (Bert Blackney & Violet) and people swimming. Wooden groyne in foreground. 233-25. Black & White photograph of a photograph. Building the slip at Newhaven, Phillip Island. 233-26. Black & White photograph of a photograph. House in the distance at Rhyll built by Johnson. Dan Patience lived there till 1950's then Ted Walton. 233-27. Black & White photograph of a photograph. San Remo to Newhaven, Phillip Island punt with 3 cars on board. 233-28. Black & White photograph of a photograph. San Remo jetty showing boats and sheds. Ivan Hayhow boat. 233-29. Black & White photograph of a photograph. Sailing boat on Westernport with Phillip Island Suspension bridge behind.233-20 The Rose Series P700. Pier Hotel, from the reserve, San Remo, Victoriahotels, pier hotel san remo victoria, san remo hotel victoria, bentons guesthouse san remo, guesthouses, san remo to newhaven barge, phillip island barge, newhaven barge, san remo beach, newhaven slip phillip island, rhyll phillip island, san remo punt, san remo jetty, phillip island suspension bridge, sailing boats, bruce bennett -
 Melbourne Tram Museum
Ephemera - Timetable/s, Melbourne & Metropolitan Tramways Board (MMTB), "MMTB Tram Timetables", 1980
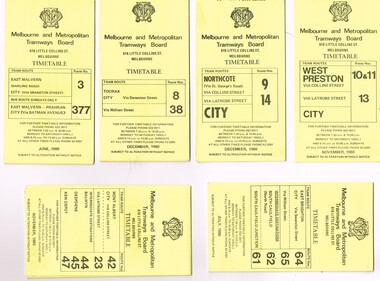
Set of 12 MMTB Tram timetables, folded sheets, generally 10 sections, providing timetables for specific routes, day of week giving information on tram times at specific time points, route map, sections and fares and organisation address - 616 Little Collins St. Melbourne. All printed on yellow paper unless noted otherwise. .1 - Route 3 - East Malvern and Route 377 - Bus on Sunday only - June 1980 .2 - Route 8 and 88 Toorak - December 1980 .3 - Route 9 and 14 - Northcote - City - Dec. 1980 .4 - Route 42, 23, 44, 45, 47 - Mont Albert - City - Nov. 1980 .5 - Route 61, 62, 64, 64 - East Brighton - City - July 1980 .6 - Route 37, 66 and 67 - Carnegie - City - July 1980 .7 - Route 10, 11, 13 - West Preston - City - November 1980 .8 - Route 69 - St Kilda Beach - Kew - Nov. 1980 .9 - Route 75, 74, 76 and 28 - East Burwood - City - Oct. 1980 .10 - Route 96, 95, 97 - East Brunswick - City - September 1980. .11 - Route 15, 22 - Moreland - City - December 1980 ,12 - Route 1 & 21 - East Coburg - City - December 1980trams, tramways, mmtb, timetables, melbourne, fares, bus replacement, route 1, route 3, route 8, route 9, route 10, route 11, route 13, route 14, route 15, route 21, route 22, route 23, route 28, route 37, route 38, route 42, route 44, route 45, route 47, route 61, route 62, route 64, route 61, route 66, route 67, route 69, route 74, route 75, route 76, route 95, route 96, route 97, route 377 -
 Flagstaff Hill Maritime Museum and Village
Equipment - Breeches Buoy and Traveller Block, 1860s to 1950s
The breeches buoy and traveller block are part of the beach rescue apparatus used by lifesaving crew overseas and in Australia in the 1860s to 1960s. The breeches buoy (or chair bucket or petticoat breeches) were invented by Lieutenant Kisbee by the 1850s. It looks like a pair of canvas shorts with a cork lifebuoy ring attached around the top. The set-up works similar way to a zip wire and allows for two-way travel. Saving lives in Warrnambool – The coastline of South West Victoria has had over 600 shipwrecks and many lost lives; even in Warrnambool’s Lady Bay there were around 16 known shipwrecks between 1850 and 1905, with eight lives lost. In 1859 the first Government-built lifeboat arrived at Warrnambool Harbour and a shed was soon built to house it, followed in 1864 by a rocket house to safely store the Rocket Rescue equipment. In 1878 the buildings were moved to the Breakwater area, and in 1910 the new Lifeboat Warrnambool arrived with its ‘self-righting’ design. For almost one hundred years the lifeboat and rocket crews, mostly local volunteers, trained regularly to maintain and improve their skills, summoned when needed by alarms, gunshots, ringing bells and foghorns. Some became local heroes but all served an important role. By the end of the 1950s the lifeboat and rescue equipment had become obsolete. Rocket Rescue Method - The first use of a lifesaving rocket rescue system is often credited to Captain Manby and his invention of a life mortar, first used in 1808 to fire a line onto a ship to rescue lives. Henry Trengrouse’s invention of 1820 was the first to use a sky rocket’s power to throw a line, and his invention included a chair for carrying the shipwrecked victims to shore. In 1832 John Dennett invented a rocket specifically for shore to ship rescue. It had an iron case and an 8 foot pole attached and could shoot the line as far as 250 yards (about 230 metres). From the 1860s the rocket rescue apparatus was in use. It comprised a breeches buoy and traveller block that was suspended on a line and manually pulled to and from the distressed vessel carrying passengers and items. Colonel Boxer, who had invented an early line-thrower, designed a rocket in 1865 with a range from 300 to 470 yards. It was the first two-stage rocket, with two rockets placed one in front of the other in a tube that carried the rescue line. The hemp line was faked, or coiled, in a particular way in a faking box to prevent twists and tangles when fired, and the angle of firing the rocket was measured by a quadrant-type instrument on the side of the rocket machine. Schermuly invented the line-throwing pistol around 1920, which used a small cartridge to fire the rocket. Victoria’s Government adopted lifesaving methods based on Her Majesty’s Coast Guard in Great Britain, which used Colonel Boxer’s rocket apparatus rescue method. The British Board of Trade published instructions in 1850 for both the beach rescue crew and ship’s crew. It involved setting up the rocket launcher on shore at a particular angle measured by the quadrant, inserting a rocket that had a light-weight line attached, then firing it across the stranded vessel. A tally board was then sent out with instructions in four languages. The ship’s crew would haul on the line to bring out the continuous whip line and attach the whip block to a mast or sturdy part the ship. The rescue crew on shore then hauled out a heavier hawser line, which the ship’s crew fixed above the whip block. The hawser is then tightened using the block on the shore end of the whip. The breeches buoy and endless whip are then attached to the traveller block on the hawser, allowing the shore crew to haul the buoy to and from the vessel, rescuing the stranded crew one at a time. The rocket system could also be used from one ship to another. This item is significant for its connection with local history, maritime history and marine technology. Lifesaving has been an important part of the services performed from Warrnambool's very early days, supported by State and Local Government, and based on the methods and experience of Great Britain. Hundreds of shipwrecks along the coast are evidence of the rough weather and rugged coastline. Ordinary citizens, the Harbour employees, and the volunteer boat and rescue crew, saved lives in adverse circumstances. Some were recognised as heroes, others went unrecognised. In Lady Bay, Warrnambool, there were around 16 known shipwrecks between 1850 and 1905. Many lives were saved but tragically, eight lives were lost.Breeches buoy and traveller lock; white canvas breeches (shorts) with lifebuoy ring attached to its waistband, with ropes for attaching it to the traveller block. Wooden traveller block has double brass inline sheaves and brass rollers on each cheek of the block, and each shell is scored for the strop. The thimble attached to the strop has a wooden slat for quick release of the breeches buoy. The ropes comprise of two equal lengths of rope that have been bunched together to form two loops, then bound together just below the loops, while the four hanging ends are looped around the lifebuoy, equally spaced, with each end finished in an eye-splice. The apparatus is suspended by the loops at the top and attached to the traveller block, which has a quick release device.flagstaff hill maritime museum & village, flagstaff hill, maritime museum, maritime village, warrnambool, great ocean road, shipwreck, life-saving, lifesaving, rescue crew, rescue, rocket rescue, maritime accidents, shipwreck victim, rocket crew, beach rescue, line rescue, rescue equipment, rocket firing equipment, rocket rescue equipment, rocket apparatus, beach apparatus, petticoat breeches, breeches buoy, rocket house, rocket shed, lifeboat men, rocket equipment, rocket machine, rocket head, rocket launcher, rocket line, marine technology, william schermuly, line-firing pistol, line throwing gun, schermuly pistol, pistol rocket apparatus, beach rescue set, traveller, block, running block, pulley, hawser, faking, faking box, faked line, rescue boat, lifeboat, lady bay, warrnambool harbour, port of warrnambool, tramway jetty, volunteer lifesavers, volunteer crew, breakwater, lifeboat warrnambool, rocket rescue method, rocket rescue apparatus, captain manby, mortar, henry trengrouse, sky rocket, john dennett, shore to ship, colonel boxer, two-stage rocket, italian hemp, quadrant, schermuly, line-throwing pistol, line throwing cartridge, rocket apparatus rescue, stranded vessel, tally board, light line, whip line, endless whip, petticoat buoy, traveller chair, traveller block, her majesty’s coast guard, harbour board, line thrower, line throwing, beach cart, hand barrow, sand anchor, hawser cutter, life jacket, faking board, irish hand barrow, government of victoria -
 Flagstaff Hill Maritime Museum and Village
Equipment - Sand anchor, Mid-19th to mid-20th Century
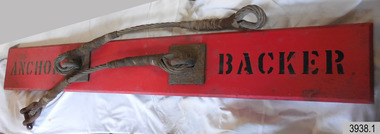
The rocket rescue crews used a sand anchor at a beach rescue site to weigh down the rescue apparatus. The crew would connect the steel cables to the connecting cable and then join heavy ropes or chains to the connecting cable. They would then bury the anchor in a trench about three-quarters of a metre deep, keeping the connecting cable’s end free. The length of heavy rope or chain was attached to a pulley block onto the heavy hawser line. The block and a crotch pole were used to keep the hawser line high and taught, keeping the survivors above the sea as they were hauled to shore on a line or in a breeches buoy. Saving lives in Warrnambool – The coastline of South West Victoria is the site of over 600 shipwrecks and many lost lives; even in Warrnambool’s Lady Bay there were around 16 known shipwrecks between 1850 and 1905, with eight lives lost. In 1859 the first Government-built lifeboat arrived at Warrnambool Harbour and a shed was soon built to house it. In 1858 the provision of rocket and mortar apparatus was approved for lifeboat stations in Victoria, and in 1864 a rocket house was built to safely store the rocket rescue equipment. In 1878 the buildings were moved to the Breakwater area, and in 1910 the new Lifeboat Warrnambool arrived with its ‘self-righting’ design. For almost a hundred years the lifeboat and rocket crews, mostly local volunteers, trained regularly to maintain their rescue skills. They were summoned when needed by alarms, gunshots, ringing bells and foghorns. Some became local heroes but all served an important role. By the end of the 1950s, the lifeboat and rescue equipment had become obsolete. Rocket Rescue Method - The Government of Victoria adopted lifesaving methods based on Her Majesty’s Coast Guard in Great Britain. It authorised the first line-throwing rescue system in 1858. Captain Manby’s mortar powered a projectile connected to a rope, invented in 1808. The equipment was updated to John Dennett’s 8-foot shaft and rocket method that had a longer range of about 250 yards. From the 1860s the breeches buoy apparatus was in use. The apparatus was suspended on a hawser line and manually pulled to and from the distressed vessel carrying passengers and items. In the early 1870s Colonel Boxer’s rocket rescue method became the standard in Victoria. His two-stage rockets, charged by a gunpowder composition, could fire the line up to 500-600 yards, although 1000 yards range was possible. Boxer’s rocket carried the light line, which was faked, or coiled, in a particular way between pegs in a faking box to prevent twists and tangles when fired. The angle of firing the rocket to the vessel in distress was measured by a quadrant-type instrument on the side of the rocket machine. Decades later, in about 1920, Schermuly invented the line-throwing pistol that used a small cartridge to fire the rocket. The British Board of Trade published instructions for both the beach rescue crew and ship’s crew. It involved setting up the rocket launcher on shore at a particular angle measured by the quadrant, inserting a rocket that had a lightweight line threaded through its shaft, and then firing it across the stranded vessel, the line issuing freely from the faking board. A tally board was then sent out to the ship with instructions in four languages. The ship’s crew would haul on the line to bring out the heavier, continuous whip line, then secure the attached whip block to the mast or other sturdy part of the ship. The rescue crew on shore then hauled out a stronger hawser line, which the ship’s crew fixed above the whip block. The hawser was then tightened using the block on the shore end of the whip. The breeches buoy and endless whip are then attached to the traveller block on the hawser, allowing the shore crew to haul the breeches buoy to and from the vessel, rescuing the stranded crew one at a time. This sand anchor is part of the rocket rescue equipment and is significant for its connection with local history, maritime history and marine technology. Lifesaving has been an important part of the services performed from Warrnambool's very early days, supported by State and Local Government, and based on the methods and experience of Great Britain. Hundreds of shipwrecks along the coast are evidence of the rough weather and rugged coastline. Ordinary citizens, the Harbour employees, and the volunteer boat and rescue crew, saved lives in adverse circumstances. Some were recognised as heroes, others went unrecognised. In Lady Bay, Warrnambool, there were around 16 known shipwrecks between 1850 and 1905. Many lives were saved but tragically, eight lives were lost.The sand anchor comprises a plank with steel cables and a connecting cable. The rectangular wooden bevelled-edged plank with two pairs of square metal plates bolted through it. Each metal plate has an eyelet and the two steel cable lengths are permanently attached by their eyelets to the plates. The eyelets at each end of the cable lengths are reinforced with rope work and one length also has a ‘U’ bolt shackle connection. The steel connecting cable also has reinforced eyelets at both ends. The plank has a black stencilled inscription on the upper surface. Stencilled in black paint "ANCHOR" "BACKER"flagstaff hill maritime museum & village, flagstaff hill, maritime museum, maritime village, warrnambool, great ocean road, shipwreck, life-saving, lifesaving, rescue crew, rescue, rocket rescue, maritime accidents, shipwreck victim, rocket crew, beach rescue, line rescue, rescue equipment, rocket firing equipment, rocket rescue equipment, rocket apparatus, beach apparatus, breeches buoy, rocket house, rocket equipment, rocket launcher, rocket line, marine technology, beach rescue set, traveller, block, running block, pulley, hawser, faked line, lady bay, warrnambool harbour, port of warrnambool, volunteer lifesavers, volunteer crew, breakwater, rocket rescue method, rocket rescue apparatus, shore to ship, rocket apparatus rescue, stranded vessel, whip line, endless whip, harbour board, sand anchor, rocket set, anchor backer, rescue anchor, beach anchor, backer, anchor, steel cable, wire cable, connecting cable -
 Flagstaff Hill Maritime Museum and Village
Ceramic - Ceramic Piece, Minton Potteries, ca 1877
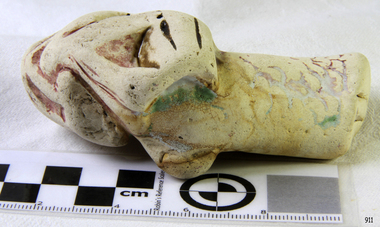
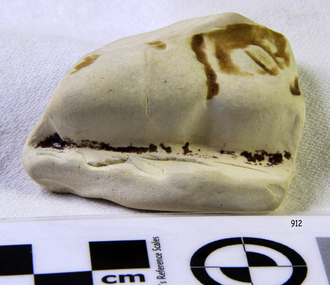
The ceramic piece is one of five porcelain fragments washed up from the Loch Ard wreck near Port Campbell, Victoria. These fragments resemble the foot and leg of a large bird, and legend has it that another bird had drifted ashore at the same time as the Loch Ard peacock. This figurine is on display at Flagstaff Hill Maritime Museum and regarded as the most valuable shipwreck relic. It is believed that all five fragments could belong to another peacock or a Minton porcelain stork that had been photographed in a Home Beautiful magazine in 1928. This stork appeared to be missing a leg and foot, and experts have hypothesised that the five fragments could belong to this stork, the whereabouts of which are currently unknown. A brief history of the Loch Ard (1873-1878): - The sailing ship Loch Ard was one of the famous Loch Line of ships that sailed the long voyage from England to Australia. Barclay, Curdle and Co. built the three-masted iron vessel in Glasgow in 1873. It had sailed three trips to Australia and one trip to Calcutta before its fateful voyage. Loch Ard left England on March 2, 1878, under the command of recently married, 29-year-old Captain Gibbs. It was bound for Melbourne with a crew of 37, plus 17 passengers. The general cargo reflected the affluence of Melbourne at the time. Onboard were straw hats, umbrellas, perfumes, clay pipes, pianos, clocks, confectionery, linen and candles, and a heavier load of railway irons, cement, lead and copper. Other cargo included items intended for display in the Melbourne International Exhibition of 1880. The Loch Ard had been sailing for three months and was close to its destination on June 1, 1878. Captain Gibbs had expected to see land at about 3 am, but the Loch Ard ran into a fog that greatly reduced visibility, and there was no sign of land or the Cape Otway lighthouse. The fog lifted at 4 am, and the sheer cliffs of Victoria's west coast were much closer to them than Captain Gibbs expected. He tried to manage the vessel but failed, and the ship struck a reef at the base of Mutton Bird Island, near Port Campbell. The top deck loosened from the hull, and the masts and rigging crashed down, knocking passengers and crew overboard. The lifeboat was launched by Tom Pearce but crashed into the side of Loch Ard and capsized. He clung onto its overturned hull and sheltered under it. He drifted out to sea, and the tide brought him back to what is now called Loch Ard Gorge. He swam to shore and found a cave for shelter. A passenger, Eva Carmichael, had raced onto the deck to find out what was happening and was confronted by towering cliffs above the ship. She was soon swept off the ship by a huge wave. Eva saw Tom Pearce on a small rocky beach and yelled to attract his attention. He swam out and dragged her to the shelter of the cave. He revived her with a bottle of brandy from a case that had washed up on the beach. Tom scaled a cliff in search of help and followed some horse hoof prints. He came from two men from Glenample Station, three and a half miles away. He told the men of the tragedy and then returned to the gorge while the two men rode back to the station to get help. They reached Loch Ard Gorge and took the two shipwreck survivors to Glenample Station to recover. Eva stayed at the station for six weeks before returning to Ireland by steamship. In Melbourne, Tom Pearce received a hero's welcome and was presented with a medal and some money. Of the 54 crew members and passengers on board, only two survived: the apprentice, Tom Pearce and the young woman passenger, Eva Carmichael, who lost her family in the tragedy. The shipwreck of the Loch Ard is of significance for Victoria and is registered on the Victorian Heritage Register ( S 417). Flagstaff Hill has a varied collection of artefacts from Loch Ard and its collection is significant for being one of the largest accumulation of artefacts from this notable Victorian shipwreck. The collections object is to also give us a snapshot into history so we can interpret the story of this tragic event. The collection is also archaeologically significant as it represents aspects of Victoria's shipping history that allows us to interpret Victoria's social and historical themes of the time. The collections historically significance is that it is associated unfortunately with the worst and best-known shipwreck in Victoria's history.Ceramic piece, broken, with remnants of burgundy, green and yellow glaze. The piece has been shaped. It could be a peacock leg section with green foliage with glaze. Noneflagstaff hill, flagstaff hill maritime museum and village, warrnambool, maritime museum, maritime village, great ocean road, shipwreck coast, ceramic, porcelain, piece, fragment, ceramic bird, loch ard, shipwreck, salvage, recover, 1877, 1878, minton, shard -
 Flagstaff Hill Maritime Museum and Village
Ceramic - Ceramic Piece, Minton Potteries, ca 1877
The ceramic piece is one of five porcelain fragments washed up from the Loch Ard wreck near Port Campbell, Victoria. These fragments resemble the foot and leg of a large bird, and legend has it that another bird had drifted ashore at the same time as the Loch Ard peacock. This figurine is on display at Flagstaff Hill Maritime Museum and regarded as the most valuable shipwreck relic. It is believed that all five fragments could belong to another peacock or a Minton porcelain stork that had been photographed in a Home Beautiful magazine in 1928. This stork appeared to be missing a leg and foot, and experts have hypothesised that the five fragments could belong to this stork, the whereabouts of which are currently unknown. A brief history of the Loch Ard (1873-1878): - The sailing ship Loch Ard was one of the famous Loch Line of ships that sailed the long voyage from England to Australia. Barclay, Curdle and Co. built the three-masted iron vessel in Glasgow in 1873. It had sailed three trips to Australia and one trip to Calcutta before its fateful voyage. Loch Ard left England on March 2, 1878, under the command of recently married, 29-year-old Captain Gibbs. It was bound for Melbourne with a crew of 37, plus 17 passengers. The general cargo reflected the affluence of Melbourne at the time. Onboard were straw hats, umbrellas, perfumes, clay pipes, pianos, clocks, confectionery, linen and candles, and a heavier load of railway irons, cement, lead and copper. Other cargo included items intended for display in the Melbourne International Exhibition of 1880. The Loch Ard had been sailing for three months and was close to its destination on June 1, 1878. Captain Gibbs had expected to see land at about 3 am, but the Loch Ard ran into a fog that greatly reduced visibility, and there was no sign of land or the Cape Otway lighthouse. The fog lifted at 4 am, and the sheer cliffs of Victoria's west coast were much closer to them than Captain Gibbs expected. He tried to manage the vessel but failed, and the ship struck a reef at the base of Mutton Bird Island, near Port Campbell. The top deck loosened from the hull, and the masts and rigging crashed down, knocking passengers and crew overboard. The lifeboat was launched by Tom Pearce but crashed into the side of Loch Ard and capsized. He clung onto its overturned hull and sheltered under it. He drifted out to sea, and the tide brought him back to what is now called Loch Ard Gorge. He swam to shore and found a cave for shelter. A passenger, Eva Carmichael, had raced onto the deck to find out what was happening and was confronted by towering cliffs above the ship. She was soon swept off the ship by a huge wave. Eva saw Tom Pearce on a small rocky beach and yelled to attract his attention. He swam out and dragged her to the shelter of the cave. He revived her with a bottle of brandy from a case that had washed up on the beach. Tom scaled a cliff in search of help and followed some horse hoof prints. He came from two men from Glenample Station, three and a half miles away. He told the men of the tragedy and then returned to the gorge while the two men rode back to the station to get help. They reached Loch Ard Gorge and took the two shipwreck survivors to Glenample Station to recover. Eva stayed at the station for six weeks before returning to Ireland by steamship. In Melbourne, Tom Pearce received a hero's welcome and was presented with a medal and some money. Of the 54 crew members and passengers on board, only two survived: the apprentice, Tom Pearce and the young woman passenger, Eva Carmichael, who lost her family in the tragedy. The shipwreck of the Loch Ard is of significance for Victoria and is registered on the Victorian Heritage Register ( S 417). Flagstaff Hill has a varied collection of artefacts from Loch Ard and its collection is significant for being one of the largest accumulation of artefacts from this notable Victorian shipwreck. The collections object is to also give us a snapshot into history so we can interpret the story of this tragic event. The collection is also archaeologically significant as it represents aspects of Victoria's shipping history that allows us to interpret Victoria's social and historical themes of the time. The collections historically significance is that it is associated unfortunately with the worst and best-known shipwreck in Victoria's history.Ceramic piece, broken with remnants of glaze. It has been shaped. It may be from a peacock leg section.Noneflagstaff hill, flagstaff hill maritime museum and village, warrnambool, maritime museum, maritime village, great ocean road, shipwreck coast, ceramic, porcelain, piece, fragment, ceramic bird, loch ard, shipwreck, salvage, recover, 1877, 1878, minton, shard -
 The Beechworth Burke Museum
Animal specimen - Silver Gull, Trustees of the Australian Museum, 1860-1880
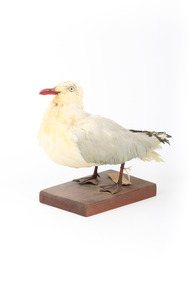
The Silver Gull is more commonly referred to as the 'Seagull'. Found all along the coast of mainland Australia and Tasmania, it can also be found in New Caledonia and New Zealand. These birds are a common nuisance at beaches and urban areas, such as shopping centres. Since the 1950s, humans have become increasingly wasteful, leading to an explosion of the Silver Gull population due to the availability of rubbish to scavenge. They feed mainly on small marine life, but they are a versatile scavenger. The population increase has impacted the breeding of other bird species, as Silver Gulls have dominated offshore island breeding grounds. Their breeding season is from August to December, when they nest on the ground, however mating can occur year-round. This species has a harsh, high-pitched call 'kwarwh', well known to all Australians. Although protected under Australian Environmental Law, there are many strategies in place to discourage increasing the numbers of Seagulls. This specimen is an inaccurate example of a Silver Gull, which although is in good condition and intact, does not look like an accurate representation of this species. The legs have been mounted too far towards the tail on this specimen, giving it an unbalanced appearance. This specimen is part of a collection of almost 200 animal specimens that were originally acquired as skins from various institutions across Australia, including the Australian Museum in Sydney and the National Museum of Victoria (known as Museums Victoria since 1983), as well as individuals such as amateur anthropologist Reynell Eveleigh Johns between 1860-1880. These skins were then mounted by members of the Burke Museum Committee and put-on display in the formal space of the Museum’s original exhibition hall where they continue to be on display. This display of taxidermy mounts initially served to instruct visitors to the Burke Museum of the natural world around them, today it serves as an insight into the collecting habits of the 19th century.This specimen is part of a significant and rare taxidermy mount collection in the Burke Museum. This collection is scientifically and culturally important for reminding us of how science continues to shape our understanding of the modern world. They demonstrate a capacity to hold evidence of how Australia’s fauna history existed in the past and are potentially important for future environmental research. This collection continues to be on display in the Museum and has become a key part to interpreting the collecting habits of the 19th century.This adult Silver Gull has a white head, body, underpart and tail. Its wings are silver-grey, with black and white tips. It has an orange-red bill, feet and beak, indicative of its maturity. The irises are white. This specimen stands upon a wooden platform and has an identification tag tied around its leg.Swing-tag: 11a / Silver Gull / See catalogue, page, 40. taxidermy mount, taxidermy, animalia, burke museum, beechworth, australian museum, skin, reynell eveleigh johns, bird, seagull, silver gull, australian bird, nuisance -
 Seaworks Maritime Museum
Shipbuilders model, SS ARGUS (1889-1907) - Steel steamship built by Palmers & Co., at Newcastle on Tyne for Archibald Currie & Partners, Melbourne, SS Argus, 1889-1907
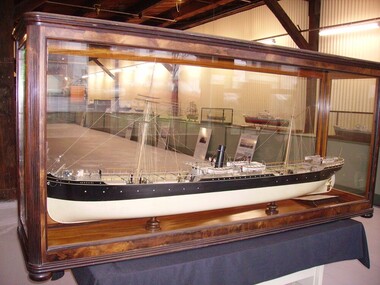
Steel screw steamer launched 1889 at Newcastle on Tyne by Palmers & Co., built for Archibald Currie and Partners - the Currie Line of Melbourne. Gross tonnage: 2,792, Length: 99.06m (325'). Width: 12.3m (40.3'). Triple expansion steam engines producing 363 nhp. Avge speed 11 knots. Coal consumption 26 ½ tons per 24 hours. Steel hull, one funnel, two masts, barque rig. • 1889: Argus launched. Worked in the Australia to India trade, passengers, goods and horses. • 1891 July: While taking coal from Newcastle to Singapore, ran onto sunken rock in Gaspar Strait (in Indonesia). Watertight bulkheads held, got to Singapore, was repaired for two months, 60,000 Straits dollars (about £12,000). • 1895 July: While taking 400 horses to Colombo, ran onto reef near Somerset, North Queensland. holed, water in two compartments. 400 tons coal jettisoned, finally got off in spring tides. • 1901 Feb: During Boer War took Victorian contingent, 5th Mounted Rifles, fromMelbourne to Durban and Cape Town, with 500 horses. • 1901 Dec: Took horses for Boer War from Brisbane to Durban. • 1903 31 July: Leaving Sydney for Calcutta with 86 horses, 20 passengers including the Sultan of Johore, was rammed by the incoming steamer Mildura (on the wrong side of the channel). Argus's side plating was cut from deck to below waterline, had to be beached on Goat Island to prevent sinking. Refloated 2 August and repaired. • 1905: Argus sold to the Japanese shipping company, Osaka Shosen Kaisha. Renamed Giran Maru. • 1907 11 Sept: Wrecked in Soya Strait, between Hokkaido & Sakhalin Island.Built for Archibald Currie & Partners, Melbourne. Carried passengers between Australia and India and between western and eastern Australia.Large ship builder's model in glass case -
 Mission to Seafarers Victoria
Photograph - Photograph, Sepia, Anne Treverton Goldsmith (nee Lobb), Picnic at Glenfern, King's Birthday 1906, 9 November 1906
Gathering of seafarers and MTS clergy and LHLG members, at Glenfern 1906. Mrs Mary Danne daughter of Reverend Kerr Johnston was a widow at the time and was renting Glenfern, the property once owned by the Boyd family, and started a private primary school she called Newington College. A member of the Mission's committee from 1905 to 1926 when she passed away, a bras plaque was made in her memory and placed in the chapel of the Flinders Street Mission. (see item 0690) In the Standard published on Saturday 17 November 1906, page 4 we could read: "In connection with the Victoria Missions to Seamen a successful and pleasant outing, was given to the sailors in port on King's Birth day. Mrs. Danne, of "Glenfern," St. Kilda, threw her house and grounds open tor sports and tea. Cricket, football and sports were enthusiastically pursued, and ample justice was done to the substantial tea provided by Mrs. Danne and her friends. The Misses Danne, Miss Godfrey and other ladies were untiring in their attentions. Mr. Axell, first officer of brig Fairy Rock, in a few appropriate words thanked Mrs. Danne and the ladies, on behalf of the sailors, for their kind hospitality. Snapshots of the party were taken by Mrs. Goldsmith. Mr. C A. Holmes and Mr. Cedric Campbell acted as stewards and starters for the races. On the invitation of the chaplain (Rev. A G. Goldsmith*) ringing cheers were given for Mrs. Danne and the ladies. Before the party broke up Mrs Danne addressed a few kind words to the men and gave them all a shake of the band at the gate. The rest of the evening was spent at the Institute, Beach street, where games and competitions were carried on to the accompaniment of vocal and instrumental music. The prizes won at the sports etc., were distributed, and after singing the National Anthem the party broke up."Thanks to the article in the Standard, Saturday 17 November 1906, page 4, we learn that some of the early sepia photographs were taken by Mrs Gurney Goldsmith herself.Small monochrome photograph depicting a group of seamen and ladies with the Mission's Flagstaff.1906, glenfern, st kilda east, picnic, lhlg, king's birthday, edward vii, mary alice isabelle danne nee johnston, 1851-1926, reverend kerr johnston, 1812-1887, boyd family, sailors, seamen, seafarers, bowler hat, cap, boater hat, snapshots, camera, photographer, sports, cricket, football, ethel augusta godfrey 1861-1935, mr axell, fairy rock, charles arthur holmes (-1947), mrs gurney goldsmith, anne treverton goldsmith (nee lobb), cedric campbell -
 Melbourne Tram Museum
Ephemera - Timetable - bus - The Met - set of 24, The Met, 1992 & 1993
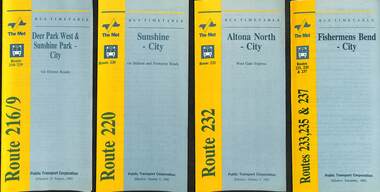
SSet of 24 The Met bus timetables, with diagrammatic map, major stops and contact details. All dated during1993 unless noted otherwise. 1 - Route 216/9 - Deer Park West & Sunshine Park - City 2 - Route 220 - Sunshine - City - 1992 3 - Route 232 - Altona North - City - 1992 4 - Route 233 - Fishermens Bend - City - 1992 5 - Route 254 - Northland Shopping Centre - City - 1992 6 - Route 256 - La Trobe Uni - City - 1992 7 - Routes 258 & 259 - Northland Shopping Centre, and La Trobe Uni - City via Eastern Freeway - 1992 8 - Route 260 etc - Deep Creek Templestow - Donvale - City 9 - Route 264 - Mitcham, Donvale City 10 - Route 265 - Deep Creek - City 11 - Route 602 - Brighton - city 12 - Route 269, 291 and 296 - Greensborough, Heidelberg & Newmans Road to Box Hill 13 - Route 272 - Warrandyte - City 14 - Route 276 & 278 - Warrandyte - City 15 - Route 284 & 270 - East Kew - City or Box Hill 16 - Route 285 - The Pines - Box Hill 17 - Route 286 & 288 - The Pines and Templestowe - Box Hill 18 - Route 290 - North Nunawading - Box Hill 19 - Route 292 etc - Box Hill, Deep Creek, Ringwood, Warrandyte 20 - Route 301, 281 315 - Ringwood, Park Orchards and Donvale - City 21 - Route 305 - Box Hill - Ringwood 22 - Route 366 & 367 - Ringwood - Croydon 23 - Route 600 - St Kilda - Brighton Beach - 1992 24 - Route 601 - Gardenvale - City - 1992Yields information about some of The Met bus services 1993Set of 24 The Met timetables, DL size, printed in two colours.timetables, the met, route 216, route 220, route 232, route 233, route 254, route 258, route 259, route 260, route 264, route 265, route 256, route 602, route 269, route 272, route 276, route 284, route 270, route 285, route 286, route 288, route 290, route 292, route 301, route 305, route 366, route 367, route 600, route 601 -
 Federation University Historical Collection
Magazine - Booklet, Ballarat School of Mines Students' Magazine, 1944, 1944
List of Full Course Students' 1944, Editorial, News and Notes, Obituary, The Literary Society, Fumes from the Lab, Our Sojourn in Port Pirie, Arts & Crafts Gossip, Sport, Commercial Notes, The Junior Techs, List of Junior Technical School Students' 1944White, blue, green and gold soft covered magazine of 66 pages including advertisements. Artworks Mr Heseltine - By Ruth Mole Mack - By Beryl Grinter Frederick - By Beryl Grinter Stan - By Ruth Mole Scotty - By Joan Walter Jenko - By Ruth Mole Dagwood - By Ruth Mole Along the track - By Neville Reeve Kanga - By Ruth Mole Nev - By Ruth Mole Charlie - By Joan Walter Shergold - By Joan Walter Very friendly people at this beach, everyone's waving at me - By John Procter At the crest of the hill - By Joan Walter Joyce - By Beryl Grinter Mr Procter - By Ruth Mole Phyllis - By Neville Reeve Gwen - By Beryl Grinter Doreen - By William Bates Laurel - By Joan Walter Lorna - By Ruth Mole Ah! an important discovery! wireless poles on Mars - By Frank Daykin Barbara - By Joan Walter Winsome - By Beryl Grinter Kath - By Joan Walter Lola - By Ruth Mole Amy - By Beryl Grinter Laurel - By Beryl Grinter Gwen - By Beryl Grinter June - By Beryl Grinter Peggy - By Beatrice Burgess Winifred - By Ruth Mole Elaine - By M.D Iris - By Ruth Mole Iris - By Ruth Mole Isobel - By Joan Walter Betty - By Joan Walter Nancy - By Neville Reeve Charlie - By Ruth Mole Harold - By Joan Walter Sammy - By Joan Walter Brokie - By Ruth Mole Dick - By Joan Walter Mac - By Ruth Mole Mac - By Beryl Grinter Willie - By Beryl Grinter Deany - By Beryl Grinter Ducky - By Ruth Mole Fitzy - By Joan Walter ballarat school of mines, magazine, percival d. fisher, neville reeve, gwen spiers, p. marxsen, stanley c. sharp, john c. shergold, beatrice e. burgess, john g. procter, alan m. scott, w. reid, elsie coombs, laurence j. george, d. wise, robert j. mckenzie, marian a. beckwith, geoffrey biddington, thelma ellsworth, maxwell a. richards, norma eltringham, k. saunders, john a. mckenzie, beryl grinter, frank d. daykin, dawn wilson, ernest j. poppins, dr pound, mr mein, mr f. g. procter, joan t. walter, peter j. wilson, ruth mole, ian cooper, jack lannen, jack henderson, james duncan, alan wilson, j. baird, ian mclachlan, maxwell lawrence, ken palmer, joy martin, patricia allan, graham lawrie, kevin mclachlan, marion pearce, dimsey, vaughan, wilson, callister, max webster, stan lawrie, eric goon, m. collins, alan paganetti, robert tasman pound, william symons, f. neville. reeve, lester w. roffey, kevin j. whiter, john m. blainey, john middlin, roy e. mawby, phillip p. coulson, john w. jolly, kingsley r. bremmer, basil j. marshall, james s. owen, raymond g. mccahon, lindsay g. pattenden, david t. coburn, bruce j. linklater, muriel coultham, g. harrison, mr cornell, b. brookman, john l. lewis, valerie vickers, robert j. mcmenzie, betty law, miss king, mrs mcilvena, valerie ballinger, grace lawry, mina gallie, eloise prowse, lois strick, kenneth j. lindsay, r. eggleton, w. redfern, w. blundell, l. clifton, w. parker, r. fitzclarence, r. sargent, d. mclachlan, c. mouser, w. trevethan, d. hart, r. bennett, j. beecroft, r. ingleton, k. dean, w. young, b. holloway, w. coad, a. clark, k. innes, k. george, r. willian, j. heys, a. coad, l. dennis, p. banfield, g. pyke, j. humphrey, h. george, f. jacobson, f. savage, c. eltringham, i. scott, a. hughes, h. fumberger, a. smith, m. grinham, c. hoffman, r. swales, joan walter, william bates -
 Ballarat Tramway Museum
Photograph - B&W print of donated negative - set of 9, Ron E. Fluck
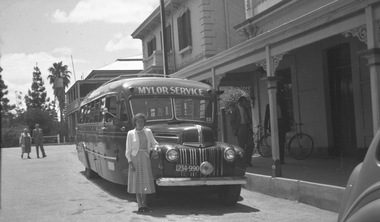
Black and white print of a donated negatives. Print made 8/1998. Various photos taken by Ron Fluck or other members of the Fluck family of various tour buses during the late 1940's and early 1950's. 886.1 - Mylor Service bus Ford V8, SA234990, Strathalbyn 5-1-1951 - standing alongside is Ron Fluck's first wife Joan (advised by Ron 09/2007) 886.2 - Pykes Cadillac Panorama Hotel, Sublime point, Bulli Pass NSW and Ron Fluck, 29-6-1951. 886.3 - Bonds REO #6, West Vic. (see also 886.9) 886.4 - Marks Ballarat, 2 Ansairs, TL943 and TL 975, Ocean Road, Melba Gully Crowes Vic - 25-3-1951. 886.5 - Parlourcars White bus, No. 29, Melbourne Hills Warburton - 13-8-1950 886.6 - Cellulose Bus, semi trailer, Millicent - 24-10-1947 with Claude Perkins Pty Ltd. hardware store in background. 886.7 - Kilkenny - Morphett - Henley Beach bus service, breakdown, Grange Road, Findon, Chev. car, Ron Fluck and D.Kay, 22-1-1949. Photo by E.G.Fluck. 886.8 - As for 886.2, NSW TV 338. 886.9 - Bonds Reo #6, Side Load, SA 2337, Diamond T motor, S.E. of SA - 23-10-1947. All images replaced by high res scan of the negatives 17/1/2019/tramways, trams, mylor service, parlourcars, bonds, marks of ballarat -
 Bendigo Military Museum
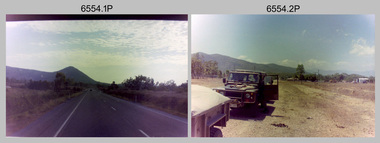
Photograph - 4th Field Survey Squadron deployed on Operation NERIGHT, Queensland & Northern Territory, 1989
This is a set of 19 photographs taken in 1989 during 4th Field Survey Squadron’s deployment on Operation NERIGHT 89 in Queensland and the Northern Territory. It was a two-part operation in 1989 with work conducted in the areas of Camooweal and Weipa. Part 1 was the field completion of topographic maps conducted near Camooweal QLD, along the Barkley Highway on the border between NT and QLD, from the 12th of September to the 20th of October 1989. A Bell Kiowa LOH helicopter from 162 Recce Sqn supported topographic field completion. Operation NERIGHT 89 Part 2 was the acquisition of mapping control by GPS field parties utilising Texas Instruments TI4100 Global Positioning System receivers around Weipa on Cape York Peninsula from the 22nd of September to the 22nd of October 1989. Part 2 Two Bell UH-1H Iroquois helicopters from RAAF’s 35 Squadron were principally used to deploy GPS field parties. Identification photography of control points was taken by air camera operators in AAAvn Pilatus Porter aircraft from 173 Gen Spt Sqn fitted with an RC10 aerial camera. The two parts of the operation were conducted concurrently. This is a set of 19 photographs taken in 1989 during 4th Field Survey Squadron’s deployment on Operation Neright in Queensland & the Northern Territory. The colour photographs are on 35mm negative film and are part of the Army Survey Regiment’s Collection. The photographs were scanned at 96 dpi. .1) to .3) - Photo, colour, 1989. En-route to areas of survey operations. .4) to .5) - Photo, colour, 1989. Unidentified personnel relax next to river/waterhole. .6) - Photo, colour, 1989. Two Bell UH-1H Iroquois helicopters from RAAF’s 35 SQN utilised in the movement of GPS parties. .7) to .9) - Photo, colour, 1989. Unidentified soldier practices repelling from a UH1H Iroquois helicopter. .10) - Photo, colour, 1989. Inside the cockpit of a UH1H Iroquois helicopter. .11) - Photo, colour, 1989. Field Party camp with GPS equipment in foreground. Unidentified soldier prepares a meal. .12) - Photo, colour, 1989. GPS antenna plumbed over a survey ground mark. Witness post on left. .13) & .14) - Photo, colour, 1989. Unknown Cape York Peninsula beaches. .15) & .16) - Photo, colour, 1989. Dramatic fire next to base camp. .17) - Photo, colour, 1989. Aboriginal rock art at unknown location. .18) - Photo, colour, 1989. Aboriginal rock art at unknown location. L to R: unidentified, SPR Andrew Quin. .19) - Photo, colour, 1989. Aboriginal rock art at unknown location. LT Chris Topovsek..1P to .19P – There are no personnel identified. ‘1989 OP NERIGHT’ annotated on negative sleeve.royal australian survey corps, rasvy, 4 fd svy sqn, op neright 89 -
 Melbourne Tram Museum
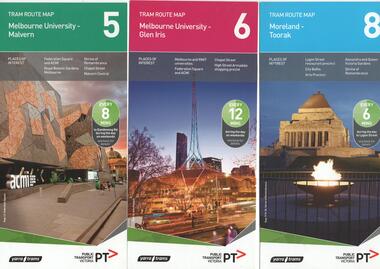
Ephemera - Tram Route Guides, Public Transport Victoria (PTV), "Tram Route Map", 1/2015 and 6/2015
Set of 7 Tram Route Maps, published during 2015. Each comprises a vertical DL folded sheet, full colour for the nominated routes, with Yarra Trams and PTV logos, listing the stops, interchanges with bus and other tram services, ticketing zones, estimated frequencies with adverts for Night tram services, TramTracker and Myki tickets. .1 - Route 5 - Melbourne University to Malvern .2 - Route 6 - Melbourne University to Glen Iris .3 - Route 8 - Moreland to Toorak .4 - Route 11 - West Preston - Victoria Harbour Docklands .5 - Route 19 - North Coburg - Flinders St Station .6 - Route 70 - Wattle Park to Waterfront City Docklands .7 - Route 72 - Melbourne University to Camberwell .8 - Route 1 - East Coburg - South Melbourne Beach .9 - Route 3 and 3A - Melbourne University to East Malvern .10 - Route 16 - Melbourne University to Kew .11 - Route 55 - West Coburg - Domain Interchange .12 - Route 57 - West Maribyrnong - Flinders St Station .13 - Route 59 - Airport West - Flinders St. Station .14 - Route 64 - Melbourne University - East Brighton .15 - Route 67 - Melbourne University - Carnegie .16 - Route 78 - North Richmond - Balaclava via Prahran .17 - Route 82 - Footscray - Moonee Ponds See Reg Item 2396 for 2012, 2278 for 2016 and 2940 for 2014 versionstrams, tramways, timetables, maps, route 1, route 3, route 5, route 6, route 8, route 11, route 16, route 19, route 55, route 57, route 59, route 64, route 67, route 70, route 72, route 78, route 82, east coburg, south melbourne, east malvern, kew, west coburg, west maribyrnong, airport west, east brighton, carnegie, north richmond, balaclava, footscray, moonee ponds, malvern, glen iris, moreland, west preston, north coburg, wattle park, camberwell -
 Melbourne Tram Museum
Ephemera - Tram Route Guides, Public Transport Victoria (PTV), "Tram Route Guide and Map", Oct. 13 to July 14
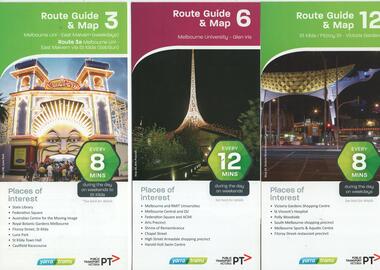
Set of 17 Tram Route Maps, published during 2013 and 2014. Each comprises a vertical DL folded sheet, full colour for the nominated routes, with Yarra Trams and PTV logos, listing the stops, interchanges with bus and other tram services, ticketing zones, estimated frequencies with adverts for Night tram services, TramTracker and Myki tickets. .1 - Route 3 - East Malvern - Melbourne Uni and 3A via St Kilda (Sat and Sun) .2 - Route 6 - Melbourne University to Glen Iris .3 - Route 12 - St Kilda - Victoria Gardens .4 - Route 16 - Kew via St Kilda .5 -Route 30 - St Vincent's Plaza - Etihad Stadium .6 - Route 55 - West Coburg - Domain Interchange .7 - Route 59 - Airport West - City (Elizabeth St) .8 - Route 64 - Melbourne University - East Brighton .9 - Route 70 - Wattle Park to Waterfront City Docklands .10 - Route 75 - Docklands - Vermont South .11 - Route 78 - North Richmond - Balaclava .12 - Route 82 - Moonee Ponds - Footscray .13 - Route 86 - Bundoora - Waterfront City .14 - Route 96 - East Brunswick - St Kilda Beach .15 - Route 109 - Box Hill - Port Melbourne .16 - Route 112 and 11 - West Preston - St Kilda and West Preston - Victoria Harbour Docklands .17 - Route 24 - North Balwyn to Etihad Stadium See Reg Item 2396 for 2012, 2278 for 2016 and 2939 for 2015 versionstrams, tramways, timetables, maps, route 3, route 6, route 11, route 12, route 16, route 24, route 30, route 55, route 59, route 64, route 70, route 75, route 78, route 82, route 86, route 96, route 109, route 112, east malvern, glen iris, victoria gardens, kew, st vincent's plaza, west coburg, airport west, east brighton, wattle park, vermont south, north richmond, moonee ponds, footscray, st kilda, docklands, west preston, victoria harbour, north balwyn, etihad stadium -
 Melbourne Tram Museum
Ephemera - Ticket/s, Melbourne & Metropolitan Tramways Board (MMTB), Set of 18 MMTB decimal currency tickets, 1960's to 1970's
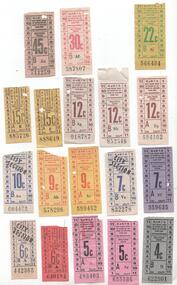
Set of 18 MMTB decimal currency tickets. Some tickets have notes or advertisements on the rear as noted. If not noted, all printed with black ink on coloured paper with black numbers. 1 - 4c - printed on grey paper - H622901 2 - 5c - pink paper - Ag 655536 3 - 5c - pink paper over printed with a Red P, A 483403 - with pencil note "Tues Sept 4 1973, tram 1041 City to St Kilda Beach (route 15), (? (special?) ticket) 4 - 6c - orange paper, A 640184 5 - 6c - off white paper, blue ink over printed in black City Section, A442365 6 - 7c - purple paper, Bf 359635 7 - 7c - off white paper, purple ink over printed in black City Section, Va 832278 8 - 10c - off white paper, purple ink over printed in black City Section, An 004421 9 - 9c - red ink on yellow paper - Ab 578298 and Ac 599462. 10 - 12c - brown ink on off white paper - Nos. Bp584102, Bb852548, and Ag 018787 with an ink note on rear "W2 517, Sat 12 Dec 1966 Camb Junct Bickleigh St about 7.25am" 11 - 15c - yellow paper, F888649 and 885726 with "641" in ink on the rear. 12 - 22c - green ink on yellow paper, Aj 566434 with "369" in ink on the rear. 13 - 30c - red ink on off white paper - Af 387807 14 - 45c - on off white paper. An 711259trams, tramways, mmtb, tickets, decimal currency, advertisements, city section, 1041 -
 Flagstaff Hill Maritime Museum and Village
Photograph
HISTORY OF THE LOCH ARD The LOCH ARD belonged to the famous Loch Line which sailed many ships from England to Australia. Built in Glasgow by Barclay, Curdle and Co. in 1873, the LOCH ARD was a three-masted square rigged iron sailing ship. The ship measured 262ft 7" (79.87m) in length, 38ft (11.58m) in width, 23ft (7m) in depth and had a gross tonnage of 1693 tons. The LOCH ARD's main mast measured a massive 150ft (45.7m) in height. LOCH ARD made three trips to Australia and one trip to Calcutta before its final voyage. LOCH ARD left England on March 2, 1878, under the command of Captain Gibbs, a newly married, 29 year old. She was bound for Melbourne with a crew of 37, plus 17 passengers and a load of cargo. The general cargo reflected the affluence of Melbourne at the time. On board were straw hats, umbrella, perfumes, clay pipes, pianos, clocks, confectionary, linen and candles, as well as a heavier load of railway irons, cement, lead and copper. There were items included that intended for display in the Melbourne International Exhibition in 1880. The voyage to Port Phillip was long but uneventful. At 3am on June 1, 1878, Captain Gibbs was expecting to see land and the passengers were becoming excited as they prepared to view their new homeland in the early morning. But LOCH ARD was running into a fog which greatly reduced visibility. Captain Gibbs was becoming anxious as there was no sign of land or the Cape Otway lighthouse. At 4am the fog lifted. A man aloft announced that he could see breakers. The sheer cliffs of Victoria's west coast came into view, and Captain Gibbs realised that the ship was much closer to them than expected. He ordered as much sail to be set as time would permit and then attempted to steer the vessel out to sea. On coming head on into the wind, the ship lost momentum, the sails fell limp and LOCH ARD's bow swung back. Gibbs then ordered the anchors to be released in an attempt to hold its position. The anchors sank some 50 fathoms - but did not hold. By this time LOCH ARD was among the breakers and the tall cliffs of Mutton Bird Island rose behind the ship. Just half a mile from the coast, the ship's bow was suddenly pulled around by the anchor. The captain tried to tack out to sea, but the ship struck a reef at the base of Mutton Bird Island, near Port Campbell. Waves broke over the ship and the top deck was loosened from the hull. The masts and rigging came crashing down knocking passengers and crew overboard. When a lifeboat was finally launched, it crashed into the side of LOCH ARD and capsized. Tom Pearce, who had launched the boat, managed to cling to its overturned hull and shelter beneath it. He drifted out to sea and then on the flood tide came into what is now known as LOCH ARD Gorge. He swam to shore, bruised and dazed, and found a cave in which to shelter. Some of the crew stayed below deck to shelter from the falling rigging but drowned when the ship slipped off the reef into deeper water. Eva Carmichael had raced onto deck to find out what was happening only to be confronted by towering cliffs looming above the stricken ship. In all the chaos, Captain Gibbs grabbed Eva and said, "If you are saved Eva, let my dear wife know that I died like a sailor". That was the last Eva Carmichael saw of the captain. She was swept off the ship by a huge wave. Eva saw Tom Pearce on a small rocky beach and yelled to attract his attention. He dived in and swam to the exhausted woman and dragged her to shore. He took her to the cave and broke open case of brandy which had washed up on the beach. He opened a bottle to revive the unconscious woman. A few hours later Tom scaled a cliff in search of help. He followed hoof prints and came by chance upon two men from nearby Glenample Station three and a half miles away. In a state of exhaustion, he told the men of the tragedy. Tom returned to the gorge while the two men rode back to the station to get help. By the time they reached LOCH ARD Gorge, it was cold and dark. The two shipwreck survivors were taken to Glenample Station to recover. Eva stayed at the station for six weeks before returning to Ireland, this time by steamship. In Melbourne, Tom Pearce received a hero's welcome. He was presented with the first gold medal of the Royal Humane Society of Victoria and a £1000 cheque from the Victorian Government. Concerts were performed to honour the young man's bravery and to raise money for those who lost family in the LOCH ARD disaster. Of the 54 crew members and passengers on board, only two survived: the apprentice, Tom Pearce and the young woman passenger, Eva Carmichael, who lost all of her family in the tragedy. Ten days after the LOCH ARD tragedy, salvage rights to the wreck were sold at auction for £2,120. Cargo valued at £3,000 was salvaged and placed on the beach, but most washed back into the sea when another storm developed. The wreck of LOCH ARD still lies at the base of Mutton Bird Island. Much of the cargo has now been salvaged and some was washed up into what is now known as LOCH ARD Gorge. Cargo and artefacts have also been illegally salvaged over many years before protective legislation was introduced. One of the most unlikely pieces of cargo to have survived the shipwreck was a Minton porcelain peacock - one of only nine in the world. The peacock was destined for the Melbourne International Exhibition in 1880. It had been well packed, which gave it adequate protection during the violent storm. Today, the Minton peacock can be seen at the Flagstaff Hill Maritime Museum in Warrnambool. From Australia's most dramatic shipwreck it has now become Australia's most valuable shipwreck artefact and is one of very few 'objects' on the Victorian State Heritage Register. Flagstaff Hill’s collection of artefacts from LOCH ARD is significant for being one of the largest collections of artefacts from this shipwreck in Victoria. It is significant for its association with the shipwreck, which is on the Victorian Heritage Register (VHR S417). The collection is significant because of the relationship between the objects, as together they have a high potential to interpret the story of the LOCH ARD. The LOCH ARD collection is archaeologically significant as the remains of a large international passenger and cargo ship. The LOCH ARD collection is historically significant for representing aspects of Victoria’s shipping history and its potential to interpret sub-theme 1.5 of Victoria’s Framework of Historical Themes (living with natural processes). The collection is also historically significant for its association with the LOCH ARD, which was one of the worst and best known shipwrecks in Victoria’s history. Photograph of Loch Ard Gorge. Photograph taken some distance from the Gorge. Three men in the Gorge and outlines of steps can be seen. Right hand side of the photograph is written "Loch Ard Gorge"flagstaff hill, warrnambool, shipwrecked coast, flagstaff hill maritime museum, maritime museum, shipwreck coast, flagstaff hill maritime village, great ocean road, loch line, loch ard, captain gibbs, eva carmichael, tom pearce, glenample station, mutton bird island, loch ard gorge, photograph of loch ard gorge, photograph -
 Flagstaff Hill Maritime Museum and Village
Painting
HISTORY OF THE LOCH ARD The LOCH ARD belonged to the famous Loch Line which sailed many ships from England to Australia. Built in Glasgow by Barclay, Curdle and Co. in 1873, the LOCH ARD was a three-masted square rigged iron sailing ship. The ship measured 262ft 7" (79.87m) in length, 38ft (11.58m) in width, 23ft (7m) in depth and had a gross tonnage of 1693 tons. The LOCH ARD's main mast measured a massive 150ft (45.7m) in height. LOCH ARD made three trips to Australia and one trip to Calcutta before its final voyage. LOCH ARD left England on March 2, 1878, under the command of Captain Gibbs, a newly married, 29 year old. She was bound for Melbourne with a crew of 37, plus 17 passengers and a load of cargo. The general cargo reflected the affluence of Melbourne at the time. On board were straw hats, umbrella, perfumes, clay pipes, pianos, clocks, confectionary, linen and candles, as well as a heavier load of railway irons, cement, lead and copper. There were items included that intended for display in the Melbourne International Exhibition in 1880. The voyage to Port Phillip was long but uneventful. At 3am on June 1, 1878, Captain Gibbs was expecting to see land and the passengers were becoming excited as they prepared to view their new homeland in the early morning. But LOCH ARD was running into a fog which greatly reduced visibility. Captain Gibbs was becoming anxious as there was no sign of land or the Cape Otway lighthouse. At 4am the fog lifted. A man aloft announced that he could see breakers. The sheer cliffs of Victoria's west coast came into view, and Captain Gibbs realised that the ship was much closer to them than expected. He ordered as much sail to be set as time would permit and then attempted to steer the vessel out to sea. On coming head on into the wind, the ship lost momentum, the sails fell limp and LOCH ARD's bow swung back. Gibbs then ordered the anchors to be released in an attempt to hold its position. The anchors sank some 50 fathoms - but did not hold. By this time LOCH ARD was among the breakers and the tall cliffs of Mutton Bird Island rose behind the ship. Just half a mile from the coast, the ship's bow was suddenly pulled around by the anchor. The captain tried to tack out to sea, but the ship struck a reef at the base of Mutton Bird Island, near Port Campbell. Waves broke over the ship and the top deck was loosened from the hull. The masts and rigging came crashing down knocking passengers and crew overboard. When a lifeboat was finally launched, it crashed into the side of LOCH ARD and capsized. Tom Pearce, who had launched the boat, managed to cling to its overturned hull and shelter beneath it. He drifted out to sea and then on the flood tide came into what is now known as LOCH ARD Gorge. He swam to shore, bruised and dazed, and found a cave in which to shelter. Some of the crew stayed below deck to shelter from the falling rigging but drowned when the ship slipped off the reef into deeper water. Eva Carmichael had raced onto deck to find out what was happening only to be confronted by towering cliffs looming above the stricken ship. In all the chaos, Captain Gibbs grabbed Eva and said, "If you are saved Eva, let my dear wife know that I died like a sailor". That was the last Eva Carmichael saw of the captain. She was swept off the ship by a huge wave. Eva saw Tom Pearce on a small rocky beach and yelled to attract his attention. He dived in and swam to the exhausted woman and dragged her to shore. He took her to the cave and broke open case of brandy which had washed up on the beach. He opened a bottle to revive the unconscious woman. A few hours later Tom scaled a cliff in search of help. He followed hoof prints and came by chance upon two men from nearby Glenample Station three and a half miles away. In a state of exhaustion, he told the men of the tragedy. Tom returned to the gorge while the two men rode back to the station to get help. By the time they reached LOCH ARD Gorge, it was cold and dark. The two shipwreck survivors were taken to Glenample Station to recover. Eva stayed at the station for six weeks before returning to Ireland, this time by steamship. In Melbourne, Tom Pearce received a hero's welcome. He was presented with the first gold medal of the Royal Humane Society of Victoria and a £1000 cheque from the Victorian Government. Concerts were performed to honour the young man's bravery and to raise money for those who lost family in the LOCH ARD disaster. Of the 54 crew members and passengers on board, only two survived: the apprentice, Tom Pearce and the young woman passenger, Eva Carmichael, who lost all of her family in the tragedy. Ten days after the LOCH ARD tragedy, salvage rights to the wreck were sold at auction for £2,120. Cargo valued at £3,000 was salvaged and placed on the beach, but most washed back into the sea when another storm developed. The wreck of LOCH ARD still lies at the base of Mutton Bird Island. Much of the cargo has now been salvaged and some was washed up into what is now known as LOCH ARD Gorge. Cargo and artefacts have also been illegally salvaged over many years before protective legislation was introduced. One of the most unlikely pieces of cargo to have survived the shipwreck was a Minton porcelain peacock - one of only nine in the world. The peacock was destined for the Melbourne International Exhibition in 1880. It had been well packed, which gave it adequate protection during the violent storm. Today, the Minton peacock can be seen at the Flagstaff Hill Maritime Museum in Warrnambool. From Australia's most dramatic shipwreck it has now become Australia's most valuable shipwreck artefact and is one of very few 'objects' on the Victorian State Heritage Register. Flagstaff Hill’s collection of artefacts from LOCH ARD is significant for being one of the largest collections of artefacts from this shipwreck in Victoria. It is significant for its association with the shipwreck, which is on the Victorian Heritage Register (VHR S417). The collection is significant because of the relationship between the objects, as together they have a high potential to interpret the story of the LOCH ARD. The LOCH ARD collection is archaeologically significant as the remains of a large international passenger and cargo ship. The LOCH ARD collection is historically significant for representing aspects of Victoria’s shipping history and its potential to interpret sub-theme 1.5 of Victoria’s Framework of Historical Themes (living with natural processes). The collection is also historically significant for its association with the LOCH ARD, which was one of the worst and best known shipwrecks in Victoria’s history. Painting of The Loch Ard oil on board depicting wreck. It shows stormy sea and coastline in background. Ship appears to be capsized.flagstaff hill, warrnambool, shipwrecked coast, flagstaff hill maritime museum, maritime museum, shipwreck coast, flagstaff hill maritime village, great ocean road, loch line, loch ard, captain gibbs, eva carmichael, tom pearce, glenample station, mutton bird island, loch ard gorge, painting -
 Flagstaff Hill Maritime Museum and Village
Photograph
HISTORY OF THE LOCH ARD The LOCH ARD belonged to the famous Loch Line which sailed many ships from England to Australia. Built in Glasgow by Barclay, Curdle and Co. in 1873, the LOCH ARD was a three-masted square rigged iron sailing ship. The ship measured 262ft 7" (79.87m) in length, 38ft (11.58m) in width, 23ft (7m) in depth and had a gross tonnage of 1693 tons. The LOCH ARD's main mast measured a massive 150ft (45.7m) in height. LOCH ARD made three trips to Australia and one trip to Calcutta before its final voyage. LOCH ARD left England on March 2, 1878, under the command of Captain Gibbs, a newly married, 29 year old. She was bound for Melbourne with a crew of 37, plus 17 passengers and a load of cargo. The general cargo reflected the affluence of Melbourne at the time. On board were straw hats, umbrella, perfumes, clay pipes, pianos, clocks, confectionary, linen and candles, as well as a heavier load of railway irons, cement, lead and copper. There were items included that intended for display in the Melbourne International Exhibition in 1880. The voyage to Port Phillip was long but uneventful. At 3am on June 1, 1878, Captain Gibbs was expecting to see land and the passengers were becoming excited as they prepared to view their new homeland in the early morning. But LOCH ARD was running into a fog which greatly reduced visibility. Captain Gibbs was becoming anxious as there was no sign of land or the Cape Otway lighthouse. At 4am the fog lifted. A man aloft announced that he could see breakers. The sheer cliffs of Victoria's west coast came into view, and Captain Gibbs realised that the ship was much closer to them than expected. He ordered as much sail to be set as time would permit and then attempted to steer the vessel out to sea. On coming head on into the wind, the ship lost momentum, the sails fell limp and LOCH ARD's bow swung back. Gibbs then ordered the anchors to be released in an attempt to hold its position. The anchors sank some 50 fathoms - but did not hold. By this time LOCH ARD was among the breakers and the tall cliffs of Mutton Bird Island rose behind the ship. Just half a mile from the coast, the ship's bow was suddenly pulled around by the anchor. The captain tried to tack out to sea, but the ship struck a reef at the base of Mutton Bird Island, near Port Campbell. Waves broke over the ship and the top deck was loosened from the hull. The masts and rigging came crashing down knocking passengers and crew overboard. When a lifeboat was finally launched, it crashed into the side of LOCH ARD and capsized. Tom Pearce, who had launched the boat, managed to cling to its overturned hull and shelter beneath it. He drifted out to sea and then on the flood tide came into what is now known as LOCH ARD Gorge. He swam to shore, bruised and dazed, and found a cave in which to shelter. Some of the crew stayed below deck to shelter from the falling rigging but drowned when the ship slipped off the reef into deeper water. Eva Carmichael had raced onto deck to find out what was happening only to be confronted by towering cliffs looming above the stricken ship. In all the chaos, Captain Gibbs grabbed Eva and said, "If you are saved Eva, let my dear wife know that I died like a sailor". That was the last Eva Carmichael saw of the captain. She was swept off the ship by a huge wave. Eva saw Tom Pearce on a small rocky beach and yelled to attract his attention. He dived in and swam to the exhausted woman and dragged her to shore. He took her to the cave and broke open case of brandy which had washed up on the beach. He opened a bottle to revive the unconscious woman. A few hours later Tom scaled a cliff in search of help. He followed hoof prints and came by chance upon two men from nearby Glenample Station three and a half miles away. In a state of exhaustion, he told the men of the tragedy. Tom returned to the gorge while the two men rode back to the station to get help. By the time they reached LOCH ARD Gorge, it was cold and dark. The two shipwreck survivors were taken to Glenample Station to recover. Eva stayed at the station for six weeks before returning to Ireland, this time by steamship. In Melbourne, Tom Pearce received a hero's welcome. He was presented with the first gold medal of the Royal Humane Society of Victoria and a £1000 cheque from the Victorian Government. Concerts were performed to honour the young man's bravery and to raise money for those who lost family in the LOCH ARD disaster. Of the 54 crew members and passengers on board, only two survived: the apprentice, Tom Pearce and the young woman passenger, Eva Carmichael, who lost all of her family in the tragedy. Ten days after the LOCH ARD tragedy, salvage rights to the wreck were sold at auction for £2,120. Cargo valued at £3,000 was salvaged and placed on the beach, but most washed back into the sea when another storm developed. The wreck of LOCH ARD still lies at the base of Mutton Bird Island. Much of the cargo has now been salvaged and some was washed up into what is now known as LOCH ARD Gorge. Cargo and artefacts have also been illegally salvaged over many years before protective legislation was introduced. One of the most unlikely pieces of cargo to have survived the shipwreck was a Minton porcelain peacock - one of only nine in the world. The peacock was destined for the Melbourne International Exhibition in 1880. It had been well packed, which gave it adequate protection during the violent storm. Today, the Minton peacock can be seen at the Flagstaff Hill Maritime Museum in Warrnambool. From Australia's most dramatic shipwreck it has now become Australia's most valuable shipwreck artefact and is one of very few 'objects' on the Victorian State Heritage Register. Flagstaff Hill’s collection of artefacts from LOCH ARD is significant for being one of the largest collections of artefacts from this shipwreck in Victoria. It is significant for its association with the shipwreck, which is on the Victorian Heritage Register (VHR S417). The collection is significant because of the relationship between the objects, as together they have a high potential to interpret the story of the LOCH ARD. The LOCH ARD collection is archaeologically significant as the remains of a large international passenger and cargo ship. The LOCH ARD collection is historically significant for representing aspects of Victoria’s shipping history and its potential to interpret sub-theme 1.5 of Victoria’s Framework of Historical Themes (living with natural processes). The collection is also historically significant for its association with the LOCH ARD, which was one of the worst and best known shipwrecks in Victoria’s history. Photograph of Loch Ard Gorge c1900flagstaff hill, warrnambool, shipwrecked coast, flagstaff hill maritime museum, maritime museum, shipwreck coast, flagstaff hill maritime village, great ocean road, loch line, loch ard, captain gibbs, eva carmichael, tom pearce, glenample station, mutton bird island, loch ard gorge, photograph of loch ard gorge, photograph -
 Flagstaff Hill Maritime Museum and Village
Calendar
HISTORY OF THE LOCH ARD The LOCH ARD belonged to the famous Loch Line which sailed many ships from England to Australia. Built in Glasgow by Barclay, Curdle and Co. in 1873, the LOCH ARD was a three-masted square rigged iron sailing ship. The ship measured 262ft 7" (79.87m) in length, 38ft (11.58m) in width, 23ft (7m) in depth and had a gross tonnage of 1693 tons. The LOCH ARD's main mast measured a massive 150ft (45.7m) in height. LOCH ARD made three trips to Australia and one trip to Calcutta before its final voyage. LOCH ARD left England on March 2, 1878, under the command of Captain Gibbs, a newly married, 29 year old. She was bound for Melbourne with a crew of 37, plus 17 passengers and a load of cargo. The general cargo reflected the affluence of Melbourne at the time. On board were straw hats, umbrella, perfumes, clay pipes, pianos, clocks, confectionary, linen and candles, as well as a heavier load of railway irons, cement, lead and copper. There were items included that intended for display in the Melbourne International Exhibition in 1880. The voyage to Port Phillip was long but uneventful. At 3am on June 1, 1878, Captain Gibbs was expecting to see land and the passengers were becoming excited as they prepared to view their new homeland in the early morning. But LOCH ARD was running into a fog which greatly reduced visibility. Captain Gibbs was becoming anxious as there was no sign of land or the Cape Otway lighthouse. At 4am the fog lifted. A man aloft announced that he could see breakers. The sheer cliffs of Victoria's west coast came into view, and Captain Gibbs realised that the ship was much closer to them than expected. He ordered as much sail to be set as time would permit and then attempted to steer the vessel out to sea. On coming head on into the wind, the ship lost momentum, the sails fell limp and LOCH ARD's bow swung back. Gibbs then ordered the anchors to be released in an attempt to hold its position. The anchors sank some 50 fathoms - but did not hold. By this time LOCH ARD was among the breakers and the tall cliffs of Mutton Bird Island rose behind the ship. Just half a mile from the coast, the ship's bow was suddenly pulled around by the anchor. The captain tried to tack out to sea, but the ship struck a reef at the base of Mutton Bird Island, near Port Campbell. Waves broke over the ship and the top deck was loosened from the hull. The masts and rigging came crashing down knocking passengers and crew overboard. When a lifeboat was finally launched, it crashed into the side of LOCH ARD and capsized. Tom Pearce, who had launched the boat, managed to cling to its overturned hull and shelter beneath it. He drifted out to sea and then on the flood tide came into what is now known as LOCH ARD Gorge. He swam to shore, bruised and dazed, and found a cave in which to shelter. Some of the crew stayed below deck to shelter from the falling rigging but drowned when the ship slipped off the reef into deeper water. Eva Carmichael had raced onto deck to find out what was happening only to be confronted by towering cliffs looming above the stricken ship. In all the chaos, Captain Gibbs grabbed Eva and said, "If you are saved Eva, let my dear wife know that I died like a sailor". That was the last Eva Carmichael saw of the captain. She was swept off the ship by a huge wave. Eva saw Tom Pearce on a small rocky beach and yelled to attract his attention. He dived in and swam to the exhausted woman and dragged her to shore. He took her to the cave and broke open case of brandy which had washed up on the beach. He opened a bottle to revive the unconscious woman. A few hours later Tom scaled a cliff in search of help. He followed hoof prints and came by chance upon two men from nearby Glenample Station three and a half miles away. In a state of exhaustion, he told the men of the tragedy. Tom returned to the gorge while the two men rode back to the station to get help. By the time they reached LOCH ARD Gorge, it was cold and dark. The two shipwreck survivors were taken to Glenample Station to recover. Eva stayed at the station for six weeks before returning to Ireland, this time by steamship. In Melbourne, Tom Pearce received a hero's welcome. He was presented with the first gold medal of the Royal Humane Society of Victoria and a £1000 cheque from the Victorian Government. Concerts were performed to honour the young man's bravery and to raise money for those who lost family in the LOCH ARD disaster. Of the 54 crew members and passengers on board, only two survived: the apprentice, Tom Pearce and the young woman passenger, Eva Carmichael, who lost all of her family in the tragedy. Ten days after the LOCH ARD tragedy, salvage rights to the wreck were sold at auction for £2,120. Cargo valued at £3,000 was salvaged and placed on the beach, but most washed back into the sea when another storm developed. The wreck of LOCH ARD still lies at the base of Mutton Bird Island. Much of the cargo has now been salvaged and some was washed up into what is now known as LOCH ARD Gorge. Cargo and artefacts have also been illegally salvaged over many years before protective legislation was introduced. One of the most unlikely pieces of cargo to have survived the shipwreck was a Minton porcelain peacock - one of only nine in the world. The peacock was destined for the Melbourne International Exhibition in 1880. It had been well packed, which gave it adequate protection during the violent storm. Today, the Minton peacock can be seen at the Flagstaff Hill Maritime Museum in Warrnambool. From Australia's most dramatic shipwreck it has now become Australia's most valuable shipwreck artefact and is one of very few 'objects' on the Victorian State Heritage Register. Flagstaff Hill’s collection of artefacts from LOCH ARD is significant for being one of the largest collections of artefacts from this shipwreck in Victoria. It is significant for its association with the shipwreck, which is on the Victorian Heritage Register (VHR S417). The collection is significant because of the relationship between the objects, as together they have a high potential to interpret the story of the LOCH ARD. The LOCH ARD collection is archaeologically significant as the remains of a large international passenger and cargo ship. The LOCH ARD collection is historically significant for representing aspects of Victoria’s shipping history and its potential to interpret sub-theme 1.5 of Victoria’s Framework of Historical Themes (living with natural processes). The collection is also historically significant for its association with the LOCH ARD, which was one of the worst and best known shipwrecks in Victoria’s history. Calendar printed by Terang Express for December 1923 with picture of Loch Ard Gorge and survivors of wreck and also story of the episode. Has some large tears in it.flagstaff hill, warrnambool, shipwrecked coast, flagstaff hill maritime museum, maritime museum, shipwreck coast, flagstaff hill maritime village, great ocean road, loch line, loch ard, captain gibbs, eva carmichael, tom pearce, glenample station, mutton bird island, loch ard gorge, calendar, terang express -
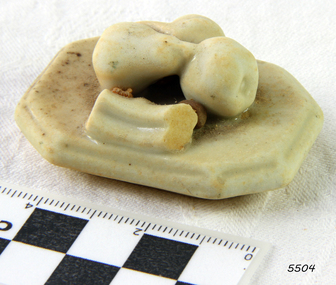 Flagstaff Hill Maritime Museum and Village
Lid
Ref: LA 2 29 274 HISTORY OF THE LOCH ARD The LOCH ARD belonged to the famous Loch Line which sailed many ships from England to Australia. Built in Glasgow by Barclay, Curdle and Co. in 1873, the LOCH ARD was a three-masted square rigged iron sailing ship. The ship measured 262ft 7" (79.87m) in length, 38ft (11.58m) in width, 23ft (7m) in depth and had a gross tonnage of 1693 tons. The LOCH ARD's main mast measured a massive 150ft (45.7m) in height. LOCH ARD made three trips to Australia and one trip to Calcutta before its final voyage. LOCH ARD left England on March 2, 1878, under the command of Captain Gibbs, a newly married, 29 year old. She was bound for Melbourne with a crew of 37, plus 17 passengers and a load of cargo. The general cargo reflected the affluence of Melbourne at the time. On board were straw hats, umbrella, perfumes, clay pipes, pianos, clocks, confectionary, linen and candles, as well as a heavier load of railway irons, cement, lead and copper. There were items included that intended for display in the Melbourne International Exhibition in 1880. The voyage to Port Phillip was long but uneventful. At 3am on June 1, 1878, Captain Gibbs was expecting to see land and the passengers were becoming excited as they prepared to view their new homeland in the early morning. But LOCH ARD was running into a fog which greatly reduced visibility. Captain Gibbs was becoming anxious as there was no sign of land or the Cape Otway lighthouse. At 4am the fog lifted. A man aloft announced that he could see breakers. The sheer cliffs of Victoria's west coast came into view, and Captain Gibbs realised that the ship was much closer to them than expected. He ordered as much sail to be set as time would permit and then attempted to steer the vessel out to sea. On coming head on into the wind, the ship lost momentum, the sails fell limp and LOCH ARD's bow swung back. Gibbs then ordered the anchors to be released in an attempt to hold its position. The anchors sank some 50 fathoms - but did not hold. By this time LOCH ARD was among the breakers and the tall cliffs of Mutton Bird Island rose behind the ship. Just half a mile from the coast, the ship's bow was suddenly pulled around by the anchor. The captain tried to tack out to sea, but the ship struck a reef at the base of Mutton Bird Island, near Port Campbell. Waves broke over the ship and the top deck was loosened from the hull. The masts and rigging came crashing down knocking passengers and crew overboard. When a lifeboat was finally launched, it crashed into the side of LOCH ARD and capsized. Tom Pearce, who had launched the boat, managed to cling to its overturned hull and shelter beneath it. He drifted out to sea and then on the flood tide came into what is now known as LOCH ARD Gorge. He swam to shore, bruised and dazed, and found a cave in which to shelter. Some of the crew stayed below deck to shelter from the falling rigging but drowned when the ship slipped off the reef into deeper water. Eva Carmichael had raced onto deck to find out what was happening only to be confronted by towering cliffs looming above the stricken ship. In all the chaos, Captain Gibbs grabbed Eva and said, "If you are saved Eva, let my dear wife know that I died like a sailor". That was the last Eva Carmichael saw of the captain. She was swept off the ship by a huge wave. Eva saw Tom Pearce on a small rocky beach and yelled to attract his attention. He dived in and swam to the exhausted woman and dragged her to shore. He took her to the cave and broke open case of brandy which had washed up on the beach. He opened a bottle to revive the unconscious woman. A few hours later Tom scaled a cliff in search of help. He followed hoof prints and came by chance upon two men from nearby Glenample Station three and a half miles away. In a state of exhaustion, he told the men of the tragedy. Tom returned to the gorge while the two men rode back to the station to get help. By the time they reached LOCH ARD Gorge, it was cold and dark. The two shipwreck survivors were taken to Glenample Station to recover. Eva stayed at the station for six weeks before returning to Ireland, this time by steamship. In Melbourne, Tom Pearce received a hero's welcome. He was presented with the first gold medal of the Royal Humane Society of Victoria and a £1000 cheque from the Victorian Government. Concerts were performed to honour the young man's bravery and to raise money for those who lost family in the LOCH ARD disaster. Of the 54 crew members and passengers on board, only two survived: the apprentice, Tom Pearce and the young woman passenger, Eva Carmichael, who lost all of her family in the tragedy. Ten days after the LOCH ARD tragedy, salvage rights to the wreck were sold at auction for £2,120. Cargo valued at £3,000 was salvaged and placed on the beach, but most washed back into the sea when another storm developed. The wreck of LOCH ARD still lies at the base of Mutton Bird Island. Much of the cargo has now been salvaged and some was washed up into what is now known as LOCH ARD Gorge. Cargo and artefacts have also been illegally salvaged over many years before protective legislation was introduced. One of the most unlikely pieces of cargo to have survived the shipwreck was a Minton porcelain peacock - one of only nine in the world. The peacock was destined for the Melbourne International Exhibition in 1880. It had been well packed, which gave it adequate protection during the violent storm. Today, the Minton peacock can be seen at the Flagstaff Hill Maritime Museum in Warrnambool. From Australia's most dramatic shipwreck it has now become Australia's most valuable shipwreck artefact and is one of very few 'objects' on the Victorian State Heritage Register. Flagstaff Hill’s collection of artefacts from LOCH ARD is significant for being one of the largest collections of artefacts from this shipwreck in Victoria. It is significant for its association with the shipwreck, which is on the Victorian Heritage Register (VHR S417). The collection is significant because of the relationship between the objects, as together they have a high potential to interpret the story of the LOCH ARD. The LOCH ARD collection is archaeologically significant as the remains of a large international passenger and cargo ship. The LOCH ARD collection is historically significant for representing aspects of Victoria’s shipping history and its potential to interpret sub-theme 1.5 of Victoria’s Framework of Historical Themes (living with natural processes). The collection is also historically significant for its association with the LOCH ARD, which was one of the worst and best known shipwrecks in Victoria’s history. Lid from child's tea set. Porcelain. Lid has small chip and some slight iron stains. Recovered from the wreck of the Loch Ard. Artefact reg No LA/16.flagstaff hill, warrnambool, shipwrecked-coast, flagstaff-hill, flagstaff-hill-maritime-museum, maritime-museum, shipwreck-coast, flagstaff-hill-maritime-village -
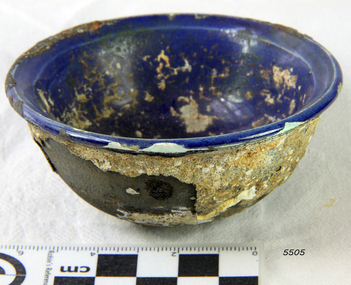 Flagstaff Hill Maritime Museum and Village
Deflector
HISTORY OF THE LOCH ARD The LOCH ARD belonged to the famous Loch Line which sailed many ships from England to Australia. Built in Glasgow by Barclay, Curdle and Co. in 1873, the LOCH ARD was a three-masted square rigged iron sailing ship. The ship measured 262ft 7" (79.87m) in length, 38ft (11.58m) in width, 23ft (7m) in depth and had a gross tonnage of 1693 tons. The LOCH ARD's main mast measured a massive 150ft (45.7m) in height. LOCH ARD made three trips to Australia and one trip to Calcutta before its final voyage. LOCH ARD left England on March 2, 1878, under the command of Captain Gibbs, a newly married, 29 year old. She was bound for Melbourne with a crew of 37, plus 17 passengers and a load of cargo. The general cargo reflected the affluence of Melbourne at the time. On board were straw hats, umbrella, perfumes, clay pipes, pianos, clocks, confectionary, linen and candles, as well as a heavier load of railway irons, cement, lead and copper. There were items included that intended for display in the Melbourne International Exhibition in 1880. The voyage to Port Phillip was long but uneventful. At 3am on June 1, 1878, Captain Gibbs was expecting to see land and the passengers were becoming excited as they prepared to view their new homeland in the early morning. But LOCH ARD was running into a fog which greatly reduced visibility. Captain Gibbs was becoming anxious as there was no sign of land or the Cape Otway lighthouse. At 4am the fog lifted. A man aloft announced that he could see breakers. The sheer cliffs of Victoria's west coast came into view, and Captain Gibbs realised that the ship was much closer to them than expected. He ordered as much sail to be set as time would permit and then attempted to steer the vessel out to sea. On coming head on into the wind, the ship lost momentum, the sails fell limp and LOCH ARD's bow swung back. Gibbs then ordered the anchors to be released in an attempt to hold its position. The anchors sank some 50 fathoms - but did not hold. By this time LOCH ARD was among the breakers and the tall cliffs of Mutton Bird Island rose behind the ship. Just half a mile from the coast, the ship's bow was suddenly pulled around by the anchor. The captain tried to tack out to sea, but the ship struck a reef at the base of Mutton Bird Island, near Port Campbell. Waves broke over the ship and the top deck was loosened from the hull. The masts and rigging came crashing down knocking passengers and crew overboard. When a lifeboat was finally launched, it crashed into the side of LOCH ARD and capsized. Tom Pearce, who had launched the boat, managed to cling to its overturned hull and shelter beneath it. He drifted out to sea and then on the flood tide came into what is now known as LOCH ARD Gorge. He swam to shore, bruised and dazed, and found a cave in which to shelter. Some of the crew stayed below deck to shelter from the falling rigging but drowned when the ship slipped off the reef into deeper water. Eva Carmichael had raced onto deck to find out what was happening only to be confronted by towering cliffs looming above the stricken ship. In all the chaos, Captain Gibbs grabbed Eva and said, "If you are saved Eva, let my dear wife know that I died like a sailor". That was the last Eva Carmichael saw of the captain. She was swept off the ship by a huge wave. Eva saw Tom Pearce on a small rocky beach and yelled to attract his attention. He dived in and swam to the exhausted woman and dragged her to shore. He took her to the cave and broke open case of brandy which had washed up on the beach. He opened a bottle to revive the unconscious woman. A few hours later Tom scaled a cliff in search of help. He followed hoof prints and came by chance upon two men from nearby Glenample Station three and a half miles away. In a state of exhaustion, he told the men of the tragedy. Tom returned to the gorge while the two men rode back to the station to get help. By the time they reached LOCH ARD Gorge, it was cold and dark. The two shipwreck survivors were taken to Glenample Station to recover. Eva stayed at the station for six weeks before returning to Ireland, this time by steamship. In Melbourne, Tom Pearce received a hero's welcome. He was presented with the first gold medal of the Royal Humane Society of Victoria and a £1000 cheque from the Victorian Government. Concerts were performed to honour the young man's bravery and to raise money for those who lost family in the LOCH ARD disaster. Of the 54 crew members and passengers on board, only two survived: the apprentice, Tom Pearce and the young woman passenger, Eva Carmichael, who lost all of her family in the tragedy. Ten days after the LOCH ARD tragedy, salvage rights to the wreck were sold at auction for £2,120. Cargo valued at £3,000 was salvaged and placed on the beach, but most washed back into the sea when another storm developed. The wreck of LOCH ARD still lies at the base of Mutton Bird Island. Much of the cargo has now been salvaged and some was washed up into what is now known as LOCH ARD Gorge. Cargo and artefacts have also been illegally salvaged over many years before protective legislation was introduced. One of the most unlikely pieces of cargo to have survived the shipwreck was a Minton porcelain peacock - one of only nine in the world. The peacock was destined for the Melbourne International Exhibition in 1880. It had been well packed, which gave it adequate protection during the violent storm. Today, the Minton peacock can be seen at the Flagstaff Hill Maritime Museum in Warrnambool. From Australia's most dramatic shipwreck it has now become Australia's most valuable shipwreck artefact and is one of very few 'objects' on the Victorian State Heritage Register. Flagstaff Hill’s collection of artefacts from LOCH ARD is significant for being one of the largest collections of artefacts from this shipwreck in Victoria. It is significant for its association with the shipwreck, which is on the Victorian Heritage Register (VHR S417). The collection is significant because of the relationship between the objects, as together they have a high potential to interpret the story of the LOCH ARD. The LOCH ARD collection is archaeologically significant as the remains of a large international passenger and cargo ship. The LOCH ARD collection is historically significant for representing aspects of Victoria’s shipping history and its potential to interpret sub-theme 1.5 of Victoria’s Framework of Historical Themes (living with natural processes). The collection is also historically significant for its association with the LOCH ARD, which was one of the worst and best known shipwrecks in Victoria’s history. Small Porcelain Heat Deflector from a kero lamp,deflector is blue inside. Outside has some encrustation. Artefact reg no LA/15. Recovered from the wreck of the Loch Ard.flagstaff hill, warrnambool, shipwrecked coast, flagstaff hill maritime museum, maritime museum, shipwreck coast, flagstaff hill maritime village, great ocean road, loch line, loch ard, captain gibbs, eva carmichael, tom pearce, glenample station, mutton bird island, loch ard gorge, porcelain heat deflector, heat deflector -
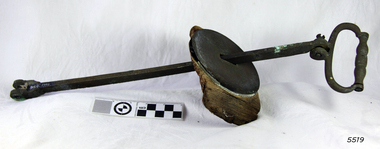 Flagstaff Hill Maritime Museum and Village
Pump
HISTORY OF THE LOCH ARD The LOCH ARD belonged to the famous Loch Line which sailed many ships from England to Australia. Built in Glasgow by Barclay, Curdle and Co. in 1873, the LOCH ARD was a three-masted square rigged iron sailing ship. The ship measured 262ft 7" (79.87m) in length, 38ft (11.58m) in width, 23ft (7m) in depth and had a gross tonnage of 1693 tons. The LOCH ARD's main mast measured a massive 150ft (45.7m) in height. LOCH ARD made three trips to Australia and one trip to Calcutta before its final voyage. LOCH ARD left England on March 2, 1878, under the command of Captain Gibbs, a newly married, 29 year old. She was bound for Melbourne with a crew of 37, plus 17 passengers and a load of cargo. The general cargo reflected the affluence of Melbourne at the time. On board were straw hats, umbrella, perfumes, clay pipes, pianos, clocks, confectionary, linen and candles, as well as a heavier load of railway irons, cement, lead and copper. There were items included that intended for display in the Melbourne International Exhibition in 1880. The voyage to Port Phillip was long but uneventful. At 3am on June 1, 1878, Captain Gibbs was expecting to see land and the passengers were becoming excited as they prepared to view their new homeland in the early morning. But LOCH ARD was running into a fog which greatly reduced visibility. Captain Gibbs was becoming anxious as there was no sign of land or the Cape Otway lighthouse. At 4am the fog lifted. A man aloft announced that he could see breakers. The sheer cliffs of Victoria's west coast came into view, and Captain Gibbs realised that the ship was much closer to them than expected. He ordered as much sail to be set as time would permit and then attempted to steer the vessel out to sea. On coming head on into the wind, the ship lost momentum, the sails fell limp and LOCH ARD's bow swung back. Gibbs then ordered the anchors to be released in an attempt to hold its position. The anchors sank some 50 fathoms - but did not hold. By this time LOCH ARD was among the breakers and the tall cliffs of Mutton Bird Island rose behind the ship. Just half a mile from the coast, the ship's bow was suddenly pulled around by the anchor. The captain tried to tack out to sea, but the ship struck a reef at the base of Mutton Bird Island, near Port Campbell. Waves broke over the ship and the top deck was loosened from the hull. The masts and rigging came crashing down knocking passengers and crew overboard. When a lifeboat was finally launched, it crashed into the side of LOCH ARD and capsized. Tom Pearce, who had launched the boat, managed to cling to its overturned hull and shelter beneath it. He drifted out to sea and then on the flood tide came into what is now known as LOCH ARD Gorge. He swam to shore, bruised and dazed, and found a cave in which to shelter. Some of the crew stayed below deck to shelter from the falling rigging but drowned when the ship slipped off the reef into deeper water. Eva Carmichael had raced onto deck to find out what was happening only to be confronted by towering cliffs looming above the stricken ship. In all the chaos, Captain Gibbs grabbed Eva and said, "If you are saved Eva, let my dear wife know that I died like a sailor". That was the last Eva Carmichael saw of the captain. She was swept off the ship by a huge wave. Eva saw Tom Pearce on a small rocky beach and yelled to attract his attention. He dived in and swam to the exhausted woman and dragged her to shore. He took her to the cave and broke open case of brandy which had washed up on the beach. He opened a bottle to revive the unconscious woman. A few hours later Tom scaled a cliff in search of help. He followed hoof prints and came by chance upon two men from nearby Glenample Station three and a half miles away. In a state of exhaustion, he told the men of the tragedy. Tom returned to the gorge while the two men rode back to the station to get help. By the time they reached LOCH ARD Gorge, it was cold and dark. The two shipwreck survivors were taken to Glenample Station to recover. Eva stayed at the station for six weeks before returning to Ireland, this time by steamship. In Melbourne, Tom Pearce received a hero's welcome. He was presented with the first gold medal of the Royal Humane Society of Victoria and a £1000 cheque from the Victorian Government. Concerts were performed to honour the young man's bravery and to raise money for those who lost family in the LOCH ARD disaster. Of the 54 crew members and passengers on board, only two survived: the apprentice, Tom Pearce and the young woman passenger, Eva Carmichael, who lost all of her family in the tragedy. Ten days after the LOCH ARD tragedy, salvage rights to the wreck were sold at auction for £2,120. Cargo valued at £3,000 was salvaged and placed on the beach, but most washed back into the sea when another storm developed. The wreck of LOCH ARD still lies at the base of Mutton Bird Island. Much of the cargo has now been salvaged and some was washed up into what is now known as LOCH ARD Gorge. Cargo and artefacts have also been illegally salvaged over many years before protective legislation was introduced. One of the most unlikely pieces of cargo to have survived the shipwreck was a Minton porcelain peacock - one of only nine in the world. The peacock was destined for the Melbourne International Exhibition in 1880. It had been well packed, which gave it adequate protection during the violent storm. Today, the Minton peacock can be seen at the Flagstaff Hill Maritime Museum in Warrnambool. From Australia's most dramatic shipwreck it has now become Australia's most valuable shipwreck artefact and is one of very few 'objects' on the Victorian State Heritage Register. Flagstaff Hill’s collection of artefacts from LOCH ARD is significant for being one of the largest collections of artefacts from this shipwreck in Victoria. It is significant for its association with the shipwreck, which is on the Victorian Heritage Register (VHR S417). The collection is significant because of the relationship between the objects, as together they have a high potential to interpret the story of the LOCH ARD. The LOCH ARD collection is archaeologically significant as the remains of a large international passenger and cargo ship. The LOCH ARD collection is historically significant for representing aspects of Victoria’s shipping history and its potential to interpret sub-theme 1.5 of Victoria’s Framework of Historical Themes (living with natural processes). The collection is also historically significant for its association with the LOCH ARD, which was one of the worst and best known shipwrecks in Victoria’s history. Part of a pump system. Has been attached to a piece of wood. Possibly a cistern plunger. From the Loch Ard.flagstaff hill, warrnambool, shipwrecked coast, flagstaff hill maritime museum, maritime museum, shipwreck coast, flagstaff hill maritime village, great ocean road, loch line, loch ard, captain gibbs, eva carmichael, tom pearce, glenample station, mutton bird island, loch ard gorge, pump system, pump -
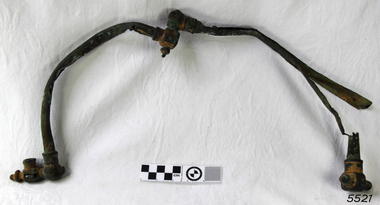 Flagstaff Hill Maritime Museum and Village
Functional object - Gas Fitting
This gas fitting was recovered from the wreck of the Loch Ard circa 1970, at the time of the discovery of the wreck. HISTORY OF THE LOCH ARD: - The LOCH ARD belonged to the famous Loch Line which sailed many ships from England to Australia. Built in Glasgow by Barclay, Curdle and Co. in 1873, the LOCH ARD was a three-masted square rigged iron sailing ship. The ship measured 262ft 7" (79.87m) in length, 38ft (11.58m) in width, 23ft (7m) in depth and had a gross tonnage of 1693 tons. The LOCH ARD's main mast measured a massive 150ft (45.7m) in height. LOCH ARD made three trips to Australia and one trip to Calcutta before its final voyage. LOCH ARD left England on March 2, 1878, under the command of Captain Gibbs, a newly married, 29 year old. She was bound for Melbourne with a crew of 37, plus 17 passengers and a load of cargo. The general cargo reflected the affluence of Melbourne at the time. On board were straw hats, umbrella, perfumes, clay pipes, pianos, clocks, confectionary, linen and candles, as well as a heavier load of railway irons, cement, lead and copper. There were items included that intended for display in the Melbourne International Exhibition in 1880. The voyage to Port Phillip was long but uneventful. At 3am on June 1, 1878, Captain Gibbs was expecting to see land and the passengers were becoming excited as they prepared to view their new homeland in the early morning. But LOCH ARD was running into a fog which greatly reduced visibility. Captain Gibbs was becoming anxious as there was no sign of land or the Cape Otway lighthouse. At 4am the fog lifted. A man aloft announced that he could see breakers. The sheer cliffs of Victoria's west coast came into view, and Captain Gibbs realised that the ship was much closer to them than expected. He ordered as much sail to be set as time would permit and then attempted to steer the vessel out to sea. On coming head on into the wind, the ship lost momentum, the sails fell limp and LOCH ARD's bow swung back. Gibbs then ordered the anchors to be released in an attempt to hold its position. The anchors sank some 50 fathoms - but did not hold. By this time LOCH ARD was among the breakers and the tall cliffs of Mutton Bird Island rose behind the ship. Just half a mile from the coast, the ship's bow was suddenly pulled around by the anchor. The captain tried to tack out to sea, but the ship struck a reef at the base of Mutton Bird Island, near Port Campbell. Waves broke over the ship and the top deck was loosened from the hull. The masts and rigging came crashing down knocking passengers and crew overboard. When a lifeboat was finally launched, it crashed into the side of LOCH ARD and capsized. Tom Pearce, who had launched the boat, managed to cling to its overturned hull and shelter beneath it. He drifted out to sea and then on the flood tide came into what is now known as LOCH ARD Gorge. He swam to shore, bruised and dazed, and found a cave in which to shelter. Some of the crew stayed below deck to shelter from the falling rigging but drowned when the ship slipped off the reef into deeper water. Eva Carmichael had raced onto deck to find out what was happening only to be confronted by towering cliffs looming above the stricken ship. In all the chaos, Captain Gibbs grabbed Eva and said, "If you are saved Eva, let my dear wife know that I died like a sailor". That was the last Eva Carmichael saw of the captain. She was swept off the ship by a huge wave. Eva saw Tom Pearce on a small rocky beach and yelled to attract his attention. He dived in and swam to the exhausted woman and dragged her to shore. He took her to the cave and broke open case of brandy which had washed up on the beach. He opened a bottle to revive the unconscious woman. A few hours later Tom scaled a cliff in search of help. He followed hoof prints and came by chance upon two men from nearby Glenample Station three and a half miles away. In a state of exhaustion, he told the men of the tragedy. Tom returned to the gorge while the two men rode back to the station to get help. By the time they reached LOCH ARD Gorge, it was cold and dark. The two shipwreck survivors were taken to Glenample Station to recover. Eva stayed at the station for six weeks before returning to Ireland, this time by steamship. In Melbourne, Tom Pearce received a hero's welcome. He was presented with the first gold medal of the Royal Humane Society of Victoria and a £1000 cheque from the Victorian Government. Concerts were performed to honour the young man's bravery and to raise money for those who lost family in the LOCH ARD disaster. Of the 54 crew members and passengers on board, only two survived: the apprentice, Tom Pearce and the young woman passenger, Eva Carmichael, who lost all of her family in the tragedy. Ten days after the LOCH ARD tragedy, salvage rights to the wreck were sold at auction for £2,120. Cargo valued at £3,000 was salvaged and placed on the beach, but most washed back into the sea when another storm developed. The wreck of LOCH ARD still lies at the base of Mutton Bird Island. Much of the cargo has now been salvaged and some was washed up into what is now known as LOCH ARD Gorge. Cargo and artefacts have also been illegally salvaged over many years before protective legislation was introduced. One of the most unlikely pieces of cargo to have survived the shipwreck was a Minton porcelain peacock - one of only nine in the world. The peacock was destined for the Melbourne International Exhibition in 1880. It had been well packed, which gave it adequate protection during the violent storm. Today, the Minton peacock can be seen at the Flagstaff Hill Maritime Museum in Warrnambool. From Australia's most dramatic shipwreck it has now become Australia's most valuable shipwreck artefact and is one of very few 'objects' on the Victorian State Heritage Register. Flagstaff Hill’s collection of artefacts from LOCH ARD is significant for being one of the largest collections of artefacts from this shipwreck in Victoria. It is significant for its association with the shipwreck, which is on the Victorian Heritage Register (VHR S417). The collection is significant because of the relationship between the objects, as together they have a high potential to interpret the story of the LOCH ARD. The LOCH ARD collection is archaeologically significant as the remains of a large international passenger and cargo ship. The LOCH ARD collection is historically significant for representing aspects of Victoria’s shipping history and its potential to interpret sub-theme 1.5 of Victoria’s Framework of Historical Themes (living with natural processes). The collection is also historically significant for its association with the LOCH ARD, which was one of the worst and best known shipwrecks in Victoria’s history. Copper gas pipe and fitting. Tow C-shaped pipes with fittings at each end. One end of each pipe is joined to the other pipe, making a U-shape. It was recovered from the 1878 wreck of the ship Loch Ard in the 1970s. flagstaff hill, warrnambool, shipwrecked coast, flagstaff hill maritime museum, maritime museum, shipwreck coast, flagstaff hill maritime village, great ocean road, loch line, loch ard, captain gibbs, eva carmichael, tom pearce, glenample station, mutton bird island, loch ard gorge, copper gas pipe and fitting, copper gas pipe