Showing 4985 items
matching australian army
-
 The Beechworth Burke Museum
Photograph
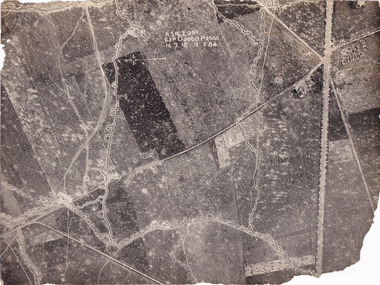
Taken some time between 1914-18, the photograph depicts an aerial view of trenches in France. The image mostly shows rural landscape, although there is a cluster of houses in the top right corner. It is believed that this record denotes a section of the Western Front. The Western Front was the main theatre of war during World War I. Following the outbreak of war in August 1914, the German Army opened the Western Front by invading Luxembourg and Belgium, then gaining military control of important industrial regions in France. The German advance was halted with the Battle of the Marne. Following the Race to the Sea, both the French-British and German armies dug in along a meandering line of fortified trenches, stretching from the North Sea to the Swiss frontier with France. Between 1915 and 1917 there were several offensives along the Western Front. The attacks employed massive artillery bombardments and massed infantry advances. Entrenchments, machine gun emplacements, barbed wire and artillery repeatedly inflicted severe casualties during attacks and counter-attacks and no significant advances were made. Among the most notable of these offensives were the Battle of Verdun (1916), the Battle of the Somme (1916), and the Battle of Passchendaele (1917).The record is historically significant due to its connection to World War I. This conflict is integral to Australian culture as it was the single greatest loss of life and the greatest repatriation of casualties in the country's history. Australia’s involvement in the First World War began when the Australian government established the Australian Imperial Force (AIF) in August 1914. Immediately, men were recruited to serve the British Empire in the Middle East and on the Western Front. The record has strong research potential. This is due to the ongoing public and scholarly interest in war, history, and especially the ANZAC legend, which is commemorated annually on 25 April, known as ANZAC Day.Black and white rectangular photograph printed on matte photographic paper.Obverse: A.3.FE.2.291 / 62D O.20bd.P.25O.C / 16.7.18 / 12 / F 8 1/4 / Reverse: 6532military album, military, army, war, wwi, world war i, france, trenches -
 The Beechworth Burke Museum
Photograph, c. 1918
Taken in c. 1918, this photograph depicts the ruins of the French village Villers-Bretonneux. In the foreground of the image are rows of shell damaged houses and buildings. In the background of the image stands a tower of the ruined church.On 24 April, Villers-Bretonneux was captured by the Germans as they advanced towards the regional city of Amiens. If they achieved their goal and drove onto the French coast, splitting the British and French armies, the Allied cause might have been lost. The fate of Amiens hung in the balance as two Australian brigades were given the task of retaking Villers-Bretonneux through a swift night-time counter attack. One brigade would assault from the south, while another would attack from the north. The assault began at 10pm on 24 April. The 13th Brigade in the south were held up by German machine guns, before the Australians linked up east of the village. After dawn on 25 April Australian and British troops were involved in fierce fighting to clear the Germans from the village. Some Germans escaped Villers-Bretonneux through nearby woods. Later on the morning of 25 April, three years to the day after the Anzacs landings at Gallipoli, French and Australian flags were raised over Villers-Bretonneux.Black and white rectangular reproduced photograph printed on matte photographic paperReverse: (A copyright and reproduction notice from the Australian War Museum, printed upside-down in blue ink) Church x Ruins/ Villers Bretonneux/ (in pencil) burke museum, world war 1, ww1, wwi, france, australia, villers-bretonneux, ruins, military album -
 The Beechworth Burke Museum
Photograph, c. 1917
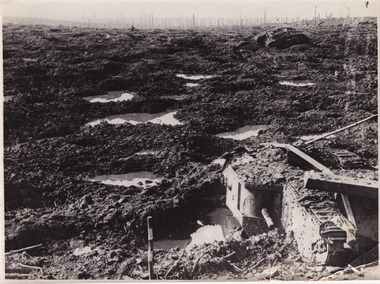
This photograph depicts the third battle of Ypres (Battle of Passchendaele). Depicted is a trench battlefield that has been turned to mud. Two army tank vehicles have been buried in the mud of the trenches. A single soldier stands in the background surveying the battlefield.After mid-1917, and following mutinies in the over-strained French Army, the British Forces had to assume an even greater role in the war on the Western Front. For Field Marshal Sir Douglas Haig, the British commander-in-chief, this provided an opportunity to launch an offensive that he had long wanted. Attacking from Ypres in Belgium, he planned to drive the Germans from the surrounding dominant ridges and even hoped to reach the Belgian coast. Following on the success at Messines in June, he unleashed his great attack on 31 July 1917. Fighting went on, often in appalling weather and despite crippling losses, until November. Finally, with the army stuck in muddy fields churned up by the artillery fire, the bloody offensive came to an untidy close. Many would afterwards call this offensive, actually a series of battles, after the name of the village that had become the last objective – 'Passchendaele'. In the Battle off Passchendaele, the 1st, 2nd and 3rd Australian Divisions captured Broodseinde Ridge on 4 October 1917. It was a vital victory. But, then it began to rain. Five days later the 2nd Australian Division suffered heavily in a further attack in the mud. Finally, on 12 October, another attack, involving the 3rd Division assisted by the 4th, was made against the village of Passchendaele atop the main ridge. In the face of heavy fire, the men fought in the mire while struggling to keep up with their artillery barrages. Ground was taken but it could not be held. In wretched conditions, with casualties mounting at an appalling rate, the Australians had to fall back. The troops were finally exhausted and could do no more; by 15 November they handed over to the Canadians.Black and white rectangular reproduced photograph printed on mate photographic paperReverse: 6523/ (A copyright and reproduction notice from the Australian War Museum, printed upside-down in blue ink)/military album, burke museum, beechworth, military vehicle, trenches, trench warfare, wwi, world war one, world war 1, ypres, belgium -
 The Beechworth Burke Museum
Photograph
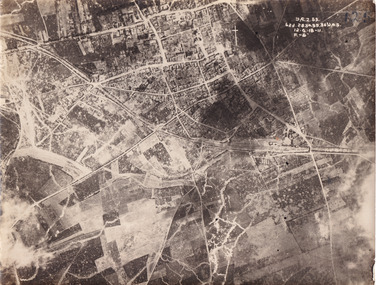
Taken some time between 1914-18, the photograph depicts an aerial view of Villers-Bretonneux in France, a region which was part of the Western Front during World War I. The image mostly shows rural landscape. The Western Front was the main theatre of war during World War I. Following the outbreak of war in August 1914, the German Army opened the Western Front by invading Luxembourg and Belgium, then gaining military control of important industrial regions in France. The German advance was halted with the Battle of the Marne. Following the Race to the Sea, both the French-British and German armies dug in along a meandering line of fortified trenches, stretching from the North Sea to the Swiss frontier with France. The First Battle of Villers-Bretonneux occurred between 30 March - 5 April 1918. It took place during Operation Michael, part of the German Spring Offensive on the Western Front. The offensive began against the British Fifth Army and the Third Army on the Somme, and pushed back the British and French reinforcements on the north side of the Somme. The capture of Villers-Bretonneux, close to Amiens, a strategically important road and rail-junction, would have brought the Germans within artillery-range. In late March, troops from the Australian Imperial Force were brought south from Belgium as reinforcements to help shore up the line. In early April, the Germans launched an attack to capture Villers-Bretonneux. After a determined defence by British and Australian troops, the attackers were close to success until a counter-attack by the 9th Australian Infantry Brigade and British troops late in the afternoon of 4 April restored the situation and halted the German advance on Amiens. The Second Battle of Villers-Bretonneux occurred between 24 - 27 April 1918, during the German Spring Offensive to the east of Amiens. It is notable for being the first occasion on which tanks fought against each other. A counter-attack by two Australian brigades and a British brigade during the night of 24 April partly surrounded Villers-Bretonneux, and on 25 April, the town was recaptured. On 26 April, the role of the Moroccan division of the French army was crucial in pushing back German units. Australian, British and French troops nearly restored the original front line by 27 April.The record is historically significant due to its connection to World War I. This conflict is integral to Australian culture as it was the single greatest loss of life and the greatest repatriation of casualties in the country's history. Australia’s involvement in the First World War began when the Australian government established the Australian Imperial Force (AIF) in August 1914. Immediately, men were recruited to serve the British Empire in the Middle East and on the Western Front. Additionally, the record's significance is enhanced by its depiction of Villers-Bretonneux. The battles that occurred in this town during World War I are especially historically significant to Australia as this is where the Australian Imperial Force had one their greatest World War I victories. An Australian flag still flies over Villers-Bretonneux in the present. Furthermore, a plaque outside the Villers-Bretonneux Town Hall recounts the battles fought to save the town in 1918. Kangaroos feature over the entrance to the Town Hall, and the main street is named Rue de Melbourne. More officially, recognition of the significance of the battle in Villers-Bretonneux is found at the Australian National Memorial, which was built just outside the town. It commemorates all Australians who fought in France and Belgium and includes the names of 10,772 who died in France and have no known grave. Each year, a small ceremony is held at the memorial to mark the sacrifice made by the soldiers. Lastly, the record has strong research potential. This is due to the ongoing public and scholarly interest in war, history, and especially the ANZAC legend, which is commemorated annually on 25 April, known as ANZAC Day.Sepia rectangular photograph printed on matte photographic paper.Obverse: yAE.2.35. / 125 / 62d.2834.35.36.VA.5. / 12.G.18-11 / F.-(?)" /military album, wwi, world war i, villers-bretonneux, australian imperial force, aif, france, war, army, conflict, germany, 1918, battle -
 The Beechworth Burke Museum
Photograph
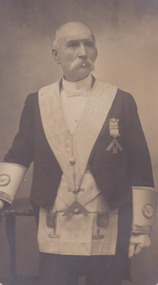
This photograph, taken by Courtney’s Thelma Studios in Wangaratta, depicts Sergeant Arthur Loftus Maule Steele standing in the regalia of the Masonic Lodge. Before his death, Steele was a long term member of the St John’s Lodge of Masons where he was a Past Master and held office of treasurer for over thirty years. He was also a dedicated member of the Church of England and was an Electoral Inspector for Wangaratta. Steele was Sergeant of Police in Wangaratta for much of his life. He was one of 17 children born to Captain Robert Ball Steele and Mary Babington in Tours, France, in 1839. His parents were travelling at the time and soon after settled in Donegal, Ireland. At the age of 12, Steele was sent to the Military Academy of Dublin where he passed his examinations and prepared to enter the British Army. Steele met a bother of Robert O’Hara Burke and was advised to travel to Australia and join as a police cadet. Steele took the advice and travelled to Australia, arriving in Melbourne at the age of 17. He spend some time in a variety of employment including working as a clerk for the White Star Line. He entered the Victorian Police force in 1856. By 1864, Steele married Ruth Ingram Ballinger at Snowy Creek and worked at Omeo until being promoted to the mining centre of Beechworth, taking charge of the Yackandandah Station. Steele and Ballinger had ten children. Steele is well known in Victorian history for a variety of reasons, the most famous being the role he played in capturing Edward “Ned” Kelly at Glenrowan on the 28th June 1880. He also arrested Frank Neville (for the murder of a local resident Mr Nicholls) and Patrick Sheehan (first person to be executed in the Beechworth Gaol 1865 for the murder of James Kennedy at Rowdy Flat Yackandandah). He later worked on the case of Bridget Mepham (charged with the murder of her sister) at Wangaratta and retired from the Police force on the 1st of August 1896. In this retirement, Steele was a keen horticulturalist who enjoyed observing the habits and growth of new varieties cared for in his conservatory. Steele passed away in February 1914. This image has the potential to support current research on Sergeant Steele, the Masonic Lodge and photography during the c.1890s. Sergeant Steele is a well-researched member of the Victorian Police force and is known primarily for his involvement with the Kelly Gang. Therefore, depictions of Steele through photography can help to provide essential information about Steele outside of the Police force. This image has the capacity to inform about Steele’s involvement with the Masonic Lodge in Wangaratta. Therefore, it is important for what it can reveal regarding historic and social aspects. The Burke Museum is home to a large collection of Kelly centred photographs. The study of these photographs in connection to those in other museums have the ability to further current understanding on important figures and events in this historic occasion.Black and White rectangular photograph printed on matte photographic paper and mounted on an oval boardObverse: Courtney's Thelma Studios/ Wangaratta Reverse: 2747portrait, ned kelly, uniform, policeman, wangarratta, sergeant, steele, 1880, photograph, oval, black and white, sergeant steele, arthur loftus maule steele, arthur steele, wangaratta, beechworth -
 The Beechworth Burke Museum
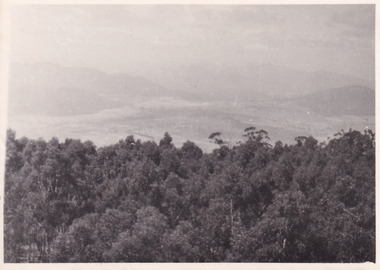
Photograph, 1944
... australian corps of signals army signal detachment unit military war ...Taken in 1944, the photograph depicts the view from Mt. Stanley. A secret experimental micro-wave radio station was established and tested at this site by the Army Signal Detachment Unit during World War II. It was part of an experimental Ultra High Frequency (UHF) link between Melbourne and Sydney. At the time, it was highly classified. It intended to enquire into the hitherto unexplored transmission of micro-waves; that is, a radio signal which could only be transmitted by line of sight, and thus required hill-top to hill-top location.The photograph is historically significant as it pertains to World War II; the largest global conflict in history. This significance is enhanced by Australia's prominent involvement in campaigns across the Pacific, particularly on land in New Guinea and across the Huon Peninsula. It was also the first time that the Australian mainland came under direct attack by the Axis, with Japanese forces targeting north-west Australia and Sydney Harbour. These battles became Australia's largest and most complex offensives during the war. The record is also historically significant as it relates to the Royal Australian Corps of Signals, or "RA Sigs". This significance is strengthened by Australia's unique distinction of having the first established signal unit under the British Empire. This unit provides electronic warfare. They enable commanders to implement highly dynamic battle control against opposing forces by using a number of methods including radio, fibre optic, micro-wave, information systems and satellite links. The record has strong research potential. This is due to the ongoing scholarly and public interest in war, military history, the ANZAC legend, and the continuing existence of the RA Sigs. The historic context of this record can provide insight into Australia's history, military, technological innovation and advancements, as well as national economic, defence and foreign policies after 1945.Black and white rectangular photograph printed on matte photographic paper.Reverse: BMM5095.4 / 32 /military album, army album, wwii, world war ii, mt stanley, beechworth, victoria, melbourne, sydney, royal australian corps of signals, army signal detachment unit, military, war -
 The Beechworth Burke Museum
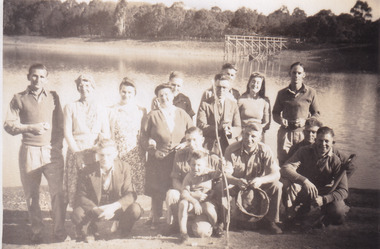
Photograph, 1944
Taken in 1944, depicted are members of the Army Signal Detachment Unit with local residents at at Lake Kerferd. David Pittard (back row, right) is standing beside Dorrie Elliot. The other people are unidentified. A secret experimental micro-wave radio station was established and tested at this site by the Army Signal Detachment Unit during World War II. It was part of an experimental Ultra High Frequency (UHF) link between Melbourne and Sydney. At the time, it was highly classified. It intended to enquire into the hitherto unexplored transmission of micro-waves; that is, a radio signal which could only be transmitted by line of sight, and thus required hill-top to hill-top location.The photograph is historically significant as it pertains to World War II; the largest global conflict in history. This significance is enhanced by Australia's prominent involvement in campaigns across the Pacific, particularly on land in New Guinea and across the Huon Peninsula. It was also the first time that the Australian mainland came under direct attack by the Axis, with Japanese forces targeting north-west Australia and Sydney Harbour. These battles became Australia's largest and most complex offensives during the war. The record is also historically significant as it relates to the Royal Australian Corps of Signals, or "RA Sigs". This significance is strengthened by Australia's unique distinction of having the first established signal unit under the British Empire. This unit provides electronic warfare. They enable commanders to implement highly dynamic battle control against opposing forces by using a number of methods including radio, fibre optic, micro-wave, information systems and satellite links. The record has strong research potential. This is due to the ongoing scholarly and public interest in war, military history, the ANZAC legend, and the continuing existence of the RA Sigs. The historic context of this record can provide insight into Australia's history, military, technological innovation and advancements, as well as national economic, defence and foreign policies after 1945.Sepia rectangular photograph printed on matte photographic paper.Reverse: BMM5095.5 / Relaxing with some of / the Stanley locals / David Pittard (back row Rt.) / next to Dorrie Elliot / I can't recall the others / Lake Sambell, I think / Kerferd /military album, army album, lake kerford, army signal detachment unit, royal australian corps of signals, military, war, wwii, world war ii, beechworth, victoria, sydney, melbourne -
 The Beechworth Burke Museum
Photograph, 1944
Taken in 1944, depicted are two unidentified soldiers presumed to be part of the Army Signal Detachment Unit. They are cooking a meal outdoors around Mt. Stanley. A secret experimental micro-wave radio station was established and tested near this site by the Army Signal Detachment Unit during World War II. It was part of an experimental Ultra High Frequency (UHF) link between Melbourne and Sydney. At the time, it was highly classified. It intended to enquire into the hitherto unexplored transmission of micro-waves; that is, a radio signal which could only be transmitted by line of sight, and thus required hill-top to hill-top location.The photograph is historically significant as it pertains to World War II; the largest global conflict in history. This significance is enhanced by Australia's prominent involvement in campaigns across the Pacific, particularly on land in New Guinea and across the Huon Peninsula. It was also the first time that the Australian mainland came under direct attack by the Axis, with Japanese forces targeting north-west Australia and Sydney Harbour. These battles became Australia's largest and most complex offensives during the war. The record is also historically significant as it relates to the Royal Australian Corps of Signals, or "RA Sigs". This significance is strengthened by Australia's unique distinction of having the first established signal unit under the British Empire. This unit provides electronic warfare. They enable commanders to implement highly dynamic battle control against opposing forces by using a number of methods including radio, fibre optic, micro-wave, information systems and satellite links.Black and white rectangular photograph printed on matte photographic paper.Reverse: BMM5095.6 / Our Cookhouse / 32 /military album, army album, military, war, wwii, world war ii, army signal detachment unit, royal australian corps of signals, mt stanley, beechworth, victoria, melbourne, sydney -
 The Beechworth Burke Museum
Photograph, 1944
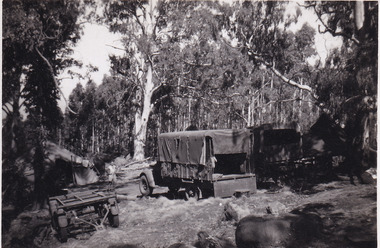
Taken in 1944, the photograph depicts two trucks and a trailer park at an undisclosed location inside the Stanley forest. An unidentified young man is standing in the background. There are also two tents installed on either side of the vehicles. A secret experimental micro-wave radio station was established and tested in Stanley, Victoria by the Army Signal Detachment Unit during World War II. It was part of an experimental Ultra High Frequency (UHF) link between Melbourne and Sydney. At the time, it was highly classified. It intended to enquire into the hitherto unexplored transmission of micro-waves; that is, a radio signal which could only be transmitted by line of sight, and thus required hill-top to hill-top location.The photograph is historically significant as it pertains to World War II; the largest global conflict in history. This significance is enhanced by Australia's prominent involvement in campaigns across the Pacific, particularly on land in New Guinea and across the Huon Peninsula. It was also the first time that the Australian mainland came under direct attack by the Axis, with Japanese forces targeting north-west Australia and Sydney Harbour. These battles became Australia's largest and most complex offensives during the war. The record is also historically significant as it relates to the Royal Australian Corps of Signals, or "RA Sigs". This significance is strengthened by Australia's unique distinction of having the first established signal unit under the British Empire. This unit provides electronic warfare. They enable commanders to implement highly dynamic battle control against opposing forces by using a number of methods including radio, fibre optic, micro-wave, information systems and satellite links. The record has strong research potential. This is due to the ongoing scholarly and public interest in war, military history, the ANZAC legend, and the continuing existence of the RA Sigs. The historic context of this record can provide insight into Australia's history, military, technological innovation and advancements, as well as national economic, defence and foreign policies after 1945.Black and white rectangular photograph printed on matte photographic paper.Reverse: BMM5095.8 /military album, army album, wwii, world war ii, army signal detachment unit, royal australian corps of signals, ra sigs, stanley, army truck, victoria, beechworth, melbourne, sydney -
 The Beechworth Burke Museum
Photograph, 1944
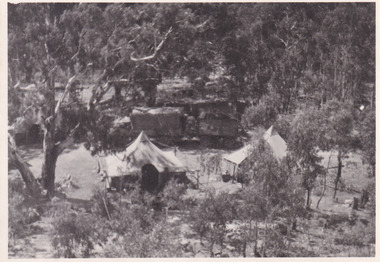
... and foreign policies after 1945. military album army album australian ...Taken in 1944, depicted is an aerial view of an Australian military camp set up at Mt. Stanley in Victoria. There are two large tents along with a vehicle and trailer surrounded by bushland. A secret experimental micro-wave radio station was established and tested at this site by the Army Signal Detachment Unit during World War II. It was part of an experimental Ultra High Frequency (UHF) link between Melbourne and Sydney. At the time, it was highly classified. It intended to enquire into the hitherto unexplored transmission of micro-waves; that is, a radio signal which could only be transmitted by line of sight, and thus required hill-top to hill-top location.The photograph is historically significant as it pertains to World War II; the largest global conflict in history. This significance is enhanced by Australia's prominent involvement in campaigns across the Pacific, particularly on land in New Guinea and across the Huon Peninsula. It was also the first time that the Australian mainland came under direct attack by the Axis, with Japanese forces targeting north-west Australia and Sydney Harbour. These battles became Australia's largest and most complex offensives during the war. The record is also historically significant as it relates to the Royal Australian Corps of Signals, or "RA Sigs". This significance is strengthened by Australia's unique distinction of having the first established signal unit under the British Empire. This unit provides electronic warfare. They enable commanders to implement highly dynamic battle control against opposing forces by using a number of methods including radio, fibre optic, micro-wave, information systems and satellite links. The record has strong research potential. This is due to the ongoing scholarly and public interest in war, military history, the ANZAC legend, and the continuing existence of the RA Sigs. The historic context of this record can provide insight into Australia's history, military, technological innovation and advancements, as well as national economic, defence and foreign policies after 1945.Black and white rectangular photograph printed on matte photographic paper.Reverse: BMM5095.11 / Our camp / From the top. / (?) (?) /military album, army album, australian royal corps of signals, army signal detachment unit, mt. stanley, victoria, beechworth, wwii, world war ii, melbourne, sydney -
 The Beechworth Burke Museum
Photograph, 1910
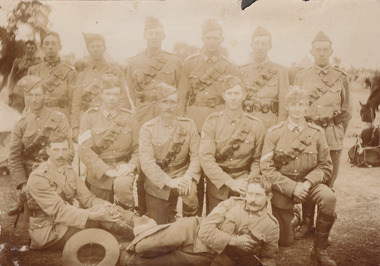
Lord Kitchener visited Seymour as part of his review of Australia's military capabilities. Lord Kitchener was Commander-in-Chief of the British Army at the time of his visit. At the invitation of Prime Minister Alfred Deakin, Kitchener visited Australia in 1909 to inspect the existing state of defence preparedness of the Commonwealth, and advise on the best means of providing Australia with a land defence. Kitchener’s report, submitted in February 1910, recommended the introduction of compulsory military training which was immediately adopted, as was the establishment of the Military College, Duntroon: It has been definitely decided that Seymour will be the site of the Kitchener camp. The troops which will make the strongest muster at the camp will be the Light Horse. This being so, the suitability of the chosen area for cavalry operations has necessarily had to be considered in selecting the site, and an additional factor is that Seymour is practically in the centre of the Light Horse districts. The country round Seymour is also suitable for artillery manoeurves, and there is no available area in the vicinity of Melbourne where these could be so well carried out. As it is considered that Field-Marshal Lord Kitchener will desire to see the troops on the move, the reason for choosing such a district as Seymour is apparent. The eight days to be devoted to the camp will be mainly occupied in moving the troops over a considerable area, and in carrying out certain tactical operations. Many of the sites recommended have been inspected by officers of the head quarter staff, and all that now remains is that the exact situation for the main camp should be selected, Major Luscombe will visit Seymour on Saturday to inspect the surround country, and select the most suitable places. The intention will be directed to sites closer to the town. Yea Chronicle (Yea, Vic), 9 December 1909. Black and white rectangular photograph printed on matte photographic paper and mounted on board.Obverse: Beechworth Light Horse (pen) / Kitchener Camp / Seymour / 1910 / Reverse: 8743 / Mrs R Scott / military album, burke museum, burke, beechworth, beechworth light horse, light horse, world war one, wwi, 1910 -
 Flagstaff Hill Maritime Museum and Village
Container - Biscuit Tin, Swallow and Ariell Pty Ltd, Mid-19th to mid-20th century
This tin was made in Melbourne and contained Swallows and Ariells biscuits. The label was written in four languages. The biscuits may have been made for export or perhaps for immigrants now living in Australia. Australia's first biscuit company was founded in 1854 by Thomas Swallow. Within five years he had taken in a partner, T.H. Ariell. After Ariell died in 1875, F.T. Derham was appointed partner and managing director in 1877, a position held by several generations of his descendants. By the early 1880s the Port Melbourne factory extended to 3 acres (1.2 ha), and the company owned flourmills and sugar plantations in the Goulburn Valley and Northern Queensland. With no equal outside Great Britain, Swallow & Ariell was the fifth largest biscuit company in the world, manufacturing over 100 varieties, including the common ship biscuit (an original product) and meat biscuits (apparently taken by Burke and Wills on their ill-fated expedition). The company also boasted popular sideline products, including cakes, plum puddings, ice-cream and dried fruit. Renowned for its patriotic fundraising campaigns during both world wars, it diverted most of its biscuits and plum puddings to the Australian and US services in World War II. Company employees were filmed leaving work in 1905 in the Salvation Army film unit's first sponsored industrial documentary film. The surviving opening sequences are held by ScreenSound Australia. The company was delisted on 5 August 1964 following acquisition of more than 95% of its capital by the Australian Biscuit Co. The factory was later registered by the National Trust and converted into units. https://www.emelbourne.net.au/biogs/EM01456b.htmThis biscuit tin is representative of local Melbourne and Victorian produce. The label was in four languages, perhaps for export or for local immigrants. The firm Swallow and Ariells Pty Ltd was a very early manufacture and was in business for over 100 years.Rectangular tin container with attached lid. Label advertises Swallow and Ariells biscuits. Made in Melbourne. The label is written in four languages. The trademark, a swallow, is on the tin. The tin is very badly corroded.'Swallow and Ariells Superior Melbourne Biscuits' Trademark: image [swallow]flagstaff hill, warrnambool, shipwrecked-coast, flagstaff-hill, flagstaff-hill-maritime-museum, maritime-museum, shipwreck-coast, flagstaff-hill-maritime-village, metal craft, tin ware, biscuit box, biscuit tin, food container, melbourne biscuit maker, swallow, thomas swallow, thomas ariell, ariell -
 Phillip Island and District Historical Society Inc.
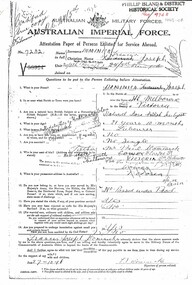
Document, Francis Joseph Dominick WW1 Enlistment and death documents
Francis was known as Joseph and his name is on the Cowes war memorial. The Dominick family had 40 acres on the Nobbies Road, next to the Smiths. He enlisted in South Melbourne on 27/10/1916 and was killed in action on 4 October 1917 in Belgium.Historical2 photocopied WW1 documents. One is his enlistment form and the other is a report of death in action.Australian Imperial Force Attestation Paper of Persons Enlisted for Service Abroad. Field Service Army Form B 20290Aworld war 1, joseph dominick, military, dominick family -
 Supreme Court of Victoria Library
Portrait, Sir Edmund Herring, 1963
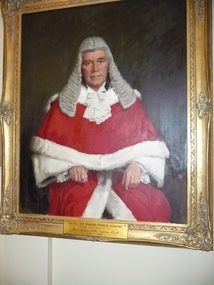
Sir Edmund Herring had a military career before becoming the Chief Justice of Victoria in 1944. Sir Edmund served as an artillery officer with the British Army in World War One and was awarded the Military Cross. While he returned to the Law between the wars, becoming King's Counsel in 1936, he continued his military associations through Australian Militia Forces, rising to colonel by the start of the Second World War. At the outset of WWII Herring was appointed as Commander of the Royal Artillery for the Australian Sixth Division. Herring saw service in North Africa and Greece and was in charge of Australian Northern forces in 1942, afterwards working with General Blamey in Papua New Guinea. Sir Edmund was appointed Chief Justice, straight from his army command in 1944. As Chief Justice he quickly established the Law Reform Committee and after the war oversaw the extension of the Supreme Court buildings, with the creation of new Courts. He was considered an able administrator, but his refusal to appoint Joan Rosanove a Queen’s Counsel throughout the 1950s, did not sit well with many legal practitioners. After his retirement from the Bench, he continued in his many public activities, including trustee of the Shrine of Remembrance and the Australian War Memorial and a member of the Melbourne Grammar School Council, as well as Lieutenant Governor of the State of Victoria, a position he held from 1945 to 1972. Herring was also an outspoken social critic; between the wars he had been a member of the White Guard, who were a far right group acting against communism. During the Cold War period of the 1950s, Herring spoke out in favour of the British Empire and the American alliance. The portrait of Sir Edmund Herring is the second one that Sir William Dargie (1912-2003), completed of Sir Edmund; his first effort in 1944/45 won the Archibald prize. Dargie won the Archibald prize a record eight times. His fame as a portrait painter was not without controversy, as he was considered ‘safe’ and the favourite of conservative sitters, particularly as many of his Archibald winners were of ‘Captains of Industry’. While no Archibald prize was awarded for this portrait, it is an interesting counterpoint to Dargie’s 1944/45 portrait. The portrait of Sir Edmund Herring is significant because of whom it portrays and the artist William Dargie who painted it.Portait in oils of Sir Edmund Herring. This is a half portrait of Sir Edmund in his red judicial robes. Gold leaf frame, with plaque.Plaque reads "The Honourable Sir Edmund Francis Herring, KCMG, KBE, DSO, MC, ED. Chief Justice of the Supreme Court 1944-1964"edmund herring, william dargie -
 Supreme Court of Victoria Library
Portrait, Sir Edmund Herring, 1964
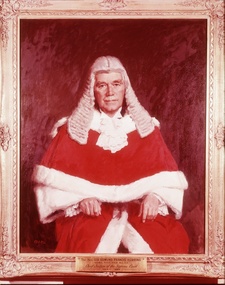
The portrait of Chief Justice Sir Edmund Herring is significant because of whom it portrays and who painted it. Sir Edmund Herring (1892-1982), had a military career before becoming the Chief Justice of Victoria in 1944. Sir Edmund served as an artillery officer with the British Army in World War One and was awarded the Military Cross. While he returned to the Law between the wars, becoming Kings Counsel in 1936, he continued his military associations through the Australian Militia forces rising to colonel by the start of the Second World War. At the outset of World War Two Herring was appointed as Commander of the Royal Artillery for the Australian Sixth Division. Herring saw service in North Africa and Greece and was in charge of Australian Northern forces in 1942, afterwards working with General Blamey in Papua New Guinea. It was at this time that Herring confirmed the death sentences of 22 Papuans who had been found guilty of murder and treason. Sir Edmund was appointed Chief Justice, straight from his army command in 1944. As Chief Justice he quickly established the Law Reform Committee and after the war oversaw the extension of the Supreme Court buildings, with the creation of new Courts. He was considered an able administrator, but his refusal to appoint Joan Rosanove a Queen’s Counsel throughout the 1950s, did not sit well with many legal practitioners. After his retirement from the Bench, he continued in his many public activities, including trustee of the Shrine of Remembrance and the Australian War Memorial and a member of the Melbourne Grammar School Council, as well as Lieutenant Governor of the State of Victoria a position he held from 1945 to 1972. Herring was also an outspoken social critic, between the wars he had been a member of the White Guard, who were a far right group acting against communism. During the Cold War period of the 1950s, Herring spoke out in favour of the British Empire and the American alliance. The portrait of Chief Justice Sir Edmund Herring is significant because of whom it portrays and who painted it. The portrait of Sir Edmund Herring is the second one that Sir William Dargie (1912-2003), completed of Sir Edmund, his first effort in 1944/45 won the Archibald prize. Dargie won the Archibald prize a record eight times.Portrait in oils of Sir Edmund Herring, Chief Justice of the Supreme Court of Victoria (1944-1964). Sir Edmund is seated, this is a half portrait, dressed in his red judicial robes. The sitter takes up most of the frame and there is very little extra information in the picture. signed lower left "Dargie'. Plaque with the following details : Sir Edmund Francis Herring, KCMG, KBE, DSO, MC, ED. Chief Justice of the Supreme Court, 1944-1964.judges, herring -
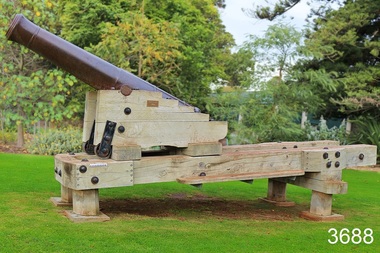
 Flagstaff Hill Maritime Museum and Village
Gun Emplacement, 1890's
The Warrnambool Battery on Flagstaff Hill has embankments for 3 guns. Those on the left and right still have cannon in place but in the centre is an empty embankment, apart from this concrete ring with metal threaded studs. In 1898 a 5 inch breech loading gun (BL) was installed here. The gun had a hydro-pneumatic disappearing carriage (hence the sign on the concrete wall "5" BL HP").. This type of gun was faster to load and fire that the 80 pound RML’s installed on either side of it. Its arrival spelt the end of the 80 pound RML guns’ useful life, although they continued to be used for practice sessions. The 5 inch BL was the main defensive weapon of the Warrnambool Battery until the Battery was downgraded in importance. It was removed in 1904 and recalled to Melbourne in 1910. The gun emplacement ring is all that remains of the mounting for a 5 inch Armstrong rifled breech loading gun. HISTOR of the WARRNAMBOOL GUNS & CANNON In the years following the Crimean War (1854-1857J) there was a great concern in the Colony that Imperial Russia would attempt an invasion. Coastal defences in the colony of Victoria were greatly strengthened by the Government as a result. Warrnambool was originally protected by cannons at Cannon Hill, approximately 1 kilometer west of the Flagstaff Hill Fortifications. The cannons included two 1866 guns, both 80 Pound Rifled Muzzle Loaders (RML) purchased by Victoria’s Colonial Government. They were part of a shipment of 26 such guns sent from England in December 1866. They are registered as No. 23 (80cwt-2qr-0lbs) - Gun 1, and No.13 (81cwt-1qr-12lbs) - Gun 2. They were cast at the Royal Gun Factory, Woolwich Arsenal, in 1866 and have a 6.3 inch bore. Both barrels carry the Royal Cypher of Queen Victoria, Insignia of the Royal Engineers, within the Garter and Motto surmounted by the Crown, with the Royal Cypher of Queen Victoria within the Garter (letters in centre “VR”, motto “HONI SOIT QUI MAL Y PENSE”, "Shame be to him who thinks evil of it."). The guns were originally supplied with wooden carriages. (The Royal Arsenal at Woolwich, England, was established eleven years after the Restoration of King Charles II. It was the principal supplier of armaments to the British and Empire Governments. At the height of its operations during World War One the factory covered 1300 acres and employed very nearly 80,000 workers. Woolwich was the Headquarters of the Royal Artillery since the raising of that Regiment in 1716. The Arsenal was closed in the late 1960’s.) These two 80pdr cannons were transferred to the Warrnambool Garrison Artillery Battery Fortifications erected at Flagstaff Hill in 1887 as part of Victoria’s Coastal Defences. The original wooden carriages were subsequently replaced with the present iron garrison carriages in 1888. They are a “C” pivot. The ‘racers’ or curved track set into the floor of the gun emplacement (which enabled the guns to be traversed more quickly) are as specified for guns up to 10 inch, being of wrought iron 2.78 inches wide. A temporary third gun, now no longer on Flagstaff Hill’s site, was the 5 inch Rifled Breech Loading (BL) Armstrong gun mounted on an Elswick hydro pneumatic disappearing carriage and installed in this very concrete base or pad. The State of Victoria took over the ownership of the guns at the time of Australian Federation in 1901. In about 1901/1902 the Garrison Battery was converted to the Warrnambool Battery of the Australian Field Artillery (No 4 Field Battery). It was equipped with 4.7 inch naval guns mounted on field carriages. They were now a mobile unit but continued to use the Warrnambool Garrison area at Flagstaff Hill for practice. When the Fortifications were declared obsolete the two 80 Pounder RML were relocated to Cannon Hill in 1910. On the outbreak of World War One the 4.7 inch guns were recalled to Melbourne, and the Battery was disbanded. Most of the personnel probably re-enlisted in the local 4th Australian Light Horse Regiment. The two 80 Pounder RML were moved back to the Fortifications in 1973. They were both fully restored by Army First Year Apprentices at the Ordinance Factory in Bendigo in time for the centenary year of the fortifications in 1987. The guns are capable of firing 80 pound (32.3kg) armour piercing exploding shells 3.65kms out to sea. They were originally manned by volunteers before a paid Garrison was established. Now the Guns are again fired by volunteers on Special Event days. Since restoration the Gun Number 1 had been fired on a regular basis but Gun Number 2 hadn’t been fired since the mid 1990’s. In April 2015 Gun Number 2 was serviced in preparation for the firing of both cannons on the ANZAC Centenary commemorations on April 25th 2015. Other guns from the original Cannon Hill location were obsolete by the time the 1887 Warrnambool Garrison Artillery Battery was built. These guns are (1) a 32 Pounder Muzzle Loading Smooth Bore (SB) cast in 1813 at the famous Carron Foundry, number 80837 and now located in the Warrnambool Botanic Gardens. It is now mounted on a replica carriage due to the original carriage being in a fragile condition (the original carriage stored under cover at Flagstaff Hill). (2) a 68 Pounder Muzzle Loading Smooth Bore cast in 1861 at the equally august Low Moor Foundry, number 10310 and now located on the lawn area at the entrance to Flagstaff Hill Maritime Village. It is still mounted on its original wooden garrison carriage. Its wooden slide compressor mechanism is fragile and now kept in Flagstaff Hill’s storage. There are only seven 32 Pounder SB made by Carron and fifteen 68 Pounder SB made at Low Moor known to exist in the State of Victoria [references; Flagstaff Hill Maritime Village interpretation boards, information sheets and other documents; South Western Victoria Guns and Cannon report, May 2008, ref W/F/08] The Gun embankment is contained within the heritage listed Lady Bay Lighthouse Comples, on the Victorian Heritage Register VHR H1520. The gun emplacement base is evidence of the last defences installed on this stretch of coastline. The Warrnambool Garrison has been added to the Victorian Heritage Register H1250 “for its intact battery and guns, a strong reminder of Victoria’s wealth and determination to protect itself from the perceived threat of invasion in the 1880’s.” The City of Warrnambool is one of several custodians of a collection of artillery pieces of heritage significance at a state, national and international level. These pieces are directly related to the defence of south-west Victoria in the 19th century. The care and preservation come under the Heritage Act 1995. Gun emplacement; the remains of the mounting platform of a temporary third gun installed in 1898 in the centre of the battery. This consists of a circular concrete well or sump surrounded by two rings of mounting bolts, the inner of 10 and the outer of 20. The base once held a 5 inch Armstrong rifled breech loading gun with hydro-pneumatic disappearing. In the centre of the ring on the ground is a keyhole shaped space. The gun was removed in 1904. flagstaff hill, warrnambool, shipwrecked coast, flagstaff hill maritime museum, maritime museum, shipwreck coast, flagstaff hill maritime village, great ocean road, colonial defences, victoria’s coastal defences, warrnambool fortification, warrnambool garrison battery, warrnambool volunteer corps, ordinance, armaments, cannon hill fortifications, flagstaff hill fortifications, 4th australian light horse regiment, garrison gun, 5 inch breech loading gun, emplacement for hydro-pneumatic disappearing carriage, gun emplacement -
 Flagstaff Hill Maritime Museum and Village
Weapon - Cannon, 1813
This 1813 cannon is classified as a carronade, having been made by the Carron Ironworks foundry in Stirling, Scotland in 1813. It is a large calibre, short range, gun mainly used on ships. The carronade model of cannon was first used when introduced into the British Royal Navy in the American War of the Revolution (1775-1883). This cannon was originally a 28pdr, 48cwt, 8ft gun. The date ‘1837’ on the barrel probably indicates the date that the Board of Ordinance accepted the change in size to a 32pdr. It may originally have been a naval gun and the conversion undertaken when it was brought ashore. It is very probably one of the 15 guns that are known to have constituted the defences of Victoria in 1860. This group of 32pdrs was the shorter model of the 4800width and 8ft length cannon and as such are different from the 32pdrs found in NSW. It was originally located on Cannon Hill in Warrnambool when it was the site of the Warrnambool Battery Western Artillery, formed in 1866. It was obsolete by the time of the 1887 fortifications, and was moved from the Warrnambool Fortifications to the Botanic Gardens in 1910, when the Fortifications were declared obsolete. HISTORIC INFORMATION ABOUT THE CANNON IN THE WARRNAMBOOL AREA In the years following the Crimean War (1854-1857J) there was a great concern in the Colony that Imperial Russia would attempt an invasion. Coastal defences in the colony of Victoria were greatly strengthened by the Government as a result. Warrnambool was originally protected by cannons at Cannon Hill, approximately 1 kilometer west of the Flagstaff Hill Fortifications. The cannons included two 1866 guns, both 80 Pound Rifled Muzzle Loaders (RML) purchased by Victoria’s Colonial Government. They were part of a shipment of 26 such guns sent from England in December 1866. They are registered as No. 23 (80cwt-2qr-0lbs) - Gun 1, and No.13 (81cwt-1qr-12lbs) - Gun 2. They were cast at the Royal Gun Factory, Woolwich Arsenal, in 1866 and have a 6.3 inch bore. Both barrels carry the Royal Cypher of Queen Victoria, Insignia of the Royal Engineers, within the Garter and Motto surmounted by the Crown, with the Royal Cypher of Queen Victoria within the Garter (letters in centre “VR”, motto “HONI SOIT QUI MAL Y PENSE”, "Shame be to him who thinks evil of it."). The guns were originally supplied with wooden carriages. (The Royal Arsenal at Woolwich, England, was established eleven years after the Restoration of King Charles II. It was the principal supplier of armaments to the British and Empire Governments. At the height of its operations during World War One the factory covered 1300 acres and employed very nearly 80,000 workers. Woolwich was the Headquarters of the Royal Artillery since the raising of that Regiment in 1716. The Arsenal was closed in the late 1960’s.) The two 80pdr cannons were transferred to the Warrnambool Garrison Artillery Battery Fortifications erected at Flagstaff Hill in 1887 as part of Victoria’s Coastal Defences. The original wooden carriages were subsequently replaced with the present iron garrison carriages in 1888. They are a “C” pivot. The ‘racers’ or curved track set into the floor of the gun emplacement (which enabled the guns to be traversed more quickly) are as specified for guns up to 10 inch, being of wrought iron 2.78 inches wide. A temporary third gun, now no longer on Flagstaff Hill’s site, was a 5 inch Rifled Breech Loading (BL) Armstrong gun mounted on an Elswick hydro pneumatic disappearing carriage It was faster to load and fire than the 80 pound RMLs and its arrival spelt the end of the older 80 pound guns’ useful life, apart from being used for practice sessions. The 5 inch BL gun was the main defensive weapon of the Warrnambool Battery until the Battery was downgraded in importance and the gun was recalled to Melbourne in 1910. The gun emplacement still remains in place set between the 2 80pdr cannon. The State of Victoria took over the ownership of the guns at the time of Australian Federation in 1901. In about 1901/1902 the Garrison Battery was converted to the Warrnambool Battery of the Australian Field Artillery (No 4 Field Battery). It was equipped with 4.7 inch naval guns mounted on field carriages. They were now a mobile unit but continued to use the Warrnambool Garrison area at Flagstaff Hill for practice. When the Fortifications were declared obsolete the two 80 Pounder RML were relocated to Cannon Hill in 1910. On the outbreak of World War 1 the 4.7 inch guns were recalled to Melbourne, and the Battery was disbanded. Most of the personnel probably re-enlisted in the local 4th Australian Light Horse Regiment. The two 80 Pounder RML were moved back to the Fortifications in 1973. They were both fully restored by Army First Year Apprentices at the Ordinance Factory in Bendigo in time for the centenary year of the fortifications in 1987. The guns are capable of firing 80 pound (32.3kg) armour piercing exploding shells 3.65kms out to sea. They were original manned by volunteers before a paid Garrison was established. Now the Guns are again fired by volunteers on Special Event days. Since restoration the Gun Number 1 had been fired on a regular basis but Gun Number 2 hadn’t been fired since the mid 1990’s. In April 2015 Gun Number 2 was serviced in preparation for the firing of both cannons on the ANZAC Centenary commemorations on April 25th 2015. Other guns from the original Cannon Hill location were obsolete by the time the 1887 Warrnambool Garrison Artillery Battery was built. These guns are (1) a 32 Pounder Muzzle Loading Smooth Bore (SB) cast in 1813 at the famous Carron Foundry, number 80837 and now located in the Warrnambool Botanic Gardens. It is now mounted on a replica carriage due to the original carriage being in a fragile condition (the original carriage stored under cover at Flagstaff Hill). (2) a 68 Pounder Muzzle Loading Smooth Bore cast in 1861 at the equally august Low Moor Foundry, number 10310 and now located on the lawn area at the entrance to Flagstaff Hill Maritime Village. It is still mounted on its original wooden garrison carriage. Its wooden slide compressor mechanism is fragile and now kept in Flagstaff Hill’s storage. There are only seven 32 Pounder SB made by Carron and fifteen 68 Pounder SB made at Low Moor known to exist in the State of Victoria Plaque attached to the carriage “This replica carriage was constructed by the Warrnambool Tritan Woodworkers club in conjunction with the generosity of local businesses and the Warrnambool community. The original carriage (circa 1860) was removed for restoration and is now located at Flagstaff Hill Maritime Village. The timber used for the replica carriage is Monterey Cypress, which was an early planting in the gardens. 2010 marked the centenary of the cannon’s relocation in the Warrnambool Botanic Gardens.” (Reference; Victorian Guns and Cannons, South Western Victoria Assessment, May 2008, item W/B/01; Flagstaff Hill Maritime Village datasheets and archives). There are only seven 32 Pounder SB made by Carron known to exist in the State of Victoria and this is one of them. On a world level, this cannon represents a high level of rarity. Further, as it has been modified (bored up) it is representative of the historical process of amending artillery in order to ensure a longer usefulness of each piece despite rapidly advancing artillery technology. The number of surviving carriages with traversing slides in this group in South Western Victoria is unique in Australia and probably in the World. Out of 10 such platforms surviving in Australia, the South Western Victorian group has half. Several survive around the world but probably not in such a large group. The wooden sliding compressor mechanism belonging to this cannon is extremely rare, and the only one in this South Western Victorian group of Guns and Cannons. As a whole, this cannon has undergone very little restoration or modification, giving it a high level of integrity. The City of Warrnambool is one of several custodians of a collection of artillery pieces of heritage significance at a state, national and international level. These pieces are directly related to the defence of south-west Victoria in the 19th century. The care and preservation come under the Heritage Act 1995. (Reference; Victorian Guns and Cannons, South Western Victoria Assessment, May 2008).Cannon, or carronade, 32pdr with wheels. Muzzle loading smooth bore (SB) cannon. Cannon has original wooden Burmese Teak carriage and slide with wrought iron fittings and iron wheels. Manufactured by Carron in Scotland, in 1813. It has been converted from a 28pdr. There is a loop for a rope on the cascabel, which was part of the original casting. Re-bored in 1837. Marks include Serial Number, Royal Cypher of King George III, broad arrow of proofing, and numbers to represent the weight. NOTE: The cannon is displayed in the Warrnambool Botanic Gardens and is mounted on a replica wooden carriage; the original wooden carriage is now stored under cover at Flagstaff Hill Maritime Village. This carriage has 4 wheels on swivel attachments and a central gear that allows the wheels to turn on rails. Pressed into left trunnion “80837 / CARRON / 1813”, cast on barrel“symbol (Royal Cypher of King George III”, “symbol (broad arrow of proofing)” and numbers “45-3-24 / 1837” . Cascable “CV” and marks with gradations from nought to three in quarters on each side, On the carriage the end of one of the main slide members carries the mark “W symbol (broad arrow) D” incised into the timber. Plaque attached to the carriage by the Warrnambool Tritan Woodworkers club, 2010, marking the centenary of the cannon’s relocation in the Warrnambool Botanic Gardens and the addition of the replica carriage. flagstaff hill, warrnambool, shipwrecked coast, flagstaff hill maritime museum, maritime museum, shipwreck coast, flagstaff hill maritime village, great ocean road, victoria’s coastal defences, warrnambool fortification, warrnambool garrison battery, ordinance, armaments, cannon hill fortifications, victorian colonial government, carron ironwroks foundary, 32pdr smooth bore cannon, 28pdr smooth bore cannon, 1813 cannon, carronade -
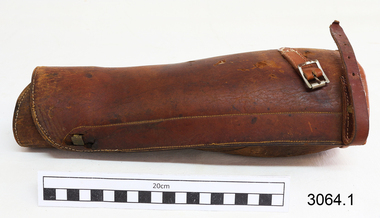 Flagstaff Hill Maritime Museum and Village
Clothing - Leather Leggings, 1899 to 1918
... that served in the Australian army from 1899 until 1918 ...The subject leather leggings are associated with mounted troops known as the Australian Light Horse that served in the South African War from 1899 to 1902. After the war, Britain wanted to use fewer mounted troops and restructured its force around a style of combat that needed more infantry. But the defence of Australia still relied upon mounted military units as these were more mobile than infantry and could travel faster over long distances. Light Horse brigades in the Australian Imperial Force (AIF) mostly contained recruits who served in the Light Horse regiments of the Citizen Forces. Many young men from rural areas of Australia volunteered for the Light Horse regiments. They had to pass a riding test to join, this test was easier for men from the bush because horses were still the main method of transport on farms and in country towns. The army did not officially accept First Australians into the AIF until May 1917 when enlistment standards were relaxed to include 'half-castes' with a parent of European origin. Indigenous soldiers served as valuable members of the Light Horse and many possessed excellent horse handling skills and specialist tracking knowledge.The subject items are part of the uniform for the Light Horse Units that served in the Australian army from 1899 until 1918. These leggings were worn by soldiers on horseback and are significant as they represent a noteworthy time in Australia's early military history. It was a time when many young men gave their lives during the South African and First World Wars in the defence of the then British Empire as part of the Imperial Forces that were gathered from many British-controlled Colonial countries.A pair of two Leather Leggings used by Mounted Australian soldiers during the first world war. The leggings are dark tan in colour with stitching to attach buckles and fastener straps. The strap buckles are made of brass and the leather legging straps are of same leather as leggings. Noneflagstaff hill, warrnambool, flagstaff hill maritime museum, shipwreck coast, flagstaff hill maritime village, great ocean road, leggings, leather leggings, protective leggings, protective clothing, australian mounted light horse units, military equipment -
 Frankston RSL Sub Branch
Document, Certificate of Discharge
Certificate of Discharge of Army serviceman James Robert Clancy (VX44669) who enlisted in the Australian Imperial Force on 8th July 1940. The Certificate of Discharge notes that he was discharged on the 8th April 1943 due to being medically unfit. See also items 00456, 00456.1, 00456.3 and 00456.4. -
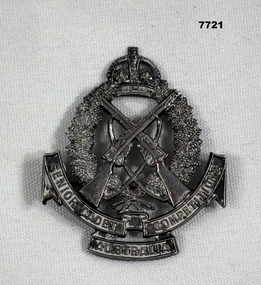 Bendigo Military Museum
Badge - ARMY CADET BADGE, 1913-14
Part of the "Leo Reoch Cohn" Collection. See Catalogue No. 5527.2 for his service record.Silver coloured metal badge featuring crossed rifles below a King's Crown. Rifles surrounded by a wreath featuring wattle flowers. Below rifles is a anner with lettering. Pin fastener soldered on back.Lettering on banner: "SENIOR CADET COMPETITIONS, AUSTRALIA" Stamped on back: CADET L. COHN, H.COY, 68th BATTN, BRIGADE SERIES, 1913-14.army cadet, rifle shoooting, badge, leo reoch cohn -
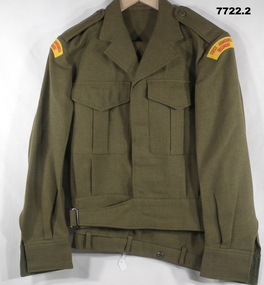 Bendigo Military Museum
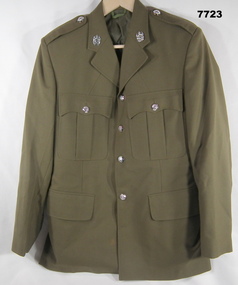
Uniform - JACKET, TROUSERS, BATTLE DRESS, ARMY, 1978-80
... , BATTLE DRESS, ARMY Australian Defence Industries ...Name on label - uniform issued to; 1. "GITTINS" 331103" 2. "J.J. SMITH"1. Jacket - khaki colour wool serge fabric. battle dress style, belted at waist with metal buckle. Dark green plastic buttons. Collar, shoulder epaulettes, two front pockets with concealed button down flap and sleeve cuffs. Shoulder sleeve insignia, red cotton embroidered lettering on yellow colour fabric - "FIRST ARMOURED REGIMENT". Green colour cotton fabric lining to waistband. White cotton manufacturers label inside left pocket. 2. Trousers - Khaki colour wool serge fabric. Battle dress style with fob pocket, two side pockets, one back pocket with button down flap. Green colour polyester fabric lining to pockets, cotton fabric lining to waistband. Metal zipper fly,Manufacturers information on labels - black ink print. 1. "A.G.C.F."/VIC. 1980/^ /8405.66.025.6406/SIZE OF CHEST/ SIZE 89/91R/ AWM 87/ BATCH 15/ DRY CLEAN ONLY/ CREASE UPPER/ HALF OF LAPELS ONLY/ NO./ NAME" Handwritten - black ink pen "331103/GITTINS". 2. A.G.C.F./VIC 1978/^/8405-66--025-6187/ AWM 1969/ BATCH 18/ SIZE WAIST 76s/ DRY CLEAN ONLY/ CREASES SET/ BY SIRO SET/ MENDING PATCH ATTACHED" Handwritten = black ink pen "J.J. SMITH".uniform, army, battle dress, gittins, smith -
 Bendigo Military Museum
Uniform - JACKET, SERVICE DRESS, ARMY, Australian Defence Industries, 1990
... , inside left. Uniform JACKET, SERVICE DRESS, ARMY Australian ...Jacket - khaki colour, wool/polyester fabric, Service Dress style. Silver colour plastic buttons with shank and metal split ring. Buttons have raised emblem, with Armoured Corps Badge logo. Collar, shoulder epaulettes, four front pockets, top two with buttons and two metal press studs on flap, lower with flap. Two lapel badges, metal, Armoured Corps Badge logo. Green colour polyester fabric lining with white polyester fabric manufacturers label, inside left.Manufacturers information on labels - black ink print, "ADI/ VIC 1990^ / 8405.66.019.8465/ SIZE 102. 5R/ MATCHING TRS/ SIZE 87.5R/ SHADE NO. D/ ARMY NO/ NAME" "DRY CLEANING ONLY/ RE-PRESS USING IRON AND/ DAMP CLOTH OR MEDIUM/ TO HOT STEAM IRON/ CRESE UPPER HALF OF LAPELS ONLY".uniform, army, service dress, gittins -
 Bendigo Military Museum
Photograph - Flag Day - Army Survey Regiment Verses School of Military Survey, Latchford Barracks, Bonegilla, 1990
... . Royal Australian Survey Corps RASvy Army Survey Regiment Army ...These 34 photographs were taken at Flag Day, an annual sports competition between the Army Survey Regiment and the School of Military Survey (SMS) at Latchford Barracks, Bonegilla in May 1990. The two RASvy units took turns each year to host the event. The day competition usually comprised basketball, cross country, golf, sailing, squash softball, tennis, touch football, tug-of-war and volleyball. The evening competition often included darts, carpet bowls, hookey, quoits and snooker. The Flag handover and speeches were held in SMS’s Café Slater recreation/morning tea area. It is not clear which RA Svy unit was the winner.This is a set of 34 photographs were taken at Flag Day, an annual sports competition between the Army Survey Regiment (ASR) and the School of Military Survey (SMS) at Latchford Barracks, Bonegilla in May 1990. There are more photographs available on colour negatives and 35mm positive proofs. The photo proofs were printed on photographic paper and are part of the Army Survey Regiment’s Collection. The 35mm colour negatives photographs were scanned at 96 dpi. .1) - Photo, colour, 1990, ASR Tug-of-war team. Back row L to R: unidentified, Geoff Ford, Ken Slater, unidentified, Anthony Hesling. Front row L to R: Mick Hogan, Mick Duggan, Damien Killeen, unidentified, Guenther Ebenwaldner. .2) - Photo, colour, 1990, ASR Tug-of-war team. L to R: Geoff Ford, unidentified (x2). .3) - Photo, colour, 1990, ASR volleyball team L to R: unidentified (x4), Phuc Tran, Guenther Ebenwaldner, unidentified (x4), Neil Taylor. .4) - Photo, colour, 1990, ASR volleyball team L to R: unidentified (x2), Neil Taylor. .5) - Photo, colour, 1990, ASR volleyball team L to R: unidentified, Phuc Tran, Guenther Ebenwaldner, Barry Hogan -spiking. SMS volleyball team L to R: unidentified (x2), Rod Skidmore, unidentified (x2). .6) - Photo, colour, 1990, ASR volleyball team Neil Taylor – serving, L to R: unidentified, Guenther Ebenwaldner, unidentified. .7) - Photo, colour, 1990, ASR volleyball team Phuc Tran – serving. .8) - Photo, colour, 1990, ASR volleyball team unidentified – serving. .9) - Photo, colour, 1990, ASR volleyball team L to R: Guenther Ebenwaldner – serving, unidentified. .10) - Photo, colour, 1990, L to R: SMS volleyball team, all unidentified. ASR volleyball team L to R: Greg Howell, Richard Arman, Rachel (Stanford) Scott, SPR Caroline (Wyatt) Evans, Tracy Tillman, unidentified SMS team member. .11) - Photo, colour, 1990, L to R: ASR volleyball team L to R: Neil Taylor, Guenther Ebenwaldner, unidentified (x2), Tracy Tillman – No.13, Barry Hogan – No.1, Richard Arman, Greg Howell, SPR Rachel (Stanford) Scott, SPR Caroline (Wyatt) Evans. .12) - Photo, colour, 1990, L to R: Bob Thrower, Rod Skidmore – No.5, unidentified referee, Guenther Ebenwaldner, Neil Taylor. .13) - Photo, colour, 1990, L to R: unidentified (x2), Rod Skidmore – No.5, unidentified, unidentified referee, unidentified, Guenther Ebenwaldner – No.2, Phuc Tran - No.8, Neil Taylor - No.9., .14) - Photo, colour, 1990, L to R: unidentified – serving, Neil Taylor. .15) - Photo, colour, 1990, L to R: unidentified (x2), Bob Thrower – No. 2, unidentified referee, Phuc Tran, unidentified, Barry Hogan – No.1, Guenther Ebenwaldner – No.2, unidentified. .16) - Photo, colour, 1990, L to R: unidentified, unidentified referee, unidentified, Neil Taylor - No.9, Guenther Ebenwaldner – No.2, unidentified. .17) - Photo, colour, 1990, L to R: Tracy Tillman, SPR Rachel (Stanford) Scott, SPR Caroline (Wyatt) Evans, Phuc Tran. .18) - Photo, colour, 1990, L to R: Guenther Ebenwaldner – serving, Barry Hogan. .19) - Photo, colour, 1990, L to R: unidentified – serving, unidentified. .20) - Photo, colour, 1990, ASR volleyball team L to R: unidentified, Guenther Ebenwaldner, SPR Caroline (Wyatt) Evans – No. 20, unidentified (x2), Richard Arman No.11, unidentified, Barry Hogan – No.1, Tracy Tillman – No.13, Neil Taylor, Rachel (Stanford) Scott, Phuc Tran. .21) - Photo, colour, 1990, SMS volleyball team, L to R: Rod Skidmore Bob Thrower, remainder unidentified. ASR volleyball team L to R: unidentified, Rachel (Stanford) Scott, Barry Hogan, Greg Howell, unidentified, Guenther Ebenwaldner, unidentified, Phuc Tran, Neil Taylor, Richard Arman. .22) - Photo, colour, 1990, SMS volleyball team, L to R: unidentified Rod Skidmore – No. 5, Bob Thrower, remainder unidentified. .23) - Photo, colour, 1990, ASR basketball team, L to R: unidentified (x3), Dave Longbottom. .24) & .25) - Photo, colour, 1990, Presentations. L to R: CAPT Brian Sloan, ASR RSM WO1 Neville Stone, SPR Frank Savy, WO2 Neil ‘Ned’ Kelly. .26) - Photo, colour, 1990, Presentations. L to R: CAPT Brian Sloan, ASR RSM WO1 Neville Stone, SPR Frank Savy, SPR Marcus Seecamp, WO2 Neil ‘Ned’ Kelly, SMS RSM WO1 Greg Francis-Wright, remainder unidentified. .27) - Photo, colour, 1990, Presentations. L to R: SPR Frank Savy, SPR Andrew Morrison-Evans – with flag, unidentified, SPR Derek Percival– with flag, SPR Dawn Hoadley, ASR CO LTCOL Rene van den Tol, CAPT Brian Sloan, ASR RSM WO1 Neville Stone, unidentified. .28) - Photo, colour, 1990, Presentations. L to R: ASR CO LTCOL Rene van den Tol, unidentified, SPR Derek Percival– with flag, SPR Dawn Hoadley, unidentified, ASR RSM WO1 Neville Stone, SMS CO LTCOL Harry Hansen. .29) - Photo, colour, 1990, Presentations. L to R: ASR CO LTCOL Rene van den Tol, SMS CO LTCOL Harry Hansen, SPR Dawn Hoadley, ASR RSM WO1 Neville Stone, unidentified, SGT Ian Fitzgerald, WO2 Tony Clark, WO2 Harald Mai. .30) - Photo, colour, 1990, Presentations. L to R: unidentified, SPR Derek Percival, ASR CO LTCOL Rene van den Tol, ASR RSM WO1 Neville Stone, SMS CO LTCOL Harry Hansen, CPL Kevin ‘Chuck’ Berry, SGT Ian Fitzgerald, WO2 Tony Clark, WO2 Harald Mai, unidentified. .31) - Photo, colour, 1990, Presentations. L to R: SPR Marcus Seecamp, SPR Dawn Hoadley, ASR CO LTCOL Rene van den Tol, unidentified, SMS CO LTCOL Harry Hansen, CPL Kevin ‘Chuck’ Berry, ASR RSM WO1 Neville Stone, SMS RSM WO1 Greg Francis-Wright, SGT Ian Fitzgerald. .32) - Photo, colour, 1990, Presentations. L to R: SPR Dawn Hoadley, ASR CO LTCOL Rene van den Tol, unidentified, SMS CO LTCOL Harry Hansen, ASR RSM WO1 Neville Stone, SMS RSM WO1 Greg Francis-Wright, SGT Ian Fitzgerald, CPL Barry Hogan, remainder unidentified. .33) - Photo, colour, 1990, Presentations. Those identified L to R: CPL Raelene Munting, CPL Peter Swandale, SGT Paul Baker, WO1 Gordon Lowery, SPR Caroline (Wyatt) Evans, SMS CO LTCOL Harry Hansen, WO2 Alan Glanville, CPL Michelle Griffith, SGT Peter Peterson, WO1 Russell ‘Rusty’ Williams, WO1 Colin Cuskelly, CPL Peter McCurdy, WO2 Steve Egan, SSGT Doug Carswell, WO1 Bill Jones, WO2 Rob Bogumil, SPR Andrew Morrison-Evans. .34) - Photo, colour, 1990, Presentations. Those identified L to R: SMS CO LTCOL Harry Hansen, SPR Anthony Hesling CPL Peter Swandale, SGT Paul Baker, CPL Tony Bestall, SPR Shane ‘Smily’ Campbell. .1P to .36P – no annotationsroyal australian survey corps, rasvy, army survey regiment, army svy regt, fortuna, asr, flag day, school of military survey -
 Bendigo Military Museum
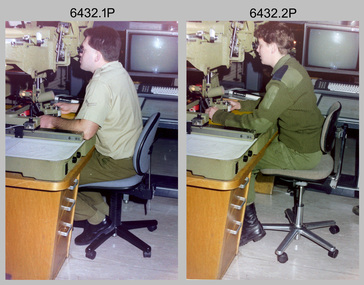
Photograph - Capturing Topographic Features with a Wild B8, AUTOMAP 2 Systems Operations – Army Survey Regiment, Fortuna, Bendigo, 1990
... Australian Survey Corps RASvy Army Survey Regiment Army Svy Regt ...This is a set of two photographs of Air Survey Squadron technicians - LCPL Peter Murphy and SPR Rachel (Stanford) Scott capturing topographic features with a Wild B8 stereo plotter with AUTOMAP 2 equipment at the Army Survey Regiment, Fortuna, Bendigo, c1990. Refer to item 6185.4P and 6204.8P for detailed information and additional photographs of the Wild B8 stereo plotter. The history of the AUTOMAP 2 system is covered in more detail with additional historic photographs in pages 119, 137-142 and 180 of Valerie Lovejoy’s book 'Mapmakers of Fortuna – A history of the Army Survey Regiment’ ISBN 0-646-4: 2120-4. See items 6087.10P and 6223.23P for additional photographs of the AUTOMAP 2 system.This is a set of two photographs of Air Survey Squadron technicians capturing topographic features with a Wild B8 stereo plotter with AUTOMAP 2 equipment at the Army Survey Regiment at Fortuna, Bendigo, c1990. The photographs are on 35mm negative film. They are part of the Army Survey Regiment’s Collection. The photographic negatives were scanned at 96 dpi. .1) - Photo, colour, 1990. LCPL Peter Murphy operating a Wild B8 stereo plotter. .2) - Photo, colour, 1990. SPR Rachel (Stanford) Scott operating a Wild B8 stereo plotter..1P to .2P – no annotationsroyal australian survey corps, rasvy, army survey regiment, army svy regt, fortuna, asr, photogrammetry -
 Bendigo Military Museum
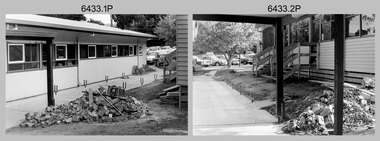
Photograph - Air Survey Squadron building refurbishment - Army Survey Regiment Fortuna, Bendigo, c1982
... . Royal Australian Survey Corps RASvy Army Survey Regiment Army ...This set of 20 black & white photographs of the refurbishment of Air Survey Squadron’s production areas, was taken in circa 1982. These refurbishments were most likely in preparation of the AUTOMAP 2 production system and to accommodate the expansion of the Army Survey Regiment’s work force. This photo set also includes the exterior and interior of a new building - 16A, a modular building of several sections transported in and joined together as part of the expansion. Another modular building - 16B was added later in the 1980s to accommodate Technical Services. The two buildings eventually were removed after Fortuna was sold by Defence in 2008.This set of 20 black & white photographs of the refurbishment of Air Survey Squadron’s production areas, was taken in circa 1982. The photographs are on 35mm negative film. They are part of the Army Survey Regiment’s Collection. The photographic negatives were scanned at 96 dpi. .1) to .2) - Photo, black & white, c1982. Air Survey Squadron building refurbishment. Pathway between Building 16 and Building 16A. .3) to .4) - Photo, black & white, c1982. Air Survey Squadron Building 16 refurbishment. .5) - Photo, black & white, c1982. Air Survey Squadron’s CAPT Chris ‘Monty’ Gehrmann. .6) - Photo, black & white, c1982. AUTOMAP 1 system, L to R: SGT Jim Gill, unidentified. .7) - Photo, black & white, c1982. AUTOMAP 1 system, SGT Bruce Bowers. .8) - Photo, black & white, c1982. AUTOMAP 1 system, unidentified staff. .9) - Photo, black & white, c1982. Technical Services - L to R: Tony Spurling, Joe Farrrington. .10) - Photo, black & white, c1982. Technical Services - Tony Spurling. .11) to .12) - Photo, black & white, c1982. Technical Services, unidentified staff. .13) - Photo, black & white, c1982. Air Survey Squadron, L to R: SPR Nick Van Dalen, SSGT Les Dixon, unidentified. .14) - Photo, black & white, c1982. Air Survey Squadron, L to R: SGT Greg Byers, WO1 Graeme Birrell. .15) - Photo, black & white, c1982. Air Survey Squadron, L to R: SSGT Bruce Gordon, CPL Dave Irving, SGT Phil Meagher, SSGT Brett ‘Dutchy’ Van Leeuwin. .16) - Photo, black & white, c1982. Air Survey Squadron, L to R: SGT Mick Hogan, CPL John Gilbert, SPR Lorraine (Daly) Talbot-Smith, SPR Santina (Argetto) Straube. .17) - Photo, black & white, c1982. Air Survey Squadron, L to R: CPL Dave Irving, SSGT Bruce Gordon, SGT Phil Meagher, SSGT Brett ‘Dutchy’ Van Leeuwin. .18) - Photo, black & white, c1982. Air Survey Squadron, L to R: CPL Dave Irving, SGT Phil Meagher. .19) - Photo, black & white, c1982. Air Survey Squadron, L to R: SPR Lorraine (Daly) Talbot-Smith, SGT Mick Hogan, CPL Dave Irving. .20) - Photo, black & white, c1982. Air Survey Squadron, L to R: SGT Phil Meagher, CPL Dave Irving, SSGT Brett ‘Dutchy’ Van Leeuwin, SSGT Bruce Gordon,.1P to .20P – no annotationsroyal australian survey corps, rasvy, army survey regiment, army svy regt, fortuna, asr, photogrammetry, automap 1 -
 Bendigo Military Museum
Uniform - JACKET, TROUSERS, SHIRT, BATTLE DRESS, ARMY, Australian Defence Industries, 2. 1990 3. 1988
... , ARMY Australian Defence Industries ...Uniform issued to "P. Green" No. 32045731. Jacket, Khaki colour wool serge fabric. Battle Dress style, belted at the waist with metal buckle. Dark green plastic buttons. Collar, shoulder epaulettes, two front pockets with concealed button down flap, sleeve cuffs. Green colour cotton twill fabric lining to waistband. Manufacturers white cotton fabric label - left pocket lining. Removeable tag on inside collar. 2. Trousers, khaki colour wool serge fabric. Battle Dress style with fob pocket, two side pockets, one back pocket with concealed button down flap. Dark green plastic buttons, metal zipper fly. Manufacturers white cotton fabric label - back pocket lining. Green colour polyester lining. 3. Shirt, Khaki colour cotton/polyester long sleeves, with shoulder epaulettes and cream plastic buttons. Two front pockets with button down flaps. Manufacturers white cotton fabric label inside back below collar.Manufacturers information on labels - black ink print. 1. "ADI P/L/ VICTORIA/ 1990/ ^ / 8405-66-025- 6418/BATCH P/ SIZE 102/104L/ ARMY NO./ NAME/DRY CLEAN ONLY/ CREASE UPPER/ HALF OF LAPELS ONLY" 2. "ADI P/L/ SUB-4 VIC 1990/ ^ / 8405-66-025-6183/ BATCH S/ SIZE 84R W.84/ DRY CLEAN ONLY/ RE-PRESS ON ORIGINAL/CREASES SET BY/ SI-RO SET/ MENDING PATCH ATTACHED/ ARMY NO/ NAME" 3. " A.G.C.F./ 1988/ ^/ SIZE 40/84/ 8405-66-088-7098/ SERVICE NO./ NAME/ DO NOT BOIL OR WRING/ MACHINE WASHABLE/ DRIP DRY/ IRON LIGHTLY/ WITH WARM IRON" Handwritten - blue ink pen "3204573/Green" uniform, army, battle dress, p. green -
 Bendigo Military Museum
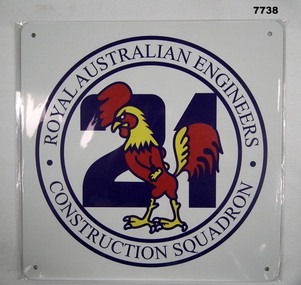
Sign - STEEL SIGN, ROYAL AUSTRALIAN ENGINEERS CONSTRUCTION SQUADRON, c.2022
... Regiment based at Amberley and is drawn mainly from Regular Army ...21st Construction Squadron is part of the 6th Engineering Regiment based at Amberley and is drawn mainly from Regular Army.White Square steel sign with hole in each corner on front and image of a fighting rooster (red and yellow) over the number 21 in purple. Surrounded by two concentric circles with the identification of the unit also in purple. All wrapped in clear plastic on back a stamp saying who made the steel. Some codes and dates.Front - "Royal Australian Engineers - Construction Squadron". Back - Stamp "Steel made by Bluescope CC38A Z47910. 22 Sep 2022 8..." Twice.sign, royal australian engineers -
 Bendigo Military Museum
Photograph - Army Survey Regiment Open Day - Briefings and Tours, Fortuna, Bendigo, 1990
... Australian Survey Corps RASvy Army Survey Regiment Army Svy Regt ...These 27 photographs were taken at an Army Survey Regiment Open Day at Fortuna Villa, Bendigo on the 24th of February 1990. This occasion was one of several events held to commemorate the 75th anniversary of the formation of the Royal Australian Survey Corps. Although historical tours of Fortuna occurred on a regular basis, this was the first technical open day since 1972. The Royal Australian Survey Corps recognised that an Open Day was the best way for the local community in Bendigo to gain an insight into the unit’s important role as Defence’s map production agency, its technical equipment, and its economic importance to Bendigo. It also gave them an opportunity to tour through historic Fortuna Villa. This occasion is covered in more detail in page 143 of Valerie Lovejoy’s book 'Mapmakers of Fortuna – A history of the Army Survey Regiment’ ISBN: 0-646-42120-4. Refer to items 6435.35P and 6436.18P for more photos of the Open Day taken in the Map Production areas of Air Survey and Cartographic Squadron, and production areas of Lithographic Squadron. Photo prints of some of these photos were scanned and catalogued in items 6247.30P and 6291.6P.These 27 photographs were taken at an Army Survey Regiment Open Day held at Fortuna, Bendigo on the 24th of February 1990. The 35mm colour and black & white negatives photographs were scanned at 96 dpi and are part of the Army Survey Regiment’s Collection. .1) & .2) - Photo, black & white, 1990. Ballroom - Visitor briefings by CO LTCOL Renee van den Tol. .3) - Photo, colour, 1990. Ballroom - Visitor briefings by MAJ Ray Redman. .4) - Photo, colour, 1990. Ballroom - Visitor briefings by unidentified UK Exchange officer. .5) - Photo, black & white, 1990. Music Room - Visitor briefings by MAJ Bob Williams. .6) - Photo, black & white, 1990. Orderly Room - ADJT CAPT Peter Parkes. .7) - Photo, colour, 1990. Music Room - ADJT CAPT Peter Parkes with civilian visitors. .8) - Photo, colour, 1990. Music Room - Visitor briefings by CPL Le-Anne (Smallshaw) Shirley. .9) - Photo, colour, 1990. Entrance Foyer - Visitor briefings. .10) - Photo, colour, 1990. CO’s Office - Visitor briefings by CPL Raelene (Munting) Brodie. .11) - Photo, colour, 1990. Mr Pat Thwaites outlining utilisation of satellite imagery to civilian visitors. .12) - Photo, black & white, 1990. Mr Pat Thwaites outlining utilisation of satellite imagery to civilian visitors. .13) - Photo, colour, 1990. Staircase leading up to the top floor - Visitor briefings by CPL Ian Nelson. .14) - Photo, colour, 1990. Building 16 - Visitor briefings by RSM WO1 Neville Stone. .15) - Photo, colour, 1990. Civilian visitors enjoying views of the garden from Fortuna Villa’s rooftop. .16) - Photo, black & white, 1990. Visitor briefings at Fortuna’s rear steps. .17) - Photo, black & white, 1990. Outside Building 16 - Visitor briefings by WO1 Gary Warnest. .18) - Photo, colour, 1990. Outside Building 16 - Visitor briefings by WO2 Adrian ‘Charlie’ Creedy. .19) - Photo, colour, 1990. Outside Building 16 - L to R: SPR Sue (Foote) Bourne, LCPL Sandy Winn, WO2 Adrian ‘Charlie’ Creedy. .20) - Photo, colour, 1990. Outside Building 16 - SGT Greg Byers. .21) - Photo, colour, 1990. Visitors enjoying Devonshire Tea in the gardens next to the Tavern. .22) - Photo, colour, 1990. RSM WO1 Neville Stone and family enjoying Devonshire Tea in the gardens next to the Tavern. .23) - Photo, colour, 1990. Visitors relaxing in the garden next to Fortuna’s lake. .24) - Photo, black & white, 1990. CPL Trevor Poll and others serve up BBQ lunch next to the tennis courts. .25) to .27) - Photo, colour, 1990. Parking at a premium inside the Army Survey Regiment and Chum Street..1P to .27P – no annotationsroyal australian survey corps, rasvy, army survey regiment, army svy regt, fortuna, asr -
 Bendigo Military Museum
Photograph - Army Survey Regiment Open Day - Map Production, Fortuna, Bendigo, 1990
... . Royal Australian Survey Corps RASvy Army Survey Regiment Army ...These 35 photographs were taken at an Army Survey Regiment Open Day at Fortuna Villa, Bendigo on the 24th of February 1990. This occasion was one of several events held to commemorate the 75th anniversary of the formation of the Royal Australian Survey Corps. Although historical tours of Fortuna occurred on a regular basis, this was the first technical open day since 1972. The Royal Australian Survey Corps recognised that an Open Day was the best way for the local community in Bendigo to gain an insight into the unit’s important role as Defence’s map production agency, its technical equipment, and its economic importance to Bendigo. It also gave them an opportunity to tour through historic Fortuna Villa. This occasion is covered in more detail in page 143 of Valerie Lovejoy’s book 'Mapmakers of Fortuna – A history of the Army Survey Regiment’ ISBN: 0-646-42120-4. Refer to items 6434.27P and 6436.18P for more photos of the Open Day taken inside Fortuna, the garden areas and production areas of Lithographic Squadron. Photo prints of some of these photos were scanned and catalogued in items 6247.30P and 6291.6P.These 35 photographs were taken at an Army Survey Regiment Open Day held at Fortuna, Bendigo on the 24th of February 1990. The 35mm colour and black & white negatives photographs were scanned at 96 dpi and are part of the Army Survey Regiment’s Collection. .1) - Photo, black & white, 1990. CPL Neale ‘Tex’ Houston with visitors in Aerotriangulation Section. .2) - Photo, black & white, 1990. L to R: MAJ Peter Clark and WO2 Neil ‘Ned’ Kelly with visitors in Aerotriangulation Section. .3) - Photo, black & white, 1990. SGT Bruce Hammond with visitors in Aerotriangulation Section. .4) - Photo, colour, 1990. SGT Bruce Hammond with visitors in Aerotriangulation Section. .5) - Photo, colour, 1990. SGT Steve Gloster with visitors in Aerotriangulation Section. .6) - Photo, colour, 1990. L to R: CPL Noel Brinsmead and CPL Darren Wilkinson with visitors in Aerotriangulation Section. .7) - Photo, colour, 1990. L to R: CPL Noel Brinsmead with visitors in Aerotriangulation Section. .8) - Photo, colour, 1990. MAJ Peter Clark with visitors in Aerotriangulation Section. .9) - Photo, colour, 1990. CPL Mark Lander with visitors in Plotting Section. .10) - Photo, colour, 1990. SSGT Andy Boath with visitors in Plotting Section. .11) - Photo, colour, 1990. SPR Stuart Bowd with visitors in Plotting Section. .12) - Photo, colour, 1990. CAPT Roger Hancock with visitors in Plotting Section. .13) & .14) - Photo, colour, 1990. AUTOMAP 2 - CPL Peter Peterson with visitors. .15) - Photo, colour, 1990, AUTOMAP 2 - L to R: SSGT Graham Johnston, SPR Grant Davis with civilian visitors. .16) - Photo, colour, 1990, AUTOMAP 2 - L to R: CPL Steve McGuiness, SSGT Graham Johnston with civilian visitors. .17) - Photo, colour, 1990, AUTOMAP 2 - civilian visitors. .19) - Photo, colour, 1990, AUTOMAP 2 - L to R: unidentified, SPR Tony Jackson, CPL Mark Westbrook, SSGT Bob Bright, with civilian visitors. .20) - Photo, colour, 1990, AUTOMAP 2 - L to R: WO2 Adrian ‘Charlie’ Creedy, CPL Mark Westbrook, SPR Mick Duggan with civilian visitors. .21) - Photo, colour, 1990, AUTOMAP 2 - L to R: SPR Mick Duggan, CO LTCOM Rene van den Tol, SSGT Bob Bright, CPL Mark Westbrook with civilian visitors. .22) - Photo, colour, 1990, AUTOMAP 2 - L to R: SPR Damien Nolan, unidentified, SPR Peter Smyth with civilian visitors. .23) - Photo, black & white, 1990, AUTOMAP 2 - L to R: SPR Peter Smyth, CAPT Steve Hledik, SGT Martin Evans, MAJ Neil Taylor with civilian visitors. .24) - Photo, black & white, 1990, AUTOMAP 2 - L to R: SPR Mick Duggan, CPL Mark Westbrook with civilian visitors. .25) - Photo, black & white, 1990, AUTOMAP 2 – LCPL Sandy Winn with civilian visitor. .26) - Photo, black & white, 1990. Display of digital storage media. .27) & .28) - Photo, colour, 1990. Cartography - SPR Ian Baldwin with civilian visitors. .29) - Photo, black & white, 1990. Cartography - SPR Ian Baldwin with civilian visitors. .30) - Photo, black & white, 1990. Cartography - SGT Sherri (Dally) Burke with civilian visitors. .31) - Photo, colour, 1990. Cartography - L to R: SGT Sherri (Dally) Burke, SSGT Dennis Learmonth with civilian visitors. .32) - Photo, colour, 1990. Cartography – SGT Barry Hogan with civilian visitors. .33) & .34) - Photo, colour, 1990. Cartography – CPL Dan Cirsky with civilian visitors. .35) - Photo, colour, 1990. Cartography – L to R: SPR Jeanette (Lane) Dury-Lane, CPL Diane (Thomas) Soutar with civilian visitors..1P to .35P – no annotationsroyal australian survey corps, rasvy, army survey regiment, army svy regt, fortuna, asr, automap 2 -
 Bendigo Military Museum
Uniform - JACKET, BATTLE DRESS - ARMY, Australian Defence Industries, 1942
... JACKET, BATTLE DRESS - ARMY Australian Defence Industries ...Jacket - Khaki colour wool serge fabric. Battle Dress style with belt at waist. Brown metal buttons with shank and split pin. Buttons have raised emblem - map of Australa and Crown and lettering "AUSTRALIAN MILITARY FORCES". Collar, shoulder epaulettes, four front pockets with button down flaps, sleeve cuffs. Unit colour patch insignia - handmade purple over red - 38th Battalion. Collar badges - metal - Rising Sun Badge. Shoulder epaulettes - metal "AUSTRALIA" badge. Manufacturers white cotton fabric label - inside right pocket.Manufacturers information on two labels. Black ink print - "REGIMENTAL NO./NAME" Red ink print - "V162/ MADE IN/ AUSTRALIA/ 1942/ size". Handwritten black ink pen "XXX/ 20X" uniform, army, battle dress, ww2