Showing 699 items matching "19 set"
-
 Ballarat Tramway Museum
Newspaper, The Courier Ballarat, 'No stopping now", 20/11/2020 12:00:00 AM
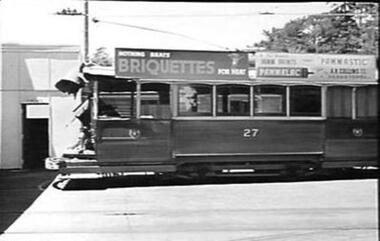
... Parade Ballarat Ballarat goldfields BTM Tram Services Covid-19 ...Set of two Newspaper clippings; front page and part of page 8, titled 'No stopping now", The Courier, Friday Nov 20, 2020 advising the resumption of tram services by the BTM. Features Chris Phillips leaning from the front of No. 27. The item on page 8 details the limited service. Notes the issues with COVID-19 Item written by Jolyon Attwooll, photo by Lachlan Bence.btm, tram services, covid-19 -
 Ballarat Tramway Museum
Photograph - Digital image, State Electricity Commission of Victoria (SECV), Ballarat tram No. 27 following a major accident, 19/01/1963
Yields information about significant damage to one end of tram 27.Set of two digital images of Ballarat tram No. 27 following a major accident 19/1/1963, The two images show the damage to the tram. The SEC workshop staff constructed a whole new end roof and the join between the two ribs can be seen in the No. 2 end of the tram. Alan Bradley’s June 2019 article on 27 at Page 8 talks about a semi-trailer demolishing the driver’s cabin of 27 at the Mair Street intersection of Drummond Street North – on 19/1/1963.trams, tramways, accidents, workshops, tram 27 -
 Ballarat Tramway Museum
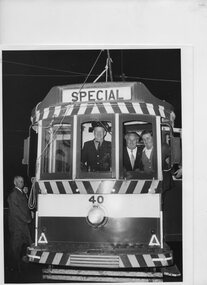
Photograph - Digital image Set of 9, W. J. Llewelyn, 19/09/2016 12:00:00 AM
Set of nine Digital images of BTM Trams on the depot fan and in Wendouree Parade, 19/9/2016, BTM night event celebrating the 45th anniversary of the closure of the SEC Ballarat operated system on 19/9/1971. All by Chris Phillips. .1 - Tram 40 on depot fan .2 - ditto .3 - ditto - end view .4 - at depot junction with passengers .5 - at depot after the event in the shed. .6 - view inside the shed with 27, 26, and 671 .7 - view inside No. 40 with Peter Waugh in kilt talking to passengers. .8 - re-enactment of the "band" leading No. 40 - Peter Waugh, .9 - view outside the shed with 40 entering. trams, tramways, btm, depot, closure, night photo, wendouree parade, tram 40, tram 27, tram 33, tram 671 -
 Ballarat Tramway Museum
Photograph - Digital image Set of 2, Doug Colquhoun, c1955
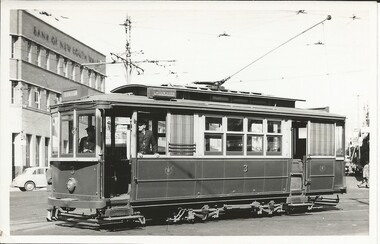
Set of six digital images of Geelong trams photographed by Doug Colquhoun. .1 - No. 3 with destination of Station turning from Ryrie into Moorabool St with the Bank of New South Wales in the background. The conductor is watching the traffic. .2 - No. 4 - at the Railway Station or Beach terminus? .3 - No. 5 - in Ryrie St? .4 - No. 19 in St. with E. R. Sparrow & Co Auctioneer and Wool Broker building in the background - Moorabool St, tram has the destination of Beach. .5 - No. 23 with the conductor leaning against the bumper bar chatting to a man. Tram has the destination of North. Has a Kodak - E. A. O'Meara Chemist shop in the background. Ryrie and Moorabool Streets Geelong looking south along Moorabool St, along with a Safety Zone sign. .6 - No. 34 with the destination of Belmont.trams, tramways, geelong, ryrie st, moorabool st, conductors, north, beach, belmont, safety zone, tram 3, tram 4, tram 5, tram 19, tram 23, tram 34 -
 Ballarat Tramway Museum
Ephemera - Ticket/s, State Electricity Commission of Victoria (SECV), Set of 4 decimal currency tickets, late 1960's
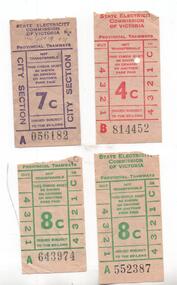
... to Sebastopol, Sat Sept 19, 1971 Set of 4 decimal currency tickets ...Has a strong association with the Ballarat and Bendigo tramway system as being identified as being used on the system and for which trip on a specific date and demonstrates the ticket style at the time of closure of Ballarat.Set of 4 decimal currency tickets used on the Ballarat or the Bendigo tramway system with three of them noted as to their use on the rear. 1 - 4c red - B814452 - ?? Bgo, Sat May 19, 1969, Tram No. 2 - Concession 2 - 7c purple - City Section - A056182 - tram 42 - Sun Sept 19, 1971 (last day of trams in Ballarat) 3 - 8c green - A552387 - 845am, tram 40 to Sebastopol, Sat Sept 19, 1971 4 - 8c green - A643974 - 745pm, tram 40 to Sebastopol, Sat Sept 19, 1971 trams, tramways, tickets, secv, ballarat, bendigo, sebastopol, closure, last day -
 Ballarat Tramway Museum
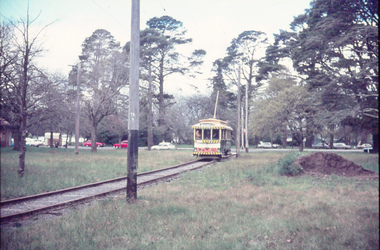
Photograph - Digital Image, Peter Knife, BTM Tram 18 Depot Junction, 19/4/2014
Set of three colour images of BTM tram 18 running in at the end of an operating day. The first image shows the driver at the rear of the tramcar and the next two of the tram crossing Wendouree Parade into the depot. This location was rebuilt during November and December 2014 and the road moved to the west for bicycle safety. Photo by Peter Knife 19/4/2014.Yields information about Ballarat Tramway Museum operations in Wendouree Parade and tram 18Set of three Digital images of colour slides.tramways, tramcars, btm, wendouree parade., depot junction, tram 18 -
 Ballarat Tramway Museum
Slide - 27 mm sq slide/s - destination roll, Lilian Butler, Sep. 1971
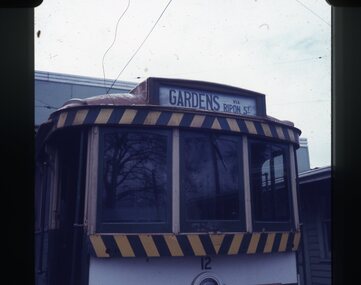
Yields information about the destination rolls and the locations shown on a roll on a Ballarat Tram.Set of 22 Colour 27 x 27 mm slide in Agfachrome blue and white plastic mounts showing various destinations on tram No. 12 parked on the depot fan. .1 - Gardens via Ripon St .2 - Grey St Sebastl (Sebastopol) .3 - Sebastopol .4 - City .5 - Victoria St .6 - Gardens via Sturt St West .7 - Mt Pleasant .8 - Depot .9 - Bell St .10 - Haddon St via Drummond Nth .11 - Depot via Drummond Nth .12 - City Oval .13 - Special .14 - Gardens via Drummond Nth .15 - View Point .16 - Gregory St .17 - Drummond St Nth .18 - Rubicon St .19 - Depot via Ripon St .20 - Grey St Sebastopol .21 -Sturt St West .22 - Special (Depot - on tram 32 with an "Pay as you Enter" inside the depot building. Photo from the collection of Lilian Butler. ballarat, tramways, trams, depot, sec depot, destination indicators, destination roll, tram 12, tram 32 -
 Ballarat Tramway Museum
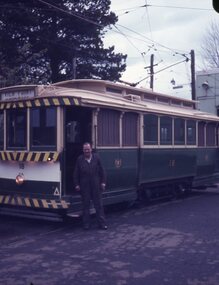
Slide - 27 mm sq slide/s - set of 20 - BTPS Official opening, Lilian Butler, 1/02/1975
Yields information about the Official opening of the BTPS operation in Wendouree Parade in 1974 and has a strong association with those involved.Set of 20 Kodachrome of the Official Opening day of the BTPS Wendouree Parade tramway. .1 - BTPS Depot and associated trackwork with two people sitting on the door step. .2 - 40 and three single truckers lined up for the opening ceremony .3 - ditto .4 - Opening ceremony with speeches etc, the band (The Ballarat Memorial Soldiers Band) .5 - ditto .6 - ditto .7 - ditto .8 - ditto .9 - Bill Jessup holding the opening banner just after being broken - Clyde Croft in the cabin of the tram. .10 - close up of the front of 40 .11 - trams in Wendouree Parade] .12 - ditto .13 - 14 passing another tram at the loop .14 - 40 ditto .15 - Some enthusiasts hiding under the trees. .16 - turning the pole .17 - Gavin Young and Graham Jordan standing on front of 26 .18 - ditto .19 - putting the pole on the overhead .20 - Former driver? standing at the No. 2 end of 40. Photos from the collection of Lilian Butler. ballarat, tramways, trams, btps, wendouree parade, opening day, tram 40, tram 14, tram 27, tram 26 -
 Ballarat Tramway Museum
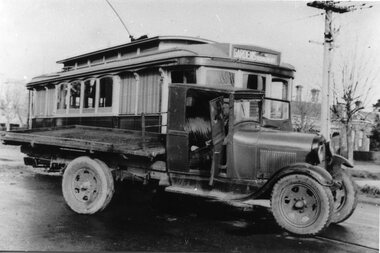
Slide - 27 mm sq slide/s - set of 22 - moving 18 to Sebastopol, Lilian Butler, 30/09/1971
Yields information about the transfer of tram 18 to Victory Park Sebastopol.Set of 22 Agfa blue and white plastic mount slides of tram 18 being moved to Victory Park for the Borough of Sebastopol - 30/9/1971. See Reg Item 2909 for the actual Newspaper cutting and 3778 for a photograph of the move. See Reg Item 3929 for list of dates of tram disposal, though this item gives the date as 2/10/71 .1 - No. 18 parked on the depot fan, with E. Davis alongside. .2 - group of 6 men standing alongside 18 - left to right - N. Lorensini, ? W. Trusler, S. Lakey, B.Peart and E. Davis .3 - tram being driven into Wendouree Parade. .4 - ditto .5 - turning from Macarthur St into Drummond St south with a SEC bucket truck following. .6 - ditto - with the Lisette Beauty Salon on the corner. .7 - Drummond St North .8 - Coupling a SEC tractor to the tram with the Ballarat Base Hospital in the background. .9 - Ditto with S. Lakey cleaning out the points. .10 - being towed across Sturt St .11 - being towed along Drummond St South .12 - workmen at Victory Park preparing the section of track. .13 - ditto .14 - being derailed near Vickers St with an Alsco Linen Service van in the background - note the overhead appears to have been removed. .15 - towing the tram across Albert St. .16 - towing the tram along Victory St, .17 - ditto .18 - moving steel channel along the street, with a tram sitting on one already. .19 - moving the tram .20 - ditto .21 - turning the track to align up with the storage track. .22 - Group of 7 men (see slide 2 for some of the names) and three children with the tram in position. Photo from the collection of Lilian Butler. See also Reg Item 6857 for a digital image. ballarat, tramways, trams, sec, depot, tram disposal, sebastopol, victory park, albert st, moving trams, drummond st, macarthur st, tram 18 -
 Ballarat Tramway Museum
Slide - 35mm slide/s - set of 13, John Theodore, Sept. / Oct. 1974
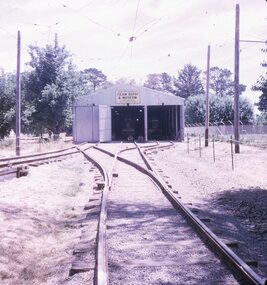
Yields information about depot activities of the BTPS in commissioning No. 40 on the access track Sept. / Oct 1974.Set of 13 AGFA blue and white plastic mount 35mm slides of the first day that 40 operated on the access track - late September early October 1974. Fares Please! for Sept. 1974 says that the first tram under power was 27 on 19/9/1974. Slides in order number noted on the slide. .1 - 40 on the access track. .2 - crossing the level crossing towards the depot .3 - on the access track .4 - ditto .5 - celebrations - Richard Gilbert, Rolf Jinks, Graeme Jordan, Lindsay Bounds .6 - celebrations .7 at the depot .8 - celebrations - with Peter Rees as well. .9 - On the depot fan .10 - crossing the level crossing .11 - at the depot .12 - on the access track - note the white stop block behind the tram. .13 - at the depot.Various notations by John as to the slide number and the trams in pencil and ink.tramways, trams, btps, commissioning, depot, tram 40 -
 Ballarat Tramway Museum
Photograph - Digital image Set of 3, John Theodore, 19/9/1974 or shortly thereafter
Yields information about the use of tram 27 on the access track following the connection of power at the depot.Set of 3 digital images scanned from 35mm slides of the installation of the initial testing and driving of tram 27 on the access track - from Fares Please would be 19/9/1974 or shortly there after. .1 - 27 at the end of the access track - not the white stop block behind the tram. .2 - 27 crossing the level crossing with three people in the cab - Clyde Croft on the left. .3 - 27 and 14 at the depot - may not be initial date.trams, tramways, btps, trackwork, depot, tramcars, commissioning -
 Ballarat Tramway Museum
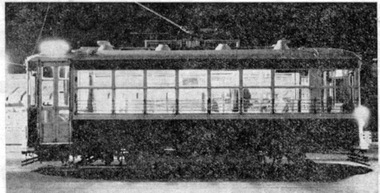
Certificate - Framed Certificate - set of 3, State Electricity Commission of Victoria (SECV), "Award of Honour - Industrial Safety", 1962 to 1964
The State Electricity Commission of Victoria 1921 to 1993 was responsible for electricity generation in Victoria and the operation of three Provincial Tramways. It had a strong safety focus for the time. These certificates show the safety focus and the reporting of safety performance to employees and visitors.Demonstrates the safety record of the SEC Ballarat depot, has a strong association with the workers and Yields information about their performance and dates.Set of three Timber framed certificates, glass front, black painted side timber with brown paper or card or Masonite backing and masking tape around the edges, titled "Award of Honour - Industrial Safety", that the Tram Depot Ballarat had established a meritorious record for safe work with no lost time. Gives the period and the date of the away. Signed by the Manager - A. W. Linaker? or F. White and the Chairman of the Safety Committee "Wm K. Trusler". Screw holes in the top and the bottom of the frame centrally. .1 - dated 12-1-1962 for 1 year and 103 days. .2 -dated 19-6-1963 for 1 year and 155 days. .3 - dated 19-6-1964 - for 1 year.trams, tramways, depot, sec, safety, personnel -
 Ballarat Tramway Museum
Photograph - Black & White Photograph/s set of 2, Charles Craig, c1955
... tram 19 tram 9 scrubber tram 4 tram 16 tram 19 tram 38 Set ...Set of two photographs of trams at the SEC Geelong Depot, mid 1950's. .1 - 19, scrubber and 9 with the depot buildings in the view - two copies of the print - slightly differently framed. .2 - bogie ( fitted with zebra stripes and dash canopy lights), 4, 16, 19, 38 (left to right) Destination Eaglehawk notes that No. 4 was the only single trucker fitted with zebra stripes and dash canopy lighting - see pages 42 and 44 during 1955 trams, tramways, geelong, depot, tram 19, tram 9, scrubber, tram 4, tram 16, tram 19, tram 38 -
 Ballarat Tramway Museum
Photograph - Digital image Set of 28, Mal Rowe, 21/09/2019 12:00:00 AM
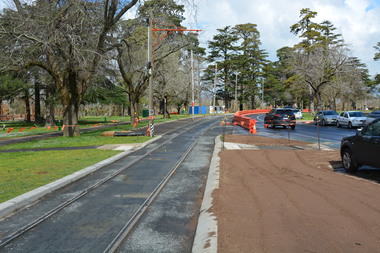
Set of 28 digital images of the 2019 Tramcar Showcase by Mal Rowe on 21/9/2019. .1 - View looking south from depot junction showing the track replacement pending the final asphalt layer. .2 - looking north towards depot junction .3 - 27 crossing Wendouree Parade .4 - 14 crossing with John Phillips ex MMTB Mk III Bus in the background. .5 - 13on the access track. .6 - 8 on the depot fan .7 - Cavalcade line up lead by 26 .8 - ditto .9 - group photo being arranged .10 - Cavalcade line up lead by 26 .11 - ditto .12 - 28 returning to the depot. .13 - ditto .14 - 27 returning to the depot on the access track. .15 - 18 ditto .16 - 18 ditto .17 - 13 ditto .18 - 13 ditto .19 - 18 ditto .20 - 40 running in with Mk III bus in the background .21 - 40 on the access track .22 - ditto .23 - 38 on the access track .24 - close up of the 22E truck .25 - depot fan in general. .26 - 14 on the access track .27 - 38 on the access track .28 - 38 dittotrams, tramways, btm, tramcar showcase, events, cavalcade, wendouree parade, trackwork, buses, 22e trucks, depot, tram 13, tram 38, tram 26, tram 14, tram 8, tram 27, tram 14, tram 28, tram 18, tram 27, tram 38, tram 40, tram 671 -
 Ballarat Tramway Museum
Newspaper, The Courier Ballarat, "Tram Museum's big plans", Dec. 2019
Set of 7 items related to the proposed extension of the BTM's depot to the south, Dec. 2019. Comprises: .1 - Newspaper clipping from The Courier, 19/12/2019 titled "Tram Museum's big plans", advising that the proposal was being advertised by Heritage Victoria, along with a photo of No. 26. .2 - Newspaper clipping from The Courier, 18/12/2019 for the advertising the permit application under the Heritage Act 2017 - in the Public Notice section. .3 - Digital image of "Museum Extension - Heritage Impact Statement - revised Oct. 2019." - 16 A4 pages. .4 - Digital image of Plans - 8 sheets of the proposal by MKM constructions. .5 - Digital image of Report - Urber Arbor - Arboricultural Report - Tree Management Plan. .6 - Digital image of Coloured site plan and drawings showing proposal depot trackwork and support mechanism around trees. Note this does not open on dbTextWorks interface. .7 - Digital image of 11 sheets of concept plans for the exterior and interior of the museum proposal by MKM Constructions. .8 - digital image of the advertising sign on the rear wall of the depot taken 7-1-2019. A similar poster was on the south east corner of the depot.btm, museum, drawings, depot extensions, heritage buildings, heritage, trackwork -
 Ballarat Tramway Museum
Photograph - digital Images, Peter Waugh, "The Floral Tram reinvented 2019", 2018 to 2019
Set of seven digital images prepared as part of the nomination of the "The Floral Tram reinvented 2019" by the BTM to the Museums Australia award - sadly we did not receive one. .1 - One of the workshops - 10-6-2018 .2 - attaching the flowers to the tram - Ken - 1-1-2019 .3 - Some of the crew on the tram - 20/2/19 .4 - Official Photograph - at the depot - 9-3-2019 .5 - In Wendouree Parade on a photo run - 24-2-2019 .6 - Official launch day - 20-02-2019 .7 - A study of the materials and the finished product - 24-4-2018 See Reg Item 7513 for the story and associated documents.trams, tramways, floral tram, flowers, btm, community, museums australia -
 Ballarat Tramway Museum
Ephemera - Timetable/s, Melbourne and Metropolitan Tramways Board (MMTB), Set of 24 MMTB Melbourne tram timetables, 1969
Set of 24 MMTB timetables for various routes, dated July 1969. Generally includes Sat and Suns, Good Friday and Christmas day as well as weekdays, unless noted otherwise. Also includes a map of the route, detailed time points, sections, connecting services, fares, and organisation address - 616 Little Collins St. Melbourne. Have been folded into ten portions. All on white paper unless noted otherwise. Items shown with an # - have a sticker modifying timetable information details on the front page. 1154.1 - Route 4 - Carnegie - City .2 - Route 4D - East Malvern (Darling Road) - City # .3 - Route 5 - Malvern Burk Road, - City # .4 - Route 6 - Glen Iris - City # .5 - Route 7 - Camberwell - City # .6 - Route 8 - Toorak - City # .7 - Routes 9, 10 and 12 - South Melbourne and St Kilda Beach - City (Brunswick St.) - via Collins St. .8 - Routes 10, 11 - West Preston and routes 9 & 9A Northcote .9 - Routes 15 & 22 - Moreland and 1 & 21 - East Coburg .10 - Route - 15 & 16 - St Kilda Beach and 1 & 2A - South Melbourne Beach - via Swanston St. .11 - Route 19 - North Coburg - City # .12 - Route 42 - Mont Albert - City # .13 - Routes 48 - North Balwyn and Burwood - City .14 - as above, but for Saturdays and Sundays on pink paper .15 - Routes 55 & 56, West Coburg - City - (William St.) - Domain Road. .16 - Route 57 - West Maribyrnong - City .17 - Route 59 - Essendon (Aerodrome) - City .18 - Route 64 & 65 - East Brighton - City .19 - Route 69 - Kew Cotham Road - St. Kilda Beach # .20 - Route 70 - Wattle Park - City # .21 - Routes 77 - Prahran - City, 78 - North Richmond - Prahran, 79 - North Richmond - St Kilda Beach .22 - Route 82 - Footscray to Moonee Ponds .23 - Route 88 - East Preston - City and Route 96, East Brunswick - City .24 - as above but for Saturdays and Sundays on pink paper. Images of a sample of documents added 16-11-2013.mmtb, timetables, melbourne -
 Ballarat Tramway Museum
Slide - 35mm slide/s - set of 11, Noel Simons, 23/10/1965 12:00:00 AM
Set of 11 Kodachrome transparencies taken on 23/10/1965 in Melbourne. 1178.1 - W7 1020 (on route 9A, Northcote via St Georges Road) with a W2 536 (Deepdene) behind at the corner of Victoria Parade and Brunswick St. East Melbourne or Fitzroy. Has Eastern Hill fire station and ICI building in background. 1020 has front dash panel ads for Queens Bridge Motors and Bridgestone tyres. 1178.2 - W5 759 (route 19, North Coburg) and W5 807 in Elizabeth St. Melbourne at the intersection of Bourke St. with the State Savings Bank building in the background. 759 has side ads, one of which is for CASTROL. 1178.3 -SW6 903 crossing Brunswick St. in Victoria Parade, Fitzroy bound for Deepdene, route 45. Photo taken after tram has passed photographer. 1178.4 - W7 1019 (route 96, East Brunswick Blyth St.) and W7 1010 (route 88 East Preston) in Nicholson St at intersection with Victoria Parade. A Herald newspaper truck is alongside 1019. 1178.5 - W7 1040 (route 96, East Brunswick Blyth St.) in Nicholson St at intersection with Albert St. Has Princess Theatre in the background. (High res scan added 26/10/2008 - copy to FOHTD) .1178.6 - W6 974 (route 89 East Preston Bell St.) in Bourke St. about to turn into Spring St. Has buildings on the south side of Bourke St in background, including Southern Cross Hotel. Note trees in tubs and red phone box by Windsor Hotel. 1178.7 - as for same location as 1178.6 - SW6 967 (route 96) and W6 971 (inbound - route 90 - City Spencer St.) 967 has Lucas ad on front dash. 1178.8 - W7 1013 (route 88 East Preston) photographed from W6 991 in Bourke St at corner of Russell St. Has Normans corner store, Treadways and Foys in background. 1178.9 - W2 553 (route 1 East Coburg) at the corner of Elizabeth St and Bourke St. Has the Leviathan, Roger David and Ezywalkin shops in the background. 1178.10 - W6 991 (route 88) and W7 (route 96) in Bourke St. at corner with Elizabeth St. Photo taken from the GPO steps. 991 has ads for BIC pens and CASTROL. In background are the State Savings Bank, Halls Books and McEwans shops. 1178.11 - Line up of north bound trams (3 +) lead by W2 449and southbound in Elizabeth St at corner of Collins St. Has Flinders St. station building in the background. Hi -res image of .10 added 22-12-2018All have date stamp of "23 Oct 1965" in purple ink. All black ink unless otherwise noted. 1178.1 - "W7 1020 turning into Brunswick St. from Victoria parade, East Melbourne (followed by W2 536) 1178.2 - "W5 799 and 807 in Elizabeth St. Melbourne at cnr. of Bourke St." 1178.3 - "SW6 903 entering reserved track in Victoria Parade, East Melbourne" 1178.4 - "W7 1019 and 1010 in Nicholson St. East Melbourne at Victoria Pde intersection" 1178.5 - "W7 1040 Melbourne's last tram (to date) in Nicholson St. at Albert St. intersection." 1178.6 - "W6 974 in Bourke St. Melbourne, about to turn into Spring St." 1178.7 - "W6 971 entering Bourke St. from Spring St. Melbourne, passes SW6 967 outward bound for East Brunswick" 1178.8 - "W7 1013 (seen from W6 991) in Bourke St. Melbourne crossing Russell St." 1178. 9 -"W2 553 in Elizabeth St. Melbourne at cnr of Bourke St." 1178.10 - "W6 991 and W7 1005 in Bourke St. Melbourne at cnr of Elizabeth St." 1178.11 - "W2 449 leads a line of Peak hour cars along Elizabeth St. Melbourne (at Collins St. corner)"tramways, trams, melbourne, victoria parade, nicholson st., brunswick st., bourke st, elizabeth st, tram 1020, tram 536, tram 799, tram 807, tram 903, tram 1019, tram 1010, tram 1040, tram 974, tram 967, tram 971, tram 1013, tram 553, tram 991, tram 1005, tram 449 -
 Ballarat Tramway Museum
Slide - 35mm slide/s - set of 5, Noel Simons, 19/11/1962 12:00:00 AM
Set of 5 transparencies taken on 19/11/1962 on Kodak mounts. 1186.1 - Bendigo 21 bound for Golden Square at Charing Cross with The Beehive buildings and shops in Pall Mall in the background. Trams has an ad for Cohns drinks on front bumper, SEC Best for Cooking roof ad. and Mamouney's furniture roof ad. Two women passengers boarding. 1186.2 - Bendigo 26 crossing Pall Mall from Mitchell St. bound for Eaglehawk with "Ezywalkin" shop in background. Tram has an SEC 'Electric Cooking' roof ad and a 'Streets Ice cream' ad on front dash. 1186.3 - Bendigo 7 arriving at the Charing Cross stop, bound for North Bendigo. Has a Huttons dash panel ad, a Castrol roof ad. Buildings as for 1186.1. Passengers waiting at the stop. 1186.4 - Bendigo 19 leaving Charing Cross for Golden Square with City Club Hotel alongside and other buildings as for 1186.1 in the background. Tram has Briquettes ad on front dash and SEC 'Electric Cooking' roof ad. 1186.5 - Bendigo 21in High St. at corner of Short St. heading for Charing Cross. Destination half way between Depot and Railway Station. Tram has ads for Cohns Drinks on dash panel, SEC 'Cook with Electricity' and a Sandhurst Milk roof ads.Information written on in black ink and date stamped in purple ink. 1186.1 - "No. 21 in Pall Mall at Charing Cross, Bendigo" 1186.2 - "No. 26 arriving at Alexandra Fountain, Charing Cross, Bendigo" 1186.3 - "No. 7 in Pall Mall at Charing Cross, Bendigo" 1186.4 - "No. 19 in High St., Bendigo, leaving Charing Cross for Golden Square" 1186.5 - "No. 21 in High St. Bendigo, at corner of Short St." tramways, trams, bendigo, charing cross, pall mall, high st., tram 7, tram 19, tram 21, tram 26 -
 Ballarat Tramway Museum
Slide - 35mm slide/s - set of 17, Noel Simons, 20/11/1962 12:00:00 AM
Set of 17 transparencies taken on 20/11/1962 on Kodak mounts. 1187.1 - Bendigo No. 2 at the Quarry Hill terminus, showing destination of Quarry Hill. Has Cohns Drinks and Streets Ice Cream ads on dash panel, a SEC 'electric cooking' roof ad and another roof ad. Shows the Y terminus at this location, but tram standing just before it. Overhead in position. 1187.2 - as above, but closer up. 1187.3 - as above, but from the north side, showing cemetery in the background. 1187.4 - Bendigo No.3 at Eaglehawk terminus. Tram showing destination of Quarry Hill. Has the various buildings at Eaglehawk in the background including the Foodland store. Has Streets Ice cream and White Horse Whiskey ads on the dash panel. 1187.5 - Bendigo No. 18 at Garden Gully crossing loop, in bound, with destination of Eaglehawk. Passengers waiting for an Eaglehawk tram at the stop. Has a white horse whiskey ad on dash panel and SEC roof ads. Conductor standing in doorway looking out. 1187.6 - Bendigo No. 7 inbound in Nolan St. at cnr of McCrae St. showing destination of Golden Square. Has Streets Ice cream ad on dash panel and a Castrol Roof ad. 1187.7 - Bendigo No. 19 at the North Bendigo terminus with railway level crossing in background. Tram has a Cohns Drinks ad and an SEC 'Electric Cooking' roof ad. 1187.8 - Bendigo No. 2 at the Quarry Hill terminus, looking back into Bendigo, showing destination of Eaglehawk. 1187.9 - Bendigo No. 21 in McCrae St, near Nolan St outbound for North Bendigo. Photo taken after tram has passed photographer. 1187.10 - Bendigo Nos. 4 and 26 at Charing Cross in View St. with fountain alongside and the Beehive, Ezywalkin Buildings in the background. No. 26 has a Sandhurst Milk and SEC 'Electric Cooking' roof ad. 1187.11 - close up of 22E maximum traction truck and folded footstep. 1187.12 - Bendigo No. 19 at Charing Cross terminus, after tram has passed photographer, showing destination of North Bendigo, with the Beehive building in the background and passengers boarding tram. 1187.13 - Bendigo No. 11, turning from View St. into Pall Mall, showing Special with the conductor holding point bar. Has the Beehive and Ezywalkin Buildings in the background. 1187.14 - No. 7 at Charing Cross terminus, in Pall Mall, bound for Golden Square. Has the Beehive and Ezywalkin buildings in the background and passengers waiting at the tram stop. 1187.15 - No. 18 at the Charing Cross terminus, bound for Eaglehawk. Has the Beehive and Ezywalkin buildings in the background and passengers waiting at the tram stop. Also has the 'Safety Zone' sign in the photograph. 1187.16 - No. 2 at Quarry Hill terminus, night or dusk photo. Tram showing destination of Depot. 1187.17 - No. 26 at Charing Cross, night photo. Tram has destination of Quarry Hill, but is on the line for Eaglehawk. Photo looks along Mitchell St. Also shows Safety Zone sign. Information written on in black ink and date stamped on purple ink. 1187.1 - "No. 2 at Quarry Hill terminus Bendigo" 1187.2 - "No. 2 at Quarry Hill terminus Bendigo" 1187.3 - "No. 2 at Quarry Hill terminus Bendigo" 1187.4 - "No. 3 at Eaglehawk terminus" 1187.5 - "No. 18 in Mt Korong Road, Long Gully at cnr of Havilah Road (Eaglehawk Route)" 1187.6 - "No. 7 in Nolan St. Bendigo, at Cnr of McCrae St., near lake Weeroona, (North Bendigo Route)' 1187.7 - "No. 19 at North Bendigo terminus" 1187.8 - "No. 2 at Quarry Hill terminus" 1187.9 - "No. 21 in McCrae St. Bendigo, near Nolan St. (North Bendigo Route) 1187.10 - "4 and 26 at Alexandra Fountain, Charing Cross Bendigo" 1187.11 - "Truck of Bogie Car, Bendigo Tramways" 1187.12 - "No. 19 in Pall Mall at Charing Cross, Bendigo" 1187.13 - "Birney car No. 11 entering Pall Mall from View St. at Charing Cross Bendigo" 1187.14 - "No. 7 in Pall Mall at Charing Cross, Bendigo" 1187.15 - "No. 18 at Alexandra Fountain, Charing Cross, Bendigo" 1187.16 - "No. 2 at Quarry Hill terminus, Bendigo" 1187.17 - "No. 26 at Alexandra Fountain, Charing Cross, Bendigo" tramways, trams, bendigo, quarry hill, eaglehawk, north bendigo, maximum traction, night photo, tram 2, tram 3, tram 4, tram 7, tram 11, tram 18, tram 19, tram 21, tram 26 -
 Ballarat Tramway Museum
Slide - 35mm slide/s - set of 3, Noel Simons, 22/11/1962 12:00:00 AM
Set of 3 transparencies taken on 22/11/1962 on Kodak mounts. 1190.1 - No. 7 (bound for North Bendigo) at the Charing Cross stop with No. 19 just left for Quarry Hill. Has the buildings on the south side of High St. in the background, including RACV building. No. 7 has front dash panel ad for Streets ice cream, and roof ads for Ilford Film and an SEC "Cook with Electricity". Passengers are boarding the tram. 1190.2 - Bendigo No. 2 at Charing Cross with fountain in the background and other buildings on the south side of High St. Tram has two SEC roof ads - good side on view - "Electric Cooking - Matchless" and "Switch to Electric Cooking". 1190.3 - Nos. 19, 2 and 7 at Charing cross with a Austin ? motor car. Has buildings on the south side of High St. in the background, along with SEC and Ilford film roof ads.Information written on in black ink and date stamped on purple ink. 1190.1 - "Nos. 19 and 7 at Alexandra Fountain, Charing Cross, Bendigo" 1190.2 - "No. 2 at Alexandra Fountain, Charing Cross, Bendigo" 1190.3 - "Nos. 19, 2 and 7 at Alexandra Fountain, Charing Cross, Bendigo" tramways, trams, bendigo, charing cross, alexandra fountain, tram 2, tram 7, tram 19 -
 Ballarat Tramway Museum
Slide - 35mm slide/s - set of 24, Noel Simons, 20/05/1971 12:00:00 AM
Set of 24 transparencies taken on 20/5/1971 on Kodak mounts. 1195.1 - Bendigo 19 arriving at Charing Cross en route to North Bendigo with Fountain Plaza and the City Family Hotel in the background. No. 19 has two roof ads for the SEC. -'Electricity better for cooking' and 'Everything's under control in my all electric kitchen' 1195.2 - as above, but standing at the Charing cross stop, with the Beehive Stores and other buildings along the east side of Pall Mall in the background. 1195.3 - No 21 ex Golden Square crossing View St. trackwork in front of No. 25 waiting to depart for Quarry Hill. No.21 has two roof ads (as for No.19 in 1195.1) and No.25 has one SEC roof ad and another. Ezywalkin sign in the background, and Fountain Plaza. 1195.4 - as for 1195.3, but after 21 has arrived and 25 left for Quarry Hill. Has Ezywalkin store and the Beehive store in the background. 1195.5 - No. 5 at the Eaglehawk terminus. Photo taken with a cannon in foreground looking along High St. Eaglehawk. Has shops on the west side of High St. in the background. 1195.6 - No. 5 at the Eaglehawk terminus, close up of the rear of the tram - note tow bar arrangement. Has destination of Quarry Hill. 1195.7-Nos.25 and 5 crossing at the Thorpe St. Loop, California Gully. No. 25 bound for Eaglehawk (has SEC Briquette and electric cooking roof ads) and 5 en route for Quarry Hill with a SEC and Cinzano roof ad. 1195.8 - as for 1195.7, but after trams have passed each other. Has Borough Auto Service building in the background. 1195.9 - No. 5 in Mt Korong Road, towards Bamard Street, photo taken after tram has passed photographer. 1195.10 - No. 30 at the Golden Square terminus with the Milk Bar on the right hand side of the photograph. 1195.11 - No. 30 inbound at Fire Station Loop, High St. Golden Square. Has old fire station in the background. Passengers are boarding the tramcar. 1195.12 - No. 30 in High St, bound for North Bendigo between Vine and Wattle Streets. 1195.13 - No. 5 bound for Eaglehawk waits at Iron Bark Gully Loop, at Hayes St. 1195.14 - No. 5 and No. 2 crossing at Iron Bark Gully Loop. 1195.15 - No. 5 bound for Eaglehawk leaving the Manchester Loop, Long gully. 1195.16 - No. 5 passing William Street, Long Gully en route to Eaglehawk. 1195.17 - No. 5 just before the California Gully Crossing Loop. 1195.18 - Nos. 5 and 26 crossing at California Gully crossing Loop. No. 5 heading to Eaglehawk, 26, Quarry Hill. 1195.19 - No. 5 in High St. Eaglehawk with Bob Moyle's Victoria Hotel and the TAB in the background. 1195.20 - No. 5 in High St. Eaglehawk approaching the terminus. Photo taken after the tram has passed the photographer. Has Foodland store and J. Best Fruit supply in the background, along with Eaglehawk Town Hall. 1195.21 - No. 5 at the Eaglehawk terminus, photo taken along seldom used track along High St. 1195.22 - as for 1195.22 - but at the very end of the track. 1195.23 - No. 5 en route for Quarry Hill climbs High St. Eaglehawk with the Victoria Hotel and Eaglehawk Town Hall in the background. 1195.24 - No. 5 and 25 crossing at Jobs Gully Loop. Note 25 has a black on white destination roll, while No. 5 has a white on black destination roll. Information written on in black ink and date stamped on purple ink. 1195.1 - "No. 19 arrives at Charing Cross Bendigo from Golden Square" 1195.2 - "No. 19 about to leave Charing Cross for North Bendigo" 1195.3 - "No. 25 awaiting departure for Quarry Hill, watches No. 21 arrive at Charring Cross from Golden Square" 1195.4 - "No. 21 on North Bendigo service and No. 25 on Quarry Hill run await departure at Charing Cross" 1195.5 - "No. 5 at Eaglehawk terminus" 1195.6 - "No. 5 at Eaglehawk terminus" 1195.7 - "Nos. 5 and 25 crossing at Thorpe St. Loop, California". 1195.8 - "Nos. 25 and 5 crossing Thorpe St. Loop, California Gully". 1195.9 - "No. 5 descending Mt Korong Rd. towards Bamard St." 1195.10 - "Birney car No. 30 at Golden Square terminus" 1195.11 - "Birney car No. 30 in High Street near Thistle Street (Fire Station Loop)" 1195.12 - "No. 30 in High St. between vine and Wattle Streets" 1195.13 - "No. 25 at Hayes Street Loop Iron Bark". 1195.14 - "Nos. 2 and 5 crossing at Hayes Street Loop Iron Bark" 1195.15 - "No. 5 at Manchester Loop opposite Havilah Road, Long Gully" 1195.16 - "No. 5 passing William Street, Long Gully". 1195.17 - "No. 5 at California Gully" 1195,18 - "Nos. 26 and 5 at Thorpe St. Loop, California Gully". 1195.19 - "No. 5 in High St. Eaglehawk". 1195.20 - "No. 5 approaching Eaglehawk terminus" 1195.21 - "No. 5 at Eaglehawk terminus" 1195.22 - "No. 5 at Eaglehawk terminus" 1195.23 - "No. 5 in High St. Eaglehawk" tramways, trams, bendigo, charing cross, eaglehawk, california gully, golden square, iron bark gully, jobs gully, tram 2, tram 5, tram 19, tram 21, tram 25, tram 26, tram 30 -
 Ballarat Tramway Museum
Slide - 35mm slide/s - set of 4, Noel Simons, Apr. 1972
Set of 4 transparencies - copy slides - possibly ARE film strip dated March 1972. 1209.2 and 1209.4 on Kodak Readymount mounts. 1209.1 - Bendigo 5, 6 and 28 on a special tram service in bound to the City on a tour in Caledonia St. about to enter Lucan St, or White Hills Road or Weeroona Ave. (mis match in names in various maps). Gas works in the background. No. 5 has a white disk on the rear of the tram. 1209.2 - Nos 2 and 26 at Charing Cross with the Fountain Plaza in the background. Both trams have the destination of Quarry Hill, though 26 is on the Eaglehawk bound track. 1209.3 - No. 19 at the Golden Square terminus, with the conductor or driver swinging the pole and Billy Rodda's Golden Square hotel in the background. 1209.4 - No. 7 at Fire Station loop, en route to North Bendigo, picking up a passenger with a pram. Part of a set of 20 slides made by the Association of Railway Enthusiast Provincial Tramways film strip. Reference Item 2560 details the ARE Film Strip and provide references to other slides.Information written on in blue ink and date stamped on purple ink. 1209.1 - "Nos 5, 6 and 28 in Caledonia St. about to enter Weeroona Ave." 1209.2 - "Nos 2 and 26 at Charing Cross." 1209.3 - "Swinging the pole on No. 19 at Golden Square Terminus." 1209.4 - "No. 7 inward bound from Golden Square stops at Fire Station Loop."tramways, trams, bendigo, charing cross, golden square, gas works, special trams, tram 2, tram 5, tram 6, tram 7, tram 19, tram 28 -
 Ballarat Tramway Museum
Slide - 35mm slide/s set of 7, Noel Simons, 1972
Set of 7 transparencies undated on PAKON mounts - appear to be early 1970's. 1212.1 - No. 18 about to enter the Long Gully loop with ESSO service station on the right hand side. 1212.2 - No. 6 in Mitchell Street bound for Charing Cross. Tram has destination of "Rly Station". Has buildings on the east side of Mitchell St. in the background. 1212.3 - No. 7 (North Bendigo) and 29 (Golden Square) crossing. Actual location? 1212.4 - "No 6 showing 'SPECIAL' at Eaglehawk terminus. Has the Foodland store and Fruit shop in the background. 1212.5 - No. 19 at Eaglehawk terminus, on the extension to the normal Eaglehawk terminus. Tram has showing 'Eaglehawk'. Tram has two SEC roof ads. 1212.6 - No. 25 and another Bogie car at Quarry Hill terminus on last day. 1212.7 - No. 18 and 29 at Quarry Hill terminus. No.. 18 showing 'Quarry Hill' - has two SEC roof ads 'Electric Cooking - Matchless' and 'Everything's fine in my all electric kitchen' and No. 29 has a briquettes roof ad.Information typed onto a white label stuck on the slide. 1212.1 - "No. 18 at Long Gully" 1212.2 - "No. 6 in Mitchell Street." 1212.3 - "7 and 29 Lake View Hotel" 1212.4 - "No. 6 at Eaglehawk" 1212.5 - "No. 19 at Eaglehawk Term." 1212.6 - "Last cars Quarry Hill." 1212.7 - "18 & 29 Quarry Hill"tramways, trams, bendigo, long gully, mitchell st., eaglehawk, quarry hill, last tram, tram 6, tram 7, tram 18, tram 19, tram 25, tram 29 -
 Ballarat Tramway Museum
Photograph - Bromide of a b/w photograph - set of 2, John Phillips, 19/09/1992 12:00:00 AM
Yields information about the BTPS 21st Anniversary celebrations which involved running a "all day" service and a cavalcade of trams.Bromide of a black and white photograph of the trams 38 and 18 outside the Lake Lodge Restaurant, on the night of the dinner for the 21st celebrations of the closure of the Ballarat tramways on 19/9/1992. Photo appeared in the Sept. 1992 issue of Fares Please! Caption was "Trams Nos. 38 and 18 are spot lit outside Lake Lodge Restaurant." Photo John Phillips. 1740.1 - Colour print, trimmed for the bromide - added 11/6/2008. See September 1992 Fares Please!trams, tramways, btps, 21st anniversary, wendouree parade, gardens loop, dinner, tram 38, tram 18 -
 Ballarat Tramway Museum
Photograph - Colour Photograph/s - set of 25, Austin Brehaut, 7/04/2000 12:00:00 AM
Yields information about various locations in Ballarat in March 2000 for comparison with previous photographs.Set of 25 colour photographs taken by Austin Brehaut on 7 April 2000 showing various locations that Ballarat trams once ran in, for use in a BTM presentation, named "Ballarat Past and Present" at the COTMA 2000 Ballarat Conference. All on Fujicolour Crystal Archive Paper. On rear in blue ink is the date, location and where relevant a reference number to photo locations that the author of the presentation had requested. Letter from Austin, filed with the worksheet for Reg. Item 1772. 1773.1 - Base Hospital, Cnr Drummond St. North and Mair St. .2 - Hospital Corner - Base Hospital Along Drummond St. North .3 - St John of God Hospital, cnr Mair and Drummond St. Nth. .4 - Hospital Corner, looking South East from Base Hospital .5 - Gardens at Loop (Wendouree Parade) .6 - Gardens Loop and Shelter .7 - Shelter at Gardens Loop .8 - Bridge Mall looking west .9 - Lower Victoria St. along Bridge St .10 - Railway crossing, Ballarat Station, with gates open .11 - Victoria St. hill facing west .12 - Railway crossing, Lydiard St. North .13 - Railway crossing, Ballarat Station, with gates closed .14 - Lydiard St. North terminus from cemetery .15 - Lydiard St. North at Macarthur St. .16 - Lydiard St. North at Sturt St facing South East - Post Office on left .17 - Looking north along Lydiard St at Sturt St .18 - Sturt and Lydiard Sts corner from Post Office .19 - Centre plantation Sturt St. looking east .20 - Sturt St. West near Ballarat and Clarendon College .21 - Sturt St. West facing west at Russell St. .22 - Victoria St. terminus .23 - Victoria St. terminus .24 - St Alipius Church, Victoria St. .25 - Junction of tramline and Phoenix foundry railway in Sturt St. at Armstrong St. (transferred from roadway) See Reg item 4645 and 4646 for the 2010 comparisons.See Aboveballarat, hospital corner, gardens loop, railway crossing, lydiard st. north, sturt st, phoenix foundry, armstrong st., victoria st., sturt st. west -
 Ballarat Tramway Museum
Photograph - Black & White Photograph/s - set of 3, Harvey Studios, 19/09/1971 12:00:00 AM
Yields information about the closure of the SEC operated Ballarat tram system and the people involved.Set of three black and white photographs of tram 40 entering the depot area on the night of the closure of the Ballarat Tramway system - 19/9/1971. Taken by N. L. Harvey & Son. 1864i1 - Front of 40 with Lew Walker at controls and two others (? and ?) alongside. 1864i2 - 40 about to break streamers at the depot gate with families of employees alongside. 1864i3 - After entering the depot area and breaking the streamers. For other photographs of the event see Reg Item 6425 and 6426.trams, tramways, ballarat, closure, depot, last tram, tram 40 -
 Ballarat Tramway Museum
Photograph - Black & White Photograph/s - set of 2, State Electricity Commission of Victoria (SECV), 1930's
1019.1 and 1019.2 - Black and white photograph of SEC Tram 14 involved with a collision with a Ford truck during 1939 on the corner of Drummond St. North and Webster St. Ford truck registration 277.745 . Both vehicles have windows smashed and other damage. Tram painted in 1930's colour scheme with a small "Pay as You Enter" sign adjacent to the open door. Known to be SEC photos originally. See SEC Photo collection item. Was reprinted in the Ballarat News during the early to mid 1980's. Other photos of this accident gave close up details of lining used in the tram paint scheme. This was used as the basis of lining done on No. 27. The tramcar body card shows it was repaired following an accident June 1939. (Note added 2-2-19). Photocopy made 4/1999 for display purposes. See Reg Item 1365.1 > .5 for the larger prints of this photograph. See also Reg Item 3904 for a mounted set of these photographs along with that of Reg Item. 580, 1366 and 1365. The vehicle is a 1928 Model A Ford type AA. See also Reg Item 6210 for a BTM printed postcard.On rear stamped on both photos "Copyright / The Ballarat News"trams, tramways, drummond st. nth, accidents, webster st, tram 14 -
 Ballarat Tramway Museum
Newspaper, Herald & Weekly Times Ltd, "A Place in the Sun", "Save the Trams", 1971
Set of two Newspaper clippings pasted onto a single sheet of paper with two Punch holes on the left hand side. Clipping from The Courier, Ballarat, 19/8/1971; two letters to the Editor, about the closure of the Ballarat tramways, that some of the trams and line should be saved and what the aims of the BTPS are. The first from a person titled "All Het Up", and the second from John Anderson of P.O. Box 145 Box Hill. The second clipping from The Sun, Melbourne dated 14/7/1971 written by Keith Dunstan in his column, "A Place in the Sun" about the forthcoming closure of the Ballarat and Bendigo systems. Has a photo of a Bendigo Birney tram and notes their rarity. The second part is about the formation of the BTPS, which has 100 paid up members and quotes Shane McCarthy, a committeeman. Both cuttings in two portions.In red ink in lower edge of first cutting "19/8/71". On sheet of paper, various pencil / ink markings - with date Dec. 1963. Possibly paper used by Donor at his job with the former machinery makers, Ronaldson and Tippet.trams, tramways, closure, btps, birney, preservation -
 Ballarat Tramway Museum
Photograph - Black & White Photograph/s - set of 2, 1905
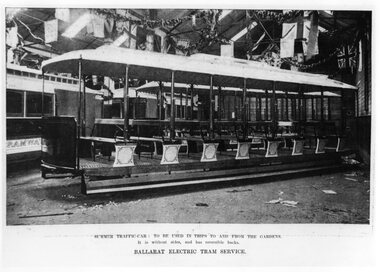
Black & White Photograph of one of the ESCo Toastracks being assembled in the Exhibition Buildings in Grenville St., north of the Alfred Hall in 1905. The other open Toastrack or Summer tramcar is behind this tram, with other California Combination cars on the sides. The trams have yet to be fitted with wheels or equipment, including headlights. Note the front dash panel has been painted, but no headlight opening or cut out. The print for this photograph made from a copy negative of page 454 of the Australasian, August 19, 1905 in 1993. Print includes caption (all in caps) "Summer Traffic Car: to be used in trips to and from the Gardens. It is without sides, and has reversible backs. Ballarat Electric Tram Service". See Reg. Item No. 763. Copy 1 made for No. 12 display 3/99. 754.1 - added 6/12/2004. Same print with details of source written on the rear. ARHS Vic. Div. Photo Number 771/24, ex Latrobe Library. Not as good as print as above. See Alan Bradley, draft Chapter 3, of the history of Ballarat Tramways.trams, tramways, esco, tramcar construction, exhibition buildings, ballarat, toastrack tram , tram 19 or 20