Showing 441 items matching "sec buildings"
-
 Ballarat Tramway Museum
Photograph - Black & White Photograph/s, Wal Jack, 11/01/1945 12:00:00 AM
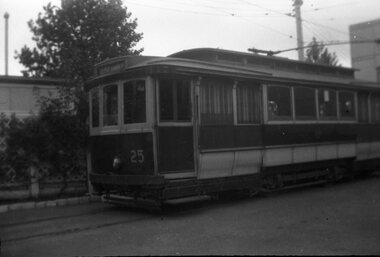
Yields information about the appearance of SEC single truck trams during 1945 and a photograph of a tramcar that later ran in Bendigo. Has a strong association with Wal Jack.Black and white photograph of No. 25, at the depot, taken on 11/1/1945. Photo by Wal Jack - details on rear in his hand writing. Has part of depot building in background. Original negative scanned at hi res and image updated 1/6/2020.On rear in blue ink "No 25, Depot Ballarat / Jan 11th, 1945" and in brackets "ex MMTB".tramways, trams, depot, secv, tram 25 -
 Ballarat Tramway Museum
Photograph - Black & White Photograph/s and Digital Image, Wal Jack, No. 23 painted as the Gold Tram in 1951, at the corner of Sturt and Lydiard St, 1951
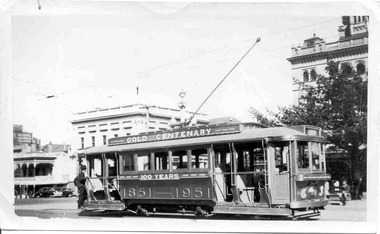
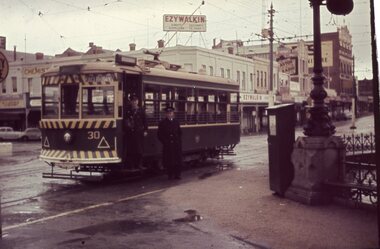
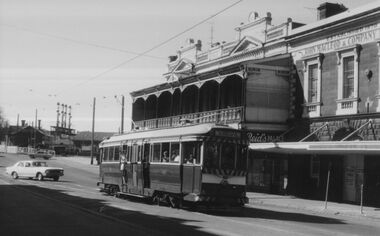
Yields information about Ballarat 's No. 23 operating as the Gold Tram in 1951 and the dates of operation.Black and white photograph of No. 23 painted as the Gold Tram in 1951, at the corner of Sturt and Lydiard St, looking south east, with a driver boarding the tram. Has the Commonwealth Bank building in the background. Wal Jack photograph, 25-3-1951. Photo used on page 9 of Destination Eaglehawk. See Reg Item 3583 for a copy negative of this photograph. 4185.1 - digital image of the same photograph from the Wal Jack Album - see image i3 and i4 for the rear of the photo. Image i5 scanned from original 125 size negative - added 11/7/2020On rear in ink "SEC Ballarat 9263# No. 23 (ex Adelaide "A" 69) painted golden bronze in connection with the Gold Centenary 1851 - 1951. Car ran from 16/3/1951 to Easter Monday 26-3-1951. Snapped in Sturt St (tram centre), Easter Monday 25-3-51 Wal Jack Photo T1/PC." In bottom left hand corner - stamped "Traction Publications, PO Box 438 Canberra (City) ACT" .1 - on rear in ink "SEC Ballarat No. 23 painted gold for Gold Centenary 1951. Ran from 16/3/1951 to Easter Monday 26-3-1951. Snapped in Sturt St (tram centre), Easter Sunday 25-3-51 Wal Jack Photo T1/PC."tramways, trams, sturt st, gold tram, gold, centenary of gold, decorated trams, tram 23 -
 Ballarat Tramway Museum
Photograph - B&W print of donated negative, John Webster, 21/08/1955 12:00:00 AM
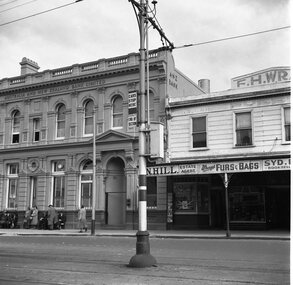
Yields information about the appearance of the appearance of the SEC tram stop equipment at the corner of Ryrie and Moorabool StreetsBlack and white digital print from scan of a donated negative showing the signage at the tram stop in Ryrie St at the corner of Ryrie and Moorabool Streets Geelong. Shows the End of Section, pole banding, Cars Stop Here Sign and a section isolator switch box. Has the Australian and New Zealand Bank Limited, L. N. Hill Estate Agent, Wrays Furs and Bags and F.H.Wray Building in the background. Alongside the ANZ bank building is a number of potential passengers, ladies and gents in overcoats. Assumed photo taken on the same day as the others - 21-8-1955. Black and White prints made from scan of negative. Original Negative stored with Negatives. Negative scanned at hi res 4/6/2020 and image updated.On left hand side of the negatives in ink is "DB12"tramways, trams, geelong, tram stops, moorabool st, ryrie st -
 Ballarat Tramway Museum
Photograph - Black & White Photograph/s, Ron Hann, Jan. 1963
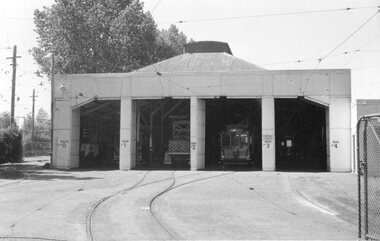
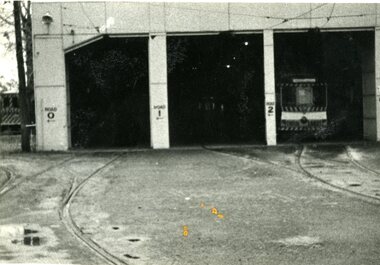
... in the depot building. tramways trams Depot SEC Depot tram 32 On rear ...Yields information about the exterior view of the depot, with the overhead tower truck in the depot building.Black and white print on heavy matt photographic paper of an exterior view of the SEC Depot, Wendouree Parade Ballarat, c1963, with No. 32 at the front of No. 3 road and the SEC tower truck on No. 2 road. Shows the general layout of the depot. Source of photo - same as Reg item 3841 - Ron Hann, note added 2/2010.On rear in pencil "Depot 1963"tramways, trams, depot, sec depot, tram 32 -
 Ballarat Tramway Museum
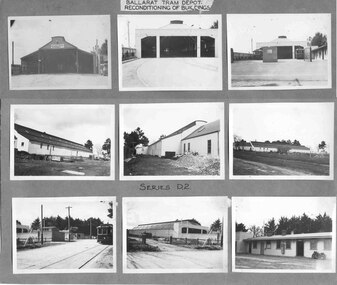
Photograph - Black and White photograph/s - mounted, State Electricity Commission of Victoria (SECV), c1936
Demonstrates an aspect and yields information about the reconstruction of the depot during the reconstruction by the SEC of the Ballarat Tramway system.Set of nine black and white prints of the reconditioning of the tramway depot building during 1936 mounted onto a grey light cardboard sheet. Each photo about 65 x 90. Marked as "Series D2" in ink and a label - in on white paper - "Ballarat Tram Depot / Reconditioning of Buildings" at the top of the sheet. Produced by the SEC c1936. See Reg Items 1349 and 1350 for larger prints of these photographs for six of these photographs. The top row of photographs show the depot prior and post to refurbishment and show a view taken from the south side of Wendouree Parade. These three photographs have been scanned at a higher resolution - see 3902i2 - i4. 3902i2 - shows remnants of the triangle connection at the depot? and that the western track may not have been electrified or laid. 390i4 - has trams 30 and 31 out the front of the depot. See In pencil above the photograph of the depot prior to refurbishment - "1934?" trams, tramways, depot, reconstruction, wendouree parade, trackwork, tram 30, tram 31 -
 Ballarat Tramway Museum
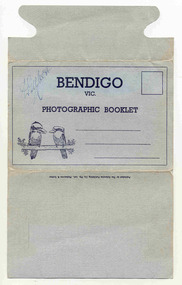
Postcard - Folder set, Valentine & Sons Publishing Co, "Bendigo Photographic Booklet", 1940's
Set of 9 black and white views of Bendigo printed on a folded strip, glued within a light grey colour light weight cardboard folder, titled "Bendigo Photographic Booklet". Booklet printed with an address area with title and kookaburras. Produced by The Valentine Publishing Co. Pty Ltd Melbourne & Sydney The rear has a slit on the rear cover that allowed the folder to be secured. Pictures are: 1. Mitchell St 2. The Lookout Tower 3. Conservatory Gardens 4. Shamrock Hotel 5. The Lake, Upper Reserve 6. The Pall Mall 7. Civic Buildings 8. Soldiers Memorial Hall and Post Office 9. Alexandria Fountain, Bendigo with a single trucker, M class type tram, prior to alterations, but in SEC colour scheme of the mid 1930's Made during 1940, with photographs of the 1930's as well given motor cars in the photo. Has "D. Gilbert" in ink on cover.trams, tramways, bendigo, pall mall, charing cross, mitchell st -
 Ballarat Tramway Museum
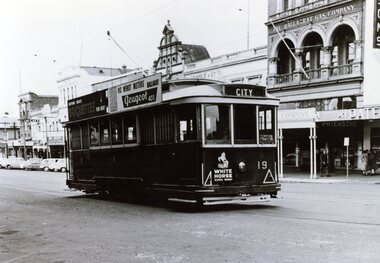
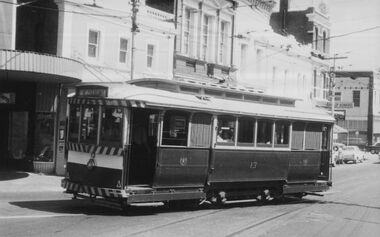
Photograph - Black & White Photograph/s, Ballarat 19 Sturt St, late 1950's or early 1960
Black and White photograph, of Ballarat No. 19, late 1950's or early 1960 in the City Loop in Sturt St. Has the Ballaarat Gas Co building in the background along with other buildings on the south side of Sturt St. Tram has roof advertisements for Vic Wendt Motors, Peugeot 403, Briquettes SEC and a advertisement for Whitehorse Whisky on the front dash panel. Printed on Fuji-colour paper. 2nd copy added 6/1/15."TMSV Sales" stamp on rear.tramways, trams, sturt st, city loop, tram 19 -
 Ballarat Tramway Museum
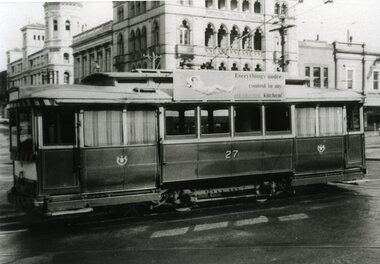
Photograph - Black & White Photograph/s, John Murray, Jun. 1969
Black and white photograph of Ballarat 27 departing the City Terminus, corner of Sturt and Lydiard Sts. Tram has the a SEC, a SEC roof advertisement. Craigs Hotel and National Mutual building buildings in the background. Photo by John Murray, c1969.On rear, written in black ink "SECV Ballarat No. 27 / c1969 / 18/23"tramways, trams, city terminus, sturt st, tram 27 -
 Ballarat Tramway Museum
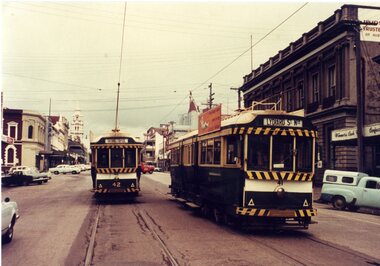
Postcard, Ron Scholten, SEC Ballarat No. 41 and 42 Mair St
Colour photograph, printed on a postcard back format of SEC Ballarat No. 41 and 42 just to the north of Mair St on the double line portion of Lydiard St. Nth. No. 42 has destination of Sebastopol, No. 41, Lydiard St Nth and a SEC 'Everything is under control etc." roof advertisement. Buildings on both side of Lydiard St Nth in view, Union Fidelity Trustee Company and the Wimmera Cash Confectionery Supply shop.trams, tramways, lydiard st nth, mair st, tram 41 -
 Ballarat Tramway Museum
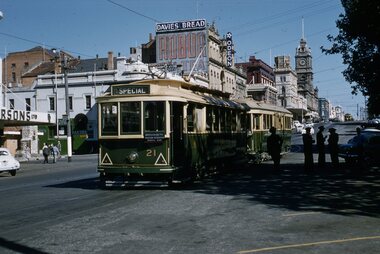
Postcard, Ron Scholten, SEC Ballarat of No. 40 at the city terminus
Colour photograph, printed on a postcard back format of SEC Ballarat of No. 40 at the city terminus, with the destination of Gardens via Sturt St West. Behind the tram is another bogie tram and a single trucker turning from Lydiard St North into Sturt St. Commonwealth Bank building is in the background.trams, tramways, sturt st, lydiard st, tram 34 -
 Ballarat Tramway Museum
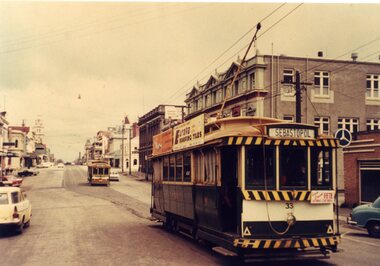
Postcard, Ron Scholten, SEC Ballarat of No. 33
Colour photograph, printed on a postcard back format of SEC Ballarat of No. 33 about to enter the double track section of Lydiard St Nth with another single trucker waiting. No. 33 has the destination of Sebastopol, a front auxiliary board advertising at Fete, Eureka Roofing tiles and a SEC 'Everything is under control in my all electric kitchen' roof advertisement. In the back ground is the Union Fidelity Trustee Co. building and the Mercedes dealership.trams, tramways, lydiard st nth, tram 11, tram 26 -
 Ballarat Tramway Museum
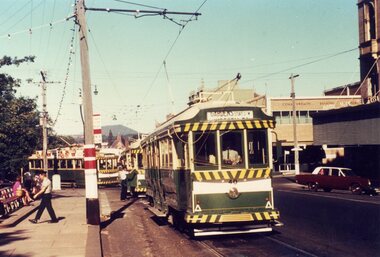
Slide - 35mm slide/s, Ben Parle, 5/04/1958 12:00:00 AM
Kodachrome Transparency - 35mm slide - cardboard mount, with one side with red border and words "Kodachrome Transparency / Processed by Kodak" top and bottom. Photo taken by Ben Parle 5/4/1958. Has slide No. "13" stamped in red in top corner. Photo of the No. 21 and 41in the Sturt St. City Loop, with a number of SEC crewmen standing in the shadows, while on the AETA tour. No. 21 has destination of Special. Both trams are carrying the AETA special car auxiliary signs. Trams have been reversed in the loop, and possibly to run "bang road" to Bridge St. Has the Odeon theatre in the background, advertisements for Robur Tea, Davies Bread. Note the Pie / Pasties sign on the building behind 21. For high resolution scan see btm2847h.tif"City Loop" "-5-4-58"tramways, trams, sturt st, city loop, tram 21, tram 41 -
 Ballarat Tramway Museum
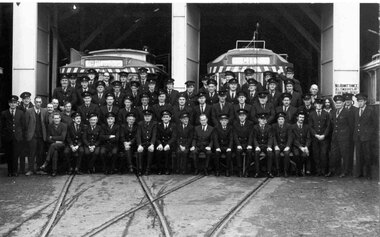
Photograph - Black & White Photograph/s - set of 2, Williams Studios and Ballarat, 1971
Black and white photograph, mounted onto heavy stippled card of the SEC Ballarat tram crews shortly before the closure of the tramway system in front of the depot building with three tramcars behind. Has a printed list of all employees or staff underneath. Titled "Ballarat Tramways Employees 1971". Photograph on light stipple paper. Features 61 personnel but only 60 apparently named. Photograph by Williams Studios, Ballarat. 2931.1 - Photograph 2931.2 - backing sheet Note this item has become separated from its backing sheet and has been maintained as such to enable scanning etc. in detail. See also Reg. Item 1862 and 1861 for another photograph/list of the same group showing trams on the sides and the whole depot front. Reg. Item 1861, another copy of the same photograph, but with some looking at different direction in particular the 7th person from left, row three who is looking down in the photograph of Reg. Item 1861 but looking up in Reg. Item 2931. 2931.2 - has name "R. Hall" ink in top left hand corner.tramways, trams, ballarat, sec crews, personnel, staff photo -
 Ballarat Tramway Museum
Photograph - Black & White Photograph/s, c1971
Set of eight black and white photographs taken towards the end of the SEC operations, by an unknown photographer possibly an SEC crew member. .1 - Western part of front of depot with scrubber on 0 road and single trucker on 3 road. .2 - Eastern part of front of depot with single trucker on 3 road. .3 - 26 at Lydiard St. North terminus with cemetery building in background. Tram has the destination of Sebastopol. .4 - ditto .5 - 43 at Sebastopol terminus. Tram has the destination of Lydiard St. North .6 - ditto .7 - Saloon door with glass engraved "Prahran & Malvern Trust" .8 - Rear portion of bogie tram at Sturt and Lydiard St. with another arriving in the distance.On rear of all pics in pencil "32"tramways, trams, depot, lydiard st north, sebastopol, tramcars, tram 43, tram 26 -
 Ballarat Tramway Museum
Document - Photocopy, M. Sayers, "The Development of Ballarat's Electricity Supply", 2000?
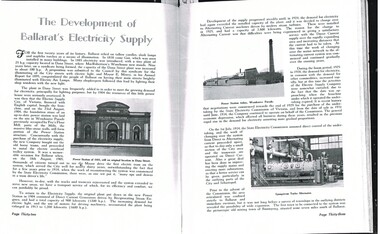
Photocopy of an article in the State Electricity Commission of Victoria Magazine, Contact, Vol 3, No. 2, Aug 1938 titled "The Development of Ballarat's Electricity Supply". Two A3 sheets. The item with six photographs details the history of the development of Ballarat's Power Supply. Details development of the initial power supply in Dana St, the take over by ESCo, DC power initially, expansion, introduction of AC in 1925 to Ballarat, the takeover by the SEC in 1934, changeover from DC to AC, expansion to outlying areas, Buninyong, Creswick etc. Gives description of installed plan, boilers, storerooms and the stores systems. Has photos of the Dana St. building, Ballarat A power station, Ljungstrom Turbo Alternator and three of the stores area. Record revised 3/4/2019 to add digital images with those from Andrew Cook CD. Each item had a thin strip of paper attached by staple to the top left hand corner, giving the Vol. No. details.On rear of 2nd A3 sheet in blue ink details of contact with the BTM by M. Sayers prior to sending the material.trams, tramways, sec, power supply, power station, ballarat a power station, esco -
 Ballarat Tramway Museum
Slide - 35mm slide/s, Bob Wilson, May. 1972
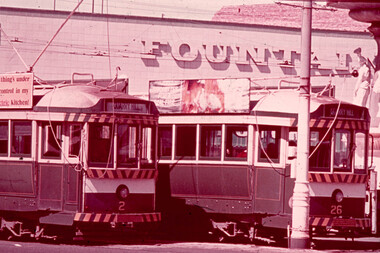
White cardboard mount, 35mm slide, from the Association of Railway Enthusiast's film strip titled "Provincial Tramway Film Strip" of Bendigo bogie tramcars Nos. 2 and 26 at Charing Cross, with the Fountain Plaza building in the background. Both trams have the destination of "Quarry Hill" No. 26 has the older type of destination roll and is fitted with a SEC Briquettes roof advertisement. The film strip notes (Reg. Item 2560), provided the following caption details: "The hub of the Bendigo system was at Charing Cross, where the "Quarry HILL" - "EAGLEHAWK "and "'GOLDEN SQUARE" - "NORTH BENDIGO" routes crossed at right angles. It was customary for trams for all four routes to meet at the CROSS. Here cars 2 & 26 (showing a wrong dest- -ination) meet by the fountain. -Mar '72 (Bob Wilson)" See image btm2580p.tif for high level scan of image. Stamped on base of slide "11789" and written in ink on top edge "No. 2 & 26 Charing Cross Bendigo"tramways, trams, are, film strip, charing cross, bendigo, tram 2, tram 26 -
 Ballarat Tramway Museum
Slide - 35mm slide/s, Travis Jeffrey, c1962
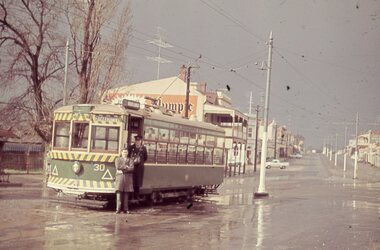
Agfa plastic mount (blue base, white cover) with a photo of Bendigo No. 30 at Charing Cross, in View St., c1962. Photo follows on from Reg Item No. 2612. Photo taken during a rainy day. Tram has destination of Eaglehawk. Note SEC crewman and Inspector standing by door. Has the Ezywalkin building in the background and a billboard advertisement for Astor Radio."BES 2" in penciltramways, trams, bendigo, charing cross, eaglehawk, tram 30 -
 Ballarat Tramway Museum
Slide - 35mm slide/s, Travis Jeffrey, c1962
Agfa plastic mount (blue base, white cover) with a photo of Bendigo No. 30 at Eaglehawk terminus, High St. Eaglehawk, c1962. Photo follows on from Reg Item No. 2612. Photo taken during a rainy day. Tram has destination of Eaglehawk. Note SEC crewman and another person standing by door. Has Olympic Tyres ad on a building in the background."BES 3" in penciltramways, trams, bendigo, high st, eaglehawk, tram 30 -
 Ballarat Tramway Museum
Slide - 35mm slide/s, Travis Jeffrey, late 1960's or early 1970's
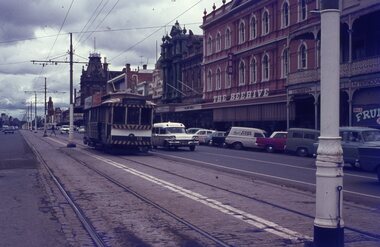
Agfa plastic mount (blue base, white cover) with a photo of Bendigo No. 19 in Pall Mall, nearing Charing Cross. Tram has the destination of Golden Square Photo taken late 1960's early 1970's. Photo has the Beehive, the Shamrock Hotel in the background. Radio station 3BO can be seen on the Beehive building. No. 19 has two SEC roof advertisements. Note the point bar on the pole on the right hand side of the photograph."BES 35" in penciltramways, trams, bendigo, pall mall, beehive building, tram 19 -
 Ballarat Tramway Museum
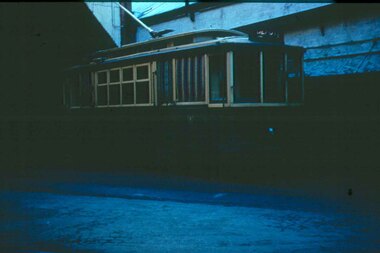
Slide - 35mm slide/s, c1955
Agfachrome Professional plastic mount (blue base, white cover) reproduction slide of a colour slide of a Geelong tram just outside the depot building structure - poor photograph. Tram in SEC livery, possibly photographed just before closure. tramways, trams, geelong, depot -
 Ballarat Tramway Museum
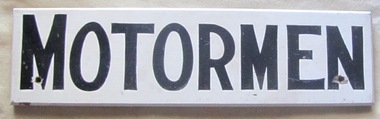
Sign, State Electricity Commission of Victoria (SECV), "Motormen"
Has a strong association with the SEC Wendouree Parade depot, indicating which parts of the building were the area for Motormen (crews).Wood sign, lettered, 'MOTORMEN", white background, black letters with countersunk mounting holes in edges off centre. Rear of sign timber and dark green - SEC green colour paint.trams, tramways, ballarat, secv, motormen, crews, depot -
 Ballarat Tramway Museum
Photograph - Digital image Set of 20, 1971-72
Set of 20 digital images of Bendigo Tramways, 1972 at or before closure while on a tram tour by Stuart Lodington. .1 - No. 29 at the North Bendigo terminus .2 - No. 29 just past the Bendigo end of the double track in High St Eaglehawk, with a BP dealer in the background. .3 - Night photo of No. 18 at a terminus, showing "Eaglehawk" .4 - ditto .5 - Night photo of No. 24 at Eaglehawk with Leo A Hughes Photographer in the background. The Tram has "Johnnie Walker whiskey" roof adverts. .6 - No. 29 outbound in Thunder St with a train passing over the bridge in the background. .7 - view from the front window of a tram on the Eaglehawk line with a large "display event float" in the foreground and tram approaching a crossing loop. .8 - No. 29 at North Bendigo .9 - view of High St Eaglehawk looking east from the terminus, showing the track and centre poles. .10 - No. 29 outbound on the North Bendigo line turning from either Nolan St or Caledonia St, running a special. .11 - No. 7 departing North Bendigo for Golden Square. .12 - No. 3 and 18 at Charing Cross. No. 3 has two SEC roof Advertisements .13 - No. 7 at North Bendigo with the trolley pole being reversed. .14 - No. 24 at Quarry Hill with Northern Terrazzo in the background with the driver alongside .15 - No. 7 and No.6 at Charing Cross with the Beehive buildings in the background. .16 - No. 7 at North Bendigo terminus .17 - ditto .18 - No. 24 at Quarry Hill with Northern Terrazzo in the background with the conductor alongside. .19 - ditto .20 - No. 26 and other bogie tram in View St near Charing Cross with the Armstrong Tyre Service building and signs for Cohn's Drinks and T&G in the view.trams, tramways, bendigo, eaglehawk, quarry hill, golden square, depot, north bendigo, charing cross, tram 29, tram 18, tram 24, tram 3, tram 7, tram 6, tram 26 -
 Ballarat Tramway Museum
Photograph - Digital image Set of 20, 16/04/1972 12:00:00 AM
Set of 20 digital images of Bendigo Tramways, of the last running day of the Eaglehawk to Quarry Hill line 16 April 1972, .1 - No. 24 outbound to Eaglehawk .2 - No. 3? at Manchester Loop .3 - No. 24 outbound to Eaglehawk .4 - bogie tram crossing the rail over bridge from Eaglehawk .5 - No. 18 in View St .6 - No. 24 outbound to Eaglehawk .7 - No 18 at Eaglehawk with destination roll being changed, and shopping centre in the background. .8 - No. 24 crossing the railway overbridge, going to Eaglehawk .9 - No. 3 outbound to Eaglehawk .10 - No. 24 crossing the railway overbridge, going to Eaglehawk .11 - No. 3 and 24 crossing at Long Gully .12 - No. 18 at Eaglehawk with Leo A Hughes photographer building in the background and a CFA truck passing the tram. Tram SEC roof advertisement and a banner for "German -?- Circus" at Eaglehawk and dates. .13 - No. 3 inbound on the Eaglehawk line. .14 - No. 18 outbound to Eaglehawk .15 - ditto .16 - No. 18 at Eaglehawk terminus with the Mechanics Institute in the background. .17 - No. 24 at the Eaglehawk terminus .18 - No 24 at the intersection with Taylor St .19 - No. 24 at the Eaglehawk terminus .20 - dittotrams, tramways, bendigo, eaglehawk, long gully, manchester loop, tram 24, tram 18, tram 3 -
 Ballarat Tramway Museum
Photograph - Digital image, 7/08/1971 12:00:00 AM
Yields information about the SEC Ballarat trams in the months before the closure of the SEC Tramway system. Yields information about the streetscape. Digital images, scanned from slides by Graeme Cleak, scanning by Peter Winspur 9/2011. Slide FR27 - No. 41, No. 11 and a another single trucker at the Tramway centre stop, Sturt and Lydiard Sts. No. 22 bound for Gardens via Drummond North and has a Twin Lakes sign on the front. In the background are the buildings of Sturt St on the south side. Taken 7-8-1971. trams, tramways, sturt st, lydiard st, tram 11 -
 Ballarat Tramway Museum
Photograph - Digital image Set of 8, 21/08/1971 12:00:00 AM
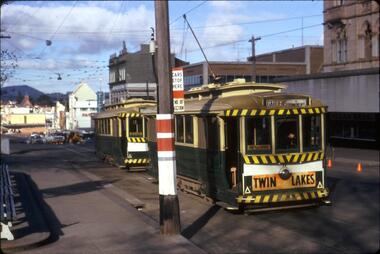
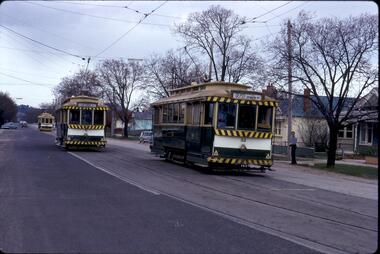
Yields information about the SEC Ballarat trams in the months before the closure of the SEC Tramway system. Yields information about the streetscape. Set of 8 Digital images, scanned from slides by Graeme Cleak, scanning by Peter Winspur 9/2011. .1 - Slide FS14 - No. 31 and 32 crossing at the High St Loop in Macarthur St. Tram 31 has the destination of Victoria St. Geoff Dean and his mini on the right hand side of the photograph. Another depot bound single trucker in the photograph, .2 - Slide FS3 - 31 outbound in Victoria St, with St Alipius church in the background. .3 - Slide FS5 - No. 31, and four other trams, some running special at Sturt and Lydiard Sts during the ARHS tour of that day. Has the ANZ Bank and SEC offices in the background. .4 - Slide FS9 - Nos. 39, 26 and two other trams in Lydiard St for the ARHS tour with Reid's Palace, Macleod & Co and J.J. Collier buildings in the background along with other buildings in Lydiard St North. Taken from the Provincial Hotel. .5 - Slide FS11 - No. 26 northbound showing Special running through the level crossing at Ballarat with the Kennedy Murray General Carrier in the background. Taken from the Provincial Hotel. .6 - Slide FS13 - No. 32 turning from Sturt St into Drummond Street North showing Depot via Drummond North, with the Southern Cross Hotel, Rimmington Bros and J.A, Malpass(?) buildings in the background. .7 - Slide FR35 - night shot of No. 17 (with Twin Lakes sign) and No. 32 in Nos 3 and 4 roads at the depot. .8 - Slide FR34 - night shot of the front of the depot - as above and No. 43 on "0" road. All photos 21-8-1971 trams, tramways, railway station, macarthur st, victoria st, sturt st, lydiard st north, level crossings, depot, tram 31, tram 32, tram 39, tram 26, tram 17, tram 43 -
 Ballarat Tramway Museum
Photograph - Digital image, c1971
Yields information about Ballarat streetscape and its trams in the closing days of the SEC tramway system.Digital image from a black and white print of tram 13, turning from Bridge St into Main Road outbound for Mt Pleasant with the various buildings on the southside in the background. Photo by Marc Dahlstrom c1971. On rear is the Marc Dahlstrom stamp.trams, tramways, bridge st, stones corner, tram 13 -
 Ballarat Tramway Museum
Photograph - Digital image, c1971
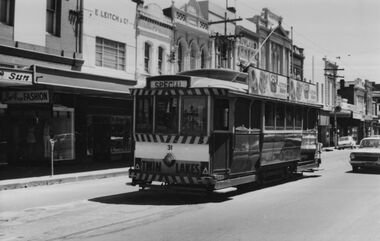
Yields information about Ballarat streetscape and its trams in the closing days of the SEC tramway system.Digital image from a black and white print of tram 40 southbound in Lydiard St North to Sebastopol with Reid's Palace and John Macleod and Company buildings in the background. Railway station signal gantry in the view. Photo by Marc Dahlstrom c1971.On rear is the Marc Dahlstrom stamp.trams, tramways, lydiard st nth, tram 40 -
 Ballarat Tramway Museum
Photograph - Digital image, c1971
Yields information about Ballarat streetscape and its trams in the closing days of the SEC tramway system.Digital image from a black and white print of tram 31 climbing the hill in Sturt St up to Lydiard St, shows the steepness of the hill. Tram has two Johnnie Walker whisky roof advertisements, a Twin Lakes sign and is showing Special. In the background are a Discount store, a Thrifty furniture van, Cooks Private Hotel, the Commonwealth Bank and the National Mutual Building. Photo by Marc Dahlstrom c1971.On rear is the Marc Dahlstrom stamp.trams, tramways, sturt st, lydiard st, tram 31 -
 Ballarat Tramway Museum
Photograph - Digital image, c1971
Yields information about Ballarat streetscape and its trams in the closing days of the SEC tramway system.Digital image from a black and white print of tram 31 in Bridge St, showing special. Tram has two Johnnie Walker whiskey roof advertisements and a Twin Lakes sign. In the background is a Fashion shop, E. Leitch & Co and Toyland buildings and others. Possibly outbound near Peel St. Photo by Marc Dahlstrom c1971.On rear is the Marc Dahlstrom stamp.trams, tramways, bridge st, tram 31 -
 Ballarat Tramway Museum
Photograph - Digital image, c1971
Yields information about Ballarat streetscape and its trams in the closing days of the SEC tramway system.Digital image from a black and white print of tram 11 outbound in Lydiard St North, crossing the railway level crossing. Has the Reid's Palace building and the railway station and signal gantry in the background. The tram has a "Bliss Bombs" (Make Bliss not Love) roof advertisement and a Twin Lakes sign. Photo by Marc Dahlstrom c1971. On rear is the Marc Dahlstrom stamp.trams, tramways, lydiard st, railway station, level crossings, tram 11