Showing 480 items
matching silver medal
-
 Wodonga & District Historical Society Inc
Photograph - Playing Fireman, c1900
... to medicine. He had previously received the Silver Jubilee Medal from... to medicine. He had previously received the Silver Jubilee Medal from ...This photograph was taken about 1900. Herbert Schlink, on the right of the image was born on 28 March 1883 in Wodonga, Victoria to German migrants Albert Joseph Schlink and Franziska Trudewind. He initially enrolled in Faculty of Arts at the University of Sydney, but after one year he transferred to medicine and graduated in 1907. This marked the beginning of a brilliant career. He was appointed as honorary gynaecological surgeon at Royal Prince Alfred, Sydney NSW from 1922. As a director of the hospital board from 1926, Schlink as chairman (1934-62) supervised the opening of Gloucester House, King George V Memorial Hospital for Mothers and Babies, Queen Mary Nurses' Home, the neurosurgical and psychiatric blocks, the (Sir Earle) Page Chest Pavilion and the hospital chapel. As a gynaecologist, Herbert pioneered the use of cobalt ray therapy in treating pelvic cancer and instigated the systematic follow-up of cancer patients. In 1954, Herbert was created Knight Bachelor for his public services and his service to medicine. He had previously received the Silver Jubilee Medal from his Majesty King George V, and the Coronation Medals of 1937 and 1953. Outside of his medical career, Dr Schlink was an enthusiastic skier. In 1926 he made the first winter crossing from Kiandra to Kosciusko. He was a foundation member of the Kosciusko Alpine Club and was directly responsible for the building of the first chalet at Charlotte Pass. Schlink Pass near Guthega in the Snowy Mountains is also named in his honour. Charlie Ryan is the boy on the left. He was to later become the editor of the Wodonga and Towong Sentinel after the death of his father in 1912.This image is of significant as it depicts a group of local boys including a preeminent medical professional who was born in Wodonga and a newspaper editor.A framed photo of a group of boys playing with a fire cart in Wodonga.Below photograph: "PLAYING FIREMEN / Young Charlie Ryan, left, with the boys of the village./ Herbert Schlink, probably the boy on the right, was to/ become Sir Herbert Schlink, on of the nations most/ distinguished men of medicine. Circa 1900. Photograph courtesy: Wodonga Historical Society"wodonga fire fighters, sir herbert schlink, charles henry ryan -
 Bendigo Historical Society Inc.
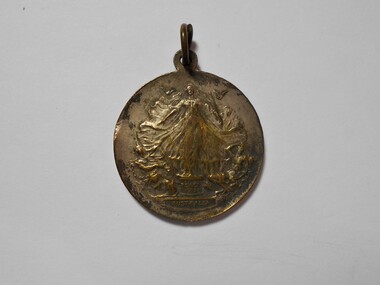
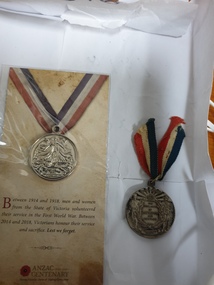
Medal - MEDAL COLLECTION: PEACE MEDAL 1919, 1919
... Object. Silver coloured metal medal with suspension piece... NUMISMATICS Medals - civil Peace Medal 1919 Object. Silver coloured ...Object. Silver coloured metal medal with suspension piece at crest with suspension ring.Obverse: The figure of Peace on a pedestal with two flying doves. Inscribed ''PEACE 1919 AUSTRALIA''. A figure in chains on the left and another entangled in bushes. Reverse: An Australian Soldier and Sailor support a wreath. Above the wreath is the word ''VICTORY''. Within the wreath is ''THE TRIUMPH OF LIBERTY AND JUSTICE''. Below the wreath on a plaque, ''THE PEACE OF 1919''. These Peace medals were issued to every child in Australia aged 0-14 years (and up to 16 years if their parents were in the Armed Forces. 1.670.000 medals were made. They were issued with a red, white and blue ribbon and a pin. Victorian children received their medals on 18/19 July 1919.numismatics, medals - civil, peace medal 1919 -
 Bendigo Historical Society Inc.
Medal - MEDAL COLLECTION: PEACE MEDAL 1919, 1919
... Object. Silver coloured metal medal with suspension piece... NUMISMATICS Medals - civil Peace Medal 1919 Object. Silver coloured ...Object. Silver coloured metal medal with suspension piece at crest with suspension ring.Obverse: The figure of Peace on a pedestal with two flying doves. Inscribed ''PEACE 1919 AUSTRALIA''. A figure in chains on the left and another entangled in bushes. Reverse: An Australian Soldier and Sailor support a wreath. Above the wreath is the word ''VICTORY''. Within the wreath is ''THE TRIUMPH OF LIBERTY AND JUSTICE''. Below the wreath on a plaque, ''THE PEACE OF 1919''. These Peace medals were issued to every child in Australia aged 0-14 years (and up to 16 years if their parents were in the Armed Forces. 1.670.000 medals were made. They were issued with a red, white and blue ribbon and a pin. Victorian children received their medals on 18/19 July 1919.numismatics, medals - civil, peace medal 1919 -
 Flagstaff Hill Maritime Museum and Village
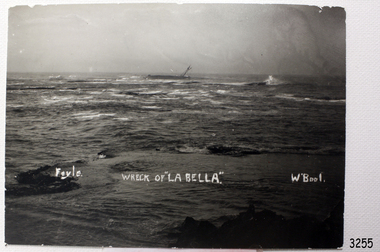
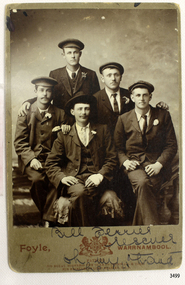
Photograph, Foyle Photographic Studio, Wreck of La Bella, about 11/11/1905
... was awarded the Silver Medal for bravery by the Royal Humane Society... rescue spread. He was awarded the Silver Medal for bravery ...The photograph shows the wreck of La Bella in Lady Bay, Warrnambool, Australia. It was probably taken on 11th November 1905, the morning after she was wrecked. “Foyle” written on the photograph is the name of Foyle’s Photographic studio. At the time of the photograph the studio was owned by both Charles and Lilian Foyle (sometimes known as Lillian or Lily), either of whom could have taken this photograph. They also worked together at a later date on the photographs, sketches and paintings of the famous and historical Pioneers’ Honour Board, which is currently on view in the Warrnambool Library. Foyles Photography was the studio of James Charles Foyle. He owned “Foyle’s Photo Card Studios” in Liebig St , Warrnambool, which operated between 1889 – 1919 . A letter to the editor (by Mr Edward Vidler) in the Melbourne Argus, 3rd August, 1907, mentions that in that year Warrnambool would celebrate its 60th anniversary of its proclamation as a town, and that talented local artist Miss Lily Foyle would paint 200 portraits in watercolour of the pioneers who settled in the district prior to 1860. The Pioneer Honour Board can still be seen on display in the Warrnambool Library. In the Warrnambool Standard, Dec. 1917, “Mr Foyle’s studio was awarded contract to decorate rail cars on newly opened Trans-Continental railway, assisted by his sister, Miss Findlay.” The subject of the painting, La Bella, has its own tragic story. Read on for further details … On November 10th, 1905, the Norwegian-built barquentine La Bella approached Warrnambool at the end of her 37 day voyage. She was carrying a cargo of timber from Lyttleton, New Zealand, in heavy seas and evening mist. (On its only other visit to Warrnambool a year earlier the master had gone to shore to find a tow. He returned to the ship to find the crew drunk and unwilling to take up their posts, even though the ship was dragging its anchors and in a dangerous position.) As Captain Mylius steered La Bella to Lady Bay Channel the ship was tossed onto its side by heavy breakers and ran aground on what is now known as La Bella Reef. The sea was so rough that it wrenched a one-and-a- half ton anchor from the vessel. Several attempts were made by parties of volunteers in lifeboats to rescue the stricken sailors, but the rough conditions made this difficult for the boats to get close enough to the ship and the parties had to return to shore. The La Bella’s crew became exhausted and sailors were being washed overboard, one by one. By sunrise only five of the twelve crew still clung to the wreck. A local fisherman, 25 year old William Ferrier, rowed his small dingy through the heavy seas and managed to rescue the captain, whilst the volunteer lifeboat crew rescued a further three sailors, returning to shore. Ferrier made a final attempt at rescue and was able to reach its stern as the conditions eased slightly, saving the last remaining, terrified sailor just before the ship broke up and sank. William Ferrier became a national hero as news of the daring rescue spread. He was awarded the Silver Medal for bravery by the Royal Humane Society and was honoured by the Prime Minister and the Governor. He was presented with several other awards for his daring rescue. Ferrier’s rescue efforts are one of the most heroic in Victoria’s shipwreck history. The wreck now lies in 13m of water and is home to an abundance of marine life. Flagstaff Hill’s La Bella Collection includes a rail holder from La Bella, a photograph of William Ferrier with four of the five men rescued, a rail holder from the ship and the letter from the Prime Minister and other Members of Parliament that was sent to William Ferrier to commend him for his bravery. La Bella has been protected under the Commonwealth Historic Shipwrecks Act (1976) as a Historic Shipwreck since 23 April 1982 (VHR S401). It is archaeologically significant as the remains of an international and inter-colonial passenger and cargo ship. Flagstaff Hill’s collection of artefacts from the La Bella is of historical and archaeological significance because of its association with the La Bella, which is on the Victorian Heritage Register, and because of the relationship between the objects. The collection represents aspects of Victorian history, and the letter to William Ferrier demonstrates how important his rescue efforts were to Victoria and Australia. Black and white photograph of the wreck of the sailing ship La Bella in the bay at Warrnambool. The photograph shows the ship lying on its side in rough sea, with mast and rope rigging hanging loosely. Several large rocks are also visible. The photograph is a rectangle shape, mounted on heavy card, with slightly ragged edges. The photographer’s name, a title for the photograph and the location are hand written in white along the bottom third of the photograph. The back of the photograph is blank. Printed in white hand writing “Foyle”, “WRECK OF “LA BELLA”, “W’Bool”foyle, la bella, william ferrier, lady bay, lifeboats, lilian foyle, lillian foyle, charles foyle, james foyle, royal humane society medal, flagstaff hill, warrnambool, shipwrecked coast, flagstaff hill, flagstaff hill maritime museum, maritime museum, shipwreck coast, flagstaff hill maritime village -
 4th/19th Prince of Wales's Light Horse Regiment Unit History Room
Medal, Australian Peace Medal 1919
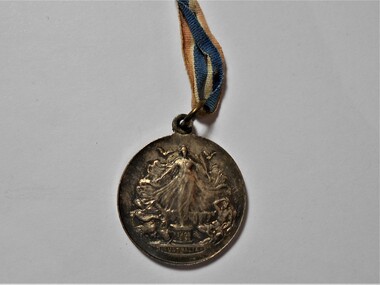
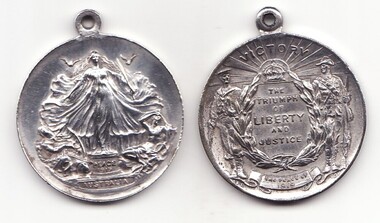
... (who later withdrew) and Platers. The medals were silvered... (who later withdrew) and Platers. The medals were silvered ...Awarded to: School Children of the Commonwealth of Australia Other Details: Of the commemorative medals issued to mark the end of the First World War, the most common was the so-called 'Peace' or 'Victory' medal issued to every child in Australia aged 0-14 years (and aged up to 16 if parents were in the armed forces). The medal was designed by Charles Douglas Richardson, better known for his work as a sculptor. Time constraints as well as pressure from the production of other victory medals meant that no single manufacturer could make the 1,670,000 medals. Six were therefore selected: Amor, Stokes, Schlank, Parkes, Angus & Coote (who later withdrew) and Platers. The medals were silvered bronze, with silver issues for special presentations. The Defence Department supplied a red, white and blue striped ribbon and pin. Distribution began in March 1919. Victorian school children received their medals on Friday 18 July and on 'Peace Day' on Saturday 19 July.White metal, circular. Peace with two flying doves on pedestal inscribed, PEACE / 1919 below AUSTRALIA; figure in chains on left and another entangled in bush to right (obverse) Australian sailor and soldier support wreath; above, VICTORY; within, THE / TRIUMPH / OF / LIBERTY / AND / JUSTICE; below on plaque, THE PEACE OF 1919(reverse)peace medal, world war 1 -
 Learmonth and District Historical Society Inc.
Peace 1919 Medal, Medal Peace 1919, 1919
... (who later withdrew) and Platers. The medals were silvered.... The medals were silvered bronze, with silver issues for special ...Awarded to: School Children of the Commonwealth of Australia Other Details: Of the commemorative medals issued to mark the end of the First World War, the most common was the so-called 'Peace' or 'Victory' medal issued to every child in Australia aged 0-14 years (and aged up to 16 if parents were in the armed forces). The medal was designed by Charles Douglas Richardson, better known for his work as a sculptor. Time constraints as well as pressure from the production of other victory medals meant that no single manufacturer could make the 1,670,000 medals. Six were therefore selected: Amor, Stokes, Schlank, Parkes, Angus & Coote (who later withdrew) and Platers. The medals were silvered bronze, with silver issues for special presentations. The Defence Department supplied a red, white and blue striped ribbon and pin. Distribution began in March 1919. Victorian school children received their medals on Friday 18 July and on 'Peace Day' on Saturday 19 July.To commemorate the end of World War 1.Round white metal medals issued to mark the end of WW1. On the front "PEACE 1919", and on the reverse, "VICTORY", middle of the medal "THE TRIUMPH OF LIBERTY AND JUSTICE". on the bottom "THE PEACE OF 1919". With a plain edge.Peace with two flying doves on pedestal inscribed, PEACE / 1919 below AUSTRALIA; figure in chains on left and another entangled in bush to right (obverse) Australian sailor and soldier support wreath; above, VICTORY; within, THE / TRIUMPH / OF / LIBERTY / AND / JUSTICE; below on plaque, THE PEACE OF 1919(reverse)world war 1, peace, victory medal australia -
 Clayton RSL Sub Branch
Medal, Peace Medal, 1919
... (who later withdrew) and Platers. The medals were silvered... (who later withdrew) and Platers. The medals were silvered ...Awarded to: School Children of the Commonwealth of Australia Other Details: Of the commemorative medals issued to mark the end of the First World War, the most common was the so-called 'Peace' or 'Victory' medal issued to every child in Australia aged 0-14 years (and aged up to 16 if parents were in the armed forces). The medal was designed by Charles Douglas Richardson, better known for his work as a sculptor. Time constraints as well as pressure from the production of other victory medals meant that no single manufacturer could make the 1,670,000 medals. Six were therefore selected: Amor, Stokes, Schlank, Parkes, Angus & Coote (who later withdrew) and Platers. The medals were silvered bronze, with silver issues for special presentations. The Defence Department supplied a red, white and blue striped ribbon and pin. Distribution began in March 1919. Victorian school children received their medals on Friday 18 July and on 'Peace Day' on Saturday 19 July.To commemorate the end of World War 1Round white metal medals issued to mark the end of WW1. On the front "PEACE 1919", and on the reverse, "VICTORY", middle of the medal "THE TRIUMPH OF LIBERTY AND JUSTICE". on the bottom "THE PEACE OF 1919". With a plain edge.Peace with two flying doves on pedestal inscribed, PEACE / 1919 below AUSTRALIA; figure in chains on left and another entangled in bush to right (obverse) Australian sailor and soldier support wreath; above, VICTORY; within, THE / TRIUMPH / OF / LIBERTY / AND / JUSTICE; below on plaque, THE PEACE OF 1919(reverse) -
 Montmorency–Eltham RSL Sub Branch
Medal - Medal Group, British War & Victory
... British War Medal Silver disc with a straight clasp... ... Pte J. H. Dempster, 24 BN AIF British War Medal Silver disc ...Ancestor of Sub Branch memberPte. Dempster was an ancestor of a Montmorency/Eltham sub-branch member.British War Medal Silver disc with a straight clasp suspender without a swivel Ribbon (in clasp) - wide central watered stripe of orange, flanked by two narrow white stripes, which are in turn flanked by two black pin-stripes, further flanked by two outer stripes of blue Obverse ... bare headed effigy of King George V (by Sir Bertram Mackennal) facing left with the legend around circumference Reverse ... St. George on horseback trampling shield of eagle (symbol of "Central Powers"); above is rising sun of victory. Victory Medal Bronze disc with circular loop which is threaded with ribbon Ribbon - a ‘two rainbow’ design, with the violet from each rainbow on the outside edges moving through to a central red stripe where both rainbows meet Obverse ... image of "winged Victory" Reverse ... inscription surrounded by laurel reathBritish War Medal Obverse ... GEORGIVS V BRITT OMN : REX ET IND. IMP. (George V, King of all the British Isles and Emperor of India) Reverse ... 1914 1918 Rim ... Pte J. H. Dempster, 24 BN AIF Victory Medal Obverse ... no inscription Reverse ... THE GREAT WAR FOR CIVILIZATION 1914 - 1919 Rim ... Pte J. H. Dempster, 24 BN AIFwar service medals, ww1 -
 Eltham District Historical Society Inc
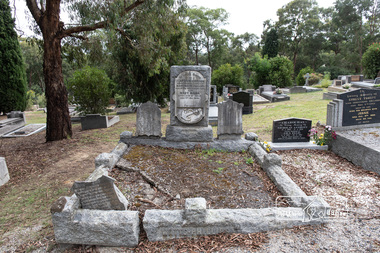
Photograph, Peter Pidgeon, Grave of (Captain) Gordon Watts-Phillips and Mary Hilda Watts-Phillips, Eltham Cemetery, Victoria, 5 April 2021
... , also a silver medal, for arresting two ruffians who had..., also a silver medal, for arresting two ruffians who had ...Charles Gordon Watts-Phillips was born in 1849 at Forest Hill, Surrey, England, the son of Dramatic Author, Watts Phillips, and Lily Mariner. He departed England for Australia around 1874. His sister Roland was a favourite Australian actress of the early 1900s. Gordon as he was known, whilst residing in Goolwa, South Australia and working as a clerk met and married a widow, Jane Luxon (nee Miller) on the 7th August, 1876 at the Wesleyan Church in Strathalbyn, South Australia. Jane, Gordon’s elder by some 11 years was born in Ireland in 1838, the daughter of Robert Joseph Miller, a carpenter and Jane Miller. She had previously married Captain William Luxon in 1861 at Encounter Bay, South Australia at age 22 and they had four children: William (1864), George Robert (1865), Miriam Louisa (1867) and Harriet Jane (1869), all born at Encounter Bay. Gordon and Jane had two further children together: Caroline Roland Watts-Phillips (1877 Islington S.A.) and Charles Gordon Watts-Phillips (1879 Yatala, S.A.). At some stage, Jane then deserted her husband. Gordon obtained a master's certificate and was a part owner of a small trader. He had also been captain of one of the passenger boats on the Darling River. He was reputedly a popular coastal skipper. By 1891 Gordon was the Captain of the S.S Omeo operating around Sale, Victoria. In August of that year some of the heaviest flooding of the Thomson River ever experienced in twenty years occurred over the 3rd and 4th of August. Gordon, and others, rescued the lives of many families over that period for which he was awarded a Bronze Medal by the Royal Humane Society. By 1892 the S.S. Omeo had passed to another Captain and Gordon subsequently retired from the sea and moved to Melbourne. Whilst residing in Coburg, Victoria, Gordon met Mary Hilda Harvey Huxley who was living in Brunswick. Mary was born in Horsham, the daughter of George Harry Huxley, a miner, and Emma Deane. Having not heard from Jane for some years and believing her dead, Gordon and Mary marry at Carlton on Christmas Eve, 1900. Interestingly, an announcement of the marriage was not placed in The Age newspaper until September 1903, nearly three years after the event by which time Gordon and Mary had a son, Victor Gordon Watts-Phillips, born 8 February 1903 in Carlton. Within months of the placement of this marriage announcement, his former wife, Jane, makes a reappearance but apparently does not interfere and Mary and Gordon continue to live together as husband and wife. Around the same time in late 1903, Gordon’s brother, Basil Watts Phillip wrote from London to the Victoria Police seeking assistance to locate his brother. He had last heard from him in a letter dated Cunninghame, Gippsland, 1891. He indicated that about 1893 Gordon and Jane and their two children were living at Beaconsfield Parade, Albert Park but the whereabouts of all was now unknown. He mentioned Gordon had also been awarded 21 guineas by Judge Boucaut on the 26th February 1884, also a silver medal, for arresting two ruffians who had brutally assaulted a jockey (in South Australia) and that he had been awarded the Royal Humane Society's medal, London, and in 1891, was presented with the Royal Humane Society's certificate of merit (Victoria). Basil also stated his brother had lost the sight of one eye through a stab he received in New York and had a scar on his temple, one on the wrist, two under the shoulder blade, and one on the thigh, and two bullet wounds in the leg. Basil’s quest was published in the Melbourne Herald and assistance was soon forthcoming to the Police. In June 1906 Gordon made his Will, leaving all his estate to his youngest son Victor. Mary was appointed Executrix and it was witnessed by Olive Huxley, married woman, and James Huxley, a pottery maker. James was subsequently killed in France in May 1918. Gordon and Mary have a second son, Basil Douglas born in Carlton in 1911 but he dies as toddler in 1913. At some point Gordon and Mary made their home at Eltham though official electoral roll records record them at Little Flinders Street Melbourne, employed as a caretaker and from 1906 in Brunswick as a decorator then painter. Eltham may have been a ‘holiday’ home but it seems Mary was actively engaged in the community as a newspaper report in the Advertiser in 1922 not long after Gordon’s death indicates Mary was one of the best known and best liked ladies of the Eltham district. She was actively engaged in all matters, tending towards the welfare of the district. At the time of Gordon’s death Mary was president of the Ladies' Public Hall Committee, responsible for the conduct of numerous, and successful entertainments. Gordon’s first and only legal wife, Jane Luxon Watts-Phillips nee Miller, died 6 November 1921 and was buried 8 November 1921 at Springvale Cemetery. Jane had lived 34 years in South Australia and 30 years in Victoria. With Jane now dead, Gordon was now officially a widower and just three weeks later, the retired master mariner of Eltham at age 55 remarried Mary, 42, of 174 Hickford Street, East Brunswick on the 29th November 1921 in the Parish of St Cuthbert, East Brunswick. Gordon died at their home, ‘The Rest’, at 174 Hickford Street, East Brunswick on February 9, 1922 and was buried at Eltham Cemetery on February 11. An interesting link is established with the heavy floods of August 1891 by the erection of a tombstone in the Eltham cemetery. The stone bears the inscription: - “In loving memory of (Captain) Gordon, dearly beloved husband of Mary Watts Phillips. Died 9th February 1922, aged 62 years." Beside the stone is a replica, carved in a marble scroll, of the Royal Humane Society of Australia's Certificate of merit. Part of the wording of this certificate is as follows:- “At a general court of directors holder at the offices of the society at Melbourne on the 6th day of September 1891, it was resolved that the courage and humanity displayed by Gordon Watts Phillips aged 30-years captain of S.S. Omeo, Sale, in rescuing many families from drowning during the heavy floods on Thomson River on 3rd and 4th of August 1891 call for the admiration of the court, and justly entitles him to the certificate of merit of this society, which is hereby awarded." Unbeknownst to Gordon, his second and subsequent legal marriage to Mary initiated a revocation of his Will of 1906, which had solely benefited his son Victor. Consequently, Mary had to apply for Letters of Administration and the only legal beneficiaries would be Mary and his two children by Jane. On June 18, 1940, at age 61, Mary married 70-year-old Arthur Ernest Fenn in Melbourne. Unfortunately for her, Arthur died a year later in July 1941 and was buried in the Cohuna Cemetery near Echuca. Mary lived a further 8 years, passing away suddenly July 4, 1948 in Carlton, and was buried July 7 with her beloved husband Gordon, at Eltham Cemetery. In Loving Memory of (Captain) Gordon Dearly beloved husbandof Mary Watts-Phillips Died 9th Feb. 1922, aged 62 years Also Mary Hilda Loved wife of above Died 4th July 1948 "At rest"Born Digitaleltham cemetery, gravestones, (captain) gordon watts-phillips, mary hilda harvey watts-phillips (nee huxley) -
 Flagstaff Hill Maritime Museum and Village
Postcard - People, Bill Ferrier - rescuer, 11th November, 1905
... in the two daring rescues, he was awarded the Silver Medal... in the two daring rescues, he was awarded the Silver Medal ...The postcard shows a photograph of William Ferrier, the 25-year-old Warrnambool fisherman from South Warrnambool whose rescue of two sailors from the wrecked La Bella made him an overnight National hero, quoted as “one of the most heroic rescues in Victoria’s shipwreck history”. The La Bella was wrecked on 10th November 1905 and the photograph was taken on the next day. In the photograph, William Ferrier is seated in the centre, with four of the five survivors beside him: (from left to right) Leonard Robertson, R. Payne, Oscar Rosenholme and Jack Noake. The photograph was taken by Foyle Photography Studio in Warrnambool, originally owned by James Charles Foyle. He previously had a photographic studio in Melbourne 1882 1887, then opened “Foyle’s Photo Card Studios” in Liebig St, Warrnambool. James Foyle died on 13th July 1905 and his son and daughter, Charles and Lilian Foyle continued on with the business until 1945. This photograph was most likely taken by either Charles or Lilian Foyle. The story of William Ferrier’s brave act follows on below … The ship from which the sailors were rescued was the three-masted, iron and steel barquentine the La Bella, built in Norway in 1893. She was one of two iron and steel ships by Johan Smith, the company was one of the leading shipping families in Tvedestrand, Norway. She was significant to Norwegian shipping, being one of only 27 iron and steel ships ever built in Norway. She was registered in New Zealand and engaged from 1902 in inter-colonial trading of timber in the Pacific, between New Zealand and Australia and was often in Port Phillip Bay, Victoria. On 5th October 1905, the twelve-year-old La Bella left Lyttleton, New Zealand carrying a cargo of timber bound for Warrnambool, Australia. She was manned by a crew of twelve: the Master, (Captain Mylius, previously 1st Mate of La Bella, appointed Captain to La Bella on 6th February 1903) 2 Mates, Cook, six able seamen, one ordinary seaman and a boy. Bad weather en route caused her to shelter at Burnie on Tasmania's North West coast. On November 10th, the 37th day of her journey, La Bella approached Warrnambool. Captain Mylius steered her towards Lady Bay Channel in heavy south-west seas and evening mist. He ordered the helmsman to steer for the light. As the ship came round, a tremendous sea struck her on the port quarter, causing her to breach broadside in a northwesterly direction into breakers. The helm was brought round twice more, but each time heavy seas broke over her, the third time throwing the La Bella on to a submerged reef in Lady Bay now known as La Bella Reef (about 100 yards from the Warrnambool breakwater). The sea was so rough that it even wrenched a one-and-a-half ton anchor from its fastenings and into the sea. As Captain Mylius headed to the steel wheelhouse, intending to send up a rocket flare, a huge sea slammed the steel door into him (resulting in massive bruising front and back) Despite his injuries he still managed to set off a blue light, which he held up in his hands. La Bella’s lifeboats were filled with seawater and broke up on their chocks. The blue light was the first indication to people on the shore that there was a ship in distress. The Harbour Master, Captain Roe (who lived in the Harbour Master’s House opposite Flagstaff Hill), organised a group of volunteers to crew the lifeboat because the trained crew was unavailable; the crewmen were working on a steamer in Port Fairy at the time. He then poured oil onto the water to try and smooth the sea. At around 11 pm three of the crew took shelter in the steel forecastle but the sea crashed into it and broke it up. While the rest of the crew and onlookers watched helplessly in the moonlight the bodies were washed away into the sea, never to be seen again. Some of the crew lashed themselves to the weather rail to keep from being washed away. Watson, the ordinary seaman, became tangled in the rigging lines and was too weak to move, so the 2nd Mate, Robertson, put a line onto him so that he wouldn’t wash off. Around 11 pm three of the crew were unconscious from exhaustion. The situation on La Bella was becoming dangerous. The 2nd Mate moved to the ‘house’ and soon afterwards the ship slipped in the heavy sea. The lashings of the 1st Mate and the ‘boy’ Denham had kept them safe until about 2 am when they were washed overboard; no one was able to help. One by one, the exhausted crew were being washed overboard, too weak to hold on any longer. During the night the La Bella had broken into two and the deckhouse ran out towards the sea. Two more men drowned when trying to reach the lifeboat. By sunrise, the only survivors of the twelve were the Master, 2nd Mate and three seamen. Early in the morning, Captain Roe used the rocket apparatus on shore to try and shoot a line to the ship for a safer rescue but each attempt fell short of the target. Several attempts were made by the lifeboat to rescue the stricken sailors, but the rough conditions made this difficult for the boat to get close enough to the ship and the lifeboat had to return to shore. During a final attempt to reach the ship Captain Mylius ordered his men to jump into the sea. Leonard Robertson, 2nd mate, jumped and swam towards the lifeboat, taking hold of the boat hook offered to him. Oscar Rosenholme managed to reach the boat floating on a piece of timber from the ship’s load and a third survivor, Noake, also made the boat. Along with the lifeboat rescue crew, 25-year-old William Ferrier rowed his small dingy through the heavy seas and managed to rescue the Captain, whom he landed on the breakwater. Ferrier then returned to the ship to attempt a final rescue, losing his oars and rowlocks into the high sea. Using just a spare paddle he skulled towards the La Bella, reaching her stern in time to cut loose the lone surviving sailor, Payne, from the lashing that held him to the ship; the terrified sailor dropped from the ship and into the dingy. Shortly after the last man was rescued, the La Bella was lifted by a huge wave and crashed back down on the reef; she broke up and sank. The ordeal had lasted ten hours. The survivors were taken to the nearby Bay View Hotel and gratefully received warm food and clothing, medical attention and a place to sleep. In the following days, an unidentified body of a young person had washed ashore; it was either Watson or Denham. The body was buried in the Warrnambool cemetery with an appropriate gravestone and inscription. William Ferrier became a national hero as news of the daring rescue spread. In recognition of his bravery in the two daring rescues, he was awarded the Silver Medal for Bravery by the Royal Humane Society and was honoured in the letter from the Prime Minister and the Parliament of the Commonwealth, telegrams and a cheque for £20 from the Governor-General, over £150 subscribed by the public, including Warrnambool and district and readers of The Argus, and a gold medal from the Glenelg Dinghy Club of South Australia. Ferrier’s rescue efforts are one of the most heroic in Victoria’s shipwreck history. (William Ferrier’s son, Frank, received a similar award almost fifty years later when he helped rescue four members of the crew on the yacht Merlan after it ran on to a reef near the Point Lonsdale Lighthouse. ) The wreck of La Bella now lies on her port side in 13 metres of sheltered water inside the reef she struck. The bow section is relatively intact and part of the stern has drifted north-easterly towards the mouth of the Hopkins River. The reef the La Bella struck now bears its name. Those five rescued from the La Bella were Captain George Mylius, Leonard Robertson (2nd Mate, 21 years old), R. Payne, Oscar Rosenholme and Jack Noake. Those seven who lost their lives were Mr Coulson (1st mate), Charles Jackman (cook) Gustave Johnson, Pierre Johann and Robert Gent (all able seamen), Harry Watson (ordinary seaman) and Jack Denham (ship’s boy), Captain Mylius was found guilty of careless navigation; he had sailed into the bay without the services of a pilot. His Master Certificate was suspended for twelve months. Later he was also charged with manslaughter of one of the crew who had died when the La Bella was wrecked but found not guilty. The event’s adverse publicity and damage to his career took a toll on his health and he died of a heart attack six months after the wreck; he was only thirty-seven. His body was buried in the Melbourne General Cemetery. The La Bella was “the best documented of all sailing ships owned in New Zealand”. Her record books, ship logs, correspondence and supporting papers are still available. At the time of the tragedy, she was owned by Messers David C.Turnbull and Co. of Timaru, New Zealand timber merchants and shipping agents, who had purchased her on 13th December 1901. A detailed account of the last journey of La Bella can be read in “Leonard Robertson, the Whangaroa & La Bella” written by Jack Churchouse, published in 1982 by Millwood Press Ltd, Wellington, NZ. As well as this postcard, Flagstaff Hill’s La Bella Collection includes a photograph of the wrecked La Bella, a brass rail holder and the letter from the Prime Minister and other Members of Parliament that was sent to William Ferrier to commend him for his bravery. Some 15 – 17 ships are believed to have sunk in Lady Bay, but only two have been discovered on the seafloor; the “La Bella” and the “Edinburgh Castle”. Both wrecks are popular diving sites and are preserved as significant historical marine and marine archaeological sites. This postcard is part of the La Bella Collection and is significant at both a local and state level. Its connection to the La Bella shipwreck and the rescue of five survivors highlights the dangers of Victoria’s Shipwreck Coast. The photograph of William Ferrier and four of the five survivors demonstrates the bravery of ordinary Australians who risked their lives to save victims of shipwrecks along the coast. The postcard is significant to the history of Warrnambool as it portrays William Ferrier, a local fisherman whose descendants continue to live in the area. It highlights the way of life of people who lived in coastal towns in 19th century Victoria and the effects of shipwrecks upon them. The postcard connects to the congratulatory letter which was sent to William Ferrier by the Prime Minister and Government of Australia and demonstrates the importance they attached to his efforts for Victoria and to Australia. The postcard is also an example of the photography of Foyle Photographers who were in the town of Warrnambool from the late 1800’s. Charles and Lillian Foyle took over the business when their father James died in 1905. Lillian Foyle is significant as the first woman photographer in Warrnambool. It is not known whether Charles of Lillian took this photograph. This postcard is significant because of its association with the sailing ship “La Bella”. The “La Bella” is of local and state and national significance. It is one of the only two shipwrecks discovered in Lady Bay, Warrnambool, out of the 15-17 shipwrecks in the bay. Sepia photograph of William (Bill) Ferrier (seated in the middle), heroic rescuer of two crew members of the La Bella, wrecked at Warrnambool. The photograph is a postcard and shows five men dressed formally in suits and hats. Printed below the photograph are the name and place of the photographer, a royal crest and the details of two patrons of the photographer. Also below the photograph are some handwritten words in black pen. On the back of the postcard is a handwritten message in the same writing as the front.Printed on the front of the card is “Foyle, WARRNAMBOOL” “PATRONS: / HIS ROYAL HIGHNESS THE DUKE OF CORNWALL & YORK. / HIS EXCELLENCY LORD BRAS_ EY, R.O.B.” Handwritten on the front of the card is “Bill Ferrier / rescuer / Oh my hero _ _ _ “ Handwritten on the back of the card is a message. “La Bella” Wrecked off W.Bool Breakwater Nov. 1906 (_ _ _ _ show night) Payne Noake Rosenholme Robertson and Capt Mylius (saved) (moonlight bright) Watson (_ _ _ _ boy) Richwoud [possibly Richmond] drowned” and signed “Desdewoua [possibly Desdemona] Slogos”la bella, foyle, william ferrier, bill ferrier, lady bay, 1905, 10th november 1905, 11th november 1905, parliament of the commonwealth, royal humane society medal, flagstaff hill, warrnambool, shipwrecked coast, flagstaff hill maritime museum, maritime museum, shipwreck coast, flagstaff hill maritime village -
 Flagstaff Hill Maritime Museum and Village
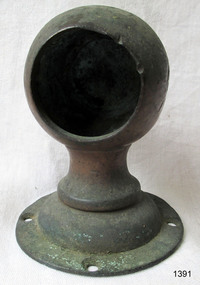
Functional object - Rail holder, About 1893, when the ship was made
... in the two daring rescues he was awarded the Silver Medal for Bravery... in the two daring rescues he was awarded the Silver Medal for Bravery ...This brass rail holder fixture would have been used to hold the end of a rail in place. There is no information as to where the fitting or rail would have been placed on the ship; sailing ships had many brass fittings. It was recovered from the wreck of the La Bella, which lies at the bottom of the Warrnambool Harbour. Some 15 ships are believed to have been wrecked in Lady Bay, but only two have been discovered on the sea floor; the La Bella and the Edinburgh Castle. Both wrecks are popular diving sites and are preserved as significant historical marine and marine archaeological sites. The story of the final voyage of the La Bella is summarised as follows … The ship from which the sailors were rescued was the three-masted, iron and steel barquentine the La Bella, built in Norway in 1893. She was one of two iron and steel ships by Johan Smith, the company being one of the leading shipping families in Tvedestrand, Norway. She was significant to Norwegian shipping, being one of only 27 iron and steel ships ever built in Norway. She was registered in New Zealand and engaged from 1902 in inter-colonial trading of timber in the pacific, between New Zealand and Australia and was often in Port Phillip Bay, Victoria. On 5th October, 1905, the twelve year old La Bella left Lyttleton, New Zealand carrying a cargo of timber bound for Warrnambool, Australia . She was manned by a crew of twelve: the Master, (Captain Mylius, previously 1st Mate of La Bella, appointed Captain to La Bella on 6th February 1903) 2 Mates, Cook, six able seamen, one ordinary seaman and a boy. . Bad weather en route caused her to shelter at Burnie on Tasmania's North West coast. On November 10th, the 37th day of her journey, La Bella approached Warrnambool. Captain Mylius steered her towards Lady Bay Channel in heavy south-west seas and evening mist. He ordered the helmsman to steer for the light. As the ship came round, a tremendous sea struck her on the port quarter, causing her to breach broadside in a north-westerly direction into breakers. The helm was brought round twice more, but each time heavy seas broke over her, the third time throwing the La Bella on to a submerged reef in Lady Bay now known as La Bella Reef (about 100 yards from the Warrnambool breakwater). The sea was so rough that it even wrenched a one-and-a-half ton anchor from its fastenings and into the sea. As Captain Mylius headed to the steel wheelhouse, intending to send up a rocket flare, a huge sea slammed the steel door into him (resulting in massive bruising front and back) Despite his injuries he still managed to set off a blue light, which he held up in his hands. La Bella’s lifeboats were filled with sea water and broke up on their chocks. The blue light was the first indication to people on shore that there was a ship in distress. The Harbour Master, Captain Roe (who lived in the Harbour Master’s House opposite Flagstaff Hill), organised a group of volunteers to crew the lifeboat because the trained crew was unavailable; the crewmen were working on a steamer in Port Fairy at the time. He then poured oil onto the water to try and smooth the sea. At around 11pm three of the crew took shelter in the steel forecastle but the sea crashed into it and broke it up. While the rest of the crew and onlookers watched helplessly in the moonlight the bodies were washed away into the sea, never to be seen again. Some of the crew lashed themselves to the weather rail to keep from being washed away. Watson, the ordinary seaman, became tangled in the rigging lines and was too weak to move, so the 2nd Mate, Robertson, put a line onto him so that he wouldn’t wash off. Around 11pm three of the crew were unconscious from exhaustion. The situation on La Bella was becoming dangerous. The 2nd Mate moved to the ‘house’ and soon afterwards the ship slipped in the heavy sea. The lashings of the 1st Mate and the ‘boy’ Denham had kept them safe until about 2am when they were washed overboard; no one was able to help. One by one, the exhausted crew were being washed overboard, too weak to hold on any longer. During the night the La Bella had broken into two and the deckhouse ran out towards the sea. Two more men drowned when trying to reach the lifeboat. By sunrise the only survivors of the twelve were the Master, 2nd Mate and three seamen. Early in the morning Captain Roe used the rocket apparatus on shore to try and shoot a line to the ship for a safer rescue but each attempt fell short of the target. Several attempts were made by the lifeboat to rescue the stricken sailors, but the rough conditions made this difficult for the boat to get close enough to the ship and the lifeboat had to return to shore. During a final attempt to reach the ship Captain Mylius ordered his men to jump into the sea. Leonard Robertson, 2nd mate, jumped and swam towards the lifeboat, taking hold of the boat hook offered to him. Oscar Rosenholme managed to reach the boat floating on a piece of timber from the ship’s load and a third survivor, Noake, also made the boat. Along with the lifeboat rescue crew, 25 year old William Ferrier rowed his small dingy through the heavy seas and managed to rescue the Captain, whom he landed on the breakwater. Ferrier then returned to the ship to attempt a final rescue, losing his oars and rowlocks into the high sea. Using just a spare paddle he skulled towards the La Bella, reaching her stern in time to cut loose the lone surviving sailor, Payne, from the lashing that held him to the ship; the terrified sailor dropped from the ship and into the dingy. Shortly after the last man was rescued, the La Bella was lifted by a huge wave and crashed back down on the reef; she broke up and sank. The ordeal had lasted ten hours. The survivors were taken to the nearby Bay View Hotel and gratefully received warm food and clothing, medical attention and a place to sleep. In the following days an unidentified body of a young person was washed ashore; it was either Watson or Denham. The body was buried in the Warrnambool cemetery with an appropriate gravestone and inscription. William Ferrier became a national hero as news of the daring rescue spread. In recognition of his bravery in the two daring rescues he was awarded the Silver Medal for Bravery by the Royal Humane Society and was honoured in the letter from the Prime Minister and the Parliament of the Commonwealth, telegrams and a cheque for £20 from the Governor General, over £150 subscribed by the public, including Warrnambool and district and readers of The Argus, and a gold medal from the Glenelg Dinghy Club of South Australia. Ferrier’s rescue efforts are one of the most heroic in Victoria’s shipwreck history. (William Ferrier’s son, Frank, received a similar award almost fifty years later, when he helped rescue four members of the crew on the yacht Merlan, after it ran on to a reef near the Point Lonsdale Lighthouse. ) The wreck of La Bella now lies on her port side in 13 metres of sheltered water inside the reef she struck. The bow section is relatively intact and part of the stern has drifted north-easterly towards the mouth of the Hopkins River. The reef the La Bella struck now bears its name. Those five rescued from the La Bella were Captain George Mylius, Leonard Robertson (2nd Mate, 21 years old), R. Payne, Oscar Rosenholme and Jack Noake. Those seven who lost their lives were Mr Coulson (1st mate), Charles Jackman (cook) Gustave Johnson, Pierre Johann and Robert Gent (all able seamen), Harry Watson (ordinary seaman) and Jack Denham (ship’s boy), Captain Mylius was found guilty of careless navigation; he had sailed into the bay without the services of a pilot. His Master Certificate was suspended for twelve months. Later he was also charged with manslaughter of one of the crew who had died when the La Bella was wrecked, but found not guilty. The event’s adverse publicity and damage to his career took a toll on his health and he died of a heart attack six months after the wreck; he was only thirty-seven. His body was buried in the Melbourne General Cemetery. The La Bella was “the best documented of all sailing ships owned in New Zealand”. Her record books, ship logs, correspondence and supporting papers are still available. At the time of the tragedy, she was owned by Messers David C.Turnbull and Co. of Timaru, New Zealand timber merchants and shipping agents, who had purchased her on 13th December 1901. A detailed account of the last journey of La Bella can be read in “Leonard Robertson, the Whangaroa & La Bella” written by Jack Churchouse, published in 1982 by Millwood Press Ltd, Wellington, NZ. Some 15 – 17 ships are believed to have sunk in Lady Bay, but only two have been discovered on the seafloor; the “La Bella” and the “Edinburgh Castle”. Both wrecks are popular diving sites and are preserved as significant historical marine and marine archaeological sites. As well as this letter, Flagstaff Hill’s La Bella Collection includes a photograph of the wrecked La Bella, a brass rail holder and a postcard of William Ferrier with four of the survivors. This original congratulatory letter sent to William Ferrier by the Prime Minister and Government of Australia demonstrates the importance attached to his efforts for Victoria and to Australia. The letter is part of the La Bella Collection and is significant at both a local and state level. Its connection to the La Bella shipwreck and the rescue of five survivors highlights the dangers of Victoria’s Shipwreck Coast. The letter to William Ferrier from the Australian Government acknowledges the bravery of ordinary Australians who risked their lives to save victims of shipwrecks along the coast. The letter is significant to the history of Warrnambool as it honours William Ferrier, a local fisherman whose descendants continue to live in the area. It highlights the way of life of people who lived in coastal towns in 19th century Victoria and the effects of shipwrecks upon them. The letter connects to the postcard of William Ferrier with four of the five rescued crew, the photograph of the wreck of the La Bella and the artefact from the wreck, the rail holder. This item is significant because of its association with the sailing ship “La Bella” . the “La Bella” is of local and state and national significance. It is one of the only two shipwrecks discovered in Lady Bay, Warrnambool, out of the 15-17 shipwrecks in the bay. Brass rail holder from the wreck "La Bella". This rail holder would have been used as a fitting for the end of a rail. It is made up of two parts and looks a little like a goblet in shape. The top is a hollow spherical shape with a circular hole cut out on one side, into which the end of a round rail would fit. There are two gouge marks close to each other on one side of the hole, about one centimetre apart, at 1 and 2 o’clock position. The sphere has a hollow pipe-like stem with a screw thread turned into the outside of the lower section and the bottom of the stem has been flared out after having the base fitted. The base is round and has a mound in the centre. The edge has four evenly spaced fixture holes around its edge. The metal shows signs of pitting and has mild encrustation. The fitting of the base is loose, allowing it to swivel in a complete circle. The top of the sphere is rough and has a dent in it. Underneath the base there is verdigris; some has flaked off and reveals a bright golden colour underneath. rail holder, brass rail holder, la bella, lady bay, norway, 1893, new zealand, captain mylius, william ferrier, flagstaff hill, warrnambool, shipwrecked coast, flagstaff hill maritime museum, maritime museum, shipwreck coast, flagstaff hill maritime village -
 Flagstaff Hill Maritime Museum and Village
Letter - William Ferrier, 14th November 1905
... in the two daring rescues, he was awarded the Silver Medal... in the two daring rescues, he was awarded the Silver Medal ...The letter to William Ferrier of South Warrnambool from the Prime Minister and the Parliament of the Commonwealth recognised the significance of William’s brave and courageous lifesaving act to the people of Australia; “They all feel that your conduct was worthy of the best deeds done by British sailors in the past and they are proud to know that Australia can produce such as you.” The story of that brave rescue follows on below … The ship from which the sailors were rescued was the three-masted, iron and steel barquentine the La Bella, built in Norway in 1893. She was one of two iron and steel ships by Johan Smith, The company was one of the leading shipping families in Tvedestrand, Norway. She was significant to Norwegian shipping, being one of only 27 iron and steel ships ever built in Norway. She was registered in New Zealand and engaged from 1902 in inter-colonial trading of timber in the Pacific, between New Zealand and Australia and was often in Port Phillip Bay, Victoria. On 5th October 1905, the twelve-year-old La Bella left Lyttleton, New Zealand carrying a cargo of timber bound for Warrnambool, Australia. She was manned by a crew of twelve: the Master, (Captain Mylius, previously 1st Mate of La Bella, appointed Captain to La Bella on 6th February 1903) 2 Mates, Cook, six able seamen, one ordinary seaman and a boy. Bad weather en route caused her to shelter at Burnie on Tasmania's North West coast. On November 10th, the 37th day of her journey, La Bella approached Warrnambool. Captain Mylius steered her towards Lady Bay Channel in heavy south-west seas and evening mist. He ordered the helmsman to steer for the light. As the ship came round, a tremendous sea struck her on the port quarter, causing her to breach broadside in a north-westerly direction into breakers. The helm was brought round twice more, but each time heavy seas broke over her, the third time throwing the La Bella on to a submerged reef in Lady Bay now known as La Bella Reef (about 100 yards from the Warrnambool breakwater). The sea was so rough that it even wrenched a one-and-a-half ton anchor from its fastenings and into the sea. As Captain Mylius headed to the steel wheelhouse, intending to send up a rocket flare, a huge sea slammed the steel door into him (resulting in massive bruising front and back) Despite his injuries he still managed to set off a blue light, which he held up in his hands. La Bella’s lifeboats were filled with seawater and broke up on their chocks. The blue light was the first indication to people on the shore that there was a ship in distress. The Harbour Master, Captain Roe (who lived in the Harbour Master’s House opposite Flagstaff Hill), organised a group of volunteers to crew the lifeboat because the trained crew was unavailable; the crewmen were working on a steamer in Port Fairy at the time. He then poured oil onto the water to try and smooth the sea. At around 11 pm three of the crew took shelter in the steel forecastle but the sea crashed into it and broke it up. While the rest of the crew and onlookers watched helplessly in the moonlight the bodies were washed away into the sea, never to be seen again. Some of the crew lashed themselves to the weather rail to keep from being washed away. Watson, the ordinary seaman, became tangled in the rigging lines and was too weak to move, so the 2nd Mate, Robertson, put a line onto him so that he wouldn’t wash off. Around 11 pm three of the crew were unconscious from exhaustion. The situation on La Bella was becoming dangerous. The 2nd Mate moved to the ‘house’ and soon afterwards the ship slipped in the heavy sea. The lashings of the 1st Mate and the ‘boy’ Denham had kept them safe until about 2 am when they were washed overboard; no one was able to help. One by one, the exhausted crew were being washed overboard, too weak to hold on any longer. During the night the La Bella had broken into two and the deckhouse ran out towards the sea. Two more men drowned when trying to reach the lifeboat. By sunrise, the only survivors of the twelve were the Master, 2nd Mate and three seamen. Early in the morning, Captain Roe used the rocket apparatus on shore to try and shoot a line to the ship for a safer rescue but each attempt fell short of the target. Several attempts were made by the lifeboat to rescue the stricken sailors, but the rough conditions made this difficult for the boat to get close enough to the ship and the lifeboat had to return to shore. During a final attempt to reach the ship Captain Mylius ordered his men to jump into the sea. Leonard Robertson, 2nd mate, jumped and swam towards the lifeboat, taking hold of the boat hook offered to him. Oscar Rosenholme managed to reach the boat floating on a piece of timber from the ship’s load and a third survivor, Noake, also made the boat. Along with the lifeboat rescue crew, 25-year-old William Ferrier rowed his small dingy through the heavy seas and managed to rescue the Captain, whom he landed on the breakwater. Ferrier then returned to the ship to attempt a final rescue, losing his oars and rowlocks into the high sea. Using just a spare paddle he skulled towards the La Bella, reaching her stern in time to cut loose the lone surviving sailor, Payne, from the lashing that held him to the ship; the terrified sailor dropped from the ship and into the dingy. Shortly after the last man was rescued, the La Bella was lifted by a huge wave and crashed back down on the reef; she broke up and sank. The ordeal had lasted ten hours. The survivors were taken to the nearby Bay View Hotel and gratefully received warm food and clothing, medical attention and a place to sleep. In the following days, an unidentified body of a young person has washed ashore; it was either Watson or Denham. The body was buried in the Warrnambool cemetery with an appropriate gravestone and inscription. William Ferrier became a national hero as news of the daring rescue spread. In recognition of his bravery in the two daring rescues, he was awarded the Silver Medal for Bravery by the Royal Humane Society and was honoured in the letter from the Prime Minister and the Parliament of the Commonwealth, telegrams and a cheque for £20 from the Governor-General, over £150 subscribed by the public, including Warrnambool and district and readers of The Argus, and a gold medal from the Glenelg Dinghy Club of South Australia. Ferrier’s rescue efforts are one of the most heroic in Victoria’s shipwreck history. (William Ferrier’s son, Frank, received a similar award almost fifty years later when he helped rescue four members of the crew on the yacht Merlan after it ran on to a reef near the Point Lonsdale Lighthouse. ) The wreck of La Bella now lies on her port side in 13 metres of sheltered water inside the reef she struck. The bow section is relatively intact and part of the stern has drifted north-easterly towards the mouth of the Hopkins River. The reef the La Bella struck now bears its name. Those five rescued from the La Bella were Captain George Mylius, Leonard Robertson (2nd Mate, 21 years old), R. Payne, Oscar Rosenholme and Jack Noake. Those seven who lost their lives were Mr Coulson (1st mate), Charles Jackman (cook) Gustave Johnson, Pierre Johann and Robert Gent (all able seamen), Harry Watson (ordinary seaman) and Jack Denham (ship’s boy), Captain Mylius was found guilty of careless navigation; he had sailed into the bay without the services of a pilot. His Master Certificate was suspended for twelve months. Later he was also charged with the manslaughter of one of the crew who had died when the La Bella was wrecked but found not guilty. The event’s adverse publicity and damage to his career took a toll on his health and he died of a heart attack six months after the wreck; he was only thirty-seven. His body was buried in the Melbourne General Cemetery. The La Bella was “the best documented of all sailing ships owned in New Zealand”. Her record books, ship logs, correspondence and supporting papers are still available. At the time of the tragedy, she was owned by Messers David C.Turnbull and Co. of Timaru, New Zealand timber merchants and shipping agents, who had purchased her on 13th December 1901. A detailed account of the last journey of La Bella can be read in “Leonard Robertson, the Whangaroa & La Bella” written by Jack Churchouse, published in 1982 by Millwood Press Ltd, Wellington, NZ. As well as this letter, Flagstaff Hill’s La Bella Collection includes a photograph of the wrecked La Bella, a brass rail holder and a postcard of William Ferrier with four of the survivors. Some 15 – 17 ships are believed to have sunk in Lady Bay, but only two have been discovered on the seafloor; the “La Bella” and the “Edinburgh Castle”. Both wrecks are popular diving sites and are preserved as significant historical marine and marine archaeological sites. This original congratulatory letter sent to William Ferrier by the Prime Minister and Government of Australia demonstrates the importance attached to his efforts for Victoria and to Australia. The letter is part of the La Bella Collection and is significant at both a local and state level. Its connection to the La Bella shipwreck and the rescue of five survivors highlights the dangers of Victoria’s Shipwreck Coast. The letter to William Ferrier from the Australian Government acknowledges the bravery of ordinary Australians who risked their lives to save victims of shipwrecks along the coast. The letter is significant to the history of Warrnambool as it honours William Ferrier, a local fisherman whose descendants continue to live in the area. It highlights the way of life of people who lived in coastal towns in 19th century Victoria and the effects of shipwrecks upon them. The letter connects to the postcard of William Ferrier with four of the five rescued crew, the photograph of the wreck of the La Bella and the artefact from the wreck, the rail holder. This letter is significant because of its association with the sailing ship “La Bella”. The “La Bella” is of local and state and national significance. It is one of the only two shipwrecks discovered in Lady Bay, Warrnambool, out of the 15-17 shipwrecks in the bay. Letter to William Ferrier of South Warrnambool from the Prime Minister and Members of Parliament commending him on his bravery. The printed letterhead includes a coat of arms in the top centre and the official address. The letter is very neatly hand written in black pen and includes 4 signatures of Members of Parliament. The rectangular paper is cream coloured with some yellow/brown discolouring. It has the letterhead on the right hand side of it and the written letter begins below the letterhead. The paper has been folded so that the right side becomes the cover page of the letter. The writing is continued onto the inside right hand page of the folded paper and the writing ends here. There is more recent writing on the bottom right hand corner of the back page. The paper has been officially folded in half a total 3 times and there is heavy discolouration on the sections that form the front and back of the folded letter. There is a 4th fold line that is less pronounced that the other folds and would make the paper the size to fit into a pocket. At several fold creases the paper has worn through. The edges of the paper have minor tears. The printed coat of arms is that of the House of Representatives. Underneath is printed “The Parliament of the Commonwealth, / Parliament House / Melbourne”. The hand written, letter is dated “14th November, 1905” and addressed to “Mr. William Ferrier / South Warrnambool” The letter begins “The Speaker, the Prime Minister and Members of the Ministry and its supporters, the Leader and Members of the Opposition, the Leader and Members of the Labour Party, being all the Members of the House of Representatives of the Federal Parliament of Australia” … It continues “desire to express to you their appreciation of your bravery in skulling out to the wreck of the “La Bella” at Warrnambool on Saturday, 11th November, 1905, and recovering therefrom two of the crew who were in imminent danger of their lives. They all feel that your conduct was worthy of the best deeds done by British sailors in the past and they are proud to know that Australia can produce such as you.” The letter is “Signed on behalf of the Members – Speaker (Frederick Holder ), Deputy Leader of the Opposition (Joseph Cook ), Prime Minister (Alfred Deakin), Leader of the Labour Party ( J.C. Watson)” On the back of the letter is blue ink handwriting “OWNER / G. FERRIER / TO. BE. PHOTOGRAPHED / 27-4-76”la bella, william ferrier, bill ferrier, lady bay, 1905, 10th november 1905, 11th november 1905, parliament of the commonwealth, prime minister, australian government, new zealand, flagstaff hill, warrnambool, shipwrecked coast, flagstaff hill maritime museum, maritime museum, shipwreck coast, flagstaff hill maritime village -
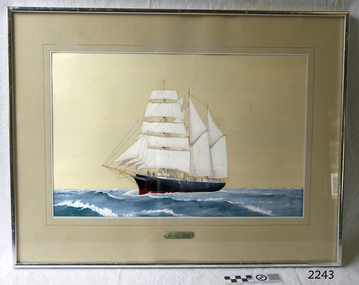 Flagstaff Hill Maritime Museum and Village
Painting - Maritime painting, The La Bella, 1980s
... in the two daring rescues he was awarded the Silver Medal for Bravery... in the two daring rescues he was awarded the Silver Medal for Bravery ...This painting of the “La Bella” is associated with Flagstaff Hill’s collection of artefacts from the wreck of the “La Bella”. It was painted around the 1980s by maritime artist Philip J. Gray. Some 15 – 17 ships are believed to have sunk in Lady Bay, but only two have been discovered on the seafloor; the “La Bella” and the “Edinburgh Castle”. Both wrecks are popular diving sites and are preserved as significant historical marine and marine archaeological sites. The Kosnar Picture Framing and Mirrors Shop identified the "GRAY 3135, Y04/111" as their job number for the framing and said that the label "ANOTHER KOSNAR FEATURE" was last used before about 1990. About artist Philip J. Gray “Philip is one of Australia’s leading maritime artists and his meticulous research and social commentary paintings of ships, such as, the Loch Ard and Schomberg form an important part of Warrnambool’s Flagstaff Hill Maritime Museum.” [Dr Marion Manifold, Artist and Art Historian, 2014] Philip James Gray was born in London but has lived most of his life in Australia. He graduated from a London school of art as an illustrator, specialising in technical and scientific illustration as well as other commercial and applied art. He was also a student for a time of Fyffe Christie - British figurative artist, mural painter and humanitarian – who had a great influence on his career. Philip has always worked as a professional artist and illustrator. Many publications on maritime history have featured his work. His paintings have been released and sold all over the world as limited edition prints. The State Library of Victoria’s ‘Latrobe Collection’ holds two of his paintings. His street painting of ‘The Ashes Contest’ decorates the brick wall of Old Bakery Laneway in Sunbury and a Sunbury café owner commissioned him to paint the ‘Sunbury Pop Festival’ as a remembrance of local history. Philip has been an active member of the Sunbury Art Society in Victoria for several years, serving on the committee for some of that time and being involved in exhibitions. He enjoys helping new artists and sharing his skills and experience. About the “La Bella” The wreck of the La Bella lies at the bottom of the Warrnambool Harbour in Lady Bay. Some 15 ships are believed to have been wrecked there but only two have been discovered on the sea floor; the La Bella and the Edinburgh Castle. Both wrecks are popular diving sites and are preserved as significant historical marine and marine archaeological sites. The story of the final voyage of the La Bella is summarised as follows … The ship from which the sailors were rescued was the three-masted, iron and steel barquentine the La Bella, built in Norway in 1893. She was one of two iron and steel ships by Johan Smith, the company being one of the leading shipping families in Tvedestrand, Norway. She was significant to Norwegian shipping, being one of only 27 iron and steel ships ever built in Norway. La Bella was registered in New Zealand and engaged from 1902 in inter-colonial trading of timber in the pacific, between New Zealand and Australia and was often in Port Phillip Bay, Victoria. On 5th October 1905 the twelve year old La Bella left Lyttleton, New Zealand carrying a cargo of timber bound for Warrnambool, Australia . She was manned by a crew of twelve: the Master, (Captain Mylius, previously 1st Mate of La Bella, appointed Captain to La Bella on 6th February 1903) 2 Mates, Cook, six able seamen, one ordinary seaman and a boy. Bad weather en-route caused her to shelter at Burnie on Tasmania's North West coast. On November 10th, the 37th day of her journey, La Bella approached Warrnambool. Captain Mylius steered her towards Lady Bay Channel in heavy south-west seas and evening mist. He ordered the helmsman to steer for the light. As the ship came round, a tremendous sea struck her on the port quarter, causing her to breach broadside in a north-westerly direction into breakers. The helm was brought round twice more, but each time heavy seas broke over her, the third time throwing the La Bella on to a submerged reef in Lady Bay now known as La Bella Reef (about 100 yards from the Warrnambool breakwater). The sea was so rough that it even wrenched a one-and-a-half ton anchor from its fastenings and into the sea. As Captain Mylius headed to the steel wheelhouse, intending to send up a rocket flare, a huge sea slammed the steel door into him (resulting in massive bruising front and back) Despite his injuries he still managed to set off a blue light, which he held up in his hands. La Bella’s lifeboats were filled with sea water and broke up on their chocks. The blue light was the first indication to people on shore that there was a ship in distress. The Harbour Master, Captain Roe (who lived in the Harbour Master’s House opposite Flagstaff Hill), organised a group of volunteers to crew the lifeboat because the trained crew was unavailable; the crewmen were working on a steamer in Port Fairy at the time. He then poured oil onto the water to try and smooth the sea. At around 11pm three of the crew took shelter in the steel forecastle but the sea crashed into it and broke it up. While the rest of the crew and onlookers watched helplessly in the moonlight the bodies were washed away into the sea, never to be seen again. Some of the crew lashed themselves to the weather rail to keep from being washed away. Watson, the ordinary seaman, became tangled in the rigging lines and was too weak to move, so the 2nd Mate, Robertson, put a line onto him so that he wouldn’t wash off. Around 11pm three of the crew were unconscious from exhaustion. The situation on La Bella was becoming dangerous. The 2nd Mate moved to the ‘house’ and soon afterwards the ship slipped in the heavy sea. The lashings of the 1st Mate and the ‘boy’ Denham had kept them safe until about 2am when they were washed overboard; no one was able to help. One by one, the exhausted crew were being washed overboard, too weak to hold on any longer. During the night the La Bella had broken into two and the deckhouse ran out towards the sea. Two more men drowned when trying to reach the lifeboat. By sunrise the only survivors of the twelve were the Master, 2nd Mate and three seamen. Early in the morning Captain Roe used the rocket apparatus on shore to try and shoot a line to the ship for a safer rescue but each attempt fell short of the target. Several attempts were made by the lifeboat to rescue the stricken sailors, but the rough conditions made this difficult for the boat to get close enough to the ship and the lifeboat had to return to shore. During a final attempt to reach the ship Captain Mylius ordered his men to jump into the sea. Leonard Robertson, 2nd mate, jumped and swam towards the lifeboat, taking hold of the boat hook offered to him. Oscar Rosenholme managed to reach the boat floating on a piece of timber from the ship’s load and a third survivor, Noake, also made the boat. Along with the lifeboat rescue crew, 25 year old William Ferrier rowed his small dingy through the heavy seas and managed to rescue the Captain, whom he landed on the breakwater. Ferrier then returned to the ship to attempt a final rescue, losing his oars and rowlocks into the high sea. Using just a spare paddle he skulled towards the La Bella, reaching her stern in time to cut loose the lone surviving sailor, Payne, from the lashing that held him to the ship; the terrified sailor dropped from the ship and into the dingy. Shortly after the last man was rescued, the La Bella was lifted by a huge wave and crashed back down on the reef; she broke up and sank. The ordeal had lasted ten hours. The survivors were taken to the nearby Bay View Hotel and gratefully received warm food and clothing, medical attention and a place to sleep. In the following days an unidentified body of a young person was washed ashore; it was either Watson or Denham. The body was buried in the Warrnambool cemetery with an appropriate gravestone and inscription. William Ferrier became a national hero as news of the daring rescue spread. In recognition of his bravery in the two daring rescues he was awarded the Silver Medal for Bravery by the Royal Humane Society and was honoured in the letter from the Prime Minister and the Parliament of the Commonwealth, telegrams and a cheque for £20 from the Governor General, over £150 subscribed by the public, including Warrnambool and district and readers of The Argus, and a gold medal from the Glenelg Dinghy Club of South Australia. Ferrier’s rescue efforts are one of the most heroic in Victoria’s shipwreck history. (William Ferrier’s son, Frank, received a similar award almost fifty years later, when he helped rescue four members of the crew on the yacht Merlan, after it ran on to a reef near the Point Lonsdale Lighthouse. ) The wreck of La Bella now lies on her port side in 13 metres of sheltered water inside the reef she struck. The bow section is relatively intact and part of the stern has drifted north-easterly towards the mouth of the Hopkins River. The reef the La Bella struck now bears its name. Those five rescued from the La Bella were Captain George Mylius, Leonard Robertson (2nd Mate, 21 years old), R. Payne, Oscar Rosenholme and Jack Noake. Those seven who lost their lives were Mr Coulson (1st mate), Charles Jackman (cook) Gustave Johnson, Pierre Johann and Robert Gent (all able seamen), Harry Watson (ordinary seaman) and Jack Denham (ship’s boy). Captain Mylius was found guilty of careless navigation; he had sailed into the bay without the services of a pilot. His Master Certificate was suspended for twelve months. Later he was also charged with manslaughter of one of the crew who had died when the La Bella was wrecked, but found not guilty. The event’s adverse publicity and damage to his career took a toll on his health and he died of a heart attack six months after the wreck; he was only thirty-seven. His body was buried in the Melbourne General Cemetery. The La Bella was “the best documented of all sailing ships owned in New Zealand”. Her record books, ship logs, correspondence and supporting papers are still available. At the time of the tragedy she was owned by Messers David C.Turnbull and Co. of Timaru, New Zealand timber merchants and shipping agents, who had purchased her on 13th December 1901. A detailed account of the last journey of La Bella can be read in “Leonard Robertson, the Whangaroa & La Bella” written by Jack Churchouse, published in 1982 by Millwood Press Ltd, Wellington, NZ.This painting of the La Bella by Philip J. Gray is part of the La Bella Collection and is significant at both a local and state level. Its connection to the La Bella shipwreck and the rescue of five survivors highlights the dangers of Victoria’s Shipwreck Coast. The painting connects with other objects and artefacts associated with the wreck of the La Bella. This painting is significant because of its association with the sailing ship “La Bella” . the “La Bella” is of local and state and national significance. It is one of the only two shipwrecks discovered in Lady Bay, Warrnambool, out of the 15-17 shipwrecks in the bay. Large framed painting of the three masted barquentine "La Bella" fully rigged. Painted by Phillip J Gray. A fine printed line squares off the painting. Beneath painting and line is a gold plate with black copper plate designating "La Bella" is encased in glass, surrounded by a silver-metal frame. Yellow and brown paper label is adhered to back of painting. Picture framed by Kosnar in Melbourne."The La Bella" on gold plaque Logo of "K" inside a brown square. "GRAY 3135, Y04/111", "ANOTHER KOSNAR FEATURE" flagstaff hill, warrnambool, shipwrecked-coast, flagstaff-hill, flagstaff-hill-maritime-museum, maritime-museum, shipwreck-coast, flagstaff-hill-maritime-village, painting, la bella, artist phillip j gray, maritime painting, lady bay warrnambool -
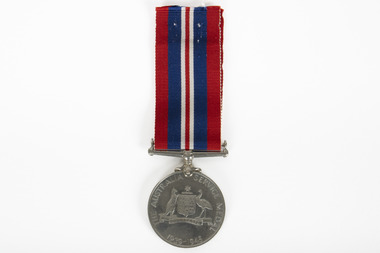 The Beechworth Burke Museum
Medal - Service Medal, c1948
... A army service medal featuring a silver pendant and a dark... service medal featuring a silver pendant and a dark blue, white ...An Australia Service Medal 1939 - 1945, issued to Corporal Joan Cahill. During her service, Joan serviced in the Signals Branch of the Australian Women's Army Service.A army service medal featuring a silver pendant and a dark blue, white, and red striped ribbonFRONT: AUSTRALIA SERVICE MEDAL / 1939-1945 / BACK: G:BR:OMN:REX ET INDIAE IMP: GEORGIV S VI /burke museum, beechworth, army service, australian women's army service, army medal, ww2, wwii, world war two -
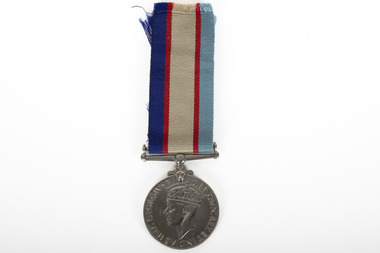 The Beechworth Burke Museum
Medal - Service Medal, c1948
... A army service medal featuring a silver pendant and a light... VI A army service medal featuring a silver pendant ...An Army Medal 1939 - 1945, issued to Corporal Joan Cahill. During her service, Joan serviced in the Signals Branch of the Australian Women's Army Service.A army service medal featuring a silver pendant and a light blue, dark blue, white, and red striped ribbonFRONT: 1939 / 1945 BACK: G:BR:OMN:REX ET INDIAE IMP: GEORGIV S VIburke museum, beechworth, army service, australian women's army service, army medal, ww2, wwii, world war two -
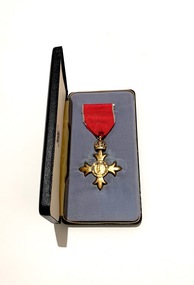 The Beechworth Burke Museum
Medal - Order of the British Empire Medal, 01/01/1976
David Aloysius Patrick McKenzie-McHarg, L.I.B, O.B.E was born on 20th June 1918 in Albury, NSW to Hugh Patrick McKenzie-McHarg and Laura May (Dunne) McKenzie-McHarg. McKenzie-McHarg served on the Council of the United Shire of Beechworth for more than a decade during the 1960s-70s, including seven years as president. He was renowned as a public speaker and played a significant role in the community. In recognition for his outstanding achievements and services rendered to the Beechworth community he was awarded an Order of the British Empire (OBE) in 1976. David McKenzie-McHarg died on 6th June 1992 and is buried in Beechworth Cemetery. David McKenzie-McHarg’s wife, Marjorie Jean McKenzie McHarg, was well known to the Beechworth community as a brilliant pianist and played at all the balls and house parties. Apparently, she could play without sheet-music and would only have to hear a tune once to play it to near perfection. Together, they were a formidable asset to the Beechworth community over many years The British honours system has various orders, usually relating to the monarchy, military and colonial officials. An OBE (or order of the British Empire) is given for an outstanding achievement or service to the community. This will have had a long-term, significant impact and stand out as an example to others. This Order was established by George V in 1917 in response to recognising the thousands of men and women who served in a variety of non-combatant roles during the First world war who didn’t otherwise receive any formal recognition but were certainly worthy of acknowledgement. Recommendations for appointments to this Order were originally made on the nomination of the United Kingdom, however this soon became available to Commonwealth countries as well. However, Australia officially ceased to recommend the Order of the British Empire in 1989 with the establishment of the Order of Australia. Silver badge suspended from red ribbon with pearl-grey edges. The badge is in the form of a cross patonce (having the arms growing broader and floriated toward the end), the obverse of which bears the same field as the star pictures George V and Queen Mary. The reverse bears George V's Royal and Imperial Cypher. Both are within a ring bearing the motto of the Order: FOR GOD AND THE EMPIRE. The presentation case in which the medal is housed is of a black outer boarder edge leatherette finishing, block letters in gold OBE. The inside has a cream velvet base with a silk padded liner to the roof with the full set of Royal Mint Crest Mark. Obverse: FOR GOD AND THE EMPIRE / burke museum, obe, obe medal, beechworth, david mckenzie-mcharg, british honours system, george v, beechworth community, order of australia., order of the british empire, marjorie jean mckenzie mcharg -
 Flagstaff Hill Maritime Museum and Village
Functional object - Ship's Wheel, 1871 or earlier
The ship building company E. & A. Sewall, from Bath, Maine, USA, built many ships that had wheels with the same decorative, starburst pattern on them as this particular wheel segment, including the Eric the Red. The wheel was manufactured by their local Bath foundry, Geo. Moulton & Co. and sold to the Sewall yard for $100, according to the construction accounts of the vessel. Eric the Red was a wooden, three masted clipper ship. She had 1,580 tons register and was the largest full-rigged ship built at Bath, Maine, USA in 1871. She was built and registered by Arthur Sewall, later to become the partnership E. & A. Sewall, and was the 51st ship built by this company. The annually-published List of Merchant Vessels of the U.S. shows that Bath was still the home port of Eric the Red in 1880. The vessel was named after the Viking discoverer, Eric the Red, who was the first European to reach the shores of North America (in 980AD). The ship Eric the Red at first traded in coal between America and Britain, and later traded in guano nitrates from South America. In 1879 she was re-metalled and was in first class condition. On 10th June 1880 (some records say 12th June) Eric the Red departed New York for Melbourne and then Sydney. She had been commissioned by American trade representatives to carry a special cargo of 500 exhibits (1400 tons) - about a quarter to a third of America’s total exhibits - from America for the U.S.A. pavilion at Melbourne’s first International Exhibition. The exhibits included furniture, ironmongery, wines, chemicals, dental and surgical instruments, paper, cages, bronze lamp trimmings, axles, stamped ware, astronomical and time globes, samples of corn and the choicest of leaf tobacco. Other general cargo included merchandise such as cases of kerosene and turpentine, brooms, Bristol's Sarsaparilla, Wheeler and Wilson sewing machines, Wheeler’s thresher machine, axe handles and tools, cases of silver plate, toys, pianos and organs, carriages and Yankee notions. The Eric the Red left New York under the command of Captain Z. Allen (or some records say Captain Jacques Allen) and 24 other crew including the owner’s son third mate Ned Sewall. There were 2 saloon passengers also. On 4th September 1880 the ship had been sailing for an uneventful 85 days and the voyage was almost at its end. Eric the Red approached Cape Otway in a moderate north-west wind and hazy and overcast atmosphere. Around 1:30am Captain Allen sighted the Cape Otway light and was keeping the ship 5-6 miles offshore to stay clear of the hazardous Otway Reef. However he had badly misjudged his position. The ship hit the Otway Reef about 2 miles out to sea, south west of the Cape Otway light station. Captain Allen ordered the wheel to be put ‘hard up’ thinking that she might float off the reef. A heavy sea knocked the man away from the wheel, broke the wheel ropes and carried away the rudder. The sea swamped the lifeboats, the mizzenmast fell, with all of its rigging, then the mainmast fell and the ship broke in two. Some said that the passenger Vaughan, who was travelling for his health and not very strong, was washed overboard and never seen again. The ship started breaking up. The forward house came adrift with three of the crew on it as well as a longboat, which the men succeeded in launching and keeping afloat by continually bailing with their sea boots. The captain, the third mate (the owner’s son) and others clung to the mizzenmast in the sea. Then the owner’s son was washed away off the mast. Within 10 minutes the rest of the ship was in pieces, completely wrecked, with cargo and wreckage floating in the sea. The captain encouraged the second mate to swim with him to the deckhouse where there were other crew but the second mate wouldn’t go with him. Eventually the Captain made it to the deckhouse and the men pulled him up. At about 4:30am the group of men on the deckhouse saw the lights of a steamer and called for help. At the same time they noticed the second mate and the other man had drifted nearby, still on the spur, and pulled them both onto the wreck. The coastal steamer Dawn was returning to Warrnambool from Melbourne, its sailing time different to its usual schedule. Cries were heard coming from out of the darkness. Captain Jones sent out two life boats, and fired off rockets and blue lights to illuminate the area. They picked up the three survivors who were in the long boat from Eric the Red. Two men were picked up out of the water, one being the owner’s son who was clinging to floating kerosene boxes. At daylight the Dawn then rescued the 18 men from the floating portion of the deckhouse, which had drifted about 4 miles from where they’d struck the reef. Shortly after the rescue the deckhouse drifted onto breakers and was thrown onto rocks at Point Franklin, about 2 miles east of Cape Otway. Captain Jones had signalled to Cape Otway lighthouse the number of the Eric the Red and later signalled that there was a wreck at Otway Reef but there was no response from the lighthouse. The captain and crew of the Dawn spent several more hours searching unsuccessfully for more survivors, even going back as far as Apollo Bay. On board the Dawn the exhausted men received care and attention to their needs and wants, including much needed clothing. Captain Allen was amongst the 23 battered and injured men who were rescued and later taken to Warrnambool for care. Warrnambool’s mayor and town clerk offered them all hospitality, the three badly injured men going to the hospital and others to the Olive Branch Hotel, then on to Melbourne. Captain Allen’s leg injury prevented him from going ashore so he and three other men travelled on the Dawn to Portland. They were met by the mayor who also treated them all with great kindness. Captain Allen took the train back to Melbourne then returned to America. Those saved were Captain Z. Allen (or Jacques Allen), J. Darcy chief mate, James F. Lawrence second mate, Ned Sewall third mate and owner’s son, John French the cook, C. Nelson sail maker, Clarence W. New passenger, and the able seamen Dickenson, J. Black, Denis White, C. Herbert, C. Thompson, A. Brooks, D. Wilson, J. Ellis, Q. Thompson, C. Newman, W. Paul, J. Davis, M. Horenleng, J. Ogduff, T. W. Drew, R. Richardson. Four men had lost their lives; three of them were crew (Gus Dahlgreen ship’s carpenter, H. Ackman steward, who drowned in his cabin, and George Silver seaman) and one a passenger (J. B. Vaughan). The body of one of them had been found washed up at Cape Otway and was later buried in the lighthouse cemetery; another body was seen on an inaccessible ledge. Twelve months later the second mate James F. Lawrence, from Nova Scotia, passed away in the Warrnambool district; an obituary was displayed in the local paper. The captain and crew of the Dawn were recognised by the United States Government in July 1881 for their humane efforts and bravery, being thanked and presented with substantial monetary rewards, medals and gifts. Neither the ship, nor its cargo, was insured. The ship was worth about £15,000 and the cargo was reportedly worth £40,000; only about £2,000 worth had been recovered. Cargo and wreckage washed up at Apollo Bay, Peterborough, Port Campbell, Western Port and according to some reports, even as far away as the beaches of New Zealand. The day after the wreck the government steam ship Pharos was sent from Queenscliff to clear the shipping lanes of debris that could be a danger to ships. The large midship deckhouse of the ship was found floating in a calm sea near Henty Reef. Items such as an American chair, a ladder and a nest of boxes were all on top of the deckhouse. As it was so large and could cause danger to passing ships, Captain Payne had the deckhouse towed towards the shore just beyond Apollo Bay. Between Apollo Bay and Blanket Bay the captain and crew of Pharos collected Wheeler and Wilson sewing machines, nests of boxes, bottles of Bristol’s sarsaparilla, pieces of common American chairs, axe handles, a Wheelers’ Patent thresher and a sailor’s trunk with the words “A. James” on the front. A ship’s flag-board bearing the words “Eric the Red” was found on the deckhouse; finally those on board the Pharos had the name of the wrecked vessel. During this operation Pharos came across the government steamer Victoria and also a steamer S.S. Otway, both of which were picking up flotsam and wreckage. A whole side of the hull and three large pieces of the other side of the hull, with some of the copper sheathing stripped off, had floated on to Point Franklin. Some of the vessels yards and portions of her masts were on shore. The pieces of canvas attached to the yards and masts confirmed that the vessel had been under sail. The beach there was piled with debris several feet high. There were many cases of Diamond Oil kerosene, labelled R. W. Cameron and Company, New York. There were also many large planks of red pine, portions of a small white boat and a large, well-used oar. Other items found ashore included sewing machines (some consigned to ‘Long and Co.”) and notions, axe and scythe handles, hay forks, wooden pegs, rolls of wire (some branded “T.S” and Co, Melbourne”), kegs of nails branded “A.T. and Co.” from the factory of A. Field and Son, Taunton, Massachusetts, croquet balls and mallets, buggy fittings, rat traps, perfumery, cutlery and Douay Bibles, clocks, bicycles, chairs, a fly wheel, a cooking stove, timber, boxes, pianos, organs and a ladder. (Wooden clothes pegs drifted in for many years). There seemed to be no personal luggage or clothing. The Pharos encountered a long line, about one and a half miles, of floating wreckage about 10 miles off land, south east of Cape Otway, and in some places about 40 feet wide. It seemed that more than half of it was from Eric the Red. The ship’s crew rescued 3 cases that were for the Melbourne Exhibition and other items from amongst the debris. There were also chairs, doors, musical instruments, washing boards, nests of trunks and fly catchers floating in the sea. Most of the goods were saturated and smelt of kerosene. A section of the hull lies buried in the sand at Parker River Beach. An anchor with chain is embedded in the rocks east of Point Franklin and a second anchor, thought to be from Eric the Red, is on display at the Cape Otway light station. (There is a photograph of a life belt on the verandah of Rivernook Guest House in Princetown with the words “ERIC THE RED / BOSTON”. This is rather a mystery as the ship was registered in Bath, Maine, USA.) Parts of the ship are on display at Bimbi Park Caravan Park and at Apollo Bay Museum. Flagstaff Hill Maritime Village also has part of the helm (steering wheel), a carved wooden sword (said to be the only remaining portion of the ship’s figurehead; further research is currently being carried out), a door, a metal rod, samples of wood and a medal for bravery. Much of the wreckage was recovered by the local residents before police and other authorities arrived at the scene. Looters went to great effort to salvage goods, being lowered down the high cliff faces to areas with little or no beach to collect items from the wreckage, their mates above watching out for dangerous waves. A Tasmanian newspaper reports on a court case in Stawell, Victoria, noting a man who was caught 2 months later selling tobacco from the wreckage of Eric the Red. Some of the silverware is still treasured by descendants of Mr Mackenzie who was given these items by officials for his help in securing the cargo. The gifts included silver coffee and tea pots, half a dozen silver serviette rings and two sewing machines. The wreck and cargo were sold to a Melbourne man who salvaged a quantity of high quality tobacco and dental and surgical instruments. Timbers from the ship were salvaged and used in the construction of houses and sheds around Apollo Bay, including a guest house, Milford House (since burnt down in bushfires), which had furniture, fittings and timber on the dining room floor from the ship. A 39.7 foot long trading ketch, the Apollo, was also built from its timbers by Mr Burgess in 1883 and subsequently used in Tasmanian waters. It was the first attempt at ship building in Apollo bay. In 1881 a red light was installed about 300 feet above sea level at the base of the Cape Otway lighthouse to warn ships when they were too close to shore; It would not be visible unless a ship came within 3 miles from it. This has proved to be an effective warning. The State Library of Victoria has a lithograph in its collection depicting the steamer Dawn and the shipwrecked men, titled. "Wreck of the ship Eric the Red, Cape Otway: rescue of the crew by the Dawn". “The Eric the Red is historically significant as one of Victoria's major 19th century shipwrecks. (Heritage Victoria Eric the Red; HV ID 239) The wreck led to the provision of an additional warning light placed below the Cape Otway lighthouse to alert mariners to the location of Otway Reef. The site is archaeologically significant for its remains of a large and varied cargo and ship's fittings being scattered over a wide area. The site is recreationally and aesthetically significant as it is one of the few sites along this coast where tourists can visit identifiable remains of a large wooden shipwreck, and for its location set against the background of Cape Otway, Bass Strait, and the Cape Otway lighthouse.“ (Victorian Heritage Database Registration Number S239, Official Number 8745 USA) Segment of a ship's wheel, or helm, from the wreck of the sailing ship Eric the Red. The wheel part is an arc shape from the outer rim of the wheel and is made up of three layers of timber. The centre layer is a dark, dense timber and is wider than the two outer layers, which are less dense and lighter in colour. The wheel segment has a vertically symmetrical, decorative copper plate inlaid on the front. The plate has a starburst pattern; six stars decorate it, each at a point where there is a metal fitting going through the three layers of timber to the rear side of the wheel. On the rear each of the six fittings has an individual copper star around it. The edges of the helm are rounded and bevelled, polished to a shine in a dark stain. Around each of the stars, front and back, the wood is a lighter colour, as though the metal in that area being polished frequently. The length of the segment suggests that it has probably come from a wheel or helm that had ten spokes. (Ref: F.H.M.M. 16th March 1994, 239.6.610.3.7. Artefact Reg No ER/1.)flagstaff hill, warrnambool, shipwrecked-coast, flagstaff-hill, flagstaff-hill-maritime-museum, maritime-museum, shipwreck-coast, flagstaff-hill-maritime-village, ship's-wheel, eric-the-red, helm, shei's wheel, ship's steering wheel -
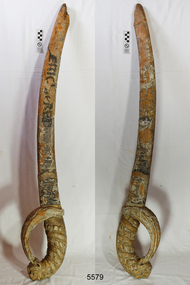 Flagstaff Hill Maritime Museum and Village
Decorative object - Sword, 1871 or earlier
This wooden sword is said to “possibly be the only remaining part of the figurehead from the sailing ship Eric the Red.” It was previously part of the collection of the old Warrnambool Museum and the entry in its inventory says “Wooden sword, portion of the figurehead, held by “Eric the Red” at the bow.” A large part of the ship’s hull was found on the rocks and a figurehead may have been attached or washed up on the shore. The shipping records for E. & A. Sewall, the builders, owners and managers of Eric the Red, are now preserved in the Maine Maritime Museum. There is no photograph on record of Eric the Red but photographs of other ships built around that time by the same company show that these did not have figureheads, and there is no record found of a figurehead for Eric the Red being ordered or paid for. Further research is being carried out. The ship building company E. & A. Sewall, from Bath, Maine, USA, built Eric the Red, a wooden, three masted clipper ship. She had 1,580 tons register and was the largest full-rigged ship built at Bath, Maine, USA in 1871. She was built and registered by Arthur Sewall, later to become the partnership E. & A. Sewall, and was the 51st ship built by this company. The annually-published List of Merchant Vessels of the U.S. shows that Bath was still the home port of Eric the Red in 1880. The vessel was named after the Viking discoverer, Eric the Red, who was the first European to reach the shores of North America (in 980AD). The ship Eric the Red at first traded in coal between America and Britain, and later traded in guano nitrates from South America. In 1879 she was re-metalled and was in first class condition. On 10th June 1880 (some records say 12th June) Eric the Red departed New York for Melbourne and then Sydney. She had been commissioned by American trade representatives to carry a special cargo of 500 exhibits (1400 tons) - about a quarter to a third of America’s total exhibits - from America for the U.S.A. pavilion at Melbourne’s first International Exhibition. The exhibits included furniture, ironmongery, wines, chemicals, dental and surgical instruments, paper, cages, bronze lamp trimmings, axles, stamped ware, astronomical and time globes, samples of corn and the choicest of leaf tobacco. Other general cargo included merchandise such as cases of kerosene and turpentine, brooms, Bristol's Sarsaparilla, Wheeler and Wilson sewing machines, Wheeler’s thresher machine, axe handles and tools, cases of silver plate, toys, pianos and organs, carriages and Yankee notions. The Eric the Red left New York under the command of Captain Z. Allen (or some records say Captain Jacques Allen) and 24 other crew including the owner’s son third mate Ned Sewall. There were 2 saloon passengers also. On 4th September 1880 the ship had been sailing for an uneventful 85 days and the voyage was almost at its end. Eric the Red approached Cape Otway in a moderate north-west wind and hazy and overcast atmosphere. Around 1:30am Captain Allen sighted the Cape Otway light and was keeping the ship 5-6 miles offshore to stay clear of the hazardous Otway Reef. However he had badly misjudged his position. The ship hit the Otway Reef about 2 miles out to sea, south west of the Cape Otway light station. Captain Allen ordered the wheel to be put ‘hard up’ thinking that she might float off the reef. A heavy sea knocked the man away from the wheel, broke the wheel ropes and carried away the rudder. The sea swamped the lifeboats, the mizzenmast fell, with all of its rigging, then the mainmast fell and the ship broke in two. Some said that the passenger Vaughan, who was travelling for his health and not very strong, was washed overboard and never seen again. The ship started breaking up. The forward house came adrift with three of the crew on it as well as a longboat, which the men succeeded in launching and keeping afloat by continually bailing with their sea boots. The captain, the third mate (the owner’s son) and others clung to the mizzenmast in the sea. Then the owner’s son was washed away off the mast. Within 10 minutes the rest of the ship was in pieces, completely wrecked, with cargo and wreckage floating in the sea. The captain encouraged the second mate to swim with him to the deckhouse where there were other crew but the second mate wouldn’t go with him. Eventually the Captain made it to the deckhouse and the men pulled him up. At about 4:30am the group of men on the deckhouse saw the lights of a steamer and called for help. At the same time they noticed the second mate and the other man had drifted nearby, still on the spur, and pulled them both onto the wreck. The coastal steamer Dawn was returning to Warrnambool from Melbourne, its sailing time different to its usual schedule. Cries were heard coming from out of the darkness. Captain Jones sent out two life boats, and fired off rockets and blue lights to illuminate the area. They picked up the three survivors who were in the long boat from Eric the Red. Two men were picked up out of the water, one being the owner’s son who was clinging to floating kerosene boxes. At daylight the Dawn then rescued the 18 men from the floating portion of the deckhouse, which had drifted about 4 miles from where they’d struck the reef. Shortly after the rescue the deckhouse drifted onto breakers and was thrown onto rocks at Point Franklin, about 2 miles east of Cape Otway. Captain Jones had signalled to Cape Otway lighthouse the number of the Eric the Red and later signalled that there was a wreck at Otway Reef but there was no response from the lighthouse. The captain and crew of the Dawn spent several more hours searching unsuccessfully for more survivors, even going back as far as Apollo Bay. On board the Dawn the exhausted men received care and attention to their needs and wants, including much needed clothing. Captain Allen was amongst the 23 battered and injured men who were rescued and later taken to Warrnambool for care. Warrnambool’s mayor and town clerk offered them all hospitality, the three badly injured men going to the hospital and others to the Olive Branch Hotel, then on to Melbourne. Captain Allen’s leg injury prevented him from going ashore so he and three other men travelled on the Dawn to Portland. They were met by the mayor who also treated them all with great kindness. Captain Allen took the train back to Melbourne then returned to America. Those saved were Captain Z. Allen (or Jacques Allen), J. Darcy chief mate, James F. Lawrence second mate, Ned Sewall third mate and owner’s son, John French the cook, C. Nelson sail maker, Clarence W. New passenger, and the able seamen Dickenson, J. Black, Denis White, C. Herbert, C. Thompson, A. Brooks, D. Wilson, J. Ellis, Q. Thompson, C. Newman, W. Paul, J. Davis, M. Horenleng, J. Ogduff, T. W. Drew, R. Richardson. Four men had lost their lives; three of them were crew (Gus Dahlgreen ship’s carpenter, H. Ackman steward, who drowned in his cabin, and George Silver seaman) and one a passenger (J. B. Vaughan). The body of one of them had been found washed up at Cape Otway and was later buried in the lighthouse cemetery; another body was seen on an inaccessible ledge. Twelve months later the second mate James F. Lawrence, from Nova Scotia, passed away in the Warrnambool district; an obituary was displayed in the local paper. The captain and crew of the Dawn were recognised by the United States Government in July 1881 for their humane efforts and bravery, being thanked and presented with substantial monetary rewards, medals and gifts. Neither the ship, nor its cargo, was insured. The ship was worth about £15,000 and the cargo was reportedly worth £40,000; only about £2,000 worth had been recovered. Cargo and wreckage washed up at Apollo Bay, Peterborough, Port Campbell, Western Port and according to some reports, even as far away as the beaches of New Zealand. The day after the wreck the government steam ship Pharos was sent from Queenscliff to clear the shipping lanes of debris that could be a danger to ships. The large midship deckhouse of the ship was found floating in a calm sea near Henty Reef. Items such as an American chair, a ladder and a nest of boxes were all on top of the deckhouse. As it was so large and could cause danger to passing ships, Captain Payne had the deckhouse towed towards the shore just beyond Apollo Bay. Between Apollo Bay and Blanket Bay the captain and crew of Pharos collected Wheeler and Wilson sewing machines, nests of boxes, bottles of Bristol’s sarsaparilla, pieces of common American chairs, axe handles, a Wheelers’ Patent thresher and a sailor’s trunk with the words “A. James” on the front. A ship’s flag-board bearing the words “Eric the Red” was found on the deckhouse; finally those on board the Pharos had the name of the wrecked vessel. During this operation Pharos came across the government steamer Victoria and also a steamer S.S. Otway, both of which were picking up flotsam and wreckage. A whole side of the hull and three large pieces of the other side of the hull, with some of the copper sheathing stripped off, had floated on to Point Franklin. Some of the vessels yards and portions of her masts were on shore. The pieces of canvas attached to the yards and masts confirmed that the vessel had been under sail. The beach there was piled with debris several feet high. There were many cases of Diamond Oil kerosene, labelled R. W. Cameron and Company, New York. There were also many large planks of red pine, portions of a small white boat and a large, well-used oar. Other items found ashore included sewing machines (some consigned to ‘Long and Co.”) and notions, axe and scythe handles, hay forks, wooden pegs, rolls of wire (some branded “T.S” and Co, Melbourne”), kegs of nails branded “A.T. and Co.” from the factory of A. Field and Son, Taunton, Massachusetts, croquet balls and mallets, buggy fittings, rat traps, perfumery, cutlery and Douay Bibles, clocks, bicycles, chairs, a fly wheel, a cooking stove, timber, boxes, pianos, organs and a ladder. (Wooden clothes pegs drifted in for many years). There seemed to be no personal luggage or clothing. The Pharos encountered a long line, about one and a half miles, of floating wreckage about 10 miles off land, south east of Cape Otway, and in some places about 40 feet wide. It seemed that more than half of it was from Eric the Red. The ship’s crew rescued 3 cases that were for the Melbourne Exhibition and other items from amongst the debris. There were also chairs, doors, musical instruments, washing boards, nests of trunks and fly catchers floating in the sea. Most of the goods were saturated and smelt of kerosene. A section of the hull lies buried in the sand at Parker River Beach. An anchor with chain is embedded in the rocks east of Point Franklin and a second anchor, thought to be from Eric the Red, is on display at the Cape Otway light station. (There is a photograph of a life belt on the verandah of Rivernook Guest House in Princetown with the words “ERIC THE RED / BOSTON”. This is rather a mystery as the ship was registered in Bath, Maine, USA.) Parts of the ship are on display at Bimbi Park Caravan Park and at Apollo Bay Museum. Flagstaff Hill Maritime Village also has part of the helm (steering wheel), a carved wooden sword (said to be the only remaining portion of the ship’s figurehead; further research is currently being carried out), a door, a metal rod, samples of wood and a medal for bravery. Much of the wreckage was recovered by the local residents before police and other authorities arrived at the scene. Looters went to great effort to salvage goods, being lowered down the high cliff faces to areas with little or no beach to collect items from the wreckage, their mates above watching out for dangerous waves. A Tasmanian newspaper reports on a court case in Stawell, Victoria, noting a man who was caught 2 months later selling tobacco from the wreckage of Eric the Red. Some of the silverware is still treasured by descendants of Mr Mackenzie who was given these items by officials for his help in securing the cargo. The gifts included silver coffee and tea pots, half a dozen silver serviette rings and two sewing machines. The wreck and cargo were sold to a Melbourne man who salvaged a quantity of high quality tobacco and dental and surgical instruments. Timbers from the ship were salvaged and used in the construction of houses and sheds around Apollo Bay, including a guest house, Milford House (since burnt down in bushfires), which had furniture, fittings and timber on the dining room floor from the ship. A 39.7 foot long trading ketch, the Apollo, was also built from its timbers by Mr Burgess in 1883 and subsequently used in Tasmanian waters. It was the first attempt at ship building in Apollo bay. In 1881 a red light was installed about 300 feet above sea level at the base of the Cape Otway lighthouse to warn ships when they were too close to shore; It would not be visible unless a ship came within 3 miles from it. This has proved to be an effective warning. The State Library of Victoria has a lithograph in its collection depicting the steamer Dawn and the shipwrecked men, titled. "Wreck of the ship Eric the Red, Cape Otway: rescue of the crew by the Dawn".The Eric the Red is historically significant as one of Victoria's major 19th century shipwrecks. (Heritage Victoria Eric the Red; HV ID 239) The wreck led to the provision of an additional warning light placed below the Cape Otway lighthouse to alert mariners to the location of Otway Reef. The site is archaeologically significant for its remains of a large and varied cargo and ship's fittings being scattered over a wide area. The site is recreationally and aesthetically significant as it is one of the few sites along this coast where tourists can visit identifiable remains of a large wooden shipwreck, and for its location set against the background of Cape Otway, Bass Strait, and the Cape Otway lighthouse. (Victorian Heritage Database Registration Number S239, Official Number 8745 USA)This carved wooden sword, recovered from the Eric the Red, is possibly the only portion of the figurehead recovered after the wreck. There are spirals carved from the base of the handle to the top of the sword. The hilt of the sword is a lion’s head holding its tail in its mouth, the tail forming the handle. The blade of the sword has engraved patterns on it. Tiny particles of gold leaf and dark blue paint fragments can be seen between the carving marks. There are remnants of yellowish-orange and crimson paint on the handle. At some time after the sword was salvaged the name of the ship was hand painted on the blade in black paint. The tip of the sword has broken or split and the remaining part is charcoal in appearance. On both the tip and the base of the handle are parts made where the sword could have been joined onto the figurehead There is a white coating over some areas of the sword, similar to white lead putty used in traditional shipbuilding. The words “ERIC the RED” have been hand painted on the blade of the sword in black paint sometime after it was salvaged.flagstaff hill, flagstaff hill maritime museum and village, warrnambool, maritime museum, maritime village, great ocean road, shipwreck coast, sword, wooden sword, eric the red, carved sword, figurehead, snake head on sword -
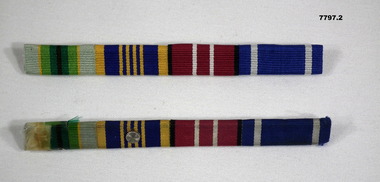 Bendigo Military Museum
Award - SERVICE RIBBONS
Service ribbons issued to Australian Service Personnel for all areas of their service. Items relate to the collection of Craig Triffett. Refer Cat. No.5997.5.Two copies of Service Ribbons for areas as follows, mounted on metal backings:- 1. Australian Service medal (Grey, Yellow, Light Green, Dark green, black. 2. Long Service Medal with rosette on one (Blue and Yellow). 3. Australian Defence Medal (Black, Red and White). 4. Nato Medal Bosnia Herzagovnia (Blue and White). 1. Has silver back with stud at one end and pin at other. 2. Has gold metal back with extended pin hook and Rosette.service ribbons, craig triffett -
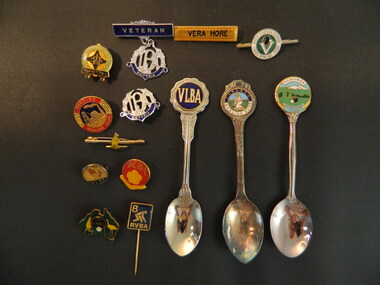 Kiewa Valley Historical Society
Medals & Spoons - Tawonga Bowling Club
Tawonga Bowling Club is well established with many local men and women involved. Bowling is a popular sport enabling locals to socialise and compete with each other and visit other clubs. Players formed teams representing the Tawonga Club and traveled to other clubs and on occasion represented their area eg. Nth East VictoriaVera Hore lived in Tawonga in the Kiewa Valley and was a prominent member of the Tawonga Bowling Club.5 silver spoons - 4 Tawonga Bowling Club with coloured picture on handle end. The 5th has 'Vera' on the handle end. 11 badges of varying shapes and colours all with pins, 2 silver, rest gold, 1 Ballarat, 1 Yallourn, 1 Bendigo, 6 Victoria, 1 Veteran and 1 'Vera Hore'tawonga bowling club, tawonga, vera hore -
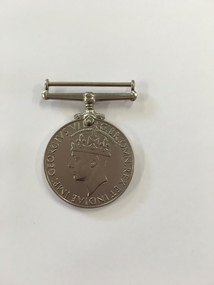 Warrnambool and District Historical Society Inc.
Medal, Medal 1939-1945, Post 1945
... This medal is round and silver metal with a crowned image... fought in World War 2. VX 88010 E. H. Swan This medal is round ...This medal was awarded to Ernest Henry Swan. He served from December 1941 to July 1942 in the Citizen Military Forces and from July 1942 to September 1944 in the Australian Imperial Forces. His reason for discharge was reserved occupation. He held the rank of corporal in 26th Motor regiment. He was born in Colac 19/11/1919 to Ernest Swan and Daisy Johnson. He died 04/08/2009 and is buried at the Warrnambool cemetery. During his life he farmed a soldiers’ settlers block in the Grasmere area, north of Warrnambool.A common item which commemorates the service of many military personnel which fought in World War 2.This medal is round and silver metal with a crowned image of George VI on the obverse and the reverse side has an image of a lion standing on top of a dragon like creature. The edge is plain with name and number of the recipient engraved. A bar is attached at the top. VX 88010 E. H. Swan -
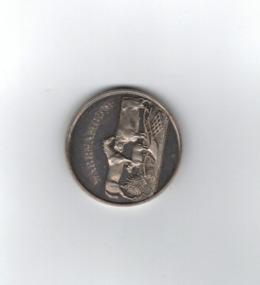 Warrnambool and District Historical Society Inc.
Medal, Villiers and Heytesbury Agricultural Association (Daniel Hourigan 1877), C 1877
This medal was awarded at the Villiers and Heytesbury Agricultural Association Annual Show to Daniel Hourigan in 1877 for his yearling colt by 'Prince of the Isles'. The formation of the Villiers and Heytesbury Agricultural Association arose out of a meeting at Woodford in 1853 and the first Show was held in Warrnambool in 1855 on a green bound by Fairy, Henna and Koroit Streets. It was held there until 1875 when it moved to the present Warrnambool Showgrounds in Koroit Street. At the 37th Annual Show in 1890 Warrnambool held its first Grand National Show, a title granted by the Chamber of Agriculture in Victoria. The Villiers and Heytesbury Agricultural Association became known as the Warrnambool Agricultural Show in 1911. Daniel Hourigan was a farmer, road contractor, poundkeeper and auditor who lived in the Tower Hill area in the 19th century. This medal is of considerable interest as it is a memento of the Villiers and Heytesbury Agricultural Association Annual Show in the 19th century. Annual Agricultural Shows have been an important feature of agricultural life in Victoria since the early days of European settlement and a feature of agricultural life in the Warrnambool district since the 1850s. The medal is also of great interest because it was awarded to Daniel Hourigan, a prominent settler in the Warrnambool district in the 19th century. .1 Circular silver disc with image of horse, bull, sheep, wheat sheaf and plough on the reverse with script around edge of obverse with awardees details engraved in the centre. Edge of the medal is plain. .2 Square maroon leather case with small metal clasp and hinge. Lined on the interior with blue velvet and cream silk.Obverse :" Warrnambool" engraved above image of cattle. W J Taylor London Reverse : Villiers & Heytesbury Agricultural Association in low relief around the edge. 1st prize awarded to Daniel Houriganfor yearling colt , "Prince of the Isles Annual Show 10th October 1877.warrnambool, villiers and heytesbury, daniel hourigan, prince of the isles, 1877, villiers & heytesbury agricultural show -
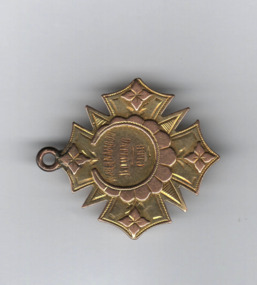 Warrnambool and District Historical Society Inc.
Medal, Warrnambool Bowling Club, C1900
This is a medal awarded by the Warrnambool Bowling Club to William Kucks in 1900. The Warrnambool Bowling Club was established in 1867 with a green near the Royal Hotel in Timor Street. The club still operates in Kelp Street. William Kucks was a long-time resident of Warrnambool, operating a boarding house in the town in Timor Street in the 1860s and then a bakery in the same street for many years.This medal is of considerable interest as a memento of the Warrnambool Bowls Club in the early 20th century and of a well-known 19th century and early 20th century Warrnambool resident, William Kucks.This silver gilt covered medallion is diamond shaped with the edge incised into four small triangles and four curved and pointed shapes. The latter have four adjacent leaf shapes in relief. The centralised text is surrounded by a horseshoe of graduated, rounded pentagons. It has a small ring attached at the top.There is a hinged pin and catch on the reverse.WARRNAMBOOL BOWLING CLUB CHAMPIONSHIP 1899-1900 W KUCKS Runner up Hallmarkwarrnambool bowling club, william kucks, warrnambool history -
 Warrnambool and District Historical Society Inc.
Medal, German Mothers Cross, Late 1930s
This item is a bronze German MotherCross. The MotherCross was given to German mothers of pure Aryan heritage before and during World War Two. Adolf Hitler wanted to encourage population growth and keep the German mother at home. Mothers were awarded these crosses according to the number of children they had – gold crosses for eight or more children, silver for six or seven children and bronze for four or five children. The crosses were presented to mothers on 4th August, the birthday of Hitler’s mother and also on Mother’s Day. They could only be worn on special occasions around the neck on a blue cord with two white stripes. This German MotherCross is a bronze one and has on one side ‘Der Deutschen Mutter’ and on the other side ‘16 Dezember 1938’ and Adolf Hitler’s signature. The date indicates when the award was first instituted. There were at least 8 million recipients of the medal.The recipient and donor of this medal are not known but it is a very interesting and unusual memento of World War Two.This is a metal medal in the shape of a cross with a bronze ridged background in the shape of a rectangle. The cross is enamelled in blue and white and has a round bronze disc in the centre and lettering with a blue swastika on a white background. There is lettering on the back of the cross. A metal catch is attached to the top of the cross and remnants of a blue and white cloth cord are looped over the catch. One small fragment of the cord is detached. The medal is in a box which is not the original container. ‘Der Deutschen Mutter’ ‘16 Dezember 1938’ plus Adolf Hitler’s signature world war two, german mothercross -
 Waverley RSL Sub Branch
Medallion on Stand
Silver Medallion on stand presented to Vterans from the Shire of Rippon WWIIObverse For God King and Country Reverse Shire of Rippon to I Lowe in apprecation of war service 1939 1945medal, badge, medallion -
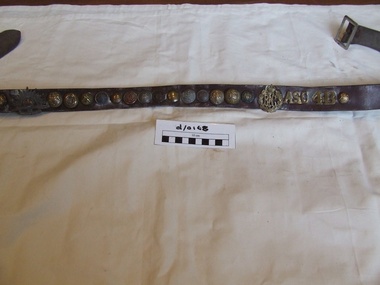 Waverley RSL Sub Branch
belt
Uniform belt decorated with buttons collected during WWIBrown leather belt with silver buckle . There are 16 metal (brass copper and steel) regimental uniform buttons mounted on the belt including i German buttonmedal, badge, medallion, insignia -
Ballarat Clarendon College
Trophy, Junior Cup 1902
E Holgate went on to serve with distinction in World War 1 and awarded a Military Medal in Belgium in 1917. The College Cup (Junior and Senior) was awarded to the competitor who won all three 120, 250 and 440 yard races. For more information about the College Cup see Ring-A-Roo December 1993.Significant indication of the place of athletics within the school program in the late 1800's.Large, ornate, engraved silver cup with two handles on wooden standInscription on cup face: JUNIOR CUP / won by / E HOLGATE Inscription on cup verso: BALLARAT COLLEGE / Minervan / 1902 edward-spencer-holgate, trophy, silver-cup, junior-cup, w-w-1, ballarat-college, -
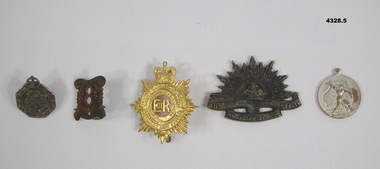 Bendigo Military Museum
Badge - BADGES VARIOUS, 1) Wallace Bishop, 1) 1940, .2) pre 1939, .4) 1939 - 45, .5) 1945
.1) Badge metal 6 sided crown at top, centre has Coat of Arms, one lug on the rear and numbered. .2) Badge pressed brass squarish shape scroll at top and bottom, centre has a figure "8", two lugs on rear. .3) Badge pressed metal gold colour crown at top, centre has letters "ER" surrounded by circles and a wreath, two lugs on rear. .4) Badge pressed metal blackened with Rising Sun depiction crown at top. .5) Badge round silver colour, one side is map of Australia with person over, rear has map depiction of the world..1) On front, "Reserve Occupation", on rear, "A17936", "Issued by the Commonwealth Govt". .2) On front, "8th Aust Inf Regt, cede Nullis". .3) On front, "Royal Australian Army Service Corp". .4) "Australian Commonwealth Military Forces". .5) On one side, "1945", on other, "Victory Medal".badges, uniform, headwear -
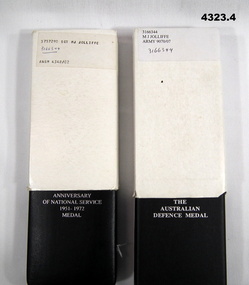 Bendigo Military Museum
Container - MEDAL PRESENTATION BOXES, Post 1956
... ". .3) "On cover in silver, "The Australian Defence Medal". .4... in silver, "Anniversary of National Service 1951 - 1972 Medal". .2 ...Boxes are for medals, ribbons Cat No 4322.3 Max Jolliffe and for service details..1) Medal Presentation Box hinged, black outer fabric covers, inside has black felt and white linen lining. .2) Medal box cover, white cardboard for .1) .3) Medal presentation box same as .1) .4) Medal box cover same as .2) All have different markings..1) On cover in silver, "Anniversary of National Service 1951 - 1972 Medal". .2) "3757290 SGT M J Jolliffe ANSM 4348/02". .3) "On cover in silver, "The Australian Defence Medal". .4) "3166344 M J Jolliffe Army 9070/07"containers, medals, presentation -
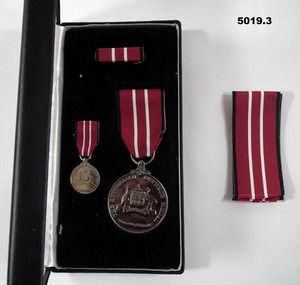 Bendigo Military Museum
Award - MEDAL SET, Australian Defence Force, 2006
Medal issued to Margaret LAMBIE F 3492 W.R.A.A.C. Margaret married Peter Dodd, refer Cat No 2436.2P for his service details..1) White cardboard outer sleeve protector for .2) .2) Box set consisting of black outer colour case, white silk and black felt lined. Set in place in the black felt lining are”Australian defence Medal”, miniature “Australian Defence Medal”, “Australian Defence medal” ribbon. .3) Plastic bag with spare ribbon for large and small medal..1) On sleeve, “F 3492 M LAMBIE ArmyADM/(x)6147/06”. .2) On Box in silver colour, “THE AUSTRALIAN DEFENCE MEDAL” .2) On large ADF Medal, “F3492 M LAMBIE”awards, medals, w.r.a.a.c