Showing 453 items
matching the platoon
-
 National Vietnam Veterans Museum (NVVM)
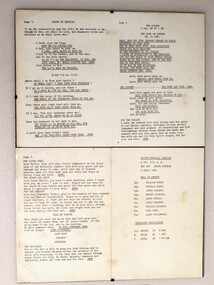
Ephemera - Order of Service, framed
Operation Hammersley , 10 February until 9 March 1970, was undertaken by a combined force of: C Company, 8th Battalion, the Royal Australian Regiment (8RAR); armoured personnel carriers from 3 Cavalry Regiment; tanks from 1 Armoured Regiment; sappers from the Royal Australian Engineers; a mortar section from 8RAR’s Support Company; air support, and even a Navy destroyer off-shore to provide gunfire support. The operation aimed to protect 17 Construction Squadron, Royal Australian Engineers, at a quarry in the western foothills of the Long Hai hills. The Long Hai hills were a stronghold for the Viet Cong, who used the caves there as a bunker complex and had planted many landmines and booby traps in the area. Over two fierce weeks, 8 RAR carried out patrols and conducted ambushes, engaging VC troops and eventually capturing the bunker system. However, it was a costly campaign. In total, over 70 Australians were killed or wounded during the operation. The worst day for mine casualties in Australia's war in Vietnam occurred on 28 February 1970. It became known as 'Black Saturday". Nine members of 8RAR were killed and 29 wounded. This item is the Order of Service from the memorial service held at Nui Dat on 3 April 1970 to honour those killed at Long Hai. It was issued to the donor, National Serviceman G G Ravenscroft, who was serving in 1 Platoon, A Company 8RAR during Operation Hammersley, and received a minor shrapnel wound on Black Saturday.Two typed A-4 pages that have been folded into booklet, now flattened and framed. Listed are the prayers, Bible readings and sermon given, along with the names of the 8 fallen soldiers, and the chaplains who officiated.8rar, long hai, long hai hills, black saturday, 1970, operation hammersley, ravenscroft, geoff ravenscroft, memorial service -
 Melbourne Legacy
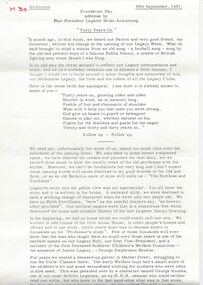
Document - Speech, 'Forty Years On' Foundation Day 1967 address by Past President Brian Armstrong (H30), 1967
In September 1967 Legatee Brian Armstrong gave a speech about the first 40 years of Legacy. He mentions; 'what, in all humility, does our word 'Legacy' conjure up? To each of us, no doubt, something different, according to the the period of our service and our particular interests. To the early ones, many pictures, grave and gay, many voices, two perhaps in particular, both on the brink of a discovery. One, rather triumphant, - 'I've got it, we will call it "Legacy", but we will give instead of take, and look for nothing in return; and two years later, a quiet voice, still with us, thank heaven, "Have you ever through what the dying wish of our cobbers would have been?". This is our link. On the one hand, the still sharp memory of the lost men of Anzac France, Belgium, and the Middle East. One's own private nightmare - the expression in the eyes of the men of one's own Platoon, particularly towards the end, when they were warned for yet another operation. Men who by some miracle had survived twelve and more separate and individual hells between Gallipoli and Villers-Bretonneux and who knew full well that the Hindenberg Line was yet to come. And then we lucky ones were home again . . . Now here it was, the link, the chance to do something of real personal value, something with a real future. We do not speak a great deal of these things, nor would I do so now if I were not sure that everyone of you who wears this small badge has travelled much the same road. " He mentions the Legacy Diary belonging to Frank Meldrum, from 1925, with records on the start of Legacy. It is believed this diary was one of many documents lost in a fire. He mentions the fire destroyed the home and valuable library of Legatee Jimmy Downing. The notation H30 in red pen shows that it was part of the archive project that was trying to capture the history of Legacy. A speech given at a Legacy function that has significant information about the first forty years of Legacy.White foolscap paper with black type x 5 pages of an address by Legatee Armstrong on 26 September 1967.Handwritten H30 in red pen.history, speakers, speech, founding legatee -
 Kew Historical Society Inc
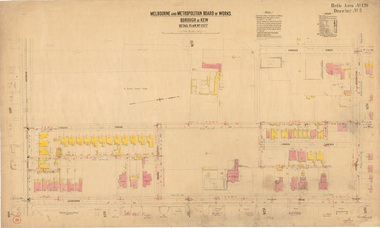
Plan, Borough of Kew Detail Plan No.1577, 1904
The Melbourne and Metropolitan Board of Works (MMBW) plans were produced from the 1890s to the 1950s. They were crucial to the design and development of Melbourne's sewerage and drainage system. The plans, at a scale of 40 feet to 1 inch (1:480), provide a detailed historical record of Melbourne streetscapes and environmental features. Each plan covers one or two street blocks (roughly six streets), showing details of buildings, including garden layouts and ownership boundaries, and features such as laneways, drains, bridges, parks, municipal boundaries and other prominent landmarks as they existed at the time each plan was produced. (Source: State Library of Victoria)This plan forms part of a large group of MMBW plans and maps that was donated to the Society by the Mr Poulter, City Engineer of the City of Kew in 1989. Within this collection, thirty-five hand-coloured plans, backed with linen, are of statewide significance as they include annotations that provide details of construction materials used in buildings in the first decade of the 20th century as well as additional information about land ownership and usage. The copies in the Public Record Office Victoria and the State Library of Victoria are monochrome versions which do not denote building materials so that the maps in this collection are invaluable and unique tools for researchers and heritage consultants. A number of the plans are not held in the collection of the State Library of Victoria so they have the additional attribute of rarity.Original survey plan, issued by the MMBW to a contractor with responsibility for constructing sewers in the area identified on the plan within the Borough of Kew. The plan was at some stage hand-coloured, possibly by the contractor, but more likely by officers working in the Engineering Department of the Borough and later Town, then City of Kew. The hand-coloured sections of buildings on the plan were used to denote masonry or brick constructions (pink), weatherboard constructions (yellow), and public buildings (grey). MMBW Plan No.1577 includes some of the most significant houses in Kew: Herbert Henty’s ‘Roxeth’ (now part of Trinity Grammar), ‘Butleigh Wooton’, ‘Bokara’ and ‘Harrow’. It also includes the streets that have since changed their names. That part of College Parade linked to Glenferrie Road is now named College Place, College Parade now extends further north, and Charles Street did not yet reach Barkers Road. Roxeth is one of a number of Henty houses in Kew. Herbert Henty made his home here and was elected a member of Kew Municipal Council in 1864 and mayor in 1868-69. Walter Henry Serle, of Harrow served in the First World War. He was awarded the Military Medal ‘’For conspicuous bravery and devotion to duty. On 29th September near BELLICOURT he showed the greatest bravery and determination when his platoon was attacked by enemy bombing parties. It was due largely to his personal efforts that all the attacks were repulsed. Until wounded, his utter disregard of personal safety and boldness in dealing with the attacks were the means of saving the situation and were an inspiring example to his men.’melbourne and metropolitan board of works, detail plans, maps - borough of kew, mmbw 1577, cartography -
 Federation University Historical Collection
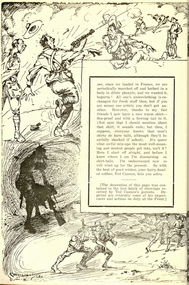
Work on paper - Cartoons, Edwin Cannon, World War One Cartoons by Edwin Cannon, 1916, 1916
Edwin (Ted) Cannon was born at Ballarat on 30 July 1895, the only son of Edwin and Florence Cannon. He studied art at the Ballarat School of Mines Technical Art School. Ted displayed a talent for industrial design but it was his black and white work that 'drew' most attention. His cartoons and caricatures, heavily influenced by Phil May, were of a particularly high standard. During the Ballarat Exhibition of 1913 Ted's work was singled out for notice and he was awarded First Prize. After completing his art course Ted was employed as an assistant teacher at the Ballarat Technical Art School, before taking a position as cartoonist with the Ballarat Star newspaper at the end of 1914. With the war raging in Europe Ted discovered a darker aspect for his artwork, but, still, he could not resist depicting Turkey as a full-feathered, fez-wearing bird. In 1915 Ted was awarded the prestigious Victorian Education Department Senior Technical School Scholarship. Only months into his scholarship, Ted volunteered for the AIF. A keen member of the local 71st "City of Ballarat" Regiment Ted was already primed for a life in the army. He embarked from Port Melbourne on 23 November 1915 with reinforcements to the 6th Infantry Battalion bound for Egypt. It was during the Battle of Pozieres on the Western Front that Ted Cannon came into his own. His work with the Scout Platoon (under the command of Lieutenant Jack Rogers) sketching the enemy's gun emplacements proved invaluable to the Brigade and brought Ted to the attention of the Australian High Command. On 13 September 1916 Ted was given a special assignment for General C.B.B. White. Ted was sent out forward of the Old Mill at Verbrandenmolen (in the Ypres Salient) to draw a panorama of the German lines in the area from Hill 60 to The Bluff. It was a hazardous task and Ted was warned to be careful. Tragically he was sniped by an enemy machine-gunner and sustained severe abdominal wounds. Stretcher-bearers rushed him to the 17th Casualty Clearing Station where he was operated on by the doctors at 8.30 that night. With little chance of success, but ever resilient, Ted remained conscious almost to the end. He died early in the morning of the 14 September 1916. His body was buried in the large Military Cemetery at Lijssenthoek. See http://www.ballarat.edu.au/about-ub/history/art-and-historical-collection/ub-honour-roll/c/edwin-joseph-ted-cannon-1895-1916Digital images of a number of cartoons published in the Ballarat School of Mines Students' Magazine, 1916. Ted Cannon sent cartoons home to Ballarat from the World War One front.edwin cannon, ted cannon, cartoons, world war, world war 1 -
 Victorian Interpretive Projects Inc.
Cartoons, World War One Cartoons by Edwin Cannon
Edwin (Ted) Cannon was born at Ballarat on 30 July 1895, the only son of Edwin and Florence Cannon. He studied art at the Ballarat School of Mines Technical Art School. Ted displayed a talent for industrial design but it was his black and white work that 'drew' most attention. His cartoons and caricatures, heavily influenced by Phil May, were of a particularly high standard. During the Ballarat Exhibition of 1913 Ted's work was singled out for notice and he was awarded First Prize. After completing his art course Ted was employed as an assistant teacher at the Ballarat Technical Art School, before taking a position as cartoonist with the Ballarat Star newspaper at the end of 1914. With the war raging in Europe Ted discovered a darker aspect for his artwork, but, still, he could not resist depicting Turkey as a full-feathered, fez-wearing bird. In 1915 Ted was awarded the prestigious Victorian Education Department Senior Technical School Scholarship. Only months into his scholarship, Ted volunteered for the AIF. A keen member of the local 71st "City of Ballarat" Regiment Ted was already primed for a life in the army. He embarked from Port Melbourne on 23 November 1915 with reinforcements to the 6th Infantry Battalion bound for Egypt. It was during the Battle of Pozieres on the Western Front that Ted Cannon came into his own. His work with the Scout Platoon (under the command of Lieutenant Jack Rogers) sketching the enemy's gun emplacements proved invaluable to the Brigade and brought Ted to the attention of the Australian High Command. On 13 September 1916 Ted was given a special assignment for General C.B.B. White. Ted was sent out forward of the Old Mill at Verbrandenmolen (in the Ypres Salient) to draw a panorama of the German lines in the area from Hill 60 to The Bluff. It was a hazardous task and Ted was warned to be careful. Tragically he was sniped by an enemy machine-gunner and sustained severe abdominal wounds. Stretcher-bearers rushed him to the 17th Casualty Clearing Station where he was operated on by the doctors at 8.30 that night. With little chance of success, but ever resilient, Ted remained conscious almost to the end. He died early in the morning of the 14 September 1916. His body was buried in the large Military Cemetery at Lijssenthoek. See http://www.ballarat.edu.au/about-ub/history/art-and-historical-collection/ub-honour-roll/c/edwin-joseph-ted-cannon-1895-1916 Digital images of a number of cartoons published in the Ballarat School of Mines Students' Magazine, 1916. Ted Cannon sent cartoons home to Ballarat from the World War One front.edwin cannon, ted cannon, cartoons, world war, world war 1 -
 Waverley RSL Sub Branch
Print Kapyong, Kapyong
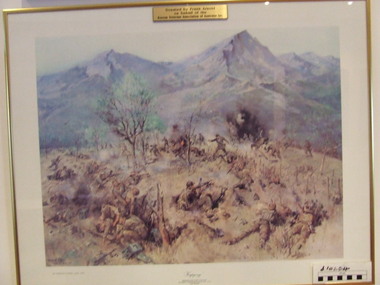
On 23 April, the 3rd Battalion, Royal Australian Regiment (3 RAR), under the command of Lieutenant Colonel Bruce Ferguson, and the 2nd Battalion, Princess Patricia's Canadian Light Infantry, occupied prominent hills on either side of the seven-kilometre-wide valley, where a small tributary joined the Kapyong River. Also forward were headquarters units, tanks and artillery. The 1st Battalion, Middlesex Regiment, were to the rear. Early in the evening, retreating South Koreans streamed past the Commonwealth position, with Chinese forces closely intermingled. Soon afterwards a platoon of American tanks supporting 3 RAR was overrun. The Kapyong valley was too large an area to defend with the forces available, and the brigade was spread very thinly. Throughout the night the Chinese repeatedly pressed the Australian positions, attacking in waves over their own dead and wounded. At dawn, A Company, under the command of Major Bernard "Ben" O'Dowd, found that the Chinese had infiltrated its position, but a counter-attack was able to eject them. Meanwhile B Company, which had spent the night on a hill near the riiver, discovered Chinese occupying some old bunkers on a small knoll. Hand-to-hand fighting ensued with grenades and bayonets. C Company, under the command of Captain Reg Saunders, was in position to reinforce both A and B Companies. "Major O'Dowd then directed the radio operator to contact anyone. The American 1st Marine Division answered but their operator refused to believe who our operator was speaking for. Major O'Dowd took the phone and demanded to speak to the commanding officer. The general in charge of the [Marine] division came on the phone and told O'Dowd we didn't exist as we had been wiped out the night before. Major O'Dowd said, 'I've got news for you, we are still here and we are staying here.'" Private Patrick Knowles, 3 RAR, on the morning of 24 April 1951 Fighting continued throughout the day with the Australians holding their positions, and the Chinese also engaging D Company. But late on 24 April, with their position now untenable, the Australians were forced into a fighting withdrawal down a ridge to the valley, where they rejoined the brigade. Their withdrawal was supported by New Zealand artillery from the 16th Field Regiment. Having found the Canadian position unassailable, the Chinese made no further attacks. By the afternoon of 25 April the road through to the Canadians had been cleared of Chinese and 2 PPCLI was relieved by US Army units. On Anzac Day 1951, the Australians rested after a long fight. Thirty-two Australians were killed and 53 were wounded for their part in stalling the Chinese advance and preventing Seoul from falling into enemy hands. Lieutenant Colonel Bruce Ferguson was awarded the Distinguished Service Order for his skilful leadership, and the Australian and Canadian battalions both received United States Presidential Distinguished Unit Citations for their part in the battle. http://www.awm.gov.au/exhibitions/korea/operations/kapyong/Print of painting of action in Kapyong Korea in wooden frame under glassDonated by Frank Arnold on behalf of Korean Veterans Association of Australia inc.korea, kapyong, 3rar -
 Red Cliffs Military Museum
Copy of a letter, Letter to Walter West from W.H. Birdwood, 19/4/1919 (exact)
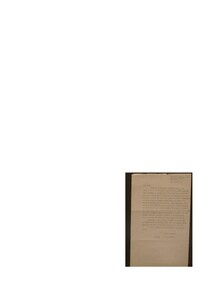
Sent by W.H. Birdwood but no signature. This is another of 5 documents in a large frame called the West Collectioncopy of typed letter to Walter West from W.H. BirdwoodTop left corner: Copy. Top right Australian Imperial Force 130 Horseferry Road, Westminster, S.W.1 19th April, 1919 Dear West, I send you my heartiest congratulations on the award to you of the Military Cross, of which I have only now been informed; in recognition of your very good and gallant work in our operations at Montbregain on 5th October last. When your platoon was held up by heavy fire from a strong post, you most gallantly rushed forwatd alone, and bombing the position captures the gun and crew. Later, when your flank could not make progress owing to fire from a post containing two machine guns, you crawled round to the right, and rushed this post, which you captured with one of the guns, killing three and taking another three of the garrison prisoners. On your company commander becoming casualty, you took command, and consolidated the line with good judgment and ability. throughout you displayed courage, initiative and determination of a very high order. I am indeed pleased that your splendid work has been recognised in this way. with kindest regards and good wishes to you for the future. Yours sincerely. W. H. Birdwood ww1, walter, thomas, west, mm, mc -
 National Vietnam Veterans Museum (NVVM)
Poster - Poster, Information Board, 5 RAR 1966 - 1967 (1st Tour)
An Poster, Information Board of 5 RAR 1966 to 1967 (tst Tour). The 5th Battalion Royal Australian Regiment ("Battalion") were the leading element of the First Australian Task Force (1 ATF) and stationed in Vietnam from 1966 to 1967. The Battalion's task was to break Viet Cong control over the central region of Phuoc Tuy Province - an area that communists had freely operated in since 1945. Commencing of the 24th May 1966, the Battalion conducted its first operation codenamed "Hardihood". Their objective was to sweep and clear areas to the north and east of Nui Dat to a distance of 5000 meters, then create a defensive position to enable 1 ATF to establish an operation base. The Battalion conducted eighteen full-lenght operations as well as numerous day and night cordon and search, search and destroy, ambush and clearing patrols conducted at company, platoon and section levels. the Battalion achieved considerable success during Operations Canberra and Queanbeyan in October 1966 when it swept and cleared the Nui Thi Vai mountain. A Viet Cong base consisting of training facilities, a hospital, booby trap factory and several tonnes of rice was located and destroyed. during phase two (Operation Queanbeyan) the battalion discovered complex cave and tunnel systems along with other fixed installations that were vigorously fought for and destroyed by the battalion. Not only di the caves contain large quantities of weapons, equipment and documents but the 274 VC Regiments deputy commanders radio complex. For bravery and leadership, three Military Crosses, one Military Medal and one Mentioned in Dispatches were awarded. The last was awarded posthumously. However, at the completion of the battalion's first tour, the 274 and 275 Viet Cong Regiments remained functional. While the enemy retained the capacity to inflict serious casualities on smaller allied forces, the Battalion and other elements of the 1 AFt were successful in denying the enemy their previous gains. This enabled the South Vietnamese Government to re-establish control of over 96 per cent of the Phuoc Tuy Province during Australia's involvement. Source O'Neill, RJ Vietnam Task, the 5th Battalion, Royal Australian Regiment 1966/67, Melbourne. Cassell Australia Ltd, 19685 rar, 1st tour 1966 - 1967, operation hardihood, 1st atf base, poster, information board, nui dat, nui thai vai mountains, operation canberra, operation queanbeyan, viet cong, 274 vc regiments -
 Federation University Historical Collection
Medal - Numismatics, 'Dead Man's Penny' for Edwin Joseph 'Ted' Cannon, c1919
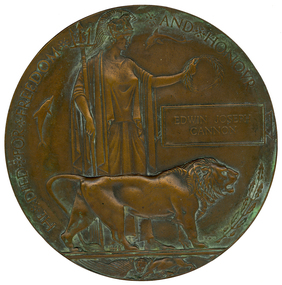
The Dead Man’s Penny is a commemorative medallion which was presented to the next-of-kin of the men and women from England and the Empire who died during World War One. The Dead Man’s Penny was accompanied by a letter from King George V, stating ‘I join with my grateful people in sending you this memorial of a brave life given for others in the Great War’.[http://nma.gov.au/blogs/education/2010/11/14/dead-mans-penny/] Popularly known as the "Dead Man’s Penny", because of the similarity in appearance to the somewhat smaller penny coin. 1,355,000 plaques were issued, which used a total of 450 tonnes of bronze, and continued to be issued into the 1930s to commemorate people who died as a consequence of the war. [http://en.wikipedia.org/wiki/Memorial_Plaque_(medallion)] It was decided that the design of the plaque was to be picked from submissions made in a public competition. Over 800 designs were submitted and the competition was won by the sculptor and medallist Edward Carter Preston with his design called Pyramus, receiving a first place prize of £250.[http://en.wikipedia.org/wiki/Memorial_Plaque_(medallion)] They were initially made at the Memorial Plaque Factory, 54/56 Church Road, Acton, W3, London from 1919. Early plaques did not have a number stamped on them but later ones have a number stamped behind the lion's back leg. [http://en.wikipedia.org/wiki/Memorial_Plaque_(medallion)] Ted Cannon's plaquette does not have a stamped number. Ted Cannon was a gifted artist and cartoonist who studied at the Ballarat School of Mines Technical Art School. During the Battle of Pozieres on the Western Front Ted Cannon worked with the Scout Platoon sketching the enemy's gun emplacements. Ted proved invaluable to the Brigade and brought he came under the attention of the Australian High Command. On 13 September 1916 Ted was given a special assignment for General C.B.B. White. Ted was sent out forward of the Old Mill at Verbrandenmolen (in the Ypres Salient) to draw a panorama of the German lines in the area from Hill 60 to The Bluff. It was a hazardous task and Ted was warned to be careful. Tragically he was sniped by an enemy machine-gunner and sustained severe abdominal wounds. Stretcher-bearers rushed him to the 17th Casualty Clearing Station where he was operated on by the doctors at 8.30 that night. With little chance of success, but ever resilient, Ted remained conscious almost to the end. He died early in the morning of the 14 September 1916. His body was buried in the large Military Cemetery at Lijssenthoek. The effects of the late Ted Cannon were returned to his parents. These were an autograph book, three brushes, prayer book, housewife, whistle, book, hymn book, curios. Another listing gives his effects as "identity disc, letters, photos, wallet, 2 books, Mexican Dollar, 1 cent (Ceylon), 3 German Straps, Fountain Pen, Cigarette-holder, Franc Note, 50 centimes Note, devotional book, mirror, rosary, scapula, metal ring, two combs, book of views, nail clippers, badges, tie clip, Egyptian stamp.[http://recordsearch.naa.gov.au/scripts/Imagine.asp?B=3202589] Ted Cannon was an only child. It is not known how the 'Dead Man's Penny' came into the ownership of the donor, but it is thought that it may have been left in a house owned by the donor's mother. Further information on Ted Cannon can be found at http://bih.ballarat.edu.au/index.php/Edwin_J._Cannon and http://www.ballarat.edu.au/about-ub/history/art-and-historical-collection/ub-honour-roll/c/edwin-joseph-ted-cannon-1895-1916Large bronze medallion or plaquette featuring an image of Lady Britannia surrounded by two dolphins (representing Britain’s sea power) and a lion (representing Britain) standing over a defeated eagle (symbolising Germany). Around the outer edge of the medallion are the words ‘He died for freedom and honour’. Next to Lady Britannia is the deceased solider’s name, with no rank provided to show equality in their sacrifice. (http://nma.gov.au/blogs/education/2010/11/14/dead-mans-penny) The plaque was distributed throughout the British Empire, and the first plaques were distributed in Australia in 1922 "Returned home" by W. & O. Mayne, 2013. ted cannon, edwin joseph cannon, cannon, world war 1, world war -
 Australian Commando Association - Victoria
Book, A history of the 2nd Independent Company and 2/2nd Commando Squadron
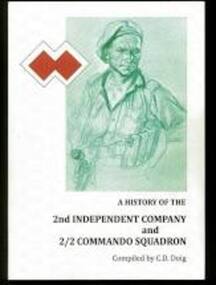
The history of the No. 2 Independent Commando Company and 2/2 Commando Squadron during World War II – scarce as a 1st edition dated 1986. Having completed its training at Foster, on Wilson’s Promontory, Victoria, the 2nd Independent Company was raised and travelled north to Katherine, in the Northern Territory. However, following Japan’s entry into the war, as with the other independent companies that were sent to the islands off Australia, the 2nd was sent to Timor, where it joined the 2/40th Battalion and the rest of Sparrow Force. Sparrow Force divided itself between west Timor, part of the Netherlands East Indies, and east Timor, which belonged to Portugal. The 2/40th Battalion defended the capital of west Timor, Koepang, and the airfield at Penfui. Most of the independent company moved to the airfield at Dili, in east Timor, and the nearby mountains. Portugal was opposed to the stationing of a Dutch or Australian garrison in case this provoked the Japanese, but despite this opposition, on 17 December 1941, elements of the 2nd Independent Company and Dutch troops landed near Dili. On 20 February 1942 the Japanese invaded the island, attacking east and west Timor simultaneously. The 2/40th Battalion held out for three days, but were overrun and were killed or captured. Similarly, the 2nd could not hold the airfield and were also driven back. But they were not captured and instead retreated to the mountains where they conducted a very successful and pursued a guerrilla war against the Japanese which lasted for over a year. Following the capture of Timor, the 2nd occupation the company was listed as “missing”, the company’s signallers were able to build a wireless transmitter, nicknamed ‘Winnie the War Winner’, and on 18/19 April were able to contact Darwin. At the end of May RAN vessels began landing supplies for the Australians on the south coast of east Timor. These supply runs were very dangerous but they allowed the Australians on Timor to continue fighting. In September the guerillas were reinforced with the 2/4th Independent Company. However, this could not go on indefinitely. In August the Japanese lunched a major offensive against the guerrillas and Japanese reprisals against the civilian population of east Timor reduced their support for the Australians. The 2nd (now named the 2/2nd Independent Company) and 2/4th were withdrawn in December and January 1943 respectively. Although the 2/2nd Independent Company is best known for its time on Timor, it also saw extensive service in New Guinea and New Britain. The independent company reformed at the army’s training centre at Canungra, Queensland, where it was reinforced and reequipped. The company then moved to the Atherton Tableland, where it briefly became part of the 2/6th Cavalry (Commando) Regiment. Due to this reorganisation, in October, the 2/2nd Independent Company was renamed the 2/2nd Cavalry (Commando) Squadron. This name was later simplified to just commando squadron. When this happened though, the 2/2nd was back in action. In June 1943 the 2/2nd sailed from Townsville for Port Moresby and was subsequently flown to Bena Bena, in the Bismark Range in New Guinea’s highlands. Here they supported the 2/7th Independent Company in patrolling the Ramu River area. In the second week of July the 2/2nd moved into position, with its headquarters at Bena Bena and with its platoons’ occupying neighbouring positions. By the end of the month their patrols were skirmishing with the Japanese. The 2/2nd remained in New Guinea until October 1944. After 90 days leave, the squadron reformed at Strathpine in Queensland before sailing to New Britain in April 1945. The 2/2nd landed at Jacquinot Bay on 17 April. The squadron then moved to Wide Bay, in order to support the 13th Brigade of the 5th Division, and was based at Lamarien. Following Japan’s surrender and the end of the war, the ranks of the squadron thinned quickly as men were discharged or transferred to other units. For those who were left, they returned to Australia and in early 1946 the 2/2nd Commando Squadron was disbanded. Includes Nominal Roll Soft Cover without Dust Jacket – 270 pages -
 National Vietnam Veterans Museum (NVVM)
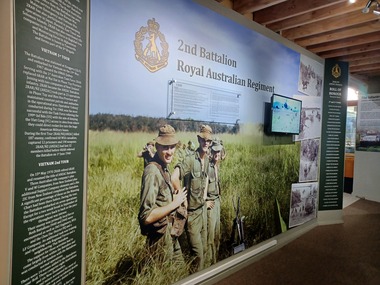
Poster - Poster, Information Board, 2nd Battalion Royal Australian Regiment
Three piece Poster, Information Board. Left on dark green background with yellow Corps Emblem with white text on the history of Vietnam during their 1st and 2nd tour. Centre section there is a coloured photograph of four soldiers standing in a field and four black and white Photograph to the right of the board of soldiers patrolling and resupplying with helicopter. On the right on a dark green background is a Roll of Honour to the many soldiers who lost their lives in Vietnam.2 RAR: This photo was taken by Elvon King of Delta Company in September of 1967. This photo was chosen without the knowledge of the historical significance of the shot, which proved to be very momentous. For within a very short time (about 30 seconds) of the photo being taken a wayward rocket from a U.S. gunship landed amongst this group of men in the photo, resulting in three of them being killed and forteen being wounded. Elvon King was one of the wounded. The three men in the photo are left to right Dennis (Dave) Enright who lost a and foot in the incident. Harry Leggett who received shrapnel wounds, and Stan Radomi who was killed outright. A very poignant moment in time. these thoughts about the incident from Wally Musgrave was one of those severly wounded at the time. What could have been a sunny afternoon at a Newcastle or Bondi Hotel or beer Garden..... After what could have been a week of patrolling, it was back inside the wire to scrub up and top up on fluids. Next morning, at 9.00, we went out side of the wire for a fire power, demonstration to satisfy a visiting General. The sun was shining, no seating, grass wasn't cut but we were young and so we thought bullet proof. then someone asked for the old Iroguois gun ship which had been firing rockets at a dead tree to be swung around to fire rockets over our heads. Why?? I haven't given "why" that much thought, but the 1 metre long port side rocket tumbled down amongst us and I'm sure everyone who was there can close their eyes and still see it today. This tumbling rocket landed where these three mates were standing amongst 11 and 12 platoon's young soldiers, chatting in the sun, then we were sailing through the air. I didn't see the devastation myself. I was under bodies. As first Dustoff priority we were off to 36 Evacuation Hospital at Vung Tau. There were two doos, one to the Morgue and one at the Hospital. Lucky me. I went through the Hospital door. eight major operations at once. three dead, forteen wounded and nothing on record!! Yeah it was a lovely Sunny Day at Nui Dat., we'll leave it at that! We can't change yesterday. I'm just another Nazho.poster, information board, 2 rar, elvon king -
 The Beechworth Burke Museum
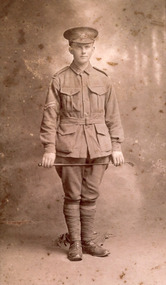
Photograph, 1916-17
Portrait of William Edward Peach in First World War military uniform, holding a crop in front of his thighs with military kit on the ground behind him. A Beechworth postal employee who enlisted in 1915, this photograph is probably taken in 1917, as he is a corporal in the photo and was promoted to this rank in May 1917. This photograph is of historic significance as it depicts William Edward Peach, a Beechworth postal assistant who enlisted in the Australian Imperial Force (AIF) on his nineteenth birthday, 5 August 1915, which required his parents' permission. He was decorated with the military medal for his courage in battle 4/5 October 1917 at the Battle of Broodseinde Ridge near Ypres, the most successful allied attack of the Third Battle of Ypres (31 July to 10 November 1917), also known as the Battle of Paschendale, which saw the greatest loss of human life during World War One, with almost half a million lives were lost on all sides. According to the recommendation for his military medal, Peach 'displayed conspicuous courage and initiative', taking charge after his platoon commander became a casualty, handling the men 'under heavy fire with great skill'. He also assisted the Company Commander in reorganising their military objectives. The photograph is of social as well as historic significance for the Beechworth community, because it provides a direct link between local, national and international histories in relation to Australia' s participation in one of WWI's best-known battles. The record has strong research potential given the ongoing public and scholarly interest in war, history, and especially the ANZAC legend, which is commemorated annually on 25 April, known as ANZAC Day. Peach is also one of the diarists of WWI, including of this significant period of Australian military history, from 1916 to 18, which can be accessed via the Australian War Memorial. Sepia rectangular photograph printed on gloss Kodak photographic paper mounted on board. Reverse: BMM 8779 item catalogue number pencilled in right-hand bottom corner.military medal, defending australia and victoria, military service, hmat a64 demosthenes, wipers, anzac, burke museum, beechworth, ypres, australian military services, beechworth post office, first world war, wartime, our boys, belgium, flanders fields, ww1, british war medal, victory medal, broodseinde, third battle of ypres -
 Bendigo Military Museum
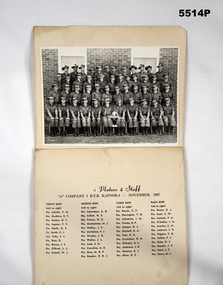
Photograph - GROUP PHOTOGRAPH KAPOOKA 1967, Aust Army, c1967
Item in the collection re Tony Cornelius, refer Cat No 1874.2 for his service details.Group photograph of 6 Pl & Staff A Coy 1 RTB KAPOOKA November 1967. They are in four rows, seated and standing. The man in the centre of the front row is holding a cane under his left arm. On his left is a Corporal. Between them is a little statue of a man, opening his outer shirt revealing Infantry crossed swords T-shirt. The statue has a title at it's base which appears to read "Rec Fitness". The photo is mounted in a folding cardboard cover and one the cover are the names and positions of the men.photo, platoon a.coy, vietnam war -
 4th/19th Prince of Wales's Light Horse Regiment Unit History Room
Training Pamphlet, The War Office, United Kingdom, Infantry Training Volume 1 Infantry Platoon Weapons Pamphlet No 2 Fieldcraft (All Arms) 1948, 1948, Reprinted with Amdt1 1949
In the mid 20th century, the Australian Army used training pamphlets of the British Army. There was a commonality then of weapons, equipment and training doctrine. It was not always a perfect fit. This pamphlet teaches direction finding by the use of the Pole Star at night and the Sun by day in the Northern hemisphere.Used by the Australian Army in mid 20th Century77 page training pamphlet, Published 1948, reprinted with Amdt No 1 of Feb 1949WO Code 8382 Rubber Stamp: "Senior Cadet Unit Inter High School Grenfell" -
 4th/19th Prince of Wales's Light Horse Regiment Unit History Room
Booklet, Alexander Bros, Infantry Training Vol 1 Infantry Platoon Weapons Pam No 13 The Ack Pack Flame Thrower 1952, 1952
Soft covered bookletWO Code No 8760 flame thrower, handbook -
 4th/19th Prince of Wales's Light Horse Regiment Unit History Room
Booklet (3 copies), Infantry Training Vol 1 Infantry Platoon Weapons No 4A Sub-machine Gun 9mm F1 1966, 1966
Soft covered booklet. Two copies amended to Amdt 1, one copy unamendedDSN 7610-66-023-3614sub-machine gun f1 -
 4th/19th Prince of Wales's Light Horse Regiment Unit History Room
Booklet, Defence Printing Esatblishment, Infantry Training Vol 1 Infantry Platoon Weapons Pam No 6A The General Purpose Machine Gun M60 1971, 1974
Soft light blue covered booklet reprinted incorporating amendment No 1. Supersedes Pam Infantry Training Vol 1 Pam 6A The GPMG 1962DSN 7610-66-041-6416m60 machine gun -
 4th/19th Prince of Wales's Light Horse Regiment Unit History Room
Booklet, Infantry Training Vol 1 Infantry Platoon Weapons No 6A General Purpose Machine Gun M60, 1962
Soft covered booklet. Incorporating amendments 1, 2 & 3DSN 7610-66-015-3985m60 machine gun -
 4th/19th Prince of Wales's Light Horse Regiment Unit History Room
Booklet, Infantry Training Vol 1 Infantry Platoon Weapons No 6 Light Machine Gun & Section Handling, 1955
Soft covered booklet incorporating amendments 1,2 & 3WO Code No 8910 light machine gun -
 4th/19th Prince of Wales's Light Horse Regiment Unit History Room
Booklet, Infantry Training Vol 1 Infantry Platoon Weapons No 6 Light Machine Gun & Section Handling, 1955
Soft covered booklet with amendments Nos 1 & 2 containing material for an instructor to teach recruits how to handle and fire the Bren LMG and how to work as a member of a section team.WO Code No 8910bren gun -
 4th/19th Prince of Wales's Light Horse Regiment Unit History Room
Booklet, Infantry Training Vol 1 Infantry Platoon Weapons Part 4 Machine Carbines 1949, April 1951
Soft covered booklet incorporating amendment No 1. Deals with 9mm Owen and Austen Machine Carbinesmachine carbine, owen, austen -
 4th/19th Prince of Wales's Light Horse Regiment Unit History Room
Booklet, Alexander Bros, Infantry Training Vol 1 Infantry Platoon Weapons Pam 6 Light Machine Gun Supplement No 1 Anti-Aircraft LMG, 1951
Soft covered bookletWO 8683bren gun, anti-aircraft -
 4th/19th Prince of Wales's Light Horse Regiment Unit History Room
Booklet, Infantry Training Vol 1 Infantry Platoon Weapons Pam 2 Fieldcraft & Target Detection (All Arms) 1967, 1967
Soft covered booklet providing instructors with information to train soldiers in individual fieldcraft and target detection.DSN 7610-66-026-3591infantry training platoon -
 4th/19th Prince of Wales's Light Horse Regiment Unit History Room
Booklet (4 copies), Infantry Training Vol 1 Infantry Platoon Weapons Pam 3B The 7.62 Self Loading Rifle and Bayonet and 7.62 Automatic Rifle, 1971
... Infantry Training Vol 1 Infantry Platoon Weapons Pam 3B The ...A soft covered booklet providing instructors with the necessary information to develop in soldiers the confidence to handle and maintain these weapons. One booklet has amdt No 1, two have amdts 1 and 2 and one has amdts 1,2 and 3DSN 7610-66-043-7060rifle 7.62 slr, automatic rifle 7.63 -
 4th/19th Prince of Wales's Light Horse Regiment Unit History Room
Booklet (2 copies), Central Drawing Office, Infantry Training Vol 1 Infantry Platoon Weapons Pam 3B The 7.62 Self Loading Rifle and Bayonet, 1961
... Infantry Training Vol 1 Infantry Platoon Weapons Pam 3B The ...A soft covered booklet containing the material necessary to equip an instructor on the weapon. The booklet is set out in lesson plan format.7610-66-013-1640rifle 7.62 slr -
 4th/19th Prince of Wales's Light Horse Regiment Unit History Room
Booklet (2 copies), Infantry Training Vol 1 Infantry Platoon Weapons Pam 5 Pistols, 1966
A soft covered booklet providing instructors with the necessary information to train soldiers to handle and fire the 9 mm self loading pistol and the .38 inch revolver.7160-66-024-7171pistol, 9mm, .38 inch revolver -
 4th/19th Prince of Wales's Light Horse Regiment Unit History Room
Booklet, B & M Ltd, Infantry Training Vol 1 Infantry Platoon Weapons Pam 11 Trained Soldiers Exercises in Handling Weapons, 1955
A soft covered booklet with suggestions for sub-unit commanders in ways of exercising their trained soldiers in the handling of infantry weaponsWO Code No 8930 Adhesive label: "Sgt P W A Fernleigh"infantry weapons training -
 4th/19th Prince of Wales's Light Horse Regiment Unit History Room
Booklet, McCarron Bird & Co, Infantry Training Vol 1 Infantry Platoon Weapons Pam 12 Fire Control & Theory of Small Arms Fire 1949, 1949
A soft covered booklet to provide useful information for Officers and NCOs on the theory of small arms fire and to teach the principles of fire controlWO Code No 8419small arms training -
 4th/19th Prince of Wales's Light Horse Regiment Unit History Room
Booklet, Infantry Training Vol 1 Infantry Platoon Weapons Pam 3C, The Automatic Rifle M-16, 1966
... , The Automatic Rifle M-16 ...A soft covered booklet to provide instructors with the necessary information to train soldiers to handle and fire the M16 Rifle. Amdt 2 with the booklet7610-66-026-3500handbook, m16 rifle -
 4th/19th Prince of Wales's Light Horse Regiment Unit History Room
Booklet (3 copies), Infantry Training Vol 1 Infantry Platoon Weapons Pam 9 Part II, 3.5 inch Rocket Launcher 1953, 1953
A soft covered booklet covering handling, firing and maintenance of the weaponWO Code 87743.5 inch rocket launcher
