Showing 4772 items
matching dream-like
-
 Eltham District Historical Society Inc
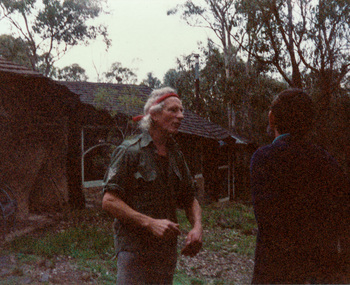
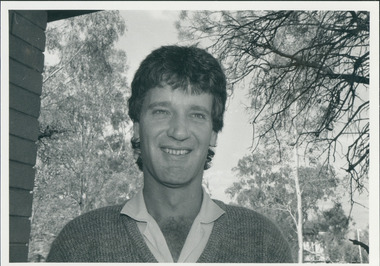
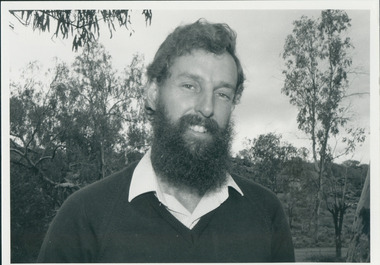
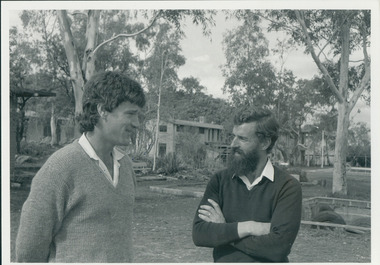
Photograph, Visit to Clifton Pugh's home, Dunmoochin, 26 May 1991, 26/05/1991
[from EDHS Newsletter No. 78, May 1991:] DUNMOOCHIN TRIP "Dunmoochin" was the home of the famous artist Clifton Pugh who died last year. The house also gives an informal name to the surrounding area at Cottles Bridge where artists, conservationists and like minded people have made their homes. This is an area of unconventional houses blending in with the surrounding bushland. The Pugh house is a rambling complex including studios and a large pottery kiln. It contains many of Clifton Pugh's works. For this excursion we have arranged a guided visit of the Pugh house and hope to be able to visit another house in the area. We will also be able to wander through bushland which Clifton had purchased for conservation purposes. This will be an afternoon excursion on Sunday 26th May starting with lunch (bring your own) at 12:30 pm at the Panton Hill Memorial Park. Transport will be by private car but transport can be arranged for those not wishing to drive. There is no cost but we need to be advised of members attending. Advise Russell Yeoman at the May Meeting or by 10th May if you intend to go. We will not be able to add extra people after that date.Three colour photographsactivities, clifton pugh, dunmoochin -
 Federation University Historical Collection
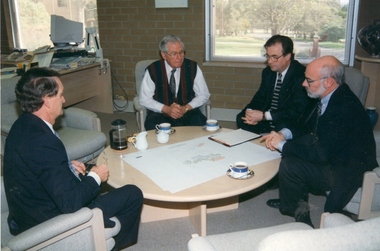
Photograph - Photograph - Colour, Planning Greenhill Enterprise Centre, 1996
At the Ballarat Technology Park (BTP) the spirit of innovation and entrepreneurship enables techno-driven businesses to thrive and prosper, in a dynamic and supportive environment. This fast evolving precinct encourages and supports the development of emerging and existing technology-oriented enterprises. Currently, more than 30 enterprises are located at the Park, including IBM, State Revenue Office, Emergency Services Telecommunications Authority, Primary Health Care and others. The Park's ideal location on the outskirts of Ballarat provides great lifestyle opportunities as well as having the convenience of being close to Melbourne, Geelong, Bendigo and Western Victoria. The BTP is a prestigious 29 hectare site set in a park-like environment, 7km from the thriving regional city of Ballarat. It is easily accessible from Melbourne, Geelong and Bendigo. Adjacent to Federation University's Mt Helen Campus, the BTP is ideally situated to support innovative technology-based enterprises grow and prosper. Enterprises can access skilled graduates through the University, as well as take advantage of the applied, academic and research knowledge available. BTP has been successfully supporting and fostering industry, innovation and job creation since 1995.Colour photograph of four men are seated at a low round table viewing design development drawings of the Greenhill Enterprise Centre prior to commencing documentation for tender purposes. They are Alan Webb (University of Ballarat Director, Buildings and Grounds), Professor David James (University of Ballarat Vice Chancellor), Michael Vincent (architect) and James Crisp (architect).ballarat technology park, university of ballarat., greenhill enterprise centre -
 City of Moorabbin Historical Society (Operating the Box Cottage Museum)
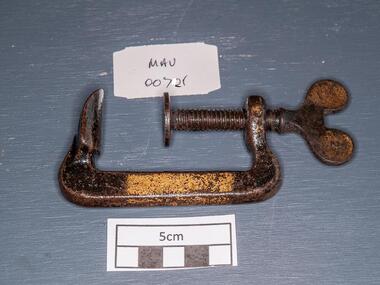
Tools, steel 'G' Clamp, early 20thC
A C-clamp or G- clamp is a type of clamp device typically used to hold a wood or metal work-piece, and often used in, but are not limited to, carpentry and welding. These clamps are called "C" clamps because of their C shaped frame, but are otherwise often called G-clamps or G-cramps because including the screw part they are shaped like an uppercase letter G. The fixed end is not adjustable so size is not variable. G-clamps are typically made of steel or cast iron, though smaller clamps may be made of pot metal. At the top of the "G" is usually a small flat edge. At the bottom is a threaded hole through which a large threaded screw protrudes. One end of this screw contains a flat edge of similar size to the one at the top of the frame, and the other end usually a small metal bar, perpendicular to the screw itself, which is used to gain leverage when tightening the clamp. When the clamp is completely closed, the flat end of the screw is in contact with the flat end on the frame When used some other object or objects will be contained between the top and bottom flat edges. A steel 'G' Clamp tools, g clamp, screws, steel, clamps, metalwork, woodwork, carpentry, early settlers, pioneers, market gardeners, moorabin, bentleigh, cheltenham -
 St Kilda Historical Society
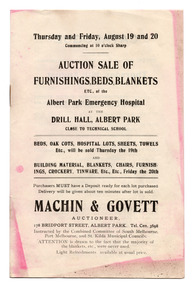
Ephemera - Catalogue, Auction Sale of Furnishings, Beds, Blankets etc of the Albert Park Emergency Hospital, 1920
Catalogue for the auction of items of the Albert Park Emergency Hospital at the Drill Hall, 178 Bridport Street, Albert Park, under instruction of a combined committee of the South Melbourne, Port Melbourne and St Kilda Councils. The full date is not given. During the Spanish Flu epidemic in 1919, 34 emergency hospitals were created in Victoria because the existing hospitals were unable to cope with the demand for care. An Epidemic Hospital was set up in the Drill Room at Albert Park, the expenses shared between the South Melbourne, Port Melbourne and St. Kilda Councils, to serve influenza patients from those local government areas. Each Council had three representatives on the Board of Management. Like the other emergency hospitals, the Albert Park hospital operated only for a short time while the epidemic was at its height. As noted in the catalogue, 'the majority of the blankets, etc. were never used.' It is possible that items advertised in this catalogue were auctioned on Thursday 19 August and Friday 20 August 1920. The items for sale include hospital equipment, furniture, sheets, pillows, towels, building materials, blankets, crockery, cutlery, clothing, furnishings.Document of 3 sheets of white paper (discoloured with age), folded and stapled and printed in blackalbert park emergency hospital, spanish flu, spanish influenza -
 Plutarch Project
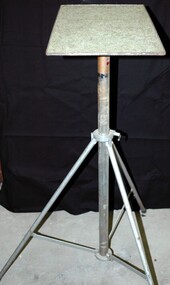
Projector tripod stand, circa 1950's
From January 1959 and until 1982, “Cosmopolitan Motion Pictures”, owned by Mr Peter Yannoudes (Παναγιώτης Γιαννούδης) and Mr Stathis Raftopoulos (Στάθης Ραφτόπουλος) travelled around Australia to entertain the Greek, Turkish, Indian and Yugoslav speaking population of Australia and provide a significant cinema culture. They travelled as far as Perth in WA, Adelaide in SA, Tasmania, Darwin in Nt, Canberra in ACT and Sydney and NSW. However they found themselves also in places like Berri and Renmark in NSW, where concentrations of migrants lived and thrived during the period. Initially they were travelling by train, carrying all their equipment by hand and placing them in boxes and suitcases. However after 1962 when they acquired their first automobile, travelling became less of a burden, nevertheless cumbersome and laborious. They carried with them initially two portable projectors (second one as a backup) and at times travelled with a third in order to ensure that technology will not be letting them down at the time of film projection. At times the films were projected onto a white sheet of cloth because there was no proper screen to project it on at the venue they were using. This projector stand was the actual projector stand used in their trips around Australia.Historic and rarity (only one left that was used by "Cosmopolitan Motion Pictures") Primary significanceMetal construction Projector tripod with a cloth on top to stop damaging the projectors. It has an adjustable height depending that extends to about 1.5 metres.T.J.N. Macey - Toolmaker and Manufacturing Engineerstand, tripod, projector, film, culture, language, greek, entertainment, yiannoudes, γιαννούδης, τρίποδο -
 Plutarch Project
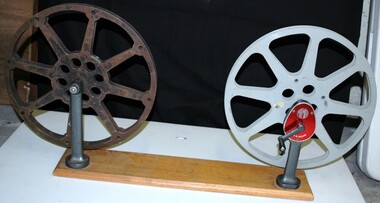
Film rewinder, circa 1950's
From January 1959 and until 1982, “Cosmopolitan Motion Pictures”, owned by Mr Peter Yannoudes (Παναγιώτης Γιαννούδης) and Mr Stathis Raftopoulos (Στάθης Ραφτόπουλος) travelled around Australia to entertain the Greek, Turkish, Indian and Yugoslav speaking population of Australia and provide a significant cinema culture. They travelled as far as Perth in WA, Adelaide in SA, Tasmania, Darwin in Nt, Canberra in ACT and Sydney and NSW. However they found themselves also in places like Berri and Renmark in NSW, where concentrations of migrants lived and thrived during the period. Initially they were travelling by train, carrying all their equipment by hand and placing them in boxes and suitcases. However after 1962 when they acquired their first automobile, travelling became less of a burden, nevertheless cumbersome and laborious. They carried with them initially two portable projectors (second one as a backup) and at times travelled with a third in order to ensure that technology will not be letting them down at the time of film projection. At times the films were projected onto a white sheet of cloth because there was no proper screen to project it on at the venue they were using. This winder was part of the equipment they carried around Australia Historical significance Primarily as it is the actual unit used to manually rewind all films.A film rewinding gadget, perhaps home made, with a wooden base, two reels, and an metal winder used for transferring the film from one reel to the next."Premier - Made in England"winder, film, entertainment, language, greek, yiannoudes, γιαννούδης, plutarch -
 Melbourne Legacy
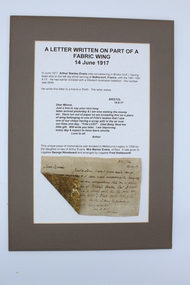
Document, Letter written on part of a fabric wing 14 June 1917, 1917
A wartime letter written by Arthur Evans that was later mounted on card for display purposes. It was donated to Legacy in 1998. The letter was written on the fabric of an aircraft wing. The letter was written by Arthur Stanley Evans while convalescing in Briston in 1917. He had been injured at Bullecourt, France with the 18th-16th AIF. The letter says 'Dear Minnie, Just a line to say your nice long letter arrived yesterday and I am now waiting the money etc. Have run out of paper so am scrawling this on a piece of wing belonging to one of Fritz's tubes that I saw one of our chaps having a scrap with in the air over our lines one day. "Fritz LOST". Glad Betty liked her little gift. Will write you later. I am improving every day and expect to have leave shortly. Love to all, Arthur." Not to let war time shortages of paper get in Arthur Evans way, he improvised and his letter to Minnie, it arrived intact. The fabric would be quite durable and light. A great memento to show family and friends.Despite war time shortages a little ingenuity can overcome many difficulties.Backing, ply board. Letter and short story typed on white cardboard, cardboard fixed to ply backing. Original letter fixed to white cardboard. Lower left hand corner folded over showing the reverse side of the fabric. Original letter rectangular in shape. All of the above is surrounded by a brownish border.The letter, the story and how the letter came to Legacy is printed in brown ink. The original letter is hand written on a piece of wing fabric from a German aircraft shot down over Allied lines.souvenir, world war one -
 Federation University Art Collection
Artwork - Ceramics, 'Dragon' by Heather Wilson, c1985
Heather WILSON (1961- ) Born Rotherham, England. Arrived Australia 1967. Heather Wilson graduated with a Bachelor of Education (Art & Craft) from Melbourne State College in 1982, majoring in Ceramics. Artist's statement - "All of my work is hand built and explores animal forms in various ways. Animals have always fascinated me and have been a part of my work for the last 30 years. Whether appearing as dragons, exotic birds or bones, most of my images have a basis in nature. Sometimes it is just a characteristic or a quirky gesture that will inspire a piece, sometimes a photograph or a drawing done at the zoo or museum. Dragons have always given me the freedom to explore an emotion or attitude without the restrictions of a form being right, no one can tell you what a dragon should be like as they are an imaginary beast. All of my work is hand built from earthenware or porcelain. Each of them is unique and they may be similar but no two are ever the same. Most of my vessels are coil built and the dragons and birds are constructed on their bases. The pieces are fired to 1080 C in a gas kiln."heather wilson, ceramics, jan feder memorial ceramics collection, gippsland campus -
Federation University Art Collection
Ceramic - Artwork - Ceramics, Lustre Dragon by Heather Wilson, c1985
Heather WILSON (1961- ) Born Rotherham, England. Arrived Australia 1967. Heather Wilson graduated with a Bachelor of Education (Art & Craft) from Melbourne State College in 1982, majoring in Ceramics. Artist's statement - "All of my work is hand built and explores animal forms in various ways. Animals have always fascinated me and have been a part of my work for the last 30 years. Whether appearing as dragons, exotic birds or bones, most of my images have a basis in nature. Sometimes it is just a characteristic or a quirky gesture that will inspire a piece, sometimes a photograph or a drawing done at the zoo or museum. Dragons have always given me the freedom to explore an emotion or attitude without the restrictions of a form being right, no one can tell you what a dragon should be like as they are an imaginary beast. All of my work is hand built from earthenware or porcelain. Each of them is unique and they may be similar but no two are ever the same. Most of my vessels are coil built and the dragons and birds are constructed on their bases. The pieces are fired to 1080 C in a gas kiln."heather wilson, ceramics, jan feder memorial ceramics collection, gippsland campus -
Federation University Art Collection
Ceramic - Artwork - Ceramics, 'Dragon' by Heather Wilson, c1985
Heather WILSON (1961- ) Born Rotherham, England. Arrived Australia 1967. Heather Wilson graduated with a Bachelor of Education (Art & Craft) from Melbourne State College in 1982, majoring in Ceramics. Artist's statement - "All of my work is hand built and explores animal forms in various ways. Animals have always fascinated me and have been a part of my work for the last 30 years. Whether appearing as dragons, exotic birds or bones, most of my images have a basis in nature. Sometimes it is just a characteristic or a quirky gesture that will inspire a piece, sometimes a photograph or a drawing done at the zoo or museum. Dragons have always given me the freedom to explore an emotion or attitude without the restrictions of a form being right, no one can tell you what a dragon should be like as they are an imaginary beast. All of my work is hand built from earthenware or porcelain. Each of them is unique and they may be similar but no two are ever the same. Most of my vessels are coil built and the dragons and birds are constructed on their bases. The pieces are fired to 1080 C in a gas kiln."heather wilson, ceramics, jan feder memorial ceramics collection, gippsland campus, dragon -
Vision Australia
Audio - Sound recording, Tilly Aston, With Love to My Niece and Song of Old Age, 15/7/1937
"Dear Friends, At your request, I'd like this recording of my voice, so that when I am no longer with you in person, the tones you are now hearing may remind you that love and remembrance are more a matter of the spirit than of the bodily contact and presence. As I have drifted or struggled along through life, I have gradually acquired many things. Always I have greatly desired to be happy and to spread the same infection around me. This wish has been amply fulfilled. First, in a joyous fashion after the manner of the young, and later in an atmosphere of hope and serenity which I trust may remain with me 'til the end. Achievement was another aim with me from the beginning, and whatever effects my life attainment may have upon others, there has been a fair amount of personal satisfaction in my victories over circumstance." Thus begins Tilly Aston's recording 'With Love to My Niece", going on to read her poem 'Song of Old Age'. This recording was converted from a 78 acetate record and was originally recorded on 15th July 1937.1 audio recording of Tilly Astontilly aston, audio books -
 Bacchus Marsh & District Historical Society
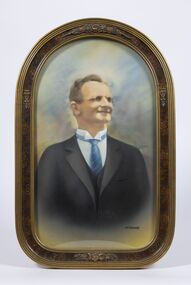
Painting, Portrait of Thomas Manly, 1930
Thomas Manly was a well-known resident of Bacchus Marsh. Born at Rowsley in 1863, Mr. Manly was a grandson in a family who had been in the service of the Greene family at "Greystones" from the time of its arrival in Victoria. The woolsheds at "Greystones" were built by deceased's grandfather, who also conducted a jeweller's shop at Rowsley. Like his forebears, Mr. Thomas Manly entered the service at "Greystones" and later worked for Messrs. Chomley and Boyd at "Glenmore." After his marriage to Miss Mary Johnston, whose mother arrived as an infant in Bacchus Marsh as early as 1839, Mr. Manly took up residence in the Main Street, Bacchus Marsh, where he has lived ever since. Deceased was a great walker, and mostly walked to his work, both at Rowsley and for the past 27 years to the Darley brickworks. Never a prominent man in public affairs, he was essentially a home-lover, and adopted horticulture as his hobby, gaining many prizes for both flowers and lucerne. Text for this description taken from the obituary for Thomas Manly in the Bacchus Marsh Express, 26 June, 1937, page 3, column 2.A framed painting based on a 1930 photograph of Tom Manly.'Heirloom' inscribed at the bottom right hand corner of the paintingthomas manly 1863-1937, bacchus marsh and district biographies -
 Wooragee Landcare Group
Photograph, 27th February, 2004
This photograph was taken at Wooragee Hall on the Friday 27th February, 2004 as part of an event called Foxy Night Out. This event was about sharing awareness about the impacts of foxes in rural areas and discussing methods to control their populations. There were two mains speakers at this event, the first; Camille Veselsky, a specialist in fox behaviour who worked for the Hume Rural lands Protection Board on pest animal control, and the second; Leanne Wheaton, a nature conservationist. Pictured in this photograph, background (left -right): Graeme Missen, Bob Stelling, Quentin Mansfield, unknown, unknown; Colin Payne. Foreground (left -right): Tony Prowse; Mary Prowse, Digby Race. Also pictured are two taxidermy goannas on top of the tables which were brought in as an example of reptile species that are vulnerable to fox attacks. Regional areas like Wooragee are susceptible to fox attacks due to the availability of food such as rubbish, scraps, native wildlife and livestock. Foxes can have a huge impact on native wildlife and domestic life as they are known to chew through irrigation systems, dig-up and defecate in gardens, raid rubbish bins and harass other domestic animals. (One paragraph about the significance ie: The photograph is an example of the type of events hosted by Wooragee Landcare to inform the general public about potential risks to private and public property. .....)Landscape coloured photograph printed on gloss paperReverse: WAN NA 0A2A0N0 ANN+ 1 6329 / [PRINTED] (No.5a7) / 496wooragee, wooragee landcare, fox, foxy -
 Merri-bek City Council
Painting - Liquid nails and spray enamel on canvas, Brian McKinnon, Scars, 2008
Uncle Brian McKinnon (b. 1957 – d. 2023) was a Geelong-based artist and descendent of the Amangu and Wongai people of Western Australia. He created powerful mixed media works that explore his campaign for Aboriginal rights and his childhood experiences growing up in Western Australia. Scars is a deeply personal and political work that reflects on some of the ways in which Aboriginal people have historically been discriminated against and marginalised because of the colour of their skin and cultural practices. Originally exhibited with two other paintings, it was also made in honour of the artist’s children and their struggle to maintain positive self-esteem. Uncle Brian McKinnon said his children inherited keloids from their ancestors: ‘These keloids look like body scars. In this work, I have placed them in the past and the presence of their ancestors through the act of beautifying the marks, which reflect the landscape and the identity of the person wearing the beautification marks. Although the marks on my children are not so beautiful and they are ostracised because of them, this made me think of racist policies and of course the referendum and when my people were seen for the first time as being human.’ -
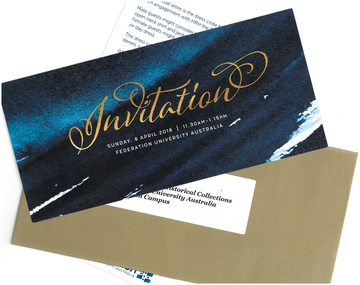 Federation University Historical Collection
Invitation, Invitation to Attend a Luncheon with HRH Prince Edward at Federation University Mt Helen Campus, 2018
Federation University Australia showcased its students and research at a luncheon for His Royal Highness The Prince Edward, Earl of Wessex KG GCVO, at the Mt Helen Campus on Sunday, 8 April. The University’s student leaders and academics joined other dignitaries and business representatives for the special event. “The University is deeply honoured to host HRH The Earl of Wessex and share his passion for volunteerism and The Duke of Edinburgh’s International Award,” Professor Helen Bartlett, Vice-Chancellor, said. Prior to the luncheon HRH The Earl of Wessex experienced a Welcome to Country and Smoking Ceremony at the University. The program included showing HRH The Earl of Wessex concept plans for a refurbished Sports Science facility at the Mt Helen Campus. Guests were treated to a performance by the Arts Academy’s renowned vocal ensemble Word of Mouth. At the conclusion of the luncheon, HRH The Earl of Wessex planted a tree at the Student Commons Courtyard. The visit to the University by HRH The Earl of Wessex was the first by a member of the Royal Family since Prince Charles visited in 1974. HRH The Earl of Wessex was in Australia to attend the Commonwealth Games and undertake additional engagements to recognise and promote The Duke of Edinburgh’s International Award in Australia. HRH The Earl of Wessex, who is the Chair of The Board of Trustees of The Duke of Edinburgh’s International Award Foundation, attended 32 engagements across Melbourne, Ballarat, Hobart, Brisbane, and Adelaide, from formal receptions, Award presentations, meetings with government officials and the community sector, to meeting Award Participants and their families at community centres. The events enabled HRH The Earl of Wessex to engage with over 1,000 young people undertaking the Award, and over 3,400 Award volunteers and supporters who will have the opportunity to discuss their activities and showcase the work being done to help young Australians dream big, challenge themselves and find their purpose, passion and place in the world. HRH The Earl of Wessex’s visit celebrates significant milestones and growth in the diversity of The Duke of Edinburgh’s International Award program in Australia. “The Award’s relevance to all young Australians is as important today as it was when it started over 60 years ago,” Mr Peter Kaye AM, Chief Executive Officer of The Duke of Edinburgh’s International Award – Australia, said. “Employers in particular are recognising the ‘soft skills’ that are so necessary for a well prepared future employee.”Invitation and dress code in a gold envelope. Addressed "Ms Clare Gervasoni Curator, Art & Historical Colelctions Federation University Australia Mt Helen Campus"prince edward, earl of wessex, helen bartlett, visitors, royal visit -
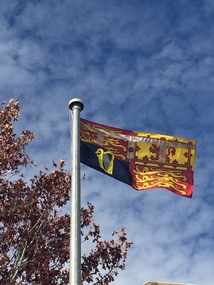 Federation University Historical Collection
Photograph - Photograph - Colour, Suzanne Godfrey, The Royal Standard Flying at Federation University Mt Helen Campus, 2018, 09/04/2018
Federation University Australia showcased its students and research at a luncheon for His Royal Highness The Prince Edward, Earl of Wessex KG GCVO, at the Mt Helen Campus on Sunday, 8 April. The University’s student leaders and academics joined other dignitaries and business representatives for the special event. “The University is deeply honoured to host HRH The Earl of Wessex and share his passion for volunteerism and The Duke of Edinburgh’s International Award,” Professor Helen Bartlett, Vice-Chancellor, said. Prior to the luncheon HRH The Earl of Wessex experienced a Welcome to Country and Smoking Ceremony at the University. The program included showing HRH The Earl of Wessex concept plans for a refurbished Sports Science facility at the Mt Helen Campus. Guests were treated to a performance by the Arts Academy’s renowned vocal ensemble Word of Mouth. At the conclusion of the luncheon, HRH The Earl of Wessex planted a tree at the Student Commons Courtyard. The visit to the University by HRH The Earl of Wessex was the first by a member of the Royal Family since Prince Charles visited in 1974. HRH The Earl of Wessex was in Australia to attend the Commonwealth Games and undertake additional engagements to recognise and promote The Duke of Edinburgh’s International Award in Australia. HRH The Earl of Wessex, who is the Chair of The Board of Trustees of The Duke of Edinburgh’s International Award Foundation, attended 32 engagements across Melbourne, Ballarat, Hobart, Brisbane, and Adelaide, from formal receptions, Award presentations, meetings with government officials and the community sector, to meeting Award Participants and their families at community centres. The events enabled HRH The Earl of Wessex to engage with over 1,000 young people undertaking the Award, and over 3,400 Award volunteers and supporters who will have the opportunity to discuss their activities and showcase the work being done to help young Australians dream big, challenge themselves and find their purpose, passion and place in the world. HRH The Earl of Wessex’s visit celebrates significant milestones and growth in the diversity of The Duke of Edinburgh’s International Award program in Australia. “The Award’s relevance to all young Australians is as important today as it was when it started over 60 years ago,” Mr Peter Kaye AM, Chief Executive Officer of The Duke of Edinburgh’s International Award – Australia, said. “Employers in particular are recognising the ‘soft skills’ that are so necessary for a well prepared future employee.”Photograph of the Royal Standard Flying on the Federation University Mt Helen Campus flagpoles during the visit of HRH the Prince Edward, Earl of Wessex, KG GCVO. Prince Edward visited the Mount Helen campus as the Chair of the trustees of The Duke of Edinburgh's International Award Foundation. The award is the world's leading youth achievement award. It has helped inspired, empower, connect and recognise the achievements of more than 8 million young people in more than 140 countries. The Award presents a balanced, non-competititive program of voluntary activites that encourage personal discovery, growth, resilience, perseverance, responsibility and community service. It is about individual challenge and encouraging young people to become mature and active citizens who positively contribute to society, through activities that inspire them.prince edward, earl of wessex, royal visitor, duke of edinburgh's international award foundation, federation university, royalty -
 Federation University Historical Collection
Poster, Federation University Australia Welcome to HRH Prince Edward, 2018, 09/04/2018
Federation University Australia showcased its students and research at a luncheon for His Royal Highness The Prince Edward, Earl of Wessex KG GCVO, at the Mt Helen Campus on Sunday, 8 April. The University’s student leaders and academics joined other dignitaries and business representatives for the special event. “The University is deeply honoured to host HRH The Earl of Wessex and share his passion for volunteerism and The Duke of Edinburgh’s International Award,” Professor Helen Bartlett, Vice-Chancellor, said. Prior to the luncheon HRH The Earl of Wessex experienced a Welcome to Country and Smoking Ceremony at the University. The program included showing HRH The Earl of Wessex concept plans for a refurbished Sports Science facility at the Mt Helen Campus. Guests were treated to a performance by the Arts Academy’s renowned vocal ensemble Word of Mouth. At the conclusion of the luncheon, HRH The Earl of Wessex planted a tree at the Student Commons Courtyard. The visit to the University by HRH The Earl of Wessex was the first by a member of the Royal Family since Prince Charles visited in 1974. HRH The Earl of Wessex was in Australia to attend the Commonwealth Games and undertake additional engagements to recognise and promote The Duke of Edinburgh’s International Award in Australia. HRH The Earl of Wessex, who is the Chair of The Board of Trustees of The Duke of Edinburgh’s International Award Foundation, attended 32 engagements across Melbourne, Ballarat, Hobart, Brisbane, and Adelaide, from formal receptions, Award presentations, meetings with government officials and the community sector, to meeting Award Participants and their families at community centres. The events enabled HRH The Earl of Wessex to engage with over 1,000 young people undertaking the Award, and over 3,400 Award volunteers and supporters who will have the opportunity to discuss their activities and showcase the work being done to help young Australians dream big, challenge themselves and find their purpose, passion and place in the world. HRH The Earl of Wessex’s visit celebrates significant milestones and growth in the diversity of The Duke of Edinburgh’s International Award program in Australia. “The Award’s relevance to all young Australians is as important today as it was when it started over 60 years ago,” Mr Peter Kaye AM, Chief Executive Officer of The Duke of Edinburgh’s International Award – Australia, said. “Employers in particular are recognising the ‘soft skills’ that are so necessary for a well prepared future employee.”Blue Federation University poster created to welcome HRH Prince Edward to the Mount Helen Campus poster, banner, prince edward, royal visitor -
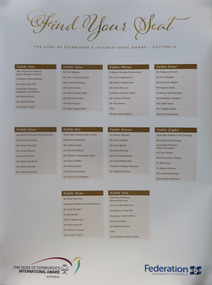 Federation University Historical Collection
Photograph - Colour, Clare Gervasoni, Federation University Seating Arrangement for lunch with HRH Prince Edward, 2018, 09/04/2018
Federation University Australia showcased its students and research at a luncheon for His Royal Highness The Prince Edward, Earl of Wessex KG GCVO, at the Mt Helen Campus on Sunday, 8 April. The University’s student leaders and academics joined other dignitaries and business representatives for the special event. “The University is deeply honoured to host HRH The Earl of Wessex and share his passion for volunteerism and The Duke of Edinburgh’s International Award,” Professor Helen Bartlett, Vice-Chancellor, said. Prior to the luncheon HRH The Earl of Wessex experienced a Welcome to Country and Smoking Ceremony at the University. The program included showing HRH The Earl of Wessex concept plans for a refurbished Sports Science facility at the Mt Helen Campus. Guests were treated to a performance by the Arts Academy’s renowned vocal ensemble Word of Mouth. At the conclusion of the luncheon, HRH The Earl of Wessex planted a tree at the Student Commons Courtyard. The visit to the University by HRH The Earl of Wessex was the first by a member of the Royal Family since Prince Charles visited in 1974. HRH The Earl of Wessex was in Australia to attend the Commonwealth Games and undertake additional engagements to recognise and promote The Duke of Edinburgh’s International Award in Australia. HRH The Earl of Wessex, who is the Chair of The Board of Trustees of The Duke of Edinburgh’s International Award Foundation, attended 32 engagements across Melbourne, Ballarat, Hobart, Brisbane, and Adelaide, from formal receptions, Award presentations, meetings with government officials and the community sector, to meeting Award Participants and their families at community centres. The events enabled HRH The Earl of Wessex to engage with over 1,000 young people undertaking the Award, and over 3,400 Award volunteers and supporters who will have the opportunity to discuss their activities and showcase the work being done to help young Australians dream big, challenge themselves and find their purpose, passion and place in the world. HRH The Earl of Wessex’s visit celebrates significant milestones and growth in the diversity of The Duke of Edinburgh’s International Award program in Australia. “The Award’s relevance to all young Australians is as important today as it was when it started over 60 years ago,” Mr Peter Kaye AM, Chief Executive Officer of The Duke of Edinburgh’s International Award – Australia, said. “Employers in particular are recognising the ‘soft skills’ that are so necessary for a well prepared future employee.”Photograph of the seating arrangements for the dinner with HRH Prince Edward at Federation University Mount Helen Campus poster, prince edward, royal visitor, seating arrangement -
 Uniting Church Archives - Synod of Victoria
Photograph, St Philip's College Alice Springs - Principal Chris Tudor & Deputy Principal Chris Eldridge, 09/1986
In 1945 the Reverend Harry Griffiths, who worked for the Methodist Inland Mission in Alice Springs, saw the need for a boarding facility for children of families living in remote areas in Central Australia who needed access to schools. He and his wife established Griffiths House, on a site in the town centre, and for many years it became home for students from all over the Outback, including many young Aboriginal people. In the late 1950's the Rev Fred McKay, successor to the Rev John Flynn as Superintendent of the Australian Inland Mission, lobbied the United Church in the Northern Territory to build and expand on this important start. Together the Presbyterian, Methodist and Congregational churches embarked on a missionary venture to develop St Philip's College - a new, larger residential hostel which would one day become a full boarding school. An ideal site - 22 acres of bush at the junction of the Charles and Todd Rivers and backing on to the Telegraph Station National Park - was secured and after six years of planning, construction began in 1964. Fred McKay led the legendary work parties comprised of volunteers from all over Australia who travelled to Alice Springs, paying their own way and volunteering their expertise, time and labour, to turn a dream into a reality. This fantastic tradition continues today, with work parties arriving each mid-year holiday. On 13 February 1965 the first boarders moved in to St Philip's College. For the first 24 years, therefore, St Philip's College operated as a residential hostel only. The College’s ninth Headmaster, Mr Christopher Tudor, arrived in 1986. He and the Council Chairman, Mrs Jan Heaslip, judged that the time was right to complete the original plan to turn St Philip’s College into a fully fledged independent boarding/day school, serving not only “bush” families, but also the growing population of Alice Springs. The then College Council embraced the idea and three years of frantic, determined preparation and planning commenced, culminating in an extensive $2 million building program in 1988. To this day there continues to be further development with the new landscaping underway near The Minnamurra Hall, Reception and Rivergum Cafe, plus the recent completion of the Science & Food Technology building and the new Rivergum Cafe.Head & Shoulders of Chris Eldridgest. philip's college, tudor, chris, eldridge, chris -
 Uniting Church Archives - Synod of Victoria
Photograph, St Philip's College Alice Springs - Principal Chris Tudor & Deputy Principal Chris Eldridge, 09/1986
In 1945 the Reverend Harry Griffiths, who worked for the Methodist Inland Mission in Alice Springs, saw the need for a boarding facility for children of families living in remote areas in Central Australia who needed access to schools. He and his wife established Griffiths House, on a site in the town centre, and for many years it became home for students from all over the Outback, including many young Aboriginal people. In the late 1950's the Rev Fred McKay, successor to the Rev John Flynn as Superintendent of the Australian Inland Mission, lobbied the United Church in the Northern Territory to build and expand on this important start. Together the Presbyterian, Methodist and Congregational churches embarked on a missionary venture to develop St Philip's College - a new, larger residential hostel which would one day become a full boarding school. An ideal site - 22 acres of bush at the junction of the Charles and Todd Rivers and backing on to the Telegraph Station National Park - was secured and after six years of planning, construction began in 1964. Fred McKay led the legendary work parties comprised of volunteers from all over Australia who travelled to Alice Springs, paying their own way and volunteering their expertise, time and labour, to turn a dream into a reality. This fantastic tradition continues today, with work parties arriving each mid-year holiday. On 13 February 1965 the first boarders moved in to St Philip's College. For the first 24 years, therefore, St Philip's College operated as a residential hostel only. The College’s ninth Headmaster, Mr Christopher Tudor, arrived in 1986. He and the Council Chairman, Mrs Jan Heaslip, judged that the time was right to complete the original plan to turn St Philip’s College into a fully fledged independent boarding/day school, serving not only “bush” families, but also the growing population of Alice Springs. The then College Council embraced the idea and three years of frantic, determined preparation and planning commenced, culminating in an extensive $2 million building program in 1988. To this day there continues to be further development with the new landscaping underway near The Minnamurra Hall, Reception and Rivergum Cafe, plus the recent completion of the Science & Food Technology building and the new Rivergum Cafe.Head & Shoulders of Chris Tudor.st. philip's college, tudor, chris, eldridge, chris -
 Uniting Church Archives - Synod of Victoria
Photograph, St Philip's College Alice Springs - Principal Chris Tudor & Deputy Principal Chris Eldridge, 09/1986
In 1945 the Reverend Harry Griffiths, who worked for the Methodist Inland Mission in Alice Springs, saw the need for a boarding facility for children of families living in remote areas in Central Australia who needed access to schools. He and his wife established Griffiths House, on a site in the town centre, and for many years it became home for students from all over the Outback, including many young Aboriginal people. In the late 1950's the Rev Fred McKay, successor to the Rev John Flynn as Superintendent of the Australian Inland Mission, lobbied the United Church in the Northern Territory to build and expand on this important start. Together the Presbyterian, Methodist and Congregational churches embarked on a missionary venture to develop St Philip's College - a new, larger residential hostel which would one day become a full boarding school. An ideal site - 22 acres of bush at the junction of the Charles and Todd Rivers and backing on to the Telegraph Station National Park - was secured and after six years of planning, construction began in 1964. Fred McKay led the legendary work parties comprised of volunteers from all over Australia who travelled to Alice Springs, paying their own way and volunteering their expertise, time and labour, to turn a dream into a reality. This fantastic tradition continues today, with work parties arriving each mid-year holiday. On 13 February 1965 the first boarders moved in to St Philip's College. For the first 24 years, therefore, St Philip's College operated as a residential hostel only. The College’s ninth Headmaster, Mr Christopher Tudor, arrived in 1986. He and the Council Chairman, Mrs Jan Heaslip, judged that the time was right to complete the original plan to turn St Philip’s College into a fully fledged independent boarding/day school, serving not only “bush” families, but also the growing population of Alice Springs. The then College Council embraced the idea and three years of frantic, determined preparation and planning commenced, culminating in an extensive $2 million building program in 1988. To this day there continues to be further development with the new landscaping underway near The Minnamurra Hall, Reception and Rivergum Cafe, plus the recent completion of the Science & Food Technology building and the new Rivergum Cafe.Tudor and Eldridge in conversation with the College in the background.st. philip's college, tudor, chris, eldridge, chris -
 The Beechworth Burke Museum
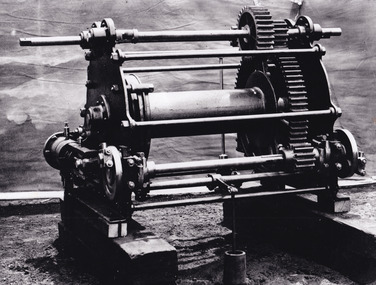
Photograph - Photograph - Reproduction, c.1870s
This photograph shows a piece of gold mining equipment identified as a mine winch, possibly an air winch cylinder of 1870s RG Ford's Patent design. Throughout the history of mining for gold and other precious materials, the windlass or winch (pictured) was used to bring up buckets full of soil from the bottom of a mine. This soil was then searched for gold/metals before being relocated to a different area. Due to the size and complexity of this particular piece of equipment, this winch may have been used to raise and lower mine carts to the entrance of the mine (often used in coal mining) and could have been used in raising cages up and down (acting as elevators) containing miners if the mine was particularly deep. The actual use of this particular item in the Beechworth locality is undocumented but these are some possibilities based on the use of these pieces of equipment in other mining locations. Mining can have a largely detrimental impact to the environment and therefore, the study of machinery like the one depicted in this photograph can help researches to reconstruct the methods and technologies used in the late 1800s and early 1900s. This particular item appears to have been removed from it's original site where it would have been used to assist with mining. It is possible that this photograph has been taken for recording purposes or as part of a machinery exhibition. Prior documentation records that this piece of equipment had connections to the Rocky Mountains Mining Company. Today, the Rocky Mountains Gold Mining company is famous in Beechworth for having been instrumental in the creation of the Rocky Mountain tunnel. Construction for this tunnel began in 1859 when a group of 12 men blasted a 400ft long tailrace though the rock beneath the town of Beechworth. Today, the 800ft tunnel, completed in 1871, is a popular tourist attraction but during the decades of gold mining, the purpose of this tunnel was to divert water away from the main sluicing operations so miners could better access gold and precious materials. The tunnel was used for this purpose for many years, later becoming useful for the Zwar Brother's tannery and currently as an outfall drain for Lake Sambell. This area continued to be mined until the early 1900s. The period when this item was in use is unclear but it is estimated to have been in the 1870s based on the design and appearance of the image. The gold works at the Rocky Mountain Tunnel closed in the early 1920s but the impact of mining remains in Beechworth today and therefore the study of photographs like this one which contain mining equipment can further understanding of mining in this region.This photograph has historic and research potential for study on the gold mining of the Beechworth region and types of equipment used to locate gold after the initial gold rush of 1853-1854 which resulted in the discovery of the surface gold and required miners to dig deeper to access precious metals. The clarity of the photo, and its good preserved condition, means it can continue to be used for research. This photo is part of a collection of six photos all within the Burke Museum Collection which depict mining equipment.Square black and white photograph on card.7793.1beechworth, mining, goldmining, goldmining equipment, beechworth burke museum -
 Flagstaff Hill Maritime Museum and Village
Domestic object - Bowl, Late 19th or early 20th Century
The Process of Making Pottery Decorating, Firing, Glazing, Making, Technical There is a rhythm and flow to clay. It can’t be done all at once! Even the making process! It can take weeks to get everything done, especially if you can only work on your pottery once a week! Even though we have three hour classes, it’s often just not enough time! Here is an overview of some of the processes so you have a bit more grasp on some of the technical stuff! Step One – Design There are SO many ideas out there for making stuff in clay! From delicate porcelain jewellery, through to heavy sculptural work and everything in between. Deciding your direction is sometimes not that easy – when you first start, try everything, you will naturally gravitate to the style that you enjoy! The options and variations are endless and can get a wee bit overwhelming too! Check in with me before you start to ensure your ideas will work, what order you might do things, how you could achieve the look you are seeking and any other technical data required! Step Two – Making Clay is thixotropic. This means that as you work with it, the clay first gets sloppier and wetter, before is begins to dry in the atmosphere. For most things, you simply can’t do all parts of the project at once. An example of work order might look like: Get last weeks work out from the shelves Prepare clay for today’s work – roll your clay, prepare balls for throwing, make the first stage of a pinch pot) Clean up last week’s work and put it on the shelf for bisque firing Check that you have any glazing to do – and do enough of it that you will have time to finish your main project Do the next step of your next project – there might be a further step that can’t be complete immediately, in that case, wrap your work well and put onto the shelves. Letting your work rest for a while can really help keep your work clean and professional looking. Many things require bagging under plastic to keep it ready for work the next week – put your name on the outside of the bag so you can find your work easily. We have stickers and markers. Consider how you want to decorate your work – coloured slip can be applied at a fairly wet stage (remembering that it will make your work even wetter!). Trying to apply slip to dry clay won’t work! If you want to do sgraffito – you will need to keep the work leather hard (a state of dryness where you can still work the clay with a little effort and a little water and care). Step Three – Drying Most of the time your work can go into the rack uncovered to let it dry out for the following week. If you want to continue forming or shaping you will need to double bag your work – put your work on a suitable sized bat and put the bat in a bag so the base of the bag is under the bat, then put another bag over the top of the work and tuck the top of the bag under the bat. If you want to trim (or turn) your thrown work the following week, it should also be double bagged. If your work is large, delicate, or of uneven thicknesses, you should lightly cover your work for drying. When considering the drying process, bare in mind the weather, humidity and wind! The hotter and dryer, the faster things dry and work can dry unevenly in the shelves – this can lead to cracking – another time to lightly cover your work for drying. Step Four – Trimming and Cleaning Up Your work is dry! It is called greenware now and it is at it’s most fragile! Handle everything with two hands. I often refer to soft hands – keep everything gentle and with your fingers spread as much as possible. Try to not pick up things like plates too much, and always with both hands! Before your work can be bisque fired it should be “cleaned up”. You work won’t go into the kiln if it has sharp edges – when glazed, sharp edges turn into razor blades! Use a piece of fly wire to rub the work all over – this will scratch a little so be light handed. Use a knife or metal kidney to scrape any areas that require a bit more dynamic treatment than the fly wire offers! Finally, a very light wipe over with a slightly damp sponge can help soften and soothe all of your edges and dags! Trimming thrown work: If you are planning to trim (or turn) your thrown work (and you should be), make sure you bag it well – your work should be leather hard to almost dry for easiest trimming. Use this step to finish the work completely – use a metal kidney to polish the surface, or a slightly damp sponge to give a freshly thrown look. Wipe the sponge around the rim after trimming, and check the inside of the pot for dags! Trimming slip cast work: Usually I will trim the rims of your work on the wheel the following day to make that stage easier, however you will still need to check your work for lumps and bumps. Last but not least – check that your name is still clearly on the bottom of your work. Step Five – Bisque Firing When the work is completely dry it can go into the bisque kiln. The bisque kiln is fired to 1000°C. This process burns off the water in the clay as well as some of the chemically bound water. The structure of the clay is not altered that much at this temperature. Inside the bisque kiln, the work is stacked a little, small bowl inside a larger bowl and onto a heavy plate. Smaller items like decorations or drink coasters might get stacked several high. Consideration is paid to the weight of the stack and shape of the work. A bisque kiln can fire about one and a half times the amount of work that the glaze kiln can fire. The firing takes about 10 hours to complete the cycle and about two days to cool down. Once it has been emptied the work is placed in the glaze room ready for you to decorate! Step Six – Glazing Decorating your work with colour can be a lot of fun – and time consuming! There are three main options for surface treatment at this stage: Oxide Washes Underglazes Glazes Washes and underglazes do not “glaze” the work – It will still need a layer of glaze to fully seal the clay (washes don’t need glaze on surfaces not designed for food or liquid as they can gloss up a little on their own). Underglazes are stable colourants that turn out pretty much how they look in the jar. They can be mixed with each other to form other colours and can be used like water colours to paint onto your work. Mostly they should have a clear glaze on top to seal them. Oxides are a different species – the pink oxide (cobalt) wash turns out bright blue for instance. They don’t always need a glaze on top, and some glazes can change the colour of the wash! The glazes need no other “glaze” on top! Be careful of unknown glaze interactions – you can put any combination of glaze in a bowl or on a plate, but only a single glaze on the outside of any vertical surface! Glazes are a chemical reaction under heat. We don’t know the exact chemicals in the Mayco glazes we use. I can guess by the way they interact with each other, however, on the whole, you need to test every idea you have, and not run the test on a vertical surface! Simply put, glaze is a layer of glass like substance that bonds with the clay underneath. Clay is made of silica, alumina and water. Glaze is made of mostly silica. Silica has a melting point of 1700°C and we fire to 1240°C. The silica requires a “flux” to help it melt at the lower temperature. Fluxes can be all sorts of chemicals – a common one is calcium – calcium has a melting point of 2500°C, however, together they both melt at a much lower temperature! Colourants are metal oxides like cobalt (blue), chrome (green through black), copper (green, blue, even red!), manganese (black, purple and pink) iron (red brown), etc. Different chemicals in the glaze can have dramatic effects. for example, barium carbonate (which we don’t use) turns manganese bright pink! Other elements can turn manganese dioxide brown, blue, purple and reddish brown. Manganese dioxide is a flux in and of itself as well. So, glazes that get their black and purple colours, often interact with other glazes and RUN! Our mirror black is a good example – it mixes really well with many glazes because it fluxes them – causes them to melt faster. It will also bring out many beautiful colours in the glazes because it’s black colouring most definitely comes from manganese dioxide! Glaze chemistry is a whole subject on it’s own! We use commercial Mayco glazes on purpose – for their huge range of colour possibilities, stability, cool interactions, artistic freedom with the ability to easily brush the glazes on and ease of use. We currently have almost 50 glazes on hand! A major project is to test the interactions of all glazes with each other. That is 2,500 test tiles!!!! I’m going to make the wall behind the wheels the feature wall of pretty colours! Step Seven – Glaze (Gloss or sometimes called “Glost”) Firing Most of the time this is the final stage of making your creation (but not always!) The glaze kiln goes to 1240°C. This is called cone 6, or midrange. It is the low end of stoneware temperatures. Stoneware clays and glazes are typically fired at cone 8 – 10, that is 1260 – 1290°C. The energy requirement to go from 1240°C to 1280°C is almost a 30% more! Our clay is formulated to vitrify (mature, turn “glass-like”) at 1240°, as are our glazes. A glaze kiln take around 12 hours to reach temperature and two to three days to cool down. Sometimes a third firing process is required – this is for decoration that is added to work after the glaze firing. For example – adding precious metals and lustres. this firing temperature is usually around 600 – 800°C depending upon the techniques being used. There are many students interested in gold and silver trims – we will be doing this third type of firing soon! After firing your work will be in the student finished work shelves. Remember to pay for it before you head out the door! There is a small extra charge for using porcelain clay (it’s more than twice the price of regular clay), and for any third firing process! Once your work has been fired it can not turn back into clay for millennia – so don’t fire it if you don’t like it! Put it in the bucket for recycling. https://firebirdstudios.com.au/the-process-of-making-pottery/ The bowl is an example of kitchenware used in the 19th century and still in use today.Bowl white ceramic. Crack on side. Badly stained.Backstamp very faint and unable to be read.flagstaff hill, warrnambool, shipwrecked-coast, flagstaff-hill, flagstaff-hill-maritime-museum, maritime-museum, shipwreck-coast, flagstaff-hill-maritime-village, mixing bowl, food preparation, kitchen equipment, ceramic -
 Flagstaff Hill Maritime Museum and Village
Domestic object - Bowl, J & G Meakin, Late 19th or early 20th Century
The Process of Making Pottery Decorating, Firing, Glazing, Making, Technical There is a rhythm and flow to clay. It can’t be done all at once! Even the making process! It can take weeks to get everything done, especially if you can only work on your pottery once a week! Even though we have three hour classes, it’s often just not enough time! Here is an overview of some of the processes so you have a bit more grasp on some of the technical stuff! Step One – Design There are SO many ideas out there for making stuff in clay! From delicate porcelain jewellery, through to heavy sculptural work and everything in between. Deciding your direction is sometimes not that easy – when you first start, try everything, you will naturally gravitate to the style that you enjoy! The options and variations are endless and can get a wee bit overwhelming too! Check in with me before you start to ensure your ideas will work, what order you might do things, how you could achieve the look you are seeking and any other technical data required! Step Two – Making Clay is thixotropic. This means that as you work with it, the clay first gets sloppier and wetter, before is begins to dry in the atmosphere. For most things, you simply can’t do all parts of the project at once. An example of work order might look like: Get last weeks work out from the shelves Prepare clay for today’s work – roll your clay, prepare balls for throwing, make the first stage of a pinch pot) Clean up last week’s work and put it on the shelf for bisque firing Check that you have any glazing to do – and do enough of it that you will have time to finish your main project Do the next step of your next project – there might be a further step that can’t be complete immediately, in that case, wrap your work well and put onto the shelves. Letting your work rest for a while can really help keep your work clean and professional looking. Many things require bagging under plastic to keep it ready for work the next week – put your name on the outside of the bag so you can find your work easily. We have stickers and markers. Consider how you want to decorate your work – coloured slip can be applied at a fairly wet stage (remembering that it will make your work even wetter!). Trying to apply slip to dry clay won’t work! If you want to do sgraffito – you will need to keep the work leather hard (a state of dryness where you can still work the clay with a little effort and a little water and care). Step Three – Drying Most of the time your work can go into the rack uncovered to let it dry out for the following week. If you want to continue forming or shaping you will need to double bag your work – put your work on a suitable sized bat and put the bat in a bag so the base of the bag is under the bat, then put another bag over the top of the work and tuck the top of the bag under the bat. If you want to trim (or turn) your thrown work the following week, it should also be double bagged. If your work is large, delicate, or of uneven thicknesses, you should lightly cover your work for drying. When considering the drying process, bare in mind the weather, humidity and wind! The hotter and dryer, the faster things dry and work can dry unevenly in the shelves – this can lead to cracking – another time to lightly cover your work for drying. Step Four – Trimming and Cleaning Up Your work is dry! It is called greenware now and it is at it’s most fragile! Handle everything with two hands. I often refer to soft hands – keep everything gentle and with your fingers spread as much as possible. Try to not pick up things like plates too much, and always with both hands! Before your work can be bisque fired it should be “cleaned up”. You work won’t go into the kiln if it has sharp edges – when glazed, sharp edges turn into razor blades! Use a piece of fly wire to rub the work all over – this will scratch a little so be light handed. Use a knife or metal kidney to scrape any areas that require a bit more dynamic treatment than the fly wire offers! Finally, a very light wipe over with a slightly damp sponge can help soften and soothe all of your edges and dags! Trimming thrown work: If you are planning to trim (or turn) your thrown work (and you should be), make sure you bag it well – your work should be leather hard to almost dry for easiest trimming. Use this step to finish the work completely – use a metal kidney to polish the surface, or a slightly damp sponge to give a freshly thrown look. Wipe the sponge around the rim after trimming, and check the inside of the pot for dags! Trimming slip cast work: Usually I will trim the rims of your work on the wheel the following day to make that stage easier, however you will still need to check your work for lumps and bumps. Last but not least – check that your name is still clearly on the bottom of your work. Step Five – Bisque Firing When the work is completely dry it can go into the bisque kiln. The bisque kiln is fired to 1000°C. This process burns off the water in the clay as well as some of the chemically bound water. The structure of the clay is not altered that much at this temperature. Inside the bisque kiln, the work is stacked a little, small bowl inside a larger bowl and onto a heavy plate. Smaller items like decorations or drink coasters might get stacked several high. Consideration is paid to the weight of the stack and shape of the work. A bisque kiln can fire about one and a half times the amount of work that the glaze kiln can fire. The firing takes about 10 hours to complete the cycle and about two days to cool down. Once it has been emptied the work is placed in the glaze room ready for you to decorate! Step Six – Glazing Decorating your work with colour can be a lot of fun – and time consuming! There are three main options for surface treatment at this stage: Oxide Washes Underglazes Glazes Washes and underglazes do not “glaze” the work – It will still need a layer of glaze to fully seal the clay (washes don’t need glaze on surfaces not designed for food or liquid as they can gloss up a little on their own). Underglazes are stable colourants that turn out pretty much how they look in the jar. They can be mixed with each other to form other colours and can be used like water colours to paint onto your work. Mostly they should have a clear glaze on top to seal them. Oxides are a different species – the pink oxide (cobalt) wash turns out bright blue for instance. They don’t always need a glaze on top, and some glazes can change the colour of the wash! The glazes need no other “glaze” on top! Be careful of unknown glaze interactions – you can put any combination of glaze in a bowl or on a plate, but only a single glaze on the outside of any vertical surface! Glazes are a chemical reaction under heat. We don’t know the exact chemicals in the Mayco glazes we use. I can guess by the way they interact with each other, however, on the whole, you need to test every idea you have, and not run the test on a vertical surface! Simply put, glaze is a layer of glass like substance that bonds with the clay underneath. Clay is made of silica, alumina and water. Glaze is made of mostly silica. Silica has a melting point of 1700°C and we fire to 1240°C. The silica requires a “flux” to help it melt at the lower temperature. Fluxes can be all sorts of chemicals – a common one is calcium – calcium has a melting point of 2500°C, however, together they both melt at a much lower temperature! Colourants are metal oxides like cobalt (blue), chrome (green through black), copper (green, blue, even red!), manganese (black, purple and pink) iron (red brown), etc. Different chemicals in the glaze can have dramatic effects. for example, barium carbonate (which we don’t use) turns manganese bright pink! Other elements can turn manganese dioxide brown, blue, purple and reddish brown. Manganese dioxide is a flux in and of itself as well. So, glazes that get their black and purple colours, often interact with other glazes and RUN! Our mirror black is a good example – it mixes really well with many glazes because it fluxes them – causes them to melt faster. It will also bring out many beautiful colours in the glazes because it’s black colouring most definitely comes from manganese dioxide! Glaze chemistry is a whole subject on it’s own! We use commercial Mayco glazes on purpose – for their huge range of colour possibilities, stability, cool interactions, artistic freedom with the ability to easily brush the glazes on and ease of use. We currently have almost 50 glazes on hand! A major project is to test the interactions of all glazes with each other. That is 2,500 test tiles!!!! I’m going to make the wall behind the wheels the feature wall of pretty colours! Step Seven – Glaze (Gloss or sometimes called “Glost”) Firing Most of the time this is the final stage of making your creation (but not always!) The glaze kiln goes to 1240°C. This is called cone 6, or midrange. It is the low end of stoneware temperatures. Stoneware clays and glazes are typically fired at cone 8 – 10, that is 1260 – 1290°C. The energy requirement to go from 1240°C to 1280°C is almost a 30% more! Our clay is formulated to vitrify (mature, turn “glass-like”) at 1240°, as are our glazes. A glaze kiln take around 12 hours to reach temperature and two to three days to cool down. Sometimes a third firing process is required – this is for decoration that is added to work after the glaze firing. For example – adding precious metals and lustres. this firing temperature is usually around 600 – 800°C depending upon the techniques being used. There are many students interested in gold and silver trims – we will be doing this third type of firing soon! After firing your work will be in the student finished work shelves. Remember to pay for it before you head out the door! There is a small extra charge for using porcelain clay (it’s more than twice the price of regular clay), and for any third firing process! Once your work has been fired it can not turn back into clay for millennia – so don’t fire it if you don’t like it! Put it in the bucket for recycling. https://firebirdstudios.com.au/the-process-of-making-pottery/This bowl was made by renowned pottery company J & G Meakin of England. The firm was established in the mid-1800's. The bowl is an example of kitchenware used in the 19th century and still in use today.Bowl; white ceramic, round and tapering inwards towards base. Made by J and G Meakin England.On base, 'Ironstone China Reg SOL 391413' with symbolflagstaff hill, flagstaff hill maritime museum and village, warrnambool, maritime museum, maritime village, great ocean road, shipwreck coast, mixing bowl, food preparation, j & g meakin, pottery, stoke-on-trent, kitchen equipment, ceramic -
 Flagstaff Hill Maritime Museum and Village
Domestic object - Plate
The Process of Making Pottery Decorating, Firing, Glazing, Making, Technical There is a rhythm and flow to clay. It can’t be done all at once! Even the making process! It can take weeks to get everything done, especially if you can only work on your pottery once a week! Even though we have three hour classes, it’s often just not enough time! Here is an overview of some of the processes so you have a bit more grasp on some of the technical stuff! Step One – Design There are SO many ideas out there for making stuff in clay! From delicate porcelain jewellery, through to heavy sculptural work and everything in between. Deciding your direction is sometimes not that easy – when you first start, try everything, you will naturally gravitate to the style that you enjoy! The options and variations are endless and can get a wee bit overwhelming too! Check in with me before you start to ensure your ideas will work, what order you might do things, how you could achieve the look you are seeking and any other technical data required! Step Two – Making Clay is thixotropic. This means that as you work with it, the clay first gets sloppier and wetter, before is begins to dry in the atmosphere. For most things, you simply can’t do all parts of the project at once. An example of work order might look like: Get last weeks work out from the shelves Prepare clay for today’s work – roll your clay, prepare balls for throwing, make the first stage of a pinch pot) Clean up last week’s work and put it on the shelf for bisque firing Check that you have any glazing to do – and do enough of it that you will have time to finish your main project Do the next step of your next project – there might be a further step that can’t be complete immediately, in that case, wrap your work well and put onto the shelves. Letting your work rest for a while can really help keep your work clean and professional looking. Many things require bagging under plastic to keep it ready for work the next week – put your name on the outside of the bag so you can find your work easily. We have stickers and markers. Consider how you want to decorate your work – coloured slip can be applied at a fairly wet stage (remembering that it will make your work even wetter!). Trying to apply slip to dry clay won’t work! If you want to do sgraffito – you will need to keep the work leather hard (a state of dryness where you can still work the clay with a little effort and a little water and care). Step Three – Drying Most of the time your work can go into the rack uncovered to let it dry out for the following week. If you want to continue forming or shaping you will need to double bag your work – put your work on a suitable sized bat and put the bat in a bag so the base of the bag is under the bat, then put another bag over the top of the work and tuck the top of the bag under the bat. If you want to trim (or turn) your thrown work the following week, it should also be double bagged. If your work is large, delicate, or of uneven thicknesses, you should lightly cover your work for drying. When considering the drying process, bare in mind the weather, humidity and wind! The hotter and dryer, the faster things dry and work can dry unevenly in the shelves – this can lead to cracking – another time to lightly cover your work for drying. Step Four – Trimming and Cleaning Up Your work is dry! It is called greenware now and it is at it’s most fragile! Handle everything with two hands. I often refer to soft hands – keep everything gentle and with your fingers spread as much as possible. Try to not pick up things like plates too much, and always with both hands! Before your work can be bisque fired it should be “cleaned up”. You work won’t go into the kiln if it has sharp edges – when glazed, sharp edges turn into razor blades! Use a piece of fly wire to rub the work all over – this will scratch a little so be light handed. Use a knife or metal kidney to scrape any areas that require a bit more dynamic treatment than the fly wire offers! Finally, a very light wipe over with a slightly damp sponge can help soften and soothe all of your edges and dags! Trimming thrown work: If you are planning to trim (or turn) your thrown work (and you should be), make sure you bag it well – your work should be leather hard to almost dry for easiest trimming. Use this step to finish the work completely – use a metal kidney to polish the surface, or a slightly damp sponge to give a freshly thrown look. Wipe the sponge around the rim after trimming, and check the inside of the pot for dags! Trimming slip cast work: Usually I will trim the rims of your work on the wheel the following day to make that stage easier, however you will still need to check your work for lumps and bumps. Last but not least – check that your name is still clearly on the bottom of your work. Step Five – Bisque Firing When the work is completely dry it can go into the bisque kiln. The bisque kiln is fired to 1000°C. This process burns off the water in the clay as well as some of the chemically bound water. The structure of the clay is not altered that much at this temperature. Inside the bisque kiln, the work is stacked a little, small bowl inside a larger bowl and onto a heavy plate. Smaller items like decorations or drink coasters might get stacked several high. Consideration is paid to the weight of the stack and shape of the work. A bisque kiln can fire about one and a half times the amount of work that the glaze kiln can fire. The firing takes about 10 hours to complete the cycle and about two days to cool down. Once it has been emptied the work is placed in the glaze room ready for you to decorate! Step Six – Glazing Decorating your work with colour can be a lot of fun – and time consuming! There are three main options for surface treatment at this stage: Oxide Washes Underglazes Glazes Washes and underglazes do not “glaze” the work – It will still need a layer of glaze to fully seal the clay (washes don’t need glaze on surfaces not designed for food or liquid as they can gloss up a little on their own). Underglazes are stable colourants that turn out pretty much how they look in the jar. They can be mixed with each other to form other colours and can be used like water colours to paint onto your work. Mostly they should have a clear glaze on top to seal them. Oxides are a different species – the pink oxide (cobalt) wash turns out bright blue for instance. They don’t always need a glaze on top, and some glazes can change the colour of the wash! The glazes need no other “glaze” on top! Be careful of unknown glaze interactions – you can put any combination of glaze in a bowl or on a plate, but only a single glaze on the outside of any vertical surface! Glazes are a chemical reaction under heat. We don’t know the exact chemicals in the Mayco glazes we use. I can guess by the way they interact with each other, however, on the whole, you need to test every idea you have, and not run the test on a vertical surface! Simply put, glaze is a layer of glass like substance that bonds with the clay underneath. Clay is made of silica, alumina and water. Glaze is made of mostly silica. Silica has a melting point of 1700°C and we fire to 1240°C. The silica requires a “flux” to help it melt at the lower temperature. Fluxes can be all sorts of chemicals – a common one is calcium – calcium has a melting point of 2500°C, however, together they both melt at a much lower temperature! Colourants are metal oxides like cobalt (blue), chrome (green through black), copper (green, blue, even red!), manganese (black, purple and pink) iron (red brown), etc. Different chemicals in the glaze can have dramatic effects. for example, barium carbonate (which we don’t use) turns manganese bright pink! Other elements can turn manganese dioxide brown, blue, purple and reddish brown. Manganese dioxide is a flux in and of itself as well. So, glazes that get their black and purple colours, often interact with other glazes and RUN! Our mirror black is a good example – it mixes really well with many glazes because it fluxes them – causes them to melt faster. It will also bring out many beautiful colours in the glazes because it’s black colouring most definitely comes from manganese dioxide! Glaze chemistry is a whole subject on it’s own! We use commercial Mayco glazes on purpose – for their huge range of colour possibilities, stability, cool interactions, artistic freedom with the ability to easily brush the glazes on and ease of use. We currently have almost 50 glazes on hand! A major project is to test the interactions of all glazes with each other. That is 2,500 test tiles!!!! I’m going to make the wall behind the wheels the feature wall of pretty colours! Step Seven – Glaze (Gloss or sometimes called “Glost”) Firing Most of the time this is the final stage of making your creation (but not always!) The glaze kiln goes to 1240°C. This is called cone 6, or midrange. It is the low end of stoneware temperatures. Stoneware clays and glazes are typically fired at cone 8 – 10, that is 1260 – 1290°C. The energy requirement to go from 1240°C to 1280°C is almost a 30% more! Our clay is formulated to vitrify (mature, turn “glass-like”) at 1240°, as are our glazes. A glaze kiln take around 12 hours to reach temperature and two to three days to cool down. Sometimes a third firing process is required – this is for decoration that is added to work after the glaze firing. For example – adding precious metals and lustres. this firing temperature is usually around 600 – 800°C depending upon the techniques being used. There are many students interested in gold and silver trims – we will be doing this third type of firing soon! After firing your work will be in the student finished work shelves. Remember to pay for it before you head out the door! There is a small extra charge for using porcelain clay (it’s more than twice the price of regular clay), and for any third firing process! Once your work has been fired it can not turn back into clay for millennia – so don’t fire it if you don’t like it! Put it in the bucket for recycling. https://firebirdstudios.com.au/the-process-of-making-pottery/Ceramics have evolved over thousands of years.White earthenware dinner plate. Crazing evident all over.Backstamped ‘Made in England S LTD’flagstaff hill, warrnambool, shipwrecked-coast, flagstaff-hill, flagstaff-hill-maritime-museum, maritime-museum, shipwreck-coast, flagstaff-hill-maritime-village, ceramics, tableware -
 Flagstaff Hill Maritime Museum and Village
Domestic object - Plate, Johnson Bros
The Process of Making Pottery Decorating, Firing, Glazing, Making, Technical There is a rhythm and flow to clay. It can’t be done all at once! Even the making process! It can take weeks to get everything done, especially if you can only work on your pottery once a week! Even though we have three hour classes, it’s often just not enough time! Here is an overview of some of the processes so you have a bit more grasp on some of the technical stuff! Step One – Design There are SO many ideas out there for making stuff in clay! From delicate porcelain jewellery, through to heavy sculptural work and everything in between. Deciding your direction is sometimes not that easy – when you first start, try everything, you will naturally gravitate to the style that you enjoy! The options and variations are endless and can get a wee bit overwhelming too! Check in with me before you start to ensure your ideas will work, what order you might do things, how you could achieve the look you are seeking and any other technical data required! Step Two – Making Clay is thixotropic. This means that as you work with it, the clay first gets sloppier and wetter, before is begins to dry in the atmosphere. For most things, you simply can’t do all parts of the project at once. An example of work order might look like: Get last weeks work out from the shelves Prepare clay for today’s work – roll your clay, prepare balls for throwing, make the first stage of a pinch pot) Clean up last week’s work and put it on the shelf for bisque firing Check that you have any glazing to do – and do enough of it that you will have time to finish your main project Do the next step of your next project – there might be a further step that can’t be complete immediately, in that case, wrap your work well and put onto the shelves. Letting your work rest for a while can really help keep your work clean and professional looking. Many things require bagging under plastic to keep it ready for work the next week – put your name on the outside of the bag so you can find your work easily. We have stickers and markers. Consider how you want to decorate your work – coloured slip can be applied at a fairly wet stage (remembering that it will make your work even wetter!). Trying to apply slip to dry clay won’t work! If you want to do sgraffito – you will need to keep the work leather hard (a state of dryness where you can still work the clay with a little effort and a little water and care). Step Three – Drying Most of the time your work can go into the rack uncovered to let it dry out for the following week. If you want to continue forming or shaping you will need to double bag your work – put your work on a suitable sized bat and put the bat in a bag so the base of the bag is under the bat, then put another bag over the top of the work and tuck the top of the bag under the bat. If you want to trim (or turn) your thrown work the following week, it should also be double bagged. If your work is large, delicate, or of uneven thicknesses, you should lightly cover your work for drying. When considering the drying process, bare in mind the weather, humidity and wind! The hotter and dryer, the faster things dry and work can dry unevenly in the shelves – this can lead to cracking – another time to lightly cover your work for drying. Step Four – Trimming and Cleaning Up Your work is dry! It is called greenware now and it is at it’s most fragile! Handle everything with two hands. I often refer to soft hands – keep everything gentle and with your fingers spread as much as possible. Try to not pick up things like plates too much, and always with both hands! Before your work can be bisque fired it should be “cleaned up”. You work won’t go into the kiln if it has sharp edges – when glazed, sharp edges turn into razor blades! Use a piece of fly wire to rub the work all over – this will scratch a little so be light handed. Use a knife or metal kidney to scrape any areas that require a bit more dynamic treatment than the fly wire offers! Finally, a very light wipe over with a slightly damp sponge can help soften and soothe all of your edges and dags! Trimming thrown work: If you are planning to trim (or turn) your thrown work (and you should be), make sure you bag it well – your work should be leather hard to almost dry for easiest trimming. Use this step to finish the work completely – use a metal kidney to polish the surface, or a slightly damp sponge to give a freshly thrown look. Wipe the sponge around the rim after trimming, and check the inside of the pot for dags! Trimming slip cast work: Usually I will trim the rims of your work on the wheel the following day to make that stage easier, however you will still need to check your work for lumps and bumps. Last but not least – check that your name is still clearly on the bottom of your work. Step Five – Bisque Firing When the work is completely dry it can go into the bisque kiln. The bisque kiln is fired to 1000°C. This process burns off the water in the clay as well as some of the chemically bound water. The structure of the clay is not altered that much at this temperature. Inside the bisque kiln, the work is stacked a little, small bowl inside a larger bowl and onto a heavy plate. Smaller items like decorations or drink coasters might get stacked several high. Consideration is paid to the weight of the stack and shape of the work. A bisque kiln can fire about one and a half times the amount of work that the glaze kiln can fire. The firing takes about 10 hours to complete the cycle and about two days to cool down. Once it has been emptied the work is placed in the glaze room ready for you to decorate! Step Six – Glazing Decorating your work with colour can be a lot of fun – and time consuming! There are three main options for surface treatment at this stage: Oxide Washes Underglazes Glazes Washes and underglazes do not “glaze” the work – It will still need a layer of glaze to fully seal the clay (washes don’t need glaze on surfaces not designed for food or liquid as they can gloss up a little on their own). Underglazes are stable colourants that turn out pretty much how they look in the jar. They can be mixed with each other to form other colours and can be used like water colours to paint onto your work. Mostly they should have a clear glaze on top to seal them. Oxides are a different species – the pink oxide (cobalt) wash turns out bright blue for instance. They don’t always need a glaze on top, and some glazes can change the colour of the wash! The glazes need no other “glaze” on top! Be careful of unknown glaze interactions – you can put any combination of glaze in a bowl or on a plate, but only a single glaze on the outside of any vertical surface! Glazes are a chemical reaction under heat. We don’t know the exact chemicals in the Mayco glazes we use. I can guess by the way they interact with each other, however, on the whole, you need to test every idea you have, and not run the test on a vertical surface! Simply put, glaze is a layer of glass like substance that bonds with the clay underneath. Clay is made of silica, alumina and water. Glaze is made of mostly silica. Silica has a melting point of 1700°C and we fire to 1240°C. The silica requires a “flux” to help it melt at the lower temperature. Fluxes can be all sorts of chemicals – a common one is calcium – calcium has a melting point of 2500°C, however, together they both melt at a much lower temperature! Colourants are metal oxides like cobalt (blue), chrome (green through black), copper (green, blue, even red!), manganese (black, purple and pink) iron (red brown), etc. Different chemicals in the glaze can have dramatic effects. for example, barium carbonate (which we don’t use) turns manganese bright pink! Other elements can turn manganese dioxide brown, blue, purple and reddish brown. Manganese dioxide is a flux in and of itself as well. So, glazes that get their black and purple colours, often interact with other glazes and RUN! Our mirror black is a good example – it mixes really well with many glazes because it fluxes them – causes them to melt faster. It will also bring out many beautiful colours in the glazes because it’s black colouring most definitely comes from manganese dioxide! Glaze chemistry is a whole subject on it’s own! We use commercial Mayco glazes on purpose – for their huge range of colour possibilities, stability, cool interactions, artistic freedom with the ability to easily brush the glazes on and ease of use. We currently have almost 50 glazes on hand! A major project is to test the interactions of all glazes with each other. That is 2,500 test tiles!!!! I’m going to make the wall behind the wheels the feature wall of pretty colours! Step Seven – Glaze (Gloss or sometimes called “Glost”) Firing Most of the time this is the final stage of making your creation (but not always!) The glaze kiln goes to 1240°C. This is called cone 6, or midrange. It is the low end of stoneware temperatures. Stoneware clays and glazes are typically fired at cone 8 – 10, that is 1260 – 1290°C. The energy requirement to go from 1240°C to 1280°C is almost a 30% more! Our clay is formulated to vitrify (mature, turn “glass-like”) at 1240°, as are our glazes. A glaze kiln take around 12 hours to reach temperature and two to three days to cool down. Sometimes a third firing process is required – this is for decoration that is added to work after the glaze firing. For example – adding precious metals and lustres. this firing temperature is usually around 600 – 800°C depending upon the techniques being used. There are many students interested in gold and silver trims – we will be doing this third type of firing soon! After firing your work will be in the student finished work shelves. Remember to pay for it before you head out the door! There is a small extra charge for using porcelain clay (it’s more than twice the price of regular clay), and for any third firing process! Once your work has been fired it can not turn back into clay for millennia – so don’t fire it if you don’t like it! Put it in the bucket for recycling. https://firebirdstudios.com.au/the-process-of-making-pottery/Ceramics have evolved over thousands of years.A white earthenware side plate with a gadroon edge. Has water marks and chips on front.‘Johnson Bros England Reg No 15587’flagstaff hill, warrnambool, shipwrecked-coast, flagstaff-hill, flagstaff-hill-maritime-museum, maritime-museum, shipwreck-coast, flagstaff-hill-maritime-village, johnson bros, ceramics, tableware -
 Flagstaff Hill Maritime Museum and Village
Domestic object - Plate, Alfred Meakin
The Process of Making Pottery Decorating, Firing, Glazing, Making, Technical There is a rhythm and flow to clay. It can’t be done all at once! Even the making process! It can take weeks to get everything done, especially if you can only work on your pottery once a week! Even though we have three hour classes, it’s often just not enough time! Here is an overview of some of the processes so you have a bit more grasp on some of the technical stuff! Step One – Design There are SO many ideas out there for making stuff in clay! From delicate porcelain jewellery, through to heavy sculptural work and everything in between. Deciding your direction is sometimes not that easy – when you first start, try everything, you will naturally gravitate to the style that you enjoy! The options and variations are endless and can get a wee bit overwhelming too! Check in with me before you start to ensure your ideas will work, what order you might do things, how you could achieve the look you are seeking and any other technical data required! Step Two – Making Clay is thixotropic. This means that as you work with it, the clay first gets sloppier and wetter, before is begins to dry in the atmosphere. For most things, you simply can’t do all parts of the project at once. An example of work order might look like: Get last weeks work out from the shelves Prepare clay for today’s work – roll your clay, prepare balls for throwing, make the first stage of a pinch pot) Clean up last week’s work and put it on the shelf for bisque firing Check that you have any glazing to do – and do enough of it that you will have time to finish your main project Do the next step of your next project – there might be a further step that can’t be complete immediately, in that case, wrap your work well and put onto the shelves. Letting your work rest for a while can really help keep your work clean and professional looking. Many things require bagging under plastic to keep it ready for work the next week – put your name on the outside of the bag so you can find your work easily. We have stickers and markers. Consider how you want to decorate your work – coloured slip can be applied at a fairly wet stage (remembering that it will make your work even wetter!). Trying to apply slip to dry clay won’t work! If you want to do sgraffito – you will need to keep the work leather hard (a state of dryness where you can still work the clay with a little effort and a little water and care). Step Three – Drying Most of the time your work can go into the rack uncovered to let it dry out for the following week. If you want to continue forming or shaping you will need to double bag your work – put your work on a suitable sized bat and put the bat in a bag so the base of the bag is under the bat, then put another bag over the top of the work and tuck the top of the bag under the bat. If you want to trim (or turn) your thrown work the following week, it should also be double bagged. If your work is large, delicate, or of uneven thicknesses, you should lightly cover your work for drying. When considering the drying process, bare in mind the weather, humidity and wind! The hotter and dryer, the faster things dry and work can dry unevenly in the shelves – this can lead to cracking – another time to lightly cover your work for drying. Step Four – Trimming and Cleaning Up Your work is dry! It is called greenware now and it is at it’s most fragile! Handle everything with two hands. I often refer to soft hands – keep everything gentle and with your fingers spread as much as possible. Try to not pick up things like plates too much, and always with both hands! Before your work can be bisque fired it should be “cleaned up”. You work won’t go into the kiln if it has sharp edges – when glazed, sharp edges turn into razor blades! Use a piece of fly wire to rub the work all over – this will scratch a little so be light handed. Use a knife or metal kidney to scrape any areas that require a bit more dynamic treatment than the fly wire offers! Finally, a very light wipe over with a slightly damp sponge can help soften and soothe all of your edges and dags! Trimming thrown work: If you are planning to trim (or turn) your thrown work (and you should be), make sure you bag it well – your work should be leather hard to almost dry for easiest trimming. Use this step to finish the work completely – use a metal kidney to polish the surface, or a slightly damp sponge to give a freshly thrown look. Wipe the sponge around the rim after trimming, and check the inside of the pot for dags! Trimming slip cast work: Usually I will trim the rims of your work on the wheel the following day to make that stage easier, however you will still need to check your work for lumps and bumps. Last but not least – check that your name is still clearly on the bottom of your work. Step Five – Bisque Firing When the work is completely dry it can go into the bisque kiln. The bisque kiln is fired to 1000°C. This process burns off the water in the clay as well as some of the chemically bound water. The structure of the clay is not altered that much at this temperature. Inside the bisque kiln, the work is stacked a little, small bowl inside a larger bowl and onto a heavy plate. Smaller items like decorations or drink coasters might get stacked several high. Consideration is paid to the weight of the stack and shape of the work. A bisque kiln can fire about one and a half times the amount of work that the glaze kiln can fire. The firing takes about 10 hours to complete the cycle and about two days to cool down. Once it has been emptied the work is placed in the glaze room ready for you to decorate! Step Six – Glazing Decorating your work with colour can be a lot of fun – and time consuming! There are three main options for surface treatment at this stage: Oxide Washes Underglazes Glazes Washes and underglazes do not “glaze” the work – It will still need a layer of glaze to fully seal the clay (washes don’t need glaze on surfaces not designed for food or liquid as they can gloss up a little on their own). Underglazes are stable colourants that turn out pretty much how they look in the jar. They can be mixed with each other to form other colours and can be used like water colours to paint onto your work. Mostly they should have a clear glaze on top to seal them. Oxides are a different species – the pink oxide (cobalt) wash turns out bright blue for instance. They don’t always need a glaze on top, and some glazes can change the colour of the wash! The glazes need no other “glaze” on top! Be careful of unknown glaze interactions – you can put any combination of glaze in a bowl or on a plate, but only a single glaze on the outside of any vertical surface! Glazes are a chemical reaction under heat. We don’t know the exact chemicals in the Mayco glazes we use. I can guess by the way they interact with each other, however, on the whole, you need to test every idea you have, and not run the test on a vertical surface! Simply put, glaze is a layer of glass like substance that bonds with the clay underneath. Clay is made of silica, alumina and water. Glaze is made of mostly silica. Silica has a melting point of 1700°C and we fire to 1240°C. The silica requires a “flux” to help it melt at the lower temperature. Fluxes can be all sorts of chemicals – a common one is calcium – calcium has a melting point of 2500°C, however, together they both melt at a much lower temperature! Colourants are metal oxides like cobalt (blue), chrome (green through black), copper (green, blue, even red!), manganese (black, purple and pink) iron (red brown), etc. Different chemicals in the glaze can have dramatic effects. for example, barium carbonate (which we don’t use) turns manganese bright pink! Other elements can turn manganese dioxide brown, blue, purple and reddish brown. Manganese dioxide is a flux in and of itself as well. So, glazes that get their black and purple colours, often interact with other glazes and RUN! Our mirror black is a good example – it mixes really well with many glazes because it fluxes them – causes them to melt faster. It will also bring out many beautiful colours in the glazes because it’s black colouring most definitely comes from manganese dioxide! Glaze chemistry is a whole subject on it’s own! We use commercial Mayco glazes on purpose – for their huge range of colour possibilities, stability, cool interactions, artistic freedom with the ability to easily brush the glazes on and ease of use. We currently have almost 50 glazes on hand! A major project is to test the interactions of all glazes with each other. That is 2,500 test tiles!!!! I’m going to make the wall behind the wheels the feature wall of pretty colours! Step Seven – Glaze (Gloss or sometimes called “Glost”) Firing Most of the time this is the final stage of making your creation (but not always!) The glaze kiln goes to 1240°C. This is called cone 6, or midrange. It is the low end of stoneware temperatures. Stoneware clays and glazes are typically fired at cone 8 – 10, that is 1260 – 1290°C. The energy requirement to go from 1240°C to 1280°C is almost a 30% more! Our clay is formulated to vitrify (mature, turn “glass-like”) at 1240°, as are our glazes. A glaze kiln take around 12 hours to reach temperature and two to three days to cool down. Sometimes a third firing process is required – this is for decoration that is added to work after the glaze firing. For example – adding precious metals and lustres. this firing temperature is usually around 600 – 800°C depending upon the techniques being used. There are many students interested in gold and silver trims – we will be doing this third type of firing soon! After firing your work will be in the student finished work shelves. Remember to pay for it before you head out the door! There is a small extra charge for using porcelain clay (it’s more than twice the price of regular clay), and for any third firing process! Once your work has been fired it can not turn back into clay for millennia – so don’t fire it if you don’t like it! Put it in the bucket for recycling. https://firebirdstudios.com.au/the-process-of-making-pottery/Ceramics have evolved over thousands of years.Earthenware dessert plate, cream colour. Made by Alfred Meakin, England. Backstamped ‘Alfred Meakin England’. flagstaff hill, warrnambool, shipwrecked-coast, flagstaff-hill, flagstaff-hill-maritime-museum, maritime-museum, shipwreck-coast, flagstaff-hill-maritime-village, alfred meakin, ceramics, earthenware, kitchenware -
 Flagstaff Hill Maritime Museum and Village
Domestic object - Jug
The Process of Making Pottery Decorating, Firing, Glazing, Making, Technical There is a rhythm and flow to clay. It can’t be done all at once! Even the making process! It can take weeks to get everything done, especially if you can only work on your pottery once a week! Even though we have three hour classes, it’s often just not enough time! Here is an overview of some of the processes so you have a bit more grasp on some of the technical stuff! Step One – Design There are SO many ideas out there for making stuff in clay! From delicate porcelain jewellery, through to heavy sculptural work and everything in between. Deciding your direction is sometimes not that easy – when you first start, try everything, you will naturally gravitate to the style that you enjoy! The options and variations are endless and can get a wee bit overwhelming too! Check in with me before you start to ensure your ideas will work, what order you might do things, how you could achieve the look you are seeking and any other technical data required! Step Two – Making Clay is thixotropic. This means that as you work with it, the clay first gets sloppier and wetter, before is begins to dry in the atmosphere. For most things, you simply can’t do all parts of the project at once. An example of work order might look like: Get last weeks work out from the shelves Prepare clay for today’s work – roll your clay, prepare balls for throwing, make the first stage of a pinch pot) Clean up last week’s work and put it on the shelf for bisque firing Check that you have any glazing to do – and do enough of it that you will have time to finish your main project Do the next step of your next project – there might be a further step that can’t be complete immediately, in that case, wrap your work well and put onto the shelves. Letting your work rest for a while can really help keep your work clean and professional looking. Many things require bagging under plastic to keep it ready for work the next week – put your name on the outside of the bag so you can find your work easily. We have stickers and markers. Consider how you want to decorate your work – coloured slip can be applied at a fairly wet stage (remembering that it will make your work even wetter!). Trying to apply slip to dry clay won’t work! If you want to do sgraffito – you will need to keep the work leather hard (a state of dryness where you can still work the clay with a little effort and a little water and care). Step Three – Drying Most of the time your work can go into the rack uncovered to let it dry out for the following week. If you want to continue forming or shaping you will need to double bag your work – put your work on a suitable sized bat and put the bat in a bag so the base of the bag is under the bat, then put another bag over the top of the work and tuck the top of the bag under the bat. If you want to trim (or turn) your thrown work the following week, it should also be double bagged. If your work is large, delicate, or of uneven thicknesses, you should lightly cover your work for drying. When considering the drying process, bare in mind the weather, humidity and wind! The hotter and dryer, the faster things dry and work can dry unevenly in the shelves – this can lead to cracking – another time to lightly cover your work for drying. Step Four – Trimming and Cleaning Up Your work is dry! It is called greenware now and it is at it’s most fragile! Handle everything with two hands. I often refer to soft hands – keep everything gentle and with your fingers spread as much as possible. Try to not pick up things like plates too much, and always with both hands! Before your work can be bisque fired it should be “cleaned up”. You work won’t go into the kiln if it has sharp edges – when glazed, sharp edges turn into razor blades! Use a piece of fly wire to rub the work all over – this will scratch a little so be light handed. Use a knife or metal kidney to scrape any areas that require a bit more dynamic treatment than the fly wire offers! Finally, a very light wipe over with a slightly damp sponge can help soften and soothe all of your edges and dags! Trimming thrown work: If you are planning to trim (or turn) your thrown work (and you should be), make sure you bag it well – your work should be leather hard to almost dry for easiest trimming. Use this step to finish the work completely – use a metal kidney to polish the surface, or a slightly damp sponge to give a freshly thrown look. Wipe the sponge around the rim after trimming, and check the inside of the pot for dags! Trimming slip cast work: Usually I will trim the rims of your work on the wheel the following day to make that stage easier, however you will still need to check your work for lumps and bumps. Last but not least – check that your name is still clearly on the bottom of your work. Step Five – Bisque Firing When the work is completely dry it can go into the bisque kiln. The bisque kiln is fired to 1000°C. This process burns off the water in the clay as well as some of the chemically bound water. The structure of the clay is not altered that much at this temperature. Inside the bisque kiln, the work is stacked a little, small bowl inside a larger bowl and onto a heavy plate. Smaller items like decorations or drink coasters might get stacked several high. Consideration is paid to the weight of the stack and shape of the work. A bisque kiln can fire about one and a half times the amount of work that the glaze kiln can fire. The firing takes about 10 hours to complete the cycle and about two days to cool down. Once it has been emptied the work is placed in the glaze room ready for you to decorate! Step Six – Glazing Decorating your work with colour can be a lot of fun – and time consuming! There are three main options for surface treatment at this stage: Oxide Washes Underglazes Glazes Washes and underglazes do not “glaze” the work – It will still need a layer of glaze to fully seal the clay (washes don’t need glaze on surfaces not designed for food or liquid as they can gloss up a little on their own). Underglazes are stable colourants that turn out pretty much how they look in the jar. They can be mixed with each other to form other colours and can be used like water colours to paint onto your work. Mostly they should have a clear glaze on top to seal them. Oxides are a different species – the pink oxide (cobalt) wash turns out bright blue for instance. They don’t always need a glaze on top, and some glazes can change the colour of the wash! The glazes need no other “glaze” on top! Be careful of unknown glaze interactions – you can put any combination of glaze in a bowl or on a plate, but only a single glaze on the outside of any vertical surface! Glazes are a chemical reaction under heat. We don’t know the exact chemicals in the Mayco glazes we use. I can guess by the way they interact with each other, however, on the whole, you need to test every idea you have, and not run the test on a vertical surface! Simply put, glaze is a layer of glass like substance that bonds with the clay underneath. Clay is made of silica, alumina and water. Glaze is made of mostly silica. Silica has a melting point of 1700°C and we fire to 1240°C. The silica requires a “flux” to help it melt at the lower temperature. Fluxes can be all sorts of chemicals – a common one is calcium – calcium has a melting point of 2500°C, however, together they both melt at a much lower temperature! Colourants are metal oxides like cobalt (blue), chrome (green through black), copper (green, blue, even red!), manganese (black, purple and pink) iron (red brown), etc. Different chemicals in the glaze can have dramatic effects. for example, barium carbonate (which we don’t use) turns manganese bright pink! Other elements can turn manganese dioxide brown, blue, purple and reddish brown. Manganese dioxide is a flux in and of itself as well. So, glazes that get their black and purple colours, often interact with other glazes and RUN! Our mirror black is a good example – it mixes really well with many glazes because it fluxes them – causes them to melt faster. It will also bring out many beautiful colours in the glazes because it’s black colouring most definitely comes from manganese dioxide! Glaze chemistry is a whole subject on it’s own! We use commercial Mayco glazes on purpose – for their huge range of colour possibilities, stability, cool interactions, artistic freedom with the ability to easily brush the glazes on and ease of use. We currently have almost 50 glazes on hand! A major project is to test the interactions of all glazes with each other. That is 2,500 test tiles!!!! I’m going to make the wall behind the wheels the feature wall of pretty colours! Step Seven – Glaze (Gloss or sometimes called “Glost”) Firing Most of the time this is the final stage of making your creation (but not always!) The glaze kiln goes to 1240°C. This is called cone 6, or midrange. It is the low end of stoneware temperatures. Stoneware clays and glazes are typically fired at cone 8 – 10, that is 1260 – 1290°C. The energy requirement to go from 1240°C to 1280°C is almost a 30% more! Our clay is formulated to vitrify (mature, turn “glass-like”) at 1240°, as are our glazes. A glaze kiln take around 12 hours to reach temperature and two to three days to cool down. Sometimes a third firing process is required – this is for decoration that is added to work after the glaze firing. For example – adding precious metals and lustres. this firing temperature is usually around 600 – 800°C depending upon the techniques being used. There are many students interested in gold and silver trims – we will be doing this third type of firing soon! After firing your work will be in the student finished work shelves. Remember to pay for it before you head out the door! There is a small extra charge for using porcelain clay (it’s more than twice the price of regular clay), and for any third firing process! Once your work has been fired it can not turn back into clay for millennia – so don’t fire it if you don’t like it! Put it in the bucket for recycling. https://firebirdstudios.com.au/the-process-of-making-pottery/The form of the jug has been in use for many centuries.Stoneware jug. Two tone brown glaze with pierced lip behind spout. Spout chipped.None.flagstaff hill, warrnambool, shipwrecked-coast, flagstaff-hill, flagstaff-hill-maritime-museum, maritime-museum, shipwreck-coast, flagstaff-hill-maritime-village, jug, ceramic jug -
 Yarra Glen & District Historical Society
Sepia postcards, Yarra Glen
Sepia postcard with a view taken from the Grand Hotel tower looking down on Bell Street and the railway crossing at Yarra Glen very late 19th century. Young street trees on Bell Street. On east side of Bell Street are a dwelling, a general store, the Victoria Hall, a horse trough. Beyond the railway line is 'River View', the bridge over the river and the Yering flats.On back of postcard at the top "POST CARD". On the left hand side "THIS SPACE MAY BE USED FOR PRINTED OR WRITTEN MATTER”. On the right hand side "ONLY THE ADDRESS TO BE WRITTEN HERE”. In a box in the right hand corner "A HALF-PENNY STAMP TO BE PLACED HERE". Along the left hand margin "Ajax series. Printed in England". In blue biro is written "G. Keets Yarra Glen". Copy 2 has the following handwritten in black ink: "Yarra Glen. 28.8.11. Dear Maggie Hope you will like the Postcard. I also hope your head is better. On Saturday we took the kitten down to Dawborn's shop to catch some mice. When we got down there the kitten got away from us and we never got it till Monday morning. This is all the news this time. From your loving cousin, Walter.yarra glen, railway line, grand hotel, victoria hall, bell street, tree guards, railway crossing, river view, street trees, bell st, general store, horse trough -
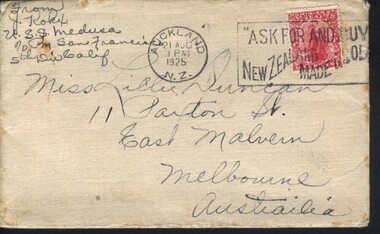 Mission to Seafarers Victoria
Letter - Correspondance, Julius Kokx, Letter to Lillie Duncan from Julius Kokx, 20 August 1925
The "letters to Lillie" show the international nature of the Mission to Seafarers. They are an important display of the handwriting style of the time, revealing courting attempts and give us an insight into life in 1925.Lillie Duncan was a member of the Harbour Lights Guild and this letter forms part of a collection of letters sent to her by different seafarers.Letter addressed to Miss Lillie Duncan, 11 Paxton St, East Malvern, Melbourne, Australia from Julius Kokx, U.S.S. Medusa, c/o Postmaster, San Francisco, 5th Div Calif. consisting of eleven parts: Part 0070.1 Envelope Part 0070.2 Medusa Mechanic Newsletter Parts 0070.3 - 0070.11 Handwritten letter The envelope is cream in colour with darker edges from aging whilst the pages are a lighter cream colour. Page 1 of the letter begins with the salutation "Dear Miss Duncan: I recieved both...".Page 2 of the letter begins with "girls in Melbourne. you are the only one...". Page 3 begins with "it but found out it...". Page 4 begins with "a girl like you...". Page 5 begins with "married. So what's a...". Page 6 begins with "and as goof as we...". Page 7 begins with "in and you must...". Page 8 begins with "Have a place to sit..." Page 9 begins with "it will be a long..." and ends with the salutation "The kind sailor as you call him x. Julius Knox." All pages of the letter are only written on one side except for page 9, on which Julius Knox has written his address in the States and in New Zealand.The envelope is torn across the back vertically towards the right of the flap but the flap is mostly in tact. It has three stamps. The first is a circular one in black ink towards the top centre of the envelope reading "AUCKLAND 21 AUG 3PM 1925 N.Z.". The second stamp is a large rectangular one in black ink in the top right of the envelope reading "ASK FOR AND BUY NEW ZEALAND MADE GOODS". The third stamp is slightly obscured by the the second ink stamp. It is a red and white stamp positioned at the top rigt of the envelope reading "Dominion of New Zealand Universal Postage One Penny".lillie duncan, letter, lhlg, julius kokx, uss medusa, auckland, new zealand, san francisco, california, lillian duncan