Showing 28 items matching " mt korong road"
-
 Ballarat Tramway Museum
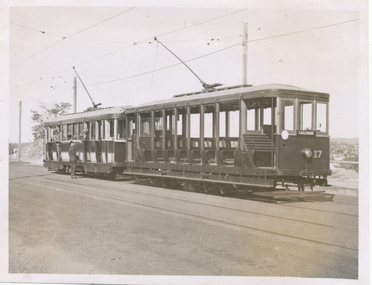
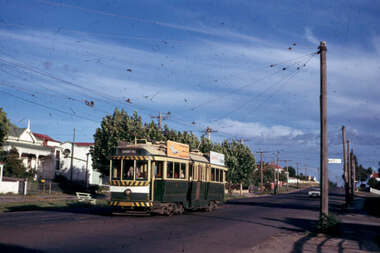
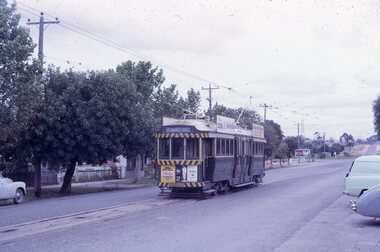
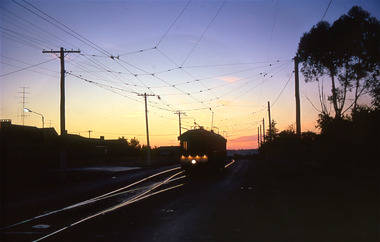
Photograph - SECV Bendigo No. 17 and No. 22 at Mt Korong Road loop, Wal Jack, Easter Saturday, 1941
... SECV Bendigo No. 17 and No. 22 at Mt Korong Road loop...... Mt Korong Road...No. 17 and No. 22 at Mt Korong Road loop - Garden Gully Loop. Photo taken Easter Saturday, 1941. ...On rear in ink "T191 State Electricity Commission Bendigo tramways / No. 17 summer car and "No. 22 Ex MMTB G Class standing at Passing Loop in Mt Korong Road, Easter Saturday 1941." In bottom right hand corner "W. ...No. 17 and No. 22 at Mt Korong Road loop - Garden Gully Loop. Photo taken Easter Saturday, 1941. ...No. 17 and No. 22 at Mt Korong Road loop - Garden Gully Loop. Photo taken Easter Saturday, 1941. Negative No. T191. No. 17 has the destination of "Eaglehawk" and is carrying a white disk at the front of the tram. Black and White print contained within the Wal Jack Bendigo and Geelong Album, see Reg Item 5003 for more details. i1 - scan of print in the album i2 - rear of image i3 - scan of negative at 3200dpi added 6/6/2020.Yields information about the use of trams, in particular No. 17, during Easter 1941.On rear in ink "T191 State Electricity Commission Bendigo tramways / No. 17 summer car and "No. 22 Ex MMTB G Class standing at Passing Loop in Mt Korong Road, Easter Saturday 1941." In bottom right hand corner "W. Jack Photo".trams, tramways, bendigo, mt korong road, garden gully loop, tram 17, tram 22 -
 Bendigo Historical Society Inc.
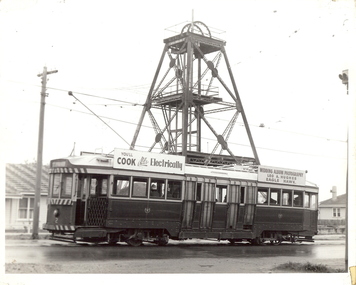
Photograph - BASIL MILLER COLLECTION: TRAM PASSING IRONBARK MINE, MT. KORONG ROAD, LONG GULLY, 1950's
... BASIL MILLER COLLECTION: TRAM PASSING IRONBARK MINE, MT. KORONG ROAD, LONG GULLY...Black and white photo, No 2 tram passing Ironbark Mine on Mt. Korong Road, (now Eaglehawk Road ) Long Gully. ...Photograph BASIL MILLER COLLECTION: TRAM PASSING IRONBARK MINE, MT. KORONG ROAD, LONG GULLY ...BHS CollectionBlack and white photo, No 2 tram passing Ironbark Mine on Mt. Korong Road, (now Eaglehawk Road ) Long Gully. Tram has two signs on side - ''You'll cook better electrically' and 'Wedding Album Photography, Leo A. Hughes, Eaglehawk'.Written on back in blue pen - 4'' wide, 85#.'4" wide, 85#'basil miller, long gully, ironbark gold mine, bendigo tramways -
 Bendigo Historical Society Inc.
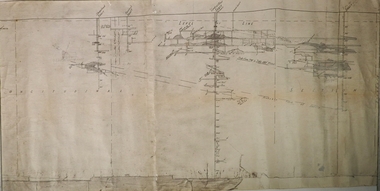
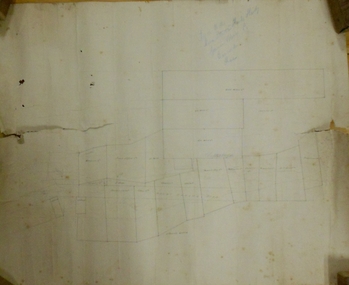
Map - MINING REPORTS - MAP OF COLLMANN AND TACCHI SHAFT
... Collman and Tacchi shaft drawn on map corner of Dowding Street and Mt. Korong Road, California Gully, Bendigo. Mt Korong Road later became Eaglehawk Road. ...It is beside Mt Korong Road, near Dowding Street. Some boundary lines are drawn. ...History House 11 Mackenzie Street Bendigo goldfields Collman and Tacchi shaft drawn on map corner of Dowding Street and Mt. Korong Road, California Gully, Bendigo. Mt Korong Road later became Eaglehawk Road. ...Collman and Tacchi shaft drawn on map corner of Dowding Street and Mt. Korong Road, California Gully, Bendigo. Mt Korong Road later became Eaglehawk Road. Hand drawn map showing the Collmann and Tacchi Shaft with No 17 Crosscut with the distances in feet and inches and the compass bearing of each leg. It is beside Mt Korong Road, near Dowding Street. Some boundary lines are drawn. Also on the map is Lansell's C and T across the road.map, bendigo, goldfields, mining reports, map of collmann and tachi shaft, collmann and tacchi shaft, lansell's c and t -
 Bendigo Historical Society Inc.
Plan - Central Blue Gold Mine, Unknown
... Lansell's Little 180 gold mine was located on the corner of Alley Street and Mt. Korong Road. ...Lansell's Little 180 gold mine was located on the corner of Alley Street and Mt. Korong Road. gold mining gold Bendigo central blue Longitudinal plan of Central Blue and Little 180 gold mines underground workings. ...Lansell's Little 180 gold mine was located on the corner of Alley Street and Mt. Korong Road. Longitudinal plan of Central Blue and Little 180 gold mines underground workings. Hand drawn in pencil, with shadings. Shafts marked: Central Blue and Sheepshead shaft. Plan forms part of the Margaret Roberts Collection.gold mining, gold, bendigo, central blue -
 Bendigo Historical Society Inc.
Map - LONG GULLY HISTORY GROUP COLLECTION: MAP OF LONG GULLY AREA
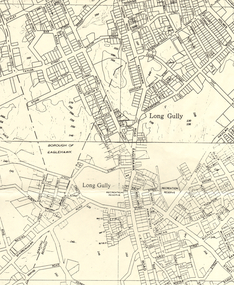
... Map shows Eaglehawk Road from Don Street to Weatherall Street, then Mt Korong Road to Dowding Street. Some contour lines on the map....Map shows Eaglehawk Road from Don Street to Weatherall Street, then Mt Korong Road to Dowding Street. Some contour lines on the map. ...BHS CollectionMap of Long Gully area printed on yellow paper. Map shows Eaglehawk Road from Don Street to Weatherall Street, then Mt Korong Road to Dowding Street. Some contour lines on the map.bendigo, history, long gully history group, the long gully history group - map of long gully area, borough of eaglehawk -
 Ballarat Tramway Museum
Slide - 35mm slide/s - set of 6, Noel Simons, 28 Feb. 1972
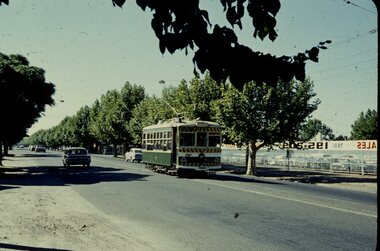
... Loop, en route for Quarry Hill. 1206.2 - No. 5 at Garden Gully Loop, Mt. Korong road, Ironbark. en route to Quarry Hill. ...Information written on in blue ink and date stamped on purple ink. 1206.1 - "No. 5 at Hayes Loop, Ironbark." 1206.2 - "No. 5 at Garden Gully Loop, Mt. Korong road, Ironbark." 1206.3 - "No. 5 in View St. just after start of double track near Barnard St." 1206.4 - "No. 6 in High St. at Fire Station loop." 1206.5 - "No. 6 in High St. running through Golden Square shopping centre." 1206.6 - "No. 6 arriving at Charing Cross from Golden Square."...Loop, en route for Quarry Hill. 1206.2 - No. 5 at Garden Gully Loop, Mt. Korong road, Ironbark. en route to Quarry Hill. ...Set of 6 transparencies taken on 28/2/1972 on Kodak mounts. 1206.1 - Bendigo No. 5 at Hayes St. Loop, en route for Quarry Hill. 1206.2 - No. 5 at Garden Gully Loop, Mt. Korong road, Ironbark. en route to Quarry Hill. Note the water column in the background. 1206.3 - No. 5 in View St. Bendigo, with the Commodore Motel in the background. 1206.4 - No. 6 en route for Golden Square in Fire Station loop, with the fire station building in the background. Photo taken after tram has passed photographer. 1206.5 - No. 6 in High St., running through Golden Square Shopping Centre, en route for Golden Square. Photo taken after tram has passed photographer. 1206.6 - No. 6 arriving at Charing Cross, bound for North Bendigo, with the City Family Hotel, ANZ bank and the Cenotaph (war memorial) in the background.Information written on in blue ink and date stamped on purple ink. 1206.1 - "No. 5 at Hayes Loop, Ironbark." 1206.2 - "No. 5 at Garden Gully Loop, Mt. Korong road, Ironbark." 1206.3 - "No. 5 in View St. just after start of double track near Barnard St." 1206.4 - "No. 6 in High St. at Fire Station loop." 1206.5 - "No. 6 in High St. running through Golden Square shopping centre." 1206.6 - "No. 6 arriving at Charing Cross from Golden Square."tramways, trams, bendigo, hayes st. loop, garden gully loop, view st., golden square, charing cross, tram 5, tram 6 -
 Bendigo Military Museum
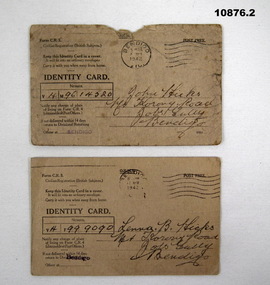
Card - IDENTITY CARDS, 1942
... John & Lenna Hicks, both of Mt Korong Road Jobs Gully Bendigo. Staley collection, refer Cat No 10758.2P for further details....John & Lenna Hicks, both of Mt Korong Road Jobs Gully Bendigo. Staley collection, refer Cat No 10758.2P for further details. ...John & Lenna Hicks, both of Mt Korong Road Jobs Gully Bendigo. Staley collection, refer Cat No 10758.2P for further details..1) .2) Two Identity cards "OHMS", brown colour, all print in black, hand written parts in black ink, stamped in purple "Bendigo", each has a recipients name, address on the front, rear has the name, signature, witness signature..1) Main points, "John Hicks - V4 M96 14520" .2) "Lenna.B. Hicks - V4 F99 9090"tmstaleycollection, identity -
 Bendigo Military Museum
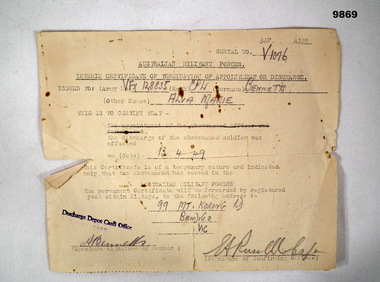
Administrative record - CERTIFICATE OF DISCHARGE, INTERIM, Australian Military Force
... Handwritten recipient's details in pencil; "V1076 VFX128835, CPL BENNETTS, ALVA MARIE, 13.4.49, 99 Mt Korong Road, Bendigo, Vic (Two signatures)". ...Discharge Certificate Bennetts Collection Alva Bennetts Handwritten recipient's details in pencil; "V1076 VFX128835, CPL BENNETTS, ALVA MARIE, 13.4.49, 99 Mt Korong Road, Bendigo, Vic (Two signatures)". ...Part of the Bennetts Collection. See Catalogue No. 9726P for details of service for "Alva Marie Bennetts."Cream coloured certificate with text in black type. Spaces for recipient's details. Print on one side only.Handwritten recipient's details in pencil; "V1076 VFX128835, CPL BENNETTS, ALVA MARIE, 13.4.49, 99 Mt Korong Road, Bendigo, Vic (Two signatures)". Stamped in blue ink on bottom LHC: 'Discharge Depot Cash Office'.discharge certificate, bennetts collection, alva bennetts -
 Bendigo Historical Society Inc.
Document - MARKS COLLECTION: MAP OF EAGLEHAWK/LONG GULLY AREA
... Section of map has been neatly cut out - area near Mt Korong Road and Victoria Hill....Section of map has been neatly cut out - area near Mt Korong Road and Victoria Hill. Document MARKS COLLECTION: MAP OF EAGLEHAWK/LONG GULLY AREA ...Map of Eaglehawk and Long Gully area. Maps shows allotments and areas. Map is split down centre (torn?) and in two pieces. Map was located in Fortuna papers, potentially belonged to G. Lansell. Section of map has been neatly cut out - area near Mt Korong Road and Victoria Hill.map, eaglehawk, long gully, marks collection -
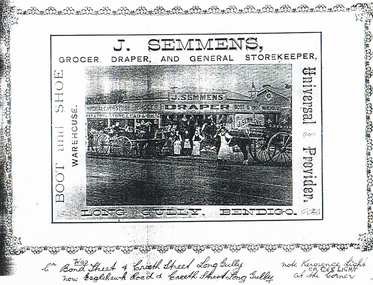 Bendigo Historical Society Inc.
Document - LONG GULLY HISTORY GROUP COLLECTION: J SEMMENS
... In 1895 he lived at McIntyre Street, Long Gully; 1901 Mt Korong Road and 1905 Crn Bond and Creeth Streets, Long Gully. ...In 1895 he lived at McIntyre Street, Long Gully; 1901 Mt Korong Road and 1905 Crn Bond and Creeth Streets, Long Gully. ...James Semmens was born in Cornwall. He married Elizabeth Ann Marks. In 1895 he lived at McIntyre Street, Long Gully; 1901 Mt Korong Road and 1905 Crn Bond and Creeth Streets, Long Gully. By the time he left Bendigo (approx 1915) he also had a store in View Street, Bendigo. He served on the Bendigo Council as a representative of the Barkly Ward and as the Mayor 1906/7.Black and white photocopy of a photo of J. Semmens, Grocer, Draper, and General Storekeeper, Long Gully, Bendigo. Photo shows the store with the name, J Semmens, Grocer, Draper, Boot and Shoe Warehouse. In front of the shop is a number of people and two horse drawn vehicles. Written under the photo is: Cr was Bond Street & Creeth Street Long Gully, now Eaglehawk Road & Creeth Street, Long Gully. Note - Kerosene Light or Gas Light at Corner.bendigo, history, long gully history group, the long gully history group - j semmens, j semmens draper -
 Bendigo Historical Society Inc.
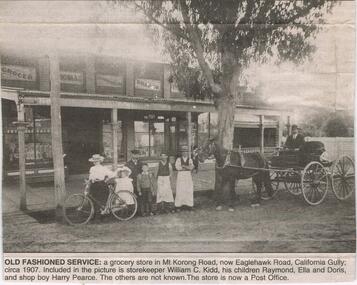
Newspaper - JENNY FOLEY COLLECTION: OLD FASHIONED SERVICE
... Old fashioned service: Old fashioned service: a grocery store in Mt. Korong Road, now Eaglehawk Road, California Gully; circa 1907. ...Old fashioned service: Old fashioned service: a grocery store in Mt. Korong Road, now Eaglehawk Road, California Gully; circa 1907. ...William Creswick Kidd (1859-1933) married Margaret Williams in 1883 and they had the following children:- Linda MAbel 1884-25/8/1890; Richard Percy 1886-10/10/1890; William Leslie 1890-25/4/1895; Ella Winifred 1892; Raymond Thomas 1897; Laura Doris 1900. William was appointed as a JP in 1913 and early in the 1900's became a councillor in the Eaglehawk borough. His grocery store was mentioned in the newspapers as early as 1892Bendigo Advertiser '' The way we were'' from Monday, October 14, 2002. Old fashioned service: Old fashioned service: a grocery store in Mt. Korong Road, now Eaglehawk Road, California Gully; circa 1907. Included in the picture is storekeeper William c. Kidd, his children Raymond, Ella and Doris and shop boy Harry Pearce. The others are not known. The store is now a post office. The clip is in a folder.newspaper, bendigo advertiser, the way we were -
 Bendigo Historical Society Inc.
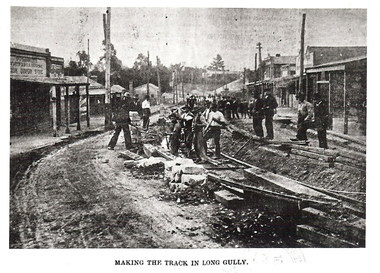
Photograph - BASIL MILLER COLLECTION: LAYING TRACKS AT LONG GULLY
... Laying tram track in Mt Korong Road, Long Gully in c.1902. Captioned on front 'Making the track in Long Gully'. ...Laying tram track in Mt Korong Road, Long Gully in c.1902. Captioned on front 'Making the track in Long Gully'. ...BHS CollectionBlack and white photograph. Laying tram track in Mt Korong Road, Long Gully in c.1902. Captioned on front 'Making the track in Long Gully'. Written in faded blue ink on back - 'Bendigo- Laying track in Long Gully. Copied from ''The Bendigonian'' 15/7/02'. In black ink, 'P. 5 middle 3/Col.' Stamped in right top corner 'K.S. Kings Collection No. S-A 792.cottage, miners -
 Bendigo Historical Society Inc.
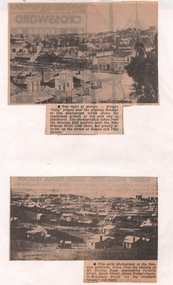
Newspaper - NEWSPAPER CLIPPINGS EARLY PHOTOGRAPHS OF BENDIGO STREETSCAPE, Unknown
... (Photograph 2) An early photograph of the Bendigo Goldfields the suburb of Ironbark taken from the vicinity of Mt. Korong Road, overlooking Victoria Street and Quick Street. ...mt korong rd Two Black & White Early Photographs of Bendigo. (Photograph 1) Panorama is taken from the Masonic Hall location with the Rifle Brigade Hotel on the corner of Rowan and View Streets and Knipe's Folly in top right of image. (Photograph 2) An early photograph of the Bendigo Goldfields the suburb of Ironbark taken from the vicinity of Mt. Korong Road ...Two Black & White Early Photographs of Bendigo. (Photograph 1) Panorama is taken from the Masonic Hall location with the Rifle Brigade Hotel on the corner of Rowan and View Streets and Knipe's Folly in top right of image. (Photograph 2) An early photograph of the Bendigo Goldfields the suburb of Ironbark taken from the vicinity of Mt. Korong Road, overlooking Victoria Street and Quick Street. Image shows Knipe's Castle in Boundary Street ''on the Ironbark Ranges'' top right.bendigo, streetscape, rowan & view st, mt korong rd -
 Bendigo Historical Society Inc.
Map - MARKS COLLECTION: CLAIM MAP SANDHURST
... Original hand drawn map showing lease holders along Mt. Korong Road, Sandhurst area. Names include Gold Mines Co., Hercules Co., H. ...History House 11 Mackenzie Street Bendigo goldfields MAP Bendigo mining leases Original hand drawn map showing lease holders along Mt. Korong Road, Sandhurst area. Names include Gold Mines Co., Hercules Co., H. ...Original hand drawn map showing lease holders along Mt. Korong Road, Sandhurst area. Names include Gold Mines Co., Hercules Co., H. Koch, Prince Alfred Co, Advance Co., J. Steane, Skeals, Abel & Co., Mounts(?) Bay co., Wellington Co., Waterloo Co., Endeavour Co., W.H. Langdon, Bridgman & Co. Written in blue pencil on top RH corner in script Syme Well, Nova Ste (indecipherable), German Aleno Co., Concord, Rae. Written on back of map in black pen 'Maps'.map, bendigo, mining leases -
 Bendigo Historical Society Inc.
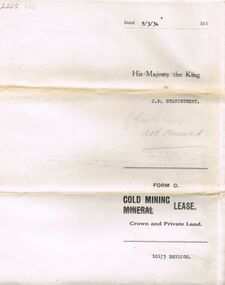
Document - MCCOLL, RANKIN AND STANISTREET COLLECTION: MINING LEASE NO 10173 GARDEN GULLY SHAFT, 9th March, 1934
... Mining lease 5 page document for lease application 10173, dated 9th March 1934, within area bounded by Don, Barnard Streets up to Mt. Korong Road, area 10 acres. Document signed by John Jepson Stanistreet in the presence of W.A. ...History House 11 Mackenzie Street Bendigo goldfields GOLD Mining Garden Gully Shaft Mining lease 5 page document for lease application 10173, dated 9th March 1934, within area bounded by Don, Barnard Streets up to Mt. Korong Road, area 10 acres. Document signed by John Jepson Stanistreet in the presence of W.A. ...Mining lease 5 page document for lease application 10173, dated 9th March 1934, within area bounded by Don, Barnard Streets up to Mt. Korong Road, area 10 acres. Document signed by John Jepson Stanistreet in the presence of W.A. Kell, Warden's Clerk, Bendigo. Hand coloured plan of lease appended to document, yellow section refers to lease. Marked on map Central Garden Gully shaft. On front of lease ' entered in the Register Book Vol 303 Fol 33698' On back ' His Majesty the King to J.P. Stanistreet (Cent G Gully not renewed written in pencil) Form C Gold Mining Lease Crown and Private Land'gold, mining, garden gully shaft -
 Bendigo Historical Society Inc.
Document - ALBERT RICHARDSON COLLECTION: VICTORIA REEF, TRY ME WELL REEF AND HERCULES REEF
... For example, page one: 'The main Victoria, really a continuation of the South Victoria, commences at a point to the west of the Mt Korong Road, where the high portion of the ranges is intersected by the head of the Iron Bark Gully, the southern most claim being Ballerstedt and Son's. ...For example, page one: 'The main Victoria, really a continuation of the South Victoria, commences at a point to the west of the Mt Korong Road, where the high portion of the ranges is intersected by the head of the Iron Bark Gully, the southern most claim being Ballerstedt and Son's. ...Three page handwritten document transcribed by Albert Richardson. On top of document: The Victoria Reef, Victoria Spurs, East Victoria Reef, Try McWell Reef and the Hercules Reef. Reference Dickers Mining Record, Vol 1, No. 1 Page g. November 23, 1861. Document details the location of the reef lines and some of the mines and claims along them. For example, page one: 'The main Victoria, really a continuation of the South Victoria, commences at a point to the west of the Mt Korong Road, where the high portion of the ranges is intersected by the head of the Iron Bark Gully, the southern most claim being Ballerstedt and Son's. This line of reef is remarkable from the extraordinary richness of the lodes, not less than from the singular manner in which the gold has been distributed'.Albert Richardsonbendigo, mining, victoria reef line -
 Ballarat Tramway Museum
Slide - 35mm slide/s - set of 10, Campbell Duncan, Jan. 1971
... A 4 square store in the background, with a fading advert for "Peeled Tomatoes". .4 - No. 6 turning from Nolan St into McCrae St with 4 square store in background. .5 - No. 26 at Quarry Hill with cemetery in background. .6 - No. 6 at the North Bendigo Terminus .7 - No. 26 outbound to Eaglehawk on the Railway Overbridge, Mt Korong Road. .8 - No. 17 (inbound to City and Quarry Hill) and another bogie crossing at a loop on the Eaglehawk line. ...A 4 square store in the background, with a fading advert for "Peeled Tomatoes". .4 - No. 6 turning from Nolan St into McCrae St with 4 square store in background. .5 - No. 26 at Quarry Hill with cemetery in background. .6 - No. 6 at the North Bendigo Terminus .7 - No. 26 outbound to Eaglehawk on the Railway Overbridge, Mt Korong Road. .8 - No. 17 (inbound to City and Quarry Hill) and another bogie crossing at a loop on the Eaglehawk line. ...Set of 10 Ferraniacolor slides - cardboard mounts taken on either 10/1/71 or 16/1/71. .1 - Birney No. 30, Golden Square line, inbound near Cathedral with car yard in background. .2 - ditto, with Cathedral gardens in background. .3 - single trucker, with two SEC roof adverts, entering Nolan St enroute to North Bendigo. Shows the driver sitting in a side on shot. A 4 square store in the background, with a fading advert for "Peeled Tomatoes". .4 - No. 6 turning from Nolan St into McCrae St with 4 square store in background. .5 - No. 26 at Quarry Hill with cemetery in background. .6 - No. 6 at the North Bendigo Terminus .7 - No. 26 outbound to Eaglehawk on the Railway Overbridge, Mt Korong Road. .8 - No. 17 (inbound to City and Quarry Hill) and another bogie crossing at a loop on the Eaglehawk line. Both trams have SEC roof adverts. The driver of the outbound car is boarding the tram. Based on .9, it is No. 3 at Long Gully. .9 - No. 3 waiting at Long Gully Loop . .10 - No. 26 at Quarry Hill terminus, with destination of Eaglehawk.In ink on slide: .1 - "1/2 mile out on Golden Square line - 10/1/71 (Sun)." .2 - "1/2 mile out on Golden Square line - 10/1/71" .3 - "Has just rounded curve near lake Weeroona on North Bendigo line - 10/1/71 (Sun)." .4 - "16/1/71" .5 - " 10/1/71 (Sun)." .6 - "North Bendigo terminus, 16/1/71 (Sat)" .7 - "10/1/71 (Sun) c 3pm" .8 - "Cross Eaglehawk line - 10/1/71 (Sun)." .9 - "Jackson St Loop on E'Hk line awaiting up - 10/1/71 " .10 - "Quarry Hill terminus Bendigo - - 10/1/71"tramways, trams, bendigo, golden square, high st, nolan st, north bendigo, quarry hill, long gully, railway bridge, tram 30, tram 6, tram 26, tram 17, tram 3 -
 Ballarat Tramway Museum
Slide - 35mm slide/s - set of 17, Noel Simons, 20/11/1962 12:00:00 AM
... Information written on in black ink and date stamped on purple ink. 1187.1 - "No. 2 at Quarry Hill terminus Bendigo" 1187.2 - "No. 2 at Quarry Hill terminus Bendigo" 1187.3 - "No. 2 at Quarry Hill terminus Bendigo" 1187.4 - "No. 3 at Eaglehawk terminus" 1187.5 - "No. 18 in Mt Korong Road, Long Gully at cnr of Havilah Road (Eaglehawk Route)" 1187.6 - "No. 7 in Nolan St. ...Ballarat Tramway Museum South Gardens Reserve Wendouree Parade Ballarat Ballarat goldfields Tramways trams Bendigo Quarry Hill Eaglehawk North Bendigo Maximum Traction Night Photo tram 2 tram 3 tram 4 tram 7 tram 11 tram 18 tram 19 tram 21 tram 26 Information written on in black ink and date stamped on purple ink. 1187.1 - "No. 2 at Quarry Hill terminus Bendigo" 1187.2 - "No. 2 at Quarry Hill terminus Bendigo" 1187.3 - "No. 2 at Quarry Hill terminus Bendigo" 1187.4 - "No. 3 at Eaglehawk terminus" 1187.5 - "No. 18 in Mt Korong Road, Long Gully at cnr of Havilah Road (Eaglehawk Route)" 1187.6 - "No. 7 in Nolan St. ...Set of 17 transparencies taken on 20/11/1962 on Kodak mounts. 1187.1 - Bendigo No. 2 at the Quarry Hill terminus, showing destination of Quarry Hill. Has Cohns Drinks and Streets Ice Cream ads on dash panel, a SEC 'electric cooking' roof ad and another roof ad. Shows the Y terminus at this location, but tram standing just before it. Overhead in position. 1187.2 - as above, but closer up. 1187.3 - as above, but from the north side, showing cemetery in the background. 1187.4 - Bendigo No.3 at Eaglehawk terminus. Tram showing destination of Quarry Hill. Has the various buildings at Eaglehawk in the background including the Foodland store. Has Streets Ice cream and White Horse Whiskey ads on the dash panel. 1187.5 - Bendigo No. 18 at Garden Gully crossing loop, in bound, with destination of Eaglehawk. Passengers waiting for an Eaglehawk tram at the stop. Has a white horse whiskey ad on dash panel and SEC roof ads. Conductor standing in doorway looking out. 1187.6 - Bendigo No. 7 inbound in Nolan St. at cnr of McCrae St. showing destination of Golden Square. Has Streets Ice cream ad on dash panel and a Castrol Roof ad. 1187.7 - Bendigo No. 19 at the North Bendigo terminus with railway level crossing in background. Tram has a Cohns Drinks ad and an SEC 'Electric Cooking' roof ad. 1187.8 - Bendigo No. 2 at the Quarry Hill terminus, looking back into Bendigo, showing destination of Eaglehawk. 1187.9 - Bendigo No. 21 in McCrae St, near Nolan St outbound for North Bendigo. Photo taken after tram has passed photographer. 1187.10 - Bendigo Nos. 4 and 26 at Charing Cross in View St. with fountain alongside and the Beehive, Ezywalkin Buildings in the background. No. 26 has a Sandhurst Milk and SEC 'Electric Cooking' roof ad. 1187.11 - close up of 22E maximum traction truck and folded footstep. 1187.12 - Bendigo No. 19 at Charing Cross terminus, after tram has passed photographer, showing destination of North Bendigo, with the Beehive building in the background and passengers boarding tram. 1187.13 - Bendigo No. 11, turning from View St. into Pall Mall, showing Special with the conductor holding point bar. Has the Beehive and Ezywalkin Buildings in the background. 1187.14 - No. 7 at Charing Cross terminus, in Pall Mall, bound for Golden Square. Has the Beehive and Ezywalkin buildings in the background and passengers waiting at the tram stop. 1187.15 - No. 18 at the Charing Cross terminus, bound for Eaglehawk. Has the Beehive and Ezywalkin buildings in the background and passengers waiting at the tram stop. Also has the 'Safety Zone' sign in the photograph. 1187.16 - No. 2 at Quarry Hill terminus, night or dusk photo. Tram showing destination of Depot. 1187.17 - No. 26 at Charing Cross, night photo. Tram has destination of Quarry Hill, but is on the line for Eaglehawk. Photo looks along Mitchell St. Also shows Safety Zone sign. Information written on in black ink and date stamped on purple ink. 1187.1 - "No. 2 at Quarry Hill terminus Bendigo" 1187.2 - "No. 2 at Quarry Hill terminus Bendigo" 1187.3 - "No. 2 at Quarry Hill terminus Bendigo" 1187.4 - "No. 3 at Eaglehawk terminus" 1187.5 - "No. 18 in Mt Korong Road, Long Gully at cnr of Havilah Road (Eaglehawk Route)" 1187.6 - "No. 7 in Nolan St. Bendigo, at Cnr of McCrae St., near lake Weeroona, (North Bendigo Route)' 1187.7 - "No. 19 at North Bendigo terminus" 1187.8 - "No. 2 at Quarry Hill terminus" 1187.9 - "No. 21 in McCrae St. Bendigo, near Nolan St. (North Bendigo Route) 1187.10 - "4 and 26 at Alexandra Fountain, Charing Cross Bendigo" 1187.11 - "Truck of Bogie Car, Bendigo Tramways" 1187.12 - "No. 19 in Pall Mall at Charing Cross, Bendigo" 1187.13 - "Birney car No. 11 entering Pall Mall from View St. at Charing Cross Bendigo" 1187.14 - "No. 7 in Pall Mall at Charing Cross, Bendigo" 1187.15 - "No. 18 at Alexandra Fountain, Charing Cross, Bendigo" 1187.16 - "No. 2 at Quarry Hill terminus, Bendigo" 1187.17 - "No. 26 at Alexandra Fountain, Charing Cross, Bendigo" tramways, trams, bendigo, quarry hill, eaglehawk, north bendigo, maximum traction, night photo, tram 2, tram 3, tram 4, tram 7, tram 11, tram 18, tram 19, tram 21, tram 26 -
 Bendigo Historical Society Inc.
Document - National Trust Collection: Former Conrad Heinze Butcher's Shop, 1872
... In 1883 he moved to Mt Korong Road Iron Bark, where he carried on another thriving business and built a substantial house close by. ...In 1883 he moved to Mt Korong Road Iron Bark, where he carried on another thriving business and built a substantial house close by. ...Source National Trust: Conrad Heinz Butchers Shop - Happy Valley Road. This building was a weatherboard cottage evidently built in three stages with the front door in the central part, planked by three paned double casements, six-paned sash windows in the rear section; front section and timber veradah with scrolled vallance. The architect and builders are unknown. The outside doors to the cellar and the simple chimney breast remain a notable feature. The original owner was Conrad Heinz a former mayor of Bendigo who with two brothers opened a butcher's shop in the building in 1872. In 1883 he moved to Mt Korong Road Iron Bark, where he carried on another thriving business and built a substantial house close by. Konrad first made his way to Castlemaine where his sister was living but, after a short stay with her, moved to the Bendigo region where his brother was prospecting, and obtained work in a butcher’s shop. An interest in horses led to his enlistment in the Prince of Wales Light Horse, in which he served for ten years. In 1866, at the age of 20, he married Franzisca Inglefinger. She had arrived in Victoria from Wuertemberg on board the “John Linn” in 1857; she was Konrad’s junior by two years. Pastor Munzel celebrated the marriage in the German Lutheran Church in Bendigo. Albert Conrad, was born in the Heinz home in Webster Street. In 1872 Conrad was naturalised; this enabled him to buy a property and go into business in his own right. Konrad’s friendly and helpful disposition brought many customers to his shop from Happy Valley and Ironbark and his business prospered. When Conrad Heinz left Happy Valley Road, one brother had died, but his widow carried on the first butchering business with the help of a lad and one of her three daughters. The little shop and residence stood for over a century on the spot, almost untouched by modern progress. The shop was closed for 70 years at most. It was demolished about 1982.Data Forms on the house on Corner of Happy Valley Road and Wells Street, Long Gully, now demolished. Various letters to and between the Bendigo Council, the National Trust and the owners of the house. This item contains the following document: 3084.49a Former Butcher's Shop Happy Valley Road, Bendigo, Data Form from the National Trust and various letters. (Contact the BHS for more details)history, national trust bendigo collection, bendigo, happy valley road long gully, butcher's shop bendigo, conrad heinze -
 Ballarat Tramway Museum
Slide - 35mm slide/s - set of 11, Eldon Hogan, mid 1960's to early 1970's
... .4 - No. 29 on the Eaglehawk line at the Mt. Korong Road and the Calder Highway, with the Ampol Service station in the background. .5 - No. 29 passing Lake Weeroona with Destination of Nth Bendigo - has a Briquettes Roof Advertisement., .6 - No. 26 ditto - with two SEC Roof Advertisements. .7 - No. 24 leaving Charing Cross for Golden Square with The Beehive building, Ezywalkin, Coca Cola and the Fountain Shopping Centre in the background. .8 - No. 29 and a bogie tram at the Golden Square terminus with Golden Square Hotel and Victoria Bitter fence in the background. ....4 - No. 29 on the Eaglehawk line at the Mt. Korong Road and the Calder Highway, with the Ampol Service station in the background. .5 - No. 29 passing Lake Weeroona with Destination of Nth Bendigo - has a Briquettes Roof Advertisement., .6 - No. 26 ditto - with two SEC Roof Advertisements. .7 - No. 24 leaving Charing Cross for Golden Square with The Beehive building, Ezywalkin, Coca Cola and the Fountain Shopping Centre in the background. .8 - No. 29 and a bogie tram at the Golden Square terminus with Golden Square Hotel and Victoria Bitter fence in the background. ...Set of 11 Agfa Plastic mounted slides - from the Eldon Hogan collection - possibly on an ARE Bendigo tours - mid 1960's (black destination rolls) and late 1960's or early 1970's. Scanned on the Canon scanner at the depot 15/12/1971 at the time of the installation of the scanner. .1 - No 18 with Lake Weeroona in the background - possibly at the same time as the tour with No. 18, though showing destination of Charing Cross. .2 - ditto .3 - No. 25 and two following trams on a special tour, note the white disc - Quarry Hill line? .4 - No. 29 on the Eaglehawk line at the Mt. Korong Road and the Calder Highway, with the Ampol Service station in the background. .5 - No. 29 passing Lake Weeroona with Destination of Nth Bendigo - has a Briquettes Roof Advertisement., .6 - No. 26 ditto - with two SEC Roof Advertisements. .7 - No. 24 leaving Charing Cross for Golden Square with The Beehive building, Ezywalkin, Coca Cola and the Fountain Shopping Centre in the background. .8 - No. 29 and a bogie tram at the Golden Square terminus with Golden Square Hotel and Victoria Bitter fence in the background. No. 29 has a SEC Briquettes roof advertisement. .9 - No. 29, with the Cathedral in background. Tram has a SEC Briquettes roof advertisement and destination of Golden Square. .10 - side view of a bogie tram on the Eaglehawk line? Tram has a Electric cooking roof advertisement. Photo has been over exposed. .11 - Single trucker, Violet St with the Central Deborah mine head in the background. Tram has two SEC Electric Cooking roof advertisements. tramways, trams, bendigo, lake weeroona, eaglehawk, golden square, charing cross, central deborah, tram 18, tram 25, tram 29, tram 24 -
 Ballarat Tramway Museum
Slide - 35mm slide/s, Noel Simons, 21/11/1962 12:00:00 AM
... Note the centre of the road poles. 1188.13 - No. 2 outbound for Eaglehawk at the intersection of Mt. Korong Road and the Calder Highway. Photo taken after the tram has passed the photographer. ...Note the centre of the road poles. 1188.13 - No. 2 outbound for Eaglehawk at the intersection of Mt. Korong Road and the Calder Highway. Photo taken after the tram has passed the photographer. ...Set of 17 transparencies taken on 21/11/1962 on Kodak mounts. 1188.1 - Bendigo No. 11 at Depot Junction McCrae and Arnold St. with driver/conductor changing points. 1188.2 - Bendigo No. 4 at Charing Cross, side on photo, with City Club Hotel and Alexandra Fountain in the background. Tram has Castrol and SEC 'Electric Cooking' ads. 1188.3 - Bendigo No. 4 climbing View St. after tram has passed photographer. Tram has Streets Ice Cream and Cohns Soft Drinks ad on rear dash panel. In the background are the buildings in View St., including the Princess Theatre. Tram has destination of Eaglehawk. 1188.4 - Trams 2 and 4 crossing at the California Gully or Thorpe St Loop. 1188.5 - Bendigo 4 in Mt Korong Road. Tram inbound with destination of Quarry Hill, just leaving Garden Gully Loop. 1188.6 - Bendigo 4 and 17 crossing at the Hayes St. or Iron Bark Gully Loop. No. 17 bound for Eaglehawk, No. 4, Quarry Hill. 17 has two SEC roof ads and a white horse whiskey ad. 1188.7 - No. 17 bound for Eaglehawk, soon after leaving California Gully. Has large mullock heap in background. 1188.8 - Bendigo 2 and 17 crossing at the Thorpe St. or California Gully Loop. Has butchers shop in background. 1188.9 - Bendigo 17 at the Eaglehawk terminus. Has destination of Quarry Hill. In background is the hotel and shops at the terminus, showing ads for "Melbourne Bitter". Tram has two SEC 'Electric Cooking' ads. Driver and conductor about to assist two lady passengers with a pram and baby. 1188.10 - No. 17 at Eaglehawk terminus, awaiting departure. Has Eaglehawk Town Hall and Post Office in background. Tram has a Whitehorse Whiskey ad on the front dash panel. 1188.11 - No. 3 in High St. Eaglehawk, with destination of Eaglehawk. Has the shops on the south side of High St. in the background, including the Eaglehawk fish shop. Tram has two roof ads, one an SEC roof ad, and Cohns Drinks and Streets Ice cream ads on front dash panel. 1188.12 - as above, but after tram has passed photographer. Note the centre of the road poles. 1188.13 - No. 2 outbound for Eaglehawk at the intersection of Mt. Korong Road and the Calder Highway. Photo taken after the tram has passed the photographer. Has an Ampol service station in the background. 1188.14 - No. 11 leaving the Bendigo depot, crossing the bridge, with the Scrubber car in the background. 1188.15 - No. 21 at the North Bendigo terminus. Tram has destination of Golden Square and Cohns drink ad on front dash and two roof ads on side. 1188.16 - No. 11 on Golden Square route, in High St. at intersection with Old High St. 1188.17 - No. 11 at the Golden Square terminus, conductor turning the pole. Hotel on the left side of the photo. Note the road works barrier and red flag behind the tram. Slide has an end of roll mark on the right hand side of the image.Information written on in black ink and date stamped on purple ink. 1188.1 - "Birney car No. 11 in McCrae St. at Cnr of Arnold about to run into depot, Bendigo" 1188.2 - "No. 4 at Alexandra Fountain, Charing Cross Bendigo" 1188.3 - "No. 4 climbing the View St. Hill from Charing Cross, Bendigo (Eaglehawk Route)" 1188.4 - "No. 4 and 2 at Thorpe St. Loop, California Gully" 1188.5 - "No. 4 in Mt Korong Rd., Long Gully, Near Havilah Rd. (Bendigo) (Eaglehawk Route)" 1188.6 - "Nos. 17 and 4 crossing on Hayes St. Loop, Ironbark, Bendigo" 1188.7 - "No. 17 soon after leaving California Gully (Eaglehawk Route)" 1188.8 - "No.2 and 17 crossing on Thorpe St. Loop, California Gully (Eaglehawk Route)" 1188.9 - "No. 17 at Eaglehawk terminus" 1188.10 - "No. 17 at Eaglehawk terminus" 1188.11 - "No. 3 in High St. Eaglehawk" 1188.12 - "No. 3 nearing Eaglehawk terminus" 1188.13 - "No. 2 in Mt. Korong Rd., Ironbark. Calder highway on left (Eaglehawk route) 1188.14 - "Birney car No. 11 leaving Bendigo depot. Scrubber car at rear" 1188.15 - "No. 21 at North Bendigo Terminus" 1188.16 - "Birney car No. 11 in High St. Bendigo at intersection with Old High Street (Golden Square Route)" 1188.17 - "Birney Car No. 11 at Golden Square terminus, High St., Bendigo". tramways, trams, bendigo, depot junction, charing cross, view st., eaglehawk, north bendigo, golden square, tram 2, tram 3, tram 4, tram 11, tram 17, tram 21, tram scrubber -
 Bendigo Historical Society Inc.
Photograph - Robert Green Collection - Photos of Bendigo Tramways - Sheet 1 of 8, 1960s
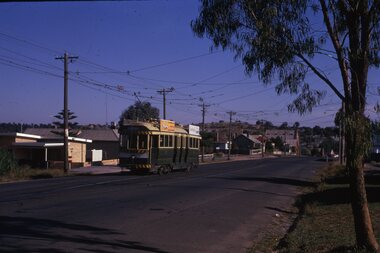
... Photos: 11147.1a and 11147.1b Tram on its way out of Long Gully along Mt Korong (Eaglehawk) Road towards Eaglehawk. Houses in the foreground, on the left is 245 Eaglehawk Road and on the right 241 Eaglehawk Road. 11147.1c Birney Car Tram on its way out of Long Gully along Mt Korong (Eaglehawk) Road towards Eaglehawk, looking back ove the Long Gully township. 11147.1d Birney Car Tram on its way out of Long Gully along Mt Korong (Eaglehawk) Road towards Eaglehawk. ...Photos: 11147.1a and 11147.1b Tram on its way out of Long Gully along Mt Korong (Eaglehawk) Road towards Eaglehawk. Houses in the foreground, on the left is 245 Eaglehawk Road and on the right 241 Eaglehawk Road. 11147.1c Birney Car Tram on its way out of Long Gully along Mt Korong (Eaglehawk) Road towards Eaglehawk, looking back ove the Long Gully township. 11147.1d Birney Car Tram on its way out of Long Gully along Mt Korong (Eaglehawk) Road towards Eaglehawk. ...This collection contains eight archive sheets (Sheet 1 to Sheet 8) of strips of original 35mm black and white negatives of photographs taken during the 1960s and early 1970s by Robert Green, of the Bendigo State Electricty Commission of Victoria Tramways prior to their abandonment The collection also includes two archive quality sheets (Sheet A and Sheet B) of original 35mm colour slides taken by Robert Green during the same period. Sheet B also contains one slide taken by Robert's friend Keigh S King (1928-2019) who was the author of the book 'The Bendigo Tramways an illustrated history, published by the Australian Railway Historical Society Victorian Division Melbourne in February 1972; BHS Item no. 5052. The collection also includes one USB stick which contains images of all photographs described above, except for one colour slide taken by Keith S Kings. Sixteen black and white prints from the images are also included.Robert Green Collection, this item contains thirty three Black and White Negatives of trams at various locations around Bendigo. Photos: 11147.1a and 11147.1b Tram on its way out of Long Gully along Mt Korong (Eaglehawk) Road towards Eaglehawk. Houses in the foreground, on the left is 245 Eaglehawk Road and on the right 241 Eaglehawk Road. 11147.1c Birney Car Tram on its way out of Long Gully along Mt Korong (Eaglehawk) Road towards Eaglehawk, looking back ove the Long Gully township. 11147.1d Birney Car Tram on its way out of Long Gully along Mt Korong (Eaglehawk) Road towards Eaglehawk. Houses in the foreground, on the left is 245 Eaglehawk Road and on the right 241 Eaglehawk Road. 11147.1e No 28 Birney Car Special 11147.1f No 28 Birney Car Special and No 2 possibly in Eaglehawk 11147.1g No 18 roars up Eaglehawk Road into Iron Bark 11147.1h Tram crossing the railway at Jobs Gully, on its way to Bendigo 11147.1i Tram crossing the railway at Jobs Gully, on its way to Eaglehawk 11147.1j Central Deborah Gold Mine 11147.1k The intersection of Reginald and Houston St, with the Cemetery on the left. 11147.1l Tram Stop on Pall Mall opposite Ezywalkins Conrner of Mitchell St 11147.1m Electrical Cable junction box 11147.1n Electrical Cable junction box 11147.1o No 18 at Canterbury Park Terminus Eaglehawk 11147.1p No 26 at the top of Mitchell St on its way to Quarry Hill 11147.1q Nos 26 and 18 at the Railway Station stop in Mitchell St 11147.1r No 18 coming down Mitchell St 11147.1s No 5 possibly in Carpenter St 11147.1t No 5 at the Cemetery Gates ready to depart the terminus 11147.1u No 5 at the Cemetery Gates ready to depart the terminus 11147.1v No 5 at the Cemetery Gates ready to depart the terminus 11147.1w Nos 18 and 5 crossover at the Fountain 11147.1x Nos 18 and 5 crossover at the Fountain 11147.1y Nos 18 and 5 crossover at the Fountain 11147.1z Heading into Long Gully past the Manchester Arms Hotel 11147.1aa No 5 loading passengers at the Eaglehawk Terminus next to Canterbury Park 11147.1ab Traffic conjestion at the loop on the way back to Bendigo 11147.1ac The Eaglehawk Terminus next to Canterbury Park 11147.1ad The Eaglehawk Terminus next to Canterbury Park 11147.1ae The Eaglehawk Terminus next to Canterbury Park 11147.1af The Eaglehawk Terminus next to Canterbury Parkkeith s king, bendigo, trams, robert green -
 Bendigo Historical Society Inc.
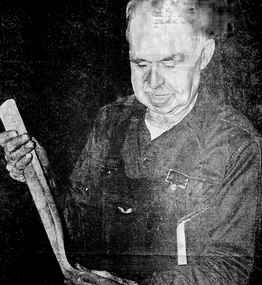
Document - National Trust Collection: Golden City Implements Foundry, Ironbark, Bendigo, 1960-1980s
... This foundry had been a landmark in Mt Korong Road for many years. It began with an Osborne and Mitchell. ...This foundry had been a landmark in Mt Korong Road for many years. It began with an Osborne and Mitchell. ...This foundry had been a landmark in Mt Korong Road for many years. It began with an Osborne and Mitchell. After 1914 when mining declined, it became the Golden City Implement boundary and the name can still be seen painted on on the façade which faces the intersection of Marong Road (Calder highway) and Eaglehawk Road. The interior is a mass of used and un-used machinery scattered amongst modern lathes and more modern apparatus. The yard was a fascinating graveyard of past times, with old mining and agricultural scrap everywhere mixed up with coke and slag from the smelting sheds at the rear. A feature of the foundry was the manufacturer of cast iron lace. This document provides a historical and contemporary overview of the Osborne family's blacksmith and metalworking business in Bendigo, highlighting its longevity, operations, and significance: The business dates back to at least 1855, originally starting as a general store before evolving into a metalworking factory. The original founders were Osborne and Mitchell; Mitchell left early on, and the business changed hands several times before being acquired by Oscar Osborne (not related to the original Osborne founder). Oscar Osborne managed the machine shop and foundry, eventually acquiring it. His sons, Charles and Walter, now run the business with Stan, a descendant of the original founder. The current operators are Charles and Walter Osborne (brothers) and Stan (a descendant of the original founder but not directly related to the brothers). The business is known for its continuity and resilience, surviving as one of the oldest in Bendigo while others have disappeared or are newcomers. The workshop covers about a third of an acre and houses a large array of machinery and tools (nearly 200 between the three operators). The Osbornes pride themselves on traditional skills and methods, many of which are being lost in modern times. They are renowned for repairing a wide range of metal items, especially for antique dealers, and for producing high-quality crowbars and decorative iron lace for both restoration and new construction. Much of their work comes from Adelaide, and they maintain a steady demand for their specialized services. T he foundry and machine shop are considered landmarks in Bendigo, located on Eaglehawk Road opposite the Marong turn-off.The business was deeply embedded in the local community and history, with the Osborne name still prominent in the district.National Trust Survey Data Sheet and article from the Bendigo Advertiser November 4th 1981. Osbornes Ironbark Foundry This items contains the following documents 3084.47a Bendigo advertiser Article 4th November 1981 "Bendigo Firm is Still Going Strong" 3084.47b National Trust Data Survey Sheet July 9th 1977 3084.47c Black and White photo of Charles Osbornehistory, national trust bendigo collection, bendigo, foundary, iron bark bendigo -
 Ballarat Tramway Museum
Slide - 35mm slide/s - set of 19, Noel Simons, 26/02/1972 12:00:00 AM
... Tram has two SEC roof ads. 1203.5 - as for 1202.4 1203.6 - No. 26 entering Garden Gully Loop, Mt. Korong Road, Ironbark. Tram en route to Eaglehawk. ...Tram has two SEC roof ads. 1203.5 - as for 1202.4 1203.6 - No. 26 entering Garden Gully Loop, Mt. Korong Road, Ironbark. Tram en route to Eaglehawk. ...Set of 18 transparencies taken on 26/2/1972 on Kodak mounts. 1203.1 - Bendigo 5 at Eaglehawk terminus - with new traffic works. 1203.2 - No. 5 climbing the High St. hill Eaglehawk with the buildings on the east side in the photo. 1203.3 - No 2 descending the road over rail bridge at Job's Gully, heading for Quarry Hill. 1203.4 - as for 1202.3, but more side on. Tram has two SEC roof ads. 1203.5 - as for 1202.4 1203.6 - No. 26 entering Garden Gully Loop, Mt. Korong Road, Ironbark. Tram en route to Eaglehawk. Water column on right hand side of photograph. 1203.7 - No. 2 on the Eaglehawk route, Iron Bark area?, bound for Quarry Hill. 1203.8 - as for 1202.7, but photo taken after tram has past photographer. 1203.9 - No. 5 at Eaglehawk terminus, night photo. Tram has arrived at terminus, showing Quarry Hill, pole turned, but the tram lights have yet to be turned around. 1203.10 - as for 1202.9, but lights have been turned around. 1203.11 - No. 26 climbing the View St. Hill near the Commodore Hotel. Has Campbells Electrical Services building in the background. Photo taken after the tram has passed the photographer. 1203.12 - No. 7 end on photograph, at Golden Square, destination showing Golden Square - night photo. 1203.13 - number not used. 1203.14 - as for 1202.12, but partially side on, has a passenger looking out the tram. 1203.15 - as for 1202.12, but with hotel in the background. 1203.16 - No. 26 and 2 at Charing Cross, night photo. Tram 26 en route to Quarry Hill, 2 to Eaglehawk. 1203.17 - Interior photo of No. 26, at night. 1203.18 - No. 26 at the Quarry Hill terminus as night. 1203.19 - as for 1202.18, but central portion of the tramcar.Information written on in blue ink and date stamped on purple ink. 1203.1 - "No. 5 at Eaglehawk terminus" 1203.1 - "No. 5 in High St. Eaglehawk" 1203.3 - "No. 2" 1203.4 - "No. 2" 1203.5 - "No. 2" 1203.6 - "No. 26 at Garden Gully Loop Mt Korong Rd., Ironbark" 1203.7 - "No. 2" 1203.8 - "No. 2" 1203.9 - "No. 5 at Eaglehawk terminus" 1203.10 - "No. 5 at Eaglehawk terminus" 1203.11 - "No. 26 in View St. Near the Commodore Motel" 1203.12 - "No. 7 at Golden Square Terminus" 1203.14 - "No. 7 at Golden Square Terminus" 1203.15 - "No. 7 at Golden Square Terminus" 1203.16 - "Nos. 26 and 2 at Charing Cross" 1203.17 - "Interior of No. 26" 1203.18 - "No. 26 at the Quarry Hill terminus" 1203.19 - "No. 26 at the Quarry Hill terminus "tramways, trams, bendigo, eaglehawk, bridges, iron bark gully, night photo, quarry hill, golden square, tram 2, tram 5, tram 7, tram 26 -
 Bendigo Historical Society Inc.
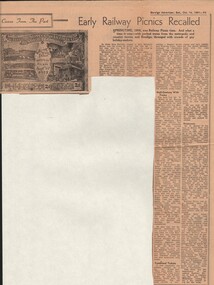
Document - BASIL MILLER COLLECTION: TRAMS, RAILWAY PICNICS, c1961
... 'Half-Century With Trams' is a history as remembered by Mr W J Evans of Mt. Korong Road, California Gully. 'Boisterous' is a history as remembered by Mr W Bolton of the firm of Bolton Bros. recalled the early picnics as 'boisterous' affairs. ...'Half-Century With Trams' is a history as remembered by Mr W J Evans of Mt. Korong Road, California Gully. 'Boisterous' is a history as remembered by Mr W Bolton of the firm of Bolton Bros. recalled the early picnics as 'boisterous' affairs. ...Newspaper clipping. Bendigo Advertiser. Saturday October 14, 1961. Early Railway Picnics Recalled. Article includes photo of souvenir tram ticket number 3588. Springtime, 1905 was Railway picnic time. And what a time it was - with packed trains from the metropolis and country towns, and Bendigo, thronged with the crowds of gay holiday-makers. Souvenir ticket belongs to rear Mrs. A. Bolitho, 5 Webster Street, Bendigo, issued by Electric Supply Coy. Of Victoria Ltd., Bendigo Tramways. Railway Picnic September 16, 1905. The ticket belong to Mrs Bolitho's father, the late Mr J H P Ellis, who lived in McIntyre Street. Post card size, printed in sepia on cream, bears photographs of the power house, engine room, a tram (we presume one of the first models) and the boiler room. Down the sides are listed cemetery, railway station, Rodney St, Charing Cross, through to California Gully Bridge and Eaglehawk. The fare was 2d. On the back a Beehive advertisement. 'Half-Century With Trams' is a history as remembered by Mr W J Evans of Mt. Korong Road, California Gully. 'Boisterous' is a history as remembered by Mr W Bolton of the firm of Bolton Bros. recalled the early picnics as 'boisterous' affairs. 'riff-raff' used to gather at Spencer St Station, arriving in Bendigo-after having spent the night drinking. The picnicers certainly had a right royal time in those early days. Railway Picnic was also boronia time, Mr Bolton said - and bunches of fragrant West Australian borania were sold on the streets. Bolton Bros always printed the tram tickets in Bendigo in those early years. A report in the 'Bendigonian' of the 1903 Railway Picnic period told that 20 special trams came to Bendigo on Saturday morning, September 15, 1903. Railway Picnic Committee: J Southern, Mrs Tait, Mrs Hudson, Mrs Fitzpatrick, Cr J H Curnow, Sir John Quick and many members of parliament. Fare from Melbourne costing 5/ for a day return, or 7/6 for the week.organization, business, bendigo trams -
 Ballarat Tramway Museum
Slide - 35mm slide/s - set of 25, Noel Simons, 26/02/1972 12:00:00 AM
... Hill Eaglehawk, heading for Quarry Hill with the buildings on the West side of High St. in the background, including the Eaglehawk Town Hall. 1204.4 - as for 1204.3, but tram close up. 1204.5 - as for 1204.3, but after tram has passed photographer. 1204.6 - No. 5 at intersection of Mt Korong Road Ironbark and Calder Highway, with the AMPOL service 'station in the background. ...Hill Eaglehawk, heading for Quarry Hill with the buildings on the West side of High St. in the background, including the Eaglehawk Town Hall. 1204.4 - as for 1204.3, but tram close up. 1204.5 - as for 1204.3, but after tram has passed photographer. 1204.6 - No. 5 at intersection of Mt Korong Road Ironbark and Calder Highway, with the AMPOL service 'station in the background. ...Set of 25 transparencies taken on 26/2/1972 on Kodak mounts. 1204.1 - Bendigo No. 5 - just arrived at Manchester Loop near Havilah Road, Long Gully. Photo taken after tram has passed photographer. 1204.2 - No. 26 in Backhaus St. Long Gully passing William St, en route to Quarry Hill. Photo taken after tram has passed photographer. 1204.3 - No. 5 climbing the High St. Hill Eaglehawk, heading for Quarry Hill with the buildings on the West side of High St. in the background, including the Eaglehawk Town Hall. 1204.4 - as for 1204.3, but tram close up. 1204.5 - as for 1204.3, but after tram has passed photographer. 1204.6 - No. 5 at intersection of Mt Korong Road Ironbark and Calder Highway, with the AMPOL service 'station in the background. Photo taken after tram has passed photographer. 1204.7 - No. 26 en route to Quarry Hill shortly after leaving Needle Loop, passing William St., Long Gully. 1204.8 - No. 5 at California Gully Loop, picking up a passenger, with the shops at Long Gully in the background. Photo taken after tram has passed photographer. 1204.9 - No. 5 in Long Gully, en route to Quarry Hill. Photo taken after tram has passed photographer. 1204.10 - No. 2 at Eaglehawk terminus with the Eaglehawk Town Hall and Post Office in the background. Tram has two SEC roof ads. 1204.11 - No. 2 at Eaglehawk terminus, close up. 1204.12 - as for 1204.11, but through the park gates. 1204.13 - as for 1204.11, but with tram stop shelters in the foreground and buildings on the West side of High St in the background. 1204.14 - No. 2 in Mt. Korong Rd, midway between California Gully Loop and Needle Loop. Photo taken after tram has passed photographer. 1204.15 - No. 5 in Long Gully, en route to Quarry Hill. 1204.16 - as for 1204.15, but with trams departed loop. Has an ESSO service station in the background. 1204.17 - No. 26 leaves Charing Cross up View St.. Photo taken after tram has passed photographer. Has Armstrong Tyre Service, Cohns Drinks ad on a building and the T&G building in the background. Also Firestone ads on the tyre service building. 1204.18 - No. 5 waits at Charing Cross with the Alexandra Fountain in the background. Tram has two SEC roof ads, 'Everything s fine in my all electric kitchen' and 'Electricity Best for Cooking'. Has RACV, Colonial Mutual Life buildings in the background and the planting areas around Charing Cross gardens in the foreground. 1204.19 - No. 21 en route to North Bendigo arrives at Charing Cross, with passengers waiting to board. No. 5 in the background. In the background is the Fountain Gate Plaza building and the City Family Hotel. 1204.20 - as for 1204.19, but with No. 7 en route to Golden Square. 1204.21 - as for 1204.19, but closer up. 1204.22 - as for 1204.18 1204.23 - No. 25 in Nolan St. near the crossing of Bendigo Creek, running a special tram tour. 1204.24 - No. 25 on a special charter, in Weeroona Ave. at Cnr of Caledonia St. passing the Gas works. 1204.25 - Nos. 25 (showing Golden Square), 7 and 26 at Charing Cross. Has fountain in the background.Information written on in blue ink and date stamped on purple ink. 1204.1 - "No. 5 at Manchester Loop, near Havilah Rd. Long Gully." 1204.2 - "No. 26 in Backhaus St. Long Gully passing William St." 1204.3 - "No. 5 in High St. Eaglehawk." 1204.4 - "No. 5 in High St. Eaglehawk." 1204.5 - "No. 5 in High St. Eaglehawk." 1204.6 - "No. 5 in Mt. Korong Rd., Ironbark, passing Calder Highway Junctn." 1204.7 - "No. 26 shortly after leaving Needle Loop, passing William St., Long Gully. No. 5 cresting hill in distance." 1204.8 - "No. 5 at California Gully Loop." 1204.9 - "No. 5 in Long Gully" 1204.10 - "No. 2 at Eaglehawk terminus." 1204.11 - "No. 2 at Eaglehawk terminus." 1204.12 - "No. 2 at Eaglehawk terminus." 1204.13 - "No. 2 at Eaglehawk terminus." 1204.14 - "No. 2 in Mt. Korong Rd, midway between California Gully Loop and Needle Loop. 1204.15 - "Nos. 2 and 26 crossing at Long Gully." 1204.16 - "No. 26 leaves Long Gully loop for Eaglehawk as No. 2 pulls out of the far end towards Bendigo" 1204.17 - "No. 26 beginning the climb up View St. from Charing Cross." 1204.18 - "No. 5 at Charing Cross." 1204.19 - "No 21 arrives at Charing Cross from Golden Square while No. 5 awaits departure time for Eaglehawk." 1204.20 - "Nos. 7, 21, and 2 (behind which is No. 5) at Charing Cross." 1204.21 - "Nos. 7, 21, and 2 at Charing Cross." 1204.22 - "No. 5 at Charing Cross." 1204.23 - "No. 25 in Nolan St. near Bendigo creek crossing" 1204.24 - "No. 25 in Weeroona Ave. at cnr of Caledonia St." 1204.25 - "Nos. 25, 7, 26 and 2 (behind 26) at Charing Cross."tramways, trams, bendigo, eaglehawk, long gully, california gully, charing cross, north bendigo, tram 2, tram 5, tram 7, tram 21, tram 25, tram 26 -
 Ballarat Tramway Museum
Slide - 35mm slide/s - set of 24, Noel Simons, 20/05/1971 12:00:00 AM
... Has Borough Auto Service building in the background. 1195.9 - No. 5 in Mt Korong Road, towards Bamard Street, photo taken after tram has passed photographer. 1195.10 - No. 30 at the Golden Square terminus with the Milk Bar on the right hand side of the photograph. 1195.11 - No. 30 inbound at Fire Station Loop, High St. ...Loop, California Gully". 1195.9 - "No. 5 descending Mt Korong Rd. towards Bamard St." 1195.10 - "Birney car No. 30 at Golden Square terminus" 1195.11 - "Birney car No. 30 in High Street near Thistle Street (Fire Station Loop)" 1195.12 - "No. 30 in High St. between vine and Wattle Streets" 1195.13 - "No. 25 at Hayes Street Loop Iron Bark". 1195.14 - "Nos. 2 and 5 crossing at Hayes Street Loop Iron Bark" 1195.15 - "No. 5 at Manchester Loop opposite Havilah Road, Long Gully" 1195.16 - "No. 5 passing William Street, Long Gully". 1195.17 - "No. 5 at California Gully" 1195,18 - "Nos. 26 and 5 at Thorpe St. ...Has Borough Auto Service building in the background. 1195.9 - No. 5 in Mt Korong Road, towards Bamard Street, photo taken after tram has passed photographer. 1195.10 - No. 30 at the Golden Square terminus with the Milk Bar on the right hand side of the photograph. 1195.11 - No. 30 inbound at Fire Station Loop, High St. ...Set of 24 transparencies taken on 20/5/1971 on Kodak mounts. 1195.1 - Bendigo 19 arriving at Charing Cross en route to North Bendigo with Fountain Plaza and the City Family Hotel in the background. No. 19 has two roof ads for the SEC. -'Electricity better for cooking' and 'Everything's under control in my all electric kitchen' 1195.2 - as above, but standing at the Charing cross stop, with the Beehive Stores and other buildings along the east side of Pall Mall in the background. 1195.3 - No 21 ex Golden Square crossing View St. trackwork in front of No. 25 waiting to depart for Quarry Hill. No.21 has two roof ads (as for No.19 in 1195.1) and No.25 has one SEC roof ad and another. Ezywalkin sign in the background, and Fountain Plaza. 1195.4 - as for 1195.3, but after 21 has arrived and 25 left for Quarry Hill. Has Ezywalkin store and the Beehive store in the background. 1195.5 - No. 5 at the Eaglehawk terminus. Photo taken with a cannon in foreground looking along High St. Eaglehawk. Has shops on the west side of High St. in the background. 1195.6 - No. 5 at the Eaglehawk terminus, close up of the rear of the tram - note tow bar arrangement. Has destination of Quarry Hill. 1195.7-Nos.25 and 5 crossing at the Thorpe St. Loop, California Gully. No. 25 bound for Eaglehawk (has SEC Briquette and electric cooking roof ads) and 5 en route for Quarry Hill with a SEC and Cinzano roof ad. 1195.8 - as for 1195.7, but after trams have passed each other. Has Borough Auto Service building in the background. 1195.9 - No. 5 in Mt Korong Road, towards Bamard Street, photo taken after tram has passed photographer. 1195.10 - No. 30 at the Golden Square terminus with the Milk Bar on the right hand side of the photograph. 1195.11 - No. 30 inbound at Fire Station Loop, High St. Golden Square. Has old fire station in the background. Passengers are boarding the tramcar. 1195.12 - No. 30 in High St, bound for North Bendigo between Vine and Wattle Streets. 1195.13 - No. 5 bound for Eaglehawk waits at Iron Bark Gully Loop, at Hayes St. 1195.14 - No. 5 and No. 2 crossing at Iron Bark Gully Loop. 1195.15 - No. 5 bound for Eaglehawk leaving the Manchester Loop, Long gully. 1195.16 - No. 5 passing William Street, Long Gully en route to Eaglehawk. 1195.17 - No. 5 just before the California Gully Crossing Loop. 1195.18 - Nos. 5 and 26 crossing at California Gully crossing Loop. No. 5 heading to Eaglehawk, 26, Quarry Hill. 1195.19 - No. 5 in High St. Eaglehawk with Bob Moyle's Victoria Hotel and the TAB in the background. 1195.20 - No. 5 in High St. Eaglehawk approaching the terminus. Photo taken after the tram has passed the photographer. Has Foodland store and J. Best Fruit supply in the background, along with Eaglehawk Town Hall. 1195.21 - No. 5 at the Eaglehawk terminus, photo taken along seldom used track along High St. 1195.22 - as for 1195.22 - but at the very end of the track. 1195.23 - No. 5 en route for Quarry Hill climbs High St. Eaglehawk with the Victoria Hotel and Eaglehawk Town Hall in the background. 1195.24 - No. 5 and 25 crossing at Jobs Gully Loop. Note 25 has a black on white destination roll, while No. 5 has a white on black destination roll. Information written on in black ink and date stamped on purple ink. 1195.1 - "No. 19 arrives at Charing Cross Bendigo from Golden Square" 1195.2 - "No. 19 about to leave Charing Cross for North Bendigo" 1195.3 - "No. 25 awaiting departure for Quarry Hill, watches No. 21 arrive at Charring Cross from Golden Square" 1195.4 - "No. 21 on North Bendigo service and No. 25 on Quarry Hill run await departure at Charing Cross" 1195.5 - "No. 5 at Eaglehawk terminus" 1195.6 - "No. 5 at Eaglehawk terminus" 1195.7 - "Nos. 5 and 25 crossing at Thorpe St. Loop, California". 1195.8 - "Nos. 25 and 5 crossing Thorpe St. Loop, California Gully". 1195.9 - "No. 5 descending Mt Korong Rd. towards Bamard St." 1195.10 - "Birney car No. 30 at Golden Square terminus" 1195.11 - "Birney car No. 30 in High Street near Thistle Street (Fire Station Loop)" 1195.12 - "No. 30 in High St. between vine and Wattle Streets" 1195.13 - "No. 25 at Hayes Street Loop Iron Bark". 1195.14 - "Nos. 2 and 5 crossing at Hayes Street Loop Iron Bark" 1195.15 - "No. 5 at Manchester Loop opposite Havilah Road, Long Gully" 1195.16 - "No. 5 passing William Street, Long Gully". 1195.17 - "No. 5 at California Gully" 1195,18 - "Nos. 26 and 5 at Thorpe St. Loop, California Gully". 1195.19 - "No. 5 in High St. Eaglehawk". 1195.20 - "No. 5 approaching Eaglehawk terminus" 1195.21 - "No. 5 at Eaglehawk terminus" 1195.22 - "No. 5 at Eaglehawk terminus" 1195.23 - "No. 5 in High St. Eaglehawk" tramways, trams, bendigo, charing cross, eaglehawk, california gully, golden square, iron bark gully, jobs gully, tram 2, tram 5, tram 19, tram 21, tram 25, tram 26, tram 30 -
 Bendigo Historical Society Inc.
Photograph - Robert Green Collection - Photos of Bendigo Tramways - Sheet B of 10, 1960s
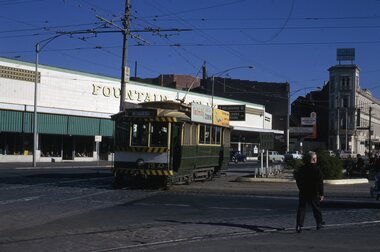
... Photos: 11147.10a Tram in the darkness, sunset or morning 11147.10b Coming off the railway Line bridge towards Eaglehawk 11147.10c Coming on to the railway Line bridge from Eaglehawk 11147.10d The Quarry Hill and Eaglehawk trams waiting to leave the fountain 11147.10e No 18 from Quarry Hill arrives at the fountain 11147.10f Getting ready to leave the fountain for Eaglehawk 11147.10g Policeman on point duty and tram at the fountain, Charing Cross 11147.10h Eaglehawk and Quarry Hill trams at the fountain 11147.10i Policeman on point duty and tram at the fountain, Charing Cross, looking down Pall Mall 11147.10j No 3 roars up View Street at the corner of McKenzie Street 11147.10k From the Rifle Brigade Hotel the Eaglehawk tram comes past the Queen Elizabeth Oval down View Street 11147.10l From the Rifle Brigade Hotel the Eaglehawk tram comes past the Queen Elizabeth Oval down View Street 11147.10m From the Rifle Brigade Hotel the Eaglehawk tram up View Street opposite the Masonic Hall 11147.10n From the Rifle Brigade Hotel the Eaglehawk tram goes past the Queen Elizabeth Oval up View Street 11147.10o From the Rifle Brigade Hotel the Eaglehawk tram comes up View Street opposite the Masonic Hall 11147.10p From the Victoria Hotel Balcony, the Eaglehawk No 18 arrives 11147.10q From the Victoria Hotel Balcony, the Eaglehawk No 18 departs towards Bendigo 11147.10r Tram No 2 arrives into Eaglehawk 11147.10s Tram No 2 heads to Quarry Hill from California Gully (Probable) 11147.1t Tram on its way out of Long Gully along Mt Korong (Eaglehawk) Road towards Eaglehawk. Houses in the foreground, on the left is 245 Eaglehawk Road and on the right 241 Eaglehawk Road....Photos: 11147.10a Tram in the darkness, sunset or morning 11147.10b Coming off the railway Line bridge towards Eaglehawk 11147.10c Coming on to the railway Line bridge from Eaglehawk 11147.10d The Quarry Hill and Eaglehawk trams waiting to leave the fountain 11147.10e No 18 from Quarry Hill arrives at the fountain 11147.10f Getting ready to leave the fountain for Eaglehawk 11147.10g Policeman on point duty and tram at the fountain, Charing Cross 11147.10h Eaglehawk and Quarry Hill trams at the fountain 11147.10i Policeman on point duty and tram at the fountain, Charing Cross, looking down Pall Mall 11147.10j No 3 roars up View Street at the corner of McKenzie Street 11147.10k From the Rifle Brigade Hotel the Eaglehawk tram comes past the Queen Elizabeth Oval down View Street 11147.10l From the Rifle Brigade Hotel the Eaglehawk tram comes past the Queen Elizabeth Oval down View Street 11147.10m From the Rifle Brigade Hotel the Eaglehawk tram up View Street opposite the Masonic Hall 11147.10n From the Rifle Brigade Hotel the Eaglehawk tram goes past the Queen Elizabeth Oval up View Street 11147.10o From the Rifle Brigade Hotel the Eaglehawk tram comes up View Street opposite the Masonic Hall 11147.10p From the Victoria Hotel Balcony, the Eaglehawk No 18 arrives 11147.10q From the Victoria Hotel Balcony, the Eaglehawk No 18 departs towards Bendigo 11147.10r Tram No 2 arrives into Eaglehawk 11147.10s Tram No 2 heads to Quarry Hill from California Gully (Probable) 11147.1t Tram on its way out of Long Gully along Mt Korong (Eaglehawk) Road towards Eaglehawk. Houses in the foreground, on the left is 245 Eaglehawk Road and on the right 241 Eaglehawk Road. ...This collection contains eight archive sheets (Sheet 1 to Sheet 8) of strips of original 35mm black and white negatives of photographs taken during the 1960s and early 1970s by Robert Green, of the Bendigo State Electricty Commission of Victoria Tramways prior to their abandonment The collection also includes two archive quality sheets (Sheet A and Sheet B) of original 35mm colour slides taken by Robert Green during the same period. Sheet B also contains one slide taken by Robert's friend Keigh S King (1928-2019) who was the author of the book 'The Bendigo Tramways an illustrated history, published by the Australian Railway Historical Society Victorian Division Melbourne in February 1972; BHS Item no. 5052. The collection also includes one USB stick which contains images of all photographs described above, except for one colour slide taken by Keith S Kings. Sixteen black and white prints from the images are also included.Robert Green Collection, this item contains 20 Colour Slides of the trams at various locations around Bendigo. Photos: 11147.10a Tram in the darkness, sunset or morning 11147.10b Coming off the railway Line bridge towards Eaglehawk 11147.10c Coming on to the railway Line bridge from Eaglehawk 11147.10d The Quarry Hill and Eaglehawk trams waiting to leave the fountain 11147.10e No 18 from Quarry Hill arrives at the fountain 11147.10f Getting ready to leave the fountain for Eaglehawk 11147.10g Policeman on point duty and tram at the fountain, Charing Cross 11147.10h Eaglehawk and Quarry Hill trams at the fountain 11147.10i Policeman on point duty and tram at the fountain, Charing Cross, looking down Pall Mall 11147.10j No 3 roars up View Street at the corner of McKenzie Street 11147.10k From the Rifle Brigade Hotel the Eaglehawk tram comes past the Queen Elizabeth Oval down View Street 11147.10l From the Rifle Brigade Hotel the Eaglehawk tram comes past the Queen Elizabeth Oval down View Street 11147.10m From the Rifle Brigade Hotel the Eaglehawk tram up View Street opposite the Masonic Hall 11147.10n From the Rifle Brigade Hotel the Eaglehawk tram goes past the Queen Elizabeth Oval up View Street 11147.10o From the Rifle Brigade Hotel the Eaglehawk tram comes up View Street opposite the Masonic Hall 11147.10p From the Victoria Hotel Balcony, the Eaglehawk No 18 arrives 11147.10q From the Victoria Hotel Balcony, the Eaglehawk No 18 departs towards Bendigo 11147.10r Tram No 2 arrives into Eaglehawk 11147.10s Tram No 2 heads to Quarry Hill from California Gully (Probable) 11147.1t Tram on its way out of Long Gully along Mt Korong (Eaglehawk) Road towards Eaglehawk. Houses in the foreground, on the left is 245 Eaglehawk Road and on the right 241 Eaglehawk Road.keith s king, bendigo, trams, robert green