Showing 22 items matching " the bendigo tramways: an illustrated history"
-
 Bendigo Historical Society Inc.
Book - HARRY BIGGS COLLECTION: THE BENDIGO TRAMWAYS: AN ILLUSTRATED HISTORY, 1972
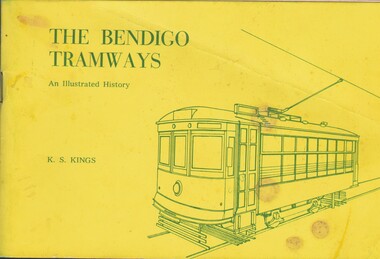
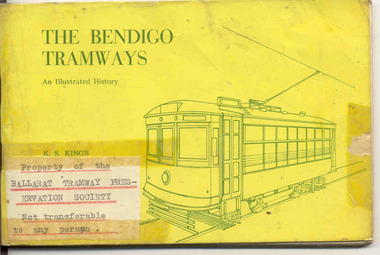
... HARRY BIGGS COLLECTION: THE BENDIGO TRAMWAYS: AN ILLUSTRATED HISTORY... The Bendigo Tramways: an Illustrated History...Bendigo Historical Society Inc. History House 11 Mackenzie Street Bendigo goldfields ORGANISATION Union transport Harry Biggs Collection The Bendigo Tramways: an Illustrated History K. ...Book. Harry Biggs Collection. A small yellow covered book. Written by K. S. Kings on the history of the Bendigo Tramways. Printed in Australia by Hedges & Bell Ltd., Maryborough, Victoria. First published in 1972.organisation, union, transport, harry biggs collection, the bendigo tramways: an illustrated history, k. s. kings, hedges & bell ltd. -
 Bendigo Historical Society Inc.
Book - THE BENDIGO TRAMWAYS AN ILLUSTRATED HISTORY, 1972
... THE BENDIGO TRAMWAYS AN ILLUSTRATED HISTORY...The Bendigo Tramways - an illustrated history 80 pages, photographs, illustrations and map. ...Book THE BENDIGO TRAMWAYS AN ILLUSTRATED HISTORY ...The Bendigo Tramways - an illustrated history 80 pages, photographs, illustrations and map. Published by Hedges and Bell Pty. Ltd. Maryborough. Chapters include battery trams, steam trams, electric supply company years and S.E.C. era.K.S. Kingstramways, history, trams, electric traction, public transport -
 Victorian Railway History Library
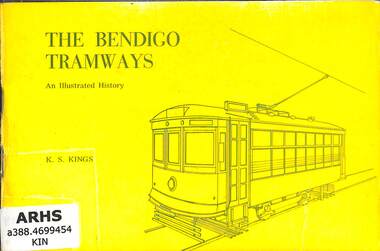
Book, Kings, Keith, The Bendigo Tramways An Illustrated History, 1972
... The Bendigo Tramways An Illustrated History...Victorian Railway History Library 39 St Edmonds Rd Prahran Prahran tramways - Bendigo - history Electric trams - Australia - history A short illustrated history of the Bendigo tramways in Victoria. ill, maps, p.80. ...A short illustrated history of the Bendigo tramways in Victoria.ill, maps, p.80.non-fictionA short illustrated history of the Bendigo tramways in Victoria.tramways - bendigo - history, electric trams - australia - history -
 Victorian Railway History Library
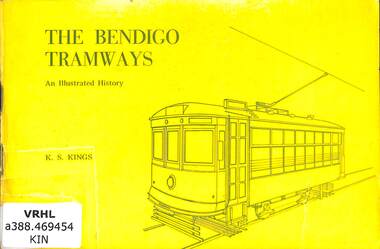
Book, KS Kings, The Bendigo tramways: An illustrated history, 1973
... The Bendigo tramways: An illustrated history...Tramways - Bendigo Trams - Bendigo - History A book on the history of Bendigo's trams. Includes a photograph of each tram and a brief history of the line. Ill, maps, p.80. The Bendigo tramways: An illustrated ...A book on the history of Bendigo's trams. Includes a photograph of each tram and a brief history of the line.Ill, maps, p.80.non-fictionA book on the history of Bendigo's trams. Includes a photograph of each tram and a brief history of the line.tramways - bendigo, trams - bendigo - history -
 Bendigo Historical Society Inc.
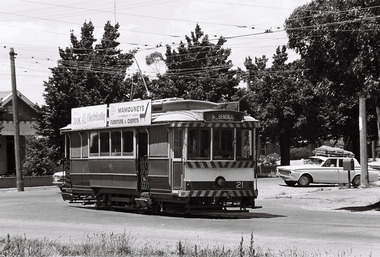
Photograph - Robert Green Collection - Photos of Bendigo Tramways - Sheet 3 of 8, 1960s
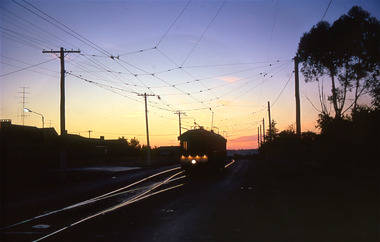
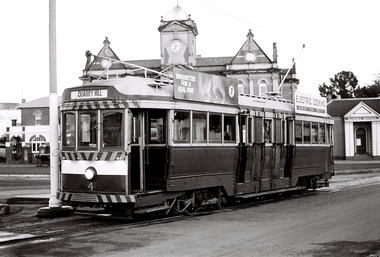
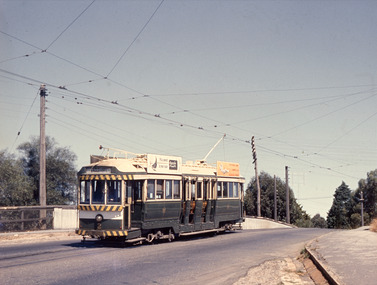
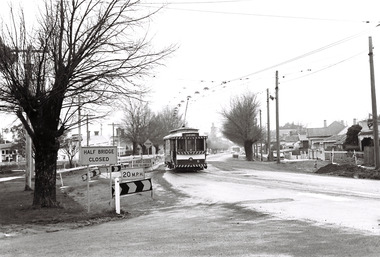
... Bendigo State Electricty Commission of Victoria Tramways prior to their abandonment. The collection also includes two archive quality sheets (Sheet A and Sheet B) of original 35mm colour slides taken by Robert Green during the same period. Sheet B also contains one slide taken by Robert's friend Keigh S King (1928-2019) who was the author of the book 'The Bendigo Tramways an illustrated history...Bendigo State Electricty Commission of Victoria Tramways prior to their abandonment. The collection also includes two archive quality sheets (Sheet A and Sheet B) of original 35mm colour slides taken by Robert Green during the same period. Sheet B also contains one slide taken by Robert's friend Keigh S King (1928-2019) who was the author of the book 'The Bendigo Tramways an illustrated history ...This collection contains eight archive sheets (Sheet 1 to Sheet 8) of strips of original 35mm black and white negatives of photographs taken by Robert green during the 1960s and early 1970s of the Bendigo State Electricty Commission of Victoria Tramways prior to their abandonment. The collection also includes two archive quality sheets (Sheet A and Sheet B) of original 35mm colour slides taken by Robert Green during the same period. Sheet B also contains one slide taken by Robert's friend Keigh S King (1928-2019) who was the author of the book 'The Bendigo Tramways an illustrated history, published by the Australian Railway Historical Society Victorian Division Melbourne in February 1972; BHS Item no. 5052. The collection also includes one USB stick which contains images of all photographs described above, except for one colour slide taken by Keith S Kings. Sixteen black and white prints from the images are also included.Robert Green Collection, this item contains 35 Black and White Negatives of the trams at various locations around Bendigo. Photos: 11147.3a No 21 turns out of McRae St into Nolan Street, on its way to North Bendigo 11147.3b No 5 on the way to Eaglehawk 11147.3c No 21 leaves Charing Cross towards North Bendigo, City Family Hotel in the background 11147.3d No 18 completes its run from Eaglehawk at the fountain, and is returning to the depot 11147.3e No 18 turns from McRae St into Tramway Avenue and the depot 11147.3f No 18 turns from McRae St into Tramway Avenue and the depot 11147.3g No 28 at the depot 11147.3h No 6 on its way to Golden Square 11147.3i No 6 at the Golden square Terminus, High and Maple Streets 11147.3j No 25 from Quarry Hill at the intersection of Wills and Mitchell Street 11147.3k No 2 leaves the Mitchell St railway bridge into Carpenter Street on its way to Quarry Hill 11147.3l No 21 comes into the Golden square Terminus, steeple of the Methodist church in the background 11147.3m Tram heading along McRae St in front of the School of Mines 11147.3n Tram heading along McRae St towards Pall Mall in front of the School of Mines 11147.o No 24 heading to Eaglehawk at the corner of Barnard and Forest Streets 11147.3p Three trams lined up in the depot, possible early morning or evening 11147.3q Tram No 21 at the North Bendigo Terminus, possible early morning or evening 11147.3s Tram leaving the Eaglehawk Town Hall in the dark 11147.3t View up Pall Mall towards the fountain from Mundy Street intersection 11147.3u Birney Car No 28 Special leaving the depot, crossing the Back Creek 11147.3w Birney Car No 28 Special at Eaglehawk Canterbury Park 11147.3x No 28 Birney Car Special hading to Eaglehawk at Iron Bark, just past the Marong Road turn-off at Iron Bark 11147.3y No 28 Birney Car Special heading to Eaglehawk at Long Gully, opposite the Manchester Arms Hotel 11147.3z No 28 Birney Car Special 11147aa No 28 Birney Car Special comes into the Eaglehawk Terminus 11147ab No 28 Birney Car Special heads down view St past the Rifle Brigade Hotel 11147ac No 28 Birney Car Special heads down Pall Mall past the Court House Hotel 11147.3ad No 5 to Eaglehawk runs up McCrae St in front of the School of Mines 11147.3ae No 28 Birney Car passes the Mundy St intersection with McRae St heading to the fountain 11147.3af No 3 passes the Mundy St intersection with McRae St heading to Eaglehawk 11147.3ah Tram passes the School of Mines in McRae St heading to the fountain 11147.3ai Birney Car Tram passes the School of Mines in McRae St heading to the fountain 11147.3aj Tramways High Electrical termination boxkeith s king, bendigo, trams, robert green -
 Bendigo Historical Society Inc.
Photograph - Robert Green Collection - Photos of Bendigo Tramways - Sheet B of 10, 1960s
... Bendigo State Electricty Commission of Victoria Tramways prior to their abandonment. The collection also includes two archive quality sheets (Sheet A and Sheet B) of original 35mm colour slides taken by Robert Green during the same period. Sheet B also contains one slide taken by Robert's friend Keigh S King (1928-2019) who was the author of the book 'The Bendigo Tramways an illustrated history...Bendigo State Electricty Commission of Victoria Tramways prior to their abandonment. The collection also includes two archive quality sheets (Sheet A and Sheet B) of original 35mm colour slides taken by Robert Green during the same period. Sheet B also contains one slide taken by Robert's friend Keigh S King (1928-2019) who was the author of the book 'The Bendigo Tramways an illustrated history ...This collection contains eight archive sheets (Sheet 1 to Sheet 8) of strips of original 35mm black and white negatives of photographs taken by Robert green during the 1960s and early 1970s of the Bendigo State Electricty Commission of Victoria Tramways prior to their abandonment. The collection also includes two archive quality sheets (Sheet A and Sheet B) of original 35mm colour slides taken by Robert Green during the same period. Sheet B also contains one slide taken by Robert's friend Keigh S King (1928-2019) who was the author of the book 'The Bendigo Tramways an illustrated history, published by the Australian Railway Historical Society Victorian Division Melbourne in February 1972; BHS Item no. 5052. The collection also includes one USB stick which contains images of all photographs described above, except for one colour slide taken by Keith S Kings. Sixteen black and white prints from the images are also included.Robert Green Collection, this item contains 20 Colour Slides of the trams at various locations around Bendigo. Photos: 11147.10a Tram in the darkness, sunset or morning 11147.10b Coming off the railway Line bridge towards Eaglehawk 11147.10c Coming on to the railway Line bridge from Eaglehawk 11147.10d The Quarry Hill and Eaglehawk trams waiting to leave the fountain 11147.10e No 18 from Quarry Hill arrives at the fountain 11147.10f Getting ready to leave the fountain for Eaglehawk 11147.10g Policeman on point duty and tram at the fountain, Charing Cross 11147.10h Eaglehawk and Quarry Hill trams at the fountain 11147.10i Policeman on point duty and tram at the fountain, Charing Cross, looking down Pall Mall 11147.10j No 3 roars up View Street at the corner of McKenzie Street 11147.10k From the Rifle Brigade Hotel the Eaglehawk tram comes past the Queen Elizabeth Oval down View Street 11147.10l From the Rifle Brigade Hotel the Eaglehawk tram comes past the Queen Elizabeth Oval down View Street 11147.10m From the Rifle Brigade Hotel the Eaglehawk tram up View Street opposite the Masonic Hall 11147.10n From the Rifle Brigade Hotel the Eaglehawk tram goes past the Queen Elizabeth Oval up View Street 11147.10o From the Rifle Brigade Hotel the Eaglehawk tram comes up View Street opposite the Masonic Hall 11147.10p From the Victoria Hotel Balcony, the Eaglehawk No 18 arrives 11147.10q From the Victoria Hotel Balcony, the Eaglehawk No 18 departs towards Bendigo 11147.10r Tram No 2 arrives into Eaglehawk 11147.10s Tram No 2 heads to Quarry Hill from California Gully (Probable) 11147.1t Tram on its way out of Long Gully along Mt Korong (Eaglehawk) Road towards Eaglehawk. Houses in the foreground, on the left is 245 Eaglehawk Road and on the right 241 Eaglehawk Road.keith s king, bendigo, trams, robert green -
 Bendigo Historical Society Inc.
Mixed media - Robert Green Collection - Photos of Bendigo Tramways - USB of Images, 1960s
... Bendigo State Electricty Commission of Victoria Tramways prior to their abandonment. The collection also includes two archive quality sheets (Sheet A and Sheet B) of original 35mm colour slides taken by Robert Green during the same period. Sheet B also contains one slide taken by Robert's friend Keigh S King (1928-2019) who was the author of the book 'The Bendigo Tramways an illustrated history...Bendigo State Electricty Commission of Victoria Tramways prior to their abandonment. The collection also includes two archive quality sheets (Sheet A and Sheet B) of original 35mm colour slides taken by Robert Green during the same period. Sheet B also contains one slide taken by Robert's friend Keigh S King (1928-2019) who was the author of the book 'The Bendigo Tramways an illustrated history ...This collection contains eight archive sheets (Sheet 1 to Sheet 8) of strips of original 35mm black and white negatives of photographs taken by Robert green during the 1960s and early 1970s of the Bendigo State Electricty Commission of Victoria Tramways prior to their abandonment. The collection also includes two archive quality sheets (Sheet A and Sheet B) of original 35mm colour slides taken by Robert Green during the same period. Sheet B also contains one slide taken by Robert's friend Keigh S King (1928-2019) who was the author of the book 'The Bendigo Tramways an illustrated history, published by the Australian Railway Historical Society Victorian Division Melbourne in February 1972; BHS Item no. 5052. The collection also includes one USB stick which contains images of all photographs described above, except for one colour slide taken by Keith S Kings. Sixteen black and white prints from the images are also included.Robert Green Collection, this item 11147.11a contains images scanned from eight plastic archival sheets of black and white negatives and colour slides.keith s king, bendigo, trams, robert green -
 Bendigo Historical Society Inc.
Photograph - Robert Green Collection - Photos of Bendigo Tramways - Sheet 5 of 8, 1960s
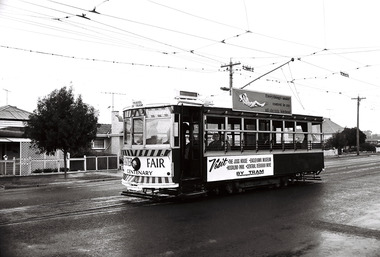
... Bendigo State Electricty Commission of Victoria Tramways prior to their abandonment. The collection also includes two archive quality sheets (Sheet A and Sheet B) of original 35mm colour slides taken by Robert Green during the same period. Sheet B also contains one slide taken by Robert's friend Keigh S King (1928-2019) who was the author of the book 'The Bendigo Tramways an illustrated history...Bendigo State Electricty Commission of Victoria Tramways prior to their abandonment. The collection also includes two archive quality sheets (Sheet A and Sheet B) of original 35mm colour slides taken by Robert Green during the same period. Sheet B also contains one slide taken by Robert's friend Keigh S King (1928-2019) who was the author of the book 'The Bendigo Tramways an illustrated history ...This collection contains eight archive sheets (Sheet 1 to Sheet 8) of strips of original 35mm black and white negatives of photographs taken by Robert green during the 1960s and early 1970s of the Bendigo State Electricty Commission of Victoria Tramways prior to their abandonment. The collection also includes two archive quality sheets (Sheet A and Sheet B) of original 35mm colour slides taken by Robert Green during the same period. Sheet B also contains one slide taken by Robert's friend Keigh S King (1928-2019) who was the author of the book 'The Bendigo Tramways an illustrated history, published by the Australian Railway Historical Society Victorian Division Melbourne in February 1972; BHS Item no. 5052. The collection also includes one USB stick which contains images of all photographs described above, except for one colour slide taken by Keith S Kings. Sixteen black and white prints from the images are also included.Robert Green Collection, this item contains 23 Black and White Negatives of the trams at various locations around Bendigo. Photos: 11147.5a Birney car decked out in advertising for the Bendigo Easter Fair 11147.5b Birney car decked out in advertising for the Bendigo Easter Fair heading to North Bendigo in Mcrae St 11147.5c Birney car decked out in advertising for the Bendigo Easter Fair heading to North Bendigo in Mcrae St passing No 17 and another tram approaching from the depot 11147.5d Birney car decked out in advertising for the Bendigo Easter Fair heading into the depot in Tramway Avenue 11147.5e No 18 and old shop front 11147.5f Tram Turning into Tramways Avenue from Mcrae St 11147.5g Three trams at the Golden Square Terminus in High Street 11147.5h No 18 tram in Mcrae Street passing by Tramways Avenue to North Bendigo 11147.5i No 21 returning to the Tramways Avenue Depot off Mcrae Street 11147.5j No 21 returning to the Tramways Avenue Depot off Mcrae Street 11147.5k No 21 returning to the Tramways Avenue Depot crossing the Back Creek 11147.5l No 21 returning to the Tramways Avenue Depot 11147.5m No 21 returning to the Tramways Avenue Depot with the scrubber tram on the left 11147.5n No 21 in the Tramways Avenue Depot 11147.5o Nos 18 and 17 pass at the Golden Square Terminus in High St 11147.5p No 17 on its way to the North Bendigo Terminus 11147.5q No 17 turns from the North Bendigo Terminus into Finn Street 11147.5r No 17 heading to the North Bendigo Terminus along Thunder Street 11147.5s No 17 at the North Bendigo Terminus off Finn Street 11147.5t Train heading from the Swan Hill direction to Bendigo off the Finn Street crossing 11147.5u No 25 heading to Golden Square 11147.5v No 25 turns from Weeroona Avenue into Caledonia Street 11147.5w The Easter Fair, intersection of Pall Mall and Williamson St with Myer Stores in the backgroundkeith s king, bendigo, trams, robert green -
 Bendigo Historical Society Inc.
Photograph - Robert Green Collection - Photos of Bendigo Tramways - Sheet 6 of 8, 1960s
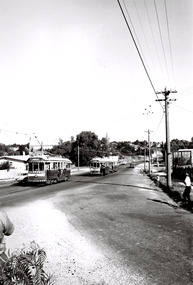
... Bendigo State Electricty Commission of Victoria Tramways prior to their abandonment. The collection also includes two archive quality sheets (Sheet A and Sheet B) of original 35mm colour slides taken by Robert Green during the same period. Sheet B also contains one slide taken by Robert's friend Keigh S King (1928-2019) who was the author of the book 'The Bendigo Tramways an illustrated history...Bendigo State Electricty Commission of Victoria Tramways prior to their abandonment. The collection also includes two archive quality sheets (Sheet A and Sheet B) of original 35mm colour slides taken by Robert Green during the same period. Sheet B also contains one slide taken by Robert's friend Keigh S King (1928-2019) who was the author of the book 'The Bendigo Tramways an illustrated history ...This collection contains eight archive sheets (Sheet 1 to Sheet 8) of strips of original 35mm black and white negatives of photographs taken by Robert green during the 1960s and early 1970s of the Bendigo State Electricty Commission of Victoria Tramways prior to their abandonment. The collection also includes two archive quality sheets (Sheet A and Sheet B) of original 35mm colour slides taken by Robert Green during the same period. Sheet B also contains one slide taken by Robert's friend Keigh S King (1928-2019) who was the author of the book 'The Bendigo Tramways an illustrated history, published by the Australian Railway Historical Society Victorian Division Melbourne in February 1972; BHS Item no. 5052. The collection also includes one USB stick which contains images of all photographs described above, except for one colour slide taken by Keith S Kings. Sixteen black and white prints from the images are also included.Robert Green Collection, this item contains 33 Black and White Negatives of the trams at various locations around Bendigo. Photos: 11147.6a Two trams passing at the loop in Eaglehawk Road at the Philpot Street intersection 11147.6b Two trams passing at the loop in Eaglehawk Road at the Philpot Street intersection 11147.6c Two trams passing at the loop in Eaglehawk Road at the Philpot Street intersection 11147.6d Two trams leave the loop in Eaglehawk Road at the Philpot Street intersection 11147.6e No 18 heading out of Iron Bark to Long Gully along Eaglehawk Road 11147.6f No 25 Special head down View Street at the McKenzie Street intersection 11147.6g The No 25 Special from Eaglehawk arrives at the fountain 11147.h No 2 to Eaglehawk comes up View Street past the Infant Welfare Centre 11147.6i The Quarry Hill tram passes the Carpenter and Houston St intersection at the corner of the cemetery 11147.6j The Quarry Hill tram passes the Carpenter and Houston St intersection at the corner of the cemetery 11147.6k The Quarry Hill tram approached the terminus at the Cemetery gates 11147.6l The Quarry Hill tram at the terminus at the Cemetery gates picking up passengers 11147.6m The Quarry Hill tram at the terminus at the Cemetery gates picking up passengers 11147.6n The Quarry Hill tram at the terminus at the Cemetery gates picking up passengers 11147.6o Tram and large crown in front of the Eaglehawk Town Hall 11147.6p Tram and large crown in front of the Eaglehawk Town Hall 11147.6q Tram and large crown in front of the Eaglehawk Town Hall 11147.6q Two Trams and large crown in front of the Eaglehawk Town Hall 11147.6r Two Trams and large crown in front of the Eaglehawk Town Hall 11147.6s Passengers on the "Last Tram" 11147.6t Passengers on the "Last Tram" 11147.6u Passengers on the "Last Tram" 11147.6v Two trams leaving the depot crossing the Back Creek 11147.6w The Scrubber tram in the depot 11147.6x Birney Car 30 tram in the depot 11147.6y Birney Car 29 and two others arriving at the depot 11147.6z Birney Car 11 and two others arriving at the depot 11147.6aa No 11 Birney Car at the depot 11147.6ab No 28 Birney Car at the depot 11147.6ac Nos 29, 11 and 25 at the depot 11147.6ad Birney Car 28 arrives at the depot 11147.6ae Birney Cars Nos 30 and 29 in the depot 11147.6af The Scrubber Car at the depot 11147.6ag Four trams and one driver at the depot TMS Bendigo Tour 24 March 1968keith s king, bendigo, trams, robert green -
 Bendigo Historical Society Inc.
Photograph - Robert Green Collection - Photos of Bendigo Tramways - Sheet 4 of 8, 1960s
... Bendigo State Electricty Commission of Victoria Tramways prior to their abandonment. The collection also includes two archive quality sheets (Sheet A and Sheet B) of original 35mm colour slides taken by Robert Green during the same period. Sheet B also contains one slide taken by Robert's friend Keigh S King (1928-2019) who was the author of the book 'The Bendigo Tramways an illustrated history...Bendigo State Electricty Commission of Victoria Tramways prior to their abandonment. The collection also includes two archive quality sheets (Sheet A and Sheet B) of original 35mm colour slides taken by Robert Green during the same period. Sheet B also contains one slide taken by Robert's friend Keigh S King (1928-2019) who was the author of the book 'The Bendigo Tramways an illustrated history ...This collection contains eight archive sheets (Sheet 1 to Sheet 8) of strips of original 35mm black and white negatives of photographs taken by Robert green during the 1960s and early 1970s of the Bendigo State Electricty Commission of Victoria Tramways prior to their abandonment. The collection also includes two archive quality sheets (Sheet A and Sheet B) of original 35mm colour slides taken by Robert Green during the same period. Sheet B also contains one slide taken by Robert's friend Keigh S King (1928-2019) who was the author of the book 'The Bendigo Tramways an illustrated history, published by the Australian Railway Historical Society Victorian Division Melbourne in February 1972; BHS Item no. 5052. The collection also includes one USB stick which contains images of all photographs described above, except for one colour slide taken by Keith S Kings. Sixteen black and white prints from the images are also included.Robert Green Collection, this item contains 22 Black and White Negatives of the trams at various locations around Bendigo. Photos: 11147.4a Tram at Carpenter St Quarry Hill, Cemetery Gates Terminus 11147.4b Tram and Conductor at Carpenter St Quarry Hill, Cemetery Gates Terminus 11147.4c Overhead Pole, wires and tram stop sign; and end of section sign 11147.4d Overhead Pole, wires and tram stop sign; and end of section sign, in View Street 11147.4e Quarry Hill, Eaglehawk and Golden Square Trams meeting at the Fountain, Charing Cross 11147.4f Quarry Hill, Eaglehawk trams and overhead sign at the fountain roundabout 11147.4g Tram line Point at the Fountain 11147.4h All lines cross at the fountain 11147.4i Turning Caution sign at Tramways Avenue (to the depot) and McRae Street 11147.4j Trams stop by request sign 11147.4k No 4 at the intersection of Eaglehawk and Havilah Roads, Long Gully 11147.4l No 4 to Quarry Hill picking up passengers in Eaglehawk Road 11147.4m No 30 Birney Car heading to Golden Square 11147.4n Birney Car crossing the creek 11147.4o Birney Car No 30 leaving Golden Square in High Street 11147.4p No 3 heading to Eaglehawk 11147.4q No 25 heading to Quarry Hill in Carpenter St possibly 11147.4r Three trams at the loop in Carpenter St Quarry Hill 11147.4s Two trams at the Quarry Hill Terminus Carpenter St 11147.4t Two trams at Canterbury Park Eaglehawk 11147.4u Birney Car 29 Special at Eaglehawk Terminus 11147.4v Passing No 26 at Eaglehawkkeith s king, bendigo, trams, robert green -
 Bendigo Historical Society Inc.
Photograph - Robert Green Collection - Photos of Bendigo Tramways - Sheet 8 of 10, 1960s
... Bendigo State Electricty Commission of Victoria Tramways prior to their abandonment. The collection also includes two archive quality sheets (Sheet A and Sheet B) of original 35mm colour slides taken by Robert Green during the same period. Sheet B also contains one slide taken by Robert's friend Keigh S King (1928-2019) who was the author of the book 'The Bendigo Tramways an illustrated history...Bendigo State Electricty Commission of Victoria Tramways prior to their abandonment. The collection also includes two archive quality sheets (Sheet A and Sheet B) of original 35mm colour slides taken by Robert Green during the same period. Sheet B also contains one slide taken by Robert's friend Keigh S King (1928-2019) who was the author of the book 'The Bendigo Tramways an illustrated history ...This collection contains eight archive sheets (Sheet 1 to Sheet 8) of strips of original 35mm black and white negatives of photographs taken by Robert green during the 1960s and early 1970s of the Bendigo State Electricty Commission of Victoria Tramways prior to their abandonment. The collection also includes two archive quality sheets (Sheet A and Sheet B) of original 35mm colour slides taken by Robert Green during the same period. Sheet B also contains one slide taken by Robert's friend Keigh S King (1928-2019) who was the author of the book 'The Bendigo Tramways an illustrated history, published by the Australian Railway Historical Society Victorian Division Melbourne in February 1972; BHS Item no. 5052. The collection also includes one USB stick which contains images of all photographs described above, except for one colour slide taken by Keith S Kings. Sixteen black and white prints from the images are also included.Robert Green Collection, this item contains 22 Black and White Negatives of the trams at various locations around Bendigo. Photos: 11147.8a No 4 outside the Eaglehawk Town Hall 11147.8b No 7 at the North Bendigo Terminus 11147.8c No 18 passing the View Street and Rowan Street intersection 11147.8d No 24 and driver at the fountain 11147.8e No 7 at the fountain 11147.8f No 24 and at the fountain 11147.8g No 24 and driver at Eaglehawk 11147.8h Picking up passengers at North Bendigo Terminus 11147.8i Birney Car 30 in Finn Street North Bendigo 11147.8j No 30 has just crossed the Bendigo Creek in high St Golden Square 11147.8k No 30 has just crossed the Bendigo Creek in High St Golden Square and is passing No 2 11147.8l Nos 29 and 19 at the depot with two drivers 11147.8m No 29 comes up Pall Mall past the Williamson St intersection 11147.8n No 29 comes up Pall Mall 11147.8o No 29 at the Golden Square Terminus loop 11147.8p No 29 and another at the Golden Square Terminus 11147.8q The Pahran and Malvern Tramways Trust Logo 11147.8r Passing No 6 on the High St Loop 11147.8s Passing No 6 on the High St Loop, Sacred Heart Cathedral Spire being buit in the background 11147.8t At the Cemetery Gate Quarry Hill 11147.8u No 25 at the Bendigo Cemetery Terminus 11147.8v At the Quarry Hill Gates in Carpenter Streetkeith s king, bendigo, trams, robert green -
 Bendigo Historical Society Inc.
Photograph - Robert Green Collection - Photos of Bendigo Tramways - Sheet 2 of 8, 1960s
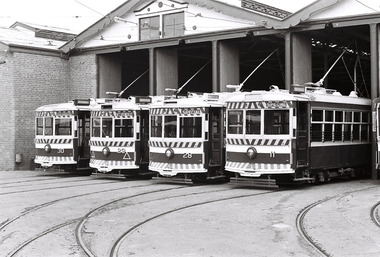
... Bendigo State Electricty Commission of Victoria Tramways prior to their abandonment. The collection also includes two archive quality sheets (Sheet A and Sheet B) of original 35mm colour slides taken by Robert Green during the same period. Sheet B also contains one slide taken by Robert's friend Keigh S King (1928-2019) who was the author of the book 'The Bendigo Tramways an illustrated history...Bendigo State Electricty Commission of Victoria Tramways prior to their abandonment. The collection also includes two archive quality sheets (Sheet A and Sheet B) of original 35mm colour slides taken by Robert Green during the same period. Sheet B also contains one slide taken by Robert's friend Keigh S King (1928-2019) who was the author of the book 'The Bendigo Tramways an illustrated history ...This collection contains eight archive sheets (Sheet 1 to Sheet 8) of strips of original 35mm black and white negatives of photographs taken by Robert green during the 1960s and early 1970s of the Bendigo State Electricty Commission of Victoria Tramways prior to their abandonment. The collection also includes two archive quality sheets (Sheet A and Sheet B) of original 35mm colour slides taken by Robert Green during the same period. Sheet B also contains one slide taken by Robert's friend Keigh S King (1928-2019) who was the author of the book 'The Bendigo Tramways an illustrated history, published by the Australian Railway Historical Society Victorian Division Melbourne in February 1972; BHS Item no. 5052. The collection also includes one USB stick which contains images of all photographs described above, except for one colour slide taken by Keith S Kings. Sixteen black and white prints from the images are also included.Robert Green Collection, this item contains 34 Black and White Negatives of the trams at various locations around Bendigo. Photos: 11147.2a No 30, 29, 28 and 11 Birney Cars lined up at the Depot 11147.2b No 30, 29, 28 and 11 Birney Cars lined up at the Depot 11147.2c No 30, 29, 28 and 11 Birney Cars lined up at the Depot 11147.2d No 30, 29, 28 and 11 Birney Cars lined up at the Depot 11147.2e No 30, 29, 28 and 11 Birney Cars lined up at the Depot 11147.2f No 30, 29, 28 Birney Cars lined up at the Depot 11147.2g No 30, 29, 28 and 11 Birney Cars lined up at the Depot 11147.2h No 30, 29, 28 and 11 Birney Cars lined up at the Depot 11147.2i No 30, 29, 28 and 11 Birney Cars and No 25 lined up at the Depot 11147.2j No 30, 29, 28 and 11 Birney Cars and No 25 lined up at the Depot 11147.2k No 28 and 11 Birney Cars lined up at the Depot 11147.2l No 30 Special leaves the depot watched by the photographer 11147.2m No 29 Special leaves the depot 11147.2n Driver and passenger inside a Birney Car 11147.2o Driver and passenger inside a Birney Car heading up Pall Mall 11147.2p The four Birney Cars in Carpenter Street, Quarry Hill Terminus at the Cemetery Gates 11147.2q The four Birney Cars in Carpenter Street, Quarry Hill Terminus at the Cemetery Gates 11147.2r The four Birney Cars in Carpenter Street, Quarry Hill Terminus at the Cemetery Gates 11147.2s The four Birney Cars in Carpenter Street, Quarry Hill Terminus at the Cemetery Gates 11147.2t The four Birney Cars at the Carpenter Street, Quarry Hill Loop 11147.2u No 28 Special Birney Car 11147.2v No 30 Special Birney Car 11147.2w The four Birney Cars at the fountain side by side getting reading to depart to Eaglehawk 11147.2x The four Birney Cars at Eaglehawk beside Canterbury Park 11147.2y The four Birney Cars at Eaglehawk beside Canterbury Park with the Drivers and the Inspector 11147.2z The four Birney Cars at Eaglehawk beside Canterbury Park 11147.2aa The four Birney Cars at Eaglehawk beside Canterbury Park 11147.2ab The four Birney Cars at Eaglehawk beside the town hall 11147.2ac Birney Car 28 passes 17 at the Long gully Manchester Arms Hotel Loop 11147.2ad No 21 and two others at the North Bendigo terminus 11147.2af Four trams heading to Golden Square in High Street 11147.2ag Four trams heading to Golden Square in High Street 11147.2ah Four trams heading at the Golden Square Terminus at Maple High Streetskeith s king, bendigo, trams, robert green -
 Bendigo Historical Society Inc.
Photograph - Robert Green Collection - Photos of Bendigo Tramways - Sheet A of 10, 1972
... Bendigo State Electricty Commission of Victoria Tramways prior to their abandonment. The collection also includes two archive quality sheets (Sheet A and Sheet B) of original 35mm colour slides taken by Robert Green during the same period. Sheet B also contains one slide taken by Robert's friend Keigh S King (1928-2019) who was the author of the book 'The Bendigo Tramways an illustrated history...Bendigo State Electricty Commission of Victoria Tramways prior to their abandonment. The collection also includes two archive quality sheets (Sheet A and Sheet B) of original 35mm colour slides taken by Robert Green during the same period. Sheet B also contains one slide taken by Robert's friend Keigh S King (1928-2019) who was the author of the book 'The Bendigo Tramways an illustrated history ...This collection contains eight archive sheets (Sheet 1 to Sheet 8) of strips of original 35mm black and white negatives of photographs taken by Robert green during the 1960s and early 1970s of the Bendigo State Electricty Commission of Victoria Tramways prior to their abandonment. The collection also includes two archive quality sheets (Sheet A and Sheet B) of original 35mm colour slides taken by Robert Green during the same period. Sheet B also contains one slide taken by Robert's friend Keigh S King (1928-2019) who was the author of the book 'The Bendigo Tramways an illustrated history, published by the Australian Railway Historical Society Victorian Division Melbourne in February 1972; BHS Item no. 5052. The collection also includes one USB stick which contains images of all photographs described above, except for one colour slide taken by Keith S Kings. Sixteen black and white prints from the images are also included.Robert Green Collection, this item contains Colour Slides of the trams at various locations around Bendigo. Photos: 11147.9a No 2 to Eaglehawk leaves Carpenter Street, crosses the railway line and enters Mitchell Street 11147.9b Two Birney Cars ready to depart in Pall Mall 11147.9c Nos 30 and 28 Birney Cars ready to depart in Pall Mall 11147.9d No 30 to North Bendigo turns off Weeroona Avenue into Caledonia St at the Gas Works 11147.9e No 5 comes up View Street past Dudley House and the Masonic Hall 11147.9f No 28 Birney Car 11147.9g No 3 comes into Eaglehawk 11147.9h Nos 2 and 3 cross over at the Eaglehawk Road and Cuneen Streets Loop in Long Gully 11147.9j No 30 Birney Car crosses the Munday St and Pall Mall intersection heading for the fountain 11147.9k No 28 Birney Car comes down Nolan Street past the Lake Weeroona 11147.9l No 30 Birney Car in the darkness 11147.9m The Scrubber Car comes up Mitchell Street 11147.9n The Scrubber Car 11147.9o No 18 at Eaglehawk, Bendigo T.M.S of Vic. Ltd Photo, Sat 15 April 1972. Robert Green and John Fitzsimons holding "Last Tram Mail" 1/125 f8. Taken at 9am on the second last day of the trams.keith s king, bendigo, trams, robert green -
 Bendigo Historical Society Inc.
Photograph - Robert Green Collection - Photos of Bendigo Tramways - Sheet 7 of 8, 1960s
... Bendigo State Electricty Commission of Victoria Tramways prior to their abandonment. The collection also includes two archive quality sheets (Sheet A and Sheet B) of original 35mm colour slides taken by Robert Green during the same period. Sheet B also contains one slide taken by Robert's friend Keigh S King (1928-2019) who was the author of the book 'The Bendigo Tramways an illustrated history...Bendigo State Electricty Commission of Victoria Tramways prior to their abandonment. The collection also includes two archive quality sheets (Sheet A and Sheet B) of original 35mm colour slides taken by Robert Green during the same period. Sheet B also contains one slide taken by Robert's friend Keigh S King (1928-2019) who was the author of the book 'The Bendigo Tramways an illustrated history ...This collection contains eight archive sheets (Sheet 1 to Sheet 8) of strips of original 35mm black and white negatives of photographs taken by Robert green during the 1960s and early 1970s of the Bendigo State Electricty Commission of Victoria Tramways prior to their abandonment. The collection also includes two archive quality sheets (Sheet A and Sheet B) of original 35mm colour slides taken by Robert Green during the same period. Sheet B also contains one slide taken by Robert's friend Keigh S King (1928-2019) who was the author of the book 'The Bendigo Tramways an illustrated history, published by the Australian Railway Historical Society Victorian Division Melbourne in February 1972; BHS Item no. 5052. The collection also includes one USB stick which contains images of all photographs described above, except for one colour slide taken by Keith S Kings. Sixteen black and white prints from the images are also included.Robert Green Collection, this item contains 28 Black and White Negatives of the trams at various locations around Bendigo. Photos: 11147.7a No 6 to Golden Square in Mcrae Street 11147.7b No 21 to North Bendigo in Mcrae Street 11147.7c No 7 to North Bendigo in Mcrae Street 11147.7d No 7 to North Bendigo in Mcrae Street passes No 21 to Golden Square on the loop 11147.7e The Depot and Back Creek bridge 11147.7f The Depot and Back Creek bridge 11147.7g Nos 25, 23 and 30 in the depot 11147.7h The photographer in Thunder Street North Bendigo, railway line in the background 11147.7i No 21 coming up to the North Bendigo terminus in Thunder or Finn street 11147.7j No 21 leaving the North Bendigo terminus in Thunder or Finn street 11147.7k The Photographer in Thunder Street, North Bendigo 11147.7l No 21 in Thunder or Finn street 11147.7m No 21 in Thunder or Finn street 11147.7n No 17 in Eaglehawk 11147.7o No 17 in Eaglehawk 11147.7p No 26 at the top of Mitchell Street 11147.7q No 26 heading to Eaglehawk in the rain 11147.7r No 2 to Quarry Hill in the rain at the Manchester Arms Loop 11147.7s Passing Trams 11147.7t No 30 Birney Car to Quarry Hill in the rain at the Manchester Arms Loop 11147.7u No 7 to North Bendigo, the rowing Club in the background, Thunder Street 11147.7v No 7 turns into Finn Street from the North Bendigo Terminus 11147.7w The Birney Car turns into the North Bendigo Terminus from Finn Street 11147.7x The Birney Car turns into the North Bendigo Terminus from Finn Street 11147.7y Two trams at the North Bendigo Terminus 11147.7z No 24 approaches the Cemetery gates and horse hitching posts in Quarry Hill 11147.7aa The Cemetery and horse hitching posts in Quarry Hill 11147.7ab No 24 and horse hitching post in Quarry Hillkeith s king, bendigo, trams, robert green -
 Bendigo Historical Society Inc.
Photograph - Robert Green Collection - Photos of Bendigo Tramways - Sheet 1 of 8, 1960s
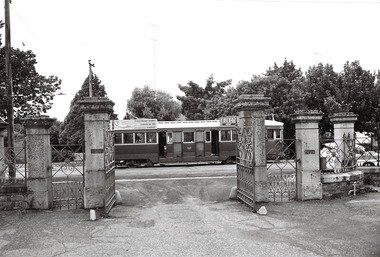
... Bendigo State Electricty Commission of Victoria Tramways prior to their abandonment. The collection also includes two archive quality sheets (Sheet A and Sheet B) of original 35mm colour slides taken by Robert Green during the same period. Sheet B also contains one slide taken by Robert's friend Keigh S King (1928-2019) who was the author of the book 'The Bendigo Tramways an illustrated history...Bendigo State Electricty Commission of Victoria Tramways prior to their abandonment. The collection also includes two archive quality sheets (Sheet A and Sheet B) of original 35mm colour slides taken by Robert Green during the same period. Sheet B also contains one slide taken by Robert's friend Keigh S King (1928-2019) who was the author of the book 'The Bendigo Tramways an illustrated history ...This collection contains eight archive sheets (Sheet 1 to Sheet 8) of strips of original 35mm black and white negatives of photographs taken by Robert green during the 1960s and early 1970s of the Bendigo State Electricty Commission of Victoria Tramways prior to their abandonment. The collection also includes two archive quality sheets (Sheet A and Sheet B) of original 35mm colour slides taken by Robert Green during the same period. Sheet B also contains one slide taken by Robert's friend Keigh S King (1928-2019) who was the author of the book 'The Bendigo Tramways an illustrated history, published by the Australian Railway Historical Society Victorian Division Melbourne in February 1972; BHS Item no. 5052. The collection also includes one USB stick which contains images of all photographs described above, except for one colour slide taken by Keith S Kings. Sixteen black and white prints from the images are also included.Robert Green Collection, this item contains 33 Black and White Negatives of the trams at various locations around Bendigo. Photos: 11147.1a and 11147.1b Tram on its way out of Long Gully along Mt Korong (Eaglehawk) Road towards Eaglehawk. Houses in the foreground, on the left is 245 Eaglehawk Road and on the right 241 Eaglehawk Road. 11147.1c Birney Car Tram on its way out of Long Gully along Mt Korong (Eaglehawk) Road towards Eaglehawk, looking back ove the Long Gully township. 11147.1d Birney Car Tram on its way out of Long Gully along Mt Korong (Eaglehawk) Road towards Eaglehawk. Houses in the foreground, on the left is 245 Eaglehawk Road and on the right 241 Eaglehawk Road. 11147.1e No 28 Birney Car Special 11147.1f No 28 Birney Car Special and No 2 possibly in Eaglehawk 11147.1g No 18 roars up Eaglehawk Road into Iron Bark 11147.1h Tram crossing the railway at Jobs Gully, on its way to Bendigo 11147.1i Tram crossing the railway at Jobs Gully, on its way to Eaglehawk 11147.1j Central Deborah Gold Mine 11147.1k The intersection of Reginald and Houston St, with the Cemetery on the left. 11147.1l Tram Stop on Pall Mall opposite Ezywalkins Conrner of Mitchell St 11147.1m Electrical Cable junction box 11147.1n Electrical Cable junction box 11147.1o No 18 at Canterbury Park Terminus Eaglehawk 11147.1p No 26 at the top of Mitchell St on its way to Quarry Hill 11147.1q Nos 26 and 18 at the Railway Station stop in Mitchell St 11147.1r No 18 coming down Mitchell St 11147.1s No 5 possibly in Carpenter St 11147.1t No 5 at the Cemetery Gates ready to depart the terminus 11147.1u No 5 at the Cemetery Gates ready to depart the terminus 11147.1v No 5 at the Cemetery Gates ready to depart the terminus 11147.1w Nos 18 and 5 crossover at the Fountain 11147.1x Nos 18 and 5 crossover at the Fountain 11147.1y Nos 18 and 5 crossover at the Fountain 11147.1z Heading into Long Gully past the Manchester Arms Hotel 11147.1aa No 5 loading passengers at the Eaglehawk Terminus next to Canterbury Park 11147.1ab Traffic conjestion at the loop on the way back to Bendigo 11147.1ac The Eaglehawk Terminus next to Canterbury Park 11147.1ad The Eaglehawk Terminus next to Canterbury Park 11147.1ae The Eaglehawk Terminus next to Canterbury Park 11147.1af The Eaglehawk Terminus next to Canterbury Parkkeith s king, bendigo, trams, robert green -
Bendigo Historical Society Inc.
Mixed media - Robert Green Collection - Photos of Bendigo Tramways - Black and White Prints, 1968
... Bendigo State Electricty Commission of Victoria Tramways prior to their abandonment. The collection also includes two archive quality sheets (Sheet A and Sheet B) of original 35mm colour slides taken by Robert Green during the same period. Sheet B also contains one slide taken by Robert's friend Keigh S King (1928-2019) who was the author of the book 'The Bendigo Tramways an illustrated history...Bendigo State Electricty Commission of Victoria Tramways prior to their abandonment. The collection also includes two archive quality sheets (Sheet A and Sheet B) of original 35mm colour slides taken by Robert Green during the same period. Sheet B also contains one slide taken by Robert's friend Keigh S King (1928-2019) who was the author of the book 'The Bendigo Tramways an illustrated history ...This collection contains eight archive sheets (Sheet 1 to Sheet 8) of strips of original 35mm black and white negatives of photographs taken by Robert green during the 1960s and early 1970s of the Bendigo State Electricty Commission of Victoria Tramways prior to their abandonment. The collection also includes two archive quality sheets (Sheet A and Sheet B) of original 35mm colour slides taken by Robert Green during the same period. Sheet B also contains one slide taken by Robert's friend Keigh S King (1928-2019) who was the author of the book 'The Bendigo Tramways an illustrated history, published by the Australian Railway Historical Society Victorian Division Melbourne in February 1972; BHS Item no. 5052. The collection also includes one USB stick which contains images of all photographs described above, except for one colour slide taken by Keith S Kings. Sixteen black and white prints from the images are also included.Robert Green Collection, this item 11147.12 contains 20 printed photos scanned from eight plastic archival sheets of black and white negatives, also one PDF Document entitled"Bendigo's Last Tram Mail" 11147.12v PDF The day before permanent closure of the Bendigo tramways on Sunday 16 April 1972, the Tramway Museum Society of Victoria Inc (TMSV) arranged for “Last Tram Mail” to be carried along the Eaglehawk line to simulate the once regular transport of mail around the city by tram. 5.5 x 3.5 Inch Photo Prints 11147.12a Print from Sheet 3 (11147.3ac) No 28 Birney Car Special heads down Pall Mall past the Court House Hotel 11147.12b Print from Sheet 8 (11147.8c) No 18 passing the View Street and Rowan Street intersection 11147.12c Print from Sheet 8 (11147.8u) No 25 at the Bendigo Cemetery Terminus 11147.12d Print from Sheet 5 (11147.5e) No 18 and old shop front 11147.12e Print from Sheet 7 (11147.7s) Passing Trams 11147.12f Print from Sheet 3 (11147.3s) Tram leaving the Eaglehawk Town Hall in the dark 11147.12g Print from Sheet 5 (11147.5m) No 21 returning to the Tramways Avenue Depot with the scrubber tram on the left 11147.12l Print from Sheet 6 (11147.6ag) Four trams and one driver at the depot TMS Bendigo Tour 24 March 1968. 11147.12m Print from Sheet 2 (11147.2ac) Birney Car 28 passes 17 at the Long gully Manchester Arms Hotel Loop TMS Bendigo Tour 24 March 1968 11147.12n Print from Sheet 2 (11147.2u) No 28 Special Birney Car on the Quarry Hill Line TMS Bendigo Tour 24 March 1968 11147.12o Print from Sheet 2 (11147.2v) No 30 Special Birney Car on the Quarry Hill Line TMS Bendigo Tour 24 March 1968 11147.12q Print from Sheet 2 (11147.2ab) The four Birney Cars at Eaglehawk beside the town hall TMS Bendigo Tour 24 March 1968 11147.12r Print from Sheet 6 (11147.6z) Birney Car 11 and two others arriving at the depot TMS Bendigo Tour 24 March 1968 11147.12s Print from Sheet 2 (11147.2t) The four Birney Cars at the Carpenter Street, Quarry Hill Loop TMS Bendigo Tour 24 March 1968 11147.12t Print from Sheet 2 (11147.2h) No 30, 29, 28 and 11 Birney Cars lined up at the Depot TMS Bendigo Tour 24 March 1968 11147.12u Print from Sheet 2 (11147.2ad) No 21 and two others at the North Bendigo terminus TMS Bendigo Tour 24 March 1968 8 x 10 Inch Photo Prints 11147.12h Print from Sheet 3 (11147.3ai) Birney Car Tram passes the School of Mines in McRae St heading to the fountain 11147.12i Print from Sheet 2 (11147.2a) No 30, 29, 28 and 11 Birney Cars lined up at the Depot 11147.12j Print from Sheet 2 (11147.2a) No 30, 29, 28 and 11 Birney Cars lined up at the Depot 11147.12k Print from Sheet 2 (11147.2a) No 30, 29, 28 and 11 Birney Cars lined up at the Depotkeith s king, bendigo, trams, robert green -
 Bendigo Historical Society Inc.
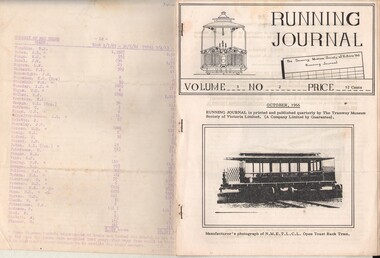
Document - BASIL MILLER COLLECTION: TRAMS - 'RUNNING JOURNAL', October 1966
... Bendigo Historical Society Inc. History House 11 Mackenzie Street Bendigo goldfields DOCUMENT Journal of the Tramway Museum Society of Victoria. Ltd., Volume 3, No. 2. October 1966. 12 cents. Fourteen pages. Cover picture (right) illustrates ...Journal of the Tramway Museum Society of Victoria. Ltd., Volume 3, No. 2. October 1966. 12 cents. Fourteen pages. Cover picture (right) illustrates manufacturer's photograph of N.M.E.T.L.C.L. open toast rack tram. History of document: Part of 'Basil Miller Tramways Collection'.document -
 Bendigo Historical Society Inc.
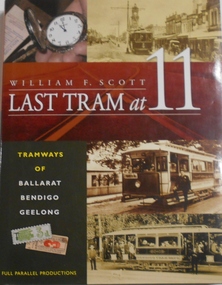
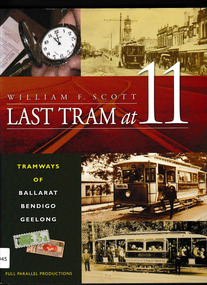
Book - Last Tram at 11, 2008
... Bendigo Historical Society Inc. History House 11 Mackenzie Street Bendigo goldfields Tramways Bendigo Tramways Ballarat Tramways Geelong Hard cover book of 198 pages. 'Last Tram at 11' by William F Scott. Tramways of Ballarat, Bendigo and Geelong. Front of dust jacket has 3 B&W photos of trams. Rear of dust cover has a short intro by Professor Weston Bate. Illustrated ...Hard cover book of 198 pages. 'Last Tram at 11' by William F Scott. Tramways of Ballarat, Bendigo and Geelong. Front of dust jacket has 3 B&W photos of trams. Rear of dust cover has a short intro by Professor Weston Bate. Illustrated with maps and colour and B&W photos of trams. Published by Full Parallel Productions, Clunes, Victoria in 2008. Printed by 1010 Printing International Ltd, Hong Kongtramways bendigo, tramways ballarat, tramways geelong -
 Bendigo Historical Society Inc.
Book - BENDIGO'S VINTAGE TALKING TRAMS, 1996
... 100-page soft cover booklet describing the history of the Bendigo tramways. Includes a brief history of Bendigo, illustrated descriptions of the tramways fleet, map of the talking tram route and a script for the tram tour. ...Bendigo Historical Society Inc. History House 11 Mackenzie Street Bendigo goldfields Bendigo Bendigo Trams Talking Trams Keith S Kings 100-page soft cover booklet describing the history of the Bendigo tramways. Includes a brief history of Bendigo, illustrated ...100-page soft cover booklet describing the history of the Bendigo tramways. Includes a brief history of Bendigo, illustrated descriptions of the tramways fleet, map of the talking tram route and a script for the tram tour. Edited by Keith S Kings. Published by the Bendigo Trust, December 1996 and printed by Bendigo Modern Press. Signed by Keith Kings 20/2/97 Copy originally owned by RW & M Birrell Inside front cover are 2 tickets for the inaugural tram trip of the restored tram No. 7Keith S Kingsbendigo, bendigo trams, talking trams -
 Ballarat Tramway Museum
Book, Keith Kings, "The Bendigo Tramways", Feb. 1972
... An illustrated History of the Bendigo Tramways. 80 pages, gloss art paper, in black ink with a yellow card cover in green ink, saddle bound. ...Ballarat Tramway Museum South Gardens Reserve Wendouree Parade Ballarat Ballarat goldfields Yields information about the history of Bendigo Tramways and has a strong association with the closure of the system in 1972 and the author. Trams tramways Bendigo History Notes on pages 2, 14, 35, 38, 42, 44, 48, 49, 51 - 55, 57, 58, 61 - 65, 70, 73, 76 and 79 - in pencil under the photograph captions, An illustrated History of the Bendigo Tramways. 80 pages, gloss art paper, in black ink with a yellow card cover in green ink, saddle bound. ...Yields information about the history of Bendigo Tramways and has a strong association with the closure of the system in 1972 and the author.An illustrated History of the Bendigo Tramways. 80 pages, gloss art paper, in black ink with a yellow card cover in green ink, saddle bound. Details history of Bendigo tramways, its tramcars and the involvement of the various operators. Has maps and photographs. Has been covered with a plastic covering material with a typed note "Property of the Ballarat Tramway Preservation Society, Not transferable to any person" underlined in red ink and position underneath the plastic covering. See also Reg item 326 for other copies of this book and scans of the map pages.Notes on pages 2, 14, 35, 38, 42, 44, 48, 49, 51 - 55, 57, 58, 61 - 65, 70, 73, 76 and 79 - in pencil under the photograph captions,trams, tramways, bendigo, history -
 Victorian Railway History Library
Book, Full Paralell Productions, Last tram at 11: Tramways of Ballarat, Bendigo, Geelong, 2008
... Victorian Railway History Library 39 St Edmonds Rd Prahran Prahran Tramways - Geelong Tramways - Ballarat Tramways - Bendigo An illustrated account of the Victorian provincial tramways. ...An illustrated account of the Victorian provincial tramways.Index, bib, Ill, maps, p16.non-fictionAn illustrated account of the Victorian provincial tramways.tramways - geelong, tramways - ballarat, tramways - bendigo -
 Victorian Railway History Library
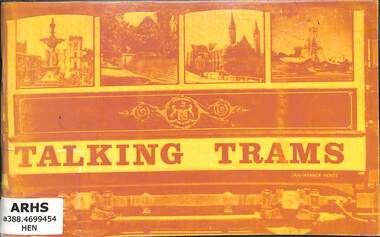
Book, Hente, Jane-Werner, Bendigo's talking trams : present, past and future, 1973
... tramways - Bendigo - history Preserved trams - Australia - history A short illustrated history of the talking trams on the preserved Bendigo tramway in Victoria. ill, p.96. ...A short illustrated history of the talking trams on the preserved Bendigo tramway in Victoria.ill, p.96.non-fictionA short illustrated history of the talking trams on the preserved Bendigo tramway in Victoria.tramways - bendigo - history, preserved trams - australia - history