Showing 14 items matching " tram 241"
-
 Melbourne Tram Museum
Photograph - Set of 11 - Melbourne trams c1970, Norm Cross, 1970s
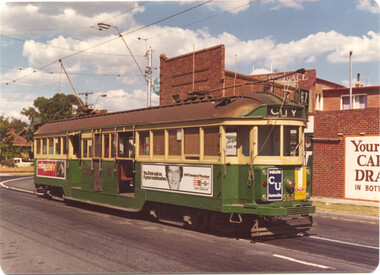
... ...tram 241...Set of 11 colour photographs of Melbourne trams by Norm Cross. 1 - Tram W2 550 - Truganini Road with adverts for HMV, Channel 9 and CU. 2 - Tram W2 268 - Brunswick St - with a board on the front bumper celebrating 50 years of the tram 3 - Tram W2 411 Victoria Parade and St Vincent's Hospital with adverts for National TV, and AAMI 4 - Tram SW6 902 St Kilda Road and High St. with an advert for Jigglers tea bags and Courage draught beer, 5 - Tram W2 432 Turganini Road - AVCO Finance Co and Heinz baked beans. 6 - Tram W2 241, Swanston St (East Malvern Darling Road, route 3) with Heinz baked beans side advert. 7 - tram W5 781, St Georges Road (route 9) with a Shell motor oil advert in the background. 8 - tram W5 825, St Georges Road with a Shumberland advert 9 - tram W2 631, Victoria Parade, route 10 with St Vincents in the background. 10 - tram W3 class 657, Brunswick Depot with route 2A, St Kilda Beach showing and a Princes Curtain/drape cleaning service. 11 - tram L class 103, running out at Essendon Depot,...Melbourne Tram Museum 8 Wallen Road Hawthorn melbourne Set of 11 colour photographs of Melbourne trams by Norm Cross. 1 - Tram W2 550 - Truganini Road with adverts for HMV, Channel 9 and CU. 2 - Tram W2 268 - Brunswick St - with a board on the front bumper celebrating 50 years of the tram 3 - Tram W2 411 Victoria Parade and St Vincent's Hospital with adverts for National TV, and AAMI 4 - Tram SW6 902 St Kilda Road and High St. with an advert for Jigglers tea bags and Courage draught beer, 5 - Tram W2 432 Turganini Road - AVCO Finance Co and Heinz baked beans. 6 - Tram W2 241, Swanston St (East Malvern Darling Road, route 3) with Heinz baked beans side advert. 7 - tram W5 781, St Georges Road (route 9) with a Shell motor oil advert in the background. 8 - tram W5 825, St Georges Road with a Shumberland advert 9 - tram W2 631, Victoria Parade, route 10 with St Vincents in the background. 10 - tram W3 class 657, Brunswick Depot with route 2A, St Kilda Beach showing and a Princes Curtain/drape cleaning service. 11 - tram L class 103, running out at Essendon Depot, Yields information about various Melbourne trams in the 1970s. trams tramways W2 class St Kilda Road SW6 class tram 550 tram 268 tram 411 tram 902 Truganini Rd Brunswick St Victoria Parade Carnegie Swanston St tram 431 tram 241 W5 class tram 781 tram 825 W3 class L class tram 103 tram 657 tram 631 Colour print with plain back, rounded corners - set of four Photograph Set of 11 - Melbourne trams c1970 Norm Cross ...Set of 11 colour photographs of Melbourne trams by Norm Cross. 1 - Tram W2 550 - Truganini Road with adverts for HMV, Channel 9 and CU. 2 - Tram W2 268 - Brunswick St - with a board on the front bumper celebrating 50 years of the tram 3 - Tram W2 411 Victoria Parade and St Vincent's Hospital with adverts for National TV, and AAMI 4 - Tram SW6 902 St Kilda Road and High St. with an advert for Jigglers tea bags and Courage draught beer, 5 - Tram W2 432 Turganini Road - AVCO Finance Co and Heinz baked beans. 6 - Tram W2 241, Swanston St (East Malvern Darling Road, route 3) with Heinz baked beans side advert. 7 - tram W5 781, St Georges Road (route 9) with a Shell motor oil advert in the background. 8 - tram W5 825, St Georges Road with a Shumberland advert 9 - tram W2 631, Victoria Parade, route 10 with St Vincents in the background. 10 - tram W3 class 657, Brunswick Depot with route 2A, St Kilda Beach showing and a Princes Curtain/drape cleaning service. 11 - tram L class 103, running out at Essendon Depot,Yields information about various Melbourne trams in the 1970s.Colour print with plain back, rounded corners - set of fourtrams, tramways, w2 class, st kilda road, sw6 class, tram 550, tram 268, tram 411, tram 902, truganini rd, brunswick st, victoria parade, carnegie, swanston st, tram 431, tram 241, w5 class, tram 781, tram 825, w3 class, l class, tram 103, tram 657, tram 631 -
 Melbourne Tram Museum
Poster, Public Transport Victoria (PTV), "Melbourne's electric trams", 2013
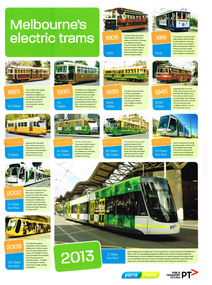
... ... tram 241...Printed colour poster - A2 size, titled "Melbourne's electric trams", featuring trams V214, HTT 8, W1 380, X2 676, SW5 758, SW6 909, Z 166, A 241, B1 2001, C3005, D 5004, C1 5113 (Bumblebee) and E 6002 with year and class and a short description and history. ...Melbourne Tram Museum 8 Wallen Road Hawthorn melbourne Trams tramways Posters Melbourne MMTB Yarra Trams PTV tram 214 tram 8 tram 380 tram 676 tram 758 tram 909 tram 166 tram 241 tram 2001 tram 3005 tram 5004 tram 5113 tram 6002 Printed colour poster - A2 size, titled "Melbourne's electric trams", featuring trams V214, HTT 8, W1 380, X2 676, SW5 758, SW6 909, Z 166, A 241, B1 2001, C3005, D 5004, C1 5113 (Bumblebee) and E 6002 with year and class and a short description and history. ...Printed colour poster - A2 size, titled "Melbourne's electric trams", featuring trams V214, HTT 8, W1 380, X2 676, SW5 758, SW6 909, Z 166, A 241, B1 2001, C3005, D 5004, C1 5113 (Bumblebee) and E 6002 with year and class and a short description and history. Has the Yarra Trams and PTV logo in the bottom right hand corner. Photo of 6002 by Adam Chandler. 2nd copy added 2/6/15trams, tramways, posters, melbourne, mmtb, yarra trams, ptv, tram 214, tram 8, tram 380, tram 676, tram 758, tram 909, tram 166, tram 241, tram 2001, tram 3005, tram 5004, tram 5113, tram 6002 -
 Melbourne Tram Museum
Poster, Yarra Trams, "A history of Melbourne Trams", c2002
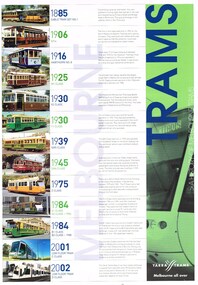
... ... tram 241...Printed colour posters - one each of A2 and A3 size, titled "A history of Melbourne Trams", featuring a cable car set, trams V214, HTT 8, W1 380, X2 676, Y613, W5 758, SW6 909, Z 166, A 241, B1 2001, C3005 and D 5001, with year and class and a short description and history. ...Melbourne Tram Museum 8 Wallen Road Hawthorn melbourne Trams tramways Posters Melbourne MMTB Yarra Trams tram 214 tram 8 tram 380 tram 676 tram 613 tram 758 tram 909 tram 166 tram 241 tram 2001 tram 3005 tram 5001 Printed colour posters - one each of A2 and A3 size, titled "A history of Melbourne Trams", featuring a cable car set, trams V214, HTT 8, W1 380, X2 676, Y613, W5 758, SW6 909, Z 166, A 241, B1 2001, C3005 and D 5001, with year and class and a short description and history. ...Printed colour posters - one each of A2 and A3 size, titled "A history of Melbourne Trams", featuring a cable car set, trams V214, HTT 8, W1 380, X2 676, Y613, W5 758, SW6 909, Z 166, A 241, B1 2001, C3005 and D 5001, with year and class and a short description and history. Has the Yarra Trams logo in the bottom right hand corner. 2nd A3 sized copy added 21/04/2017 from David Frost items received late 2016.trams, tramways, posters, melbourne, mmtb, yarra trams, tram 214, tram 8, tram 380, tram 676, tram 613, tram 758, tram 909, tram 166, tram 241, tram 2001, tram 3005, tram 5001 -
 Melbourne Tram Museum
Poster, Yarra Trams, "Melbourne's electric trams", Late 2009 or early 2010
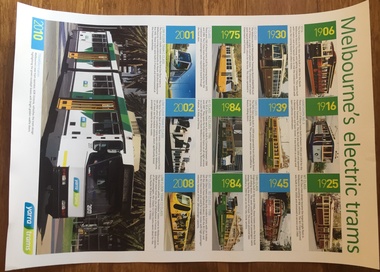
... ... tram 241...Printed colour poster - A2 size, titled "Melbourne's electric trams", featuring trams V214, HTT 8, W1 380, X2 676, SW5 758, SW6 909, Z 166, A 241, B1 2001, C3005, D 5001, C1 5113 (Bumblebee) and B2017 with year and class and a short description and history. ...Melbourne Tram Museum 8 Wallen Road Hawthorn melbourne Trams tramways Posters Melbourne MMTB Yarra Trams tram 214 tram 8 tram 380 tram 676 tram 758 tram 909 tram 166 tram 241 tram 2001 tram 3005 tram 5001 tram 5113 tram 2017 Printed colour poster - A2 size, titled "Melbourne's electric trams", featuring trams V214, HTT 8, W1 380, X2 676, SW5 758, SW6 909, Z 166, A 241, B1 2001, C3005, D 5001, C1 5113 (Bumblebee) and B2017 with year and class and a short description and history. ...Printed colour poster - A2 size, titled "Melbourne's electric trams", featuring trams V214, HTT 8, W1 380, X2 676, SW5 758, SW6 909, Z 166, A 241, B1 2001, C3005, D 5001, C1 5113 (Bumblebee) and B2017 with year and class and a short description and history. Has the Yarra Trams logo in the bottom right hand corner. Issued at the time KDR took over Yarra Trams, late 2009 or early 2010. Two copies held. See Reg Item 497 for a version when the E class commenced.trams, tramways, posters, melbourne, mmtb, yarra trams, tram 214, tram 8, tram 380, tram 676, tram 758, tram 909, tram 166, tram 241, tram 2001, tram 3005, tram 5001, tram 5113, tram 2017 -
 Melbourne Tram Museum
Negative, Wal Jack, 19/01/1941 12:00:00 AM
... ... tram 241...Melbourne Tram Museum 8 Wallen Road Hawthorn melbourne Trams tramways Northcote Buses Double Deck Buses High St tram 241 Black and white negative by Wal Jack of MMTB bus No. 241, double decker, outside the Commonwealth Bank High St Northcote, 19-1-1941, has the destination of Northcote. ...Black and white negative by Wal Jack of MMTB bus No. 241, double decker, outside the Commonwealth Bank High St Northcote, 19-1-1941, has the destination of Northcote.trams, tramways, northcote, buses, double deck buses, high st, tram 241 -
 Ballarat Tramway Museum
Drawing - Brisbane City Council Tramway Trackwork drawings
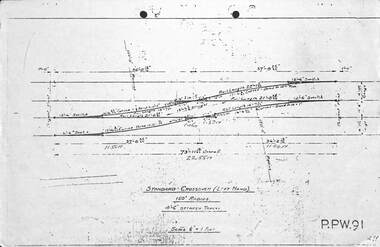
... Set of nine City of Brisbane Tram Track drawings .1 - PPW91 - Standard Crossover left hand - 4'6" between tracks .2 - PPW2450 - Data for British Standard Crossings .3 - PPW 241 - Data for British Standard Lateral Switches .4 - PPW 463 - Concrete Track Construction is 102.73lb rail. .5 - PPW 501 - ditto for AS 82lb rail and other rails .6 - Not numbered - Concrete roads when using T rail sleepers .7 - PPW 575 - 150' radius RH crossover - 5' between tracks .8 - PPW 576 - 150' radius RH Crossover - 4'6" between tracks .9 - PPW 577 - 150' radius LH Crossover - 5' between tracks - 14/12/1948...Trackwork Points Switches BCC Transport tramways Set of nine City of Brisbane Tram Track drawings .1 - PPW91 - Standard Crossover left hand - 4'6" between tracks .2 - PPW2450 - Data for British Standard Crossings .3 - PPW 241 - Data for British Standard Lateral Switches .4 - PPW 463 - Concrete Track Construction is 102.73lb rail. .5 - PPW 501 - ditto for AS 82lb rail and other rails .6 - Not numbered - Concrete roads when using T rail sleepers .7 - PPW 575 - 150' radius RH crossover - 5' between tracks .8 - PPW 576 - 150' radius RH Crossover - 4'6" between tracks .9 - PPW 577 - 150' radius LH Crossover - 5' between tracks - 14/12/1948 Drawing Brisbane City Council Tramway Trackwork drawings Brisbane City Council Transport Department ...Prepared by the City of Brisbane for the design of trackworkYields information on the design of trackwork.Set of nine City of Brisbane Tram Track drawings .1 - PPW91 - Standard Crossover left hand - 4'6" between tracks .2 - PPW2450 - Data for British Standard Crossings .3 - PPW 241 - Data for British Standard Lateral Switches .4 - PPW 463 - Concrete Track Construction is 102.73lb rail. .5 - PPW 501 - ditto for AS 82lb rail and other rails .6 - Not numbered - Concrete roads when using T rail sleepers .7 - PPW 575 - 150' radius RH crossover - 5' between tracks .8 - PPW 576 - 150' radius RH Crossover - 4'6" between tracks .9 - PPW 577 - 150' radius LH Crossover - 5' between tracks - 14/12/1948trackwork, points, switches, bcc transport, tramways -
 Ballarat Tramway Museum
Album - Photo Album, Wal Jack, NSWT Sydney System - Album 1 of 2, 1950's
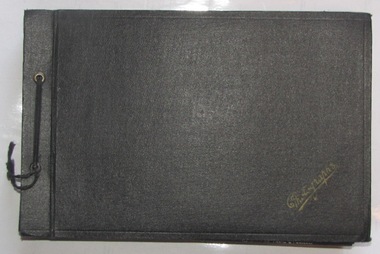
... Some 241 black and white photographs of trams in Sydney and Newcastle. ...Ballarat Tramway Museum South Gardens Reserve Wendouree Parade Ballarat Ballarat goldfields Some 241 black and white photographs of trams in Sydney and Newcastle. ...Some 241 black and white photographs of trams in Sydney and Newcastle. Includes works cars, horse trams, some depots and location and coloured postcards. Contains a newspaper clipping titled "Tram Dive in Harbor: Four hurt", from the Sydney Sun newspaper dated 21/7/1952. Almost all of the photographs have been obtained from his correspondents. For details of each photograph and layouts see - WJ Sydney Electrtic part 1.pdf Has a strong association with Wal Jack and his collecting of tramway history / developments until 1964.Black loose folders holding some 49 black coloured sheets of light card on which photos have been mounted using photo corners of various types, captions in white ink. trams, tramways, sydney, newcastle, tramcars, wal jack -
 Ballarat Tramway Museum
Document - Photocopy, Alan Bradley, "Tiny Tram's New Job", 14/02/1996 12:00:00 AM
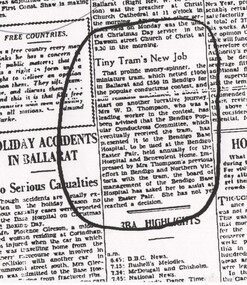
... Photocopy per facsimile machine of part of The Courier, Ballarat 27/12/1944 detailing the movement and location of the miniature or Treasure Tram that was used to raise money during the wartime in Ballarat as part of the most popular conductress competition (see also Reg. items 241 and 247 )had been presented to the Bendigo Base Hospital to be used in the Bendigo Easter Fair. ...Ballarat Tramway Museum South Gardens Reserve Wendouree Parade Ballarat Ballarat goldfields Trams tramways Treasure Tram Most Popular Conductress Competition Bendigo Base Hospital Conductresses Photocopy per facsimile machine of part of The Courier, Ballarat 27/12/1944 detailing the movement and location of the miniature or Treasure Tram that was used to raise money during the wartime in Ballarat as part of the most popular conductress competition (see also Reg. items 241 and 247 )had been presented to the Bendigo Base Hospital to be used in the Bendigo Easter Fair. ...Photocopy per facsimile machine of part of The Courier, Ballarat 27/12/1944 detailing the movement and location of the miniature or Treasure Tram that was used to raise money during the wartime in Ballarat as part of the most popular conductress competition (see also Reg. items 241 and 247 )had been presented to the Bendigo Base Hospital to be used in the Bendigo Easter Fair. In addition is a item concerning the death of Mrs Eeleen Scruse on 25/12/1944. Mrs. Scruse husband was a tram driver. (See Reg Item 1655 for photo of Frank Scruse) Fax dated 14/2/1996. In the file is the Fax Cover Sheet from Alan Bradley who supplied the item.trams, tramways, treasure tram, most popular conductress competition, bendigo base hospital, conductresses -
 Melbourne Tram Museum
Poster, Yarra Trams, "A History of Melbourne Trams - 1885 to 2000", 2000
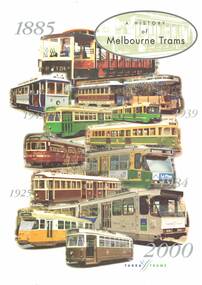
... On the rear has timeline photo and short history of the various trams: Cable Tram Set 1 V214 HTT 8 Y1 613 X2 676 W1 380 SW5 758 SW6 909 Z2 166 B2 ? B1 2001 A 241 Two copies held - A3 and A1 size....On the rear has timeline photo and short history of the various trams: Cable Tram Set 1 V214 HTT 8 Y1 613 X2 676 W1 380 SW5 758 SW6 909 Z2 166 B2 ? B1 2001 A 241 Two copies held - A3 and A1 size. ...Poster - full colour, printed on heavy card paper, titled "A History of Melbourne Trams - 1885 to 2000". Has a montage of Melbourne trams from the cable tram set to B class trams on the front. Prepared by Yarra Trams. On the rear has timeline photo and short history of the various trams: Cable Tram Set 1 V214 HTT 8 Y1 613 X2 676 W1 380 SW5 758 SW6 909 Z2 166 B2 ? B1 2001 A 241 Two copies held - A3 and A1 size.trams, tramways, melbourne, tramcars, posters -
 Melbourne Tram Museum
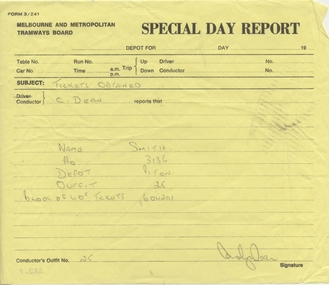
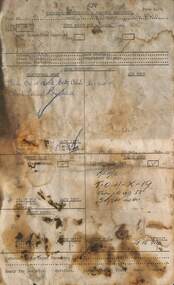
Document - Form/s, Melbourne & Metropolitan Tramways Board (MMTB), "Special Day Report", 1980
... Melbourne Tram Museum 8 Wallen Road Hawthorn melbourne Trams tramways MMTB Conductors Tickets Operations Set of two completed "Special Day Report", MMTB form No. 3/241 recording events that had to be advised to the depot, completed by Carolyn Dean. 222.1 - Block of tickets obtained from another Conductor - c1980 222.2 - Change dispute 27/8/1980. ...Set of two completed "Special Day Report", MMTB form No. 3/241 recording events that had to be advised to the depot, completed by Carolyn Dean. 222.1 - Block of tickets obtained from another Conductor - c1980 222.2 - Change dispute 27/8/1980. See Reg Item 3336 for an original of this form.trams, tramways, mmtb, conductors, tickets, operations -
 Melbourne Tram Museum
Document - Form/s, Melbourne & Metropolitan Tramways Board (MMTB), "Progress Certificate - Preston Workshops - Form R18", 1920's and 1930's
... Tram 19W. Electrical shop cleaned and checked both controllers with dates of test, air shop - air and sand ok, and truck shop put notes in as well, not sure what they mean, though the axle is 33" by Thomson's & Co and it was fitted with GE 241 motors. ...Tram 19W. Electrical shop cleaned and checked both controllers with dates of test, air shop - air and sand ok, and truck shop put notes in as well, not sure what they mean, though the axle is 33" by Thomson's & Co and it was fitted with GE 241 motors. ...Form - duplicated - "Progress Certificate - Preston Workshops - Form R18", giving a summary of work undertaken by Preston Workshops. Has space for the Electrical Shop, Air shop, Body Shop, Truck shop, and Paint shop. Form used to advise that works car 19 had a loose tyre 2C, advised by South Melbourne Depot 3-12-1970. Tram 19W. Electrical shop cleaned and checked both controllers with dates of test, air shop - air and sand ok, and truck shop put notes in as well, not sure what they mean, though the axle is 33" by Thomson's & Co and it was fitted with GE 241 motors. Noted it was test run 21-12-70. Item was located within Reg Item 3912.trams, tramways, preston workshops, forms, tramcar trucks, axles, wheels, maintenance, advertising trams, tram 19, tram 19w -
 Melbourne Tram Museum
Document - Form/s, Melbourne & Metropolitan Tramways Board (MMTB), "Special Day Report", c1970
... Melbourne Tram Museum 8 Wallen Road Hawthorn melbourne Trams tramways Forms Reports Crews MMTB Form - printed on yellow paper, titled "Special Day Report". Form No. 3/241 ...Form - printed on yellow paper, titled "Special Day Report". Form No. 3/241. Used for incidents and other traffic matters encountered by crews. Could be used for ticketing issues, swapping blocks. See Reg Item 222 for a training version.trams, tramways, forms, reports, crews, mmtb -
 Bendigo Historical Society Inc.
Photograph - Robert Green Collection - Photos of Bendigo Tramways - Sheet 1 of 8, 1960s
... Photos: 11147.1a and 11147.1b Tram on its way out of Long Gully along Mt Korong (Eaglehawk) Road towards Eaglehawk. Houses in the foreground, on the left is 245 Eaglehawk Road and on the right 241 Eaglehawk Road. 11147.1c Birney Car Tram on its way out of Long Gully along Mt Korong (Eaglehawk) Road towards Eaglehawk, looking back ove the Long Gully township. 11147.1d Birney Car Tram on its way out of Long Gully along Mt Korong (Eaglehawk) Road towards Eaglehawk. ...Photos: 11147.1a and 11147.1b Tram on its way out of Long Gully along Mt Korong (Eaglehawk) Road towards Eaglehawk. Houses in the foreground, on the left is 245 Eaglehawk Road and on the right 241 Eaglehawk Road. 11147.1c Birney Car Tram on its way out of Long Gully along Mt Korong (Eaglehawk) Road towards Eaglehawk, looking back ove the Long Gully township. 11147.1d Birney Car Tram on its way out of Long Gully along Mt Korong (Eaglehawk) Road towards Eaglehawk. ...This collection contains eight archive sheets (Sheet 1 to Sheet 8) of strips of original 35mm black and white negatives of photographs taken during the 1960s and early 1970s by Robert Green, of the Bendigo State Electricty Commission of Victoria Tramways prior to their abandonment The collection also includes two archive quality sheets (Sheet A and Sheet B) of original 35mm colour slides taken by Robert Green during the same period. Sheet B also contains one slide taken by Robert's friend Keigh S King (1928-2019) who was the author of the book 'The Bendigo Tramways an illustrated history, published by the Australian Railway Historical Society Victorian Division Melbourne in February 1972; BHS Item no. 5052. The collection also includes one USB stick which contains images of all photographs described above, except for one colour slide taken by Keith S Kings. Sixteen black and white prints from the images are also included.Robert Green Collection, this item contains thirty three Black and White Negatives of trams at various locations around Bendigo. Photos: 11147.1a and 11147.1b Tram on its way out of Long Gully along Mt Korong (Eaglehawk) Road towards Eaglehawk. Houses in the foreground, on the left is 245 Eaglehawk Road and on the right 241 Eaglehawk Road. 11147.1c Birney Car Tram on its way out of Long Gully along Mt Korong (Eaglehawk) Road towards Eaglehawk, looking back ove the Long Gully township. 11147.1d Birney Car Tram on its way out of Long Gully along Mt Korong (Eaglehawk) Road towards Eaglehawk. Houses in the foreground, on the left is 245 Eaglehawk Road and on the right 241 Eaglehawk Road. 11147.1e No 28 Birney Car Special 11147.1f No 28 Birney Car Special and No 2 possibly in Eaglehawk 11147.1g No 18 roars up Eaglehawk Road into Iron Bark 11147.1h Tram crossing the railway at Jobs Gully, on its way to Bendigo 11147.1i Tram crossing the railway at Jobs Gully, on its way to Eaglehawk 11147.1j Central Deborah Gold Mine 11147.1k The intersection of Reginald and Houston St, with the Cemetery on the left. 11147.1l Tram Stop on Pall Mall opposite Ezywalkins Conrner of Mitchell St 11147.1m Electrical Cable junction box 11147.1n Electrical Cable junction box 11147.1o No 18 at Canterbury Park Terminus Eaglehawk 11147.1p No 26 at the top of Mitchell St on its way to Quarry Hill 11147.1q Nos 26 and 18 at the Railway Station stop in Mitchell St 11147.1r No 18 coming down Mitchell St 11147.1s No 5 possibly in Carpenter St 11147.1t No 5 at the Cemetery Gates ready to depart the terminus 11147.1u No 5 at the Cemetery Gates ready to depart the terminus 11147.1v No 5 at the Cemetery Gates ready to depart the terminus 11147.1w Nos 18 and 5 crossover at the Fountain 11147.1x Nos 18 and 5 crossover at the Fountain 11147.1y Nos 18 and 5 crossover at the Fountain 11147.1z Heading into Long Gully past the Manchester Arms Hotel 11147.1aa No 5 loading passengers at the Eaglehawk Terminus next to Canterbury Park 11147.1ab Traffic conjestion at the loop on the way back to Bendigo 11147.1ac The Eaglehawk Terminus next to Canterbury Park 11147.1ad The Eaglehawk Terminus next to Canterbury Park 11147.1ae The Eaglehawk Terminus next to Canterbury Park 11147.1af The Eaglehawk Terminus next to Canterbury Parkkeith s king, bendigo, trams, robert green -
 Bendigo Historical Society Inc.
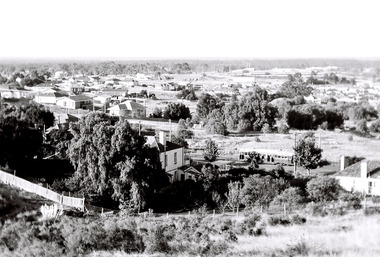
Photograph - Robert Green Collection - Photos of Bendigo Tramways - Sheet B of 10, 1960s
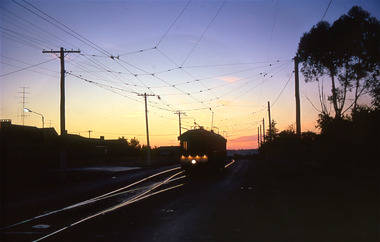
... Photos: 11147.10a Tram in the darkness, sunset or morning 11147.10b Coming off the railway Line bridge towards Eaglehawk 11147.10c Coming on to the railway Line bridge from Eaglehawk 11147.10d The Quarry Hill and Eaglehawk trams waiting to leave the fountain 11147.10e No 18 from Quarry Hill arrives at the fountain 11147.10f Getting ready to leave the fountain for Eaglehawk 11147.10g Policeman on point duty and tram at the fountain, Charing Cross 11147.10h Eaglehawk and Quarry Hill trams at the fountain 11147.10i Policeman on point duty and tram at the fountain, Charing Cross, looking down Pall Mall 11147.10j No 3 roars up View Street at the corner of McKenzie Street 11147.10k From the Rifle Brigade Hotel the Eaglehawk tram comes past the Queen Elizabeth Oval down View Street 11147.10l From the Rifle Brigade Hotel the Eaglehawk tram comes past the Queen Elizabeth Oval down View Street 11147.10m From the Rifle Brigade Hotel the Eaglehawk tram up View Street opposite the Masonic Hall 11147.10n From the Rifle Brigade Hotel the Eaglehawk tram goes past the Queen Elizabeth Oval up View Street 11147.10o From the Rifle Brigade Hotel the Eaglehawk tram comes up View Street opposite the Masonic Hall 11147.10p From the Victoria Hotel Balcony, the Eaglehawk No 18 arrives 11147.10q From the Victoria Hotel Balcony, the Eaglehawk No 18 departs towards Bendigo 11147.10r Tram No 2 arrives into Eaglehawk 11147.10s Tram No 2 heads to Quarry Hill from California Gully (Probable) 11147.1t Tram on its way out of Long Gully along Mt Korong (Eaglehawk) Road towards Eaglehawk. Houses in the foreground, on the left is 245 Eaglehawk Road and on the right 241 Eaglehawk Road....Photos: 11147.10a Tram in the darkness, sunset or morning 11147.10b Coming off the railway Line bridge towards Eaglehawk 11147.10c Coming on to the railway Line bridge from Eaglehawk 11147.10d The Quarry Hill and Eaglehawk trams waiting to leave the fountain 11147.10e No 18 from Quarry Hill arrives at the fountain 11147.10f Getting ready to leave the fountain for Eaglehawk 11147.10g Policeman on point duty and tram at the fountain, Charing Cross 11147.10h Eaglehawk and Quarry Hill trams at the fountain 11147.10i Policeman on point duty and tram at the fountain, Charing Cross, looking down Pall Mall 11147.10j No 3 roars up View Street at the corner of McKenzie Street 11147.10k From the Rifle Brigade Hotel the Eaglehawk tram comes past the Queen Elizabeth Oval down View Street 11147.10l From the Rifle Brigade Hotel the Eaglehawk tram comes past the Queen Elizabeth Oval down View Street 11147.10m From the Rifle Brigade Hotel the Eaglehawk tram up View Street opposite the Masonic Hall 11147.10n From the Rifle Brigade Hotel the Eaglehawk tram goes past the Queen Elizabeth Oval up View Street 11147.10o From the Rifle Brigade Hotel the Eaglehawk tram comes up View Street opposite the Masonic Hall 11147.10p From the Victoria Hotel Balcony, the Eaglehawk No 18 arrives 11147.10q From the Victoria Hotel Balcony, the Eaglehawk No 18 departs towards Bendigo 11147.10r Tram No 2 arrives into Eaglehawk 11147.10s Tram No 2 heads to Quarry Hill from California Gully (Probable) 11147.1t Tram on its way out of Long Gully along Mt Korong (Eaglehawk) Road towards Eaglehawk. Houses in the foreground, on the left is 245 Eaglehawk Road and on the right 241 Eaglehawk Road. ...This collection contains eight archive sheets (Sheet 1 to Sheet 8) of strips of original 35mm black and white negatives of photographs taken during the 1960s and early 1970s by Robert Green, of the Bendigo State Electricty Commission of Victoria Tramways prior to their abandonment The collection also includes two archive quality sheets (Sheet A and Sheet B) of original 35mm colour slides taken by Robert Green during the same period. Sheet B also contains one slide taken by Robert's friend Keigh S King (1928-2019) who was the author of the book 'The Bendigo Tramways an illustrated history, published by the Australian Railway Historical Society Victorian Division Melbourne in February 1972; BHS Item no. 5052. The collection also includes one USB stick which contains images of all photographs described above, except for one colour slide taken by Keith S Kings. Sixteen black and white prints from the images are also included.Robert Green Collection, this item contains 20 Colour Slides of the trams at various locations around Bendigo. Photos: 11147.10a Tram in the darkness, sunset or morning 11147.10b Coming off the railway Line bridge towards Eaglehawk 11147.10c Coming on to the railway Line bridge from Eaglehawk 11147.10d The Quarry Hill and Eaglehawk trams waiting to leave the fountain 11147.10e No 18 from Quarry Hill arrives at the fountain 11147.10f Getting ready to leave the fountain for Eaglehawk 11147.10g Policeman on point duty and tram at the fountain, Charing Cross 11147.10h Eaglehawk and Quarry Hill trams at the fountain 11147.10i Policeman on point duty and tram at the fountain, Charing Cross, looking down Pall Mall 11147.10j No 3 roars up View Street at the corner of McKenzie Street 11147.10k From the Rifle Brigade Hotel the Eaglehawk tram comes past the Queen Elizabeth Oval down View Street 11147.10l From the Rifle Brigade Hotel the Eaglehawk tram comes past the Queen Elizabeth Oval down View Street 11147.10m From the Rifle Brigade Hotel the Eaglehawk tram up View Street opposite the Masonic Hall 11147.10n From the Rifle Brigade Hotel the Eaglehawk tram goes past the Queen Elizabeth Oval up View Street 11147.10o From the Rifle Brigade Hotel the Eaglehawk tram comes up View Street opposite the Masonic Hall 11147.10p From the Victoria Hotel Balcony, the Eaglehawk No 18 arrives 11147.10q From the Victoria Hotel Balcony, the Eaglehawk No 18 departs towards Bendigo 11147.10r Tram No 2 arrives into Eaglehawk 11147.10s Tram No 2 heads to Quarry Hill from California Gully (Probable) 11147.1t Tram on its way out of Long Gully along Mt Korong (Eaglehawk) Road towards Eaglehawk. Houses in the foreground, on the left is 245 Eaglehawk Road and on the right 241 Eaglehawk Road.keith s king, bendigo, trams, robert green