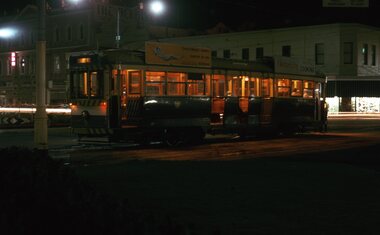
Showing 18 items matching "centre overhead pole"
-
 Melbourne Tram Museum
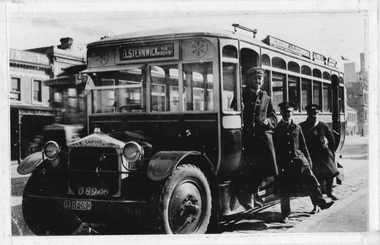
Photograph - Garford 5IHL bus number 46, early 1926
... ...centre overhead pole...Note the centre tramway overhead pole behind the bus that was installed in 1924 to permit Coburg and Preston trams to reach Lonsdale Street. ...Note the centre tramway overhead pole behind the bus that was installed in 1924 to permit Coburg and Preston trams to reach Lonsdale Street. ...Photograph shows Garford 5IHL bus No 46 with James Motors body of South Melbourne. One of only two in the fleet. Photo of the stationary bus at a temporary terminus outside the State Library in Swanston Street, bound for Elsternwick. Buses replaced trams on this route between late 1925 and early 1926 during the conversion of the cable line to electric traction. Note the centre tramway overhead pole behind the bus that was installed in 1924 to permit Coburg and Preston trams to reach Lonsdale Street. A number of crew are featured in the photo. Yields information about replacement buses during Swanston Street cable line conversion. Black and white photograph stuck to cardboard with note on rear. Pencil written note reads: "11495"garford 5ihl, 46, james motors, state library, elsternwick, conversion of cable line, centre overhead pole, coburg and preston trams -
 Ballarat Tramway Museum
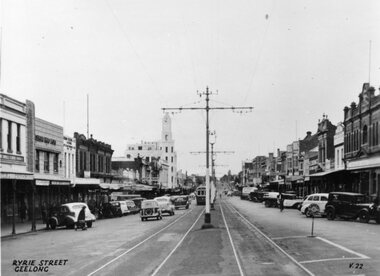
Photograph - Black & White Photograph/s, Late 1940's
... Shows a safety zone and sign and centre overhead poles. A commercial produced photograph - printer/publisher unknown. ...Shows a safety zone and sign and centre overhead poles. A commercial produced photograph - printer/publisher unknown. ...Yields information about the appearance of Ryrie Street Geelong and its buildings and vehicles.Black and white photograph of Ryrie Street Geelong Has The title "Ryrie Street Geelong" in the bottom left hand corner and "V.22" in the bottom right hand corner. Shows a safety zone and sign and centre overhead poles. A commercial produced photograph - printer/publisher unknown. See HTD Reg Item 557 for the same image used in an Ashtray.tramways, trams, geelong, ryrie st -
 Melbourne Tram Museum
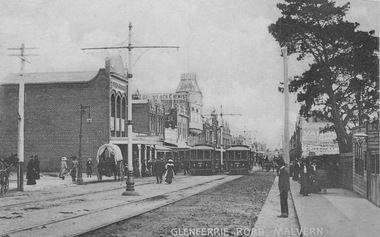
Postcard - Glenferrie Road, Malvern, 1910s
... Photograph looks north along Glenferrie Road with centre tramway overhead poles and several electric trams in motion. ...Photograph looks north along Glenferrie Road with centre tramway overhead poles and several electric trams in motion. ...Photograph looks north along Glenferrie Road with centre tramway overhead poles and several electric trams in motion. The road is lined with commercial buildings as numerous horse drawn carts and pedestrians go about their business along the roadway and footpaths. Postcards were a common way of quickly communicating with others before the telephone and were cheaper than telegrams. Yields information about early Glenferrie Road and an early communication method.Postcard with location and greetings on front and postcard markings, stamp with personal message on rear. Printed at bottom of photograph: 'Glenferrie Road, Malvern'. On the rear are postcard markings with a handwritten personal message in ink: 'Malvern, Won't meet two-thirty train. But if possible meet five-thirty. Will be bringing home a heavy bag. We are getting English mail late afternoon. Eric. Miss G Martin, The Bend, Dandenong'. The one penny stamp bears the image of Queen Victoria who died in 1901.horse drawn carts, telegrams, telephone, glenferrie road, centre tramway overhead poles, electric trams -
 Ballarat Tramway Museum
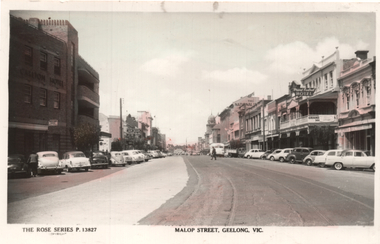
Postcard, Rose Stereograph Co, Malop Street Geelong, post 3/1956
... Photo shows Malop St Geelong after the closure of the tram system but before the removal of the tram tracks. The centre poles and overhead shown in item 9410 have been removed. ...Photo shows Malop St Geelong after the closure of the tram system but before the removal of the tram tracks. The centre poles and overhead shown in item 9410 have been removed. ...Photo shows Malop St Geelong after the closure of the tram system but before the removal of the tram tracks. The centre poles and overhead shown in item 9410 have been removed. In the background are the Carlton Hotel, Robbialac paints, Solomons stores, the National Bank buildings and the Grand Central Hotel,Yields information about Malop St Geelong.Rose series postcard No. P13827 - Real Photograph print.trams, tramways, geelong, malop st, tram tracks, geelong tramway -
 Ballarat Tramway Museum
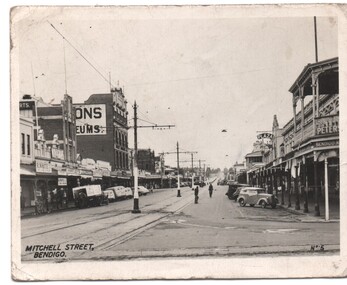
Photograph - Black & White Photograph/s
... Shows the tramway overhead, track, centre poles. Photo early 1950's. ...Shows the tramway overhead, track, centre poles. Photo early 1950's. Photograph Black & White Photograph/s ...Black and white photograph, reproduced for sale, of Mitchell St Bendigo looking east towards the Railway Station. Has the title "Mitchell Street Bendigo" in the bottom left hand corner and " No. 5" in the bottom right hand corner. Shows the tramway overhead, track, centre poles. Photo early 1950's. trams, tramways, bendigo, mitchell st -
 Melbourne Tram Museum
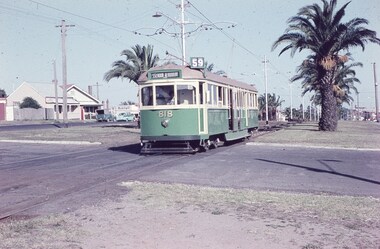
Slide, Keith Caldwell, 12/03/1960 12:00:00 AM
... centre median plantation. The house with the red guttering is one that dates back to the gold mining era. See http://www.esshissoc.org.au/1070%20Mount%20Alexander%20Road.pdf It was relocated to Woodland Park during 2017? Note the Centre poles, overhead...centre median plantation. The house with the red guttering is one that dates back to the gold mining era. See http://www.esshissoc.org.au/1070%20Mount%20Alexander%20Road.pdf It was relocated to Woodland Park during 2017? Note the Centre poles, overhead ...Agfa Colour slide, cardboard mount, by Keith Caldwell dated 12 March 1960, of W5 818 running in Mount Alexander Road, North Essendon, crossing the street access for Marco Polo Street. The tram showing route 59, Essendon Aerodrome, has trolley wheels and has a second person in the cab, possibly a trainer. Unusually the tram number is placed above the headlight, In the background are the palm trees in the centre median plantation. The house with the red guttering is one that dates back to the gold mining era. See http://www.esshissoc.org.au/1070%20Mount%20Alexander%20Road.pdf It was relocated to Woodland Park during 2017? Note the Centre poles, overhead construction and street light. Also in the background is a Mobil Service station that later became a garden centre. Now a block of apartments.hand stamped "12 Mar '60"trams, tramways, mount alexander rd, north essendon, essendon airport, essendon aerodrome, route 59, w5 class, tram 818 -
 Ballarat Tramway Museum
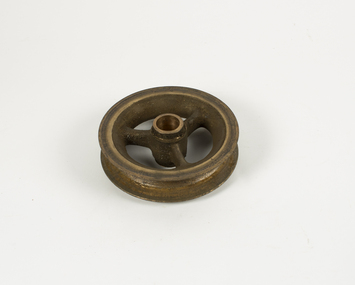
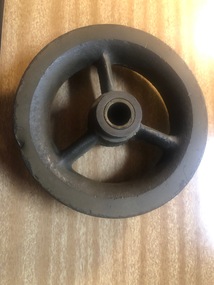
Functional object - Trolley Wheel
... centre. Fitted to the end of a trolley pole with another cast item known as a hasp. The wheel runs along the underside of the copper trolley wire, and enables the tram to powered. See item 4809 for a SEC drawing of the item. Demonstrates the mechanism by which the electrical power is transferred from the overhead ...Cast brass, fitted with a cylindrical bush in the centre. Fitted to the end of a trolley pole with another cast item known as a hasp. The wheel runs along the underside of the copper trolley wire, and enables the tram to powered. See item 4809 for a SEC drawing of the item.Demonstrates the mechanism by which the electrical power is transferred from the overhead to the tram itself.Cast brass wheel, with three spokes and hole in the centre for fitting to trolley pole.btm, ballarat tramway museum, trolley wheel -
 Ballarat Tramway Museum
Photograph - digital Images, Max Harris, ESCo 14 and Vote No tram - Sturt and Lydiard Sts, 1930
... There a lot of switches or equipment on the centre pole by the tram with a section insulator in the overhead. See also Reg Item 6101 and 5904 for other images of a "six window" tramcar....There a lot of switches or equipment on the centre pole by the tram with a section insulator in the overhead. See also Reg Item 6101 and 5904 for other images of a "six window" tramcar. ...Photograph from an original postcard - Southern Cross Series No. 143. of the intersection of Sturt and Lydiard St., 1930, looking south with two ESCo trams and the buildings at the intersection. Note the cab stand building on Lydiard St South. Many motor cars in the photo. ESCo trams - one crossing Lydiard St has a "Vote No" sign on it. The one in Lydiard Street has a "Pay as you leave" sign and a "Sunshine Biscuits Advertisements". The closest tram is No. 14, the number under the destination sign. Buildings in the view are the Bank of Australasia, Commonwealth Bank, Cooke & Co Auctioneer, a sign saying "Vai Purdue"? National Mutual Building and Craigs Hotel. The tram crossing Lydiard St has 6 windows - possibly tram No. 9 or 7. There a lot of switches or equipment on the centre pole by the tram with a section insulator in the overhead. See also Reg Item 6101 and 5904 for other images of a "six window" tramcar.Yields information about the intersection of Sturt and Lydiard St in 1930, the ESCO trams, buildings and people and the Vote about the referendum for abolition of alcohol.Digital Images from a Max Harris print and David Critchley collections.trams, tramways, ballarat, sturt st, lydiard st, esco, tram 14, prohibition -
 Ballarat Tramway Museum
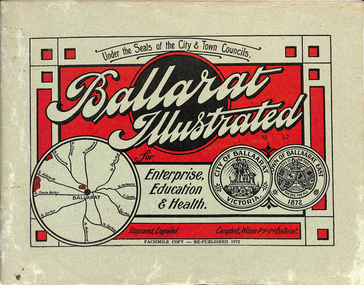
Book, "Ballarat Illustrated", 1972
... overhead poles. Page 23: Street scene, Gardens North Entrance gates, shows details of gates near St. Aidans Drive. Note double trolley wire on poles, and style of insulators. No trams in photo, three ladies walking down the track. Page 37: Street Scene; Lydiard St views, top left hand photo, shows Railway station and railway gates with signal gantry and horse drawn vehicles. Tram tracks apparent. Bottom left hand photo shows Lydiard St. North, near Post Office, double track with centre...overhead poles. Page 23: Street scene, Gardens North Entrance gates, shows details of gates near St. Aidans Drive. Note double trolley wire on poles, and style of insulators. No trams in photo, three ladies walking down the track. Page 37: Street Scene; Lydiard St views, top left hand photo, shows Railway station and railway gates with signal gantry and horse drawn vehicles. Tram tracks apparent. Bottom left hand photo shows Lydiard St. North, near Post Office, double track with centre ...Original c 1914 (see below), facsimile copy - re-published 1972. Original features photos of Ballarat City and Town, its buildings, parks and the various industries and organisations that were in Ballarat at the time of publication, including ESCo. Many photos features ESCo trams. Photos sepia toned. Has some red colour block printing on the front cover and rear, for Star Oil Engines. On inside back cover is a map with the places of interest and tram route map, marked in red. Pages are un-numbered. Original published by Ballarat East Town Council and Ballaarat City Council. On cover has number stamped in black in, "No. 87" (assume facsimile copy No.). Photos with publication show tram No. 21, built 1913 and ESCo photo page shows Mr. Pringle as Manager. Mr Pringle became manager in January 1911, As there is no photos of the "Avenue of Honour", or other mention of the first world war, assume original published about 1913 or 1914. Original shows Engravings and printing by "Campbell Wilson Prop Ltd, Ballarat". See Other Information as well for more listing details. High Resolution image added 31/8/2012 of i2 of ESCo page and i3 for Ballarat identies and sheet i4 extracted for Mr Pringle. PDF scan of full document added 21/5/2019 - see images btm633-1i.pdf and btm633-2i.pdf Notes on "Ballarat Illustrated" Reg. Item No. 733 From notes made by Neville Gower 12/1/1997 Cover: Inside front cover: Last paragraph, "Facilities for Travelling" - Electric trams serve all parts of Ballarat. Page 3: Street Scene, Municipal Town Hall, showing tram wiring Page 7: Street Scene, Lydiard St. North, intersection and tramway centre, with ESCo tram No. 21 in the bottom photo. Other photos features trams as well in Sturt St and Lydiard St. North. Page 9: Street Scene, Top photo of Sturt St. from Lydiard St. looking east, shows piles on right-hand side of road. Car parked by Post Office has a car registration number "9007". Bottom photo, an tram climbing hill, shows double trolley in the street, with early English type of pull offs. Page 13: Street Scenes and Historic Buildings: One of five photos, shows Victoria St. looking East, with tram track prominent in photo and how stone work was set up about the rails and overhead poles. Page 23: Street scene, Gardens North Entrance gates, shows details of gates near St. Aidans Drive. Note double trolley wire on poles, and style of insulators. No trams in photo, three ladies walking down the track. Page 37: Street Scene; Lydiard St views, top left hand photo, shows Railway station and railway gates with signal gantry and horse drawn vehicles. Tram tracks apparent. Bottom left hand photo shows Lydiard St. North, near Post Office, double track with centre poles - Single wire per track. Top right hand photo, showing Cemetery gates in background. Bottom right hand photo - from north end of Lydiard St. South, looking north, with an ESCo tram in background. Also has a parked car on left hand side. Page 45: Street Scenes - Bridge St; top photo at west end of Bridge St. with ESCo No. 11 with possibly double trolley wire in photo. Bottom photo at east end of Bridge St. with tram in background, shows junction. Double trolley heading out to Mt. Pleasant, single trolley for Victoria St. Page 45: Street Scenes - Bridge St; top photo at west end of Bridge St. with ESCo No. 11 with possibly double trolley wire in photo. Bottom photo at east end of Bridge St. with tram in background, shows junction. Double trolley heading out to Mt. Pleasant, single trolley for Victoria St. Page 61: Street Scenes and Historic Buildings - Public Institutions Ballarat - top left hand photo of the Hospital shows some tram track in foreground, with double trolley wire. Top right photo is of the Orphanage, the name of the tram terminus for many years. Page 68: Electric Supply Co. of Victoria's pages - top photo showing powerhouse in background, across the lake, can hardly see anything for the trees, except for the chimney. Bottom photos of the steam Turbo Generators and the switchboard. Gives Mr. P.J. Pringle as Chief Engineer and General Manager. He took over in Jan. 1911. Page 69: Ballarat East Views - features photo of Black Hill open cut, Ballarat East Railway Station, Ballarat Fire Station and "Victoria St. looking East", repeat of photo printed on page 12, but slightly darker. Image on system includes fire station and railway station, - Ballarat East. Page 78: Series of photos of various Ballarat VIP's of the era, fourth one in on top line features "P.J.Pringle, Electric Supply Co." Inside Back cover - map of Ballarat including tram lines and places of interest marked in red. Gives a detailed photographic presentation of Ballarat in 1914.80 page book with, in addition, light green card covers, titled "Ballarat Illustrated". Loose copy of page 9 and 10 held.trams, tramways, ballarat, local history, heritage buildings, esco -
 Ballarat Tramway Museum
Slide - 35mm slide/s - set of 32, Noel Simons, 25/02/1971 12:00:00 AM
... Has buildings west of Mackenzie St. in photograph. 1201.4 - Tram stop and centre of the road pole with two "CARS STOP BY REQUEST" signs mounted on pole at the corner of Mackenzie St. 1201.5 - same position as for 1201.3, but with No. 5 descending the street. 1201.6 - same position as for 1201.2, but with No. 5 descending the street. Photo taken after tram has passed photographer. 1201.7 - No. 7 in Nolan St. from across the park at Lake Weeroona. 1201.8 - No. 7 entering McCrae St from Nolan St. - distant view. Note "TRAM "sign on left hand side under tree and overhead...Has buildings west of Mackenzie St. in photograph. 1201.4 - Tram stop and centre of the road pole with two "CARS STOP BY REQUEST" signs mounted on pole at the corner of Mackenzie St. 1201.5 - same position as for 1201.3, but with No. 5 descending the street. 1201.6 - same position as for 1201.2, but with No. 5 descending the street. Photo taken after tram has passed photographer. 1201.7 - No. 7 in Nolan St. from across the park at Lake Weeroona. 1201.8 - No. 7 entering McCrae St from Nolan St. - distant view. Note "TRAM "sign on left hand side under tree and overhead ...Set of 31 transparencies taken on 25/2/1972 on Kodak mounts. 1201.1 - Bendigo No. 26 in Bond St. just after leaving Long Gully en route for Quarry Hill. Has Norris Supermarket in background. Has two SEC roof ads. 1201.2 - No. 26 climbing View St. from Charing Cross en route to Eaglehawk. Has ANZ bank and AMOCO service station in background. 1201.3 - as for 1201.3, but after tram has passed photographer. Has buildings west of Mackenzie St. in photograph. 1201.4 - Tram stop and centre of the road pole with two "CARS STOP BY REQUEST" signs mounted on pole at the corner of Mackenzie St. 1201.5 - same position as for 1201.3, but with No. 5 descending the street. 1201.6 - same position as for 1201.2, but with No. 5 descending the street. Photo taken after tram has passed photographer. 1201.7 - No. 7 in Nolan St. from across the park at Lake Weeroona. 1201.8 - No. 7 entering McCrae St from Nolan St. - distant view. Note "TRAM "sign on left hand side under tree and overhead in McCrae St. from former track that once was in this street. 1201.9 - No. 7 in High St. with Cathedral in background. Tram en route to North Bendigo. Note scaffolding around Cathedral main spire area. 1201.10 - No. 7 crossing Bendigo Creek bridge in High St. near Golden Square. Has a Caltex Service station in the background. 1201.11 - No. 7 at Golden Square terminus with Sunburst Fruit Juices and a Peters Ice cream delivery vans alongside. 1201.12 - as for 1201.11 but photo taken from behind tram, with the end of the rails in the photograph. 1201.13 - No. 7 and 21 in Pall Mall at Charing Cross with No. 5 in the background. Taken some distance away from the location. 1201.14 - No. 7 at Golden Square terminus, taken a short distance from the tram terminus. Shows Milk Bar on right hand side and the hotel on the left hand side. Taken from the south side of the roadway. 1201.15 - as from 1201.14 but taken from the north side of the roadway. 1201.16 - No 5 waiting at California Gully loop. Distant photo showing surrounds 1201.17 - No. 5 en route for Quarry Hill crossing No. 26 at California Gully. 1201.18 - No. 26 at Eaglehawk terminus with Eaglehawk Town Hall and Post Office in background. 1201.19 - No. 21 arriving at Charing Cross en route to North Bendigo. Has Alexandra Fountain in the background, ANZ bank RACV building, and other buildings on the north side of Pall Mall or Nolan St. 1201.20 - No. 26 en route for Quarry Hill at Charing Cross, with crew standing by front door. Has Colonial Mutual life building, Armstrong Tyre Service (Firestone) and a sign for Cohns Drinks in the background. 1201.21 - as for 1201.20 but with No. 5 en route to Eaglehawk now in photograph. 1201.22 - No. 26 at Quarry Hill terminus. 1201.23 - No. 26 at Quarry Hill terminus, view of front portion of tram only from a gate at the Bendigo cemetery. 1201.24 - Track at the end of the Quarry Hill line showing the point blades of the former "Y" terminus and the overhead for this. 1201.25 - No. 2 at the Quarry Hill terminus, looking along the former Trackwork. 1201.26 - as for 1201.25 1201.27 - number not used. 1201.28 - Golden Square terminus from some distance from the actual terminus, showing the Warning sign "TRAM" for motorists from the south. No. 7 at the terminus. 1201.29 - No. 7 passing through the Golden Square shopping centre. Numerous cars and pedestrians. Tram en route for North Bendigo. 1201.30 - No. 7 in High St. Golden Square, en route for North Bendigo. Photo taken after tram has passed photographer. 1201.31 - No. 7 in High St. just past Wattle St. with the Cathedral in the background. Tram has two SEC roof ads good side on photo, 'Everything's fine in my all electric kitchen' and 'Electrical cooking - clean, quick, economical'. 1201.32 - No. 7 in High St. nearing Wattle St. Has Cathedral in the background. Photo taken after tram has passed photographer.Information written on in black ink and date stamped on purple ink. 1201.1 - "No. 26 in Bond St just after leaving Long Gully" 1201.2 - "No. 26 climbing View St. from Charing Cross" 1201.3 - "No. 26 ascending View St. from Charing Cross (At Mackenzie St.)" 1201.4 - "View St. & Mackenzie St." 1201.5 - "No. 5 in View St. near Mackenzie St." 1201.6 - "No. 5 in View St. nearing Charing Cross." 1201.7 - "No. 7 in Nolan St. seen from Lake Weeroona Park." 1201.8 - "No. 7 entering McRae St. from Nolan St. Note "TRAM" warning sign on left. 1201.9 - "No. 7 in High St. passing Short St." 1201.10 - "No. 7 crossing Bendigo Creek bridge in High St. near Golden Square." 1201.11 - "No. 7 at Golden Square terminus" 1201.12 - "No. 7 at Golden Square terminus" 1201.13 - "No 7, 21 and 5 at Charing Cross" 1201.14 - "No. 7 at Golden Square terminus" 1201.15 - "No. 7 at Golden Square terminus" 1201.16 - "No 5 waiting at California Gully loop." 1201.17 - "Nos. 5 and 26 crossing at California Gully loop" 1201.18 - "No. 26 at Eaglehawk terminus" 1201.19 - "No. 21 arriving at Charing Cross from Golden Square" 1201.20 - "No. 26 at Charing Cross" 1201.21 - "Nos. 5 and 26 at Charing Cross." 1201.22 - "No. 26 at Quarry Hill terminus" 1201.23 - "No. 26 at Quarry Hill terminus seen through the gates of the Bendigo Cemetery." 1201.24 - "Quarry Hill terminus showing remains for former double track layout abandoned before 1964." 1201.25 - "No. 2 at Quarry Hill terminus" 1201.26 - "No. 2 at Quarry Hill terminus" 1201.28 - "The Southern approach to Golden Square with No. 7 standing at the terminus, "TRAM" warning sign on the left. 1201.29 - "No. 7 passing through Golden Square Shopping Centre" 1201.30 - "No. 7 in High St. Golden Square" 1201.31 - "No. 7 in High St. passing Wattle St." 1201.32 - "No. 7 in High St. nearing Wattle St."tramways, trams, bendigo, bond st., view st., nolan st., high st., eaglehawk, california gully, charing cross, quarry hill, trackwork, tram 2, tram 5, tram 7, tram 21, tram 26 -
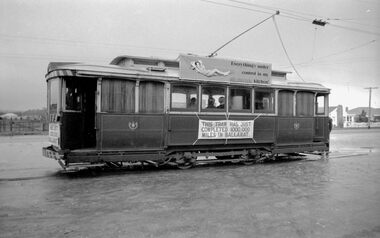 Ballarat Tramway Museum
Photograph - Digital image, Mal Rowe, 29/06/1968 12:00:00 AM
... Note the undeveloped land on the opposite side of Albert St and the overhead pan used to help centre the pole at night. Tram showing "Special", has banner "This tram has just completed 1,000,000 (million) miles in Ballarat" on the front of the tram during the TMSV Celebratory tour. ...Note the undeveloped land on the opposite side of Albert St and the overhead pan used to help centre the pole at night. Tram showing "Special", has banner "This tram has just completed 1,000,000 (million) miles in Ballarat" on the front of the tram during the TMSV Celebratory tour. ...Yields information about the purported achievement of tram 27 reaching 1,000,000 miles and the TMSV Tour and the Sebastopol terminus.Digital image of a Black and white photograph of Tram 27 at Sebastopol terminus during the celebrations of the tram completing its "millionth" mile in Ballarat on Saturday 29 June 1968. Note the undeveloped land on the opposite side of Albert St and the overhead pan used to help centre the pole at night. Tram showing "Special", has banner "This tram has just completed 1,000,000 (million) miles in Ballarat" on the front of the tram during the TMSV Celebratory tour. See also Reg Items 1878 and 7990 to 7995 for other photos of the day by Mal Rowe. Note: A review of the tram car mileages by Dave Macartney, showed that it was actually 900,000, due to a carryover error.trams, tramways, tmsv, million miles, albert st, sebastopol, tram 27 -
 Ballarat Tramway Museum
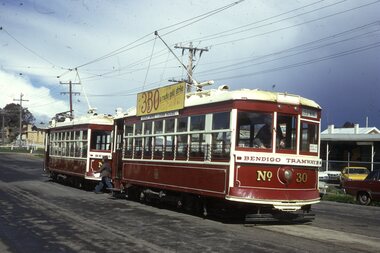
Slide - 35mm slide/s - set of 13, Peter Moses, 1974
... No. 30 has a 3BO Roof advertisement. .2 - ditto .3 - ditto with the Central Deborah mine and buildings in the background. .4 - No. 30 inbound in High St. with Sacred Heart Cathedral in the background (spire under construction) .5 - Nos. 30 and 28 crossing at Charing Cross with the Fountain Plaza building and the fountain in the background. .6 - No. 28 north bound in Pall Mall, after leaving Charing Cross with the Shamrock Hotel in the background. .7 - Photo showing track and centre poles in View St. looking west - no overhead. Has AMOCO service station near McKenzie St. .8 - No. 28 taken from cab of No. 30, in McCrae St, at end of double track. .9 - No. 28 turning from McCrae St. into Nolan St. .10 - No. 28 in Nolan St. with Lake Weeroona rowing sheds in the background. .11 - No. 19 in now Tramway Ave (then Arnold St.) running into depot .12 - No. 19 outside Bendigo depot .13 - ditto Slides taken by Peter Moses, during the winter of 1974 (no leaves on the trees)....No. 30 has a 3BO Roof advertisement. .2 - ditto .3 - ditto with the Central Deborah mine and buildings in the background. .4 - No. 30 inbound in High St. with Sacred Heart Cathedral in the background (spire under construction) .5 - Nos. 30 and 28 crossing at Charing Cross with the Fountain Plaza building and the fountain in the background. .6 - No. 28 north bound in Pall Mall, after leaving Charing Cross with the Shamrock Hotel in the background. .7 - Photo showing track and centre poles in View St. looking west - no overhead. Has AMOCO service station near McKenzie St. .8 - No. 28 taken from cab of No. 30, in McCrae St, at end of double track. .9 - No. 28 turning from McCrae St. into Nolan St. .10 - No. 28 in Nolan St. with Lake Weeroona rowing sheds in the background. .11 - No. 19 in now Tramway Ave (then Arnold St.) running into depot .12 - No. 19 outside Bendigo depot .13 - ditto Slides taken by Peter Moses, during the winter of 1974 (no leaves on the trees). ...Set of 13 colour slides, 7 on Kodak cardboard mounts and 6 on Agfa colour plastic mounts. .1 - Bendigo Trust, Birney trams 28 and 30 at Central Deborah Mine terminus. No. 30 has a 3BO Roof advertisement. .2 - ditto .3 - ditto with the Central Deborah mine and buildings in the background. .4 - No. 30 inbound in High St. with Sacred Heart Cathedral in the background (spire under construction) .5 - Nos. 30 and 28 crossing at Charing Cross with the Fountain Plaza building and the fountain in the background. .6 - No. 28 north bound in Pall Mall, after leaving Charing Cross with the Shamrock Hotel in the background. .7 - Photo showing track and centre poles in View St. looking west - no overhead. Has AMOCO service station near McKenzie St. .8 - No. 28 taken from cab of No. 30, in McCrae St, at end of double track. .9 - No. 28 turning from McCrae St. into Nolan St. .10 - No. 28 in Nolan St. with Lake Weeroona rowing sheds in the background. .11 - No. 19 in now Tramway Ave (then Arnold St.) running into depot .12 - No. 19 outside Bendigo depot .13 - ditto Slides taken by Peter Moses, during the winter of 1974 (no leaves on the trees).On the rear of all the slides "P. Moses" in black ink. .1 - "1974 Bendigo Central Deborah Mine" in blue ink and in red ink “16”. .2 - "1974 Bendigo two Birney cars / Central Deborah Mine" in blue ink and in red ink “18”. .3 - "1974 Bendigo trams at Central Deborah Mine" in blue ink and in red ink “17”. .4 - "1974 Bendigo High St / tram near Sacred Hearth Cathedral" in blue ink and in red ink “15”. .5 - "1974 Bendigo two Birney cars / Charing Cross" in blue ink and in red ink “20”. .6 - "1974 Bendigo No. 28 Pall Mall" in blue ink and in red ink “8”. .7 - "1974 Bendigo / Old Tramline View St." in black ink and in red ink “5”. .8 - "1974 Bendigo, McRae St. (Pall Mall)" and in red ink "9". .9 - "1974 Bendigo, Lake Weeroona, / tram " and in red ink "10". .10 - "1974 Bendigo, Lake Weeroona" and in red ink “11”. .11 - "1974 Bendigo / Outside depot" and in red ink “24”. .12 - "1974 Bendigo / Outside depot" and in red ink “25”. .13 - "1974 Bendigo / Depot" and in red ink “26”.tramways, trams, bendigo, central deborah, bendigo trust, sacred hearth cathedral, north bendigo, depot, tram 19, tram 28, tram 30 -
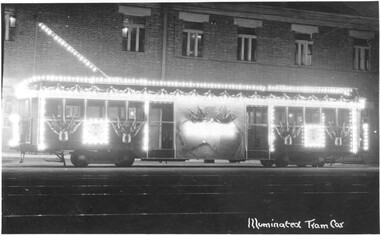 Melbourne Tram Museum
Postcard - Illuminated Tram Car, 1927
... pole. Much of the drop centre is blocked by a large drop sheet that is also lit and painted with flags. Numerous clusters of flags are placed along the sides of the saloons. Behind the tram is the administration office block at South Melbourne Depot. As tram drivers understand, driving such an illuminated tram that draws so much power from the overhead...pole. Much of the drop centre is blocked by a large drop sheet that is also lit and painted with flags. Numerous clusters of flags are placed along the sides of the saloons. Behind the tram is the administration office block at South Melbourne Depot. As tram drivers understand, driving such an illuminated tram that draws so much power from the overhead ...This night-time photograph shows a side on view of an unnumbered W1 class tramcar covered with hundreds of light globes, including on the raised trolley pole. Much of the drop centre is blocked by a large drop sheet that is also lit and painted with flags. Numerous clusters of flags are placed along the sides of the saloons. Behind the tram is the administration office block at South Melbourne Depot. As tram drivers understand, driving such an illuminated tram that draws so much power from the overhead would not be an easy task. The Duke and Duchess of York visited Australia in 1927 to open the new Parliament House in Canberra. They also visited Melbourne in April that year. They became the King and Queen of Australia in 1936. Yields information about illuminated trams and a royal visit Black and white photograph with note at bottom and on rear.Note at bottom reads: "Illuminated Tram Car" Note on rear is a postcard with place for stamp and correspondence. In biro the message reads: "Duke of Yorks Visit 1927 For Opening of Parliament. Class W1 No. * A L Cushing, East Preston Running Shed"w1 class tramcar, light globes, trolley pole, flags, administration office block, south melbourne depot, duke and duchess of york, 1927, parliament house, king and queen of australia -
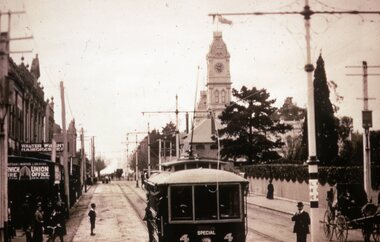 Melbourne Tram Museum
Slide - Black and white reproduction photograph - PMTT tram 4 Glenferrie Road 1910
... Photo shows the centre of the road overhead support poles in Glenferrie Road and a "Hail Cars Here" sign. ...Photo shows the centre of the road overhead support poles in Glenferrie Road and a "Hail Cars Here" sign. ...Photograph - PMTT tram 4 Glenferrie Road 1910, possibly undertaking testing prior to the official opening on 30/5/1910. Photo shows the centre of the road overhead support poles in Glenferrie Road and a "Hail Cars Here" sign. In the background is the Malvern Town Hall, signs for Norwich Union and Walter Wright Hairdresser.Yields information about the opening of the tram lines built by the PMTTKodachrome cardboard duplicate slide - Black and white reproduction photograph - PMTT tram 4 Glenferrie Road 1910 "MP5" in penciltrams, tramways, opening, tram 4, pmtt, glenferrie road, tram stop -
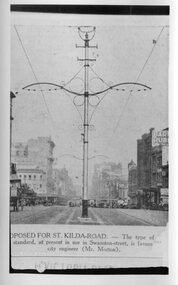 Melbourne Tram Museum
Photograph - Black and White - Swanston Street centre poles - Newspaper photo, Proposed for St Kilda Road, 1923-24
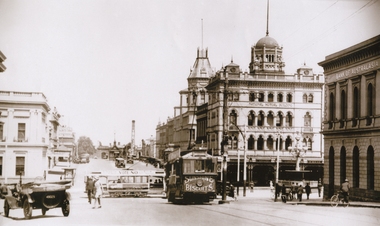
... centre of the road pole used to extend the electric tram in Swanston St from Queensberry St to Little Lonsdale St. Was proposed to be used in the conversion of cable to electric trams in St Kilda Road, but was not adopted. William St had a similar type of pole but these were removed when they became a traffic hazard. Shows design of centre poles that support overhead ...Image shows a centre of the road pole used to extend the electric tram in Swanston St from Queensberry St to Little Lonsdale St. Was proposed to be used in the conversion of cable to electric trams in St Kilda Road, but was not adopted. William St had a similar type of pole but these were removed when they became a traffic hazard.Shows design of centre poles that support overhead electric wires. Swanston Street electric trams centre poles - Newspaper photo. MMTB Swanston Street looking south from Little Lonsdale Street Melbourne, about 1923-24.tramways, trams, swanston street, centre poles, st kilda road -
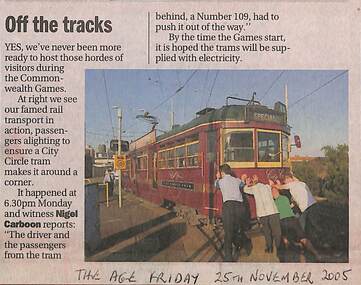 Melbourne Tram Museum
Newspaper, Herald Sun, The Age, "Jumper leads, anyone", "Off the tracks", "Extensive damage to derailed tram", 2004 - 2005
... Melbourne Tram Museum 8 Wallen Road Hawthorn melbourne Trams tramways Derailments Accidents Spencer St C Class City Circle Passengers Overhead Victoria St Victoria Gardens tram 965 Set of newspaper clipping featuring derailed or incidents. .1 - "Off the tracks" - The Age 25/11/2005 with a photo of a city circle car being pushed to clear a section insulator. .2 - "Jumper leads, anyone" - Herald Sun 6/12/2005 - tram C 3001 - derailed at the corner of Flinders and Spencer Streets. Photo Ellen Smith .3 - "Extensive damage to derailed tram" - The Age 20-05-2004 - derailment of a C Class tram at the Victoria Gardens shunt, and hitting a pole with heavy damage to the centre ...Set of newspaper clipping featuring derailed or incidents. .1 - "Off the tracks" - The Age 25/11/2005 with a photo of a city circle car being pushed to clear a section insulator. .2 - "Jumper leads, anyone" - Herald Sun 6/12/2005 - tram C 3001 - derailed at the corner of Flinders and Spencer Streets. Photo Ellen Smith .3 - "Extensive damage to derailed tram" - The Age 20-05-2004 - derailment of a C Class tram at the Victoria Gardens shunt, and hitting a pole with heavy damage to the centre section. Quotes the CE Hubert Guyot. Picture John Woudstra.trams, tramways, derailments, accidents, spencer st, c class, city circle, passengers, overhead, victoria st, victoria gardens, tram 965 -
 Ballarat Tramway Museum
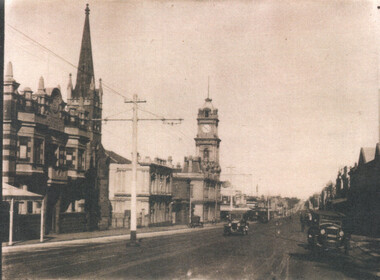
Photograph - Geelong Ryrie St looking east from near Fenwick St, c1930
... Has the tramway double tracks, overhead support poles in the centre of the road and a tram in the far distance. ...Has the tramway double tracks, overhead support poles in the centre of the road and a tram in the far distance. ...Photograph shows a view looking east along Ryrie St Geelong from near Fenwick St. Has the tramway double tracks, overhead support poles in the centre of the road and a tram in the far distance. In the view are various buildings which have since been demolished and the Geelong Post Office with its tower and clock. Photo late 1920s or early 1930s. Photo possibly a copy of a postcard.Yields information about Ryrie St Geelong looking east from near Fenwick St.Black and white photograph, with a plain back.geelong, ryrie st, geelong post office, tramway -
 Melbourne Tram Museum
Functional object - Trolley Wheel, Melbourne & Metropolitan Tramways Board (MMTB), 1950's?
... centre. Used on Melbourne trams until the late 1950's when changed for trolley skids to bring the power from the overhead into the tram. Fitted to the end of a trolley pole...Melbourne Tram Museum 8 Wallen Road Hawthorn melbourne Trams tramways Tramcar Component Overhead Trolley Wheels Trolley Poles Trolley Wheel - cast brass, fitted with a cylindrical bush in the centre. ...Trolley Wheel - cast brass, fitted with a cylindrical bush in the centre. Used on Melbourne trams until the late 1950's when changed for trolley skids to bring the power from the overhead into the tram. Fitted to the end of a trolley pole with another cast item known as a hasp. Has been used. Used by Ballarat and Bendigo trams.trams, tramways, tramcar component, overhead, trolley wheels, trolley poles