Showing 71 items matching "day signal"
-
 Flagstaff Hill Maritime Museum and Village
Equipment - Distant Signal, 1897-1931
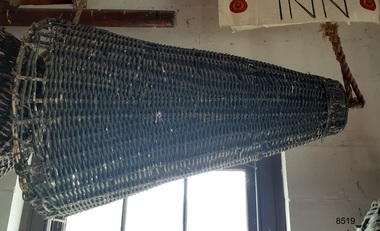
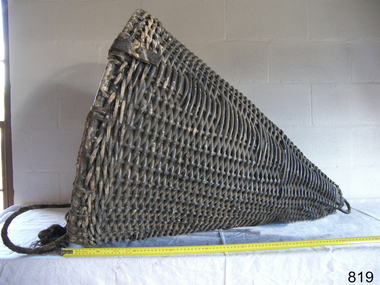
... ...day signal...Signals and of fixed semaphore was abandoned”. It is of interest to know that modern marine law in many countries insists that a set of Day Shapes must be carried onboard vessels of a certain size. ...The cane signals’ shapes appear to be the same from whatever direction they are viewed, removing confusion about the message they convey. The same shapes continue to be used today for the sets of Day Shapes used as marine navigational signals that are mandatory on certain-sized vessels. flagstaff hill warrnambool flagstaff Hill Maritime Museum and village Shipwreck Coast Marine Navigation Marine communications Communication Signal Lifesaving ship at sea day shape masthead signal day signal day mark signals marine technology safety equipment navigation equipment marine day shape day marker cane day shape signal cone day signal cone cone signal cone day shape distant signal flagstaff signal signal station communications signals marine signals flaghoists International Marine Conference International Code of Signals signal codes marine safety signal flags daymark day symbol navigation Warrnambool flagstaff 1854 1857 1931 1887 1897 Distant Signal Cone, part of a Flagstaff signal set. ...This three-dimensional Distant Signal is part of a Flagstaff Signal set of ball, cone and drum shapes. It has been woven and then fabricated with strong metal swivel fittings and loops for suspending from a high point on a flagstaff at a signal station or on a ship’s masthead. The cane signal was constructed to withstand all weather and to be visible from a long distance. The gaps between the woven cane allow air to pass through, minimising possible swaying. Similar sets were made from rope or fabric. Warrnambool's Flagstaff was erected in 1854. Its primary use was to display visual signals that could convey messages between land and sea. It was also used to notify the local population of the approach of ships. One of the popular signalling codes in use in the early-to-mid 1800s was the Marryat’s Code but there were others in use as well; there was no one standard code. In 1857 the International Marine Conference adopted an International Code of Signals as a standard communications system for all vessels that could be understood in many different languages. The Normanby Advertiser reported on June 5th 1857 a query from the Post Master General as to whether the request of the Chief Harbour Master would be carried out, in that Warrnambool would receive a new flagstaff and a set of Marryatt’s signal flags. The Table of Codes was published, showing how to use combinations of these flags to send messages. The Code was revised in 1887 to cover situations where distance, light, wind and weather conditions affected the visibility of the flags and prevented clear communication. The first report of the International Code of Signals Committee of 1897 warned signalmen not to rely on ordinary semaphore flags and introduced a Distant Signal Code using either particular semaphore flags or the three-dimensional shapes of a ball, cone and drum that aligned with the semaphore flag shapes of a circle, pennant and square. International Code of Signals In 1931, after World War I’s experiences in using signal codes, the International Code of Signals conference in Washington revised and published the rules for the conduct of signalling. One of the changes was that “the use of the Distant Signals and of fixed semaphore was abandoned”. It is of interest to know that modern marine law in many countries insists that a set of Day Shapes must be carried onboard vessels of a certain size. These highly visible geometric shapes are used at sea in daylight to communicate messages between vessels. They are used in a similar way to the Distant Signals, in that different combinations of shapes represent different messages. The set of shapes includes a ball, cylinder, cone and diamond. The shapes are hung between the top of the vessel’s foremast and the front of the vessel. They are only coloured black and are about 1.5 metres high. The vertical line of shapes can mean messages such as Boat not under command, Fishing, and Under sail and power.Distant Signals were an important means of marine communication from the late 1880s to the early 1930s, including during World War I. They were an advancement to the International Shipping Codes and safety. The cane signals’ shapes appear to be the same from whatever direction they are viewed, removing confusion about the message they convey. The same shapes continue to be used today for the sets of Day Shapes used as marine navigational signals that are mandatory on certain-sized vessels.Distant Signal Cone, part of a Flagstaff signal set. A woven cane cone, painted black, with a metal rod passing through the centre and two crossed metal bars at the base. The central rod has a loop at the top and passes through the bars at the base, finishing in a metal loop. The rod has swivels at each end.flagstaff hill, warrnambool, flagstaff hill maritime museum and village, shipwreck coast, marine navigation, marine communications, communication signal, lifesaving, ship at sea, day shape, masthead signal, day signal, day mark signals, marine technology, safety equipment, navigation equipment, marine day shape, day marker, cane day shape, signal cone, day signal cone, cone signal, cone day shape, distant signal, flagstaff signal, signal station, communications, signals, marine signals, flaghoists, international marine conference, international code of signals, signal codes, marine safety, signal flags, daymark, day symbol, navigation, warrnambool flagstaff, 1854, 1857 1931, 1887, 1897 -
 Flagstaff Hill Maritime Museum and Village
Equipment - Distant Signal, 1897-1931
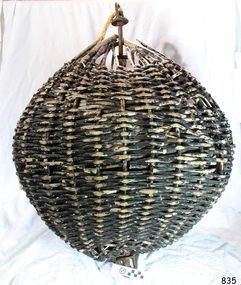
... ...day signal...Signals and of fixed semaphore was abandoned”. It is of interest to know that modern marine law in many countries insists that a set of Day Shapes must be carried onboard vessels of a certain size. ...The cane signals’ shapes appear to be the same from whatever direction they are viewed, removing confusion about the message they convey. The same shapes continue to be used today for the sets of Day Shapes used as marine navigational signals that are mandatory on certain-sized vessels. flagstaff hill warrnambool flagstaff Hill Maritime Museum and village Shipwreck Coast Marine Navigation Marine communications Communication Signal Lifesaving ship at sea day shape masthead signal day signal day mark signals marine technology safety equipment navigation equipment marine day shape day marker cane day shape signal ball day signal ball Ball signal ball day shape distant signal flagstaff signal signal station communications signals marine signals flaghoists International Marine Conference International Code of Signals signal codes marine safety signal flags daymark day symbol navigation Warrnambool flagstaff 1854 1857 1931 1887 1897 Distant Signal Ball, part of a Flagstaff signal set. ...This three-dimensional Distant Signal is part of a Flagstaff Signal set of ball, cone and drum shapes. It has been woven and then fabricated with strong metal swivel fittings and loops for suspending from a high point on a flagstaff at a signal station or on a ship’s masthead. The cane signal was constructed to withstand all weather and to be visible from a long distance. The gaps between the woven cane allow air to pass through, minimising possible swaying. Similar sets were made from rope or fabric. Warrnambool's Flagstaff was erected in 1854. Its primary use was to display visual signals that could convey messages between land and sea. It was also used to notify the local population of the approach of ships. One of the popular signalling codes in use in the early-to-mid 1800s was the Marryat’s Code but there were others in use as well; there was no one standard code. In 1857 the International Marine Conference adopted an International Code of Signals as a standard communications system for all vessels that could be understood in many different languages. The Normanby Advertiser reported on June 5th 1857 a query from the Post Master General as to whether the request of the Chief Harbour Master would be carried out, in that Warrnambool would receive a new flagstaff and a set of Marryatt’s signal flags. The Table of Codes was published, showing how to use combinations of these flags to send messages. The Code was revised in 1887 to cover situations where distance, light, wind and weather conditions affected the visibility of the flags and prevented clear communication. The first report of the International Code of Signals Committee of 1897 warned signalmen not to rely on ordinary semaphore flags and introduced a Distant Signal Code using either particular semaphore flags or the three-dimensional shapes of a ball, cone and drum that aligned with the semaphore flag shapes of a circle, pennant and square. International Code of Signals In 1931, after World War I’s experiences in using signal codes, the International Code of Signals conference in Washington revised and published the rules for the conduct of signalling. One of the changes was that “the use of the Distant Signals and of fixed semaphore was abandoned”. It is of interest to know that modern marine law in many countries insists that a set of Day Shapes must be carried onboard vessels of a certain size. These highly visible geometric shapes are used at sea in daylight to communicate messages between vessels. They are used in a similar way to the Distant Signals, in that different combinations of shapes represent different messages. The set of shapes includes a ball, cylinder, cone and diamond. The shapes are hung between the top of the vessel’s foremast and the front of the vessel. They are only coloured black and are about 1.5 metres high. The vertical line of shapes can mean messages such as Boat not under command, Fishing, and Under sail and power.Distant Signals were an important means of marine communication from the late 1880s to the early 1930s, including during World War I. They were an advancement to the International Shipping Codes and safety. The cane signals’ shapes appear to be the same from whatever direction they are viewed, removing confusion about the message they convey. The same shapes continue to be used today for the sets of Day Shapes used as marine navigational signals that are mandatory on certain-sized vessels.Distant Signal Ball, part of a Flagstaff signal set. A round woven cane ball, painted black, with a metal rod passing through the centre. The rod has a loop at each end, then a concave, octagonal metal plate that rests on the outside surface of the ball, serving as a washer. The rod has swivels at each end.flagstaff hill, warrnambool, flagstaff hill maritime museum and village, shipwreck coast, marine navigation, marine communications, communication signal, lifesaving, ship at sea, day shape, masthead signal, day signal, day mark signals, marine technology, safety equipment, navigation equipment, marine day shape, day marker, cane day shape, signal ball, day signal ball, ball signal, ball day shape, distant signal, flagstaff signal, signal station, communications, signals, marine signals, flaghoists, international marine conference, international code of signals, signal codes, marine safety, signal flags, daymark, day symbol, navigation, warrnambool flagstaff, 1854, 1857 1931, 1887, 1897 -
 Flagstaff Hill Maritime Museum and Village
Document - Log Book page, 21/10/1805
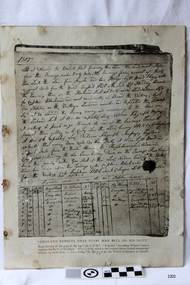
... admiralty official day signal book (1799 issue)...Nelson’s signal was transmitted from his ship HMS Victory in 12 separate flag-hoists, according to Sir Home Popham’s Telegraphic Code that had been supplied to the fleet as an experiment, with the numerical flags of the Admiralty official Day Signal book (1799 issue). The signal flags comprised eight that represented whole words and four that represented single letters - [ENGLAND] [EXPECTS] [THAT] [EVERY] [MAN] [WILL] [DO] [HIS] [D] [U] [T] [Y]. ...Nelson’s signal was transmitted from his ship HMS Victory in 12 separate flag-hoists, according to Sir Home Popham’s Telegraphic Code that had been supplied to the fleet as an experiment, with the numerical flags of the Admiralty official Day Signal book (1799 issue). The signal flags comprised eight that represented whole words and four that represented single letters - [ENGLAND] [EXPECTS] [THAT] [EVERY] [MAN] [WILL] [DO] [HIS] [D] [U] [T] [Y]. ...This document is a reproduction of the page of the log book from the vessel HMS Euryalus, recording Nelson's famous signal at the Battle of Trafalgar. On October 21, 1805, Admiral Lord Nelson led the British Navy to victory against the French and Spanish navies in the Atlantic Ocean. The event became known as the Battle of Trafalgar. To commence the battle Nelson commanded his now-famous flag signal “England expects that every man will do his duty”. Nelson’s signal was transmitted from his ship HMS Victory in 12 separate flag-hoists, according to Sir Home Popham’s Telegraphic Code that had been supplied to the fleet as an experiment, with the numerical flags of the Admiralty official Day Signal book (1799 issue). The signal flags comprised eight that represented whole words and four that represented single letters - [ENGLAND] [EXPECTS] [THAT] [EVERY] [MAN] [WILL] [DO] [HIS] [D] [U] [T] [Y]. Nelson’s signal was received by the ‘reporting frigates’ who would then send them on to the other vessels. The signal was recorded by Captain Henry Blackwood who was in command of the HMS Euryalus. Captain Blackwood led a squadron of frigates, reporting back to Nelson on the movement of the French and Spanish fleets. Nelson’s famous signal was recorded in the log book of Euryalus and repeated to other vessels. The original log book is a canvas-backed manuscript written up from hour to hour during the battle. It is in the Nelson Collection at Lloyd's. Lloyd’s of London is a large insurance company in the United Kingdom. In 1803 Lloyd’s founded the Lloyd’s Patriotic Fund to honour the brave and provide for the wounded and dependents of those killed in major Napoleonic battles. Over the years Lloyd’s has accumulated an assorted collection of artefacts and memorabilia associated with Nelson, including this log book from HMS Euryalus. In 2003 Lloyds created a temporary exhibition to mark the bicentennial of Nelson’s Battle of Trafalgar. The display included key items from the Nelson Collection celebrating Nelson’s role in British Naval History. Lloyd’s now has a department called The Nelson Collection and Heritage Floor where historical artifacts are displayed and the story of Lloyd’s 300 years of history is told. This document, being a reproduction, is not significant in itself. However it's content is of historical significance for its connection to Admiral Nelson and The Battle of Trafalgar. Through the leadership and victory of Nelson, the British obtained the mastery of the seas over the French and Spanish and opened up the way for Britain to colonise many countries including Australia. The document is also associated with a wood sample from Napoleon's ship Victory that is in our Collection.Reproduction of a page of the log book of HMS Euryalus recording Nelson's famous signal at the Battle of Trafalgar. The original log book entry was handwritten, dated 21 Oct 1805.flagstaff hill, warrnambool, shipwrecked-coast, flagstaff-hill, flagstaff-hill-maritime-museum, maritime-museum, shipwreck-coast, flagstaff-hill-maritime-village, log book, flag signal, hms euryalus, nelson's famous signal, battle of trafalgar, october 21, 1805, admiral lord nelson, french and spanish navies, england expects that every man will do his duty, hms victory, sir home popham’s telegraphic code, admiralty official day signal book (1799 issue), reporting frigates, captain henry blackwood, canvas-backed manuscript, nelson collection at lloyd's, lloyd’s of london, lloyd’s patriotic fund, napoleonic battles, british naval history -
 Flagstaff Hill Maritime Museum and Village
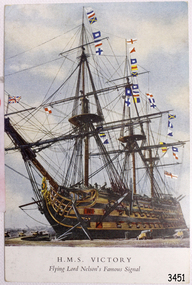
Postcard - Vessel, Sailing Ship, after October 1805
... admiralty official day signal book...day. Conventional practice at the time was for opposing fleets to engage each other in single parallel lines, in order to facilitate signalling and disengagement and to maximise fields of fire and target areas. ...Through Nelson’s leadership and unorthodox battle tactics, he secured not only a victory against the French and Spanish but reaffirmed Britain's naval supremacy opening the way for Britain to continuing the policy of colonisation of many countries including Australia. flagstaff hill warrnambool shipwrecked-coast flagstaff-hill flagstaff-hill-maritime-museum maritime-museum shipwreck-coast flagstaff-hill-maritime-village post card postcard sailing ship vice-admiral lord nelson horatio nelson lord nelson oak piece piece of oak nelson battle of trafalgar maritime technology ship relics 18th century warship british royal navy sir home popham’s telegraphic code admiralty official day signal book october 21, 1805 admiral lord nelson french and spanish navies nelson's famous signal england expects that every man will do his duty hms victory nelson collection at lloyd's lloyd’s of london lloyd’s patriotic fund napoleonic battles british naval history 18th century warship 18th century battleship Printed on the front "H.M.S. ...The British Royal Navy’s warship HMS Victory was once Lord Nelson’s flagship. The HMS Victory was built in 1765 and after serving active duty is now, in 2019, still a ship of the Royal Navy, in dry dock undergoing continuous restoration to preserve her for display as a museum ship, due to the vessel’s significant naval history. Battle of Trafalgar: On October 21, 1805, twenty-seven British ships of the line, led by Admiral Lord Nelson aboard HMS Victory, defeated thirty-three French and Spanish ships of the line under French Admiral Villeneuve. The battle took place in the Atlantic Ocean off the southwest coast of Spain, just west of Cape Trafalgar, near the town of Los Caños de Meca. The victory confirmed the naval supremacy Britain had established during the course of the eighteenth century and it was achieved in part through Nelson's departure from the prevailing naval tactical orthodoxy of the day. Conventional practice at the time was for opposing fleets to engage each other in single parallel lines, in order to facilitate signalling and disengagement and to maximise fields of fire and target areas. Nelson instead arranged his ships into two columns to sail perpendicularly into the enemy fleet's line. During the battle, Nelson was shot by a French musketeer and he died shortly before the battle ended. Villeneuve was captured, along with his ship Bucentaure. He later attended Nelson's funeral while a captive on parole in Britain. Admiral Federico Gravina, the senior Spanish flag officer, escaped with the remnant of the fleet. He died five months later from wounds sustained during the battle. It was prior to this battle that Nelson had issued his now-famous final orders to his ships in 12 separate flag-hoists “England expects that every man will do his duty”. This wood sample is historically significant for its association with Admiral Lord Nelson the Battle of Trafalgar. Through Nelson’s leadership and unorthodox battle tactics, he secured not only a victory against the French and Spanish but reaffirmed Britain's naval supremacy opening the way for Britain to continuing the policy of colonisation of many countries including Australia.A coloured postcard of a sailing ship, warship or battleship, deck cannons on the ship and in the foreground, many signal flags flying from the masts. Printed on the front "H.M.S. Victory Flying Lord Nelson Famous Signal". The signal was given by Lord Nelson in 1805.Printed on the front "H.M.S. Victory / Flying Lord Nelson Famous Signal"flagstaff hill, warrnambool, shipwrecked-coast, flagstaff-hill, flagstaff-hill-maritime-museum, maritime-museum, shipwreck-coast, flagstaff-hill-maritime-village, post card, postcard, sailing ship, vice-admiral lord nelson, horatio nelson, lord nelson, oak piece, piece of oak, nelson, battle of trafalgar, maritime technology, ship relics, 18th century warship, british royal navy, sir home popham’s telegraphic code, admiralty official day signal book, october 21, 1805, admiral lord nelson, french and spanish navies, nelson's famous signal, england expects that every man will do his duty, hms victory, nelson collection at lloyd's, lloyd’s of london, lloyd’s patriotic fund, napoleonic battles, british naval history, 18th century warship, 18th century battleship -
 Flagstaff Hill Maritime Museum and Village
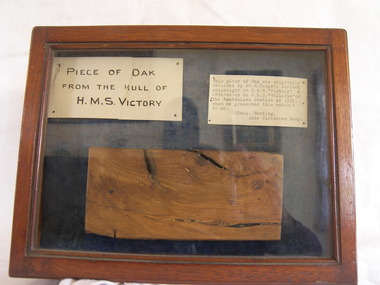
Plant specimen - Wood Sample, Herbst, 1759-1765
... admiralty official day signal book...day. Conventional practice at the time was for opposing fleets to engage each other in single parallel lines, in order to facilitate signalling and disengagement, and to maximise fields of fire and target areas. ...Through Nelson’s leadership and unorthodox battle tactics, he secured not only a victory against the French and Spanish but reaffirmed Britain's naval supremacy opening the way for Britain to continuing the policy of colonisation of many countries including Australia. flagstaff hill warrnambool shipwrecked-coast flagstaff-hill flagstaff-hill-maritime-museum maritime-museum shipwreck-coast flagstaff-hill-maritime-village oak hms victory vice-admiral lord nelson horatio nelson lord nelson oak piece piece of oaknelson battle of trafalgar maritime technology ship relics 18th century warship british royal navy h cooper shipwright hms wallaroo herbst hyde park sydney charles harding hmv naval orpedo depot williamstown sir home popham’s telegraphic code admiralty official day signal book Photograph Front: printed- "Herbst" "28 Oxford Street, Hyde Park, Sydney", handwritten - "Mr Cooper", "see back". ...The piece of oak wood sample inside the case was obtained from Mr. H Cooper during the time he served as a shipwright for the British Royal Navy on Nelson’s flagship, HMS Victory, in 1891. By that time the H.M.S. Victory was around 100 years old having been built in 1765 and was currently in dry dock undergoing restoration. Cooper’s skills as a shipwright would have been well employed during this period. HMS Victory was and still does undergoing continuous restoration to preserve her for display as a museum ship, due to the vessel's significant naval history. It was during that time of early restoration that Cooper obtained the piece of Oak from HMS Victory believed to be from the ships hull. Cooper was in Australia in September 1891 serving on the HMS Wallaroo, a British Auxiliary Squadron commissioned to serve as part of the British Royal Navy contingent, tasked to operate in Australian waters. The photograph included with the donation of the wood sample is a portrait of Mr H Cooper taken in 1895 in Sydney. The inscription on the photograph describes him as a skilled shipwright from the H.M.S. Wallaroo, depicting Cooper as a young man in Royal Navy uniform, with the emblem of a petty officer third class. While Cooper was stationed on the H.M.S. Wallaroo in Sydney he presented the display case, containing the wood sample from H.M.S. Victory, as well as the exhibit labels to Charles Harding, ("Chas") late of the Royal Australian Navy. Harding had been based at the H M Naval Torpedo Depot at Williamstown, Victoria. Although not mentioned, it is believed the two men met whilst serving together in Australia in their respective assignments. It could have been a retirement gift from Cooper to Harding with the photograph of Cooper likely included with the case, and gifted to Harding in 1895, as the date on the photograph indicates. One of the exhibits labels indicates that Harding had the item on display whilst serving at the Naval Torpedo Depot in Williamstown. The label indicates: "This piece of Oak is part of the hull of H.M.S. “Victory” Lord Nelson’s renowned Flag Ship, which took such a prominent part in the Battle of Trafalgar. 21st October 1805. Exhibited by Charles Harding, H.M.V. Naval Torpedo Depot, Williamstown.” After Charles Harding died in 1931 the case containing the sample of oak from H.M.S. Victory was donated by his son Reg Harding to Mr. Murphy in 1962. The display case has since become a treasured item at Flagstaff Hill. A newspaper article dated 1905 included with the donation mentions that the city of Hamilton in Victoria was shortly expecting a mounted piece of the H.M.S. Victory, to be included in the city’s commemoration of the centenary of the "Battle of Trafalgar". Battle of Trafalgar: On October 21, 1805, twenty-seven British ships of the line led by Admiral Lord Nelson aboard HMS Victory defeated thirty-three French and Spanish ships of the line under French Admiral Villeneuve. The battle took place in the Atlantic Ocean off the southwest coast of Spain, just west of Cape Trafalgar, near the town of Los Caños de Meca. The victory confirmed the naval supremacy Britain had established during the course of the eighteenth century and it was achieved in part through Nelson's departure from the prevailing naval tactical orthodoxy of the day. Conventional practice at the time was for opposing fleets to engage each other in single parallel lines, in order to facilitate signalling and disengagement, and to maximise fields of fire and target areas. Nelson instead arranged his ships into two columns to sail perpendicularly into the enemy fleet's line. During the battle, Nelson was shot by a French musketeer and he died shortly before the battle ended. Villeneuve was captured, along with his ship Bucentaure. He later attended Nelson's funeral while a captive on parole in Britain. Admiral Federico Gravina, the senior Spanish flag officer, escaped with the remnant of the fleet. He died five months later from wounds sustained during the battle. It was prior to this battle that Nelson had issued his now-famous final orders to his ships in 12 separate flag-hoists “England expects that every man will do his duty”. This wood sample is historically significant for its association with Admiral Lord Nelson the Battle of Trafalgar. Through Nelson’s leadership and unorthodox battle tactics, he secured not only a victory against the French and Spanish but reaffirmed Britain's naval supremacy opening the way for Britain to continuing the policy of colonisation of many countries including Australia.Wood sample adhered to the base of a hinged wood and glass display case. Wood is a sample of oak taken from the hull of Vice-Admiral Lord Nelson's flagship, the HMS Victory, built in 1765. The case also contain two exhibit labels pinned above the wood sample. Other items donated with the display case, and relating to the wood sample: an 1895 photograph, a 1905 newspaper clipping, a 1962 donor's letter (two pages), and a handwritten exhibit label with a border of red lines. Photograph Front: printed- "Herbst" "28 Oxford Street, Hyde Park, Sydney", handwritten - "Mr Cooper", "see back". Back: handwritten - "Mr H Cooper, skilled shipwright, H.M.S. Wallaroo 1895" Exhibit labels still in the case: Left: handwritten- “PIECE OF OAK FROM THE HULL OF H.M.S. VICTORY”, Right: typewritten- “This piece of Oak was originally obtained by Mr. H. Cooper, skilled shipwright on H.M.S. “Victory” & afterwards on H.M.S. “Wallaroo” on the Australian Station in 1895, when he presented this exhibit to me. Chas. Harding, Late Victorian Navy.”flagstaff hill, warrnambool, shipwrecked-coast, flagstaff-hill, flagstaff-hill-maritime-museum, maritime-museum, shipwreck-coast, flagstaff-hill-maritime-village, oak, hms victory, vice-admiral lord nelson, horatio nelson, lord nelson, oak piece, piece of oaknelson, battle of trafalgar, maritime technology, ship relics, 18th century warship, british royal navy, h cooper shipwright, hms wallaroo, herbst hyde park sydney, charles harding, hmv naval orpedo depot williamstown, sir home popham’s telegraphic code, admiralty official day signal book -
 Queenscliffe Maritime Museum
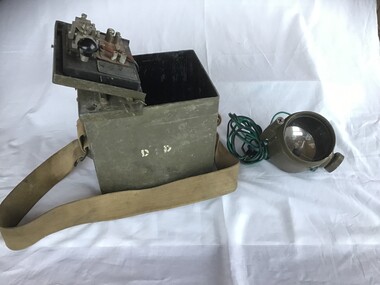
Equipment - Morse and day light set in timber box with accessories
... 1942 portable morse code set with a day signaling light and spare globes. All fitted in timber carry case with webbing strap....Operating instructions on spare globes box lid 1942 portable morse code set with a day signaling light and spare globes. All fitted in timber carry case with webbing strap. ...Military communications and signaling equipment used from 19421942 portable morse code set with a day signaling light and spare globes. All fitted in timber carry case with webbing strap.Plate "Lamp Signaling Daylight. Short Range Case MK IIPMG MELM1942" S/N 10356. Operating instructions on spare globes box lidmorse code, wwii, signaling -
 Surrey Hills Historical Society Collection
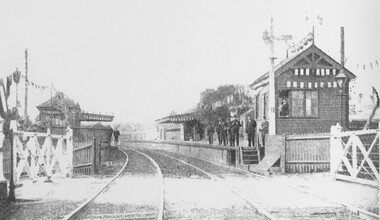
Photograph, Surrey Hills railway station on Empire Day in 1909
... Black and white photo of Surrey Hills railway station on Empire Day in 1909. Signal box and station are decorated with bunting and lanterns. ...signal box is believed to be Mr J Rasmussan and the assistant stationmaster, Mr Tom Keating. Published in book 'Surrey Hills in Celebration of its Centenary: 1883-1983', compiled by the History Nook and edited by William Chandler. transport empire day railways surrey hills station mr tom keating mr j rasmussan Black and white photo of Surrey Hills railway station on Empire Day in 1909. ...Man in the signal box is believed to be Mr J Rasmussan and the assistant stationmaster, Mr Tom Keating. Published in book 'Surrey Hills in Celebration of its Centenary: 1883-1983', compiled by the History Nook and edited by William Chandler.Black and white photo of Surrey Hills railway station on Empire Day in 1909. Signal box and station are decorated with bunting and lanterns. Gates are closed and there is a man in the signal box. There are approximately 9 men on the platforms including the stationmaster, assistant stationmaster, Mr Tom Keating and other railway officials.transport, empire day, railways, surrey hills station, mr tom keating, mr j rasmussan -
 Otway Districts Historical Society
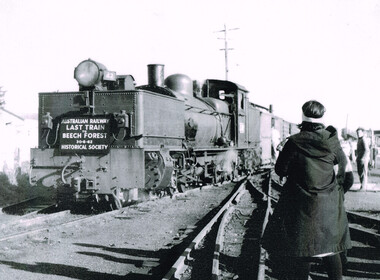
Photograph, Ray Jude, Colac: G42 about to depart with the last train, 30 June 1962
... When it returned to Colac on that cold, gloomy June day it signalled the end of narrow gauge operations in the Otway Ranges....When it returned to Colac on that cold, gloomy June day it signalled the end of narrow gauge operations in the Otway Ranges. colac; beech forest; railways; B/W. ...The last train to Beech Forest ran on 30 June, 1962. The train had a particularly motley look to it; 180 passengers were loaded into NU goods vans which had been hastily fitted out with temporary seats and tarpaulin roofing. The train was hauled by the dilapidated G42 locomotive, kept alive through patch-up repairs and cannibalised G41 parts, which intending travellers looked at with some trepidation. The train made it without mishap. When it returned to Colac on that cold, gloomy June day it signalled the end of narrow gauge operations in the Otway Ranges.B/W. Locomotive G42 with the sign " Australian Railway, Last Train to Beech Forest, 30-6-62, Historical Society" is departing Colac. NC guard's van and NU louvred van are attached. A woman and man watching. .colac; beech forest; railways; -
 Flagstaff Hill Maritime Museum and Village
Functional object - Bell, Probably second half of 19th Century or first half of the 20th Century for this particular item
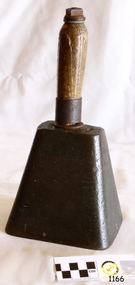
... It was then rung throughout the day to signal the start and end of specific lesson periods, the beginning and end of school morning and afternoon breaks, the lunch period, and the end of the school day, no doubt eagerly awaited by many students! ...It was then rung throughout the day to signal the start and end of specific lesson periods, the beginning and end of school morning and afternoon breaks, the lunch period, and the end of the school day, no doubt eagerly awaited by many students! ...The school bell has been used in various forms for several centuries. In Australia and the UK it was often a hand bell, located on the teacher's desk in a small school. In larger schools it was positioned in a central area, and one bell was used to signal to all classrooms. In North America it was more usual to find a large bell on a stand located in a central area of the school where it could be heard by everyone throughout the premises. More recently, the school bell has become wall located, and electrically activated, using a mechanical timing apparatus. Now the same bell is computer programmed and activated, although there are many older bells still in operation. The school bell was rung at the beginning at the school day, often to summon students to the morning assembly in larger schools. It was then rung throughout the day to signal the start and end of specific lesson periods, the beginning and end of school morning and afternoon breaks, the lunch period, and the end of the school day, no doubt eagerly awaited by many students! The school bell was used as a timing device in schools to signal the start and end of specific activities.Bell brass with heavy metal square shaped base and wooden handle-hand held, Kel(?)her Melbourne on the topInscribed on the metal at the top of the bell are the letters "Kel(?)her Melbourne" flagstaff hill, warrnambool, shipwrecked-coast, flagstaff-hill, flagstaff-hill-maritime-museum, maritime-museum, shipwreck-coast, flagstaff-hill-maritime-village, bell, school, lessons -
 Bendigo Historical Society Inc.
Photograph - NORTH DEBORAH GOLD MINE BENDIGO MINING PLAQUE
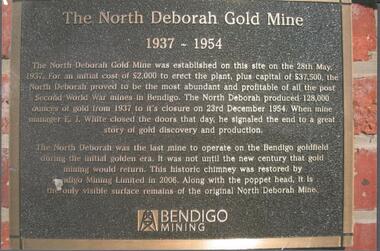
... White closed the doors that day he signaled the end to a great story of gold discovery and production. ...White closed the doors that day he signaled the end to a great story of gold discovery and production. ...Metal plaque, gold writing, erected at the site of the former North Deborah Gold Mine when the brick chimney was restored by Bendigo Mining NL. The plaque reads: 'The North Deborah Gold Mine, 1937-1954. The North Deborah Gold mine was established on this site on the 28th May 1937. For an initial cost of 2,000 pounds to erect the plant, plus capital of 37,500 pounds, the North Debnorah proved to be the most abundant and profitable of all the post Second War mines in Bendigo. The North Deborah produced 128,000 ounces of gold from 1937 to its closure on 23rd December 1954. When mine manager E.J. White closed the doors that day he signaled the end to a great story of gold discovery and production. The North Deborah was the last mine to operate on the Bendigo goldfield during the initial golden era. It was not until the new century that gold mining would return. This historic chimney was restored by Bendigo Mining Limited in 2006. Along with the poppet head. It is the only visible surface remains of the original North Deborah Mine.' The mine site is situated off Breen Street in Golden Square.Kay MacGregor 2012bendigo, mining, north deborah mining company -
 Flagstaff Hill Maritime Museum and Village
Document - Telegraph, Klingender Dickson and Kiddle, solicitors, 3-6-1896
... signals are then converted back to words at the other end of the wire. Morse code is a similar system. A fee is charged to send a telegraph, per letter or per word. The telegraph greatly improved communication, particularly in a large country like Australia. It was a fast way to send news and send out calls for help for people during a shipwreck. In Warrnambool, it was even used to set the correct time every day...signals are then converted back to words at the other end of the wire. Morse code is a similar system. A fee is charged to send a telegraph, per letter or per word. The telegraph greatly improved communication, particularly in a large country like Australia. It was a fast way to send news and send out calls for help for people during a shipwreck. In Warrnambool, it was even used to set the correct time every day ...The telegraph system of sending and receiving messages was developed in the early 1800s and improved as time went on. It sends electronic signals that represent letters and words along a wire. Those signals are then converted back to words at the other end of the wire. Morse code is a similar system. A fee is charged to send a telegraph, per letter or per word. The telegraph greatly improved communication, particularly in a large country like Australia. It was a fast way to send news and send out calls for help for people during a shipwreck. In Warrnambool, it was even used to set the correct time every day; a signal was sent from the time ball in Melbourne, and along the railway line to the Warrnambool Post Office. This 1896 telegraph tells a big story in very few words, only fourteen! The layout of the paper form includes a table with four columns and five rows, set out for writing just one word into each of the twenty spaces. The happy message is the approval to go ahead with the exchange/sale of the title from landowner Rutledge to Wilson. The Melbourne Legal firm Klingender Dickson and Kiddle sent this message on behalf of its client to the Bank of Australasia in Warrnambool. The Bank of Australasia was incorporated by the Royal Charter of England in March 1834. The bank began in Australia on 14th December 1835, opening in Sydney. The Acting Superintendent of the bank at that time was David Charters McArthur. He was Superintendent from 1867-to 1876. The Melbourne branch opened on 28th August 1838 in a two-roomed brick cottage on the north side of Little Collins Street, where two huge mastiff dogs were used at night to guard the bank. The government also provided an armed military sentinel. Due to the bank's rapid growth, a new building for the Melbourne branch was opened in 1840 at 75 Collins Street West. By 1879 the bank had been upgraded to a magnificent two-storey building on the corners of Collins and Queens Streets, with the entry on Collins Street. In 1951 the Bank of Australasia amalgamated with the Union Bank to form Australia and New Zealand Bank, now known as the ANZ. Then in 1970, the ANZ merged with both the ES&A and the London Bank of Australia to form the ANZ Banking Group Limited. The ANZ Banking Group Ltd kindly donated a variety of historic items from the Bank of Australasia. BANK of AUSTRALASIA, WARRNAMBOOL – In 1854 Warrnambool had two banks, the Union Bank and the Bank of Australasia. Later, completely different bank businesses opened; in 1867 the National Bank of Australasia, then in 1875 the Colonial Bank of Australasia. The original Warrnambool branch of the Bank of Australasia was established in July 1854, and operated from a leased cottage on Merri Street, close to Liebig Street. The bank later bought a stone building previously erected by drapers Cramond & Dickson on the corner of Timor and Gibson Streets. Samuel Hannaford was a teller and then Manager at the Warrnambool branch from 1855 to 1856 and the Warrnambool Council chose that bank for its dealings during 1856-57. In 1859 Roberts & Co. was awarded the contract to build the new Bank of Australasia branch for the sum of £3,000. The land was on a sand hill on the northeast corner of Timor and Kepler Streets and had been bought in 1855 from investor James Cust. The new building opened on May 21, 1860. The bank continued to operate there until 1951 when it merged with the Union Bank to form the ANZ Bank, which continued operating from its Liebig Street building. Warrnambool City Council purchased the former Bank of Australasia building in 1971 and renovated it, then on 3rd December 1973 it was officially opened as the Art Gallery by Cr. Harold Stephenson and Gallery Director John Welsh. The Gallery transferred to the purpose-built building in Liebig Street in 1986 and the old bank building is now the Gallery club. Staff at the Bank of Australasia in Warrnambool included the following men but others were also involved: Samuel Hannaford, Teller then Manager from 1855-1856; W H Palmer, Manager from January 1857 until November 1869 when the Teller Basil Spence was promoted to Manager; H B Chomley, Manager from April 1873 and still there in 1886; A Butt, Manager in 1895-1904; J R McCleary Accountant and Acting Manager for 12 months, until 1900; A Kirk, Manager 1904; J Moore, staff until his transfer to Bendigo in December 1908; J S Bath was Manager until 1915; C C Cox, Manager until April 1923; Richard C Stanley, Manager 1923 to April 1928. This telegraph has historical significance as it was sent to the Bank of Australasia in Warrnambool. The parties involved in the message, Rutledge and Wilson, were involved in a land deal in 1896 when the district was importing and exporting goods into and out of Warrnambool Harbour via sailing ships. It is also a historical record of the nature of financial agreements between similar institutions in Warrnambool and the district. The telegraph is significant for its association with the Bank of Australasia in Warrnambool, the first bank in Warrnambool, established in 1854. The bank continued to operate until its merger in 1951 when it became the ANZ Bank, which is still in operation today. The Bank was an integral part of the establishment and growth of commerce in Colonial Warrnambool and throughout Australia.Telegraph RECEIVED: Warrnambool Post Office, Wednesday 3rd June 1896. FROM: Klingender, Dickson, and Kiddle, solicitors, Bank Place, Melbourne FOR :the Manager, Bank of Australasia, Warrnambool, REGARDING: Rutledge to Wilson titleSTAMP: text inside circle "WARRNAMBOOL VIC", and in centre of the circle "JE 3 96" Telegraph No. "23", FROM :"Melbourne", FOR: "The Mgr, Bank of Australasia" MESSAGE (14 words): "Rutledge to Wilson title accepted by Purchaser's Solicitors settlement may be effected with auctioneers" TIME: "9:24" SIGNED: " Klingender Dickson Kiddle, Solrs, Bank Place"flagstaff hill, warrnambool, flagstaff hill maritime museum, maritime museum, commerce, banking, bank of australasia, australia & new zealand bank, anz bank, david charters mcarthur, telegraph, 1896, rutledge, wilson, klengender, dickson, kiddle, warrnambool post office, klengender dickson and kiddle, bank place -
 Warrnambool and District Historical Society Inc.
News Sheet, The Sun News-Pictorial 1945, 1945
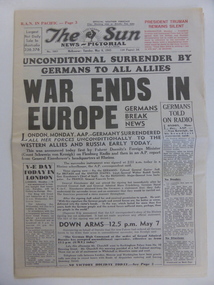
... This paper has no local significance but the event it describes (the end of the war in Europe in May 1945) is of signal importance in world history and affected all in Australia at the time and still does today. The newspaper will be of interest to researchers and useful for display. World War Two V.E. Day ...This Melbourne Sun newspaper of May 8, 1945 contains details of the surrender of Germany in World War Two. The first surrender document was signed at Rheims, France by representatives of Germany, Britain, Russia, France and the United States of America. This paper has no local significance but the event it describes (the end of the war in Europe in May 1945) is of signal importance in world history and affected all in Australia at the time and still does today. The newspaper will be of interest to researchers and useful for display. This is a Melbourne newspaper (The Sun News-Pictorial 1945). It has 16 pages and is printed in black print on a white (now creamy-coloured) background. It has the news of the end of the war in Europe with the surrender of Germany. The newspaper includes black and white photographs, advertisements, cartoons, comic strips and a crossword puzzle. world war two, v.e. day, warrnambool, history -
 4th/19th Prince of Wales's Light Horse Regiment Unit History Room
Photo Albums - set of two, c. 1919
... Got him back with us when we countered. 357 Signal station at CANA 358 H Videon in german rig 359 ROD-EL-FARAC 360 Sweetwater Canal ZAG-A-ZOG 361 Hospital train on beach EL-ARISH 362 Jerusalem Road 363 Bedouin camel and young'un 364 Admiralty Offices, PORT SAID 365 Suez Canal PORT SAID 366 Taking wounded to clearing station 367 Hills of 10-60 MALHA 368 Junction Station 369 EL ARISH 370 Wine Distillery LATRON 371 White figures how entrance to Pyramid 372 RAPC Wireless Station 373 Sports in Canal. ANZAC Day...Got him back with us when we countered. 357 Signal station at CANA 358 H Videon in german rig 359 ROD-EL-FARAC 360 Sweetwater Canal ZAG-A-ZOG 361 Hospital train on beach EL-ARISH 362 Jerusalem Road 363 Bedouin camel and young'un 364 Admiralty Offices, PORT SAID 365 Suez Canal PORT SAID 366 Taking wounded to clearing station 367 Hills of 10-60 MALHA 368 Junction Station 369 EL ARISH 370 Wine Distillery LATRON 371 White figures how entrance to Pyramid 372 RAPC Wireless Station 373 Sports in Canal. ANZAC Day ...Memorabilia of 908 Dvr Thomas Edward Whyte, 3rd Light Horse Field Ambulance, World War 1 READ THIS. During the last war I sent these pictures home through devious channels. When I lobbed back I found them all pasted in these albums by my young brother Billy. He was only a kid then! Nowadays he is serving up North. Went away with the original 9th Battn. Was in the Blitz on England and served in Libya, Tobruk, Greece, Crete and Palestine and was twice knocked. It's not long since the last upheaval 1914-18 and I wonder if these boys think as we did. This will be the last war? I sincerely hope so. TWSet of two photo albums. Photos pasted into albums with captions in white ink. Photo captions - Vol 1. (? = not legible) 1. Prisoners from ES SALT 2. Dust scene at AUJA FORD. 4th LH BDE 3. ? ? CHEOPS PYRAMID 4. Houses and domain WASSA battle 5 .Pontoon at SERAPELAI 6. SPINX (sic) & PYRAMID 7. The Nile floods occur once yearly and all irrigation centres are alternatively flooded 8. Pontoon bridge over SUEZ Canal at SERAPEUM . Constructed by Aust Engineers 9. The arrival of newspapers and mail 10. Lake IIMSAH-ISMALIA 11. Camp outside Jerusalem. Walls of old city easily discernible 12. Roman walls on beach at MONTAZEH 13. ? ? These boats are used for conveying between steamer & shore 14. Interest shown in the new issue. Through the scarcity of horses Batmen/Grooms and drivers ? allotted donkeys ? ? 15. DAMASCUS GATE JERUSALEM 16. Trumpeter ? 17 Indians making ? for railroad 18. 'SPELLO' Sinai Country 19. Police searching Egyptian labourer 20. Cavalry ?? SHA? 21. Entering ? WADI ? 22. Bedouins at ? 23 No caption 24 No caption 25 Bolar trees EZBEKIEH Gardens CAIRO 26 .Flamingos at NOUZEH Gardens ALEXANDRIA 27 BARAGE 28 KASR-ELNILL Bridge 29 NOUZEH GARDENS 30 AMGS on beach at ? 31 NOUZEH GARDENS - ALEX 32 Mascot of 7th M.V.G. 3RD ALHR 33 Printing on walls inside St Mary's Church. Depicting the Flight from Herod. (Corner torn off photo) 34 Inside Virgin Mary's Church at MATARA 35 ? painting in Church ?? 36 SUEZ Canal. Finish of Arab pony race. ZAL-A-ZIA 37 Admiralty offices at PORT SAID 38 A corner of CHEOP"s PYRAMID 39 The Spinx (sic). Nose was blown off by a shell from one of Napoleon's guns. 40 Monastry on the MT of TEMPTATION 41 Mess orderlies. Foodstuffs in locker given to troops by the AIF 42 Mid day meal on treck 43 Ambulance sand carts for conveying wounded and sick over desert sand 44 3rd ALHB 45 Kaisers Church JERUSALEM. Inside is a large painting figuring the Kaiser & Kaiserine holding a model church. 46 Bedouin women drawing water from well at EL-ARISH 47 2nd ALH BGDE doing route march on JERUSALEM-JERICHO ROAD 48 GEN HODSON GOC Anzac Mounted Divn presenting decorations & investitures on the sands at SHEIKS-ZOWAID 49 Armoured Car 50 Snow at the CEEDERS (sic) on Mt LEBANON 51 Compulsory phenyle bath for all troops in front line area 52 Austrian guns taken at point of bayonet by NZ & 2nd BGDE at GAZA 53 CACHOLETS for carrying wounded 54 The boys found some timber and made a spring board on SUEZ Canal 55 Bedouin wedding. The Bride travels in state amongst rubbish on top of camel. Her father leads conveyance. 56 Australian graves at SHALLAL 57 Camel Transport Company bring rations along beach 58 Billy the mascot holds an offensive & checks advancement 59 Exercising horses at HELMIEH Egypt 60 PONT-DE-QUOBBA Egypt. A suburb of well-to-do Egyptian merchants 61 Demolition stunt at ASLU. Bridge destroyed by Australian Engineers 62 Swimming horses in Great Bitter Lakes Egypt 63 On the move along Wadi 64 On the shores of the Bitter Lakes EL-EGYTE 65 A leave party waiting for the pontoon to swing into position 66 Carting grain 67 Egyptian Brass Band 68 French warboat (sic) in Canal 69 Russian Troops from Mesopotamia passing through SUEZ Canal 70 Prisoners coming in under escort. Turkish & German officers in lead mounted on ponies 71 Turkish prisoners 72 T.B.D in Canal 73 Old trenches on SUEZ CANAL near BITTER LAKES on W Bank 74 Monitor in Canal 75 Block house, trenches & entanglements near Post 62 76 A halt in an Egyptian village EL-MARO' 77 Mobile wireless plant 78 On the road from Canal to Railhead 79 Old Turkish guns in ancient fort at ALEXANDRIA 80 Francenia steaming through Canal 81 After MAGHDABA stunt. Convoy taking wounded form EL-ARISH to railway at 139 82 Indian Camelry 83 Virgin Mary's Church 84 Sluice gate at BARAGE Egypt 85 Hospital at lower W bank of Canal 86 Virgin Mary's tree 87 Sweetwater Canal at ISMAILIA Egypt 88 Halt and Feed. The A.M.C. attached to flying column. 89 Bringing stores ashore at JAFFA 90 H Videon & J Britton astride donks. Horses became scarce through casualties etc and units had donkeys issued to them 91 RAMLEH. The traditional burial place of St John the patron saint of England (sic). 92 Jewish Synagogue at RISHON-COUR-LE-LION (Richard the Lion Hearted) 93 Water tower at HELIOPOLIS 94 Portion of camp on HELIOPOLIS Racecourse 95 Arrival of papers 96 Sand sleigh 97 Boring plant & prisoners taken on the JIFF-JAFFA stunt. Two Austrian officers and party of Turks taken whilst building a concrete gun emplacement 98 The obelisk at MATARIA 99 In an avenue of Australian gums at ZEITOUA 100 Mountain battery gun 101 The 3rd ALH BGDE camped at HELIOPOLIS Racecourse 102 Captured Turkish guns 103 Turkish and Austrian prisoners. JORDAN VALLEY 104 The MT of Temptation Monastery built over spot where Christ spent his 40 days 105 Refugees from ES-SALT at JERICHO 106 3rd LHFA and 8th LH REGT at HELIOPOLIS 107 Fig trees at Roman Wells JIFF JAFFA 108 Inside the Blue Mosque CAIRO 109 Lagoon that was destroyed on JIFF JAFFA stunt 110 Section race at Brigade sports 111 Another tombstone at ALEX 112 Innoculating female date palm 113 Bronze tombstone in a cemetary at ALEXANDRIA 114 Luna Park at HELIOPOLIS 115 Egyptian water buffalo. Used by natives for ploughing etc 116 Russian church. Some call it the "Church of St Mary Magdelene" 117 At pyramids GIZA. Billingsley lost leg & McMullin KIA 118 Pontoon bridge over Suez Canal 119 DURBAN 120 Rescue work 121 Paddy Hanly 122 Motor train for conveying rations between Canal and Railhead. 123 At MUCKSHUBE ? 124 British ??? 125 Bedouins bringing in their harvest from the fields of ABBASSAN-EL-KEBIR Palestine 126 German HD QTRS BEERSHEBA 127 Date ? SINAI 128 Military railroad running through ? at EL-ARISH 129 Street scene at KHAN-YUNIS Palestine. Samson often called at this place to visit his girl. Napoleon narrowly escaped capture here during his ? in 1799 130 Date palms bearing fruit. These do not ? they are ?? 131 Motor ambulance convoy 132 Turkish hospital BEERSHEBA 133 MT CALVARY 134 Town Hall BEERSHEBA 135 Railway station BEERSHEBA 136 ASLUJ 137 Turkish depot MAGDABA 138 DURAN 139 3rd ALAB Hospital 140 Main Street PORT SAID 141 Stock Exchange ALEXANDRIA 142 The "Bull Ring" 14th AGH 143 (Double exposure) 144 Jewish School at DURAN Palestine 145 Damascus Gate JERUSALEM 146 Roller used for grinding clay for making bricks 147 The Harbour at ALEXANDRIA 148 Part of Napoleons Road along sea shore opposite BEELAH 149 Hotel at ALEX. Barred to the troops of course. 150 HELIOPOLIS 151 -153 ALEXANDRIA 154 Ambulance treck 155 Cacholets at the casually clearing station 156 Refugees from ES-SALT entering the Jordan Valley. Mts of MOAB in background 157 Cameliers bring in prisoners 158 The "Niagara". Casualties were from the front line by all descriptions of transport and passed through several field hospitals until they eventually reached the railway. They were sent to KANTARA by train. Despatched from there to PORT SAID by this boat 159 JERICHO 160 Turkish prisoners in JORDAN VALLEY 161 Bedouin nippers of SINAI 162 Bridge destroyed by ALH at ASLUJ 163 Railway sheds at BEERSHEBA. Portion was set afire by retreating Turks 164 ASLUJ Station 165 German Hospice 166 at ASLUJ 167 Suez Canal offices PORT SAID 168 MENA Village from top of Cheops. White lines at left are roads made by Australian troop. First Aust Contingent camped here. 169 A felukeh passing through gate at BARAGE 170 Military railway terminal EL ARISH 171 (No caption) 172 Egyptian family waiting for a train 173 Turkish prisoners and captured material coming in 174 Turkish wounded at BEERSHEBA awaiting removal 175 Two hospital ships at ALEXANDRIA 176 Some of the Bd boys 177 Race meeting 3rd ALHB at TRIPOLI- SYRIA 178 The blacksmith and Rodney Thomas swimming horse in SUEZ CANAL 179 Natives grinding grain 180 Thoroughbred 181 MUKATTAM HILLS 182 Trenches at JIFF JAFFA 183 MacBoyd as a Padre 184 Egyptian Syce having shave by travelling barber 185 The creek outside ALMINA 186 Cameliers 187 Clearing Station on beach at EL-ARISH 188 Wadi at TALLAT-EL-DUMM 189 Motor transport park 190 Some of the boys 191 Pompeys Pillar 192 at MAGHDABA 193 Hospital at JERUSALEM 194 Cheop's Pyramid 195 Golden Gate JERUSALEM 196 Hustling Turks through BEERSHEBA 197 Holy City 198 Mosque of Omar Jerusalem 199 Railway bridge destroyed by ALH at ASLUJ 200 Enemy material captured at SHERIA BEERSHEBA 201-3 These Mosques built with alabaster taken from pyramids at GIZA 204 Pontoon bridge built by our Engineers over RIVER JORDAN 205 3rd Bgde in Koil at MASAID 206 Billy McGhie throwing the weight 207 Nirazeh ? Gardens 208 Motor Ambulance Park 209 Bedouin women in Palestine village 210 ALEXANDRIA 211 Junction Stn 212 Indian Lancers 213 Motor convoy at ESSANI 214 A & B Sections 215 JERUSALEM. Once known as the 'City of Palms' and presented to Cleopatra by Anthony 216 Monastery on the Mount of Temptation. Situated on the Hills of Solomon on E side of Jordan Valley just behind JERICHO 217 DURAN A Jewish village in Palestine 218 One of our planes meets with a mishap on landing 219 Bedouin flocks around NABLUS 220 ES-SALT Road just above Jordan River 221 Halt! Action Front! Getting guns into action from pack 222 Village well 223 Gun inspection 224 WADI GHUZZEE Bridge 225-6 At GIZA Zoo Egypt 227 Syrians gathering olives 228 Smashed plane 229 MacBoyd 230 Bridge across Jordan at GORRONHOER 231 Competitors for Gretna Green. 3rd Bgde sports at TRIPOLIA 232 EL ARISH 233 Main street JAFFA 234 The beach at MARI-KHEB 235 Scene of old Cairo 236 Bedouin market 237 Bridge built over Wadi EL-ARISH. The biblical "River of Egypt". 238 Old water reservoir in native village 239 A "spello" on the track 240 Plane going out on reconnaissance 241 Bomb attached to carrier on a plane 242 Ancient Turkish gun at forts in TRIPOLI - SYRIA 243 Gun inspection 3rd AMGS 244 Old Turkish trenches outside GAZA 245 Wadi KHUZEL Bridge at SHALLA 246 BEERSHEBA 247 Street scene ZAG-A-ZIG 248 Spinx (sic) & Pyramid - GIZA 249 Egyptian Coastguards at ALEXANDRIA 250 A Palestine camp E Troop 3rd MG Sqn 251 B class horses killed in Syria 252 Scene from summit of Pyramid 253 Bert Richmond & an old Turkish Howitzer on MONTAZEH 254 LION'S WELL 255 Australian trenches outside Ferry's Post near Hill 70 256 A street scene in HELIO{PLIS 257 Electric trams at ALEXANDRIA 258 Cleaning harness 259 Swinging pontoon bridge into position at SERAPEUM 260 British Monitor in Suez Canal 261-2 Scenes of Turkish buildings at MAGHDABA. Taken by the ALH The first time in history mounted troops have attacked and taken entrenched positions 263 Aussies at Egypt's ancient monuments 264 Scenes of old CAIRO from MOKATTAM Hils 265 Bridge across canal at BARAGE, 16 miles outside CAIRO 266 Curly and Vic Norton 267 Stumpy McIntyre & Long Pikington 268 In Wadi GHUZZEL near TELL-EL-JEMM 269 Digging post holes for stables 270 Cameliers bring in prisoner. Austrian Officer in black 271 White washing mess shed 272 F Troop 3rd AMGS Sqn 273 Jews at Recruiting Depot at JERUSALEM, forming Jewish Battalion 274 In Jordan Valley, 3rd Machine Gunners have 8 horses killed by an aerial torpedo 275 Turkish prisoners 276 Cocos Island 277 Snow on the Lebanon Ranges 278 Egyptian Hotel 279 Gordon Wake. Note intruders 280 Electric trams at HELIOPOLIS Egypt. Heliopolis built by Belgian firm in 7 years 281 Sweetwater Canal at SERAPEUM 282 The ? wells at JIFF-JAFFA 283 Virgin Mary's well at MATARIA. Boyd, Simpkin & Crowley 284 Cricket for convalescents at MONTAREH 285 Indians working at cutting for military railway 286 Australian Hospital BEERSHEBA 287 Removing wrecked ambulance car from rail road 288 Engineers depot in ? at EL-ARISH 289 Water preservation scheme at SHALLAL 290 German Princes Palace at HELIOPOLOLIS 291 Some of the boys 292 Aussie aerodrome BEELAH 293 EL-JALLAH outside BETHLEHEM 294 Some of the gunners 295 Trying camels in gun carriages. Note sand caterpillar 296 Street outside old city JERUSALEM 297 D.H QRS In EL-ARISH. Hod 298 Cairo Museum 299 Wadi bridge built by Army Engineers 300 A two storied building at GALM used as German HQrs until reached by our guns 301-2 No caption 303 Ambulance with Flying Column 304 Jack Pegg 3 AMGS 305 KHAN YUNIS 306 In the Jewish village of "Rischon le Lion" 307 Wet Canteen BEELAH 308 Motor Transport LATRON 309 Gen Chauvel OC Desert Mounted Column 310 10th LH - Inverness Battery "Railhead" 311 3rd LHFA "SERAPIUM" 312 ESBEKIEN Gardens "LE CAIRE" 313 Camel training and wireless station Hill 60 314 ZAG-A-ZIG Rly Stn 315 One of the Irrigation Canal locks "HELOUAN" 316 Indian Camel Corps 317 Base at Hill 60 318 Aussie transport arriving "ALEXANDRIA" 319 3 ALHB at AL MINA 320 Main entry to city of JAFFA 321 Mosque at DAMASCUS 322 A Turk brought to earth by one of our patrols 323 Brigade boxing contrst 324 Ostrich farm ZEITOUN 325 MATERIA 326 No caption 327 Mail day 328 3rd LHFA entering HELIOPOLIS from MENA 329 M Boyd, L Simpkins, S Crowley 330 Stretcher bearers 331 French Hosp JERUSALEM 332 SERAPIUM 333 Gippo crushing wheel 334 On the move - bully and biscuits 335 V Morton, F Stokes, L Simpkins & Hanley 336 Turkish prisoners - SHERIA 337 Getting used to the mask J Antonio MM 338 Sand carts 339 Model house - MONTAZA Hospital 340 "Abdul" 341 Wood Depot "ESDUD" 342 On troop ship - from Syria 343 Turkish prisoners "JULIUS" 344 TRIPOLI 345 3rd AMGS cook house "BEELAH" 346 Breaking camp "ZEITOUN" 347 Turkish prisoners "GAZA" 348 One of our tanks. About nine were blown out of action at GAZA 349 Camp in HOD-EL-ARISH 350 German HQRS BEERSHEBA 351 Race Course TRIPOLI 352 A Locke & P Leeming 353 Sea planing in Suez Canal 354 MOASCR detail camp 355 KANTARE Suez Canal 356 Four boys of MG Sqn at cards while convalescing . Marked X was a prisoner of war for three days. Got him back with us when we countered. 357 Signal station at CANA 358 H Videon in german rig 359 ROD-EL-FARAC 360 Sweetwater Canal ZAG-A-ZOG 361 Hospital train on beach EL-ARISH 362 Jerusalem Road 363 Bedouin camel and young'un 364 Admiralty Offices, PORT SAID 365 Suez Canal PORT SAID 366 Taking wounded to clearing station 367 Hills of 10-60 MALHA 368 Junction Station 369 EL ARISH 370 Wine Distillery LATRON 371 White figures how entrance to Pyramid 372 RAPC Wireless Station 373 Sports in Canal. ANZAC Day 1916. Prince of Wales is aboard white launch. 374-5 Captured Austrian boat. 40,000 cases of benzine aboard. She was brought into Canal at Port Said. Spies set her afire. She burnt for some considerable time and eventually blew up. 376 Pumping water from Wadi on Muckshabee stunt 377 On trenches 378 Bringing in disabled battle plane 379 Giving a motor transport a lift 380 Old Turkish howitzer. MONTAZZA 381 Jerusalem country 382 Palm Hod in SINAI. Trees do not bear dates until 14 years old. No bees here. Palms innoculated by Bedouin. 383 Camel cacolets for conveying wounded 384 ESKBEKIEL Gardens Cairo 385 LAKE TIMBAH 386 Xmas dinner 1916 387 Gift billies from ACF 388 Section competition 389 In big marquees HELIOPOLIS 390 HM Landships 391 Capt Aberdeen inspecting horses 392 Football. Black vs White 393 The game 394 Old Napoleon fort. 10 mile along coast from ALEX 395 Jewish Cemetery AKRON 396 Ration fatigue 397 Blowing bottom out of Turkish Reservoir to allow soakage 398 Tilley & Farley - 14th AGH 399 At GIZA Zoo. Note height of giraffe 400 On this stunt we destroyed Turkish reservoir of 2 1/2 million gallons 401 Demolition party at wells MUCK-SHUBE 402 3rd ALH Bde HELIOPOLIS Race course 403 HMLS "Lady Wingate" 404 Turks blew out our tanks at GAZA 405 One of our aviators captured by German. Note German wearing Iron Cross. Snapped behind Turkish lines. Original of this snap was dropped at Aust aerodrome to let them know Aussie airman was alright and not killed in capture. Chivalry 406 Sausage observation balloon 407 READY 408 Bomb on carrier 409 Testing 410 B Richmond, Wireless Operator RAFC 411 Loading Bomb 412 Crash in desert 413 Bomb in YMCA at MAZRAR 414 No caption 415 LW Simpkin - Late 3LHFA 416 LEMNOS 417 Shelling the MARSDEN 418 Pontoon across Jordan River 419 Shells on Walkers Ridge 420 Sweetwater Canal 421 LAKE ISMAILIA 422 Indian Lancers on Canal 423 CAIRO Railway Station 424 Destroying Turkish water supplies. Explosives used for breaking clay at bottom of lagoon, help to absorb water 425 Exercising horses at ZEITOUN Egypt 426 In Wadi on MUG-SHUBEE stunt 427 Tractor drawing 60 lb gun towards front line 428 Sultan's mother's place at HELIOPOLIS = City of the Sun 429 Camped on the sands outside RAILHEAD, Jump off for SINAI campaign 430 G Turner & A Lockwood out for a camel ride. 431 GAZA and Nile floods from top of Pyramid 432 Baby refuses to carry his harness and his pal wears an astonished look 433 No caption 434 Turkish Officers 435 Regt HQRS at IBEETA 436 No caption 437 3rd Machine Gun Squadron 3rd ALH Bgde (my unit) 438 Camel Corps at dinner 439 KHEFREN Pyramid snapped from top of Cheops 440 CHEOPS 441 Pyramids 442 MENA from top of Pyramids 443 Snap from Pyramid showing MENA-CAIRO road running through Nile floods 444 MENA village from Pyramid 445 Band of British West Indies Regt 446 Gippo Band 447 Swimming on Med Sea 102 KmA 448 H Maddocks 449 Bedouin and Egyptians utilise any animals for their fields 450 Captured Turkish train - BEERSHEBA 451 Gardens ISMAILIA 452 Gippos used for horse lines etc 453 Canteens at HELIOPOLIS 454 3 ALHB watering in Wadi on ESSANI stunt 454 JAFFA 455 ALEX, Napoleon relics 456 Egyptian water wheel 457 SUEZ 458 WADI GHUZZEE 459 On Reconnaissance at 10-60 460 Goats and sheep captured from hostile Bedouins 461 Pontoon SERAPIUM 462 Aust trenches - Suez Canal. Turks attacked FEB 1916 463 Camel transport 464 3 ALHB Wireless Station. Col Scott 9 LH got DSO on this stunt (MUCK SHUBE) 465 ALEXANDRIA 466 Canal Hospital Ships 467 Ambulance - Sand cart 468 At old Cairo 469 No 1 Casualty Clearing Station 470 3rd Brigade on move 471 3rd LHFB- Making camp SERAPIUM 472 Watering horses 473 Moving up wadi 474 The wells at Wadi GHUZZEE 475 Camel transport SINAI 476 Turkish reservoir destroyed by ALH 477 Wall in a Luxor tomb 478 Entrance to "Temple of Bulls" 479 Bob White 480 Bedouin crops 481 Harem of Montazza, Turkish prince 482 Jack Holmes, Billy McGhee 483 MUDERIA, B Troop post 484 JIFF JAFFA 485 Natives on railroad construction 486 Aust graves SHALLAL 487 The Stumpy Mirror 488 R Nile at MANSUREH 489 Aust graves - BEELAH 490 NOUZEH Gardens - ALEXANDRIA 491 On issue from QMS. Take what comes. Fit does not matter 492 MATARA 493 German Yacht Club - ALEX 494 Old Turkish Howitzer and cannon ball 495 Field hospital 496 Gardens at BARAGE 497 A dispute's ending 498 Snow. MT LEBANON 499 Bedouin sheep 500 Combat in the air 501 no caption 502 Old Napoleon gun 503 Gordon Wake HQ car 504-5 Burying the dead at GAZA 506 Water Polo 507 Brigade boxing comp 508 Field cooker 509 Bridge on Jerusalem road, Blown up by Turks 510 Teaching horses to lay quiet. For protective purposes 511 "Major" and "Bitsy" 512 Bedouin Scarabs 513 Convalescent 514 1. W Billings. Returned to Aust 2. W McMahon KIA 515 Hospital 516 Coming good 517 1st day up - 14th AGH PORT SAID 518 Back again in Regt 519 Billy and Taffy 520 Stew 521 KHAN YUNIS 522 MENA 523 Casualties PORT SAID 524 Washing 525 Mail 526 Gun from the "Emden" mounted in Syney 527 MARSURES 528 Desert bivouac 529 HASSED 530 3RD ALH Bde. Good camp (Extra) All conv's 531 New issue 532 On to another camp (8 LH Regt) 533 Shore - JAFFA on MED SEA Photo Captions Volume 2 (Illegible = ?) 1 The Cedars on Mt Lebanon, according to tradition originated from the staves of the 12 Apostles 2000 years ago. 2 TIBERIUS taken 27th Sept '18 3 NAZARETH taken 20th Sept. German officer and Arab pony 4 TIBERIUS fell on 27th Sep. Von Saunders was the GOC of Turkish Forces in Palestine 5 Jordan Valley & Plains of Jericho run between Mts of Moab & Hills of Solomon. Distance across valley from foot of each range of hills abt 13 miles, looks ? 6 Storm on Sea of Galilee 7 DAMASCUS fell on 1st October. German vehicle park. 8 German funeral near Jerusalem 9 JENIN. German Headquarters. Fell 20th Sept. German field bakery 10 Three pages back will be seen a storm on GALILEE. Note now calm here. This photo taken near spot from which the previous one was taken. German motor launch on Galilee. 11 Captured intact on 20th Sept. German workshops JENIN 12 Turkish aerodrome captured here. Hostile aircraft landed whilst it was in our hands. Aviators greatly surprised and even indignant. Motor smash near EL FULE. 13 German Orderly Room (Ammunition box full of gold), DAMASCUS. All this gold Turkish coin secured by our troops. 14 German artillery on the way to the front near KENETRA. The ALH swooped down on the artillery around this vicinity & captured many field guns. 15 German Despatch Rider on the road to ES SALT. Unsuccessful raids carried out on ES SALT on 30th April & 4th May. This country was hard on men and horses. Goat tracks were used at times but horse were led most of the time. Stunt lasted 14 days in wet weather & horses were only unsaddled for about 2 hours during stunt. 16 Strand, ? , Tiberius, Gallilee 17 German workshop. Captured by ALH 18 One of the dead lying outside GAZA. Killed 19th April 17. We could not bury them before November 19 Some of the boys that fell in the charge at BEERSHEBA. Tibby Cotter 20 Collecting our dead for burial. They were K in A on the 19th April at GAZA. Buried seven months later, 23,000 casualties in one day 21 German U-Boat 22 Page of postage stamps and money - Struck to commemorate Gallipoli victory - Turkish war postage stamps - War duty - Turkish war bank notes 23 Pamphlet. With paper badges affixed These badges were worn by young Egyptian students. Arabic translation means "Egypt for Egyptians Long Live Egypt" This pamphlet was printed under German influence & distributed around ZAG-A-ZIG, the chief centre of hostilities during the recent Egyptian riots. The Young Egyptian Students influenced the Natives to oppose British Administration, what they called Tyranny. They professed to have sufficient competent educated men to govern their own affairs, but our Heads would not hear of it. Consequently the riots. Many ? and soldiers killed. All railways and communications disorganised. It took several months to bring things to their normal ? Pictures of medals 1. In honour of General Falkenhaugh GOC Turkish Forces 2. The Victorious Emperors of Germany, Austria and Turkey 3. Egypt Awakening 24 Those large photographs I sent you were procured for me by a pal who knew the chap that owned the negatives. The owner of these snaps belongs to the 5th Regiment of the 2nd Brigade, and he took the camera from a Turkish Officer. It had only 6 snaps of a spool of 10, and the BIll Jim finished off the spool by taking 4 of the special entry into Jerusalem. The cross indicates those taken by the Australian, the remainder were taken by the Jackos in the vicinity of BEERSHEBA and SHERIA Turkish field bakery 25 Cavalry going up to support their own line. However never had much action against the Turkish horsemen 26 Turkish Electricians in the field. I have an idea that this photo was taken to get the centre figure. He looks dinkum Australian. Note Australian leggings on Turk on the right 27 Turkish machine gunners ready for action. This is very much like the Beersheba country. Turkish officers on the right, and along side him is the range taker with his Barand Stroud. We use these instruments in the Sqn and they cost about 83 (Pound) 28 Turkish General Head Quarters just beyond SHERIA. Note hard rocky country 29 Turkish Cavalry watching a fight and getting ready to go into action. This is at SHERIA, and the heavy fighting lasted several days. Plenty of water and the Jacko's tried their hardest to hold on to this pozzie. Often our chaps met the gamer Turks in the dead of night, because both sides were on the same game, crawling down for water. This stunt is known as the Junction Fight. 30 Official entry Dec 11th. The official entry into Jerusalem. Sir G Allenby in the lead with his staff officers of the French and Italian troops accompanying him. Guard represents New Zealand, Australia, England Wales Scotland Ireland and India entering theJaffa Gate 31 Sir Ronald Storrs made Governor of JERU. Captured 9th Dec 17. Reading the Proclamation, General Allenby wearing white breeches. Troops of other nations were present, and the notables of Jerusalem. It was read from the foot of the Tower of David, a place that has been standing since the time of Christ 32 The first of the British troops entering Jerusalem. A few Turkish officers may b seen walking at the head of the column. Populace in a bad plight, very poor and no tucker, and all were greatly overjoyed at the ?? of the British Hundreds and kiddies ill treated ?? (Part of caption missing) 33 10th LH Regt first to enter JERUSALEM. Mounted officer on the right supposed to be the CO of the first troops to enter Jerusalem. Note mud on the horses. Had very wet and muddy weather 34 Dead Jacko 35 Turkish machine gun and crew 36 Hanging Armenian doctors who refused to join Turkish Army 37 Outside Damascus Gate Jerusalem 38 Turkish patrol lying outside trench at EL BUAJ 39 Burying Aussies at DAMASCUS 40 1. Djemel Pasha 2. General Limon Von Saunders GOC Turkish Forces in Palestine 41 One execution in Egypt. Executing an Egyptian offender 42 Turkish atrocities DAMASCUS 43 Turks occupying trenches outside JERICHO 44 On ASLUJ demolition stunt. Feeding and spelling. Arrived at Rendezvous too early 45 Turkish saw bayonet 46 Captured guns taken at BEERSHEBA & SHERIA 47 Our gunners obtained a direct hit on ammunition train 48 The large and small of the game. At GAZA. 74th CCS in background 49 Around JULIOUS. These Turkish shell dumps were very numerous around this vicinity 50 Captured Turkish Cavalry 51 Cavalry leaders 52 Turkish machine gun & crew 53 Enemy officers. One on left is wearing Iron Cross ribbon 54 Captured Austrian boat afire, Suez Canal Port Said. 40,000 cases of benzine aboard. Fire a mysterious outbreak 55 ? Hotchkiss gunners and enemy aircraft over ? TELL-EL-FARA 56 Types of enemy officers. One of our bikes in their possession. Recaptured later. The five pointed medals worn by these officers is called the Gallipoli Star. Issued to commemorate the Turkish victory at Gallipoli 57 Our batteries put in some good shooting amongst Turkish transport 58 Showing compactness of Turkish trenches 59 Desert homes. The only time we had cover in SINAI was when we camped near a Hod. Then we could use date palm leaves 60 JIFF JAFFA 61 ZAITZOUN 62 10th Regt MGS amongst hills outside JERUSALEM 63 Jews wailing place JERUSALEM 64-5 German post card characters 66 Post Card PHYLAE The Kiosk 67 Post Card Vue du Canal de Suez 68 Post Card No 93 Queen Street, Fort, Colombo 69 Snipers at NALIN Sth Syria. Lousy country for richochets. Nast wounds. (Aust War Memorial Melbourne) 70 Myself on Ginger. This little neddie is boshter jumper 71 Magazine cutting - Lt C H Vautin & German airman G Felmy 72 9th Regt 3rd LHB Judean Hills outside JERUSALEM. (Aust War memorial Melbourne) 73 Sand hills SINAI ? Desert (Aust War Memorial Melbourne) 74 3rd LHB spelling at GALILEE (AWM Melbourne) 75 Jordan Valley outside JERICHO (AWM Melbourne) - lovely Jordan Valley, dust and heat, 1280 ft below sea level 76 Copy of no 69 77 Watering at MATARIA 78 A desert grave - Tpr H R Olver MM 6th LH MGS Beneath this simple cross there lies a comrade true and tried He fought as fights a soldier And like a soldier died 79 B Section. When they first took our Stetsons and issued cumbersome helmets 80 Palestine types of Turkish and German officers 81 Some of the gunners amongst the snows in MT LEBANON 82 The country around JERUSALEM 83 JERUSALEM 84 Fishing ? ? at GALLILEE 85 Jerusalem taken Dec 9th. Official entry on the 11th. Jerusalem (showing) Holy City and Mosque of Omar 86 Turkish shell hits old tomb at ZERNUKAH. Capt Hurley official photographer - AWM Melbourne 87 14th AGH at PORT SAID 88 Human bones at Dead City ABBASSIA 89 3rd ALH Bde at HELIOPOLIS 90 Men wearing gloves 91 Wireless station in course of erection at MATARIA - 28 masts 92 Old slave market at ABBRASSIA. Many excavations performed on projecting wooden frame at corners 93 3rd guns on the move. The beautiful scenery between LATRON & JERUSALEM 94 Bedouin agents 95 Collecting captured enemy material 96 Captured double-engined plane 97 On the march. Country at Eastern SINAI 98 Anzac mosaic found at SHALLAL whilst trench digging now covered with gun etc ready for removal. Was sent to Canberra. 99 A Troop watering. A rotten job at a small well when horses are thirsty 100 The new Jericho road. Running through Hills of Solomon Valley in distance 101 Gun inspection 102 Draining pools at WADI AUJA. Keeping down Malaria carrying mosquitos 103 8th Regt and 3rd AMGS at BEELAH 104 A rendezvous in the Jordan Valley 105 2nd ALHB camped outside JERUSALEM 106 WADI AUJA in the Jordan Valley 107 Hospital train on the beach at EL -ARISH 108 Jacko's 109 Jerries 110 Stables of Turkish Headquarters SHALLAL 111 Early training. Every man to throw and quieten his horse for purpose of taking cover 112 A Troop 3rd Guns at TAALAT-EL-DUMM 113 Watering at WADI GHUZZEE 114 J Rushden KIA at ES-SALT 115 J Carling F Troop 3rd AMGS. Taken prisoner at EL-BURJ. Repatriated after Armistace 116 Captured enemy plane 117 Jacko gun 118 Brig-Gen Galloping Jack Royston. OC 3rd ALH Bde 119 Cleaning ammunition belts in the Hod at MASAID 120 Bringing up the fodder at ABBASSAN-EL-KEBIA 121 Some of the boys amongst the snow on MT LEBANON 122 Turkish barley crops at SHALLAL in Southern Palestine 123 The crops a few weeks after our horses had been in this vicinity 124 Clearing up after a stunt 125 On the move. 5 minute spells for the horses 126 In Jordan Valley. An airial torpedo lobbed amongst 3rd MG Transport horses & killed 28 127 Camel ration convoy coming along beach 128 Field Hospital at ET MALER 129 Desert graves at ROMANI 130 A day on the beach. Wash self, horse and clothing 131 Watering on the beach at BEELAH. Note how close fresh water is to the seashore 132 A patrol caught by a shell 133 Spello 134 Crossing the Wadi 135 Halt! Weights off and feed 136 Gas instruction 137 F Troop at TELL-EL-FARI 138 Xmas Dinner at MASAID 1916-17. Arrived back at this camp Xmas Eve after 5 nights & 4 days in saddle & the capture of MAGHDABA 139 Exercising along the beach at MARA-KHEB 140 Watering at a Bedouin well 141 At Sheikh's ZOWAID 142 3rd Gun Squadron at ABBASSAN-EL-KEBIR 143 Captured plane on its way to Australian Aerodrome 144 One of our planes about to pass over Hod 145 E & F Troop horse lines and horses 146 Sun set on Med Sea 147 Beach scene at EL-ARISH 148 Turkish transport. Small animals but they can pull big loads and they possess large hearts 149 The dressing station JIFF JAFFA ? 150-8 Types of Egyptian women - Nubian - Fellaheen - Sudanese - Low class Gippo - Egyptian - Middle Class -Egyptian Aristocracy - Turkish 159 French girls on beach at PORT SAID 160 Bedouin girls drawing water 161 Egyptian flappers at ALEXANDRIA 162 Post Card- Dame Turque 163 Post Card - Jeunne Fille Arabe 164 Graves of New Zealanders at RISCHON 165 Graves of Australians at DEIR-EL-BELAH 166 Race day. The saddling paddock 167 Bivouacs 168 3rd ALH Brigade at TRIPOLI 169 Advance party putting down horse lines at KHAN YURIS 170 Breaking the desert monotony 171 WADI QUELT. Taken from one of its precipitous banks 172 Turkish stores on N shore of DEAD SEA 173 Watering at Solomon's Pools 174 Waiting for action at - ES DUN (AWM Melbourne) 175 Camel Corps in action SINAI (AWM Melbourne) 176 ALH Time to Camp (part missing) (AWM Melbourne) 177 3rd Machine Gun Squadron IBU-HARITH, Lieut Breed, McLeod, Guppy, Whyte 178 Cartoon sketch - "A Digger" 179 Turkish Cavalry 180 Gun crew of No 2 Sub F Troop, 3rd Gun Sqdn 181 Operating base of JIFF JAFFA stunt 182 One of the British war boats that cooperated with the Land Force 183 Military railway line passing through a Hod in SINAI 184 AL-MINAH The sea port of Tripoli, Syria 185 NAZARETH Taken on 20 Sep 18 186 The Monastery on the Mt of Temptation, Taken from a cave on opposite hill. 187 JAFFA From the beach 188 In Monastery on the Mt of Temptation Rock on which Christ spent his 40 days 189 Cross indicates Garden of Gethsemane. Arrow at Russian Church of St Magdalene. MT of Olives on left 190 The Roman Bath at MONTAZAH. Hewn out of solid rock 191 Mine sweeper ashore near SHEIK'S ZOWAIL 192 Throwing "Chester" for an operation 193 The swimming pozzie at LAKE TIMSAH, ISMAILIA. Half a mile from MOASCAR, the Aust Training Depot 194 The remains of Napoleon's road. Portions can be seen running between BEELAH & GAZA 195 Camels utilised for ambulance work 196 TULKERAM taken on 19th Sep. This stunt started the previous night and this position fell to us the first day. About 60 miles from starting point 197 German officer at mess, JERUSALEM 198 German Headquarters SEMAK 199 TIBERIAS 200 Water preservation scheme at SHALLAL 201 A dip in the Jordan River. Crossed river on night 21-22 April 18 202 Watering and a wash up 203 JERICHO Taken on 21 Feb 18 204 Turkish graves 205 KHAN YUNIS. Southern Palestine, Note how sand ridges from the beach meet vegetation area. Fertile land 20 miles in width. the beginning of PHILISTIA 206 TAUBE-OVER 207 Drawing drinking water in Wadi GHUZZEE 208 The swimming pozzie in JORON 209 Landing stores at EL-ARISH 210 A camp near the wadi 211 Railway line and bridge crossing wadi above SHALLAL 212 The mid-day halt 213 Turks and Aussies at Dressing Station on beach 214 Washing day 215 Bringing supplies ashore 216 Trying mules in a 60 pounder 217 The desert winds have blown away and left this piece standing 218 Pontoons used by the Turks in their attempt to cross Suez Canal Feb 15 219 "HASSEIN" 220 "GIPPO" Mascot of 3rd AMG Sqdn 221 "Biddy" 222 Railhead camp 223 Typical Bedouin 224 Motor Submarine chaser dvr whyte, photos, ww1, light horse field ambulance -
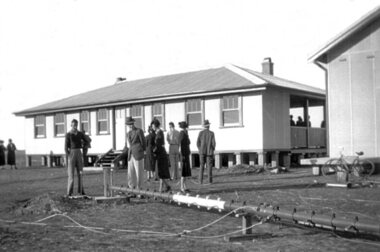 Nhill Aviation Heritage Centre
Black and white photograph, Local photograph. Original of this scan held by Nhill Historical Society, Aeradio Building c1937
... signalling and meteorology equipment aimed at providing safer navigation for aircraft travelling throughout Australia. The facility closed in the 1960s This photo is significant due to it having been taken soon after the building was constructed. It is the earliest known photograph taken on an open to the public day ...This building is still intact at the Nhill Aerodrome. Some of the infrastructure is also in place or can be evidenced by its foundations.The Aeradio building was built on the present aerodrome in 1937. This was one of only sixteen buildings of this type built across Australia and it housed radio communications and guidance equipment. The building and its equipment were part of a comprehensive system of radio towers, signalling and meteorology equipment aimed at providing safer navigation for aircraft travelling throughout Australia. The facility closed in the 1960sThis photo is significant due to it having been taken soon after the building was constructed. It is the earliest known photograph taken on an open to the public day before the receiver aerials were erected.The Aeradio building was built on the present (2012) aerodrome in 1937 or 1938. This was one of only fifteen buildings of this type built across Australia and it housed radio communications and guidance equipment. The building and its equipment were part of a comprehensive system of radio towers lights and signalling equipment aimed at providing safer navigation for aircraft travelling throughout Australia. The facility closed in the 1960sphoto, aeradio, early, civil aviation, dca, dept of civil aviation -
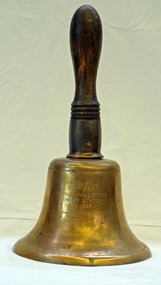 Orbost & District Historical Society
Functional object - Bell, hand-held, Early 20th century, c.1900s
... VictorianPlaces) The school bell is a signal that tells a school's students when it is time to go to class in the morning and when it is time to change classes during the day as well as when students are dismissed from school. ...The settlement of Cabbage Tree Creek is located on the Princes Highway, 27 km east of Orbost in East Gippsland. The creek, which flows through undulating forest, takes its name from the patches of Cabbage Fan palms growing along its course. A school commenced classes in 1913, but enrolment was small and at times the school operated part time with several other small schools in the area. The school building served as a hall for the district. About 1946 two sawmills commenced operations at Cabbage Tree Creek, and the Forests Commission ranger was stationed in the area. The increased population allowed the school to have more teachers and make improvements. In 1953, a new prefabricated building was erected on a new site. However, by the 1970s employment in the timber industry was unstable and the population decreased. By 1974 the school again had only one teacher and eventually closed in 1993 to amalgamate with the Orbost primary School in Ruskin Street, Orbost. (Ref. VictorianPlaces)The school bell is a signal that tells a school's students when it is time to go to class in the morning and when it is time to change classes during the day as well as when students are dismissed from school. In most schools today it will be a tone, siren, electronic bell sound, a series of chimes, or music played over an intercom but often still called "the school bell". This item reflects the history of Cabbage Tree Creek as well as the technological changes in the school system.Brass bell with incised double lines on bottom edge and top near handle, featuring descriptive notation on front face. Bell has long wooden handle shaped and incised with four lines at base before brass housing with singular screw holding handle in place. Object is showing signs of wear, with blackened handle and patches of green oxidisation.SCHOOL BELL / SS No 3812 / CABBAGE TREE CREEK / PRIMARY SCHOOL / 1913-1993 / FORMALLY INCORPORATED / INTO / ORBOST / PRIMARY SCHOOL / 1994cabbage tree, east gippsland, cabbage tree creek, cabbage tree creek primary school, orbost primary school, school bells -
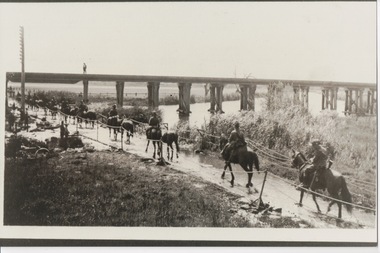 Lara RSL Sub Branch
Photograph, Set 4 photographs. and others for Torquay Light Horse camp, 1940
... Day, 1997, Sir John Young unveiled this plaque on Point Danger, Torquay. Torquay history, Light Horse Training Camp, WW2 Plaque at Pt. Danger Note----- (See images to view plaque) The plaque identifies a significant event in Torquay’s history and the sentiments of ‘change’ for the Light Horse Brigade – from horses to machines. In 1940 the four Light Horse Regiments (4th, 8th, 13th and 20th), some 5000 Light Horse and 2000 horses camped and trained at Torquay. Three other regiments, formerly mounted on horses, were also at Torquay ‘mounted’ on privately owned trucks and cars. Division troops included Artillery, Engineers, Signals...Day, 1997, Sir John Young unveiled this plaque on Point Danger, Torquay. Torquay history, Light Horse Training Camp, WW2 Plaque at Pt. Danger Note----- (See images to view plaque) The plaque identifies a significant event in Torquay’s history and the sentiments of ‘change’ for the Light Horse Brigade – from horses to machines. In 1940 the four Light Horse Regiments (4th, 8th, 13th and 20th), some 5000 Light Horse and 2000 horses camped and trained at Torquay. Three other regiments, formerly mounted on horses, were also at Torquay ‘mounted’ on privately owned trucks and cars. Division troops included Artillery, Engineers, Signals ...These images capture for all time Light Horsemen travelling through Geelong on their way to camp at Torquay for the last Group meeting in Australia . information following - details obtained from .........https://torquayhistory.com/light-horse-brigade/ On Australia Day, 1997, Sir John Young unveiled this plaque on Point Danger, Torquay. Torquay history, Light Horse Training Camp, WW2 Plaque at Pt. Danger Note----- (See images to view plaque) The plaque identifies a significant event in Torquay’s history and the sentiments of ‘change’ for the Light Horse Brigade – from horses to machines. In 1940 the four Light Horse Regiments (4th, 8th, 13th and 20th), some 5000 Light Horse and 2000 horses camped and trained at Torquay. Three other regiments, formerly mounted on horses, were also at Torquay ‘mounted’ on privately owned trucks and cars. Division troops included Artillery, Engineers, Signals, Field Ambulance and other branches of the Army necessary to enable a Division to function. It wasn’t just the sheer numbers of men coming to this little town that made the event significant, it was also the fact that the men of the Light Horse were dramatic, almost glamorous figures and it is easy to see their exploits as some splendid adventure. Horses have played a special role in the story of Australia. They were the only means of transport across this huge country, so it was necessary for everyone to have the ability to ride a horse. When war broke out in 1899 between Britain and the Boers of South Africa (“Boer” was Dutch for “farmer”) Australia sent troops to fight. At first Britain was wary of using untried, unprofessional colonial cavalrymen but soon saw that the slouch-hatted Australian “bushmen” were a match for the fast-moving and unconventional mounted commandos of the Boers. The Australians proved themselves to be expert rough-riding horsemen and good shots. Bush life had hardened them to go for long periods with little food and water. They also showed remarkable ability to find their way in a strange country and use its features for cover, in both attack and defence. By 1914, when Australia joined the war against Germany, there were 23 Light Horse regiments of militia volunteers. Many men from these units joined the Light Horse regiments of the Australian Imperial Force (AIF). Men were given remounts (if not using their own horses) – army horses bought by Commonwealth purchasing officers from graziers and breeders. These were called “walers” because they were a New South Wales stockhorse type – strong, great-hearted animals with the strains of the thoroughbred and semi-draught to give them speed, strength and stamina. On 1st November, 1914, Australia’s First Infantry Division and the first four Light Horse regiments sailed for England in a fleet of transport ships. The first of the Light Horse arrived at Gallipoli in May without their horses. Back with their horses after Gallipoli, they were formidable combatants across the Sinai and Palestine. Some British commanders observed that the light horseman moved with a “lazy, slouching gait, like that of a sleepy tiger” but described how the promise of battle “changes that careless gait, into a live athletic swing that takes him over the ground much quicker than other troops”. They had Light Horse, Torquay, training campdeveloped a reputation as formidable infantrymen. The Turks called them “the White Ghurkas” – a reference to their deadly skill with the bayonet. The Arabs called them “The Kings of the Feathers”. The plume had originally been a battle honour of the Queensland Mounted Infantry for their work in the shearer’s strike of 1891. During WW1 it was adopted by almost all the Light Horse Regiments. It was the proud badge of the light horseman. The most famous of their battles was the attack on Beersheba- the charge of the 4th Light Horse Brigade. Mounted infantrymen and their superb walers had carried out one of the most successful cavalry charges in history – against what seemed impossible odds. They surprised the Turks by charging cavalry-style, when they would normally have ridden close to an objective then dismounted to fight. The fall of Beersheba swung the battle tide against the Turks in Palestine; and changed the history of the Middle East. While 19 men from the Surf Coast Shire served with the 4th Light Horse over the course of WW1, only four were involved in the charge of Beersheba- John GAYLARD, Philip QUINN.(Winchelsea); Wallace FINDLAY (Anglesea); Harry TRIGG (Bambra). After the war, Light Horse units played a key role in the Australian Government’s compulsory military training programme. The Citizen Military Forces (C.M.F.) thrived on the glamour of the wartime Light Horse tradition, ignoring the possibility that motor vehicles would soon replace the horses. When training was no longer compulsory, the C.M.F. regiments declined and horses became more of a luxury during the 1930s depression years of poverty and unemployment. Some regiments were motorised. Then, in 1939, Australia joined Britain in another world war. Training was increased for the militia at both home bases and regional training camps. The camp at Torquay in 1940, commanded by Major General Rankin, was at Divisional strength. By the end of the camp some felt that the Division was ready for active service. Gradually, over the next four years, the Australian Light Horse units were mounted on wheels and tracks and the horses were retired. Six men enlisted at the Torquay camp and another 57 men and women enlisted at Torquay for service in WW2. Those who served in the Militia provided valuable Officers and NCOs and men for the armed services during the war. Each infantry division of the 2nd AIF had a Light Horse regiment attached to it. But the day of the Australian mounted soldier hadn’t quite passed. During World War II, Australia’s 6th Cavalry Regiment formed a mounted unit they called “The Kelly Gang” which did valuable scouting work. In New Guinea, a mounted Light Horse Troop did patrol duty and helped carry supplies. Some fully equipped walers were flown into Borneo for reconnaissance in rugged mountain country. But by the end of the war, in 1945, the horse had disappeared from the Australian Army. References: Australian Light Horse Association www.lighthorse.org.au National Australia Archives Australian War Memorial Surf Coast Shire WW1 memorials www.togethertheyserved.com The Light horse- a Cavalry under Canvas Light Horse, Training Camp, Torquay, WW2 Late in 1939 it was decided to set up a Lighthorse training camp in Torquay to train both men and horses for the battles of the Second World War. Horses, men and equipment came on special trains from all over Victoria and NSW, and as you would expect horseman came from areas such as Omeo and Sale, the Wimmera and the Western District. They arrived at the Geelong racecourse for watering in the Barwon River and then were ridden across the ford at the breakwater and began their 11 mile trek to Torquay. Light Horse, Training Camp, Torquay, WW2 Tent city By the end of January 1940 the camp at Torquay accommodated some 5000 men and 2500 horses of the Second Cavalry Division. The rows of horses, tents and huts near Blackgate Road were quite a sight. While the cavalrymen engaged in exercises on the land and on the beaches, many of the troops took over the Torquay School for special training of men and officers. Mr Bob Pettit local farmer and Councillor for the Barrabool Shire, wrote about the Light horse in the Surf Coast Community News in 1985 saying “They used to travel about the district riding four abreast in one long convoy. To my annoyance they went through my property and shut all the gates behind them. I had certain gates open to let stock in to the water holes and it would take me three -quarters of an hour to follow the horsemen up and put all the gates right again” he continued “the men from the Light Horse were here when the fire went through in March 1940. He recalled an incident when early one morning, as some one blew the bugle, a soldier putting a white sheet on the line frightened the horses. They panicked and ran off in all directions. Six went over the cliff near Bird Rock, five were never found, and the rest were gathered up after nearly a fortnight in the bush around Addiscott and Anglesea" Light Horse, Training Camp, Torquay, WW2, Geelong Parade Geelong parade The training camp culminated in a parade through the streets of Geelong on March 12th 1940. The salute was given at the Town Hall and the troops continued on a route to the You Yang’s for a training exercise. Note-----(see media section for photograph) The Camp was abandoned in mid 1940 as it was deemed unsuitable for training during winter and the cost of a permanent camp could not be justified if it could not be used all year. Historic.......Rare,,,Interpretive.Sepia photographs.set of four ....post card size ....Horses &LighthorsemenNo 1, Lighthorsemen Regiment Geelong 1940......No 2 Light Horse at Breakwater Geelong 1938 to 1940....No 3 Light Horse at Breakwater Geelong 1938 to 1940.....No 4 Light Horse crossing Breakwater camped at Geelong Showgrounds. These markings are on reverse of photographs.light horsemengeelong 1940., world war 2 -
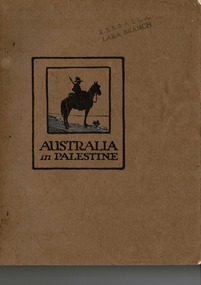 Lara RSL Sub Branch
Book, Australia in Palestine, 1919
... His fearlessness, initiative and endurance, and his adaptability to almost any task, are due to the adventurous life he leads in his own country where he has been accustomed to long hours in the saddle, day and night, and to facing danger of all sorts from his earliest youth. battle of beersheba battle of richon ze zion battle of bir er abd camel corps lighthorse slush light sir h.g. chauvel mounted division at kantara medical services signal engineers katia oasis new zealand mounted troops sir edmund h allenby walers story 5th lighthorse romani WW1 World War 1 Australian Army To the memory of fallen comrades. ...A soldier's book produced almost entirely by soldiers in the field under active service conditions to send to their friends in Australia and abroad. Australian Lighthorse men is a type peculiar his own and has no counterpart in h is NZ brother. His fearlessness, initiative and endurance, and his adaptability to almost any task, are due to the adventurous life he leads in his own country where he has been accustomed to long hours in the saddle, day and night, and to facing danger of all sorts from his earliest youth.Brown front and back hardcover with dark brown text 'Australia in Palestine' with a light horseman framed in centre of front cover. The spine is green with text Australia in Palestine, Angus and Robertson bottom of spine. Evidence of water on front cover. Silverfish have eaten top right hand corner of first two pages. Farm scene in four boxes with AR in the lower corner of each square. Inside front and back covers are illustrations of a camel train and came corps in the desert with the rising sun in the background with a mountain. There is a grave and white cross in their foreground right lower corner Illustrations, photographs, poems, short stories, Centre foldout of the Battle for Richon Le Zion and Battle of Beersheba and after the Battle of Bir El Abed To the memory of fallen comrades. Pen mark inside W. Mathews Larabattle of beersheba, battle of richon ze zion, battle of bir er abd, camel corps, lighthorse, slush light, sir h.g. chauvel, mounted division at kantara, medical services, signal engineers, katia oasis, new zealand mounted troops, sir edmund h allenby, walers story, 5th lighthorse, romani, ww1, world war 1, australian army -
 Lara RSL Sub Branch
Book, Signals - Story of the Australian Corps of Signals, 1953
... An outline of the Australian Signals Corps over the years from the campaign in the Middle East to the present day of the victories in New Guinea. ...Little has been written previously about this technical group of men and women and that their duties were under insurmountable difficulties which they faced and overcome in conditions that were encountered in the desert and jungle warfare. Without their constant and never ending services, the task of the force in bringing to a close this fight for freedom would have been greatly handicapped.An outline of the Australian Signals Corps over the years from the campaign in the Middle East to the present day of the victories in New Guinea. A tribute to the corps that stayed on duty every hour of every day providing and maintaining vital communication channels.Signals - Story of the Australian Corps of Signals. Green front and back hardcover with black text and insignia. Photographs, cartoons, illustrations and poems. The inside front and back covers have a photograph montage in green sepia.signal corps, wwii, c.h.simpson, motorcycle couriers, signals 7 australian division, lt.commander b.t.r chadd, palestine, spark plug, semiphore, morse code, field radio, a.i.f, british signals corps, pieter mersk, breconshire corp signals, new guinea, malaysa, singapore, switchboard, carrier pigeons, linesmen, gaza signal office -
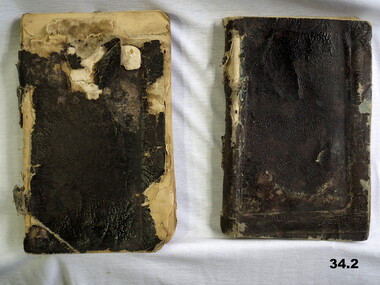 Bendigo Military Museum
Book - DIARIES, c.WWI
... Signal Coy 9.3.16. Embarked for France 2.6.1916. KIA Zonnebeke Belgium 23.9.1917. Horace Gibson was born in Bendigo. documents diaries personal notes records military history Inside cover of Volume 1: Horace Stanley Gibson, Clerk, Camberwell Victorian Railways Australia. Private address, c/o Mrs S E Gibson Barrell Street Eaglehawk, Victoria Australia. Diaries Volume 1 and Volume 2 are written in pen & ink, also contains sketches, names & addresses. Detailed account by day ...The diaries belonged to Horace S. GIBSON, clerk with the Victorian Railways, Camberwell, No. 1817, 4th Div. Signal Coy. (Born Bendigo, enlisted Melbourne) on 6.7.1915 in the 12th reinforcements 1st Div Signal Coy. Embarked for Egypt 9.11.1915. Transferred to 4th Div Signal Coy 9.3.16. Embarked for France 2.6.1916. KIA Zonnebeke Belgium 23.9.1917. Horace Gibson was born in Bendigo. Diaries Volume 1 and Volume 2 are written in pen & ink, also contains sketches, names & addresses. Detailed account by day of the weather & what was eaten for each meal, as well as training, the war up to the morning he is killed in action.Inside cover of Volume 1: Horace Stanley Gibson, Clerk, Camberwell Victorian Railways Australia. Private address, c/o Mrs S E Gibson Barrell Street Eaglehawk, Victoria Australia. documents, diaries, personal notes, records, military history -
Werribee RSL Sub Branch
Book, Military History, SIGNALS STORY OF THE AUSTRALIAN CORPS OF SIGNALS, 1951 (exact)
... "SIGNALS" is an outline of the achievments of the Australian Corpf of Signals over the years from the campaigns in the Middle East to the present day of the victories in New Guinea. ..."SIGNALS" is an outline of the achievments of the Australian Corpf of Signals over the years from the campaigns in the Middle East to the present day of the victories in New Guinea. ..."SIGNALS" is an outline of the achievments of the Australian Corpf of Signals over the years from the campaigns in the Middle East to the present day of the victories in New Guinea. Itpays tribute to the Arm of the services which is on duty and maintainimng vital communication channels for the passage of signals traffic to the far-flung Headquarters and Units of the Australian Military Forces.'TO THE FALLEN" Front cover is embossed. The embossing is in silver. The embossung shows the Signal Corp emblem and title. world war two, signals, middle east, australian military forces, new, guinea, aaho 6 -
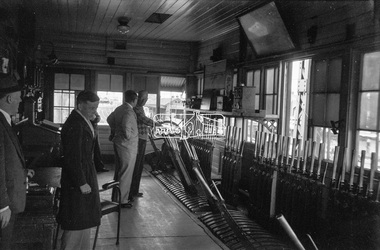 Eltham District Historical Society Inc
Photograph, George Coop, Newport Signal Box, Newport Railway Station, c.1951
... One of several photos at Newport taken the same day in the early 1950s when George Coop was a secondary school student. George Coop Collection Newport Railway Station Level Crossing Melbourne Road Newport Signal Box Digital TIFF file Scan of Kopdak 620 black and white negative transparency Newport Signal Box, Newport Railway Station Photograph Photograph George Coop ...Now demolished. Newport Railway station, visible through the windows was situated on the opposite side of the Melbourne Road level crossing. All of this infrastructure has since been replaced by a large overpass, the level crossing now the location of a pedestrain underpass. One of several photos at Newport taken the same day in the early 1950s when George Coop was a secondary school student.Digital TIFF file Scan of Kopdak 620 black and white negative transparencygeorge coop collection, newport railway station, level crossing, melbourne road, newport signal box -
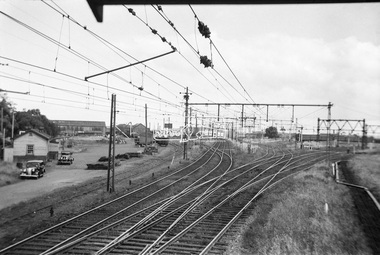 Eltham District Historical Society Inc
Photograph, George Coop, View looking south from the Newport Signal Box, Newport Railway Station, c.1951
... One of several photos at Newport taken the same day in the early 1950s when George Coop was a secondary school student. George Coop Collection Newport Railway Station Newport Signal Box Digital TIFF file Scan of Kopdak 620 black and white negative transparency View looking south from the Newport Signal Box, Newport Railway Station Photograph Photograph George Coop ...The pair of lines running to trhe left head to Williamstown. the central pair of lines are heading into the Newport Workshops and various stored trains are visible in the background and the pair of lines diverging to the right are heading to Geelong. One of several photos at Newport taken the same day in the early 1950s when George Coop was a secondary school student.Digital TIFF file Scan of Kopdak 620 black and white negative transparencygeorge coop collection, newport railway station, newport signal box -
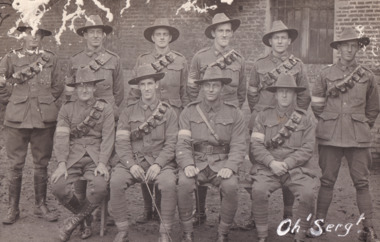 The Beechworth Burke Museum
Postcard, 1918
... This is due to the ongoing public and scholarly interest in war, history, and especially the ANZAC legend, which is commemorated annually on 25 April, known as ANZAC Day. military album army aif uniform military wwi world war i rising sun badge william archibald griggs anzac signal companies postcard patches chevron Obverse: Oh 'Serg!' ...It is believed that the photograph on the obverse side of the postcard was taken in 1918. Depicted are ten Australian male soldiers. Their names are transcribed in pencil on the reverse side of the postcard. Each soldier is dressed in a formal military uniform. It is believed that these soldiers were part of The Australian Imperial Force during World War I. This can be inferred by the chevron rank insignia visible on the uniforms of nine of ten men. The placement of this insignia on the sleeves of their right arms suggests that they were either Warrant Officers or Non-Commissioned Officers (NCO). Specifically, the number of chevron stripes - here, nine men have three - are believed to signify a Corporal rank. The men pictured on this postcard are also wearing 'Rising Sun' collar badges on their coats. Australia, unlike most other Commonwealth countries, did not adopt metal regimental badges during the First World War. All units were issued with the Australian Army General Service Badge, better known as the 'Rising Sun’ badge. This insignia is almost always identified with the Australian Imperial Force. Another characteristic of the Australian Imperial Force uniform are the rectangular colour patches worn by all men on this postcard. In March 1915, a new scheme of unit identification was devised to replace the wearing of unit titles. This consisted of cloth colour patches on the upper arms of a soldier’s tunic. The black and white nature of the record means that we cannot establish which battalion these soldiers were part of. However, one of the handwritten signatures on the reverse side of the postcard reads "W.A. Griggs". This was the signature of Sergeant William Archibald Griggs. Further research shows that Griggs was part of the 5th Australian Division Signals Company. Therefore, it is believed these soldiers were part of the ANZAC Signal Companies. The main role of the Signal Companies during World War I was the laying and maintenance of telephone cables and switchboards, used to connect various units in their area. Furthermore, the man standing in the back row, third from the left side, has an Overseas Service chevron patch on his coat. In January 1918, the Australian Imperial Force approved the wearing of the overseas service chevrons which had been adopted by the British Army. These were embroidered or woven inverted chevrons worn above the cuff on the right arm. Due to a shortage of supply, some men had chevrons privately made. For each year of war service, a blue chevron was awarded, and those men who had embarked in 1914 received a red chevron to indicate that year’s service; however, the black and white nature of the postcard makes it difficult to determine what colours are on this man's patch.The record is historically significant due to its connection to World War I. This conflict is integral to Australian culture as it was the single greatest loss of life and the greatest repatriation of casualties in the country's history. Australia’s involvement in the First World War began when the Australian government established the Australian Imperial Force (AIF) in August 1914. Immediately, men were recruited to serve the British Empire in the Middle East and on the Western Front. The first significant Australian action of the war was the Australian Naval and Military Expeditionary Force’s (ANMEF) landing on Rabaul on 11 September 1914. The ANMEF took possession of German New Guinea at Toma on 17 September 1914 and of the neighbouring islands of the Bismarck Archipelago in October 1914. On 25 April 1915, members of the AIF landed on Gallipoli in Turkey with troops from New Zealand, Britain, and France. This specific event holds very strong significance within Australian history. The record has strong research potential. This is due to the ongoing public and scholarly interest in war, history, and especially the ANZAC legend, which is commemorated annually on 25 April, known as ANZAC Day.Black and white rectangular postcard printed on paper.Obverse: Oh 'Serg!' / Reverse: CARTE POSTALE / 6537 / Correspondance / Adresse / w.a. Grigg / J. Fain / Ruckling / R.J Farrar / (?) / Clarke / L (?) / GFFisher / R. M. Forrest / With Compliments / Sgt's Mess / November 1918 /military album, army, aif, uniform, military, wwi, world war i, rising sun badge, william archibald griggs, anzac, signal companies, postcard, patches, chevron -
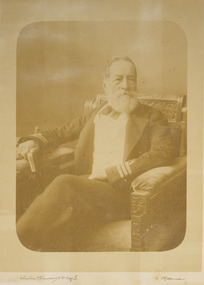 Mission to Seafarers Victoria
Photograph - Gelatin silver photograph, Johnstone O'Shannessy & Co, Commander Crawford Atchinson Denman Pasco, c. 1895
... On 7 April 1803 he was assigned to Nelson's flagship HMS Victory and was appointed as signal officer by Nelson on the day of the Battle of Trafalgar. ...On 7 April 1803 he was assigned to Nelson's flagship HMS Victory and was appointed as signal officer by Nelson on the day of the Battle of Trafalgar. ...Commander Crawford Atchinson Denman Pasco (1818–1898), Royal Navy, was member of the Mission's Committee. He was the son of Rea-Admiral John Pascoe (1774–1853) who served in the Royal Navy between 1784 and 1853. On 7 April 1803 he was assigned to Nelson's flagship HMS Victory and was appointed as signal officer by Nelson on the day of the Battle of Trafalgar. In this role he was to hoist the famous signal "England expects that every man will do his duty".Sepia tone photograph of man in uniform seating in armchaircrawford atchison denman pasco (1818-1898) -
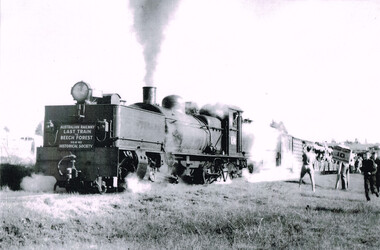 Otway Districts Historical Society
Photograph, Ray Jude, Tulloh: last passenger train to Beech Forest, 30 June 1962
... On this cold, gloomy day when it got back to Colac it signalled the end of narrow gauge operations in the Otway Ranges....On this cold, gloomy day when it got back to Colac it signalled the end of narrow gauge operations in the Otway Ranges. colac; beech forest; railway; tulloh; B/W. ...The last train ran to Beech Forest on 30 June 1962. It had a particularly motley look: 180 passengers were loaded into a series of NU goods wagons hastily fitted with temporary seats and, given the time of year, tarpaulin covers. The G42 locomotive had patched-up repairs and cannibalised G41 parts. Intending travellers faced up to the trip with some trepidation but the train made it with no problems. On this cold, gloomy day when it got back to Colac it signalled the end of narrow gauge operations in the Otway Ranges.B/W. Locomotive G42 with the sign "Australian Railway Historical Society, Last Train to Beech Forest, 30-6-62", an NC guard's van, a NU louvred van and many NQR open wagons, at a photostop near Tulloh. Several passengers taking photos while the driver is waiting to proceed.colac; beech forest; railway; tulloh; -
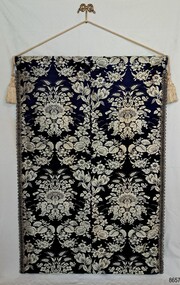 Flagstaff Hill Maritime Museum and Village
Textile - Wall Hanging, curtain, 1854-1855
... signal while on its way to Portland and, with the agreement of his passengers, rescued as many as possible from the Schomberg and returned to Melbourne with them. Captain Helpman, master of the steamer Champion, rescued most of the remaining Schomberg passengers on December 27. On Friday, 28th, Captain James Lawrence was on his way to Adelaide in the steamer Burra Burra, and called past the Schomberg. He reported that the remaining crew were all doing their duties, but the Schomberg was deteriorating on a sand spit and had about 16 feet of water in its hold. That same day...signal while on its way to Portland and, with the agreement of his passengers, rescued as many as possible from the Schomberg and returned to Melbourne with them. Captain Helpman, master of the steamer Champion, rescued most of the remaining Schomberg passengers on December 27. On Friday, 28th, Captain James Lawrence was on his way to Adelaide in the steamer Burra Burra, and called past the Schomberg. He reported that the remaining crew were all doing their duties, but the Schomberg was deteriorating on a sand spit and had about 16 feet of water in its hold. That same day ...The striking fabric of this wall hanging was recovered from the sinking Schomberg. It was originally one of the many curtains adorning the captain’s cabin and ladies’ saloons that attracted first-class passengers to this luxury vessel, built for comfort and speed. The clipper ship was on its maiden voyage, full of passengers emigrating to Australia in 1855. Its commander was Captain James Nicol Forbes, who had been selected by James Baine & Co for his navigation skills, experience, and reputation for breaking sailing records. However, on December 26th, 1855, the vessel became stranded and sank west of Cape Otway, not quite reaching its destination of Melbourne. A reporter explored the Schomberg before its journey; the following detailed description is an excerpt of his article published in a newspaper after the disastrous voyage was announced. “ … descending by a flight of stairs, covered with carpet of a very rich pattern, we came to the saloon passengers’ cabin. This is a noble place, and all that refined taste would suggest has been done to make each berth a miniature palace. The bedding is of the very best material, and the fittings are replete with every convenience. The carpets are of various coloured velvet pile, and the curtains are of satin damask, lined with white satin … The fronts of the berths are highly decorated, and festoons of flowers are painted on the panels … No two berths are furnished with the same-coloured material … the visitor is, therefore, much pleased with the variety which he has to inspect….” (Trove: Shipping Gazette and Sydney General Trade, 31 Dec 1955, p. 283) The curtain material, ‘folded into a single piece and parcelled for protection’, has been passed down through generations of Captain Forbes’ relatives, starting with his half-sister Isabella Jeffrey Nicol. The curtain has remained with the family, although some transition details are incomplete. About a century later, Isabella and Blakiston Robinson’s great-grandson and his wife had the fabric professionally mounted as a wall hanging to showcase the beauty of the woven brocade. Eventually, the custodianship of the curtain was transferred to the donor, who is also a great-grandson of Isabella and Blakiston. He and his wife hung the curtain on the wall of a high-ceilinged room in their home, away from direct light, making it visible for all to appreciate its beauty and significance. In 2024, they donated the curtain for inclusion among the collection of artefacts that help tell the story of the Schomberg and those who sailed on its first and last voyage. The donor’s aunt was highly involved in the family’s history. She had collected and recorded information that dates back to pre-1341. A footnote included in a handwritten letter dated April 20, 1959, from the late Arthur William Rudd, OBE, MA, LLB, husband of another of the donor’s aunts, states, “The curtains you mentioned came from the Schomberg. AWR.” CAPTAIN JAMES NICOL FORBES (1821-1874) and the donor’s family: - Captain Forbes was born in Aberdeen. In his late teens, he moved to Liverpool, a hub for international trade and an emigration port. By the age of 25, he was master of the Prince of Waterloo and later, the Wakefield. He then commanded the Cleopatra for the James Baines Co., which, two years later, transferred him to command the Maria, providing fast and lucrative passage to the gold fields in Ballarat, Australia. James Baines Co. and shipbuilder Thomas Mackay formed the Black Ball Line of clipper ships in 1852. Forbes was appointed master of the largest ship in the fleet, the marvellous Marco Polo. He broke the record time for the passage to Australia, taking only 68 days at sea, and the return journey in only 76 days, a total of 5 months and 21 days. On his second voyage to Melbourne in the Marco Polo the following year, he took 75 days, and 95 days on the return trip. His accomplishment made him famous. James Baines reported that the Marco Polo was the only ship, sail or steam, to do the round trip within 6 months, and it had done it twice. Captain Forbes then took command of the American-built clipper Lightning, one of four built for the Black Ball line. His 19-year-old half-sister, Isabella Jaffray Nicol, was also onboard when he sailed for Melbourne in 1854. During the 77-day voyage, Isabella met Blakiston Robinson, and not long after the ship arrived in Melbourne on July 31, the couple married, with James Nicol Forbes as a witness, on August 16. When Forbes returned to Liverpool, he took a record-breaking 63 days, which has never been bettered. James Baines Co. ordered a new luxury emigrant ship from Alexander Hall of Aberdeen; the Schomberg was the largest sailing ship ever built in Britain. On October 6, 1855, the vessel departed Liverpool commanded by Captain Forbes, with 430 passengers on board, 54 of whom were First Class. It had almost completed its voyage to Melbourne when, on the night of December 26, it ran aground west of Cape Otway. Captain Doran, master of the steamer Queen, responded to the distress signal while on its way to Portland and, with the agreement of his passengers, rescued as many as possible from the Schomberg and returned to Melbourne with them. Captain Helpman, master of the steamer Champion, rescued most of the remaining Schomberg passengers on December 27. On Friday, 28th, Captain James Lawrence was on his way to Adelaide in the steamer Burra Burra, and called past the Schomberg. He reported that the remaining crew were all doing their duties, but the Schomberg was deteriorating on a sand spit and had about 16 feet of water in its hold. That same day, the schooner Jane Elizabeth collected 220 packages of passengers’ luggage to deliver to Melbourne on the 29th. Two steamers also arrived on the 29th with 20 men to collect passengers’ luggage and valuable ship’s cargo items. They were accompanied by water police, customs agents, company representatives and a Lloyds agent. The decision was made to abandon ship on the 30th due to rough and unsafe conditions. The officials and Captain Forbes voyaged to Melbourne, while the seamen remained behind awaiting rescue. Evacuation by sea became too risky, so on January 2, 1856, while the first Mate and Steward remained at the wreck site, the rest of the crew began the 70-mile march to Warrnambool, led by the band. They arrived on January 5th and left for Melbourne on the steamer Champion on January 10th. Parts of the Schomberg wreck ended up in New Zealand. The curtain is important for its connection to the Schomberg, which was unique for being designed and built in Aberdeen, and commanded by an Aberdonian who was the most celebrated clipper captain of the age. The ship was the largest sailing ship ever built in Britain, and reported as the largest vessel that sailed to Australia. The curtain is an example of the rich decorative furnishings available in 1855. The preservation and respect the donor and his family have shown towards the curtain over many decades reflect its important role in telling the family’s history; the journey, the romantic attachment, the family connection to the sea, and travel in gold rush times. The curtain is significant for its connection to James Nocol Forbes, a famous sailing ship commander who broke several sailing records, one of which has never been bettered. This wall hanging, also known as the Schomberg Curtain, was created from a curtain recovered from the stranded luxury ship Schomberg in December 1855. The woven satin damask fabric in blue and cream has been meticulously joined to blend the intricate pattern. The reverse features a soft cream lining. The hems at the top and bottom of the fabric hold wooden rods. The side edges feature decorative braid that has been hand-stitched in place. On the reverse, the bottom hem includes the same braid, which remains unseen from the front, and the centre of the top hem has a hand-worked, unused buttonhole. Each of the hems varies in depth. The curtain was tastefully mounted later to highlight the beauty of the original saloon curtain. A decorative twisted cord of cream silk threads, accented with gold highlights and decorative tassels, was coiled and attached to the ends of the top rod. The elegant display was completed with an ornate gold hook, chosen to complement the wall hanging.flagstaff hill maritime museum and village, great ocean road, shipwreck coast, shipwreck artefact, memorabilia, curtain, saloon curtain, schomberg, wall hanging, decorative object, domestic item, warrnambool, flagstaff hill, maritime museum, maritime village, maritime history, shipwreck, stranding, schomberg curtain, schomberg wall hanging, luxury ship, 1855, damask, silk damask, blue and cream, captain’s cabin, ladies’ saloon, clipper ship, migrant, emigrant, liverpool to australia, captain james nicol forbes, james forbes, captain forbes, bully forbes, james baines & co, james baines, cape otway, aberdeen, prince of waterloo, wakefield, cleopatra, maria, thomas mackay, black ball line, marco polo, sailing record, lightning, isabella jaffray nocol, blakiston robinson, alexander hall, steamer queen, captain helpman, james lawrence, steamer burra burra, steamer jane elizabeth, water police, customs agents, lloyds agent, ship’s band, walk to warrnambool, march to warrnambool, steamer champion, agnes nicol robinson, arthur william rudd obe ma llb -
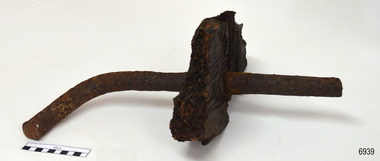 Flagstaff Hill Maritime Museum and Village
Functional object - Ship's nail in wood, Ca. 1855
... At dawn on the next day, the ship’s Chief Officer signalled a passing steamer, SS Queen, for help and all of Schomberg’s passengers were able to disembark safely. ...At dawn on the next day, the ship’s Chief Officer signalled a passing steamer, SS Queen, for help and all of Schomberg’s passengers were able to disembark safely. ...This ship's nail in a wood sample was part of the construction of the ship SCHOMBERG. About the SCHOMBERG- James Blaine’s Black Ball Line had commissioned the luxury sailing ship, Schomberg, to be built for its fleet of passenger liners The three-masted wooden ship was launched in 1855, designed by the Aberdeen builders to sail faster than the quick clippers designed by North American Donald McKay. The material used for the diagonal planking was British oak with layers of Scottish larch. The Schomberg’s master Captain ‘Bully’ Forbes commanded the ship on its maiden journey between Liverpool and Melbourne, departing on 6 October 1855 with 430 passengers and 3000 tons of cargo including iron rails and equipment intended the build the Geelong Railway and a bridge over the Yarra from Melbourne to Hawthorn. After sailing for 78 days she ran aground on a sand spit at Curdies Inlet near Peterborough, Victoria, on 27 December 1835. At dawn on the next day, the ship’s Chief Officer signalled a passing steamer, SS Queen, for help and all of Schomberg’s passengers were able to disembark safely. The passengers’ baggage and some of the cargo were later collected from the Schomberg. Local merchants Manifold & Bostock bought the wreck and the remaining cargo but did not attempt to salvage the cargo that was still on board. They eventually sold it and after two of the men drowned in the salvage efforts the job was abandoned. In 1975, divers from Flagstaff Hill, including former Director, Peter Ronald, explored the Schomberg wreck site and recovered many artefacts that are now on display at the Museum.The ship's nail in a wood sample is significant for its connection with the Schomberg, which is on the Victorian Heritage Register (VHR S612), has great historical significance as a rare example of a large and fast clipper ship that sailed on the England-to-Australia run, carrying emigrants at the time of the Victorian gold rush. She represents the technical advances made to break sailing records between Europe and Australia. Flagstaff Hill’s collection of artefacts from the Schomberg is significant for its association with the shipwreck. The collection is primarily significant because of the relationship between the objects, as together they can interpret the story of the ship, Schomberg. It is archaeologically significant as the remains of an international passenger Ship. It is historically significant for representing aspects of Victoria’s shipping history and for its association with the shipwreck and the ship, which was designed to be the fastest and most luxurious of its day.Ship's nail in a wood sample. The object was recovered from the wreck of the SCHOMBERG.flagstaff hill, warrnambool, maritime village, maritime museum, shipwreck coast, great ocean road, schomberg, clipper ship, black ball line, 1855 shipwreck, aberdeen clipper ship, captain forbes, peterborough shipwreck, ss queen, ship's nail, ship's wood, wood sample, ship construction -
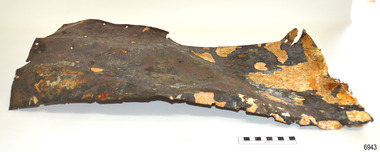 Flagstaff Hill Maritime Museum and Village
Functional object - Copper Sheathing, Ca. 1855
... At dawn on the next day, the ship’s Chief Officer signalled a passing steamer, SS Queen, for help and all of Schomberg’s passengers were able to disembark safely. ...At dawn on the next day, the ship’s Chief Officer signalled a passing steamer, SS Queen, for help and all of Schomberg’s passengers were able to disembark safely. ...This sheet of copper sheathing or Muntz metal has been recovered from the site of the wrecked ship Schomberg. It has been damaged by the reaction of the metals to the sea, it has encrustations from the sea such as sand, and another damage has caused the edges to break away or fold over. Early sailing ships had a problem of the timber hulls being eaten through by the marine animals called Teredo Worms, sometimes called ‘sea worms’ or ‘termites of the sea’. The worms bore holes into wood that is immersed in seawater and the bacteria inside the worms digest the wood. Early shipbuilders applied coatings of tar, was, lead or pitch onto the timber to prevent this. In the 18th and 19th centuries, the outsides of ships’ hulls were encased in either copper sheathing or Muntz metal, which is a combination of 60 per cent copper and 40 per cent zinc. The ships would be re-metalled periodically to ensure the sheathing would remain effective. In more recent times the ships are protected with a toxic coating. About the SCHOMBERG- James Blaine’s Black Ball Line had commissioned the luxury sailing ship, Schomberg, to be built for its fleet of passenger liners The three-masted wooden ship was launched in 1855, designed by the Aberdeen builders to sail faster than the quick clippers designed by North American Donald McKay. The material used for the diagonal planking was British oak with layers of Scottish larch. The Schomberg’s master Captain ‘Bully’ Forbes commanded the ship on its maiden journey between Liverpool and Melbourne, departing on 6 October 1855 with 430 passengers and 3000 tons of cargo including iron rails and equipment intended the build the Geelong Railway and a bridge over the Yarra from Melbourne to Hawthorn. After sailing for 78 days she ran aground on a sand spit at Curdies Inlet near Peterborough, Victoria, on 27 December 1835. At dawn on the next day, the ship’s Chief Officer signalled a passing steamer, SS Queen, for help and all of Schomberg’s passengers were able to disembark safely. The passengers’ baggage and some of the cargo were later collected from the Schomberg. Local merchants Manifold & Bostock bought the wreck and the remaining cargo but did not attempt to salvage the cargo that was still on board. They eventually sold it and after two of the men drowned in the salvage efforts the job was abandoned. In 1975, divers from Flagstaff Hill, including former Director, Peter Ronald, explored the Schomberg wreck site and recovered many artefacts that are now on display at the Museum.The copper sheathing is significant for its connection with the Schomberg, which is on the Victorian Heritage Register (VHR S612), has great historical significance as a rare example of a large and fast clipper ship that sailed on the England-to-Australia run, carrying emigrants at the time of the Victorian gold rush. She represents the technical advances made to break sailing records between Europe and Australia. Flagstaff Hill’s collection of artefacts from the Schomberg is significant for its association with the shipwreck. The collection is primarily significant because of the relationship between the objects, as together they can interpret the story of the ship, Schomberg. It is archaeologically significant as the remains of an international passenger Ship. It is historically significant for representing aspects of Victoria’s shipping history and for its association with the shipwreck and the ship, which was designed to be the fastest and most luxurious of its day.Copper sheathing; rectangular sheet of copper, shaped for use on a ship's hull, buckled, with fibres protruding from one edge. The object was recovered from the wreck of the SCHOMBERG.flagstaff hill, warrnambool, maritime village, maritime museum, shipwreck coast, great ocean road, schomberg, clipper ship, black ball line, 1855 shipwreck, aberdeen clipper ship, captain forbes, peterborough shipwreck, ss queen, ship construction, copper sheating, sheathing, sea worm, muntz, muntz metal, copper sheathing, teredo worms, sea worms, sea termites, shipbuilding