Showing 9 items
matching northern terrazzo
-
 Bendigo Historical Society Inc.
Photograph - BENDIGO BUSINESSES COLLECTION: NORTHERN TERRAZZO
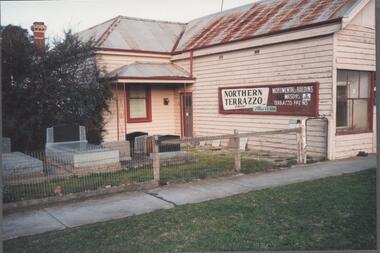
... BENDIGO BUSINESSES COLLECTION: NORTHERN TERRAZZO...northern terrazzo...Colour photograph of Northern Terrazzo business... BENDIGO Business northern terrazzo Colour photograph of Northern ...Colour photograph of Northern Terrazzo business in Carpenter Street, showing the house and a couple of display marble graves. The photo was taken in July 1993.bendigo, business, northern terrazzo -
 Bendigo Historical Society Inc.
Document - W. BABIDGE COLLECTION: WHERE TO SHOP IN BENDIGO AND SUBURBS
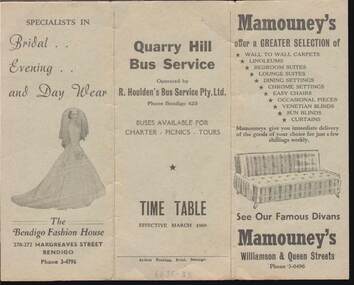
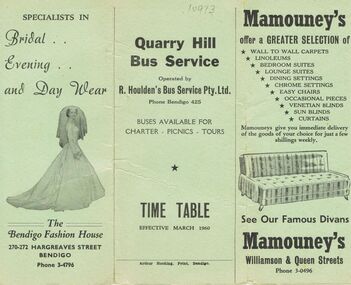
... Northern Terrazzo Co.... Chamberlin, Northern Terrazzo Co, Suttons Pty. Ltd., Bus Time Table.... Chamberlin Northern Terrazzo Co Suttons Pty. Ltd. Bus Time Table ...Pale green three fold card with the names, addresses, phone numbers, and goods which can be purchased at the businesses. Businesses named are: Fletchers International Food Store, T. Chamberlin, Northern Terrazzo Co, Suttons Pty. Ltd., Bus Time Table, Ashmans, Reg. V. Brock, Gillies Bros., Miller Bros., The Bendigo Fashion House, Quarry Hill Bus Service, Mamouney's. Printed by Arthur Hocking, Print, Bendigo. Bus Time Table effective March 1960.commerce, advertising, w. babidge collection - where to shop in bendigo and suburbs, fletchers international food store, t. chamberlin, northern terrazzo co, suttons pty. ltd., bus time table, ashmans, reg. v. brock, gillies bros., miller bros., the bendigo fashion house, quarry hill bus service, mamouney's. arthur hocking, print, bendigo, . -
 Bendigo Historical Society Inc.
Document - R.S.L. BENDIGO COLLECTION: BENDIGO R.S.L. NEWS VOL. 1 NO. 3
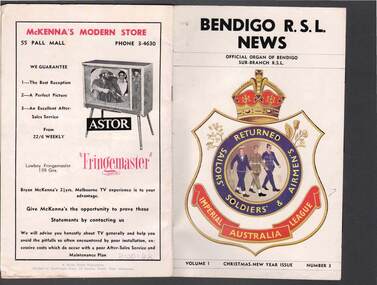
... Northern Terrazzo Co...-View Upholsterers Alwyn Nelson Northern Terrazzo Co L Fawssett ...Bendigo R.S.L. News Volume 1, Number 3 Christmas-New Year Issue. Red, blue, yellow and gold badge on the front cover. Contains advertisements from local businesses, Bendigo R.S.L. Office Bearers 1960, news, notes from Clubs, an article titled 'When the Japs Broke Out at Cowra' and a short obituary of Sir Horace Robertson.A Wicks Knott Publication, Printed by Southdown Press, 33 Rosslyn Street, West Melbourne.magazine, organization, bendigo rsl, r.s.l. bendigo collection - bendigo r.s.l. news vol. 1 no. 3, ashmans dry cleaners, h q radio service, f c straub, hampel furniture products, pierce grenfell, ron meurer, h w snell, axedale quarries, a l & k stringer, excavations, al & b g pearce, w mcculloch & co, bendigo motor co, m g taylor, fair-view upholsterers, alwyn nelson, northern terrazzo co, l fawssett & co, bendigo sub-branch r.s.s, &, a.i.l.a., col j w swatton, h a w morey, s thompson, g j baker, j k barnes, a c harridge, j harrison, t h hume, w h pinder, d e mcgregor, f e schilling, g g styles, c vaughan, j e fay, geo j baker, a v palmer, n mclaren young, e m vains & co, g e h rowell, a v & l e smith, j r palmers, graham lowe refrigeration service, a w pulfer motors, b r burns, vic palmer, golden square dry cleaners, j w carter & sons, alltyre service pty ltd, ian wills, bill nicholls jack watts, the robyn, a g power, leo a hughes, bendigo manchester house, frank wilson, hesse bros, frank bouchier, your typewriter sales and service, tom heenan, win patten, bendigo legacy, r wilson, w e p carruthers, antonian café, kairn's auto-bits, cohns, jeffreys bread, 4th armoured regt social club, g e baldwin, bendigo & district ex-p.o.w. social club, w hargreaves, d gregor, bendigo r.s.l. ladies auxiliary, mrs h morey, mrs p floyd, mrs w hocking, mrs h sims, mrs t hall, rsl women's council of victoria, mr & mrsa kersting, w coates, a bolitho, w hocking, n mcivor, perretts, martin washington, e a bennett pty ltd, john burgoyne, 38th battalion (a.i.f.) social club, j plim c findlay, ex-navelmen's club, t staley, airforce association, a stevens, t grimes, rats of tobruk association, j ferguson, catholic war veterans' association, j noonan, t coppock, dads' association, w murphy, bendigo legacy club, win patten, t h iser, t h runnalls, legacy house, 105 anti-tank regiment social club, alwyn nelson, laurie townsing, bendigo repatriation local committee, v w hosking, w rex porter, g a pethard, f t dunphy, l m porter, e h duus, lt col thomas waitson williams dso, ric coulson, r ball & son, lorraine florist, neol searle pty ltd, bendigo and district t & p i social club, e j taylor, t wellins, w phelan, g keily, l boyd, t tuddenham, e butler, g armstrong, geo j baker, easter fair society, bendigo agricultural society, 6th battalion (a.i.f.) social club, f t dunphy, w green, r c wright, bendigo showgrounds r.a.a.o.c. camp club, j j davies, e p perrett, t g heenan, w rex porter, fred coulson, harry hall, alan bath, tom hume, ted commons, geo h baker, percy floyd, stan hunter, joe wagland, railway sub-section r.s.l., g brown, don chalmer pty ltd, bendigo timber co pty ltd, g p hyett, a w comber, w nichols, maurice f noonan, allans walk delicatessen, r b webb, jack l lyons, perrow, s paints, t c sheers, provincial motors (bendigo) pty ltd, banjo paterson, will ogilvey, ben hall, joe gardiner, major bob ramsay mc, 53rd batt., major e v timms, ww1, 2nd a.i.f., f m carson, tooranie house, brian abe, p e dunstan, a lam sun, don murray, windermere hotel, bendigo disposals, frank a hill & co, fitzpatrick's, sandhurst dairies pty ltd, m williamson, george symon's dairy, w h oakley, sir horace robertson, british commonwealth occupation forces, australian light horse, state savings bank, royal military college, golden fleece service station, j w williams, tomlins simmie pty ltd, clark king & co pty ltd, mckenna's modern store, bryan mckenna, wicks knott publication, southdown press -
 Ballarat Tramway Museum
Slide - 35mm slide/s, Travis Jeffrey, c1962
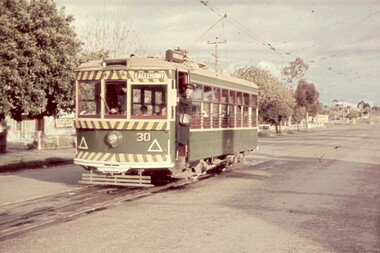
... . In the background is the premises for "Northern Terrazzo".... is the premises for "Northern Terrazzo". Slide 35mm slide/s Travis Jeffrey ...Agfa plastic mount (blue base, white cover) with a photo of Bendigo 30 at the Quarry Hill terminus. Tram has the destination of Eaglehawk . Conductor standing in the doorway for the photographer. In the background is the premises for "Northern Terrazzo"."BES 16" in penciltramways, trams, bendigo, quarry hill, tram 30 -
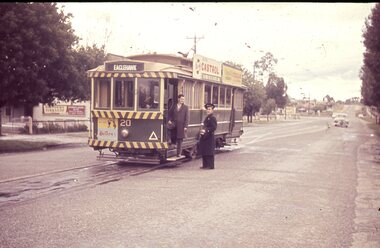 Ballarat Tramway Museum
Slide - 35mm slide/s, Travis Jeffrey, c1962
... for "Northern Terrazzo"..... In the background is the premises for "Northern Terrazzo". Slide 35mm slide ...Agfa plastic mount (blue base, white cover) with a photo of Bendigo 20 at the Quarry Hill terminus. Tram has the destination of Eaglehawk and has a Castrol Oil, and another company roof advertisements, with Huttons Ham advertisement on the dash panel. Conductor and another person (enthusiast) outside the tram, driver changing ends on the inside. In the background is the premises for "Northern Terrazzo"."BES 15" in penciltramways, trams, bendigo, quarry hill, tram 20 -
 Bendigo Historical Society Inc.
Document - CURNOW COLLECTION: BENDIGO BUSINESS FORMS, 1920 - 1930
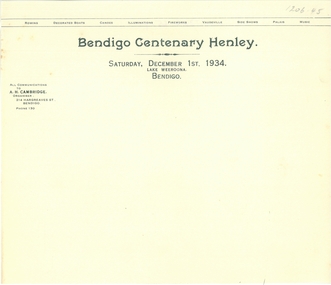
... ; Bendigo Tomato Products Co; Favaloro Bros; Northern Terrazzo Coy... Products Co; Favaloro Bros; Northern Terrazzo Coy; Leslie & Sons ...Collection of Bendigo business forms for the following: Bendigo Centenary Henley; J. H. Knight; J.W. & E.M. Davies; F.C. Cross Pty Ltd; Mason Bros; Nuttall, Clark & Co.; James Andrew & Co.; Bruechert's; Ellis, Nuttall & Co.; W.D.Mason Pty Ltd; Bendigo Tomato Products Co; Favaloro Bros; Northern Terrazzo Coy; Leslie & Sons; Cockings.person, individual, curnow collection, bendigo businesses -
 Ballarat Tramway Museum
Photograph - Digital image Set of 20, 1971-72
... at Quarry Hill with Northern Terrazzo in the background... with Northern Terrazzo in the background with the driver alongside .15 ...Set of 20 digital images of Bendigo Tramways, 1972 at or before closure while on a tram tour by Stuart Lodington. .1 - No. 29 at the North Bendigo terminus .2 - No. 29 just past the Bendigo end of the double track in High St Eaglehawk, with a BP dealer in the background. .3 - Night photo of No. 18 at a terminus, showing "Eaglehawk" .4 - ditto .5 - Night photo of No. 24 at Eaglehawk with Leo A Hughes Photographer in the background. The Tram has "Johnnie Walker whiskey" roof adverts. .6 - No. 29 outbound in Thunder St with a train passing over the bridge in the background. .7 - view from the front window of a tram on the Eaglehawk line with a large "display event float" in the foreground and tram approaching a crossing loop. .8 - No. 29 at North Bendigo .9 - view of High St Eaglehawk looking east from the terminus, showing the track and centre poles. .10 - No. 29 outbound on the North Bendigo line turning from either Nolan St or Caledonia St, running a special. .11 - No. 7 departing North Bendigo for Golden Square. .12 - No. 3 and 18 at Charing Cross. No. 3 has two SEC roof Advertisements .13 - No. 7 at North Bendigo with the trolley pole being reversed. .14 - No. 24 at Quarry Hill with Northern Terrazzo in the background with the driver alongside .15 - No. 7 and No.6 at Charing Cross with the Beehive buildings in the background. .16 - No. 7 at North Bendigo terminus .17 - ditto .18 - No. 24 at Quarry Hill with Northern Terrazzo in the background with the conductor alongside. .19 - ditto .20 - No. 26 and other bogie tram in View St near Charing Cross with the Armstrong Tyre Service building and signs for Cohn's Drinks and T&G in the view.trams, tramways, bendigo, eaglehawk, quarry hill, golden square, depot, north bendigo, charing cross, tram 29, tram 18, tram 24, tram 3, tram 7, tram 6, tram 26 -
 Bendigo Historical Society Inc.
Document - BUS SERVICE TIME TABLE, 1960
... . Monumental & Building Masons, Northern Terrazzo Co. Suttons Music... and sporting goods. Monumental & Building Masons, Northern Terrazzo Co ...BHS CollectionBus Service Time Table: Quarry Hill Bus Service operated by R. Houlden's Bus Service Pty Ltd. Phone Bendigo 424. Buses Available for Charter - Picnics - Tours. Time Table Effective March 1960. Advertising of the tri Fold Brochure is the Bendigo Fashion House 270-272 Hargreaves Street Bendigo Phone 3-47496. Mamouney's home furnishings, Williamson & Queen Streets Phone 3-0496.Fletchers International Food Store 344a Hargreaves St (Opp State Savings Bank) Phone 3-5684. Prime Poultry and Continental and Australian Delicacies. T. Chamberlin canvas and sporting goods. Monumental & Building Masons, Northern Terrazzo Co. Suttons Music Store. Ashman's Men's Shop. Reg. V. Brock Photography. Gillies Bros. Bakery. Miller Bros Deborah Stores Groceries. Box 625Arthur Hocking, Print, Bendigotransport, bus, quarry hill -
 Ballarat Tramway Museum
Photograph - Digital image Set of 20, 1971-72
... with Northern Terrazzo sign in the background. .15 - No. 24 at Quarry... - No. 18 at Quarry Hill terminus with Northern Terrazzo sign ...Set of 22 digital images of Bendigo Tramways, 1972 at or before closure while on a tram tour by Stuart Lodington. .1 - No. 7 arriving at North Bendigo .2 - No. 5 departing Charing Cross along View St, with a Firestone tyres in the background. .3 - front view of a tram in View St with a blurred background image. .4 - No. 24 showing Eaglehawk destination .5 - No 26 and 3 in View St, with the Armstrong Tyre Service building in the background and signs for T&G and Cohn's Drinks. .6 - ditto .7 - No. 3 arriving at Charing Cross from Eaglehawk in View St, with a Quarry Hill destination. .8 - No. 3 and 18 at Charing Cross. .9 - No. 24 on the Quarry Hill line. .10 - No 26 in View St, with the Armstrong Tyre Service building in the background and signs for T&G and Cohn's Drinks. .11 - ditto, with fountain in view, Colonial Mutual building and a newsagent with a Herald sign on the building. .12 - No. 7 at North Bendigo terminus .13 - ditto with pole being reversed. .14 - No. 18 at Quarry Hill terminus with Northern Terrazzo sign in the background. .15 - No. 24 at Quarry Hill terminus .16 - No. 18 arriving at Charring Cross, with Fountain Plaza and Bendigo Pharmacy in the background. .17 - No. 3 and 18 at Charing Cross. .18 - No. 7 at North Bendigo terminus with pole being placed on the overhead. .19 - No. 26 in View St inbound, with Sandhurst Trustees sign in the background. .20 - No. 6 leaving Charing Cross in Pall Mall with Myer and other buildings in the background. .21 - No. 7 at North Bendigo .22 - Single trucker with two roof Advertisements crossing View St with fountain in view, Colonial Mutual building and a newsagent with a Herald sign on the building.trams, tramways, bendigo, eaglehawk, quarry hill, north bendigo, charing cross, view st, tram 7, tram 5, tram 24, tram 26, tram 5, tram 3, tram 18, tram 6