
Showing 87 items matching "point bar"
-
 Ballarat Tramway Museum
Functional Object - Point Bar, State Electricity Commission of Victoria (SECV), 1960's
... Point Bar...This particular point bar was reportedly located at the Lydiard St. and Sturt St. intersection for use by inspectors and other tram crew to change the points at this intersection without obtaining a point bar from the tramcar itself. ...Functional Object Point Bar State Electricity Commission of Victoria (SECV) ...Length of 5/8ths of inch or approx. 15.5mm diameter steel bar, which has been heated and formed at one end to give an eye approx. 32mm internal diameter and hammered and ground to form a point edge at the opposite end forming a point bar. Used by Ballarat Tram crews to change tram track points. Standard equipment to all tramcars (two each). This particular point bar was reportedly located at the Lydiard St. and Sturt St. intersection for use by inspectors and other tram crew to change the points at this intersection without obtaining a point bar from the tramcar itself. Taken by a Brisbane Tramway Museum Society member at the time of closure. The point bar was repainted by the BTMS in the green colour scheme prior to presentation to the BTPS/BTM during the 1992 COTMA Perth Conference to Carolyn Dean. Handed to the Archives for collection on 18/6/2003.trams, tramways, track equipment, tram equipment -
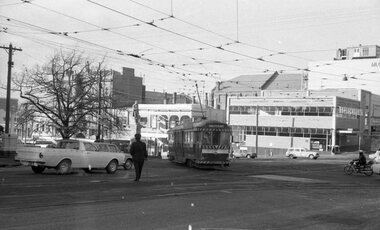 Ballarat Tramway Museum
Photograph - Ballarat Tram 39, Tram at the corner of Lydiard Street and Sturt Street, 10 August 1971
... ...point bar...In the foreground is a conductor with a point bar, used for changing direction of lines. ...In the foreground is a conductor with a point bar, used for changing direction of lines. ballarat tram 39 1914 duncan and fraser prahran and malvern tramways trust no.42 state electricity commission 1951 1971 lismore lions club recreational reserve 1976 to ballarat museum display souvenir centre 2022 item 10755 lydiard street sturt street robbie burns statue cooks private hotel commonwealth bank conductor point bar campbell duncan photographer . ...Ballarat Tram 39 was built in 1914 by Duncan and Fraser Adelaide for the Prahran and Malvern Tramways Trust where it was number 42. It was sold to the State Electricity Commission in 1951 and renumbered as Ballarat Tram 39. When the trams stopped running in 1971, it was acquired by Lismore Lions Club and displayed in a recreational reserve until purchased by the Museum in 1976. It was converted into a museum display and souvenir centre located at the depot until 2022. (See Item 10755 for return of 39 to Ballarat) The photograph shows Tram 39 turning from Lydiard Street North into Sturt Street South. The Robbie Burns statue is in the centre grassed area of Lydiard Street. In the background is the Cooks Private Hotel and the Commonwealth Bank, on the corner. In the foreground is a conductor with a point bar, used for changing direction of lines. Negative folder, paper. Photape Pty Ltd. containing six strips of 35mm negatives in plastic clear sleeve.ballarat tram 39, 1914, duncan and fraser, prahran and malvern tramways trust, no.42, state electricity commission, 1951, 1971, lismore lions club, recreational reserve, 1976 to ballarat, museum display, souvenir centre, 2022, item 10755, lydiard street, sturt street, robbie burns statue, cooks private hotel, commonwealth bank, conductor, point bar, campbell duncan, photographer, . -
 Ballarat Tramway Museum
Newspaper, The Courier Ballarat, "On Schedule...with a message", 9/06/1970
... Conductor standing in the doorway with a point bar. Tram has the destination of "Gardens via Sturt St." . ...Conductor standing in the doorway with a point bar. Tram has the destination of "Gardens via Sturt St." . ...Copy of the original newspaper cutting of No. 18 with anti-litter advertisement sponsored by Ballarat Jaycees, at Carlton St loop. "Keep Ballarat Beautiful" and "Electricity is Cleaner and Easier to Use" - indicating that the SEC may have sponsored the Advertisements on the tram. Conductor standing in the doorway with a point bar. Tram has the destination of "Gardens via Sturt St." . Title of cutting "On schedule...with a message" - A hand written note on the cutting above the head line gives the possible name of the conductor with the point bar as "Van Orshot". See item 3760 for a print of the photograph.Yields information about tram 18 and promotion of Keep Ballarat Beautiful campaign.Newspaper cutting from The Courier, 10/6/1970.in ink above the headline "Van Orshot"tramways, trams, carlton st, advertisements, jaycees, tram 18 -
 Ballarat Tramway Museum
Slide - 35mm slide/s, Mark Plummer, Sep. 1971
... Note tram stop sign and point bar. Kodak cardboard mount slide, taken Mark Plummer, September 1971...Note tram stop sign and point bar. Kodak cardboard mount slide, taken Mark Plummer, September 1971 Slide 35mm slide/s Mark Plummer ...Photo taken from the left hand side window of an inbound or eastbound tram, eastbound in Sturt St., nearing Lyons St. intersection. Note tram stop sign and point bar. Kodak cardboard mount slide, taken Mark Plummer, September 1971tramways, trams, sturt st, lyons st -
 Ballarat Tramway Museum
Negative - SECV Ballarat No. 31 turning from Lydiard St into Sturt St, Wal Jack, late 1940's or early 1950's
... In the background is the Robbie Burns statue, the inspector observing and holding a point bar. The Mechanics Institute, Beacham's Unicorn Hotel, and Ballarat Built Bicycles and a sign for Holland cycles....In the background is the Robbie Burns statue, the inspector observing and holding a point bar. The Mechanics Institute, Beacham's Unicorn Hotel, and Ballarat Built Bicycles and a sign for Holland cycles. ...Photograph of No. 31 turning from Lydiard St into Sturt St with the destination of Victoria St. In the background is the Robbie Burns statue, the inspector observing and holding a point bar. The Mechanics Institute, Beacham's Unicorn Hotel, and Ballarat Built Bicycles and a sign for Holland cycles.Yields information about the tram services and the Sturt St and Lydiard St intersection and the buildings behind.Negative and Digital image of the Wal Jack Ballarat Negative filetrams, tramways, sturt st, tram 31 -
 Ballarat Tramway Museum
Photograph - Digital image, 1970s
... Digital image, black and white, of the conductor on No. 18 standing along side with a point bar, to change the points before the tram goes out along Drummond St Nth. ...Trams tramways Hospital Corner Conductors Points Sturt St tram 18 Digital image, black and white, of the conductor on No. 18 standing along side with a point bar, to change the points before the tram goes out along Drummond St Nth. ...Yields information about Sturt St, Drummond St Jtn and the conductor changing the points.Digital image, black and white, of the conductor on No. 18 standing along side with a point bar, to change the points before the tram goes out along Drummond St Nth. Photo taken by Peter Bruce 1970's and 1971, prior to the closure of the Ballarat tramway system. Peter's Title of image: "No. 18 and Connie"trams, tramways, hospital corner, conductors, points, sturt st, tram 18 -
 Melbourne Tram Museum
Negative, Travis Jeffrey, 1/12/1959 12:00:00 AM
... On the side of the bundy clock could be a point bar clipped to the clock case....On the side of the bundy clock could be a point bar clipped to the clock case. Negative Travis Jeffrey ...Negative of tram 822 in Swan St Richmond, at Bendigo St. Tram has destination Wattle Park - Elgar Rd and Route No 70. Photo shows driver on road talking to conductor who is leaning out of doorway. Tram stop has a bundy clock. On the side of the bundy clock could be a point bar clipped to the clock case.Paper folder that contained the negative had "NR14A" written in red ink, "M14" written in pencil, "14A" written in blue ink, "P Ormond" written in purple ink and date stamped as 1 Dec 1959.trams, tramways, w5 class, swan st, crews, bundy clock, tram 822 -
 Ballarat Tramway Museum
Photograph - Digital image Set of 3, Richard Gilbert, BTPS volunteers shunting trams 27 and 28 at the former SEC Depot, Jan. 1972
... .1 - tram 27 in Wendouree Parade .2 - tram 28, damaged being towed across Wendouree Parade, with Rolf Jinks holding a point bar. .3 - ditto with Warren Doubleday in shorts and Clyde Croft in the drivers cabin. ....1 - tram 27 in Wendouree Parade .2 - tram 28, damaged being towed across Wendouree Parade, with Rolf Jinks holding a point bar. .3 - ditto with Warren Doubleday in shorts and Clyde Croft in the drivers cabin. ....1 - tram 27 in Wendouree Parade .2 - tram 28, damaged being towed across Wendouree Parade, with Rolf Jinks holding a point bar. .3 - ditto with Warren Doubleday in shorts and Clyde Croft in the drivers cabin. Was part of the process of setting up the depot for the Begonia Festival open day the BTPS held.Yields information about early BTPS activities at the former SEC Tram depot.Set of three digital images of the BTPS volunteers shunting trams 27 and 28 at the former SEC Depot, Wendouree Parade Jan. 1972. trams, tramways, btps, depot, wendouree parade, tram 27, tram 28 -
 Mont De Lancey
Tool - Hammer and Spanner Combination, Unknown
... A handmade steel hammer and spanner combination with a hooked pry bar point at the end of the handle. ...Spanners Wrenches Tools Farm equipment Steel Hammers A handmade steel hammer and spanner combination with a hooked pry bar point at the end of the handle. Tool Hammer and Spanner Combination ...A handmade steel hammer and spanner combination with a hooked pry bar point at the end of the handle. spanners, wrenches, tools, farm equipment, steel, hammers -
 Ballarat Tramway Museum
Slide - 27 mm sq slide/s, Lilian Butler, conductor 11 (R. Walker??) holding bag and cash tin, c1971
... holding bag and cash tin, marked 11C standing in front of No. 40 at the city terminus. Note the point bar in the bumper bar tow pin hole. Photo from the collection of Lilian Butler. ...holding bag and cash tin, marked 11C standing in front of No. 40 at the city terminus. Note the point bar in the bumper bar tow pin hole. Photo from the collection of Lilian Butler. ...Has a strong association with some of the Ballarat tram crews.Kodachrome colour slide, white cardboard mount of conductor 11 (R. Walker??) holding bag and cash tin, marked 11C standing in front of No. 40 at the city terminus. Note the point bar in the bumper bar tow pin hole. Photo from the collection of Lilian Butler. Names based on list given in Reg Item 3425. Person does not appear on photograph Reg Item 3425 ballarat, tramways, trams, crews, motormen, conductors, city, points, tram 40 -
 Ballarat Tramway Museum
Photograph - Photo of tram 18, Keep Ballarat Beautiful, The Courier Ballarat, 9/06/1970
... Conductor standing in the doorway with a point bar. Tram has the destination of "Gardens via Sturt St." ...Conductor standing in the doorway with a point bar. Tram has the destination of "Gardens via Sturt St." ...Photo taken by The Courier, taken on 9/06/1970, published 10/6/1970 of No. 18 with anti-litter advertisement sponsored by Ballarat Jaycees, at Carlton St loop. "Keep Ballarat Beautiful" and "Electricity is Cleaner and Easier to Use" - indicating that the SEC may have sponsored the Advertisements on the tram. Conductor standing in the doorway with a point bar. Tram has the destination of "Gardens via Sturt St." See item 3760A for the actual newspaper cutting.Yields information about tram 18 and promotion of Keep Ballarat Beautiful campaign.Black and White copy photograph by The Courier.tramways, trams, carlton st, advertisements, jaycees, tram 18 -
 Melbourne Tram Museum
Negative, Wal Jack, 4/01/1943 12:00:00 AM
... The driver of 118 has his handles and point bar in hand while attending to the pole. ...The driver of 118 has his handles and point bar in hand while attending to the pole. ...Black and white negative, by Wal Jack, of maximum traction tram N 118 (Kew Cotham Rd Route 69) and possibly CW5 682 passing. The driver of 118 has his handles and point bar in hand while attending to the pole. N 118 is on turning loop track at the intersection of Carlisle St and The Esplanade. Photo dated 4-1-43 in the Wal Jack album along with details of the location and the tramcar.trams, tramways, st kilda, the esplanade, route 69, carlisle st, n class, tram 118, cw5 class, tram 682, world war ii -
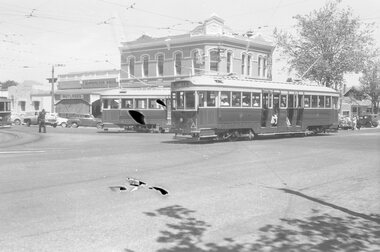 Ballarat Tramway Museum
Negative - Hospital corner - Drummond and Sturt Streets, Laurie Gallop, 1950s
... A conductor can be seen walking forward with a point bar. In the background is the sign for Rimmiington Bros Butchers and the Southern Cross Hotel. ...A conductor can be seen walking forward with a point bar. In the background is the sign for Rimmiington Bros Butchers and the Southern Cross Hotel. ...The photo shows three trams at Hospital Corner, during the mid to late1950s. Tram 35 turns from Drummond Street South on its way to Lydiard St North. Another bogie tram is turning into Drummond St South while No. 25 waits at the tram stop. A conductor can be seen walking forward with a point bar. In the background is the sign for Rimmiington Bros Butchers and the Southern Cross Hotel. The negative has been damaged - photographer unknown.Yields information about the tram operations at Hospital Corner Ballarat.Black and white Negative - 120 sizetram stops, tramways, sturt st, drummond st, tram 25, tram 35, conductor -
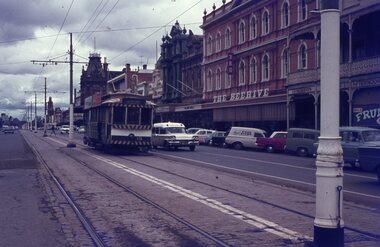 Ballarat Tramway Museum
Slide - 35mm slide/s, Travis Jeffrey, late 1960's or early 1970's
... No. 19 has two SEC roof advertisements. Note the point bar on the pole on the right hand side of the photograph....No. 19 has two SEC roof advertisements. Note the point bar on the pole on the right hand side of the photograph. ...Agfa plastic mount (blue base, white cover) with a photo of Bendigo No. 19 in Pall Mall, nearing Charing Cross. Tram has the destination of Golden Square Photo taken late 1960's early 1970's. Photo has the Beehive, the Shamrock Hotel in the background. Radio station 3BO can be seen on the Beehive building. No. 19 has two SEC roof advertisements. Note the point bar on the pole on the right hand side of the photograph."BES 35" in penciltramways, trams, bendigo, pall mall, beehive building, tram 19 -
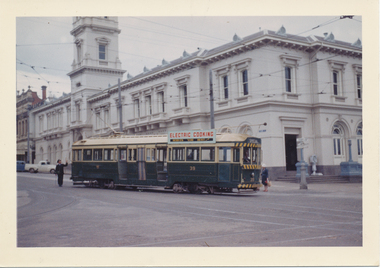 Ballarat Tramway Museum
Photograph - Colour Photograph/s, Travis Jeffrey, 6/11/1962 12:00:00 AM
... Appears that an Inspector is holding a point bar and holding the trolley rope prior to the wheel passing through the overhead pan or frog. ...Appears that an Inspector is holding a point bar and holding the trolley rope prior to the wheel passing through the overhead pan or frog. ...Colour photograph of Ballarat No. 39 starting the turn from Lydiard St. North into Sturt St. (north side) with the Post Office in the background. See also Reg. Item 2400. Tram has a SEC Electric Cooking roof advertisement at the leading end and destination of "Special". Appears that an Inspector is holding a point bar and holding the trolley rope prior to the wheel passing through the overhead pan or frog. Photo dated 6/11/1962. On Kodacolor paper."70Ed" in blue ink, date stamp 6 Nov 1962" in red ink.sturt st, sec, post office, lydiard st north, tram 39 -
 Ballarat Tramway Museum
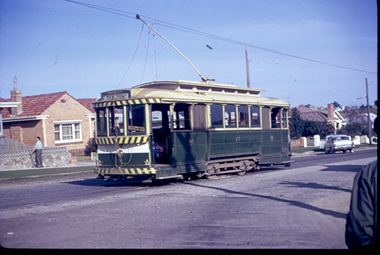
Photograph - Digital image, Joy Waller, 19/09/1971 12:00:00 AM
... One of the crew can be seen standing near a fence in the background, with a point bar in his hand. Several homes and motor cars can be seen. ...One of the crew can be seen standing near a fence in the background, with a point bar in his hand. Several homes and motor cars can be seen. ...Copy of a colour slide showing Tram 17 in Lydiard Street North, at the terminus. This photo is taken from further north than 6013. From the direction of the trolley pole it is preparing to head back into the city, however the destination board is reading View Point.. One of the crew can be seen standing near a fence in the background, with a point bar in his hand. Several homes and motor cars can be seen. The photographer says this was taken on the last day of trams in Lydiard Street in 1971. There are shadows of other photographers at the location.trams, tramways, ballarat trams, crews, houses, last day, lydiard st nth, secv tramways, street scene, terminus, tramway closure, tram 17 -
 Ballarat Tramway Museum
Photograph - Digital image Set of 2, George Coop, 1968 - 1970
... The short end of section pole is in the view with its point bar....The short end of section pole is in the view with its point bar. Photograph Digital image Set of 2 George Coop ...Yields information about the City tram terminus and its operation.Two (2) Digital images taken by George Coop during the period 1968 - 1970, of trams at the City Terminus, Sturt and Lydiard St North. .1 - No. 28 with the destination of Lydiard St North turns into Lydiard St from Sturt St. Tram has a SEC roof advert and Tristrams Bliss bombs (to read pack, tilt tram) roof advert. In the background is the Crockers Store. .2 - No. 17 at the terminus, with the destination of Victoria St. The short end of section pole is in the view with its point bar.trams, tramways, sturt st, city, lydiard st north, tram 28, tram 17 -
 Ballarat Tramway Museum
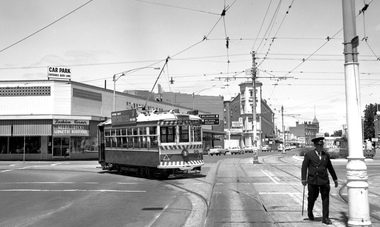
Photograph - Digital image, John Ward, 2/01/1972 12:00:00 AM
... In the foreground is the Inspector returning the point bar to its holder on a pole. Photo by John Ward 2-1-1972. ...In the foreground is the Inspector returning the point bar to its holder on a pole. Photo by John Ward 2-1-1972. ...Digital image of the Bendigo tram 29 turning from Pall Mall into Mitchell St with the destination of Railway Station. In the background is the Fountain Plaza, advertising Melba Frocks and Gidgette Boutique, the City Family Hotel, Park Lane chicken shop. In the foreground is the Inspector returning the point bar to its holder on a pole. Photo by John Ward 2-1-1972. Slide title "04771 020172 7210-F SECV Birney tram 29 Pall Mall to Mitchell St at High St & View St Charing Cross Bendigo Vic"trams, tramways, bendigo, pall mall, mitchell st, charing cross, tram 29 -
 Ballarat Tramway Museum
Negative - SECV Ballarat tram 25 - Made in Australia promotion, Wal Jack, 18/09/1958
... In front of the tram is a conductor with a point bar and a very cold looking driver with a great coat on. ...In front of the tram is a conductor with a point bar and a very cold looking driver with a great coat on. ...Photograph of No. 25 at the City Terminus, carrying banners for Made in Australia Week. In front of the tram is a conductor with a point bar and a very cold looking driver with a great coat on. Tram has a sheet with an Australian flag painted onto it, with holes made for the lights on the front of the tram, and three panels that have been fixed to the side of the tram. Tram has the destination of Victoria St. The Town Hall is in the background. Photo by Wal Jack 18-9-1958. See image i2 for rear of photograph. See image i3 for hi res scan of print. See image i4 for hi res scan of negative See Reg Item 7763 for another photo of the tram.Yields information about the appearance of No. 25 promoting Made in Australia week during 1958.Negative and Digital image from the Wal Jack Ballarat AlbumOn rear of photograph in ink "SEC, Ballarat No.25 with Made in Australia posters, Sturt St from Lydiard St 18th Sept. '58" and in top right hand corner, Wal Jack stamp with "T248" written in.trams, tramways, sturt st, advertisements, made in australia week, crews, conductors, drivers, tram 25 -
 Melbourne Tram Museum
Functional object - Model - Cooee N gauge W6 964 - keyring, Cooee Classics Pty Ltd
... At one end of the object, - tow bar point on the bumper bar is a small extension to allow for the fitting of a key ring. ...At one end of the object, - tow bar point on the bumper bar is a small extension to allow for the fitting of a key ring. ...Diecast and painted N gauge model of a Melbourne W6 or SW6 tram, made in China for Cooee Concepts. Painted in MMTB Colours with a Yarra Trams logo. The individual wheels rotate. On the original blister packaging, described as "W6 tram c1955"Demonstrates the work of the model maker.Diecast painted model of a W6 or SW6 tram - numbered 964 on the ends of the trams, with a Yarra Trams logo. Numbered 1955 on the underside. At one end of the object, - tow bar point on the bumper bar is a small extension to allow for the fitting of a key ring. The photo of the box that the item was sold in was supplied by a collector.models, cooee concepts, w6 class, trams -
 Ballarat Tramway Museum
Slide - Set of 8, Warren Doubleday, Ballarat - last day of the Mt Pleasant line, 5/9/1971
... dress shop in the background. 4 - Tram 30 in bound in Sturt near Doveton St with the Queen Alexandra Bandstand in the view. 5 - A busy Sturt St with three trams and people observing on a nice day. 6 - and now with five trams at Tramway or the City Centre - trams 39, 27, 12 7 - Tram 43 pulls into the stop at Sturt and Lydiard St, 8 -Turning into Lydiard St North with 39 behind - a man with a point bar and possibly the Inspector as well. ...dress shop in the background. 4 - Tram 30 in bound in Sturt near Doveton St with the Queen Alexandra Bandstand in the view. 5 - A busy Sturt St with three trams and people observing on a nice day. 6 - and now with five trams at Tramway or the City Centre - trams 39, 27, 12 7 - Tram 43 pulls into the stop at Sturt and Lydiard St, 8 -Turning into Lydiard St North with 39 behind - a man with a point bar and possibly the Inspector as well. ...Photos taken on the last day of the Mt Pleasant tram line 5/9/1971 1 - Tram 43 at the Gardens - trams reversed at this point and returned to Mt Pleasant. 2 - Trams 43, 13 and 14 in Sturt St West at the Russell St loop. 3 - Tram 13 in Sturt St, inbound with an ANZ bank and Miss Heidi? dress shop in the background. 4 - Tram 30 in bound in Sturt near Doveton St with the Queen Alexandra Bandstand in the view. 5 - A busy Sturt St with three trams and people observing on a nice day. 6 - and now with five trams at Tramway or the City Centre - trams 39, 27, 12 7 - Tram 43 pulls into the stop at Sturt and Lydiard St, 8 -Turning into Lydiard St North with 39 behind - a man with a point bar and possibly the Inspector as well. Behind are the Town Hall and the Myer store. Yields information about the last day of the Mt Pleasant tram line in Ballarat.Set of 7 Kodachrome colour slides - cardboard mountsHave the photographer's slide numbers written on them.trams, tramways, closure, lydiard st nth, sturt st, tram 27, tram 14, tram 13, tram 43, tram 39, tram 30, tram 12, sturt st west, russell st -
 Ballarat Tramway Museum
Negative, Campbell Duncan, 28/02/1971 12:00:00 AM
... Photograph of the intersection of the intersection of Webster St and Wendouree Parade, View Point with the milk bar on the right of the photo. ...Trams tramways Wendouree Parade View Point Webster St Photograph of the intersection of the intersection of Webster St and Wendouree Parade, View Point with the milk bar on the right of the photo. Taken 28/2/1971. ...Yields information about the appearance of Wendouree Parade at the intersection with Webster St.Photograph of the intersection of the intersection of Webster St and Wendouree Parade, View Point with the milk bar on the right of the photo. Taken 28/2/1971.trams, tramways, wendouree parade, view point, webster st -
 Ballarat Tramway Museum
Photograph - SECV Ballarat - operations - set of 16, George Stevens, 4/12/1968
... Set of 16 Digital images, from slides taken by George Stevens on 4/12/1968: 1 Tram 41 Lyons St, St Patricks Cathedral and two Johnnie Walker roof adverts 2 Trams 38, 40, 43 From Sturt St looking towards parkiing loop, with Dickins Food store 3 Trams 11, 42 Sturt and Lydiard Sts, No. 11 for Mt Pleasant, 42 for Lydiard St North, with point bar being put back' 4 Tram 43 just past Lyons St, tram has destination of Haddon St via Drummond Nth 5 Tram 18 At Armstrong St, tram to Victoria St' 6 Tram 41 At Sturt and Lydiard, showing City tram stop 7 Tram 18 Inbound 8 Tram 18 at Gardens Loop 9 Tram 12 Tram to Victoria St, has Twin Lakes and Pay as you enter sign 10 Tram 40 In Drummond St Nth 11 Tram 40 Turning from Barkly St to Main St 12 Tram 34 In Drummond St Sth to Sebastopol 13 Trams 34 & 37 Crossing 37 at Urquhart St 14 Tram 37 Drummond St Sth before Uqhart St loop 15 Depot with no trams on the fan 16 Tram 40 On depot fan with Eureka and SEC Roof adverts ...Set of 16 Digital images, from slides taken by George Stevens on 4/12/1968: 1 Tram 41 Lyons St, St Patricks Cathedral and two Johnnie Walker roof adverts 2 Trams 38, 40, 43 From Sturt St looking towards parkiing loop, with Dickins Food store 3 Trams 11, 42 Sturt and Lydiard Sts, No. 11 for Mt Pleasant, 42 for Lydiard St North, with point bar being put back' 4 Tram 43 just past Lyons St, tram has destination of Haddon St via Drummond Nth 5 Tram 18 At Armstrong St, tram to Victoria St' 6 Tram 41 At Sturt and Lydiard, showing City tram stop 7 Tram 18 Inbound 8 Tram 18 at Gardens Loop 9 Tram 12 Tram to Victoria St, has Twin Lakes and Pay as you enter sign 10 Tram 40 In Drummond St Nth 11 Tram 40 Turning from Barkly St to Main St 12 Tram 34 In Drummond St Sth to Sebastopol 13 Trams 34 & 37 Crossing 37 at Urquhart St 14 Tram 37 Drummond St Sth before Uqhart St loop 15 Depot with no trams on the fan 16 Tram 40 On depot fan with Eureka and SEC Roof adverts Yields information about the tramcars used on 4/12/1968 and the various locations around the system. ...Set of 16 Digital images, from slides taken by George Stevens on 4/12/1968: 1 Tram 41 Lyons St, St Patricks Cathedral and two Johnnie Walker roof adverts 2 Trams 38, 40, 43 From Sturt St looking towards parkiing loop, with Dickins Food store 3 Trams 11, 42 Sturt and Lydiard Sts, No. 11 for Mt Pleasant, 42 for Lydiard St North, with point bar being put back' 4 Tram 43 just past Lyons St, tram has destination of Haddon St via Drummond Nth 5 Tram 18 At Armstrong St, tram to Victoria St' 6 Tram 41 At Sturt and Lydiard, showing City tram stop 7 Tram 18 Inbound 8 Tram 18 at Gardens Loop 9 Tram 12 Tram to Victoria St, has Twin Lakes and Pay as you enter sign 10 Tram 40 In Drummond St Nth 11 Tram 40 Turning from Barkly St to Main St 12 Tram 34 In Drummond St Sth to Sebastopol 13 Trams 34 & 37 Crossing 37 at Urquhart St 14 Tram 37 Drummond St Sth before Uqhart St loop 15 Depot with no trams on the fan 16 Tram 40 On depot fan with Eureka and SEC Roof adverts Yields information about the tramcars used on 4/12/1968 and the various locations around the system.Set of 16 digital images scanned from slides.sturt st, victoria st, drummond st nth, depot, tram 41, tram 38, tram 40, tram 11, tram 43, tram 18, tram 12, tram 34, tram 37 -
 Ballarat Tramway Museum
Photograph - Digital image Set of 10, Tony Smith, 1971
... Note the conductor in the distance with a point bar about to hop onto the tram turning into Lydiard St North. ...Note the conductor in the distance with a point bar about to hop onto the tram turning into Lydiard St North. ...Yields information about Ballarat Tramways and trams prior to the closure of the tramway system.Set of 10 digital images of Ballarat trams prior to closure, scanned from original slides by Tony Smith, 1971 prior to closure of the system. .1 - 13 at the Parker St loop, Sturt St west waiting for another tram to arrive - Mercedes Benz car pull out around the stationary tramcar. .2 - 13 and another single trucker at the City terminus, north side of Sturt St. Note the conductor in the distance with a point bar about to hop onto the tram turning into Lydiard St North. Has the Post Office in the background. .3 - 26 arriving at the City stop, with the Mechanics Institute and Cooks Provide Hotel in the background. Tram has destination of Gardens via Drummond St North. .4 - 33 and 12 in Lydiard St Nth at Sturt St. 33 (Lydiard St Nth), 12 (Sebastopol). Has the post office and other buildings in the background .5 - 12 and 26 at city stop, south side with Town Hall and Myers in the background. 12 has destination of Sebastopol. .6 - 12 at intersection of Drummond St and Sturt St with Mobil petrol station in background and ad for Marshall batteries. Has the tram stop sign on the left hand side. Tram has destination of Sebastopol and a Twin Lakes sign. .7 - 30 northbound in Drummond St south at Sturt St about to turn into Sturt St. Has destination of Lydiard St Nth. Has the Southern Cross hotel in the background. .8 - 31 turning from Drummond St North into Sturt St, en route to Victoria St with the Shell service station in the background. Hospital Corner. Tram has roof advertisements for Johnnie Walker whisky. .9 - 30 and 31 (from above photos) in Sturt St. .10 - Tony Smith standing on the doorstep of 26 at Mt Pleasant terminus. Has the store in the background with The Sun and Robur tea adverts. trams, tramways, parker st loop, sturt st west, sturt st, conductors, drummond st, hospital corner, mt pleasant, tram 13, tram 26, tram 12, tram 30, tram 33 -
 Ballarat Tramway Museum
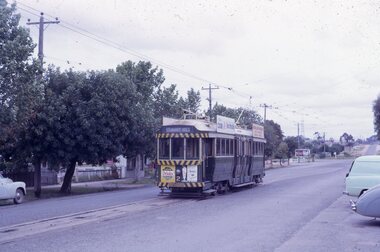
Slide - 35mm slide/s - set of 17, Noel Simons, 20/11/1962 12:00:00 AM
... No. 26 has a Sandhurst Milk and SEC 'Electric Cooking' roof ad. 1187.11 - close up of 22E maximum traction truck and folded footstep. 1187.12 - Bendigo No. 19 at Charing Cross terminus, after tram has passed photographer, showing destination of North Bendigo, with the Beehive building in the background and passengers boarding tram. 1187.13 - Bendigo No. 11, turning from View St. into Pall Mall, showing Special with the conductor holding point bar. Has the Beehive and Ezywalkin Buildings in the background. 1187.14 - No. 7 at Charing Cross terminus, in Pall Mall, bound for Golden Square. ...No. 26 has a Sandhurst Milk and SEC 'Electric Cooking' roof ad. 1187.11 - close up of 22E maximum traction truck and folded footstep. 1187.12 - Bendigo No. 19 at Charing Cross terminus, after tram has passed photographer, showing destination of North Bendigo, with the Beehive building in the background and passengers boarding tram. 1187.13 - Bendigo No. 11, turning from View St. into Pall Mall, showing Special with the conductor holding point bar. Has the Beehive and Ezywalkin Buildings in the background. 1187.14 - No. 7 at Charing Cross terminus, in Pall Mall, bound for Golden Square. ...Set of 17 transparencies taken on 20/11/1962 on Kodak mounts. 1187.1 - Bendigo No. 2 at the Quarry Hill terminus, showing destination of Quarry Hill. Has Cohns Drinks and Streets Ice Cream ads on dash panel, a SEC 'electric cooking' roof ad and another roof ad. Shows the Y terminus at this location, but tram standing just before it. Overhead in position. 1187.2 - as above, but closer up. 1187.3 - as above, but from the north side, showing cemetery in the background. 1187.4 - Bendigo No.3 at Eaglehawk terminus. Tram showing destination of Quarry Hill. Has the various buildings at Eaglehawk in the background including the Foodland store. Has Streets Ice cream and White Horse Whiskey ads on the dash panel. 1187.5 - Bendigo No. 18 at Garden Gully crossing loop, in bound, with destination of Eaglehawk. Passengers waiting for an Eaglehawk tram at the stop. Has a white horse whiskey ad on dash panel and SEC roof ads. Conductor standing in doorway looking out. 1187.6 - Bendigo No. 7 inbound in Nolan St. at cnr of McCrae St. showing destination of Golden Square. Has Streets Ice cream ad on dash panel and a Castrol Roof ad. 1187.7 - Bendigo No. 19 at the North Bendigo terminus with railway level crossing in background. Tram has a Cohns Drinks ad and an SEC 'Electric Cooking' roof ad. 1187.8 - Bendigo No. 2 at the Quarry Hill terminus, looking back into Bendigo, showing destination of Eaglehawk. 1187.9 - Bendigo No. 21 in McCrae St, near Nolan St outbound for North Bendigo. Photo taken after tram has passed photographer. 1187.10 - Bendigo Nos. 4 and 26 at Charing Cross in View St. with fountain alongside and the Beehive, Ezywalkin Buildings in the background. No. 26 has a Sandhurst Milk and SEC 'Electric Cooking' roof ad. 1187.11 - close up of 22E maximum traction truck and folded footstep. 1187.12 - Bendigo No. 19 at Charing Cross terminus, after tram has passed photographer, showing destination of North Bendigo, with the Beehive building in the background and passengers boarding tram. 1187.13 - Bendigo No. 11, turning from View St. into Pall Mall, showing Special with the conductor holding point bar. Has the Beehive and Ezywalkin Buildings in the background. 1187.14 - No. 7 at Charing Cross terminus, in Pall Mall, bound for Golden Square. Has the Beehive and Ezywalkin buildings in the background and passengers waiting at the tram stop. 1187.15 - No. 18 at the Charing Cross terminus, bound for Eaglehawk. Has the Beehive and Ezywalkin buildings in the background and passengers waiting at the tram stop. Also has the 'Safety Zone' sign in the photograph. 1187.16 - No. 2 at Quarry Hill terminus, night or dusk photo. Tram showing destination of Depot. 1187.17 - No. 26 at Charing Cross, night photo. Tram has destination of Quarry Hill, but is on the line for Eaglehawk. Photo looks along Mitchell St. Also shows Safety Zone sign. Information written on in black ink and date stamped on purple ink. 1187.1 - "No. 2 at Quarry Hill terminus Bendigo" 1187.2 - "No. 2 at Quarry Hill terminus Bendigo" 1187.3 - "No. 2 at Quarry Hill terminus Bendigo" 1187.4 - "No. 3 at Eaglehawk terminus" 1187.5 - "No. 18 in Mt Korong Road, Long Gully at cnr of Havilah Road (Eaglehawk Route)" 1187.6 - "No. 7 in Nolan St. Bendigo, at Cnr of McCrae St., near lake Weeroona, (North Bendigo Route)' 1187.7 - "No. 19 at North Bendigo terminus" 1187.8 - "No. 2 at Quarry Hill terminus" 1187.9 - "No. 21 in McCrae St. Bendigo, near Nolan St. (North Bendigo Route) 1187.10 - "4 and 26 at Alexandra Fountain, Charing Cross Bendigo" 1187.11 - "Truck of Bogie Car, Bendigo Tramways" 1187.12 - "No. 19 in Pall Mall at Charing Cross, Bendigo" 1187.13 - "Birney car No. 11 entering Pall Mall from View St. at Charing Cross Bendigo" 1187.14 - "No. 7 in Pall Mall at Charing Cross, Bendigo" 1187.15 - "No. 18 at Alexandra Fountain, Charing Cross, Bendigo" 1187.16 - "No. 2 at Quarry Hill terminus, Bendigo" 1187.17 - "No. 26 at Alexandra Fountain, Charing Cross, Bendigo" tramways, trams, bendigo, quarry hill, eaglehawk, north bendigo, maximum traction, night photo, tram 2, tram 3, tram 4, tram 7, tram 11, tram 18, tram 19, tram 21, tram 26 -
 Flagstaff Hill Maritime Museum and Village
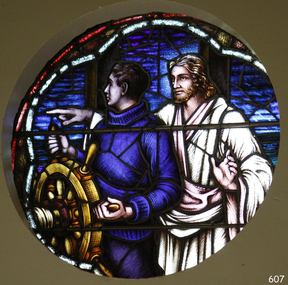
Artwork, other - Window, Brooks, Robinson & Co, Christ Showing the Helmsman the Way, circa August 1947
... bars. The window represents Christ showing the helmsman the way. It shows a man in blue knitted jumper holding onto a ship's wheel, looking over his right shoulder. Behind him stands a man in a white robe, pointing...bars. The window represents Christ showing the helmsman the way. It shows a man in blue knitted jumper holding onto a ship's wheel, looking over his right shoulder. Behind him stands a man in a white robe, pointing ...This round, stained glass window, titled "Christ Showing the Helmsman the Way", was also referred to as the Sanctuary Window or Memorial window. It was installed in the St Nicholas Seamen's Church at 139 Nelson Place, Williamstown, Victoria, inside the chapel above the altar. This memorial window has significance as a part of Victoria's War Heritage and is listed on the Victorian Heritage Database. The window and subsequent plaque were donated to St Nicholas Seamen’s Church as a memorial to the members of the Merchant Navy whose lives were lost in the Second World War, 1939-1945. The donor was the Williamstown Lightkeepers Auxiliary, an independent ladies' association working with the Williamstown Missions to Seamen (the Missions to Seamen organisation was re-named the Mission to Seafarers in the year 2000). The window was officially dedicated on December 14, 1947, by Geelong's Anglican Bishop, Rt. Rev. J.D. McKie. In the early months of 1948, a bronze plaque was also placed in the chapel above the altar. It recognises the lost souls of the Merchant Navy during World War 2, as well as the donor of the window, the Williamstown Lightkeepers Auxiliary. The inscription impressed on the rectangular bronze plaque, 20.4 x 10.2cm, is as follows: “IN MEMORY OF THE MEMBERS OF THE MERCHANT NAVY WHO WERE LOST IN THE SECOND WORLD WAR 1939-1945 FAITHFUL UNTO DEATH. THE WINDOW ABOVE THE ALTAR WAS ERECTED BY THE WILLIAMSTOWN LIGHTKEEPERS AUXILIARY 1947.” The Williamstown St Nicholas Seamen’s Church ceased operation in 1966. In 1979, the Victoria Missions to Seamen donated this round, stained glass window and the memorial plaque to Flagstaff Hill Maritime Village, along with many other items and furnishings. These items have been used to simulate the Williamstown Mission and Chapel as much as possible. The round space that formerly displayed the window can still be seen at the back of the old St Nicholas Seamen’s Church, previously the ES&A bank, in Williamstown. THE MISSIONS TO SEAMEN (Brief History): - The Missions to Seamen was an Anglican charity in Great Britain that has served the world's seafarers since 1856. Its symbol is a Flying Angel, inspired by a Bible verse. Today, there are centres in over 200 ports worldwide where seamen of all backgrounds are offered a warm welcome and provided with a wide range of facilities. In Victoria, the organisation began in Williamstown in 1857 as a Sailors’ Church, also known as ‘Bethel’ or the ‘Floating Church’ in an old hulk floating in Hobson’s Bay, Port of Melbourne. It soon became part of the Missions to Seamen, Victoria. In 2000, the organisation, now named Mission to Seafarers, still operated locally in Melbourne, Portland, Geelong and Hastings. The Ladies’ Harbour Lights Guild was formed in 1906 to support the Missions to Seamen in Melbourne and other centres, such as Williamstown. Two of the most significant ladies of the Guild were founder Ethel Augusta Godfrey and foundation member Alice Sibthorpe Tracy (who established a branch of the Guild in Warrnambool in 1920). The Guild continued its work until the 1960s. In 1943, a former Williamstown bank was purchased for the Missions to Seamen Club. The chapel was named St Nicholas’ Seamen’s Church and was supported by the Ladies’ Harbour Lights Guild, the Williamstown Lightkeepers’ Auxiliary and the League of Soldiers’ and Sailors’ Friends. It ceased operation in 1966. A Missions to Seamen Chapel and Recreation Room was a significant feature of ports during the late 1800s and 1900s. It seemed appropriate for Flagstaff Hill to include such a representation within the new Maritime Village, and the Melbourne Board of Management of Missions to Seamen Victoria gave its permission on 21st May 1979 for the entire furnishings of the Williamstown chapel to be transferred to Flagstaff Hill. The St Nicholas Seamen’s Church was officially opened on October 11, 1981, and resembles the Williamstown chapel. This stained glass window is historically significant for its connection to the St Nicholas Mission to Seamen's Church in Williamstown, established in 1857 to cater for the physical, social, and spiritual needs of seafarers. It was donated to the Mission by the Lightkeepers Auxiliary (Ladies Harbour Lights Guild, which was formed in 1905). The Missions to Seamen organisation had its origins in Bristol, England, when a Seamen's Mission was formed in 1837. The first Australian branch was started in 1856 by the Rev. Kerr Johnston, a Church of England clergyman, and operated from a hulk moored in Hobson’s Bay. Later, the Mission occupied buildings in Williamstown and Port Melbourne. The connection of this window, the Mission to Seamen and the Ladies Harbour Lights Guild highlights the strong community awareness of the life of people at sea, their dangers and hardships, and their need for physical, financial, spiritual and moral support. This memorial window is significant as a part of Victoria's War Heritage and is listed on the Victorian Heritage Database, Heritage Number 196973.Window, stained glass, circular, with reinforcing bars. The window represents Christ showing the helmsman the way. It shows a man in blue knitted jumper holding onto a ship's wheel, looking over his right shoulder. Behind him stands a man in a white robe, pointing to his right and looking to his left, his left hand gesturing to pause. The background has various shapes and patterns of blue glass, bordered by two arcs; the outer one is white, the inner one is red. This beautiful window is in our St Nicholas Seamen's Church Collection and was brought to Warrnambool from the original St Nicholas Seamen’s Church in Williamstown. flagstaff hill, warrnambool, shipwrecked coast, flagstaff hill maritime museum, maritime museum, shipwreck coast, flagstaff hill maritime village, great ocean road, mission to seamen williamstown, st nicholas seaman’s church williamstown, missions to seamen victoria, mission to seafarers, lightkeepers auxiliary, ladies harbour light guild, 139 nelson place williamstown, religion, religious service, sailors rest, bethel sailors’ church, bethel floating church, e. s. & a. bank williamstown, christ directing a sailor, christ showing the helmsman the way, quartermaster’s hand on the wheel, stained glass window, church window, religious window, sanctuary window, memorial window, war memorial window, victorian war heritage inventory, victorian heritage database, merchant navy ww2, 1939-1945, anglican church, bishop mckie, mrs musther, brooks robinson & co, flying angel club, williamstown lightkeepers' auxiliary, ladies' harbour lights guild, commemorative window -
 Mission to Seafarers Victoria
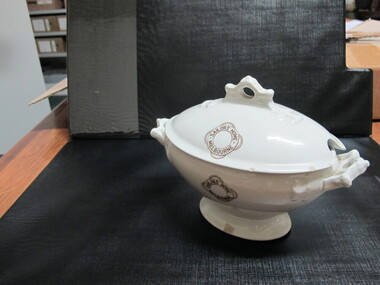
Domestic object - Condiment Tureen, 1883-1913
... Bar area of the Flying Angels Club at 717 Flinders St. The inscription "Sailors' Home" may refer to either the establishment formerly on Spencer St or later on Siddeley St built in 1903 and used until 1963. The Sailors' Home and Sailors' Rest were established in various locations in Melbourne and in Williamstown throughout the late19th century and early 20th century. It was of significance as a feature of the township that for some years was the main point ...This item was found in the Bar area of the Flying Angels Club at 717 Flinders St. The inscription "Sailors' Home" may refer to either the establishment formerly on Spencer St or later on Siddeley St built in 1903 and used until 1963. The Sailors' Home and Sailors' Rest were established in various locations in Melbourne and in Williamstown throughout the late19th century and early 20th century. It was of significance as a feature of the township that for some years was the main point of arrival in the early days before establishment and early days of Melbourne. Hugh Ronald Reid, member of the Melbourne Harbour Trust, was a founder of the Sailors' Home. The tureen is one of the rare remaining objects from the Sailors' Home.Small oval shaped condiment tureen or serving dish with lid; white glazed ironstone. Small hole in lid for spoon (missing). Lid and front of tureen have picture of a lifebuoy with a rope around it and "SAILORS' HOME MELBOURNE" written on it. Printed Inscription on the base with pottery crest.SAILORS' HOME MELBOURNE on lid on body. ROYAL IRONSTONE CHINA JOHNSON BROS ENGLAND with a picture of royal arms under base.condiment, ironstone china, johnson bros, sailors' home melbourne, tureen, hugh ronald reid -
 Mission to Seafarers Victoria
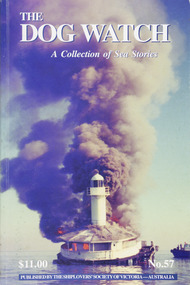
Journal (item) - Periodicals-Annual, Shiplovers' Society of Victoria, The Annual Dog Watch
... Point - Cliff Gibson - 6 Australia Day - C H Longstaff - 15 Capt. Joseph Ferrell Colton - Kenneth Shewan - 16 James Craig — A unique ship for the Southern Hemisphere - Hugh Lander - 20 The Wreck of the Isis - Margaret Grice - 29 Unusual Maritime Hazards - Capt. J Abernethy - 33 Crewing in Endeavour - Phoenix Arrien - 34 Finished With Engines - Ian L Barton - 45 Lighterage on Norfolk Island - Harrow Morgan - 53 Ship-owners Liability - ‘Flinders Bar’- 59 Nelson -Dr J H Leavesley - 61 The Knife Sheath - W P Shemmeld - 66 A Surfeit of Adventure - Stan Evans - 70 Cook’s Island - Jeremy Gadd - 75 Pig Overboard - Alf (Bluey) Thornton - 80 Educated - Noel Smith - 83 Jack Of All Trades - ‘Flinders Bar’ - 90 Tacking Ship Off Shore - Walter Frederick Stevens - 93 Australia’sMost Inland Shipwreck - Roy Stuart - 95 The Barwon Beer Crisis - R N Theile - 97 New Year Fireworks - Kenneth Shewan - 102 The Philadelphia Story - John Thompson - 104 AB Nuisance — Conclusion - Mick Hardware - 107 SSV Officers & TDW Editors - Kenneth Shewan - 108 Book Reviews - - 111...Point - Cliff Gibson - 6 Australia Day - C H Longstaff - 15 Capt. Joseph Ferrell Colton - Kenneth Shewan - 16 James Craig — A unique ship for the Southern Hemisphere - Hugh Lander - 20 The Wreck of the Isis - Margaret Grice - 29 Unusual Maritime Hazards - Capt. J Abernethy - 33 Crewing in Endeavour - Phoenix Arrien - 34 Finished With Engines - Ian L Barton - 45 Lighterage on Norfolk Island - Harrow Morgan - 53 Ship-owners Liability - ‘Flinders Bar’- 59 Nelson -Dr J H Leavesley - 61 The Knife Sheath - W P Shemmeld - 66 A Surfeit of Adventure - Stan Evans - 70 Cook’s Island - Jeremy Gadd - 75 Pig Overboard - Alf (Bluey) Thornton - 80 Educated - Noel Smith - 83 Jack Of All Trades - ‘Flinders Bar’ - 90 Tacking Ship Off Shore - Walter Frederick Stevens - 93 Australia’sMost Inland Shipwreck - Roy Stuart - 95 The Barwon Beer Crisis - R N Theile - 97 New Year Fireworks - Kenneth Shewan - 102 The Philadelphia Story - John Thompson - 104 AB Nuisance — Conclusion - Mick Hardware - 107 SSV Officers & TDW Editors - Kenneth Shewan - 108 Book Reviews - - 111 The Annual Dog Watch Journal Periodicals-Annual Shiplovers' Society of Victoria ...This journal provides the reader with glimpses of the adventures and hardships of a seaman's life. Many of the stories are of sailing ships.Contributes to our knowledge of the importance of shipping and places on record those stories of the sea which would otherwise be lost.Contents Editorial - Harrow Morgan - 5 Sentinel’s of Gellibrand’s Point - Cliff Gibson - 6 Australia Day - C H Longstaff - 15 Capt. Joseph Ferrell Colton - Kenneth Shewan - 16 James Craig — A unique ship for the Southern Hemisphere - Hugh Lander - 20 The Wreck of the Isis - Margaret Grice - 29 Unusual Maritime Hazards - Capt. J Abernethy - 33 Crewing in Endeavour - Phoenix Arrien - 34 Finished With Engines - Ian L Barton - 45 Lighterage on Norfolk Island - Harrow Morgan - 53 Ship-owners Liability - ‘Flinders Bar’- 59 Nelson -Dr J H Leavesley - 61 The Knife Sheath - W P Shemmeld - 66 A Surfeit of Adventure - Stan Evans - 70 Cook’s Island - Jeremy Gadd - 75 Pig Overboard - Alf (Bluey) Thornton - 80 Educated - Noel Smith - 83 Jack Of All Trades - ‘Flinders Bar’ - 90 Tacking Ship Off Shore - Walter Frederick Stevens - 93 Australia’sMost Inland Shipwreck - Roy Stuart - 95 The Barwon Beer Crisis - R N Theile - 97 New Year Fireworks - Kenneth Shewan - 102 The Philadelphia Story - John Thompson - 104 AB Nuisance — Conclusion - Mick Hardware - 107 SSV Officers & TDW Editors - Kenneth Shewan - 108 Book Reviews - - 111sailing ships, steamships, shipping, seafaring life, shiplovers' society of victoria, dog watch -
 Marysville & District Historical Society
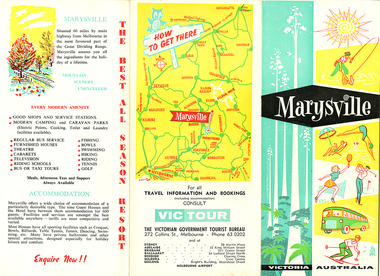
Ephemera (Item) - Tourist brochure, Victorian Government Tourist Bureau, Marysville Victoria Australia, Unknown
... point...eildon weir...snob's creek...rubicon...lake mountain...marysville tourist and progress association...the cumberland...kerami guest house...kooringa guest house...marylands guest house...marylyn guesthouse...marysville hotel...mount kitchener house...barton brothers' store...fruit salad farm...marysville dairy...marysville caravan park...marysville garage...marysville riding school...marysville theatre...mckenzie's tourist services...potters fruit and milk bar...A tourist brochure on Marysville and the surrounding area published by the Victorian Government Tourist Bureau for the Marysville Tourist and Progress Association. marysville victoria tourist brochure victorian government tourist bureau cumberland valley cumberland falls cora-lyn falls robart's lookout meeting of the waters warburton acheron way healesville launching place reefton spur upper yarra dam maroondah highway black spur maroondah dam alexandra mansfield jamieson wood's point eildon weir snob's creek rubicon lake mountain marysville tourist and progress association the cumberland kerami guest house kooringa guest house marylands guest house marylyn guesthouse marysville hotel mount kitchener house barton brothers' store fruit salad farm marysville dairy marysville caravan park marysville garage marysville riding school marysville theatre mckenzie's tourist services potters fruit and milk bar arosa holiday cottages scenic motel beauty spot walk red hill walk wishing well taggerty river mount gordon steavenson falls keppel's lookout keppel's falls A tourist brochure on Marysville and the surrounding area published by the Victorian Government Tourist Bureau for the Marysville Tourist and Progress Association. ...A tourist brochure on Marysville and the surrounding area published by the Victorian Government Tourist Bureau for the Marysville Tourist and Progress Association.A tourist brochure on Marysville and the surrounding area published by the Victorian Government Tourist Bureau for the Marysville Tourist and Progress Association.marysville, victoria, tourist brochure, victorian government tourist bureau, cumberland valley, cumberland falls, cora-lyn falls, robart's lookout, meeting of the waters, warburton, acheron way, healesville, launching place, reefton spur, upper yarra dam, maroondah highway, black spur, maroondah dam, alexandra, mansfield, jamieson, wood's point, eildon weir, snob's creek, rubicon, lake mountain, marysville tourist and progress association, the cumberland, kerami guest house, kooringa guest house, marylands guest house, marylyn guesthouse, marysville hotel, mount kitchener house, barton brothers' store, fruit salad farm, marysville dairy, marysville caravan park, marysville garage, marysville riding school, marysville theatre, mckenzie's tourist services, potters fruit and milk bar, arosa holiday cottages, scenic motel, beauty spot walk, red hill walk, wishing well, taggerty river, mount gordon, steavenson falls, keppel's lookout, keppel's falls -
 Marysville & District Historical Society
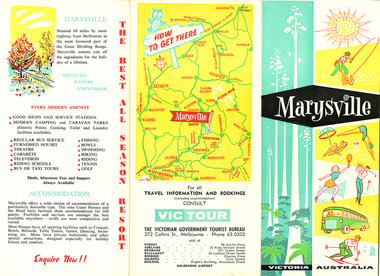
Ephemera (Item) - Tourist brochure, Victorian Government Tourist Bureau, Marysville Victoria Australia, Unknown
... point...eildon weir...snob's creek...rubicon...lake mountain...marysville tourist and progress association...the cumberland...kerami guest house...kooringa guest house...marylands guest house...marylyn guesthouse...marysville hotel...mount kitchener house...barton brothers' store...fruit salad farm...marysville dairy...marysville caravan park...marysville garage...marysville riding school...marysville theatre...mckenzie's tourist services...potters fruit and milk bar...A tourist brochure on Marysville and the surrounding area published by the Victorian Government Tourist Bureau for the Marysville Tourist and Progress Association. marysville victoria tourist brochure victorian government tourist bureau cumberland valley cumberland falls cora-lyn falls robart's lookout meeting of the waters warburton acheron way healesville launching place reefton spur upper yarra dam maroondah highway black spur maroondah dam alexandra mansfield jamieson wood's point eildon weir snob's creek rubicon lake mountain marysville tourist and progress association the cumberland kerami guest house kooringa guest house marylands guest house marylyn guesthouse marysville hotel mount kitchener house barton brothers' store fruit salad farm marysville dairy marysville caravan park marysville garage marysville riding school marysville theatre mckenzie's tourist services potters fruit and milk bar arosa holiday cottages scenic motel beauty spot walk red hill walk wishing well taggerty river mount gordon steavenson falls keppel's lookout keppel's falls A tourist brochure on Marysville and the surrounding area published by the Victorian Government Tourist Bureau for the Marysville Tourist and Progress Association. ...A tourist brochure on Marysville and the surrounding area published by the Victorian Government Tourist Bureau for the Marysville Tourist and Progress Association.A tourist brochure on Marysville and the surrounding area published by the Victorian Government Tourist Bureau for the Marysville Tourist and Progress Association.marysville, victoria, tourist brochure, victorian government tourist bureau, cumberland valley, cumberland falls, cora-lyn falls, robart's lookout, meeting of the waters, warburton, acheron way, healesville, launching place, reefton spur, upper yarra dam, maroondah highway, black spur, maroondah dam, alexandra, mansfield, jamieson, wood's point, eildon weir, snob's creek, rubicon, lake mountain, marysville tourist and progress association, the cumberland, kerami guest house, kooringa guest house, marylands guest house, marylyn guesthouse, marysville hotel, mount kitchener house, barton brothers' store, fruit salad farm, marysville dairy, marysville caravan park, marysville garage, marysville riding school, marysville theatre, mckenzie's tourist services, potters fruit and milk bar, arosa holiday cottages, scenic motel, beauty spot walk, red hill walk, wishing well, taggerty river, mount gordon, steavenson falls, keppel's lookout, keppel's falls
