Showing 10 items matching "river yarra, railway bridge - hawthorn"
-
 Kew Historical Society Inc
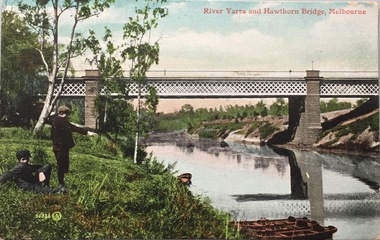
Postcard, Valentine's Series, River Yarra and Hawthorn Bridge, Melbourne, c.1907
... river yarra, railway bridge - hawthorn...Early postcard of the Hawthorn to Burnley Railway Bridge on the River Yarra. Station picnic on left. ...(Valentine & Sons 1825-1963) for Australian distribution river yarra, railway bridge - hawthorn postcards -- hawthorn (vic.) ...Valentine's Series postcard, printed in Great Britain by Valentine’s Co. Ltd. (Valentine & Sons 1825-1963) for Australian distributionEarly postcard of the Hawthorn to Burnley Railway Bridge on the River Yarra. Station picnic on left. Tay Creggan on right. Buildings and location identified by Marshall Slattery in 1977. The postcard was printed in Great Britain and was published as one of Valentine's Series. "KH.87. Donated by Mrs B. Challen 2.2.76. Burnley to Hawthorn Railway Bridge. Station Picnic on left. "Tay Creggan" on right. Marshall Slattery 1977".river yarra, railway bridge - hawthorn, postcards -- hawthorn (vic.) -
 University of Melbourne, Burnley Campus Archives
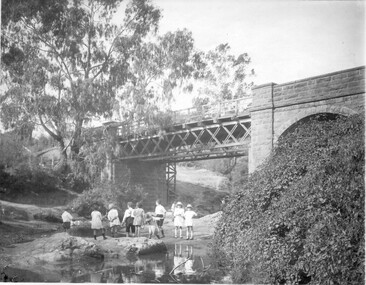
Photograph - Black and white print, Children Playing in the River, Unknown
... river...bridge...yarra...Hawthorn railway...river (Yarra?) with a bridge above them. T H Kneen suggests it is the Melbourne Hawthorn Railway Bridge and that The Boulevard now passes under the arch....University of Melbourne, Burnley Campus Archives 500 Yarra Boulevard Richmond melbourne children rocks river bridge yarra Hawthorn railway Black and white photograph. ...Black and white photograph. Children standing on rocks in the river (Yarra?) with a bridge above them. T H Kneen suggests it is the Melbourne Hawthorn Railway Bridge and that The Boulevard now passes under the arch.children, rocks, river, bridge, yarra, hawthorn railway -
 Melbourne Tram Museum
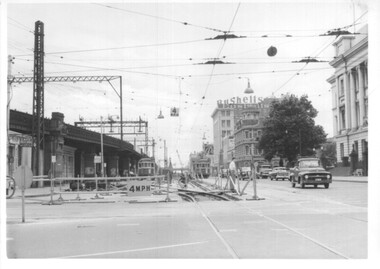
Photograph - Set of 12 - construction of King St overpass in Flinders St, 1959
... Melbourne Tram Museum 8 Wallen Road Hawthorn melbourne Photos show the construction of King St overpass in Flinders St which was part of the project to construct a bridge over the Yarra River and provide a new southern outlet road between the city and eventually St Kilda Junction. The overpass construction was commenced in 1959 with tramway works first commencing. It was demolished in 2005. 1 - looking west at Market St. 2 - looking east from Spencer and Flinders St with the railway ...Photos show the construction of King St overpass in Flinders St which was part of the project to construct a bridge over the Yarra River and provide a new southern outlet road between the city and eventually St Kilda Junction. The overpass construction was commenced in 1959 with tramway works first commencing. It was demolished in 2005. 1 - looking west at Market St. 2 - looking east from Spencer and Flinders St with the railway viaduct behind. 3 - Tram lines diverted onto the new overpass. Note the hand-powered overhead tower on the left behind the compressor. 4 - Tracks partially diverted. 5 - Looking east at Spencer and Flinders St with a Dunlop tyre truck in the view. 6 - prior to the diversion onto the new bridge. 7 - Looking east near William St. with W2 451 (Route 48, North Balwyn) in the view. 8 - Bridge works near King St. Original tracks still in use. 9 - Looking east prior to the introduction of the temporary tracks on the south side of the new overpass. 10 - SW6 852 and a W2 on new overpass trackwork - old trackwork being demolished. 11 - Cross over at Spencer St in Flinders St, prior to change over. 12 - Looking west at Flinders and Spencer St with SW6 853 turning into Spencer St.Yields information about the construction of the King St overpass in Flinders St during 1959.Set of 12 black and white prints of the construction of the King St overpass in Flinders St.trams, tramways, flinders st, king st overpass, construction, bridges, w2 class, sw6 class, tram 451, tram 853, tram 852 -
 Melbourne Tram Museum
Photograph - Set of 5 Black & White - First AETA tour, 15-2-1947
... See page 8 of the March 1947 issue of "Tram Tracks" for details of the tour and the MMTB Crew. 1 - SW6 881 about to leave Glen Huntly Depot 2 - Crossing Balaclava Junction 3 - Crossing the Kooyong railway level crossing in Glenferrie Road - has the railway signal box and gates in view. 4 - Turning into Riversdale Road from Glenferrie Road with the Stotts Business College building in the background. 5 - Just to the east of Yarra River Bridge in Swan Street with the Burnley Gardens on the right. Yields information about the first AETA tram tour in 1947 trams tramways AETA tram tours tram 881 SW6 class Glen Huntly Kooyong level crossing Glenferrie Road Riversdale Road Burnley Hawthorn Balaclava Junction Glen Huntly Depot Hawthorn Road Swan St Each one of the set has a photographers file stamp on the rear, but no details filled in. ...Set of five photographs of the first Australian Electric Traction Association (AETA) tram tour of Melbourne on 15/2/1947. See page 8 of the March 1947 issue of "Tram Tracks" for details of the tour and the MMTB Crew. 1 - SW6 881 about to leave Glen Huntly Depot 2 - Crossing Balaclava Junction 3 - Crossing the Kooyong railway level crossing in Glenferrie Road - has the railway signal box and gates in view. 4 - Turning into Riversdale Road from Glenferrie Road with the Stotts Business College building in the background. 5 - Just to the east of Yarra River Bridge in Swan Street with the Burnley Gardens on the right.Yields information about the first AETA tram tour in 1947Set of 5 Black and white photograph on paper. Two copies of each held.Each one of the set has a photographers file stamp on the rear, but no details filled in.trams, tramways, aeta, tram tours, tram 881, sw6 class, glen huntly, kooyong level crossing, glenferrie road, riversdale road, burnley, hawthorn, balaclava junction, glen huntly depot, hawthorn road, swan st -
 Melbourne Tram Museum
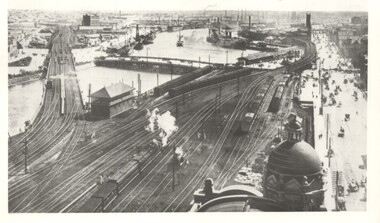
Photograph - Yarra River from Flinders St Station clock tower, Town and Country Journal, 1909
... Hawthorn melbourne Photos show the Yarra river and the shipping turning basin that was used prior to the construction of the Spencer St bridge. In the view are are steam hauled suburban trains, Flinders St A signal box, Queensbridge, and the wharves on either side of the river. The viaduct was expanded to four tracks in 1915. Yields information about Yarra River, Flinders St railway ...Photos show the Yarra river and the shipping turning basin that was used prior to the construction of the Spencer St bridge. In the view are are steam hauled suburban trains, Flinders St A signal box, Queensbridge, and the wharves on either side of the river. The viaduct was expanded to four tracks in 1915. Yields information about Yarra River, Flinders St railway station yards and shipping,Set of two photographs looking west from the Flinders St Station clocktower. over the Yarra River and station yards.On rear of both prints in ink: 1 – Melbourne - West from clock tower on Flinders St station - “Town and Country Journal 21/7/1909” Copy neg Mark Plummer collections ex late John Alfred collection. .2 - Melbourne, Looking west along Flinders St from clocktower of Flinders St station. Copy neg Mark Plummer collections ex late John Alfred collection. Has “T&C 20/12/09” in pencil on rear. bridges, flinders st station, yarra river, wharves, railways, signal boxes, queens bridge, shipping -
 Melbourne Tram Museum
Photograph - Yarra River and Princes Bridge from Flinders St Station clock tower, Town and Country Journal, 1909
... Hawthorn melbourne Photos show the Yarra river looking east over Princes Bridge. In both photos are cable trams, the rowing sheds and parts of Flinders St station. The first phtograph shows the nearly completed ramps from the platform, while the second has the former exit structure that allowed passengers to exit to Princes Bridge and St Kilda Road. Yields information about Yarra River, Flinders St railway ...Photos show the Yarra river looking east over Princes Bridge. In both photos are cable trams, the rowing sheds and parts of Flinders St station. The first phtograph shows the nearly completed ramps from the platform, while the second has the former exit structure that allowed passengers to exit to Princes Bridge and St Kilda Road. Yields information about Yarra River, Flinders St railway station yards and Princes Bridge.Set of two photographs looking east from a Flinders St Station clocktower. over the Yarra River and Princes Bridge..1 – Melbourne Princes Bridge. Copy neg Mark Plummer collections ex late John Alfred collection. Has “T&C 20/12/09” in pencil on rear. .2 – Melbourne – Princes Bridge “Town and Country Journal 29/12/1909” Copy neg Mark Plummer collections ex late John Alfred collection.bridges, flinders st station, yarra river, railways, princes bridge, cable trams -
 Melbourne Tram Museum
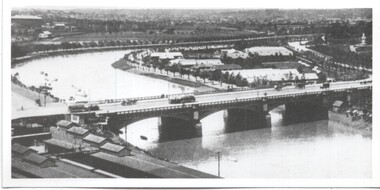
Photograph - Digital Image, Kevin O'Reilly, series of three images of the Hawthorn Bridge over the Yarra, c1930, c1930's
... Bridge Road to the east with Hawthorn Bridge in the middle of the photograph. Shows the industrial and residential areas, Hawthorn Railway Station and part of the Burnley Race course, the cable tram depot building. W class tram in Church St Hawthorn and W class tram crossing the bridge on the north side temporary track. Note the cable tram used as a shelter on the north east corner of the bridge. .3 - Looking south along River St towards Bridge Road, with the Yarra...Bridge Road to the east with Hawthorn Bridge in the middle of the photograph. Shows the industrial and residential areas, Hawthorn Railway Station and part of the Burnley Race course, the cable tram depot building. W class tram in Church St Hawthorn and W class tram crossing the bridge on the north side temporary track. Note the cable tram used as a shelter on the north east corner of the bridge. .3 - Looking south along River St towards Bridge Road, with the Yarra ...Image from CD (Compact Diskette for use in computers) - see Reg Item 135. A series of three images of the Hawthorn Bridge over the Yarra, c1930, during the era with problems with the bridge. See separate article for more details. Richmond 6, Richmond, Richmond 3 on the CD as original files. .1 - Looking from the south west, at the Hawthorn bridge with the temporary wooden bridge being constructed on the south side. Has the cable tram depot in the photo and part of the Burnley racing course. Temporary track on the north side of the steel bridge and crossings can be seen. .2 - Looking along Bridge Road to the east with Hawthorn Bridge in the middle of the photograph. Shows the industrial and residential areas, Hawthorn Railway Station and part of the Burnley Race course, the cable tram depot building. W class tram in Church St Hawthorn and W class tram crossing the bridge on the north side temporary track. Note the cable tram used as a shelter on the north east corner of the bridge. .3 - Looking south along River St towards Bridge Road, with the Yarra River and Hawthorn Bridge on the left side of the photograph. Shows the industry in the area at the time, wool and skin Merchants, north side of the cable depot, housing and the outlook to the river!trams, tramways, hawthorn, yarra river, burnley, richmond, hawthorn bridge -
 Melbourne Tram Museum
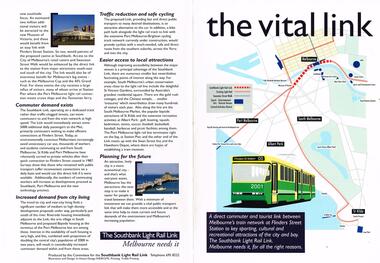
Pamphlet, Committee for the Southbank Light Rail Line, "the vital link", 1993?
... Melbourne Tram Museum 8 Wallen Road Hawthorn melbourne Trams tramways Flinders St Station Clarendon St New Tramway Batman Ave Route 96 Light Rail Yarra River tram 2001 Pamphlet - full colour A3 sheet folded to A4, titled "the vital link", outlining a proposal for a tram line connecting Flinders St station to Clarendon St, Port Junction, via the former railway bridge, connecting Batman Ave tram line. ...Pamphlet - full colour A3 sheet folded to A4, titled "the vital link", outlining a proposal for a tram line connecting Flinders St station to Clarendon St, Port Junction, via the former railway bridge, connecting Batman Ave tram line. Published by the Committee for the Southbank Light Rail Line. Gives reasons and benefits for such a link. Published based on a printing date 1993. Features an image of 2001 on front cover and crossing the Yarra River.trams, tramways, flinders st station, clarendon st, new tramway, batman ave, route 96, light rail, yarra river, tram 2001 -
 Melbourne Tram Museum
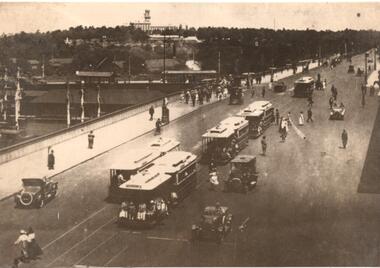
Photograph - Photograph Card, Kelly Collection, View Productions, Princes Bridge / Batman Ave tram terminus, Photo c1920
... Melbourne Tram Museum 8 Wallen Road Hawthorn melbourne Trams tramways Princes Bridge Batman Ave Swanston St Cable Trams Shelters Photograph Card - folded card, blank inside of Cable Trams, motor cars, pedestrians crossing Princes Bridge over the Yarra River with the Princes Bridge / Batman Ave tram terminus with a shelter in the background. Shows five cable tram sets. Has railway ...Photograph Card - folded card, blank inside of Cable Trams, motor cars, pedestrians crossing Princes Bridge over the Yarra River with the Princes Bridge / Batman Ave tram terminus with a shelter in the background. Shows five cable tram sets. Has railway signals and Government House in the view. Produced by View Productions GPO Box 1858 Sydney, from the Kelly Collection, titled "On the Princes Bridge, circa 1920, Melbourne, Victoria, Australia". Has the Publishers logo on the rear.trams, tramways, princes bridge, batman ave, swanston st, cable trams, shelters -
 Melbourne Tram Museum
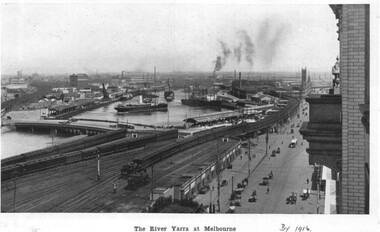
Photograph - Illustration, c1916
... Melbourne Tram Museum 8 Wallen Road Hawthorn melbourne Trams tramways Flinders St Railways Shipping Cable Trams in ink in bottom right hand comer "By 1916" Illustration from a photograph reproduced in a magazine of the river Yarra, Flinders St railway yard, the viaduct, the swing basin, the wharves and Queens Bridge. ...Illustration from a photograph reproduced in a magazine of the river Yarra, Flinders St railway yard, the viaduct, the swing basin, the wharves and Queens Bridge. Has a number of cable cars and trains in the view. Taken prior to the construction of the second or duplicate viaduct which was completed during 1915. Construction of the second viaduct on the south side of the original can be seen.in ink in bottom right hand comer "By 1916"trams, tramways, flinders st, railways, shipping, cable trams