Showing 24 items matching "shunting yards"
-
 Latrobe Regional Gallery
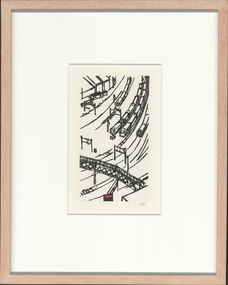
Print, CAMPBELL, Cressida, Shunting Yards I, 1996
... Shunting Yards I...shunting yards...Latrobe Regional Gallery 138 Commercial Road Morwell gippsland shunting yards trains Initialled l.l 'C C" Woodblock Print Shunting Yards I Print CAMPBELL, Cressida ...Woodblock PrintInitialled l.l 'C C"shunting yards, trains -
 Latrobe Regional Gallery
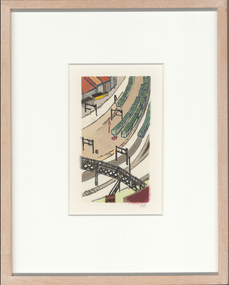
Print, CAMPBELL, Cressida, Shunting Yards II, 1996
... Shunting Yards II...shunting yards...Latrobe Regional Gallery 138 Commercial Road Morwell gippsland shunting yards trains Initialled l.l. "C C" Woodblock Print Shunting Yards II Print CAMPBELL, Cressida ...Woodblock PrintInitialled l.l. "C C"shunting yards, trains -
 Latrobe Regional Gallery
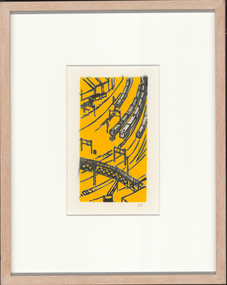
Print, CAMPBELL, Cressida, Shunting Yards III, 1996
... Shunting Yards III...shunting yards...Latrobe Regional Gallery 138 Commercial Road Morwell gippsland shunting yards trains Initialled l.l. "C C" Woodblock Print Shunting Yards III Print CAMPBELL, Cressida ...Woodblock PrintInitialled l.l. "C C"shunting yards, trains -
 Latrobe Regional Gallery
Print, CAMPBELL, Cressida, Shunting Yards IV, 1996
... Shunting Yards IV...shunting yards...Latrobe Regional Gallery 138 Commercial Road Morwell gippsland shunting yards trains Initialled l.l. 'C C" Woodblock print Shunting Yards IV Print CAMPBELL, Cressida ...Woodblock printInitialled l.l. 'C C"shunting yards, trains -
 Port Melbourne Historical & Preservation Society
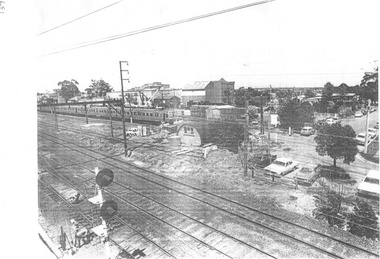
Photograph - Railway shunting yards, Port Melbourne, Douglas Smallpage, 1970s
... Railway shunting yards, Port Melbourne...Lasercopy enlargement of a photo showing the railway shunting yards with Centenary Bridge, Station and Princes Piers in the background, taken from the Graham St overpass in the 1970s...Port Melbourne Historical & Preservation Society Port Melbourne Town Hall 333 Bay Street Port Melbourne melbourne transport - railways Lasercopy enlargement of a photo showing the railway shunting yards with Centenary Bridge, Station and Princes Piers in the background, taken from the Graham St overpass in the 1970s Photograph Railway shunting yards, Port Melbourne Douglas Smallpage ...Lasercopy enlargement of a photo showing the railway shunting yards with Centenary Bridge, Station and Princes Piers in the background, taken from the Graham St overpass in the 1970stransport - railways -
 Box Hill Historical Society
Photograph - Railway line
... Shunting yard, Carrington Road, Box Hill - showing factories in background. ...Shunting yard is now the site of Box Hill Central - North and South - Shopping Centres. ...Shunting yard, Carrington Road, Box Hill - showing factories in background. Shunting yard is now the site of Box Hill Central - North and South - Shopping Centres. There used to be a branchline from Shunting yard to Brickworks along Thurston RoadB&w photorailways, carrington road, railway lines, trains -
Port Melbourne Historical & Preservation Society
Photograph - Photograph -Centenary Bridge stairway, Port Melbourne, 1991
... Colour photograph of Centenary Bridge stairway (west, beach side) through the gap under the bridge can be seen what remains of the Port Melbourne railway shunting yard. Mounted on grey paper....Port Melbourne Historical & Preservation Society Port Melbourne Town Hall 333 Bay Street Port Melbourne melbourne Taken by Alison Kelly during the demolition years for 'Bayside' development centenary bridge built environment - civic transport alison kelly Colour photograph of Centenary Bridge stairway (west, beach side) through the gap under the bridge can be seen what remains of the Port Melbourne railway shunting yard. Mounted on grey paper. Photograph Photograph -Centenary Bridge stairway, Port Melbourne ...Taken by Alison Kelly during the demolition years for 'Bayside' developmentColour photograph of Centenary Bridge stairway (west, beach side) through the gap under the bridge can be seen what remains of the Port Melbourne railway shunting yard. Mounted on grey paper.centenary bridge, built environment - civic, transport, alison kelly -
 Bendigo Historical Society Inc.
Newsletter - Victorian Railways Newsletter July 1951
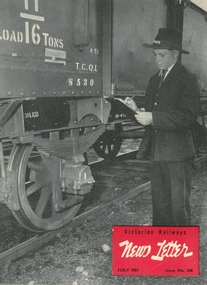
... On the front cover a photo of 15 years old Keith Albert Brook of Long Gully proudly doing his job as number taker in the Bendigo shunting yard. The newsletter has 16 pages....On the front cover a photo of 15 years old Keith Albert Brook of Long Gully proudly doing his job as number taker in the Bendigo shunting yard. The newsletter has 16 pages. Newsletter Victorian Railways Newsletter July 1951 ...Victorian Railways Newsletter issue no. 248 from July 1951. On the front cover a photo of 15 years old Keith Albert Brook of Long Gully proudly doing his job as number taker in the Bendigo shunting yard. The newsletter has 16 pages.victorian railways, newsletter, keith albert brook -
 Whitehorse Historical Society Inc.
Photograph, Mitcham Railway Station construction 2013-14
... Until the 1970s a shunting yard and goods shed existed where the southern car park is now. ...Until the 1970s a shunting yard and goods shed existed where the southern car park is now. ...The original Mitcham Station was opened on 25th December 1882. Until the 1970s a shunting yard and goods shed existed where the southern car park is now. Tracks remained embedded in the car park for many years. In 1979 boom gates were provided at both Mitcham Road and Rooks Road. From December 2009 to January 2010 Mitcham Railway Station was used as a bus interchange when the realignment of tracks and construction of a new station occurred at Nunawading. The new Mitcham Station opened on 25th January 2014.Coloured photographs of the construction of the underground railway station at Mitcham in 2013-14 and the opening in 2014.mitcham railway station construction 2013-14, mitcham railway station opening 2014, mitcham railway station, rialway stations -
 Ballarat Tramway Museum
Slide - Bendigo tram depot - set of 6, Ron Hood, 12/1970
... Set of six colour photographs by Ron Hood December 1970 taken at the Bendigo tram depot: 1 - Bendigo scrubber parked in the depot yard. 2 - tram No. 3 shunting in the yard. 3 - ditto 4 - general view of the front of the depot shed with trams 23 and 30. 5 - scrubber tram 6 - depot entrance...Ballarat Tramway Museum South Gardens Reserve Wendouree Parade Ballarat Ballarat goldfields Set of six colour photographs by Ron Hood December 1970 taken at the Bendigo tram depot: 1 - Bendigo scrubber parked in the depot yard. 2 - tram No. 3 shunting in the yard. 3 - ditto 4 - general view of the front of the depot shed with trams 23 and 30. 5 - scrubber tram 6 - depot entrance Yields information about the Bendigo tram depot and some of the trams at the time - December. 1970 tramways trams Bendigo depot Scrubber tram 3 tram 23 tram 30 Numbered "Bendigo Depot" in ink and slide nos, 12 to 17. ...Set of six colour photographs by Ron Hood December 1970 taken at the Bendigo tram depot: 1 - Bendigo scrubber parked in the depot yard. 2 - tram No. 3 shunting in the yard. 3 - ditto 4 - general view of the front of the depot shed with trams 23 and 30. 5 - scrubber tram 6 - depot entranceYields information about the Bendigo tram depot and some of the trams at the time - December. 1970Set of 6 Colour slides in hanimount cardboard mounts.Numbered "Bendigo Depot" in ink and slide nos, 12 to 17.tramways, trams, bendigo depot, scrubber, tram 3, tram 23, tram 30 -
 Puffing Billy Railway
Phoenix Foundry Plate
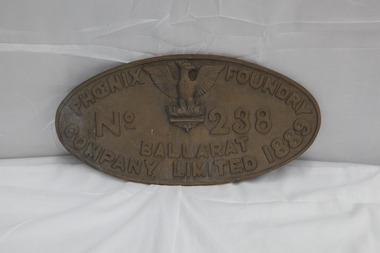
... They were inevitably superseded by more modern and powerful steam locomotives and a number cascaded into shunting and yard pilot duties, often with the addition of shunters steps along both locomotive and tender. ...They were inevitably superseded by more modern and powerful steam locomotives and a number cascaded into shunting and yard pilot duties, often with the addition of shunters steps along both locomotive and tender. ...Phoenix Foundry Plate - replica Made about 2010 cast off original from locomotive Y112 The Phoenix Foundry (1857-1906) fabricated iron and brass products - including engines and pumping gear for the mining industry, locomotives, steam rollers, water pipes, water gauges and diverse small items. Throughout its operation the business was located at premises on Armstrong Street, Ballarat . Background In 1852, at the age of thirty-three and after a year of operating his own engineering business at Williamstown, Lancashire-born blacksmith and engineer George Threlfall (1819-1897) arrived on the Sebastopol gold plain and immediately undertook blacksmith work repairing picks and tools for the miners. Little did he know that this fledgling business would be the genesis of the most iconic business of nineteenth-century Ballarat. At approximately thirty-nine years of age, English mechanical engineer Richard Carter (c1814-1883) came to Australia on board the Arrogant - arriving in Melbourne on 19 April 1853. He soon travelled to the Ballarat goldfields. Born in the year 1830 in Belfast (Ireland), mechanical engineer William Henry Shaw (1830-1896) arrived in Australia in October 1853. He worked briefly with George Threlfall at Sebastopol, then moved to Geelong to manage the small foundry of Frederick Moore. Twenty-four year old English-born iron moulder Robert Holden (c1831-?) left his home in Belfast (Ireland) in late 1854 and travelled from Liverpool to Melbourne on board the James Baines - arriving in February 1855. Afterwards he joined his brother-in-law William Henry Shaw in Ballarat. History Foundation to Incorporation In March 1857 George Threlfall joined in business with Richard Carter, William Henry Shaw and Robert Holden. They relocated Threlfall's successful engineering enterprise from Sebastopol to new premises in Armstrong Street, Ballarat. This business was then known variously as the Phoenix Iron Works Company, Phoenix Foundry or Messrs Carter and Co. By 15 April 1857 they were advertising that they were open for business as engineers, millwrights, boiler makers, smiths, iron founders and brass founders. In January 1858 George Threlfall left the partnership. Incorporation to 1889 1890 to Closing locomotive Y112 Builder: Phoenix Foundry, Ballarat Builder’s Number & Year: 238 of 1889 Designer: Kitson & Co Wheel Arrangement: 0-6-0 No. in class: 31 Entered Service: 24 July 1889 Taken off Register: 11 May 1961 The origins of the Victorian Railways Y-class lay with the decision by Kitson & Co, Leeds to place a 0-6-0 freight locomotive on display at the Centennial International Exhibition, Melbourne in 1888, together with a 2-4-2T suburban passenger locomotive. This marketing initiative proved successful as the Victorian Railways were clearly impressed with these machines, with both purchased after the exhibition and becoming the patterns for new standard locomotive types. Thirty examples of the 0-6-0 heavy freight design were ordered from the Phoenix Foundry, Ballarat, becoming the Y-class for main line heavy freight duties, while the 2-4-2T design became the E-class for Melbourne suburban passenger duties (represented by preserved locomotive E 236). The Y-class prove successful in service and accrued high mileages. They were inevitably superseded by more modern and powerful steam locomotives and a number cascaded into shunting and yard pilot duties, often with the addition of shunters steps along both locomotive and tender. Y 112 was one of the last in service when withdrawn in 1961. Fortunately it was saved for preservation and plinthed in central Ballarat, ostensibly in commemoration of Phoenix Foundry. I understand it is owned by the Sovereign Hill Museums Association. During the 1980’s, Y 112 was leased to Steamrail Victoria and restored to operation at an industrial site in Ballarat. Y 112 features an attractive lined apple green livery and has performed various rail tours around Victoria since restoration. It is normally based at the Steamrail depot in Ballarat East. Y 112 is the only 19th century design in operational condition in Victoria and as such is one of the oldest working steam locomotive in Victoria . Historic - Phoenix Foundry Plate - replica Made about 2010 cast off original from locomotive Y112Phoenix Foundry Plate Oval shaped plate with an image of a phoenix centered at the top with lettering surrounding it.Phoenix Foundry No 238 Ballarat Company Limited 1889.puffing billy, phoenix foundry, ballarat, locomotive y112, phoenix foundry plate - replica -
 City of Melbourne Libraries
Photograph (item), Bull, Hugh Jones, 1897-1993, Unloading timber at Victoria Dock, 1933
... In 1892 the West Melbourne Dock (later Victoria Dock) was opened, downstream and immediately west of the Spencer Street railway shunting yards. It contained a swing basin for ships, replacing the one which had been provided on the south side of the river, later to be the Duke and Orr dry dock, west of the Charles Grimes Bridge. ...In 1892 the West Melbourne Dock (later Victoria Dock) was opened, downstream and immediately west of the Spencer Street railway shunting yards. It contained a swing basin for ships, replacing the one which had been provided on the south side of the river, later to be the Duke and Orr dry dock, west of the Charles Grimes Bridge. ...Photographer notations on slide: "Unloading Timber at Wharves 1933 Age B5" Published: Age (Melbourne, Vic.: 1854- ), Tuesday 15 August 1933 MAHOGANY FROM MANILA. (1933, August 15). The Age (Melbourne, Vic. : 1854 - 1954), p. 11. Retrieved January 16, 2026, from http://nla.gov.au/nla.news-article204377024 Published title: MAHOGANY FROM MANILA Published Caption: Age Tue 15 Aug 1933 Caption: Unloading Mahogany Logs brought from Manila, Philippine Islands, by the steamer Taiping, which berthed yesterday at Victoria Dock. The vessel discharged twenty logs, each weighing three tons, the first shipment of this type of timber landed in Melbourne. Research by Project Volunteer, Louise McKenzie: This photograph in many ways epitomises Melbourne in the 1930s. It is a time of enormous growth, development and change. But before delving into that, the photo itself is very powerful. The huge mahogany logs being unloaded appear to be so heavy that the ship itself seems to list to port as they are craned over the side. They are being levered into a cart to which two large and sturdy Clydesdale horses are hitched. In contrast to the traditional horses, the wharf is crisscrossed with modern railway tracks. Unloading is both mechanical and manual, and the scene is one of intense interest to a young boy bystander. The ship appears to be squat and solid, but the whole image also gives a feeling of movement and intensity. The mahogany being delivered to Melbourne would be intended for high quality furniture. In the 1930s Australia actually had a growing timber industry, but much of the eucalyptus wood was being utilised for mass produced furniture, and much of this furniture would then have had a veneer applied to it. The fact that it was economic to import this timber from the “Philippine Islands” – not a traditional trading market for Australia – reflects a Victorian economy that was strong enough to support a growing demand for good quality furniture Mahogany was described as a classic, strong hardwood, often used for dark opulent furniture. In the 1930s the importation of timber from Manila (Philippines) to Australia was a notable trade, particularly in Philippine Lauan (often referred to as Philippine Mahogany), which was used as a cheaper alternative to other hardwoods. 1930s furniture, dominated by the art deco style, used a mix of luxurious exotic woods like mahogany, macassar and ebony for high-end pieces, often veneered over less expensive woods such as walnut, birch and poplar, and with plywood, chrome and lacquer also popular for more practical, streamlined designs during the Depression era. By the mid 1930s timber mills were being relocated away from the immediate dock area, but the fact that these logs were being transported by horse-drawn cart implies that the load would not have had to be taken too far for milling. 1885 the Melbourne Harbour Trust Commissioners had decided that land in or near the city was far too valuable to be used as timber yards. Furthermore, large stacks of timber posed a fire risk. The Trust asked the Victorian Government to reserve a site on the east side of the Yarra River opposite Yarraville and Spotswood. Here, in 1889, the Trust began building six jetties and a wharf specifically for the landing of timber. Clydesdale horses were initially brought to Victoria from Tasmania in the 1830s, and with the 1850s gold rush they were imported direct from Scotland. Melbourne was from its earliest years an important centre of horse-breeding from both imported and colonial-bred stock, providing the well-built draught horse for pulling heavily loaded wagons, the harness horse for delivery work and drawing coaches, and the saddle-horse used for riding. Stud breeding facilities were advertised from the early 1840s. By the 1870s the horse export trade was thriving, and the Port of Melbourne was the country's busiest exporter of horses to Indian, Asian and New Zealand markets. Kirk's Melbourne Horse and Carriage Bazaar in Bourke Street first advertised for business in 1840, and by the 1850s Bourke Street West was famed for its horse bazaars and saleyards. The Victorian Clydesdale Horse Society reports that Clydesdale working horses were a vital part of Melbourne's infrastructure and agricultural industry in the 1930s, when they reached the peak of their popularity despite the increasing competition from mechanization. Their main roles and usage at this time were: • City Delivery: Clydesdales were a common sight for metropolitan deliveries, particularly for breweries (such as Carlton & United Breweries), milk runs, and bread deliveries. • Industrial Work: They were heavily used for hauling cargo at the docks, in construction, and at specialized sites like the Truganina Explosives Reserve, where they pulled wagons. • Agriculture: In surrounding rural areas, they were the primary power source for ploughing and agricultural machinery. • Specialization: By the 1930s, the Clydesdale was smaller and more compact than the Shire or Percheron breeds, making them ideal for navigation in urban environments. After the 1930s their numbers decreased due to the onset of WWI and mechanisation. Wartime petrol rationing led to a brief revival for the working horse, as suburban tradesmen, now used to motor delivery, took their old jinkers out of mothballs. By 1947, however, only 1.5% of city traffic was horse-drawn. In 1952 the large horse cartage company A. Kellet Pty Ltd sold its 250 horses and converted its Richmond stables to storage. In the 1950s at Station and Princes piers, wharf labourers refused to work with the six draught horses still being used to haul trolleys and which were soon superseded by the fork lift, semi-trailer and mobile crane. Where carefully trained horses had once shunted trains in city goods yards, a few hundred a week were now being killed at the abattoirs for pet and human consumption. The last MCC dray horse was withdrawn from service in 1958, but some of the few remaining working animals are used by the mounted police for crowd control at demonstrations and football games. The death knell had also sounded for the associated trades of farrier, saddler and blacksmith. Our photo, therefore, showing the wharf with both the haulage Clydesdales and the rail lines, is a strong visual summary of the social and economic changes experienced in Victoria in the 1930s and on towards the 1950s. Our photo is located at Victoria Dock (also known as Victoria Harbour) which is still an active component of Melbourne’s port system. In 1892 the West Melbourne Dock (later Victoria Dock) was opened, downstream and immediately west of the Spencer Street railway shunting yards. It contained a swing basin for ships, replacing the one which had been provided on the south side of the river, later to be the Duke and Orr dry dock, west of the Charles Grimes Bridge. Further west was the South Wharf along the river bank. The history of Victoria Dock is extremely well described by Ashley Smith in his 2 March 2022 article in Docklands News, and its accompanying aerial photo of the Dock taken in 1934. He writes: "In the early 1930s Victoria Dock was one of the biggest sites for trade and export in Melbourne. A constant queue of ships sailed in, unloaded their cargo, recharged and reloaded, then left for the next port. Around the time this photo was taken (found in a 1934 photo book), the trapezium-shaped basin had been through some changes since its construction in the 1890s. The 497-metre-long Central Pier, finished in 1919, now featured six sheds to house the ever-increasing volume of cargo. The entrance had also been widened in the 1920s to allow better access. Some of the berths featured three-ton jib electric cranes to help with loading cargo and a rail network connected to the State Railway service. By the time construction was completed, the dock was 39 hectares and hailed as the second-largest dock in the world (behind Cavendish Dock, Barrow-in-Furness). To further save costs, excavations were dug to a more reasonable seven metres below low water, instead of British engineer Sir John Coode’s recommended 8.3 metres. Even then, the costs were still around £900,000. It was envisaged, with the extra wharfage, that around thirty 90-metre ships could berth inside. On March 22, 1892, Victoria Dock was opened by Victoria’s Governor, the Earl of Hopetoun (later Australia’s first Governor-General) who opened the sluice to let the Yarra in. It took six days to fill the basin with The Leader newspaper estimating that it would take another six months to completely fill (March 26, 1892). In the end, it took nearly a year before the first ship was allowed to enter on February 20, 1893, when the steamer Hubbuck sailed in to unload 1200 tonnes of cargo in 15 hours. The Argus (February 23, 1893) reported that the ship’s captain, J. R. Brodie, called the Yarra “better than the Thames”, and compared Victoria Dock favourably to the Albert Dock (Liverpool)." This would be a good time to move our focus on to the Taiping, which is the transporter of these giant mahogany logs. The Taiping was a steel-hulled, single-screw passenger-cargo Chinese steamer, which today has the dubious legacy of being involved in a collision headlined as “The Chinese Titanic”. It was constructed by the Hong Kong and Shampoa Dock Company at its facility in Hong Kong, with completion in 1926 for service under the Australia Oriental Line. Her gross register tonnage measured 4,324 tons, reflecting her design for inter-island and coastal trade routes, accommodating both passengers and freight. She operated routes connecting Australian ports with East Asian destinations. As World War II approached, Taiping continued predominantly working the trade routes between China and Australia, until December 1941, when she evacuated women and children from Hong Kong to Manila just before Japanese forces overran the region. She then safely reached Australia despite enemy air raids. Taiping was then requisitioned by the Royal Navy and repurposed as a victualling stores issuing ship for the Eastern Fleet, supporting logistical needs in the Pacific and Indian oceans. Returned to the Australian Oriental Line in 1947, she underwent refitting and by mid-1948 was chartered to the Shanghai Shipping Company, and modified for greater passenger accommodation – approximately 500 passengers. In 1948/49 the Chinese Civil War took place. The Taiping departed Shanghai on 26 January 1949 as one of the final vessels evacuating civilians from to Keelung Harbour in Taiwan. Reports indicate that the Taiping carried double the rated capacity of passengers i.e. 1000. The ship carried families, military personnel, civilians, carrying personal belongings, gold and valuables in hope of resettlement in Nationalist Taiwan. It also held heavy cargo in the form of silver and gold bullion loaded by the Central Bank of China. Because of the risk of patrols, and to conserve fuel, the Captain took the ship away from the usual open-sea passage, and instead navigated along the coast. He also extinguished navigation lights to avoid detection. Shortly after midnight on 27 January 1949 the Taiping collided with the smaller cargo steamer Chien Yuan in the East China Sea near the Zhoushan Archipelago. The Chien Yuan was also operating in darkness. The subsequent collision was catastrophic. The Chien Yuan sank with in 5 minutes, with the loss of 72 of its 74 crew. The Taiping sustained severe structural compromise from the broadside strike and initially remained afloat, then made a swift descent into the freezing water, with no attempt at an organised evacuation. No formal recovery process was instigated, however a distress signal went out. 32 survivors were picked up by the Australian destroyer HMAS Warramunga (on patrol nearby), a passing US vessel found 2 more, and local Zhoushan fishermen retrieved others. In the end, only 37 people survived. The event is remembered as a poignant moment in the mass migration to Taiwan, with families tragically separated. A memorial to the disaster exists at the Keelung Harbour naval base on Taiwan. With its total of over 1,500 deaths, it constituted one of the worst peacetime maritime losses. It is sometimes referred to as the “Oriental Titanic” because of the similarly large loss of life and speed of demise with the RMS Titanic in 1912. A fictional depiction of this event appears in the John Woo movies “The Crossing (Part 1) (2014), and The Crossing II (2015), known in Chinese as “Taiping Wheel”. The narrative weaves a story around pre-disaster romances and wartime turmoil among passengers, culminating in the ship’s rapid sinking. “The production, a high-budget Sino-Taiwanese-Hong Kong co-effort, portrays the event as a microcosm of the 1940s Sino-Japanese and civil war legacies, though critics noted the melodramatic style prioritizing spectacle over historical precision.” In conclusion, it is nice to return to our photo, and observe the people involved in this moment. The dockworkers are, so typical of the 1930s, dressed in what looks to us like formal clothing – dark suits or coats, white shirts, and black hats. I am particularly drawn to the young boy, bare-headed, arms crossed, and so intent on the unloading process. He too is wearing a white shirt, black trousers and jacket, and black shoes. This is 1933 Melbourne – but the haircut he is sporting is now very “hipster” and modern in 2026 Melbourne. References: MAHOGANY FROM MANILA. (1933, August 15). The Age (Melbourne, Vic. : 1854 - 1954), p. 11. Retrieved January 30, 2026, from http://nla.gov.au/nla.news-article204377024 Wikipedia, Taiping steamer, https://en.wikipedia.org/wiki/Taiping_(steamer) Wikipedia, Victoria Dock, https://en.wikipedia.org/wiki/Victoria_Dock_(Melbourne) Docklands News, Ashley Smith, 2 Mar 2022, https://www.docklandsnews.com.au/victoria-dock/ Living Histories: Heritage Council of Victoria, Jill Barnard, 2008, Jetties and Piers, https://livinghistories.net.au/wp-content/uploads/2015/11/Jetties-ONL-intro_Part-1.pdf eMelbourne, Wharves and Docks, https://www.emelbourne.net.au/biogs/EM01612b.htm Australian Academy of Technological Sciences – Harvesting Wood, https://www.austehc.unimelb.edu.au/tia/225.html Old Treasury Building, On the Water – The Docks, https://tinyurl.com/3wkbk66m Old Treasury Building, On The Road, https://tinyurl.com/dw44yr3t Port of Melbourne, Victorian Places, https://www.victorianplaces.com.au/port-of-melbourne Docklands Heritage Study - Environmental History, https://mvga-prod-files.s3.ap-southeast-4.amazonaws.com/public/2024-05/docklands-heritage-review-thematic-environmental-history-1991.pdf eMelbourne, Horses, https://www.emelbourne.net.au/biogs/EM00723b.htm Victorian Clydesdale Horse Society, https://www.clydesdalesvic.org.au/history The Crossing, https://letterboxd.com/film/the-crossing-i/Photographer notations on slide: "Unloading Timber at Wharves 1933 Age B5"ships, shipping, timber industry, shipwrecks, horses, docks, wharves, 1930-1939, wars, docklands -
 Melbourne Tram Museum
Album - Photographs - Comeng Dandenong, 1980s - 1990s
... June-July 1989 Comeng Scans 2024-03-05 0030 Comeng suburban train carriage 1190T on a traverser in the yard at Comeng Dandenong – possible Factory Acceptance Inspection by the Met c. June-July 1989 Comeng Scans 2024-03-05 0031 Comeng suburban train carriage 1190T being tractor-shunted in the yard at Comeng Dandenong – possible Factory Acceptance Inspection by the Met c. ...June-July 1989 Comeng Scans 2024-03-05 0030 Comeng suburban train carriage 1190T on a traverser in the yard at Comeng Dandenong – possible Factory Acceptance Inspection by the Met c. June-July 1989 Comeng Scans 2024-03-05 0031 Comeng suburban train carriage 1190T being tractor-shunted in the yard at Comeng Dandenong – possible Factory Acceptance Inspection by the Met c. ...In March 2024, Milissa Box (DTP) was at a trash and treasure market. She'd found a $5 photo album for sale with some photos that she thought might be of interest… From what I can gather it belonged to the gentleman pictured who was a worker at Dandenong in the Comeng and ABB eras. He appears to have worked on the Z3, A1/A2, B1/B2 class trams, Hong Kong LRVs, Comeng Melbourne suburban trains, and later the extra Victorian-purchased XP power cars and XAM sleepers to enable the Riverina XPT to be extended to Melbourne. It's clear he was very proud of the vehicles he'd helped to build. I have scanned a selection of the images, which appear to be a mix of official builder's portraits, team photos, and self-taken shots showing candid everyday scenes on the shop floor. There are also images of the launch of the XP power cars with then-Victorian Premier Joan Kirner; and some personal visits to see the Flying Scotsman, Victorian Goldfields Railway, Coal Creek, etc. Filename Description Date Comeng Scans 2024-03-05 0001 Three Comeng workers (including the photographer) stand in front of Comeng suburban train 697M (Chopper unit) c. June-July 1989 Comeng Scans 2024-03-05 0002 Three Comeng workers (including the photographer) stand in front of Comeng suburban train 697M (Chopper unit) c. June-July 1989 Comeng Scans 2024-03-05 0003 Hong Kong Light Rail Phase 1 LRV 1013 being lifted onto its transport loader c. 1987-88 Comeng Scans 2024-03-05 0004 Walter Wright transport truck (Mack) waits to draw a heavy transport platform out of a shed at Comeng Dandenong. Hong Kong Phase I LRV (1024) can be seen inside the shed c. 1988 Comeng Scans 2024-03-05 0005 Hong Kong Light Rail Phase 1 LRV 1013 on its transport loader in a shed at Comeng Dandenong ready for transport c. 1988 Comeng Scans 2024-03-05 0006 Hong Kong Light Rail Phase 1 LRV 1013 on its transport loader in a shed at Comeng Dandenong ready for transport c. 1988 Comeng Scans 2024-03-05 0007 The photographer is pictured fitting components to the cab of a Phase I Hong Kong LRV No 1026 c. 1988 Comeng Scans 2024-03-05 0008 Hong Kong Light Rail Phase 1 LRV 1013 on its transport loader at Comeng Dandenong ready for transport c. 1988 Comeng Scans 2024-03-05 0009 Hong Kong Light Rail Phase 1 LRV 1013 on its transport loader at Comeng Dandenong ready for transport c. 1988 Comeng Scans 2024-03-05 0010 Hong Kong Light Rail Phase 1 LRV 1013 on its transport loader at Comeng Dandenong ready for transport c. 1988 Comeng Scans 2024-03-05 0011 The photographer and a colleague are pictured in the car park posing for a photo at Comeng Dandenong c. 1988 Comeng Scans 2024-03-05 0012 The photographer and a colleague are pictured inside the cab of Comeng suburban train 697M, posing for a photo at Comeng Dandenong c. 1989 Comeng Scans 2024-03-05 0013 A stainless steel Hitachi train bodyshell is being transported on a truck-trailer. Possibly taken at Martin and King in Bayswater, under transport to the station for railing to Somerton for fitout. This is a later series M car with the rear-mounted pantograph (note the mounting lugs above the non-driving end) c. 1980 Comeng Scans 2024-03-05 0014 A shot at Comeng Dandenong of the onsite workforce standing in front of a Phase I Hong Kong LRV. c.1987-88 Comeng Scans 2024-03-05 0015 A shot at Comeng Dandenong of the onsite workforce standing in front of a Phase I Hong Kong LRV. c.1987-88 Comeng Scans 2024-03-05 0016 Hong Kong Light Rail Phase 1 LRV 1038 on its transport loader at Port of Melbourne ready for transport c. 1988 Comeng Scans 2024-03-05 0017 Three Comeng workers (including the photographer) stand in front of a workbench at Comeng Dandenong c. June-July 1989 Comeng Scans 2024-03-05 0018 A newly completed Comeng train (wearing VicRail teacup orange) on the factory access track at Comeng Dandenong c. 1981 Comeng Scans 2024-03-05 0019 A newly completed Z3 class tram on a transporter, with its bogie frames waiting transport to Preston Workshops for final fitout and commissioning c. 1981 Comeng Scans 2024-03-05 0020 A newly completed Comeng train (wearing VicRail teacup orange) on the factory access track at Comeng Dandenong c. 1981 Comeng Scans 2024-03-05 0021 A newly completed Z3 class tram on a transporter, with its bogie frames waiting transport to Preston Workshops for final fitout and commissioning c. 1981 Comeng Scans 2024-03-05 0022 A Comeng/ABB artist impression presumably part of their bid for the Double Decker demonstrator train for Melbourne. Note the similarity to similar Comeng sets constructed for Sydney. c. Nov 1989 – April 1990 Comeng Scans 2024-03-05 0023 Victorian Railways steam locomotive K 169 on static display at Coal Creek. c. 1980s Comeng Scans 2024-03-05 0024 Comeng suburban train carriage 1190T on a traverser in the yard at Comeng Dandenong. c. June-July 1989 Comeng Scans 2024-03-05 0025 Comeng suburban train carriages the yard at Comeng Dandenong. c. June-July 1989 Comeng Scans 2024-03-05 0026 Comeng suburban train carriages the yard at Comeng Dandenong. c. June-July 1989 Comeng Scans 2024-03-05 0027 Comeng suburban train carriages the yard at Comeng Dandenong. c. June-July 1989 Comeng Scans 2024-03-05 0028 Comeng suburban train carriages the yard at Comeng Dandenong. c. June-July 1989 Comeng Scans 2024-03-05 0029 Comeng suburban train in a shed at Comeng Dandenong. c. June-July 1989 Comeng Scans 2024-03-05 0030 Comeng suburban train carriage 1190T on a traverser in the yard at Comeng Dandenong – possible Factory Acceptance Inspection by the Met c. June-July 1989 Comeng Scans 2024-03-05 0031 Comeng suburban train carriage 1190T being tractor-shunted in the yard at Comeng Dandenong – possible Factory Acceptance Inspection by the Met c. June-July 1989 Comeng Scans 2024-03-05 0032 Two Comeng workers carry a train part (possibly a first aid kit) for fitting to a Comeng suburban train. c. June-July 1989 Comeng Scans 2024-03-05 0033 Comeng suburban train carriage 1190T on a traverser in the yard at Comeng Dandenong – possible Factory Acceptance Inspection by the Met. One of the Met staff appears to be giving one of the Comeng workers a kiss on the cheek. c. June-July 1989 Comeng Scans 2024-03-05 0034 A B2 Class tram is on a low-loader multiwheel transport trailer waiting transport to Preston Workshops; while what appears to be a classic AP6 Valiant Safari Wagon is in the foreground. c. June-July 1989 Comeng Scans 2024-03-05 0035 A B2 Class tram is on a low-loader multiwheel transport trailer waiting transport to Preston Workshops; while a worker poses for a photo with his hand on the rigging. c. June-July 1989 Comeng Scans 2024-03-05 0036 A B2 Class tram is on a low-loader multiwheel transport trailer waiting transport to Preston Workshops; An HT Holden Belmont sedan has been posed in front to appear as if it is towing the heavy vehicle. c. June-July 1989 Comeng Scans 2024-03-05 0037 A B2 Class tram is on a low-loader multiwheel transport trailer waiting transport to Preston Workshops; An HT Holden Belmont sedan has been posed in front to appear as if it is towing the heavy vehicle. c. June-July 1989 Comeng Scans 2024-03-05 0038 A1 Class tram 232 is pictured up on stands while various A/B class tram cab frames are in the foreground in various stages of assembly. Of note, 232 appears to have been returned to Dandenong for major repair or other work, and shows signs of having been in traffic for some time (weathering and wear) c. June-July 1989 Comeng Scans 2024-03-05 0039 various A/B class tram cab frames are in the foreground in various stages of assembly. c. June-July 1989 Comeng Scans 2024-03-05 0040 A group of Comeng Dandenong workers stopped on a tea break. c. June-July 1989 Comeng Scans 2024-03-05 0041 An A/B Class tram cab being fitted out with electronics and controls. c. June-July 1989 Comeng Scans 2024-03-05 0042 A new Comeng suburban train in Metropolitan Transit livery on the test track at Comeng Dandenong. c. mid 1980s Comeng Scans 2024-03-05 0043 A new Comeng suburban train in Metropolitan Transit livery on the test track at Comeng Dandenong. c. mid 1980s Comeng Scans 2024-03-05 0044 Interior shot of a new Comeng suburban train at Comeng Dandenong. c. mid 1980s Comeng Scans 2024-03-05 0045 Interior shot of a new Comeng suburban train at Comeng Dandenong. c. mid 1980s Comeng Scans 2024-03-05 0046 The exterior sign at Dandenong showing ABB brand. Early 1990s Comeng Scans 2024-03-05 0047 A B2 Class tram is on a low-loader multiwheel transport trailer waiting transport to Preston Workshops. Early 1990s Comeng Scans 2024-03-05 0048 The Brush generator and Paxman Valenta engine as fitted inside a new XP power car for NSW Countrylink (paid for by Victoria) c. 1992 Comeng Scans 2024-03-05 0049 An exterior shot of a new Countrylink XP power car for NSW under construction (paid for by Victoria) c. 1992 Comeng Scans 2024-03-05 0050 Two new XAM class XPT sleeper carriages under construction at Comeng Dandenong c. 1992 Comeng Scans 2024-03-05 0051 A B2 class tram under construction at Comeng Dandenong Early 1990s Comeng Scans 2024-03-05 0052 A B2 class tram under construction at Comeng Dandenong Early 1990s Comeng Scans 2024-03-05 0053 An exterior shot of a new Countrylink XP power car for NSW being moved out of the shed c. 1992 Comeng Scans 2024-03-05 0054 An exterior shot of a new Countrylink XP power car at Comeng Dandenong c. 1992 Comeng Scans 2024-03-05 0055 An exterior shot of a new Countrylink XP power car at Comeng Dandenong c. 1992 Comeng Scans 2024-03-05 0056 An exterior shot of a new Countrylink XP power car at Comeng Dandenong c. 1992 Comeng Scans 2024-03-05 0057 B2 class trams under construction at Comeng Dandenong Early 1990s Comeng Scans 2024-03-05 0058 An XP Powercar from NSW wearing the Intercity XPT Candy Livery at Comeng Dandenong. It is not known if this was originally painted in this livery (incorrectly) or if this was one of the first delivered series transported to Dandenong to aid the construction process of the four additional locomotives. Early 1990s Comeng Scans 2024-03-05 0059 Melbourne B2 Class tram B2.2100 (renumbered from 2102) painted in the distinctive Chocolate and Cream livery to mark the completion of 100 B2 class trams Early 1990s Comeng Scans 2024-03-05 0060 A factory forklift wearing a hand painted “We love Labo(u)r” cardboard sign, possibly in connection to a media event with the Victorian Premier onsite at Comeng Dandenong. c. 1992 Comeng Scans 2024-03-05 0061 An exterior shot of a new Countrylink XP power car at Comeng Dandenong c. 1992 Comeng Scans 2024-03-05 0062 Two new new Countrylink XP power cars under construction and final fitout at Comeng Dandenong c. 1992 Comeng Scans 2024-03-05 0063 An exterior shot of a new Countrylink XP power car on the traverser at Comeng Dandenong c. 1992 Comeng Scans 2024-03-05 0064 A B2 Class tram is on a low-loader multiwheel transport trailer waiting transport to Preston Workshops. A large banner is draped on the side explaining that this is the 106th vehicle delivered to the Public Transport Corporation (B2.2108). c. Oct 1992 (based on delivery date) Comeng Scans 2024-03-05 0065 Victorian Premier Joan Kirner addresses a group of dignitaries in front of an ABB banner inside the main administration building at Dandenong, on the occasion of the first XPT power car purchased by Victoria being unveiled at a media event c. 1992 Comeng Scans 2024-03-05 0066 An ABB executive addresses a group of dignitaries in front of an ABB banner inside the main administration building at Dandenong, on the occasion of the first XPT power car purchased by Victoria being unveiled at a media event c. 1992 Comeng Scans 2024-03-05 0067 Victorian Premier Joan Kirner addresses the media in front of a completed XP class XPT power car at Dandenong, on the occasion of the first XPT power car purchased by Victoria being unveiled at a media event c. 1992 Comeng Scans 2024-03-05 0068 An exterior shot of a new Countrylink XP power car at Comeng Dandenong c. 1992 Comeng Scans 2024-03-05 0069 A Melbourne B2 class tram undergoing testing on the test circuit at ABB Dandenong c. early 1990s Comeng Scans 2024-03-05 0070 An XPlorer type DMU emerges from a shed at ABB Dandenong c.1994 Comeng Scans 2024-03-05 0071 Voith final drive axle mounted units for XPlorer railcars waiting to be fitted at Dandenong. c.1994 Comeng Scans 2024-03-05 0072 A completed XAM class sleeper carriage at ABB Dandenong. c.1993 Comeng Scans 2024-03-05 0073 Completed XPlorer railcars wait transfer to South Dynon for bogie exchange and transfer to NSW at ABB Dandenong. c. 1994 Comeng Scans 2024-03-05 0074 A clipping from an ABB internal newsletter outlining the staff-led initiative to commemorate the 100th B2 class tram with a special livery c.1992 Has photographs of ABB, Steamrail tours, Castlemaine and Maldon Railway, Fying Scotsman 4472 visit and Puffing Billy.Yields information about the people and events at Commonwealth Engineering plant Dandenong and the activities of the unknown compiler.Album containing 40 leaves, photos in a heavy card 3 ring spring binder.comeng, commonwealth engineering co., tramcars, hong kong, nsw, sydney, melbourne, railways, the met, b class, cmr, steam engines, abb, asea brown boveri -
 Otway Districts Historical Society
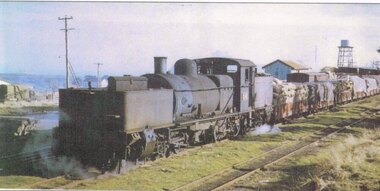
Photograph, R. Preston, Beech Forest: G42 shunting, 1957, 5 June 1957
... Locomotive G42 shunting in the Beech Forest railway yard on 5 June 1957. In the background, an NUU louvred van, and behind that the Goods Shed and the water tank for the sawmill. 135mm x 279mm print....Locomotive G42 shunting in the Beech Forest railway yard on 5 June 1957. In the background, an NUU louvred van, and behind that the Goods Shed and the water tank for the sawmill. 135mm x 279mm print. ...Colour. Locomotive G42 shunting in the Beech Forest railway yard on 5 June 1957. In the background, an NUU louvred van, and behind that the Goods Shed and the water tank for the sawmill. 135mm x 279mm print.beech forest; railways; loco g42; -
 Orbost & District Historical Society
black and white photograph, February 1971
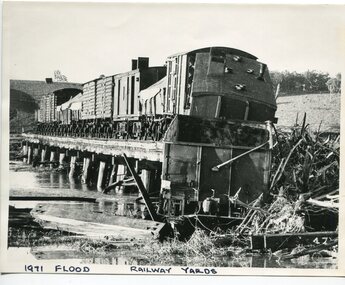
... shunted across the viaduct when waters smashed through washing away several trucks sending the crew running for their lives. This is pictorial evidence of a significant local event. It is connected to the history of the railway in East Gippsland. floods-1971-orbost orbost-railway natural-disasters-orbost on front - "1971 Flood, Railway Yards" A large black / white photograph of flooded railway yards with a train engine stranded on a small section of track surrounded by water and debris. black and white photograph ...The 1971 flood was the the worst flood on record. At Jarrahmond it was at least 11 metres and up to one and a half kilometres wide on the flats causing enormous damage to the flood plain. Records say that "The brown floodwater stain in Bass Strait could be seen from passing airliners." Considerable damage was done to railway infrastructure, roads and farms. More information from the APRIL, 2008 newsletter by John Phillips. (see orbosthistory.com.au) The railway line was destroyed and was not expected to be opened for a fortnight. Orbost was cut off by 50 square miles of Snowy River floodwater. This train was being shunted across the viaduct when waters smashed through washing away several trucks sending the crew running for their lives.This is pictorial evidence of a significant local event. It is connected to the history of the railway in East Gippsland.A large black / white photograph of flooded railway yards with a train engine stranded on a small section of track surrounded by water and debris.on front - "1971 Flood, Railway Yards"floods-1971-orbost orbost-railway natural-disasters-orbost -
 Sunshine and District Historical Society Incorporated
Photograph - Ashley Street Railway Underpass Photographs
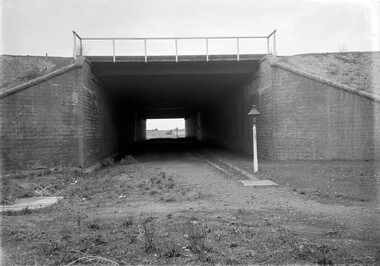
... Today the yard is used for wagon storage, crew changes, light shunting and providing access to the Tottenham triangle and Sunshine corridor....Today the yard is used for wagon storage, crew changes, light shunting and providing access to the Tottenham triangle and Sunshine corridor. ...The Tottenham Yard began as a modest goods yard supporting local industries in Braybrook, Tottenham, and West Footscray, the Sunshine industrial belt and the nearby munitions and explosives factories Key features of the early yard included a small number of sidings, a goods shed, a basic loading / unloading facilities and a connection to the Tottenham triangle (Sunshine–Footscray–North Melbourne junction). As the yard expanded with additional siding and larger marshalling areas, there was a requirement to maintain the Ashley Street North – South access route for private and commercial travel. The work involved to solve this problem was to elevate the railway yard and place Ashley Street through a tunnel. This railway underpass for many years was simply known as the Ashley Street Tunnel. By the 1970s, the Tottenham Yard had become one of the largest freight yards in Victoria, second only to Dynon. In the 1982, the level crossing gates at the southern end of tunnel were removed, the tunnel extended southwards and the former Tottenham Railway Station was replaced with an elevated one above the new tunnel extension. During these works the road surface level was lowered to allow for higher trucks to pass through. At this point of time, the reference to tunnel was replaced with underpass. During the 1990’s and 2000’s, there was a decline in the use of the Tottenham Yard and many sidings were removed, shorten, converted to storage or left unused. Today the yard is used for wagon storage, crew changes, light shunting and providing access to the Tottenham triangle and Sunshine corridor.These photographs were taken shortly after the tunnel was completed.5335.01 - Ashley Street Railway Underpass Looking North Photo 01.jpg 5335.02 - Ashley Street Railway Underpass Looking South Photo 02.jpgashley street, railway line, tottenham -
 Puffing Billy Railway
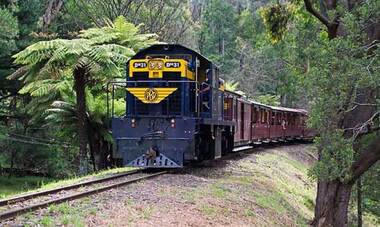
DH59 - Diesel Hydraulic locomotive (formerly DH 31), 1970
... This was later purchased and by 1974 the 73 DH class locomotives had taken over shunting duties in most Queensland yards. They were also used on short distance freight services. ...This was later purchased and by 1974 the 73 DH class locomotives had taken over shunting duties in most Queensland yards. They were also used on short distance freight services. ...DH31 - DH59 Diesel Hydraulic locomotive Built to 3'6" gauge in 1970 this Diesel Hydraulic locomotive entered service for the Queensland Railways where it remained until withdrawn in 1994. Purchased by the E.T.R.B. in 1995, it was converted to 2'6" gauge in Queensland and transported to Belgrave in 1996 for overhaul. It re-entered service later in 1996, although instead of receiving a V.R. type classification & number and V.R. style livery, it retained its Q.R. number of DH59 and its Q.R. livery minus the Q.R. logo, but has since been repainted the traditional Blue & Gold of V.R. diesel locomotives and reclassified DH31. It has since been returned to DH 59. The DH class was a class of diesel-hydraulic locomotives built by Walkers Limited, Maryborough for Queensland Railways between 1966 and 1974. In 1966 Queensland Railways tested a Walkers Limited built diesel-hydraulic shunting locomotive. This was later purchased and by 1974 the 73 DH class locomotives had taken over shunting duties in most Queensland yards. They were also used on short distance freight services. With the closure of many freight yards and the move to longer trains withdrawals started in the 1980s. Many were sold for further use on Queensland sugar cane railways. Locomotive's Queensland Railways Service History : Locomotive : DH59 Serial No: 646 In Service : 19/05/1970 With drawn from Service : 20/05/1991 LOCOMOTIVE DETAILS DH class No. originally constructed : 74 No. in service : 2 No. stored : Wheel arrangement : Bo-BoDH Roadworthy weight : 40T Maximum axle load : 10T Tractive effort (85%) Length overall: 33' Height overall : 12' 6 1⁄2" Driving wheel diameter : 36" Date of manufacture :1970 Manufacturer :Walkers Place of manufacture : Maryborough, Queensland Locomotive type : Diesel Hydraulic DH Class Type Diesel-Hydraulic Introduced 1966 Number in class 73 Manufacturer Walkers Gauge Narrow (QR, MIM) 900mm (SECV) Axles B-B Length 11.1 m Mass 37 t Engine Caterpillar D355E Transmission Voith L42U2 Power 347 kW / 465 HP Tractive effort 114 / 82 kN Speed 50 / 10 km/hHistoric - Queensland Railways - Diesel Hydraulic locomotive DH59DH59 Diesel Hydraulic locomotive made of steel and metalDH59 Diesel Hydraulic locomotivepuffing billy, diesel-hydraulic locomotive, dh59, dh31, walkers diesel hydraulic, queensland railways -
 Puffing Billy Railway
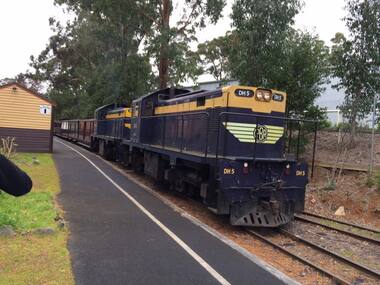
DH 5 - Diesel Hydraulic locomotive, 1968
... This was later purchased and by 1974 the 73 DH class locomotives had taken over shunting duties in most Queensland yards. They were also used on short distance freight services. ...This was later purchased and by 1974 the 73 DH class locomotives had taken over shunting duties in most Queensland yards. They were also used on short distance freight services. ...DH5 Diesel Hydraulic locomotive The DH class was a class of diesel-hydraulic locomotives built by Walkers Limited, Maryborough for Queensland Railways between 1966 and 1974. In 1966 Queensland Railways tested a Walkers Limited built diesel-hydraulic shunting locomotive. This was later purchased and by 1974 the 73 DH class locomotives had taken over shunting duties in most Queensland yards. They were also used on short distance freight services. With the closure of many freight yards and the move to longer trains withdrawals started in the 1980s. Many were sold for further use on Queensland sugar cane railways. Locomotive's Queensland Railways Service History : Locomotive : DH5 Serial No: 587 In Service : 27/08/1968 With drawn from Service : 7/07/1992 LOCOMOTIVE DETAILS DH class No. originally constructed : 74 No. in service : 2 No. stored : Wheel arrangement : Bo-BoDH Roadworthy weight : 40T Maximum axle load : 10T Tractive effort (85%) Length overall: 33' Height overall : 12' 6 1⁄2" Driving wheel diameter : 36" Date of manufacture :1970 Manufacturer :Walkers Place of manufacture : Maryborough, Queensland Locomotive type : Diesel Hydraulic DESCRIPTION - B-B DH FORMER CLASS AND NUMBER - 8/1968 Built By - Walkers, Maryborough, Queensland Service History Date built - 1968 Original owner - Queensland Government Railways Original gauge - 1067mm Withdrawn - Next owner - State Electricity Commission of Victoria DH5 8/1968 Sold to SECV as CC2, In service 8-1993 Sold to Mackay Sugar CC02 (Ex DH5). CC02 was purchased by Cooks Construction in 1992 and used on the 900mm Yallourn railway in Victoria. Mackay Sugar purchased in 2001. Title Value Status Preserved - Operational Gauge Narrow 2ft 6in (762mm) Owners Puffing Billy Railway Operators Puffing Billy Railway Manufacturer Walkers Ltd - Maryborough, Queensland Builders number 587 Associated locos Renumbered from CC02 Liveries carried VR Blue & Gold Puffing Billy Service History or Notes Date acquired - 2008 Acquired from - Mackay Sugar Mill ? State when acquired - Operational ? Work done - Regauged, overhauled Restored to service - Current State - Operational Historic - Queensland Railways - Diesel Hydraulic locomotive DH5DH 5 Diesel Hydraulic locomotive made of steel and metalDH 5puffing billy railway, dh5, locomotive, cc02, diesel,, queensland railways, diesel hydraulic locomotive dh5, walkers diesel hydraulic -
 Melbourne Tram Museum
Album - David Frost Slide Collection, David Frost
... Number Brief Description date DFC1 A general view from the former railway platform at Port Melb Station looking towards Station Pier on opening day 20-12-1987 DFC2 A2 285 in the Tramway Platform at Port Melbourne Station on opening Day 20-12-1987 DFC3 A2 285 in the Tramway Platform at Port Melbourne Station on opening Day 20-12-1987 DFC4 A2 285 in the Tramway Platform at Port Melbourne Station on opening Day 20-12-1987 DFC5 A2 273 at St Kilda Tramway Station on opening day 22-11-1987 DFC6 A2 273 turning from Fitzroy St into St Kilda Tramway Station on opening day 22-11-1987 DFC7 B1 2001 at St Kilda Tramway Station turning into Fitzroy St on opening day 22-11-1987 DFC8 B1 2002 enters St Kilda Tramway Station on opening day 22-11-1987 DFC9 An A2 approaches St Kilda Tramway Station on opening day 22-11-1987 DFC10 Concreting the connecting curve from Fitroy St into St Kilda Station c July 1987 DFC11 An MTA AEC MKVI bus in Grey St St Kilda at Dalgety St with Tramway works in the background c July 1987 DFC12 Grey St St Kilda at Dalgety St with Tramway works in the background in Fitzroy St c July 1987 DFC13 Concreting the connecting curve from Fitroy St into St Kilda Station c July 1987 DFC14 Restaurant Tram 442 in Fitzroy St at Grey St Passing MTA bus 59 outside St Kilda Station c1986 DFC15 Former VR tram stop sign painted on a pole at Glenhuntly Rd & Broadway DFC16 Former VR Elwood Tram Depot under demolition 1996 DFC17 Former VR Elwood Tram Depot under demolition 1996 DFC18 Former VR Elwood Tram Depot under demolition 1996 DFC19 Former VR Elwood Tram Depot under demolition 1996 DFC20 Former VR Elwood Tram Depot under demolition 1996 DFC21 Former VR Elwood Tram Depot under demolition 1996 DFC22 Former VR Elwood Tram Depot under demolition 1996 DFC23 Former VR Elwood Tram Depot under demolition 1996 DFC24 MTS Tower waggon in use at the former VR Elwood Tram Depot under demolition 1996 DFC25 A Sign advertising the sale of the Former VR Elwood Tram Depot – 10/8/1996 1996 DFC26 Former VR Elwood Tram Depot under demolition 1996 DFC27 Interior of a shed at the former VR Elwood Tram Depot under demolition 1996 DFC28 Former VR Elwood Tram Depot under demolition 1996 DFC29 Former VR Elwood Tram Depot under demolition 1996 DFC30 Former VR Elwood Tram Depot under demolition 1996 DFC31 VR 20, former breakdown car in Bob Prentice’s Back Yard Jan 1974 DFC32 VR 20 on a low loader en route to Bob Prentice’s for preservation 1959 DFC33 VR 20 as the breakdown car on the St Kilda Electric Street Railway c1955 DFC34 VR 39 waits in St Kilda St as breakdown car 20 enters Elwood Depot c1955 DFC35 VR 54 and 50 in the rear yard of Elwood Depot c1958 DFC36 VR 50 in the rear yard of Elwood Depot c1958 DFC37 VR 50 in the rear yard of Elwood Depot c1958 DFC38 VR 28 in St Kilda St outside Elwood depot after the line had been cut back to this point c1958 DFC39 VR 29 in St Kilda St outside Elwood depot after the line had been cut back to this point c1958 DFC40 VR 35 passes 28 on the St Kilda Electric Street Railway c1955 DFC41 VR 39 on the St Kilda Electric Street Railway c1955 DFC42 Y1 613 on a tour c1970 DFC43 VR 54 in St Kilda St outside Elwood Depot c1955 DFC44 VR 28 at Brighton Beach Terminus c1955 DFC45 VR 33 being washed in the wash bay at the rear of Elwood Depot c1955 DFC46 VR 20 breakdown car running into Elwood Depot c1955 DFC47 VR 3 in the rear yard at Elwood Depot c1955 DFC48 VR 51 on an AETA Tour running out of Elwood Depot c1958 DFC49 VR 28 on the St Kilda Electric Street Railway c1955 DFC50 VR 28 with crew in St Kilda St outside Elwood depot after the line had been cut back to this point 1959 DFC51 VR 52 in Grey St near Fitzroy St c1958 DFC52 VR 51 on a AETA Tour passes 33 in Grey St near Fitzroy St c1958 DFC53 VR 29 in Grey St near Fitzroy St c1958 DFC54 VR51 on an AETA Tour shunts as 52 waits on the St Kilda Electric Street Railway c1958 DFC55 VR 51 on the Black Rock Electric Street Railway c1955 DFC56 VR 28 in St Kilda St outside Elwood depot after the line had been cut back to this point c1958 DFC57 Combined Rail-Tram Tickets of the Black Rock Electric Street Railway Feb 1975 DFC58 Combined Rail-Tram Tickets of the St Kilda Electric Street Railway Feb 1975 DFC59 Electric Street Railway & Motor Coach Paper Tear off Tickets Feb 1975 DFC60 VR 52 & 53 on Rt 82 pass in Cordite Ave near Wests Rd Sept 1975 DFC61 Z 68 & 52 in East Preston Depot in M&MTB Livery c1977 DFC62 Copy photo of VR 18 in Elwood Depot c1910 DFC63 VR 51 as a one man car at Black Rock Terminus c1955 DFC64 VR 53 on Rt 82 in Droop St Footscray Jan 1974 DFC65 B2 2027 on Rt 96 in South Melb Station c1988 DFC66 VR 20 as preserved in Bob Prentice’s backyard High St Prahran Jan 1974 DFC67 VR 700 on Rt 82 in Droop St Footsray c1978 DFC68 VR 28 as the last car from ST Kilda Station 28-2-1959 DFC69 VR 700 at the Rt 82 Moonee Ponds Terminus c1978 DFC70 VR 52 waiting time at the Rt 82 Footscray Terminus, the driver intently stares at the bundy clock as the Braid and the Connie gossip Jul 1972 DFC71 VR 54 shunting outside Elwood Depot to return to St Kilda Station 1959 DFC72 SW6 969 in MTA Livery blocking the entrance to South Melb Depot presumably during the scratch ticket dispute Jan 1990 DFC73 VR 52 & 53 on Rt 82 pass in Droop St Footscray Sept 1975 DFC74 VR 700 after withdrawl in the Newport Railway museum in the process of a repaint c1985 DFC75 VR 700 after withdrawl in the Newport Railway museum in the process of a repaint c1985 DFC76 VR 700 on Rt 82 in Droop St Footsray at The Cresent c1978 DFC77 VR 700 on Rt 82 in Droop St Footsray c1978 DFC78 Former VR tram depot in use as an MTA Bus depot c1990 DFC79 VR 52 waiting time at the Rt 82 Footscray Terminus Jul 1972 DFC80 VR 52 waiting time at the Rt 82 Footscray Terminus with Connie changing the pole Jul 1972 DFC81 VR 52 at the Rt 82 Moonee Ponds Terminus with the crew chatting 7-12-1974 DFC82 VR 52 on Rt 82 on the reserved track in Raleigh Rd Ascot Vale Jan 1974 DFC83 VR 53 on Rt 82 in Leeds St Footscray about to turn into Hopkins St April 1976 DFC84 VR 53 on Rt 82 in Droop St Footsray Jan 1974 DFC85 VR 700 on Rt 82 in Droop St Footsray at Hopkins St c1978 DFC86 Z 52 in MTA livery on Rt 19 in Elizabeth St near Bourke St c1985 DFC87 VR 52 at the Rt 82 Moonee Ponds Terminus Jul 1972 DFC88 VR 53 at the Rt 82 Footscray Terminus Jan 1974 DFC89 VR 52 freshly outshopped from the workshops and W7 1011 at the Bourke St Terminus with 52 on display for the 1968 railway exhibition 1968 DFC90 Painting of W class 369 in Chocolate & Cream c1930 DFC91 Charing Cross, Bendigo at night c1965 DFC92 Ballarat ? ...Number Brief Description date DFC1 A general view from the former railway platform at Port Melb Station looking towards Station Pier on opening day 20-12-1987 DFC2 A2 285 in the Tramway Platform at Port Melbourne Station on opening Day 20-12-1987 DFC3 A2 285 in the Tramway Platform at Port Melbourne Station on opening Day 20-12-1987 DFC4 A2 285 in the Tramway Platform at Port Melbourne Station on opening Day 20-12-1987 DFC5 A2 273 at St Kilda Tramway Station on opening day 22-11-1987 DFC6 A2 273 turning from Fitzroy St into St Kilda Tramway Station on opening day 22-11-1987 DFC7 B1 2001 at St Kilda Tramway Station turning into Fitzroy St on opening day 22-11-1987 DFC8 B1 2002 enters St Kilda Tramway Station on opening day 22-11-1987 DFC9 An A2 approaches St Kilda Tramway Station on opening day 22-11-1987 DFC10 Concreting the connecting curve from Fitroy St into St Kilda Station c July 1987 DFC11 An MTA AEC MKVI bus in Grey St St Kilda at Dalgety St with Tramway works in the background c July 1987 DFC12 Grey St St Kilda at Dalgety St with Tramway works in the background in Fitzroy St c July 1987 DFC13 Concreting the connecting curve from Fitroy St into St Kilda Station c July 1987 DFC14 Restaurant Tram 442 in Fitzroy St at Grey St Passing MTA bus 59 outside St Kilda Station c1986 DFC15 Former VR tram stop sign painted on a pole at Glenhuntly Rd & Broadway DFC16 Former VR Elwood Tram Depot under demolition 1996 DFC17 Former VR Elwood Tram Depot under demolition 1996 DFC18 Former VR Elwood Tram Depot under demolition 1996 DFC19 Former VR Elwood Tram Depot under demolition 1996 DFC20 Former VR Elwood Tram Depot under demolition 1996 DFC21 Former VR Elwood Tram Depot under demolition 1996 DFC22 Former VR Elwood Tram Depot under demolition 1996 DFC23 Former VR Elwood Tram Depot under demolition 1996 DFC24 MTS Tower waggon in use at the former VR Elwood Tram Depot under demolition 1996 DFC25 A Sign advertising the sale of the Former VR Elwood Tram Depot – 10/8/1996 1996 DFC26 Former VR Elwood Tram Depot under demolition 1996 DFC27 Interior of a shed at the former VR Elwood Tram Depot under demolition 1996 DFC28 Former VR Elwood Tram Depot under demolition 1996 DFC29 Former VR Elwood Tram Depot under demolition 1996 DFC30 Former VR Elwood Tram Depot under demolition 1996 DFC31 VR 20, former breakdown car in Bob Prentice’s Back Yard Jan 1974 DFC32 VR 20 on a low loader en route to Bob Prentice’s for preservation 1959 DFC33 VR 20 as the breakdown car on the St Kilda Electric Street Railway c1955 DFC34 VR 39 waits in St Kilda St as breakdown car 20 enters Elwood Depot c1955 DFC35 VR 54 and 50 in the rear yard of Elwood Depot c1958 DFC36 VR 50 in the rear yard of Elwood Depot c1958 DFC37 VR 50 in the rear yard of Elwood Depot c1958 DFC38 VR 28 in St Kilda St outside Elwood depot after the line had been cut back to this point c1958 DFC39 VR 29 in St Kilda St outside Elwood depot after the line had been cut back to this point c1958 DFC40 VR 35 passes 28 on the St Kilda Electric Street Railway c1955 DFC41 VR 39 on the St Kilda Electric Street Railway c1955 DFC42 Y1 613 on a tour c1970 DFC43 VR 54 in St Kilda St outside Elwood Depot c1955 DFC44 VR 28 at Brighton Beach Terminus c1955 DFC45 VR 33 being washed in the wash bay at the rear of Elwood Depot c1955 DFC46 VR 20 breakdown car running into Elwood Depot c1955 DFC47 VR 3 in the rear yard at Elwood Depot c1955 DFC48 VR 51 on an AETA Tour running out of Elwood Depot c1958 DFC49 VR 28 on the St Kilda Electric Street Railway c1955 DFC50 VR 28 with crew in St Kilda St outside Elwood depot after the line had been cut back to this point 1959 DFC51 VR 52 in Grey St near Fitzroy St c1958 DFC52 VR 51 on a AETA Tour passes 33 in Grey St near Fitzroy St c1958 DFC53 VR 29 in Grey St near Fitzroy St c1958 DFC54 VR51 on an AETA Tour shunts as 52 waits on the St Kilda Electric Street Railway c1958 DFC55 VR 51 on the Black Rock Electric Street Railway c1955 DFC56 VR 28 in St Kilda St outside Elwood depot after the line had been cut back to this point c1958 DFC57 Combined Rail-Tram Tickets of the Black Rock Electric Street Railway Feb 1975 DFC58 Combined Rail-Tram Tickets of the St Kilda Electric Street Railway Feb 1975 DFC59 Electric Street Railway & Motor Coach Paper Tear off Tickets Feb 1975 DFC60 VR 52 & 53 on Rt 82 pass in Cordite Ave near Wests Rd Sept 1975 DFC61 Z 68 & 52 in East Preston Depot in M&MTB Livery c1977 DFC62 Copy photo of VR 18 in Elwood Depot c1910 DFC63 VR 51 as a one man car at Black Rock Terminus c1955 DFC64 VR 53 on Rt 82 in Droop St Footscray Jan 1974 DFC65 B2 2027 on Rt 96 in South Melb Station c1988 DFC66 VR 20 as preserved in Bob Prentice’s backyard High St Prahran Jan 1974 DFC67 VR 700 on Rt 82 in Droop St Footsray c1978 DFC68 VR 28 as the last car from ST Kilda Station 28-2-1959 DFC69 VR 700 at the Rt 82 Moonee Ponds Terminus c1978 DFC70 VR 52 waiting time at the Rt 82 Footscray Terminus, the driver intently stares at the bundy clock as the Braid and the Connie gossip Jul 1972 DFC71 VR 54 shunting outside Elwood Depot to return to St Kilda Station 1959 DFC72 SW6 969 in MTA Livery blocking the entrance to South Melb Depot presumably during the scratch ticket dispute Jan 1990 DFC73 VR 52 & 53 on Rt 82 pass in Droop St Footscray Sept 1975 DFC74 VR 700 after withdrawl in the Newport Railway museum in the process of a repaint c1985 DFC75 VR 700 after withdrawl in the Newport Railway museum in the process of a repaint c1985 DFC76 VR 700 on Rt 82 in Droop St Footsray at The Cresent c1978 DFC77 VR 700 on Rt 82 in Droop St Footsray c1978 DFC78 Former VR tram depot in use as an MTA Bus depot c1990 DFC79 VR 52 waiting time at the Rt 82 Footscray Terminus Jul 1972 DFC80 VR 52 waiting time at the Rt 82 Footscray Terminus with Connie changing the pole Jul 1972 DFC81 VR 52 at the Rt 82 Moonee Ponds Terminus with the crew chatting 7-12-1974 DFC82 VR 52 on Rt 82 on the reserved track in Raleigh Rd Ascot Vale Jan 1974 DFC83 VR 53 on Rt 82 in Leeds St Footscray about to turn into Hopkins St April 1976 DFC84 VR 53 on Rt 82 in Droop St Footsray Jan 1974 DFC85 VR 700 on Rt 82 in Droop St Footsray at Hopkins St c1978 DFC86 Z 52 in MTA livery on Rt 19 in Elizabeth St near Bourke St c1985 DFC87 VR 52 at the Rt 82 Moonee Ponds Terminus Jul 1972 DFC88 VR 53 at the Rt 82 Footscray Terminus Jan 1974 DFC89 VR 52 freshly outshopped from the workshops and W7 1011 at the Bourke St Terminus with 52 on display for the 1968 railway exhibition 1968 DFC90 Painting of W class 369 in Chocolate & Cream c1930 DFC91 Charing Cross, Bendigo at night c1965 DFC92 Ballarat ? ...Photo - see pdf file for further information. Number Brief Description date DFC1 A general view from the former railway platform at Port Melb Station looking towards Station Pier on opening day 20-12-1987 DFC2 A2 285 in the Tramway Platform at Port Melbourne Station on opening Day 20-12-1987 DFC3 A2 285 in the Tramway Platform at Port Melbourne Station on opening Day 20-12-1987 DFC4 A2 285 in the Tramway Platform at Port Melbourne Station on opening Day 20-12-1987 DFC5 A2 273 at St Kilda Tramway Station on opening day 22-11-1987 DFC6 A2 273 turning from Fitzroy St into St Kilda Tramway Station on opening day 22-11-1987 DFC7 B1 2001 at St Kilda Tramway Station turning into Fitzroy St on opening day 22-11-1987 DFC8 B1 2002 enters St Kilda Tramway Station on opening day 22-11-1987 DFC9 An A2 approaches St Kilda Tramway Station on opening day 22-11-1987 DFC10 Concreting the connecting curve from Fitroy St into St Kilda Station c July 1987 DFC11 An MTA AEC MKVI bus in Grey St St Kilda at Dalgety St with Tramway works in the background c July 1987 DFC12 Grey St St Kilda at Dalgety St with Tramway works in the background in Fitzroy St c July 1987 DFC13 Concreting the connecting curve from Fitroy St into St Kilda Station c July 1987 DFC14 Restaurant Tram 442 in Fitzroy St at Grey St Passing MTA bus 59 outside St Kilda Station c1986 DFC15 Former VR tram stop sign painted on a pole at Glenhuntly Rd & Broadway DFC16 Former VR Elwood Tram Depot under demolition 1996 DFC17 Former VR Elwood Tram Depot under demolition 1996 DFC18 Former VR Elwood Tram Depot under demolition 1996 DFC19 Former VR Elwood Tram Depot under demolition 1996 DFC20 Former VR Elwood Tram Depot under demolition 1996 DFC21 Former VR Elwood Tram Depot under demolition 1996 DFC22 Former VR Elwood Tram Depot under demolition 1996 DFC23 Former VR Elwood Tram Depot under demolition 1996 DFC24 MTS Tower waggon in use at the former VR Elwood Tram Depot under demolition 1996 DFC25 A Sign advertising the sale of the Former VR Elwood Tram Depot – 10/8/1996 1996 DFC26 Former VR Elwood Tram Depot under demolition 1996 DFC27 Interior of a shed at the former VR Elwood Tram Depot under demolition 1996 DFC28 Former VR Elwood Tram Depot under demolition 1996 DFC29 Former VR Elwood Tram Depot under demolition 1996 DFC30 Former VR Elwood Tram Depot under demolition 1996 DFC31 VR 20, former breakdown car in Bob Prentice’s Back Yard Jan 1974 DFC32 VR 20 on a low loader en route to Bob Prentice’s for preservation 1959 DFC33 VR 20 as the breakdown car on the St Kilda Electric Street Railway c1955 DFC34 VR 39 waits in St Kilda St as breakdown car 20 enters Elwood Depot c1955 DFC35 VR 54 and 50 in the rear yard of Elwood Depot c1958 DFC36 VR 50 in the rear yard of Elwood Depot c1958 DFC37 VR 50 in the rear yard of Elwood Depot c1958 DFC38 VR 28 in St Kilda St outside Elwood depot after the line had been cut back to this point c1958 DFC39 VR 29 in St Kilda St outside Elwood depot after the line had been cut back to this point c1958 DFC40 VR 35 passes 28 on the St Kilda Electric Street Railway c1955 DFC41 VR 39 on the St Kilda Electric Street Railway c1955 DFC42 Y1 613 on a tour c1970 DFC43 VR 54 in St Kilda St outside Elwood Depot c1955 DFC44 VR 28 at Brighton Beach Terminus c1955 DFC45 VR 33 being washed in the wash bay at the rear of Elwood Depot c1955 DFC46 VR 20 breakdown car running into Elwood Depot c1955 DFC47 VR 3 in the rear yard at Elwood Depot c1955 DFC48 VR 51 on an AETA Tour running out of Elwood Depot c1958 DFC49 VR 28 on the St Kilda Electric Street Railway c1955 DFC50 VR 28 with crew in St Kilda St outside Elwood depot after the line had been cut back to this point 1959 DFC51 VR 52 in Grey St near Fitzroy St c1958 DFC52 VR 51 on a AETA Tour passes 33 in Grey St near Fitzroy St c1958 DFC53 VR 29 in Grey St near Fitzroy St c1958 DFC54 VR51 on an AETA Tour shunts as 52 waits on the St Kilda Electric Street Railway c1958 DFC55 VR 51 on the Black Rock Electric Street Railway c1955 DFC56 VR 28 in St Kilda St outside Elwood depot after the line had been cut back to this point c1958 DFC57 Combined Rail-Tram Tickets of the Black Rock Electric Street Railway Feb 1975 DFC58 Combined Rail-Tram Tickets of the St Kilda Electric Street Railway Feb 1975 DFC59 Electric Street Railway & Motor Coach Paper Tear off Tickets Feb 1975 DFC60 VR 52 & 53 on Rt 82 pass in Cordite Ave near Wests Rd Sept 1975 DFC61 Z 68 & 52 in East Preston Depot in M&MTB Livery c1977 DFC62 Copy photo of VR 18 in Elwood Depot c1910 DFC63 VR 51 as a one man car at Black Rock Terminus c1955 DFC64 VR 53 on Rt 82 in Droop St Footscray Jan 1974 DFC65 B2 2027 on Rt 96 in South Melb Station c1988 DFC66 VR 20 as preserved in Bob Prentice’s backyard High St Prahran Jan 1974 DFC67 VR 700 on Rt 82 in Droop St Footsray c1978 DFC68 VR 28 as the last car from ST Kilda Station 28-2-1959 DFC69 VR 700 at the Rt 82 Moonee Ponds Terminus c1978 DFC70 VR 52 waiting time at the Rt 82 Footscray Terminus, the driver intently stares at the bundy clock as the Braid and the Connie gossip Jul 1972 DFC71 VR 54 shunting outside Elwood Depot to return to St Kilda Station 1959 DFC72 SW6 969 in MTA Livery blocking the entrance to South Melb Depot presumably during the scratch ticket dispute Jan 1990 DFC73 VR 52 & 53 on Rt 82 pass in Droop St Footscray Sept 1975 DFC74 VR 700 after withdrawl in the Newport Railway museum in the process of a repaint c1985 DFC75 VR 700 after withdrawl in the Newport Railway museum in the process of a repaint c1985 DFC76 VR 700 on Rt 82 in Droop St Footsray at The Cresent c1978 DFC77 VR 700 on Rt 82 in Droop St Footsray c1978 DFC78 Former VR tram depot in use as an MTA Bus depot c1990 DFC79 VR 52 waiting time at the Rt 82 Footscray Terminus Jul 1972 DFC80 VR 52 waiting time at the Rt 82 Footscray Terminus with Connie changing the pole Jul 1972 DFC81 VR 52 at the Rt 82 Moonee Ponds Terminus with the crew chatting 7-12-1974 DFC82 VR 52 on Rt 82 on the reserved track in Raleigh Rd Ascot Vale Jan 1974 DFC83 VR 53 on Rt 82 in Leeds St Footscray about to turn into Hopkins St April 1976 DFC84 VR 53 on Rt 82 in Droop St Footsray Jan 1974 DFC85 VR 700 on Rt 82 in Droop St Footsray at Hopkins St c1978 DFC86 Z 52 in MTA livery on Rt 19 in Elizabeth St near Bourke St c1985 DFC87 VR 52 at the Rt 82 Moonee Ponds Terminus Jul 1972 DFC88 VR 53 at the Rt 82 Footscray Terminus Jan 1974 DFC89 VR 52 freshly outshopped from the workshops and W7 1011 at the Bourke St Terminus with 52 on display for the 1968 railway exhibition 1968 DFC90 Painting of W class 369 in Chocolate & Cream c1930 DFC91 Charing Cross, Bendigo at night c1965 DFC92 Ballarat ? c1965 DFC93 Bendigo 18 on an AETA tour in McCrae St near Tramway Ave c1965 DFC94 View from the roof of a tram in the body shop at Preston Workshops 1977 DFC95 View from the roof of a tram in the body shop at Preston Workshops 1977 DFC96 View from the roof of a tram in the body shop at Preston Workshops showing the panto on 546 1977 DFC97 Interior view of Carlton Control Centre showing desk and wall panel c1968 DFC98 W2 493 on Rt 55 in Kingsway outside South Melb Depot Aug 1973 DFC99 W2 496 in Sturt St at Kingsway on Rt 1 Jul 1973 DFC100 Z class truck c1975 DFC101 Z3 116 in Bourke St at King St as new c1979 DFC102 Bob Prentice on tour c1968 DFC103 SW6 900 as an advertising tram for Newsday at night 1969 DFC104 597 Jul 1973 DFC105 W2 480 on Rt 3 passing under the railway bridge at Caulfield Oct 1972 DFC106 Interior view of Carlton Control Centre showing desk c1968 DFC107 SW6 856 on Rt 77 at night Jul 1973 DFC108 W2 496 in Sturt St at Kingsway on Rt 1 Jul 1973 DFC109 PCC 980 on a tour at South Melb Depot c1968 DFC110 SW6 856 on Rt 77 at night Jul 1973 DFC111 View from the roof of a tram in the body shop at Preston Workshops showing the panto on 546 1977 DFC112 Dandenong Rd from Chapel St Nov 1968 DFC113 A Z class car turns from Gertrude into Nicholson St c1990 DFC114 SW6 900 as an advertising tram for Newsday at night 1969 DFC115 Port Melbourne Station showing Centennial bridge and station building prior to closure. 10-1987 DFC116 Port Melbourne station with train prior to closure, looking south 10-1987 Demonstrates the work of David Frost in photography and or collecting slides.Assembled album in a black presentation folder of 116 colour slides, 6 slide sleeves, collected or photographed by David Frost. Many are TMSV or Windsor Publications slides. All photographs have been scanned and placed on the Museum's G drive. A list of all photographs with details has been compiled. melbourne, tramways, trams, vr trams, elwood, st kilda light rail, port melbourne, opening, elwood depot, buses -
 Melbourne Tram Museum
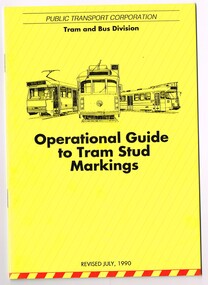
Document - Instruction, Public Transport Corporation (PTC), "Operational Guide to Tram Stud Markings", Jul. 1990
... Gives information to drivers on types of studs at facing points, cross overs, shunts, clearance markings, section insulations, H crossings, T light, depot yards, compulsory stops. ...Gives information to drivers on types of studs at facing points, cross overs, shunts, clearance markings, section insulations, H crossings, T light, depot yards, compulsory stops. ...Set of two documents involved with stud markings in the roadways for Melbourne tramway operations. .1 - A5 size centre stapled document, 16 pages on white paper plus colour, printed yellow with sketches of a B, W and Z class trams, titled "Operational Guide to Tram Stud Markings". Published by the PTC July 1990. Gives information to drivers on types of studs at facing points, cross overs, shunts, clearance markings, section insulations, H crossings, T light, depot yards, compulsory stops. Has diagrams, and provides details for various classes of trams. 2nd copy added 6-1-2018. .2 - folded A4 sheet printed on gloss white paper, with the same sketch of trams on the top, titled "Summary of Changes and additions to stud markings", published by the PTC.trams, tramways, ptc, tramways, stud marking, drivers, instructions -
 Melbourne Tram Museum
Album - Ron Scholten Slide Collection, Ron Scholten
... RSC93 Freight Car No 19 at Preston Workshops in green Livery RSC94 Rail Grinder No 3 in green Livery at South Melbourne Per Way Yard RSC95 A SW6 class car on route 50 shunting at Elizabeth Street Terminus at night, taken from Flinders Street Station RSC96 W2 588 & 435 in St Kilda Road at Batman Avenue RSC97 Y1 613 in service at Wattle Park Terminus RSC98 W2 588 in Wellington Parade en-route to the City with a Grand Final Load of passengers followed closely by No 384 RSC99 W2 558 on MCG Footy Special entering the Simpson Street siding RSC100 W3 657 & an L Class in the new shed at Malvern Depot RSC101 Y1 613 in St Kilda Road on an enthusiast's tour in St Kilda Road south of St Kilda Junction RSC102 Y1 613 on an enthusiast's tour in Clarendon Street with the two extra tracks on the Railways viaduct under construction RSC103 W6 976 on the fan of the new shed at Malvern Depot RSC104 W7 1024 as an advertising car for Bank of NSW at the route 1 terminus at South Melbourne Beach RSC105 PCC 980 on route 96 in Nicholson Street near North Fitzroy Depot RSC106 SW6 890 with dash canopy lighting in Market Street on the opening day of William Street Services RSC107 W2 444 with big numbers heads a line of footy specials in Simpson Street Siding RSC108 Cable Cars in Elizabeth Street RSC109 NMEL&T co No 2 with a trailer outside the power station in Mount Alexander Road RSC110 Alf Twentyman’s cable car set in his Northcote backyard RSC111 Cable Cars in Queens Parade Clifton Hill RSC112 Cable cars in Collins Street outside the Town Hall RSC113 PCC 1041 at Carnegie terminus RSC114 Cable cars in Elizabeth Street RSC115 Cable cars in Collins St near Swanston St RSC116 HTT 19 turns from Riversdale Road into Camberwell Road at Camberwell Junction RSC117 W1 419 official builders photo of first car of the class RSC118 Cable car with a full load of passengers RSC119 W1 422 illuminated for the visit of T.R.H. ...RSC93 Freight Car No 19 at Preston Workshops in green Livery RSC94 Rail Grinder No 3 in green Livery at South Melbourne Per Way Yard RSC95 A SW6 class car on route 50 shunting at Elizabeth Street Terminus at night, taken from Flinders Street Station RSC96 W2 588 & 435 in St Kilda Road at Batman Avenue RSC97 Y1 613 in service at Wattle Park Terminus RSC98 W2 588 in Wellington Parade en-route to the City with a Grand Final Load of passengers followed closely by No 384 RSC99 W2 558 on MCG Footy Special entering the Simpson Street siding RSC100 W3 657 & an L Class in the new shed at Malvern Depot RSC101 Y1 613 in St Kilda Road on an enthusiast's tour in St Kilda Road south of St Kilda Junction RSC102 Y1 613 on an enthusiast's tour in Clarendon Street with the two extra tracks on the Railways viaduct under construction RSC103 W6 976 on the fan of the new shed at Malvern Depot RSC104 W7 1024 as an advertising car for Bank of NSW at the route 1 terminus at South Melbourne Beach RSC105 PCC 980 on route 96 in Nicholson Street near North Fitzroy Depot RSC106 SW6 890 with dash canopy lighting in Market Street on the opening day of William Street Services RSC107 W2 444 with big numbers heads a line of footy specials in Simpson Street Siding RSC108 Cable Cars in Elizabeth Street RSC109 NMEL&T co No 2 with a trailer outside the power station in Mount Alexander Road RSC110 Alf Twentyman’s cable car set in his Northcote backyard RSC111 Cable Cars in Queens Parade Clifton Hill RSC112 Cable cars in Collins Street outside the Town Hall RSC113 PCC 1041 at Carnegie terminus RSC114 Cable cars in Elizabeth Street RSC115 Cable cars in Collins St near Swanston St RSC116 HTT 19 turns from Riversdale Road into Camberwell Road at Camberwell Junction RSC117 W1 419 official builders photo of first car of the class RSC118 Cable car with a full load of passengers RSC119 W1 422 illuminated for the visit of T.R.H. ...Photo - see pdf file for further information. Number Brief Description RSC1 PCC 1041 at the gates of Preston Workshops on a test run without its trolley retriever RSC2 PCC 1041 in Glenhuntly Road on Route 67 en-route to Carnegie crossing the Railway Gates at Glenhuntly Station RSC3 W2 482 stored at Malvern Depot with Olympic Park on the Destination RSC4 Cable Car Set 64 in Swanston Street outside Princess Bridge Station in bound with open top Double Deck Bus, Trak Motors ? Departing from Flinders St Station RSC5 W3 669 in St George Road at Sumner Street en-route to Preston Workshops for scrapping RSC6 Cable Car in Lygon Street en-route to Carlton RSC7 PCC 1041 turning from St Georges Road into Miller Street to enter the Preston Workshops RSC8 Flinders Street Station with cable cars RSC9 PCC 1041 in strife on its maiden day in service. Trams on route 88 delayed in Queens Parade Clifton Hill RSC10 Flinders Street at William Street with Cable Cars RSC11 L 104 on the fan of the new shed at Malvern Depot on a TMSV tour RSC12 Cable Set 1 after it’s restoration at Preston Workshops on the fan near the front gate RSC13 X1 466 at a suburban terminus of the Footscray System RSC14 X2 680 at Point Ormond Terminus RSC15 An ex Launceston Tram at the outside terminus of the Penny Royal Complex Tramway in Launceston RSC16 Q 148 at Preston Workshops awaiting disposal RSC17 Elizabeth Street with Cable Cars RSC18 Elizabeth and Bourke Streets corner outside the GPO with cable cars RSC19 Collins Street with Cable Cars RSC20 A photo taken from the observation deck of the ICI building showing a view of Parliament House with a W class tram in Nicholson Street RSC21 Auburn Horse car with a posed photo of all the tramway men employed RSC22 Cheltenham Double Deck Horsecar with a full load of passengers RSC23 City of Northcote cable trailer No 3 at a terminus RSC24 City of Northcote Cable cars passing in High Street Northcote RSC25 St Kilda Road at Princes Bridge with Cable Cars RSC26 Flinders Street with Cable Cars RSC27 Cable Cars RSC28 Bourke Street looking towards Elizabeth Street from Queen Street RSC29 Cable cars in Bourke Street at Elizabeth Street looking east RSC30 Cable cars in Elizabeth Street at the terminus at Flinders Street RSC31 Cable cars in Bourke Street at Swanston Street looking west RSC32 Cable cars in Swanston Street at Flinders Street looking north RSC33 Cable cars in Collins Street near Russell Street RSC34 Cable cars in Elizabeth Street at Bourke Street RSC35 Cable cars in Collins Street at Elizabeth Street RSC36 Cable Cars in Swanston Street at Flinders Street RSC37 Cable cars in Collins Street RSC38 Cable Cars RSC39 Cable cars in St Kilda Road near Princes Bridge RSC40 Cable cars in Collins Street east of Swanston Street RSC41 Cable cars in Spring Street outside Parliament House RSC42 K class No 92 in M&MTB Chocolate and cream livery but with a P&MTT Destination box on Route 14 RSC43 Thornbury Depot viewed from Miller Street and St Georges Road. Two W2 class cars are laying over between the peaks RSC44 Z3 No 201 in Met Livery passes D1 No 3510 in new M/Tram livery. A staff member in uniform stands in the doorway. Dandenong Road RSC45 D1 No 3530 advertising Heinekin Super Golf on Route 55 in Royal Park RSC46 D1 No 3504 in M/Tram livery on the reserved track in Matthews Avenue near Essendon Airport showing Route 81 Travancore. I suspect it is a private enthusiasts charter due to the Malvern W class run number in the rear windscreen RSC47 D1 No 3504 on Route 64 in Dandenong Road in M/Tram Livery RSC48 D1 No 3504 in M/Tram Livery at Airport West Terminus RSC49 D1 No 3504 in M Tram Livery in Union Road outside the Showgrounds RSC50 D1 No 3504 at West Maribyrnong Terminus in M/Tram Livery RSC51 D1 No 3503 in M/Tram Livery in Malvern Depot RSC52 SW6 No 960 and VR No 53 in Harbour Esplanade for the NMEL&T Co Centenary RSC53 Hawthorn Tramways Trust No 32 in Harbour Esplanade for the NMEL&T Co Centenary RSC54 VR 53 & B 2042 in Harbour Esplanade for the NMEL&T Co Centenary RSC55 VR 53 & C 3016 in Harbour Esplanade for the NMEL&T Co Centenary RSC56 NMEL&T Co No 13 (Formerly No 214) in Harbour Esplanade for the NMEL&T Co Centenary RSC57 NMEL&T Co 13 (formerly No 214) at Preston Workshops for the NMEL&T Co Centenary RSC58 Hawthorn Tramways Trust Lettering on HTT No 32 in Harbour Esplanade for the NMEL&T Co Centenary RSC59 Hawthorn Tramways Trust No 32 in Harbour Esplanade for the NMEL&T Co Centenary RSC60 Hawthorn Tramways Trust No 32 in Harbour Esplanade for the NMEL&T Co Centenary RSC61 Hawthorn Tramways Trust No 32 in Harbour Esplanade for the NMEL&T Co Centenary RSC62 NMEL&T Co No 13 (formerly No 214) at Preston Workshops for the NMEL&T Co Centenary RSC63 W2 516 and another on route 59 wait to shunt at Essendon Aerodrome Terminus as W2 571 on route 49 departs. This was the last day of operation. RSC64 Australia’s First Electric Tram at Box Hill with tramway men including H J Hilton who is in the centre RSC65 W2 484 en-route to St Kilda Junction and another wait for passengers after a race meeting at Caulfield Racecourse RSC66 X1 463 on the Footscray system en-route to Russell Street RSC67 Geelong 35 on Chilwell Route, Formerly HTT 13, M&MTB 119, then Bendigo 1 and Ballarat 37 RSC68 P&MTT No 4 on Opening Day of the system in Glenferrie Road RSC69 Bendigo No 6 in McCrae Street near the Depot en-route to North Bendigo RSC70 P&MTT No 4 in Glenferrie Road on opening day of the system RSC71 Scrubber No 3 stripped and awaiting scrapping at Preston Workshops RSC72 Scrubber No 4 at South Melbourne Depot RSC73 Q 191 & 139 at Preston Workshops awaiting scrapping RSC74 Rail Grinder No 3 at Preston Workshops as purchased from Sydney RSC75 Y 469 waits to shunt at Wattle Park Terminus as Y1 613 departs on driver training duties RSC76 VR 53 on the outside roads at Essendon Depot RSC77 W5 796 with three doors and square windows running out of Brunswick Depot in Cameron Street, with a supplementary destination board showing “City via Swanston St” RSC78 W2 258 on the wheel grinder road at Brunswick Depot RSC79 X2 676 on a TMSV tour, W5 817 & 836 & VR 53 on the open roads at Essendon Depot RSC80 PCC 1041 on test, passes W7 1035 in High Street Preston RSC81 D1 class production number 7 as delivered on test in Matthews Avenue RSC82 W2 383 on route 5 turning from the reserved track in Dandenong Road into St Kilda Road at St Kilda Junction RSC83 Z3 204 as advertising tram for Vodaphone Grand Prix running into Malvern Depot new shed RSC84 Z1 No 4 on test in St Georges Road RSC85 PCC 1041 on Route 96 in Bourke Street near Exhibition Street RSC86 Z1 No 3 without numbers on test turning from Miller Street in St Georges Road RSC87 Track components stored in Coldblo Road at Malvern Depot with Z class cars adjacent RSC88 D1 3501 in M/Tram Livery on Route 55 in Peel Street at Franklin Street RSC89 C 3001 in Yarra Trams Livery Porto No 018 & D1 3502 in M/Tram Livery on display in Harbourside Esplanade RSC90 D1 class tram production number 7, in as delivered condition on test in Matthews Avenue RSC91 D1 3503 inside Malvern Depot RSC92 SW6 955 and W6 974 in St Kilda Road at City Road at dusk. RSC93 Freight Car No 19 at Preston Workshops in green Livery RSC94 Rail Grinder No 3 in green Livery at South Melbourne Per Way Yard RSC95 A SW6 class car on route 50 shunting at Elizabeth Street Terminus at night, taken from Flinders Street Station RSC96 W2 588 & 435 in St Kilda Road at Batman Avenue RSC97 Y1 613 in service at Wattle Park Terminus RSC98 W2 588 in Wellington Parade en-route to the City with a Grand Final Load of passengers followed closely by No 384 RSC99 W2 558 on MCG Footy Special entering the Simpson Street siding RSC100 W3 657 & an L Class in the new shed at Malvern Depot RSC101 Y1 613 in St Kilda Road on an enthusiast's tour in St Kilda Road south of St Kilda Junction RSC102 Y1 613 on an enthusiast's tour in Clarendon Street with the two extra tracks on the Railways viaduct under construction RSC103 W6 976 on the fan of the new shed at Malvern Depot RSC104 W7 1024 as an advertising car for Bank of NSW at the route 1 terminus at South Melbourne Beach RSC105 PCC 980 on route 96 in Nicholson Street near North Fitzroy Depot RSC106 SW6 890 with dash canopy lighting in Market Street on the opening day of William Street Services RSC107 W2 444 with big numbers heads a line of footy specials in Simpson Street Siding RSC108 Cable Cars in Elizabeth Street RSC109 NMEL&T co No 2 with a trailer outside the power station in Mount Alexander Road RSC110 Alf Twentyman’s cable car set in his Northcote backyard RSC111 Cable Cars in Queens Parade Clifton Hill RSC112 Cable cars in Collins Street outside the Town Hall RSC113 PCC 1041 at Carnegie terminus RSC114 Cable cars in Elizabeth Street RSC115 Cable cars in Collins St near Swanston St RSC116 HTT 19 turns from Riversdale Road into Camberwell Road at Camberwell Junction RSC117 W1 419 official builders photo of first car of the class RSC118 Cable car with a full load of passengers RSC119 W1 422 illuminated for the visit of T.R.H. The Duke and Duchess of York RSC120 PCC 1041 in strife on it’s maiden day in service. Trams on route 88 delayed in Queens Parade Clifton Hill RSC121 Bendigo Birney car in Finn Street near North Bendigo terminus RSC122 SW6 in St Kilda Road at Domain Road at night RSC123 All 3 of Alf Twentyman’s cable cars in his Northcote backyard RSC124 Cable trailer 256 being unloaded into the shed at Bylands RSC125 Cable grip car 1 being removed from the Melbourne Museum RSC126 Alf Twentyman's cable cars in his Northcote Backyard RSC127 Alf Twentyman's cable cars in his Northcote Backyard RSC128 Alf Twentyman's cable cars in his Northcote Backyard RSC129 Alf Twentyman's cable cars in his Northcote Backyard RSC130 W class car in Swanston Street at Collins Street RSC131 Y1 469, L & W3 on the run out of Glenhuntly Depot on a tour RSC132 W7 1024 as an advertising tram for Bank of NSW at Clifton Hill RSC133 W2 496 on a footy special in Simpson Street Siding RSC134 W2 as originally converted to a test car at Preston Workshops RSC135 W3 667 in Brunswick Depot with Ellen Butland at the controls RSC136 W3 669 on its final run at Victoria Parade and Brunswick Street RSC137 W2 571 in Wellington Parade at Clarendon Street with a Footy Final load of Passengers RSC138 Y1 613 shunts at Spencer Street Terminus as X 217 waits on Australia Day Pageant RSC139 PCC 1041 on Route 96 in Bourke Street outside the Southern Cross Hotel RSC140 SW6 890 with accident damage on the outside roads at Preston Workshops, c1978 RSC141 W2 535 on Route 4 at the old St Kilda Junction, c1967 RSC142 PCC 1041 on Route 88 turns from Bourke Street into Spring Street, 1973 RSC143 L 102 on a tour at Albert Park Beach Terminus, Feb 1972 RSC144 W5 class Nos 833, 834 & 835 in Malvern Depot, c1976 RSC145 W2 No 281 in Wellington Parade on a football very crowded special c1974 RSC146 X1 No 464 Ballarat Road 1960 RSC147 T No 181 bound for the Explosives Factory - at Footscray Station - July 1960 RSC148 T No 181 at Williamstown Road, 1960 RSC149 Cable car set in Alf Twentyman’s back yard, c1970 RSC150 X No 217 at Malvern Depot, c1970 RSC151 X1 No 465 and T No181 Footscray Football ground in Barkly Street. c1960 RSC152 Scrubber No 5 at South Melbourne Depot, c1960 RSC153 X1 No 465 Footscray to Russell Street, c1960 RSC154 X1 No 467 Leeds Street Footscray, 1960 RSC155 PMTT No 4 Glenferrie Road, 1910 RSC156 S No 164 at Malvern Depot c1970 RSC157 T No 178 Footscray c1960 RSC158 Cleaner No. 7 at South Melbourne Depot c1960 RSC159 Two Y classes at Princes Bridge and Batman Avenue mid 1950s RSC160 Swanston Street – Nu color vue slide – M142 Demonstrates the work of Ron Scholten in photography, collection and/or production of duplicate slidesAssembled album in a black presentation folder of 160 colour slides, 8 slide sleeves, collected or produced by Ron Scholten. Many are TMSV or Windsor Publications slides. All photographs have been scanned and placed on the Museum's G drive. A list of all photographs with details has been compiled. melbourne, tramways, trams, cable trams, horse tram, route 67, route 88, route 55, route 64, route 59, route 49, route 50, point ormond, royal park, swanston st, footscray, essendon depot, matthews ave, brunswick depot, glenhuntly depot, malvern depot, st.georges road, preston workshops, pcc class, vr class, w2 class, w3 class, l class, s class, x class, x1 class, k class, z3 class, d1 class, sw6 class, w6 class, w7 class, t class, b1 class, c class, q class, y class, y1 class, w5 class, z1 class, tram 465, tram 181, tram 217, tram 467, tram 164, tram 102, tram 669, tram 667, tram 976, tram 890, tram 558, tram 657, tram 571, tram 484, tram 535, flinders st, tram 980, tram 1041, tram 482, tram 64, tram 104, tram 1, tram 466, tram 680, tram 676, tram 955, tram 92, tram 201, tram 3510, tram 3530, tram 3504, tram 3503, tram 53, tram 588, tram 383, tram 960, tram 32, tram 2042, tram 3016, tram 516, tram 43, tram 463, tram 191, tram 139, tram 469, tram 613, tram 796, tram 258, tram 384 -
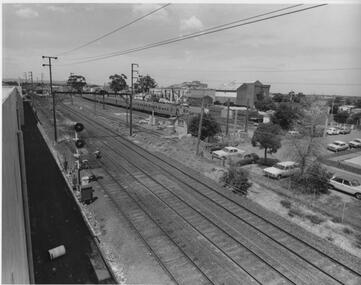 Box Hill Historical Society
Photograph - Box Hill railway station, October 1975
... Also shows goods yard where goods trains were loaded, shunted and passenger trains were parked as needed, looking east to Box Hill Station, Thurston Street with parked cars....Also shows goods yard where goods trains were loaded, shunted and passenger trains were parked as needed, looking east to Box Hill Station, Thurston Street with parked cars. ...Box Hill Railway Station and tracks, October 1975. Also shows goods yard where goods trains were loaded, shunted and passenger trains were parked as needed, looking east to Box Hill Station, Thurston Street with parked cars.Black and white photorailway stations, railways, thurston street, box hill railway station -
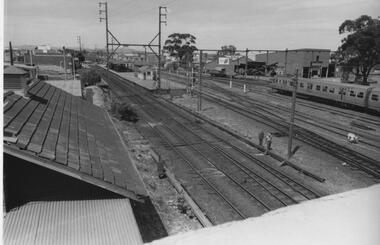 Box Hill Historical Society
Photograph - Box Hill Railway Station and goods yard, October 1975
... Box Hill Railway Station and goods yard where goods trains were loaded, shunted and passenger trains were parked as needed....Box Hill Railway Station and goods yard where goods trains were loaded, shunted and passenger trains were parked as needed. ...Box Hill Railway Station and goods yard where goods trains were loaded, shunted and passenger trains were parked as needed.Black and white photorailway stations, railway carriages, box hill railway station -
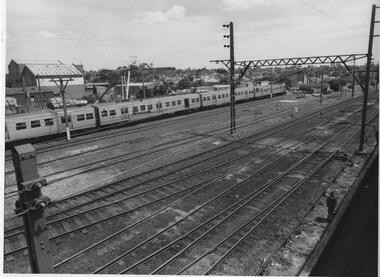 Box Hill Historical Society
Photograph - Box Hill Railway goods yard, 1/10/1975
... Box Hill Railway goods yard where trains were shunted, goods trains were loaded and passenger trains were parked as needed....Box Hill Railway goods yard where trains were shunted, goods trains were loaded and passenger trains were parked as needed. ...Box Hill Railway goods yard where trains were shunted, goods trains were loaded and passenger trains were parked as needed.Black and white phototrain services, trains, railway carriages, railway lines