Showing 97 items matching "tram safety signs"
-
 Ballarat Tramway Museum
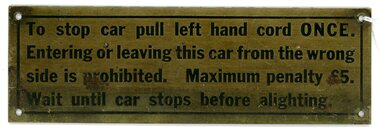
Sign - "To stop car pull left hand cord ONCE. Entering or leaving this car from the wrong side is prohibited. Maximum penalty 5 pound. Wait until car stops before alighting"
... ...Tram Safety signs...Ballarat Tramway Museum South Gardens Reserve Wendouree Parade Ballarat Ballarat goldfields Demonstrates how the SEC used signage to convey instructions to passengers and confirm the advice of the conductor. Tram signs Tram cars Tram Safety signs A brass metal plate sign with stenciled lettering and border lines etched and painted black. ...Demonstrates how the SEC used signage to convey instructions to passengers and confirm the advice of the conductor.A brass metal plate sign with stenciled lettering and border lines etched and painted black. A small hole has been drilled in each of the corners to enable fixing to the tram car. The reverse has remnants of glue and timber fragments from past adhesion.tram signs, tram cars, tram safety signs -
 Ballarat Tramway Museum
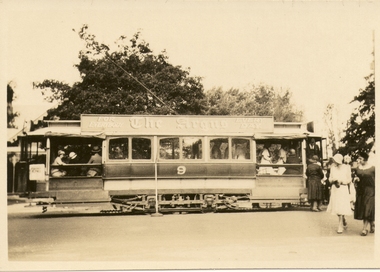
Photograph - Digital image, c1926
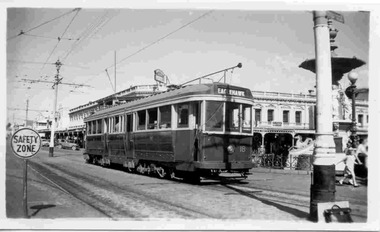
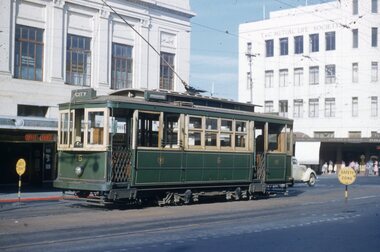
... The tram has a roof advertisement for "The Argus" newspaper. Is the sign by the tram a "Safety Zone" sign? ...The tram has a roof advertisement for "The Argus" newspaper. Is the sign by the tram a "Safety Zone" sign? ...Image held by David Critchley of Ballarat ESCo No. 9, possibly at the Gardens, Kiosk in the background. Has passengers getting off on the "wrong side". All the passengers are well dressed, indicating attending a possible event. The tram has a roof advertisement for "The Argus" newspaper. Is the sign by the tram a "Safety Zone" sign? David's notes indicates c1926. See also Reg Item 6101 and 5435 for other images of a tram fitted with a mullion in each saloon window.Yields information about an ESCo tramcar ex Sydney tramways in Ballarat and the way passengers were managed c1926.Digital image of a photograph. trams, tramways, esco, wendouree parade, tram 9 -
 Ballarat Tramway Museum
Slide - 35mm slide/s, Keith Kings, 3/11/1953 12:00:00 AM
... Stopped by a centre of the road pole marked as a tram stop, with 'Safety Zone' sign in foreground. Outside Mayfair School of Dancing building. ...Stopped by a centre of the road pole marked as a tram stop, with 'Safety Zone' sign in foreground. Outside Mayfair School of Dancing building. ...Geelong No. 37 at Corner of Ryrie and Moorabool Streets 3/11/1953, showing 'East' on destination. Tram not well exposed. Stopped by a centre of the road pole marked as a tram stop, with 'Safety Zone' sign in foreground. Outside Mayfair School of Dancing building. Photo by Keith Kings.In Blue ink 'Geelong was closed early 1956' in top left hand corner. In base 'Geelong No. 37, on 'EAST' Cr Ryrie &b Moorabool Sts City, 3/11/53, Maximum traction 1/50 f11' Stamped on top edge, 'K.S.Kings No. K(a)(7)'tramways, trams, geelong, ryrie st, maximum traction, tram 37 -
 Ballarat Tramway Museum
Document, State Electricity Commission of Victoria (SECV), "General instructions - maintenance of electric trams", 11/1948
... trams" issued in Ballarat. Sets out First Aid, Safety, fire precautions, ladders, tools, access to depot, working on rooves, tram operation within depot, and changing lamps. Appendix A - first aid treatment, B - form to be signed...trams" issued in Ballarat. Sets out First Aid, Safety, fire precautions, ladders, tools, access to depot, working on rooves, tram operation within depot, and changing lamps. Appendix A - first aid treatment, B - form to be signed ...Instruction dated Nov. 1948 titled "General instructions for employees engaged on the construction, repair and maintenance of electric trams" issued in Ballarat. Sets out First Aid, Safety, fire precautions, ladders, tools, access to depot, working on rooves, tram operation within depot, and changing lamps. Appendix A - first aid treatment, B - form to be signed by the employee that they understood "live equipment" and C - regarding the return of tools and equipment when employment ceases.Yields information about depot first aid and general work instructions.Memo duplicated nine foolscap sheets, stapled along left hand edge.has numerous pen updates on the sides of the document.secv, depot, employees, workshops, first aid, •electrical equipment -
Ballarat Tramway Museum
Legal record, City of Ballaarat, City of Ballaarat - by-law - No. 120, June 1939
... By-Law No. 120, details the regulation or control of traffic, motor vehicles and horse drawn, pedestrians in the City of Ballaarat, including tram stops and safety zones. Dated 19/6/1939. Signed Alex M King Mayor, J Pryor Councillor and Geo F Morton Town Clerk....Ballarat Tramway Museum South Gardens Reserve Wendouree Parade Ballarat Ballarat goldfields By-Law No. 120, details the regulation or control of traffic, motor vehicles and horse drawn, pedestrians in the City of Ballaarat, including tram stops and safety zones. Dated 19/6/1939. Signed Alex M King Mayor, J Pryor Councillor and Geo F Morton Town Clerk. ...By-Law No. 120, details the regulation or control of traffic, motor vehicles and horse drawn, pedestrians in the City of Ballaarat, including tram stops and safety zones. Dated 19/6/1939. Signed Alex M King Mayor, J Pryor Councillor and Geo F Morton Town Clerk.Yields information about the operation of vehicles in Sturt St. Ballarat at the time when Councils were responsible for traffic control within their municipalities.Folded sheet - 8 pages printed centre stapled. Two copies, includes one marked reprint.tramways, city of ballaarat, sturt st, two way traffic, traffic control -
 Ballarat Tramway Museum
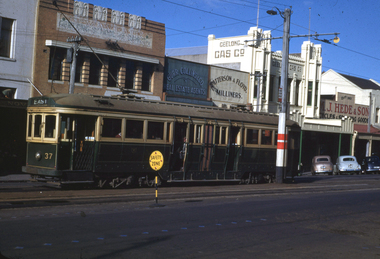
Slide - SECV Geelong 23 in Ryrie St, Hugh Ballment, 25/5/1954
... Photograph of Geelong No. 23 in Ryrie St with the destination of West and tram 3 to Newtown. Note the Safety Zone sign. Photo by Hugh Ballment 25/5/1954. ...Ballarat Tramway Museum South Gardens Reserve Wendouree Parade Ballarat Ballarat goldfields Photograph of Geelong No. 23 in Ryrie St with the destination of West and tram 3 to Newtown. Note the Safety Zone sign. Photo by Hugh Ballment 25/5/1954. ...Photograph of Geelong No. 23 in Ryrie St with the destination of West and tram 3 to Newtown. Note the Safety Zone sign. Photo by Hugh Ballment 25/5/1954. In the background are the Bank of NSW, Harclays Fashion Salon and Mrs Elliott Milliner.Yields information about trams 23 and 3 in Ryrie St.Slide - Kodak cardboard mountIn ink "#23, Ryrie St?, SEC Geelong, 25/5/1954" and Hugh Ballment stamp.tramways, geelong, ryrie st, tram 23, tram 3 -
 Ballarat Tramway Museum
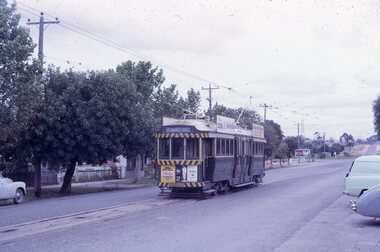
Photograph - Geelong 4 - Moorabool St, late 1930s
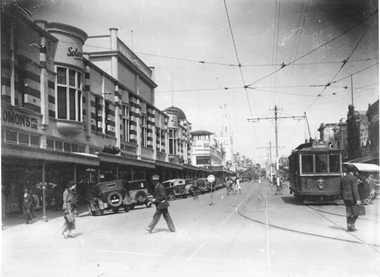
... Shows Geelong tram 4 with the destination of North, about to turn into Malop St with several passengers boarding the tram. In the background is a safety zone sign, the Solomons store, the T&G building, and many angle-parked motor cars. ...Shows Geelong tram 4 with the destination of North, about to turn into Malop St with several passengers boarding the tram. In the background is a safety zone sign, the Solomons store, the T&G building, and many angle-parked motor cars. ...The photo taken at the corner of Moorabool and Malop Streets is looking south along Moorabool St. Shows Geelong tram 4 with the destination of North, about to turn into Malop St with several passengers boarding the tram. In the background is a safety zone sign, the Solomons store, the T&G building, and many angle-parked motor cars. The T&G building is finished. The bar traffic lights don’t appear to be at the Moorabool and Ryrie St corner yet so the photo was taken between 1934 and 1939Yields information about Geelong late 1930s and tramway operations.Black and white photograph - plain back.geelong, moorabool st, malop st, tramways, tram 4, safety zone -
 Ballarat Tramway Museum
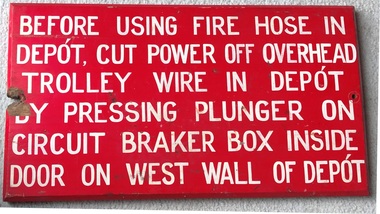
Sign - Emergency Response - SEC Tram Depot Ballarat
... Tram depot during the mid 1930's. Note the spelling of Depot with the accent. Demonstrates and provides information to Depot workers and Fire Fighters that the power had to be turned off to the Trolley Wire inside the depot using an emergency circuit breaker and where this equipment was provided before using a fire hose. Tramways Ballarat signs Emergencies tramway Power Fire fighting Safety ...Possibly made by local SEC Staff for the refurbished Ballarat Tram depot during the mid 1930's. Note the spelling of Depot with the accent.Demonstrates and provides information to Depot workers and Fire Fighters that the power had to be turned off to the Trolley Wire inside the depot using an emergency circuit breaker and where this equipment was provided before using a fire hose.Set of two wooden signs, with chamfered edges, red background with white painted letters, advising SEC Ballarat Depot workers or Firefighters that the power had to be cut to the Trolley Wire prior to using a fire hose in the depot building. An emergency button was provided in a circuit breaker box for this purpose. Rear has been primed with a pink primer. .1 - complete sign .2 - bottom section broken offtramways, ballarat, signs, emergencies, tramway power, fire fighting, safety -
 Ballarat Tramway Museum
Photograph - Laminated - ESCo 18 Wendouree Parade
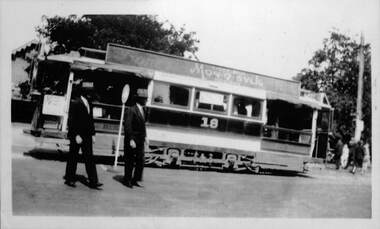
... Tram has a roof advertisement for Monosylk hosiery. There is a safety zone sign and two gentlemen standing alongside. ...Tram has a roof advertisement for Monosylk hosiery. There is a safety zone sign and two gentlemen standing alongside. ...Photograph of Electric Supply Co. of Vic (ESCo) Ballarat tram 18 in Wendouree Parade with the Gardens Kiosk in the background. Tram has a roof advertisement for Monosylk hosiery. There is a safety zone sign and two gentlemen standing alongside. The safety zone and line markings are unusual in Ballarat where passengers alighted or boarded on the lake side of the roadway. A related item could be 5904 which shows ESCo tram 9 offloading passengers on the "wrong side" for Ballarat at this location and a sign in position. Possibly a special event or a trial. Photo possibly mid 1920sYields information about the use of a safety zone sign in Ballarat and tram 18Laminated laser print photograph black and whitesafety zone, wendouree parade, ballarat, tram 18, esco, events, monosvlk -
 Ballarat Tramway Museum
Photograph - Black & White Photograph/s, Late 1940's
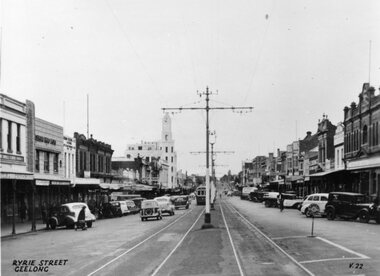
... Ballarat Tramway Museum South Gardens Reserve Wendouree Parade Ballarat Ballarat goldfields Yields information about the appearance of Ryrie Street Geelong and its buildings and vehicles. tramways trams Geelong Ryrie St Black and white photograph of Ryrie Street Geelong Has The title "Ryrie Street Geelong" in the bottom left hand corner and "V.22" in the bottom right hand corner. Shows a safety zone and sign ...Yields information about the appearance of Ryrie Street Geelong and its buildings and vehicles.Black and white photograph of Ryrie Street Geelong Has The title "Ryrie Street Geelong" in the bottom left hand corner and "V.22" in the bottom right hand corner. Shows a safety zone and sign and centre overhead poles. A commercial produced photograph - printer/publisher unknown. See HTD Reg Item 557 for the same image used in an Ashtray.tramways, trams, geelong, ryrie st -
 Ballarat Tramway Museum
Photograph - Black & White Photograph/s, John Webster, 6/06/1950 12:00:00 AM
... Safety Zone stop sign in photograph. Tram has the destination of Belmont. ...Ballarat Tramway Museum South Gardens Reserve Wendouree Parade Ballarat Ballarat goldfields Yields information about the appearance of one Geelong's single truck trams and its city streets. tramways trams Geelong Moorabool St Safety Zone tram 22 Copy 1 - On rear in ink "Tram 22 Geelong Vic" and on right hand edge "BB31 F2 / T20 / F16 / 6/6/50 1/100 at 12, VV HP3". Black and white photograph of Geelong No. 22 photographed in Moorabool St at a Safety Zone stop. Safety Zone stop sign ...Yields information about the appearance of one Geelong's single truck trams and its city streets.Black and white photograph of Geelong No. 22 photographed in Moorabool St at a Safety Zone stop. Safety Zone stop sign in photograph. Tram has the destination of Belmont. Chemist, Crofts Stores and Austral Art Furnishers store building in the background. Photographed by John Webster, 6/6/1950. Copy 1 - On rear in ink "Tram 22 Geelong Vic" and on right hand edge "BB31 F2 / T20 / F16 / 6/6/50 1/100 at 12, VV HP3".tramways, trams, geelong, moorabool st, safety zone, tram 22 -
 Ballarat Tramway Museum
Photograph - B&W print of donated negative, John Webster, 21/08/1955 12:00:00 AM
... Tram has the destination of Each Photographed by John Webster, 21/8/1955, assumed date given other photographs. Safety Zone signs...Ballarat Tramway Museum South Gardens Reserve Wendouree Parade Ballarat Ballarat goldfields Yields information about the appearance of Geelong No. 6 in Moorabool St and background buildings tramways trams Geelong Moorabool St Ryrie St Safety Zone tram 16 On left hand side of the negatives in ink is "DB 11" Black and white digital print from scan of a donated negative of Geelong No. 16 at the corner of Moorabool and Ryrie St. Geelong. Has the Bank of New South Wales building in the background. Tram has the destination of Each Photographed by John Webster, 21/8/1955, assumed date given other photographs. Safety Zone signs ...Yields information about the appearance of Geelong No. 6 in Moorabool St and background buildingsBlack and white digital print from scan of a donated negative of Geelong No. 16 at the corner of Moorabool and Ryrie St. Geelong. Has the Bank of New South Wales building in the background. Tram has the destination of Each Photographed by John Webster, 21/8/1955, assumed date given other photographs. Safety Zone signs on either side of the tramcar, lady with a pram and the bar lights are shown. Black and White prints made from scan of negative. Original Negative stored with Negatives. Negative scanned at hi res 4/6/2020 and image updated.On left hand side of the negatives in ink is "DB 11"tramways, trams, geelong, moorabool st, ryrie st, safety zone, tram 16 -
 Ballarat Tramway Museum
Document - Instruction, Ballarat Tramway Preservation Society (BTPS), "First Aid", 1972
... Trams tramways BTPS First Aid Instructions Safety Set of papers providing first aid instructions, contents of first aid box and other notes provided during September 1972 when the depot was being occupied and set up. 4305.1 - Plastic covered typed - two colours - instruction regarding the first aid kit - signed by Clyde Croft Secretary, 22/9/1972. 4305.2 - plastic covered sheet - photocopied, giving contents of box and basic instructions with orange Dymo label "BTPS" on top of sheet. 2nd copy - foolscap photocopy folded. ...Demonstrates the early development of the BTPS through the provision of a first aid box in the depot.Set of papers providing first aid instructions, contents of first aid box and other notes provided during September 1972 when the depot was being occupied and set up. 4305.1 - Plastic covered typed - two colours - instruction regarding the first aid kit - signed by Clyde Croft Secretary, 22/9/1972. 4305.2 - plastic covered sheet - photocopied, giving contents of box and basic instructions with orange Dymo label "BTPS" on top of sheet. 2nd copy - foolscap photocopy folded. See also Reg Item 5720.1 to .3 for other similar sheets.trams, tramways, btps, first aid, instructions, safety -
 Ballarat Tramway Museum
Postcard - Folder set, Nu-color-vue or Nucolorvue Productions, "A Souvenir of Geelong", 1950's
... tram and bus routes" Pictures are: 1. Gheringhap St showing Geelong City Hall and Post Office 2. The Barwon River, Geelong 3. T&G Building, Ryrie St - shows tramway overhead 4. Christ Church, Moorabool St 5. Malop St Geelong 6. Art Gallery and Park 7. St Marys Roman Catholic Cathedral 8. The Geelong Post Office with buses in background and a Safety Zone sign...tram and bus routes" Pictures are: 1. Gheringhap St showing Geelong City Hall and Post Office 2. The Barwon River, Geelong 3. T&G Building, Ryrie St - shows tramway overhead 4. Christ Church, Moorabool St 5. Malop St Geelong 6. Art Gallery and Park 7. St Marys Roman Catholic Cathedral 8. The Geelong Post Office with buses in background and a Safety Zone sign ...Set of 12 colour views of Geelong on a folded strip, glued within a colour printed cover, titled "A Souvenir of Geelong", printed on both sides of the strip. Booklet printed with an address area on rear. Produced by Nulcolorvue Productions, Mentone, Victoria. The rear has a slit on the rear cover that allowed the folder to be secured. On the inside of the front cover, has an introduction to Geelong, notes "modern tram and bus routes" Pictures are: 1. Gheringhap St showing Geelong City Hall and Post Office 2. The Barwon River, Geelong 3. T&G Building, Ryrie St - shows tramway overhead 4. Christ Church, Moorabool St 5. Malop St Geelong 6. Art Gallery and Park 7. St Marys Roman Catholic Cathedral 8. The Geelong Post Office with buses in background and a Safety Zone sign 9. Moorabool St Geelong - has overhead and a bar traffic light/ 10. Queens Park Geelong 11. The Waterfront at Geelong. 12. Eastern Beach Swimming Pool. Made during the early 1950's, given motor cars in the photo. trams, tramways, geelong, moorabool st, ryrie st -
 Ballarat Tramway Museum
Document - Photocopy, Alan Bradley, "Increase in Tramway Fares - Ballarat", 2003
... Trams tramways Tickets Fares Weekly Tickets SEC Photocopy of a two page SEC letter addressed to The Honourable T.T. Hollway, MLA, signed by R.A. Hunt Chairman, dated 28 June 1951 with the subject heading "Increase in Tramway Fares - Ballarat". Notes representation by Mr. Hollway, his letter. Notes loss in Ballarat tramway services, safety ...Yields information about the 1951 increase in SEC Fares, the reasoning behind them and the demise of weekly tickets.Photocopy of a two page SEC letter addressed to The Honourable T.T. Hollway, MLA, signed by R.A. Hunt Chairman, dated 28 June 1951 with the subject heading "Increase in Tramway Fares - Ballarat". Notes representation by Mr. Hollway, his letter. Notes loss in Ballarat tramway services, safety, rendering services, maintaining a loyal and contented staff, 2nd revision in fares since 1934, weekly tickets, overlapping sections, losses in other systems, City Section tickets. Photocopied made 2003 from a letter copied by Alan Bradley from PRO files. Has highlighted two paragraphs. trams, tramways, tickets, fares, weekly tickets, sec -
 Ballarat Tramway Museum
Document - Instruction, State Electricity Commission of Victoria (SECV), "Special Order to Motormen (49/1)", late 1960's?
... tram operations, safety instructions and leaving trams. Trams tramways Braking Instructions SEC Emergency Driver Training Two foolscap duplicated sheets titled "Special Order to Motormen (49/1)" giving instructions regarding 1) Responsibility (for trams), 2) Relief on the road, 3) Controller key, 4) Air brake handle, 5) leaving tram unattended with definition, general precautions, special precautions - such as parking the tram at Lydiard St North, parking trams at City Loop and 6) an explanation on the braking system at either end of the tram. Undated. Printed from wax stencil and stapled along the top edge. Signed ...Yields information about the instructions about tram operations, safety instructions and leaving trams.Two foolscap duplicated sheets titled "Special Order to Motormen (49/1)" giving instructions regarding 1) Responsibility (for trams), 2) Relief on the road, 3) Controller key, 4) Air brake handle, 5) leaving tram unattended with definition, general precautions, special precautions - such as parking the tram at Lydiard St North, parking trams at City Loop and 6) an explanation on the braking system at either end of the tram. Undated. Printed from wax stencil and stapled along the top edge. Signed by F. K. White Manager. See Reg Item 261 for 9-1961 issue and Reg item 3459 for a Jan. 1961 issue. trams, tramways, braking, instructions, sec, emergency, driver training -
 Ballarat Tramway Museum
Document - Instruction, State Electricity Commission of Victoria (SECV), "Notice for Motormen/Conductors and Conductors", 30/5/19561
... safety issues in regard to the position of point blades at junctions. Trams tramways Depot Safety Points Wendouree Parade Instructions Typed notice on Quarto paper, titled "Notice for Motormen/Conductors and Conductors" about the need to reset the depot junction points for the through road. Dated 30/5/1951 and signed ...Yields information about the type of instruction issued to crews and demonstrates important safety issues in regard to the position of point blades at junctions.Typed notice on Quarto paper, titled "Notice for Motormen/Conductors and Conductors" about the need to reset the depot junction points for the through road. Dated 30/5/1951 and signed by the Branch Tramway Superintendent.trams, tramways, depot, safety, points, wendouree parade, instructions -
 Ballarat Tramway Museum
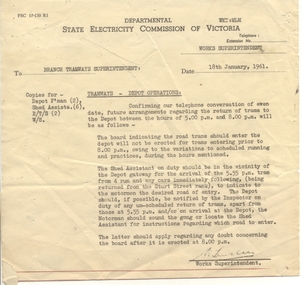
Document - Instruction, State Electricity Commission of Victoria (SECV), "Tramways - Depot Operations", 18/01/1961 12:00:00 AM
... Trams tramways Depot Safety Tramcars Wendouree Parade Instructions Typed notice on Quarto paper, titled "Tramways - Depot Operations" detailing the operations for the return of trams to the depot and the allocation of roads" and the use of the notice board. Dated 18/1/1961. Signed ...Yields information about the type of instruction issued to crews and demonstrates how trams returning to the depot were to be managed.Typed notice on Quarto paper, titled "Tramways - Depot Operations" detailing the operations for the return of trams to the depot and the allocation of roads" and the use of the notice board. Dated 18/1/1961. Signed by the Works Superintendent.trams, tramways, depot, safety, tramcars, wendouree parade, instructions -
 Ballarat Tramway Museum
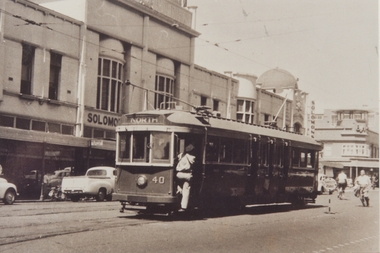
Photograph - Black & White Photograph/s, mid 1950's
... tram. Has the Solomons building in the background and a small safety zone stop portable sign alongside the tram. ...tram. Has the Solomons building in the background and a small safety zone stop portable sign alongside the tram. ...Black and white print of Geelong No. 40, in Moorabool St, just south of Malop St. with the destination of North. Appears the driver is board the tram. Has the Solomons building in the background and a small safety zone stop portable sign alongside the tram. Photo mid 1950's. Printed on AGFA paper.On rear in ink PMTT=MMTB E40 = Geelong 40 = Ball 43"trams, tramways, geelong, moorabool st, tram 40 -
 Ballarat Tramway Museum
Document - Instruction, Ballarat Tramway Preservation Society (BTPS), "First Aid", 1972
... Trams tramways BTPS First Aid Instructions Safety Set of papers providing first aid instructions, first aid courses and other notes provided during September 1972 when the depot was being occupied and set up. Each sheet has been covered with an adhesive plastic film. Sheets 2 and 3 are typed on the rear of the Association of Railway Enthusiasts letterhead and signed ...Demonstrates the early development of the BTPS through the provision of a first aid box in the depot.Set of papers providing first aid instructions, first aid courses and other notes provided during September 1972 when the depot was being occupied and set up. Each sheet has been covered with an adhesive plastic film. Sheets 2 and 3 are typed on the rear of the Association of Railway Enthusiasts letterhead and signed by Clyde Croft, dated 22/9/1972. 5720.1 - Extract from Labour and Industry instructions - "Emergency Instructions for Serious Injuries. 5720.2 - First Aid Classes of the St John's Ambulance. 5720.3 - Notes regarding the first aid kit. See also Reg Item 4305.1, 4305.2 for other similar sheets.trams, tramways, btps, first aid, instructions, safety -
 Ballarat Tramway Museum
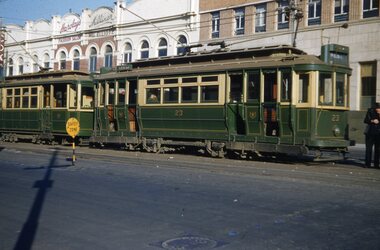
Photograph - Black & White Photograph/s, 1955 or 1956
... The third tram is eastbound in Ryrie St. Note Safety zone signs, the bar traffic lights. ...Ballarat Tramway Museum South Gardens Reserve Wendouree Parade Ballarat Ballarat goldfields tramways trams Geelong Moorabool St Ryrie St Traffic Lights Safety Zone tram 33 Black and white photograph of three Geelong bogie trams at the intersection of Moorabool and Ryrie Streets. Tram No. 33 in Moorabool St. has the destination of Belmont, while the adjacent tram has the destination of North. The third tram is eastbound in Ryrie St. Note Safety zone signs ...Black and white photograph of three Geelong bogie trams at the intersection of Moorabool and Ryrie Streets. Tram No. 33 in Moorabool St. has the destination of Belmont, while the adjacent tram has the destination of North. The third tram is eastbound in Ryrie St. Note Safety zone signs, the bar traffic lights. See also Reg. item 2799 for a subsequent photograph. In the background is the Bank of New South Wales building. Two copies held.tramways, trams, geelong, moorabool st, ryrie st, traffic lights, safety zone, tram 33 -
 Ballarat Tramway Museum
Photograph - Black & White Photograph/s, 1955 or 1956
... The third tram is eastbound in Ryrie St. Note Safety zone signs, the bar traffic lights. ...Ballarat Tramway Museum South Gardens Reserve Wendouree Parade Ballarat Ballarat goldfields tramways trams Geelong Moorabool St Ryrie St Traffic Lights Safety Zone tram 33 tram 17 Black and white photograph of two Geelong bogie trams at the intersection of Moorabool and Ryrie Streets and Pengelly tram No. 17 turning into Moorabool St. See Reg. Item 2798 for a photograph just taken prior to this one. Tram No. 33 in Moorabool St. has the destination of Belmont, while the adjacent tram has the destination of North. The third tram is eastbound in Ryrie St. Note Safety zone signs ...Black and white photograph of two Geelong bogie trams at the intersection of Moorabool and Ryrie Streets and Pengelly tram No. 17 turning into Moorabool St. See Reg. Item 2798 for a photograph just taken prior to this one. Tram No. 33 in Moorabool St. has the destination of Belmont, while the adjacent tram has the destination of North. The third tram is eastbound in Ryrie St. Note Safety zone signs, the bar traffic lights. In the background is Kays bakery. tramways, trams, geelong, moorabool st, ryrie st, traffic lights, safety zone, tram 33, tram 17 -
 Ballarat Tramway Museum
Photograph - B&W print of donated negative
... trams Personnel Retirements Ballarat On rear in black ink "Send off Insp. S. Lawrence" and in pencil "893". Black and White photograph of the retirement of SEC Ballarat inspector, S. Lawrence. Taken in the depot crew room area, with SEC Safety signs ...Black and White photograph of the retirement of SEC Ballarat inspector, S. Lawrence. Taken in the depot crew room area, with SEC Safety signs in the background. From left to right, ?, S. Lawrence, ?, Les Denmead and ?. Not known when photograph taken.On rear in black ink "Send off Insp. S. Lawrence" and in pencil "893".tramways, trams, personnel, retirements, ballarat -
 Ballarat Tramway Museum
Photograph - Black & White Photograph/s, 14/01/1952 12:00:00 AM
... Black and white photograph of Geelong Tramways, Scrubber or track cleaning tram in Ryrie St, at Moorabool St.. Taken by Keith Kings 14/1/1952. Note the 'Safety Zone' signs and arrangements. ...Tram Track Cleaner Geelong Safety Zone tram Scrubber Stamp on rear, purple ink 'K.S. Kings No. F(k)(14) Copyright Reserved', with number hand written in using blue ink. Also written on back of photograph "Geelong / Track cleaning car. / Ryrie St. at Moorabool St., City / 14/1/52." Black and white photograph of Geelong Tramways, Scrubber or track cleaning tram in Ryrie St, at Moorabool St.. Taken by Keith Kings 14/1/1952. Note the 'Safety Zone' signs ...Black and white photograph of Geelong Tramways, Scrubber or track cleaning tram in Ryrie St, at Moorabool St.. Taken by Keith Kings 14/1/1952. Note the 'Safety Zone' signs and arrangements. Stamp on rear, purple ink 'K.S. Kings No. F(k)(14) Copyright Reserved', with number hand written in using blue ink. Also written on back of photograph "Geelong / Track cleaning car. / Ryrie St. at Moorabool St., City / 14/1/52."trams, tramways, scrubber tram, track cleaner, geelong, safety zone, tram scrubber -
 Ballarat Tramway Museum
Photograph - Black & White Photograph/s, Keith Kings, 11/04/1953 12:00:00 AM
... Tram showing destination of Eaglehawk. Has "City Club Hotel" in the background, a Safety Zone sign to the left of the photo. ...Tram showing destination of Eaglehawk. Has "City Club Hotel" in the background, a Safety Zone sign to the left of the photo. ...Black and White photograph contained with Reg. Item 1902 - Photo Album from Keith Kings to Les Denmead 1970. Photograph of SEC Bendigo tram 18 at Charing Cross. Date of photo 11/4/1953. Tram showing destination of Eaglehawk. Has "City Club Hotel" in the background, a Safety Zone sign to the left of the photo. Note bag and folder or envelope on pole closest to photographer. Tram converted for "one-man" operation. Keith Kings No. H(e)(1) Scanning: i - image file, p - presentation file, b - back of photograph.Stamp in top left hand corner and handwritten number with "K.S. Kings No. H(e)(1) Copyright reserved". In blue ink "Bendigo / No.18, as converted for "One-man" operation. / Charing Cross. 11/4/53"trams, tramways, bendigo, charing cross, city club hotel, one man trams, tram 18 -
 Ballarat Tramway Museum
Slide - 35mm slide/s - set of 17, Noel Simons, 20/11/1962 12:00:00 AM
... Has the Beehive and Ezywalkin buildings in the background and passengers waiting at the tram stop. Also has the 'Safety Zone' sign in the photograph. 1187.16 - No. 2 at Quarry Hill terminus, night or dusk photo. ...Has the Beehive and Ezywalkin buildings in the background and passengers waiting at the tram stop. Also has the 'Safety Zone' sign in the photograph. 1187.16 - No. 2 at Quarry Hill terminus, night or dusk photo. ...Set of 17 transparencies taken on 20/11/1962 on Kodak mounts. 1187.1 - Bendigo No. 2 at the Quarry Hill terminus, showing destination of Quarry Hill. Has Cohns Drinks and Streets Ice Cream ads on dash panel, a SEC 'electric cooking' roof ad and another roof ad. Shows the Y terminus at this location, but tram standing just before it. Overhead in position. 1187.2 - as above, but closer up. 1187.3 - as above, but from the north side, showing cemetery in the background. 1187.4 - Bendigo No.3 at Eaglehawk terminus. Tram showing destination of Quarry Hill. Has the various buildings at Eaglehawk in the background including the Foodland store. Has Streets Ice cream and White Horse Whiskey ads on the dash panel. 1187.5 - Bendigo No. 18 at Garden Gully crossing loop, in bound, with destination of Eaglehawk. Passengers waiting for an Eaglehawk tram at the stop. Has a white horse whiskey ad on dash panel and SEC roof ads. Conductor standing in doorway looking out. 1187.6 - Bendigo No. 7 inbound in Nolan St. at cnr of McCrae St. showing destination of Golden Square. Has Streets Ice cream ad on dash panel and a Castrol Roof ad. 1187.7 - Bendigo No. 19 at the North Bendigo terminus with railway level crossing in background. Tram has a Cohns Drinks ad and an SEC 'Electric Cooking' roof ad. 1187.8 - Bendigo No. 2 at the Quarry Hill terminus, looking back into Bendigo, showing destination of Eaglehawk. 1187.9 - Bendigo No. 21 in McCrae St, near Nolan St outbound for North Bendigo. Photo taken after tram has passed photographer. 1187.10 - Bendigo Nos. 4 and 26 at Charing Cross in View St. with fountain alongside and the Beehive, Ezywalkin Buildings in the background. No. 26 has a Sandhurst Milk and SEC 'Electric Cooking' roof ad. 1187.11 - close up of 22E maximum traction truck and folded footstep. 1187.12 - Bendigo No. 19 at Charing Cross terminus, after tram has passed photographer, showing destination of North Bendigo, with the Beehive building in the background and passengers boarding tram. 1187.13 - Bendigo No. 11, turning from View St. into Pall Mall, showing Special with the conductor holding point bar. Has the Beehive and Ezywalkin Buildings in the background. 1187.14 - No. 7 at Charing Cross terminus, in Pall Mall, bound for Golden Square. Has the Beehive and Ezywalkin buildings in the background and passengers waiting at the tram stop. 1187.15 - No. 18 at the Charing Cross terminus, bound for Eaglehawk. Has the Beehive and Ezywalkin buildings in the background and passengers waiting at the tram stop. Also has the 'Safety Zone' sign in the photograph. 1187.16 - No. 2 at Quarry Hill terminus, night or dusk photo. Tram showing destination of Depot. 1187.17 - No. 26 at Charing Cross, night photo. Tram has destination of Quarry Hill, but is on the line for Eaglehawk. Photo looks along Mitchell St. Also shows Safety Zone sign. Information written on in black ink and date stamped on purple ink. 1187.1 - "No. 2 at Quarry Hill terminus Bendigo" 1187.2 - "No. 2 at Quarry Hill terminus Bendigo" 1187.3 - "No. 2 at Quarry Hill terminus Bendigo" 1187.4 - "No. 3 at Eaglehawk terminus" 1187.5 - "No. 18 in Mt Korong Road, Long Gully at cnr of Havilah Road (Eaglehawk Route)" 1187.6 - "No. 7 in Nolan St. Bendigo, at Cnr of McCrae St., near lake Weeroona, (North Bendigo Route)' 1187.7 - "No. 19 at North Bendigo terminus" 1187.8 - "No. 2 at Quarry Hill terminus" 1187.9 - "No. 21 in McCrae St. Bendigo, near Nolan St. (North Bendigo Route) 1187.10 - "4 and 26 at Alexandra Fountain, Charing Cross Bendigo" 1187.11 - "Truck of Bogie Car, Bendigo Tramways" 1187.12 - "No. 19 in Pall Mall at Charing Cross, Bendigo" 1187.13 - "Birney car No. 11 entering Pall Mall from View St. at Charing Cross Bendigo" 1187.14 - "No. 7 in Pall Mall at Charing Cross, Bendigo" 1187.15 - "No. 18 at Alexandra Fountain, Charing Cross, Bendigo" 1187.16 - "No. 2 at Quarry Hill terminus, Bendigo" 1187.17 - "No. 26 at Alexandra Fountain, Charing Cross, Bendigo" tramways, trams, bendigo, quarry hill, eaglehawk, north bendigo, maximum traction, night photo, tram 2, tram 3, tram 4, tram 7, tram 11, tram 18, tram 19, tram 21, tram 26 -
 Ballarat Tramway Museum
Photograph - Illustration/s, W2 417 Collins St. Melbourne
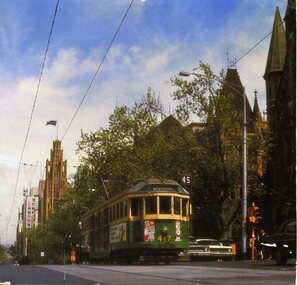
... tram W2 417 on a route 45, Deepdene service in Collins St. Melbourne at the intersection of Russell St. with the Scots Church in the background. Points of interest in the photograph are the lack of white lines along the tracks, safety zone equipment, "Hail Cars Here" tram stop sign on a steel pole by a traffic light and the style of traffic light. ...tram W2 417 on a route 45, Deepdene service in Collins St. Melbourne at the intersection of Russell St. with the Scots Church in the background. Points of interest in the photograph are the lack of white lines along the tracks, safety zone equipment, "Hail Cars Here" tram stop sign on a steel pole by a traffic light and the style of traffic light. ...Colour illustration of M&MTB tram W2 417 on a route 45, Deepdene service in Collins St. Melbourne at the intersection of Russell St. with the Scots Church in the background. Points of interest in the photograph are the lack of white lines along the tracks, safety zone equipment, "Hail Cars Here" tram stop sign on a steel pole by a traffic light and the style of traffic light. Two advertising panels on the front of the tram advertise "Jex Soap Pads" and the musical "Hair" at the Metro Theatre Bourke St. Two Fords are alongside the tramcar. Musical "Hair" in Melbourne 1971 - Wikipedia - https://en.wikipedia.org/wiki/Hair_%28musical%29 accessed 6-4-2016 trams, tramways, collins st., melbourne, mmtb -
 Ballarat Tramway Museum
Postcard, Biscay Greetings, Bourke St Melbourne
... Safety Zones and stops. In image are buildings along either side of Bourke St., featuring the sign of the Salvation Army City Temple in the top left hand corner, Mittys, and a Kwikasair van by the outbound safety zone. Tram...tram 2 Colour postcard with serrated edges of Bourke St. Melbourne from Parliament house with MMTB Z8 and about 6 W7's in photo, along with many motor vehicles. Also shown are the Safety Zones and stops. In image are buildings along either side of Bourke St., featuring the sign ...Colour postcard with serrated edges of Bourke St. Melbourne from Parliament house with MMTB Z8 and about 6 W7's in photo, along with many motor vehicles. Also shown are the Safety Zones and stops. In image are buildings along either side of Bourke St., featuring the sign of the Salvation Army City Temple in the top left hand corner, Mittys, and a Kwikasair van by the outbound safety zone. Tram Z8 has destination of "CITY - SPENCER ST." and showing route 89. On rear of card is name of company "Biscay" and caption "New Z class tram in Bourke Street, Melbourne Victoria." and card number BG98 in dark brown ink, along with space for stamp and address. See Destination City re introduction of Z class trams (1975)trams, tramways, bourke st, melbourne, z class trams, tram 2 -
 Ballarat Tramway Museum
Sign, State Electricity Commission of Victoria (SECV), "SEC Safety Noticeboard"
... Demonstrates a SEC Safety sign and a reuse by the BTPS Trams tramways SEC Safety Ballarat Depot RCTA Sheet of plywood painted green, with of our mounting holes & clip on the right hand side. ...Used for SEC safety messages and a welcome to a tour group by the Ballarat Tramway Preservation Society.Demonstrates a SEC Safety sign and a reuse by the BTPSSheet of plywood painted green, with of our mounting holes & clip on the right hand side. With a "SEC safety" transfer applied to one side. Has rounded corners on the tap. Has had two hinges on the left hand side. On rear in yellow paint faded with brown mark stains "BTPS / WELCOMES / RCTA / TOUR / GROUP" (Rail Coach Touring Association.) Used late seventies?trams, tramways, sec, safety, ballarat, depot, rcta -
 Ballarat Tramway Museum
Slide - 35mm slide/s, Keith Kings, 15/01/1955 12:00:00 AM
... Geelong No. 6 in Ryrie St at Moorabool St, 15/1/1955 with T& G building in background and safety zone signs on either side of tram. Tram showing 'CITY' as destination. ...tram 6 Stamped on top edge 'K.S.Kings No. K(y)(15)' and in ink on base, 'Geelong No. 6, in Ryrie St at Moorabool St 15/1/1955 1/50. on f4 3/4'. Geelong No. 6 in Ryrie St at Moorabool St, 15/1/1955 with T& G building in background and safety zone signs on either side of tram. ...Geelong No. 6 in Ryrie St at Moorabool St, 15/1/1955 with T& G building in background and safety zone signs on either side of tram. Tram showing 'CITY' as destination. Photo by Keith Kings.Stamped on top edge 'K.S.Kings No. K(y)(15)' and in ink on base, 'Geelong No. 6, in Ryrie St at Moorabool St 15/1/1955 1/50. on f4 3/4'.tramways, trams, geelong, ryrie st, moorabool st, tram 6