Showing 2780 items matching "view st"
-
 Ballarat Tramway Museum
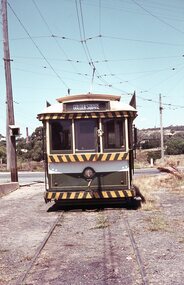
Photograph - SECV Bendigo - No. 17, 18 and three other former ESCo trams in View St, Easter 1940
... SECV Bendigo - No. 17, 18 and three other former ESCo trams in View St....... View St...Wal's photo caption "Two summer cars 17 & 18 together with original stock View St Bendigo, Easter 1940". Printed on Kodak Velox paper....On rear in ink "B.E.S&T Peak hour traffic awaiting the procession to pass View St. Bendigo 1940"....Photograph SECV Bendigo - No. 17, 18 and three other former ESCo trams in View St. ...Photo of No. 17, 18 and three other ESCo trams in View, Easter 1940. Black and White print contained within the Wal Jack Bendigo and Geelong Album, see Reg Item 5003 for more details. Wal's photo caption "Two summer cars 17 & 18 together with original stock View St Bendigo, Easter 1940". Printed on Kodak Velox paper.Yields information about the use of original ESCo trams in Bendigo during Easter 1940.On rear in ink "B.E.S&T Peak hour traffic awaiting the procession to pass View St. Bendigo 1940".trams, tramways, bendigo, easter fair, view st, esco, tram 17, tram 18 -
 Ballarat Tramway Museum
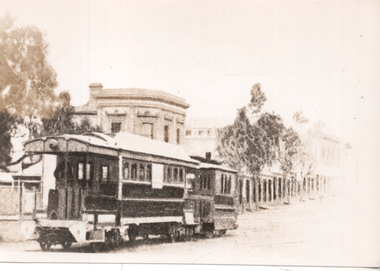
Photograph - Bendigo Steam tram View St, Between 1890 and 1903
... Bendigo Steam tram View St....... View St...Photograph of a steam hauled tram in Bendigo - View St. Steam tram is hauling a bogie trailer. ...On rear in ink "Bendigo Steam Tram" & "G.H.Eardley Collection" .1 - "Bendigo steam tram and trailer in View St Bendigo"...Photograph of a steam hauled tram in Bendigo - View St. Steam tram is hauling a bogie trailer. ...Photograph of a steam hauled tram in Bendigo - View St. Steam tram is hauling a bogie trailer. Rear view, trailer closest to the camera. Shops and offices in background. Outside edges of older photograph are apparent in the photograph. Photographer assumed to be G.Eardley, same handwriting as for 678 or from his collection. 677.1 - Black and White copy print contained within the Wal Jack Bendigo and Geelong Album, see Reg Item 5003 for more details. Added 1/7/2013 Copy negative from the Wal Jack collection of negatives added 11/6/2020 - scanned at hires - see image i4. See The Bendigo Tramways, K.S.KingsYields information about Bendigo Steam tram operations.Black and white photo copy print.On rear in ink "Bendigo Steam Tram" & "G.H.Eardley Collection" .1 - "Bendigo steam tram and trailer in View St Bendigo"trams, tramways, bendigo, steam trams, view st -
 Ballarat Tramway Museum
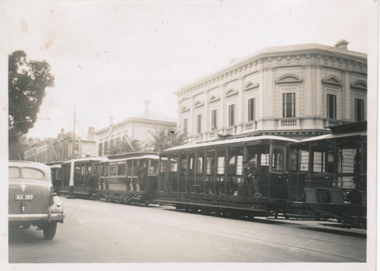
Photograph - SECV Bendigo 24 leaving Charing Cross in View St, Wal Jack, 10/04/1950
... SECV Bendigo 24 leaving Charing Cross in View St...... View St...Photo of No. 24 leaving Charing Cross in View St with the destination of Eaglehawk, photo by Wal Jack 10-4-1950. ...On the rear in blue ink "SEC Bendigo No 24 bogie in View St Bendigo 10-4-50" with Wal Jack copyright stamp in the top right hand corner and the number "T216" written in....Photo of No. 24 leaving Charing Cross in View St with the destination of Eaglehawk, photo by Wal Jack 10-4-1950. ...Photo of No. 24 leaving Charing Cross in View St with the destination of Eaglehawk, photo by Wal Jack 10-4-1950. Has the Beehive in the background, a single trucker at Charing Cross, and other buildings. Black and White print contained within the Wal Jack Bendigo and Geelong Album, see Reg Item 5003 for more details. i1 - scan of print in the album i2 - rear of image i3 - scan of negative at 3200dpi added 6/6/2020Yields information about Bendigo tram 24 and the Charing Cross area.Black and white photograph with notes on the rear.On the rear in blue ink "SEC Bendigo No 24 bogie in View St Bendigo 10-4-50" with Wal Jack copyright stamp in the top right hand corner and the number "T216" written in.trams, tramways, bendigo, charing cross, view st, tram 24 -
 Ballarat Tramway Museum
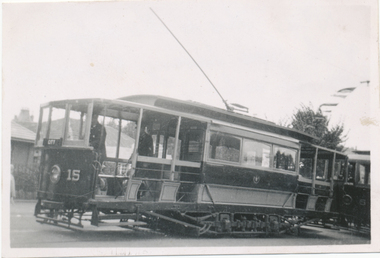
Photograph - SECV / ESCo tram No. 15 in View St Bendigo, c1940's
... SECV / ESCo tram No. 15 in View St Bendigo...... View St...Photograph of ESCo tram No. 15 in View St, c1940's, the tram has been modified with additional bracing and the open end seats changed to longitudinal. ...Photograph SECV / ESCo tram No. 15 in View St Bendigo ...Photograph of ESCo tram No. 15 in View St, c1940's, the tram has been modified with additional bracing and the open end seats changed to longitudinal. Tram has the destination of City. Black and White print contained within the Wal Jack Bendigo and Geelong Album, see Reg Item 5003 for more details.Yields information about ESCo built tram No. 15 and its repair techniques.Black and white print with photographer’s notes on the rear.On rear in ink "No.15. This is the only car of its type having 3 windows in the saloon. Bendigo."trams, tramways, bendigo, esco, secv, view st, tram 15 -
 Bendigo Historical Society Inc.
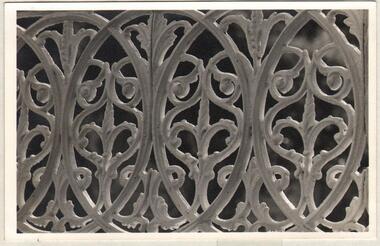
Photograph - 288 View St, Bendigo
... 288 View St, Bendigo...A black and white photograph by Allan Doney of 288 View St in Bendigo. The photo shows detail of the wrought iron on the fence. ...Photograph 288 View St, Bendigo ...Cast iron lace was made in foundries in most cities. There were 42 such foundries in Melbourne alone. It was cheaper to make than wrought iron. "Pig iron",iron ore, was melted in a blast furnace, mixed with alloys and then poured into moulds usually made of sand. The alloys needed a minimum of 2% carbon. A black and white photograph by Allan Doney of 288 View St in Bendigo. The photo shows detail of the wrought iron on the fence. bendigo, wrought iron, allan doney -
 Bendigo Historical Society Inc.
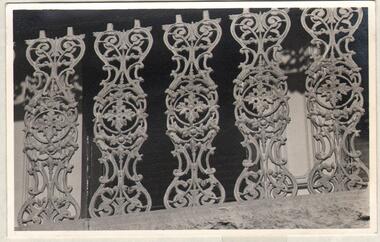
Photograph - 257 View St, Bendigo
... 257 View St, Bendigo...A black and white photograph by Allan Doney of the building at 257 View St in Bendigo. The photo shows detail of the wrought iron on the verandah. ...Photograph 257 View St, Bendigo ...Cast Iron lace was made in foundries in most cities. There were 42 such foundries in Melbourne alone. It was cheaper to make than wrought iron. "Pig iron", iron ore, was melted in a blast furnace, mixed with alloys and then poured into moulds usually made of sand. The alloys needed a minimum of 2% carbon.A black and white photograph by Allan Doney of the building at 257 View St in Bendigo. The photo shows detail of the wrought iron on the verandah. bendigo, wrought iron, allan doney -
 Bendigo Historical Society Inc.
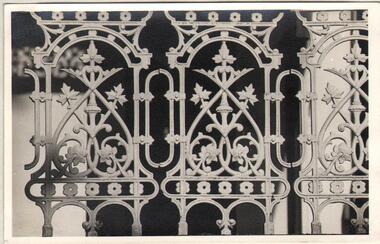
Photograph - 247 View St, Bendigo
... 247 View St, Bendigo...A black and white photograph by Allan Doney of the building at 247 View St in Bendigo. The photo shows detail of the wrought iron on the verandah. ...Photograph 247 View St, Bendigo ...Cast Iron lace was made in foundries in most cities. There were 42 such foundries in Melbourne alone. It was cheaper to make than wrought iron. "Pig iron", iron ore was melted in a blast furnace, mixed with alloys and then poured into molds usually made of sand. The alloys needed a minimum of 2% carbon.A black and white photograph by Allan Doney of the building at 247 View St in Bendigo. The photo shows detail of the wrought iron on the verandah. bendigo, wrought iron, allan doney -
 Bendigo Historical Society Inc.
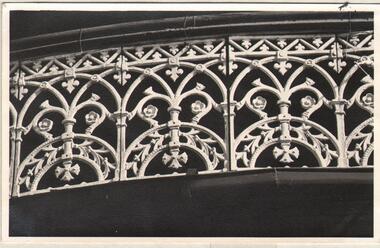
Photograph - View St and Mackenzie St
... View St and Mackenzie St....A black and white photograph by Allan Doney of the residence at the corner of View St and Mackenzie St in Bendigo. The photo shows detail of the wrought iron on the verandah. ...Photograph View St and Mackenzie St. ...A black and white photograph by Allan Doney of the residence at the corner of View St and Mackenzie St in Bendigo. The photo shows detail of the wrought iron on the verandah. bendigo, wrought iron, allan doney -
 Bendigo Historical Society Inc.
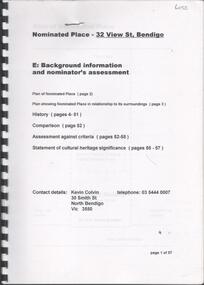
Book - 32 VIEW ST, BENDIGO, not known
... 32 VIEW ST, BENDIGO...29 page spiral bound soft cover booklet 'Nominated Place - 32 View St, Bendigo'. History and cultural heritage significance. ...Book 32 VIEW ST, BENDIGO ...29 page spiral bound soft cover booklet 'Nominated Place - 32 View St, Bendigo'. History and cultural heritage significance. Plans, drawings, extracts from Annals of Bendigo, Bendigo Advertiser and Sandhurst Directory 1872-73. Includes 4 pages from 'Bendigo Mac and His Courts'. 32 View St is currently between the Trades Hall and Temperance Hall.Kevin Colvin -
 Bendigo Historical Society Inc.
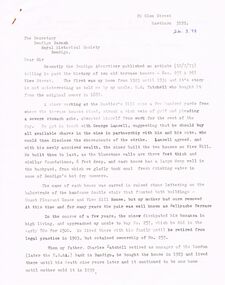
Document - CORRESPONDENCE: VIEW ST PROPERTY OWNED BY CHARLES TATCHELL, 24th March, 1973
... CORRESPONDENCE: VIEW ST PROPERTY OWNED BY CHARLES TATCHELL...1973 correspondence to BHS re the two View St properties (257 and 267 View St) bought in 1923 by Charles Tatchell. ...Document CORRESPONDENCE: VIEW ST PROPERTY OWNED BY CHARLES TATCHELL ...1973 correspondence to BHS re the two View St properties (257 and 267 View St) bought in 1923 by Charles Tatchell. Sold by family in 1939 Description in the letter from Tatchell's daughter about the history of the houses - the pair were called for many years ''Bellyache Terrace''. Known originally as Mount Pleasant House and View Hill House (later removed by Mrs Tatchell).Nancy Macpherson Smithperson, individual, charles tatchell, george lansell, view street, view hill house, mount plesant house, bellyache terrace, charles tatchell, london bank bendigo -
 Bendigo Historical Society Inc.
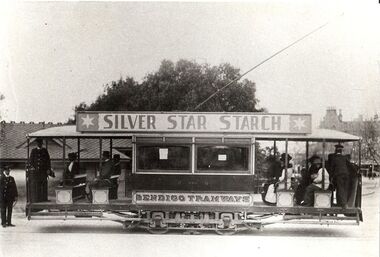
Photograph - BASIL MILLER COLLECTION: TRAM AT VIEW ST AND PALL MALL
... BASIL MILLER COLLECTION: TRAM AT VIEW ST AND PALL MALL...Black and white photo of tram stopped at bottom of view St where it intersects with pall mall, 2 tramways employees in uniform and a number of passengers. ...Photograph BASIL MILLER COLLECTION: TRAM AT VIEW ST AND PALL MALL ...Black and white photo of tram stopped at bottom of view St where it intersects with pall mall, 2 tramways employees in uniform and a number of passengers. Silverstar Starch advertisement on top of tram. 'Basil' in black ink on the back. There are two copies of this photo.basil miller, bendigo trams -
 Ballarat Tramway Museum
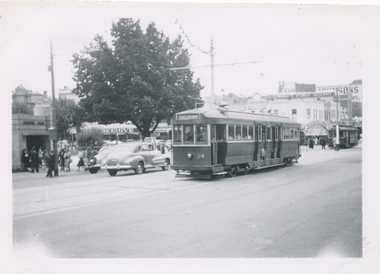
Slide - 35mm slide/s set of 7, Noel Simons, 29 Feb. 1972
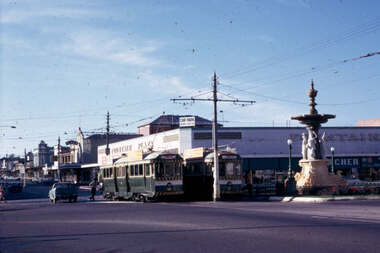
... ... View St....Set of 7 transparencies taken on 29/2/1972 on Kodak mounts. 1208.1 - Bendigo 18 (en route to Quarry Hill) and 2 (Eaglehawk) in the early morning at Charing cross with the Alexandra fountain and the Fountain Plaza building in the background. 1208.2 - No. 2 descending View St. Photo taken after tram has passed the photographer. 1208.3 - as for 1208.2 at Mackenzie St. intersection 1208.4 - No. 26 ascending View St. with the ANZ bank, T& G in the background. 1208.5 - as for 1208.4, but at Mackenzie St. intersection. ...Information written on in blue ink and date stamped on purple ink. 1208.1 - "Nos. 18 and 2 in the early morning sun at Charing Cross." 1208.2 - "No. 2 descending View St. towards Charing Cross." 1208.3 - "No. 2 in View St. passing Mackenzie St." 1208.4 - "No. 26 in View St. just after leaving Charing Cross." 1208.5 - "No. 26 climbing View St. past Mackenzie St." 1208.6 - "No. 18 climbing View St. seen from lookout tower in Rosalind Park." 1208.7 - "No. 7 in Nolan St. heading towards North Bendigo. / Last picture of a Bendigo tram."...Ballarat Tramway Museum South Gardens Reserve Wendouree Parade Ballarat Ballarat goldfields Tramways trams Bendigo Charing Cross View St. Nolan St. tram 2 tram 7 tram 18 tram 26 Information written on in blue ink and date stamped on purple ink. 1208.1 - "Nos. 18 and 2 in the early morning sun at Charing Cross." 1208.2 - "No. 2 descending View St. towards Charing Cross." 1208.3 - "No. 2 in View St. passing Mackenzie St." 1208.4 - "No. 26 in View St. just after leaving Charing Cross." 1208.5 - "No. 26 climbing View St. past Mackenzie St." 1208.6 - "No. 18 climbing View St. seen from lookout tower in Rosalind Park." 1208.7 - "No. 7 in Nolan St. heading towards North Bendigo. / Last picture of a Bendigo tram." ...Set of 7 transparencies taken on 29/2/1972 on Kodak mounts. 1208.1 - Bendigo 18 (en route to Quarry Hill) and 2 (Eaglehawk) in the early morning at Charing cross with the Alexandra fountain and the Fountain Plaza building in the background. 1208.2 - No. 2 descending View St. Photo taken after tram has passed the photographer. 1208.3 - as for 1208.2 at Mackenzie St. intersection 1208.4 - No. 26 ascending View St. with the ANZ bank, T& G in the background. 1208.5 - as for 1208.4, but at Mackenzie St. intersection. Photo taken after tram has passed the photographer. 1208.6 - No. 18 in View St. seen from the lookout tower in Rosalind Park. 1208.7 - No. 7 en route to North Bendigo in Nolan St. Photographed across the Centenary Oval.Information written on in blue ink and date stamped on purple ink. 1208.1 - "Nos. 18 and 2 in the early morning sun at Charing Cross." 1208.2 - "No. 2 descending View St. towards Charing Cross." 1208.3 - "No. 2 in View St. passing Mackenzie St." 1208.4 - "No. 26 in View St. just after leaving Charing Cross." 1208.5 - "No. 26 climbing View St. past Mackenzie St." 1208.6 - "No. 18 climbing View St. seen from lookout tower in Rosalind Park." 1208.7 - "No. 7 in Nolan St. heading towards North Bendigo. / Last picture of a Bendigo tram."tramways, trams, bendigo, charing cross, view st., nolan st., tram 2, tram 7, tram 18, tram 26 -
 Bendigo Historical Society Inc.
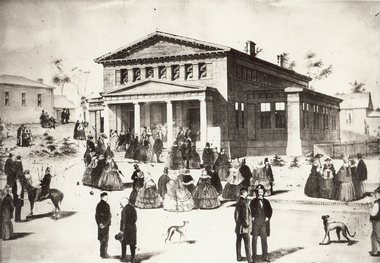
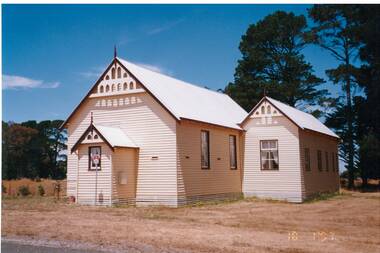
Photograph - TEMPERANCE HALL, VIEW ST
... TEMPERANCE HALL, VIEW ST...Enlargement of illustration of original Temperance Hall, View St. Building with four column portico. ...Photograph TEMPERANCE HALL, VIEW ST ...Black and white photograph . Enlargement of illustration of original Temperance Hall, View St. Building with four column portico. Groups of people gathered in foreground (street and footpath) and LHS mid-ground (spare block). History of object: James Lerk March, 2000. Illustration of the Bendigo Temperance Hall designed' in 1860 by Vahland and Getzschmann. The Warden's Court is on the left. This section (minus the portico) is still in situ'.buildings, temperance hall -
 Bendigo Historical Society Inc.
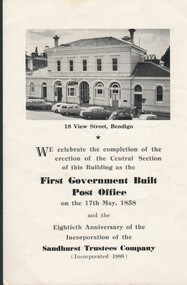
Document - PAMPHLET - COMPLETION OF RENOVATION OF 18 VIEW ST, 1968
... PAMPHLET - COMPLETION OF RENOVATION OF 18 VIEW ST...PAMPHLET - COMPLETION OF RENOVATION OF 18 VIEW ST. 4 page pamphlet (last page blank) . ...Document PAMPHLET - COMPLETION OF RENOVATION OF 18 VIEW ST ...PAMPHLET - COMPLETION OF RENOVATION OF 18 VIEW ST. 4 page pamphlet (last page blank) . First page titled: 'We celebrate the completion of the erection of the Central Section of this Building (18 View Street, Bendigo) as the First Government Built Post Office on the 17th May, 1858 and the Eightieth Anniversay of the Incorporation of the Sandhust Trustees Company (Incorporated 1888)'. Inside - two pages of historical text relevant to above.organization, business, sandhurst trustees -
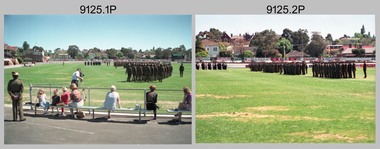
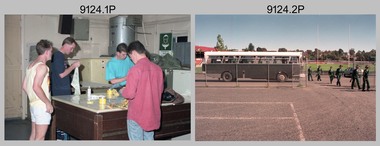
 Bendigo Military Museum
Photograph - Army Survey Regiment Freedom of Entry Parade, Bendigo CBD, 1990
... Led by the Regiment’s CO – LTCOL Rene van den Tol, the unit marched down View St, along Pall Mall and to Gaol Rd. Regiment members were treated to a civic reception at the City Hall after the ceremony. ...The Army Survey Regiment marches down View St towards Pall Mall. .2) - Photo, colour, 1990. ......View St, Bendigo...The Army Survey Regiment marches down View St towards Pall Mall. .2) - Photo, colour, 1990. ...The Freedom of Entry to the City on the 26th of October 1990 was an honour first conferred by the Bendigo City Council to the Army Survey Regiment in 1970. This was the fifth time the unit exercised its freedom of marching into the city with swords drawn, bayonets fixed and drums beating. The honour is usually bestowed upon local regiments, in recognition of their dedicated service, and it is common for military units to periodically exercise their freedom by arranging a parade through the city. The event began with a ceremonial parade at the Queen Elizabeth II Oval. The RAAF Central Command Band provided the music at the parade. After formal inspections of the troops, the Army Survey Regiment saluted as it marched past the Reviewing Officer - Mayor of Bendigo Councillor James Douglass, military dignitaries and guests. Led by the Regiment’s CO – LTCOL Rene van den Tol, the unit marched down View St, along Pall Mall and to Gaol Rd. Regiment members were treated to a civic reception at the City Hall after the ceremony. The Regiment also exercised its Freedom of Entry with anniversary parades in 1977, 1980, 1985, 1992 and 1996. See items 9124.28P and 9125.54P for additional sets of photos taken at the event. The formal booklet covering the event is catalogued under item 9123.This set of 24 photographs of the Army Survey Regiment were taken at the Freedom of Entry parade, held at the City of Bendigo’s Queen Elizabeth Oval (QEO) on the 26th of October 1990. The colour photographs are on 35mm negative film and scanned at 2400 dpi. They are part of the Army Survey Regiment’s Collection. .1) - Photo, colour, 1990. The Army Survey Regiment marches down View St towards Pall Mall. .2) - Photo, colour, 1990. The Army Survey Regiment marches down View St towards Pall Mall. L to R: 2IC MAJ Duncan Burns, CO LTCOL Rene van den Tol, MAJ Bob Williams. .3) - Photo, colour, 1990. The Army Survey Regiment marches down View St towards Pall Mall. L to R: 2IC MAJ Duncan Burns, CO LTCOL Rene van den Tol, MAJ Bob Williams, RSM WO1 Neville Stone. .4) - Photo, colour, 1990. The RAAF Central Command Band marches down View St towards Pall Mall led by L to R: Drum Major Warrant Officer E. Hayward and Deputy Music Director Flying Officer S. Wright. WO1 Rowan Gillies at fat left. .5) - Photo, colour, 1990. City Marshall – Superintendent D.R. Mansell standing at the ready in Charing Cross, to challenge the entry of the Army Survey Regiment at the bottom of View St. .6) - Photo, colour, 1990. The Army Survey Regiment at the halt in View St ready to exercise its right to pass through the City of Bendigo. L to R: 2IC MAJ Duncan Burns, CO LTCOL Rene van den Tol, ADJT CAPT Peter Parkes. .7) - Photo, colour, 1990. The Army Survey Regiment salutes parade dignitaries as it marches down Pall Mall past the dias. L to R: CO LTCOL Rene van den Tol, 2IC MAJ Duncan Burns, MAJ Bob Williams. At the dias L to R: City of Bendigo Chief Executive Officer - Mr. R. J. Burton, Reviewing Officer: City of Bendigo Mayor - Councillor James Douglass, Parade Host -D-SVY COL Don Swiney MBE. .8) - Photo, colour, 1990. The RAAF Central Command Band salutes parade dignitaries as it marches down Pall Mall past the dias. L to R: Drum Major Warrant Officer E. Hayward and Deputy Music Director Flying Officer S. Wright. .9) - Photo, colour, 1990. Air Survey Squadron salutes parade dignitaries as it marches down Pall Mall past the dias. L to R: LT Craig Hersant, OC MAJ Peter Clark, LT Simon Buckpitt, WO1 Allan Hancox, SGT Max Watson, remainder unidentified. .10) - Photo, colour, 1990. Cartographic Squadron salutes parade dignitaries as it marches down Pall Mall past the dias. L to R: LT Garret Addison, OC MAJ Neil Taylor, CAPT Dave McLachlan, LT Steve Hledik, WO1 Graham Ragless, SSGT Graham Johnston, SSGT Dennis Learmoth, SPR Cam Bramich, remainder unidentified. .11) - Photo, colour, 1990. Lithographic Squadron salutes parade dignitaries as it marches down Pall Mall past the dias. L to R: LT Marty Lyons, OC MAJ Bob Coote, SGT Steve Burke, SGT Brian Paul, LT Derek Bell, WO2 Rob Bogumil, SPR Doug Whiteside, remainder unidentified. .12) - Photo, colour, 1990. Air Survey Squadron marches down Pall Mall towards Gaol Rd. L to R: LT Craig Hersant, OC MAJ Peter Clark, LT Simon Buckpitt, WO1 Allan Hancox, SGT Max Watson, remainder unidentified. .13) to .15) - Photo, colour, 1990. The RAAF Central Command Band marches down Gaol Rd. L to R: Drum Major Warrant Officer E. Hayward and Deputy Music Director Flying Officer S. Wright. .16) - Photo, colour, 1990. Air Survey Squadron marches down Gaol Rd. L to R: LT Craig Hersant, OC MAJ Peter Clark, SPR Ian Baldwin, LT Simon Buckpitt, WO1 Allan Hancox, SGT Max Watson, remainder unidentified. .17) - Photo, colour, 1990. Cartographic Squadron marches down Gaol Rd. L to R: LT Garret Addison, OC MAJ Neil Taylor, CAPT Dave McLachlan, CPL Guenther Ebenwaldner, SGT Doug Carswell, LT Steve Hledik, WO1 Graham Ragless, SSGT Graham Johnston, SSGT Dennis Learmoth, SPR Cam Bramich, remainder unidentified. .18) - Photo, colour, 1990. Lithographic Squadron marches down Gaol Rd. L to R: OC MAJ Bob Coote, LT Marty Lyons, SGT Steve Burke, SGT Brian Paul, SSGT Peter Imeson, SPR Shane Campbell, LT Derek Bell, WO2 Rob Bogumil, SPR Doug Whiteside, SPR Scott Cameron, remainder unidentified. .19) - Photo, colour, 1990. Headquarters Squadron in Gaol Rd stands at ease. Right marker SGT Chris Edwards 6th from left, OC MAJ Ray Redman at far right, remainder unidentified. .20) - Photo, colour, 1990. Army Survey Regiment in transit. L to R: unidentified, CAPT Noel ‘Nesty’ Coulthard, unidentified, LT Simon Buckpitt. .21) - Photo, colour, 1990. Civic reception at the City Hall after the ceremony. .22) - Photo, colour, 1990. Civic reception at the City Hall after the ceremony. L to R: unidentified (x2), WO2 Mick Flynn, WO2 Steve Hansen, MAJ Neil Taylor, remainder unidentified. .23) - Photo, colour, 1990. Civic reception at the City Hall after the ceremony. L to R: WO2 Steve Hansen, WO2 Rhys De Laine, unidentified (x4), WO2 Alan Virtue. .24) - Photo, colour, 1990. Civic reception at the City Hall after the ceremony. L to R: unidentified, CO LTCOL Rene van den Tol, Chief Superintendent F. Fox.No personnel or civilians are identified. ‘Freedom of Entry Parade ‘90’ is annotated on plastic negative sleeve.royal australian survey corps, rasvy, army survey regiment, army svy regt, fortuna -
 Kew Historical Society Inc
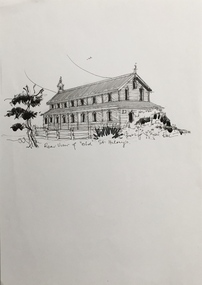
Drawing, Dione McIntyre, Rear view of 'old' St Hilary's, 2013
... Rear view of 'old' St Hilary's...Pen and ink drawing of the rear view of ‘old’ St Hilary’s, drawn by Dione McIntyre, 2013. ..."Rear view of 'old' St Hilary's"...Rear view of 'old' St Hilary's Drawing Drawing Dione McIntyre ...The first St. Hilary’s Church of England (Kew) was a timber building on the corner of John and Rowland Streets, designed in 1888 by Albert Purchas. This timber building was demolished in the 1940s to make way for a new church and tennis courts. The drawing was made to accompany a newsletter article by Dione McIntyre.Pen and ink drawing of the rear view of ‘old’ St Hilary’s, drawn by Dione McIntyre, 2013. "Rear view of 'old' St Hilary's"st hilary's church (kew), dione mcintyre, churches -- kew (vic) -
 Bendigo Military Museum
Photograph - Army Headquarters (AHQ) Survey Regiment Freedom of Entry Parade, Bendigo CBD, 1970
... The Freedom of Entry Parade occurred on the 14th of June 1970 led by the Regiment’s CO – LTCOL Bill Sprenger MID, MBE; the unit marched up View St in the CBD to the Queen Elizabeth II Oval. ...AHQ Survey Regiment marches down View St in the City of Bendigo. .7) to .11) - Photo, colour, 1970. ......View St, Bendigo, Victoria...AHQ Survey Regiment marches up View St in the City of Bendigo. .12) to .13) - Photo, colour, 1970. ...The Freedom of Entry to the City was an honour conferred by the Bendigo City Council to the AHQ Survey Regiment on the 20th of April 1970. The unit was granted for the first time the privilege of marching into the city with swords drawn, bayonets fixed and drums beating. The honour is usually bestowed upon local regiments, in recognition of their dedicated service, and it is common for military units to periodically exercise their freedom by arranging a parade through the city. The Freedom of Entry Parade occurred on the 14th of June 1970 led by the Regiment’s CO – LTCOL Bill Sprenger MID, MBE; the unit marched up View St in the CBD to the Queen Elizabeth II Oval. The ceremonial parade followed with a march past the guests of honour, Mayor of Bendigo Councillor Clark Jeffrey and military dignitaries. The parade concluded after formal inspections of the troops. A ceremonial scroll was presented to the Bendigo City Council to the AHQ Survey Regiment citing the occasion and was proudly displayed in the entry foyer to Fortuna Villa up to October 2008. The Regiment continued to exercise its Freedom of Entry with anniversary parades in 1977, 1980, 1985, 1992 and 1996. Refer to item 6020.8P for another set of photos of this event scanned from photographic prints.This set of 39 colour photographs were taken on the occasion of the Army Headquarters (AHQ) Survey Regiment’s Freedom of Entry parade to the City of Bendigo on the 14th of June 1970. The photographs are on 35mm negative film. They are part of the Army Survey Regiment’s Collection. The photographic negatives were scanned at 96 dpi. .1) to .2) - Photo, colour, 1970. AHQ Survey Regiment marches to Queen Elizabeth Oval entry, led by CO LTCOL Lionel Sprenger MBE, MID, unidentified 2IC and RSM WO1 John Hogan. .3) to .4) - Photo, colour, 1970. AHQ Survey Regiment at entry to Queen Elizabeth Oval, exercising its right of entry to City of Bendigo. .5) to .6) - Photo, colour, 1970. AHQ Survey Regiment marches down View St in the City of Bendigo. .7) to .11) - Photo, colour, 1970. AHQ Survey Regiment marches up View St in the City of Bendigo. .12) to .13) - Photo, colour, 1970. AHQ Survey Regiment enters Queen Elizabeth Oval, led by CO LTCOL Lionel Sprenger MBE, MID, unidentified 2IC and RSM WO1 John Hogan. .14) - Photo, colour, 1970. One of AHQ Survey Regiment’s squadrons enters Queen Elizabeth Oval. .15) to .19) - Photo, colour, 1970. AHQ Survey Regiment forms up on Queen Elizabeth Oval awaiting arrival of dignitaries. .20) - Photo, colour, 1970. AHQ Survey Regiment inspected by dignitaries. L to R: Director of the Survey Corps COL Frank Buckland OBE, MID; Colonel Commandant BRIG Don Macdonald AM, MID; unidentified General, CO LTCOL Lionel Sprenger MBE, MID, Mayor of Bendigo Councillor Clark Jeffrey, unidentified personnel. .21) to .23) - Photo, colour, 1970. AHQ Survey Regiment inspected by dignitaries. Director of the Survey Corps COL Frank Buckland OBE, MID; Colonel Commandant BRIG Don Macdonald AM, MID; unidentified General, CO LTCOL Lionel Sprenger MBE, MID, Mayor of Bendigo Councillor Clark Jeffrey. WRAAC personnel centre rank - PTE Desi Asaris, rear rank L to R: unidentified, PTE Pat Lumsden, PTE Heather (Turnbull) Slater, SGT Irene (Rankins) Saunders. .24) to .27) - Photo, colour, 1970. Band inspected by dignitaries. Director of the Survey Corps COL Frank Buckland OBE, MID; Colonel Commandant BRIG Don Macdonald AM, MID; unidentified General, CO LTCOL Lionel Sprenger MBE, MID, Mayor of Bendigo Councillor Clark Jeffrey. .28) to .30) - Dignitaries return to dias. Director of the Survey Corps COL Frank Buckland OBE, MID; Colonel Commandant BRIG Don Macdonald AM, MID; unidentified General, CO LTCOL Lionel Sprenger MBE, MID, Mayor of Bendigo Councillor Clark Jeffrey.Director of the Survey Corps COL Frank Buckland OBE, MID; Colonel Commandant BRIG Don Macdonald AM, MID; unidentified General, CO LTCOL Lionel Sprenger MBE, MID, Mayor of Bendigo Councillor Clark Jeffrey. .31) - Photo, colour, 1970. Unidentified Padre’s Freedom of Entry parade address. .32) - Photo, colour, 1970. AHQ Survey Regiment during the unidentified Padre’s Freedom of Entry parade address. .33) to .35) - Photo, colour, 1970. AHQ Survey Regiment led by CO LTCOL Lionel Sprenger MBE, MID, unidentified 2IC and RSM WO1 John Hogan march past the dais to salute the parade dignitaries. .36) - Photo, colour, 1970. Parade dignitaries at the dais: unidentified councillor, Mayor of Bendigo Councillor Clark Jeffrey. Colonel Commandant BRIG Don Macdonald AM, MID; unidentified General. .37) to .38) - Photo, colour, 1970. AHQ Survey Regiment squadrons march past the dais to salute the parade dignitaries. .39) - Photo, colour, 1970. AHQ Survey Regiment WRAAC personnel march past the dais to salute the parade dignitaries. L to R: unidentified (x2), CPL Beryl Parkinson, unidentified (x2), PTE Robyn (Marsh) Kemsley, unidentified, WO2 Marj Knight, PTE Desi Asaris, PTE Heather (Turnbull) Slater, SGT Irene (Rankins) Saunders..1P to .3P – no annotationsroyal australian survey corps, rasvy, army survey regiment, army svy regt, fortuna, asr -
 Buninyong & District Historical Society
Photograph - Colour photograph, side view, St. Patrick's Church, Elaine, Exterior, St. Patrick's Church, Elaine, 1997
... Colour photograph, side view, St. Patrick's Church, Elaine...Patrick's Church, Elaine, 1997 Photograph Colour photograph, side view, St. Patrick's Church, Elaine ...historic, social, religious,Colour photo, Exterior, St. Patrick's Church, Elaine, 1997elaine, st. patrick's church -
 Bendigo Military Museum
Photograph - Army Survey Regiment Freedom of Entry Parade, Queen Elizabeth Oval, Bendigo, 1980
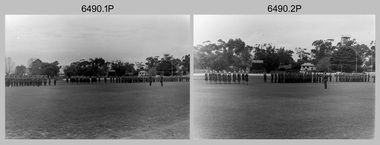
... Led by the Regiment’s CO – LTCOL Bob Skitch, the unit marched down View St in the CBD, along Pall Mall and up Gaol Rd to the Queen Elizabeth II Oval. ...View St, Bendigo, Victoria...Led by the Regiment’s CO – LTCOL Bob Skitch, the unit marched down View St in the CBD, along Pall Mall and up Gaol Rd to the Queen Elizabeth II Oval. ...The Freedom of Entry to the City was an honour conferred by the Bendigo City Council to the Army Survey Regiment in 1970. 1980 was the third time the unit exercised its freedom of marching into the city with swords drawn, bayonets fixed and drums beating. The honour is usually bestowed upon local regiments, in recognition of their dedicated service, and it is common for military units to periodically exercise their freedom by arranging a parade through the city. Led by the Regiment’s CO – LTCOL Bob Skitch, the unit marched down View St in the CBD, along Pall Mall and up Gaol Rd to the Queen Elizabeth II Oval. The ceremonial parade followed with a march past the guests of honour, Mayor of Bendigo Councillor Paul Tomkinson and military dignitaries. The parade concluded after formal inspections of the troops. The Regiment also exercised its Freedom of Entry with anniversary parades in 1977, 1980, 1985, 1990, 1992 and 1996. Some photos in this set were also printed on photo paper and catalogued under item 6021.25P. Photos of the march are catalogued under item 6491.21P. Photos of the Freedom of Entry parade rehearsal are catalogued under item 6479.38P.These black and white photographs of the Army Survey Regiment were taken on the occasion of the Freedom of Entry parade to the City of Bendigo in 1980. The photographs are on 35mm negative film and scanned at 96 dpi. They are part of the Army Survey Regiment’s Collection. .1) to .7) - Photo, black & white, 1980. Squadrons formed up at beginning of parade. .8) & .9) - Photo, black & white, 1980. 3rd Military District Band marches to their parade position. .10) to .11) - Photo, black & white, 1980. Squadrons formed up parade with 3rd Military District Band playing music. .12) to .14) - Photo, black & white, 1980. Officers formed up before taking posts. L to R: MAJ Peter Eddy, LT Brendon Jaego-Banks, CAPT Peter Searle - UK Exchange, unidentified, ADJT CAPT John Harrison, MAJ Sam Schwartz US Exchange, unidentified, MAJ Robin Blackburn, remainder unidentified. .15) - Photo, black & white, 1980. Officers march to their posts. L to R: MAJ Peter Eddy, LT Brendon Jaego-Banks, CAPT Peter Searle - UK Exchange, unidentified, ADJT CAPT John Harrison, MAJ Sam Schwartz US Exchange, unidentified, MAJ Robin Blackburn, remainder unidentified. .16 - Photo, black & white, 1980. Officers march to their posts. .17 - Photo, black & white, 1980. Army Svy Regt awaits the arrival of the Mayor – Councillor Paul Tomkinson. .18 - Photo, black & white, 1980. CO LTCOL Bob Skitch escorts the Mayor – Councillor Paul Tomkinson and unidentified guest to the dais. .19) to .25) – Army Svy Regt salutes the Mayor – Councillor Paul Tomkinson. .26) - Photo, black & white, 1980. CO LTCOL Bob Skitch escorts the Mayor – Councillor Paul Tomkinson to Headquarters Squadron to inspect its personnel. .27) - Photo, black & white, 1980. Headquarters Squadron inspection. L to R: OC MAJ Paddy Strunks, RSM WO1 Aub Harvey, Mayor – Councillor Paul Tomkinson, SPR Chris ‘Charlie’ Brown, unidentified, SGT John Grove (orderly room), unidentified, SPR Jeff Ruiz, WO2 Max Neil, unidentified, SGT Alan Brown, SGT Tim Allanson. .28) - Photo, black & white, 1980. Headquarters Squadron inspection. L to R: OC MAJ Paddy Strunks, Mayor – Councillor Paul Tomkinson, unidentified, SGT Rick Warren, unidentified, CPL Andy Wilson, WO2 Ted Burgess. .29) - Photo, black & white, 1980. Headquarters Squadron inspection. L to R: OC MAJ Paddy Strunks, RSM WO1 Aub Harvey, unidentified civilian, Mayor – Councillor Paul Tomkinson, unidentified, SGT Rick Warren, unidentified, CPL Andy Wilson, WO2 Ted Burgess. .30) - Photo, black & white, 1980. Cartographic Squadron’s OC CAPT Bob Roche salutes the Mayor – Councillor Paul Tomkinson. L to R: unidentified civilian, CO LTCOL Bob Skitch. In background L to R: SSGT Bob Scaddan, unidentified, CPL John Tempest, CAPT Simon Lemon, SSGT Colin Cuskelly, CPL Trevor Bottomley, SPR Bob Sheppard, WO2 Bob ‘Stretch’ Hayden, unidentified, CPL Ian McKenzie, FLTLT Ron Aitken, SPR Ian Fitzgerald, SPR Greg Else. .31) - Photo, black & white, 1980. Cartographic Squadron’s OC CAPT Bob Roche salutes the Mayor – Councillor Paul Tomkinson. L to R: unidentified civilian, CO LTCOL Bob Skitch. In background L to R: CPL Terry Danger, SPR Rod Skidmore, SSGT Bob Scaddan, unidentified, CPL John Tempest, CAPT Simon Lemon, SSGT Colin Cuskelly, CPL Trevor Bottomley, SPR Bob Sheppard, WO2 Bob ‘Stretch’ Hayden, unidentified, CPL Ian McKenzie, FLTLT Ron Aitken, SPR Ian Fitzgerald, SPR Greg Else. .32) - Photo, black & white, 1980. Cartographic Squadron inspection. L to R: OC CAPT Bob Roche, Mayor – Councillor Paul Tomkinson. In background L to R: SGT Stu Thaxter, unidentified, SSGT John Barrie, CPL Roger Pearson, SGT Doug Carswell, SPR Peter Main, WO2 Bob ‘Stretch’ Hayden. .33) - Photo, black & white, 1980. Cartographic Squadron inspection. L to R: CO LTCOL Bob Skitch, OC CAPT Bob Roche, unidentified civilian, SGT Doug Carswell, Mayor – Councillor Paul Tomkinson, WO2 Bob ‘Stretch’ Hayden. .34) - Photo, black & white, 1980. Female Contigent inspection L to R: unidentified, SPR Gae (Amato) Robinson, SPR Scheryl Delforce, unidentified officer, unidentified civilian, Mayor – Councillor Paul Tomkinson, CPL Marrianne (Van De Zee) De Groot, SPR Cathy Regan, SPR Ginny (Turner) Rowe, SPR Ilen Isaac, SPR Penny Knott, SPR Santina (Argetto) Straube, SPR Gina (Coore) Neilson, WO2 Pat Lumsden. .35) - Photo, black & white, 1980. Female Contigent inspection L to R: SPR Scheryl Delforce, unidentified officer, CO LTCOL Bob Skitch, unidentified civilian, Mayor – Councillor Paul Tomkinson, SPR Ginny Turner, SPR Ilen Isaac, SPR Penny Knott, SPR Santina (Argetto) Straube, SPR Gina (Coore) Neilson, WO2 Pat Lumsden. .36) - Photo, black & white, 1980. Female Contigent inspection L to R: SPR Scheryl Delforce, unidentified officer, CO LTCOL Bob Skitch, unidentified civilian, Mayor – Councillor Paul Tomkinson, SPR Cathy Regan, SPR Ginny Turner, SPR Ilen Isaac, SPR Penny Knott, SPR Santina (Argetto) Straube, SPR Gina (Coore) Neilson, WO2 Pat Lumsden. .37) - Photo, black & white, 1980. Female Contigent inspection L to R: SPR Scheryl Delforce, unidentified officer, CO LTCOL Bob Skitch, CPL Marrianne (Van De Zee) De Groot, unidentified civilian, Mayor – Councillor Paul Tomkinson, SPR Ilen Isaac, SPR Penny Knott, SPR Santina (Argetto) Straube, SPR Gina (Coore) Neilson, WO2 Pat Lumsden. .38) - Photo, black & white, 1980. Air Survey Squadron’s OC MAJ Peter Eddy salutes the Mayor – Councillor Paul Tomkinson. L to R: unidentified civilian, CO LTCOL Bob Skitch. In background L to R: WO1 Jim ‘Triple J’ Jefferies, SPR Allan Choat, SPR Geoff Havelberg, CPL Alan Hawkins, CPL Dave Cook, LT Brendon Jaego-Banks, SGT Jim Beard, SSGT Russell ‘Rusty’ Williams, SGT Cam Chapman, SSGT Alan Derby, SSGT Greg Buckingham. .39) - Photo, black & white, 1980. Air Survey Squadron inspection. L to R: back of CAPT Kym Weston, OC MAJ Peter Eddy, Mayor – Councillor Paul Tomkinson, unidentified civilian. .40) - Photo, black & white, 1980. Air Survey Squadron inspection. L to R: CAPT Peter Searle - UK Exchange, unidentified officer, unidentified civilian, Mayor – Councillor Paul Tomkinson, unidentified, SSGT Alan Derby, LCPL Paul Hopes, SPR Peter Jones, SPR John Lane, WO2 Brian Meade, CPL Mick Hogan, CPL Greg Byers, SGT Cliff Webb. .41) - Photo, black & white, 1980. Air Survey Squadron inspection. Centre rank L to R: SGT Bruce ‘Stretch’ Gordon, WO2 Chris Parkinson. Rear rank L to R: SPR Allan Choat, unidentified, SPR Jamie McRae, SSGT Russell ‘Rusty’ Williams, SSGT Greg Buckingham, CPL Greg Byers, CPL Roger Rees, SPR Gary Ames, SGT Greg Gilbert, SSGT Peter Warwick, WO2 Mick Dempster. .42) - Photo, black & white, 1980. Air Survey Squadron inspection. Rear rank: SSGT Russell ‘Rusty’ Williams. Centre rank L to R: SPR Geoff Havelberg, CPL Peter Treble, SGT Jim Beard, SPR Peter Hardy, SPR Steve Hilton, SPR John Lane, CPL Mick Hogan, Mayor – Councillor Paul Tomkinson, OC MAJ Peter Eddy. .43) - Photo, black & white, 1980. Air Survey Squadron inspection. Centre rank L to R: SGT Bruce ‘Stretch’ Gordon, WO2 Chris Parkinson. Mayor – Councillor Paul Tomkinson, OC MAJ Peter Eddy. Rear rank L to R: SPR Allan Choat, unidentified, SPR Jamie McRae, SSGT Russell ‘Rusty’ Williams, SSGT Greg Buckingham, CPL Greg Byers, CPL Roger Rees, SPR Gary Ames, SGT Greg Gilbert, SSGT Peter Warwick, WO2 Mick Dempster. .44) - Photo, black & white, 1980. Lithographic Squadron’s OC MAJ Robin Blackburn salutes the Mayor – Councillor Paul Tomkinson. L to R: unidentified civilian, CO LTCOL Bob Skitch. In background L to R: WO1 Manfred Panknin, SSGT Peter Coombes, CPL Frank Lenane, SPR Per Andersen, CPL John ‘Flash’ Anderson, unidentified, MAJ Sam Schwartz US Exchange, CPL Warren ‘Waldo’ Shirley, SPR Warren ‘Wah’ Hall, unidentified, SPR Neville Carr, SPR Paul Davis, SPR Paul Baker, CPL Mick ‘Buddha’ Ellis, SPR Martin Van De Maele, CPL Bill Jones, SPR Greg Rowe. .45) - Photo, black & white, 1980. Lithographic Squadron inspection. L to R: RSM WO1 Aub Harvey, SPR Warren ‘Wah’ Hall, CO LTCOL Bob Skitch, SPR Paul Davis, unidentified civilian, unidentified, OC MAJ Robin Blackburn, CPL Lance Strudwick, Mayor – Councillor Paul Tomkinson, SPR Neville Carr, SPR Roy Hicks, SSGT Trevor Osborne, SPR Paul Baker, CAPT Stan Vote, CPL Bill Jones, SGT Greg Francis-Wright, SGT Ralph Chant, CPL Garry Drummond, WO2 Noel ‘Nesty’ Coulthard. .46) - Photo, black & white, 1980. Lithographic Squadron inspection. Front rank L to R: SGT Greig Kidman, SPR Garry Hudson, SPR Gary Tremain, CPL Steve Egan, SPR Greg Rowe, CPL Mick ‘Buddha’ Ellis, remainder unidentified. Centre rank: SSGT Kevin Macquire. Inspection party L to R: CO LTCOL Bob Skitch, OC MAJ Robin Blackburn, unidentified civilian, Mayor – Councillor Paul Tomkinson. Rear rank L to R: unidentified (x5), CPL Warren ‘Waldo’ Shirley, SPR Neville Carr, SPR Paul Baker, CPL Bill Jones, CPL Garry Drummond, SGT Graeme Jeffers, WO2 Tom Pattison. .47) - Photo, black & white, 1980. Lithographic Squadron inspection. Front rank L to R: SSGT Trevor Osborne, SGT Greig Kidman, SPR Garry Hudson, SPR Gary Tremain, CPL Steve Egan, SPR Greg Rowe, CPL Mick ‘Buddha’ Ellis, remainder unidentified. Centre rank: SSGT Kevin Macquire, SGT Ralph Chant. Inspection party L to R: OC MAJ Robin Blackburn, RSM WO1 Aub Harvey, unidentified civilian, Mayor – Councillor Paul Tomkinson. Rear rank L to R: SPR Paul Baker, CPL Bill Jones, CPL Garry Drummond, SGT Graeme Jeffers, WO2 Tom Pattison. 48) - Photo, black & white, 1980. Lithographic Squadron inspection. Inspection party L to R: OC MAJ Robin Blackburn, Mayor – Councillor Paul Tomkinson, CO LTCOL Bob Skitch, unidentified civilian. Rear rank L to R: WO2 Tom Pattison, SGT Graeme Jeffers, CPL Garry Drummond, CPL Bill Jones, CPL SPR Neville Carr, Warren ‘Waldo’ Shirley, unidentified. Rear supernumery: WO1 John McCulloch. 49) - Photo, black & white, 1980. Lithographic Squadron inspection. Inspection party L to R: OC MAJ Robin Blackburn, CO LTCOL Bob Skitch, Mayor – Councillor Paul Tomkinson, unidentified civilian, RSM WO1 Aub Harvey. Rear rank L to R: WO2 Tom Pattison, SGT Graeme Jeffers, remainer unidentified. 50) - Photo, black & white, 1980. 3rd Military District Band inspection. L to R: unidentified band master, CO LTCOL Bob Skitch, Mayor – Councillor Paul Tomkinson. 51) - Photo, black & white, 1980. CO LTCOL Bob Skitch delivers his speech. 52) & .53) - Photo, black & white, 1980. Army Svy Regt squadrons stand at ease during CO LTCOL Bob Skitch’s speech.There are no personnel identified. royal australian survey corps, rasvy, army survey regiment, army svy regt, fortuna, asr -
 Bendigo Military Museum
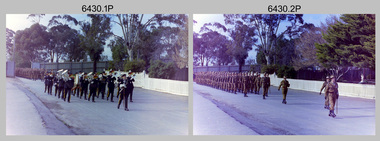
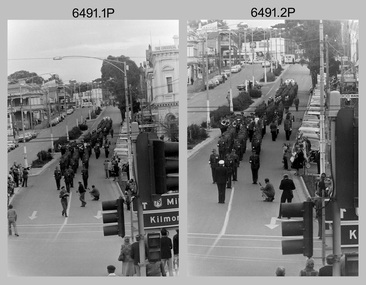
Photograph - Army Survey Regiment Freedom of Entry March, Bendigo CBD, 1980
... Led by the Regiment’s CO – LTCOL Bob Skitch, the unit marched down View St in the CBD, along Pall Mall and up Gaol Rd to the Queen Elizabeth II Oval. ...View St, Pall Mall, Bendigo, VIC...Led by the Regiment’s CO – LTCOL Bob Skitch, the unit marched down View St in the CBD, along Pall Mall and up Gaol Rd to the Queen Elizabeth II Oval. ...The Freedom of Entry to the City was an honour conferred by the Bendigo City Council to the Army Survey Regiment in 1970. 1980 was the third time the unit exercised its freedom of marching into the city with swords drawn, bayonets fixed and drums beating. The honour is usually bestowed upon local regiments, in recognition of their dedicated service, and it is common for military units to periodically exercise their freedom by arranging a parade through the city. Led by the Regiment’s CO – LTCOL Bob Skitch, the unit marched down View St in the CBD, along Pall Mall and up Gaol Rd to the Queen Elizabeth II Oval. The ceremonial parade followed with a march past the guests of honour, Mayor of Bendigo Councillor Paul Tomkinson and military dignitaries. The parade concluded after formal inspections of the troops. The Regiment also exercised its Freedom of Entry with anniversary parades in 1977, 1980, 1985, 1990, 1992 and 1996. Some photos in this set were also printed on photo paper and catalogued under item 6021.25P. Photos of the parade are catalogued under item 6490.53P. Photos of the Freedom of Entry parade rehearsal are catalogued under item 6479.38P.This set of 21 black and white photographs of the Army Survey Regiment were taken on the occasion of the Freedom of Entry to the City of Bendigo March in 1980. The majority of photographs are on 35mm negative film and scanned at 96 dpi. Photos 6491.3P and 6491.18P were printed on photographic paper and scanned at 300 dpi. They are part of the Army Survey Regiment’s Collection. .1) - Photo, black & white, 1980. L to R: MAJ Don Swiney MBE, LTCOL Bob Skitch, WO1 Aub Harvey, ADJT CAPT John Harrison, photographer in foreground – SGT Garran Hill .2) to .5) - Photo, black & white, 1980. L to R: MAJ Don Swiney MBE, LTCOL Bob Skitch, WO1 Aub Harvey, ADJT CAPT John Harrison. .6) - Photo, black & white, 1980. Headquarters Squadron marches left wheels into Pall Mall followed by 3rd MD Band. L to R: WO2 Ted Burgess, WO1 Dave Thomson, WO2 George Graham, CPL Andy Wilson, unidentified (x2), SPR Jeff Ruiz, unidentified, SGT Rick Warren, remainder unidentified. .7) - Photo, black & white, 1980. Headquarters Squadron marches down Pall Mall followed by 3rd MD Band. Right file L to R: WO1 Alex Cairney, WO2 Ted Burgess, CPL Andy Wilson, unidentified, SGT Rick Warren, remainder unidentified. Centre file L to R: unidentified (x2), SGT Bruce Hammond, CPL Phil McGuire. .8) - Photo, black & white, 1980. 3rd MD Band marches down Pall Mall. .9) - Photo, black & white, 1980. Dignitaries on dais next to Soldiers Institute Memorial Hall. L to R: Colonel Commandant COL J.L. Stedman (Retd), Commander 3MD BRIG Geoffrey Cohen AM, unidentified aide de camp, Brigadier Lawrence Fitzgerald OBE (Retd), Mayor – Councillor Paul Tomkinson, CAPT Don Maskew. .10) - Photo, black & white, 1980. Lithographic Squadron marches down Pall Mall towards the dais. L to R: CPL Josh Degroot, CPL Rhys De Laine, unidentified, SPR Per Andersen – right marker, MAJ Sam Schwartz US Exchange, CAPT Stan Vote, OC MAJ Robin Blackburn. .11) - Photo, black & white, 1980. Headquarters Squadron salutes on the march past the dais. L to R: CPL Cliff Webb, unidentified officer, SGT Bob Croxton, unidentified, SGT Syd Davis, CAPT Bob Cooper. .12) - Photo, black & white, 1980. 3rd MD Band marches down Pall Mall towards the dais. .13) - Photo, black & white, 1980. 3rd MD Band marches past the dais. L to R: Colonel Commandant COL J.L. Stedman (Retd), Commander 3MD BRIG Geoffrey Cohen AM, unidentified aide de camp, Brigadier Lawrence Fitzgerald OBE (Retd), Mayor – Councillor Paul Tomkinson, CAPT Don Maskew, unidentified officer. .14) - Photo, black & white, 1980. 3rd MD Band salutes on the march past the dais. L to R: unidentified aide de camp, Colonel Commandant COL J.L. Stedman (Retd), Commander 3MD BRIG Geoffrey Cohen AM, CAPT Don Maskew, Brigadier Lawrence Fitzgerald OBE (Retd), Mayor – Councillor Paul Tomkinson, unidentified officer. .15) - Photo, black & white, 1980. 3rd MD Band salutes on the march past the dais. L to R: Colonel Commandant COL J.L. Stedman (Retd), Commander 3MD BRIG Geoffrey Cohen AM, Mayor – Councillor Paul Tomkinson, CAPT Don Maskew. .16) - Photo, black & white, 1980. Squadrons march past the dais. .17) - Photo, black & white, 1980. Female Contingent salutes on the march past the dais. L to R: Colonel Commandant COL J.L. Stedman (Retd), Commander 3MD BRIG Geoffrey Cohen AM, CAPT Don Maskew, Brigadier Lawrence Fitzgerald OBE (Retd), Mayor – Councillor Paul Tomkinson. .18) - Photo, black & white, 1980. Female Contingent salutes on the march past the dais. L to R: SPR Scheryl Delforce, SPR Ilen Isaac, SPR Ginny (Turner) Rowe, SPR Cathy Regan, CPL Marrianne (Van De Zee) De Groot, SPR Gae (Robinson) Amato, SPR Megan (McBurney) Reynolds, SPR Sue (Fryer) Bottomley, SPR Le-anne (Smallshaw) Shirley, SPR Janet (Chopping) Justin, SPR Zoe (Lisiewich) Ames, unidentified saluting officer, L to R: Colonel Commandant COL J.L. Stedman (Retd), Commander 3MD BRIG Geoffrey Cohen AM. .19) - Photo, black & white, 1980. Cartographic Squadron led by CAPT Bob Roche salutes on the march past the dais. L to R: Colonel Commandant COL J.L. Stedman (Retd), Commander 3MD BRIG Geoffrey Cohen AM, CAPT Don Maskew, Brigadier Lawrence Fitzgerald OBE (Retd), Mayor – Councillor Paul Tomkinson. .20) & .21) - Photo, black & white, 1980. Air Survey Squadron salutes on the march past the dais. L to R: Colonel Commandant COL J.L. Stedman (Retd), Commander 3MD BRIG Geoffrey Cohen AM, CAPT Don Maskew, Brigadier Lawrence Fitzgerald OBE (Retd), Mayor – Councillor Paul Tomkinson.There are no personnel identified. royal australian survey corps, rasvy, army survey regiment, army svy regt, fortuna, asr -
 Bendigo Military Museum
Photograph - Army Survey Regiment Freedom of Entry Parade, Bendigo CBD, 1990
... Led by the Regiment’s CO – LTCOL Rene van den Tol, the unit marched down View St, along Pall Mall and to Gaol Rd. Regiment members were treated to a civic reception at the City Hall after the ceremony. ......View St, Bendigo...Led by the Regiment’s CO – LTCOL Rene van den Tol, the unit marched down View St, along Pall Mall and to Gaol Rd. Regiment members were treated to a civic reception at the City Hall after the ceremony. ...The Freedom of Entry to the City on the 26th of October 1990 was an honour first conferred by the Bendigo City Council to the Army Survey Regiment in 1970. This was the fifth time the unit exercised its freedom of marching into the city with swords drawn, bayonets fixed and drums beating. The honour is usually bestowed upon local regiments, in recognition of their dedicated service, and it is common for military units to periodically exercise their freedom by arranging a parade through the city. The event began with a ceremonial parade at the Queen Elizabeth II Oval. The RAAF Central Command Band provided the music at the parade. After formal inspections of the troops, the Army Survey Regiment saluted as it marched past the Reviewing Officer - Mayor of Bendigo Councillor James Douglass, military dignitaries and guests. Led by the Regiment’s CO – LTCOL Rene van den Tol, the unit marched down View St, along Pall Mall and to Gaol Rd. Regiment members were treated to a civic reception at the City Hall after the ceremony. The Regiment also exercised its Freedom of Entry with anniversary parades in 1977, 1980, 1985, 1992 and 1996. See items 9124.28P and 9126.24P for additional sets of photos taken at the event. The formal booklet covering the event is catalogued under item 9123.This set of 54 photographs of the Army Survey Regiment were taken at the Freedom of Entry parade, held at the City of Bendigo’s Queen Elizabeth Oval (QEO) on the 26th of October 1990. The colour photographs are on 35mm negative film and scanned at 2400 dpi. They are part of the Army Survey Regiment’s Collection. .1) - Photo, colour, 1990. Army Survey Regiment marches on to the QEO. .2) - Photo, colour, 1990. Army Survey Regiment formed up at the start of the parade. .3) & .4) - Photo, colour, 1990. Lithographic Squadron fixes bayonets. Centre rank: LCPL Damien Cole, remainder unidentified. Rear rank R to L: CPL Peter Swandale, SPR Andrew Arman, remainder unidentified. SSM WO1 Bill Jones at far right. .5) - Photo, colour, 1990. Army Survey Regiment await the order to take posts. .6) - Photo, colour, 1990. Army Survey Regiment standing at ease await the arrival of the Parade Host. .7) - Photo, colour, 1990. Arrival of the Parade Host - D-SVY COL Don Swiney MBE. L to R: CPL Mick McConnell, CPL Warren ‘Waldo’ Shirley, unidentified. .8) - Photo, colour, 1990. The Parade Host - D-SVY COL Don Swiney MBE and MAJ John South at his right returns the Regiment’s salute. .9) - Photo, colour, 1990. Arrival of dignitaries: L to R: CPL Mick McConnell, City of Bendigo Mayor - Councillor James Douglass, City of Bendigo Chief Executive Officer - Mr. R. J. Burton, CPL Warren ‘Waldo’ Shirley, unidentified. .10) - Photo, colour, 1990. Arrival of dignitaries: L to R: CPL Mick McConnell, Chief Superintendent F. Fox (presumed), unidentified, D-SVY COL Don Swiney MBE, CPL Warren ‘Waldo’ Shirley, unidentified. .11) - Photo, colour, 1990. Arrival of dignitaries: L to R: CPL Mick McConnell, Bishop of Sandhurst most Reverend N. Daly DD, unidentified padre, CPL Warren ‘Waldo’ Shirley, unidentified, D-SVY COL Don Swiney MBE. .12) - Photo, colour, 1990. L to R: City of Bendigo Mayor - Councillor James Douglass, City of Bendigo Chief Executive Officer - Mr. R. J. Burton view the parade from the dias. .13) - Photo, colour, 1990. CO of the Army Survey Regiment greets the parade dignitaries. L to R: CO LTCOL Rene van den Tol, D-SVY COL Don Swiney MBE, City of Bendigo Mayor - Councillor James Douglass, City of Bendigo Chief Executive Officer - Mr. R. J. Burton. .14) - Photo, colour, 1990. Headquarters Squadron inspection L to R: CO LTCOL Rene van den Tol, Chief Executive Officer - Mr. R. J. Burton, D-SVY COL Don Swiney MBE, Mayor - Councillor James Douglass, 2nd from right SGT Brendan McKinless, supernumerary WO2 Steve Hansen in background, remainder unidentified. .15) - Photo, colour, 1990. Unidentified squadron inspection L to R: D-SVY COL Don Swiney MBE, Chief Executive Officer - Mr. R. J. Burton, Mayor - Councillor James Douglass, CO LTCOL Rene van den Tol. .16) - Photo, colour, 1990. Air Survey Squadron inspection L to R: unidentified, SSGT Bob Garritty, CPL Craig Kellet, CPL Raelene (Munting) Brodie, unidentified, SPR Jodi Seath, remainder ranks unidentified, Mayor - Councillor James Douglass, Chief Executive Officer - Mr. R. J. Burton, CO LTCOL Rene van den Tol. .17) - Photo, colour, 1990. Lithographic Squadron inspection L to R: CO LTCOL Rene van den Tol, SGT Brian Paul, Mayor - Councillor James Douglass, SGT Steve Burke, D-SVY COL Don Swiney MBE. .18) - Photo, colour, 1990. The official party pass behind Headquarters Squadron and head towards the RAAF Central Command Band. L to R: Chief Executive Officer - Mr. R. J. Burton, Mayor - Councillor James Douglass, D-SVY COL Don Swiney MBE. .19) - Photo, colour, 1990. RAAF Central Command Band inspection L to R: Deputy Music Director Flying Officer S. Wright, Mayor - Councillor James Douglass, remainder unidentified. .20) - Photo, colour, 1990. RAAF Central Command Band inspection L to R: Chief Executive Officer - Mr. R. J. Burton, Deputy Music Director Flying Officer S. Wright, Mayor - Councillor James Douglass, remainder unidentified. .21) - Photo, colour, 1990. Cartographic Squadron commanded by OC MAJ Neil Taylor performs left form in slow time. .22) - Photo, colour, 1990. RAAF Central Command Band performs drill manoeuvre. .23) - Photo, colour, 1990. Air Survey Squadron commanded by OC MAJ Peter Clark performs left form. .24) - Photo, colour, 1990. Headquarters Squadron commanded by OC MAJ Ray Redman marches forward in slow time. .25) - Photo, colour, 1990. Army Survey Regiment in formation commanded by CO LTCOL Rene van den Tol advances in slow time. 2IC MAJ Duncan Burns at left. MAJ Bob Williams at right. .26) - Photo, colour, 1990. Air Survey 2IC MAJ Duncan Burns at left Squadron commanded by OC MAJ Peter Clark advances in quick time. WO1 Graham Ragless is closest to camera. .27) & .28) - Photo, colour, 1990. Lithographic Squadron commanded by OC MAJ Bob Coote advances before left form. LT Marty Lyons at left. LT Derek Bell at right. .29) - Photo, colour, 1990. Army Survey Regiment salutes as it marches past the Reviewing Officer Mayor - Councillor James Douglass, Chief Executive Officer - Mr. R. J. Burton and D-SVY COL Don Swiney MBE at the dias. .30) - Photo, colour, 1990. Parade official guests L to R: unidentified, MAJ John South, unidentified (x5), MAJ B.J. Donaldson – US Exchange, unidentified, unidentified padres (x2), Bishop of Sandhurst most Reverend N. Daly DD. .31) - Photo, colour, 1990. Army Survey Regiment salutes as it marches past the dias. .32) - Photo, colour, 1990. Lithographic Squadron commanded by OC MAJ Bob Coote performs left form. .33) - Photo, colour, 1990. Deputy Music Director Flying Officer S. Wright conducts the RAAF Central Command Band. .34) - Photo, colour, 1990. The RAAF Central Command Band performs during the parade. All musicians are unidentified. .35) - Photo, colour, 1990. Lithographic Squadron commanded by OC MAJ Bob Coote marches forward in quick time. .36) - Photo, colour, 1990. Cartographic Squadron commanded by OC MAJ Neil Taylor marches forward in quick time. .37) - Photo, colour, 1990. Lithographic Squadron commanded by OC MAJ Bob Coote marches forward in quick time. .38) - Photo, colour, 1990. Army Survey Regiment salutes as it marches past the dias. .39) - Photo, colour, 1990. L to R: Reviewing Officer Mayor - Councillor James Douglass, Chief Executive Officer - D-SVY COL Don Swiney MBE, Mr. R. J. Burton and at the dias. Parade official guests L to R: unidentified (x2), MAJ John South, unidentified (x5), MAJ B.J. Donaldson – US Exchange, unidentified, unidentified padres (x2), Bishop of Sandhurst most Reverend N. Daly DD. .40) - Photo, colour, 1990. Army Survey Regiment salutes as it marches past the Reviewing Officer Mayor - Councillor James Douglass, Chief Executive Officer - Mr. R. J. Burton and D-SVY COL Don Swiney MBE at the dias. MAJ P.G. Dinwiddie – UK Exchange is seen among the guests. .41) - Photo, colour, 1990. Air Survey Squadron commanded by OC MAJ Peter Clark stands at attention. .42) - Photo, colour, 1990. Headquarters Squadron commanded by OC MAJ Ray Redman stands at ease. 2IC MAJ Duncan Burns at far left. .43) - Photo, colour, 1990. Cartographic Squadron commanded by OC MAJ Neil Taylor stands at ease. CO LTCOL Rene van den Tol in foreground. .44) & .45) - Photo, colour, 1990. The Parade Host: D-SVY COL Don Swiney MBE addresses the Parade. .46) - Photo, colour, 1990. The Reviewing Officer: Mayor - Councillor James Douglass addresses the Parade. .47) - Photo, colour, 1990. L to R: City of Bendigo Chief Executive Officer - Mr. R. J. Burton, Reviewing Officer Bendigo Mayor - Councillor James Douglass. .48) - Photo, colour, 1990. Parade official guests Middle row L to R: MAJ P.G. Dinwiddie – UK Exchange, Chief Superintendent F. Fox, unidentified MAJ B.J. Donaldson – US Exchange, remainder unidentified. Front row L to R: unidentified (x2), MAJ John South, unidentified (x4). .49) - Photo, colour, 1990. Unidentified padre addresses the Parade. On his left: City of Bendigo Chief Executive Officer - Mr. R. J. Burton, Bishop of Sandhurst most Reverend N. Daly DD. .50) - Photo, colour, 1990. Unidentified padre addresses the Parade. On his right: Bishop of Sandhurst most Reverend N. Daly DD, City of Bendigo Chief Executive Officer - Mr. R. J. Burton, Reviewing Officer Bendigo Mayor - Councillor James Douglass. .51) - Photo, colour, 1990. Departure of Chief Superintendent F. Fox at conclusion of Parade. .52) - Photo, colour, 1990. Departure of unidentified padres (x2), Bishop of Sandhurst most Reverend N. Daly DD at conclusion of Parade. .53) & .54) - Photo, colour, 1990. Departure of Parade Host - D-SVY COL Don Swiney MBE at conclusion of Parade. No personnel or civilians are identified. ‘Freedom of Entry Parade ‘90’ is annotated on plastic negative sleeve.royal australian survey corps, rasvy, army survey regiment, army svy regt, fortuna -
 Bendigo Military Museum
Photograph - Army Survey Regiment Freedom of Entry Parade, Bendigo CBD, 1990
... Led by the Regiment’s CO – LTCOL Rene van den Tol, the unit marched down View St, along Pall Mall and to Gaol Rd. Regiment members were treated to a civic reception at the City Hall after the ceremony. ......View St, Bendigo...Led by the Regiment’s CO – LTCOL Rene van den Tol, the unit marched down View St, along Pall Mall and to Gaol Rd. Regiment members were treated to a civic reception at the City Hall after the ceremony. ...The Freedom of Entry to the City on the 26th of October 1990 was an honour first conferred by the Bendigo City Council to the Army Survey Regiment in 1970. This was the fifth time the unit exercised its freedom of marching into the city with swords drawn, bayonets fixed and drums beating. The honour is usually bestowed upon local regiments, in recognition of their dedicated service, and it is common for military units to periodically exercise their freedom by arranging a parade through the city. The event began with a ceremonial parade at the Queen Elizabeth II Oval. The RAAF Central Command Band provided the music at the parade. After formal inspections of the troops, the Army Survey Regiment saluted as it marched past the Reviewing Officer - Mayor of Bendigo Councillor James Douglass, military dignitaries and guests. Led by the Regiment’s CO – LTCOL Rene van den Tol, the unit marched down View St, along Pall Mall and to Gaol Rd. Regiment members were treated to a civic reception at the City Hall after the ceremony. The Regiment also exercised its Freedom of Entry with anniversary parades in 1977, 1980, 1985, 1992 and 1996. See items 9125.54P and 9126.24P for additional sets of photos taken at the event. The formal booklet covering the event is catalogued under item 9123.This set of 28 photographs of the Army Survey Regiment were taken at the beginning of the Freedom of Entry parade, held at the City of Bendigo’s Queen Elizabeth Oval (QEO) on the 26th of October 1990. The colour photographs are on 35mm negative film and scanned at 2400 dpi. They are part of the Army Survey Regiment’s Collection. .1) - Photo, colour, 1990. Lithographic Squadron personnel at Fortuna Villa prepare for the parade. L to R: CPL Daryl South, SGT Steve Burke, SPR Tony Hilbig, unidentified. .2) - Photo, colour, 1990. Female personnel arrive at the QEO. .3) - Photo, colour, 1990, Personnel prepare for the parade at the QEO. L to R: SGT John Phillips, SPR Steve Linane, CPL Mark Lander 4th from right, remainder unidentified. .4) - Photo, colour, 1990, Personnel prepare for the parade at the QEO. In foreground L to R: WO1 Colin Cuskelly, SSGT Paul Leskovec CSM, unidentified, SGT Brendon McKinless, SSGT Paul Cheater, CPL Damian Killeen, SGT Greg Else, SGT Chris Edwards, SGT Wolfgang Thun, WO2 Mick Flynn, WO1 Ken ‘Sluggo’ Slater, unidentified, WO2 Steve Hansen. .5) & .6) - Photo, colour, 1990. Support personnel at the QEO. L to R: unidentified (x2), SPR Steve Wright, LCPL Ross Anza. .7) - Photo, colour, 1990. Officers prepare for the parade at the QEO L to R: LT Derek Bell, CAPT Dave McLachlan. .8) - Photo, colour, 1990. Officers prepare for the parade at the QEO L to R: CO LTCOL Rene van den Tol, CAPT Dave McLachlan, MAJ Peter Clark, MAJ Neil Taylor. .9) - Photo, colour, 1990. Officers prepare for the parade at the QEO L to R: Unidentified partners, LT Craig Hersant, LT Steve Hledik, LT Marty Lyons. .10) - Photo, colour, 1990. View of the QEO’s grandstand prior to the parade. .11) - Photo, colour, 1990. Spectators arriving at QEO are directed by Army Survey Regiment marshalls. L to R: CPL Graeme Priestley, unidentified (x2). .12) - Photo, colour, 1990. Personnel from the four squadrons await orders to form up. .13) & .14) - Photo, colour, 1990. Right markers for the four squadrons await orders to take posts. Front to back: Headquarters Squadron’s SGT Chris Edwards, Air Survey Squadron’s SGT Max Watson, Cartographic Squadron’s SSGT Graham Johnston and Lithographic Squadron’s SPR Doug Whiteside. .15) to .19) - Photo, colour, 1990. The RAAF Central Command Band marches through the car park to the QEO’s entrance led by Drum Major Warrant Officer E. Hayward (in front) and Deputy Music Director Flying Officer S. Wright. .20) - Photo, colour, 1990. Headquarters Squadron commanded by SSM WO1 Colin Cuskelly marches through the QEO’s car park. L to R: SGT Wolfgang Thun, unidentified, CPL John ‘Flash’ Anderson, SGT Rick Gerhardt, unidentified. .21) - Photo, colour, 1990. Headquarters Squadron commanded by SSM WO1 Colin Cuskelly (with sword) marches through the QEO’s car park. .22) & .23) - Photo, colour, 1990. Air Survey Squadron commanded by SSM WO1 Russell ‘Rusty’ Williams (with sword) march through the QEO’s car park. .24) - Photo, colour, 1990. Air Survey Squadron commanded by SSM WO1 Russell ‘Rusty’ Williams (with sword) march through the QEO’s car park. L to R: unidentified, SPR Allan Blake, SPR Bob Bousfield, unidentified, SPR Harris Lee, SPR Andy Love. .25) - Photo, colour, 1990. Cartographic Squadron commanded by SSM WO1 Gary Warnest (with sword) march through the QEO’s car park. L to R: SGT Doug Carswell, CPL Geunther Ebenwaldner, SPR Leigh Palfrey, SGT Bob Garritty, unidentified, SSGT Dennis Learmonth. .26) - Photo, colour, 1990. Cartographic Squadron commanded by SSM WO1 Gary Warnest (with sword) march through the QEO’s car park. L to R: SGT Doug Carswell, CPL Geunther Ebenwaldner, SGT Bob Garritty, SPR Leigh Palfrey, SSGT Dennis Learmonth, unidentified. .27) - Photo, colour, 1990. Lithographic Squadron commanded by SSM WO1 Bill Jones (with sword) march through the QEO’s car park. .28) - Photo, colour, 1990. Lithographic Squadron commanded by SSM WO1 Bill Jones (with sword) march through the QEO’s car park. L to R: SSGT Peter Imeson, SGT Brian Paul, SGT Steve Burke, SPR Scott Cameron, SPR Shane Campbell. No personnel or civilians are identified. ‘Freedom of Entry Parade ‘90’ is annotated on plastic negative sleeve.royal australian survey corps, rasvy, army survey regiment, army svy regt, fortuna -
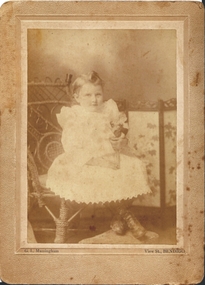 Bendigo Historical Society Inc.
Photograph - CHILD PORTRAIT, approx. 1910
... G.I. Massingham, View St. Bendigo, printed on bottom of photo....G.I Massingham, View St., Bendigo....G.I. Massingham, View St. Bendigo, printed on bottom of photo. ...studio portrait of young girl, seated. Approx. 5 years of age, dressed in lacey dress. G.I. Massingham, View St. Bendigo, printed on bottom of photo.G.I Massingham, View St., Bendigo.person, individual, child portrait -
 Ballarat Tramway Museum
Slide - 35mm slide/s - set of 4, Noel Simons, Apr. 1972
... ... View St....Note sign on the closet pole - "No standing between Notices" 1210.3 - Nos. 26 (Quarry Hill) and 25 (Eaglehawk) at Jobs Gully Loop. 1201.4 - No. 5 showing Charing Cross in bound for Charing Cross and No. 3 en route for Eaglehawk in View St. near the end of the double track. ...Information written on in blue ink and date stamped on purple ink. 1210.1 - "No. 3 arriving at Quarry Hill terminus." 1210.2 - "Bogie car at Long Gully Loop." 1210.3 - "Nos. 26 and 25 at Jobs Gully Loop." 1210.4 - "Nos 5 and 3 in View St. near the end of the double track."...Ballarat Tramway Museum South Gardens Reserve Wendouree Parade Ballarat Ballarat goldfields Tramways trams Bendigo Long Gully Quarry Hill View St. tram 3 tram 5 tram 25 tram 26 Information written on in blue ink and date stamped on purple ink. 1210.1 - "No. 3 arriving at Quarry Hill terminus." 1210.2 - "Bogie car at Long Gully Loop." 1210.3 - "Nos. 26 and 25 at Jobs Gully Loop." 1210.4 - "Nos 5 and 3 in View St. near the end of the double track." ...Set of 4 transparencies - copy slides - possibly ARE film strip dated April 1972. 1210.3 on Kodak Readymount mount. 1210.1 - No. 3 arriving at Quarry Hill terminus. 1210.2 - Bogie car at Long Gully Loop, in the far distance, with a Hotel and the ESSO service station in between. Has Fosters Lager and Carlton signs on hotel. Note sign on the closet pole - "No standing between Notices" 1210.3 - Nos. 26 (Quarry Hill) and 25 (Eaglehawk) at Jobs Gully Loop. 1201.4 - No. 5 showing Charing Cross in bound for Charing Cross and No. 3 en route for Eaglehawk in View St. near the end of the double track. Appears to be SEC employee at the rear of No. 3. Part of a set of 20 slides made by the Association of Railway Enthusiast Provincial Tramways film strip. Reference Item 2560 details the ARE Film Strip and provide references to other slides.Information written on in blue ink and date stamped on purple ink. 1210.1 - "No. 3 arriving at Quarry Hill terminus." 1210.2 - "Bogie car at Long Gully Loop." 1210.3 - "Nos. 26 and 25 at Jobs Gully Loop." 1210.4 - "Nos 5 and 3 in View St. near the end of the double track."tramways, trams, bendigo, long gully, quarry hill, view st., tram 3, tram 5, tram 25, tram 26 -
 Ballarat Tramway Museum
Photograph - Digital image Set of 20, 1971-72
... ... View St...Set of 22 digital images of Bendigo Tramways, 1972 at or before closure while on a tram tour by Stuart Lodington. .1 - No. 7 arriving at North Bendigo .2 - No. 5 departing Charing Cross along View St, with a Firestone tyres in the background. .3 - front view of a tram in View St with a blurred background image. .4 - No. 24 showing Eaglehawk destination .5 - No 26 and 3 in View St, with the Armstrong Tyre Service building in the background and signs for T&G and Cohn's Drinks. .6 - ditto .7 - No. 3 arriving at Charing Cross from Eaglehawk in View St, with a Quarry Hill destination. .8 - No. 3 and 18 at Charing Cross. .9 - No. 24 on the Quarry Hill line. .10 - No 26 in View St, with the Armstrong Tyre Service building in the background and signs for T&G and Cohn's Drinks. .11 - ditto, with fountain in view, Colonial Mutual building and a newsagent with a Herald sign on the building. .12 - No. 7 at North Bendigo terminus .13 - ditto with pole being reversed. .14 - No. 18 at Quarry Hill terminus with Northern Terrazzo sign in the background. .15 - No. 24 at Quarry Hill terminus .16 - No. 18 arriving at Charring Cross, with Fountain Plaza and Bendigo Pharmacy in the background. .17 - No. 3 and 18 at Charing Cross. .18 - No. 7 at North Bendigo terminus with pole being placed on the overhead. .19 - No. 26 in View St inbound, with Sandhurst Trustees sign in the background. .20 - No. 6 leaving Charing Cross in Pall Mall with Myer and other buildings in the background. .21 - No. 7 at North Bendigo .22 - Single trucker with two roof Advertisements crossing View St with fountain in view, Colonial Mutual building and a newsagent with a Herald sign on the building....Ballarat Tramway Museum South Gardens Reserve Wendouree Parade Ballarat Ballarat goldfields Trams tramways Bendigo Eaglehawk Quarry Hill North Bendigo Charing Cross View St tram 7 tram 5 tram 24 tram 26 tram 5 tram 3 tram 18 tram 6 Set of 22 digital images of Bendigo Tramways, 1972 at or before closure while on a tram tour by Stuart Lodington. .1 - No. 7 arriving at North Bendigo .2 - No. 5 departing Charing Cross along View St, with a Firestone tyres in the background. .3 - front view of a tram in View St with a blurred background image. .4 - No. 24 showing Eaglehawk destination .5 - No 26 and 3 in View St, with the Armstrong Tyre Service building in the background and signs for T&G and Cohn's Drinks. .6 - ditto .7 - No. 3 arriving at Charing Cross from Eaglehawk in View St, with a Quarry Hill destination. .8 - No. 3 and 18 at Charing Cross. .9 - No. 24 on the Quarry Hill line. .10 - No 26 in View St, with the Armstrong Tyre Service building in the background and signs for T&G and Cohn's Drinks. .11 - ditto, with fountain in view, Colonial Mutual building and a newsagent with a Herald sign on the building. .12 - No. 7 at North Bendigo terminus .13 - ditto with pole being reversed. .14 - No. 18 at Quarry Hill terminus with Northern Terrazzo sign in the background. .15 - No. 24 at Quarry Hill terminus .16 - No. 18 arriving at Charring Cross, with Fountain Plaza and Bendigo Pharmacy in the background. .17 - No. 3 and 18 at Charing Cross. .18 - No. 7 at North Bendigo terminus with pole being placed on the overhead. .19 - No. 26 in View St inbound, with Sandhurst Trustees sign in the background. .20 - No. 6 leaving Charing Cross in Pall Mall with Myer and other buildings in the background. .21 - No. 7 at North Bendigo .22 - Single trucker with two roof Advertisements crossing View St with fountain in view, Colonial Mutual building and a newsagent with a Herald sign on the building. ...Set of 22 digital images of Bendigo Tramways, 1972 at or before closure while on a tram tour by Stuart Lodington. .1 - No. 7 arriving at North Bendigo .2 - No. 5 departing Charing Cross along View St, with a Firestone tyres in the background. .3 - front view of a tram in View St with a blurred background image. .4 - No. 24 showing Eaglehawk destination .5 - No 26 and 3 in View St, with the Armstrong Tyre Service building in the background and signs for T&G and Cohn's Drinks. .6 - ditto .7 - No. 3 arriving at Charing Cross from Eaglehawk in View St, with a Quarry Hill destination. .8 - No. 3 and 18 at Charing Cross. .9 - No. 24 on the Quarry Hill line. .10 - No 26 in View St, with the Armstrong Tyre Service building in the background and signs for T&G and Cohn's Drinks. .11 - ditto, with fountain in view, Colonial Mutual building and a newsagent with a Herald sign on the building. .12 - No. 7 at North Bendigo terminus .13 - ditto with pole being reversed. .14 - No. 18 at Quarry Hill terminus with Northern Terrazzo sign in the background. .15 - No. 24 at Quarry Hill terminus .16 - No. 18 arriving at Charring Cross, with Fountain Plaza and Bendigo Pharmacy in the background. .17 - No. 3 and 18 at Charing Cross. .18 - No. 7 at North Bendigo terminus with pole being placed on the overhead. .19 - No. 26 in View St inbound, with Sandhurst Trustees sign in the background. .20 - No. 6 leaving Charing Cross in Pall Mall with Myer and other buildings in the background. .21 - No. 7 at North Bendigo .22 - Single trucker with two roof Advertisements crossing View St with fountain in view, Colonial Mutual building and a newsagent with a Herald sign on the building.trams, tramways, bendigo, eaglehawk, quarry hill, north bendigo, charing cross, view st, tram 7, tram 5, tram 24, tram 26, tram 5, tram 3, tram 18, tram 6 -
 Buninyong & District Historical Society
Photograph - Original Photograph, Front view Netherby, Warrenheip St. in 1991, 1991
... Front view Netherby, Warrenheip St. in 1991...Colour photograph, Front view Netherby, Warrenheip St. in 1991...St. Netherby Sparling Colour photograph, Front view Netherby, Warrenheip St. in 1991 Front view Netherby, Warrenheip St. in 1991 Photograph Original Photograph ...historic, buildingColour photograph, Front view Netherby, Warrenheip St. in 1991buninyong, warrenheip st., netherby, sparling -
 Bendigo Historical Society Inc.
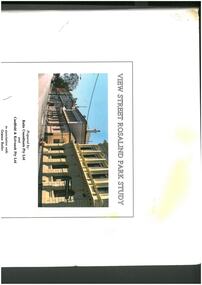
Book - View Street Rosalind Park Study, 1991
... View St....Includes details and colour photos of shops, residences and buildings in the View St Rosalind Park precinct and elevation drawings. ...History House 11 Mackenzie Street Bendigo goldfields View St. Rosalind Park 258-page spiral bound book titled 'View Street Rosalind Park Study'. ...258-page spiral bound book titled 'View Street Rosalind Park Study'. Includes details and colour photos of shops, residences and buildings in the View St Rosalind Park precinct and elevation drawings. Prepared by Ratio Consultants Pty Ltd and Caulfield & Krivanek Pty Ltd in association with Graeme Butler and Francine Gilfedder & Associated December 1991 Document enclosed in cardboard cover with a colour photo of part of View St.view st., rosalind park -
 Bendigo Historical Society Inc.
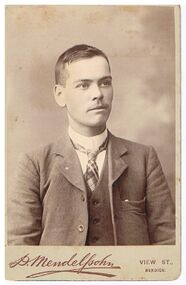
Photograph - HICKSON COLLECTION: MALE PORTRAIT FREDERICK GEORGE HICKSON ?
... On bottom of photo : D. Mendelfsohn, View St., Bendigo. Photo likely to be Frederick Hickson as a young male adult. ...D. Mendelfsohn, View St., Bendigo...On bottom of photo : D. Mendelfsohn, View St., Bendigo. Photo likely to be Frederick Hickson as a young male adult. ...Portrait: sepia coloured photo of baby sitting on ornate cane chair. Baby is wearing white lace over over garment, with long-sleeved garment underneath. Written on back of photo in fountain pen 'Freddie Hickson Age ten months' On bottom of photo Alan Spicer Williamson Street, Bendigo. Information provided with photos: Frederick George Hickson born 1884, Toolleen, Victoria. Father Edward George, mother Lucy MaryAnne Aylett, married 1879 in Kerry. Frederick died 1942, Heathcote, aged 86. Edward George Hickson, born 1837, father James, mother Barbara Godfrey, died 1915 Toolleen aged 78. Frederick George Hickson married Rose Victoria Louise Osborne in 1913. Rose Osborne born 1889 Raywood, father Louis, mother Margaret Ann Carmen. Children of Frederick and Rose : Edward George born 1914, Long gully. Margaret Lucy born 1916 Bendigo.Sepia coloured portrait of young male adult dressed in three piece suit, wing collar and tartan print tie. On bottom of photo : D. Mendelfsohn, View St., Bendigo. Photo likely to be Frederick Hickson as a young male adult. See information on 1632.2D. Mendelfsohn, View St., Bendigoperson, individual, frederick george hickson, toolleen, hickson -
![Photograph, Bull, Hugh Jones, 1897-1993, View looking along St Kilda Road [completed Centenary pylons on Princes Bridge]](/media/collectors/68524623ad73480cc6fce59f/items/68f089892b74709eaf6d30e8/item-media/68f089af2b74709eaf6d372a/item-fit-380x285.jpg?cb=6) City of Melbourne Libraries
City of Melbourne LibrariesPhotograph, Bull, Hugh Jones, 1897-1993, View looking along St Kilda Road [completed Centenary pylons on Princes Bridge]
... View looking along St Kilda Road [completed Centenary pylons on Princes Bridge]...Exhibition caption by project volunteer, Louise McKenzie Photographer notations on slide: "View looking along St Kilda Road C57" Published: (1934, September 5). ...Photographer notations on slide: "View looking along St Kilda Road C57"....Retrieved September 21, 2023, from http://nla.gov.au/nla.news-article10977836 centenaries 1930-1939 bridges Photographer notations on slide: "View looking along St Kilda Road C57". Glass plate negative View looking along St Kilda Road [completed Centenary pylons on Princes Bridge] Photograph Bull, Hugh Jones, 1897-1993 ...Princes Bridge Centenary pylons complete Even though this is a street scene, it feels very intimate; we are instantly immersed in the activity of a Melbourne afternoon, looking down St Kilda Road from a viewpoint near today’s Federation Square. The focus is on the Centenary Pylons, erected on Princes Bridge to mark Melbourne’s Centenary in 1934. The sixteen plastered pylons were designed by Roy Prentice, the second person to qualify as an architect at the University of Melbourne in 1933, and aged just 27. The State Electricity Commission sponsored the work and The Argus reported that the pylons were “illuminated from within to give the effect of soft radiance”. Australia Home Beautiful reported that the taller pylons were 48 feet high. Timber-framed and faced with fibrous plaster and galvanised sheet iron, each structure was bolted to a concrete foundation three feet in depth. Panels of glass were indirectly lit by forty 100 watt lamps, and the upper bank of lamps were dyed so as to flood them with a deep red light. The shields and flagpoles were illuminated by three 200 watt concealed projectors, part of an electric night light decoration scheme involving 28 miles of wire to supply more than 20,000 lights. Melbourne was converted into “a coloured fairyland by night”. Featured in "Newsworthy: Melbourne in photographs 1933-1936" exhibition at East Melbourne Library, October to December 2023. Exhibition caption by project volunteer, Louise McKenzie Photographer notations on slide: "View looking along St Kilda Road C57" Published: (1934, September 5). The Age (Melbourne, Vic. : 1854 - 1954), p. 11. Published title: DECORATIONS -- THEN AND NOW. Published caption: "The second picture shows one of the Princes-bridge pylons completed..." Trove article identifier: http://nla.gov.au/nla.news-article205880269 Research by project volunteer, Louise McKenzie: Even though this is a street scene, it feels very intimate; we are instantly immersed in the activity of a Melbourne afternoon, looking down St Kilda Road from a viewpoint near today’s Federation Square. The focus is on the Centenary Pylons, erected on Princes Bridge to mark Melbourne’s Centenary in 1934. The sixteen plastered pylons were designed by Roy Prentice, the second person to qualify as an architect at the University of Melbourne in 1933, and aged just 27. The State Electricity Commission sponsored the work and The Argus reported that the pylons were “illuminated from within to give the effect of soft radiance”. Australia Home Beautiful reported that the taller pylons were 48 feet high. Timber-framed and faced with fibrous plaster and galvanised sheet iron, each structure was bolted to a concrete foundation three feet in depth. Panels of glass were indirectly lit by forty 100 watt lamps, and the upper bank of lamps were dyed so as to flood them with a deep red light. The shields and flagpoles were illuminated by three 200 watt concealed projectors, part of an electric night light decoration scheme involving 28 miles of wire to supply more than 20,000 lights. Melbourne was converted into “a coloured fairyland by night”. References: DECORATIONS -- THEN AND NOW. (1934, September 5). The Age (Melbourne, Vic. : 1854 - 1954), p. 11. Retrieved September 21, 2023, from http://nla.gov.au/nla.news-article205880269 'Dressing Melbourne for the Duke', The Australian home beautiful: a journal for the home builder. Vol 12 No. 10 (1 October 1934), page 21, 58. Retrieved September 14, 2023, from http://nla.gov.au/nla.obj-2950922209 28 Miles of Wire (1934, October 18). The Argus (Melbourne, Vic. : 1848 - 1957), p. 1 (The Junior Argus). Retrieved September 21, 2023, from http://nla.gov.au/nla.news-article10977836Photographer notations on slide: "View looking along St Kilda Road C57".centenaries, 1930-1939, bridges -
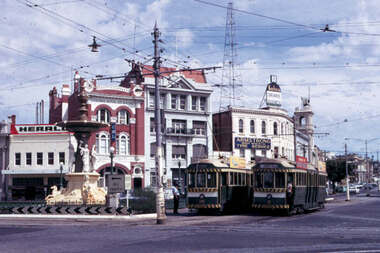 Ballarat Tramway Museum
Slide - 35mm slide/s - set of 12, Noel Simons, 28 Feb. 1972
... ... View St....Photo taken after the tram has passed the photographer from within the Highway Car Sales yard. 1207.11 - No. 26 bound for Eaglehawk at the end of the double track in View St., note signal contactors, tram stop and section signs mounted on pole. 1207.12 - No. 26 turning from View St. into Barnard St....Information written on in blue ink and date stamped on purple ink. 1207. 1- "Nos. 26 and 2 at Charing Cross." 1207.2 - "Nos. 26 and 2 at Charing Cross." 1207.3 - "No. 2 in Mitchell St. just after leaving Charing Cross." 1207.4 - "No.6 leaving Charing Cross for Golden Square." 1207.5 - "No. 2 arriving at Charing Cross from Quarry Hill." 1207.6 - "No. 21 waits at Charing Cross as No. 6 arrives from Golden Square." 1207.7 - "No 5 at Charing Cross with No. 2 lurking behind." 1207.8 - "No. 21 in High St. at cnr of Wattle St." 1207.9 - "No. 6 in High St. at cnr of Wattle St." 1207.10 - "No. 6 in High St. between Wattle and Vine Sts." 1207.11 - "No. 26 at end of double track in View St. near Barnard. St. 1207.12 - "No. 26 seen at dusk turning from View St. into Barnard St."...St. 1207.12 - "No. 26 seen at dusk turning from View St. into Barnard St." Set of 12 transparencies taken on 28/2/1972 on Kodak mounts. 1207.1 - Bendigo 26 and 2 at Charing Cross. 26 en route for Eaglehawk, 2 for Quarry Hill. ...Set of 12 transparencies taken on 28/2/1972 on Kodak mounts. 1207.1 - Bendigo 26 and 2 at Charing Cross. 26 en route for Eaglehawk, 2 for Quarry Hill. Has the Colonial Mutual Life, Armstrong Tyre Service, and Australian Mutual Provident Society buildings and a Cohns Drinks ad. in the background. 1207.2 - as for 1207.1 but with Alexandra fountain in the foreground. 1207.3 - No. 2 in Mitchell St. heading for Quarry Hill. Photo taken after tram has passed photographer. Has buildings on either side of Mitchell St. in the background, including the Plaza Theatre. 1207.4 - No. 6 en route for Golden Square departing Charing Cross. Has the RACV and ANZ bank in the background. 1207.5 - No. 2 crossing Pall Mall to enter Charing Cross ex Quarry Hill, with the Fountain Plaza in the background. 1207.6 - No. 6 arriving Charing Cross ex Golden Square with No. 21 alongside. No. 21 has the SEC ad. 'Everything's fine in my all electric kitchen.' Has the City Family Hotel and the Fountain Plaza shopping centre in the background. 1207.7 - No. 5 at Charing Cross en route for Quarry Hill with No. 2 behind. No. 2 has two SEC roof ads, 'Everything s fine in my all electric kitchen' and 'Electricity best for cooking'. RACV building in the background. Tram crews are discussing the day in the front of the tram. 1207. 8 - No. 21 in High St. Bendigo with the Cathedral in the background. No. 21 has two SEC roof ads, 'Everything's fine in my all electric kitchen' and 'Electricity best for cooking'. 1207.9 - No. 6 in High St. Bendigo with the Cathedral in the background. 1207.10 - No. 6 in High St. Bendigo, just past Wattle St. Photo taken after the tram has passed the photographer from within the Highway Car Sales yard. 1207.11 - No. 26 bound for Eaglehawk at the end of the double track in View St., note signal contactors, tram stop and section signs mounted on pole. 1207.12 - No. 26 turning from View St. into Barnard St.Information written on in blue ink and date stamped on purple ink. 1207. 1- "Nos. 26 and 2 at Charing Cross." 1207.2 - "Nos. 26 and 2 at Charing Cross." 1207.3 - "No. 2 in Mitchell St. just after leaving Charing Cross." 1207.4 - "No.6 leaving Charing Cross for Golden Square." 1207.5 - "No. 2 arriving at Charing Cross from Quarry Hill." 1207.6 - "No. 21 waits at Charing Cross as No. 6 arrives from Golden Square." 1207.7 - "No 5 at Charing Cross with No. 2 lurking behind." 1207.8 - "No. 21 in High St. at cnr of Wattle St." 1207.9 - "No. 6 in High St. at cnr of Wattle St." 1207.10 - "No. 6 in High St. between Wattle and Vine Sts." 1207.11 - "No. 26 at end of double track in View St. near Barnard. St. 1207.12 - "No. 26 seen at dusk turning from View St. into Barnard St."tramways, trams, bendigo, charing cross, high st, view st., tram 2, tram 5, tram 6, tram 21, tram 26