Showing 89 items matching "water treatment"
-
 Bendigo Historical Society Inc.
Photograph - PHOTOGRAPH. WATER TREATMENT PLANT IN BENDIGO
... PHOTOGRAPH. WATER TREATMENT PLANT IN BENDIGO.......water treatment...Sepia photograph - water treatment plant, Bendigo. Picture of a tank laying on it's side, at the front has 8 turning wheels, written on front of tank, 'Water Treatment. ...History House 11 Mackenzie Street Bendigo goldfields PHOTOGRAPH Tank water treatment Photograph. Water Treatment Plant Bendigo. ...Sepia photograph - water treatment plant, Bendigo. Picture of a tank laying on it's side, at the front has 8 turning wheels, written on front of tank, 'Water Treatment. Frank A. Stevenson, Bendigo.' Picture has lots of pipes and taps at the rear of the tank.photograph, tank, water treatment, photograph. water treatment plant, bendigo. frank a.stevenson. -
 Bendigo Historical Society Inc.
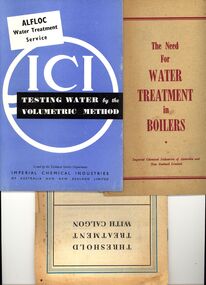
Document - BILL ASHMAN COLLECTION: PRINTED MATERIAL ON WATER TREATMENT
... BILL ASHMAN COLLECTION: PRINTED MATERIAL ON WATER TREATMENT...Three small publications on treatment of water, The Need For Water Treatment in Boilers, Testing Water by the Volumetric Method, Threshold Treatment With Calgon....Document BILL ASHMAN COLLECTION: PRINTED MATERIAL ON WATER TREATMENT ...Three small publications on treatment of water, The Need For Water Treatment in Boilers, Testing Water by the Volumetric Method, Threshold Treatment With Calgon.books, technical, chemistry -
 Lakes Entrance Historical Society
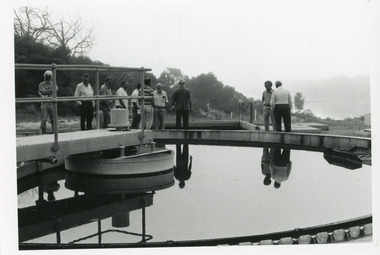
Photograph - Tambo Water Board waste water treatment plant Golf Links Road Lakes Entrance 1993, Lakes Post Newspaper
... Tambo Water Board waste water treatment plant Golf Links Road Lakes Entrance 1993...Black and white photograph taken during inspection at the waste water treatment plant Golf Links Road Lakes Entrance Victoria...Water Resources Public Works Black and white photograph taken during inspection at the waste water treatment plant Golf Links Road Lakes Entrance Victoria Photograph Tambo Water Board waste water treatment plant Golf Links Road Lakes Entrance 1993 Lakes Post Newspaper ...Black and white photograph taken during inspection at the waste water treatment plant Golf Links Road Lakes Entrance Victoriawater resources, public works -
 Eltham District Historical Society Inc
Negative - Photograph, Water treatment plant at Kangaroo Ground end of Maroondah Aqueduct tunnel, 1991
... Water treatment plant at Kangaroo Ground end of Maroondah Aqueduct tunnel......Water treatment plant...Eltham District Historical Society Inc 728 Main Rd Eltham melbourne Kangaroo Ground Maroondah Aqueduct Water treatment plant Fuji HG 200 CA-1 Roll of 35mm colour negative film, 9 strips Colour print 10 x 15 cm Water treatment plant at Kangaroo Ground end of Maroondah Aqueduct tunnel Negative Photograph ...Roll of 35mm colour negative film, 9 strips Colour print 10 x 15 cmFuji HG 200 CA-1kangaroo ground, maroondah aqueduct, water treatment plant -
 Bendigo Historical Society Inc.
Document - BILL ASHMAN COLLECTION: CORRESPONDENCE
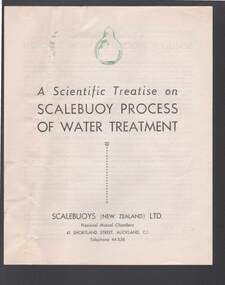
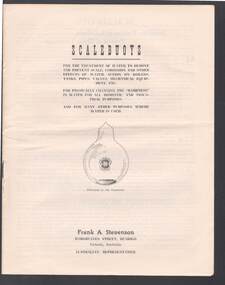
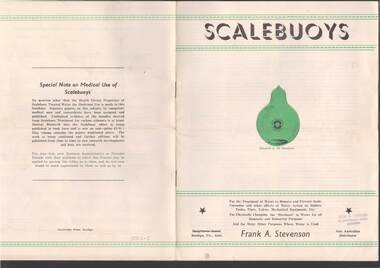
... A Scientific Treatise on Scalebuoy Process of Water Treatment...Printed brochure titled ' A Scientific Treatise on Scalebuoy Process of Water Treatment. Top of front page has a green bulb at the top with the title underneath. ...History House 11 Mackenzie Street Bendigo goldfields SCIENCES Instruments - general scalebuoy Bill Ashman Collection - Correspondence A Scientific Treatise on Scalebuoy Process of Water Treatment Scalebuoys (New Zealand) Ltd R H S Abbott Herald Printing Works Auckland Printed brochure titled ' A Scientific Treatise on Scalebuoy Process of Water Treatment. ...Printed brochure titled ' A Scientific Treatise on Scalebuoy Process of Water Treatment. Top of front page has a green bulb at the top with the title underneath. Brochure gives the history of the Scalebuoy, the fundamental principles, use and a summary of the Scalebuoy method of water treatment. Written by R. H. S. Abbott.sciences, instruments - general, scalebuoy, bill ashman collection - correspondence, a scientific treatise on scalebuoy process of water treatment, scalebuoys (new zealand) ltd, r h s abbott, herald printing works auckland -
 Bendigo Historical Society Inc.
Document - BILL ASHMAN COLLECTION: CORRESPONDENCE
... Scalebuoy Process of Water Treatment...Typed notes titled 'Scalebuoy Process of Water Treatment'. Notes give some history, fundamental principles, use and summary....History House 11 Mackenzie Street Bendigo goldfields SCIENCES Instruments - general scalebuoy Bill Ashman Collection - Correspondence Scalebuoy Process of Water Treatment Typed notes titled 'Scalebuoy Process of Water Treatment'. ...Typed notes titled 'Scalebuoy Process of Water Treatment'. Notes give some history, fundamental principles, use and summary.sciences, instruments - general, scalebuoy, bill ashman collection - correspondence, scalebuoy process of water treatment -
Marysville & District Historical Society
THE TRIANGLE NEWS-VOL 37 NO 36-OCTOBER 1 2010
... ...shepparton water treatment...Marysville & District Historical Society 39 Darwin Street Marysville yarra-valley-and-the-dandenong-ranges marysville victoria australia national water week goulburn-murray water shepparton water treatment river to tap tour alexandra goulburn broken catchment donation to yea community murrindindi shire council THE TRIANGLE NEWS-VOL 37 NO 36-OCTOBER 1 2010 ...marysville, victoria, australia, national water week, goulburn-murray water, shepparton water treatment, river to tap tour alexandra, goulburn broken catchment, donation to yea community, murrindindi shire council -
Marysville & District Historical Society
THE TRIANGLE NEWS-VOL 41 NO 19-MAY 23 2014
... ...marysville water treatment plant upgrade underway...marysville victoria australia marysville main street goes pink for breast cancer support breast cancer network australia marysville mini-field of women triangle new contact details what's on when in may 2014 seasonal influenza vaccine available the committee of management of the gallipoli park precinct marysville community market creative triangle marysville sub-branch rsl portable skate ramp at buxton reserve church notices marysville golf report emotions anonymous international intrepid triangle bushwalkers mayor's chair advertisements councillor comment buxton recreational reserve marysville and triangle community men's shed marsyville saddletramps payment of rate instalment residential and rural real estate marysville triangle real estate marysville water treatment plant upgrade underway requiem mass elaine postlethwaite r.i.p. dianne mcnamara marysville triangle youth christ church marysville blumes fashion winter collection council welcomes permit exemptions from bushfire rebuilding efforts cleaner needed for marysville villains alexandra clearing sale marysville midweek netball tenders marysville preschool centre long day care & kindergarten el kanah marysville eat in eat out menu council plans for future financial stability depression recovery program emergence from surviving to thriving lake mountain opening weekend buxton hall trivia night good governance in practice training and compliance systems & solutions cfa mountains mayhem THE TRIANGLE NEWS-VOL 41 NO 19-MAY 23 2014 ...marysville, victoria, australia, marysville main street goes pink for breast cancer support, breast cancer network australia, marysville mini-field of women, triangle new contact details, what's on when in may, 2014 seasonal influenza vaccine available, the committee of management of the gallipoli park precinct, marysville community market, creative triangle, marysville sub-branch rsl, portable skate ramp at buxton reserve, church notices, marysville golf report, emotions anonymous international, intrepid triangle bushwalkers, mayor's chair, advertisements, councillor comment, buxton recreational reserve, marysville and triangle community men's shed, marsyville saddletramps, payment of rate instalment, residential and rural real estate, marysville triangle real estate, marysville water treatment plant upgrade underway, requiem mass elaine postlethwaite, r.i.p. dianne mcnamara, marysville triangle youth, christ church marysville, blumes fashion winter collection, council welcomes permit exemptions from bushfire rebuilding efforts, cleaner needed for marysville villains, alexandra clearing sale, marysville midweek netball, tenders, marysville preschool centre, long day care & kindergarten, el kanah marysville, eat in eat out menu, council plans for future financial stability, depression recovery program, emergence from surviving to thriving, lake mountain opening weekend, buxton hall trivia night, good governance in practice, training and compliance systems & solutions, cfa, mountains mayhem -
 Bendigo Historical Society Inc.
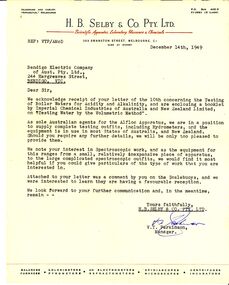
Document - BILL ASHMAN COLLECTION: BENDIGO ELECTRIC COMPANY LETTER & BOOKLET
... Booklet on Alfloc water treatment service along with a one page letter from H.B.Selby & Co Pty Ltd to Bendigo Electric Company of Aust Pty Ltd with reference to Scalebuoys....History House 11 Mackenzie Street Bendigo goldfields SCIENCES Instruments - general scalebuoy Booklet on Alfloc water treatment service along with a one page letter from H.B.Selby & Co Pty Ltd to Bendigo Electric Company of Aust Pty Ltd with reference to Scalebuoys. ...Booklet on Alfloc water treatment service along with a one page letter from H.B.Selby & Co Pty Ltd to Bendigo Electric Company of Aust Pty Ltd with reference to Scalebuoys.sciences, instruments - general, scalebuoy -
 Eltham District Historical Society Inc
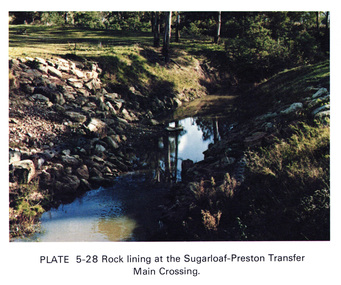
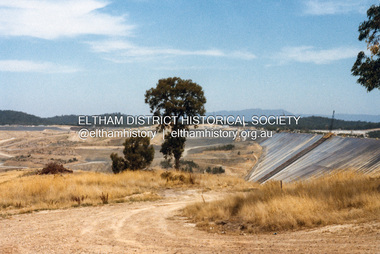
Work on paper (Sub-Item) - Photograph, Rock lining at the Sugarloaf-Preston transfer main crossing, 1976
... The Sugarloaf Reservoir and the Winneke Water Treatment Plant (Winneke) are located 32 km north-east of Melbourne, near Christmas Hills. ...The Sugarloaf Reservoir and the Winneke Water Treatment Plant (Winneke) are located 32 km north-east of Melbourne, near Christmas Hills. rock lining water supply Image printed on A4 page from 04997 Diamond Creek Basin Study, 1980 Rock lining at the Sugarloaf-Preston transfer main crossing Work on paper Photograph ...Colour photograph of rock lining at the Sugarloaf-Preston transfer main crossing. The Sugarloaf Reservoir and the Winneke Water Treatment Plant (Winneke) are located 32 km north-east of Melbourne, near Christmas Hills. rock lining, water supply -
 Bendigo Historical Society Inc.
Tool - BILL ASHMAN COLLECTION: SCALEBUOY SAMPLE CASE
... A Scalebuoy is a handheld water treatment device, invented by Hartley Abbott and patented under the name of the Bendigo Electronic Company, designed to prevent scale buildup in water vessels and boilers by supposedly "softening" the water. ...A Scalebuoy is a handheld water treatment device, invented by Hartley Abbott and patented under the name of the Bendigo Electronic Company, designed to prevent scale buildup in water vessels and boilers by supposedly "softening" the water. scalebuoy W. ...Leather display case holding scalebuoys belonged to Bill Ashman, who was a salesperson for the Abbott company. A Scalebuoy is a handheld water treatment device, invented by Hartley Abbott and patented under the name of the Bendigo Electronic Company, designed to prevent scale buildup in water vessels and boilers by supposedly "softening" the water. Brown leather case with 2 keys containing 4 scalebuoys of various types and sizes held in a blue velvet holder & a pocket in lid holding 9 publications by W.N.Abbott on the uses of Scalebuoys along with 2 letters attesting to the success of Scalebuoys.scalebuoy, w. abbott -
 Eltham District Historical Society Inc
Newspaper articles, Yarra Dam
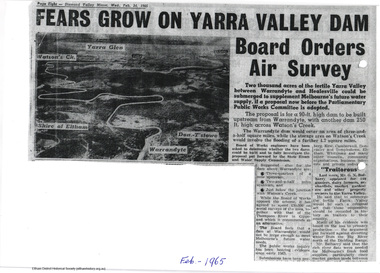
... Two newspaper articles discussing the proposed construction of the Yarra Dam at Warrandyte: Yarra Dam at Warrandyte not the only alternative - Mr Stokes, Diamond Valley Mirror, 14 October, 1964 Fears grow on Yarra Valley Dam Board orders air surey, Diamond Valley Mirror, 24 February 1965 The Sugarloaf Reservoir Project, including a major pumping station and water treatment plant was completed, increasing Melbourne's total storage capacity by 95,000 million litres in 1981....Eltham District Historical Society Inc 728 Main Rd Eltham melbourne Two newspaper articles discussing the proposed construction of the Yarra Dam at Warrandyte: Yarra Dam at Warrandyte not the only alternative - Mr Stokes, Diamond Valley Mirror, 14 October, 1964 Fears grow on Yarra Valley Dam Board orders air surey, Diamond Valley Mirror, 24 February 1965 The Sugarloaf Reservoir Project, including a major pumping station and water treatment plant was completed, increasing Melbourne's total storage capacity by 95,000 million litres in 1981. water supply sugarloaf reservoir christmas hills Yarra Dam Warrandyte 2 pages Yarra Dam Newspaper articles ...Two newspaper articles discussing the proposed construction of the Yarra Dam at Warrandyte: Yarra Dam at Warrandyte not the only alternative - Mr Stokes, Diamond Valley Mirror, 14 October, 1964 Fears grow on Yarra Valley Dam Board orders air surey, Diamond Valley Mirror, 24 February 1965 The Sugarloaf Reservoir Project, including a major pumping station and water treatment plant was completed, increasing Melbourne's total storage capacity by 95,000 million litres in 1981.2 pageswater supply, sugarloaf, reservoir, christmas hills, yarra dam, warrandyte -
 Melbourne Legacy
Newspaper - Document, article, New water process will benefit country towns
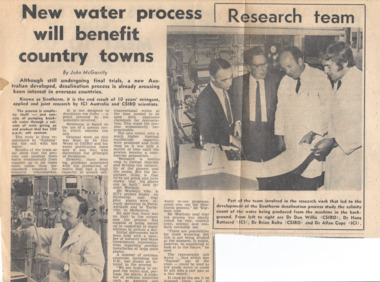
... A newspaper article about scientists working on water treatment processes. This document was from a file of information about guest speakers (see also 00812-00822 and 00830-00837). ...Melbourne Legacy 293 Swanston Street Melbourne melbourne A newspaper article about scientists working on water treatment processes. This document was from a file of information about guest speakers (see also 00812-00822 and 00830-00837). ...A newspaper article about scientists working on water treatment processes. This document was from a file of information about guest speakers (see also 00812-00822 and 00830-00837). So it is assumed that one of the scientists mentioned was approached to speak at a Legacy function. The caption mentions Dr Don Willis (CSIRO), Dr Hans Battered (ICI), Dr Brian Bolto (CSIRO), and Dr Allan Cope (ICI). Legatees met regularly and had guest speakers to entertain and inform on different subjects at their Tuesday Luncheons. The Programme Committee was responsible for organising the speakers.A record that the speakers at Legacy functions came from many walks of life and the subjects spoken on were varied.Newspaper article with black and white photos of scientists.speakers, legatee event -
 Bendigo Historical Society Inc.
Document - BILL ASHMAN COLLECTION: CORRESPONDENCE
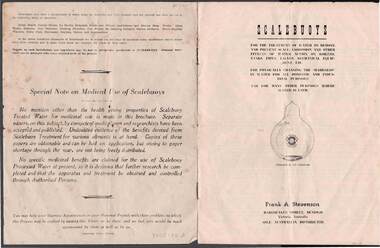
... Contains Scientific Treatise of Scalebuoy . . . Process of Water Treatment (By the Creator R. H. S. Abbott, Jnr.)Also mentions How Scalebuoys Function, Not a 'Water-Softener', Special Features and First Cost is the Last Cost. ...Contains Scientific Treatise of Scalebuoy . . . Process of Water Treatment (By the Creator R. H. S. Abbott, Jnr.)Also mentions How Scalebuoys Function, Not a 'Water-Softener', Special Features and First Cost is the Last Cost. ...Brochure titled Scalebuoys. Contains Scientific Treatise of Scalebuoy . . . Process of Water Treatment (By the Creator R. H. S. Abbott, Jnr.)Also mentions How Scalebuoys Function, Not a 'Water-Softener', Special Features and First Cost is the Last Cost. Scalebuoys Units includes Domestic Household Tank Unit, Hydraulic-Nozzle Tank Unit, Scalebuoy Tap Unit, Practical Applications of Scalebuoy for Domestic Uses, Scalebuoy Hand Unit, Vest Pocket Unit, Large Hydraulic-Nozzle Agitation Tank Unit, Motorized Tank Unit, A Few of the Many Industrial & Processing Applications, Motor Car Unit and a Special Note on Medical Use of Scalebuoys.sciences, instruments - general, scalebuoy, bill ashman collection - correspondence, frank a stevenson, r h s abbott jnr, bendigo electronic coy of australia, cambridge press -
 Bendigo Historical Society Inc.
Document - BILL ASHMAN COLLECTION: CORRESPONDENCE
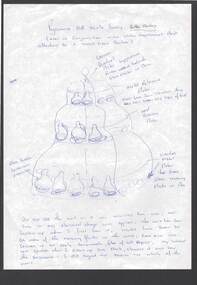
... Piece of paper with a sketch of a Scalebuoy Unit used in conjunction with water treatment & Plant attached to a wood fired Boiler at the Pyramid Hill Butter Factory. ...History House 11 Mackenzie Street Bendigo goldfields SCIENCES Instruments - general scalebuoy Bill Ashman Collection - Correspondence Pyramid Hill Scale Buoy Butter Factory Frank Honeychurch Piece of paper with a sketch of a Scalebuoy Unit used in conjunction with water treatment & Plant attached to a wood fired Boiler at the Pyramid Hill Butter Factory. ...Piece of paper with a sketch of a Scalebuoy Unit used in conjunction with water treatment & Plant attached to a wood fired Boiler at the Pyramid Hill Butter Factory. Sketch shows the Scalebuoy Unit. Note at the bottom mentions that he did not see the unit as it was intended for use. The unit had been broken up when he first saw it. Would have been about thirty mercury flasks, each of which was covered in an easily removable film of salt deposit. Interest was sparked after cleaning one of the flasks and seeing the engraving. He regretted not taking the whole of the unit. On the back is written the name - Frank Honeychurch-8 Harley St, Bendigo 1/3/02.sciences, instruments - general, scalebuoy, bill ashman collection - correspondence, pyramid hill scale buoy butter factory, frank honeychurch -
 Bendigo Historical Society Inc.
Document - BILL ASHMAN COLLECTION: SCALEBUOYS BROCHURE
... Items mentioned are: Scientific Treatise of Scalebuoy - Process of Water Treatment, How Scalebuoys Function, Not a 'Water-Softener', Special Features, First Cost is the Last Cost. ...Items mentioned are: Scientific Treatise of Scalebuoy - Process of Water Treatment, How Scalebuoys Function, Not a 'Water-Softener', Special Features, First Cost is the Last Cost. ...Six copies of an eight page brochure titled 'Scalebuoys'. Printed by Cambridge Press, Bendigo. Items mentioned are: Scientific Treatise of Scalebuoy - Process of Water Treatment, How Scalebuoys Function, Not a 'Water-Softener', Special Features, First Cost is the Last Cost. Scalebuoy Units for Domestic Household Tanks, Hydraulic-Nozzle Tank Unit, Scalebuoy Tap Unit, Practical Applications of Scalebuoy for Domestic Uses, Scalebuoy Hand Unit, Vest Pocket Unit, Large Hydraulic-Nozzle Agitation Tank Unit, Motorised Tank Unit. Also A Few of the Many Industrial & Processing Applications, Motor Car Unit. On the back page is a list of where Scalebuoy Units have been installed.sciences, instruments - general, scalebuoy, bill ashman collection - correspondence, frank a stevenson, r h s abbott, jnr, bendigo electronic coy of australia, civic square bendigo, cambridge press -
 Deaf Children Australia
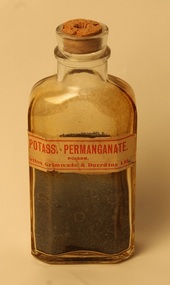
Bottle, Felton Grimwade & Duerdins Ltd, Bottle of Potassium Permanganate, Using the company name, it dates between 1929 and the early 1950s
... Potassium permanganate is used extensively in the water treatment industry. Historically it was used to disinfect drinking water. ...Potassium permanganate is used extensively in the water treatment industry. Historically it was used to disinfect drinking water. ..."Potassium permanganate is an inorganic chemical compound with the chemical formula KMnO4. It is a salt consisting of K+ and MnO−4 ions. Formerly known as permanganate of potash or Condy's crystals, it is a strong oxidizing agent. It dissolves in water to give intensely pink or purple solutions, the evaporation of which leaves prismatic purplish-black glistening crystals. (Which is what in contained in the bottle.) As an oxidant, potassium permanganate can act as an antiseptic. For example, dilute solutions are used to treat canker sores (ulcers), disinfectant for the hands and treatment for mild pompholyx, dermatitis, and fungal infections of the hands or feet. Potassium permanganate is used extensively in the water treatment industry. Historically it was used to disinfect drinking water. (From Wikipedia)" Eight sided, rectangular, clear glass bottle containing grey filings. It is closed with a cork, which is probably broken off. Label indicates Potassium Permanagate manufactured by Felton, Grimwade & Duerdins Ltd. "POTASSI PERMANGANATE."/"POISON"/"Felton Grimwade & Duerdins Ltd." on label on front. There are numbers in the glass on the bottom: "1608 M" and small difficult to read letters. deaf children australia,, chemical, antiseptic, potassium permanganate, water purifier, felton grimwade & duerdins ltd, bottle -
 Bendigo Historical Society Inc.
Document - BILL ASHMAN COLLECTION: SCALEBUOYS BROCHURE
... Brochure mentions the Scientific Treatise of Scalebuoy Process of Water Treatment by the Creator R. H. S. Abbott, Jnr. ...Brochure mentions the Scientific Treatise of Scalebuoy Process of Water Treatment by the Creator R. H. S. Abbott, Jnr. ...Eight page brochure printed by Cambridge Press titled Scalebuoys. Sole Australian Distributor Frank A. Stevenson, 62 Honeysuckle Street, Bendigo. Pages have green horizontal lines. Brochure mentions the Scientific Treatise of Scalebuoy Process of Water Treatment by the Creator R. H. S. Abbott, Jnr. Other topics are How Scalebuoys Function, Not a 'Watersoftener', Special Features, First Cost is the Last Cost. Scalebuoy Units are for Domestic Household Tank Unit, Hydraulic-Nozzle Tank Unit and Scalebuoy Tap Unit. Practical Applications of Scalebuoy for Domestic Uses are listed. There is also a Scalebuoy hand Unit, Vest Pocket Unit, Large Hydraulic-Nozzle Tank Unit and a Motorized Tank Unit. There are illustrations of the Units. There are also a list of A Few of the Many Industrial and Processing Applications. On the back page is a Special Note on Medical use of Scalebuoys.sciences, instruments - general, scalebuoy, bill ashman collection, scalebuoys, the scalebuoy company, frank a stevenson, r h s abbott jnr, bendigo electronic coy of australia, cambridge press -
 Bendigo Historical Society Inc.
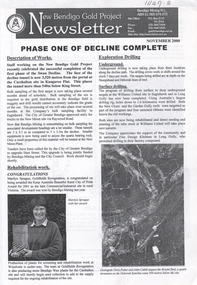
Document - Kangaroo Flat Gold Mine Collection: New Bendigo Gold Project Newsletters, no date
... The newsletter includes information on water treatment plant, new shaft below the surface and provides a personality profile of John Cahill (Frank) the Senior Geologist. ...The newsletter includes information on water treatment plant, new shaft below the surface and provides a personality profile of John Cahill (Frank) the Senior Geologist. ...Three New Bendigo Gold Project newsletters, dated November 2000, June 2002 and April 2003. November 2000 newsletter is headed ' Phase One of Decline Complete' Articles include description of works, rehabilitation work, exploration drilling - underground and surface drilling and dewatering and safety. Map showing decline development superimposed on street map on back of sheet. June 2002 newsletter, headed 'Environmental Manager Joins the Team' describes the appointment and previous experience of Philipa Varris. The newsletter includes information on water treatment plant, new shaft below the surface and provides a personality profile of John Cahill (Frank) the Senior Geologist. April 2003 newsletter, headed 'Bendigo Mining Seeks Site Expansion for Production' provides facts on the Swan Decline, a mine public open day, bird watching at Woodvale, the advisory board and a personality profile on Phil Walklate, project draftsman. A decline development map is provided on bottom right of sheet. bendigo mining n.l., bendigo, mining, gold, kangaroo flat, new bendigo gold project, drilling, rehabilitation, bree darcy, sam mcgowan, marilynh sprague, philipa varris, swan decline -
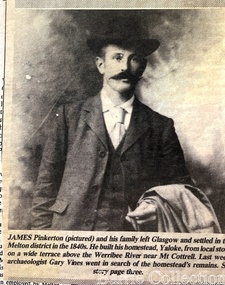 Melton City Libraries
Newspaper, James Pinkerton, 1991
... "James Pinkerton, described by fellow settler Isaac Batey as ‘a fine old Scotish [sic] gentleman’, and his wife Margaret established ‘Chamois Ponds’ on Kororoit Creek in the Keilor district in 1840.44 After a fire in 1848, the Pinkerton family moved further west to a holding called Yaloke, on the Werribee River in the Melton district.45 Today, the Surbiton Park water treatment plant operates on part of the Yaloke run. ...Melton City Libraries 31 McKenzie Street Melton melbourne "James Pinkerton, described by fellow settler Isaac Batey as ‘a fine old Scotish [sic] gentleman’, and his wife Margaret established ‘Chamois Ponds’ on Kororoit Creek in the Keilor district in 1840.44 After a fire in 1848, the Pinkerton family moved further west to a holding called Yaloke, on the Werribee River in the Melton district.45 Today, the Surbiton Park water treatment plant operates on part of the Yaloke run. ..."James Pinkerton, described by fellow settler Isaac Batey as ‘a fine old Scotish [sic] gentleman’, and his wife Margaret established ‘Chamois Ponds’ on Kororoit Creek in the Keilor district in 1840.44 After a fire in 1848, the Pinkerton family moved further west to a holding called Yaloke, on the Werribee River in the Melton district.45 Today, the Surbiton Park water treatment plant operates on part of the Yaloke run. The Pinkerton family is remembered in Melton in part due to the historic graves of the original settler, Margaret Pinkerton, and four of her grandchildren, which were marked by a memorial cairn in 1931. Changes to sewage flood zoning in the area in the 1990s necessitated that these burials be relocated. Members of the Melton & District Historical Society oversaw a project to relocate the Pinkerton graves and cairn 200 metres from their original site to their current resting place at Mount Cottrell. This relocation ceremony took place on 8 November 1992, with the participation of local school students and with Pinkerton descendants playing a central role. This occasion also marked the opening of the Pinkerton Forest Project, which saw 50 hectares of degraded woodland in Surbiton Park protected for regeneration".Photograph of Jame Pinkerton featured in the the Telegraphlocal identities, pioneer families -
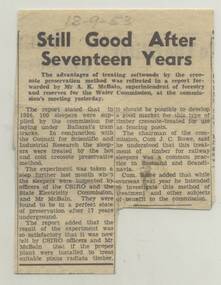 Ballarat Tramway Museum
Newspaper, The Courier Ballarat, "Still good after Seventeen Years", 18/09/1953 12:00:00 AM
... Newspaper clipping from The Courier, Ballarat, dated 18-9-53 regarding treated softwood sleepers, 100 installed in 1936 from Ballarat Water Commission, creosote treatment CSIRO. Titled "Still good after Seventeen Years" Record updated and images added 20/8/2013....Trams tramways Sleepers Tram Track Trackwork Pencil date of "18-9-53" Newspaper clipping from The Courier, Ballarat, dated 18-9-53 regarding treated softwood sleepers, 100 installed in 1936 from Ballarat Water Commission, creosote treatment CSIRO. Titled "Still good after Seventeen Years" Record updated and images added 20/8/2013. ...Yields information about a provision of treated wooden pine sleepers to tramways in Ballarat.Newspaper clipping from The Courier, Ballarat, dated 18-9-53 regarding treated softwood sleepers, 100 installed in 1936 from Ballarat Water Commission, creosote treatment CSIRO. Titled "Still good after Seventeen Years" Record updated and images added 20/8/2013.Pencil date of "18-9-53"trams, tramways, sleepers, tram track, trackwork -
 Bendigo Historical Society Inc.
Document - BILL ASHMAN COLLECTION: ALFLOC SYSTEM
... Different chemicals were used to suit different types of water in different areas. Items discussed are: Summary, Introduction, External treatment, Internal Treatment, General Principles of the 'Alfloc' Internal Treatment, Precipitation of the Scale-forming Salts, Temporary Hardness, Permanent Hardness, Conditioning of the Precipitate - Floc Formation, Efficient Control of the Concentration of both Dissolved and Suspended Solids by Blowdown, Prevention of Corrosion, Testing and Control, The 'Alfloc' Reagents for Internal Treatment, 'Alfloc' Liquors, 'Alfloc' Briquettes, Alfloc' Powders, Methods of Application, Liquors - Stationary boilers and Locomotive boilers, Briquettes - Stationary boilers and Locomotive boilers, Powders, Blowdown, Sludge, Caustic Embrittlement, Control of 'Alfloc' System, Cost and Economies of 'Alfloc' Internal Treatment and 'Alfloc' Water Treatment Service. ...Different chemicals were used to suit different types of water in different areas. Items discussed are: Summary, Introduction, External treatment, Internal Treatment, General Principles of the 'Alfloc' Internal Treatment, Precipitation of the Scale-forming Salts, Temporary Hardness, Permanent Hardness, Conditioning of the Precipitate - Floc Formation, Efficient Control of the Concentration of both Dissolved and Suspended Solids by Blowdown, Prevention of Corrosion, Testing and Control, The 'Alfloc' Reagents for Internal Treatment, 'Alfloc' Liquors, 'Alfloc' Briquettes, Alfloc' Powders, Methods of Application, Liquors - Stationary boilers and Locomotive boilers, Briquettes - Stationary boilers and Locomotive boilers, Powders, Blowdown, Sludge, Caustic Embrittlement, Control of 'Alfloc' System, Cost and Economies of 'Alfloc' Internal Treatment and 'Alfloc' Water Treatment Service. ...Eleven page article titled Water Softening in the Boiler by the 'Alfloc' System. This is an internal method of conditioning boiler feed water and the use of coagulants designed to prevent scale formation in the boiler and accessory plant, to reduce corrosion to a minimum, and further to provide for those conditions in the boiler water which from present experience are believed to prevent the occurrence of caustic ombrittlement. Different chemicals were used to suit different types of water in different areas. Items discussed are: Summary, Introduction, External treatment, Internal Treatment, General Principles of the 'Alfloc' Internal Treatment, Precipitation of the Scale-forming Salts, Temporary Hardness, Permanent Hardness, Conditioning of the Precipitate - Floc Formation, Efficient Control of the Concentration of both Dissolved and Suspended Solids by Blowdown, Prevention of Corrosion, Testing and Control, The 'Alfloc' Reagents for Internal Treatment, 'Alfloc' Liquors, 'Alfloc' Briquettes, Alfloc' Powders, Methods of Application, Liquors - Stationary boilers and Locomotive boilers, Briquettes - Stationary boilers and Locomotive boilers, Powders, Blowdown, Sludge, Caustic Embrittlement, Control of 'Alfloc' System, Cost and Economies of 'Alfloc' Internal Treatment and 'Alfloc' Water Treatment Service. Listed on page 11 are ICIANZ Sales Offices the Australian States. Between pages 7 and 8 is a page of diagrams. They are: Showing method of feeding liquors to the feed tank of boilers for 'Alfloc' internal treatment, typical arrangement of pressure vessel and typical arrangement of 'Alfloc' by-pass feeder.sciences, instruments - general, scalebuoy, bill ashman collection, alfloc system, imperial chemical industries limited alkali division, alfloc liquors, alfloc briquettes, alfloc powders, imperial chemical industries of australia and new zealand limited, elder smith & co limited, chemical & textile agencies pty ltd -
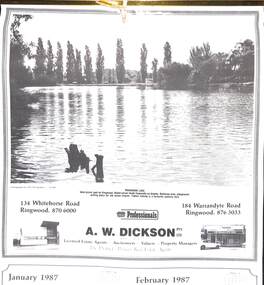 Ringwood and District Historical Society
Souvenir, Complimentary A.W.Dickson Real Estate Agents calendars - 1987 and 1988.1987 calendar with photographic images of local Ringwood features and 1988 calendar featuring local Ringwood land sale promotional images from early 20th Century
... Featuring the latest ozone water treatment techniques. In summer folding doors can be opened to give access to existing outdoor pools and sunbathing area. ...Featuring the latest ozone water treatment techniques. In summer folding doors can be opened to give access to existing outdoor pools and sunbathing area. ...A.W.Dickson was a Real Estate Agent in Ringwood for many years. These calendars show the local buildings of the day. For example the original Eastland 's building of 1967, Maroondah Hospital 1976 and the Civic Centre now the Karralyka Centre.1 1987 calendar with six black and white photos of buildings and vistas around Ringwood with monthly dates in lower quarter of page. 2 1988 calendar with six posters advertising early 20th century land sales in Ringwood, Heathmont and Ringwood East with dates in lower quarter of page Compiled by A.W.Dickson Pty. Ltd. Real Estate Agent. Photographed by C.M.S. Photographers - 725 9441 (January February 1987) RINGWOOD LAKE - Ideal picnic spot for Ringwood Model power boats frequently on display. Barbecue area, playground, resting place for old steam engine. Yabbie netting is a favourite pastime here. (March April 1987) CLOCK TOWER - Moved from its former site on Warrandyte Road corner in 1967 and re-built in its present location, brick by brick. A wreath laying ceremony is held here on Anzac day each year. (May June 1987) RINGWOOD AQUATIC CENTRE - A world class swimming facility opened in 1986 at a cost of $3 million. Featuring the latest ozone water treatment techniques. In summer folding doors can be opened to give access to existing outdoor pools and sunbathing area. (July August 1987) MAROONDAH HOSPITAL - Opened in 1976 after many years of fund raising efforts by local people. The opening of casualty facilities was welcomed by locals as previously Box Hill Hospital catered for the entre area. (September October 1987) EASTLAND - Opened October 1967. Built on a former football oval. Now about to undergo major extensions to cater for Ringwood's population growth into the 21st Century. November December 1987 CIVIC CENTRE - Built on the site of a former antimony mine behind the council offices. Now the venue for many activities and a local point for Ringwood's Cultural Life. -
 Bendigo Historical Society Inc.
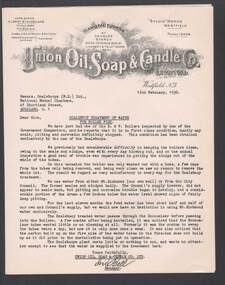
Document - BILL ASHMAN COLLECTION: CORRESPONDENCE
... Letter refers to Scalebuoy treatment of water for boiler feed. Mentioned is how clean the boiler were of scale and sludge. ...Letter refers to Scalebuoy treatment of water for boiler feed. Mentioned is how clean the boiler were of scale and sludge. ...Four copies of a typed letter from ? Bell, Manager of the Union Oil, Soap & Candle Co. Ltd. To Scalebuoys (N. Z.) Ltd., dated 16 February, 1938. Letter refers to Scalebuoy treatment of water for boiler feed. Mentioned is how clean the boiler were of scale and sludge. Letter typed on paper with printed letterhead.sciences, instruments - general, scalebuoy, bill ashman collection - correspondence, union oil soap & candle co limited, scalebuoys (n.z.) ltd, ? bell -
 Eltham District Historical Society Inc
Photograph - Digital Photograph, Alan King, Maroondah Aqueduct Siphon Bridge over the Plenty River, 26 January 2008
... Sugarloaf was officially opened in 1980 and serves as a water storage and treatment plant supplying Melbourne. ...Sugarloaf was officially opened in 1980 and serves as a water storage and treatment plant supplying Melbourne. ...Opened in 1891, the bridge formed part of the Maroondah Aqueduct carrying water from Watts River near Healesville to the reservoir at Preston where it joined Melbourne's metropolitan water system. Covered under Heritage Overlay, Nillumbik Planning Scheme. Published: Nillumbik Now and Then / Marguerite Marshall 2008; photographs Alan King with Marguerite Marshall.; p99 Built to supply thirsty Melbourne in the late 19th century, the siphon bridge spanning the Plenty River off Leischa Court, Greensborough, was part of an engineering masterpiece. Opened in 1891, the bridge formed part of the Maroondah Aqueduct carrying water from the Watts River near Healesville to the reservoir at Preston where it joined the metropolitan distribution system. A major link in Melbourne’s water supply, it also had a huge impact on communities, which mushroomed along its route. Named after the Aboriginal word for the area around the Maroondah Reservoir, the Maroondah Aqueduct was fully operational until the 1970s. Since the 1980s the land along parts of the aqueduct have been used for walking and bicycle riding, shaded in places by Monterey Pine trees planted to stabilise the surrounding ground. From 1857 the Yan Yean Reservoir supplied Melbourne’s water but the growing city needed additional catchments.1 In 1886 work began on a weir on the Watts River to enable the aqueduct to carry most of the river water 41 miles (66km) to Melbourne. The aqueduct, built by the Board of Works, is the oldest remaining aqueduct near Melbourne and was probably the first built with concrete.2 Although the aqueduct is now only used between the Maroondah and Sugarloaf Reservoirs, it can still be traced across the Shire. It extends from the Maroondah Reservoir through Christmas Hills, Kangaroo Ground, Research, Eltham, St Helena and then previously wound west through Greensborough to Reservoir.3 Built by horse and manpower the aqueduct gravity fed 25 million gallons (113.6ML) of water a day to Melbourne along a gradient of one foot to the mile. It included 25 miles (41km) of open concrete and brick channel, six miles (10km) of tunnels, and nine miles (15km) of 14 inverted siphons of riveted wrought-iron across creeks. Bricks for the aqueduct were made from clay found near the sites and remains of several kilns can still be found between Kangaroo Ground and Christmas Hills. Building the aqueduct transformed local communities. An abattoir was established at Christmas Hills. Grog shanties and labourers’ camps sprang up and local courts dealt with cases of ‘petty pilfering and boisterous behaviour’.4 The Kangaroo Ground school population jumped to 91, crammed into a room with one teacher. Miners who built the tunnels camped just north of Churinga in Greensborough – then called Tunnel Hill Camp – and adjacent to the Evelyn Arms Hotel. The miners’ high spirits were sometimes quenched in horse troughs or by a ‘welt under the ear and kick on the behind’ as the local constable calmed them down rather than lock them up.5 But the growing city of Melbourne needed more water, so the O’Shannassy catchment, east of Warburton, was added to the system in 1914. In 1920 work began on the present concrete Maroondah Dam one mile (1.6km) from the weir on the Watts River. The aqueduct capacity was thus doubled to 50 million gallons (227ML) a day.6 Intense land development threatened to pollute the open water supply, so channel sections were replaced with large pipes. In the late 1960s a large water main was built from the tunnel outlet at Research and extended through St Helena and Greensborough, so this section of the aqueduct was taken out of use. Long sections of the unused open channels in Greensborough and Bundoora were destroyed, but the old channel in Research and Eltham North remained largely intact. In the 1970s, the Sugarloaf Reservoir was constructed, inundating 445 hectares of land in Christmas Hills. Sugarloaf was officially opened in 1980 and serves as a water storage and treatment plant supplying Melbourne. In the early 1980s pipes replaced the section from Sugarloaf Reservoir to the tunnel entrance at Kangaroo Ground. The Research-Kangaroo Ground tunnel operates as part of the pipeline system.This collection of almost 130 photos about places and people within the Shire of Nillumbik, an urban and rural municipality in Melbourne's north, contributes to an understanding of the history of the Shire. Published in 2008 immediately prior to the Black Saturday bushfires of February 7, 2009, it documents sites that were impacted, and in some cases destroyed by the fires. It includes photographs taken especially for the publication, creating a unique time capsule representing the Shire in the early 21st century. It remains the most recent comprehenesive publication devoted to the Shire's history connecting local residents to the past. nillumbik now and then (marshall-king) collection, maroondah aqueduct, pipe bridge, siphon bridge -
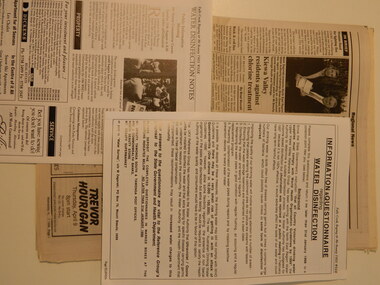 Kiewa Valley Historical Society
Papers - Mt Beauty Drinking Water 1997, 1997 - 1998
... water...chlorination...ultra violet/ozone treatment...Water Guidelines, instead of World Health Organisation Guidelines introduced in 1983, were introduced. The Australian guidelines allowed for some flexibility and the Upper Kiewa Community Consultative Committee supported a package proposal that included Ultra Violet/Ozone treatment. ...Mt Beauty residents were asked about the treatment of their drinking water at a public meeting and by an Information Questionnaire. ...In 1996, the Australian Drinking Water Guidelines, instead of World Health Organisation Guidelines introduced in 1983, were introduced. The Australian guidelines allowed for some flexibility and the Upper Kiewa Community Consultative Committee supported a package proposal that included Ultra Violet/Ozone treatment. The debate was a rejection of chlorination by a public meeting in Mt Beauty in Feb. 1997.Mt Beauty residents were asked about the treatment of their drinking water at a public meeting and by an Information Questionnaire. North East Region Water Authority was involved - the debate is an example of community consultation, drinking water standards and the input of the authorities that were involved.Papers re introducing the chlorination of the water in Mt Beauty in 1997-1998. The papers consist of articles in a green folder, the newspaper "The Alpine Times" x2, the Ovens & Kiewa 'Valley Echo' and the local Falls Creek and Bogong, Mt Beauty news 'This Week' x5.drinking water, chlorination, ultra violet/ozone treatment, community consultation -
Federation University Historical Collection
Book, The Melbourne Technical College Hydraulic Engineering
... water supply...sewerage...sewers...sewerage treatment...Barker Library (top floor) Mount Helen goldfields Hydraulic Engineering melbourne technical college rmit rex hollioake leakage aquaducts dams spillways ground water pumping curvss pipes reservoirs tanks weir channel water supply sewerage sewers sewerage treatment drainage Two volumes of course notes for the course of Hydraulic Engineering at the Melbourne Technical College The Melbourne Technical College Hydraulic Engineering Book ...Two volumes of course notes for the course of Hydraulic Engineering at the Melbourne Technical Collegehydraulic engineering, melbourne technical college, rmit, rex hollioake, leakage, aquaducts, dams, spillways, ground water, pumping, curvss, pipes, reservoirs, tanks, weir, channel, water supply, sewerage, sewers, sewerage treatment, drainage -
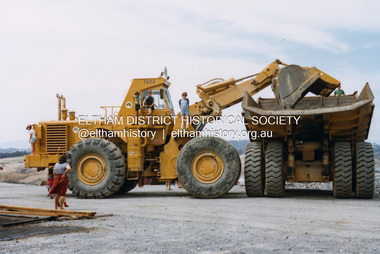 Eltham District Historical Society Inc
Photograph - Colour Print, Lewis Tulk, Construction Winneke Reservoir and treatment plant / Melbourne and Metropolitan Board of Works, c.1981
... water storage was completed in 1982 and serves Melbourne's northern suburbs. Within the visitor areas are two picnic grounds and other recreational facilities. Below its massive rock embankment is located the Winnecke Treatment...water storage was completed in 1982 and serves Melbourne's northern suburbs. Within the visitor areas are two picnic grounds and other recreational facilities. Below its massive rock embankment is located the Winnecke Treatment ...Sugarloaf Reservoir is situated on former farmland. This large water storage was completed in 1982 and serves Melbourne's northern suburbs. Within the visitor areas are two picnic grounds and other recreational facilities. Below its massive rock embankment is located the Winnecke Treatment Plan designed to purify its water before being piped into Melbourne. The dam partly inundated the old firing ranges of the former Christmas Hills Rifle Club. Source: Christmas Hills Now and then: Yarra Glen & District Historical Society, 2004.lewis tulk collection, construction, sugarloaf reservoir, winnecke dam -
 Eltham District Historical Society Inc
Photograph - Colour Print, Lewis Tulk, Construction Winneke Reservoir and treatment plant / Melbourne and Metropolitan Board of Works, c.1981
... water storage was completed in 1982 and serves Melbourne's northern suburbs. Within the visitor areas are two picnic grounds and other recreational facilities. Below its massive rock embankment is located the Winnecke Treatment...water storage was completed in 1982 and serves Melbourne's northern suburbs. Within the visitor areas are two picnic grounds and other recreational facilities. Below its massive rock embankment is located the Winnecke Treatment ...Sugarloaf Reservoir is situated on former farmland. This large water storage was completed in 1982 and serves Melbourne's northern suburbs. Within the visitor areas are two picnic grounds and other recreational facilities. Below its massive rock embankment is located the Winnecke Treatment Plan designed to purify its water before being piped into Melbourne. The dam partly inundated the old firing ranges of the former Christmas Hills Rifle Club. Source: Christmas Hills Now and then: Yarra Glen & District Historical Society, 2004.lewis tulk collection, construction, sugarloaf reservoir, winnecke dam