Showing 69 items
matching photographer eaglehawk
-
 Northern District School of Nursing. Managed by Bendigo Historical Society Inc.
Photograph - Preliminary Training School 28
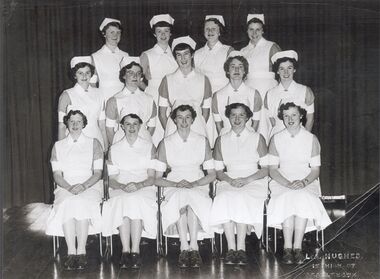
The Northern District School of Nursing opened in 1950 in to address the issues around nurse recruitment, training and education that had previously been hospital based. The residential school was to provide theoretical and in-house education and practical training over three years. The students would also receive practical hands-on training in the wards of associated hospitals. The Northern District School of Nursing operated from Lister House, Rowan Street, Bendigo. It was the first independent school of nursing in Victoria and continued until it closed in 1989. Black and white photograph of fourteen PTS 28 nurses. Photo taken 19th October, 1955Photographers stamp bottom R corner L.A. Hughes Hight Street Eaglehawkfourteen pts nurses photo, taken 19th october 1955 -
 Ballarat Tramway Museum
Photograph - Bendigo Tram No. 2, 4/1949
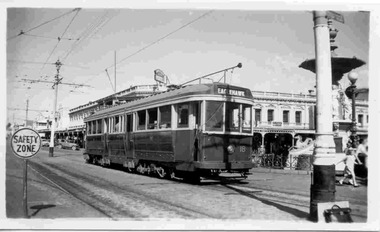
Bendigo Tram No. 2. Photographer :I.K. Winney, tram displaying a white disc on the front dash that indicates a following tram in the same single line section.Yields information about SEC tramway operations.Black and white photograph on plain paper"BENDIGO No2 on EAGLEHAWK Route" "Taken by I.K.Winney 4/49" "N.J. THORPE NEG." "15 154/88"bendigo, bendigo tramcar 2, eaglehawk -
 Ballarat Tramway Museum
Slide - 35mm slide/s - set of 17, Noel Simons, 20/11/1962 12:00:00 AM
Set of 17 transparencies taken on 20/11/1962 on Kodak mounts. 1187.1 - Bendigo No. 2 at the Quarry Hill terminus, showing destination of Quarry Hill. Has Cohns Drinks and Streets Ice Cream ads on dash panel, a SEC 'electric cooking' roof ad and another roof ad. Shows the Y terminus at this location, but tram standing just before it. Overhead in position. 1187.2 - as above, but closer up. 1187.3 - as above, but from the north side, showing cemetery in the background. 1187.4 - Bendigo No.3 at Eaglehawk terminus. Tram showing destination of Quarry Hill. Has the various buildings at Eaglehawk in the background including the Foodland store. Has Streets Ice cream and White Horse Whiskey ads on the dash panel. 1187.5 - Bendigo No. 18 at Garden Gully crossing loop, in bound, with destination of Eaglehawk. Passengers waiting for an Eaglehawk tram at the stop. Has a white horse whiskey ad on dash panel and SEC roof ads. Conductor standing in doorway looking out. 1187.6 - Bendigo No. 7 inbound in Nolan St. at cnr of McCrae St. showing destination of Golden Square. Has Streets Ice cream ad on dash panel and a Castrol Roof ad. 1187.7 - Bendigo No. 19 at the North Bendigo terminus with railway level crossing in background. Tram has a Cohns Drinks ad and an SEC 'Electric Cooking' roof ad. 1187.8 - Bendigo No. 2 at the Quarry Hill terminus, looking back into Bendigo, showing destination of Eaglehawk. 1187.9 - Bendigo No. 21 in McCrae St, near Nolan St outbound for North Bendigo. Photo taken after tram has passed photographer. 1187.10 - Bendigo Nos. 4 and 26 at Charing Cross in View St. with fountain alongside and the Beehive, Ezywalkin Buildings in the background. No. 26 has a Sandhurst Milk and SEC 'Electric Cooking' roof ad. 1187.11 - close up of 22E maximum traction truck and folded footstep. 1187.12 - Bendigo No. 19 at Charing Cross terminus, after tram has passed photographer, showing destination of North Bendigo, with the Beehive building in the background and passengers boarding tram. 1187.13 - Bendigo No. 11, turning from View St. into Pall Mall, showing Special with the conductor holding point bar. Has the Beehive and Ezywalkin Buildings in the background. 1187.14 - No. 7 at Charing Cross terminus, in Pall Mall, bound for Golden Square. Has the Beehive and Ezywalkin buildings in the background and passengers waiting at the tram stop. 1187.15 - No. 18 at the Charing Cross terminus, bound for Eaglehawk. Has the Beehive and Ezywalkin buildings in the background and passengers waiting at the tram stop. Also has the 'Safety Zone' sign in the photograph. 1187.16 - No. 2 at Quarry Hill terminus, night or dusk photo. Tram showing destination of Depot. 1187.17 - No. 26 at Charing Cross, night photo. Tram has destination of Quarry Hill, but is on the line for Eaglehawk. Photo looks along Mitchell St. Also shows Safety Zone sign. Information written on in black ink and date stamped on purple ink. 1187.1 - "No. 2 at Quarry Hill terminus Bendigo" 1187.2 - "No. 2 at Quarry Hill terminus Bendigo" 1187.3 - "No. 2 at Quarry Hill terminus Bendigo" 1187.4 - "No. 3 at Eaglehawk terminus" 1187.5 - "No. 18 in Mt Korong Road, Long Gully at cnr of Havilah Road (Eaglehawk Route)" 1187.6 - "No. 7 in Nolan St. Bendigo, at Cnr of McCrae St., near lake Weeroona, (North Bendigo Route)' 1187.7 - "No. 19 at North Bendigo terminus" 1187.8 - "No. 2 at Quarry Hill terminus" 1187.9 - "No. 21 in McCrae St. Bendigo, near Nolan St. (North Bendigo Route) 1187.10 - "4 and 26 at Alexandra Fountain, Charing Cross Bendigo" 1187.11 - "Truck of Bogie Car, Bendigo Tramways" 1187.12 - "No. 19 in Pall Mall at Charing Cross, Bendigo" 1187.13 - "Birney car No. 11 entering Pall Mall from View St. at Charing Cross Bendigo" 1187.14 - "No. 7 in Pall Mall at Charing Cross, Bendigo" 1187.15 - "No. 18 at Alexandra Fountain, Charing Cross, Bendigo" 1187.16 - "No. 2 at Quarry Hill terminus, Bendigo" 1187.17 - "No. 26 at Alexandra Fountain, Charing Cross, Bendigo" tramways, trams, bendigo, quarry hill, eaglehawk, north bendigo, maximum traction, night photo, tram 2, tram 3, tram 4, tram 7, tram 11, tram 18, tram 19, tram 21, tram 26 -
 Ballarat Tramway Museum
Slide - 35mm slide/s, Noel Simons, 21/11/1962 12:00:00 AM
Set of 17 transparencies taken on 21/11/1962 on Kodak mounts. 1188.1 - Bendigo No. 11 at Depot Junction McCrae and Arnold St. with driver/conductor changing points. 1188.2 - Bendigo No. 4 at Charing Cross, side on photo, with City Club Hotel and Alexandra Fountain in the background. Tram has Castrol and SEC 'Electric Cooking' ads. 1188.3 - Bendigo No. 4 climbing View St. after tram has passed photographer. Tram has Streets Ice Cream and Cohns Soft Drinks ad on rear dash panel. In the background are the buildings in View St., including the Princess Theatre. Tram has destination of Eaglehawk. 1188.4 - Trams 2 and 4 crossing at the California Gully or Thorpe St Loop. 1188.5 - Bendigo 4 in Mt Korong Road. Tram inbound with destination of Quarry Hill, just leaving Garden Gully Loop. 1188.6 - Bendigo 4 and 17 crossing at the Hayes St. or Iron Bark Gully Loop. No. 17 bound for Eaglehawk, No. 4, Quarry Hill. 17 has two SEC roof ads and a white horse whiskey ad. 1188.7 - No. 17 bound for Eaglehawk, soon after leaving California Gully. Has large mullock heap in background. 1188.8 - Bendigo 2 and 17 crossing at the Thorpe St. or California Gully Loop. Has butchers shop in background. 1188.9 - Bendigo 17 at the Eaglehawk terminus. Has destination of Quarry Hill. In background is the hotel and shops at the terminus, showing ads for "Melbourne Bitter". Tram has two SEC 'Electric Cooking' ads. Driver and conductor about to assist two lady passengers with a pram and baby. 1188.10 - No. 17 at Eaglehawk terminus, awaiting departure. Has Eaglehawk Town Hall and Post Office in background. Tram has a Whitehorse Whiskey ad on the front dash panel. 1188.11 - No. 3 in High St. Eaglehawk, with destination of Eaglehawk. Has the shops on the south side of High St. in the background, including the Eaglehawk fish shop. Tram has two roof ads, one an SEC roof ad, and Cohns Drinks and Streets Ice cream ads on front dash panel. 1188.12 - as above, but after tram has passed photographer. Note the centre of the road poles. 1188.13 - No. 2 outbound for Eaglehawk at the intersection of Mt. Korong Road and the Calder Highway. Photo taken after the tram has passed the photographer. Has an Ampol service station in the background. 1188.14 - No. 11 leaving the Bendigo depot, crossing the bridge, with the Scrubber car in the background. 1188.15 - No. 21 at the North Bendigo terminus. Tram has destination of Golden Square and Cohns drink ad on front dash and two roof ads on side. 1188.16 - No. 11 on Golden Square route, in High St. at intersection with Old High St. 1188.17 - No. 11 at the Golden Square terminus, conductor turning the pole. Hotel on the left side of the photo. Note the road works barrier and red flag behind the tram. Slide has an end of roll mark on the right hand side of the image.Information written on in black ink and date stamped on purple ink. 1188.1 - "Birney car No. 11 in McCrae St. at Cnr of Arnold about to run into depot, Bendigo" 1188.2 - "No. 4 at Alexandra Fountain, Charing Cross Bendigo" 1188.3 - "No. 4 climbing the View St. Hill from Charing Cross, Bendigo (Eaglehawk Route)" 1188.4 - "No. 4 and 2 at Thorpe St. Loop, California Gully" 1188.5 - "No. 4 in Mt Korong Rd., Long Gully, Near Havilah Rd. (Bendigo) (Eaglehawk Route)" 1188.6 - "Nos. 17 and 4 crossing on Hayes St. Loop, Ironbark, Bendigo" 1188.7 - "No. 17 soon after leaving California Gully (Eaglehawk Route)" 1188.8 - "No.2 and 17 crossing on Thorpe St. Loop, California Gully (Eaglehawk Route)" 1188.9 - "No. 17 at Eaglehawk terminus" 1188.10 - "No. 17 at Eaglehawk terminus" 1188.11 - "No. 3 in High St. Eaglehawk" 1188.12 - "No. 3 nearing Eaglehawk terminus" 1188.13 - "No. 2 in Mt. Korong Rd., Ironbark. Calder highway on left (Eaglehawk route) 1188.14 - "Birney car No. 11 leaving Bendigo depot. Scrubber car at rear" 1188.15 - "No. 21 at North Bendigo Terminus" 1188.16 - "Birney car No. 11 in High St. Bendigo at intersection with Old High Street (Golden Square Route)" 1188.17 - "Birney Car No. 11 at Golden Square terminus, High St., Bendigo". tramways, trams, bendigo, depot junction, charing cross, view st., eaglehawk, north bendigo, golden square, tram 2, tram 3, tram 4, tram 11, tram 17, tram 21, tram scrubber -
 Ballarat Tramway Museum
Slide - 35mm slide/s - set of 4, Noel Simons, Apr. 1967
Set of 2 slides made from the Association of Railway Enthusiast Provincial Tramways film strip, possibly during April 1967. 1192.1 and 1192.3 mounted in Kodak Ready Mounts. The others in plain white mounts. Slides dated Dec. 1968. 1192.1 - No. 21 out bound to Golden Square in High St., between Wattle and Vine Streets. Photo taken after tram has passed photographer. Has a sign for "Reid's Furnituorium" in the background. 1192.2 - Bendigo No. 28 dressed up as Myers Christmas tram, passing the Post Office and Courts in Pall Mall. 1192.3 - Bendigo No. 23 at Needle Loop en route to Eaglehawk. Tram has two SEC roof ads, one "Electric Cooking" and the other "Everything fine in my all electric kitchen". 1192.4 - Bendigo scrubber parked at the end of the main depot lead, alongside the depot office buildings.Details in blue ink, date hand stamped in purple ink. 1192.1 - "No. 21 heads along High St for Golden Square between Wattle and Vine Streets." 1192.2 - "Birney No. 28 in Christmas Garb, traverses Pall Mall en route to North Bendigo". 1192.3 - "No. 23 at Needle Loop on its run to Eaglehawk". 1192.4 - "Scrubber car at Bendigo Depot".tramways, trams, north bendigo, bendigo, bridge st loop, depot, tram 21, tram 23, tram 28, tram scrubber -
 Ballarat Tramway Museum
Slide - 35mm slide/s - set of 24, Noel Simons, 20/05/1971 12:00:00 AM
Set of 24 transparencies taken on 20/5/1971 on Kodak mounts. 1195.1 - Bendigo 19 arriving at Charing Cross en route to North Bendigo with Fountain Plaza and the City Family Hotel in the background. No. 19 has two roof ads for the SEC. -'Electricity better for cooking' and 'Everything's under control in my all electric kitchen' 1195.2 - as above, but standing at the Charing cross stop, with the Beehive Stores and other buildings along the east side of Pall Mall in the background. 1195.3 - No 21 ex Golden Square crossing View St. trackwork in front of No. 25 waiting to depart for Quarry Hill. No.21 has two roof ads (as for No.19 in 1195.1) and No.25 has one SEC roof ad and another. Ezywalkin sign in the background, and Fountain Plaza. 1195.4 - as for 1195.3, but after 21 has arrived and 25 left for Quarry Hill. Has Ezywalkin store and the Beehive store in the background. 1195.5 - No. 5 at the Eaglehawk terminus. Photo taken with a cannon in foreground looking along High St. Eaglehawk. Has shops on the west side of High St. in the background. 1195.6 - No. 5 at the Eaglehawk terminus, close up of the rear of the tram - note tow bar arrangement. Has destination of Quarry Hill. 1195.7-Nos.25 and 5 crossing at the Thorpe St. Loop, California Gully. No. 25 bound for Eaglehawk (has SEC Briquette and electric cooking roof ads) and 5 en route for Quarry Hill with a SEC and Cinzano roof ad. 1195.8 - as for 1195.7, but after trams have passed each other. Has Borough Auto Service building in the background. 1195.9 - No. 5 in Mt Korong Road, towards Bamard Street, photo taken after tram has passed photographer. 1195.10 - No. 30 at the Golden Square terminus with the Milk Bar on the right hand side of the photograph. 1195.11 - No. 30 inbound at Fire Station Loop, High St. Golden Square. Has old fire station in the background. Passengers are boarding the tramcar. 1195.12 - No. 30 in High St, bound for North Bendigo between Vine and Wattle Streets. 1195.13 - No. 5 bound for Eaglehawk waits at Iron Bark Gully Loop, at Hayes St. 1195.14 - No. 5 and No. 2 crossing at Iron Bark Gully Loop. 1195.15 - No. 5 bound for Eaglehawk leaving the Manchester Loop, Long gully. 1195.16 - No. 5 passing William Street, Long Gully en route to Eaglehawk. 1195.17 - No. 5 just before the California Gully Crossing Loop. 1195.18 - Nos. 5 and 26 crossing at California Gully crossing Loop. No. 5 heading to Eaglehawk, 26, Quarry Hill. 1195.19 - No. 5 in High St. Eaglehawk with Bob Moyle's Victoria Hotel and the TAB in the background. 1195.20 - No. 5 in High St. Eaglehawk approaching the terminus. Photo taken after the tram has passed the photographer. Has Foodland store and J. Best Fruit supply in the background, along with Eaglehawk Town Hall. 1195.21 - No. 5 at the Eaglehawk terminus, photo taken along seldom used track along High St. 1195.22 - as for 1195.22 - but at the very end of the track. 1195.23 - No. 5 en route for Quarry Hill climbs High St. Eaglehawk with the Victoria Hotel and Eaglehawk Town Hall in the background. 1195.24 - No. 5 and 25 crossing at Jobs Gully Loop. Note 25 has a black on white destination roll, while No. 5 has a white on black destination roll. Information written on in black ink and date stamped on purple ink. 1195.1 - "No. 19 arrives at Charing Cross Bendigo from Golden Square" 1195.2 - "No. 19 about to leave Charing Cross for North Bendigo" 1195.3 - "No. 25 awaiting departure for Quarry Hill, watches No. 21 arrive at Charring Cross from Golden Square" 1195.4 - "No. 21 on North Bendigo service and No. 25 on Quarry Hill run await departure at Charing Cross" 1195.5 - "No. 5 at Eaglehawk terminus" 1195.6 - "No. 5 at Eaglehawk terminus" 1195.7 - "Nos. 5 and 25 crossing at Thorpe St. Loop, California". 1195.8 - "Nos. 25 and 5 crossing Thorpe St. Loop, California Gully". 1195.9 - "No. 5 descending Mt Korong Rd. towards Bamard St." 1195.10 - "Birney car No. 30 at Golden Square terminus" 1195.11 - "Birney car No. 30 in High Street near Thistle Street (Fire Station Loop)" 1195.12 - "No. 30 in High St. between vine and Wattle Streets" 1195.13 - "No. 25 at Hayes Street Loop Iron Bark". 1195.14 - "Nos. 2 and 5 crossing at Hayes Street Loop Iron Bark" 1195.15 - "No. 5 at Manchester Loop opposite Havilah Road, Long Gully" 1195.16 - "No. 5 passing William Street, Long Gully". 1195.17 - "No. 5 at California Gully" 1195,18 - "Nos. 26 and 5 at Thorpe St. Loop, California Gully". 1195.19 - "No. 5 in High St. Eaglehawk". 1195.20 - "No. 5 approaching Eaglehawk terminus" 1195.21 - "No. 5 at Eaglehawk terminus" 1195.22 - "No. 5 at Eaglehawk terminus" 1195.23 - "No. 5 in High St. Eaglehawk" tramways, trams, bendigo, charing cross, eaglehawk, california gully, golden square, iron bark gully, jobs gully, tram 2, tram 5, tram 19, tram 21, tram 25, tram 26, tram 30 -
 Ballarat Tramway Museum
Slide - 35mm slide/s - set of 20, Noel Simons, 21/05/1971 12:00:00 AM
Set of 20 transparencies taken on 21/5/1971 on Kodak mounts. 1197.1 - Bendigo No. 5 en route to Eaglehawk at Creeth St Long Gully. Tram has a SEC roof ad and Cinzano roof ad. 1197.2 - No 5 approaching Needle Loop between Long Gully and California Gully. On left hand side is the City of Bendigo sign, indicating city boundary. 1197.3 - As for 1197.2 but actually entering loop. Photo taken after tram has passed photographer. 1197.4 - No. 26 bound for Eaglehawk descending the railway bridge near Eaglehawk, at Jobs Gully. 1197.5 - as for 1197.4, but after crossing bridge, now ascending a hill. Photo taken after tram has passed photographer. 1197.6 - No. 26 climbing High St. hill Eaglehawk, nearing end of Double track, bound for Quarry Hill. Shows centre of the road poles. 1197.7 - As for 1197.6, with tram entering single track section. Photo taken after tram has passed photographer. Has a BP service station in the background. 1197.8 - No. 26 (bound for Quarry Hill) crossing No. 17 (Eaglehawk) at Job's Gully Loop. 1197.9 - No. 17 climbing railway bridge at Job's Gully, en route to Eaglehawk. Photo taken after tram has passed photographer. 1197.10 - No.26 bound for Quarry Hill, leaving Long Gully Loop? Has the Creeth St. church in l197.l in the far background. Photo taken after tram has passed photographer. 1197.11 - Tramway Point work at the northern end of Long Gully Loop. 1197.12 - No. 17 en route for Quarry Hill turning into View St. from Bamard St. Tram has SEC roof ads "Everything fine in my all electric Kitchen' and 'Electric Cooking is Matchless'. 1197.13 - as for 1197.12, but tram has turned into View St and about to enter the double line track. Photo taken after tram has passed photographer. 1197.14 - No. 21 enters Nolan St after turning from MacRae St. en route to Bendigo. Note sign on its own post noting tram turns "Beware Tram Turns" and stop sign on adjacent pole "Trams stop on Request". No. 21 has two SEC roof ads. 1197.15 - No. 21 in Nolan St. after turning from Bridge St. (White Hills Road). Note signal light for Bridge St. loop on pole corner of street. Photo taken after tram has passed photographer. 1197.16 - No. 2 bound for Eaglehawk at unknown location. 1197.17 - Tram stop sign on a pole "CARS STOP BY REQUEST" 1197.18 - No. 5 in Carpenter St.? en route to Quarry Hill. 1197.19 - No. 28 has just arrive at Golden Square terminus, passengers are disembarking and the trolley pole is being turned. Golden Square Hotel in the background. 1197.20 - No. 28 at Golden Square terminus. Has a "Nothing beats Briquettes for hear roof ad. Information written on in black ink and date stamped on purple ink. 1197.1 - "No. 5 at Creeth St. Long Gully" 1197.2 - "No. 5 approaching Needle Loop between Long Gully and California Gully" 1197.3 - "No. 5 at Needle Loop between Long Gully and California Gully" 1197.4 - "No. 26 crossing railway bridge at Job's Gully near Eaglehawk" 1197.5 - "No. 26 just after crossing railway bridge at Job's Gully near Eaglehawk/ 1197.6 - "No. 26 in High St. Eaglehawk" 1197.7 - "No. 26 at end of double track in High St. Eaglehawk" 1197.8 - "Nos. 26 and 17 crossing at Job's Gully Loop" 1197.9 - "No. 17 crossing railway bridge at Job's Gully near Eaglehawk". 1197.10 - "No. 26 at Long Gully" 1197.11 - 'Northern end of points at Long Gully Loop". 1197.12 - "No. 17 turning into View St. from Bamard St. Bendigo". 1197.13 -'No. 17 at beginning of double track in View St. after leaving Bamard St. Bendigo. 1197.14 - "No. 21 enters Nolan St. from MacRae St. Bendigo." 1197.15 - "No. 21 in Nolan St. Bendigo just after leaving White Hills Road." 1197.16 - "No. 2" 1197.18 - "No. 5" 1197.19 - "Birney car No. 28 at Golden Square Terminus" 1197.20 "Birney car No. 28 at Golden Square Terminus" tramways, trams, bendigo, long gully, railway bridge, jobs gully, trackwork, nolan st, quarry hill, tram stops, golden square, tram 2, tram 5, tram 17, tram 21, tram 26, tram 28 -
 Ballarat Tramway Museum
Slide - 35mm slide/s - set of 4, Noel Simons, 24/05/1971 12:00:00 AM
Set of 4 transparencies taken on 24/5/1971 on Kodak mounts. 1199.1 - No. 21 in High St. at junction with old High St., near Fire Station Loop. Tram has two SEC roof ads. 1199.2 - No. 21 in High St. between Shamrock and Thistle Sts. Photo taken after the tram has passed the photographer. 1199.3 - Photo of a green box containing timetables for the four Bendigo routes. Located at Charing Cross. 1199.4 - Bendigo No. 23 en route to Eaglehawk at Charing Cross, with two SEC roof ads 'Everything's fine in my all electric kitchen' and "Switch to electric cooking'. Has the Ezywalkin building and the Beehive building in the background. Information written on in black ink and date stamped on purple ink. 1199.1 - "No. 21 in High St. at junction with old High St., near Fire Station Loop." 1199.2 - "No. 21 in High St. between Shamrock and Thistle Sts." 1199.3 - "Bendigo Tramways timetable at Alexandra Fountain Charing Cross." 1199.4 - "No. 23 at Alexandra Fountain Charing Cross, Bendigo." tramways, trams, bendigo, timetables, charing cross, high st., tram 21, tram 23 -
 Ballarat Tramway Museum
Slide - 35mm slide/s - set of 13, Noel Simons, 24/05/1971 12:00:00 AM
Set of 13 transparencies taken on 24/5/1971 on Kodak mounts. 1200.1 - No. 7 en route to Golden Square turning from Bridge St. into Nolan St. Photo taken after tram has passed photographer. Tram has a briquettes roof ad. 1200.2 - No. 21 in McCrae St. just before Nolan St. Photo taken after tram has passed photographer. 1200.3 - No. 7 in Nolan St at corner with McCrae St. Passenger boarding tram at a tram stop. 1200.4 - No 7 turning from Nolan into McCrae St. with Golden Fleece service station in background. 1200.5 - No. 7 in Thunder St en route to North Bendigo. Photo taken after tram has passed photographer. 1200.6 - No. 5 en route to Eaglehawk just after leaving Needle Loop between Long Gully and California Gully. 1200.7 - No. 5 at the start of the double track in High St. Eaglehawk. 1200.8 - No. 5 at Eaglehawk terminus showing "Depot" with Leo A Hughes Photographer advertisement on building in background. 1200.9 - No. 5 at Eaglehawk terminus. Has two SEC roof ads 'Everything's fine in my all electric kitchen' and 'Electricity best for cooking'. 1200.10 - No. 5 at Eaglehawk terminus, with canon, war memorial outside Town Hall and Leo A Hughes Photographer advertisement on building in background. 1200.11 - No. 5 in McCrae St. about to enter Arnold St. and depot. Tram showing depot, has driver changing points. 1200.12 - No. 5 in Arnold St. Photo taken looking up the centre of the access track - shows the overhead at depot junction. 1200.13 - Depot entrance with signage at depot entrance and depot building in background.Information written on in black ink and date stamped on purple ink. 1200.1 - "No. 7 entering Nolan St. from Bridge St." 1200.2 -"No. 21 in McRae St. about to turn into Nolan St." 1200.3 - "No. 7 in Nolan St. at corner of McRae St." 1200.4 - "No. 7 turning from Nolan St. into McRae St." 1200.5 - "No. 7 in Thunder St. just after turning from Caledonia St." 1200.6 - "No. 5 just after leaving Needle Loop between Long Gully and California Gully. 1200.7 - "No. 5 in High St. Eaglehawk at start of double track." 1200.8 - "No. 5 at Eaglehawk terminus" 1200.9 - "No. 5 at Eaglehawk terminus" 1200.10 - "No. 5 at Eaglehawk terminus."\ 1200.11 - "No. 5 in McCrae St. about to enter Arnold St." 1200.12 - "No. 5 in Arnold St." 1200.13 - "Entrance to Bendigo Tram Depot, No. 5 running into shed."tramways, trams, bendigo, mccrae st, north bendigo, california gully, eaglehawk, depot, tram 5, tram 7, tram 21 -
 Ballarat Tramway Museum
Slide - 35mm slide/s - set of 32, Noel Simons, 25/02/1971 12:00:00 AM
Set of 31 transparencies taken on 25/2/1972 on Kodak mounts. 1201.1 - Bendigo No. 26 in Bond St. just after leaving Long Gully en route for Quarry Hill. Has Norris Supermarket in background. Has two SEC roof ads. 1201.2 - No. 26 climbing View St. from Charing Cross en route to Eaglehawk. Has ANZ bank and AMOCO service station in background. 1201.3 - as for 1201.3, but after tram has passed photographer. Has buildings west of Mackenzie St. in photograph. 1201.4 - Tram stop and centre of the road pole with two "CARS STOP BY REQUEST" signs mounted on pole at the corner of Mackenzie St. 1201.5 - same position as for 1201.3, but with No. 5 descending the street. 1201.6 - same position as for 1201.2, but with No. 5 descending the street. Photo taken after tram has passed photographer. 1201.7 - No. 7 in Nolan St. from across the park at Lake Weeroona. 1201.8 - No. 7 entering McCrae St from Nolan St. - distant view. Note "TRAM "sign on left hand side under tree and overhead in McCrae St. from former track that once was in this street. 1201.9 - No. 7 in High St. with Cathedral in background. Tram en route to North Bendigo. Note scaffolding around Cathedral main spire area. 1201.10 - No. 7 crossing Bendigo Creek bridge in High St. near Golden Square. Has a Caltex Service station in the background. 1201.11 - No. 7 at Golden Square terminus with Sunburst Fruit Juices and a Peters Ice cream delivery vans alongside. 1201.12 - as for 1201.11 but photo taken from behind tram, with the end of the rails in the photograph. 1201.13 - No. 7 and 21 in Pall Mall at Charing Cross with No. 5 in the background. Taken some distance away from the location. 1201.14 - No. 7 at Golden Square terminus, taken a short distance from the tram terminus. Shows Milk Bar on right hand side and the hotel on the left hand side. Taken from the south side of the roadway. 1201.15 - as from 1201.14 but taken from the north side of the roadway. 1201.16 - No 5 waiting at California Gully loop. Distant photo showing surrounds 1201.17 - No. 5 en route for Quarry Hill crossing No. 26 at California Gully. 1201.18 - No. 26 at Eaglehawk terminus with Eaglehawk Town Hall and Post Office in background. 1201.19 - No. 21 arriving at Charing Cross en route to North Bendigo. Has Alexandra Fountain in the background, ANZ bank RACV building, and other buildings on the north side of Pall Mall or Nolan St. 1201.20 - No. 26 en route for Quarry Hill at Charing Cross, with crew standing by front door. Has Colonial Mutual life building, Armstrong Tyre Service (Firestone) and a sign for Cohns Drinks in the background. 1201.21 - as for 1201.20 but with No. 5 en route to Eaglehawk now in photograph. 1201.22 - No. 26 at Quarry Hill terminus. 1201.23 - No. 26 at Quarry Hill terminus, view of front portion of tram only from a gate at the Bendigo cemetery. 1201.24 - Track at the end of the Quarry Hill line showing the point blades of the former "Y" terminus and the overhead for this. 1201.25 - No. 2 at the Quarry Hill terminus, looking along the former Trackwork. 1201.26 - as for 1201.25 1201.27 - number not used. 1201.28 - Golden Square terminus from some distance from the actual terminus, showing the Warning sign "TRAM" for motorists from the south. No. 7 at the terminus. 1201.29 - No. 7 passing through the Golden Square shopping centre. Numerous cars and pedestrians. Tram en route for North Bendigo. 1201.30 - No. 7 in High St. Golden Square, en route for North Bendigo. Photo taken after tram has passed photographer. 1201.31 - No. 7 in High St. just past Wattle St. with the Cathedral in the background. Tram has two SEC roof ads good side on photo, 'Everything's fine in my all electric kitchen' and 'Electrical cooking - clean, quick, economical'. 1201.32 - No. 7 in High St. nearing Wattle St. Has Cathedral in the background. Photo taken after tram has passed photographer.Information written on in black ink and date stamped on purple ink. 1201.1 - "No. 26 in Bond St just after leaving Long Gully" 1201.2 - "No. 26 climbing View St. from Charing Cross" 1201.3 - "No. 26 ascending View St. from Charing Cross (At Mackenzie St.)" 1201.4 - "View St. & Mackenzie St." 1201.5 - "No. 5 in View St. near Mackenzie St." 1201.6 - "No. 5 in View St. nearing Charing Cross." 1201.7 - "No. 7 in Nolan St. seen from Lake Weeroona Park." 1201.8 - "No. 7 entering McRae St. from Nolan St. Note "TRAM" warning sign on left. 1201.9 - "No. 7 in High St. passing Short St." 1201.10 - "No. 7 crossing Bendigo Creek bridge in High St. near Golden Square." 1201.11 - "No. 7 at Golden Square terminus" 1201.12 - "No. 7 at Golden Square terminus" 1201.13 - "No 7, 21 and 5 at Charing Cross" 1201.14 - "No. 7 at Golden Square terminus" 1201.15 - "No. 7 at Golden Square terminus" 1201.16 - "No 5 waiting at California Gully loop." 1201.17 - "Nos. 5 and 26 crossing at California Gully loop" 1201.18 - "No. 26 at Eaglehawk terminus" 1201.19 - "No. 21 arriving at Charing Cross from Golden Square" 1201.20 - "No. 26 at Charing Cross" 1201.21 - "Nos. 5 and 26 at Charing Cross." 1201.22 - "No. 26 at Quarry Hill terminus" 1201.23 - "No. 26 at Quarry Hill terminus seen through the gates of the Bendigo Cemetery." 1201.24 - "Quarry Hill terminus showing remains for former double track layout abandoned before 1964." 1201.25 - "No. 2 at Quarry Hill terminus" 1201.26 - "No. 2 at Quarry Hill terminus" 1201.28 - "The Southern approach to Golden Square with No. 7 standing at the terminus, "TRAM" warning sign on the left. 1201.29 - "No. 7 passing through Golden Square Shopping Centre" 1201.30 - "No. 7 in High St. Golden Square" 1201.31 - "No. 7 in High St. passing Wattle St." 1201.32 - "No. 7 in High St. nearing Wattle St."tramways, trams, bendigo, bond st., view st., nolan st., high st., eaglehawk, california gully, charing cross, quarry hill, trackwork, tram 2, tram 5, tram 7, tram 21, tram 26 -
 Ballarat Tramway Museum
Slide - 35mm slide/s - set of 19, Noel Simons, 26/02/1972 12:00:00 AM
Set of 18 transparencies taken on 26/2/1972 on Kodak mounts. 1203.1 - Bendigo 5 at Eaglehawk terminus - with new traffic works. 1203.2 - No. 5 climbing the High St. hill Eaglehawk with the buildings on the east side in the photo. 1203.3 - No 2 descending the road over rail bridge at Job's Gully, heading for Quarry Hill. 1203.4 - as for 1202.3, but more side on. Tram has two SEC roof ads. 1203.5 - as for 1202.4 1203.6 - No. 26 entering Garden Gully Loop, Mt. Korong Road, Ironbark. Tram en route to Eaglehawk. Water column on right hand side of photograph. 1203.7 - No. 2 on the Eaglehawk route, Iron Bark area?, bound for Quarry Hill. 1203.8 - as for 1202.7, but photo taken after tram has past photographer. 1203.9 - No. 5 at Eaglehawk terminus, night photo. Tram has arrived at terminus, showing Quarry Hill, pole turned, but the tram lights have yet to be turned around. 1203.10 - as for 1202.9, but lights have been turned around. 1203.11 - No. 26 climbing the View St. Hill near the Commodore Hotel. Has Campbells Electrical Services building in the background. Photo taken after the tram has passed the photographer. 1203.12 - No. 7 end on photograph, at Golden Square, destination showing Golden Square - night photo. 1203.13 - number not used. 1203.14 - as for 1202.12, but partially side on, has a passenger looking out the tram. 1203.15 - as for 1202.12, but with hotel in the background. 1203.16 - No. 26 and 2 at Charing Cross, night photo. Tram 26 en route to Quarry Hill, 2 to Eaglehawk. 1203.17 - Interior photo of No. 26, at night. 1203.18 - No. 26 at the Quarry Hill terminus as night. 1203.19 - as for 1202.18, but central portion of the tramcar.Information written on in blue ink and date stamped on purple ink. 1203.1 - "No. 5 at Eaglehawk terminus" 1203.1 - "No. 5 in High St. Eaglehawk" 1203.3 - "No. 2" 1203.4 - "No. 2" 1203.5 - "No. 2" 1203.6 - "No. 26 at Garden Gully Loop Mt Korong Rd., Ironbark" 1203.7 - "No. 2" 1203.8 - "No. 2" 1203.9 - "No. 5 at Eaglehawk terminus" 1203.10 - "No. 5 at Eaglehawk terminus" 1203.11 - "No. 26 in View St. Near the Commodore Motel" 1203.12 - "No. 7 at Golden Square Terminus" 1203.14 - "No. 7 at Golden Square Terminus" 1203.15 - "No. 7 at Golden Square Terminus" 1203.16 - "Nos. 26 and 2 at Charing Cross" 1203.17 - "Interior of No. 26" 1203.18 - "No. 26 at the Quarry Hill terminus" 1203.19 - "No. 26 at the Quarry Hill terminus "tramways, trams, bendigo, eaglehawk, bridges, iron bark gully, night photo, quarry hill, golden square, tram 2, tram 5, tram 7, tram 26 -
 Ballarat Tramway Museum
Slide - 35mm slide/s - set of 25, Noel Simons, 26/02/1972 12:00:00 AM
Set of 25 transparencies taken on 26/2/1972 on Kodak mounts. 1204.1 - Bendigo No. 5 - just arrived at Manchester Loop near Havilah Road, Long Gully. Photo taken after tram has passed photographer. 1204.2 - No. 26 in Backhaus St. Long Gully passing William St, en route to Quarry Hill. Photo taken after tram has passed photographer. 1204.3 - No. 5 climbing the High St. Hill Eaglehawk, heading for Quarry Hill with the buildings on the West side of High St. in the background, including the Eaglehawk Town Hall. 1204.4 - as for 1204.3, but tram close up. 1204.5 - as for 1204.3, but after tram has passed photographer. 1204.6 - No. 5 at intersection of Mt Korong Road Ironbark and Calder Highway, with the AMPOL service 'station in the background. Photo taken after tram has passed photographer. 1204.7 - No. 26 en route to Quarry Hill shortly after leaving Needle Loop, passing William St., Long Gully. 1204.8 - No. 5 at California Gully Loop, picking up a passenger, with the shops at Long Gully in the background. Photo taken after tram has passed photographer. 1204.9 - No. 5 in Long Gully, en route to Quarry Hill. Photo taken after tram has passed photographer. 1204.10 - No. 2 at Eaglehawk terminus with the Eaglehawk Town Hall and Post Office in the background. Tram has two SEC roof ads. 1204.11 - No. 2 at Eaglehawk terminus, close up. 1204.12 - as for 1204.11, but through the park gates. 1204.13 - as for 1204.11, but with tram stop shelters in the foreground and buildings on the West side of High St in the background. 1204.14 - No. 2 in Mt. Korong Rd, midway between California Gully Loop and Needle Loop. Photo taken after tram has passed photographer. 1204.15 - No. 5 in Long Gully, en route to Quarry Hill. 1204.16 - as for 1204.15, but with trams departed loop. Has an ESSO service station in the background. 1204.17 - No. 26 leaves Charing Cross up View St.. Photo taken after tram has passed photographer. Has Armstrong Tyre Service, Cohns Drinks ad on a building and the T&G building in the background. Also Firestone ads on the tyre service building. 1204.18 - No. 5 waits at Charing Cross with the Alexandra Fountain in the background. Tram has two SEC roof ads, 'Everything s fine in my all electric kitchen' and 'Electricity Best for Cooking'. Has RACV, Colonial Mutual Life buildings in the background and the planting areas around Charing Cross gardens in the foreground. 1204.19 - No. 21 en route to North Bendigo arrives at Charing Cross, with passengers waiting to board. No. 5 in the background. In the background is the Fountain Gate Plaza building and the City Family Hotel. 1204.20 - as for 1204.19, but with No. 7 en route to Golden Square. 1204.21 - as for 1204.19, but closer up. 1204.22 - as for 1204.18 1204.23 - No. 25 in Nolan St. near the crossing of Bendigo Creek, running a special tram tour. 1204.24 - No. 25 on a special charter, in Weeroona Ave. at Cnr of Caledonia St. passing the Gas works. 1204.25 - Nos. 25 (showing Golden Square), 7 and 26 at Charing Cross. Has fountain in the background.Information written on in blue ink and date stamped on purple ink. 1204.1 - "No. 5 at Manchester Loop, near Havilah Rd. Long Gully." 1204.2 - "No. 26 in Backhaus St. Long Gully passing William St." 1204.3 - "No. 5 in High St. Eaglehawk." 1204.4 - "No. 5 in High St. Eaglehawk." 1204.5 - "No. 5 in High St. Eaglehawk." 1204.6 - "No. 5 in Mt. Korong Rd., Ironbark, passing Calder Highway Junctn." 1204.7 - "No. 26 shortly after leaving Needle Loop, passing William St., Long Gully. No. 5 cresting hill in distance." 1204.8 - "No. 5 at California Gully Loop." 1204.9 - "No. 5 in Long Gully" 1204.10 - "No. 2 at Eaglehawk terminus." 1204.11 - "No. 2 at Eaglehawk terminus." 1204.12 - "No. 2 at Eaglehawk terminus." 1204.13 - "No. 2 at Eaglehawk terminus." 1204.14 - "No. 2 in Mt. Korong Rd, midway between California Gully Loop and Needle Loop. 1204.15 - "Nos. 2 and 26 crossing at Long Gully." 1204.16 - "No. 26 leaves Long Gully loop for Eaglehawk as No. 2 pulls out of the far end towards Bendigo" 1204.17 - "No. 26 beginning the climb up View St. from Charing Cross." 1204.18 - "No. 5 at Charing Cross." 1204.19 - "No 21 arrives at Charing Cross from Golden Square while No. 5 awaits departure time for Eaglehawk." 1204.20 - "Nos. 7, 21, and 2 (behind which is No. 5) at Charing Cross." 1204.21 - "Nos. 7, 21, and 2 at Charing Cross." 1204.22 - "No. 5 at Charing Cross." 1204.23 - "No. 25 in Nolan St. near Bendigo creek crossing" 1204.24 - "No. 25 in Weeroona Ave. at cnr of Caledonia St." 1204.25 - "Nos. 25, 7, 26 and 2 (behind 26) at Charing Cross."tramways, trams, bendigo, eaglehawk, long gully, california gully, charing cross, north bendigo, tram 2, tram 5, tram 7, tram 21, tram 25, tram 26 -
 Ballarat Tramway Museum
Slide - 35mm slide/s - set of 12, Noel Simons, 28 Feb. 1972
Set of 12 transparencies taken on 28/2/1972 on Kodak mounts. 1207.1 - Bendigo 26 and 2 at Charing Cross. 26 en route for Eaglehawk, 2 for Quarry Hill. Has the Colonial Mutual Life, Armstrong Tyre Service, and Australian Mutual Provident Society buildings and a Cohns Drinks ad. in the background. 1207.2 - as for 1207.1 but with Alexandra fountain in the foreground. 1207.3 - No. 2 in Mitchell St. heading for Quarry Hill. Photo taken after tram has passed photographer. Has buildings on either side of Mitchell St. in the background, including the Plaza Theatre. 1207.4 - No. 6 en route for Golden Square departing Charing Cross. Has the RACV and ANZ bank in the background. 1207.5 - No. 2 crossing Pall Mall to enter Charing Cross ex Quarry Hill, with the Fountain Plaza in the background. 1207.6 - No. 6 arriving Charing Cross ex Golden Square with No. 21 alongside. No. 21 has the SEC ad. 'Everything's fine in my all electric kitchen.' Has the City Family Hotel and the Fountain Plaza shopping centre in the background. 1207.7 - No. 5 at Charing Cross en route for Quarry Hill with No. 2 behind. No. 2 has two SEC roof ads, 'Everything s fine in my all electric kitchen' and 'Electricity best for cooking'. RACV building in the background. Tram crews are discussing the day in the front of the tram. 1207. 8 - No. 21 in High St. Bendigo with the Cathedral in the background. No. 21 has two SEC roof ads, 'Everything's fine in my all electric kitchen' and 'Electricity best for cooking'. 1207.9 - No. 6 in High St. Bendigo with the Cathedral in the background. 1207.10 - No. 6 in High St. Bendigo, just past Wattle St. Photo taken after the tram has passed the photographer from within the Highway Car Sales yard. 1207.11 - No. 26 bound for Eaglehawk at the end of the double track in View St., note signal contactors, tram stop and section signs mounted on pole. 1207.12 - No. 26 turning from View St. into Barnard St.Information written on in blue ink and date stamped on purple ink. 1207. 1- "Nos. 26 and 2 at Charing Cross." 1207.2 - "Nos. 26 and 2 at Charing Cross." 1207.3 - "No. 2 in Mitchell St. just after leaving Charing Cross." 1207.4 - "No.6 leaving Charing Cross for Golden Square." 1207.5 - "No. 2 arriving at Charing Cross from Quarry Hill." 1207.6 - "No. 21 waits at Charing Cross as No. 6 arrives from Golden Square." 1207.7 - "No 5 at Charing Cross with No. 2 lurking behind." 1207.8 - "No. 21 in High St. at cnr of Wattle St." 1207.9 - "No. 6 in High St. at cnr of Wattle St." 1207.10 - "No. 6 in High St. between Wattle and Vine Sts." 1207.11 - "No. 26 at end of double track in View St. near Barnard. St. 1207.12 - "No. 26 seen at dusk turning from View St. into Barnard St."tramways, trams, bendigo, charing cross, high st, view st., tram 2, tram 5, tram 6, tram 21, tram 26 -
 Ballarat Tramway Museum
Slide - 35mm slide/s set of 7, Noel Simons, 29 Feb. 1972
Set of 7 transparencies taken on 29/2/1972 on Kodak mounts. 1208.1 - Bendigo 18 (en route to Quarry Hill) and 2 (Eaglehawk) in the early morning at Charing cross with the Alexandra fountain and the Fountain Plaza building in the background. 1208.2 - No. 2 descending View St. Photo taken after tram has passed the photographer. 1208.3 - as for 1208.2 at Mackenzie St. intersection 1208.4 - No. 26 ascending View St. with the ANZ bank, T& G in the background. 1208.5 - as for 1208.4, but at Mackenzie St. intersection. Photo taken after tram has passed the photographer. 1208.6 - No. 18 in View St. seen from the lookout tower in Rosalind Park. 1208.7 - No. 7 en route to North Bendigo in Nolan St. Photographed across the Centenary Oval.Information written on in blue ink and date stamped on purple ink. 1208.1 - "Nos. 18 and 2 in the early morning sun at Charing Cross." 1208.2 - "No. 2 descending View St. towards Charing Cross." 1208.3 - "No. 2 in View St. passing Mackenzie St." 1208.4 - "No. 26 in View St. just after leaving Charing Cross." 1208.5 - "No. 26 climbing View St. past Mackenzie St." 1208.6 - "No. 18 climbing View St. seen from lookout tower in Rosalind Park." 1208.7 - "No. 7 in Nolan St. heading towards North Bendigo. / Last picture of a Bendigo tram."tramways, trams, bendigo, charing cross, view st., nolan st., tram 2, tram 7, tram 18, tram 26 -
 Ballarat Tramway Museum
Photograph - Black & White Photograph/s - set of 3, W.C. Meyer and Photographer, 1955
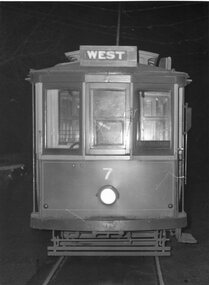
Set of three photographs of Geelong single trams, one of the same type of tram (No. 7) prior to fitting with marker lights and No. 4 after fitting with marker lights, one during daylight and one at night. Three photographs taken by W.C. Meyer, Photographer, 333 Myers St. East Geelong, Phone 3289. Photo of one end of the tram only. Note top marker lights, not repeated on any other cars shown in photographs in Destination Eaglehawk. Shows as well, arrangements for tow bars, mirror and handrails. 1872.1 - Before fitting with additional lights, at night with 'flash' - showing destination 'West' - tram No. 7 1872.2 - after fitting with lights and stripes, during daylight - showing destination 'CITY' - tram No. 4 1872.3 - ditto at night, showing destination of 'CITY'. - tram No. 4 1872i4 - close up of the mirror and light on the roof - right hand side of i2. Note all lights illuminated in the night photo. Destination Eaglehawk, page 44, notes tram 4 as being fitted with dash canopy lighting and zebra stripes in 1955. No mention of No. 7 being so fitted. For date of photograph, assumed early 1955 at this time (14/11/2001) See Destination EaglehawkAll stamped with black ink stamp " W.C. Meyer, Photographer, 333 Myers St. East Geelong, Phone 3289" and on rear of photos in dark blue ink, handwriting, 1872.1 - Night - with 'flash' photo. 1872.2 - Daylight 1872.3 - Night - with 'flash' photo. This tram has supplementary lights trams, tramways, geelong, dash canopy lights, lights, mirrors, tram 7, tram 4 -
 Ballarat Tramway Museum
Photograph - Black & White Photograph/s, Keith Kings, 11/04/1953 12:00:00 AM
Black and White photograph contained with Reg. Item 1902 - Photo Album from Keith Kings to Les Denmead 1970. Photograph of SEC Bendigo tram 18 at Charing Cross. Date of photo 11/4/1953. Tram showing destination of Eaglehawk. Has "City Club Hotel" in the background, a Safety Zone sign to the left of the photo. Note bag and folder or envelope on pole closest to photographer. Tram converted for "one-man" operation. Keith Kings No. H(e)(1) Scanning: i - image file, p - presentation file, b - back of photograph.Stamp in top left hand corner and handwritten number with "K.S. Kings No. H(e)(1) Copyright reserved". In blue ink "Bendigo / No.18, as converted for "One-man" operation. / Charing Cross. 11/4/53"trams, tramways, bendigo, charing cross, city club hotel, one man trams, tram 18 -
 Ballarat Tramway Museum
Photograph - Colour Photograph/s, 21/11/1962 12:00:00 AM
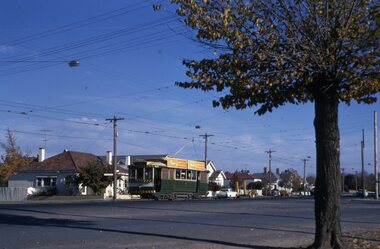
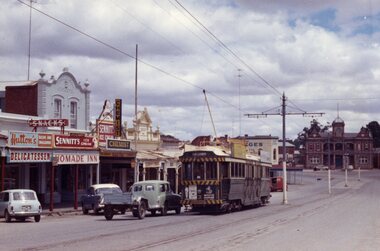
Colour print of Bendigo SECV Bendigo tram 3 travelling High St Eaglehawk towards the Eaglehawk Terminus. Photo taken after the tram has passed the photographer. On Kodacolor paper with a Kodak red ink stamp on rear. Tram has dash canopy lights, but no large white strip under the drivers windows. Photo not dated but appears to be at about the same time as 977, 21.11.1962. Has Eaglehawk Town Hall and Post office in background and shops along the south side of High St. Tram showing destination of "Eaglehawk". Tram has White Horse Whiskey ad and another on front dash panel and two roof ads. In photo are advertisements for "Hutton's Bacon" and "Sennett's Ice Cream" on shop roof advertisements.On rear top left hand corner "3"eaglehawk, bendigo, town hall., high st, tram 3 -
 Ballarat Tramway Museum
Photograph - Black & White Photograph/s set of 19, Mar. 1972
Set of 19 black and white prints, all 89mm square of Bendigo trams, date machine printed on print is "Mar 1972". 981.1 - Tram 21 at North Bendigo terminus, with level crossing in background. Has destination "Golden Square" and two SEC roof ads. 981.2 - tram 2? at Eaglehawk, with destination "Depot", two SEC roof ads and "Leo A. Hughes Photographer" on side of building in background. 981.3 - tram 2? at Eaglehawk, side on view. 981.4 - tram 26 at Quarry Hill terminus looking back into city. 981.5 - tram 7 en route to North Bendigo at the site of the Bridge St. loop. Has a Peters Ice Cream truck and Sandhurst Fruit Juices truck on right side of photograph. 981.6 - tram 2 at Quarry Hill terminus. 981.7 - tram 2? at one of the loops on the Eaglehawk line, inbound? 981.8 - bogie tram at Charing Cross with fountain in background. Side on view looking south. 981.9 -trams 7 and 21 on Golden Square/North Bendigo line with bogie tram in background, at Charing Cross. Same as item 972. 981.10 - bogie tram at Charing Cross - has buildings in south west corner in background, including Colonial Mutual Life and an advertisement for the Herald newspaper. 981.11 - trams 25, 7 and two other trams at Charing Cross. 981.12 - trams 2 and 26 and three others at Charing Cross. 981.13 - tram 25 at Golden Square terminus, with Rodda's Golden Square Hotel in the background. Tram showing destination of "Nth Bendigo" 981.14 - tram 24, showing "Special" on depot access track. Has two Johnnie Walker roof ads on side. 981.15 - as above, but tram on bridge outside depot. 981.16 - trams 25 and 28 at depot 981.17 - tram 24 showing "Special" on depot access track with a single truck car in background. 981.18 - trams 2 and 26 at Charing Cross. Has advertisements for "Armstrong Tyre Service" and "Cohn's drinks" on buildings in background. 981.19 - Bendigo 2 at location?, about to enter a loop or double track section. Has hotel in background. On rear of each photo in the top left hand corner is a print number 1 to 19 in ink and location notes, generally "Bendigo"trams, tramways, charing cross, bendigo, golden square, quarry hill, tram 2, tram 21, tram 7, tram 24, tram 26 -
 Ballarat Tramway Museum
Slide - 35mm slide/s - set of 13, Carolyn Dean, 24/09/1970 12:00:00 AM
Set of photographs of operations, including special tram, track work by SEC prior to the Bendigo system closing closing.Set of 13 Agfa slides, blue and white plastic base of Bendigo trams. Taken 24.9.1970 by Carolyn Dean. .1 - "5" - No. 7 at Golden Square terminus, with Golden Square Hotel in background. .2 - "6" - No. 7 passing SEC workmen replacing a broken joint, in McCrae St. Piece of rail alongside tram. .3 - "7" - No. 7 crossing No. 29 at start of double track with Hotel in background .4 - "8" - No. 29 running special at depot junction. .5 - "9" - No. 29 turning from Nolan into Bridge St. .6 - "10" - ditto, passing old loop .7 - "12" - ditto, turning from Caledonia into Thunder St .8 - "13" - ditto, southbound in Pall Mall near Bull St. .9 - "16" - ditto, crossing bridge into tram depot, with tram depot in background. .10 - "17" - ditto, entering depot. .11 - "18" - No. 26 entering the Eaglehawk terminus, High St. with Leo A Hughes photographer shop in background. .12 - "19" - No. 26 at terminus, showing "Quarry Hill", with High St in the background. .13 - "21" - No. 26 after leaving terminus, travelling in High St with shops n the background.Each slide has in corner a number in pencil and the first one the date of "24-9-70".tramways, trams, bendigo, tram 7, tram 29, tram 26 -
 Ballarat Tramway Museum
Photograph - Black & White Photograph/s - set of 7, 16/04/1972 12:00:00 AM
Yields information about the final day of the Bendigo tramways and some of the tramcars used.Set of seven black and white photographs of the day Bendigo Tramways closed 16-4-1972. Taken on Agfa paper. Has printing date of 18.8.72 stamped on rear. All have been used for display purposes. .1 - 25 leaving the depot .2 - 2 at Charing Cross, bound for Eaglehawk - has Ezywalkin Store in background. .3 - 18 crossing another tram at a loop on the Eaglehawk line. .4 - 28 at Charing Cross showing Special .5 - 26 inside depot, with Borough of Eaglehawk sign on the front bumper and bunting around the tram. .6 - 29 leaving the depot .7 - 26 in the final parade, with "Destination Eaglehawk" on a roof mounted advertisement board, with the Beehive building in the background and Coca Cola advertisement on top of the building. Photographer not known.3549.8 - has "photo No. 8" on rear and been marked out for publication. tramways, trams, bendigo, closure, eaglehawk, tram 25, tram 2, tram 18, tram 28, tram 26, tram 29 -
 Ballarat Tramway Museum
Slide - 35mm slide/s, Travis Jeffrey, c1962
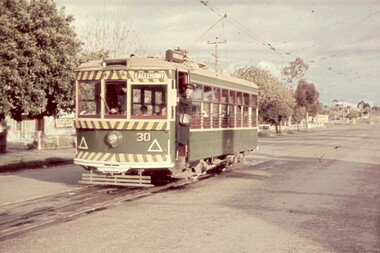
Agfa plastic mount (blue base, white cover) with a photo of Bendigo 30 at the Quarry Hill terminus. Tram has the destination of Eaglehawk . Conductor standing in the doorway for the photographer. In the background is the premises for "Northern Terrazzo"."BES 16" in penciltramways, trams, bendigo, quarry hill, tram 30 -
 Ballarat Tramway Museum
Photograph - Digital image Set of 20, 1971-72
Set of 20 digital images of Bendigo Tramways, 1972 at or before closure while on a tram tour by Stuart Lodington. .1 - No. 29 at the North Bendigo terminus .2 - No. 29 just past the Bendigo end of the double track in High St Eaglehawk, with a BP dealer in the background. .3 - Night photo of No. 18 at a terminus, showing "Eaglehawk" .4 - ditto .5 - Night photo of No. 24 at Eaglehawk with Leo A Hughes Photographer in the background. The Tram has "Johnnie Walker whiskey" roof adverts. .6 - No. 29 outbound in Thunder St with a train passing over the bridge in the background. .7 - view from the front window of a tram on the Eaglehawk line with a large "display event float" in the foreground and tram approaching a crossing loop. .8 - No. 29 at North Bendigo .9 - view of High St Eaglehawk looking east from the terminus, showing the track and centre poles. .10 - No. 29 outbound on the North Bendigo line turning from either Nolan St or Caledonia St, running a special. .11 - No. 7 departing North Bendigo for Golden Square. .12 - No. 3 and 18 at Charing Cross. No. 3 has two SEC roof Advertisements .13 - No. 7 at North Bendigo with the trolley pole being reversed. .14 - No. 24 at Quarry Hill with Northern Terrazzo in the background with the driver alongside .15 - No. 7 and No.6 at Charing Cross with the Beehive buildings in the background. .16 - No. 7 at North Bendigo terminus .17 - ditto .18 - No. 24 at Quarry Hill with Northern Terrazzo in the background with the conductor alongside. .19 - ditto .20 - No. 26 and other bogie tram in View St near Charing Cross with the Armstrong Tyre Service building and signs for Cohn's Drinks and T&G in the view.trams, tramways, bendigo, eaglehawk, quarry hill, golden square, depot, north bendigo, charing cross, tram 29, tram 18, tram 24, tram 3, tram 7, tram 6, tram 26 -
 Ballarat Tramway Museum
Photograph - Digital image Set of 20, 16/04/1972 12:00:00 AM
Set of 20 digital images of Bendigo Tramways, of the last running day of the Eaglehawk to Quarry Hill line 16 April 1972, .1 - No. 24 outbound to Eaglehawk .2 - No. 3? at Manchester Loop .3 - No. 24 outbound to Eaglehawk .4 - bogie tram crossing the rail over bridge from Eaglehawk .5 - No. 18 in View St .6 - No. 24 outbound to Eaglehawk .7 - No 18 at Eaglehawk with destination roll being changed, and shopping centre in the background. .8 - No. 24 crossing the railway overbridge, going to Eaglehawk .9 - No. 3 outbound to Eaglehawk .10 - No. 24 crossing the railway overbridge, going to Eaglehawk .11 - No. 3 and 24 crossing at Long Gully .12 - No. 18 at Eaglehawk with Leo A Hughes photographer building in the background and a CFA truck passing the tram. Tram SEC roof advertisement and a banner for "German -?- Circus" at Eaglehawk and dates. .13 - No. 3 inbound on the Eaglehawk line. .14 - No. 18 outbound to Eaglehawk .15 - ditto .16 - No. 18 at Eaglehawk terminus with the Mechanics Institute in the background. .17 - No. 24 at the Eaglehawk terminus .18 - No 24 at the intersection with Taylor St .19 - No. 24 at the Eaglehawk terminus .20 - dittotrams, tramways, bendigo, eaglehawk, long gully, manchester loop, tram 24, tram 18, tram 3 -
 Ballarat Tramway Museum
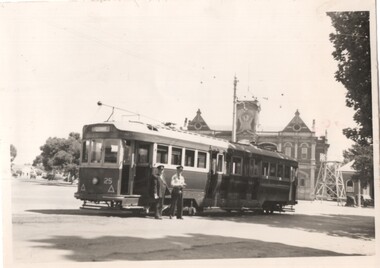
Photograph - Black & White Photograph/s, mid to late 1950's
Black and white photograph of Bendigo 25, at Eaglehawk terminus with the driver and conductor alongside the tram. Has the Eaglehawk Town Hall in the background. Note the fire training stand on the right hand side of the photograph. Photographer unknown - see history of object. See Keith Kings, The Bendigo Tramways, re the fitting of reflective tape in 1956, page 59.In the rear in ink "Bendigo"trams, tramways, eaglehawk, tram 25 -
 Ballarat Tramway Museum
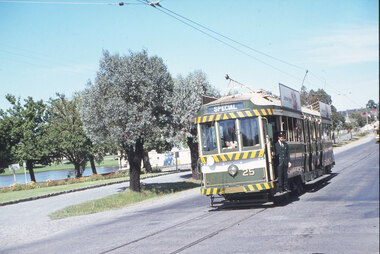
Slide - 35mm slide/s - set of 20, Eldon Hogan, 22/05/1971 12:00:00 AM
Set of 20 35mm Agfa colour blue and white plastic mount slide - featuring photos taken during an Association of Railway Enthusiasts Tour by Eldon Hogan. Folder had the date "22/5/1971" on it. Scanned on the Canon scanner at the depot 15/12/2005 at the time of the installation of the scanner. .1 - No. 25 in Nolan St with Lake Weeroona in the background. .2 - Three Birneys at the Depot junction, 30 and 29 with Conoles Hotel, McCrae St in the background. .3 - No. 5 in front of the Shamrock Hotel, Pall Mall .4 - No. 29 in front of the Shamrock Hotel with Stonemasons sign in the background. .5 - No. 18 ditto .6 - No. 30 and another Birney at the Quarry Hill terminus .7 - No. 24 southbound High St at the Violet St intersection with a "Mine Open" sign in the foreground and the Cathedral in the background. .8 - No. 19 at the Golden Square terminus, with the Golden Square Hotel in the background. .9 - No. 29 - side on view, North Bendigo line? Thunder St? .10 - No. 30 crossing the railway overbridge, inbound from Eaglehawk with a number of photographers in the foreground. .11 - No. 29? ditto .12 - No. 5 outbound - side on view, Thunder St, North Bendigo line? .13 - No. 29 and 30 at the intersection of High St and Brazier St with Church or School hall in the background. .14 - ditto .15 - ditto .16 - No. 25 and the two Birneys at the Eaglehawk terminus. .17 - No. 29 and two other trams at ditto .18 - No. 30 and 19 adjacent to the Lake View Hotel, McCrae St .19 - No. 5 and 25 crossing on the Eaglehawk Line, Ironbark? .20 - No. 29 at Quarry Hilltramways, trams, bendigo, lake weeroona, pall mall, golden square, eaglehawk, quarry hill, tram 25, tram 30, tram 29, tram 5, tram 18, tram 19, tram 24, tram 25 -
 Bendigo Historical Society Inc.
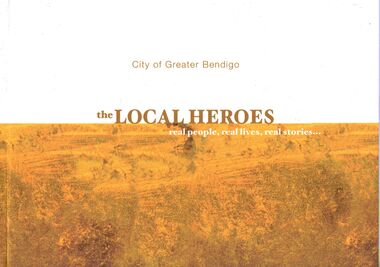
Book - IAN DYETT COLLECTION: THE LOCAL HEROES
66 page booklet titled The Local Heroes real people, real lives, real stories… Front cover is off white at the top and patterned yellow shades at the bottom with the title in the centre, City of Greater Bendigo above. Background to the Local Heroes Project, drafted by Dr Gan Che ng PhD. MA. Inside the front cover. Photos, names of Students, Principal and Teachers of Bendigo South East College Team, Catholic College Bendigo Team, Eaglehawk Secondary College Team, Girton Grammar School Team and Weeroona College Bendigo team are in the front of the book. There is information about the project. Photo and information about Simmon Pang - Project Initiator/Photographer. Foreword by The Hon. Martin Dixon MP - Minister for Education Victoria with photo and Foreword - Cr Lisa Ruffell - Mayor of the City of Greater Bendigo. The following pages have a short synopsis and photo of Barry Ackerman - Expert in the Rubber Industry & Twice Mayor, Joanne Baker - Founder of Righteous Pups Australia, Linda Beilharz OAM - Intrepid Adventurer, Valerie Broad OAM - Founder & Artistic Director of Youth Choir, Paul Chapman - Co-Founder of The Australian Turntable Company, Susanne Clarke - Passionate about Community Engagement, Patrick (Pat) James Connolly - Bendigo Amateur Boxing Club Coach, Robert Jackson (Cookie) Cook - Founder of Horizon House, Geoff Curnow - Farmer & Community Volunteer, Merna Curnow - Farmer & Agricultural Consultant, Jenny Dawson - Accounting & Banking, Laura Dusseljee - Choir Director & Music Teacher, Ian Maxwell Dyett JP - Life Dedicated to Volunteering, Donald James Erskine - Founder of Industrial Conveying Australia, James Victor Evans - Teacher, Historian & Actor, Rod Fyffe - Champion of Arts & Culture, Richard Guy OAM - banker & Philatelist, Edwin Richard (Dick) Hazeldene OAM - Chicken Farmer to Poultry Entrepreneur, Robert (Rob) Hunt AM - Head of Bendigo Adelaide Bank and Founder of Community Banking Model, Russell Goldfield Jack AM - Founder of Golden Dragon Museum, Jack Kelly - Teacher Sharing Experience, Ian George Mansbridge - Farmer, Accountant & Banker, Ken Marchingo - Instigator of Haven; Home Safe, Elizabeth (Beth) McKerlie OAM - Dedicated to Scouting, Gordon McKern OAM - Founder of McKern Steel, Sharelle McMahon - Netballer Extraordinaire, Lola Mary Miller AM BEM - Teacher of Health & Physical Education, Julie Millowick - Accomplished Photographer, Educator & Artist, Dennis Reginald O'Hoy - Academic & Historian, Margaret O'Rourke - A Champion for Connected Communities, Karen Quinlan - Director of Bendigo Art Gallery, Jonathan William Ridnell - Broadcaster, Leon Maxwell Scott OAM - Business Entrepreneur & Rotary Volunteer, Margot Elizabeth Spalding - Co-founder of Jimmy Possum Designer Furniture, Wendy Diane Stavrianos - Painter, Sculptor & Installation Artist, Jack Taylor OAM JP - An Eaglehawk Legend, Wes Vine - School Principal & Vigneron, Lynn Warren - Aboriginal Elder, Raymond James Wild - A Plumber's Story, Diana Williams - Founder of Fernwood Fitness and John Wolseley - International Artist. The back cover also has small photos and the names of people mentioned.ian dyett collection - the local heroes, city of greater bendigo, dr gan che ng, la trobe ubiversity bendigo, bendigo south east college, catholic college bendigo, eaglehawk secondary college, girton grammar school, weeroona college bendigo, simmon pang, the hon martin dixon mp, cr lisa ruffell, bendigo art gallery, city of greater bendigo, the capital - bendigo's performing arts centre, la trobe university australia, catholic kiocese of sandhirst, haven home safe, the hotel shamrock bendigo, hazendene's, bendigo & district aboriginal co-operative, mr baillieu myer ac, bendigo advertiser, australian broadcasting corporation, bendigo chinese association inc - lion team, wannik dance academy dancers, bendigo forever young choir, bendigo youth choir -
 Bendigo Historical Society Inc.
Document - PETER ELLIS COLLECTION: PETER ELLIS EULOGY
2 A4 sheets. Handwritten pencil note at top of first page reads: Eulogy published in Trad & Now Magazine. Vale Peter Ellis OAM. By John Williams. The folk community lost a giant on May 18th when Peter Ellis passed away after a short illness. Peter had been a collector, author and musician for nearly forty years and his work has been prodigious to say the least. Peter has the largest collection of dance related material in the National Library and had travelled Australia on his collection trips. He produced twenty CDs of dance music and historical music with his Bendigo based band the Celebrated Emu Creek Bush Band which he founded and led for thirty four years. His final project was the double CD 'Cooee, Songs of the ANZACS' which he organised in conjunction with the Bendigo Historical Society. It was launched on 24th April and was Peter's last performance. Peter has also been a member of the Wedderburn Old Timers for over thirty years and has assisted with many of their recordings including their latest Bush Concert CD which Peter Organised. Peter has contributed to many other CDs over the years and has been thanked on many a CD cover by many folk artists. Peter has also written several books, the three volume 'Collectors' Choice,' 'Two Hundred Dancing Years' co-written with Shirley Andrews OAM, and 'Music Makes Me Smile' the history of the Nariel Valley musicians co-written with Harry Gardner. Peter's recent major work The Merry Country Dance will become the bible for people wishing to learn about our bush music heritage with its matching six CD collection. Peter has also contributed to 'Verandah Music' edited by Rob Willis and Graham Seal and 'The Oxford Companion to Australian Folklore' edited by Graham Seal and is a regular contributor to Trad & Now. He completed his last Trad & Now article the week before he died. Peter was also a life member of the Field Naturalists and was extremely active in campaigns to preserve Lake Pedder, the Whipstick Forest and Kamarooka Forest (now part of Bendigo National Park and preserved forever) One Tree Hill, Jackass Flat Flora Reserve and Saloman's Gully bushlands. Peter has discovered and named plants in the whipstick and enjoyed propagating native plants. He loved his amazing bush block in suburban Bendigo. Peter was also a keen photographer and had photos published in the book 'Wildflowers of Bendigo'. Peter taught dancing and music classes with Continuing Education for many years and encouraged many young musicians over the years. Peter was an accomplished ballroom dancer and had achieved gold medal status in that field. He was one of Australia's finest exponents of the button accordion, concertina, harmonica and tin whistle. Peter also played piano, organ and ukulele as well as the Swanee whistle and bones. Peter was the founder of the Annual Dinki Di Ball held each September in Eaglehawk as a tribute to the old MC's. Peter was happy playing for fund-raisers for any organisation who asked and also enjoyed plying the big gigs such as for the opening of the Melbourne Museum or for State Parliament. He played in the National Folk Festivals in four states and was a regular at the National in Canberra where he gave regular classes, performed with his bands and was a stalwart of the Aussie section of the session bar. He performed at nearly every Maldon Folk Festival and was MC at Nariel Folk Festival dances for many years. Peter was very proud of his OAM and wore the little medal at all of his performances. That honour was rightly given to one who did so much to preserve Australia's dance history. Peter lived a full life and was a friend to hundreds of people. He was taken far too young and in typical fashion was planning new projects right till the end. His passing is a huge loss for us all but one thing is certain. He will never be forgotten.person, individual, peter ellis oam -
 City of Greater Bendigo - Civic Collection
Photograph - Portrait, Reg Brock, Mrs E.F. Granger Mayoress 1948 - 49, c 1949
Elizabeth Enid Granger (nee Webster) born Eaglehawk (1906-1965).Framed, oval photographic studio portrait. Hand coloured detail. Glass domed, photograph is flat. cl; Mrs E F Granger / Mayoress 1948 - 9. lr: Reg Brockelizabeth webster, mayoress granger, mayor granger, reg brock photographer, city of bendigo, city of greater bendigo portraits -
 Northern District School of Nursing. Managed by Bendigo Historical Society Inc.
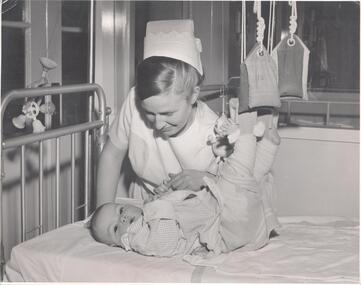
Photograph - School 71 - Nurse caring for child
... Photographer 7 High Street Eaglehawk 3556... to J O'Shea Small Photo - Leo A Hughes Photographer 7 High ...The Northern District School of Nursing opened in 1950 in to address the issues around nurse recruitment, training and education that had previously been hospital based. The residential school was to provide theoretical and in-house education and practical training over three years. The students would also receive practical hands-on training in the wards of associated hospitals. The Northern District School of Nursing operated from Lister House, Rowan Street, Bendigo. It was the first independent school of nursing in Victoria and continued until it closed in 1989.Nurse Margaret Eva Jacka School 71 (PTS 31/7/72) holding the fingers of a child in traction in hospital bedNDSN Please return to J O'Shea Small Photo - Leo A Hughes Photographer 7 High Street Eaglehawk 3556ndns, nursing training, nursing education equipment -
 Bendigo Historical Society Inc.
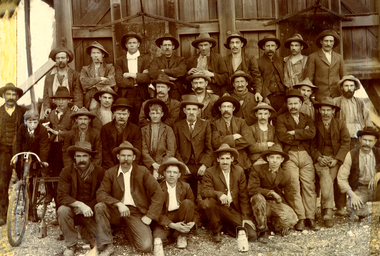
Photograph - PRINCE OF WALES MINES, c1800s
Sepia photo. Prince of Wales Mine, engine drivers and miners picnic. 32 men and boys in photo, one boy on bike. Drinks can be seen on the ground. Markings/Inscriptions: front; Prince of Wales Mines, Engine Drivers and Miners Picnic. Eaglehawk. Rear; John Lightfoot, Brazier St, Eaglehawk. Engine driver and miners. Prince of Wales Group of minesW H Robinsonorganization, business, prince of wales mine, w h robinson, photographer, mundy street, bendigo